

Page 1

Your Handset
Your Handset
The Cisco IP DECT 6800 Series is made up of the Cisco IP DECT 210 Multi-Cell Base Station and the Cisco
IP DECT Phone 6825 Handset.
Figure 1: Cisco IP DECT 210 Multi-Cell Base Station and Cisco IP DECT Phone 6825 Handset
• Your Handset, on page 1
• Getting Started, on page 2
• Buttons and Hardware, on page 3
• Care of Your Handset, on page 11
• Additional Help and Information, on page 13
The handsets communicate with the base station using Digital Enhanced Cordless Telecommunications (DECT)
to provide call functions.
In this document, the term phone means the handset and the term system means the handset and base station.
Note
Not all features may be supported by your handset. Contact your service provider for the supported features.
Your Handset
1
Page 2
Getting Started
Getting Started
Turn On Your Handset
Procedure
Press and hold Power/End until the screen turns on.
Turn Off Your Handset
Procedure
Your Handset
Press and hold Power/End until the screen turns off.
Report an Emergency Situation
Your handset has an emergency button, located at the top of the handset. If set up by your administrator, you
can press this button to raise an alert in an emergency situation. The handset places a call to a predefined
emergency number and automatically turns on the speakerphone.
Procedure
Press and hold Emergency for 3 seconds.
Lock the Handset Keypad
You can manually lock the keypad to stop accidental dialing.
Note
When the keypad is locked, you can only dial emergency numbers.
Your Handset
2
Page 3
Your Handset
Procedure
Press and hold Asterisk until the message “Press and hold *” and the key lock icon ( or ) are
displayed on the screen.
Related Topics
Set the Handset Lock and PIN
Set the Timer to Automatically Lock the Handset
Unlock the Handset Keypad
If the keypad is locked, you must unlock it before you can place most calls. You may need to input a PIN to
unlock the handset.
Unlock the Handset Keypad
Note
When the keypad is locked, you can only dial emergency numbers.
Procedure
Press and hold Asterisk until the message “Press and hold *” and the key lock icon or
doesn't display on the screen.
Related Topics
Set the Handset Lock and PIN
Set the Timer to Automatically Lock the Handset
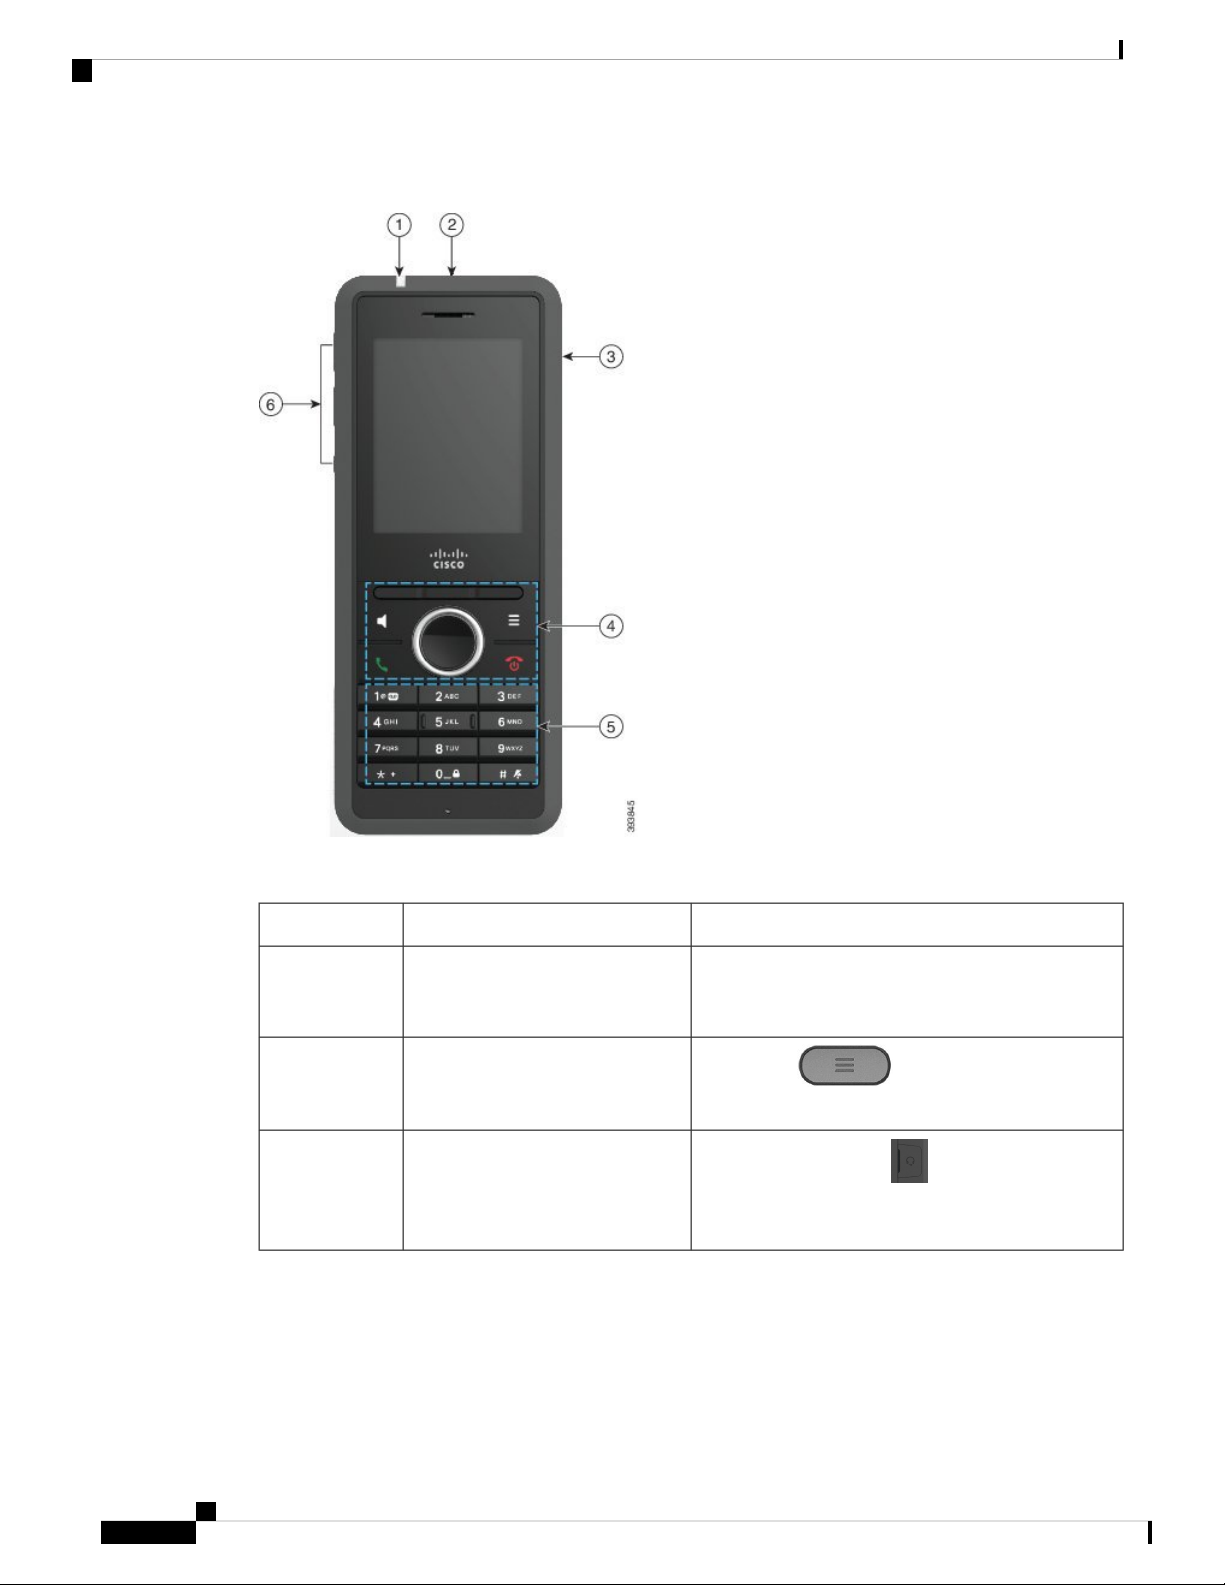
Buttons and Hardware
Your handset has many buttons and hardware features that you will use regularly. Use the following figure
and table to identify the important button and hardware features.
Your Handset
3
Page 4
Buttons and Hardware
Your Handset
Figure 2: Cisco IP DECT Phone 6825 Handset Buttons and Hardware
Table 1: Cisco IP DECT Phone 6825 Handset Buttons and Hardware
Indicator light (LED)1
Emergency button2
Headset port3
DescriptionName or GroupingItem
Indicator light—Use the light to identify states. You
can configure the event that triggers the red, yellow,
or green LED.
Emergency Raises an emergency alarm,
if configured.
Headset port with cover . Remove the protective
cover and plug in a headset or ear buds (3.5 mm audio
jack).
Your Handset
4
Page 5

Your Handset
Buttons and Hardware
DescriptionName or GroupingItem
4
Softkeys, handset control buttons
(Speaker, Menu), Navigation
Softkeys Activate the option
displayed on the screen.
cluster, call control buttons
(Answer/Send, Power/End).
Speaker Toggle the speaker mode on or off for
the handset.
Menu Access directories, settings, status, and
other information.
Navigation cluster Navigation ring and Select
button:
• Navigation ring (outer ring): Move up, down,
left, or right.
• Select button (center of the cluster): select
a menu item.
Answer/Send Answer a ringing call or, after
dialing a number, place the call.
Power/End Turn the handset on or off, or end
a connected call. In menus, the button returns you to
the previous screen.
Your Handset
5
Page 6

Buttons and Hardware
Your Handset
DescriptionName or GroupingItem
Keypad5
Dial numbers and enter letters.
One
• Enter “1” when you dial a number.
• Access voicemail. Press and hold to
automatically dial the voicemail system.
• Enter these special text characters: . ! ? , - " @
+ ; :
Asterisk
• Press and hold to add the plus (+) symbol at the
beginning of a phone number.
Zero
• Enter “0” when you dial a number.
• Press and hold to lock or unlock the keypad.
• Enter a space.
Pound
• Press and hold to silence the handset ringer. If
configured, the handset will vibrate instead.
• Enter this special text characters: #
Use the keys 2 through 9 to enter letters and numbers.
Note
In some languages, additional characters
may be present.
Your Handset
6
Page 7

Your Handset
Navigation
DescriptionName or GroupingItem
Volume and Mute buttons6
Volume
• When the handset is idle, change the ring volume
or turn off the ringer.
• During a call, control the speaker volume for the
active handset, headset, or speaker.
Mute Toggle the mute feature on or off.
Navigation
Use the outer ring of the Navigation cluster to scroll through menus and to move between fields. Use the inner
Select button of the Navigation cluster to select menu items.
Supported Characters
When you input information, the Cisco IP DECT Phone 6825 Handset supports the following characters:
Your Handset
7
Page 8

Handset Screen Features
Your Handset
Figure 3: Supported Characters
Handset Screen Features
The screen shows information about your handset such as directory number, date and time, and softkeys. The
screen is made up of three sections: the header row, the middle section, and the footer row.
Figure 4: Handset Screen
1
At the top of the screen is the header row. The header row displays the radio signal strength and
battery charge, as well a number of icons. The icons display when features are active.
If your organization uses the BroadWorks Shared Call Appearance feature, a row of boxes displays
immediately below the header row.
Your Handset
8
Page 9

Your Handset
Header Icons
Header Icons
2
The middle of the screen displays the information associated with the handset: date and time,
configured handset owner, and handset phone number.
3
The bottom row of the screen contains the softkey labels. Each label indicates the action for the
softkey button below the screen. Sometimes, icons are displayed above the softkey labels.
Related Topics
BroadWorks Shared Call Appearance
The header icons tell you about the handset state. This section displays the header icons and gives their
meaning. The header row icons can be different when do not disturb (DND) is enabled.
Audio Path Icons
DescriptionDND Mode IconIcon
Speaker is off
Headset in use.
Handset is muted.
Bluetooth Icons
Network Icons
DescriptionDND Mode IconIcon
Bluetooth is connected.
Bluetooth is disconnected.
DescriptionDND Mode IconIcon
No network connection.
Weak network connection.
Good network connection.
Better network connection.
Best network connection
Your Handset
9
Page 10

Differences Between Phone Calls and Lines
Battery Icons
Your Handset
DescriptionDND Mode IconIcon
Battery is depleted. Recharge the battery to use the handset.
Battery is 1% to 24% charged. Recharge the battery as soon as
possible.
Battery is 25% to 49% charged.
Battery is 50% to 74% charged.
Battery is 75% to 100% charged.
Battery is charging.
Call-Related Icons
Other Icons
DescriptionDND Mode IconIcon
Answered call
Dialed call
Do not disturb is enabled.
Phone is forwarded.
Voicemail message waiting.
Missed call
DescriptionDND Mode IconIcon
Handset keypad is locked.
Message
Differences Between Phone Calls and Lines
We use the terms lines and calls in very specific ways to explain how to use your phone.
Your Handset
10
Page 11

Your Handset
Phone Batteries
Your phone contains a lithium ion battery. The fully charged battery provides the following hours of service:
The battery life is reduced when the phone is turned on. Calls, messages, application use, Bluetooth use, and
actions like menu navigation use power and reduce the talk time. Your phone screen dims and turns off after
a configurable period of inactivity to reduce battery drain.
Phone Batteries
• Lines—Each line corresponds to a directory number or intercom number that others can use to call you.
You have up to four lines.
• Calls—Each line can support up to two calls. However, you can have only two calls on the handset.
Only one call can be active at any time; the other call is automatically placed on hold.
Here is an example: If you have four lines and each line supports two calls, then you can have two
connected calls at one time. These two calls can be on the same line or on different lines. Only one of
those calls is active and the other is a held call.
• Up to 17 hours of talk time
• Up to 200 hours of standby time
Related Topics
Set the Timer to Turn Off the Screen
Care of Your Handset
You can clean your handset. Make sure you follow our cleaning instructions.
Clean your handset immediately if it comes in contact with anything that may cause stains, or other damage;
for example, dirt or sand, ink, makeup, soap, detergent, acids, acidic foods, or lotions.
Caution
Do not blow or use compressed air (for example, aerosol cans, low- or high-pressure air nozzles) to clean the
openings of the handset.
Do not use a vacuum cleaner or other suction device to clean the openings of the handset.
Do not use pins or other objects to clean the openings of the handset.
Use of air, suction, or mechanical objects to clean the openings can damage the handset and voids the handset
warranty.
If you happen to drop the handset into water, or it gets splashed, follow our instructions to dry off the handset.
See If You Drop Your Handset in Water, on page 13.
Your Handset
11
Page 12

Clean the Handset Screen
Clean the Handset Screen
Procedure
If your handset screen gets dirty, wipe it with a soft, dry cloth.
Your Handset
Caution
Do not use any liquids or powders on the phone because they can contaminate the handset components
and cause failures.
Clean the Handset Exterior
You can clean the handset exterior using a dry, lint-free cloth. For the health-care environment, we recommend
that you use Caviwipes™and Saniwipes™to thoroughly clean the handset. Caviwipes and Saniwipes contain
up to 17% isopropanol.
Any cleaning solution containing a higher amount of isopropanol, including pure isopropanol, or an alternative
alcohol-based liquid could potentially damage the handset. Do not clean the handset with bleach or other
caustic products.
Excessive use of Caviwipes and Saniwipes more than 3 times a day will damage the handset surface coating
and will change the appearance of handset.
Clean your handset immediately if it comes in contact with anything that may cause stains, or other damage;
for example, dirt or sand, ink, makeup, soap, detergent, acids, acidic foods, or lotions.
Caution
Do not blow or use compressed air (for example, aerosol cans, low- or high-pressure air nozzles) to clean the
openings of the handset.
Do not use a vacuum cleaner or other suction device to clean the openings of the handset.
Do not use pins or other objects to clean the openings of the handset.
Use of air, suction, or mechanical objects to clean the openings can damage the handset and voids the handset
warranty.
Procedure
Step 1 Remove the handset from the charger.
Step 2 Wipe the handset and screen with a soft, lint-free cloth or with an approved sanitizing wipe.
Step 3 If there are foreign objects (for example, fine sand) in an opening in the handset, tap the handset against your
hand to dislodge the objects.
Your Handset
12
Page 13

Your Handset
If You Drop Your Handset in Water
If you drop your handset in water, here's what you do:
• Gently shake the water off the handset.
• Dry the handset with a soft, dry, lint-free cloth.
• Leave your handset in a dry area with some air flow; for example, a fan blowing cool air can be directed
onto the handset speaker grill to help the handset dry out. Just don't put the fan close to the handset.
Here are some things you don't do:
• Don't open the battery door while the handset is wet.
• Don't use compressed air to blow off the water.
• Don't use a hair dryer to dry off the handset.
• Don't put a cotton swab, paper towel, or cloth into the headset jack or inside the battery compartment.
• Don't tap the handset on a hard surface.
If You Drop Your Handset in Water
• Don't put a wet handset into the charging cradle. You must wait until the handset is completely dry.
Note
The handset warranty does not cover handsets that have been dropped in water or other fluids.
Caution
Do not blow or use compressed air (for example, aerosol cans, low- or high-pressure air nozzles) to clean the
openings of the handset.
Do not use a vacuum cleaner or other suction device to clean the openings of the handset.
Do not use pins or other objects to clean the openings of the handset.
Use of air, suction, or mechanical objects to clean the openings can damage the handset and voids the handset
warranty.
If the sound is muffled after you dry the handset, there may still be water in the microphone or speaker
compartments. Place your handset, speaker-side down, on a dry, lint-free cloth to see if water drips out. If
there is still water in the handset, allow the handset to completely dry before you use it.
Additional Help and Information
If you have questions about the functions available on your phone, contact your administrator.
The Cisco website (https://www.cisco.com) contains more information about the phones and call control
systems.
• For quick start guides and end-user guides in English, follow this link:
https://www.cisco.com/c/en/us/support/collaboration-endpoints/
ip-phone-6800-series-multiplatform-firmware/products-user-guide-list.html
Your Handset
13
Page 14

Cisco IP DECT 6800 Series Documentation
• For guides in languages other than English, follow this link:
https://www.cisco.com/c/en/us/support/collaboration-endpoints/
ip-phone-6800-series-multiplatform-firmware/tsd-products-support-translated-end-user-guides-list.html
• For licensing information, follow this link:
https://www.cisco.com/c/en/us/support/collaboration-endpoints/
ip-phone-6800-series-multiplatform-firmware/products-licensing-information-listing.html
Cisco IP DECT 6800 Series Documentation
See the publications that are specific to your language and firmware release. Navigate from the following
Uniform Resource Locator (URL):
https://www.cisco.com/c/en/us/support/collaboration-endpoints/ip-dect-6800-series-multiplatform-firmware/
tsd-products-support-series-home.html
Lost Phone Connectivity
Your Handset
Sometimes your phone can lose its connection to the base station, or the base station can lose its connection
to the call control system. When this connection is lost, your phone displays a message.
If you are on an active call when either connection is lost, the call ends.
If you lost the connection because you moved out of the base station range, you should add a coverage warning.
For more information, see Set the Coverage Warning.
When the phone reconnects to the base station or the base station reconnects to the call control system, you'll
be able to use your phone normally again.
Cisco One-Year Limited Hardware Warranty Terms
Special terms apply to your hardware warranty and services that you can use during the warranty period.
Your formal Warranty Statement, including the warranties and license agreements applicable to Cisco software,
is available on Cisco.com at this URL: https://www.cisco.com/go/hwwarranty.
Your Handset
14
 Loading...