

Cisco Fourth-Generation Versatile Interface Processor VIP4, VIP4-50=, VIP4-80=, MEM-VIP4-64M-SD=, MEM-VIP4-128M-SD= Installation And Configuration Manual
...Page 1

Introduction
Fourth Generation Versatile Interface Processor
(VIP4) Installation and Configuration Guide
Product Numbers: VIP4-50=, VIP4-80=, MEM-VIP4-64M-SD=, MEM-VIP4-128M-SD=, MEM-VIP4-256M-SD=
This guide provides instructions for installing, configuring, and maintaining the fourth-generation
Versatile Interface Processor (VIP4). The VIP4 operates with the Cisco 7505, Cisco 7507, Cisco
7507-MX, Cisco 7513, Cisco 7513-MX, and the Cisco 7576 routers with the Route Switch Processor
(RSP1, RSP2, RSP4, RSP4+, or RSP8), and with the Cisco 7000 series routers using the 7000 Series
Route Switch Processor(RSP7000) and 7000 Series Chassis Interface (RSP7000CI). See the “Software
Requirements” section on page 9 for specific compatibility requirements.
The VIP4 supports online insertion and removal(OIR), which allows you to remove and replace a VIP4
without first shutting down the system. Online insertion and removal maximizes router availability by
letting you add or remove VIP4s during system operation. See the “Guidelines for VIP4 Removal and
Installation” section on page 15 for more information on removing and installing the VIP4.
The VIP4 supports LAN and WAN port adapters (PAs), including Fast Ethernet, T1/E1, High-Speed
Serial Interface (HSSI), T3/E3, T3/E3 ATM, multichannel T1/E1, multichannel T3/E3, OC-3 ATM,
Packet over SONET (POS), and OC-12 ATM. For a list of supported port adapters, refer to the “VIP4
and Port Adapter Compatibility” section on page 7.
The VIP4 port adapters do not support OIR, so when removing or inserting a port adapter, the system
must be shut down first. The VIP42 must be removed from its interface processor slot before removing
or installing a port adapter.
For complete descriptions of interface subcommands and the configuration options available for
VIP4-related interfaces, refer to the configuration note for each of the port adapters installed on your
VIP4 and to the appropriate Cisco IOS software configuration publications. (See the “Related
Documentation” section on page 2.)
Corporate Headquarters:
Cisco Systems, Inc., 170 West Tasman Drive, San Jose, CA 95134-1706 USA
Copyright © 2002. Cisco Systems, Inc. All rights reserved.
Page 2

Contents
Contents
This guide includes the following sections:
• Related Documentation, page 2
• VIP4 Overview, page 3
• Installation Prerequisites, page 9
• Agency Approvals, page 11
• Safety Guidelines, page 12
• VIP4 Installation Procedures, page 15
• Checking the VIP4 Installation, page 21
• VIP4 Maintenance Procedures, page 28
• VIP4 Troubleshooting, page 40
• Obtaining Documentation, page 40
• Obtaining Technical Assistance, page 41
Related Documentation
Your router and the Cisco IOS softwarerunning on it contain extensive features and functionality,which
are documented in the following resources:
• Cisco IOS software:
For configuration information and support, refer to the modular configuration and modular
command reference publications in the Cisco IOS software configuration documentation set that
corresponds to the software release installed on your Cisco hardware.
Note You can access Cisco IOS software configuration and hardware installation and maintenance
documentation on the World Wide Web at http://www.cisco.com. Translated documentation is
available at the following URL:http://www.cisco.com/public/countries_languages.shtml.
• Cisco 7000 series routers:
For hardware installation and maintenance information on the Cisco 7000 series routers, refer to the
Cisco 7000 Hardware Installation and Maintenance manual that shipped with your router.
• Cisco 7500 series routers:
For hardware installation and maintenance information on the Cisco 7500 series routers, refer to the
Cisco 7500 Installation and Configuration Guide that shipped with your router.
• For international agency compliance, safety, and statutory information for WAN interfaces:
–
Site Preparation and Safety Guide
–
Regulatory Compliance and Safety Information for the Cisco 7500 Series Routers
–
Regulatory Compliance and Safety Information for the Cisco 7000 Series Routers
Fourth Generation Versatile Interface Processor (VIP4) Installation and Configuration Guide
2
OL-3673-01
Page 3

• Port adapters/interface processors/service adapters:
For port adapter information and maintenance information, refer to the specific port adapter
installation and configuration guide. See the port adapter index online at
http://www.cisco.com/univercd/cc/td/doc/product/core/cis7505/portadpt/index.htm.
• To view Cisco documentation or obtain general information about the documentation, refer to the
following sources:
VIP4 Overview
This section describes the VIP4 and discusses VIP4-specific features and functions, such as:
• What is the VIP4?, page 3
• How to Identify the VIP4 Model, page 3
• Specifications, page 6
• VIP4 Port Adapter Overview, page 6
• VIP4 and Port Adapter Compatibility, page 7
–
“World Wide Web” section on page 40
–
“Documentation CD-ROM” section on page 40
–
“Obtaining Technical Assistance” section on page 41
VIP4 Overview
What is the VIP4?
The VIP4 is the fourth generation of Versatile Interface Processors for use with Cisco 7500 or
Cisco 7000 series routers. The VIP4 installs in any interface processor slot on your router, as noted
below:
• Slots 0, 1, 2, 3, or 4 in the Cisco 7000 router
• Slots 0, 1, or 2 in the Cisco 7010 router
• Slots 0, 1, 2, or 3 of the Cisco 7505 router
• Slots 0, 1, 4, 5, or 6 of the Cisco 7507 router
• Slots 0, 1, 2, 3, 4, or 5, and 8, 9, 10, 11, or 12 of the Cisco 7513 router
• Slots 0, 1, 2, 3, 4, or 5 of Router A, and slots 8, 9, 10, 11, or 12 of Router B in the Cisco 7576 router
For more information on interface processor slots on your router, refer to the Cisco 7500 Series
Installation and Configuration Guide or the appropriate Quick Start Guide for the Cisco 7500 series
routers, or refer to Cisco 7000 HardwareInstallation and Maintenance manual for the Cisco 7000 series
routers.
How to Identify the VIP4 Model
There are two different versions of the VIP4: the VIP4-50 and the VIP4-80. Both VIP4 versions support
two single-width port adapters or one dual-width port adapter and identical ECC-protected memory
expansion options. Each VIP4 operates with the Cisco 7505, Cisco 7507, Cisco 7507-MX, Cisco 7513,
Cisco 7513-MX, and the Cisco 7576 routers.
OL-3673-01
Fourth Generation Versatile Interface Processor (VIP4) Installation and Configuration Guide
3
Page 4

VIP4 Overview
Using the show diag command, you can distinguish between the VIP4-50 and VIP4-80, as indicated in
the following example, and in Table 1.
Table 1 Distinguishing the VIP4 Models
EEPROM contents (hex) Value VIP4 Model
0x31 VIP4-50
0x22 VIP4-80
In the example below, the VIP is a VIP4-80:
Router# show diag 1
Slot 1:
Physical slot 1, ~physical slot 0xE, logical slot 1, CBus 0
Microcode Status 0x4
Master Enable, LED, WCS Loaded
Board is analyzed
Pending I/O Status:None
EEPROM format version 1
VIP4-80 RM7000 controller, HW rev 2.01, board revision A0
Serial number:14773010 Part number:73-3143-02
Test history:0x00 RMA number:00-00-00
Flags:cisco 7000 board; 7500 compatible
EEPROM contents (hex):
0x20:01 22 02 01 00 E1 6B 12 49 0C 47 02 00 00 00 00
0x30:50 06 00 00 00 00 00 00 00 00 00 00 00 00 00 00
Slot database information:
Flags:0x4 Insertion time:0x5168 (2w1d ago)
Controller Memory Size:64 MBytes CPU SDRAM, 64 MBytes Packet
SDRAM
PA Bay 0 Information:
Fast-Ethernet PA, 1 ports, 100BaseTX-ISL
EEPROM format version 1
HW rev 1.00, Board revision A0
Serial number:03536381 Part number:73-1688-03
PA Bay 1 Information:
Dual Port Fast Ethernet (RJ45), 2 ports
EEPROM format version 4
HW rev 1.00, Board revision 04
Serial number:MIC043929WV Part number:73-5419-03
--Boot log begin--
Cisco Internetwork Operating System Software
IOS (tm) VIP Software (SVIP-DW-M), Version 12.0(16.5)S, EARLY DEPLOYMENT
MAINTENANCE INTERIM SOFTWARE
TAC Support:http://www.cisco.com/cgi-bin/ibld/view.pl?i=support
Copyright (c) 1986-2001 by cisco Systems, Inc.
Compiled Thu 29-Mar-01 16:33 by ninahung
Image text-base:0x60010938, data-base:0x60340000
--Boot log end--
Fourth Generation Versatile Interface Processor (VIP4) Installation and Configuration Guide
4
OL-3673-01
Page 5

Table 2 outlines features of the VIP4 models, and Table 3 provides a list of the VIP4 internal
components.
Note You can use any combination of available CPU memory configurations and packet memory
configurationson the VIP4. You do not need to haveequal amounts of CPU memory and packet memory
installed. (For information about upgrading memory, see the “Upgrading VIP4 Memory” section on
page 31.)
Table 2 VIP4 Model Features
VIP4 Overview
Packets Forwarding
Product
(PPS)
1
Bandwidth
VIP4-50 ~140,000 750+ MB Yes;
Distributed Switching/
Services (DSW) Usage
Distributed switching
Moderate to high DSW
Moderate link utilization
Cisco Express Forwarding (CEF)
VIP4-80 ~170,000 750+ MB Yes;
Very high DSW
High distributed switching performance
Multiple high-speed PAs with high link utilization
Extensive use of distributed IP services
Cisco Content Networking (CCN)
1. PPS = Packets per Second
Table 3 VIP4 Internal Components
Type Size/Speed Description
CPU (for VIP4-50) 200 megahertz (MHz)
internal operating frequency
CPU (for VIP4-80) 250 megahertz (MHz)
internal operating frequency
SDRAM DIMMs
1
64 (default), 128, or 256 MB 100-MHz synchronous dynamic random-access
(program or CPU
memory)
SDRAM DIMMs
1
64 MB 100-MHz synchronous dynamic random-access
(packet memory)
Reduced Instruction Set Computer (RISC),
IPSR5271 processor
Reduced Instruction Set Computer (RISC),
MIPS R7000 processor
memory (SDRAM) as CPU memory contained on
dual in-line memory modules (DIMMs)
memory (SDRAM) as packet memory contained on
dual in-line memory modules (DIMMs)
1. 8-bit error correction code (ECC), rather than byte parity, for single error-bit correction and double error-bit detection
Location
(see Figure 1)
CPU
CPU
U1
U5
OL-3673-01
Fourth Generation Versatile Interface Processor (VIP4) Installation and Configuration Guide
5
Page 6
VIP4 Overview
Specifications
The VIP4 physical specifications are listed in Table 4.
Table 4 VIP4 Specifications
Description Specifications
Physical dimensions The VIP4 occupies one chassis slot and can only be operated in a
Shipping weight 5 lb (2.25 kg)
Operating temperature 32 to 104˚F (0 to 40˚C)
Relative humidity 10 to 90 percent, noncondensing
Storage temperature -4 to 149˚F (-20 to 65˚C)
VIP4 Port Adapter Overview
Cisco 7500 series, or Cisco 7000 series routers using the 7000 Series
Route Switch Processor (RSP7000) and 7000 Series Chassis Interface
(RSP7000CI)
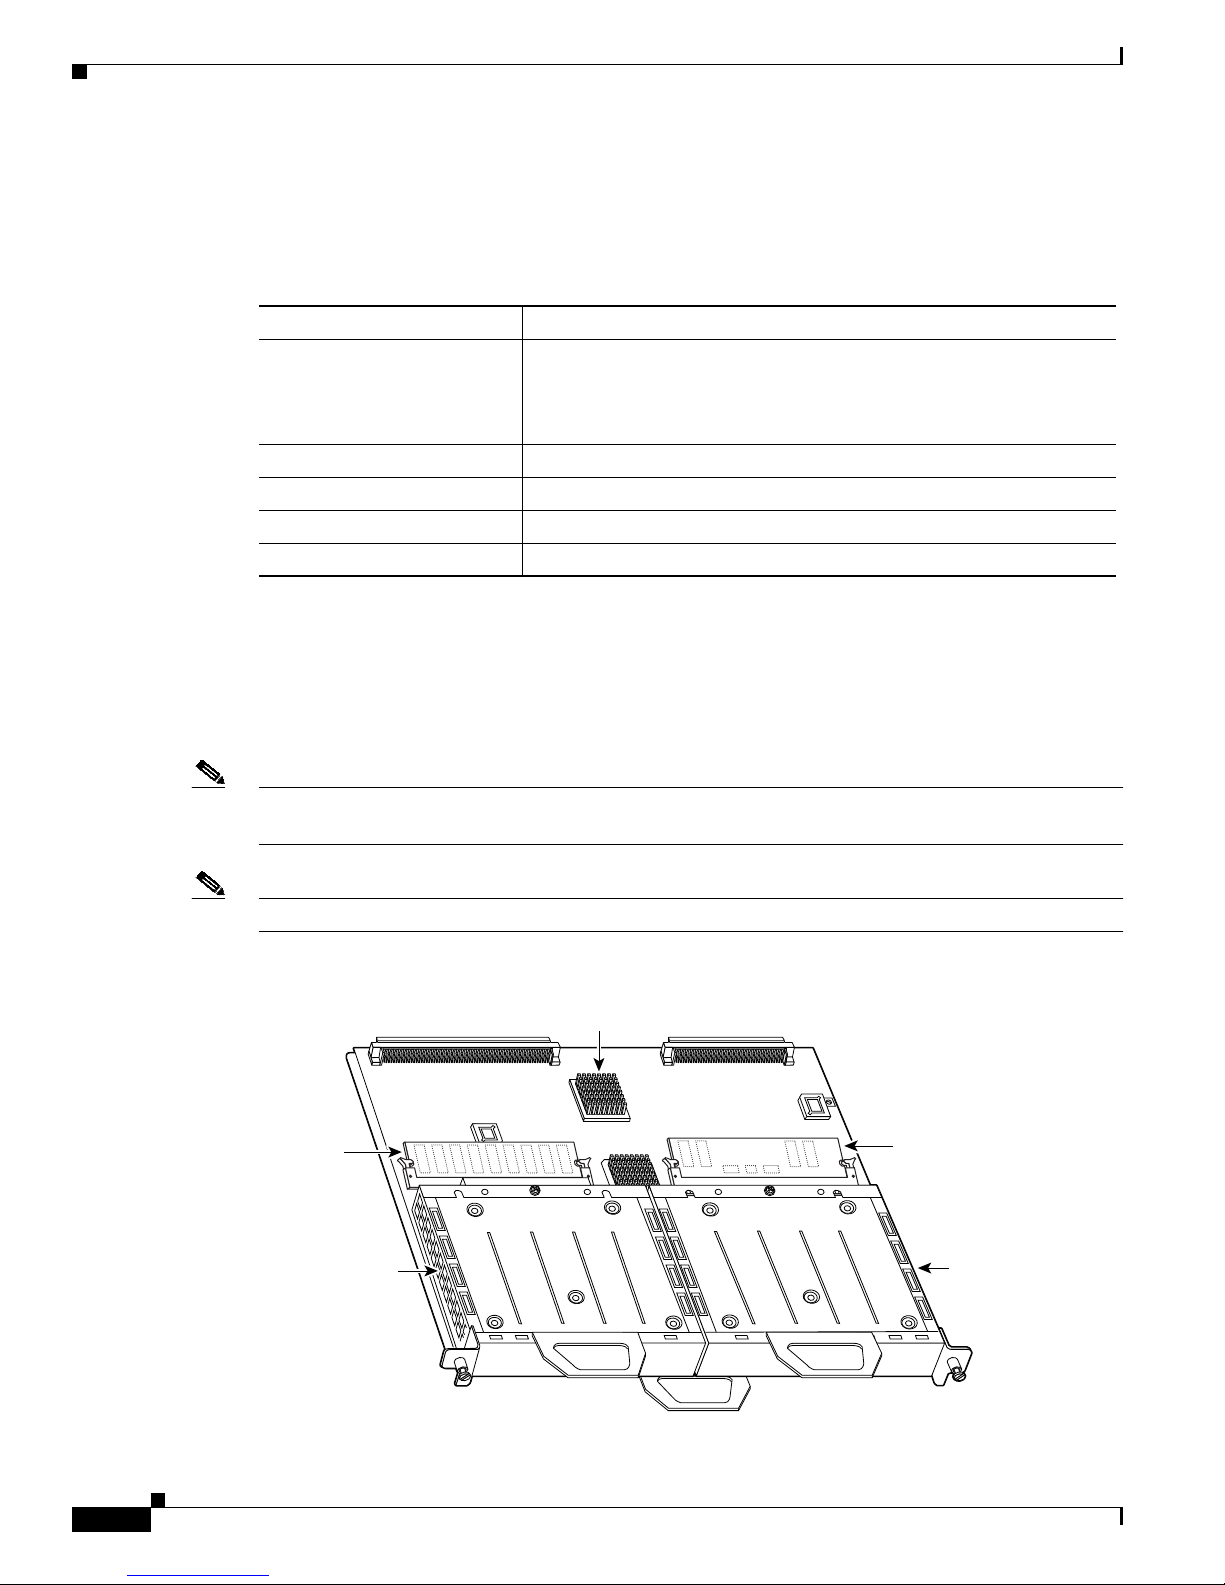
The VIP4, a single motherboard, supports up to two single-width port adapters, or one dual-width port
adapter.Figure 1 shows a VIP4 with two installed single-width port adapters. A dual-width port adapter
occupies both port adapter slots (not shown).
Note To ensure proper airflow in the router and compliance with EMI prevention standards, a VIP4 with one
single-width port adapter must have a blank port adapter installed in the empty port adapterslot location.
Note A VIP4 without at least one installed port adapter is not supported.
Figure 1 VIP4 with Two Single-Width Port Adapters—Horizontal Orientation Shown
Bus connector
Packet
memory
DIMM U5
CPU
CPU memory
DIMM U1
Port adapter
in slot 0
Fourth Generation Versatile Interface Processor (VIP4) Installation and Configuration Guide
6
Port adapter
in slot 1
26561
OL-3673-01
Page 7

VIP4 and Port Adapter Compatibility
For more information on the available port adapters supported by the VIP4, refer to the Cisco Product
Catalog online, or contact a Cisco sales representative in your area. For more information on a specific
port adapter, refer to the specific port adapter installation and configuration guide. The port adapters,
including part numbers for ordering, are listed in the Cisco Port Adapter Documentation flyer. This
document is available online at http://www.cisco.com/univercd/cc/td/doc/product/core/12939paf.htm or
in print (DOC-7812939).
Note The VIP4 does not support the PA-GE. However, the VIP4-80 supports the Enhanced Gigabit Ethernet
Interface Processor (GEIP+), an assembly consisting of a VIP4-80 with a permanently attached
dual-width Enhanced Gigabit Ethernet port adapter.
Table 5 identifies the port adapters supported by the VIP4 at the time of this writing, and Table 6
identifies the interface processors and service adapters that are supported by the VIP4.
Note The following table does not address which software release applies to the VIP6-80 port adapters. For
more information, refer to the Software Advisor at
http://www.cisco.com/cgi-bin/Support/CompNav/Index.pl.
VIP4 Overview
Table 5 List of Port Adapters Supported by VIP4
Number of
Product Number Description
Ports Single/Dual Width
PA-A3-T3 ATM DS3 port adapter, enhanced 1 Single
PA-A3-E3 ATM E3 port adapter, enhanced 1 Single
PA-A3-8T1IMA ATM inverse multiplexer over ATM port adapter 8 Single
PA-A3-8E1IMA ATM inverse multiplexer over ATM port adapter 8 Single
PA-A3-OC3MM ATM OC-3c/STM-1 multimode, enhanced 1 Single
PA-A3-OC3SMI ATM OC-3c/STM-1 single-mode (IR), enhanced 1 Single
PA-A3-OC3SML ATM OC-3c/STM-1 single-mode (LR), enhanced 1 Single
PA-A3-OC12-MM ATM OC-12/STM-4 single-mode (IR); multimode 1 Dual
PA-A3-OC12-SMI ATM OC-12/STM-4 single-mode (IR); multimode 1 Dual
PA-POS-OC3- MM Single-wide OC-3c/STM-1 1 Single
PA-POS-OC3- SMI Single-wide OC-3c/STM-1 1 Single
PA-POS-OC3- SML Single-wide OC-3c/STM-1 1 Single
PA-A1-OC3SM ATM OC3 Single-Mode Intermediate Reach 1 Single
PA-A1-OC3MM ATM OC3 Multimode 1 Single
PA-FE-TX Fast Ethernet 100BaseTX 1 Single
PA-FE-FX Fast Ethernet 100BaseFX 1 Single
PA-2FE-TX Dual-Port Fast Ethernet 100BaseTX 2 Single
PA-2FE-FX Dual-Port Fast Ethernet 100BaseFX 2 Single
PA-4E Ethernet 10BaseT 4 Single
OL-3673-01
Fourth Generation Versatile Interface Processor (VIP4) Installation and Configuration Guide
7
Page 8

VIP4 Overview
Table 5 List of Port Adapters Supported by VIP4 (continued)
Number of
Product Number Description
Ports Single/Dual Width
PA-8E Ethernet 10BaseT 8 Single
PA-F-MM FDDI Multimode 1 Single
PA-F-SM FDDI Single-Mode 1 Single
PA-FD-MM FDDI Full Duplex Multimode 1 Single
PA-FD-SM FDDI Full Duplex Single-mode 1 Single
PA-4T+ Serial, Enhanced 4 Single
PA-8T-V35 Serial, V.35 8 Single
PA-8T-232 Serial, RS232 8 Single
PA-8T-X21 Serial, X.21 8 Single
PA-T3/PA-T3+ T3 Serial Interface/T3 Serial Interface enhanced 1 Single
PA-2T3/ PA-2T3+ T3 Serial Interface/T3 Serial Interface enhanced 2 Single
PA-E3 E3 Serial Interface 1 Single
PA-2E3 E3 Serial Interface 2 Single
PA-4E1G/75 E1 G.703 Serial (75 ohm/Unbalanced) 4 Single
PA-4E1G/120 E1 G.703 Serial (120 ohm/Balanced) 4 Single
PA-MC-T3 Multichannel T3 1 Single
PA-MC-E3 Multichannel E3 1 Single
PA-MC-2T1 Multichannel DS1/PRI T1 (100 ohm) 2 Single
PA-MC-4T1 Multichannel DS1/PRI T1 (100 ohm) 4 Single
PA-MC-8T1 Multichannel DS1/PRI T1 (100 ohm) 8 Single
PA-MC-2T3+ Multichannel with two T3 interfaces 2 Single
PA-MC-8DSX1 Multichannel DS1/PRI T1 (100 ohm) 8 Single
PA-MC-2E1/120 Multichannel E1 with G.703 120-ohm interface 2 Single
PA-MC-8E1/120 Multichannel E1 with G.703 120-ohm interface 8 Single
PA-MC-STM-1MM Multichannel STM-1 Port Adapter 1 Single
PA-MC-STM-1SMI
1
Multichannel STM-1 Port Adapter 1 Single
PA-H HSSI 1 Single
PA-2H HSSI 2 Single
PA-VXC-2TE1 High-Capacity Digital Voice 2 Single
PA-VXC-2TE1+ High-Capacity Digital Voice 2 Single
PA-VXB-2TE1 Moderate-Capacity Digital Voice 2 Single
PA-VXB-2TE1+ Moderate-Capacity Digital Voice 2 Single
PA-SRP-OC12MM
PA-SRP-OC12SMI
2
2
Multimode fiber 2 Dual
Single-mode fiber, intermediate reach 2 Dual
Fourth Generation Versatile Interface Processor (VIP4) Installation and Configuration Guide
8
OL-3673-01
Page 9

Table 5 List of Port Adapters Supported by VIP4 (continued)
Product Number Description
PA-SRP-OC12SML
PA-SRP-OC12SMX
1. Supported on VIP4-80 only.
2. Requires Cisco IOS release 12.1(12)E or later, or Cisco IOS release 12.1(21)S or later.
2
2
Table 6 List of Interface Processors Supported by VIP4
Single-mode fiber, long reach 2 Dual
Single-mode fiber, extended reach 2 Dual
Product Number Description Number of Ports
GEIP Gigabit Ethernet Interface Processor 1
GEIP+ Gigabit Ethernet Interface Processor, enhanced 1
Note All interface processors are dual-width.
Installation Prerequisites
Number of
Ports Single/Dual Width
Installation Prerequisites
This section providesinstallation prerequisites to ensure a successful VIP4 installation, and includes the
following sections:
• Software Requirements, page 9
• Hardware Requirements, page 10
• Microcode Overview, page 10
• ROM Monitor Overview, page 11
• Tools and Parts Required, page 11
Software Requirements
The minimum Cisco IOS Release requirements for VIP4-50 and VIP4-80 are listed in Table 7. For
configuration information and support, refer to the modular configuration and modular command
reference publications in the Cisco IOS software configuration documentation set that corresponds to
the software release installed on your Cisco hardware.
Note You can access Cisco IOS software configuration and hardware installation and maintenance
documentation on the World Wide Web at http://www.cisco.com, http://www-china.cisco.com, or
http://www-europe.cisco.com.
OL-3673-01
Fourth Generation Versatile Interface Processor (VIP4) Installation and Configuration Guide
9
Page 10

Installation Prerequisites
Table 7 VIP4 Minimum Software Release Requirements
VIP Release Minimum Cisco IOS Supported Releases
VIP4-50 Cisco IOS Release 12.0(13)S2 or later release of Cisco IOS Release 12.0 S
Cisco IOS Release 12.1(6) or later release of Cisco IOS Release 12.1 mainline
Cisco IOS Release 12.1(5)E or later release of Cisco IOS Release 12.1 E
Cisco IOS Release 12.1(5.3)T or later release of Cisco IOS Release 12.1 T
Cisco IOS Release 12.2(1) or later release of Cisco IOS Release 12.2 mainline
Cisco IOS Release 12.2(1)T or later release of Cisco IOS Release 12.2 T
VIP4-80 Cisco IOS Release 12.0(10)S1 or later release of Cisco IOS Release 12.0 S
Cisco IOS Release 12.1(3) or later release of Cisco IOS Release 12.1 mainline
Cisco IOS Release 12.1(3)E or later release of Cisco IOS Release 12.1 E
Cisco IOS Release 12.1(3)T or later release of Cisco IOS Release 12.1 T
Cisco IOS Release 12.2(1) or later release of Cisco IOS Release 12.2 mainline
Cisco IOS Release 12.2(1)T or later release of Cisco IOS Release 12.2 T
Traffic Management
• Simple Network Management Protocol (SNMP) agent V1 (RFCs 1155-1157)
• Management Information Base (MIB) II (RFC 1213)
Hardware Requirements
The VIP4 is a single motherboard. It operates with:
• Cisco 7505, Cisco 7507, Cisco 7507-MX, Cisco 7513, Cisco 7513-MX, and the Cisco 7576 routers
with the Route Switch Processor (RSP1, RSP2, RSP4, RSP4+, or RSP8); the RSP should have at
least 64 MB of DRAM.
• Cisco 7000 series routers with the 7000 Series Route Switch Processor (RSP7000) and 7000 Series
Chassis Interface (RSP7000CI), the RSP7000 should have at least 64 MB of DRAM.
• Two single-width port adapters, or one dual-width port adapter, supporting multiple LAN and WAN
port adapter types, including Ethernet, Fast Ethernet, Gigabit Ethernet, serial, channelized serial,
multichannel, HSSI, ATM, and POS.
Note The VIP4 requires at leastone port adapter installed inorder to be supported. Asingle-width port adapter
must have a blank port adapter installed in the empty port adapter slot location.
Microcode Overview
The VIP4 microcode (firmware) is an image that provides card-specific software instructions. A
programmable read-only memory (PROM) device on the VIP4 contains a default microcode boot image
that assists the system in finding and loading the microcode image from the Cisco IOS bundle or Flash
memory. The router supports downloadable microcode, which enables you to upgrade microcode
versions by downloading new microcode images, storing them in system Flash memory, and instructing
the system to load its image from Flash memory.You can storemultiple images for an interface type and,
with a configuration command, instruct the system to load any one of them or the default microcode
image.
Fourth Generation Versatile Interface Processor (VIP4) Installation and Configuration Guide
10
OL-3673-01
Page 11

The microcode boot image in the PROM initializes the VIP4 and then assists downloading the VIP4
microcode image. Allinterfaces of the same type (VIP4, and so on) will load the same microcode image,
either from the microcode image bundled with the Cisco IOS or from an image stored in system Flash
memory. Although multiple microcode versions for a specific interface type can be stored concurrently
in Flash memory, only one image can load at startup.
The show controllers cbus command displays the currently loaded and running microcode version for
each interface processor and VIP4. The show startup-config EXEC command showsthe current system
instructions for loading microcode at startup.
Software and interface processor microcode images are carefully optimized and bundled to work
together. Overriding the bundle can result in system incompatibilities. We recommend that you use the
microcode included in the software bundle. For a complete description of microcode and downloading
procedures, refer to the “Upgrading VIP4 Microcode” section on page 28.
ROM Monitor Overview
The VIP4 read-only memory (ROM) monitor, known as Rommon, is firmware. It runs a brief set of
system diagnostics, initializes the VIP4 hardware, and downloads a copy of the Cisco IOS image.The
ROM monitor loads the Cisco IOS image from Flash memory or from a TFTP server. While multiple
Cisco IOS images can be stored in RSP Flash memory, just one can be loaded at system startup.
The VIP4 ROM monitor functions similarly to the boot loader image on the RSP, which runs a copy of
the Cisco IOS image. The boot loader image allows the router to access the Cisco IOS image when
powering up or initializing the system.
Agency Approvals
Tools and Parts Required
You need the following tools and parts to install or upgrade a VIP4:
• Number 1 Phillips and a 3/16-inch flat-blade screwdriver
• ESD-prevention equipment or disposable grounding wrist strap, included with all Cisco products
• VIP4 (For specific compatibility requirements, see the “Software Requirements” section on page 9.)
Note The VIP4 requires at leastone port adapter installed inorder to be supported. Asingle-width port adapter
must have a blank port adapter installed in the empty port adapter slot location.
If you need additional equipment, contact a service representative for ordering information.
Agency Approvals
The VIP4 is designed to comply with and meet the following agency approvals:
OL-3673-01
Fourth Generation Versatile Interface Processor (VIP4) Installation and Configuration Guide
11
Page 12

Safety Guidelines
Approvals Agencies
Safety CSA-C22.2 No. 950 (Canada)
Emissions CE marking (Europe)
Safety Guidelines
Following are safety guidelines that you should follow when working with any equipment that connects
to electrical power or telephone wiring.
EN60950 (Europe)
IEC 950 (International)
UL 1950 (United States)
CISPR 22 Class B (International)
FCC Part 15 Class A (United States)
EN55022 Class B (Europe)
ICES-003 Class A (Canada)
VCCI Class B (Japan)
Safety Warnings
Safety warnings appear throughout this publication in procedures that, if performed incorrectly, may
harm you. A warning symbol precedes each warning statement.
Warning
Waarschuwing
Varoitus
Thiswarning symbol means
work on any equipment, be aware of the hazards involved with electrical circuitry and be familiar
with standard practices for preventing accidents. To see translations of the warnings that appear
in this publication, refer to the
accompanied this device.
Dit waarschuwingssymbool betekent gevaar. U verkeert in een situatie die lichamelijk letsel kan
veroorzaken. Voordat u aan enige apparatuur gaat werken, dient u zich bewust te zijn van de bij
elektrische schakelingen betrokken risico's en dient u op de hoogte te zijn van standaard
maatregelen om ongelukken te voorkomen. Voor vertalingen van de waarschuwingen die in deze
publicatie verschijnen, kunt u het document
(Informatie over naleving vanveiligheids- en andere voorschriften) raadplegen dat bij dit toestelis
ingesloten.
Tämä varoitusmerkki merkitsee vaaraa. Olet tilanteessa, joka voi johtaa ruumiinvammaan. Ennen
kuin työskentelet minkään laitteiston parissa, ota selvää sähkökytkentöihin liittyvistä vaaroista ja
tavanomaisista onnettomuuksien ehkäisykeinoista. Tässä julkaisussa esiintyvien varoitusten
käännökset löydät laitteen mukana olevasta
-kirjasesta (määräysten noudattaminen ja tietoa turvallisuudesta).
danger
.Youareinasituationthat could cause bodily injury. Before you
Regulatory Compliance and Safety Information
Regulatory Compliance and Safety Information
Regulatory Compliance and Safety Information
document that
Fourth Generation Versatile Interface Processor (VIP4) Installation and Configuration Guide
12
OL-3673-01
Page 13

Safety Guidelines
Attention
Warnung
Avvertenza
Advarsel
Ce symbole d'avertissement indique un danger. Vous vous trouvez dans une situation pouvant
causer des blessures ou des dommages corporels. Avant de travailler sur un équipement, soyez
conscient des dangers posés par les circuits électriques et familiarisez-vous avec les procédures
couramment utilisées pour éviter les accidents. Pour prendre connaissance des traductions
d’avertissements figurant dans cette publication, consultez le document
and Safety Information
appareil.
Dieses Warnsymbol bedeutet Gefahr. Sie befinden sich in einer Situation, die zu einer
Körperverletzung führen könnte. Bevor Sie mit derArbeitanirgendeinem Gerät beginnen, seien Sie
sich der mit elektrischen Stromkreisen verbundenen Gefahren und der Standardpraktiken zur
Vermeidung von Unfällen bewußt. Übersetzungen der in dieser Veröffentlichung enthaltenen
Warnhinweise finden Sie im Dokument
(Informationen zu behördlichen Vorschriften und Sicherheit), das zusammen mit diesem Gerät
geliefert wurde.
Questo simbolo di avvertenza indica un pericolo. La situazione potrebbe causare infortuni alle
persone. Prima di lavorare su qualsiasi apparecchiatura, occorre conoscere i pericoli relativi ai
circuiti elettrici ed essere al corrente delle pratiche standard per la prevenzione di incidenti. La
traduzione delle avvertenze riportate in questa pubblicazione si trova nel documento
Compliance and Safety Information
accompagna questo dispositivo.
Dette varselsymbolet betyr fare.Du befinnerdegi en situasjon somkan føre til personskade. Før du
utfører arbeid på utstyr, må du vare oppmerksom på de faremomentene som elektriske kretser
innebærer,samt gjøre deg kjent med vanlig praksis når det gjelder å unngå ulykker. Hvis du vil se
oversettelser av de advarslene som finnes i denne publikasjonen, kan du se i dokumentet
Regulatory Compliance and Safety Information
sikkerhetsinformasjon) som ble levert med denne enheten.
(Conformité aux règlements et consignes de sécurité) qui accompagne cet
Regulatory Compliance and Safety Information
(Conformità alle norme e informazioni sulla sicurezza) che
(Overholdelse av forskrifter og
Regulatory Compliance
Regulatory
Aviso
¡Advertencia!
Este símbolo de aviso indica perigo. Encontra-se numa situação que lhe poderá causar danos
físicos. Antes de começar a trabalhar com qualquer equipamento, familiarize-se com os perigos
relacionados com circuitos eléctricos, e com quaisquer práticas comuns que possam prevenir
possíveis acidentes. Para ver as traduções dos avisos que constam desta publicação, consulte o
documento
Disposições Reguladoras) que acompanha este dispositivo.
Estesímbolo de aviso significapeligro. Existeriesgoparasu integridad física. Antes de manipular
cualquier equipo, considerar losriesgosque entraña la corrienteeléctrica y familiarizarse con los
procedimientos estándar de prevención de accidentes. Para ver una traducción de las
advertencias que aparecen en esta publicación, consultar el documento titulado
Regulatory Compliance and Safety Information
Compliance and Safety Information
disposiciones reglamentarias) que se acompaña con este dispositivo.
Electrical Equipment Guidelines
Follow these basic guidelines when working with any electrical equipment:
• Before beginning any procedures requiring access to the router interior, locate the emergency
power-off switch for the room in which you are working.
• Disconnect all power and external cables before moving a router.
(Informação de Segurança e
Regulatory
(Información sobre seguridad y conformidad con las
OL-3673-01
Fourth Generation Versatile Interface Processor (VIP4) Installation and Configuration Guide
13
Page 14

Safety Guidelines
• Do not work alone when potentially hazardous conditions exist.
• Never assume that power has been disconnected from a circuit; always check.
• Do not perform any action that creates a potential hazard or makes the equipment unsafe.
• Carefully examine your work area for possible hazards such as moist floors, ungrounded power
extension cables, and missing safety grounds.
Telephone Wiring Guidelines
Use the followingguidelines when working with anyequipment that is connected to telephone wiring or
to other network cabling:
• Never install telephone wiring during a lightning storm.
• Never install telephone jacks in wet locations unless the jack is specifically designed for wet
locations.
• Never touch uninsulated telephone wires or terminals unless the telephone line has been
disconnected at the network interface.
• Use caution when installing or modifying telephone lines.
Preventing Electrostatic Discharge Damage
Electrostatic discharge (ESD) damage, which can occur when electronic cards or components are
improperly handled, results in complete or intermittent failures.
Use the following guidelines for preventing ESD damage:
• Always use an ESD wrist or ankle strap and ensure that it makes good skin contact.
• Connect the equipment end of the strap to an unfinished chassis surface.
• When installing a component, use any available ejector levers or captive installation screws to
properly seat the bus connectors in the backplane.
• When removing a component, use any available ejector levers or captive installation screws to
release the bus connectors from the backplane or midplane.
• Handle carriers by available handles or edges only; avoid touching the printed circuit boards or
connectors.
• Place a removed board component-side-up on an antistatic surface or in a static shielding container;
otherwise, immediately place it in a static shielding container.
• Avoid contact between the printed circuit boards and clothing. The wrist strap only protects
components from ESD voltages on the body; ESD voltages on clothing can still cause damage.
• Never attempt to remove the printed circuit board from the metal carrier.
Caution For safety, periodically check the resistance value of the antistatic strap. The measurement should be
between 1 and 10 megohms (Mohms).
Fourth Generation Versatile Interface Processor (VIP4) Installation and Configuration Guide
14
OL-3673-01
Page 15

VIP4 Installation Procedures
This section includes procedures for VIP4 installation in the Cisco 7500 series or Cisco 7000 series
routers, and includes information on the following topics:
• Guidelines for VIP4 Removal and Installation, page 15
• Removing a VIP4, page 18
• Installing a VIP4, page 19
• Performing a Basic Configuration, page 21
VIP4 installation is the same for each router model, except where otherwise noted.
The VIP4 is oriented horizontally in the Cisco 7010 and Cisco 7505 routers, and vertically in the Cisco
7000, Cisco 7507, Cisco 7507-MX, Cisco 7513, Cisco 7513-MX, and Cisco 7576 routers.
Each unused interface processor slots must contain an interface processor filler (an interface processor
carrier without a printed circuit board) to keep dust out of the router and to maintain proper airflow
through the interface processor compartment.
Note To ensure compliance with electromagnetic interference (EMI) approvals by providing a tight
EMI-preventive seal for the Cisco 7500 series routers, we recommend that you first install VIP4s in the
interface processor slots closest to the RSP slots, and then work out to the interface processor slots
furthest from the RSP slots.
VIP4 Installation Procedures
Proceed to the “Removing a VIP4” section on page 18 if you plan to replace a VIP4 with another VIP4,
or if you plan to install a newVIP4, in which case you would firstremovean existing interface processor
or interface processor filler from an unused slot.
To install or remove a port adapter, see the “Installing or Replacing a Port Adapter on a VIP4” section
on page 35.
Guidelines for VIP4 Removal and Installation
This section describes the correct procedures to avoid unnecessary board failures.
Caution The online insertion and removal (OIR) instructions should be carefully followed. Failure to insert the
VIP4 properly can cause system error messages indicating a board failure. We strongly recommend that
you remove or insert only one interface processor at a time. You must allow the system time to complete
the initialization process before removing or inserting another interface processor. Disrupting the
sequence before the system completes its verification can cause the system to detect spurious hardware
failures.
Note The VIP4 port adapters do not support OIR, so when removing or inserting a port adapter, the system
must be shut down first. The VIP4 must be uninstalled before removing or installing a port adapter.
OL-3673-01
Fourth Generation Versatile Interface Processor (VIP4) Installation and Configuration Guide
15
Page 16

VIP4 Installation Procedures
You can remove and replace interface processors (such as the VIP4) while the system is operating, with
minimal disruption.When an interface processor is added or removed, the switching complex is paused
while the internal data structures arerebuiltfor the new interface configuration.Duringthis time, packets
are not switched through the system. However, routing adjacencies and forwarding entries are
maintained throughout the insertion and removal process.
After a VIP4 is reinstalled, the system brings online only interfaces that match the current configuration
and were previously configured as up; all others require that you configure them with the configure
command. For more information on the configure command, refer to the documentation of the specific
port adapter or interface processor that you are installing.
Figure 2 shows a detail of the ejector lever mechanism on the ends of the interface processor. Use the
ejector levers when removing an interface processor to ensure that the backplane connector pins
disconnect from the interface processor in the sequence expected by the system. Any interface processor
that is only partially connected to the backplane can hang the bus.
Fourth Generation Versatile Interface Processor (VIP4) Installation and Configuration Guide
16
OL-3673-01
Page 17

VIP4 Installation Procedures
Figure 2 Ejector Levers and Captive Installation Screws on the VIP4—Vertical Orientation Shown
a
b
Bottom ejector lever
Processor module
slot
Processor
module
carrier guide
Captive
installation
screw
c
OL-3673-01
Stop
immediately
on contact
H1482a
Note Handle processor modules by the carrier handles and carrier edges only; never touch the board or any
connector pins. (See Figure 3.)
Fourth Generation Versatile Interface Processor (VIP4) Installation and Configuration Guide
17
Page 18

VIP4 Installation Procedures
Figure 3 Handling Interface Processors—Vertical Orientation Shown
H1355a
Caution Failure to use the ejector levers and insert the interface processor properly can disrupt the order in which
the pins make contactwith the card or interface processor.This may cause the system to interpret a board
failure.
Removing a VIP4
This section describes the procedure for removing a VIP4, an interface processor, or an
interface processor filler, and replacing it with a new VIP4. Please read the “Guidelines for VIP4
Removal and Installation” section on page 15 before proceeding with this procedure.
Note To help prevent dust and contaminants from entering the chassis, do not leave the interface processor
slot open. Either insert an interface processor filler in the empty slot, or proceed immediately to the
“Installing a VIP4” section on page 19.
Caution In Cisco 7507, Cisco 7507-MX, Cisco 7513, or Cisco 7513-MX routers with the high system availability
(HSA) or high availability(HA) feature enabled, online insertion and removal of any interfaceprocessor
in either CyBus might cause the standby RSP2 to reboot with a bus error or a processor memory parity
error. The active RSP recovers from this event and issues a “cBus Complex Restart” message. Systems
that are configured with an RSP4 or an RSP8 as the system standby are not affected and do not
experience this problem.
For more information on HSA or HA, refer to your RSP Installation and Configuration Guide.
Fourth Generation Versatile Interface Processor (VIP4) Installation and Configuration Guide
18
OL-3673-01
Page 19

VIP4 Installation Procedures
If your router does not have the HSA or HA feature enabled, perform only Step 4 through Step 7 in the
following procedure. If the router has the HSA or HA feature enabled with an RSP2 configured as the
system standby, we recommend that you perform all the steps in the following procedure:
Step 1 Attach an ESD-preventive wrist strap between you and an unpainted chassis surface.
Step 2 Remove the standby RSP2.
Step 3 Wait 20 to 30 seconds. This time will vary depending on the number of interfaces installed in your
system.
Step 4 Disconnect all cables from the VIP4 port adapter interface ports.
Step 5 Use a screwdriver to loosen the captive installation screws at both ends of the board. (See a in
Figure 2.)
Caution Always use the ejector levers to remove a VIP4 or interface processor. Failure to do so can cause
erroneous system error messages indicating a board failure.
Step 6 Place your thumbs on the ejector levers and simultaneously pull both of the ejector levers outward (in
the direction shown in a of Figure 2) to release the board from the backplane connector.
• Use the board’s handle to carefully pull it straight out of the slot, keeping your other hand under the
carrier to guide it. (See c in Figure 3.) Keep the board parallel to the backplane.
• If you removed a VIP4 or interface processor and the interface processor slot is to remain empty,
install an interface processor filler (Product Number MAS7K-BLANK=) to keep dust out of the
router, maintain proper airflow inside the router, and ensure compliance with EMI approvals by
providing a tight EMI-preventive seal. Do not leave the interface processor slot open.
Step 7 Place the removed board on an antistatic mat or foam pad, or place it in an antistatic container if you
plan to return it to the factory.
Note If you do not have a Cisco 7507 or Cisco 7513 with the HSA or HA features enabled and an
Step 8 Wait 20 to 30 seconds. This time will vary depending on the number of interfaces installed in your
system.
Step 9 Reinsert the standby RSP2.
This completes the procedure for removing a VIP4 or interface processor from your Cisco 7000 series
or Cisco 7500 series router. Proceed to the section “Installing a VIP4.”
Installing a VIP4
This section describes the procedure for installing a VIP4. The VIP4 slides into an open interface
processor slot and connects directly to the backplane. The interface processors are keyed to guide pins
on the backplane, so the VIP4 can be installed only in an interface processor slot. Please read the
“Guidelines for VIP4 Removal and Installation” section on page 15, if you have not already done so,
before proceeding.
OL-3673-01
RSP2 configured as the system standby, immediately proceed to the section “Installing a VIP4”;
otherwise, proceed to Step 8.
Fourth Generation Versatile Interface Processor (VIP4) Installation and Configuration Guide
19
Page 20

VIP4 Installation Procedures
Note To ensurecompliance with EMI approvals by providing a tightEMI seal for the Cisco 7500and the Cisco
7000 routers, we recommend that you first install interface processors in the interface processor slots
closest to the RSP slots, and then work out to the interface processor slots furthest from the RSP slots.
For more information on interface processor slots on your router, refer to the Cisco 7500 Series
Installation and Configuration Guide or the appropriate Quick Start Guide for the Cisco 7500 series
routers, or refer to Cisco 7000 HardwareInstallation and Maintenance manual for the Cisco 7000 series
routers.
Figure 2 shows the functional details of inserting an interface processor and using the ejector levers.
Figure 3 shows proper handling of an interface processor during installation.
Caution Remove or insert only one interface processor at a time. Allow the system to complete its discovery and
initialization of the interfaces before removing or inserting another interface processor. Disrupting the
sequence before the system has completed verification can cause the system to detect spurious hardware
failures.
Use the following procedure to install a new VIP4:
Step 1 Attach an ESD-preventive wrist strap between you and an unpainted chassis surface.
Step 2 Ensure that a console terminal is connected to the console port (on the RSP or RSP7000) and that your
console is turned on, or that you have a reliable Telnet connection to the system.
Step 3 Hold the VIP4 handle with one hand and place your other hand under the carrier to support the VIP4
and guide it into the slot. (See Figure 3.) Avoid touching the card or any connector pins.
Caution To prevent ESD damage, handle interface processors by the handles and carrier edges only.
Step 4 Place the back of the VIP4 in the slot and align the notch on the carrier with the groove in the slot. (See
Figure 2.)
Step 5 While keeping the VIP4 parallel to the backplane, carefully slide it into the slot until the back of the
faceplate makes contact with the ejector levers, and then stop. (See b in Figure 2.)
Caution Always use the ejector levers when installing or removing interface processors. An interface processor
that is partially seated in the backplane might cause the system to hang and subsequently crash, and
shoving or slamming the interface processor into the slot can damage the backplane pins and board.
Step 6 Using your thumbs, simultaneously push both ejector levers inward until the VIP4 is pushed entirely
into its slot. (See c in Figure 2.)
Step 7 Tighten both of the captive installation screws.
Caution To ensure proper EMI isolation for the router, be sure to tighten the captive installation screws on each
VIP4 immediately after you install it and before proceeding with the installation of each remaining VIP4
or other interface processor.
Fourth Generation Versatile Interface Processor (VIP4) Installation and Configuration Guide
20
OL-3673-01
Page 21

This completes the procedure for installing a VIP4 in a Cisco 7500 series or Cisco 7000 series router.
(For the procedures for installing or removing a port adapter on your VIP4, see the “Installing or
Replacing a Port Adapter on a VIP4” section on page 35.)
Performing a Basic Configuration
For complete descriptions of interface subcommands and the configuration options available for
VIP4-related interfaces, refer to the configuration note for each of the port adapters installed on your
VIP4 and to the appropriate Cisco IOS software configuration publications. (See the “Related
Documentation” section on page 2.)
Checking the VIP4 Installation
This section describes the procedures you can use to verify your VIP4 installation, and includes
information on the following topics:
• Verifying the VIP4 Installation, page 21
• Using show Commands to Verify the VIP4 Status, page 24
• Using show Commands to Display Interface Information, page 24
• Using the ping Command to Verify Network Connectivity, page 28
You can use the configure command to configure the interfaces on the port adapters installed on your
VIP4. To use the configure command, enter the privileged level of the EXEC command interpreter with
the enable command, as shown below. The system prompts you for a password if one has been set.
The system prompt for the privileged level ends with a pound sign (#) instead of an angle bracket (>).
Use the following procedure to enter the privileged level:
Checking the VIP4 Installation
Step 1 At the user-level EXEC prompt, enter the enable command. The EXEC prompts you for a
privileged-level password, as follows:
Router> enable
Password:
Step 2 Enter the password (the password is case sensitive). For security purposes, the password is not
displayed on your console.
Step 3 When you enter the correct password and press Return, the system displays the privileged-mode
system prompt (#) as follows:
Router#
Verifying the VIP4 Installation
After you install the VIP4 and connect cables (using connectionprocedures in the respectivesubsections
of the configuration notes that shipped with your port adapters), verify the installation by observing the
port adapter LED states and the information displayed on your console terminal.
OL-3673-01
Fourth Generation Versatile Interface Processor (VIP4) Installation and Configuration Guide
21
Page 22

Checking the VIP4 Installation
Note The VIP4 has no LEDs that arevisible or usable when the VIP4 isinstalled. The port adapters you install
Removal
on the VIP4 have status and interface LEDs.
When the system has reinitialized all interfaces, the enabled LED on the VIP4 port adapters and on all
interface processors should goon, depending on your connections and configuration. The console screen
also displays a message as the system discovers each interface during its reinitialization.
When you remove and replace interface processors, the system provides status messages on the console
screen. The messages are for information only. The following sample display shows the events logged
by the system as a VIP4 with a Gigabit Ethernet port adapter was removed from interface processor
slot 2; the system then reinitialized the remaining interface processors and marked as down the
Gigabit Ethernet interface on the VIP4 that was removed from slot 2. When you reinsert the VIP4, the
system automatically brings up the interfaces that were up when the VIP4 was removed. (A Gigabit
Ethernet interface is used in the following examples.)
Router#
%OIR-6-REMCARD: Card removed from slot 2, interface disabled
%LINK-5-CHANGED: Interface GigabitEthernet2/0/0, changed state to administratively down
Insertion
Router#
%OIR-6-INSCARD: Card inserted in slot 2, interface administratively shut down
%LINK-5-CHANGED: Interface GigabitEthernet2/0/0, changed state to up
Note When a new VIP4 is inserted or when a VIP4 is moved to a new slot, the system recognizes the new
interfaces but leaves them in the shutdown state until you configure them and change their state to up.
The following sample display shows the events logged by the system as you insert a new VIP4 in
interface processor slot 3. (A Gigabit Ethernet interface is used in the following example.)
Router#
%OIR-6-INSCARD: Card inserted in slot 3, interface administratively shut down
%LINK-5-CHANGED: Interface GigabitEthernet3/0/0, changed state to administratively down
Use the following procedure to verify that the VIP4 is installed correctly:
Step 1 While the system reinitializes each interface, observe the console display messages and verify that the
system discovers the VIP4 as follows:
• If you installed a new VIP4, the system should recognize all new interfaces but leave them
configured as down.
• If you replaced a VIP4, the system should recognize each interface and place it in the same state (up
or down) each was in when you removed the VIP4.
Step 2 When the reinitialization is complete, verify that the enabled LED on each port adapter goes on and
remains on. If it does, proceed to Step 5. If it does not, proceed to the next step.
Fourth Generation Versatile Interface Processor (VIP4) Installation and Configuration Guide
22
OL-3673-01
Page 23

Checking the VIP4 Installation
Step 3 If the enabled LED on a port adapter fails to go on, suspect that the VIP4 board connector is not fully
seated in the backplane. Loosen the captive installation screws, and then firmly push both ejector levers
into place until they are approximately in the same orientation as the VIP4 faceplate. Tighten the
captive installation screws. After the system reinitializes the interfaces, the enabled LED on the port
adapter should go on. If it does, proceed to Step 5. If it does not, proceed to Step 4.
Step 4 If the enabled LED still fails to go on, remove the VIP4 and try installing it in another available
interface processor slot.
• If the enabled LED goes on when the VIP4 is installed in the new interface processor slot, suspect
a failed backplane port in the original interface processor slot.
• If the enabled LED still fails to go on, but other LEDs on the VIP4 port adapters go on to indicate
activity, proceed to Step 5 to resume the installation checkout; suspect that the enabled LED on the
port adapter has failed. Contact a service representative to report the problem and obtain further
instructions.
• If no LEDs on the VIP4 port adapters go on, suspect that the VIP4 is faulty. Contact a service
representative to report the problem and obtain further instructions.
• If just the enabled LED still fails to go on, remove the VIP4 and ensure the port adapter is firmly
installed in their port adapter slots. Remove and reinstall them accordingly.
Step 5 If the VIP4 is new and not a replacement, you have to configure the new interfaces. Proceed to the
appropriate configuration section in the configuration note that shipped with your port adapter. (This
does not have to be done immediately,but new interfaces are not be available until you configure them.)
Step 6 If the VIP4 is a replacement, use the show interfaces type interface-processor-slot-
number/port-adapter-slot-number/interface-port-number command or the show controllers command
to verify the status of the interfaces. (See the following section, “Using show Commands to Verify the
VIP4 Status.”)
If you replaced a VIP4 with a newVIP4 with a greater number of interfaces (for example, if you replaced
a VIP4 with a single port adapter with a VIP4 with two port adapters), the system recognizes the
interfaces on the previously configured port adapter but does not recognize the additional port adapter
interfaces. The new interfaces remain in the shutdown state until you configure them.
Step 7 When the interfaces are up, check the activity of each interface by observing the status LEDs, which
are described in the appropriate LED section of your port adapter installation and configuration notes.
Step 8 In general, if an interface LED fails to go on and a cable is connected to the interface port, check the
cable connection and make certain it is properly seated in the connector.
If you experience other problems that you are unable to solve, contact a service representative for
assistance.
This completes the VIP4 installation. If you installed a new VIP4 or if you installed a replacement VIP4
with an additional port, you must now configure the new interface as described in the configurationnote
that shipped with the port adapter or in the appropriate Cisco IOS software configuration documentation
listed in the section “Related Documentation” on page 2. The documentation is available on Cisco.com
and the Documentation CD-ROM.
Note Port adapter configuration information is beyond the scope of this document. Please refer to the specific
port adapter installation and configuration guide for more information.
OL-3673-01
Fourth Generation Versatile Interface Processor (VIP4) Installation and Configuration Guide
23
Page 24

Checking the VIP4 Installation
Using show Commands to Verify the VIP4 Status
The following steps use show commands to verify that the new interfaces are configured and operating
correctly.
Step 1 Use the show version command to display the system hardware configuration. Ensure that the list
includes the new interfaces.
Step 2 Display all the current interface processors and their interfaces with the show controllers command.
Verify that the new VIP4 appears in the correct interface processor slot.
Step 3 Specify one of the new interfaces with the show interfaces type interface-processor-slot-
number/port-adapter-slot-number/interface-port-number command and verify that the first line of the
display specifies the interface with the correct slot number. Also verify that the interface and line
protocol are in the correct state: up or down.
Step 4 Display the protocols configured for the entire system and specific interfaces with the show protocols
command. If necessary, return to configuration mode to add or remove protocol routing on the system
or specific interfaces.
Step 5 Display the running configuration file with the show running-config command. Display the
configuration stored in the RSP NVRAM using the show startup-config command. Verify that the
configuration is accurate for the system and each interface.
If the interface is down and you configured it as up, or if the displays indicate that the hardware is not
functioning properly, ensure that the network interface is properly connected and terminated. If you still
have problems bringing the interface up, contact a service representative for assistance.
Note The outputs that appear in this document may not match the output you receive when running these
commands. The outputs in this document are examples only.
Using show Commands to Display Interface Information
To display information about a specific interface, use the show interfaces command with the interface
type and interface address in the format show interfaces type interface-processor-slot-
number/port-adapter-slot-number/interface-port-number.
With the show interfaces command, use arguments such as the interface type and the interface address
to display information about a specific interface only. The following example of the
show interfaces fastethernet command shows information specific to a VIP4 with a Fast Ethernet port
adapter (PA-2FE) installed; the VIP4 is installed in interface processor slot 1:
Router# show interfaces fastethernet 1/0/0
FastEthernet1/0/0 is up, line protocol is up
Hardware is cyBus FastEthernet Interface, address is 0000.0c4c.8820 (bia 0000.0c4c.8820)
Internet address is 192.168.36.4/28
MTU 1500 bytes, BW 100000 Kbit, DLY 100 usec, rely 255/255, load 1/255
Encapsulation ARPA, loopback not set
Keepalive set (10 sec)
Full-duplex, 100Mb/s, 100BaseTX/FX
ARP type:ARPA, ARP Timeout 04:00:00
Last input 00:00:00, output 00:00:00, output hang never
Last clearing of "show interface" counters 01:25:25
Queueing strategy:fifo
Fourth Generation Versatile Interface Processor (VIP4) Installation and Configuration Guide
24
OL-3673-01
Page 25

Checking the VIP4 Installation
Output queue 0/40, 0 drops; input queue 0/75, 0 drops
5 minute input rate 1271000 bits/sec, 251 packets/sec
5 minute output rate 470000 bits/sec, 83 packets/sec
1703680 packets input, 532380667 bytes, 0 no buffer
Received 4008 broadcasts, 0 runts, 0 giants, 0 throttles
0 input errors, 0 CRC, 0 frame, 0 overrun, 0 ignored
0 watchdog, 0 multicast
0 input packets with dribble condition detected
566766 packets output, 260633463 bytes, 0 underruns
0 output errors, 0 collisions, 0 interface resets
0 babbles, 0 late collision, 0 deferred
0 lost carrier, 0 no carrier
0 output buffer failures, 0 output buffers swapped out
To display hardware information about all of the interface processors in your router,including the VIP4,
use the show controllers cbus command.
Following is an example of the show controllers cbus command used with a Cisco 7500 series router:
Router# show controllers cbus
slot1:VIP4-80 RM7000, hw 2.01, sw 22.20, ccb 5800FF30, cmdq 48000088, vps 8192
software loaded from system
IOS (tm) VIP Software (SVIP-DW-M), Version 12.0(16.5)S, EARLY
DEPLOYMENT MAINTENANCE INTERIM SOFTWA
ROM Monitor version 103.0
FastEthernet1/0/0, addr 0000.0c4c.8820 (bia 0000.0c4c.8820)
gfreeq 48000178, lfreeq 48000208 (1536 bytes)
rxlo 4, rxhi 287, rxcurr 3, maxrxcurr 222
txq 48001A00, txacc 48001A02 (value 106), txlimit 110
FastEthernet1/1/0, addr 0000.0c4c.8828 (bia 0000.0c4c.8828)
gfreeq 48000178, lfreeq 48000210 (1536 bytes)
rxlo 4, rxhi 287, rxcurr 0, maxrxcurr 0
txq 48001A08, txacc 48001A0A (value 0), txlimit 110
FastEthernet1/1/1, addr 0000.0c4c.8829 (bia 0000.0c4c.8829)
gfreeq 48000178, lfreeq 48000218 (1536 bytes)
rxlo 4, rxhi 287, rxcurr 3, maxrxcurr 134
txq 48001A10, txacc 48001A12 (value 106), txlimit 110
OL-3673-01
To display hardware information about a specific interface on a VIP4 port adapter, append the type
argument (fastethernet, hssi, and so forth) and the interface address argument
(interface-processor-slot-number/port-adapter-slot-number/interface-port-number) to the
show controllers command.
Following is an example of the syntax for this command for the interface on a PA-2FE port adapter
installed in port adapter slot 0 of a VIP4 installed in interface processor slot 1 of a Cisco 7000 series or
Cisco 7500 series router:
Router# show controllers fastethernet 1/0/0
To display the configuration of the system hardware (the number of each interface processor type
installed), the software version, the names and sources of configuration files, and the boot images, use
the show version (or show hardware) command.
Fourth Generation Versatile Interface Processor (VIP4) Installation and Configuration Guide
25
Page 26

Checking the VIP4 Installation
Following is an example of the show version command used with a Cisco 7500 series router:
Router# show version
Cisco Internetwork Operating System Software
IOS (tm) RSP Software (RSP-JSV-M), Version 12.0(16.5)S, EARLY DEPLOYMENT
MAINTENANCE INTERIM SOFTWARE
TAC Support:http://www.cisco.com/cgi-bin/ibld/view.pl?i=support
Copyright (c) 1986-2001 by cisco Systems, Inc.
Compiled Thu 29-Mar-01 16:27 by ninahung
Image text-base:0x60010950, data-base:0x612A2000
ROM:System Bootstrap, Version 12.0(19991117:232605) [gautham-Rommon-120S
102], DEVELOPMENT SOFTWARE
BOOTFLASH:RSP Software (RSP-JSV-M), Version 12.0(16.5)S, EARLY DEPLOYMENT
MAINTENANCE INTERIM SOFTWARE
Router uptime is 2 weeks, 1 day, 19 hours, 33 minutes
System returned to ROM by reload at 20:45:17 UTC Mon Apr 2 2001
System restarted at 16:34:31 PDT Sat Apr 7 2001
System image file is "disk1:rsp-jsv-mz.120-16.5.S"
cisco RSP8 (R7000) processor with 262144K/8216K bytes of memory.
R7000 CPU at 250Mhz, Implementation 39, Rev 1.0, 256KB L2, 2048KB L3 Cache
Last reset from power-on
G.703/E1 software, Version 1.0.
G.703/JT2 software, Version 1.0.
X.25 software, Version 3.0.0.
SuperLAT software (copyright 1990 by Meridian Technology Corp).
Bridging software.
TN3270 Emulation software.
Chassis Interface.
1 EIP controller (6 Ethernet).
1 GEIP controller (1 GigabitEthernet).
1 VIP2 controller (16 Ethernet).
4 VIP2 R5K controllers (3 FastEthernet)(24 Ethernet).
2 VIP4-80 RM7000 controllers (3 FastEthernet)(1 ATM).
46 Ethernet/IEEE 802.3 interface(s)
6 FastEthernet/IEEE 802.3 interface(s)
1 GigabitEthernet/IEEE 802.3 interface(s)
1 ATM network interface(s)
2043K bytes of non-volatile configuration memory.
20480K bytes of Flash PCMCIA card at slot 0 (Sector size 128K).
40960K bytes of ATA PCMCIA card at slot 1 (Sector size 512 bytes).
16384K bytes of Flash internal SIMM (Sector size 256K).
Slave in slot 7 is running Cisco Internetwork Operating System Software
IOS (tm) RSP Software (RSP-DW-M), Version 12.0(16.5)S, EARLY DEPLOYMENT
MAINTENANCE INTERIM SOFTWARE
TAC Support:http://www.cisco.com/cgi-bin/ibld/view.pl?i=support
Copyright (c) 1986-2001 by cisco Systems, Inc.
Compiled Thu 29-Mar-01 16:30 by ninahung
Slave:Loaded from system
Slave:cisco RSP8 (R7000) processor with 262144K bytes of memory.
Configuration register is 0x2002
To determine specific hardware configuration information about a VIP4 installed in your system
(including the amount of installed CPU and packet memory), use the show diag slot command.
Fourth Generation Versatile Interface Processor (VIP4) Installation and Configuration Guide
26
OL-3673-01
Page 27

Checking the VIP4 Installation
Specific information is displayed, as shown in the following example of a VIP4-80 with a PA-2FE port
adapter; the VIP4 is installed in interface processor slot 1:
Router# show diag 1
Slot 1:
Physical slot 1, ~physical slot 0xE, logical slot 1, CBus 0
Microcode Status 0x4
Master Enable, LED, WCS Loaded
Board is analyzed
Pending I/O Status:None
EEPROM format version 1
VIP4-80 RM7000 controller, HW rev 2.01, board revision A0
Serial number:14773010 Part number:73-3143-02
Test history:0x00 RMA number:00-00-00
Flags:cisco 7000 board; 7500 compatible
EEPROM contents (hex):
0x20:01 22 02 01 00 E1 6B 12 49 0C 47 02 00 00 00 00
0x30:50 06 00 00 00 00 00 00 00 00 00 00 00 00 00 00
Slot database information:
Flags:0x4 Insertion time:0x5168 (2w1d ago)
Controller Memory Size:64 MBytes CPU SDRAM, 64 MBytes Packet
SDRAM
PA Bay 0 Information:
Fast-Ethernet PA, 1 ports, 100BaseTX-ISL
EEPROM format version 1
HW rev 1.00, Board revision A0
Serial number:03536381 Part number:73-1688-03
PA Bay 1 Information:
Dual Port Fast Ethernet (RJ45), 2 ports
EEPROM format version 4
HW rev 1.00, Board revision 04
Serial number:MIC043929WV Part number:73-5419-03
--Boot log begin--
Cisco Internetwork Operating System Software
IOS (tm) VIP Software (SVIP-DW-M), Version 12.0(16.5)S, EARLY DEPLOYMENT
MAINTENANCE INTERIM SOFTWARE
TAC Support:http://www.cisco.com/cgi-bin/ibld/view.pl?i=support
Copyright (c) 1986-2001 by cisco Systems, Inc.
Compiled Thu 29-Mar-01 16:33 by ninahung
Image text-base:0x60010938, data-base:0x60340000
--Boot log end--
Note In the preceding command output, the line that begins with Controller Memory Size shows the amount
of memory installed on the VIP4. If you plan a memory upgrade, make a note of these indicated memory
values, then compare them after you upgrade memory to verify the upgrade.
OL-3673-01
Fourth Generation Versatile Interface Processor (VIP4) Installation and Configuration Guide
27
Page 28

VIP4 Maintenance Procedures
Using the ping Command to Verify Network Connectivity
This section provides brief descriptions of the ping command. The ping command allows you to verify
that an interfaceport is functioningproperly and to check the path between a specificport and connected
devices at various locations on the network. After you verify that the system and VIP4 have booted
successfully and are operational, you can use this command to verify the status of the VIP4 interface
ports. Refer to the publications listed in the “Related Documentation” section on page 2 for detailed
command descriptions and examples.
The ping command sends an echo request out to a remote device at an IP address that you specify.After
sending a series of signals, the command waitsa specified time for the remote deviceto echo the signals.
Each returned signal is displayed as an exclamation point (!) on the console terminal; each signal that is
not returned before the specified timeout is displayed as a period (.). A series of exclamation points
(!!!!!) indicates a good connection; a series of periods (.....) or the messages [timed out] or [failed]
indicate that the connection failed.
Following is an example of a successful ping command to a remote server with the IP address 10.1.1.60:
Router# ping 10.1.1.60 <Return>
Type escape sequence to abort.
Sending 5, 100-byte ICMP Echoes to 10.1.1.60, timeout is 2 seconds:
!!!!!
Success rate is 100 percent (5/5), round-trip min/avg/max = 1/15/64 ms
Router#
If the connection fails, verify that you have the correct IP address for the server and that the server is
active (powered on), and repeat the ping command.
For complete descriptions of interface subcommands and the configuration options available for
VIP4-related interfaces, and which commands supportVIP4 functionality,refertothe publications listed
in the “Related Documentation” section on page 2.
VIP4 Maintenance Procedures
The following sections discuss maintenance proceduresyou might need for yourVIP4 and port adapters:
• Upgrading VIP4 Microcode, page 28
• Upgrading VIP4 Memory, page 31
• Checking the VIP4 Memory Upgrade, page 35
• Installing or Replacing a Port Adapter on a VIP4, page 35
Upgrading VIP4 Microcode
The Cisco 7000 series and Cisco 7500 series routers support downloadable microcode, which enables
you to upgrade microcode versions over the network. You can download new microcode versions and
store multiple versions in Flash memory, and you can then boot from them just as you can with the
system software images. System software upgrades might also contain upgraded microcode images,
which will load automatically when the new software image is loaded (unless the configuration states
otherwise).
Fourth Generation Versatile Interface Processor (VIP4) Installation and Configuration Guide
28
OL-3673-01
Page 29

VIP4 Maintenance Procedures
Note Software and interface processor microcode images are carefully optimized and bundled to work
together. Overriding the Cisco IOS software bundle can result in system incompatibilities. We
recommend that you use the microcode included in the Cisco IOS software bundle.
You can download microcode to Flash memory by copying the TFTP image of a microcode version to
Flash memory. When the microcode image is stored in Flash memory, you have to configure the router
to use that image using the microcode vip4 flash command; then you can use the microcode reload
command to manually load the new microcode file. Finally, you use the configure command to instruct
the system to load the new image automatically at each system boot.
Note The appropriate microcode image runs from DRAM (or SDRAM) on the VIP4.
To compare the size of the microcode image and the amount of Flash memory available, you must know
the size of the new microcode image. The image size is specified in the README file that is included
with the new image.
Note Note the size of the new image before proceeding to ensure that you have sufficient available Flash
memory for the new image.
Caution Before you copy a file to system Flash memory, be sure there is ample space available in Flash memory.
Compare the size of the file you want to copy to the amount of available Flash memory shown. If the
space available is less than the space required by the file you want to copy, the copy process will
continue, but the entire file will not be copied into Flash memory.
Use the following procedure to download (copy) a microcode version from a TFTP server to Flash
memory:
Step 1 To display the total amount of Flash memory present, its location, any files that currently exist in Flash
memory and their size, and the amount of Flash memory remaining, use the show flash command.
Following is an example of the output that is displayed:
Router# show flash
-#- ED --type-- --crc--- -seek-- nlen -length- -----date/time------ name
1 .. image 0A423F1B E01200 22 14553472 Apr 18 2001 19:19:16 rsp-jsv-mz_n
6024704 bytes available (14553600 bytes used)
Step 2 Compare the amount of available Flash memory (last line in the preceding example) to the size of the
new microcode image on the floppydisk. If you attempt to copy in a new image, and the size of the new
image exceeds the available space in Flash memory, only part of the new image will be copied, and the
following error message will be displayed:
buffer overflow - xxxx/xxxx
In this error message, xxxx/xxxx is the number of bytes read in/number of bytes available.
OL-3673-01
Fourth Generation Versatile Interface Processor (VIP4) Installation and Configuration Guide
29
Page 30

VIP4 Maintenance Procedures
Step 3 After you verify that there is sufficient space available in Flash memory for the new image, use the
command copy tftp:filename [ flash | slot0 | slot1 ]:filename to copy an image to Flash memory. (The
file source is tftp:filename, and [ flash | slot0 | slot1 ]:filename is the destination in onboard Flash
memory or on either of the Flash memory cards.)
An example of the copy tftp:filename command follows:
Router# copy tftp:vip11-1 slot0:vip11-1
20575008 bytes available on device slot0, proceed? [confirm]
Address or name of remote host [1.1.1.1]?
Loading new.image from 1.1.1.1 (via Ethernet1/0): !!!!!!!!!!!!!!!!!!!!!!!!!!!!!!
!!!!!!!!!!!!!!!!!!!!!!!!!!!!!!!!!!!!!!!!!!!!!!!!!!!!!!!!!!!!!!!!!!!!!!!!!!!!!!!!
!!!!!!!!!!!!!!!!!!!!!!!!!!!!!!!!!!!!!!!!!!!!!!!!!!!!!!!!!!!!!!!!!!!!!!!!!!!!!!!!
!!!!!!!!!!!!!!!!!!!!!!!!!!!!!!!!!!!!!!!!!!!!!!!!!!!!!!!!!!!!!!!!!!!!!!!!!!!!!!!!
!!!!!!!!!!!!!!!!!!!!!!!!!!!!!!!!!!!!!!!!!!!!!!!!!!!!!!!!!!!!!!!!!!!!!!!!!!!!!!!!
!!!!!!!!!!!!!!!!!!!!!!!!!!!!!!!!!!!!!!!!!!!!!!![OK - 7799951/15599616 bytes]
CCCCCCCCCCCCCCCCCCCCCCCCCCCCCCCCCCCCCCCCCCCCCCCCCCCCCCCCCCCCCCCCCCCCCCCCCCCCCCCC
CCCCCCCCCCCCCCCCCCCCCCCCCCCCCCCCCCCCCCCCCCCCCCCCCCCCCCCCCCCCCCCCCCCCCCCCCCCCCCCC
CCCCCCCCCCCCCCCCCCCCCCCCCCCCCCCCCCCCCCCCCCCCCCCCCCCCCCCCCCCCCCCCCCCCCCCCCC
Router#
Step 4 Use the show flash command to verify that the microcode has been copied to Flash memory. The
output should display the filename of the image you copied to Flash memory (vip11-1 in the following
example):
Router# show flash
-#- ED --type-- --crc--- -seek-- nlen -length- -----date/time------ name
1 .. FFFFFFFF B4A18E0B 3F6494 30 4023316 Jun 26 1994 19:44:29 image/file/1
2 .. FFFFFFFF 8075AA5D 4118B4 23 111518 Jun 29 1994 11:05:57 image/file/2
3 .. FFFFFFFF EEA1FEEB 8436E8 22 600516 Oct 10 1995 19:35:25 vip11-1
7646052 bytes available (16179788 bytes used)
Step 5 To ensure that the new microcode is used when you reboot the system, add the appropriate commands
to the configuration file. To modify the configuration file, enter the configure terminal command, as
follows:
Router# configure terminal
Enter configuration commands, one per line. End with CNTL/Z.
Router(config)#
Step 6 Specify that you are changing the microcode for the VIP4 (microcode vip4), and that it will load from
Flash memory (flash slot0 or slot1). Then add the filename of the new microcode image to be loaded
from Flash memory:
Router(config)# microcode vip4 flash slot0:vip11-1
Step 7 To exit configuration mode, press Ctrl-Z.
Step 8 Copy the new configuration to nonvolatile random-access memory (NVRAM):
Router# copy running-config startup-config
The microcode reload command is automatically added to your running configuration. The new VIP4
microcode image will load automatically the next time the system boots or reinitializes.
Step 9 To load the new microcode immediately, you can issue the microcode reload configuration command
(you must be in configuration mode to enter this command):
Router# configure terminal
Enter configuration commands, one per line. End with CNTL/Z.
Router(config)# microcode reload
Fourth Generation Versatile Interface Processor (VIP4) Installation and Configuration Guide
30
OL-3673-01
Page 31

Immediately after you enter the microcode reload command and press Return, the system reloads all
microcode. Configuration mode remains enabled; after the reload is complete, press Ctrl-Z to exit
configuration mode and return to the system prompt.
Step 10 To verify that the VIP4 is using the correct microcode, issue the show startup-config or show
controllers cbus command, which indicates the currently loaded and running microcode version for
each interface processor.
Router# show controllers cbus
This completes the procedure for downloading microcode to Flash memory.
Upgrading VIP4 Memory
This section provides the guidelines and procedures for upgrading CPU memory (also called program
memory).
To upgrade CPU memory on your VIP4, you must replace the SDRAM DIMM located in socket U1. Be
sure that you locate the correct socket, because you should not upgrade the SDRAM DIMM for packet
memory that is located in socket U5. See Figure 4. The default memory configurations for the VIP4 are
64 MB of CPU memory and 64 MB of packet memory.
VIP4 Maintenance Procedures
Note You can upgrade CPU memory to 256 MB but you should not upgrade the packet memory from the
standard 64 MB.
Note In the output display of the show diag command (see page 26), the line that begins with Controller
Memory Size shows the amount of memory installed on the VIP4. Make a note of these memory values,
then compare them after you upgrade memory to verify the upgrade.
The following Cisco Systems memory spare and upgrade kits are compatible with the VIP4:
Table 8 Memory Spare and Upgrade Kit
Product Description
MEM-VIP4-64M-SD= Memory spare option for VIP4 CPU memory or packet memory
MEM-VIP4-128M-SD= Upgrades VIP4 CPU memory from 64 to 128 MB, with one
128-MB SDRAM DIMM (This 128-MB memory option is for CPU
memory only.)
MEM-VIP4-256M-SD= Upgrades VIP4 CPU memory from 64 to 256 MB, or from 128 MB
to 256 MB, with one 256-MB SDRAM DIMM (This 256-MB
memory option is for CPU memory only.)
Depending on your system configuration, a memory upgrade might be required. Also, if a system
problem is determined to be caused by a DIMM, a DIMM replacement might be required.
Figure 4 shows the locations of the CPU memory and packet memory SDRAM DIMMs on the VIP4.
OL-3673-01
Fourth Generation Versatile Interface Processor (VIP4) Installation and Configuration Guide
31
Page 32

VIP4 Maintenance Procedures
Figure 4 Location of CPU Memory and Packet Memory DIMMs on the VIP4
Bus connector
Packet
memory
DIMM U5
Port adapter
in slot 0
Caution Toprevent ESD damage, handle DIMMs by the card edges only. Place removed DIMMs on an antistatic
CPU
CPU memory
DIMM U1
Port adapter
in slot 1
26561
mat and store them in an antistatic bag.
Note Use only SDRAM DIMMs from Cisco Systems. A Cisco manufacturing part number appears on each
SDRAM DIMM.
Removing SDRAM DIMMs
Use the following procedure to remove the existing DIMMs:
Step 1 Turn off the system power and remove the VIP4 from the system. (Follow the steps in the “Removing a
VIP4” section on page 18.)
Step 2 Place the VIP4 on an antistatic mat or pad and ensure that you are wearing an antistatic device, such as
a wrist strap.
Position the VIP4 so that the handles are away from you and the bus connectors are toward
you—opposite of the position shown in Figure 4.
Step 3 Locate the DIMM and position the VIP4 so that you are facing the DIMM module you want to remove.
Step 4 Open the DIMM socket tabs on the DIMM to release the DIMM from the socket. (See Figure 5.) The
DIMM is under tension in the socket; therefore, the DIMM might be released from the socket with
some force.
Fourth Generation Versatile Interface Processor (VIP4) Installation and Configuration Guide
32
OL-3673-01
Page 33

Figure 5 Opening the DIMM Socket Tabs
Pull the tabs away with
your thumbs, bracing your
forefingers against the
DIMM socket sides
VIP4 Maintenance Procedures
SDRAM DIMM
Step 5 With the DIMM socket tabs open, grasp the ends of the DIMM between your thumbs and forefingers
and pull the DIMM completely out of the socket. (See Figure 6.)
Figure 6 Removing the DIMM
Polarization notch Metal fingers
13341
Note Handle the edges of the DIMM only; avoid touching the memory module, pins, or traces (the metal
fingers along the connector edge of the DIMM). (See Figure 7.)
Figure 7 Handling the DIMM
13339
OL-3673-01
SDRAM DIMM
13340
Fourth Generation Versatile Interface Processor (VIP4) Installation and Configuration Guide
33
Page 34

VIP4 Maintenance Procedures
Caution To prevent ESD damage when working with DIMMs: handle the DIMM by the card edges only, place a
removed DIMM on an antistatic mat, and store it in an antistatic container.
Step 6 Place the DIMM in an antistatic container to protect it from ESD damage.
This completes the DIMM removal procedure.
Installing SDRAM DIMMs
Caution The DIMM is a sensitive component that is susceptible to ESD damage. Handle the DIMM by the edges
only; avoid touching the memory modules, pins, or traces (the metal fingers along the connector edge of
the DIMM). To prevent ESD damage, handle the DIMM as shown in Figure 7.
Withthe VIP4 in the same orientation as the previousprocedure (with the handle awayfrom you and the
bus connector toward you), use the following procedure to install the new DIMM in the DIMM socket:
Step 1 Remove the new DIMM from its antistatic container.
Step 2 Hold the DIMM between your thumbs and forefingers. (See Figure 7.)
Note The 64-MB DIMM should be facing component-side down.
Step 3 Insert the connector edge of the DIMM straight into the socket.
Caution When inserting the DIMM, use firm but not excessive pressure. If you damage a socket, you will have
to return the VIP4 to the factory for repair.
Step 4 Gently push the DIMM into the socket until the socket tabs close over the ends of the DIMM. (See
Figure 8.) If necessary, rock the DIMM gently back and forth to seat it properly.
Figure 8 Inserting the DIMM
13418
Step 5 When the DIMM is installed, check to see it is seated properly. If the DIMM appears misaligned,
carefully remove it and reseat it in the socket. Push the DIMM firmly back into the socket until first one
and then the other socket tab moves into place.
Fourth Generation Versatile Interface Processor (VIP4) Installation and Configuration Guide
34
OL-3673-01
Page 35

Step 6 If you have a network processing engine with more than one DIMM socket and are replacing the
second DIMM also, repeat steps Step 1 through Step 5 above.
This completes the DIMM replacement procedure. Reinstall the VIP4 in the system. (Follow the steps
in the “Installing a VIP4” section on page 19.) See the following section, “Checking the VIP4 Memory
Upgrade,” as required.
Checking the VIP4 Memory Upgrade
After you upgrade the VIP4 memory, verify the memory upgrade:
• Observe the LED states and the console display.When the system has reinitialized all interfaces, the
enabled LEDs on the VIP4 port adapters should go on. (Port adapter status LEDs might be on,
depending on your connections.) Theconsole screen also displays amessageas the system discovers
each interface during its reinitialization.
• Use the show diag command to verify that the system recognizes the new memory; check the line
of the show diag command output that begins with Controller Memory Size.
If, after you have replaced memory devices, the system fails to boot properly, if the console terminal
displays a checksum or memory error,or ifthe show diag command output indicatesan incorrect amount
of memory (or no memory), check the following:
• Ensure that all memory devices are installed correctly. If necessary, shut down the system and
removethe VIP4. Check the memory devicesbylooking straight down on them andthen at eye level.
The devices should be aligned at the same angle and the same height when properly installed. If a
memory device appears to stick out or rest in the socket at a different angle from the others, remove
the device and reinsert it; then replace theVIP4 and reboot the system for anotherinstallation check.
• Each DIMM socket must contain aDIMM of the correct sizeand speed or the systemcannot operate.
To ensure this, use only memory devices that are included with Cisco Systems memory kits.
• See the “Checking the VIP4 Installation” section on page 21.
If after several attempts the system fails to restart properly, contact a service representative for
assistance. Before you call, make note of any error messages, unusual LED states, or any other
indications that might help solve the problem.
This completes the VIP4 memory upgrade.
VIP4 Maintenance Procedures
Installing or Replacing a Port Adapter on a VIP4
Depending on the circumstances, youmight need to install a newsingle-widthor dual-width port adapter
on a VIP4 motherboard or replace a failed port adapter in the field. In either case, you need a number 1
Phillips screwdriver, an antistatic mat onto which you can place the removed VIP4, and an antistatic
container into which you can place a failed port adapter for shipment back to the factory. Always handle
the port adapter by the carrier edges and handle; never touch the port adapter components or connector
pins. (See Figure 9.)
OL-3673-01
Fourth Generation Versatile Interface Processor (VIP4) Installation and Configuration Guide
35
Page 36

VIP4 Maintenance Procedures
Figure 9 Handling a Port Adapter
Caution To prevent system problems, do not remove port adapters from the VIP4 motherboard or attempt to
install other port adapters on the VIP4 motherboard while the system is operating. To install or replace
port adapters, first remove the VIP4.
Metal carrier
Printed circuit board
H6420
Caution Toprevent interface reconfiguration requirements, you should replace a port adapter with the same type
of port adapter you removed, but this is not a requirement.
Warning
When performing the followingprocedures, wear a groundingwrist strap to avoidESD damage to the
card. Some platforms have an ESD connector for attaching the wrist strap. Do not directly touch the
backplane with your hand or any metal tool, or you could shock yourself.
To replace a port adapter, use the procedure that is appropriate to your port adapter type:
• Single-Width Port Adapter, page 36—For replacing a single-width port adapter on your VIP4
• Dual-Width Port Adapter, page 37—For replacing a dual-width port adapter on your VIP4
Single-Width Port Adapter
Single-width port adapters occupy one of the two port adapter slots on a VIP4. When a single-width port
adapter slot is not in use, a blank port adapter must fill the empty slot to allow the router to conform to
electromagnetic interference (EMI) emissions requirements and to allow proper airflow through the
router. If you plan to install a new single-width port adapter in a port adapter slot that is not in use, you
must first remove the blank port adapter.
Figure 10 describes the steps required to install a single-width port adapter.
Fourth Generation Versatile Interface Processor (VIP4) Installation and Configuration Guide
36
OL-3673-01
Page 37

Figure 10 Removing and Installing a Single-Width Port Adapter
Note: You must first remove the
VIP from the chassis before
removing a port adapter from the
VIP4.
A
Step 1
To remove the port adapter,
remove
the screw that secures the port
adapter (or blank port adapter).
(See A.)
Screw
Step 2
With the screw removed, grasp
the handle on the front of the port
adapter (or blank port adapter)
and carefully pull it out of its slot,
away from the edge connector at
the rear of the slot. (See A.)
B
Step 3
To insert the port adapter,
carefully align the port adapter
carrier between the upper and
the lower edges of the port
Carrier
adapter slot. (See B.)
Step 4
Install the screw in the rear of the
port adapter slot. Do not overtighten
the screw. (See A.)
DC FAIL
AC POWER
NORMAL
Step 5
SLOT 1
SLOT 0
MASTER
SLAVE
SLAVE/MASTER
AUX.
CONSOLE
EJECT
CPU HALT
RESET
ROUTE SWITCH PROCESSOR 2
7
6
PA-MC-8TE1-SS7
5
4
3
2
1
0
EN
AL
ENABLE
Carefully slide the new port adapter
into the port adapter slot until the
connector on the port adapter is
completely seated in the connector
at the rear of the port adapter slot.
(See B.)
Step 6
Reinstall the VIP motherboard in the
chassis, and tighten the captive
installation screw on each end of the
I
O
DC FAIL
AC POWER
I
O
VIP faceplate. (See C.)
VIP4 Maintenance Procedures
Upper edge
Lower edge
C
Captive
installation
screw
29327
Dual-Width Port Adapter
Dual-width port adapters occupy both port adapter slots on a VIP4. Before you can install a dual-width
port adapter, you must first remove the slot divider that is located between the two port adapter slots.
(See Figure 11.) Refer to Table 5 for a list of dual-width port adapters.
OL-3673-01
Fourth Generation Versatile Interface Processor (VIP4) Installation and Configuration Guide
37
Page 38

VIP4 Maintenance Procedures
Figure 11 Location of VIP4 Slot Divider and Screws
Use the following procedure to remove the slot divider from a VIP4:
27871
Screw holes for septum
Step 1 Attach an ESD-preventive wrist strap between you and an unpainted chassis surface.
Step 2 Remove the VIP4 from the router. (See the “Removing a VIP4” section on page 18.)
Step 3 Place the removed VIP4 on an antistatic mat or foam pad.
Step 4 Remove any installed port adapters or blank port adapters from the port adapter slots on the VIP4. To
do this, use a number 1 Phillips screwdriver to remove the screw located at the rear of each port adapter
slot.
• To locate this screw on single-width port adapters, see the first panel of Figure 10.
• To locate this screw on dual-width port adapters, see the first panel of Figure 12.
Step 5 Use a number 1 Phillips screwdriver to remove the four slot divider screws that secure the slot divider
to the VIP4 motherboard. (See Figure 11.)
Step 6 Remove the slot divider and store it (and the screws) in a location where you can retrieve it for use later.
Note If you needto reinstall the port adapter slot divider,place the slot dividerin position on the VIP4
and secure it with the four Phillips screws.
With the slot divider removed, see Figure 12, which describes the steps required to install or remove a
dual-width port adapter.
Fourth Generation Versatile Interface Processor (VIP4) Installation and Configuration Guide
38
OL-3673-01
Page 39

Figure 12 Removing and Installing a Dual-Width Port Adapter
e
Note: You must first remove the VIP
from the chassis before removing the
dual-width port adapter from the VIP.
Step 1
To remove the port adapter, remove
the screws that secure the port
adapter to the VIP.
Step 2
With the screws removed, grasp the
handles on the front of the port
adapter and carefully pull it out of its
slot, away from the edge connector
at the rear of the slot. (See A.)
A
Step 3
To insert the port adapter, carefully
align the port adapter carrier between
the upper and the lower edges of the
port adapter slot on the VIP. (See B.)
Carefully slide the port adapter into
the port adapter slot until the
connectors at the rear of the port
B
adapter are completely seated in
the connectors at the rear of the
port adapter slot.
VIP4 Maintenance Procedures
Step 4
Install the screws in the rear of the
port adapter slot. Do not overtighten
the screws.
Step 5
Carefully slide the VIP into the
interface processor slot until the
connectors at the rear of the VIP are
completely seated in the connectors
at the rear of the interface processor
slot. Use the ejector levers to seat the
VIP in the interface processor slot.
Tighten the captive installation screws
on the VIP. (See C.)
Captive
installation
screw
C
Carrier
Upper edg
Lower edge
EJECT
SLOT 1
NORMAL
SLOT 0
CPU HALT
RESET
AUX.
ROUTE SWITCH PROCESSOR
CONSOLE
27869
OL-3673-01
Fourth Generation Versatile Interface Processor (VIP4) Installation and Configuration Guide
39
Page 40

VIP4 Troubleshooting
VIP4 Troubleshooting
To troubleshoot the VIP4, refer to Troubleshooting VIP Crashes online at
http://www.cisco.com/warp/customer/63/vip_crash.html which requires user registration to access. To
become a registered user, refer to http://www.cisco.com/register/.
Listed below are common sense guidelines to troubleshoot the router, the VIP4 and its memory
components, and the port adapter installation:
• Verify that the router is plugged in.
• Visuallyinspect the routers, the port adapters, and the VIP4 and its components to confirm that they
appear to be in working order. Check to see that the LEDs are lighting up.
• Remove and reinstall the VIP4 to reseat it. See instructions in the “Removing a VIP4” section on
page 18.
• If you replaced the SDRAM DIMMs, remove and reinstall them, to reseat them. See the “Upgrading
VIP4 Memory” section on page 31.
• Remove and reinstall the port adapters. See the “Installing or Replacing a Port Adapter on a VIP4”
section on page 35.
Obtaining Documentation
The following sections provide sources for obtaining documentation from Cisco Systems.
World Wide Web
You can access the most current Cisco documentation on the World Wide Web at the following sites:
• http://www.cisco.com
• http://www-china.cisco.com
• http://www-europe.cisco.com
Documentation CD-ROM
Cisco documentation and additional literature are available in a CD-ROM package, which ships
with your product. The Documentation CD-ROM is updated monthly and may be more current than
printed documentation. The CD-ROM package is available as a single unit or as an annual subscription.
Ordering Documentation
Cisco documentation is available in the following ways:
• Registered Cisco Direct Customers can order Cisco Product documentation from the Networking
Products MarketPlace:
http://www.cisco.com/cgi-bin/order/order_root.pl
Fourth Generation Versatile Interface Processor (VIP4) Installation and Configuration Guide
40
OL-3673-01
Page 41

• Registered Cisco.com users can order the DocumentationCD-ROMthrough the online Subscription
Store:
http://www.cisco.com/go/subscription
• Nonregistered Cisco.com users can order documentation through a local account representative by
calling Cisco corporate headquarters (California, USA) at 408 526-7208 or, in North America, by
calling 800 553-NETS (6387).
Documentation Feedback
If you are reading Cisco product documentation on the World Wide Web, you can submit technical
comments electronically. Click Feedback in the toolbar and select Documentation. After you complete
the form, click Submit to send it to Cisco.
You can e-mail your comments to bug-doc@cisco.com.
To submit your comments by mail, for your convenience many documents contain a response card
behind the front cover. Otherwise, you can mail your comments to the following address:
Cisco Systems, Inc.
Document Resource Connection
170 West Tasman Drive
San Jose, CA 95134-9883
We appreciate your comments.
Obtaining Technical Assistance
Obtaining Technical Assistance
Cisco provides Cisco.com as a starting point for all technical assistance. Customers and partners can
obtain documentation, troubleshooting tips, and sample configurations from online tools. For Cisco.com
registered users, additional troubleshooting tools are available from the TAC website.
Cisco.com
Cisco.com is the foundation of a suite of interactive, networked services that provides immediate, open
access to Cisco information and resources at anytime, from anywhere in the world. This highly
integrated Internet application is a powerful, easy-to-use tool for doing business with Cisco.
Cisco.com provides a broad range of features and services to help customers and partners streamline
business processes and improve productivity.Through Cisco.com, you can find information about Cisco
and our networking solutions, services, and programs. In addition, you can resolve technical issues with
online technical support, download and test software packages, and order Cisco learning materials and
merchandise. Valuable online skill assessment, training, and certification programs are also available.
Customers and partners can self-registeron Cisco.com to obtain additionalpersonalized information and
services. Registered users can order products, check on the status of an order, access technical support,
and view benefits specific to their relationships with Cisco.
To access Cisco.com, go to the following website:
http://www.cisco.com
OL-3673-01
Fourth Generation Versatile Interface Processor (VIP4) Installation and Configuration Guide
41
Page 42

Obtaining Technical Assistance
Technical Assistance Center
The Cisco TAC website is availableto all customers who need technical assistance with a Cisco product
or technology that is under warranty or covered by a maintenance contract.
Contacting TAC by Using the Cisco TAC Website
If you have a priority level 3 (P3) or priority level 4 (P4) problem, contact TAC by going to the TAC
website:
http://www.cisco.com/tac
P3 and P4 level problems are defined as follows:
• P3—Your network performanceis degraded. Network functionality isnoticeably impaired, but most
business operations continue.
• P4—You need information or assistance on Cisco product capabilities, product installation, or basic
product configuration.
In each of the above cases, use the Cisco TAC website to quickly find answers to your questions.
To register for Cisco.com, go to the following website:
http://www.cisco.com/register/
If you cannot resolveyour technical issue by using the TAC online resources, Cisco.com registered users
can open a case online by using the TAC Case Open tool at the following website:
http://www.cisco.com/tac/caseopen
Contacting TAC by Telephone
If you have a priority level 1 (P1) or priority level 2 (P2) problem, contact TAC by telephone and
immediately open a case. To obtain a directory of toll-free numbers for your country,go to the following
website:
http://www.cisco.com/warp/public/687/Directory/DirTAC.shtml
P1 and P2 level problems are defined as follows:
• P1—Your production network is down, causing a critical impact to business operations if service is
not restored quickly. No workaround is available.
• P2—Your production network is severely degraded, affecting significant aspects of your business
operations. No workaround is available.
Fourth Generation Versatile Interface Processor (VIP4) Installation and Configuration Guide
42
OL-3673-01
Page 43

Obtaining Technical Assistance
This document is to be used in conjunction with the documents listed in the “Related Documentation” section on page 2 section.
CCSP, CCVP, the Cisco Square Bridge logo, Follow Me Browsing, and StackWise are trademarks of Cisco Systems, Inc.; Changing the Way We Work,
Live, Play, and Learn, and iQuick Study are service marks of Cisco Systems, Inc.; and Access Registrar, Aironet, BPX, Catalyst, CCDA, CCDP,
CCIE, CCIP, CCNA, CCNP, Cisco, the Cisco Certified Internetwork Expert logo, Cisco IOS, Cisco Press, Cisco Systems, Cisco Systems Capital,
the Cisco Systems logo, Cisco Unity, Enterprise/Solver, EtherChannel, EtherFast, EtherSwitch, Fast Step, FormShare, GigaDrive, GigaStack, HomeLink,
Internet Quotient, IOS, IP/TV, iQ Expertise, the iQ logo, iQ Net Readiness Scorecard, LightStream, Linksys, MeetingPlace, MGX, the Networkers logo,
Networking Academy, Network Registrar, Packet, PIX, Post-Routing, Pre-Routing, ProConnect, RateMUX, ScriptShare, SlideCast, SMARTnet,
The Fastest Way to Increase Your Internet Quotient, and TransPath are registered trademarks of Cisco Systems, Inc. and/or its affiliates in the
United States and certain other countries.
All other trademarks mentioned in this document or Website are the property of their respective owners. The use of the word partner does not imply a
partnership relationship between Cisco and any other company. (0601R)
Copyright © 2002, Cisco Systems, Inc.
All rights reserved.
OL-3673-01
Fourth Generation Versatile Interface Processor (VIP4) Installation and Configuration Guide
43
Page 44

Obtaining Technical Assistance
Fourth Generation Versatile Interface Processor (VIP4) Installation and Configuration Guide
44
OL-3673-01
 Loading...