

Page 1

Cisco Firepower 4100/9300 FXOS Command Reference
First Published: 2017-08-28
Last Modified: 2019-01-15
Americas Headquarters
Cisco Systems, Inc.
170 West Tasman Drive
San Jose, CA 95134-1706
USA
http://www.cisco.com
Tel: 408 526-4000
800 553-NETS (6387)
Fax: 408 527-0883
Page 2

THE SPECIFICATIONS AND INFORMATION REGARDING THE PRODUCTS IN THIS MANUAL ARE SUBJECT TO CHANGE WITHOUT NOTICE. ALL STATEMENTS,
INFORMATION, AND RECOMMENDATIONS IN THIS MANUAL ARE BELIEVED TO BE ACCURATE BUT ARE PRESENTED WITHOUT WARRANTY OF ANY KIND,
EXPRESS OR IMPLIED. USERS MUST TAKE FULL RESPONSIBILITY FOR THEIR APPLICATION OF ANY PRODUCTS.
THE SOFTWARE LICENSE AND LIMITED WARRANTY FOR THE ACCOMPANYING PRODUCT ARE SET FORTH IN THE INFORMATION PACKET THAT SHIPPED WITH
THE PRODUCT AND ARE INCORPORATED HEREIN BY THIS REFERENCE. IF YOU ARE UNABLE TO LOCATE THE SOFTWARE LICENSE OR LIMITED WARRANTY,
CONTACT YOUR CISCO REPRESENTATIVE FOR A COPY.
The Cisco implementation of TCP header compression is an adaptation of a program developed by the University of California, Berkeley (UCB) as part of UCB's public domain version of
the UNIX operating system. All rights reserved. Copyright©1981, Regents of the University of California.
NOTWITHSTANDING ANY OTHER WARRANTY HEREIN, ALL DOCUMENT FILES AND SOFTWARE OF THESE SUPPLIERS ARE PROVIDED “AS IS" WITH ALL FAULTS.
CISCO AND THE ABOVE-NAMED SUPPLIERS DISCLAIM ALL WARRANTIES, EXPRESSED OR IMPLIED, INCLUDING, WITHOUT LIMITATION, THOSE OF
MERCHANTABILITY, FITNESS FOR A PARTICULAR PURPOSE AND NONINFRINGEMENT OR ARISING FROM A COURSE OF DEALING, USAGE, OR TRADE PRACTICE.
IN NO EVENT SHALL CISCO OR ITS SUPPLIERS BE LIABLE FOR ANY INDIRECT, SPECIAL, CONSEQUENTIAL, OR INCIDENTAL DAMAGES, INCLUDING, WITHOUT
LIMITATION, LOST PROFITS OR LOSS OR DAMAGE TO DATA ARISING OUT OF THE USE OR INABILITY TO USE THIS MANUAL, EVEN IF CISCO OR ITS SUPPLIERS
HAVE BEEN ADVISED OF THE POSSIBILITY OF SUCH DAMAGES.
Any Internet Protocol (IP) addresses and phone numbers used in this document are not intended to be actual addresses and phone numbers. Any examples, command display output, network
topology diagrams, and other figures included in the document are shown for illustrative purposes only. Any use of actual IP addresses or phone numbers in illustrative content is unintentional
and coincidental.
All printed copies and duplicate soft copies of this document are considered uncontrolled. See the current online version for the latest version.
Cisco has more than 200 offices worldwide. Addresses and phone numbers are listed on the Cisco website at www.cisco.com/go/offices.
Cisco and the Cisco logo are trademarks or registered trademarks of Cisco and/or its affiliates in the U.S. and other countries. To view a list of Cisco trademarks, go to this URL: www.cisco.com
go trademarks. Third-party trademarks mentioned are the property of their respective owners. The use of the word partner does not imply a partnership relationship between Cisco and any
other company. (1721R)
©
2017–2019 Cisco Systems, Inc. All rights reserved.
Page 3

About the FXOS CLI Command Reference Guide
This guide represents an on-going effort to document the many CLI commands in FXOS, and as such, should
be viewed as a work-in-progress. The guide will be republished periodically as new command descriptions
are added and existing descriptions updated or corrected.
Cisco Firepower 4100/9300 FXOS Command Reference
1
Page 4

About the FXOS CLI Command Reference Guide
Cisco Firepower 4100/9300 FXOS Command Reference
2
Page 5

CLI Overview
• Managed Objects, on page 4
• Command Modes, on page 5
• Object Commands, on page 7
• Complete a Command, on page 8
• Command History, on page 9
• Commit, Discard, and View Pending Commands, on page 10
• Inline Help for the CLI, on page 11
• CLI Session Limits, on page 12
Cisco Firepower 4100/9300 FXOS Command Reference
3
Page 6

Managed Objects
Managed Objects
The Firepower eXtensible Operating System (FXOS) uses a managed object model, where managed objects
are abstract representations of physical or logical entities that can be managed. For example, chassis, security
modules, network modules, ports, and processors are physical entities represented as managed objects, and
licenses, user roles, and platform policies are logical entities represented as managed objects.
Managed objects may have one or more associated properties that can be configured.
CLI Overview
Cisco Firepower 4100/9300 FXOS Command Reference
4
Page 7

CLI Overview
Command Modes
The CLI is organized into a hierarchy of command modes, with EXEC mode being the highest-level mode
of the hierarchy. Higher-level modes branch into lower-level modes. You use create, enter, and scope
commands to move from higher-level modes to modes in the next lower level, and you use the up command
to move up one level in the mode hierarchy. You can also use the top command to move to the top level in
the mode hierarchy.
Note
Most command modes are associated with managed objects, so you must create an object before you can
access the mode associated with that object. You use create and enter commands to create managed objects
for the modes being accessed. The scope commands do not create managed objects and can only access modes
for which managed objects already exist.
Each mode contains a set of commands that can be entered in that mode. Most of the commands available in
each mode pertain to the associated managed object.
Command Modes
The CLI prompt for each mode shows the full path down the mode hierarchy to the current mode. This helps
you to determine where you are in the command mode hierarchy, and it can be an invaluable tool when you
need to navigate through the hierarchy.
The following table lists the main command modes, the commands used to access each mode, and the CLI
prompt associated with each mode.
Table 1: Main Command Modes and Prompts
Mode PromptCommands Used to AccessMode Name
#top command from any modeEXEC
/adapter #scope adapter command from EXEC modeAdapter
/cabling #scope cabling command from EXEC modeCabling
/chassis #scope chassis command from EXEC modeChassis
Ethernet server domain
/eth-server #scope eth-server command from EXEC
mode; this command and all subcommands
are currently not supported
Ethernet uplink
/eth-uplink #scope eth-uplink command from EXEC
mode
Fabric interconnect
/fabric-interconnect #scope fabric-interconnect command from
EXEC mode
Firmware
/firmware #scope firmware command from EXEC
mode
Cisco Firepower 4100/9300 FXOS Command Reference
5
Page 8

Command Modes
CLI Overview
Mode PromptCommands Used to AccessMode Name
Host Ethernet interface
Monitoring
Packet capture
Service profile
mode
Note
This command and all
subcommands are not supported
at this level; the Host Ethernet
interface commands are available
in /adapter # mode.
mode
EXEC mode
mode
Note
Do not alter or configure service
profiles; that is, do not use the
create, set, or delete
subcommand sets.
/host-eth-if #scope host-eth-if command from EXEC
/license #scope license command from EXEC modeLicense
/monitoring #scope monitoring command from EXEC
/org #scope org command from EXEC modeOrganization
/packet-capture #scope packet-capture command from
/security #scope security command from EXEC modeSecurity
/server #scope server command from EXEC modeServer
/service-profile #scope service-profile command from EXEC
/ssa #scope ssa command from EXEC modeSSA
/system #scope system command from EXEC modeSystem
Virtual HBA
Note
This command and all
/vhba #scope vhba command from EXEC mode
subcommands are currently not
supported.
/vnic #scope vnic command from EXEC modeVirtual NIC
Cisco Firepower 4100/9300 FXOS Command Reference
6
Page 9

CLI Overview
Object Commands
Four general commands are available for object management:
• create object
• delete object
• enter object
• scope object
You can use the scope command with any managed object, whether a permanent object or a user-instantiated
object. The other commands allow you to create and manage user-instantiated objects. For every create object
command, a corresponding delete object and enter object command exists.
In the management of user-instantiated objects, the behavior of these commands depends on whether the
object exists, as described in the following tables:
Table 2: Command Behavior If The Object Does Not Exist
Object Commands
create object
delete object
enter object
scope object
Table 3: Command Behavior If The Object Exists
create object
delete object
enter object
scope object
BehaviorCommand
The object is created and its configuration mode, if applicable, is entered.
An error message is generated.
The object is created and its configuration mode, if applicable, is entered.
An error message is generated.
BehaviorCommand
An error message is generated.
The object is deleted.
The configuration mode, if applicable, of the object is entered.
The configuration mode of the object is entered.
Cisco Firepower 4100/9300 FXOS Command Reference
7
Page 10

Complete a Command
Complete a Command
You can use the Tab key in any mode to complete a command. Partially typing a command name and pressing
Tab causes the command to be displayed in full or to the point where you must enter another keyword or an
argument value.
CLI Overview
Cisco Firepower 4100/9300 FXOS Command Reference
8
Page 11

CLI Overview
Command History
The CLI stores all commands used in the current session. You can step through the previously used commands
by using the up-arrow or down-arrow keys. The up-arrow key moves to the previous command in the history,
and the down-arrow key moves to the next command in the history. When you get to the end of the history,
pressing the down-arrow key does nothing.
You can enter any command in the history again by stepping through the history to recall that command and
then pressing Enter. The command is entered as if you had manually typed it. You can also recall a command
and change it before you press Enter.
Command History
Cisco Firepower 4100/9300 FXOS Command Reference
9
Page 12

Commit, Discard, and View Pending Commands
Commit, Discard, and View Pending Commands
When you enter a configuration command in the CLI, the command is not applied until you enter the
commit-buffer command. Until committed, a configuration command is pending and can be discarded by
entering a discard-buffer command.
You can accumulate pending changes in multiple command modes and apply them together with a single
commit-buffer command. You can view the pending commands by entering the show configuration pending
command in any command mode.
Note
All pending commands are checked for validity. However, if any queued command fails during commit, the
remaining commands are applied; failed commands are reported in an error message.
While any commands are pending, an asterisk (*) appears before the command prompt. The asterisk disappears
when you enter the commit-buffer command.
The following example shows how the prompts change during the command entry process:
Firepower# scope system
Firepower /system # scope services
Firepower /system/services # create ntp-server 192.168.200.101
Firepower /system/services* # show configuration pending
scope services
+ create ntp-server 192.168.200.101
exit
Firepower /system/services* # commit-buffer
Firepower /system/services #
CLI Overview
Cisco Firepower 4100/9300 FXOS Command Reference
10
Page 13

CLI Overview
Inline Help for the CLI
At any time, you can enter the ? character to display the options available at the current state of the command
syntax.
If you have not entered anything at the prompt, entering ? lists all available commands for the mode you are
in. With a partially entered command, entering ? lists all keywords and arguments available at your current
position in the command syntax.
Inline Help for the CLI
Cisco Firepower 4100/9300 FXOS Command Reference
11
Page 14

CLI Session Limits
CLI Session Limits
FXOS limits the number of CLI sessions that can be active at one time to 32 total sessions. This value is not
configurable.
CLI Overview
Cisco Firepower 4100/9300 FXOS Command Reference
12
Page 15

Filter and Save Show Output
• Save and Filter Show Command Output, on page 14
Cisco Firepower 4100/9300 FXOS Command Reference
13
Page 16

Save and Filter Show Command Output
Save and Filter Show Command Output
You can save the output of show commands by redirecting the output to a text file. You can filter the output
of show commands by piping the output to filtering commands.
Saving and filtering output are available with all show commands but are most useful when dealing with
commands that produce a lot of text.
Filter Show Command Output
To filter the output of a show command, use the following subcommands. Note that in the following syntax
description, the initial vertical bar | after the show command is the pipe character and is part of the command,
not part of the syntax description. The filtering options are entered after the command’s initial | character.
show command | {begin expression|count|cut expression|egrep expression|end expression|exclude
expression|grep expression|head|include expression|last|less|no-more|sort expression|tr
expression|uniq expression|wc}
Filter and Save Show Output
Filtering Options
These are the filtering subcommands:
• begin—Finds the first line that includes the specified pattern, and display that line and all subsequent
lines.
• count—Counts the number of lines.
• cut—Removes (“cut”) portions of each line.
• egrep—Displays only those lines that match the extended-type pattern.
• end—Ends with the line that matches the pattern.
• exclude—Excludes all lines that match the pattern and show all other lines.
• grep—Displays only those lines that match the pattern.
• head—Displays the first lines.
• include—Displays only those lines that match the pattern.
• last—Displays the last lines.
• less—Filters for paging.
• no-more—Turns off pagination for command output.
• sort—Sorts the lines (stream sorter).
• tr—Translates, squeezes, and/or deletes characters.
• uniq—Discards all but one of successive identical lines.
• wc—Displays a count of lines, words, and characters.
expression
Cisco Firepower 4100/9300 FXOS Command Reference
14
Page 17

Filter and Save Show Output
Note
Several of these subcommands have additional options that let you further control the filtering. For example,
with show configuration | head and show configuration | last, you can use the lines keyword to change the
number of lines displayed; the default is 10. As another example, with show configuration | sort, you can
add the option -u to remove duplicate lines from the output. (Complete descriptions of these options is beyond
the scope of this document; refer to the FXOS help output for the various commands, and to the appropriate
Linux help, for more information.)
Examples
The following example shows how to determine the number of lines currently in the system event log:
FP9300-A# show sel 1/1 | count
3008
FP9300-A#
Save Show Command Output
An expression, or pattern, is typically a simple text string. Do not enclose the expression in single or
double-quotes—these will be seen as part of the expression. Also, trailing spaces will be included in the
expression.
The following example shows how to display lines from the system event log that include the string “error”:
FP9300-A# show sel 1/1 | include error
968 | 05/15/2016 16:46:25 | CIMC | System Event DDR4_P2_H2_EC
C #0x99 | Upper critical - going high | Asserted | Reading 20
000 >= Threshold 20000 error
FP9300-A#
Related Topics
Save Show Command Output, on page 15
Save Show Command Output
You can save the output of show commands by redirecting the output to a text file.
show command [ > {ftp:|scp:|sftp:|tftp:|volatile: |workspace:}]|[ >> {volatile: |workspace:}]
Syntax Description
> {ftp:|scp:|sftp:|tftp:|volatile:
|workspace:}
Redirects the show command output to a specified text file
using the selected transport protocol.
After you enter the command, you are queried for remote
server name or IP address, user name, file path, and so on.
If you press Enter at this point, the output is saved locally.
>> {volatile: | workspace:}
Appends the show command output to the appropriate text
file, which must already exist.
Example
The following example attempts to save the current configuration to the system workspace; a configuration
file already exists, which you can choose to overwrite or not.
Cisco Firepower 4100/9300 FXOS Command Reference
15
Page 18

Save Show Command Output
FP9300-A# show configuration > workspace
File already exists, overwrite (y/n)?[n]n
Reissue command with >> if you want to append to existing file
FP9300-A#
Related Topics
Filter Show Command Output, on page 14
Filter and Save Show Output
Cisco Firepower 4100/9300 FXOS Command Reference
16
Page 19

Unsupported and Restricted Commands
• Unsupported Commands, on page 18
• Restricted Commands, on page 22
Cisco Firepower 4100/9300 FXOS Command Reference
17
Page 20

Unsupported Commands
Unsupported Commands
The following commands, while visible in the CLI, are not supported. Entering any of these commands has
no effect.
EXEC (Top-level) Commands
# restore-check
# scope eth-server (and all subcommands)
# scope host-eth-if (the host-eth-if subcommands are available in /adapter mode)
# scope nh-test (and all subcommands)
# set nh-test
# show nh-test
# show registry-repository
Unsupported and Restricted Commands
# show ucspe-tech-support
# ucspe-copy
# vhba (and all subcommands)
Chassis Mode Commands
/chassis # scope iom
/chassis # show iom
/chassis # show post
Fabric Interconnect Mode Commands
/fabric-interconnect # scope fan
/fabric-interconnect # scope fan-module
/fabric-interconnect # scope psu
/fabric-interconnect # scope sw-uplink
/fabric-interconnect # show fan
/fabric-interconnect # show fan-module
/fabric-interconnect # show lan-neighbors
/fabric-interconnect # show psu
/fabric-interconnect # show san-neighbors
/fabric-interconnect # show sw-uplink
Organization Mode Commands
/org # scope auth-profile
Cisco Firepower 4100/9300 FXOS Command Reference
18
Page 21

Unsupported and Restricted Commands
/org # scope fc-policy
/org # scope iqn-pool
/org # scope iscsi-policy
/org # scope kvm-mgmt-policy
/org # scope rackserver-disc-policy
/org # scope rackserver-mgmt-policy
/org # scope san-connectivity-policy
/org # scope storage-connection-policy
/org # scope udld-link-policy
/org # scope udld-system-settings
/org # scope uuid-suffix-pool
/org # scope vhba-beh-policy
/org # scope vhba-templ
Unsupported Commands
/org # scope vmq-conn-policy
/org # scope wwn-pool
/org # show fc-policy
/org # show fc-zone
/org # show iqn-pool
/org # show rackserver-disc-policy
/org # show rackserver-mgmt-policy
/org # show san-connectivity-policy
/org # show udld-link-policy
/org # show udld-system-settings
/org # show uuid-suffix-pool
/org # show vhba-beh-policy
/org # show vhba-templ
/org # show vmq-conn-policy
/org # show wwn-pool
Packet Capture Mode Commands
/packet-capture # show nh-test
Security Mode Commands
/security # create role
/security # delete role
Cisco Firepower 4100/9300 FXOS Command Reference
19
Page 22

Unsupported Commands
Unsupported and Restricted Commands
Server Mode Commands
/server # show flexflash-controller
Service Profile Mode Commands
/service-profile # disassociate
/service-profile # rename-to
/service-profile # scope dynamic-vnic-conn
/service-profile # scope ext-pooled-ip
/service-profile # scope ext-static-ip
/service-profile # scope fc-zone
/service-profile # scope iscsi-boot
/service-profile # scope vhba
/service-profile # set dynamic-vnic-conn-policy
/service-profile # set ext-mgmt-ip-pool-name
/service-profile # set ext-mgmt-ip-state
/service-profile # set iscsi-identity
/service-profile # set kvm-mgmt-policy
/service-profile # set san-connectivity-policy-name
/service-profile # set src-templ-name
/service-profile # show dynamic-vnic-conn
/service-profile # show dynamic-vnic-conn-policy
/service-profile # show ext-pooled-ip
/service-profile # show ext-static-ip
/service-profile # show fc-zone
/service-profile # show initiator-group
/service-profile # show iscsi-boot
/service-profile # show iscsi-identity
/service-profile # show mgmt-iface
/service-profile # show vhba
/service-profile # show vnic-iscsi
System Mode Commands
/system # scope control-ep
/system # scope environment-features
/system # scope storage-features
Cisco Firepower 4100/9300 FXOS Command Reference
20
Page 23

Unsupported and Restricted Commands
/system # scope vm-mgmt
/system # set virtual-ip
/system # show control-ep
Unsupported Commands
Cisco Firepower 4100/9300 FXOS Command Reference
21
Page 24

Restricted Commands
Restricted Commands
Use of the following commands is restricted. Do not use any of these commands unless instructed to do so
by a member of the Cisco Technical Assistance Center (TAC).
Service Profile Mode Commands
Do not change any service profile configurations; specifically do not use any of the /service-profile #
create, /service-profile # delete or /service-profile # set subcommands.
Unsupported and Restricted Commands
Cisco Firepower 4100/9300 FXOS Command Reference
22
Page 25

PART I
A – R Commands
• A – C Commands, on page 25
• D – R Commands, on page 81
Page 26

Page 27

A – C Commands
• acknowledge fault, on page 27
• acknowledge server, on page 28
• acknowledge slot, on page 29
• activate firmware, on page 30
• backup sel, on page 31
• cancel, on page 32
• clear lock-status, on page 33
• clear password-history, on page 34
• clear sel, on page 35
• commit-buffer, on page 36
• connect adapter, on page 37
• connect asa, on page 38
• connect cimc, on page 40
• connect ftd, on page 42
• connect fxos, on page 44
• connect local-mgmt, on page 46
• connect module, on page 48
• connect vdp, on page 50
• create app-instance, on page 52
• create bootstrap-key FIREWALL_MODE, on page 53
• create bootstrap-key PERMIT_EXPERT_MODE, on page 54
• create certreq, on page 55
• create connection, on page 57
• create destination, on page 58
• create ip-block, on page 60
• create ipv6-block, on page 62
• create keyring, on page 64
• create local-user, on page 65
• create policy (callhome), on page 67
• create policy (flow control), on page 70
• create profile, on page 71
• create resource-profile, on page 73
• create ssh-server, on page 75
Cisco Firepower 4100/9300 FXOS Command Reference
25
Page 28

• create subinterface, on page 76
• create trustpoint, on page 79
• cycle, on page 80
A – R Commands
Cisco Firepower 4100/9300 FXOS Command Reference
26
Page 29

A – R Commands
acknowledge fault
To acknowledge a system fault, use the acknowledge fault command.
acknowledge fault id
acknowledge fault
Syntax Description
Command Modes
Command History
Usage Guidelines
Related Commands
fault id
The fault identification number. The range of valid values is 0 to
18446744073709551615.
Multiple modes
ModificationRelease
Command added.1.1(1)
Use the acknowledge fault command to acknowledge the existence of a fault.
Example
The following example shows how to acknowledge a fault:
firepower # acknowledge fault 11347599
firepower* # commit-buffer
firepower #
DescriptionCommand
Acknowledges a server on the device.acknowledge server
Acknowledges the existence of a slot in the device.acknowledge slot
Shows fault policy information.show fault
Cisco Firepower 4100/9300 FXOS Command Reference
27
Page 30

acknowledge server
acknowledge server
To acknowledge a server, use the acknowledge server command.
acknowledge server {id|chassis/blade_id}
A – R Commands
Syntax Description
Command Modes
Command History
Usage Guidelines
server
{id|chassis/blade_id}
To use the server identification number to identify the server to acknowledge,
provide the id.
To use the chassis and blade identification numbers to identify the server to
acknowledge, enter chassis/blade_id in n/n format.
Note
The chassis ID number is always 1.
EXEC
scope chassis/
ModificationRelease
Command added.1.1(1)
Use the acknowledge server command to verify the existence of a server in your network. For example, you
can acknowledge a server that was recently commissioned to ensure that it exists.
In chassis mode, you can use only the id variable to identify the server to be acknowledged.
Example
The following example shows how to acknowledge a server in module 2 while in chassis mode:
firepower# scope chassis 1
firepower /chassis # acknowledge server 2
firepower /chassis* # commit-buffer
firepower /chassis #
Related Commands
28
DescriptionCommand
Acknowledges a system fault.acknowledge fault
Verifies the existence of a slot that was recently commissioned.acknowledge slot
show server
The show server commands display a variety of server-related configuration
information.
Cisco Firepower 4100/9300 FXOS Command Reference
Page 31

A – R Commands
acknowledge slot
To acknowledge a slot, use the acknowledge slot command.
acknowledge slot {id|chassis/blade_id}
acknowledge slot
Syntax Description
Command Modes
Command History
Usage Guidelines
slot {id|chassis/blade_id}
In chassis or fabric-interconnect mode, use the slot id to identify the module
to acknowledge.
In EXEC mode, use the chassis and blade identification numbers to identify
the slot to acknowledge; enter chassis/blade_id in n/n format.
Note
The chassis ID number is always 1.
EXEC
scope chassis/
scope fabric-interconnect/
ModificationRelease
Command added.1.1(1)
Use the acknowledge slot command to verify the existence of a slot that was recently commissioned to ensure
that it exists. In fabric-interconnect mode, you must use this command when an existing module is replaced
with one with a different product ID (PID).
In chassis and fabric-interconnect mode, you can use only the id variable to identify the slot to be acknowledged.
In EXEC mode, you can use only the chassis and blade identification (chassis/blade_id) numbers to identify
the slot to be acknowledged.
Related Commands
Example
The following example shows how to acknowledge a slot while in chassis mode:
firepower# scope chassis 1
firepower /chassis # acknowledge slot 2
firepower /chassis* # commit-buffer
firepower /chassis #
DescriptionCommand
Acknowledges a system fault.acknowledge fault
Acknowledges the existence of a server in your network.acknowledge server
Cisco Firepower 4100/9300 FXOS Command Reference
29
Page 32

activate firmware
activate firmware
To activate a firmware package, use the activate firmware command.
activate firmware version
A – R Commands
Syntax Description
Command Modes
Command History
Usage Guidelines
Related Commands
version
Use its version number to specify the firmware package to be activated.
scope system/
ModificationRelease
Command added.1.1(1)
As part of the activation process, all CLI sessions will be terminated.
Example
This example shows how to activate a firmware package:
firepower# scope system
firepower /system # activate firmware 2.4(1.52)
As part of activation, all cli sessions will be terminated.
Continue with activation? (yes/no)
DescriptionCommand
Shows system firmware versions and status information.show firmware
Shows server firmware versions and status information.show server firmware
Cisco Firepower 4100/9300 FXOS Command Reference
30
Page 33

A – R Commands
backup sel
backup sel
To back up the system event log (SEL), use the backup sel command.
backup sel {id|chassis/blade_id}
Syntax Description
Command Modes
Command History
Usage Guidelines
id
chassis/blade_id
The server ID. On 9300 devices, there may be up to 3 servers.
The appliance chassis number and blade number in x/y format.
Note
The chassis ID number is always 1.
Any command mode
ModificationRelease
Command added.1.1(1)
Use this command to back up the system event log (SEL) for a server.
In the command mode of a specific server (/chassis/server), you can run this command without any options.
Example
This example shows how to back up the SEL for server 2 in chassis 1:
firepower# backup sel 1/2
firepower* # commit-buffer
firepower#
Related Commands
DescriptionCommand
Clears the system event log (SEL) for a server.clear sel
Cisco Firepower 4100/9300 FXOS Command Reference
31
Page 34

cancel
cancel
A – R Commands
To cancel a reservation request, use the cancel command.
cancel
Syntax Description
Command Modes
Command History
Usage Guidelines
Related Commands
This command has no arguments or keywords.
scope license/scope reservation/
ModificationRelease
Command added.1.1(1)
If you have already generated the authorization code, you must install it.
Example
This example shows how to cancel a reservation request:
firepower# scope license
firepower /license # scope reservation
firepower /license/reservation # cancel
Warning : If you have already generated the authorization code from CSSM, please abort the
cancellation by issuing discard-buffer and then install the authorization code.
firepower /license/reservation* #
DescriptionCommand
Enables permanent license reservation.enable reservation
Shows current license information.show license
Cisco Firepower 4100/9300 FXOS Command Reference
32
Page 35

A – R Commands
clear lock-status
To clear a user’s locked-out status, use the clear lock-status command in local user mode.
clear lock-status
clear lock-status
Syntax Description
Command Modes
Command History
Usage Guidelines
This command has no arguments or keywords.
Local user (/security/local-user)
ModificationRelease
Command added.1.1(1)
If any user (including admin users) exceeds the specified maximum number of login attempts, the user is
locked out of the system and must wait the specified amount of time before being allowed to log in, unless
you clear the user’s locked-out status.
Example
This example shows how to enter local user mode and specify the amount of time that must pass
before a locked-out user can log in.
FP9300-A # scope security
FP9300-A # scope local-user test_user1
FP9300-A /security/local-user # clear lock-status
FP9300-A /security/local-user* # commit-buffer
FP9300-A /security/local-user #
Related Commands
set max-login-attempts
set
user-account-unlock-time
DescriptionCommand
Specifies the maximum number of failed login attempts before the user is
locked out of the system.
Specifies the amount of time a user remains locked out of the system after
reaching the maximum number of login attempts.
Cisco Firepower 4100/9300 FXOS Command Reference
33
Page 36

clear password-history
clear password-history
To clear the password history for a local user, use the clear password-history command.
clear password-history
A – R Commands
Syntax Description
Command Modes
Command History
Usage Guidelines
This command has no arguments or keywords.
Local user (/security/local-user) mode
ModificationRelease
Command added.1.1(1)
You must be a user with admin or AAA privileges to use this command.
Example
This example shows how to enter local user mode and clear the password history for the user.
FP9300-A # scope security
FP9300-A /security # scope local-user test_user
FP9300-A /security/local-user # clear password history
FP9300-A /security/local-user* # commit-buffer
FP9300-A /security/local-user #
DescriptionCommand
Creates a new local user account.create local-user
Specifies the password for a user account.set password
Cisco Firepower 4100/9300 FXOS Command Reference
34
Page 37

A – R Commands
clear sel
clear sel
To clear the system event log (SEL) for a server, use the clear sel command.
clear sel {id|chassis_id/blade_id}
Syntax Description
Command Modes
Command History
Usage Guidelines
id
chassis_id/blade_id
(Optional) The server ID. The 9300 devices have a maximum of 3 servers.
(Optional) The chassis number and blade number in n/n format.
Note
The chassis ID number is always 1.
Any command mode
ModificationRelease
Command added.1.4(1)
Use this command to clear the system event log (SEL) for a server.
In the command mode for a specific server (/chassis/server), you can run this command without specifying a
server.
Example
This example shows how to clear system event logs for server 1 in chassis 1 while in organization
mode.
FP9300-A # scope org Test
FP9300-A /org # clear sel 1/1
FP9300-A /org* # commit-buffer
FP9300-A /org #
Related Commands
DescriptionCommand
Backs up the system event log (SEL).backup sel
Cisco Firepower 4100/9300 FXOS Command Reference
35
Page 38

commit-buffer
commit-buffer
To save or verify configuration changes, use the commit-buffer command.
commit-buffer [verify-only]
A – R Commands
Syntax Description
Command Modes
Command History
Usage Guidelines
Related Commands
verify-only
(Optional) Verifies/validates buffer contents only; the contents are not
committed.
Any command mode
ModificationRelease
Command added.1.1(1)
Use this command to execute or verify all pending configuration changes. While any configuration changes
are pending, an asterisk (*) appears before the command prompt. When you enter the commit-buffer command,
the pending commands are committed and the asterisk disappears.
Example
This example shows how to save configuration changes:
FP9300-A# create org 3
FP9300-A /org* # commit-buffer
FP9300-A /org #
DescriptionCommand
Cancels and discards all uncommitted configuration changes.discard-buffer
Shows all pending configuration changes.show configuration
pending
Cisco Firepower 4100/9300 FXOS Command Reference
36
Page 39

A – R Commands
connect adapter
To connect to the adapter command shell, use the connect command.
connect adapter {chassis/server/id | rack_server/id}
connect adapter
Syntax Description
Command Modes
Command History
Usage Guidelines
chassis/server/id
Specifies the chassis, server (module) and adapter IDs (entered in n/n/n format).
On the Firepower 9300, the module number can be 1, 2, or 3. On the Firepower
4100, it is 1.
rack_server/id
Note
Specifies the rack number and module ID (entered in n/n format).
The chassis ID number is always 1.
Any command mode
ModificationRelease
Command added.1.1(1)
Use help to list available mezzanine adapter commands; use help command to view information about an
individual command.
Refer to connect adapter: Command List, on page 392 for additional information.
To exit the adapter mode, enter exit.
Example
The following example shows how to connect to the adapter command shell, and view available
commands:
Related Commands
firepower# connect adapter 1/1/1
adapter 1/1/1 # help
Available commands:
connect - Connect to remote debug shell
exit - Exit from subshell
help - List available commands
history - Show command history
show-fwlist - Show firmware versions on the adapter
show-identity - Show adapter identity
show-phyinfo - Show adapter phy info
show-systemstatus - Show adapter status
adapter 1/1/1 # exit
firepower#
DescriptionCommand
Returns you to the previous CLI mode.exit
Cisco Firepower 4100/9300 FXOS Command Reference
37
Page 40

connect asa
connect asa
To connect to the ASA CLI, use the connect asa command.
connect asa [name]
A – R Commands
Syntax Description
Command Modes
Command History
Usage Guidelines
name
(Optional) Specifies the ASA application instance name, which is the same as
the logical device name.
connect module/
ModificationRelease
2.4(1)
Added the name argument.
Command added.1.1(4)
See the ASA documentation for commands available from the CLI.
To exit the ASA console, enter Ctrl-a, d
Return to the supervisor level of the FXOS CLI:
Exit the console:
Enter ~, then quit to exit the Telnet application.
Example:
asa> Ctrl-a, d
Firepower-module1> ~
telnet> quit
firepower#
Exit the Telnet session:
Enter Ctrl-], .
Example:
asa> Ctrl-a, d
Firepower-module1> Ctrl-], .
firepower#
Example
This example shows how to connect to the ASA CLI on module 1:
firepower# connect module 1 console
Telnet escape character is '~'.
Trying 127.5.1.1...
Connected to 127.5.1.1.
Cisco Firepower 4100/9300 FXOS Command Reference
38
Page 41

A – R Commands
connect asa
Escape character is '~'.
CISCO Serial Over LAN:
Close Network Connection to Exit
Firepower-module1> connect asa
asa>
Related Commands
DescriptionCommand
Connects to the FTD CLI.connect ftd
Connects to the module CLI.connect module
Connects to the vDP CLI.connect vdp
Cisco Firepower 4100/9300 FXOS Command Reference
39
Page 42

connect cimc
connect cimc
To connect to the Cisco Integrated Management Controller (CIMC) command shell, use the connect cimc
command.
connect cimc {chassis_id/blade_id | rack_id}
A – R Commands
Syntax Description
Command Modes
Command History
Usage Guidelines
chassis_id/blade_id
rack_id
Specifies the chassis and module numbers (entered in n/n format).
Note
The chassis ID number is always 1.
Specifies the rack number.
Any command mode
ModificationRelease
Command added.1.1(1)
Enter help to list available CIMC firmware debug utility commands; enter help command to view information
about an individual command. Enter exit to terminate the utility. Do not use this utility unless instructed to
do so by Cisco TAC. Refer to connect cimc: Command List, on page 394 for additional information.
Example
The following example shows how to connect to cimc mode and then list the available commands:
firepower# connect cimc 1/1
Trying 127.5.1.1...
Connected to 127.5.1.1.
Escape character is '^]'.
CIMC Debug Firmware Utility Shell [ support ]
[ help ]# help
__________________________________________
__________________________________________
Command List
__________________________________________
alarms
cores
dimmbl
exit
i2cstats
images
mctools
memory
messages
mrcout
network
obfl
post
power
Cisco Firepower 4100/9300 FXOS Command Reference
40
Debug Firmware Utility
Page 43

A – R Commands
connect cimc
programmables
sensors
sel
fru
tasks
top
update
users
version
cert
sldp
help
help [COMMAND]
__________________________________________
Notes:
"enter Key" will execute last command
"COMMAND ?" will execute help for that command
__________________________________________
[ help ]# exit
Connection closed by foreign host.
firepower#
Related Commands
DescriptionCommand
Returns you to the previous CLI mode.exit
Cisco Firepower 4100/9300 FXOS Command Reference
41
Page 44

connect ftd
connect ftd
A – R Commands
To connect to the Firepower Threat Defense (FTD) CLI, use the connect ftd command.
connect ftd name
Syntax Description
Command Modes
Command History
Usage Guidelines
name
Specifies the FTD application instance name, which is the same as the logical
device name. If you have multiple application instances for an application type,
you must specify the name of the instance. To view the instance names, enter
the command without a name.
connect module/
ModificationRelease
2.4(1)
Added the name argument. The escape character was changed to exit from
Ctrl-a, d.
Command added.1.1(4)
See the FTD documentation for commands available from the CLI.
To exit the FTD console, enter exit. For pre-2.4(1) versions, enter Ctrl-a, d
Return to the supervisor level of the FXOS CLI:
Exit the console:
Enter ~, then quit to exit the Telnet application.
Example:
> exit
Firepower-module1> ~
telnet> quit
firepower#
Exit the Telnet session:
Enter Ctrl-], .
Example:
> exit
Firepower-module1> Ctrl-], .
firepower#
Example
This example shows how to connect to the FTD CLI on module 1:
Cisco Firepower 4100/9300 FXOS Command Reference
42
Page 45

A – R Commands
connect ftd
firepower# connect module 1 console
Telnet escape character is '~'.
Trying 127.5.1.1...
Connected to 127.5.1.1.
Escape character is '~'.
CISCO Serial Over LAN:
Close Network Connection to Exit
Firepower-module1> connect ftd
>
Related Commands
DescriptionCommand
Connects to the ASA CLI.connect asa
Connects to the module CLI.connect module
Connects to the vDP CLI.connect vdp
Cisco Firepower 4100/9300 FXOS Command Reference
43
Page 46

connect fxos
connect fxos
To connect to the fxos command shell, use the connect fxos command.
connect fxos [a]
A – R Commands
Syntax Description
Command Modes
Command History
Usage Guidelines
a
(Optional) Connects to fabric a.
Note
The fabric ID is always a. If you omit the fabric ID, you are
connected to fabric A.
Any command mode
ModificationRelease
Command added.1.1(1)
To exit the fxos mode, enter exit.
Example
The following example shows how to connect to the fxos command shell, and view available
commands:
firepower# connect fxos
firepower(fxos)# ?
clear Reset functions
cli CLI commands
debug Debugging functions
debug-filter Enable filtering for debugging functions
ethanalyzer Configure cisco packet analyzer
no Negate a command or set its defaults
ntp NTP configuration
show Show running system information
system System management commands
terminal Set terminal line parameters
test Test command
undebug Disable Debugging functions (See also debug)
end Go to exec mode
exit Exit from command interpreter
pop Pop mode from stack or restore from name
push Push current mode to stack or save it under name
where Shows the cli context you are in
Related Commands
44
firepower(fxos)# exit
firepower#
DescriptionCommand
Connects to a remote debug shell while connected to a specific adapter.connect local-mgmt
Cisco Firepower 4100/9300 FXOS Command Reference
Page 47

A – R Commands
connect fxos
DescriptionCommand
Returns you to the previous CLI mode.exit
Cisco Firepower 4100/9300 FXOS Command Reference
45
Page 48

connect local-mgmt
connect local-mgmt
To connect to the local-mgmt command shell, use the connect local-mgmt command.
connect local-mgmt [a]
A – R Commands
Syntax Description
Command Modes
Command History
Usage Guidelines
a
(Optional) Connects to fabric a.
Note
The fabric ID is always a. If you omit the fabric ID, you are
connected to fabric A.
Any command mode
ModificationRelease
Command added.1.1(1)
Refer to connect local-mgmt: Command List, on page 409 for additional information.
To exit the local-mgmt mode, enter exit.
Example
The following example shows how to connect to the local-mgmt command shell, and view available
commands:
firepower# connect local-mgmt
firepower(local-mgmt)# ?
cd Change current directory
clear Clear managed objects
cluster Cluster mode
connect Connect to Another CLI
copy Copy a file
cp Copy a file
delete Delete managed objects
dir Show content of dir
enable Enable
end Go to exec mode
erase Erase
erase-log-config Erase the mgmt logging config file
exit Exit from command interpreter
fips FIPS compliance
ls Show content of dir
mgmt-port Management Port
mkdir Create a directory
move Move a file
mv Move a file
ping Test network reachability
ping6 Test IPv6 network reachability
pwd Print current directory
reboot Reboots Fabric Interconnect
restore-check Check if in restore mode
rm Remove a file
rmdir Remove a directory
Cisco Firepower 4100/9300 FXOS Command Reference
46
Page 49

A – R Commands
connect local-mgmt
run-script Run a script
show Show system information
shutdown Shutdown
ssh SSH to another system
tail-mgmt-log tail mgmt log file
telnet Telnet to another system
terminal Terminal
top Go to the top mode
traceroute Traceroute to destination
traceroute6 Traceroute to IPv6 destination
verify Verify Application Image
firepower(local-mgmt)# exit
firepower#
Related Commands
DescriptionCommand
Connects to the FXOS command shell.connect fxos
Returns you to the previous CLI mode.exit
Cisco Firepower 4100/9300 FXOS Command Reference
47
Page 50

connect module
connect module
To connect to the module command shell, use the connect module command.
connect module module_id {console | telnet}
A – R Commands
Syntax Description
Command Modes
Command History
Usage Guidelines
console
Connects to the serial console. The benefit of a console connection is that it is
persistent.
module_id
telnet
On 9300 devices the module number can be 1, 2, or 3; on 4100 devices it is 1.
Connects using a Telnet connection. The benefits of using a Telnet connection
is that you can have multiple sessions to the module at the same time, and the
connection speed is faster.
Any command mode
ModificationRelease
Telnet support added.2.4(1)
Command added.1.1(1)
From the module CLI, you can connect to the application CLI using the connect application command.
Refer to connect module: Command List, on page 414 for additional information.
Example
The following example shows how to connect to the module 1 console, and view available commands:
firepower# connect module 1 console
Telnet escape character is '~'.
Trying 127.5.1.1...
Connected to 127.5.1.1.
Escape character is '~'.
CISCO Serial Over LAN:
Close Network Connection to Exit
Firepower-module1>?
secure-login => Enable blade secure login
show => Display system information. Enter show ? for options
config => Configure the system. Enter config ? for options
terminalLength => Terminal settings. Enter terminal ? for options
ping => Ping a host to check reachability
nslookup => Look up an IP address or host name with the DNS servers
traceroute => Trace the route to a remote host
connect => Connect to specific csp console (asa, etc)
support => System file operations
testcrashinfo => Test crashinfo support
help => Get help on command syntax
Cisco Firepower 4100/9300 FXOS Command Reference
48
Page 51

A – R Commands
connect module
Firepower-module1> ~
telnet> quit
Connection closed.
firepower#
The following example shows how to connect to the module 1 using Telnet, and view available
commands:
firepower# connect module 1 telnet
Type exit or Ctrl-] followed by . to quit.
Firepower-module1>?
secure-login => Enable blade secure login
show => Display system information. Enter show ? for options
config => Configure the system. Enter config ? for options
terminalLength => Terminal settings. Enter terminal ? for options
ping => Ping a host to check reachability
nslookup => Look up an IP address or host name with the DNS servers
traceroute => Trace the route to a remote host
connect => Connect to specific csp console (asa, etc)
support => System file operations
testcrashinfo => Test crashinfo support
exit => Exit the session
help => Get help on command syntax
Firepower-module1> <Ctrl-], .>
firepower#
Related Commands
DescriptionCommand
Connects to the ASA CLI.connect asa
Connects to the FTD CLI.connect ftd
Connects to the vDP CLI.connect vdp
Cisco Firepower 4100/9300 FXOS Command Reference
49
Page 52

connect vdp
connect vdp
To connect to the Radware DefensePro (vDP) CLI, use the connect vdp command.
connect vdp [name]
A – R Commands
Syntax Description
Command Modes
Command History
Usage Guidelines
name
(Optional) Specifies the vDP application instance name, which is the same as
the main application logical device/application instance name.
connect module/
ModificationRelease
2.4(1)
Added the name argument.
Command added.1.1(4)
See the vDP documentation for commands available from the CLI.
To exit the vDP console, enter Ctrl-], .
Return to the supervisor level of the FXOS CLI:
Exit the console:
Enter ~, then quit to exit the Telnet application.
Example:
> Ctrl-], .
Firepower-module1> ~
telnet> quit
firepower#
Exit the Telnet session:
Enter Ctrl-], .
Example:
> Ctrl-], .
Firepower-module1> Ctrl-], .
firepower#
Example
This example shows how to connect to the vDP CLI on module 1:
firepower# connect module 1 console
Telnet escape character is '~'.
Trying 127.5.1.1...
Connected to 127.5.1.1.
Cisco Firepower 4100/9300 FXOS Command Reference
50
Page 53

A – R Commands
connect vdp
Escape character is '~'.
CISCO Serial Over LAN:
Close Network Connection to Exit
Firepower-module1> connect vdp
Related Commands
DescriptionCommand
Connects to the ASA CLI.connect asa
Connects to the FTD CLI.connect ftd
Connects to the module CLI.connect module
Cisco Firepower 4100/9300 FXOS Command Reference
51
Page 54

create app-instance
create app-instance
To define an application instance, use the create app-instance command.
create app-instance app_type app_name
A – R Commands
Syntax Description
Command Modes
Command History
Usage Guidelines
app_name
The name of the application instance, between 1 and 64 characters. You will
use this device name when you create the logical device for this instance.
app_type
The application type, either asa, ftd, or vdp.
scope ssa/scope slot/
ModificationRelease
2.4(1)
The app_name argument is now required.
Command added.1.1(1)
You can set many parameters for this application instance, including the the image version, deployment type,
resource profile and mode. You can also enable, disable and restart the application.
Example
The following example shows how to set the image version for an FTD application instance:
firepower# scope ssa
firepower /ssa # scope slot 1
firepower /ssa/slot # create app-instance ftd MyDevice1
firepower /ssa/slot/app-instance* # set deploy-type container
firepower /ssa/slot/app-instance* # set resource-profile-name silver 1
firepower /ssa/slot/app-instance* # set startup-version 6.3.0
firepower /ssa/slot/app-instance* #
Related Commands
52
DescriptionCommand
Shows current application attributes.show app-attri
Cisco Firepower 4100/9300 FXOS Command Reference
Page 55

A – R Commands
create bootstrap-key FIREWALL_MODE
To specify the firewall mode, routed or transparent, in the bootstrap configuration for the FTD and ASA, use
the create bootstrap-key FIREWALL_MODE command.
create bootstrap-key FIREWALL_MODE
create bootstrap-key FIREWALL_MODE
Command Modes
Command Default
Command History
Usage Guidelines
scope ssa/create logical-device/create mgmt-bootstrap/
The default mode is routed.
ModificationRelease
Added support for the ASA.2.4(1)
Command added for FTD.1.1(4)
Bootstrap settings are meant for initial deployment only, or for disaster recovery. For normal operation, you
can change most values in the application CLI configuration.
Example
The following example shows how to set the mode to routed mode:
firepower# scope ssa
firepower /ssa # create logical-device FTD1 ftd 1 standalone
Firepower /ssa/logical-device* # create mgmt-bootstrap ftd
firepower /ssa/logical-device/mgmt-bootstrap* # create bootstrap-key FIREWALL_MODE
firepower /ssa/logical-device/mgmt-bootstrap/bootstrap-key* # set value routed
firepower /ssa/logical-device/mgmt-bootstrap/bootstrap-key* # exit
firepower /ssa/logical-device/mgmt-bootstrap* #
Related Commands
DescriptionCommand
Creates the logical device.create logical-device
Creates the bootstrap configuration for the application.create mgmt-bootstrap
Sets the value for this command.set value
Cisco Firepower 4100/9300 FXOS Command Reference
53
Page 56

create bootstrap-key PERMIT_EXPERT_MODE
create bootstrap-key PERMIT_EXPERT_MODE
To permit Expert Mode from FTD SSH sessions for the FTD, use the create bootstrap-key
PERMIT_EXPERT_MODE command.
create bootstrap-key PERMIT_EXPERT_MODE
A – R Commands
Command Modes
Command Default
Command History
Usage Guidelines
scope ssa/create logical-device/create mgmt-bootstrap/
The default is no.
ModificationRelease
Command added.2.4(1)
Expert Mode provides FTD shell access for advanced troubleshooting. By default for container instances,
Expert Mode is only available to users who access the FTD CLI from the FXOS CLI. This limitation is only
applied to container instances to increase isolation between instances. Use Expert Mode only if a documented
procedure tells you it is required, or if the Cisco Technical Assistance Center asks you to use it. To enter this
mode, use the expert command in the FTD CLI.
Example
The following example shows how to enable Expert Mode from SSH:
firepower# scope ssa
firepower /ssa # create logical-device FTD1 ftd 1 standalone
Firepower /ssa/logical-device* # create mgmt-bootstrap ftd
firepower /ssa/logical-device/mgmt-bootstrap* # create bootstrap-key PERMIT_EXPERT_MODE
firepower /ssa/logical-device/mgmt-bootstrap/bootstrap-key* # set value yes
firepower /ssa/logical-device/mgmt-bootstrap/bootstrap-key* # exit
firepower /ssa/logical-device/mgmt-bootstrap* #
Related Commands
54
DescriptionCommand
Creates the logical device.create logical-device
Creates the bootstrap configuration for the application.create mgmt-bootstrap
Sets the value for this command.set value
Cisco Firepower 4100/9300 FXOS Command Reference
Page 57

A – R Commands
create certreq
To add a new keyring certificate request, use the create certreq command. If a request already exists for the
current keyring, the command will fail.
To edit an existing certificate request, use the enter certreq command.
You also can use the scope form of this command to enter an existing certificate request to assign or change
properties.
To delete an existing certificate request, use the delete form of this command.
create certreq [ip|subject-name]
delete certreq
enter certreq
scope certreq
create certreq
Syntax Description
Command Modes
Command History
Usage Guidelines
ip ip_address
subject-name name
scope security/scope keyring/
When you create a new keyring certificate request, you are automatically entered into certificate request mode
(security/keyring/certreq) with an asterisk indicating the new certificate request is not yet defined and committed.
You also can scope into certificate request mode for an existing keyring.
Use the set command in certificate request mode to specify certificate request parameters.
(Optional) Enter the ip keyword and the IPv4 address of the domain on which
this device resides. You will be asked to enter and confirm a password for the
request. This parameter applies only to the create certreq form of the
command.
(Optional) Enter the subject-name keyword and an identifier for this request;
for example, the appliance host name. You will be asked to enter and confirm
a password for the request. This parameter applies only to the create certreq
form of the command.
ModificationRelease
Command added.1.1(1)
Note
Before you create or commit a new certificate request, you must set the RSA key modulus (SSL key length)
using set modulus, on page 202.
Example
This example shows how to create a new keyring and its certificate request:
Cisco Firepower 4100/9300 FXOS Command Reference
55
Page 58

create certreq
A – R Commands
firepower # scope security
firepower /security # create keyring test-ring2
firepower /security/keyring* # create certreq ip 209.165.201.20
Certificate request password:
Confirm certificate request password:
firepower /security/keyring* # scope certreq
firepower /security/keyring/certreq* #
firepower /security/keyring/certreq* # set ?
country Country name (2 letter code)
dns DNS name (subject alternative name)
e-mail E-mail name
fi-a-ip Certificate request FI A ip address
fi-a-ipv6 Certificate request FI A ipv6 address
fi-b-ip Certificate request FI B ip address
fi-b-ipv6 Certificate request FI B ipv6 address
ip Certificate request ip address
ipv6 Certificate request ipv6 address
locality Locality name (eg, city)
org-name Organisation name (eg, company)
org-unit-name Organisational Unit Name (eg, section)
password Certificate request password
state State, province or county (full name)
subject-name Certificate request subject name
Related Commands
firepower /security/keyring/certreq* # set
DescriptionCommand
Deletes an existing keyring certificate request.delete certreq
Sets keyring certificate request-related information.set (certreq)
Cisco Firepower 4100/9300 FXOS Command Reference
56
Page 59

A – R Commands
create connection
To add a new IPSec connection, use the create connection command. If a connection with the specified name
already exists, the command will fail.
To add or edit an IPSec connection, use the enter connection command. If the specified connection does not
exist, it is created and entered; if the connection exists, it is entered.
You also can use the scope form of this command to enter an existing connection to assign or change properties.
Generally, “scoping into” an object is more convenient than entering it, since the objectʼs name is usually all
that is needed, whereas the enter form of the command often requires entering all its definition parameters.
To delete an existing connection, use the delete form of this command.
create connection name
enter connection name
delete connection name
scope connection name
create connection
Syntax Description
Command Modes
Command History
Usage Guidelines
name
The connection name; can be up to 16 alphanumeric characters.
scope security/scope ipsec/
ModificationRelease
Command added.1.1(1)
When you create a new IPSec connection, you are automatically entered into security/ipsec/connection mode
with an asterisk indicating the new connection is not yet committed. You can configure the connection before
committing it.
After you create a connection, the name cannot be changed. You must delete the connection and create a new
one.
Example
This example shows how to create and enter a new IPSec connection:
firepower # scope security
firepower /security # scope ipsec
firepower /security/ipsec # enter connection ipsec_conn2
firepower /security/ipsec/connection* #
Related Commands
DescriptionCommand
Sets the IPSec connection administrative state to disabled or enabled.set adminstate
Shows current IPSec connection information.show connection
Cisco Firepower 4100/9300 FXOS Command Reference
57
Page 60

create destination
create destination
To add a new Smart Call Home destination, use the create destination command. If a destination with the
specified name already exists, the command will fail.
To add or edit a Smart Call Home destination, use the enter destination command. If the specified destination
does not exist, it is created and entered; if the destination exists, it is entered.
You also can use the scope form of this command to enter an existing destination to assign or change properties.
Generally, “scoping into” an object is more convenient than entering it, since the objectʼs name is usually all
that is needed, whereas the enter form of the command often requires entering all its definition parameters.
To delete an existing destination, use the delete form of this command.
create destination name
delete destination name
enter destination name
scope destination name
A – R Commands
Syntax Description
Command Modes
Command History
Usage Guidelines
Note
name
The name identifying the Smart Call Home destination.
scope monitoring/scope callhome/scope profile/
ModificationRelease
Command added.1.4(1)
When you create a new Smart Call Home destination, you are automatically entered into callhome/profile
mode (monitoring/callhome/profile) with an asterisk indicating the new destination is not yet committed. You
can set the destination parameters—transport protocol and an email address—and then commit the new
destination information.
An email address is the only allowed destination address in a callhome profile.
After you create a Smart Call Home destination, the destination name cannot be changed. You must delete
the destination and create a new one.
Example
This example shows how to create, enter and configure a Smart Call Home destination:
firepower # scope monitoring
firepower /monitoring # scope callhome
firepower /monitoring/callhome # scope profile SLProfile
firepower /monitoring/callhome/profile # enter destination TestDest
firepower /monitoring/callhome/profile/destination* # set address user1@test.com
firepower /monitoring/callhome/profile/destination* # set protocol email
firepower /monitoring/callhome/profile/destination* # commit-buffer
firepower /monitoring/callhome/profile/destination #
Cisco Firepower 4100/9300 FXOS Command Reference
58
Page 61

A – R Commands
create destination
Related Commands
DescriptionCommand
Deletes an existing Smart Call Home destination.delete destination
Enters a Smart Call Home destination.enter destination
Sets an email address for a Smart Call Home destination.set address
Sets the transport protocol for a Smart Call Home destination.set protocol
Cisco Firepower 4100/9300 FXOS Command Reference
59
Page 62

create ip-block
create ip-block
To add a new block of IPv4 addresses for service access, use the create ip-block command. If an address
block with the specified properties already exists, the command will fail.
To add or edit a block of IPv4 addresses, use the enter ip-block command. If the specified address block does
not exist, it is created and entered; if the address block exists, it is entered.
You also can use the scope form of this command to enter an existing address block to assign or change
properties.
To delete an existing address block, use the delete form of this command.
create ip-block ip_address prefix_length {https|snmp|ssh}
delete ip-block ip_address prefix_length {https|snmp|ssh}
enter ip-block ip_address prefix_length {https|snmp|ssh}
scope ip-block ip_address prefix_length {https|snmp|ssh}
A – R Commands
Syntax Description
Command Modes
Command History
Usage Guidelines
ip_address
prefix_length
The starting address for the IPv4 address block.
The prefix length; determines the number of addresses in the block. Value can
be 0 to 32.
The service (HTTPS, SNMP, or SSH) to which the address block is assigned.https|snmp|ssh
scope system/scope services/
ModificationRelease
Command added.1.1(1)
Use this command to assign a block of IPv4 addresses to provide access to a specified service (HTTPS, SNMP,
or SSH).
When you create a new IP block, you are automatically entered into ip-block mode (system/services/ip-block)
with an asterisk indicating the new block assignment is not yet committed.
Up to 25 different blocks can be configured for each service. A address of 0.0.0.0 and a prefix of 0 allows
unrestricted access to a service. Each block of addresses is identified by its starting IPv4 addresss.
Example
This example shows how to create, enter and verify an IPv4 address block to provide SSH access:
firepower # scope system
firepower /system # scope services
firepower /system/services # enter ip-block 192.168.200.101 24 ssh
firepower /system/services/ip-block* # commit-buffer
firepower /system/services/ip-block # up
firepower /system/services # show ip-block
Permitted IP Block:
IP Address Prefix Length Protocol
Cisco Firepower 4100/9300 FXOS Command Reference
60
Page 63

A – R Commands
create ip-block
--------------- ------------- --------
0.0.0.0 0 https
0.0.0.0 0 snmp
0.0.0.0 0 ssh
192.168.200.101 24 ssh
firepower /system/services #
Related Commands
DescriptionCommand
Creates an IPv6 address block.create ipv6-block
Deletes an existing IPv4 block.delete ip-block
Cisco Firepower 4100/9300 FXOS Command Reference
61
Page 64

create ipv6-block
create ipv6-block
To add a new block of IPv6 addresses for service access, use the create ipv6-block command. If an address
block with the specified properties already exists, the command will fail.
To add or edit a block of IPv6 addresses, use the enter ipv6-block command. If the specified address block
does not exist, it is created and entered; if the address block exists, it is entered.
You also can use the scope form of this command to enter an existing address block to assign or change
properties.
To delete an existing address block, use the delete form of this command.
create ipv6-block ipv6_address prefix_length {https|snmp|ssh}
delete ipv6-block ipv6_address prefix_length {https|snmp|ssh}
enter ipv6-block ipv6_address prefix_length {https|snmp|ssh}
scope ipv6-block ipv6_address prefix_length {https|snmp|ssh}
A – R Commands
Syntax Description
Command Modes
Command History
Usage Guidelines
ipv6_address
prefix_length
The starting address for the IPv6 address block.
The prefix length; determines the number of addresses in the block. Value can
be 0 to 128.
The service (HTTPS, SNMP, or SSH) to which the address block is assigned.https|snmp|ssh
scope system/scope services/
ModificationRelease
Command added.1.1(1)
Use this command to assign a block of IPv6 addresses to provide access to a specified service (HTTPS, SNMP,
or SSH).
When you create a new IPv6 block, you are automatically entered into ipv6-block mode
(system/services/ipv6-block) with an asterisk indicating the new block assignment is not yet committed.
Up to 25 different blocks can be configured for each service. A address of 0:0:0:0:0:0:0:0 and a prefix of 0
allows unrestricted access to a service. Each block of addresses is identified by its starting IPv6 addresss.
Example
This example shows how to create, enter and verify an IPv6 address block to provide SSH access:
firepower # scope system
firepower /system # scope services
firepower /system/services # create ipv6-block 2001:DB8:1::1 64 ssh
firepower /system/services/ipv6-block* # commit-buffer
firepower /system/services/ipv6-block # up
firepower /system/services # show ipv6-block
Permitted IPv6 Block:
IPv6 Address Prefix Length Protocol
Cisco Firepower 4100/9300 FXOS Command Reference
62
Page 65

A – R Commands
create ipv6-block
------------ ------------- --------
:: 0 https
:: 0 snmp
:: 0 ssh
2001:DB8:1::1
64 ssh
firepower /system/services #
Related Commands
DescriptionCommand
Creates an IPv4 block.create ip-block
Deletes an existing IPv6 block.delete ipv6-block
Cisco Firepower 4100/9300 FXOS Command Reference
63
Page 66

create keyring
create keyring
To add a new RSA keyring, use the create keyring command. If a keyring with the specified name already
exists, the command will fail.
To edit an existing keyring, use the enter keyring command.
You also can use the scope form of this command to enter an existing keyring to assign or change properties.
To delete an existing keyring, use the delete form of this command.
create keyring name
delete keyring name
enter keyring name
scope keyring name
A – R Commands
Syntax Description
Command Modes
Command History
Usage Guidelines
name
The name identifying the keyring; can be between 1 and 16 characters.
scope security/
ModificationRelease
Command added.1.1(1)
When you create a new keyring, you are automatically entered into keyring mode (security/keyring) with an
asterisk indicating the new keyring is not yet committed. You can create a keyring certificate request, and set
keyring parameters such as RSA key modulus and certificate authority trustpoint, and then commit the new
keyring information.
Example
This example shows how to create and enter a new RSA keyring:
firepower # scope security
firepower /security # enter keyring test_keyring
firepower /security/keyring* # set ?
cert Keyring certificate
modulus RSA key modulus
regenerate Regenerate keyring
trustpoint Trustpoint CA
Related Commands
64
firepower /security/keyring* # set
DescriptionCommand
Deletes an existing RSA keyring.delete keyring
Cisco Firepower 4100/9300 FXOS Command Reference
Page 67

A – R Commands
create local-user
To add a new local user account, use the create local-user command. If a local user account with the specified
name already exists, the command will fail.
To add or edit a local user account, use the enter local-user command. If the specified account does not exist,
it is created and entered; if the account exists, it is entered.
You also can use the scope form of this command to enter an existing local user account to assign or change
properties.
To delete an existing local user account, use the delete form of this command.
create local-user user_name
delete local-user user_name
enter local-user user_name
scope local-user user_name
create local-user
Syntax Description
user_name
The ID to be used when logging into this local user account. Note the following
guidelines and restrictions when entering a user name:
• The name can contain between 1 and 32 characters, including the
following:
• Any alphabetic character
• Any numeral
• _ (underscore)
• - (dash)
• . (dot)
• The name must be unique.
• The name must start with an alphabetic character. It cannot start with a
number or a special character, such as an underscore.
• The name is case-sensitive.
• You cannot create an all-number name.
After you create a user account, you cannot change its name. You must delete
the user account and create a new one.
Command Modes
Command History
Usage Guidelines
scope security/
ModificationRelease
Command added.1.1(1)
You can configure up to 48 local user accounts. Each account must have a unique user name and password.
Cisco Firepower 4100/9300 FXOS Command Reference
65
Page 68

create local-user
A – R Commands
When you create a new user account, you are automatically entered into local user mode (/security/local-user)
with an asterisk indicating the new account is not yet committed. You can specify additional user account
information such as password, first and last names, and so on, and then commit the new account information.
After you create the user account, the account name cannot be changed. You must delete the user account and
create a new one.
Example
This example shows how to enter security mode, enter a local user account (simultaneously creating
the new account since it does not exist), and then assigning first and last names to the account:
firepower # scope security
firepower /security # enter local-user test_user
firepower /security/local-user* # set firstname test
firepower /security/local-user* # set lastname user
firepower /security/local-user* # commit-buffer
firepower /security/local-user #
Related Commands
DescriptionCommand
Deletes an existing local user account.delete local-user
Specifies the date on which the user account expires.set expiration
Sets a password for the user account.set password
Cisco Firepower 4100/9300 FXOS Command Reference
66
Page 69

A – R Commands
create policy (callhome)
To add a new Smart Call Home and Smart Licensing policy, use the create policy command. If a policy with
the specified name already exists, the command will fail.
To add or edit an IPSec connection, use the enter policy command. If the specified policy does not exist, it
is created and entered; if the policy exists, it is entered.
You also can use the scope form of this command to enter an existing policy to assign or change properties.
To delete an existing policy, use the delete form of this command.
create policy event
delete policy event
enter policy event
scope policy event
create policy (callhome)
Syntax Description
Command Modes
Command History
Usage Guidelines
event
scope monitoring/scope callhome/
When you create a new Smart Call Home policy, you are automatically entered into callhome/policy mode
(monitoring/callhome/policy) with an asterisk indicating the new policy is not yet committed. You can set
property values and enable/disable services, and then commit the new policy.
After you create a Smart Call Home policy, the policy name cannot be changed. You must delete the policy
and create a new one.
Use this command to create an instance of a policy for an existing type of fault or system event. The available
keywords for Call Home policy event types are:
• adaptor-mismatch
• arp-targets-config-error
• association-failed
• configuration-failure
The fault or system event type. See Usage Guidelines below for event options.
ModificationRelease
Command added.1.1(1)
• connectivity-problem
• election-failure
• equipment-degraded
• equipment-disabled
• equipment-inaccessible
• equipment-inoperable
Cisco Firepower 4100/9300 FXOS Command Reference
67
Page 70

create policy (callhome)
A – R Commands
• equipment-offline
• equipment-problem
• equipment-removed
• fru-problem
• health-led-amber
• health-led-amber-blinking
• identity-unestablishable
• inventory-failed
• license-graceperiod-expired
• limit-reached
• link-down
• management-services-failure
• management-services-unresponsive
• memory-error
• mgmtif-down
• ndisc-targets-config-error
• near-max-limit
• port-failed
• power-problem
• psu-insufficient
• psu-mixed-mode
• thermal-problem
• version-incompatible
• vif-ids-mismatch
• voltage-problem
Example
This example shows how to create, enter and enable a Call Home policy instance for link-down
events:
firepower # scope monitoring
firepower /monitoring # scope callhome
firepower /monitoring/callhome # enter policy link-down
firepower /monitoring/callhome/policy* # set admin-state enabled
firepower /monitoring/callhome/policy* # commit-buffer
Cisco Firepower 4100/9300 FXOS Command Reference
68
Page 71

A – R Commands
create policy (callhome)
firepower /monitoring/callhome/policy #
Related Commands
DescriptionCommand
Deletes an existing Smart Call Home policy.delete policy
Enables or disables the administrative state for a Smart Call Home policy.set admin-state
Cisco Firepower 4100/9300 FXOS Command Reference
69
Page 72

create policy (flow control)
create policy (flow control)
To add a new named flow control policy, use the create policy command. If a policy with the specified name
already exists, the command will fail.
To add or edit a named flow control policy, use the enter policy command. If the specified policy does not
exist, it is created and entered; if the policy exists, it is entered.
You also can use the scope form of this command to enter an existing policy to assign or change properties.
To delete an existing policy, use the delete form of this command.
create policy name
delete policy name
enter policy name
scope policy name
A – R Commands
Syntax Description
Command Modes
Command History
Usage Guidelines
name
A name to identify the flow control policy. The name can be from 1 to 32
characters.
scope eth-uplink/scope flow-control/
ModificationRelease
Command added.1.1(1)
When you create a new flow control policy, you are automatically entered into flow-control/policy mode
(eth-uplink/flow-control/policy) with an asterisk indicating the new policy is not yet committed. You can set
policy property values and then commit the new policy.
After you create a flow control policy, the policy name cannot be changed. You must delete the policy and
create a new one.
Example
This example shows how to create and enter a named policy for flow control:
firepower # scope eth-uplink
firepower /eth-uplink # scope flow-control
firepower /eth-uplink/flow-control # enter policy FCpolicy1
firepower /eth-uplink/flow-control/policy* # commit-buffer
firepower /eth-uplink/flow-control/policy #
Related Commands
70
DescriptionCommand
Deletes an existing flow control policy.delete policy
In flow-control/policy mode, sets flow control policy properties.set
Shows property values for a flow control policy.show policy
Cisco Firepower 4100/9300 FXOS Command Reference
Page 73

A – R Commands
create profile
To add a new Smart Call Home and Smart Licensing destination profile, use the create profile command. If
a profile with the specified name already exists, the command will fail.
To add or edit a destination profile, use the enter profile command. If the specified profile does not exist, it
is created and entered; if the profile exists, it is entered.
You also can use the scope form of this command to enter an existing profile to assign or change properties.
If the profile does not exist, the command will fail.
To delete an existing profile, use the delete form of this command.
create profile name
delete profile name
enter profile name
scope profile name
create profile
Syntax Description
Command Modes
Command History
Usage Guidelines
name
The name identifying the destination profile.
scope monitoring/scope callhome/
ModificationRelease
Command added.1.1(1)
When you create a new Smart Call Home profile, you are automatically entered into callhome/profile mode
(monitoring/callhome/profile) with an asterisk indicating the new profile is not yet committed. You can define
the profile, and then commit the new profile information.
After you create a Smart Call Home destination profile, the profile name cannot be changed. You must delete
the profile and create a new one.
Example
This example shows how to create and enter a Smart Call Home destination profile:
firepower # scope monitoring
firepower /monitoring # scope callhome
firepower /monitoring/callhome # enter profile TestProfile
firepower /monitoring/callhome/profile* # commit-buffer
firepower /monitoring/callhome/profile #
Related Commands
DescriptionCommand
Deletes an existing Smart Call Home destination profile.delete profile
In monitoring/callhome mode, sets profile properties.set
Cisco Firepower 4100/9300 FXOS Command Reference
71
Page 74

create profile
A – R Commands
DescriptionCommand
show profile
Lists currently defined Smart Call Home and Smart Licensing profiles; available
in monitoring/callhome mode.
Cisco Firepower 4100/9300 FXOS Command Reference
72
Page 75

A – R Commands
create resource-profile
To add a resource profile for use with container instances, use the create resource-profile command.
create resource-profile name
create resource-profile
Syntax Description
Command Modes
Command History
Usage Guidelines
name
Sets the name of the profile between 1 and 64 characters. Note that you cannot
change the name of this profile after you add it.
scope ssa/
ModificationRelease
Command added.2.4(1)
To specify resource usage per container instance, create one or more resource profiles. When you deploy the
logical device/application instance, you specify the resource profile that you want to use. The resource profile
sets the number of CPU cores; RAM and disk space are dynamically allocated according to the number of
cores.
• The minimum number of cores is 6.
• You cannot specify 8 cores due to internal architecture.
• You can assign cores as an even number (6, 10, 12, 14 etc.) up to the maximum.
• The maximum number of cores available depends on the security module/chassis model.
The chassis includes a default resource profile called "Default-Small," which includes the minimum number
of cores. You can change the definition of this profile, and even delete it if it is not in use. Note that this profile
is created when the chassis reloads and no other profile exists on the system.
If you change the settings for a resource profile, then any instances that use the resource profile will reload,
which can take approximately 5 minutes.
If you change the resource profile settings after you add the FTD instance to the FMC, update the inventory
for each unit on the Devices > Device Management > Device > System > Inventory dialog box.
Example
The following example adds three resource profiles.
firepower# scope ssa
firepower /ssa # enter resource-profile basic
firepower /ssa/resource-profile* # set description "lowest level"
firepower /ssa/resource-profile* # set cpu-core-count 6
firepower /ssa/resource-profile* # exit
firepower /ssa # enter resource-profile standard
firepower /ssa/resource-profile* # set description "middle level"
firepower /ssa/resource-profile* # set cpu-core-count 10
firepower /ssa/resource-profile* # exit
firepower /ssa # enter resource-profile advanced
Cisco Firepower 4100/9300 FXOS Command Reference
73
Page 76

create resource-profile
A – R Commands
firepower /ssa/resource-profile* # set description "highest level"
firepower /ssa/resource-profile* # set cpu-core-count 12
firepower /ssa/resource-profile* # commit-buffer
firepower /ssa/resource-profile #
Related Commands
DescriptionCommand
Sets the number of CPUs for the resource profile.set cpu-count
Assigned the resource profile to the application instance.set resource-profile-name
Shows resource usage for the security module/engine slot.show monitor detail
Shows resource allocation for the application instance.show resource detail
Shows resource profile assignments.show resource-profile
user-defined
Cisco Firepower 4100/9300 FXOS Command Reference
74
Page 77

A – R Commands
create ssh-server
To create a new SSH host key, use the create ssh-server command with the host-key keyword.
To delete the existing SSH host key, use the delete ssh-server command with the host-key keyword.
create ssh-server host-key
create ssh-server host-key
create ssh-server
Syntax Description
Command Modes
Command History
Usage Guidelines
This command has no additional arguments.
scope system/scope services/
ModificationRelease
Command added.1.1(1)
Use the create form of this command to generate a new SSH host key.
Use the delete form of this command to destroy an existing SSH host key before generating a new one.
Examples
This example shows how to generate a new SSH host key:
firepower # scope system
firepower /system # scope services
firepower /system/services # create ssh-server host-key
firepower /system/services* # commit-buffer
firepower /system/services #
This example shows how to delete the existing SSH host key and confirm its deletion:
firepower # scope system
firepower /system # scope services
firepower /system/services # delete ssh-server host-key
firepower /system/services* # commit-buffer
firepower /system/services # show ssh-server host-key
Host Key Size: 2048
Deleted: Yes
firepower /system/services #
Related Commands
DescriptionCommand
Sets the SSH server host key size.set ssh-server
Shows the SSH server properties.show ssh-server
Cisco Firepower 4100/9300 FXOS Command Reference
75
Page 78

create subinterface
create subinterface
To add a subinterface to a physical or EtherChannel interface for use with container instances, use the create
subinterface command.
create subinterface id
A – R Commands
Syntax Description
Command Modes
Command History
Usage Guidelines
id
scope eth-uplink/scope fabric a/scope interface/
scope eth-uplink/scope fabric a/create port-channel/
You can add between 250 and 500 VLAN subinterfaces to the chassis, depending on your network deployment.
VLAN IDs per interface must be unique, and within a container instance, VLAN IDs must be unique across
all assigned interfaces. You can reuse VLAN IDs on separate interfaces as long as they are assigned to different
container instances. However, each subinterface still counts towards the limit even though it uses the same
ID.
For native instances, you can create VLAN subinterfaces within the application only. For container instances,
you can also create VLAN subinterfaces inside the application on interfaces that do not have FXOS VLAN
subinterfaces defined, and these subinterfaces are not subject to the FXOS limit. Choosing in which operating
system to create subinterfaces depends on your network deployment and personal preference. For example,
to share a subinterface, you must create the subinterface in FXOS. Another scenario that favors FXOS
subinterfaces comprises allocating separate subinterface groups on a single interface to multiple instances.
For example, you want to use Port-Channel1 with VLAN 2-11 on instance A, VLAN 12-21 on instance B,
and VLAN 22-31 on instance C. If you create these subinterfaces within the application, then you would have
to share the parent interface in FXOS, which may not be desirable. See the following illustration that shows
the three ways you can accomplish this scenario:
Sets the ID between 1 and 4294967295. This ID will be appended to the parent
interface ID as interface_id.subinterface_id. For example, if you add a
subinterface to Ethernet1/1 with the ID of 100, then the subinterface ID will
be: Ethernet1/1.100. This ID is not the same as the VLAN ID, although you
can set them to match for convenience.
ModificationRelease
Command added.2.4(1)
Cisco Firepower 4100/9300 FXOS Command Reference
76
Page 79
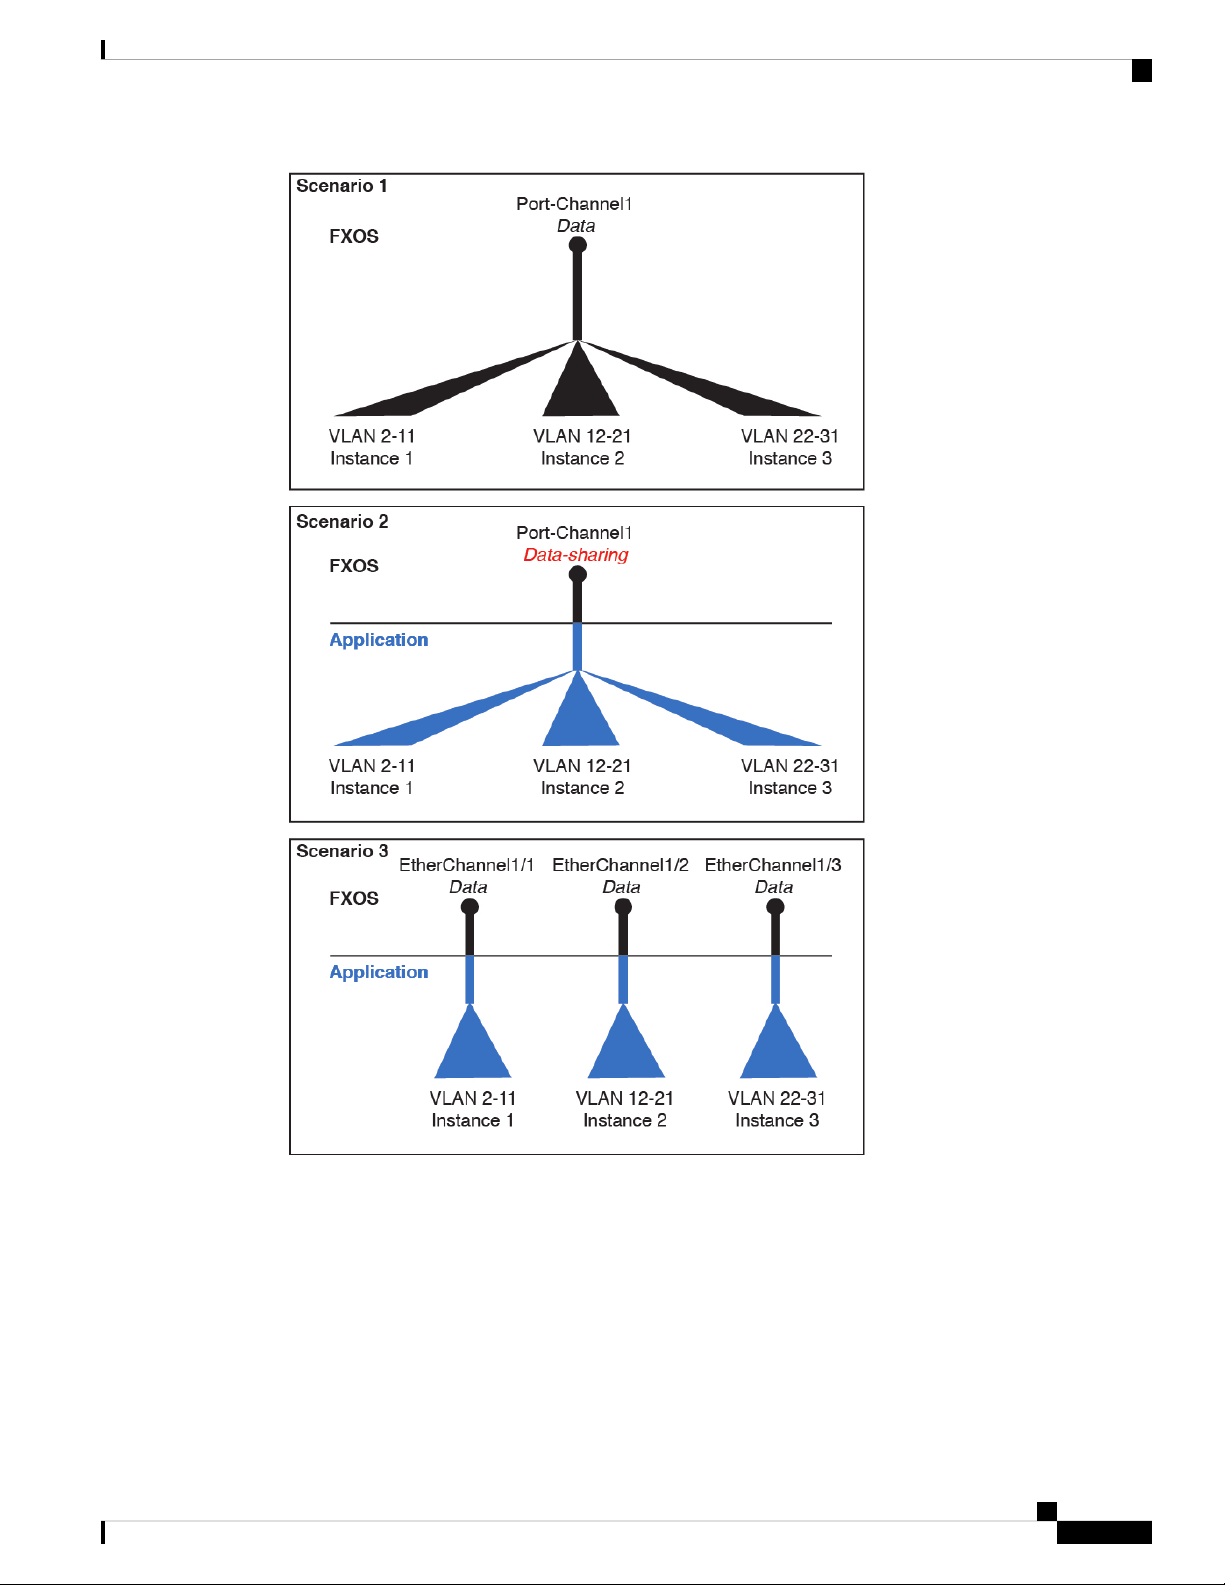
A – R Commands
create subinterface
You cannot add a subinterface to a physical interface that is currently allocated to a logical device. If other
subinterfaces of the parent are allocated, you can add a new subinterface as long as the parent interface itself
is not allocated.
Subinterfaces are supported on data or data-sharing type interfaces only.
Example
The following example creates 3 subinterfaces on Ethernet 1/1, and sets them to be data-sharing
interfaces.
Cisco Firepower 4100/9300 FXOS Command Reference
77
Page 80

create subinterface
A – R Commands
firepower# scope eth-uplink
firepower /eth-uplink # scope fabric a
firepower /eth-uplink/fabric # scope interface Ethernet1/1
firepower /eth-uplink/fabric/interface # create subinterface 10
firepower /eth-uplink/fabric/interface/subinterface* # set vlan 10
firepower /eth-uplink/fabric/interface/subinterface* # set port-type data-sharing
firepower /eth-uplink/fabric/interface/subinterface* # exit
firepower /eth-uplink/fabric/interface # create subinterface 11
firepower /eth-uplink/fabric/interface/subinterface* # set vlan 11
firepower /eth-uplink/fabric/interface/subinterface* # set port-type data-sharing
firepower /eth-uplink/fabric/interface/subinterface* # exit
firepower /eth-uplink/fabric/interface # create subinterface 12
firepower /eth-uplink/fabric/interface/subinterface* # set vlan 12
firepower /eth-uplink/fabric/interface/subinterface* # set port-type data-sharing
firepower /eth-uplink/fabric/interface/subinterface* # commit-buffer
firepower /eth-uplink/fabric/interface/subinterface #
Related Commands
DescriptionCommand
Creates an EtherChannel (port channel).create port-channel
Enters the physical interface object.scope interface
Sets the interface type.set port-type
Sets the VLAN ID for a subinterface.set vlan
Cisco Firepower 4100/9300 FXOS Command Reference
78
Page 81

A – R Commands
create trustpoint
To add a new trustpoint for validation of a certificate during Internet Key Exchange (IKE) authentication, use
the create trustpoint command. If a connection with the specified name already exists, the command will
fail.
To add or edit a trustpoint, use the enter trustpoint command. If the specified trustpoint does not exist, it is
created and entered; if the trustpoint exists, it is entered.
You also can use the scope form of this command to enter an existing trustpoint to assign or change properties.
To delete an existing trustpoint, use the delete form of this command.
create trustpoint name
delete trustpoint name
enter trustpoint name
scope trustpoint name
create trustpoint
Syntax Description
Command Modes
Command History
Usage Guidelines
name
The trustpoint name; can be up to 32 alphanumeric characters.
scope security/
ModificationRelease
Command added.1.1(1)
Use this command to identify trustpoints that will be used to validate certificates during Internet Key Exchange
(IKE) authentication.
When you create a new trustpoint, you are automatically entered into security/trustpoint mode with an asterisk
indicating the new trustpoint is not yet committed. After you create a trustpoint, the name cannot be changed.
You must delete the trustpoint and create a new one.
Example
This example shows how to create and enter a trustpoint:
firepower # scope security
firepower /security # enter trustpoint tPoint4
firepower /security/trustpoint* #
Related Commands
DescriptionCommand
Sets certificate information for a trustpoint.set certchain
Shows current trustpoint information.show trustpoint
Cisco Firepower 4100/9300 FXOS Command Reference
79
Page 82

cycle
cycle
A – R Commands
To power-cycle a security module/engine, use one of the cycle commands.
cycle {cycle-immediate | cycle-wait}
Syntax Description
Command Modes
Command History
Related Commands
Power-cycles the module immediately.cycle-immediate
cycle-wait
The system waits up to five minutes for the application running on the module
to shut down before power-cycling the module.
Service Profile (/service-profile) mode
ModificationRelease
This command was introduced.1.1(1)
Example
This example shows how to power-cycle a module after its running application is shut down:
FP9300-A # scope service-profile server 1/1
FP9300-A /org/service-profile # cycle cycle-wait
FP9300-A /org/service-profile* # commit-buffer
FP9300-A /org/service-profile #
DescriptionCommand
Takes a network module offline or online.set adminstate
Cisco Firepower 4100/9300 FXOS Command Reference
80
Page 83

D – R Commands
• decommission, on page 82
• delete, on page 83
• delete decommissioned server, on page 85
• deregister, on page 86
• disable, on page 87
• disable cc-mode, on page 88
• disable fips-mode, on page 89
• disable reservation, on page 90
• discard-buffer, on page 91
• download image, on page 92
• enable, on page 94
• enable cc-mode, on page 95
• enable fips-mode, on page 96
• enable reservation, on page 97
• end, on page 98
• enter, on page 99
• exit, on page 101
• install, on page 102
• install firmware, on page 103
• install platform, on page 105
• ping (connect local-mgmt), on page 106
• ping6 (connect local-mgmt), on page 108
• power, on page 110
• reboot, on page 111
• recommission, on page 113
• register, on page 114
• reinitialize, on page 115
• remove server, on page 116
• renew, on page 117
• request universal, on page 118
• return, on page 119
Cisco Firepower 4100/9300 FXOS Command Reference
81
Page 84

decommission
decommission
To decommission a server, use the decommission server command.
decommission server {id|chassis_id/blade_id}
A – R Commands
Syntax Description
Usage Guidelines
Command Modes
Command History
Related Commands
id
chassis_id/blade_id
The server identification number. This is a value between 1 and 255.
The chassis and blade identification numbers in n/n format.
Depending on the type of device hosting the module to be decommissioned, identify it using its module ID
(4100 series), or the chassis number and module number (9300 devices).
Any command mode
ModificationRelease
Command added.1.4(1)
Example
This example shows how to decommission a server:
FP9300-A# decommission server 1/1
FP9300-A* # commit-buffer
FP9300-A #
DescriptionCommand
Deletes a decommissioned server.delete decommissioned
Recommissions a decommissioned server.recommission
Shows any decommissioned servers.show server
decommissioned
Cisco Firepower 4100/9300 FXOS Command Reference
82
Page 85

A – R Commands
delete
delete
To delete an existing managed object, use the relevant delete command in the appropriate command mode.
delete object_type name [parameters]
Syntax Description
Command Modes
Command History
Usage Guidelines
object_type
The type of object to be deleted. Examples include local user account and
organization.
name
parameters
The name of the specific object to be deleted.
(Optional) Any additional properties or parameters needed to identify the
object. Refer to the description of the create command for the specific object
type for more information.
Depends on the type of object being deleted; refer to the description of the create command for the specific
object type for more information.
Refer to the description of the create command for the specific object type for history information.
Objects are abstract representations of physical components or logical entities that can be managed. For
example, the chassis, security modules, network modules, ports, and processors are physical components
represented as managed objects, while licenses, user roles, and platform policies are logical entities represented
as managed objects.
FXOS provides four general commands for managing objects: create, delete, enter, and scope. For example,
you can create a local user account, you can delete a local user account, and you can enter a local user account
to assign or change properties for that account; you also can “scope into” the local user account to assign or
change properties.
Generally, the keywords and options available to each of these object-management commands are the same,
so we detail only the create version of the various object commands. In other words, for information about
the delete command for a particular object, refer to the description of the create command for that object.
For example, refer to create local-user, on page 65 for information related to deleting an existing local user
account.
Related Commands
Example
This example shows how to enter security mode and then delete a local user account:
firepower # scope security
firepower /security # delete local-user test_user
firepower /security/local-user* # commit-buffer
firepower /security/local-user #
DescriptionCommand
Creates a new local user account.create local-user
Cisco Firepower 4100/9300 FXOS Command Reference
83
Page 86

delete
A – R Commands
DescriptionCommand
Adds or edits a local user account.enter local-user
Deletes an existing local user account.delete local-user
Enters a existing local user account.scope local-user
Cisco Firepower 4100/9300 FXOS Command Reference
84
Page 87

A – R Commands
delete decommissioned server
To delete a decommissioned server, use the delete decommissioned server command.
delete decommissioned server vendor model serial_number
delete decommissioned server
Syntax Description
Command Modes
Command History
Related Commands
vendor
The name of the company that manufactured the server; can be no more than
510 characters.
model
serial_number
The module’s model name; can be no more than 510 characters.
The module’s serial number; can be no more than 510 characters.
Any command mode
ModificationRelease
Command added.1.4(1)
Example
This example shows how to delete a decommissioned server.
FP9300-A # delete decommissioned server Cisco Systems, Inc.
Cisco Firepower 9000 Series Security Module
FLM1949C6J1
FP9300-A* # commit-buffer
DescriptionCommand
Decommissions a server.decommission server
Cisco Firepower 4100/9300 FXOS Command Reference
85
Page 88

deregister
deregister
A – R Commands
To remove this Firepower 4100/9300 device from your Cisco Smart Software License account, use the
deregister command.
deregister
Syntax Description
Command Modes
Command History
Usage Guidelines
Related Commands
This command has no arguments or keywords.
License mode
ModificationRelease
Command added.1.1(1)
Deregistration removes the device from your account, and all license entitlements and certificates on the
device are removed. You can use this to free up a license for a new Firepower 4100/9300, or you can remove
the device from the Smart Software Manager.
Example
This example shows how to deregister this device.
FP9300-A # scope license
FP9300-A /license # deregister
FP9300-A /license #
DescriptionCommand
register
Registers a Smart Software Manager account on this Firepower 4100/9300
device.
Cisco Firepower 4100/9300 FXOS Command Reference
86
Page 89

A – R Commands
disable
disable
To disable an existing application instance, use the disable command.
Syntax Description
Command Modes
Command History
Usage Guidelines
This command has no arguments or keywords.
Application instance (/ssa/slot/app-instance) mode
ModificationRelease
Command added.1.1(1)
Use this command to disable an application instance without removing it from the system.
Example
This example shows how to display current application instances, including their status, then enter
application instance mode and disable an application instance:
FP9300-A # scope ssa
FP9300-A /ssa # scope slot 2
FP9300-A /ssa/slot # show app-instance
Application Instance:
App Name Identifier Admin State Oper State Running Version Startup Version
Deploy Type Profile Name Cluster State Cluster Role
---------- ---------- ----------- ---------------- --------------- ---------------
----------- ------------ --------------- -----------ftd1 IFT-63 Enabled Online 6.3.0.12 6.3.0.12
Native In Cluster Slave
Related Commands
Application Instance:
App Name Identifier Admin State Oper State Running Version Startup Version
Deploy Type Profile Name Cluster State Cluster Role
---------- ---------- ----------- ---------------- --------------- ---------------
----------- ------------ --------------- -----------ftd2 FTD-2 Enabled Online 6.3.0.12 6.3.0.12
Container bronze Not Applicable None
FP9300-A /ssa/slot # scope app-instance ftd2 FTD-2
FP9300-A /ssa/slot/app-instance # disable
FP9300-A /ssa/slot/app-instance* # commit-buffer
FP9300-A /ssa/slot/app-instance #
DescriptionCommand
Enables an existing application instance.enable
Enters application mode for a specific application instance.scope app-instance
Cisco Firepower 4100/9300 FXOS Command Reference
87
Page 90

disable cc-mode
disable cc-mode
To disable Common Criteria mode, use the disable cc-mode command.
disable cc-mode
A – R Commands
Syntax Description
Command Modes
Command History
Usage Guidelines
Related Commands
This command has no arguments or keywords.
Security (/security) mode
ModificationRelease
Command added.1.1(1)
A reboot of the system will be required after this command is committed.
Example
This example shows how to enter security mode and disable Common Criteria mode:
FP9300-A # scope security
FP9300-A /security # disable cc-mode
Warning: A reboot of the system is required in order for the system to be
operating in a non-CC approved mode.
FP9300-A /security* #
DescriptionCommand
Enables Common Criteria mode.enable cc-mode
Shows current Common Criteria mode admin and operational states.show cc-mode
Cisco Firepower 4100/9300 FXOS Command Reference
88
Page 91

A – R Commands
disable fips-mode
To disable FIPS (Federal Information Processing Standard) mode, use the disable fips-mode command.
disable fips-mode
disable fips-mode
Syntax Description
Command Modes
Command History
Usage Guidelines
Related Commands
This command has no arguments or keywords.
Security (/security) mode
ModificationRelease
Command added.1.1(1)
A reboot of the system will be required after this command is committed.
Example
This example shows how to enter security mode and disable FIPS mode:
FP9300-A # scope security
FP9300-A /security # disable fips-mode
Warning: A reboot of the system is required in order for the system to be
operating in a non-FIPS approved mode.
FP9300-A /security* #
DescriptionCommand
Enables FIPS mode.enable fips-mode
Shows current FIPS mode admin and operational states.show fips-mode
Cisco Firepower 4100/9300 FXOS Command Reference
89
Page 92

disable reservation
disable reservation
To disable permanent license reservation, use the disable reservation command.
disable reservation
A – R Commands
Syntax Description
Command Modes
Command History
Usage Guidelines
Related Commands
This command has no arguments or keywords.
License (/license) mode
ModificationRelease
Command added.1.1(1)
Enable license reservation before attempting to assign a permanent license to your Firepower 4100/9300
chassis.
Example
This example shows how to enter license mode and disable reservation mode:
FP9300-A # scope license
FP9300-A /license # disable reservation
Warning: If you have already generated the authorization code from CSSM
and have not installed it on the device, please abort this command by
issuing discard-buffer and complete the installation.
FP9300-A /license* #
DescriptionCommand
Enables permanent license reservation.enable reservation
Shows current license information.show license
Cisco Firepower 4100/9300 FXOS Command Reference
90
Page 93

A – R Commands
discard-buffer
To cancel pending configuration changes, use the discard-buffer command.
discard-buffer
discard-buffer
Syntax Description
Command Modes
Command History
Usage Guidelines
This command has no arguments or keywords.
Any command mode
ModificationRelease
Command added.1.1(1)
Use this command to cancel and discard all uncommitted configuration changes. While any configuration
commands are pending, an asterisk (*) appears before the command prompt. When you enter the discard-buffer
command, the commands are discarded and the asterisk disappears.
Example
This example shows how to discard pending configuration changes:
FP9300-1# scope chassis 1
FP9300-1 /chassis # enable locator-led
FP9300-1 /chassis* # show configuration pending
scope chassis 1
+ enable locator-led
exit
FP9300-1 /chassis* # discard-buffer
FP9300-1 /chassis #
Related Commands
DescriptionCommand
Saves or verifies configuration changes.commit-buffer
Shows uncommitted configuration changes.show configuration
pending
Cisco Firepower 4100/9300 FXOS Command Reference
91
Page 94

download image
download image
To copy an FXOS firmware image to the Firepower 4100/9300 chassis, use the download image command
in firmware mode.
To copy a logical device software image to the Firepower 4100/9300 chassis, use the download image
command in application software (/ssa/app-software) mode.
download image {ftp:|scp:|sftp:|tftp:|usbA:|usbB:}
A – R Commands
Syntax Description
Command Modes
ftp://server-ip-addr/path
scp://username@
server-ip-addr/path
sftp://username@
server-ip-addr/path
tftp://username@
server-ip-addr:port-num/path
usbA:/path
usbB:/path
Firmware (/firmware) mode
Application software (/ssa/app-software) mode
(Optional) Specifies the URI of an image file to be imported via FTP (File
Transfer Protocol).
(Optional) Specifies the URI of an image file to be imported via SCP (Secure
Copy Protocol).
(Optional) Specifies the URI of an image file to be imported via SFTP (SSH
File Transfer Protocol or Secure File Transfer Protocol).
(Optional) Specifies the URI of an image file to be imported via TFTP (Trivial
File Transfer Protocol).
Note
(Optional) Specifies the path to an image file to be imported from a connected
USB Type A device.
(Optional) Specifies the path to an image file to be imported from a connected
USB Type B device.
TFTP has a file size limitation of 32 MB. Because firmware bundles
can be much larger than that, we recommend that you do not use
TFTP for firmware downloads.
Command History
Usage Guidelines
92
ModificationRelease
Command added.1.1(1)
Be sure you have the location address and authentication credentials for image file access, as well as the fully
qualified name of the file.
FXOS stores firmware images in bootflash on the fabric interconnect.
In firmware mode, you can use the show package image_name detail command to monitor the image download
process. The output display does not refresh automatically, so you may have to enter the command multiple
times until the task State is “Downloaded.”
In firmware mode, and in application software mode, you can use the show download-task command to
monitor the image download process. The output display does not refresh automatically, so you may have to
enter the command multiple times.
Cisco Firepower 4100/9300 FXOS Command Reference
Page 95

A – R Commands
download image
Examples
This example shows how to download a firmware image file using the SCP protocol, and monitor
the download progress:
FP9300-A# scope firmware
FP9300-A /firmware # download image scp://user@192.168.1.1/images/fxos-k9.1.1.1.119.SPA
FP9300-A /firmware # show package fxos-k9.1.1.1.119.SPA detail
Download task:
File Name: fxos-k9.1.1.1.119.SPA
Protocol: scp
Server: 192.168.1.1
Userid:
Path:
Downloaded Image Size (KB): 5120
State: Downloading
Current Task: downloading image fxos-k9.1.1.1.119.SPA from
192.168.1.1(FSM-STAGE:sam:dme:FirmwareDownloaderDownload:Local)
This example shows how to download a software image file using the SCP protocol, and monitor
the download progress:
FP9300-A# scope ssa
FP9300-A /ssa # scope app-software
FP9300-A /ssa/app-software # download image
scp://user@192.168.1.1/images/cisco-asa.9.4.1.65.csp
FP9300-A /ssa/app-software # show download-task
Downloads for Application Software:
File Name Protocol Server Userid State
------------------------------ ---------- -------------------- --------------- -----
cisco-asa.9.4.1.65.csp Scp 192.168.1.1 user Downloaded
Related Commands
DescriptionCommand
Shows progress of the image file download.show download-task
Shows progress of the firmware file download.show package
Verifies a specified FXOS platform image.verify platform-pack
Cisco Firepower 4100/9300 FXOS Command Reference
93
Page 96

enable
enable
A – R Commands
To enable an existing application instance, use the enable command.
Syntax Description
Command Modes
Command History
Usage Guidelines
This command has no arguments or keywords.
Application instance (/ssa/slot/app-instance) mode
ModificationRelease
Command added.1.1(1)
Use this command to re-enable an application instance that was previously disabled.
Example
This example shows how to display current application instances, including their status, then enter
application instance mode and enable a disabled application:
FP9300-A # scope ssa
FP9300-A /ssa # scope slot 2
FP9300-A /ssa/slot # show app-instance
Application Instance:
App Name Identifier Admin State Oper State Running Version Startup Version
Deploy Type Profile Name Cluster State Cluster Role
---------- ---------- ----------- ---------------- --------------- ---------------
----------- ------------ --------------- -----------ftd1 IFT-63 Enabled Online 6.3.0.12 6.3.0.12
Native In Cluster Slave
Related Commands
94
Application Instance:
App Name Identifier Admin State Oper State Running Version Startup Version
Deploy Type Profile Name Cluster State Cluster Role
---------- ---------- ----------- ---------------- --------------- ---------------
----------- ------------ --------------- -----------ftd2 FTD-2 Disabled Online 6.3.0.12 6.3.0.12
Container bronze Not Applicable None
FP9300-A /ssa/slot # scope app-instance ftd2 FTD-2
FP9300-A /ssa/slot/app-instance # enable
FP9300-A /ssa/slot/app-instance* # commit-buffer
FP9300-A /ssa/slot/app-instance #
DescriptionCommand
Disables an existing application instance.disable
Enters application mode for a specific application instance.scope app-instance
Cisco Firepower 4100/9300 FXOS Command Reference
Page 97

A – R Commands
enable cc-mode
To enable Common Criteria mode, use the enable cc-mode command.
enable cc-mode
enable cc-mode
Syntax Description
Command Modes
Command History
Usage Guidelines
Important
This command has no arguments or keywords.
Security mode
ModificationRelease
Command added.1.1(1)
Connectivity to one or more services may be denied when this command is committed. Also, a reboot of the
system will be required.
Prior to FXOS release 2.0.1, the existing SSH host key created during first-time setup of a device was
hard-coded to 1024 bits. To comply with FIPS and Common Criteria certification requirements, you must
destroy this old host key and generate a new one (see create ssh-server, on page 75 for information about
creating and deleting SSH host keys). If you do not perform these additional steps, you will not be able to
connect to the Supervisor using SSH after the device has rebooted with Common Criteria mode enabled. If
you performed initial setup using FXOS 2.0.1 or later, you do not have to generate a new host key.
Example
This example shows how to enter security mode and enable Common Criteria mode:
FP9300-A # scope security
FP9300-A /security # enable cc-mode
Warning: Connectivity to one or more services may be denied when committed.
Please consult the product's CC Security Policy documentation.
WARNING: A reboot of the system is required in order for the system to be operating in a
CC approved mode.
Related Commands
FP9300-A /security* #
DescriptionCommand
Disables Common Criteria mode.disable cc-mode
Shows current Common Criteria mode administrative and operational states.show cc-mode
Cisco Firepower 4100/9300 FXOS Command Reference
95
Page 98

enable fips-mode
enable fips-mode
To enable FIPS (Federal Information Processing Standard) mode, use the enable fips-mode command.
enable fips-mode
A – R Commands
Syntax Description
Command Modes
Command History
Usage Guidelines
Important
This command has no arguments or keywords.
Security mode
ModificationRelease
Command added.1.1(1)
Connectivity to one or more services may be denied when this command is committed. Also, a reboot of the
system will be required.
Prior to FXOS release 2.0.1, the existing SSH host key created during first-time setup of a device was
hard-coded to 1024 bits. To comply with FIPS and Common Criteria certification requirements, you must
destroy this old host key and generate a new one (see create ssh-server, on page 75 for information about
creating and deleting SSH host keys). If you do not perform these additional steps, you will not be able to
connect to the Supervisor using SSH after the device has rebooted with Common Criteria mode enabled. If
you performed initial setup using FXOS 2.0.1 or later, you do not have to generate a new host key.
Example
This example shows how to enter security mode and enable FIPS mode:
FP9300-A # scope security
FP9300-A /security # enable fips-mode
Warning: Connectivity to one or more services may be denied when committed.
Please consult the product's FIPS Security Policy documentation.
WARNING: A reboot of the system is required in order for the system to be operating in a
FIPS approved mode.
Related Commands
96
FP9300-A /security* #
DescriptionCommand
Disables FIPS mode.disable fips-mode
Shows current FIPS mode administrative and operational states.show fips-mode
Cisco Firepower 4100/9300 FXOS Command Reference
Page 99

A – R Commands
enable reservation
To enable permanent license reservation, use the enable reservation command.
enable reservation
enable reservation
Syntax Description
Command Modes
Command History
Usage Guidelines
Related Commands
This command has no arguments or keywords.
License (/license) mode
ModificationRelease
Command added.1.1(1)
Enable license reservation before attempting to assign a permanent license to your Firepower 4100/9300
chassis.
Example
This example shows how to enter license mode and enable reservation mode:
FP9300-A # scope license
FP9300-A /license # enable reservation
FP9300-A /license #
DescriptionCommand
Disables permanent license reservation.disable reservation
Shows current license information.show license
Cisco Firepower 4100/9300 FXOS Command Reference
97
Page 100

end
end
A – R Commands
To return to the EXEC (top level) mode of the CLI, use the end command.
end
Syntax Description
Command Modes
Command History
Related Commands
This command has no arguments or keywords.
Any command mode
ModificationRelease
Command added.1.1(1)
Example
This example shows how to return to the highest-level mode of the CLI from service profile mode.
FP9300-A # scope org Test
FP9300-A /org # scope service-profile Sample
FP9300-A /org/service-profile # end
FP9300-A #
DescriptionCommand
Enters top level mode from any mode.top
Cisco Firepower 4100/9300 FXOS Command Reference
98
 Loading...