

Page 1

APPENDIX
A
Replacing a RAID Battery Backup Unit
Assembly on the Firepower Management
Center 3500
Use these instructions to replace the RAID battery backup unit (BBU) assembly on Firepower
Management Center 3500. You should power down the device before you replace the BBU assembly
during a maintenance window. See the following sections for more information:
• BBU Overview, page A-1
• Working in an ESD Environment, page A-1
• Safety Warnings, page A-2
• Preparing to Replace the BBU, page A-2
• BBU Replacement Instructions, page A-4
• Monitoring the BBU, page A-10
BBU Overview
The Firepower Management Center 3500 contains a battery backup unit (BBU) that protects the integrity
of cached data on the RAID controllers by providing backup power if there is a complete loss of AC
power or a brief power interruption. Cisco recommends that you replace this BBU once a year.
A new BBU replacement assembly is available from Cisco. The assembly includes a new BBU model
(BBU8) with a five year lifespan and a new plastic battery tray. The BBU is held in place in the plastic
battery tray (see in Figure A-1) that securely locks into the base of the Firepower MC3500 chassis. You
remove the installed BBU and tray and replace them with the new BBU assembly.
Working in an ESD Environment
Electrostatic discharge (ESD) can damage equipment and impair electrical circuitry. ESD damage occurs
when electronic components are improperly handled and can result in complete or intermittent failures.
Always follow ESD-prevention procedures when you remove and replace components. Ensure that the
chassis is electrically connected to earth ground. Wear an ESD-preventive wrist strap, ensuring that it
makes good skin contact. Connect the grounding clip to an unpainted surface of the chassis frame to
Cisco Firepower Management Center 750, 1500, 2000, 3500, and 4000 Hardware Installation Guide
A-1
Page 2

Appendix A Replacing a RAID Battery Backup Unit Assembly on the Firepower Management Center 3500
Safety Warnings
safely ground unwanted ESD voltages. To guard against ESD damage and shocks, the wrist strap and
cord must operate properly. If no wrist strap is available, ground yourself by touching the metal part of
the chassis.
Caution For the safety of your equipment, periodically check the resistance value of the anti-static strap. It should
be between 1 and 10 megohms (Mohm).
Safety Warnings
This section contains important safety warnings for the installation and use of the appliance.
Warning
Warning
Warning
Warning
Warning
Before working on a system that has an On/Off switch, turn OFF the power and unplug the power
cord. Statement 1
Only trained and qualified personnel should be allowed to install, replace, or service this
equipment. Statement 1030
This equipment must be grounded. Never defeat the ground conductor or operate the equipment
in the absence of a suitably installed ground conductor. Contact the appropriate electrical
inspection authority or an electrician if you are uncertain that suitable grounding is available.
Statement 1024
Do not work on the system or connect or disconnect cables during periods of lightning activity.
Statement 1001
Read the installation instructions before connecting the system to the power source. Statement
1004
Warning
Ultimate disposal of this product should be handled according to all national laws and
regulations. Statement 1040
Preparing to Replace the BBU
Tools You Supply
You must provide a #2 Phillips screwdriver and a razor knife to replace the BBU.
Cisco Firepower Management Center 750, 1500, 2000, 3500, and 4000 Hardware Installation Guide
A-2
Page 3

Appendix A Replacing a RAID Battery Backup Unit Assembly on the Firepower Management Center 3500
BBU Components
The following illustration shows the BBU assembly components you should be familiar with when
replacing the BBU.
Figure A-1 BBU Assembly Components
Preparing to Replace the BBU
1 BBU tray 2 BBU
3 BBU wire connector and cable — —
Firepower Management Center 3500 Components
This section helps you identify the components of your Firepower MC3500 system. If you are near the
system, you can also use the Quick Reference Label provided on the inside of the chassis cover to assist
in identifying components.
Cisco Firepower Management Center 750, 1500, 2000, 3500, and 4000 Hardware Insta llation Guide
A-3
Page 4
BBU Replacement Instructions
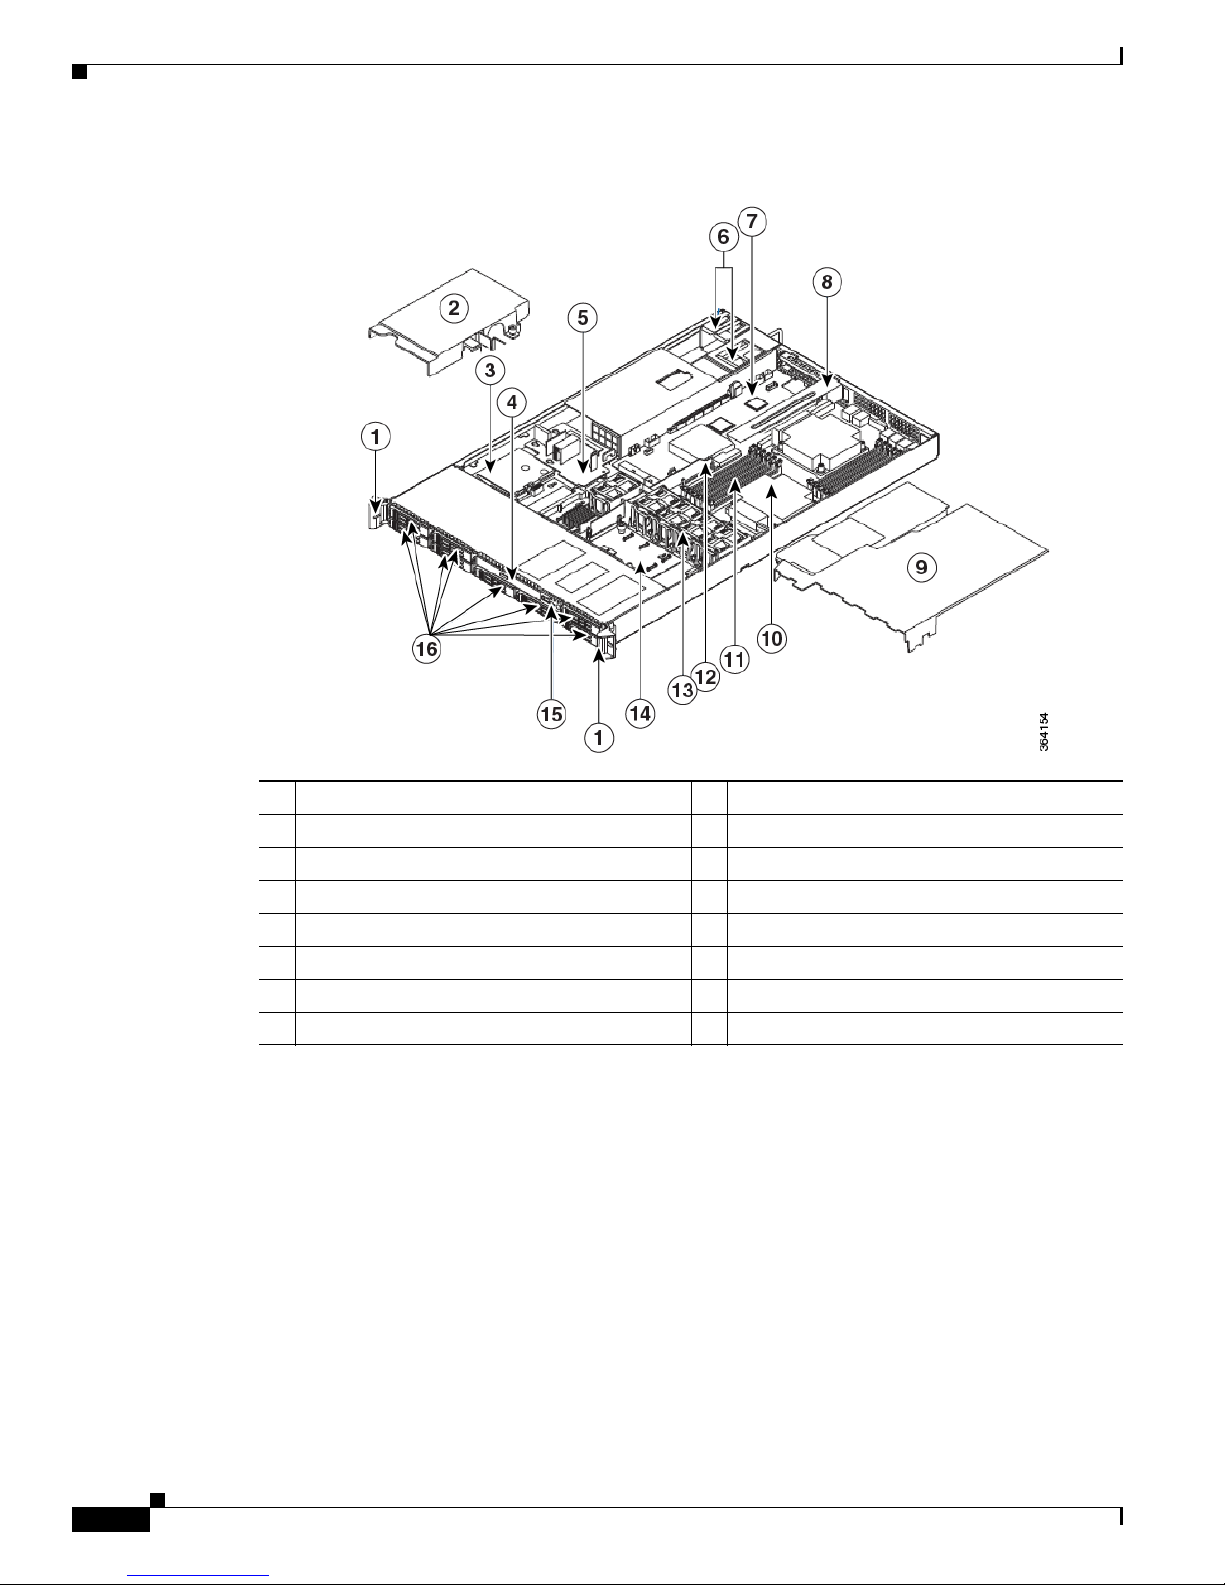
Figure A-2 MC3500 Chassis Components
Appendix A Replacing a RAID Battery Backup Unit Assembly on the Firepower Management Center 3500
1 Rack handles 9 Processor air duct
2 Power supply air duct 10 Processor and heatsink
3 Battery backup unit (BBU) assembly 11 System memory
4 Drive bay 12 Bridge board
5 Power distribution board 13 Fan assembly
6 Power supply modules 14 Midplane board
7 Server board 15 Mini control panel
8 PCI riser assembly 16 Disk drive bays
BBU Replacement Instructions
The following sections explain how to replace the RAID BBU in your Firepower MC3500. Follow the
instructions in the order presented:
• Removing the Cover, page A-5
• Removing the Power Supply Air Duct, page A-5
• Removing the Old BBU Assembly, page A-6
• Installing the New BBU Assembly, page A-7
• Replacing the Power Supply Air Duct, page A-8
• Replacing the Cover, page A-9
• Disposing the Old BBU, page A-10
Cisco Firepower Management Center 750, 1500, 2000, 3500, and 4000 Hardware Installation Guide
A-4
Page 5

Appendix A Replacing a RAID Battery Backup Unit Assembly on the Firepower Management Center 3500
Removing the Cover
The Firepower MC3500 must be operated with the chassis cover in place to ensure proper cooling. You
will need to remove the top cover to add or replace components inside of the device.
Note A nonskid surface or a stop behind the MC3500 may be needed to prevent the device from sliding on
your work surface.
To remove the Firepower MC3500 cover:
Step 1 Remove the security screw if it is installed (see “1” in Figure A-3).
Step 2 Cut the warranty label on the unit if it is intact.
Step 3 While holding in the blue button on the top of the FireSIGHT 3500 in (see “3” in Figure A-3), slide the
top cover back until it stops (see “4” in Figure A-3).
Step 4 Insert your finger in the notch (see “2” in Figure A-3) and lift the cover upward to remove it.
BBU Replacement Instructions
Figure A-3 Removing the MC3500 Cover
1 Security screw 3 Top cover
2 Button 4 Notch
Removing the Power Supply Air Duct
The RAID BBU is located under the power supply air duct (see Figure A-2). To remove the air duct,
follow these steps:
Step 1 Locate the power supply air duct (see “1” in Figure A-4).
Step 2 Unscrew the thumbscrew (see “2” in Figure A-4) using your fingers or a Phillips head screwdriver. Be
careful to retain the thumbscrew.
Step 3 Carefully lift the air duct upward and set aside.
Cisco Firepower Management Center 750, 1500, 2000, 3500, and 4000 Hardware Insta llation Guide
A-5
Page 6

BBU Replacement Instructions
Figure A-4 Removing the Power Supply Air Duct
Appendix A Replacing a RAID Battery Backup Unit Assembly on the Firepower Management Center 3500
1 Power supply air duct 2 Thumbscrew
Removing the Old BBU Assembly
The RAID BBU is held in place in a plastic battery tray (see in Figure A-1) that securely locks into the
base of the chassis via two tabs on the underside of the battery holder. These tabs securely slide into two
notches located on the bottom of the chassis. Cisco recommends that you remove the BBU assembly as
described in the following procedure.
Note The plastic tray that comes with your replacement BBU assembly is different from the one currently
installed. You can discard the old plastic tray after you install your replacement BBU assembly.
To remove the BBU:
Step 1 Carefully remove the cable from the rear of the BBU unit by gently pulling the connector (not the cable)
uniformly out of the BBU connector. Note the cable polarity as you remove the connector. This is
important when reattaching the cable.
Step 2 Locate the side tab of the BBU assembly tray (see “2” in Figure A-5). This tab secures the BBU assembly
by locking the battery tray into place.
Step 3 Push the side tab inward towards the battery, apply downward pressure on the BBU assembly, and slide
the assembly towards the front of the chassis, away from the power supply.
Cisco Firepower Management Center 750, 1500, 2000, 3500, and 4000 Hardware Installation Guide
A-6
Page 7

Appendix A Replacing a RAID Battery Backup Unit Assembly on the Firepower Management Center 3500
Step 4 Remove the BBU assembly from the chassis.
Installing the New BBU Assembly
Once the old BBU assembly is removed from the chassis, you can install the replacement BBU assembly
which comes pre-assembled for ease of installation. Cisco recommends that you install the replacement
BBU assembly as described in the following procedure.
To install the replacement BBU assembly:
Step 1 Locate the tabs that secure the BBU assembly to the chassis. They are located on the inside floor of the
chassis, on the left side, near the front of the chassis by the power supply (see Figure A-6).
Step 2 Align the clips on the bottom of the plastic battery tray (see “1” in Figure A-5) with the tabs on the
chassis.
Step 3 Slide the BBU assembly unit toward the power supply until the tabs engage with the notches in the
chassis.
BBU Replacement Instructions
Caution Make sure the side clip (see “2” in Figure A-5) has fully engaged with the chassis to lock the tray into
place. Failure to properly secure the battery tray may allow the BBU assembly to move freely inside the
chassis. This could cause a malfunction, such as loosening of the BBU cable, which would jeopardize
the battery protection.
Step 4 Carefully connect the cable to the new BBU. Make sure you observe cable polarity and uniformly insert
the connector into the BBU connector.
Figure A-5 Underside of BBU Battery Tray
1 Tray clips 2 Side clip
Cisco Firepower Management Center 750, 1500, 2000, 3500, and 4000 Hardware Insta llation Guide
A-7
Page 8

BBU Replacement Instructions
Figure A-6 Installing the Replacement BBU Assembly
Appendix A Replacing a RAID Battery Backup Unit Assembly on the Firepower Management Center 3500
1 BBU and tray assembly 2 Chassis tabs
Replacing the Power Supply Air Duct
Replace the power supply air duct once the replacement BBU assembly is in place and connected (see
Figure A-7).
To replace the air duct:
Step 1 Locate the power supply air duct and the thumbscrew that you removed previously.
Step 2 Align the power supply air duct over the BBU assembly, the power distribution board, and the matching
thumbscrew hole. Note that the thumbscrew attaches to a chassis standoff underneath the power
distribution board (see “4” in Figure A-7).
Make sure that no cables are pinched by any part of the power supply air duct before securing the duct.
Step 3 Tighten the thumbscrew using your fingers or a Phillips head screwdriver.
Cisco Firepower Management Center 750, 1500, 2000, 3500, and 4000 Hardware Installation Guide
A-8
Page 9

Appendix A Replacing a RAID Battery Backup Unit Assembly on the Firepower Management Center 3500
Figure A-7 Replacing the Power Supply Air Duct
BBU Replacement Instructions
1 Installed BBU assembly 4 Chassis standoff
2 Power supply air duct 5 Power distribution unit
3 Thumbscrew — —
Replacing the Cover
To replace the Firepower MC3500 cover:
Step 1 Place the cover over the device as shown in Figure A-8 so that the side edges of the cover sit just inside
the chassis sidewalls.
Step 2 Slide the cover forward to engage the recessed edge of the cover with the front of the chassis (see “2” in
Figure A-8). Make sure the cover latch clicks into place.
Step 3 Insert the security screw at the center of the top cover (see “3” in Figure A-8).
Cisco Firepower Management Center 750, 1500, 2000, 3500, and 4000 Hardware Insta llation Guide
A-9
Page 10

Monitoring the BBU
Appendix A Replacing a RAID Battery Backup Unit Assembly on the Firepower Management Center 3500
Figure A-8 Replacing the MC3500 Cover
1 Top cover 3 Security screw
2 Recessed edge — —
Disposing the Old BBU
Warning
Do not damage the battery pack in any way. Toxic chemicals can be released if it is damaged.
The material in the battery pack contains heavy metals that can contaminate the environment. Federal,
state, and local regulations prohibit the disposal of rechargeable batteries in public landfills. Be sure to
recycle old battery packs properly. Cisco would like to remind you that you must comply with all
applicable battery disposal and hazardous material handling laws and regulations in the country or other
jurisdiction where you are using the BBU.
Monitoring the BBU
After you install a new BBU, use the Intel® RAID BIOS Console Battery Module configuration utility
to reset the battery recharge cycle counter to zero. The utility is independent of the operating system and
can be accessed at device start up by pressing <Ctrl><G>.
To view the BBU information:
Step 1 At boot, press <Ctrl><G> when prompted.
Step 2 From the main menu of the Intel
Step 3 Click Next to view the second Adapter Properties screen.
®
RAID BIOS Console, choose Adapter Properties.
Step 4 In the Battery Backup field at the top left of the Adapter Properties screen, click Present.
Step 5 The Battery Module screen appears. This screen contains the following information:
— Battery information
— Design information
— Capacity information
Cisco Firepower Management Center 750, 1500, 2000, 3500, and 4000 Hardware Installation Guide
A-10
Page 11

Appendix A Replacing a RAID Battery Backup Unit Assembly on the Firepower Management Center 3500
— Properties and settings
Step 6 Verify that BBU8 is installed in the Battery Type field.
Step 7 Set the Bbu Mode option to 1.
This sets the BBU charging mode to provide 12 hours of data retention in a power loss while providing
5 years of BBU life, assuming the BBU is kept below 45 degrees Celsius.
Step 8 Click Go to save the settings.
Step 9 Click Home to return to the main RAID BIOS screen, then exit.
Monitoring the BBU
Cisco Firepower Management Center 750, 1500, 2000, 3500, and 4000 Hardware Insta llation Guide
A-11
Page 12

Monitoring the BBU
Appendix A Replacing a RAID Battery Backup Unit Assembly on the Firepower Management Center 3500
Cisco Firepower Management Center 750, 1500, 2000, 3500, and 4000 Hardware Installation Guide
A-12
 Loading...