

Page 1

Cisco Small Business
TelePresence CLX300
Cisco TelePresence CLX300
pour petites entreprises
English
Quick Start
Guide
Guide de
démarrage
Page 2

Page 3

1
Confirm your
Callway subscription
To use your Cisco Small Business TelePresence
CLX300, you need a Callway small business
subscription. Your channel partner sold this
subscription when you or your company’s system
administrator bought your hardware product.
Either you or your system administrator received
an email containing the video number and
activation code for your CLX300. The subject line
for this email is Cisco Callway - Next steps to
getting started. Write down your video number
and activation code here for reference.
English
Video number
Activation code
NOTE: If the message you or your system
administrator received from the Callway team
doesn’t contain your video address and activation
code, this means that your subscription sign-up
is not complete. Click the links in the email to
accept the Terms & Conditions and complete
the subscription sign-up.
1
Page 4

2
English
What’s in the box
If anything is missing, please contact the Cisco
customer service hotline at (877) 533-4246
(US, toll-free) or (408) 902-2214 (outside the US).
Device (includes camera)
Microphones (6)
Camera
Speaker
Incoming
video call
indicator
Active video
call indicator
Power
cable jack
Remote/batteries
TV bracket
Power button
Missed video
call indicator
Front
HDMI output
Service
Ethernet cable jack
Back
Power cable
HDMI cable
2
Page 5
3
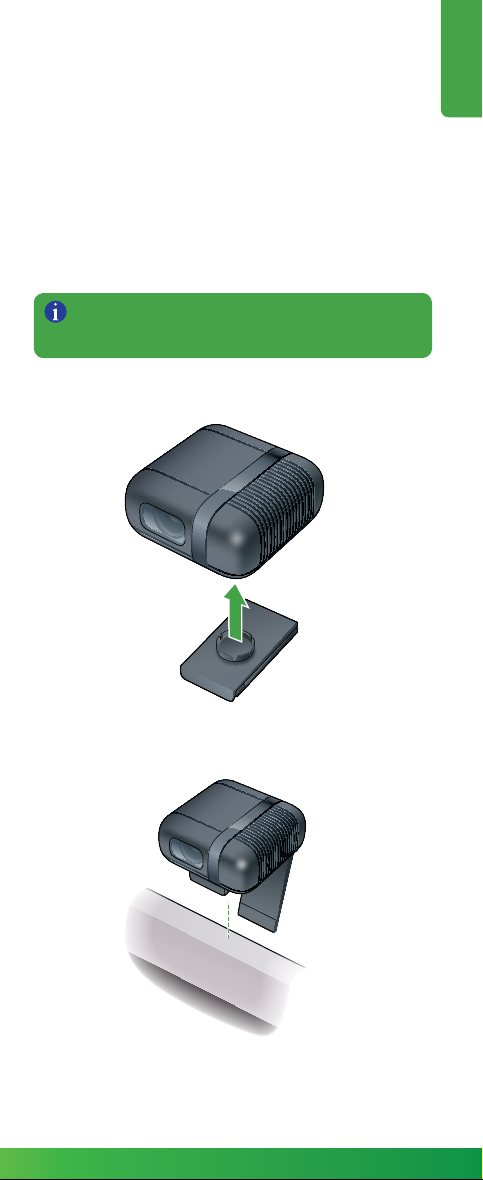
Mount your CLX300
Follow these instructions to mount your CLX300
on top of your display.
You can place your device on a flat
surface instead of mounting it.
a. Snap the device onto the bracket.
English
b. Position the bracket on top of your display.
3
Page 6
English
English
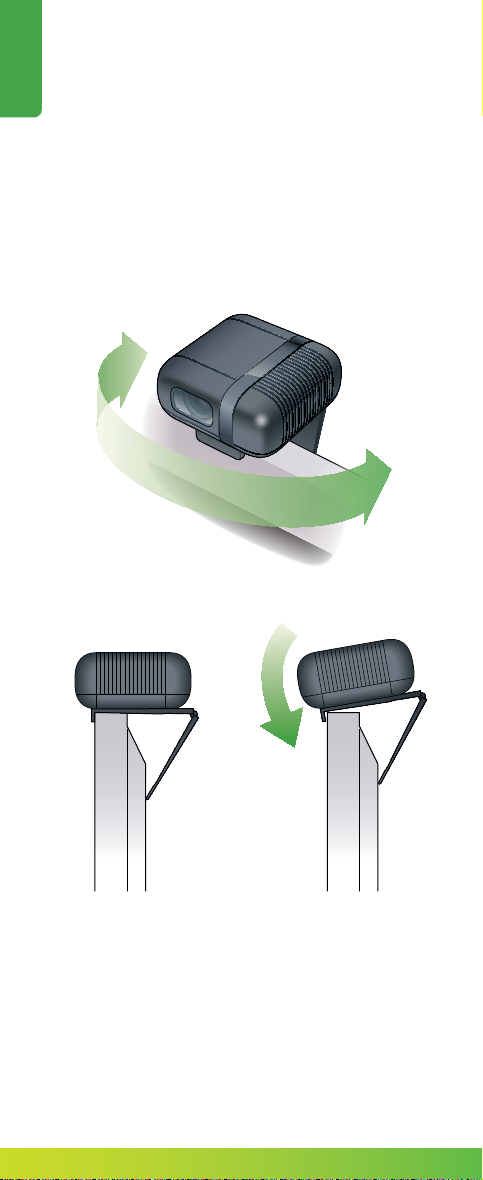
c. Pan and tilt the camera as needed until it is
pointing in the direction you want. To tilt the
camera, bend the bracket.
NOTE: After you complete setup, you can use the
remote to pan and tilt the camera digitally.
4
Page 7

4
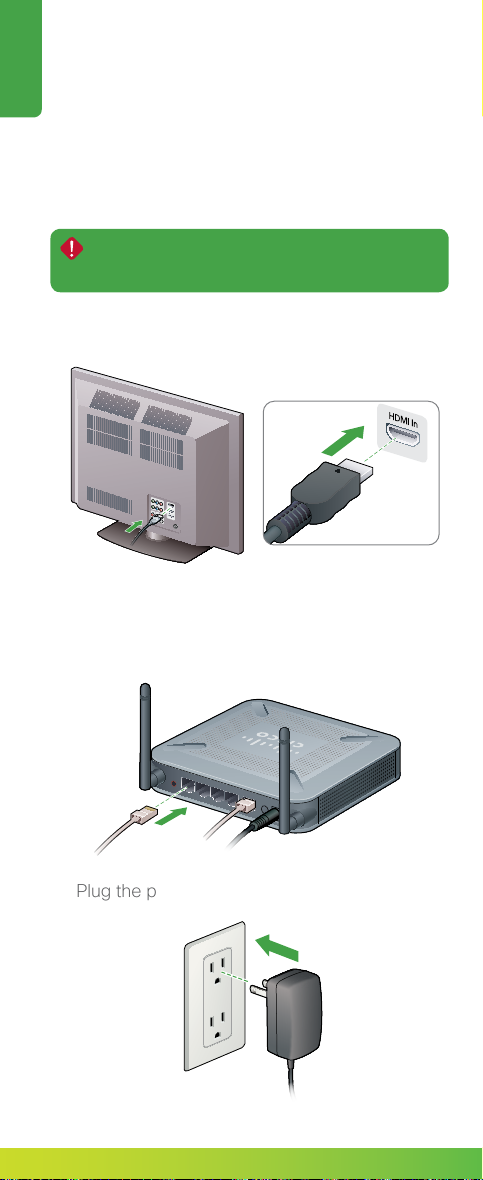
Connect the cables
Connect these cables to the back of the device:
• HDMI cable
• Power cable
• Ethernet cable (sold separately) if you are
using Ethernet to connect to your network
English
NOTE: You do not need an Ethernet cable if you
will connect to your network wirelessly using the
internal Wi-Fi radio.
5
Page 8
5
POWER
SWITCH
English
English
Connect the cables to
your other devices
Be sure to connect the cables in the
order described here.
a. Insert the HDMI cable into any available HDMI
port on your TV.
b. If you are using Ethernet, insert the Ethernet
cable into any available port on your router or
Internet connection jack.
LAN 1
RESET
LAN 2
LAN 3
LAN 4
WAN
ON/OFF
12VDC 1A
c. Plug the power cable into a working outlet.
66
Page 9

6
Set up your CLX300
on your TV or monitor
a. When the Welcome screen appears, you’re
ready to begin onscreen setup. Use the
CLX300 remote to make selections and enter
text. Be sure you inserted the batteries into
the remote.
Here is a quick reference guide to remote
buttons and keys:
Arrow buttons
Center
(selects the
highlighted
item)
Home
Self-view
Make/answer
video call
(displays the
main menu)
End video
call
English
Zoom camera
Be sure to point the remote at your CLX300,
not at your TV or monitor.
7
Page 10

English
English
b. Follow the onscreen instructions to complete
these setup steps. Some steps are optional.
• Selectyourlanguage.
• SetupyourEthernetorwirelessnetwork
connection.
• Selectyourregion.
• Enteryourvideonumberandcode.
• Checkyournetworkconnection.
• Adjustthecamerasothatitcapturesthe
part of the room you want others to see
when you are on a video call.
• Takeaprofilepicturethatotherswillsee
when you call.
c. After setup is complete, your system checks to
see if a system software update is available.
If an update is available, the system reboots to
install the update.
During the reboot process, the startup
screen appears one or more times. This
process may take up to 15 minutes.
8
Page 11

Use your CLX300
The Home screen
English
Contacts
More (select to access settings
camera )
Make your first video call
You can call anyone in your Company directory
right away.
1. Select
2. Use the arrow keys to navigate to the contact
to highlight it.
3. Press Center to call the contact.
You can also add a contact to My
contacts. Select
Use the onscreen keyboard to enter the
contact information, and select Done.
Call history
> .
Dial pad
and adjust the
> > New.
9
Page 12

English
English
English
Create a favorite
You can assign any contact from your Company
directory or your My contacts list as a favorite.
1. Select
2. Select
.
or .
3. Use the arrow keys to navigate to the contact
to highlight it.
4. Select
>
.
The contact now appears as a favorite. Access
your favorites by selecting
> .
You can also assign a contact as a favorite
from any entry in your call history list.
Use your personal group calling bridge
As part of your Callway subscription, you can
invite up to 6 participants to join a conference
using your personal bridge.
Your My Group Calling Bridge entry appears
under
> .
You received your group calling bridge
video address in your welcome email.
This is the address other users call to
join the bridge.
10
Page 13

1
Confirmation de votre
abonnement Callway
Pour pouvoir utiliser votre Cisco TelePresence
CLX300 pour petites entreprises, il vous faut un
abonnement Callway pour petites entreprises.
Votre partenaire de distribution vous a vendu cet
abonnement lorsque vous ou l’administrateur
système de votre société avez acheté le matériel.
Vous ou votre administrateur système avez reçu
un courriel contenant le numéro et le code
d’activation vidéo de votre appareil. L’objet de
ce courriel est Cisco Callway - Next steps to
getting started (Cisco Callway : démarches
nécessaires pour le démarrage). Notez le
numéro et le code d’activation vidéo ici à titre
de référence.
FrançaisEnglish
Numéro vidéo
Code d’activation
REMARQUE : si le message que vous ou votre
administrateur système avez reçu de l’équipe
Callway ne contient ni votre adresse ni votre
code d’activation vidéo, cela signie que votre
formulaire d’abonnement est incomplet. Cliquez
sur les liens qui se trouvent dans le courriel pour
accepter les conditions générales et remplir le
formulaire d’abonnement.
11
Page 14

2
Contenu de la boîte
Français English
Si un élément quelconque manque, communiquez
avec le service à la clientèle de Cisco au
(877)533-4246 (service sans frais) pour les
États-Unis ou au (408) 902-2214 pour les
clients en dehors des États-Unis.
Appareil (avec caméra)
Microphones (6)
Caméra
Haut-parleur
Indicateur
d’appel
vidéo
entrant
Indicateur d’appel
vidéo actif
Connecteur pour
câble d’alimentation
Bouton de mise
en marche
Télécommande/piles
Support pour téléviseur
12
Indicateur d’appel
Devant
Dos
vidéo manqué
Port de sortie
HDMI
Connecteur pour
câble Ethernet
Câble d’alimentation
Câble HDMI
Service
Page 15

3
Installation de la caméra
Suivez ces instructions pour installer la caméra
sur votre téléviseur.
Vous pouvez fixer votre appareil sur une
surface plane au lieu de l’installer.
a. Fixez l’appareil au support.
Français
b. Placez le support sur votre téléviseur.
13
Page 16

Français
c. Orientez et inclinez la caméra à votre
convenance jusqu’à ce qu’elle pointe vers
la direction recherchée. Pour l’incliner, pliez
le support.
REMARQUE : vous pouvez régler la position de la
caméra à tout moment.
14
Page 17

4
Connexion des câbles
Connectez les câbles suivants au dos de
l’appareil :
• Câble HDMI
• Câble d’alimentation
• Câble Ethernet (vendu séparément) si vous
utilisez Ethernet pour vous connecter à votre
réseau
Français
REMARQUE : vous n’avez pas besoin d’un câble
Ethernet si vous vous connectez à un réseau
sans fil par le moyen d’une radio interne 802.11n.
15
Page 18

POWER
SWITCH
5
Connexion des câbles
aux autres appareils
Français
Assurez-vous de connecter les câbles
dans l’ordre décrit ci-après.
a. Insérez le câble HDMI dans un port HDMI
disponible de votre téléviseur.
b. Si vous utilisez Ethernet, insérez le câble
Ethernet dans un port disponible de votre
routeur ou dans une prise de connexion
Internet.
LAN 1
RESET
LAN 2
LAN 3
LAN 4
WAN
ON/OFF
12VDC 1A
c. Branchez le câble d’alimentation dans une
prise qui fonctionne.
16
Page 19

6
Installation de la caméra
sur un téléviseur ou un
moniteur
a. Lorsque l’écran d’accueil s’affiche, vous
pouvez commencer l’installation. Utilisez
la télécommande HTP pour effectuer les
sélections et saisir du texte. Veillez à bien
insérer les piles dans la télécommande.
Voici un guide de référence rapide
concernant les boutons et les touches
de la télécommande :
Flèches
Centre
(sélectionne
l’élément en
surbrillance)
Accueil
(affiche
Vue miroir
Passer
un appel
vidéo ou y
répondre
le menu
principal)
Mettre fin
à un appel
vidéo
Français
Zoom avec la
caméra
Pointez le port infrarouge de la télécommande
vers la caméra et non vers votre téléviseur ou
votre écran.
17
Page 20

Français
b. Suivez les instructions à l’écran pour
terminer l’installation. Certaines étapes sont
facultatives.
• Sélectionnezvotrelangue.
• ConfigurezvotreconnexionréseauEthernet
ou sans fil.
• Sélectionnezvotrerégion.
• Saisissezlenuméroetlecodevidéo.
• Configurezlaconnexionréseau.
• Réglezlacaméraafinqu’ellefilmelapartie
de la pièce que vos interlocuteurs verront
lorsque vous appellerez.
• Prenezunephotodeprofilquelesautres
membres verront lorsque vous appellerez.
c. Une fois la configuration terminée, votre
système vérifie si une mise à jour logicielle
du système est disponible. Si une mise à jour
est disponible, le système redémarre pour
l’installer.
Au cours du redémarrage, l’écran de
démarrage s’affiche une ou plusieurs
fois. Cette opération peut prendre
jusqu’à 15minutes.
18
Page 21

Utilisation de la caméra
Écran d’accueil
Historique
Contacts
d’appel
Pavé numérique
Français
Plus (appuyez pour accéder aux paramètres
régler la caméra )
Premier appel vidéo
Vous pouvez tout de suite appeler quiconque
dans votre répertoire d’entreprises.
1. Sélectionnez
2. Utilisez les flèches pour accéder au contact et
le mettre en surbrillance.
3. Appuyez sur la touche Centre pour appeler
le contact.
Vous pouvez également ajouter un
contact dans My contacts (Mes
contacts). Sélectionnez
New (Nouveau). Utilisez le clavier à
l’écran pour saisir les coordonnés et
sélectionnez Done (Terminé).
> .
> >
et
19
Page 22

Français
Création d’un favori
Vous pouvez assigner un contact de votre
répertoire d’entreprises dans votre liste My
contacts (Mes contacts) en tant que favori.
1. Sélectionnez
2. Sélectionnez
.
ou .
3. Utilisez les flèches pour accéder au contact et
le mettre en surbrillance.
4. Sélectionnez
>
.
Le contact s’affiche maintenant en tant que favori.
Accédez à vos favoris en sélectionnant
dans
le menu principal.
Vous pouvez également définir un contact
comme favori depuis toute entrée (entrant,
sortant, manqué) dans votre liste de
l’historique des appels.
Utilisation du pont d’appel de groupe
individuel
Dans le cadre de votre abonnement Callway, vous
pouvez inviter jusqu’à 6 participants à se joindre à
une conférence en utilisant votre pont individuel.
Votre entrée My Group Calling Bridge
(Mon pont d’appel de groupe) s’affiche sous
Contacts > Company directory (Répertoire
d’entreprise).
Vous avez reçu l’adresse vidéo de
votre pont d’appel de groupe dans
votre courriel de bienvenue. Il s’agit de
l’adresse que d’autres utilisateurs doivent
appeler pour rejoindre le pont.
20
Page 23

Cisco small business product limited warranty
Under Compliance and Safety Review
terms
The following are terms applicable to your hardware warranty. Your formal
Warranty Statement, including the warranty applicable to Cisco software,
appears below.
Duration of hardware warranty: 1 year
Replacement, repair, or refund procedure for hardware: Cisco or
its service center will use commercially reasonable efforts to ship a
replacement part upon receipt of the defective product at Cisco’s site.
The replacement part will be shipped via ground shipping with shipping
charges prepaid. Actual delivery times may vary depending on customer
location. Cisco reserves the right to refund the purchase price as its
exclusive warranty remedy.
To receive a return materials authorization (RMA) number: Please
contact the party from whom you purchased the product. If you
purchased the product directly from Cisco, contact your Cisco Sales and
Service representative.
Complete the form below and keep for ready reference.
Product purchased from:
Their telephone number:
Serial number:
Product warranty terms and other information applicable to Cisco products
are available at the following URL: www.cisco-warrantyfinder.com
End User License Agreement: Go to www.cisco.com/go/eula
Conditions de la garantie limitée des produits
Cisco pour petites entreprises
Les conditions suivantes s’appliquent à la garantie de votre matériel. Votre
déclaration de garantie officielle, incluant la garantie applicable au matériel
Cisco, s’affiche ci-dessous et dans la trousse d’information Cisco qui
accompagne le produit.
Durée de la garantie du matériel : 2 ans
Remplacement, réparation ou procédure de remboursement du
matériel : Cisco ou son centre de réparation doit déployer des efforts
raisonnables sur le plan commercial afin d’expédier une pièce de
rechange après réception du produit défectueux sur le site de Cisco. La
pièce de rechange sera expédiée par voie terrestre avec des frais de
transport prépayés. Le délai d’envoi peut changer selon l’emplacement
des clients. Cisco se réserve le droit de rembourser le prix d’achat en tant
que recours exclusif de garantie.
Pour obtenir un numéro d’autorisation de retour de matériel (RMA) :
veuillez contacter l’entité auprès de laquelle vous avez acheté le produit.
Si vous avez acheté le produit directement chez Cisco, contactez votre
représentant du service à la clientèle Cisco.
Remplissez le formulaire ci-dessous et gardez-le pour faciliter la
consultation.
Produit acheté auprès de :
Leur numéro de téléphone :
Numéro de série :
Les conditions et autres informations de garantie du produit applicables
aux produits Cisco sont disponibles à l’adresse URL suivante :
www.ciscowarrantyfinder.com
Accord de licence d’utilisateur final : consultez le site
www.cisco.com/go/eula
21
Page 24

Regulatory and Safety Information for the
Under Compliance and Safety Review
Cisco Small Business TelePresence CLX300
Renseignements sur la réglementation et
la sécurité du service de Cisco TelePresence
CLX300 pour petites entreprises
Translated Safety Warnings
Consignes de sécurité traduites
Statement 331—Power Supply Installation Warning
Avis de sécurité331 - Avertissement relatif à l’installation du bloc
d’alimentation électrique
Warning The power supply must be placed indoors. Statement
Attention Le bloc d’alimentation électrique doit être placé à
Statement 1004—Installation Instructions
Avis de sécurité1004 - Instructions d’installation
Warning Read the installation instructions before connecting
Attention Consultez les directives d’installation avant de
Statement 1019—Main Disconnecting Device
Avis de sécurité1019 - Système principal de déconnexion
Warning The plug-socket combination must be accessible at
Attention La combinaison de prise de courant doit être
Statement 1024—Ground Conductor
Avis de sécurité1024 - Conducteur de mise à la terre
Warning This equipment must be grounded. Never defeat the
Attention Cet équipement doit être mis à la terre. Ne rendez
331
l’intérieur. Avis de sécurité331
the system to the power source. Statement 1004
brancher le système sur la source d’alimentation. Avis
de sécurité1004
all times, because it serves as the main disconnecting
device. Statement 1019
accessible à tout moment parce qu’elle fait office
de système principal de déconnexion. Avis de
sécurité1019
ground conductor or operate the equipment in the
absence of a suitably installed ground conductor.
Contact the appropriate electrical inspection authority
or an electrician if you are uncertain that suitable
grounding is available. Statement 1024
jamais le conducteur de mise à la terre inopérant et
n’utilisez jamais l’équipement sans un conducteur
de mise à la terre correctement installé. En cas de
doute sur la mise à la terre appropriée disponible,
adressez-vous à l’organisme responsable de la
sécurité électrique ou à un électricien. Avis de
sécurité1024
22
Page 25

Statement 1045—Short-circuit Protection
Under Compliance and Safety Review
Avis de sécurité1045 - Protection contre les courts-circuits
Warning This product requires short-circuit (overcurrent)
Attention La protection de ce produit contre les courts-
Statement 1071—Warning Definition
Avis de sécurité 1071 - Dénition des avertissements
Warning IMPORTANT SAFETY INSTRUCTIONS
This warning symbol means danger. You are in a
SAVE THESE INSTRUCTIONS
Attention IMPORTANTS RENSEIGNEMENTS DE SÉCURITÉ
Ce symbole d’avertissement indique un danger.
CONSERVEZ CES INSTRUCTIONS
Statement 1074—Comply with Local and National Electrical Codes
Avis de sécurité1074 - Conformité aux normes électriques nationales et
locales
protection, to be provided as part of the building
installation. Install only in accordance with national and
local wiring regulations. Statement 1045
circuits (surtensions) doit être assurée par la
configuration électrique du bâtiment. Vérifiez
que l’installation a lieu uniquement en conformité
avec les normes de câblage en vigueur au niveau
national et local. Avis de sécurité1045
situation that could cause bodily injury. Before you
work on any equipment, be aware of the hazards
involved with electrical circuitry and be familiar with
standard practices for preventing accidents. Use
the statement number provided at the end of each
warning to locate its translation in the translated safety
warnings that accompanied this device. Statement
1071
Vous vous trouvez dans une situation pouvant
entraîner des blessures ou des dommages
corporels. Avant de travailler sur un équipement,
soyez conscient des dangers liés aux circuits
électriques et familiarisez-vous avec les
procédures couramment utilisées pour éviter
les accidents. Pour prendre connaissance des
traductions des avertissements figurant dans les
consignes de sécurité traduites qui accompagnent
cet appareil, référez-vous au numéro d’instruction
situé à la fin de chaque avertissement. Avis de
sécurité1071
Warning Installation of the equipment must comply with local
Attention L’équipement doit être installé conformément aux
and national electrical codes. Statement 1074
normes électriques nationales et locales. Avis de
sécurité1074
23
Page 26

European Directives
Under Compliance and Safety Review
Directives européennes
Statement 287—Declaration of Conformity to R&TTE Directive 1999/5/
EC for the European Community, Switzerland, Norway, Iceland and
Liechtenstein
Avis de sécurité287 - Déclaration de conformité à la Directive R&TTE
de 1999/5/CE propre à la Communauté européenne, la Suisse, la
Norvège, l’Islande et le Lichtenstein
English: This equipment is in compliance with the essential
Français: Cet équipement répond aux exigences et provisions
Español: Este equipo cumple con los requisitos esenciales y
Statement 2002—EMC Directive 2004/108/EC
Avis de sécurité2002 - Directive CEM 2004/108/EC
English: This equipment complies with the essential
Espanol: Este equipo cumple con los requisitos esenciales
Francais: Cet appareil remplit les principales conditions requises
Statement 2019—FCC Declaration of Conformity Information
(for USA only)
Product: Cisco Small Business TelePresence CLX300
This equipment has been tested and found to comply with the limits for
a Class B digital device, pursuant to Part 15 of the FCC Rules. These
limits are designed to provide reasonable protection against harmful
interference in a residential installation. This equipment generates, uses
and can radiate radio frequency energy and, if not installed and used in
accordance with the instructions, may cause harmful interference to radio
communications. However, there is no guarantee that interference will
not occur in a particular installation. If this equipment does cause harmful
interference to radio or television reception, which can be determined by
turning the equipment off and on, the user is encouraged to try to correct
the interference by one or more of the following measures:
• Reorientorrelocatethereceivingantenna.
• Increasetheseparationbetweentheequipmentandreceiver.
• Connecttheequipmentintoanoutletonacircuitdifferentfromthat
to which the receiver is connected.
• Consultthedealeroranexperiencedradio/TVtechnicianforhelp.
Note Equipment must be installed and operated using the relevant manuals
and only installed with the correct cables and connectors. Cisco Systems
Inc. is not responsible for any radio or television interference caused by
unauthorized changes or modifications to this equipment. Unauthorized
changes or modifications could void the users authority to operate the
equipment.
This device complies with Part 15 of the FCC rules. Operation is subject
to the following two conditions: (1) this device may not cause harmful
interference, and (2) this device must accept any interference received,
including interference that may cause undesired operation.
Responsible party:
Cisco Systems Inc.
170 West Tasman Drive
San Jose, CA 95134
USA
+408 526-7208
requirements and other relevant provisions of
Directive 1999/5/EC.
de la Directive 1999/5/EC.
otras provisiones relevantes de la Directiva 1999/5/
EC.
requirements and other provisions of Directives
2006/95/EC and 2004/108/EC. For more information,
please refer to the Declaration of Conformity.
y otras disposiciones de las Directrices 2006/95/
EC y 2004/108/EC. Para obtener más información,
consulte a la Declaración de Conformidad.
et autres dispositions des Directives 2006/95/EC et
2004/108/EC. Pour plus d’informations, s’il vous plaît
se référer à la Déclaration de Conformité.
24
Page 27

Avis de sécurité2019 - Renseignements sur la Déclaration de
Under Compliance and Safety Review
conformité (pour les États-unis uniquement)
Produit: Cisco TelePresence CLX300 pour petites entreprises
Cet appareil a été testé et satisfait aux limites d’un appareil numérique
de classe B, conformément à la section15 de la réglementation de la
FCC. Ces limites sont prévues pour permettre une protection raisonnable
contre les interférences nuisibles dans les installations domestiques.
Cet appareil génère, utilise et peut dégager de l’énergie radiofréquence
et, s’il n’est pas installé et utilisé conformément aux instructions, il
peut provoquer des interférences nuisibles aux communications radio.
Nous ne pouvons cependant pas garantir que des interférences ne
surviendront pas dans une installation donnée. Si cet appareil provoque
effectivement des interférences dans les réceptions radio ou télévision,
ce que l’on peut déterminer en éteignant puis en rallumant l’appareil,
nous encourageons l’utilisateur à remédier à ces interférences par l’un
ou plusieurs des moyens suivants:
• Réorientezoudéplacezl’antennederéception.
• Éloignezl’appareildurécepteur.
• Connectezl’appareilàunesortiesuruncircuitdifférentdecelui
auquel le récepteur est branché.
• Consultezvotrerevendeurouuntechnicienqualifiéenradio/TVsi
vous avez besoin d’aide.
Remarque L’appareil doit être installé et utilisé à l’aide de manuels
pertinents et l’installation doit s’effectuer uniquement avec les câbles
et les connecteurs adaptés. Cisco Systems Inc. n’est pas responsable
des interférences TV ou radio résultant de modifications non autorisées
apportées à cet appareil. Tout changement ou toute modification non
autorisé(e) pourra priver l’utilisateur de son droit d’utiliser cet appareil.
Cet appareil est conforme à la section15 de la réglementation de la
FCC. Son utilisation est soumise aux deux conditions suivantes:(1)
cet appareil ne doit pas causer de perturbations électromagnétiques
gênantes et (2) il doit accepter toutes les perturbations reçues,
y compris celles susceptibles d’occasionner un fonctionnement
indésirable.
Partie responsable:
Cisco Systems Inc.
170 West Tasman Drive
San Jose, CA 95134
ÉTATS-UNIS
+14085267208
Regulatory Standards Compliance
This section includes all regulatory, safety, EMC (Class A or Class B),
telecom, and NEBS standards.
The Cisco Small Business telepresence is in compliance with national and
international standards as described in Table 1.
Regulatory Standards Compliance: Safety & EMC
Specication Description
Regulatory Compliance
(Mandatory)
Safety (Mandatory) UL 60950-1
EMC – Emissions
(Mandatory)
EMC – Immunity
(Mandatory)
Products with the CE Marking indicate
compliance with the 1999/5/EC directive,
which includes the safety and EMC
standards listed.
CAN/CSA-C22.2 No. 60950-1
EN 60950-1
IEC 60950-1
AS/NZS 60950-1
47CFR Part 15 Class B
AS/NZS CISPR22 Class B
CISPR22 Class B
EN55022 Class B
ICES003 Class B
VCCI Class B
CNS13438 Class B
KN22 Class B
EN61000-3-2
EN61000-3-3
EN55024
EN300386
CISPR24
KN24
25
Page 28

Regulatory Standards Compliance: Radio
Under Compliance and Safety Review
Specication Description
Radio (Mandatory) FCC Part 15.247 (CFR 47)
Listed/Certified safety and stability testing for this product was
performed on a Sharp LC-52D85UN display.
FCC OET 65C (01-01)
EN301489-17
EN301489-1
RSS-102
RSS-210
EN300328
IDA TS SRD
HKTA 1039
ARIB STD – T66
ARIB STED – T70, T71
ANSI C95.1 (91)
AS/NZS 4268
EN50360
EN50385
Conformité aux normes réglementaires
Cette section inclut toutes les normes réglementaires, de sécurité,
de CEM Cette section inclut toutes les normes réglementaires, de
sécurité, de CEM (Classe A ou Classe B), de télécommunications et
NEBS.
Le service de Cisco TelePresence pour petites entreprises est
conforme aux normes nationales et internationales décrites dans le
tableau1.
Conformité aux normes réglementaires: Sécurité et normes de
compatibilité électromagnétique (CEM)
Spécication Description
Conformité à la
réglementation
(obligatoire)
Sécurité (obligatoire) UL 60950-1
CEM - Émissions
(oligatoire)
CEM - Immunités
(oligatoire)
Le marquage CE apposé sur les produits
indique leur conformité aux exigences de
la directive 1999/5/CE, comprenant les
normes de sécurité et de CEM.
CAN/CSA- C22.2 No. 60950-1
EN 60950-1
IEC 60950-1
AS/NZS 60950-1
47CFR Section15 ClasseB
AS/NZS CISPR22 ClasseB
CISPR22 ClasseB
EN55022 ClasseB
ICES003 ClasseB
VCCI ClasseB
CNS13438 ClasseB
KN22 ClasseB
EN61000-3-2
EN61000-3-3
EN55024
EN300386
CISPR24
KN24
26
Page 29

Page 30

Page 31

Page 32

© 2012 Cisco and/or its affiliates. All rights reserved. Cisco and the
Cisco logo are trademarks or registered trademarks of Cisco Systems,
Inc. and/or its affiliates in the U.S. and certain other countries. HDMI, the
HDMI logo, and High-Definition Multimedia Interface are trademarks or
registered trademarks of HDMI Licensing LLC in the United States and
other countries. All other trademarks mentioned in this document are
property of their respective owners.
© 2012 Cisco Systems, Inc. et/ou ses affiliés. Tous droits réservés.
Cisco et le logo Cisco sont des marques de commerce ou des marques
déposées de Cisco Systems, Inc. et/ou de ses entreprises affiliées
aux États-Unis et dans certains autres pays. HDMI, le logo HDMI et
High-Definition Multimedia Interface sont des marques de commerce ou
des marques déposées de HDMI Licensing LLC aux États-Unis et dans
d’autres pays. Toutes les autres marques de commerce mentionnées
dans ce document appartiennent à leurs propriétaires respectifs.
P/N: 56-18997-01
 Loading...