

Page 1

Cisco Aironet 802.11a/b/g Wireless LAN Client Adapters (CB21AG and PI21AG) Installation and Configuration Guide for Windows Vista
Software Release 1.0
Americas Headquarters
Cisco Systems, Inc.
170 West Tasman Drive
San Jose, CA 95134-1706
USA
http://www.cisco.com
Tel: 408 526-4000
800 553-NETS (6387)
Fax: 408 527-0883
Customer Order Number:
Text Part Number: OL-16534-01
Page 2

THE SPECIFICATIONS AND INFORMATION REGARDING THE PRODUCTS IN THIS MANUAL ARE SUBJECT TO CHANGE WITHOUT NOTICE. ALL
STATEMENTS, INFORMATION, AND RECOMMENDATIONS IN THIS MANUAL ARE BELIEVED TO BE ACCURATE BUT ARE PRESENTED WITHOUT
WARRANTY OF ANY KIND, EXPRESS OR IMPLIED. USERS MUST TAKE FULL RESPONSIBILITY FOR THEIR APPLICATION OF ANY PRODUCTS.
THE SOFTWARE LICENSE AND LIMITED WARRANTY FOR THE ACCOMPANYING PRODUCT ARE SET FORTH IN THE INFORMATION PACKET THAT
SHIPPED WITH THE PRODUCT AND ARE INCORPORATED HEREIN BY THIS REFERENCE. IF YOU ARE UNABLE TO LOCATE THE SOFTWARE LICENSE
OR LIMITED WARRANTY, CONTACT YOUR CISCO REPRESENTATIVE FOR A COPY.
The following inform ation is for FCC compliance of Class A devices: This equipment has been tested and found to comply with the limits for a Class A digital device, pursuant
to part 15 of the FCC rules. These limits are designed to provide reasonable protection against harmful interference when the equipment is operated in a commercial
environment. This equipment generates, uses, and can radiate radio-frequency energy and, if not installed and used in accordance with the instruction manual, may cause
harmful interference to radio communications. Operation of this equipment in a residential area is likely to cause harmful interference, in which case users will be required
to correct the interference at their own expense.
The following information is for FCC compliance of Class B devices: The equipment described in this manual generates and may radiate radio-frequency energy. If it is not
installed in accordance with Cisco’s installation instructions, it may cause interference with radio and television reception. This equipment has been tested and found to
comply with the limits for a Class B digital device in accordance with the specifications in part 15 of the FCC rules. These specifications are designed to provide reasonable
protection against such interference in a residential installation. However, there is no guarantee that interference will not occur in a particular installation.
Modifying the equipment without Cisco’s written authorization may result in the equipment no longer complying with FCC requirements for Class A or Class B digital
devices. In that event, your right to use the equipment may be limited by FCC regulations, and you may be required to correct any interference to radio or television
communications at your own expense.
You can determine whether your equipment is causing interference by turning it off. If the interference stops, it was probably caused by the Cisco equipment or one of its
peripheral devices. If the equipment causes interference to radio or television reception, try to correct the interference by using one or more of the following measures:
• Turn the television or radio antenna until the interference stops.
• Move the equipment to one side or the other of the television or radio.
• Move the equipment farther away from the television or radio.
• Plug the equipment into an outlet that is on a different circuit from the television or radio. (That is, make certain the equipment and the television or radio are on circuits
controlled by different circuit breakers or fuses.)
Modifications to this product not authorized by Cisco Systems, Inc. could void the FCC approval and negate your authority to operate the product.
The Cisco implementation of TCP header compression is an adaptation of a program developed by the University of California, Berkeley (UCB) as part of UCB’s public
domain version of the UNIX operating system. All rights reserved. Copyright © 1981, Regents of the University of California.
NOTWITHSTANDING ANY OTHER WARRANTY HEREIN, ALL DOCUMENT FILES AND SOFTWARE OF THESE SUPPLIERS ARE PROVIDED “AS IS” WITH
ALL FAULTS. CISCO AND THE ABOVE-NAMED SUPPLIERS DISCLAIM ALL WARRANTIES, EXPRESSED OR
LIMITATION, THOSE OF MERCHANTABILITY, FITNESS FOR A PARTICULAR PURPOSE AND NONINFRINGEMENT OR ARISING FROM A COURSE OF
DEALING, USAGE, OR TRADE PRACTICE.
IN NO EVENT SHALL CISCO OR ITS SUPPLIERS BE LIABLE FOR ANY INDIRECT, SPECIAL, CONSEQUENTIAL, OR INCIDENTAL DAMAGES, INCLUDING,
WITHOUT LIMITATION, LOST PROFITS OR LOSS OR DAMAGE TO DATA ARISING OUT OF THE USE OR INABILITY TO USE THIS MANUAL, EVEN IF CISCO
OR ITS SUPPLIERS HAVE BEEN ADVISED OF THE POSSIBILITY OF SUCH DAMAGES.
CCDE, CCENT, Cisco Eos, Cisco Lumin, Cisco Nexus, Cisco StadiumVision, the Cisco logo, DCE, and Welcome to the Human Network are trademarks; Changing the Way
We Work, Live, Play, and Learn is a service mark; and Access Registrar, Aironet, AsyncOS, Bringing the Meeting To You, Catalyst, CCDA, CCDP, CCIE, CCIP, CCNA,
CCNP, CCSP, CCVP, Cisco, the Cisco
Cisco
Unity, Collaboration Without Limitation, EtherFast, EtherSwitch, Event Center, Fast Step, Follow Me Browsing, FormShare, GigaDrive, HomeLink, Internet Quotient,
IOS, iPhone, iQ Expertise, the iQ logo, iQ
Networkers, Networking Academy, Network Registrar, PCNow, PIX, PowerPanels, ProConnect, ScriptShare, SenderBase, SMARTnet, Spectrum Expert, StackWise, The
Fastest Way to Increase Your Internet Quotient, TransPath, WebEx, and the WebEx
States and certain other countries.
All other trademarks mentioned in this document or Website are the property of their respective owners. The use of the word partner does not imply a partnership relationship
between Cisco and any other company. (0805R)
Cisco Aironet 802.11a/b/g Wireless LAN Client Adapters (CB21AG and PI21AG) Installation and Configuration Guide for Window Vista
Copyright © 2008 Cisco Systems, Inc.
All rights reserved.
Certified Internetwork Expert logo, Cisco IOS, Cisco Press, Cisco Systems, Cisco Systems Capital, the Cisco Systems logo,
Net Readiness Scorecard, iQuick Study, IronPort, the IronPort logo, LightStream, Linksys, MediaTone, MeetingPlace, MGX,
logo are registered trademarks of Cisco Systems, Inc. and/or its affiliates in the United
IMPLIED, INCLUDING, WITHOUT
Page 3

CONTENTS
Preface ix
Audience ix
Purpose ix
Organization x
Conventions x
Related Publications xii
Obtaining Documentation, Obtaining Support, and Security Guidelines xii
CHAPTER
1 Product Overview and Installation 1-1
Introduction to the Client Adapters 1-2
Terminology 1-2
Hardware Components 1-3
Radio 1-3
Radio Antenna 1-3
LEDs 1-3
Software Components 1-4
Network Configurations Using Client Adapters 1-4
Ad Hoc Wireless LAN 1-4
Wireless Infrastructure with Workstations Accessing a Wired LAN 1-5
Safety information 1-6
FCC Safety Compliance Statement 1-6
Safety Guidelines 1-6
Warnings 1-7
Unpacking the Client Adapter 1-7
Package Contents 1-8
System Requirements 1-8
Site Requirements 1-9
For Infrastructure Devices 1-9
For Client Devices 1-9
Inserting the Client Adapter 1-10
Inserting a PC-Cardbus Card 1-10
Inserting a PCI Card 1-11
Changing the Bracket 1-11
Cisco Aironet 802.11a/b/g Wireless LAN Client Adapters (CB21AG and PI21AG) Installation and Configuration Guide for Windows Vista
OL-16534-01
iii
Page 4

Contents
Inserting the Card 1-12
Assembling the Antenna 1-13
Mounting the Antenna 1-14
Obtaining Client Adapter Software 1-17
Installing the Client Adapter Driver and Software 1-18
CHAPTER
CHAPTER
2 Configuring Wireless Profiles 2-1
Overview of Wireless Profiles 2-2
Accessing Microsoft Vista Network and Sharing Center 2-2
Creating a New Profile and Configuring Basic Settings 2-3
Security and Encryption Types 2-10
WEP (Shared) Security with Static WEP Keys 2-10
WPA and WPA2 2-10
802.1X with Dynamic WEP Keys 2-11
CCKM Fast Secure Roaming 2-12
Accessing a Profile That Was Created Previously 2-12
Viewing and Changing the Settings of a Profile 2-13
Radio Measurement 2-18
Advanced Roaming Setting 2-19
3 Configuring EAP Types 3-1
Overview of EAP-FAST 3-1
How EAP-FAST Works 3-2
Two-Phase Tunneled Authentication 3-2
Protected Access Credentials 3-3
Server Certificate Validation 3-3
iv
Configuring EAP-FAST 3-4
Accessing EAP-FAST Properties for Configuration 3-4
Configuring EAP-FAST Settings in the Connection Tab 3-5
Overview of the User Credentials Tab 3-9
Client Certificates 3-9
Usernames and Passwords 3-9
Configuring EAP-FAST Settings in the User Credentials Tab 3-10
Understanding PIN Mode and Token Mode with OTP 3-12
Configuring EAP-FAST Settings in the Authentication Tab 3-13
Finding the Version of the EAP-FAST Module 3-16
Overview of LEAP 3-17
How LEAP Works 3-17
Cisco Aironet 802.11a/b/g Wireless LAN Client Adapters (CB21AG and PI21AG) Installation and Configuration Guide for Windows Vista
OL-16534-01
Page 5

Configuring LEAP 3-18
Accessing LEAP Properties for Configuration 3-18
Configuring LEAP Settings in the Network Credentials Tab 3-19
Finding the Version of the LEAP Module 3-21
Overview of PEAP-GTC 3-21
How PEAP-GTC Works 3-22
Configuring PEAP-GTC 3-23
Accessing PEAP-GTC Properties for Configuration 3-23
Configuring PEAP-GTC Settings in the Connection Tab 3-25
Configuring PEAP-GTC Settings in the User Credentials Tab 3-27
Understanding PIN Mode and Token Mode with OTP 3-29
Understanding PEAP-GTC Authentication 3-30
Finding the Version of the PEAP-GTC Module 3-30
Contents
CHAPTER
CHAPTER
4 Performing Administrative Tasks 4-1
Using Microsoft Tools to Perform Administrative Tasks 4-2
Overview of Group Policy Objects 4-2
Adding a Group Policy Object Editor 4-2
Creating a EAP Group Policy Object in Windows Vista 4-3
Configuring Machine Authentication for EAP-FAST 4-4
Configuring Single Sign-On for EAP-FAST 4-5
Configuring Machine Authentication for PEAP-GTC 4-5
Configuring Single Sign-On for PEAP-GTC and LEAP 4-5
The EAP-FAST XML Schema 4-6
The PEAP-GTC XML Schema 4-17
The LEAP XML Schema 4-23
Logging for EAP Modules 4-26
Configuring and Starting Logging 4-26
Disabling Logging and Flushing Internal Buffers 4-27
Locating Log Files 4-28
5 Routine Procedures 5-1
Removing a Client Adapter 5-2
Removing a PC-Cardbus Card 5-2
Removing a PCI Card 5-2
Upgrading the Client Adapter Software 5-3
Cisco Aironet 802.11a/b/g Wireless LAN Client Adapters (CB21AG and PI21AG) Installation and Configuration Guide for Windows Vista
OL-16534-01
v
Page 6

Contents
CHAPTER
APPENDIX
APPENDIX
APPENDIX
6 Troubleshooting and Diagnostics 6-1
Troubleshooting with Cisco Aironet Client Diagnostics 6-2
Enabling Client Reporting 6-6
A EAP Messages A-1
EAP-FAST Error Messages and Prompts A-1
PEAP-GTC and LEAP Error Messages and Prompts A-6
Creating Strong Passwords A-9
Characteristics of Strong Passwords A-9
Characteristics of Weak Passwords A-9
Password Security Basics A-10
B Technical Specifications B-1
C Translated Safety Warnings C-1
Explosive Device Proximity Warning C-2
Antenna Installation Warning C-3
APPENDIX
Warning for Laptop Users C-4
D Declarations of Conformity and Regulatory Information D-1
Manufacturer’s Federal Communication Commission Declaration of Conformity Statement D-2
Department of Communications – Canada D-3
Canadian Compliance Statement D-3
European Community, Switzerland, Norway, Iceland, and Liechtenstein D-3
Declaration of Conformity with Regard to the R&TTE Directive 1999/5/EC D-3
Declaration of Conformity Statement D-5
Cisco Aironet CB21AG Wireless LAN Client Adapter D-5
Cisco Aironet PI21AG Wireless LAN Client Adapter D-6
Declaration of Conformity for RF Exposure D-7
Guidelines for Operating Cisco Aironet CB21AG and PI21AG Wireless LAN Client Adapters in Japan D-7
Japanese Translation D-7
English Translation D-7
Administrative Rules for Cisco Aironet CB21AG and PI21AG Wireless LAN Client Adapters in
Taiwan
D-8
2.4- and 5-GHz Client Adapters D-8
Chinese Translation D-8
English Translation D-8
5-GHz Client Adapters D-9
vi
Cisco Aironet 802.11a/b/g Wireless LAN Client Adapters (CB21AG and PI21AG) Installation and Configuration Guide for Windows Vista
OL-16534-01
Page 7

Chinese Translation D-9
English Translation D-9
Brazil/Anatel Approval D-9
AIR-CB21AG-W-K9 D-10
AIR-PI21AG-W-K9 D-11
Contents
APPENDIX
APPENDIX
APPENDIX
E Channels, Power Levels, and Antenna Gains E-1
Channels E-2
IEEE 802.11a E-2
IEEE 802.11b/g E-3
Maximum Power Levels and Antenna Gains E-4
IEEE 802.11a E-4
IEEE 802.11b E-4
IEEE 802.11g E-5
F Acknowledgments and Licensing F-1
G Abbreviations G-1
Cisco Aironet 802.11a/b/g Wireless LAN Client Adapters (CB21AG and PI21AG) Installation and Configuration Guide for Windows Vista
OL-16534-01
vii
Page 8

Contents
viii
Cisco Aironet 802.11a/b/g Wireless LAN Client Adapters (CB21AG and PI21AG) Installation and Configuration Guide for Windows Vista
OL-16534-01
Page 9

Preface
The preface provides an overview of this guide, references related publications, and explains how to
obtain other documentation and technical assistance, if necessary.
The following topics are covered in this section:
• Audience, page ix
• Purpose, page ix
• Organization, page x
• Conventions, page x
Audience
Purpose
Caution This guide pertains specifically to Cisco Aironet CB21AG and PI21AG client adapters on devices that
• Related Publications, page xii
• Obtaining Documentation, Obtaining Support, and Security Guidelines, page xii
This publication is for the person responsible for installing, configuring, and maintaining a Cisco
Aironet IEEE 802.11a/b/g Wireless LAN Client Adapter (CB21AG or PI21AG) on a computer that is
running the Microsoft Windows Vista operating system. This person should understand Windows Vista
and should be familiar with computing devices, network terms, and concepts.
This publication describes the Cisco Aironet CB21AG and PI21AG client adapters on devices that are
running Windows Vista.
are running Window Vista. For information about the Cisco Aironet CB21AG and PI21AG on devices
that are running Windows XP or Cisco Aironet 340, 350, and CB20A wireless LAN client adapters, refer
to the appropriate guides at this URL:
http://www.cisco.com/en/US/products/hw/wireless/ps4555/tsd_products_support_series_home.html
Cisco Aironet 802.11a/b/g Wireless LAN Client Adapters (CB21AG and PI21AG) Installation and Configuration Guide for Windows Vista
OL-16534-01
ix
Page 10

Organization
This publication contains the following chapters:
• Chapter 1, “Product Overview and Installation,” describes the Cisco Aironet CB21AG and PI21AG
• Chapter 2, “Configuring Wireless Profiles,” explains how to use the Microsoft Vista Network and
• Chapter 3, “Configuring EAP Types,” explains the Cisco EAP types that are used for authenication
• Chapter 4, “Performing Administrative Tasks,” explains how to obtain Microsoft administrative
• Chapter 5, “Routine Procedures,”provides procedures for common tasks related to the client adapter.
• Chapter 6, “Troubleshooting and Diagnostics,” provides information about diagnosing problems
Preface
client adapters and their role in a wireless network. This chapter also provides information that you
need to know before installing a client adapter and instructions for installing the client adapter
hardware and software.
Sharing Center to create and manage profiles for your client adapter.
to wireless networks.
tools to distribute wireless profiles to users and computers in an Active Directory environment. This
chapter also provides the XML schemas for EAP-FAST, LEAP, and PEAP-GTC.
that might occur when you try to operate the client adapter.
• Appendix A, “EAP Messages,” describes EAP-FAST, PEAP-GTC and LEAP error messages and
• Appendix B, “Technical Specifications,” provides technical specifications for the Cisco Aironet
• Appendix C, “Translated Safety Warnings,” provides translations of the safety warnings that appear
• Appendix D, “Declarations of Conformity and Regulatory Information,”provides declarations of
• Appendix E, “Channels, Power Levels, and Antenna Gains,” lists the IEEE 802.11a, b, and g
• Appendix F, “Acknowledgments and Licensing,” provides information about open-source software
• Appendix G, “Abbreviations,” includes commonly used abbreviations.
Conventions
This publication uses the following conventions to convey instructions and information:
prompts. This appendix also provides guidelines for creating strong passwords.
CB21AG and PI21AG Wireless LAN Client Adapters.
in this publication. The second warning pertains to the PI21AG client adapter, and the third warning
pertains to the CB21AG client adapter.
conformity and regulatory information for the Cisco Aironet CB21AG and PI21AG Wireless LAN
client adapters.
channels supported by the world's regulatory domains as well as the maximum power levels and
antenna gains allowed per data rate.
that is used in the Cisco EAP modules.
• Commands are in boldface.
• Variables are in italics.
• Configuration parameters are capitalized.
• Notes, cautions, and warnings use the following conventions and symbols:
Cisco Aironet 802.11a/b/g Wireless LAN Client Adapters (CB21AG and PI21AG) Installation and Configuration Guide for Windows Vista
x
OL-16534-01
Page 11

Preface
Note Means reader take note. Notes contain helpful suggestions or references to materials not contained in
this manual.
Caution Means reader be ca reful. In this situation, you might do something that could result in equipment
damage or loss of data.
Warning
Waarschuwing
Varoitus
Attention
Warnung
This warning symbol means danger. You are in a situation that could cause bodily injury. Before you
work on any equipment, be aware of the hazards involved with electrical circuitry and be familiar
with standard practices for preventing accidents. (To see translations of the warnings that appear
in this publication, refer to the appendix “Translated Safety Warnings.”)
Dit waarschuwingssymbool betekent gevaar. U verkeert in een situatie die lichamelijk letsel kan
veroorzaken. Voordat u aan enige apparatuur gaat werken, dient u zich bewust te zijn van de bij
elektrische schakelingen betrokken risico’s en dient u op de hoogte te zijn van standaard
maatregelen om ongelukken te voorkomen. (Voor vertalingen van de waarschuwingen die in deze
publicatie verschijnen, kunt u het aanhangsel “Translated Safety Warnings” (Vertalingen van
veiligheidsvoorschriften) raadplegen.)
Tämä varoitusmerkki merkitsee vaaraa. Olet tilanteessa, joka voi johtaa ruumiinvammaan. Ennen
kuin työskentelet minkään laitteiston parissa, ota selvää sähkökytkentöihin liittyvistä vaaroista ja
tavanomaisista onnettomuuksien ehkäisykeinoista. (Tässä julkaisussa esiintyvien varoitusten
käännökset löydät liitteestä "Translated Safety Warnings" (käännetyt turvallisuutta koskevat
varoitukset).)
Ce symbole d’avertissement indique un danger. Vous vous trouvez dans une situation pouvant
entraîner des blessures. Avant d’accéder à cet équipement, soyez conscient des dangers posés par
les circuits électriques et familiarisez-vous avec les procédures courantes de prévention des
accidents. Pour obtenir les traductions des mises en garde figurant dans cette publication, veuillez
consulter l’annexe intitulée «
Translated Safety Warnings » (Traduction des avis de sécurité).
Dieses Warnsymbol bedeutet Gefahr. Sie befinden sich in einer Situation, die zu einer
Körperverletzung führen könnte. Bevor Sie mit der Arbeit an irgendeinem Gerät beginnen, seien Sie
sich der mit elektrischen Stromkreisen verbundenen Gefahren und der Standardpraktiken zur
Vermeidung von Unfällen bewußt. (Übersetzungen der in dieser Veröffentlichung enthaltenen
Warnhinweise finden Sie im Anhang mit dem Titel “Translated Safety Warnings” (Übersetzung der
Warnhinweise).)
Avvertenza
Questo simbolo di avvertenza indica un pericolo. Si è in una situazione che può causare infortuni.
Prima di lavorare su qualsiasi apparecchiatura, occorre conoscere i pericoli relativi ai circuiti
elettrici ed essere al corrente delle pratiche standard per la prevenzione di incidenti. La traduzione
delle avvertenze riportate in questa pubblicazione si trova nell’appendice, “Translated Safety
Warnings” (Traduzione delle avvertenze di sicurezza).
Cisco Aironet 802.11a/b/g Wireless LAN Client Adapters (CB21AG and PI21AG) Installation and Configuration Guide for Windows Vista
OL-16534-01
xi
Page 12

Preface
Advarsel
Aviso
¡Advertencia!
Varning!
Dette varselsymbolet betyr fare. Du befinner deg i en situasjon som kan føre til personskade. Før du
utfører arbeid på utstyr, må du være oppmerksom på de faremomentene som elektriske kretser
innebærer, samt gjøre deg kjent med vanlig praksis når det gjelder å unngå ulykker. (Hvis du vil se
oversettelser av de advarslene som finnes i denne publikasjonen, kan du se i vedlegget "Translated
Safety Warnings" [Oversatte sikkerhetsadvarsler].)
Este símbolo de aviso indica perigo. Encontra-se numa situação que lhe poderá causar danos fisicos.
Antes de começar a trabalhar com qualquer equipamento, familiarize-se com os perigos
relacionados com circuitos eléctricos, e com quaisquer práticas comuns que possam prevenir
possíveis acidentes. (Para ver as traduções dos avisos que constam desta publicação, consulte o
apêndice “Translated Safety Warnings” - “Traduções dos Avisos de Segurança”).
Este símbolo de aviso significa peligro. Existe riesgo para su integridad física. Antes de manipular
cualquier equipo, considerar los riesgos que entraña la corriente eléctrica y familiarizarse con los
procedimientos estándar de prevención de accidentes. (Para ver traducciones de las advertencias
que aparecen en esta publicación, consultar el apéndice titulado “Translated Safety Warnings.”)
Denna varningssymbol signalerar fara. Du befinner dig i en situation som kan leda till personskada.
Innan du utför arbete på någon utrustning måste du vara medveten om farorna med elkretsar och
känna till vanligt förfarande för att förebygga skador. (Se förklaringar av de varningar som
förekommer i denna publikation i appendix "Translated Safety Warnings" [Översatta
säkerhetsvarningar].)
Related Publications
Release notes for Cisco Aironet 802.11a/b/g client adapters (CB21AG and PI21AG) for Windows Vista
are located at this URL:
http://www.cisco.com/en/US/products/hw/wireless/ps4555/prod_release_notes_list.html
For more information about related Cisco Aironet products, refer to the publications for your
infrastructure device. You can find Cisco Aironet technical documentation at this URL:
http://www.cisco.com/en/US/products/hw/wireless/tsd_products_support_category_home.html
Obtaining Documentation, Obtaining Support, and Security
Guidelines
For information on obtaining documentation, obtaining support, providing documentation feedback,
security guidelines, and also recommended aliases and general Cisco
What’s
New in Cisco Product Documentation, which also lists all new and revised Cisco technical
documentation, at:
http://www.cisco.com/en/US/docs/general/whatsnew/whatsnew.html
documents, see the monthly
xii
Cisco Aironet 802.11a/b/g Wireless LAN Client Adapters (CB21AG and PI21AG) Installation and Configuration Guide for Windows Vista
OL-16534-01
Page 13

CHA PTER
1
Product Overview and Installation
This chapter describes the Cisco Aironet CB21AG and PI21AG client adapters and their role in a
wireless network. This chapter also provides information that you need to know before installing a client
adapter and instructions for installing the client adapter hardware and software.
The following topics are covered in this chapter:
• Introduction to the Client Adapters, page 1-2
• Hardware Components, page 1-3
• Software Components, page 1-4
• Network Configurations Using Client Adapters, page 1-4
• Safety information, page 1-6
• Unpacking the Client Adapter, page 1-7
• System Requirements, page 1-8
• Site Requirements, page 1-9
• Inserting the Client Adapter, page 1-10
• Obtaining Client Adapter Software, page 1-17
• Installing the Client Adapter Driver and Software, page 1-18
Cisco Aironet 802.11a/b/g Wireless LAN Client Adapters (CB21AG and PI21AG) Installation and Configuration Guide for Windows Vista
OL-16534-01
1-1
Page 14

Chapter 1 Product Overview and Installation
Introduction to the Client Adapters
Introduction to the Client Adapters
The Cisco Aironet IEEE 802.11a/b/g Wireless LAN Client Adapters (CB21AG and PI21AG) are radio
modules that provide wireless data communications among fixed, portable, and mobile devices within
both wireless and wired network infrastructures. The client adapters are fully compatible when used in
devices supporting “plug-and-play” (PnP) technology.
The primary function of the client adapters is to transfer data packets through the wireless infrastructure
by communicating with other clients or with access points that are connected to a wired LAN. The
adapters operate similarly to a standard network product except that radios rather than Ethernet cables
make the connection to the wire. No special wireless networking functions are required, and all existing
applications that operate over a network can operate using the adapters.
This document covers the two client adapters described in Table 1-1.
Ta b l e 1-1 Client Adapter Types
Client Adapter Model Number Description Illustration
PC-Cardbus
card
AIR-CB21AG An IEEE 802.11a/b/g-compliant 2.4- and 5-GHz 54-Mbps client
adapter card radio module with a Cardbus interface that can be
inserted into any device equipped with a 32-bit Cardbus slot. Host
devices can include laptops and notebook computers.
95579
PCI card AIR-PI21AG An IEEE 802.11a/b/g-compliant 2.4- and 5-GHz 54-Mbps client
adapter card radio module that can be inserted into any device
equipped with an empty PCI expansion slot, such as a desktop
personal computer.
Terminology
The following terms are used throughout this document:
• client adapter—Refers to both types of adapters.
• PC-Cardbus card or PCI card—Refers to a specific adapter.
• workstation (or station)—Refers to a computing device with an installed client adapter.
• infrastructure device—Refers to a device that connects client adapters to a wired LAN, such as an
access point, bridge, or base station. Throughout this document, access point is used to represent
infrastructure devices in general.
ACTIVITY
STATUS
95580
1-2
Cisco Aironet 802.11a/b/g Wireless LAN Client Adapters (CB21AG and PI21AG) Installation and Configuration Guide for Windows Vista
OL-16534-01
Page 15

Chapter 1 Product Overview and Installation
Hardware Components
The client adapters have three major hardware components: a radio, a radio antenna, and two LEDs.
Radio
The client adapters contain a dual-band radio that is both IEEE 802.11a and 802.11b/g compliant. The
radio uses both direct-sequence spread spectrum (DSSS) technology and orthogonal frequency division
multiplexing (OFDM) technology for client applications in the 2.4-GHz Industrial Scientific Medical
(ISM) frequency band and OFDM technology in the 5-GHz Unlicensed National Information
Infrastructure (UNII) frequency bands. The client adapters operate with other IEEE 802.11a or
802.11b/g-compliant client devices in ad hoc mode or with Cisco Aironet access points and other IEEE
802.11a or 802.11b/g-compliant infrastructure devices in infrastructure mode.
Radio Antenna
The type of antenna used depends on your client adapter:
Hardware Components
LEDs
• PC-Cardbus cards have an integrated, permanently attached 0-dBi gain, dual-band 2.4/5-GHz
diversity antenna. The benefit of the diversity antenna system is improved coverage. The system
works by enabling the card to sample and switch between its two antenna ports in order to select the
optimum port for receiving data packets. As a result, the card has a better chance of maintaining the
radio frequency (RF) connection in areas of interference. The antenna is housed within the section
of the card that hangs out of the Cardbus slot when the card is installed.
• PCI cardshave a 1-dBi gain, dual-band 2.4/5-GHz antenna that is permanently attached by a 6.6-foot
(2-meter) cable. A base is provided with the antenna to enable it to be mounted to a wall or to sit
upright on a desk or other horizontal surface.
The client adapters have two LEDs that glow or blink to indicate the status of the adapter or to convey
system messages.
Ta b l e 1-2 LED Operating Messages
Status LED (green) Activity LED (amber) Condition
Off Off Client adapter is not receiving power.
Blinking slowly Off Client adapter is in power save mode.
On Off Client adapter has awakened from power save mode.
Alternating blink: Client adapter is scanning for the wireless network
On Off
Off On
Tabl e 1-2 provides interpreations of the the LEDs.
for which it is configured.
Cisco Aironet 802.11a/b/g Wireless LAN Client Adapters (CB21AG and PI21AG) Installation and Configuration Guide for Windows Vista
OL-16534-01
1-3
Page 16

Software Components
Table 1-2 LED Operating Messages (continued)
Status LED (green) Activity LED (amber) Condition
Blinking slowly Blinking slowly Client adapter is associated to an access point (in
Blinking quickly Blinking quickly Client adapter is transmitting or receiving data
Software Components
You can install both the driver for the CB21AG and PI21AG and the software that runs the adapter by
running a single executable file that is available from Cisco.com. You must execute this file on devices
that are running Windows Vista. This driver and softward can be used only with CB21AG and PI21AG
client adapters.
Chapter 1 Product Overview and Installation
infrastructure mode) or another client (in ad hoc
mode).
while associated to an access point (in infrastructure
mode) or another client (in ad hoc mode).
Network Configurations Using Client Adapters
Client adapters can be used in a variety of network configurations. In some configurations, access points
provide connections to your network or act as repeaters to increase wireless communication range. The
maximum communication range is based on how you configure your wireless network.
This section describes and illustrates the two most common network configurations:
• Ad hoc wireless local area network (LAN)
• Wireless infrastructure with workstations accessing a wired LAN
For examples of more complex network configurations involving client adapters and access points, refer
to the documentation for your access point.
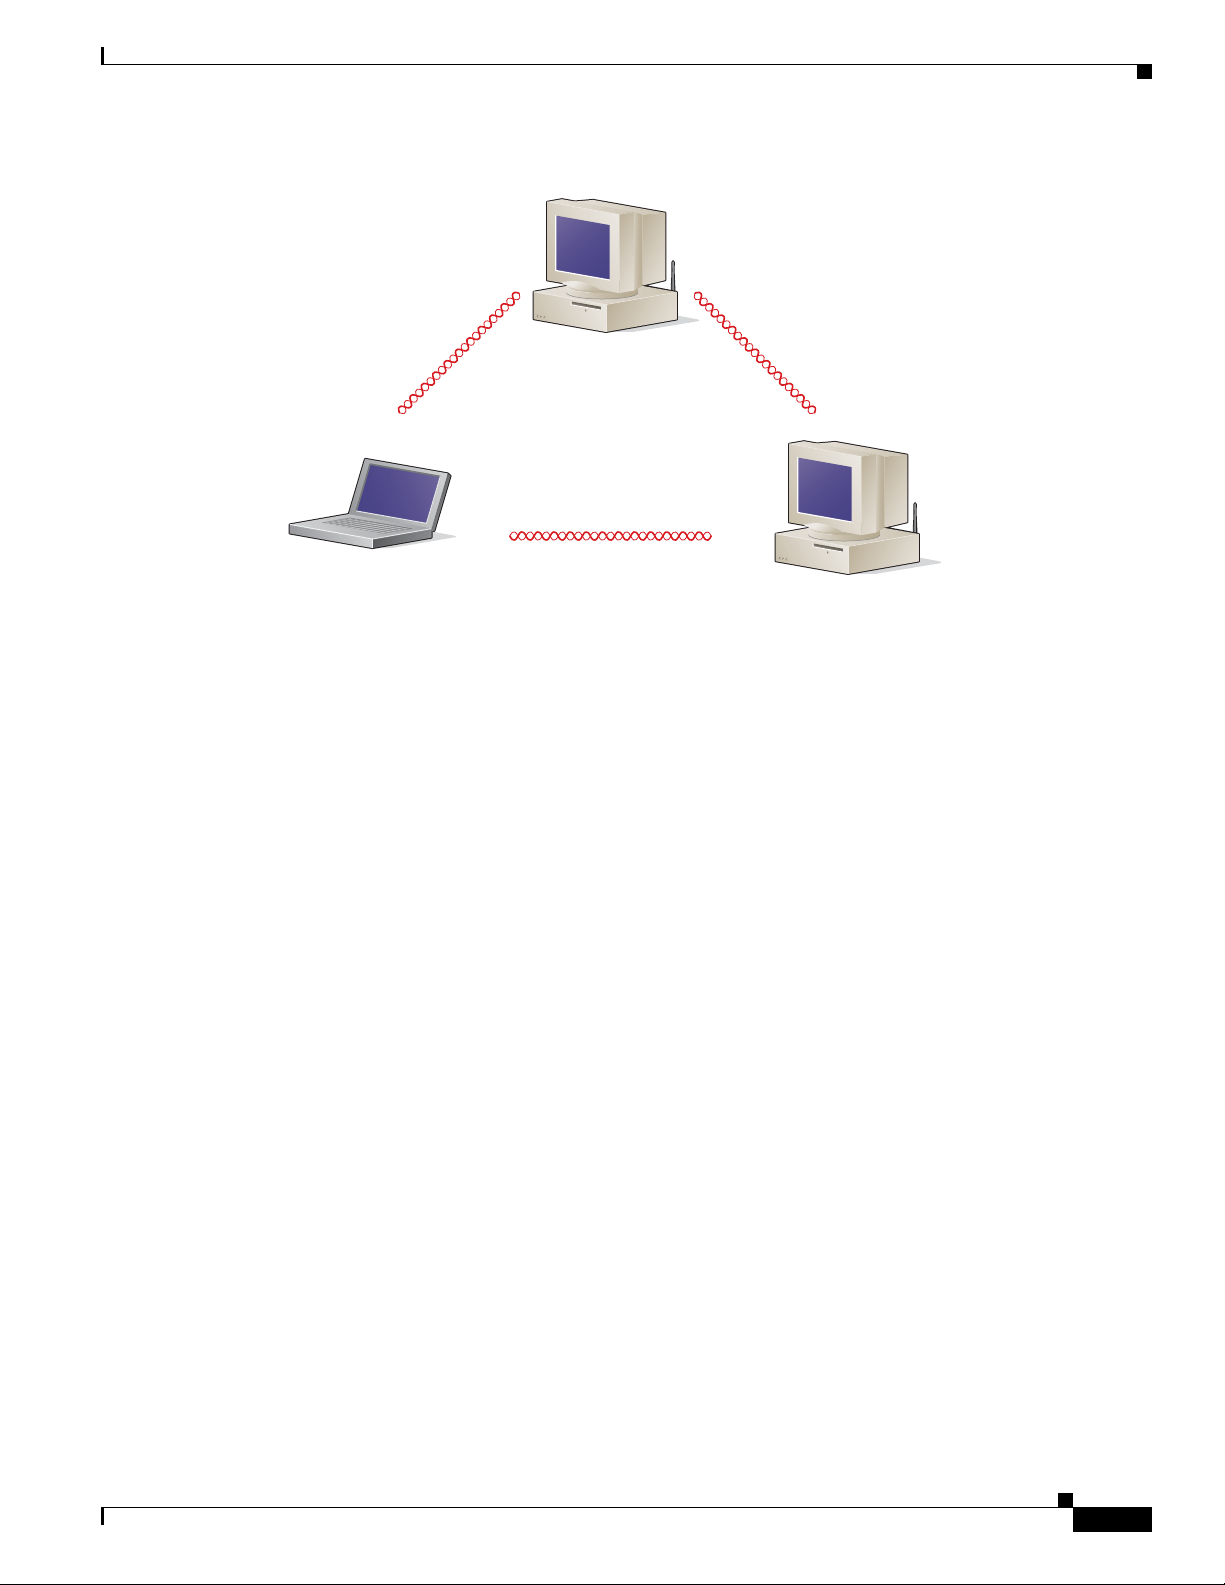
Ad Hoc Wireless LAN
An ad hoc (or peer-to-peer) wireless LAN (see Figure 1-1) is the simplest wireless LAN configuration.
In a wireless LAN using an ad hoc network configuration, all devices equipped with a client adapter can
be linked together and communicate directly with each other. The use of an infrastructure device, such
as an access point, is not required.
1-4
Cisco Aironet 802.11a/b/g Wireless LAN Client Adapters (CB21AG and PI21AG) Installation and Configuration Guide for Windows Vista
OL-16534-01
Page 17
Chapter 1 Product Overview and Installation
Figure 1-1 Ad Hoc Wireless LAN
Network Configurations Using Client Adapters
47520
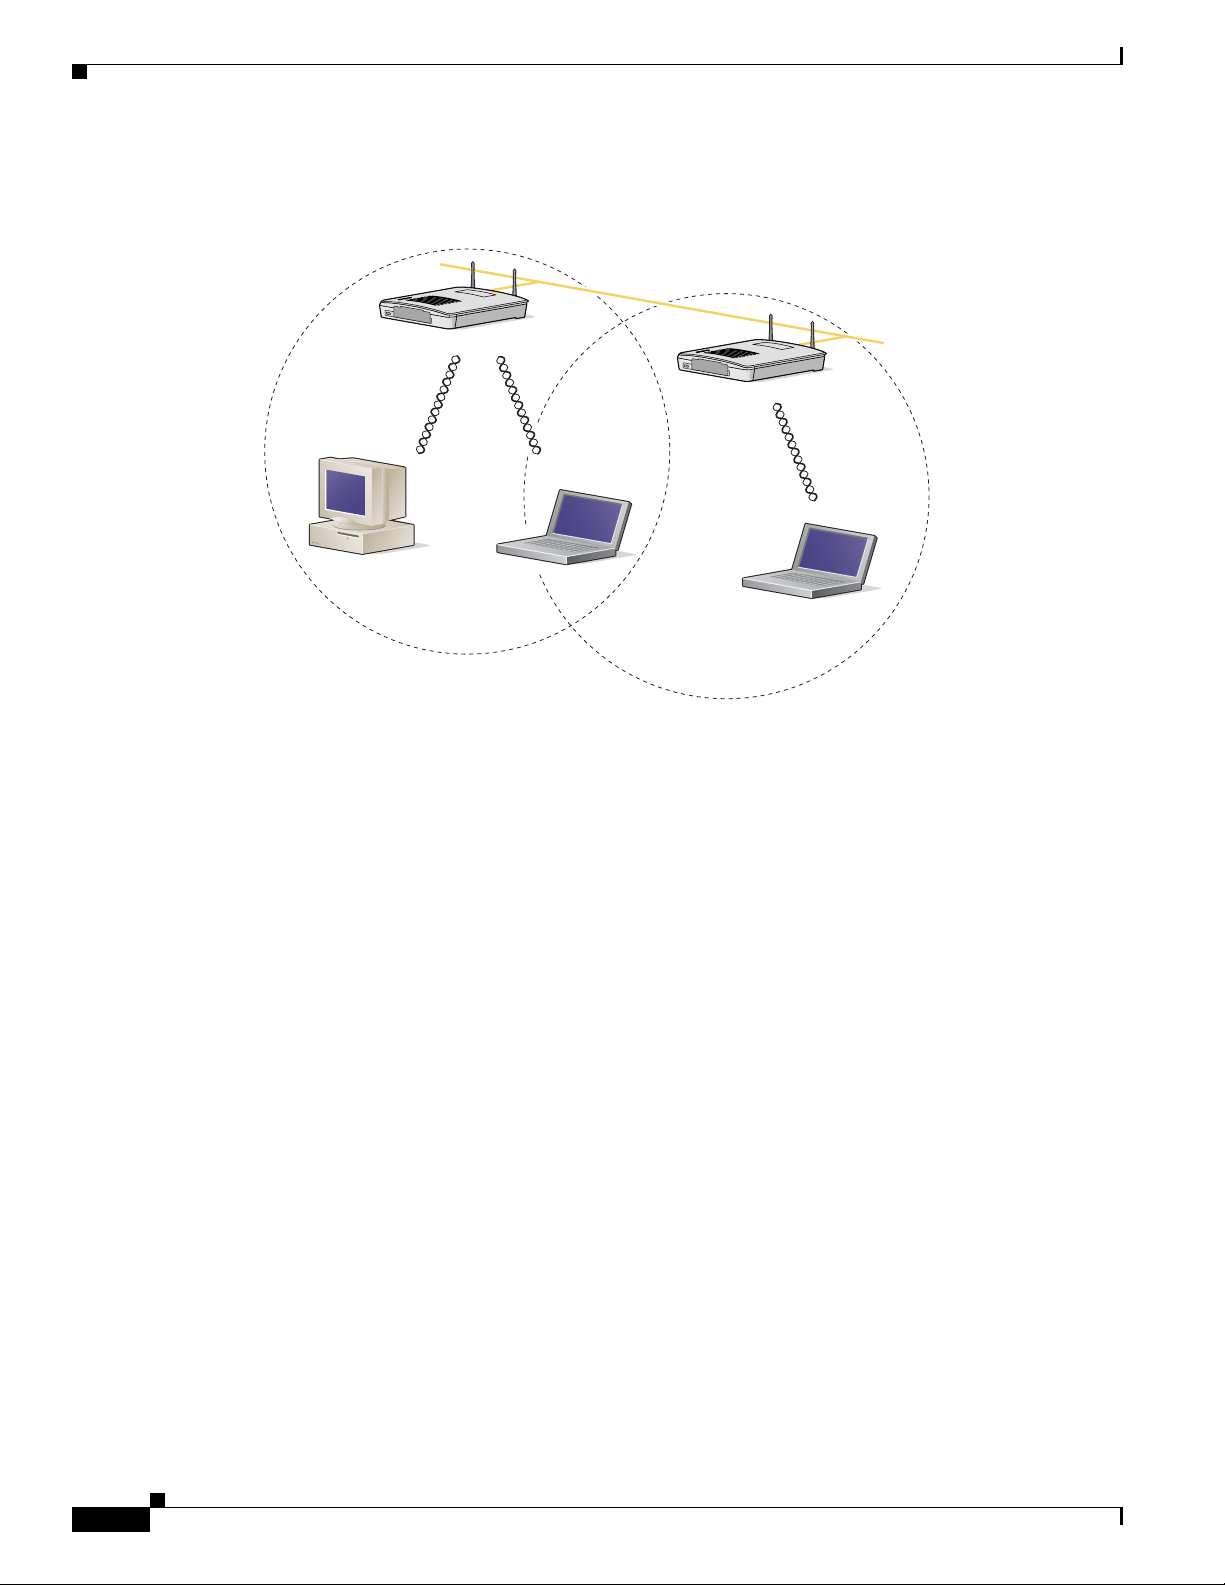
Wireless Infrastructure with Workstations Accessing a Wired LAN
A infrastructure network can be created by placing two or more access points on a LAN. Figure 1-2
shows a microcellular network with workstations accessing a wired LAN through several access points.
This configuration is useful with portable or mobile stations because it enables them to be directly
connected to the wired network even while moving from one microcell domain to another. This process
is transparent, and the connection to the file server or host is maintained without disruption. The mobile
station stays connected to an access point as long as it can. However, when the transfer of data packets
needs to be retried or beacons are missed, the station automatically searches for and associates to another
access point. This process is referred to as seamless roaming.
Cisco Aironet 802.11a/b/g Wireless LAN Client Adapters (CB21AG and PI21AG) Installation and Configuration Guide for Windows Vista
OL-16534-01
1-5
Page 18
Safety information
Chapter 1 Product Overview and Installation
Figure 1-2 Wireless Infrastructure with Workstations Accessing a Wired LAN
Access Point
(Root Unit)
Wired LAN
Access Point
(Root Unit)
Safety information
Follow the guidelines in this section to ensure proper operation and safe use of the client adapter.
FCC Safety Compliance Statement
The FCC, with its action in ET Docket 96-8, has adopted a safety standard for human exposure to RF
electromagnetic energy emitted by FCC-certified equipment. When used with approved Cisco Aironet
antennas, Cisco Aironet products meet the uncontrolled environmental limits found in OET-65 and ANSI
C95.1, 1991. Proper operation of this radio device according to the instructions in this publication will
result in user exposure substantially below the FCC recommended limits.
Safety Guidelines
• Do not touch or move the antenna while the unit is transmitting or receiving.
• Do not hold any component containing a radio such that the antenna is very close to or touching any
exposed parts of the body, especially the face or eyes, while transmitting.
65999
1-6
• Do not operate the radio or attempt to transmit data unless the antenna is connected; otherwise, the
radio may be damaged.
Cisco Aironet 802.11a/b/g Wireless LAN Client Adapters (CB21AG and PI21AG) Installation and Configuration Guide for Windows Vista
OL-16534-01
Page 19

Chapter 1 Product Overview and Installation
• Use in specific environments:
–
The use of wireless devices in hazardous locations is limited to the constraints posed by the
safety directors of such environments.
–
The use of wireless devices on airplanes is governed by the Federal Aviation Administration
(FAA).
–
The use of wireless devices in hospitals is restricted to the limits set forth by each hospital.
Warnings
Observe the following warnings when operating the client adapter. The second warning pertains to the
PI21AG client adapter, and the third warning pertains to the CB21AG client adapter.
Unpacking the Client Adapter
Warning
Warning
Warning
Do not operate your wireless network device near unshielded blasting caps or in an explosive
environment unless the device has been modified to be especially qualified for such use.
In order to comply with FCC radio frequency (RF) exposure limits, antennas should be located at a
minimum of 7.9 inches (20 cm) or more from the body of all persons.
This device has been tested and complies with FCC RF Exposure (SAR) limits in typical laptop
computer configurations and this device can be used in desktop or laptop computers with side
mounted PC Card slots that can provide at least 0.394 in (1 cm) separation distance from the antenna
to the body of the user or a nearby person. Thin laptop computers may need special attention to
maintain antenna spacing while operating. This device cannot be used with handheld PDAs (personal
digital assistants). Use in other configurations may not ensure compliance with FCC RF exposure
guidelines. This device and its antenna must not be co-located or operated in conjunction with any
other antenna or transmitter.
Translated versions of these safety warnings are provided in Appendix B
Unpacking the Client Adapter
Follow these steps to unpack the client adapter:
Step 1 Open the shipping container and carefully remove the contents.
Step 2 Return all packing materials to the shipping container and save the container.
Step 3 Ensure that all items listed in the “Package Contents” section below are included in the shipment. Check
each item for damage.
Note If any item is damaged or missing, notify your authorized Cisco sales representative.
Cisco Aironet 802.11a/b/g Wireless LAN Client Adapters (CB21AG and PI21AG) Installation and Configuration Guide for Windows Vista
OL-16534-01
1-7
Page 20

System Requirements
Package Contents
Each client adapter is shipped with the following items:
• 1-dBi gain antenna permanently attached by a 6.6-ft (2-m) cable, antenna base, low-profile bracket,
two mounting screws, and two plastic wall anchors (PCI cards only)
• Quick Start Guide: Cisco Aironet 802.11a/b/g Wireless LAN Client Adapters (CB21AG and PI21AG)
• Cisco Aironet 802.11a/b/g Wireless Adapters (CB21AG and PI21AG) CD
System Requirements
In addition to the items shipped with the client adapter, you also need the following items in order to
install and use the adapter:
• One of the following computing devices running Windows Vista.
–
Laptop or notebook computer equipped with a 32-bit Cardbus slot
–
Desktop personal computer equipped with an empty PCI expansion slot
Chapter 1 Product Overview and Installation
• Windows Vista Service Pack 1 or Windows Vista with hotfix KB932063 and hotfix KB935222
Note You must obtain these hotfix patches from the Microsoft site. You must also contact Microsoft
directly for any support that you need for these patches.
http://support.microsoft.com/kb/932063
http://support.microsoft.com/kb/935222
Note The client adapter software supports Windows Vista Business, Enterprise, and Ultimate
operating systems.
• 1 GHz 32-bit (x86) or 64-bit (x64) processor.
• 1 GB of system memory
• 40 GB hard drive with at least 15 GB of available space
• The appropriate tools for removing your computer’s cover and expansion slot dust cover and for
mounting the antenna base (for PCI cards)
• If your wireless network uses EAP-TLS or PEAP authentication, Certificate Authority (CA) and
user certificates for EAP-TLS authentication or CA certificate for PEAP authentication
• If your wireless network uses PEAP (EAP-GTC) authentication with a One-Time Password (OTP)
user database:
1-8
–
A hardware token device from OTP vendors or the Secure Computing SofToken program
(version 2.1 or later)
–
Your hardware or software token password
• All necessary infrastructure devices (such as access points, servers, gateways, user databases, etc.)
must be properly configured for any authentication type you plan to enable on the client.
• The following information from your system administrator:
Cisco Aironet 802.11a/b/g Wireless LAN Client Adapters (CB21AG and PI21AG) Installation and Configuration Guide for Windows Vista
OL-16534-01
Page 21

Chapter 1 Product Overview and Installation
–
The logical name for your workstation (also referred to as client name)
–
The protocols necessary to bind to the client adapter, such as TCP/IP
–
The case-sensitive service set identifier (SSID) for your RF network
–
If your network setup does not include a DHCP server, the IP address, subnet mask, and default
gateway address of your computer
–
The wired equivalent privacy (WEP) keys of the access points with which your client adapter
will communicate, if your wireless network uses static WEP for security
–
The username and password for your network account
–
Protected access credentials (PAC) file if your wireless network uses EAP-FAST authentication
with manual PAC provisioning
Site Requirements
This section discusses the site requirements for both infrastructure and client devices.
Site Requirements
For Infrastructure Devices
Because of differences in component configuration, placement, and physical environment, every
network application is a unique installation. Therefore, before you install any wireless infrastructure
devices (such as access points, bridges, and base stations, which connect your client adapters to a wired
LAN), a site survey must be performed to determine the optimum placement of these devices to
maximize range, coverage, and network performance.
Note Infrastructure devices are installed and initially configured prior to client devices.
For Client Devices
Because the client adapter is a radio device, it is susceptible to RF obstructions and common sources of
interference that can reduce throughput and range. Follow these guidelines to ensure the best possible
performance:
• Install the client adapter in an area where large steel structures such as shelving units, bookcases,
and filing cabinets will not obstruct radio signals to and from the client adapter.
• Install the client adapter away from microwave ovens. Microwave ovens operate on the same
frequency as the client adapter and can cause signal interference.
Cisco Aironet 802.11a/b/g Wireless LAN Client Adapters (CB21AG and PI21AG) Installation and Configuration Guide for Windows Vista
OL-16534-01
1-9
Page 22
Inserting the Client Adapter
Inserting the Client Adapter
This section provides instructions for inserting a PC-Cardbus card or PCI card into your computer.
Caution These procedures and the physical connections they describe apply generally to conventional Cardbus
slots and PCI expansion slots. In cases of custom or nonconventional equipment, be alert to possible
differences in Cardbus slot and PCI expansion slot configurations.
Inserting a PC-Cardbus Card
Step 1 Before you begin, examine the card. One end has a dual-row, 68-pin connector. The card is keyed so it
can be inserted only one way into the Cardbus slot.
Note The PC-Cardbus slot, if supported, is usually on the left or right side of a laptop computer,
depending on the model.
Chapter 1 Product Overview and Installation
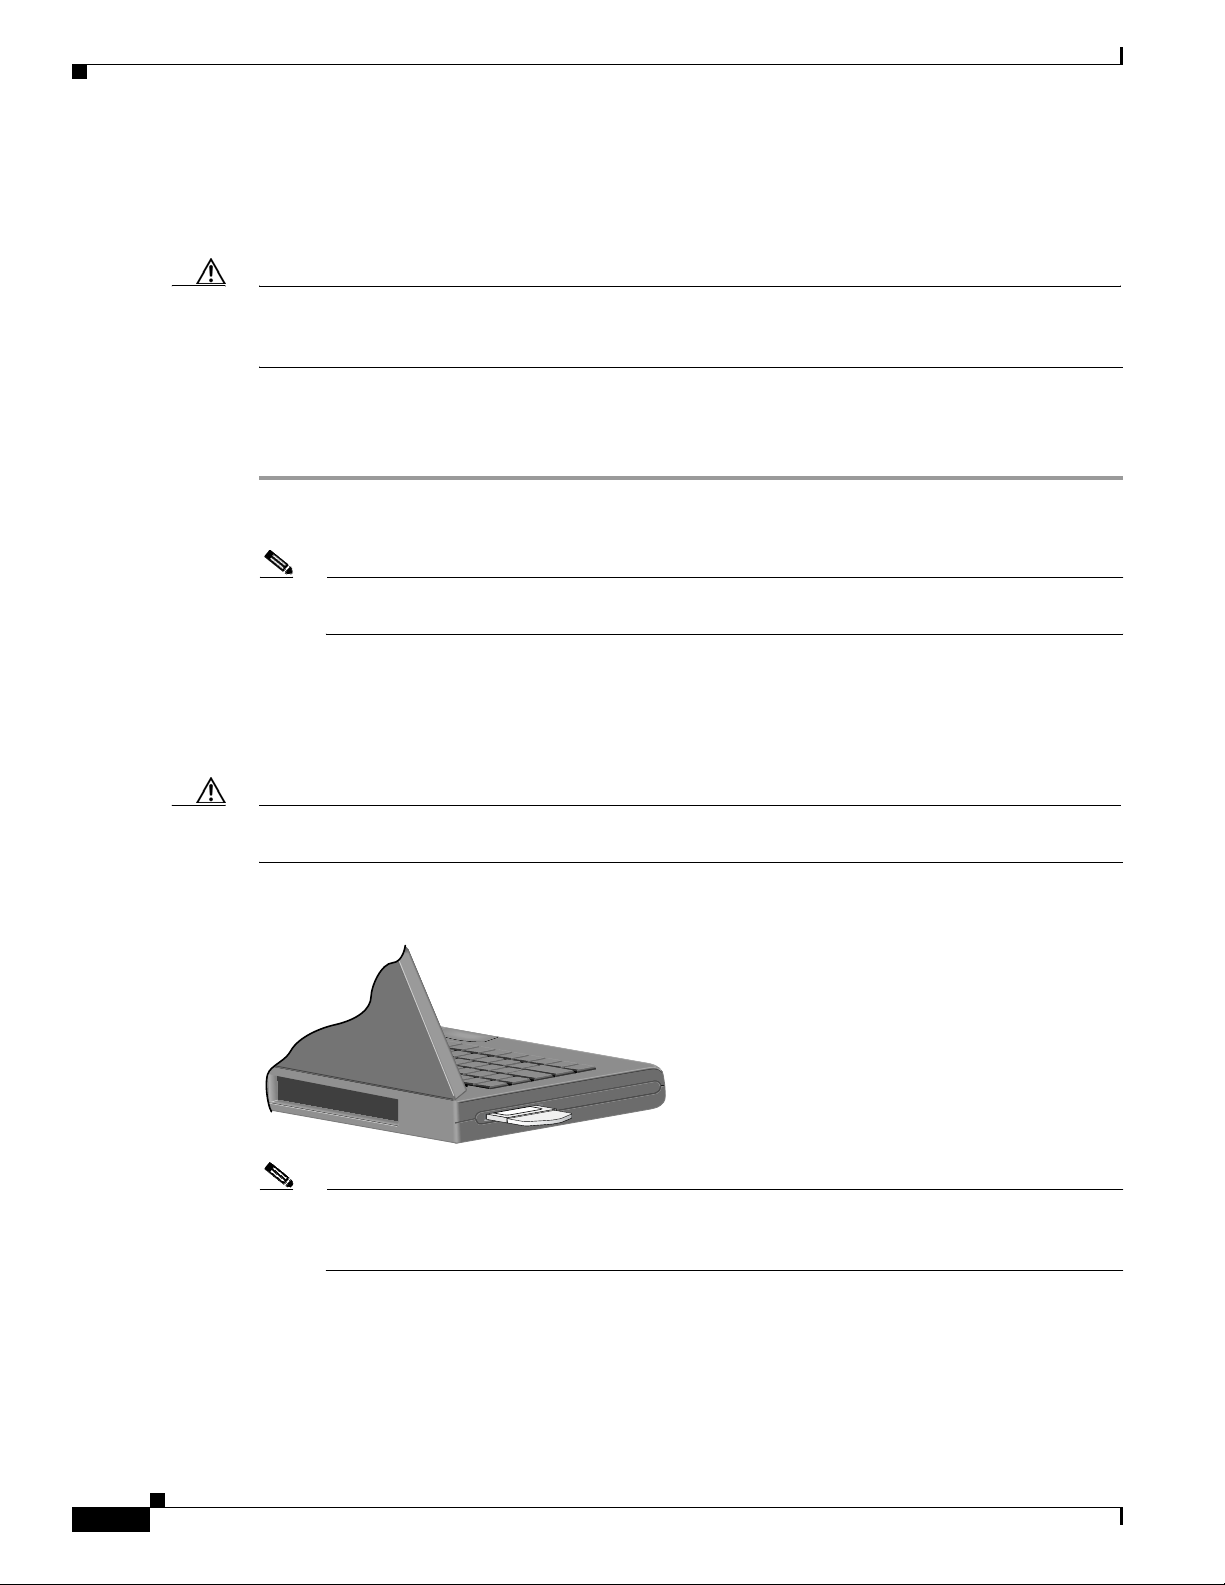
Step 2 Turn on your computer and let the operating system boot up completely.
Step 3 Hold the card with the Cisco label facing up and insert it into the Cardbus slot, applying just enough
pressure to make sure it is fully seated (see
properly.
Caution Do not force the card into your computer’s Cardbus slot. Forcing it will damage both the card and the
slot. If the card does not insert easily, remove the card and reinsert it.
Figure 1-3 Inserting a PC-Cardbus Card into a Computer
Note The configuration profiles for PC-Cardbus cards are tied to the slot in which the card is inserted.
Therefore, you must always insert your PC-Cardbus card into the same slot or create profiles for
both slots. See Chapter 4 for information on creating profiles for your client adapter.
Figure 1-3). The green LED lights when the card is inserted
32617
1-10
Cisco Aironet 802.11a/b/g Wireless LAN Client Adapters (CB21AG and PI21AG) Installation and Configuration Guide for Windows Vista
OL-16534-01
Page 23
Chapter 1 Product Overview and Installation
Step 4 If the Found New Hardware Wizard window appears, click Cancel.
Note If you do not click Cancel, the wizard will attempt to install software for the client adapter but
will be unable to find it.
Step 5 Go to the “Installing the Client Adapter Driver and Software” section on page 1-18.
Inserting a PCI Card
You must perform the following procedures in the order listed below to insert a PCI card:
• If required, change the bracket (see the “Changing the Bracket” section on page 1-11).
• Insert the card (see the “Inserting the Card” section on page 1-12).
• Assemble the antenna (see the “Assembling the Antenna” section on page 1-13).
• Mount the antenna (see the “Mounting the Antenna” section on page 1-14).
Inserting the Client Adapter
Changing the Bracket
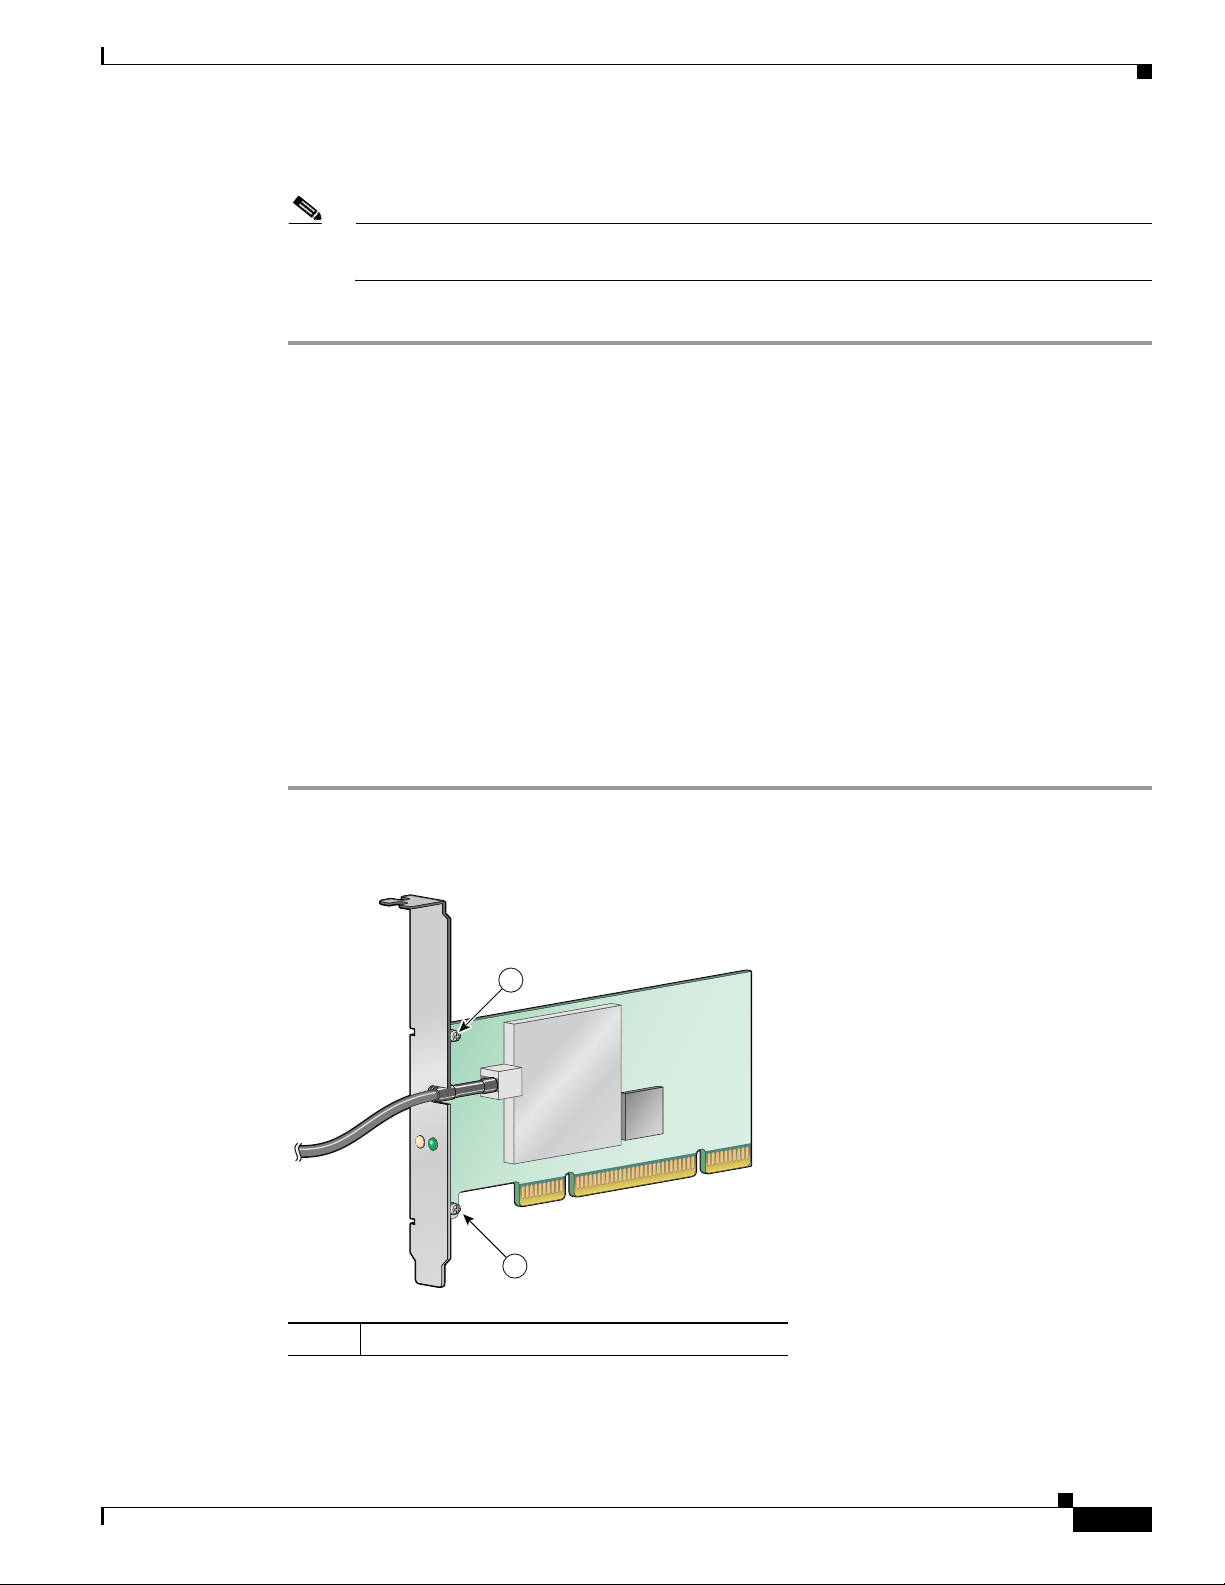
The PCI card is shipped with a full-profile bracket attached. If the PC into which you are inserting the
PCI card requires the card to use a low-profile bracket, follow these steps to change brackets.
Step 1 Remove the two screws that attach the bracket to the card. See Figure 1-4.
Figure 1-4 Changing the PCI Card Bracket
ACTIVITY
STATUS
1
1
1
Cisco Aironet 802.11a/b/g Wireless LAN Client Adapters (CB21AG and PI21AG) Installation and Configuration Guide for Windows Vista
OL-16534-01
Bracket screws
95581
1-11
Page 24

Inserting the Client Adapter
Step 2 Slide the bracket away from the card; then tilt the bracket to free the antenna cable.
Caution Do not pull on the antenna cable or detach it from the PCI card. The antenna is meant to be permanently
Step 3 Hold the low-profile bracket to the card so that the LEDs slip through their corresponding holes on the
Step 4 Insert the screws that you removed in Step 1into the holes on the populated side of the card near the
Inserting the Card
Step 1 Turn off the PC and all its components.
attached to the card.
bracket.
bracket (see
Follow the steps below to insert a PCI card into your PC.
Figure 1-4) and tighten.
Chapter 1 Product Overview and Installation
Step 2 Remove the computer cover.
Note On most Pentium PCs, PCI expansion slots are white. Refer to your PC documentation for slot
identification.
Step 3 Remove the screw from the top of the CPU back panel above an empty PCI expansion slot. This screw
holds the metal bracket on the back panel.
Caution Static electricity can damage your PCI card. Before removing the card from the anti-static packaging,
discharge static by touching a metal part of a grounded PC.
Step 4 Locate an empty PCI expansion slot inside your computer.
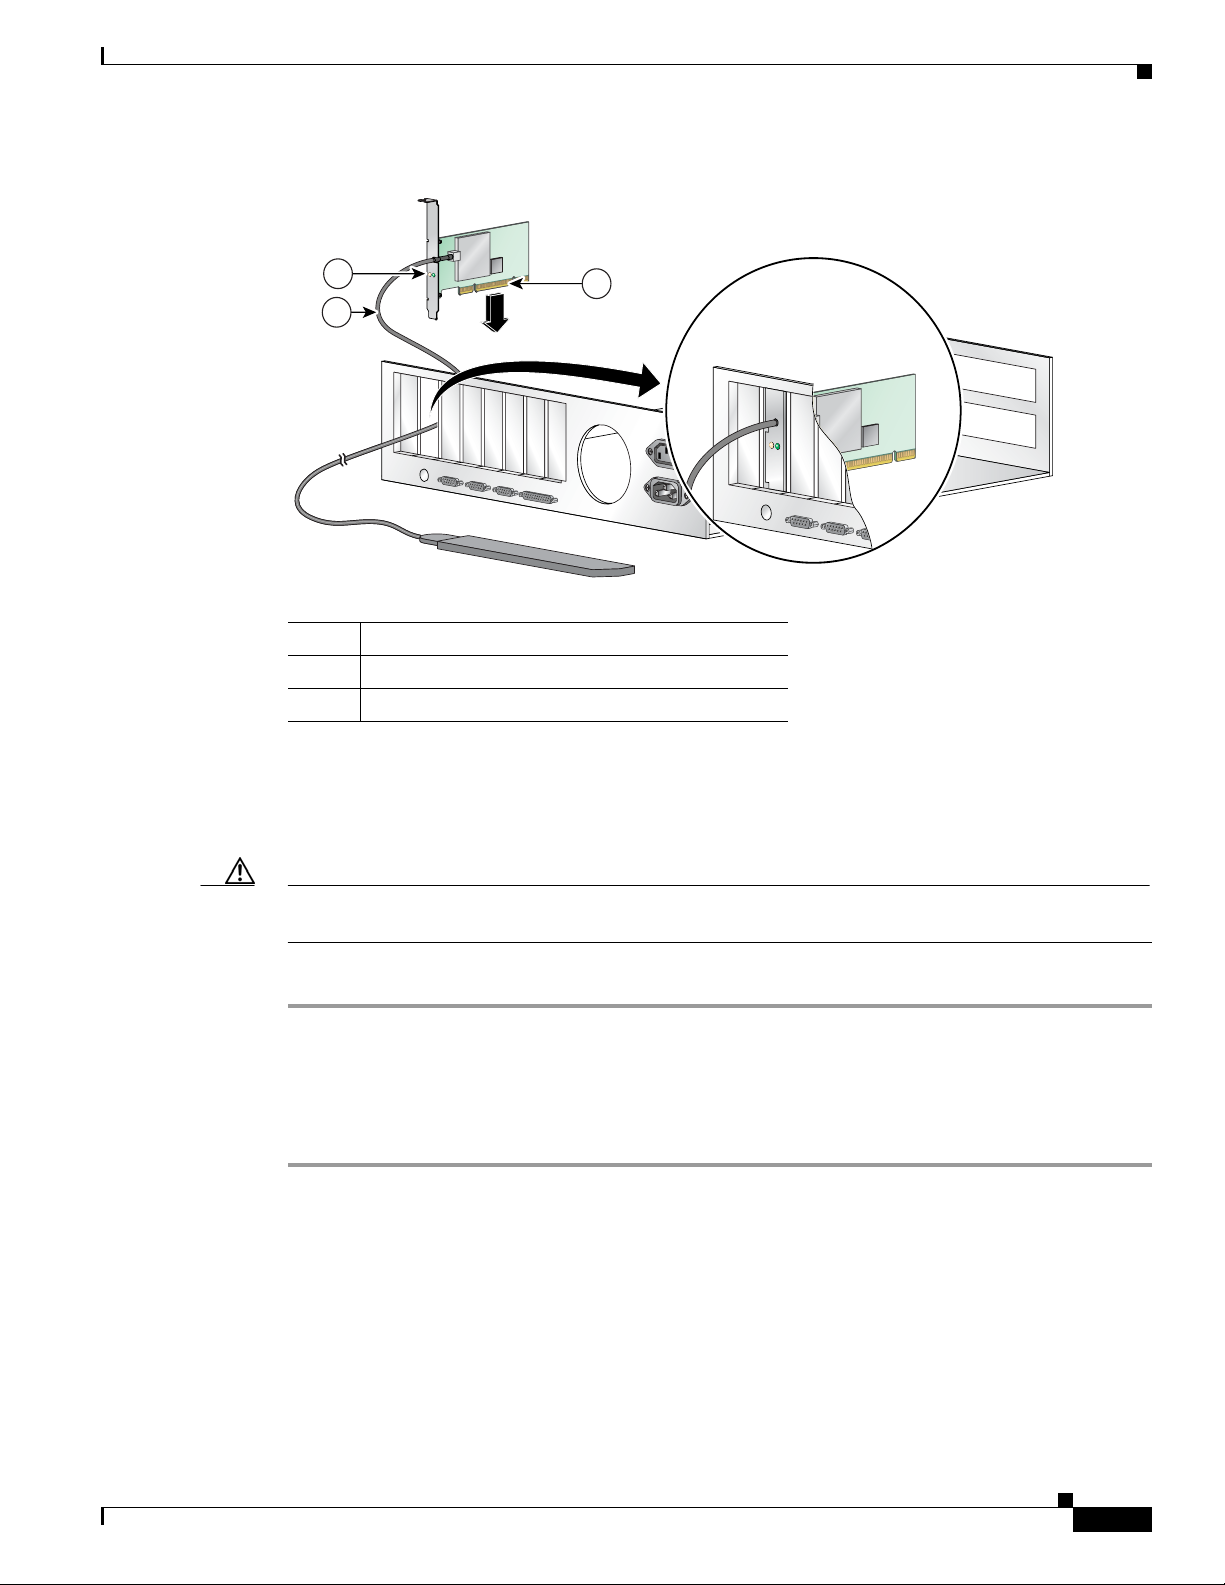
Step 5 Slip your card’s antenna through the opening near the empty expansion slot so that it is located outside
of the computer. See
Figure 1-5.
1-12
Cisco Aironet 802.11a/b/g Wireless LAN Client Adapters (CB21AG and PI21AG) Installation and Configuration Guide for Windows Vista
OL-16534-01
Page 25
Chapter 1 Product Overview and Installation
Figure 1-5 Inserting a PCI Card into a PC
2
1
Inserting the Client Adapter
ACTIVITY
STATUS
3
ACTIVITY
STATUS
95582
1
2
3
Step 6 Tilt the card to enable the LEDs to slip through the opening in the CPU back panel. See the enlarged
view in
Step 7 Press the card into the empty slot until its connector is firmly seated.
Caution Do not force the card into the expansion slot; this could damage both the card and the slot. If the card
does not insert easily, remove it and reinsert it.
Step 8 Reinstall the screw on the CPU back panel and replace the computer cover.
Assembling the Antenna
Follow the steps below to assemble the PCI card’s antenna.
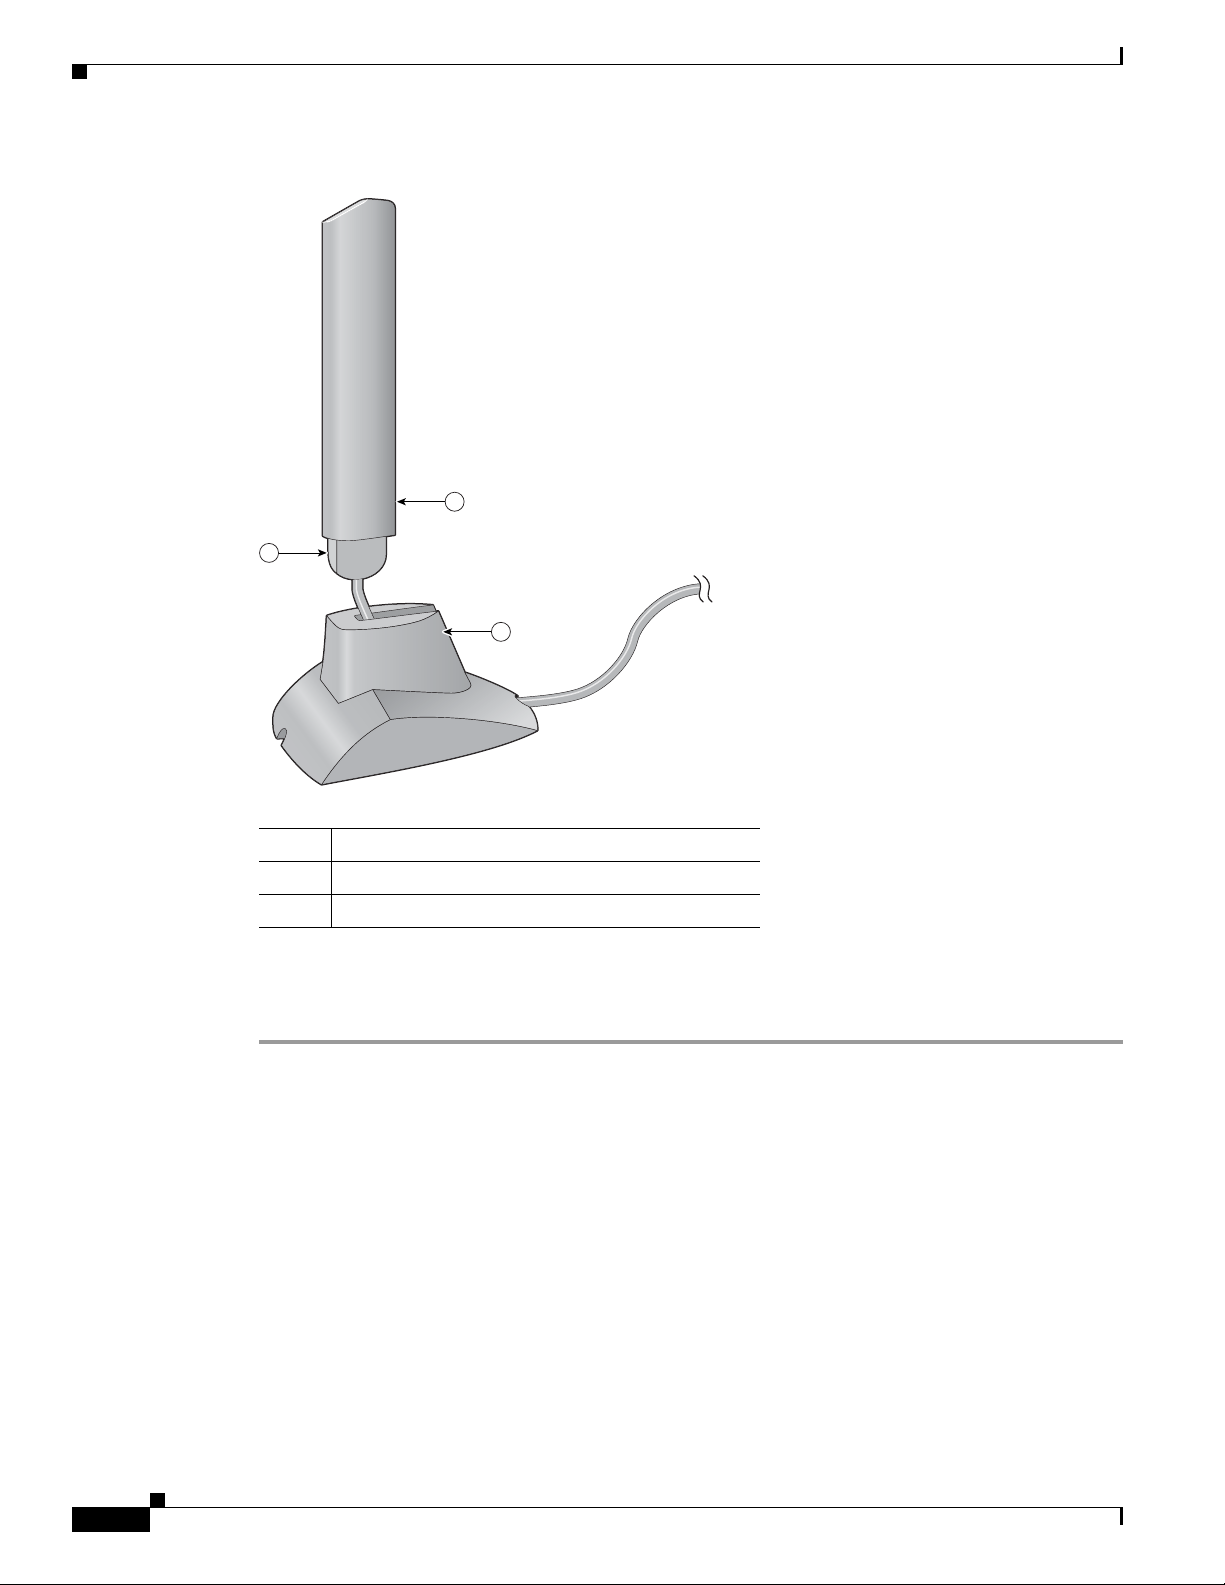
Step 1 Slide the antenna through the opening in the bottom of the antenna base.
Antenna cable
LEDs
Card edge connector
Figure 1-5.
Step 2 Position the antenna so its notches are facing the Cisco label on the front of the base. See Figure 1-6.
Cisco Aironet 802.11a/b/g Wireless LAN Client Adapters (CB21AG and PI21AG) Installation and Configuration Guide for Windows Vista
OL-16534-01
1-13
Page 26
Inserting the Client Adapter
Figure 1-6 Inserting the Antenna into Its Base
2
Chapter 1 Product Overview and Installation
1
3
1
2
3
Step 3 Press the antenna cable into the receptacle on the top of the base as shown in Figure 1-6.
Step 4 Press the antenna straight down into the receptacle until it clicks into place.
Mounting the Antenna
Because the PCI card is a radio device, it is susceptible to RF obstructions and common sources of
interference that can reduce throughput and range. Follow these guidelines to ensure the best possible
performance:
• Place the PCI card’s antenna in an area where large steel structures such as shelving units,
• Place the antenna away from microwave ovens and 2.4- and 5.8-GHz cordless phones. These
95584
Antenna
Notch
Antenna base
bookcases, and filing cabinets will not obstruct radio signals being transmitted or received.
products can cause signal interference because they operate in the same frequency range as the PCI
card.
1-14
Cisco Aironet 802.11a/b/g Wireless LAN Client Adapters (CB21AG and PI21AG) Installation and Configuration Guide for Windows Vista
OL-16534-01
Page 27
Chapter 1 Product Overview and Installation
Follow the steps below to position the PCI card’s antenna on a flat horizontal surface or to mount it to a
wall.
Step 1 Perform one of the following:
• If you want to use the antenna on a flat horizontal surface, position the antenna so it is pointing
straight up. Then go to Step
• If you want to mount the antenna to a wall, go to Step 2.
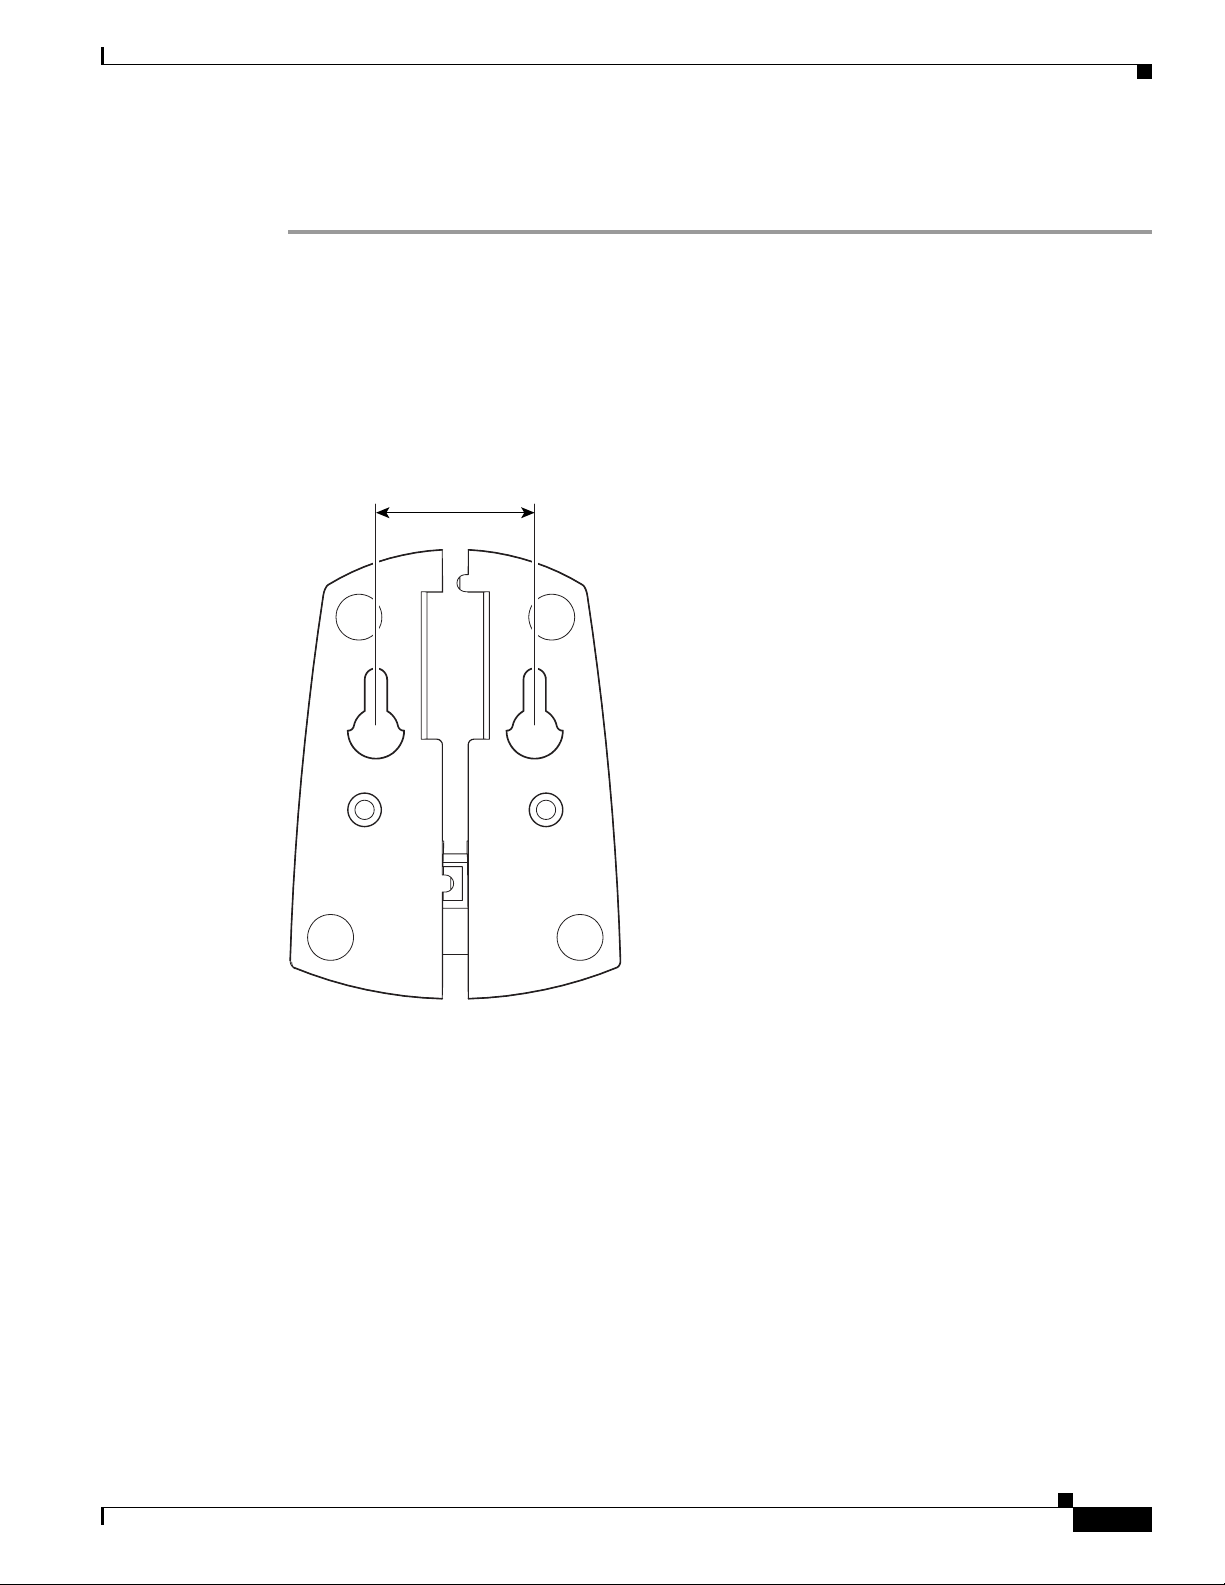
Step 2 Drill two holes in the wall that are 1.09 in. (2.8 cm) apart. Figure 1-7 shows the distance between the
mounting holes on the bottom of the antenna base.
Figure 1-7 Bottom of Antenna Base
Inserting the Client Adapter
7.
1.09 inches
95597
Step 3 Tap the two supplied wall anchors into the holes.
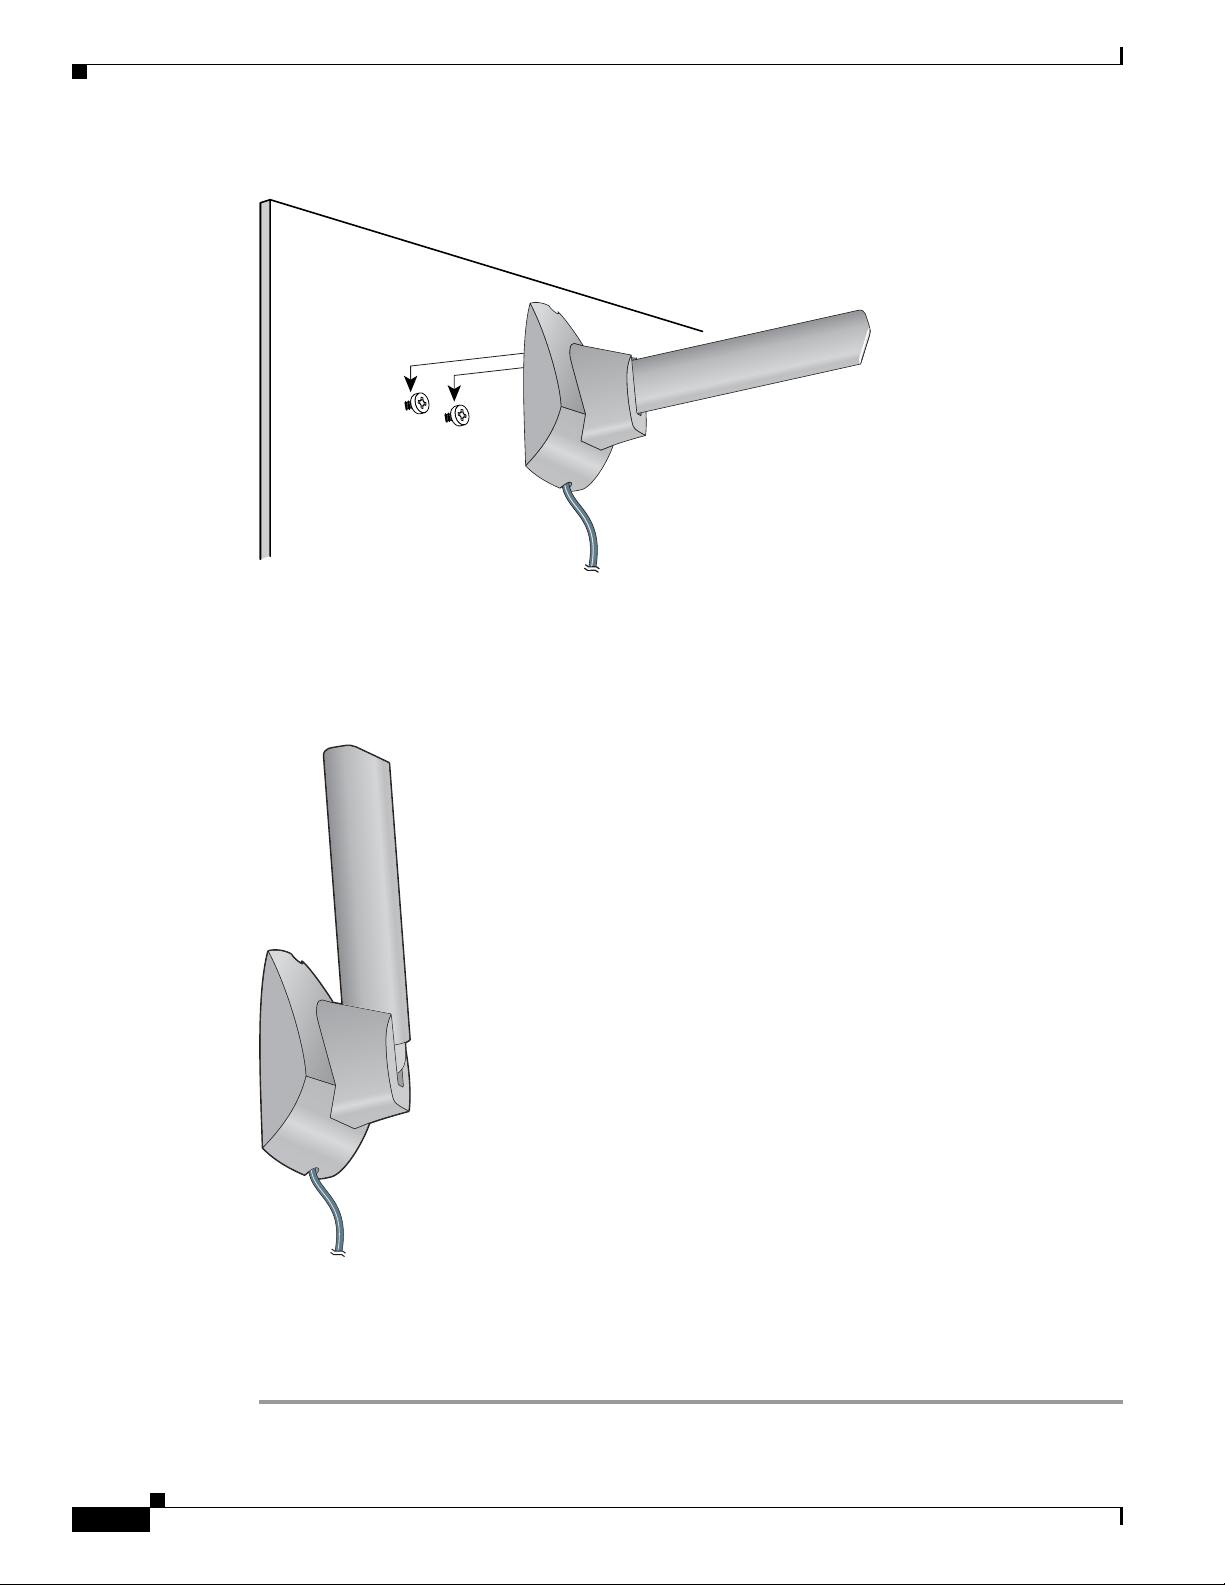
Step 4 Drive the two supplied screws into the wall anchors, leaving a small gap between the screw head and the
anchor.
Step 5 Position the mounting holes on the bottom of the antenna base over the screws (see Figure 1-8) and pull
down to lock in place.
Cisco Aironet 802.11a/b/g Wireless LAN Client Adapters (CB21AG and PI21AG) Installation and Configuration Guide for Windows Vista
OL-16534-01
1-15
Page 28
Inserting the Client Adapter
Figure 1-8 Mounting the Antenna
Step 6 The antenna rotates 90 degrees from its base. For optimal reception, position the antenna so it is pointing
straight up (see
Chapter 1 Product Overview and Installation
95595
Figure 1-9).
Figure 1-9 Rotating the Antenna
95596
1-16
Step 7 Boot up your PC.The green LED lights when the card is inserted properly.
Step 8 If the Found New Hardware Wizard window appears, click Cancel.
Step 9 Go to the “Installing the Client Adapter Driver and Software” section on page 1-18.
Cisco Aironet 802.11a/b/g Wireless LAN Client Adapters (CB21AG and PI21AG) Installation and Configuration Guide for Windows Vista
OL-16534-01
Page 29

Chapter 1 Product Overview and Installation
Obtaining Client Adapter Software
The software is provided on the CD that shipped with your client adapter; however, Cisco recommends
retrieving it from Cisco.com to ensure that you have the latest version.
• To obtain the version of the software on the CD, open the FileList.txt file on the CD root directory.
• To obtain the version of the latest software on Cisco.com, follow these steps:
Step 1 Make sure that you have a Cisco.com username and password.
Step 2 If you do not have a Cisco.com username and password, go to Cisco’s main page (http://www.cisco.com)
and click Register (top). Follow the instructions to create a username and password.
Step 3 Use your computer’s web browser to access the following URL:
Step 4 http://www.cisco.com/public/sw-center/
Step 5 Click Wireless Software.
Step 6 Click Client Adapters and Client Software.
Step 7 Click Cisco Aironet Wireless LAN Client Adapters.
Obtaining Client Adapter Software
Step 8 Follow one of these steps:
Step 9 If you are using a PC-Cardbus card, click Cisco Aironet 802.11a/b/g CardBus Wireless LAN Client
Adapter (CB21AG).
Step 10 If you are using a PCI card, click Cisco Aironet 802.11a/b/g PCI Wireless LAN Client Adapter
(PI21AG).
Step 11 When prompted, enter your Cisco.com username and password, and click OK.
Step 12 Click Windows Vista.
Step 13 Under Available Releases, determine whether the Install Wizard file on Cisco.com has a later version
number than the file on the CD. If it does, proceed to the next step. If it does not, use the Install Wizard
file on your CD.
Step 14 Click the link with the latest release number.
Step 15 Click the software file (WinClient-802.11a-b-g-Vista-Ins-Wizard-vxx.exe), where xx is the version
number.
Step 16 Click the Download button.
Step 17 Read and accept the terms and conditions of the Software License Agreement. Click Agree to accept the
terms and condition, or click Decline not to accept. Save the file to your device.
Cisco Aironet 802.11a/b/g Wireless LAN Client Adapters (CB21AG and PI21AG) Installation and Configuration Guide for Windows Vista
OL-16534-01
1-17
Page 30

Chapter 1 Product Overview and Installation
Installing the Client Adapter Driver and Software
Installing the Client Adapter Driver and Software
Caution Do not eject your client adapter at any time during the installation process, including during the reboot.
Follow these steps to use to install the client software on a device that is running Windows Vista.
Step 1 Double-click WinClient-802.11a-b-g-Vista-Ins-Wizard-vxx.exe. A window appears that asks you if
you want to run the softward file.
Step 2 Click Run. The Cisco Aironet Installation Program - InstallShield window appears (see Figure 1-10).
Figure 1-10 Cisco Aironet Installation Program—Installation Wizard Preparing Setup Window
1-18
Step 3 Allow the preparation sequence to finish . After the preparation sequence finishes, the next Cisco Aironet
Installation Program window appears (see
Cisco Aironet 802.11a/b/g Wireless LAN Client Adapters (CB21AG and PI21AG) Installation and Configuration Guide for Windows Vista
Figure 1-11).
OL-16534-01
Page 31

Chapter 1 Product Overview and Installation
Figure 1-11 Cisco Aironet Installation Program Window
Installing the Client Adapter Driver and Software
Step 4 Click Next. A Cisco Aironet Installation Program dialog box that includes a message about driver and
hardware installation appears (see
Figure 1-12).
Figure 1-12 Cisco Aironet Installation Program Dialog Box—Driver Installation and
Hardware
Step 5 Click OK. The Cisco Aironet Installation Program—Setup Status window appears (see Figure 1-13).
Insertion
Cisco Aironet 802.11a/b/g Wireless LAN Client Adapters (CB21AG and PI21AG) Installation and Configuration Guide for Windows Vista
OL-16534-01
1-19
Page 32

Installing the Client Adapter Driver and Software
Figure 1-13 Cisco Aironet Installation Program—Setup Status Window
Chapter 1 Product Overview and Installation
Step 6 Allow the software installation to finish. A Windows Security dialog box might appear (see Figure 1-14).
Figure 1-14 Windows Security—Windows can’t verify the publisher of this driver software
Box
Dialog
Step 7 If this dialog box appears, double-click Install this driver software anyway. After the driver
installation finishes, the Cisco Aironet Installation Program—InstallShield Wizard Complete window
appears (see
Figure 1-15).
1-20
Cisco Aironet 802.11a/b/g Wireless LAN Client Adapters (CB21AG and PI21AG) Installation and Configuration Guide for Windows Vista
OL-16534-01
Page 33

Chapter 1 Product Overview and Installation
Figure 1-15 Cisco Aironet Installation Program—InstallShield Wizard Complete Window
Installing the Client Adapter Driver and Software
Step 8 Click Finish.
Cisco Aironet 802.11a/b/g Wireless LAN Client Adapters (CB21AG and PI21AG) Installation and Configuration Guide for Windows Vista
OL-16534-01
1-21
Page 34

Installing the Client Adapter Driver and Software
Chapter 1 Product Overview and Installation
1-22
Cisco Aironet 802.11a/b/g Wireless LAN Client Adapters (CB21AG and PI21AG) Installation and Configuration Guide for Windows Vista
OL-16534-01
Page 35

CHA PTER
2
Configuring Wireless Profiles
This chapter explains how to use the Microsoft Vista Network and Sharing Center to create and manage
profiles for your client adapter.
The following topics are covered in this chapter:
• Overview of Wireless Profiles, page 2-2
• Accessing Microsoft Vista Network and Sharing Center, page 2-2
• Creating a New Profile and Configuring Basic Settings, page 2-3
• Accessing a Profile That Was Created Previously, page 2-12
• Viewing and Changing the Settings of a Profile, page 2-13
Cisco Aironet 802.11a/b/g Wireless LAN Client Adapters (CB21AG and PI21AG) Installation and Configuration Guide for Windows Vista
OL-16534-01
2-1
Page 36

Chapter 2 Configuring Wireless Profiles
Overview of Wireless Profiles
Overview of Wireless Profiles
A wireless profile is a set of of configuration parameters that you (or your network administrator) can
create and manage in the Microsoft Vista user interface. You can connect to a wireless network with the
profile, which includes the wireless network name, the network security type, the network encryption
type, and other feature configurations.
You can create several different profiles that enable you to connect to wireless networks in different
locations. For example, you might want to create and manage profiles that allow you to use your client
adapter at the office, at home, and in public areas, such as airport terminals. After the profiles are created,
you can switch between them without having to configure your client adapter each time you move to a
new location.
Accessing Microsoft Vista Network and Sharing Center
To create and manage wireless profiles, you must access the Microsoft Vista Network and Sharing
Center.
To access the Network and Sharing Center window, follow these steps:
Step 1 Double-click the networking icon (two computer monitors) in the system tray at the bottom right corner
of the screen. A small dialog box appears (see
Figure 2-1 Networking Icon in System Tray
Step 2 Click Network and Sharing Center. The Network and Sharing window appears (see Figure 2-2).
Figure 2-1).
2-2
Cisco Aironet 802.11a/b/g Wireless LAN Client Adapters (CB21AG and PI21AG) Installation and Configuration Guide for Windows Vista
OL-16534-01
Page 37

Chapter 2 Configuring Wireless Profiles
Figure 2-2 Network and Sharing Center Window
Creating a New Profile and Configuring Basic Settings
Step 3 To set up a wireless profile, click Set up a connection or network in the Tasks area.
Note You can also access the Network and Sharing Center by choosing Start > Control Panel > Network
and Sharing Center.
Creating a New Profile and Configuring Basic Settings
To create a wireless profile, follow these steps:
Step 1 Open the Network and Sharing Center window (see the “Accessing Microsoft Vista Network and Sharing
Center” section on page 2-2).
Step 2 Click Set up a connection or network in the Tasks area. The Set up a connection or network dialog box
appears (see
Cisco Aironet 802.11a/b/g Wireless LAN Client Adapters (CB21AG and PI21AG) Installation and Configuration Guide for Windows Vista
OL-16534-01
Figure 2-3).
2-3
Page 38

Creating a New Profile and Configuring Basic Settings
Figure 2-3 Set up a connection or network Dialog Box
Chapter 2 Configuring Wireless Profiles
Step 3 In the Choose a connection option area, click Manually connect to a wireless network.
Step 4 Click Next. A Manually connect to a wireless network dialog box appears (see Figure 2-4.)
Step 5 From the Choose a wireless adapter drop-down list, choose the option for the
Cisco
Aironet 802.11a/b/g Wireless Adapter (see Figure 2-4).
Note Client adapters might not be easy to identify in the Choose a wireless adapter drop-down list
because the adapters might be generically named (for example, Wireless Network Connection
or Wireless Network Connection 2). If you have multiple client adapters on your device, choose
Network and Sharing Center > Manage network connections. In the Views drop-down list,
choose Details to see which generic name corresponds with which client adapter. When you
view the details of available network connections, the client adapter is identified in the Device
Name column.
2-4
Cisco Aironet 802.11a/b/g Wireless LAN Client Adapters (CB21AG and PI21AG) Installation and Configuration Guide for Windows Vista
OL-16534-01
Page 39

Chapter 2 Configuring Wireless Profiles
Figure 2-4 Manually connect to a wireless network Dialog Box—Choose a wireless adapter
Creating a New Profile and Configuring Basic Settings
Step 6 Click Next. Another Manually connect to a wireless network dialog box appears (see Figure 2-5).
Cisco Aironet 802.11a/b/g Wireless LAN Client Adapters (CB21AG and PI21AG) Installation and Configuration Guide for Windows Vista
OL-16534-01
2-5
Page 40

Creating a New Profile and Configuring Basic Settings
Figure 2-5 Manually connect to a wireless network Dialog Box—Enter information for the
wireless network you want to add
Chapter 2 Configuring Wireless Profiles
Step 7 In this dialog box, enter information for the wireless network that you want to add.Ta ble 2-1 lists and
describes general settings for the profile. Follow the instructions in the table to configure these settings.
2-6
Cisco Aironet 802.11a/b/g Wireless LAN Client Adapters (CB21AG and PI21AG) Installation and Configuration Guide for Windows Vista
OL-16534-01
Page 41

Chapter 2 Configuring Wireless Profiles
Ta b l e 2-1 Profile Management General Settings
Setting What to Enter
Network name Enter the service set identifier (SSID). The network name and the SSID
Security type From the Security type drop-down list, choose the method that is used
Creating a New Profile and Configuring Basic Settings
are the same.
Range: The network consists of 1 to 32 case-sensitive characters.
Default: A blank field
to secure a connection to the wireless network. The choices are the
following:
• No authentication (Open)—Open system authentication with no
encryption
• WEP (also called Shared)—Open system authentication with
Wired Equivalent Privacy (WEP)
• WPA2-Personal—Wi-Fi Protected Access 2 (WPA2)
authentication with a preshared key (designed for networks without
a RADIUS infrastructure)
• WPA-Personal—WPA with a preshared key (designed for networks
without a RADIUS infrastructure)
• WPA2-Enterprise—802.1X authentication (designed for medium
and large infrastructure mode networks)
• WPA-Enterprise—802.1X authentication (designed for medium
and large infrastructure mode networks)
• 802.1x—802.1X authentication with WEP (also known as dynamic
WEP).
• CCKM—Cisco Centralized Key Management
For more information about these security types, see the “Security and
Encryption Types” section on page 2-10.
Default: None. You must choose a security type to create a wireless
profile.
Cisco Aironet 802.11a/b/g Wireless LAN Client Adapters (CB21AG and PI21AG) Installation and Configuration Guide for Windows Vista
OL-16534-01
2-7
Page 42

Creating a New Profile and Configuring Basic Settings
Table 2-1 Profile Management General Settings (continued)
Setting What to Enter
Encryption type Encryption choices are determined by the security type that you choose.
Chapter 2 Configuring Wireless Profiles
From the Encryption type drop-down list, choose an available method.
The choices are the following:
• If you choose No authentication (Open), your encryption choice is
None.
• If you choose WEP, your only encryption choice is WEP.
• If you choose WPA2-Personal, you can choose AES or TKIP.
• If you choose WPA-Personal, you can choose AES or TKIP.
• If you choose WPA2-Enterprise, your encryption choice is AES,
TKIP, AES (MFP), or TKIP (MFP).
• If you choose WPA-Enterprise, your encryption choice is AES or
TKIP.
• If you choose 802.1x, your only encryption choice is WEP.
• If you choose CCKM, your encryption choices are WEP, AES, and
TKIP.
For more information about these encryption types, see the “Security
and Encryption Types” section on page 2-10.
Default: The default that appear in the Encryption type drop-down list
is determined by what you selected in the Security type drop-down list.
Security Key/Passphrase • If you choose No authentication (Open), a Security Key/Passphrase
is not necessary.
• If you choose the WEP security type, enter the WEP key.
• If you choose the WPA2-Personal security type, enter the WPA2
preshared key.
• If you choose the WPA-Personal security type, enter the WPA
preshared key.
• For the WPA2-Enterprise and WPA-Enterprise security types, see
Chapter 3, “Configuring EAP Types.” The enterprise network EAP
type determines the credentials that the client adapter must use for
authentication.
• If you choose the 802.1x security type, a Security Key/Passphrase
is not necessary.
Note Contact the wireless network administrator for the network
WEP key, the WPA2-Personal preshared key, or the
WPA-Personal preshared key.
Display characters Check this check box if you want to view the characters that you enter
into the Security Key/Passphrase field. If you do not check this check
box, the key or passphrase that you enter appears as black dots.
2-8
Default: Not checked.
Cisco Aironet 802.11a/b/g Wireless LAN Client Adapters (CB21AG and PI21AG) Installation and Configuration Guide for Windows Vista
OL-16534-01
Page 43

Chapter 2 Configuring Wireless Profiles
Table 2-1 Profile Management General Settings (continued)
Setting What to Enter
Start this connection
automatically
Connect even if the network
is not broadcasting
Step 8 After you enter all required settings, click Next. Another Manually connect to a wireless network dialog
box appears (see
Creating a New Profile and Configuring Basic Settings
Check this check box if you want the device to connect automatically
whenever the wireless network is in range. If you do not check this
check box, you must manually connect to this wireless network from
the Connect to a network dialog box, which you can access through the
Network and Sharing Center.
Default: For the No authentication (Open) security type, this check box
is unchecked. For all other security types, this check box is checked.
Check this check box if you want the device to attempt to connect even
if the wireless network is not broadcasting its name.
Default: Not checked.
Figure 2-6).
Figure 2-6 Manually connect to a wireless network Dialog Box—Successfully added
<network
name>
Step 9 Click Connect to to connect to a wireless network, including the one for which you have created a
profile. Or click Change connection settings to change the profile settings. See the
Changing the Settings of a Profile” section on page 2-13 for more information.
Cisco Aironet 802.11a/b/g Wireless LAN Client Adapters (CB21AG and PI21AG) Installation and Configuration Guide for Windows Vista
OL-16534-01
“Viewing and
2-9
Page 44

Security and Encryption Types
Security and Encryption Types
The dialog box in Figure 2-5 includes the settings that allow you to configure how the client adapter
associates to an access point, authenticates to a wireless network, and encrypts and decrypts data. The
following sections provide explanations of options that are available in the Security type drop-down list,
the Encryption type drop-down list, and the Security Key/Passphrase field of this dialog box.
WEP (Shared) Security with Static WEP Keys
You can protect your data as it is transmitted through your wireless network by encrypting it through the
use of wired equivalent privacy (WEP) encryption keys. With WEP encryption, the transmitting device
encrypts each packet with a WEP key, and the receiving device uses that same key to decrypt each
packet.
The WEP keys used to encrypt and decrypt transmitted data can be statically associated with your client
adapter. Static WEP keys are either 40 or 128 bits in length. 128-bit WEP keys offer more security than
40-bit WEP keys.
Each profile can be assigned a static WEP keys. If the device receives a packet that is not encrypted with
the appropriate key (as the WEP keys of all devices that are to communicate with each other must match),
the device discards the packet and never delivers it to the intended receiver.
Chapter 2 Configuring Wireless Profiles
You do not need to re-enter the static WEP key each time the client adapter is inserted or the Windows
device is rebooted because the key is stored (in an encrypted format for security reasons) in the Windows
profile store.
You can obtain a static WEP key from your network administrator.
Note WEP encryption is not considered safe enough for today’s wireless networks. We do not recommend that
you use it in enterprise wireless networks.
WPA and WPA2
Wi-Fi Protected Access (WPA) and WPA2 are standards-based security solutions from the Wi-Fi
Alliance that provide data protection and access control for wireless LAN systems. WPA is compatible
with the IEEE 802.11i standard but was implemented prior to the standard’s ratification; WPA2 is the
Wi-Fi Alliance’s implementation of the ratified IEEE 802.11i standard.
WPA and WPA2 can use Temporal Key Integrity Protocol (TKIP) and message integrity check (MIC)
for data protection or the stronger Advanced Encryption Standard encryption algorithm using Counter
Mode with Cipher Block Chaining Message Authentication Code Protocol (AES-CCMP). Both WPA
and WPA2 use 802.1X for authenticated key management.
Both WPA and WPA2 support two mutually exclusive key management types: WPA/WPA2 and
WPA/WPA2 passphrase (also known as WPA pre-shared key or WPA-PSK). Using WPA or WPA2,
clients and the authentication server authenticate to each other using an EAP authentication method, and
the client and server generate a pairwise master key (PMK). The server generates the PMK dynamically
and passes it to the access point. Using WPA or WPA2 passphrase, however, you configure a passphrase
(or pre-shared key) on both the client and the access point, and that passphrase is used as the PMK.
2-10
Cisco Aironet 802.11a/b/g Wireless LAN Client Adapters (CB21AG and PI21AG) Installation and Configuration Guide for Windows Vista
OL-16534-01
Page 45

Chapter 2 Configuring Wireless Profiles
• WPA2 -Personal—WPA2 authentication with a preshared key. WPA2-Personal is suitable for
environments without a Remote Authentication Dial-In User Service (RADIUS) infrastructure (for
example, a small office or ho me o ffice network). W PA2-Personal supports the u s e of a p re share d
key (PSK).Obtain the preshared key from your system admi nistrator. When you choose
WPA2 -Personal as you r secur ity type, your encryptio n type is TKIP or A ES.
• WPA-Personal—WPA with a preshared key. Like WPA2-Perso nal, W PA-Personal is suitable for
environments without a RA DIU S infr astr uc ture . Ob tain t he pr e share d key from yo ur syste m
administrator. When you choose WPA-Personal as your security type, your encryption type is TKIP
or AES.
• WPA2 -Enterprise—WPA2 -Enterprise requires authentication in two phases: the first is an open
system authenticatio n, and th e second use s 802.1X wi th an Exten sible A uthent ication Prot ocol
(EAP) authentication method. See chapter Chapter 3, “ Configuring E AP Types,” for more
information about supp orted EAP me thods. Whe n you choose WPA2-Enterprise as your security
type, your encr ypt ion typ e is T KI P o r AE S.
• WPA-Enterprise—WP A-Enterprise also uses 802.1X authentication and is designed for medium and
large infrastructure mode networks. See chapter for more information about supported EAP
methods. When you cho ose WPA-Enterprise as you securi ty type , yo ur e ncry ptio n type is TKIP o r
AES.
Security and Encryption Types
802.1X with Dynamic WEP Keys
The standard for wirel ess LAN se curity, as defined by IEEE, is called 802.1X f or 80 2.11 , or simply
802.1X. An acc ess poi nt tha t sup port s 80 2.1X and it s pr otocol , E xten sibl e A uthe nticat ion Proto col
(EAP), acts as the interface between a wireless client and an authentication server, such as a RADIUS
server, to which the access point communicates over the wired network.
Dynamic WEP ke ys are cr eated as part o f the EAP aut hentication process. Dynamic WEP keys with EAP
offer a higher degree of security than static WEP keys.
When you choose t he 8 02. 1X w it h WEP e ncryp tion , you can con figure t he pro file to use five different
authentication me thods of dy na mic WEP key cre ation :
• Smart Card or other certificate—for more information about smart cards and other certification
authentication, go to the Microsoft site:
http://technet2.microsoft.com/windowsserver/en/library/7c6b414a-80c7-4bc1-b952-6eca6585dff9
1033.mspx?mfr=tru e
• Protected EAP (PEAP)
• LEAP
• PEAP-GTC
• EAP-FAST
Note For more inform ation about EAP a uthenti cation me thods, see Cha pter 3, “Configuring EAP Types.”
Cisco Aironet 802.11a/b/g Wireless LAN Client Adapters (CB21AG and PI21AG) Installation and Configuration Guide for Windows Vista
OL-16534-01
2-11
Page 46

Accessing a Profile That Was Created Previously
CCKM Fast Secure Roaming
Some applications that run on a client device may require fast roaming between access points. Voice
applications, for example, require it to prevent delays and gaps in conversation. CCKM fast secure
roaming is enabled automatically for CB21AG and PI21AG clients using WPA/WPA2/CCKM with
LEAP, EAP-FAST, EAP-TLS, PEAP (EAP-GTC), or PEAP (EAP-MSCHAP V2). However, this feature
must be enabled on the access point.
During normal operation, EAP-enabled clients mutually authenticate with a new access point by
performing a complete EAP authentication, including communication with the main RADIUS server.
However, when you configure your wireless LAN for CCKM fast secure roaming, EAP-enabled clients
securely roam from one access point to another without the need to reauthenticate with the RADIUS
server. Using Cisco Centralized Key Management (CCKM), an access point that is configured for
wireless domain services (WDS) uses a fast rekeying technique that enables Cisco client devices to roam
from one access point to another typically in under 150 milliseconds (ms). CCKM fast secure roaming
ensures that there is no perceptible delay in time-sensitive applications such as wireless Voice over IP
(VoIP), enterprise resource planning (ERP), or Citrix-based solutions.
Chapter 2 Configuring Wireless Profiles
Accessing a Profile That Was Created Previously
After you have created a profile and configured its basic settings (see the “Creating a New Profile and
Configuring Basic Settings” section on page 2-3), you can change the settings by accessing the
properties of the profile.
To access the profile, follow these steps:
Step 1 Open the Network and Sharing Center (see the “Accessing Microsoft Vista Network and Sharing Center”
section on page 2-2).
Step 2 In the Network and Sharing window (see Figure 2-7), click Manage wireless networks in the Tasks
area.
2-12
Cisco Aironet 802.11a/b/g Wireless LAN Client Adapters (CB21AG and PI21AG) Installation and Configuration Guide for Windows Vista
OL-16534-01
Page 47

Chapter 2 Configuring Wireless Profiles
Figure 2-7 Network and Sharing Center Window
Viewing and Changing the Settings of a Profile
Step 3 In the Manage wireless networks window that appears, double-click the profile that contains the settings
that you want to change. A Wireless Network properties dialog box appears (see Figure 2-8). See the
“Viewing and Changing the Settings of a Profile” section on page 2-13 for information about modifying
the profile that you have selected.
Viewing and Changing the Settings of a Profile
To access a profile whose settings you want to view or change, follow the procedure in the “Accessing
a Profile That Was Created Previously” section on page 2-12. To view or change the settings of a profile,
follow these steps:
Cisco Aironet 802.11a/b/g Wireless LAN Client Adapters (CB21AG and PI21AG) Installation and Configuration Guide for Windows Vista
OL-16534-01
2-13
Page 48

Viewing and Changing the Settings of a Profile
Step 1 In the Connection tab of the Wireless Network properties dialog box (see Figure 2-8), view the wireless
network’s Name, SSID (service set identifier), Network Type (for example, Access point for an
infrastructure-mode network), and the Network Availability (specifies the availability for types of users).
You cannot change these settings in this dialog box.
Figure 2-8 Wireless Network properties Dialog Box—Connection Tab
Chapter 2 Configuring Wireless Profiles
2-14
Step 2 In the Connection tab, check or uncheck the check boxes that are available. Table 2-2 lists and describes
these check boxes. Follow the instructions in the table to configure these settings.
Cisco Aironet 802.11a/b/g Wireless LAN Client Adapters (CB21AG and PI21AG) Installation and Configuration Guide for Windows Vista
OL-16534-01
Page 49

Chapter 2 Configuring Wireless Profiles
Ta b l e 2-2 Profile Management General Settings
Setting What to Enter
Connect automatically when
this network is in range
Connect to a more preferred
network if available.
Connect even if the network
is not broadcasting
Enable Cisco connection
settings
Viewing and Changing the Settings of a Profile
Check this check box if you want the device to connect automatically
whenever the wireless network is in range. If you do not check this
check box, you must manually connect to this wireless network from
the Connect to a network dialog box, which you can access through the
Network and Sharing Center.
Note You configured this setting when you first created the wireless
profile. See the Start this connection automatically check box
in
Table 2-1 on page 2-7.
Check this check box to connect to a wireless network that you prefer
more than the wireless network specified in this profile. To designate
the order in which your profiles connect when more than one network
is available, Choose Control Panel > Manage Wireless Networks.
You can order your wireless profiles in this window.
Check this check box if you want the device to attempt to connect even
if the wireless network is not broadcasting its name.
Note You configured this setting when you first created the wireless
profile. See the Connect even if the network is not broadcasting
check box in
Check this check box to view, configure, and enable Radio
Measurement and Advanced Roaming. When you check the Enable
Cisco connection settings check box, the Configure button is no longer
dimmed. Click on the Configure Button to open the Cisco Connection
Settings dialog box. See the
page 2-18 and the “Advanced Roaming Setting” section on page 2-19
for more information about these Cisco connection settings.
Table 2-1 on page 2-7.
“Radio Measurement” section on
Step 3 Click the Security tab to change security settings. The security settings on the Security tab appear (see
Figure 2-9).
Cisco Aironet 802.11a/b/g Wireless LAN Client Adapters (CB21AG and PI21AG) Installation and Configuration Guide for Windows Vista
OL-16534-01
2-15
Page 50

Viewing and Changing the Settings of a Profile
Figure 2-9 Wireless Network properties Dialog Box—Security Tab
Chapter 2 Configuring Wireless Profiles
2-16
Step 4 In this dialog box, configure security settings that are available for this profile. Table 2-3 lists and
describes security settings. Follow the instructions in the table to configure these settings.
Cisco Aironet 802.11a/b/g Wireless LAN Client Adapters (CB21AG and PI21AG) Installation and Configuration Guide for Windows Vista
OL-16534-01
Page 51

Chapter 2 Configuring Wireless Profiles
Ta b l e 2-3 Profile Management General Settings
Setting What to Enter
Security type From Security type drop-down list, choose the method that is used to
Encryption type Encryption choices are determined by the security type that you choose.
Viewing and Changing the Settings of a Profile
authenticate a connection to the wireless network. The choices are the
following:
• No authentication (Open)
• Shared
• WPA2-Personal
• WPA-Personal
• WPA2-Enterprise
• WPA-Enterprise
• 802.1X
• CCKM
From the Encryption type drop-down list, choose an available method.
The choices are the following:
• If you choose No authentication (Open), your encryption choice is
None or WEP.
• If you choose Shared, your only encryption choice is WEP.
• If you choose WPA2-Personal you can choose AES or TKIP.
• If you choose WPA-Personal, you can choose AES or TKIP.
• If you choose, WPA2-Enterprise, you can choose AES, TKIP, AES
(MFP), TKIP (MFP).
• If you choose WPA-Enterprise, you can choose AES or TKIP.
• If you choose 802.1x, your only encryption choice is WEP.
• If you choose CCKM, you can choose AES, WEP, or TKIP.
Network security key Enter the network security key that you obtain from the network
administrator.
Note The Network security key field only appears when you choose
No authentication (Open) with WEP encryption, Shared,
WPA2-Personal, or WPA-Personal as the security type.
Cisco Aironet 802.11a/b/g Wireless LAN Client Adapters (CB21AG and PI21AG) Installation and Configuration Guide for Windows Vista
OL-16534-01
2-17
Page 52

Viewing and Changing the Settings of a Profile
Table 2-3 Profile Management General Settings (continued)
Setting What to Enter
Choose a network
authentication method
Chapter 2 Configuring Wireless Profiles
From the Choose a network authentication method drop-down list,
choose an authentication method. The choices are the following:
• Smart Card or other certificate
• Protected EAP (PEAP)
• LEAP
• PEAP-GTC
• EAP-FAST
Note Smart Card and Protected EAP (PEAP) are provided by
Microsoft. These methods were not tested by Cisco on the
CB21AG or the PI21AG client adapter.
Note The Choose a network authentication method drop-down list
appears only when you choose WPA2-Enterprise,
WPA-Enterprise, 802.1X, or CCKM as the security type.
Cache user information for
subsequent connections to
this network
Radio Measurement
You can enable or disable the radio measurement feature in the Cisco Connection Settings dialog box,
which is available from the profile’s Connection tab in the Wireless Network properties dialog box (see
Step 2 in the “Viewing and Changing the Settings of a Profile” section on page 2-13 to get to the Cisco
Connection Settings dialog box).
When you check the Enable Radio Measurement check box, the radio measurement feature is enabled.
The client driver advertises support for the Cisco wireless LAN radio measurement feature by including
a radio measurement information element when the client associates with the access point. The client
can then service radio measurement requests that the network infrastructure sends.
Note After you choose the network authentication method, click the
Settings button to configure the authentication methods. For
more information about the authentication method settings, see
the EAP-FAST, PEAP-GTC, and LEAP administrator guides.
Check this check box if you want user information stored for later
connections through this profile to the network.
Note The Cache user information for subsequent connections to this
network check box appears only when you choose
WPA2-Enterprise, WPA-Enterprise, 802.1X, or CCKM as the
security type. These security types rely on a network
authentication method that requires user credentials.
2-18
When you uncheck the Enable Radio Measurement check box, the client does not advertise the radio
measurement information element. The client cannot service radio measurement requests that the
network infrastructure sends.
Cisco Aironet 802.11a/b/g Wireless LAN Client Adapters (CB21AG and PI21AG) Installation and Configuration Guide for Windows Vista
OL-16534-01
Page 53

Chapter 2 Configuring Wireless Profiles
Advanced Roaming Setting
You can enable or disable the advanced roaming feature in the Cisco Connection Settings dialog box,
which is available from the profile’s Connection tab in the Wireless Network properties dialog box (see
Step 2 in the “Viewing and Changing the Settings of a Profile” section on page 2-13 to get to the Cisco
Connection Settings dialog box).
Check the Enable Advanced Roaming Setting check box to enable the advanced roaming feature.
Uncheck the check box to disable the feature.
You can choose from five roaming policies to meet the needs of your wireless network. The roaming
policy is the level of aggressiveness for roaming. From the Roaming Option drop-down list, choose
roaming policy:
• Ve r y L ow —Roaming aggressiveness is very low. The client maintains connection with the current
access point until its RSSI and transmit rate drop to the values where it may loose connection. The
client roams to another access point only when it might loose connection with the current access
point. This roaming policy prioritizes connection to the current AP rather than performance. This
policy is best suited for environments in which only one access point is present.
• Low—Roaming aggressiveness is low . The client maintains co nnection with the curr ent access point
until its RSSI and transmit rate drop to values where performance is heavily degraded. This policy
is best suited for en viron me nts i n whic h a ccess poi nts are dist rib uted sp arsel y.
Viewing and Changing the Settings of a Profile
• Normal—Roaming aggressiveness is norma l. The c lient main tains conne ction wit h the curr ent
access point until its RSSI and transmit rate drop to values where performance is degraded. This
policy gives balanced priorities to roaming aggressiveness and performance.
• High—Roaming aggressiveness is high . The RSSI and rate thr esholds are set to high values to
increase the aggressiveness of roaming. This policy is best suited for environments in which many
access points are closely distributed and in which the user moves around at a faster pace.
• Very High—Roaming aggressiveness is very high. The RSSI and rate thresholds are set to values
that give the best performance. This policy is best suited for environments in which multiple access
points are present and in which the user can switch to the best performing access points at any time.
• Default—The default roaming policy is Normal. This roaming policy is set in the client driver.
Cisco Aironet 802.11a/b/g Wireless LAN Client Adapters (CB21AG and PI21AG) Installation and Configuration Guide for Windows Vista
OL-16534-01
2-19
Page 54

Viewing and Changing the Settings of a Profile
Chapter 2 Configuring Wireless Profiles
2-20
Cisco Aironet 802.11a/b/g Wireless LAN Client Adapters (CB21AG and PI21AG) Installation and Configuration Guide for Windows Vista
OL-16534-01
Page 55

CHA PTER
3
Configuring EAP Types
This chapter explains the EAP types that are used for authenication to wireless networks.
The following topics are covered:
• Overview of EAP-FAST, page 3-1
• How EAP-FAST Works, page 3-2
• Configuring EAP-FAST, page 3-4
• Overview of LEAP, page 3-17
• How LEAP Works, page 3-17
• Configuring LEAP, page 3-18
• Overview of PEAP-GTC, page 3-21
• How PEAP-GTC Works, page 3-22
• Configuring PEAP-GTC, page 3-23
Overview of EAP-FAST
Note For additional information about EAP-FAST, see RFC4851.
EAP-FAST is an EAP method that enables secure communication between a client and an authentication
server by using Transport Layer Security (TLS) to establish a mutually authenticated tunnel. Within the
tunnel, data in the form of type, length, and value (TLV) objects are used to send further
authentication-related data between the client and the authentication server.
EAP-FAST supports the TLS extension as defined in RFC 4507 to support the fast re-establishment of
the secure tunnel without having to maintain per-session state on the server. EAP-FAST-based
mechanisms are defined to provision the credentials for the TLS extension. These credentials are called
Protected Access Credentials (PACs).
EAP-FAST provides the following:
• Mutual authentication
An EAP server must be able to verify the identity and authenticity of the client, and the client must
be able to verify the authenticity of the EAP server.
• Immunity to passive dictionary attacks
Cisco Aironet 802.11a/b/g Wireless LAN Client Adapters (CB21AG and PI21AG) Installation and Configuration Guide for Windows Vista
OL-16534-01
3-1
Page 56

How EAP-FAST Works
Chapter 3 Configuring EAP Types
Many authentication protocols require a password to be explicitly provided (either as cleartext or
hashed) by the client to the EAP server. The communication of the weak credential (such as a
password) must be immune from eavesdropping.
• Immunity to man-in-the-middle (MitM) attacks
In establishing a mutually authenticated protected tunnel, the protocol must prevent adversaries
from successfully interjecting information into the communication between the client and the EAP
server.
• Flexibility to enable support for most password authentication interfaces
Many different password interfaces exist to authenticate a client—for example, Microsoft Challenge
Handshake Authentication Protocol (MS-CHAP), Lightweight Directory Access Protocol (LDAP),
and One-Time Password (OTP). EAP-FAST provides support for these different password types.
• Efficiency in computational and power resources
Especially when using wireless media, clients have limited computational and power resources.
EAP-FAST enables network access communication to occur in a more efficient manner.
• Flexibility to extend the communications inside the tunnel
Because network infrastructures are becoming increasingly complex, authentication, authorization,
and accounting is also becoming more complex. For example, there are instances in which multiple
existing authentication protocols are required to achieve mutual authentication. Also, different
protected conversations might be required to achieve the proper authorization when a client has
successfully authenticated.
• Minimize authentication server requirements for per-user authentication
With large deployments, it is typical to have several servers that act as authentication servers for
several clients. A client uses the same shared secret to secure a tunnel in much the same way that is
uses a username and password to gain access to the network. EAP-FAST facilitates the use of a
single strong shared secret by the client, while enabling the authentication servers to minimize the
per-user and device state that they must cache and manage.
How EAP-FAST Works
The following sections describe how EAP-FAST works:
• Two-Phase Tunneled Authentication, page 3-2
• Protected Access Credentials, page 3-3
• Server Certificate Validation, page 3-3
Two-Phase Tunneled Authentication
EAP-FAST uses a two-phase tunneled authentication process.
In the first phase of authentication, EAP-FAST employs the TLS handshake to provide an authenticated
key exchange and to establish a protected tunnel between the client and the authentication server. The
tunnel protects client identity information from disclosure outside the tunnel. During this phase, the
client and the server engage in EAP-FAST version negotiation to ensure that they are using a compatible
version of the protocol.
3-2
Cisco Aironet 802.11a/b/g Wireless LAN Client Adapters (CB21AG and PI21AG) Installation and Configuration Guide for Windows Vista
OL-16534-01
Page 57

Chapter 3 Configuring EAP Types
After the tunnel is established, the second phase of authentication begins. The client and server
communicate further to establish the required authentication and authorization policies. This phase
consists of a series of requests and responses that are encapsulated in TLV objects. The TLV exchange
includes the EAP method to be used within the protected tunnel. For more information about TLV
objects and format, see section 4.2 of RFC
The EAP-FAST module offers a variety of EAP-FAST configuration options, including whether
automatic or manual PAC provisioning is used to establish a tunnel, whether or not server certificate is
used to establish a tunnel, what type of user credentials to use for authentication and provisioning, and
what type of authentication method to use to in the established tunnel.
Protected Access Credentials
Protected Access Credentials (PACs) are credentials that are distributed to clients for optimized network
authentication. PACs can be used to establish an authentication tunnel between the client and the
authentication server (the first phase of authentication as described in the
Authentication” section on page 3-2). A PAC consists of, at most, three components: a shared secret, an
opaque element, and other information.
The shared secret component contains the pre-shared key between the client and authentication server.
Called the PAC-Key, this pre-shared key establishes the tunnel in the first phase of authentication.
How EAP-FAST Works
4851.
“Two-Phase Tunneled
The opaque component is provided to the client and is presented to the authentication server when the
client wants to obtain access to network resources. Called the PAC-Opaque, this component is a variable
length field that is sent to the authentication server during tunnel establishment. The EAP server
interprets the PAC-Opaque to obtain the required information to validate the client's identity and
authentication. The PAC-Opaque includes the PAC-Key and may contain the PAC's client identity.
The PAC might contain other information. Called PAC-Info, this component is a variable length field
that is used to provide, at a minimum, the authority identity of the PAC issuer (the server that created the
PAC). Other useful but not mandatory information, such as the PAC-Key lifetime, can also be conveyed
by the PAC-issuing server to the client during PAC provisioning or refreshment.
PACs are created and issued by a PAC authority, such as Cisco Secure ACS, and are identified by an ID.
A user obtains his or her own copy of a PAC from a server, and the ID links the PAC to a profile.
Persistent PACs, such as machine PACs, are stored in the EAP-FAST registry and encrypted. These PACs
are also protected with access control lists (ACLs) so only designated users (the owners of the PACs)
and members of privileged user groups (for example, administrators) can access them. Machine PACs
are stored globally so that all users of a machine can use the PACs.
All PACs are encrypted and tied to the host machine with Microsoft Crypto API (CryptoProtectData).
PACs cannot be copied and used on other machines.
All non-persistent PACs, such as User Authorization PACs, are stored in volatile memory and do not
persist after reboot or after a user has logged off.
Server Certificate Validation
As a part of TLS negotiation in the first phase of EAP-FAST authentication, the authentication server
presents the client with a certificate. The client must verify the validity of the EAP server certificate and
also examines the EAP server name that is presented in order to determine if the server can be trusted.
Cisco Aironet 802.11a/b/g Wireless LAN Client Adapters (CB21AG and PI21AG) Installation and Configuration Guide for Windows Vista
OL-16534-01
3-3
Page 58

Configuring EAP-FAST
Configuring EAP-FAST
This section explains how to configure EAP-FAST module settings, such as connection settings, user
credentials, and authentication methods. The following topics are covered:
• Accessing EAP-FAST Properties for Configuration, page 3-4
• Configuring EAP-FAST Settings in the Connection Tab, page 3-5
• Configuring EAP-FAST Settings in the User Credentials Tab, page 3-10
• Configuring EAP-FAST Settings in the Authentication Tab, page 3-13
• Finding the Version of the EAP-FAST Module, page 3-16
Accessing EAP-FAST Properties for Configuration
To access the EAP-FAST Properties window, perform the following steps:
Step 1 Click the Start button on the lower-left corner of the desktop.
Chapter 3 Configuring EAP Types
Step 2 From the right pane, right-click Network.
Step 3 Select Properties.
Step 4 From the left pane, select Manage wireless networks.
Step 5 Double-click the wireless network.
Step 6 From the Wireless Network properties window, select the Security tab (see Figure 3-1).
3-4
Cisco Aironet 802.11a/b/g Wireless LAN Client Adapters (CB21AG and PI21AG) Installation and Configuration Guide for Windows Vista
OL-16534-01
Page 59

Chapter 3 Configuring EAP Types
Figure 3-1 Wireless Network Properties Window
Configuring EAP-FAST
Step 7 Select Cisco EAP-FAST from the "Choose a network authentication method" drop down list.
Step 8 Click the Settings button.
Step 9 Click the Connection tab, the User Credentials tab, the Authentication tab, or the About tab. For more
information about configuring settings in those tabs, see the
“Configuring EAP-FAST Settings in the
Connection Tab” section on page 3-5, the “Configuring EAP-FAST Settings in the User Credentials Tab”
section on page 3-10, and the “Configuring EAP-FAST Settings in the Authentication Tab” section on
page 3-13. For information about finding the version of the module on the device, see the “Finding the
Version of the EAP-FAST Module” section on page 3-16.
Configuring EAP-FAST Settings in the Connection Tab
The EAP-FAST Connection tab includes settings for the establishment of an outer Transport Layer
Security (TLS) tunnel. Settings include identity protection, the use of a Protected Access Credential
(PAC), PAC provisioning, the use of authenticated server certificates to establish the tunnel, and the use
of a Trusted Root Certificate Authority (CA) from a list of Trusted Root CA certificates.
Cisco Aironet 802.11a/b/g Wireless LAN Client Adapters (CB21AG and PI21AG) Installation and Configuration Guide for Windows Vista
OL-16534-01
3-5
Page 60

Configuring EAP-FAST
Chapter 3 Configuring EAP Types
You can configure connection settings from the Connection tab (see Figure 3-2).
Figure 3-2 Connection Tab in EAP-FAST Properties Window
3-6
Table 3-2 lists and describes all connection settings.
Ta b l e 3-1 Connection Settings
Connection Settings Description
Use anonymous outer identity Check this box to enable identity privacy protection.
Default: On
Outer identity field Enter an outer identity if the Use anonymous outer identity check box
is checked. Follow an administrator’s instructions, or follow
RFC
4282 for guidelines about what to enter in the outer identity
field.
Default: anonymous
Note The maximum number of characters allowed in this field
is
256.
Cisco Aironet 802.11a/b/g Wireless LAN Client Adapters (CB21AG and PI21AG) Installation and Configuration Guide for Windows Vista
OL-16534-01
Page 61

Chapter 3 Configuring EAP Types
Table 3-1 Connection Settings (continued)
Connection Settings Description
Use Protected Access
Credential (PAC)
Allow automatic PAC
provisioning
Configuring EAP-FAST
Check this box to enable the use of a PAC to establish a tunnel. When
this box is checked, PAC provisioning is requested. If this box is not
checked, EAP-FAST acts as PEAP and uses only the authenticated
server certificate to establish the tunnel every time.
The PAC is a unique shared credential used to mutually authenticate
a client and a server. The PAC is associated with a specific client
username and a server authority ID. A PAC removes the need for PKI
and digital certificates. The PAC is distributed or imported to the
client automatically or manually.
Manual PAC provisioning generates the PAC file locally on the AAA
or EAP-FAST server. With manual provisioning, the user credentials
are supplied to the server to generate the PAC file for that user. This
PAC must then be manually installed on the client device.
Default: On
Check this box to enable the automatic retrieval of a PAC during
EAP-FAST authentication.
Automatic PAC provisioning enables the automatic retrieval of a PAC
during EAP-FAST authentication. Automatic PAC provisioning uses
TLS with a Diffie-Hellman Key Agreement protocol to establish a
secure tunnel. In addition, MSCHAPv2 is used to authenticate the
client and for early man-in-the-middle (MITM) attack detection.
Default: On
PAC Authority Select a PAC authority from the drop-down list.
Default: None
Note The drop-down list contains the names of all of the PAC
authorities from which you have previously provisioned a
tunnel PAC. If you have not provisioned a PAC, then "none"
is the only option. You can also select "none" to force the host
to request provisioning a PAC.
Import Click the Import button to manually import a PAC file. When you
click on this button, the Import Protected Access Credentials (PAC)
File window appears. If you need to enter a password for the PAC file
that you have selected, a password window will appear.
After you have selected and imported a valid PAC file, the PAC
authority is added to the PAC authority drop-down list.
Default: Enabled
Cisco Aironet 802.11a/b/g Wireless LAN Client Adapters (CB21AG and PI21AG) Installation and Configuration Guide for Windows Vista
OL-16534-01
3-7
Page 62

Configuring EAP-FAST
Chapter 3 Configuring EAP Types
Table 3-1 Connection Settings (continued)
Connection Settings Description
Validate server certificate Check this box to use an authenticated server certificate to establish
a tunnel. You can check both the Use Protected Access Credentials
(PAC) box and the Validate Server Certificate box at the same time.
If both are checked, you can select one or more Trusted Root CA
certificates from the list of trusted Certificate Authority certificates
that are installed on the host system.
The EAP-FAST module always tries to use the PAC first if both check
boxes are checked. The module uses the server certifcate if the PAC
is missing or rejected by the server.
If both check boxes are unchecked, EAP-FAST functions as PEAP
does without validating server certificate. We do not recommend
leaving both boxes unchecked because the module bypasses
fundamental trust validation.
Default: Off
Connect to only these servers Check this box to enter an optional server name that must match the
server certificate that is presented by the server. You can enter
multiple server names; separate multiple server names with
semicolons. The EAP-FAST module only allows connections to
continue without prompting if the subject field (CN) in the server
certificate matches the server names that you enter in this field.
Default: Off
Note You can use an asterisk (*) as a wildcard character in server
names only if the asterisk appears before the first period (.) in
the name.domain.com format. For example, “*.cisco.com”
matches any server name that ends with “.cisco.com.” If you
put an asterisk anywhere else in the server name, it is not
treated as a wildcard character.
Trusted Root CA Select one of more Trusted Root CA certificates from the list of
certificates that are installed on the system. Only trusted CA
certificates that are installed on the host system are displayed in the
drop-down list.
To view details about the selected Trusted Root CA certificate,
double-click the certificate name. Double-clicking the certificate
name opens the Windows certificate property screen, where
certificate details are available.
Default: None
Do not prompt user to authorize
new servers or trusted
certificate authorities.
Check this box if you do not want the user to be prompted to authorize
a connection when the server name does not match or the server
certificate is not signed by one of the Trusted Root CA certiticates
that was selected. If this box is checked, the authentication fails.
Default: Off
3-8
Cisco Aironet 802.11a/b/g Wireless LAN Client Adapters (CB21AG and PI21AG) Installation and Configuration Guide for Windows Vista
OL-16534-01
Page 63

Chapter 3 Configuring EAP Types
Overview of the User Credentials Tab
The EAP-FAST module supports the use of both a client certificate and a username and password as user
credentials for authentication and provisioning.
Client Certificates
If a client certificate is used, the EAP-FAST module automatically obtains the client certificate from the
Windows certificate store of the current user. The EAP-FAST module finds the user certificate that
matches the username of the user who is logged on. The certificate cannot be expired.
If multiple user certificates are available, the EAP-FAST module prompts the user to select one, and that
selection is saved to the profile. By default, the user certificate is sent securely through TLS
renegotiation or through the EAP-TLS inner method in the protected TLS tunnel. If the EAP-FAST
server does not start TLS renegotiation to request the client certificate after the tunnel is established, then
the EAP-FAST module sends the certificate through the EAP-TLS inner method.
The EAP-FAST module administrator can configure the EAP-FAST module XML schema to send the
user certificate without using these security measures.
Configuring EAP-FAST
Usernames and Passwords
If a username and password are used, the user provide one of the following types of username and
password:
• Windows username and password—The Windows username and password are used as network
access credentials. The user is not prompted to enter the username and password unless the password
is invalid or must be changed.
• Prompted user credentials—The user is prompted during authentication for credentials. These
credentials are credentials that are separate from the Windows username and password, such as
Lightweight Directory Access Protocol (LDAP) credentials.
• Saved user credentials—These are user credentials that are entered as part of the EAP-FAST
configuration. The user is not prompted for credentials during authentication unless the saved
credentials fail or have expired. New credentials that the user enters after successful authentication
are saved automatically in the configuration. The user does not have to return to the configuration
screen to change the old saved credentials.
• One-time password (OTP)—The user must manually enter a OTP. New PIN mode and next token
mode for OTP are supported.
Cisco Aironet 802.11a/b/g Wireless LAN Client Adapters (CB21AG and PI21AG) Installation and Configuration Guide for Windows Vista
OL-16534-01
3-9
Page 64

Configuring EAP-FAST
Configuring EAP-FAST Settings in the User Credentials Tab
The user can configure user credentials from the User Credentials tab (see Figure 3-3).
Figure 3-3 User Credentials Tab in EAP-FAST Properties Window
Chapter 3 Configuring EAP Types
3-10
Table 3-2 lists and describes all options for user credentials.
Cisco Aironet 802.11a/b/g Wireless LAN Client Adapters (CB21AG and PI21AG) Installation and Configuration Guide for Windows Vista
OL-16534-01
Page 65

Chapter 3 Configuring EAP Types
Ta b l e 3-2 User Credentials Options
User Credentials Description
Use a certificate on this
computer
Use one-time password Click this radio button to use a one-time password (OTP). For more
Use Windows username and
password
Prompt automatically for
username and password
Use saved username and
password
Configuring EAP-FAST
Click this radio button to automatically obtain the client certificate
from the Windows certificate store of the current user.
Default: Off
information about OTP, see the
Mode with OTP” section on page 3-12.
Default: Off
Click this radio button to use the Windows username and password as
the EAP-FAST username and password for network authentication.
Default: On
Click this radio button to require the user to enter a separate
EAP-FAST username and password in addition to a Windows
username and password with every authentication attempt. This
options supports non-Windows passwords, such as LDAP.
Default: Off
Click this radio button so that the user is not required to enter an
EAP-FAST username and password each time. Authentication occurs
automatically as needed using a saved user name and password,
which are registered with the backend server.
Default: Off
“Understanding PIN Mode and Token
When selecting this option, the user must enter the following:
• Username—Enter the username and the domain name in one of
these two formats:
–
Domain-qualified user name—domain\user
–
User Principal Name (UPN)—user@domain.com
• Password—Enter a password. This encrypted password is stored
in the EAP-FAST configuration.
• Confirm password—Enter the password again to verify that it
was entered correctly.
Note The maximum number of characters allowed for the username
and password is 256.
Cisco Aironet 802.11a/b/g Wireless LAN Client Adapters (CB21AG and PI21AG) Installation and Configuration Guide for Windows Vista
OL-16534-01
3-11
Page 66

Configuring EAP-FAST
Understanding PIN Mode and Token Mode with OTP
New PIN mode for OTP is supported. If a new PIN is needed, the backend server sends a text message
(for example, “Enter New PIN”) to indicate that a new PIN is neeeded. The EAP-FAST module displays
a prompt window that includes the text message from the server (see
might prompt the user twice to confirm the new PIN that the user entered.
Figure 3-4 New PIN Prompt Window
Chapter 3 Configuring EAP Types
Figure 3-4). The backend server
Next Token mode for OTP is also supported. If the next token is needed, the backend server sends a text
message (for example, “Enter Next PASSCODE:”) to indicate that the next token is needed. The
EAP-FAST module displays a prompt window that includes the text message sent from the server
(see
Figure 3-5). The user must get the next token from the OTP device or from the software and enter
it in the prompt field.
Figure 3-5 Next Token Prompt Window
3-12
Cisco Aironet 802.11a/b/g Wireless LAN Client Adapters (CB21AG and PI21AG) Installation and Configuration Guide for Windows Vista
OL-16534-01
Page 67

Chapter 3 Configuring EAP Types
Configuring EAP-FAST Settings in the Authentication Tab
The EAP-FAST module supports three authentication methods: EAP-GTC, EAP-MSCHAPv2, and
EAP-TLS.
These three authentication methods use the following types of credentials:
• EAP-GTC—Active Directory password, OTP, Token, LDAP
• EAP-MSCHAPv2—Active Directory password
• EAP-TLS—certificate
The EAP-GTC module is bundled with the EAP-FAST module. The EAP-GTC module is not registered
with the EAPHost framework; it is not available to other applications.
A modified version of the EAP-MSCHAPv2 module is also bundled with the EAP-FAST module. This
modified version is used in anonymous TLS provisioning mode to support the modification of
EAP-MSCHAPv2 challenges. This same module also supports user authentication in authentication
mode without modification.
The EAP-FAST module uses the standard EAP-TLS module that is shipped with Windows Vista.
The user can select only one of these three inner authentication methods through the user interface.
Although other third-party EAP methods are registered with the EAPHost framework and can be selected
in the administrator interface, these methods have not been officially tested.
Configuring EAP-FAST
Cisco Aironet 802.11a/b/g Wireless LAN Client Adapters (CB21AG and PI21AG) Installation and Configuration Guide for Windows Vista
OL-16534-01
3-13
Page 68

Configuring EAP-FAST
Chapter 3 Configuring EAP Types
You can choose settings for authentication in the Authentication tab (see Figure 3-6).
Figure 3-6 Authentication Tab in EAP-FAST Properties Window
3-14
Table 3-3 lists and describes options for authentication.
Cisco Aironet 802.11a/b/g Wireless LAN Client Adapters (CB21AG and PI21AG) Installation and Configuration Guide for Windows Vista
OL-16534-01
Page 69

Chapter 3 Configuring EAP Types
Ta b l e 3-3 Authentication Settings
Authentication Settings Description
Select an authentication
method
Configuring EAP-FAST
Select the inner tunnel EAP method from the drop-down list.
Available methods are EAP-GTC, EAP-MSCHAPv2, EAP-TLS, and
Any Method.
The Any Method option allows the EAP-FAST module to choose any
of the supported methods that the EAP server requests. The method
must also be appropriate to the user credentials that are used.
Default: Any Method
Note EAP-GTC is the only option available if you selected the Use
one-time password radio button in the User Credentials tab.
Note EAP-TLS is the only option available if you selected the Use
a certificate on this computer radio button in the User
Credentials tab.
Note The use of the Any Method value to allow all methods is
unsupported by Cisco or Microsoft and is not recommended.
This configuration is used “as-is”; Cisco makes no guarantee
that there will not be adverse performance to the system if
unsupported methods are used. Unsupported methods should
never be used in a production environment.
Configure Click the Configure button to configure EAP-TLS options. This
option is available only if EAP-TLS is the selected authentication
method. When you click this button, the standard Windows Vista
EAP-TLS Properties Screen appears.
Default: Disabled
Enable fast reconnect Check this box to allow session resumption.
The EAP-FAST module supports fast reconnect (also called session
resumption) by using the User Authorization PAC. When you enable
fast reconnect, you can roam or return from suspend mode without
re-entering your credentials. Fast reconnect can be used across
different network access servers.
Default: On
Note If you switch profiles, logs off, or reboot, fast reconnect is not
attempted. You must be reauthenticated.
Enable posture validation Check this box to allow the health information of the host machine to
be queried.
Cisco Aironet 802.11a/b/g Wireless LAN Client Adapters (CB21AG and PI21AG) Installation and Configuration Guide for Windows Vista
OL-16534-01
3-15
Page 70

Configuring EAP-FAST
Finding the Version of the EAP-FAST Module
Follow these steps to learn the current version of the EAP-FAST module on the device:
Step 1 Access the EAP-FAST Properties window. The procedure for accessing this window is detailed in the
“Accessing EAP-FAST Properties for Configuration” section on page 3-4.
Step 2 Click the About tab (see Figure 3-7). The version number, copyright information, and open-source
software information are in this tab.
Figure 3-7 About Tab in EAP-FAST Properties Window
Chapter 3 Configuring EAP Types
3-16
Cisco Aironet 802.11a/b/g Wireless LAN Client Adapters (CB21AG and PI21AG) Installation and Configuration Guide for Windows Vista
OL-16534-01
Page 71

Chapter 3 Configuring EAP Types
Overview of LEAP
Cisco LEAP is an authentication protocol that is designed for use in IEEE 802.11 wireless local are
networks (WLANs). Important features of LEAP include the following:
• Mutual authentication between the network infrastructure and the user.
• Secure derivation of random, user-specific cryptographic session keys.
• Compatibility with existing and widespread network authentication mechanisms (for example,
RADIUS).
• Computational speed.
Although Cisco LEAP is a Cisco proprietary protocol, it is based on existing IETF and IEEE standards.
Cisco LEAP relies on the following:
• Extensible Authentication Protocol (EAP)
EAP was originally designed to provide an framework so that new authentication methods could be
introduced into Point-to-Point Protocol (PPP). Before EAP existed, entirely new PPP authentication
protocols had to be defined to create new authentication methods. However, with EAP, new
authentication types simply require the definition of a new EAP type. A new EAP type comprises a
set of set of EAP request and response messages and their associated semantics.
• Extensible Authentication Protocol over LAN (EAPOL)
Overview of LEAP
Although originally designed to operate as part of PPP, EAP is flexible enough to be mapped to most
types of framed link layer. With a wireless access point, this link layer is a wireless LAN, not PPP.
The IEEE 802.1X EAP over LAN (EAPOL) specifies a method for encapsulating EAP packets in
Ethernet packets so that they can be transmitted over a LAN.
• Encryption and Key Exchange
The 802.11 specification allows for data traffic between the client and access point to be encrypted
using an encryption key. As a result of key exchange through WPA, WPA2, CCKM, or WEP, the
client and the network access device derive the same pair of keys—one key for broadcast and
multicast traffic from the network access device and another key for all other packets.
• Remote Authentication Dial-In User Service (RADIUS) Servers
Network access servers (such as WLAN access points) often rely on a centralized AAA server to
authenticate clients on their behalf. One of the more popular types of AAA servers is a RADIUS
server. Extensions to the RADIUS protocol have been defined to allow the transfer of the EAP
packets between the authentication server and the network access server. In this case, the network
access server is a relay agent; the authentication conversation takes place between the client and the
RADIUS server. The RADIUS server informs the access point of the result of the authentication and
whether to allow the client to access the network. Other parameters might be returned as well,
including session keys for use between the client and the access point.
How LEAP Works
Because most RADIUS servers support the MS Challenge Handshake Authentication Protocol
(MS-CHAP), MS-CHAP is the basis for LEAP. The protocol consists of the authenticator sending a
random challenge to client. The client’s data encryption standard (DES) encrypts the challenge by using
an MD4 hash of the password. The authenticator then verifies the response by using its knowledge of the
client username and password.
Cisco Aironet 802.11a/b/g Wireless LAN Client Adapters (CB21AG and PI21AG) Installation and Configuration Guide for Windows Vista
OL-16534-01
3-17
Page 72

Configuring LEAP
Chapter 3 Configuring EAP Types
During authentication, the access point acts as a transparent relay for the conversation between the client
and the RADIUS server. The EAPOL header is removed from EAPOL packets that come from the client.
The contents of the EAPOL packet are added as an EAP attribute to a RADIUS request packet and sent
to the RADIUS server. RADIUS packets from the server have the EAP attribute contents added to an
EAPOL packet and sent to the client. The access point never examines the contents of the EAP data.
When the client associates to an access point, the access point sends an EAP identity request to the client.
The client responds with a username. The RADIUS server then formats a LEAP challenge EAP attribute.
The client sends a LEAP challenge response back to the RADIUS server.
If the user is invalid, the RADIUS server sends a RADIUS access-deny message that contains an EAP
failure attribute. If the user is valid, the server sends a RADIUS access-challenge packet with an EAP
success attribute. The client responds with a LEAP challenge. The server responds with a RADIUS
access-accept packet that contains an EAP attribute with the LEAP challenge response. This packet also
contains a Cisco vendor-specific attribute that informs the access point of the value of the encryption
key. The client verifies the challenge response. If the response is invalid, client disassociates and
attempts to find another access point.
802.11 supports the use of up to four encryption keys for the traffic between a client and its access point.
The access point uses one of the key indices for the session key. This key has a different value for each
connection between the client and the access point.
The session key is derived from the user password and the contents of the LEAP challenges and
responses that go to and from the client. 802.11 encryption might be based on a 40-bit key or a 128-bit
key. The key derivation routines provide a key that is longer than needed.
Configuring LEAP
This section explains how to configure LEAP module settings. The following topics are covered in this
section:
• Accessing LEAP Properties for Configuration, page 3-18
• Configuring LEAP Settings in the Network Credentials Tab, page 3-19
• Finding the Version of the LEAP Module, page 3-21
Accessing LEAP Properties for Configuration
To access the LEAP Properties window, perform the following steps:
Step 1 Click the Start button on the lower-left corner of the desktop.
Step 2 From the right pane, right-click Network.
Step 3 Select Properties.
Step 4 From the left pane, select Manage Wireless Networks.
Step 5 Double-click the wireless network.
Step 6 From the Wireless Network properties window, select the Security tab (see Figure 3-1).
3-18
Cisco Aironet 802.11a/b/g Wireless LAN Client Adapters (CB21AG and PI21AG) Installation and Configuration Guide for Windows Vista
OL-16534-01
Page 73

Chapter 3 Configuring EAP Types
Figure 3-8 Wireless Network Properties Window
Configuring LEAP
Step 7 Select LEAP from the "Choose a network authentication method" drop down list.
Step 8 Click the Settings button. You are now ready to configure settings for LEAP.
Configuring LEAP Settings in the Network Credentials Tab
The user provides one of the following types of network credentials:
• Windows username and password—The Windows username and password are used as network
access credentials. The user is not prompted to enter a username and password if this option is
selected.
• Prompted user credentials—The user is prompted during authentication for credentials. These
credentials are credentials that are separate from the Windows username and password, such as
Lightweight Directory Access Protocol (LDAP) credentials.
Cisco Aironet 802.11a/b/g Wireless LAN Client Adapters (CB21AG and PI21AG) Installation and Configuration Guide for Windows Vista
OL-16534-01
3-19
Page 74

Configuring LEAP
Chapter 3 Configuring EAP Types
• Saved user credentials—These are user credentials that are entered as part of the LEAP
configuration. The user is not prompted for credentials during authentication unless the saved
credentials fail or have expired. New credentials that the user enters after successful authentication
are saved automatically in the configuration. The user does not have to return to the configuration
screen to change the old saved credentials.
You can configure LEAP network credentials settings from the Network Credentials tab (see Figure 3-9).
Figure 3-9 Network Credentials Tab in LEAP Properties Window
Table 3-4 lists and describes LEAP network credentials settings.
Ta b l e 3-4 LEAP Network Credentials Settings
LEAP Network Credentials
Settings
Use Windows username and
password
Description
Click this radio button to use the Windows username and password as
the LEAP username and password for network authentication.
Default: On
3-20
Cisco Aironet 802.11a/b/g Wireless LAN Client Adapters (CB21AG and PI21AG) Installation and Configuration Guide for Windows Vista
OL-16534-01
Page 75

Chapter 3 Configuring EAP Types
Table 3-4 LEAP Network Credentials Settings (continued)
LEAP Network Credentials
Settings Description
Prompt automatically for
username and password
Use saved username and
password
Overview of PEAP-GTC
Click this radio button to require the user to enter a separate LEAP
username and password, which are registered with the backend
server, in addition to a Windows username and password with every
authentication attempt.
Default: Off
Click this radio button so that the user is not required to enter a LEAP
username and password with each Windows login. Authentication
occurs automatically as needed using a saved username and
password, which are registered with the backend server.
Default: Off
When selecting this option, the user must do the following:
• Enter a username in the Username field.
• Enter a password in the Password field.
• Confirm password—Enter the password again to verify that it
was entered correctly.
Note The maximum number of characters allowed for the username
The following three scenarios for credentials entry are supported by the LEAP module:
• Boot time—During this state, no users are logged on. The LEAP module uses machine credentials
for network authentication. The LEAP module does not prompt the user for information but instead
obtains the machine credentials by using Microsoft’s Local Security Authority (LSA) API.
• Pre-Logon—During this state, Microsoft’s Layer 2 credential provider (L2NA) queries the LEAP
module through Microsoft’s EAPHost APIs for types of credentials that are needed. The LEAP
module indicates the appropriate type: Windows, network, or none. The user enters the appropriate
credentials in a Microsoft L2NA prompt.
• Post-Logon—Although the user has already logged on, the LEAP module might need to prompt the
user for network credentials because a card was inserted or because network authentication failed.
The LEAP module invokes the EapInvokeInteractiveUI API, which is a Microsoft EAPHost API. A
LEAP credentials prompt appears, and the user must enter a username and password.
Finding the Version of the LEAP Module
The LEAP module version number, copyright information, and open-source software information are in
About tab (see
Figure 3-9).
and password is 256.
Overview of PEAP-GTC
Extensible Authentication Protocol (EAP) provides support for multiple authentication methods. While
EAP was originally created for use with PPP, it has since been adopted for use with IEEE 802.1X, which
is Network Port Authentication. Since its deployment, a number of weaknesses in EAP have become
Cisco Aironet 802.11a/b/g Wireless LAN Client Adapters (CB21AG and PI21AG) Installation and Configuration Guide for Windows Vista
OL-16534-01
3-21
Page 76

How PEAP-GTC Works
Chapter 3 Configuring EAP Types
apparent. These weaknesses include a lack of protection of user identity, notification messages, or the
EAP negotiation; no standardized mechanism for key exchange; no built-in support for fragmentation
and reassembly; no support for acknowledged success or failure indicators; and a lack of support for fast
reconnect.
Protected Extensible Authentication Protocol (PEAP) addresses these weaknesses by wrapping the EAP
protocol within a Transport Layer Security (TLS) channel. Any EAP method running within PEAP is
provided with the following:
• Identity protection—The identity exchange is encrypted, and client certificates are provided after
negotiation of the TLS channel.
• Header protection—Because the EAP method conversation is conducted within a TLS channel, the
EAP header is protected against modification.
• Protected negotiation—Within PEAP, the EAP conversation is authenticated; integrity and replay
are protected on a per-packet basis; and the EAP method negotiation that occurs within PEAP is
protected, as are error messages sent within the TLS channel.
• Support for key exchange—To provide keying material for a wide range of link-layer ciphersuites,
EAP methods should provide a key hierarchy that generates authentication and encryption keys, as
well as initialization vectors. By relying on the TLS key derivation method, PEAP provides the
required keying material for any EAP method running within it.
• Packet fragmentation and reassembly—Because EAP does not include support for fragmentation
and reassembly, individual EAP methods need to include this capability. By including support for
fragmentation and reassembly within PEAP, methods leveraging PEAP do not need to support
fragmentation and reassembly on their own.
• Acknowledged success or failure indications—By sending success or failure indications within the
TLS channel, PEAP provides support for protected termination of the EAP conversation.
Acknowledged indications prevent an attacker from carrying out denial-of-service (DOS) attacks by
spoofing EAP failure messages or by tricking the EAP peer into accepting a rogue NAS by spoofing
an EAP success message.
• Fast reconnect—Where EAP is used for authentication in wireless networks, the EAP method
should be able to quickly reauthenticate when the client is roaming between access points. PEAP
supports fast reconnect by leveraging the TLS session resumption facility. Any EAP method running
within PEAP can use fast reconnect.
• Dictionary attack resistance—By conducting the EAP conversation within a TLS channel, PEAP
protects an EAP method that might be subject to offline dictionary attacks if the EAP conversation
had been conducted in the clear.
How PEAP-GTC Works
PEAP-GTC works in two phases.
In phase 1, an authentication server performs TLS authentication to create an encrypted tunnel and to
achieve server-side authentication in a manner that is similar to Web server authentication that uses
Secure Sockets Layer (SSL). When phase 1 of PEAP is successfully completed, all data is encrypted,
including all sensitive user information.
3-22
Phase 2 is extensible. The client can authenticate by using the GTC method within the TLS tunnel.
Cisco Aironet 802.11a/b/g Wireless LAN Client Adapters (CB21AG and PI21AG) Installation and Configuration Guide for Windows Vista
OL-16534-01
Page 77

Chapter 3 Configuring EAP Types
Configuring PEAP-GTC
This section explains how to configure PEAP-GTC module settings. The following topics are covered:
• Accessing PEAP-GTC Properties for Configuration, page 3-23
• Configuring PEAP-GTC Settings in the Connection Tab, page 3-25
• Configuring PEAP-GTC Settings in the User Credentials Tab, page 3-27
Accessing PEAP-GTC Properties for Configuration
To access the PEAP-GTC Properties window, perform the following steps:
Step 1 Click the Start button on the lower-left corner of the desktop.
Step 2 From the right pane, right-click Network.
Step 3 Select Properties.
Step 4 From the left pane, select Manage Wireless Networks.
Configuring PEAP-GTC
Step 5 Double-click the wireless network.
Step 6 From the Wireless Network properties window, select the Security tab (see Figure 3-10).
Cisco Aironet 802.11a/b/g Wireless LAN Client Adapters (CB21AG and PI21AG) Installation and Configuration Guide for Windows Vista
OL-16534-01
3-23
Page 78

Configuring PEAP-GTC
Chapter 3 Configuring EAP Types
Figure 3-10 Wireless Network Properties Window
3-24
Step 7 Select PEAP-GTC or LEAP from the "Choose a network authentication method" drop down list.
Step 8 Click the Settings button. You are now ready to configure settings for PEAP-GTC.
Cisco Aironet 802.11a/b/g Wireless LAN Client Adapters (CB21AG and PI21AG) Installation and Configuration Guide for Windows Vista
OL-16534-01
Page 79

Chapter 3 Configuring EAP Types
Configuring PEAP-GTC Settings in the Connection Tab
You can configure connection settings from the PEAP-GTC Connection tab (see Figure 3-11).
Figure 3-11 Connection Tab in PEAP-GTC Properties Window
Configuring PEAP-GTC
Cisco Aironet 802.11a/b/g Wireless LAN Client Adapters (CB21AG and PI21AG) Installation and Configuration Guide for Windows Vista
OL-16534-01
3-25
Page 80

Configuring PEAP-GTC
Chapter 3 Configuring EAP Types
Table 3-5 lists and describes PEAP-GTC connection settings.
Ta b l e 3-5 PEAP-GTC Connection Settings
PEAP-GTC Connection Settings Description
Use anonymous outer identity Check this box to enable identity privacy protection. If this box is
checked, the Outer identity field is enabled, and the outer identity in
this field is used in response to an EAP identity request, which is sent
in the clear.
Default: On
Outer identity field Enter an outer identity if the Use anonymous outer identity check box
is checked. Follow an administrator’s instructions, or follow
RFC
4282 for guidelines about what to enter in the outer identity
field.
Default: anonymous
Note The maximum numberl of characters allowed in this field
is
256.
Validate server certificate Check this box to validate the server certificate that is used to
establish a tunnel.
If the Validate server certificate box is checked and the Do not
prompt user to authorize new servers or trusted certificate
authorities box is checked, you must select one or more Trusted Root
CA certificates from the list of trusted Certificate Authority
certificates that are installed on the host system.
If the Validate server certificate box is checked but the Do not
prompt user to authorize new servers or trusted certificate
authorities box is not checked, the list can be empty, and the user is
prompted to validate the certificate. If authentication succeeds, then
the Root CA that signed the server certificate is marked as trusted in
the profile. The name of the server is then added to the Connect to
only these servers field.
Default: On
Connect to only these servers Check this box to enter an optional server name that must match the
server certificate that is presented by the server. You can enter
multiple server names; separate multiple server names with
semicolons. The PEAP-GTC module only allows connections to
continue without prompting if the subject field (CN) or the subject
alternative name in the server certificate matches the server names
that you enter in this field.
Default: Off
Note You can use an asterisk (*) as a wildcard character in server
names only if the asterisk appears before the first period (.) in
the name.domain.com format. For example, “*.cisco.com”
matches any server name that ends with “.cisco.com.” If you
put an asterisk anywhere else in the server name, it is not
treated as a wildcard character.
3-26
Cisco Aironet 802.11a/b/g Wireless LAN Client Adapters (CB21AG and PI21AG) Installation and Configuration Guide for Windows Vista
OL-16534-01
Page 81

Chapter 3 Configuring EAP Types
Table 3-5 PEAP-GTC Connection Settings (continued)
PEAP-GTC Connection Settings Description
Trusted Root Certificate
Authority (CA)
Do not prompt user to authorize
new servers or trusted
certificate authorities.
Enable fast reconnect Check this box to allow session resumption.
Configuring PEAP-GTC
Select one of more Trusted Root CA certificates from the list of
certificates that are installed on the system. Only trusted CA
certificates that are installed on the host system are displayed in the
drop-down list, so you must make sure that the desired trusted root
CA certificate is installed.
To view details about the selected Trusted Root CA certificate,
double-click the certificate name. Double-clicking the certificate
name opens the Windows certificate property screen, where
certificate details are available.
Default: None
Check this box if you do not want the user to be prompted to authorize
a connection when the server name does not match or the server
certificate is not signed by one of the Trusted Root CA certiticates
that was selected. If this box is checked and the server certificate is
not trusted, the authentication fails.
Default: Off
The PEAP-GTC module supports fast reconnect (also called session
resumption). When you enable fast reconnect, you can roam without
re-entering your credentials. Fast reconnect can be used across
different network access servers.
Default: On
Note If you switch profiles, log off, or reboot, fast reconnect is not
attempted. You must be reauthenticated.
Configuring PEAP-GTC Settings in the User Credentials Tab
The PEAP-GTC module supports OTP and a username and password as user credentials for
authentication.
The user provides one of the following types of username and password:
• One-time password (OTP)—The user must manually enter a OTP. New PIN mode and next token
mode for OTP are supported.
• Windows username and password—The Windows username and password are used as network
access credentials. The user is always prompted to enter a password unless PEAP-GTC is configured
to use single sign-on (SSO) or the password is cached.
• Prompted user credentials—The user is prompted during authentication for credentials. These
credentials are credentials that are separate from the Windows username and password, such as
Lightweight Directory Access Protocol (LDAP) credentials.
• Saved user credentials—These are user credentials that are entered as part of the PEAP-GTC
configuration. The user is not prompted for credentials during authentication unless the saved
credentials fail or have expired. New credentials that the user enters after successful authentication
are saved automatically in the configuration. The user does not have to return to the configuration
screen to change the old saved credentials.
Cisco Aironet 802.11a/b/g Wireless LAN Client Adapters (CB21AG and PI21AG) Installation and Configuration Guide for Windows Vista
OL-16534-01
3-27
Page 82

Configuring PEAP-GTC
Chapter 3 Configuring EAP Types
The user can configure PEAP-GTC user credentials from the User Credentials tab (see Figure 3-12).
Figure 3-12 User Credentials Tab in PEAP-GTC Properties Window
3-28
Table 3-2 lists and describes options for PEAP-GTC user credentials.
Ta b l e 3-6 PEAP-GTC User Credentials Options
User Credentials Description
Use one-time password Click this radio button to use a one-time password (OTP). In this
mode, credentials are never cached. Each time the server asks for
credentials, the user is prompted to supply credentials.
For more information about OTP, see the “Understanding PIN Mode
and Token Mode with OTP” section on page 3-12.
Default: Off
Use Windows username and
password
Click this radio button to use the Windows username and password as
the PEAP-GTC username and password for network authentication.
This mode only affects single sign-on authentication when the login
screen has one set of credentials instead of two sets of credentials,
which is the case for the Prompt automatically for username and
password option.
Default: On
Cisco Aironet 802.11a/b/g Wireless LAN Client Adapters (CB21AG and PI21AG) Installation and Configuration Guide for Windows Vista
OL-16534-01
Page 83

Chapter 3 Configuring EAP Types
Table 3-6 PEAP-GTC User Credentials Options (continued)
User Credentials Description
Prompt automatically for
username and password
Use saved username and
password
Configuring PEAP-GTC
Click this radio button to require the user to enter a separate
PEAP-GTC username and password, which are registered with a
RADIUS server, in addition to a Windows username and password
with every authentication attempt. This option supports non-Windows
passwords, such as LDAP.
Default: Off
Click this radio button so that the user is not required to enter a
PEAP-GTC username and password with each Windows login.
Authentication occurs automatically as needed using a saved
username and password, which are registered with the backend server.
Default: Off
When selecting this option, the user must enter the following:
• Username—Enter the username and the domain name in one of
these two formats:
–
Domain-qualified username—domain\user
–
UPN—user@domain.com
• Password—Enter a password. This encrypted password is stored
in the PEAP-GTC configuration.
• Confirm password—Enter the password again to verify that it
was entered correctly.
Note The maximum number of characters allowed for the username
and password is 256.
Understanding PIN Mode and Token Mode with OTP
New PIN mode for OTP is supported. If a new PIN is needed, the backend server sends a text message
(for example, “Enter New PIN”) to indicate that a new PIN is neeeded. The PEAP-GTC module displays
a prompt window that includes the text message from the server (see
might prompt the user twice to confirm the new PIN that the user entered.
Figure 3-13 New PIN Prompt Window
Figure 3-13). The backend server
Cisco Aironet 802.11a/b/g Wireless LAN Client Adapters (CB21AG and PI21AG) Installation and Configuration Guide for Windows Vista
OL-16534-01
3-29
Page 84

Configuring PEAP-GTC
Chapter 3 Configuring EAP Types
Next Token mode for OTP is also supported. If the next token is needed, the backend server sends a text
message (for example, “Enter Next PASSCODE:”) to indicate that the next token is needed. The
PEAP-GTC module displays a prompt window that includes the text message sent from the server
(see
Figure 3-14). The user must get the next token from the OTP device or from the software and enter
it in the prompt field.
Figure 3-14 Next Token Prompt Window
Understanding PEAP-GTC Authentication
The PEAP-GTC module prompts the user for a username and password (or PIN for OTP) if the
supplicant is configured to prompt for credentials during Windows logon or after the user is notified of
an authentication error or failure.
If the user password expires, the PEAP-GTC modules prompts the user to enter a new password and to
confirm the new password.
Finding the Version of the PEAP-GTC Module
The PEAP-GTC module version number, copyright information, and open-source software information
are in About tab (see
Figure 3-12).
3-30
Cisco Aironet 802.11a/b/g Wireless LAN Client Adapters (CB21AG and PI21AG) Installation and Configuration Guide for Windows Vista
OL-16534-01
Page 85

CHA PTER
4
Performing Administrative Tasks
This chapter explains how to obtain Microsoft administrative tools to distribute wireless profiles to users
and computers in an Active Directory environment. This chapter also provides the XML schemas for
EAP-FAST, LEAP, and PEAP-GTC.
The following topics are covered in this chapter:
• Using Microsoft Tools to Perform Administrative Tasks, page 4-2
• The EAP-FAST XML Schema, page 4-6
• The PEAP-GTC XML Schema, page 4-17
• The LEAP XML Schema, page 4-23
• Logging for EAP Modules, page 4-26
Cisco Aironet 802.11a/b/g Wireless LAN Client Adapters (CB21AG and PI21AG) Installation and Configuration Guide for Windows Vista
OL-16534-01
4-1
Page 86

Chapter 4 Performing Administrative Tasks
Using Microsoft Tools to Perform Administrative Tasks
Using Microsoft Tools to Perform Administrative Tasks
You must perform administrative tasks, such as the distribution of wireless profiles to users and
computers within an Active Directory environment, by creating Microsoft Group Policy Objects with a
Microsoft Group Policy Object Editor. Detailed discussion of these Microsoft solutions and their
functionality is beyond the scope of this Cisco document.
The following sections contain preliminary information and references to assist you in finding out more
about performing administrative tasks with Microsoft tools:
• Overview of Group Policy Objects, page 4-2
• Adding a Group Policy Object Editor, page 4-2
• Creating a EAP Group Policy Object in Windows Vista, page 4-3
Overview of Group Policy Objects
Group Policy is an infrastructure that allows you to specify managed configurations for users and
computers in an Active Directory directory service environment. Group Policy settings are contained in
Group Policy objects (GPOs). GPOs exist in a domain and can be linked to the following Active
Directory containers: sites, domains, or organizational units (OUs).
For more information about GPOs and the GPO Editor, refer to the Microsoft Windows Server
TechCenter at this URL:
http://technet2.microsoft.com/windowsserver/en/technologies/featured/gp/faq.mspx
Microsoft provides a program snap-in that allows you to use the Group Policy Object editor in the
Microsoft Management Console (MMC).
For more information about the MMC, refer to the Microsoft Management Console Help at this URL:
http://www.microsoft.com/technet/WindowsVista/library/ops/06e1cb7b-19c9-4c49-9db8-a941f6f593c
3.mspx
Adding a Group Policy Object Editor
Before you configure a Group Policy Object, you must add a Group Policy Object Editor snap-in. To add
the snap-in, perfom the following steps:
Step 1 Open the MMC:
a. Click the Start button on the lower-left corner of the desktop.
b. Enter mmc in the Search box and press Enter.
Note To open an existing or saved MMC console, browse to the snap-in console or a shortcut to the snap-in
console in Windows Explorer, and then double-click it.
You can also open an existing MMC console from another console in which you are working. To do this,
click the File menu, and then click Open.
4-2
Cisco Aironet 802.11a/b/g Wireless LAN Client Adapters (CB21AG and PI21AG) Installation and Configuration Guide for Windows Vista
OL-16534-01
Page 87

Chapter 4 Performing Administrative Tasks
Step 2 Add the Group Policy Object Editor snap-in:
a. Go to File > Add/Remove Snap-in...
The Add or Remove Snap-ins dialog box is displayed.
b. From the Add or Remove Snap-ins dialog box, highlight Group Policy Object Editor in the
Available snap-ins list, and click the Add button.
The Select Group Policy Object dialog box is displayed.
c. From the Select Group Policy Object dialog box, click Browse.
The Browse for a Group Policy Object dialog box is displayed.
d. From the Browse for a Group Policy Object dialog box, select the Domains/O Us tab.
e. Select your domain controller from the Look in drop down list.
f. Click OK.
g. From the Select Group Policy Object dialog box, click Finish.
h. From the Add or Remove Snap-ins dialog box, click OK.
Using Microsoft Tools to Perform Administrative Tasks
Now the Group Policy Object Editor is ready for use.
Creating a EAP Group Policy Object in Windows Vista
To create a new EAP group policy object , perform the following steps:
Step 1 In the Default Domain Policy pane, select Windows Settings > Security Settings > Wireless Network
Policies.
Step 2 Right-click Wireless Network Policies and select Create a New Policy.
Step 3 Set your wireless network properties, such as SSID, encryption, and authentication method.
Step 4 Select the EAP method.
Step 5 Open properties for the desired EAP modules and configure the settings.
• EAP-FAST—In the Advanced Security screen, you can configure supplicant settings such as
machine authentication and SSO. For more information about machine authentication, see the
“Configuring Machine Authentication for EAP-FAST” section on page 4-4. For more information
about SSO see the “Configuring Single Sign-On for EAP-FAST” section on page 4-5.
• PEAP-GTC—In the Advanced Security screen, you can configure supplicant settings such as
machine authentication and SSO. For more information about machine authentication, see the
“Configuring Machine Authentication for PEAP-GTC” section on page 4-5. For more information
about SSO see the “Configuring Single Sign-On for PEAP-GTC and LEAP” section on page 4-5
• LEAP—In the Advanced Security screen, you can configure supplicant settings for SSO. FOr more
information about SSO, see the
“Configuring Single Sign-On for PEAP-GTC and LEAP” section on
page 4-5
Note You can configure settings for a wired network by selecting the Wired Network Policy object.
Cisco Aironet 802.11a/b/g Wireless LAN Client Adapters (CB21AG and PI21AG) Installation and Configuration Guide for Windows Vista
OL-16534-01
4-3
Page 88

Using Microsoft Tools to Perform Administrative Tasks
Step 6 After you are done, save the GPO. You can refresh the Vista client by running "gpupdate /force" to force
update of the GPO. You should see the new profile being added to Vista machine.
After you create a GPO network profile, it cannot be changed by the user on the Vista machine.
On the General tab of a wireless network policy, you can configure a name and description for the policy,
specify whether the WLAN AutoConfig service is enabled, and configure a list of wireless network
policies and their settings in a preferred order. You can also export profiles as XML files and import
XML files as wireless profiles.
For detailed information about configuring policies, exporting profiles, and importing profiles, see the
following documentation:
• Windows Vista Wireless Networking Evaluation Guide
http://technet2.microsoft.com/WindowsVista/en/library/f0b0d1fd-6dff-46a2-8e6a-bdd152d2337f1033.
mspx?mfr=true
• Wireless Group Policy Settings for Windows Vista
http://www.microsoft.com/technet/technetmag/issues/2007/04/CableGuy/default.asp
Chapter 4 Performing Administrative Tasks
Configuring Machine Authentication for EAP-FAST
You can enable machine authentication from the Advanced Security screen when you create a Group
Policy Object.
The EAPHost notifies the EAP-FAST module that the current authentication is a machine authentication.
Machine authentication is achieved by using one of the following:
• a machine PAC
• a machine certificate
• a machine password
The EAP-FAST module attempts to fetch the machine PAC first. If a machine PAC is unavailable, the
EAP-FAST module attempts to fetch a machine certificate. If a machine certificate is unavailable, the
EAP-FAST module attempts to fetch the machine password for the machine account in the Active
Directory.
When the machine is authenticated with either a machine certificate or a machine password, the
EAP-FAST module then requests the provisioning of a machine PAC for subsequent use. If neither a
machine certificate nor a machine password is available, the EAP-FAST module requests a machine PAC
during the next successful user authentication after a user has logged on. If an existing machine PAC is
invalid or expired, the EAP-FAST module relies on this process to request a new machine PAC.
Because machine authentication is integrated with and supported by the Windows 802.1X supplicant,
the EAP-FAST module is only responsible for authentication to gain network access. Additional network
operations to support machine authentication, such as DHCP, machine-level GPO, and other related
network services, are the responsibility of the operating system and the 802.1X supplicant.
4-4
Cisco Aironet 802.11a/b/g Wireless LAN Client Adapters (CB21AG and PI21AG) Installation and Configuration Guide for Windows Vista
OL-16534-01
Page 89

Chapter 4 Performing Administrative Tasks
Using Microsoft Tools to Perform Administrative Tasks
Configuring Single Sign-On for EAP-FAST
SSO is supported by Microsoft Windows Vista in the following ways:
• Windows user credentials are passed to the EAP-FAST module through the EAPHost interface. The
system does not prompt the user to provide additional credentials if the EAP-FAST module is
configured to use Windows user credentials for network authentication and if the network profile is
configured for single sign-on.
• Non-Windows network credentials are collected during the Microsoft Windows Vista logon process.
The EAP-FAST module requests the logon module to prompt the user for these network credentials.
• If necessary, the EAP-FAST module is able to prompt the user for additional network credentials
before the user logs in to Microsoft Windows Vista.
If network credentials are stored in the configuration, the EAP-FAST module has access to these
credentials before the user logs in to Microsoft Windows Vista.
Configuring Machine Authentication for PEAP-GTC
The PEAP-GTC module supports machine authentication only via the machine password. The
PEAP-GTC module gets the machine password from Windows through Microsoft’s Local Security
Authority (LSA) API. The user is not prompted for the password.
Machine authentication is enabled and configured on the supplicant.
Configuring Single Sign-On for PEAP-GTC and LEAP
For both the PEAP-GTC module and the LEAP module, single sign-on (SSO) is supported by Microsoft
Windows Vista in the following ways:
• Windows user credentials are passed to the module through the EAPHost interface. The system does
not prompt the user to provide additional credentials if the module is configured to use Windows
user credentials for network authentication and if the network profile is configured for single
sign-on.
• Non-Windows network credentials are collected during the Microsoft Windows Vista logon process.
The module requests the logon module to prompt the user for these network credentials.
• The Windows 802.1X supplicant handles the Group Policy process and ensures that it is
synchronized and exercised with the Window’s logon process.
• If necessary, the module is able to prompt the user for additional network credentials before the user
logs in to Microsoft Windows Vista.
• If network credentials are stored in the configuration, the module has access to these credentials
before the user logs in to Microsoft Windows Vista.
Cisco Aironet 802.11a/b/g Wireless LAN Client Adapters (CB21AG and PI21AG) Installation and Configuration Guide for Windows Vista
OL-16534-01
4-5
Page 90

The EAP-FAST XML Schema
The EAP-FAST XML Schema
The EAP-FAST module stores all settings in the Native EAP method section of the network profile as
XML by using the following schema:
<?xml version="1.0"?>
<!--
*******************************************************************************
Cisco EAP-FAST Schema (1.0.40)
Copyright 2006-2007, Cisco Systems, Inc. All rights reserved.
*******************************************************************************
-->
Chapter 4 Performing Administrative Tasks
<xs:schema
xmlns:xs="http://www.w3.org/2001/XMLSchema"
xmlns="http://www.cisco.com/CCX"
targetNamespace="http://www.cisco.com/CCX"
elementFormDefault="qualified"
attributeFormDefault="unqualified">
<xs:element name="eapFast" type="EapFast"/>
<xs:complexType name="EapFast">
<xs:complexContent>
<xs:extension base="TunnelMethods">
<xs:sequence>
<xs:choice>
<xs:element name="usePac">
<xs:complexType>
<xs:sequence>
<xs:element name="allowUnauthPacProvisioning" type="xs:boolean" default="true">
4-6
<xs:annotation>
<xs:documentation>Will accept a PAC from an unauthenticated server.</xs:documentation>
</xs:annotation>
</xs:element>
<xs:element name="autoGrouping" type="xs:boolean" default="true">
<xs:annotation>
Cisco Aironet 802.11a/b/g Wireless LAN Client Adapters (CB21AG and PI21AG) Installation and Configuration Guide for Windows Vista
OL-16534-01
Page 91

Chapter 4 Performing Administrative Tasks
<xs:documentation>
An aid-group is a set of A-IDs that are all trusted equally. Any A-ID in the group can be utilized.
Auto-grouping means that when an untrusted A-ID is accepted by the end-user then that A-ID is grouped
with the A-ID(s) that were already trusted for that profile, hence automatically creating and growing an
A-ID group based on user actions. The advantage of an A-ID group is that if a profile initially starts
with the same trusted A-ID(1) and then at some point the end-user authorizes the use of a new A-ID(2)
when using this profile it will accept A-ID(2) without bothering the end-user a second
time.</xs:documentation>
</xs:annotation>
</xs:element>
<xs:element name="userValidatesServerIdFromUnauthProv" type="xs:boolean"
default="true">
<xs:annotation>
<xs:documentation>
If true, then when the client is about to do unauthenticated provisioning, the user will be prompted to
allow or disallow the unauthenticated provisioning.</xs:documentation>
The EAP-FAST XML Schema
</xs:annotation>
</xs:element>
<xs:element name="unauthProvAllowedTilPacReceived" type="xs:boolean" default="false">
<xs:annotation>
<xs:documentation>if true, then unauthenticated provisioning is allowed to occur until it
succeeds and a PAC is received, then only authenticated provisioning will be
allowed.</xs:documentation>
</xs:annotation>
</xs:element>
<xs:choice>
<xs:element name="validateWithSpecificPacs" type="ValidateWithSpecificPacs">
<xs:annotation>
<xs:documentation>This indicates that only those PACs referenced in this element (as
well as PACs that are auto-provisioned to this profile when this profile is in use) shall be used for
validation. </xs:documentation>
</xs:annotation>
</xs:element>
</xs:choice>
</xs:sequence>
</xs:complexType>
</xs:element>
<xs:element name="doNotUsePac" type="Empty">
<xs:annotation>
<xs:documentation>Will not utilize PAC for authentication.</xs:documentation>
</xs:annotation>
Cisco Aironet 802.11a/b/g Wireless LAN Client Adapters (CB21AG and PI21AG) Installation and Configuration Guide for Windows Vista
OL-16534-01
4-7
Page 92

The EAP-FAST XML Schema
</xs:element>
</xs:choice>
<xs:element name="enablePosture" type="xs:boolean" default="false">
<xs:annotation>
<xs:documentation>Allow posture information to be processed.</xs:documentation>
</xs:annotation>
</xs:element>
<xs:element name="authMethods">
<xs:complexType>
<xs:choice>
<xs:element name="builtinMethods">
<xs:complexType>
<xs:choice>
<xs:element name="authenticateWithPassword">
Chapter 4 Performing Administrative Tasks
<xs:complexType>
<xs:sequence>
<xs:element name="protectedIdentityPattern" type="IdentityPattern" minOccurs="0">
<xs:annotation>
<xs:documentation>Format rules same as for unprotectedIdentityPattern. Typical
pattern: [username]@[domain] or if password source is this profile then the pattern would be the actual
string to send as the username. </xs:documentation>
</xs:annotation>
</xs:element>
<xs:element name="passwordSource" type="PasswordSource"/>
<xs:element name="methods">
<xs:annotation>
<xs:documentation>At least 1 child element is required.</xs:documentation>
</xs:annotation>
<xs:complexType>
<xs:all>
<xs:element name="eapMschapv2" type="Empty" minOccurs="0"/>
<xs:element name="eapGtc" type="Empty" minOccurs="0"/>
4-8
</xs:all>
</xs:complexType>
</xs:element>
</xs:sequence>
</xs:complexType>
</xs:element>
Cisco Aironet 802.11a/b/g Wireless LAN Client Adapters (CB21AG and PI21AG) Installation and Configuration Guide for Windows Vista
OL-16534-01
Page 93

Chapter 4 Performing Administrative Tasks
<xs:element name="authenticateWithToken">
<xs:complexType>
<xs:sequence>
<xs:element name="protectedIdentityPattern" type="IdentityPattern" minOccurs="0">
<xs:annotation>
<xs:documentation>Format rules same as for unprotectedIdentityPattern. Typical
pattern: [username]@[domain] </xs:documentation>
</xs:annotation>
</xs:element>
<xs:element name="tokenSource" type="TokenSource"/>
<xs:element name="methods">
<xs:complexType>
<xs:all>
<xs:element name="eapGtc" type="Empty"/>
</xs:all>
The EAP-FAST XML Schema
</xs:complexType>
</xs:element>
</xs:sequence>
</xs:complexType>
</xs:element>
<xs:element name="authenticateWithCertificate">
<xs:complexType>
<xs:sequence>
<xs:element name="protectedIdentityPattern" type="IdentityPattern" minOccurs="0">
<xs:annotation>
<xs:documentation>Format rules same as for unprotectedIdentityPattern. Typical
pattern: [username]@[domain] </xs:documentation>
</xs:annotation>
</xs:element>
<xs:element name="certificateSource" type="CertificateSource"/>
<xs:choice>
<xs:element name="doNotUseInnerMethod">
<xs:complexType>
<xs:choice>
<xs:element name="sendWheneverRequested" type="Empty"/>
<xs:element name="sendSecurelyOnly" type="Empty"/>
</xs:choice>
</xs:complexType>
Cisco Aironet 802.11a/b/g Wireless LAN Client Adapters (CB21AG and PI21AG) Installation and Configuration Guide for Windows Vista
OL-16534-01
4-9
Page 94

The EAP-FAST XML Schema
</xs:element>
<xs:element name="sendViaInnerMethod">
<xs:complexType>
<xs:all>
<xs:element name="eapTls" type="Empty"/>
</xs:all>
</xs:complexType>
</xs:element>
</xs:choice>
</xs:sequence>
</xs:complexType>
</xs:element>
</xs:choice>
</xs:complexType>
Chapter 4 Performing Administrative Tasks
</xs:element>
<xs:element name="extendedInnerMethods" type="ExtendedInnerEapMethod"
maxOccurs="unbounded"/>
</xs:choice>
</xs:complexType>
</xs:element>
</xs:sequence>
</xs:extension>
</xs:complexContent>
</xs:complexType>
<xs:complexType name="IdentityPattern">
<xs:simpleContent>
<xs:extension base="NonEmptyString">
<xs:attribute name="encryptContent" type="xs:boolean" use="optional" default="true">
<xs:annotation>
<xs:documentation>this is defaulted to 'true' as an indication to the post-process tool that it
should encrypt this element.</xs:documentation>
4-10
</xs:annotation>
</xs:attribute>
</xs:extension>
</xs:simpleContent>
</xs:complexType>
Cisco Aironet 802.11a/b/g Wireless LAN Client Adapters (CB21AG and PI21AG) Installation and Configuration Guide for Windows Vista
OL-16534-01
Page 95

Chapter 4 Performing Administrative Tasks
<xs:complexType name="PasswordFromProfile">
<xs:simpleContent>
<xs:extension base="xs:string">
<xs:attribute name="encryptContent" type="xs:boolean" use="optional" default="true">
<xs:annotation>
<xs:documentation>this is defaulted to 'true' as an indication to the post-process tool that it
should encrypt this element.</xs:documentation>
</xs:annotation>
</xs:attribute>
</xs:extension>
</xs:simpleContent>
</xs:complexType>
<xs:complexType name="PasswordSource">
<xs:choice>
The EAP-FAST XML Schema
<xs:element name="passwordFromLogon" type="Empty"/>
<xs:element name="passwordFromUser" type="Empty"/>
<xs:element name="passwordFromProfile" type="PasswordFromProfile"/>
</xs:choice>
</xs:complexType>
<xs:complexType name="TokenSource">
<xs:choice>
<xs:element name="passwordFromOtherToken" type="Empty">
<xs:annotation>
<xs:documentation>this will result in a prompt to user to obtain identity and otp from
token</xs:documentation>
</xs:annotation>
</xs:element>
</xs:choice>
</xs:complexType>
<xs:complexType name="CertificateSource">
<xs:choice>
<xs:element name="certificateFromUser" type="Empty">
<xs:annotation>
<xs:documentation>
Cisco Aironet 802.11a/b/g Wireless LAN Client Adapters (CB21AG and PI21AG) Installation and Configuration Guide for Windows Vista
OL-16534-01
4-11
Page 96

The EAP-FAST XML Schema
The client certificate to use during authentication is the one that the end-user selects from a list presented
to them.</xs:documentation>
</xs:annotation>
</xs:element>
<xs:element name="certificateFromLogon" type="Empty">
<xs:annotation>
<xs:documentation>The client certificate to use during authentication is the one the end-user used
in order to logon to windows.</xs:documentation>
</xs:annotation>
</xs:element>
<xs:element name="certificateFromProfile" type="ClientCertificate">
<xs:annotation>
<xs:documentation>The client user certificate to use during authentication is indicated
here.</xs:documentation>
</xs:annotation>
Chapter 4 Performing Administrative Tasks
</xs:element>
</xs:choice>
</xs:complexType>
<xs:complexType name="ExtendedInnerEapMethod">
<xs:sequence>
<xs:element name="methodName" type="xs:string"/>
<xs:element name="methodEapId" type="xs:unsignedInt"/>
<xs:element name="vendorId" type="xs:integer" default="0"/>
<xs:element name="AuthorName" type="xs:string"/>
<xs:element name="AuthorId" type="xs:unsignedInt"/>
<xs:any namespace="##any" processContents="lax" minOccurs="0"/>
</xs:sequence>
</xs:complexType>
<xs:complexType name="TunnelMethods">
<xs:sequence>
<xs:choice>
4-12
<xs:element name="validateServerCertificate" type="serverCertificateValidationParameters"/>
<xs:element name="doNotValidateServerCertificate" type="Empty"/>
</xs:choice>
<xs:element name="unprotectedIdentityPattern" type="IdentityPattern" minOccurs="0">
<xs:annotation>
Cisco Aironet 802.11a/b/g Wireless LAN Client Adapters (CB21AG and PI21AG) Installation and Configuration Guide for Windows Vista
OL-16534-01
Page 97

Chapter 4 Performing Administrative Tasks
<xs:documentation>If the [username] and/or [domain] placeholders are used in the pattern then:
if a client certificate is used for authentication then placeholder's values shall be obtained from the CN
field of the client certificate. if the credentials are obtained from the end-user then these shall be
obtained from the information the user enters. if the credentials are obtained from the operating system
then these shall be obtained from the information the logon provides. Typical pattern:
anonymous@[domain] for tunneled methods or [username]@[domain] for non-tunneled methods. If the
credential source is this profile then the pattern would be the actual string to send as the username (no
placeholders).</xs:documentation>
</xs:annotation>
</xs:element>
<xs:choice>
<xs:element name="enableFastReconnect">
<xs:complexType>
<xs:complexContent>
<xs:extension base="Empty">
<xs:choice>
The EAP-FAST XML Schema
<xs:element name="alwaysAttempt" type="Empty"/>
</xs:choice>
</xs:extension>
</xs:complexContent>
</xs:complexType>
</xs:element>
<xs:element name="disableFastReconnect" type="Empty"/>
</xs:choice>
</xs:sequence>
</xs:complexType>
<xs:complexType name="ClientCertificate">
<xs:choice>
<xs:element name="certificateId" type="CertificateIdentifier">
<xs:annotation>
<xs:documentation>This is a reference to an OS pre-stored certificate.</xs:documentation>
</xs:annotation>
</xs:element>
</xs:choice>
</xs:complexType>
<xs:complexType name="CertificateContainer">
<xs:choice minOccurs="0" maxOccurs="unbounded">
<xs:element name="certificateId" type="CertificateIdentifier">
Cisco Aironet 802.11a/b/g Wireless LAN Client Adapters (CB21AG and PI21AG) Installation and Configuration Guide for Windows Vista
OL-16534-01
4-13
Page 98

The EAP-FAST XML Schema
<xs:annotation>
<xs:documentation>This is a reference to an OS pre-stored certificate.</xs:documentation>
</xs:annotation>
</xs:element>
</xs:choice>
</xs:complexType>
<xs:complexType name="CertificateIdentifier">
<xs:simpleContent>
<xs:annotation>
<xs:documentation>SHA 1 hash over the whole binary certificate in X509 format that uniquely
identifies a certificate in the global list of trusted CAs for the machine (OS managed store in
windows).</xs:documentation>
</xs:annotation>
<xs:extension base="NonEmptyString">
<xs:attribute name="reference" type="xs:boolean">
Chapter 4 Performing Administrative Tasks
<xs:annotation>
<xs:documentation>true means the element value is a file reference to a certificate in PEM format,
the post-process tool will retrieve the certificate file, convert to a hash, populate the certificateId
element, and set the reference to false to indicate this is the SHA1 hash over that
certificate.</xs:documentation>
</xs:annotation>
</xs:attribute>
</xs:extension>
</xs:simpleContent>
</xs:complexType>
<xs:complexType name="Empty"/>
<xs:simpleType name="NonEmptyString">
<xs:restriction base="xs:string">
<xs:minLength value="1"/>
</xs:restriction>
</xs:simpleType>
4-14
<xs:complexType name="ServerRuleFormat">
<xs:simpleContent>
<xs:extension base="NonEmptyString">
<xs:attribute name="match" use="required">
Cisco Aironet 802.11a/b/g Wireless LAN Client Adapters (CB21AG and PI21AG) Installation and Configuration Guide for Windows Vista
OL-16534-01
Page 99

Chapter 4 Performing Administrative Tasks
<xs:simpleType>
<xs:restriction base="xs:string">
<xs:enumeration value="exactly"/>
<xs:enumeration value="endsWith"/>
</xs:restriction>
</xs:simpleType>
</xs:attribute>
</xs:extension>
</xs:simpleContent>
</xs:complexType>
<xs:complexType name="ServerValidationRules">
<xs:choice minOccurs="0" maxOccurs="unbounded">
<xs:annotation>
The EAP-FAST XML Schema
<xs:documentation>
Optional only when product allows user to trust server. In which case it allows a profile that has no server
validations rules to start with and when a user validates an untrusted server the validation process still
validates the server name.</xs:documentation>
</xs:annotation>
<xs:element name="matchSubjectAlternativeName" type="ServerRuleFormat">
<xs:annotation>
<xs:documentation>DNSName: typically takes the form of a Fully Qualified Domain Name
(FQDN)</xs:documentation>
</xs:annotation>
</xs:element>
<xs:element name="matchSubject" type="ServerRuleFormat">
<xs:annotation>
<xs:documentation>Either Subject: CN (Common Name) - typically a simple ASCII string.Or
Subject: DN (Domain Name) - a composite of a set of DC (Domain Component)
attributes</xs:documentation>
</xs:annotation>
</xs:element>
</xs:choice>
</xs:complexType>
<xs:complexType name="serverCertificateValidationParameters">
<xs:sequence>
<xs:choice>
<xs:element name="serverNameValidationRules" type="ServerValidationRules"/>
Cisco Aironet 802.11a/b/g Wireless LAN Client Adapters (CB21AG and PI21AG) Installation and Configuration Guide for Windows Vista
OL-16534-01
4-15
Page 100

The EAP-FAST XML Schema
<xs:element name="anyServerName" type="Empty">
<xs:annotation>
<xs:documentation>the server name within the certificate will not be tested.</xs:documentation>
</xs:annotation>
</xs:element>
</xs:choice>
<xs:choice>
<xs:element name="validateChainWithSpecificCa">
<xs:complexType>
<xs:complexContent>
<xs:extension base="CertificateContainer"/>
</xs:complexContent>
</xs:complexType>
</xs:element>
Chapter 4 Performing Administrative Tasks
<xs:element name="validateChainWithAnyCaFromOs" type="Empty">
<xs:annotation>
<xs:documentation>the certificate chain will be trusted if it ends in a CA cert from the global
CA cert store.</xs:documentation>
</xs:annotation>
</xs:element>
</xs:choice>
<xs:element name="userValidatesUntrustedServerCertificate" type="xs:boolean">
<xs:annotation>
<xs:documentation>if the server certificate fails to validate then if this is true the end-user will be
asked to validate the server. If they do so then appropriate trustedCaCerts will be remembered as well
as the server name fields so it will be automatically trusted in the future.</xs:documentation>
</xs:annotation>
</xs:element>
</xs:sequence>
</xs:complexType>
<xs:complexType name="ValidateWithSpecificPacs">
4-16
<xs:choice minOccurs="0" maxOccurs="unbounded">
<xs:annotation>
<xs:documentation>This is optional because it allows the profile to indicate that we want the engine
to validate the server PACs but that the PACs will be dynamically added by the end-user actions or via
unauthenticated provisioning rather than being statically defined here in the
profile.</xs:documentation>
</xs:annotation>
Cisco Aironet 802.11a/b/g Wireless LAN Client Adapters (CB21AG and PI21AG) Installation and Configuration Guide for Windows Vista
OL-16534-01
 Loading...