

Page 1
Cisco BWX360 WiMAX Outdoor Modem
User Guide
This device works in a frequency band for which a general licence might have to be
obtained. Please c ontact your servi ce provider or your Natio nal Authority for Frequen cy
Management about licensing before putting this device into service.
Page 2

Page 3

Contents
Contents
For your safety . . . . . . . . . . . . . . . . . . . . . . . . . . . . . . . . . . . . 5
Safety precautions . . . . . . . . . . . . . . . . . . . . . . . . . . . . . . . . . . . . . . . . . . . . . . . . . . 5
Trademarks . . . . . . . . . . . . . . . . . . . . . . . . . . . . . . . . . . . . . . . . . . . . . . . . . . . . . 5
Information on Specific Absorption Rate (SAR) . . . . . . . . . . . . . . . . . . . . . . . . . . . . 6
Notes on the user guide . . . . . . . . . . . . . . . . . . . . . . . . . . . . . . . . . . . . . . . . . . . . . . 6
The Cisco BWX360 WiMAX Outdoor Modem . . . . . . . . . . . . 7
What is WiMAX? . . . . . . . . . . . . . . . . . . . . . . . . . . . . . . . . . . . . . . . . . . . . . . . . . . . . 7
The Cisco BWX360 WiMAX Outdoor Modem . . . . . . . . . . . . . . . . . . . . . . . . . . . . . . 7
Product features . . . . . . . . . . . . . . . . . . . . . . . . . . . . . . . . . . . . . . . . . . . . . . . . . . . . 8
Scope of delivery . . . . . . . . . . . . . . . . . . . . . . . . . . . . . . . . . . . . . . . . . . . . . . . . . . . 8
Connectors and LEDs . . . . . . . . . . . . . . . . . . . . . . . . . . . . . . . . . . . . . . . . . . . . . . . . 9
Installing the Cisco BWX360 WiMAX Outdoor Modem . . . 10
Choosing the location . . . . . . . . . . . . . . . . . . . . . . . . . . . . . . . . . . . . . . . . . . . . . . . 11
System requirements . . . . . . . . . . . . . . . . . . . . . . . . . . . . . . . . . . . . . . . . . . . . . . . 11
Wall mounting (optional) . . . . . . . . . . . . . . . . . . . . . . . . . . . . . . . . . . . . . . . . . . . . . 11
Connecting the CiscoBWX360 WiMAX Outdoor Modem . . . . . . . . . . . . . . . . . . . . 12
Connecting the outdoor modem . . . . . . . . . . . . . . . . . . . . . . . . . . . . . . . . . . . . 12
Connecting a PC or switch . . . . . . . . . . . . . . . . . . . . . . . . . . . . . . . . . . . . . . . . 12
Switching on the devices . . . . . . . . . . . . . . . . . . . . . . . . . . . . . . . . . . . . . . . . . . 14
Configuration with the Web browser . . . . . . . . . . . . . . . . . 15
User interface . . . . . . . . . . . . . . . . . . . . . . . . . . . . . . . . . . . . . . . . . . . . . . . . . . . . . 15
Launching the user interface . . . . . . . . . . . . . . . . . . . . . . . . . . . . . . . . . . . . . . . 15
User interface elements . . . . . . . . . . . . . . . . . . . . . . . . . . . . . . . . . . . . . . . . . . 16
Setting the language . . . . . . . . . . . . . . . . . . . . . . . . . . . . . . . . . . . . . . . . . . . . . 18
Opening online Help . . . . . . . . . . . . . . . . . . . . . . . . . . . . . . . . . . . . . . . . . . . . . 18
Menu structure . . . . . . . . . . . . . . . . . . . . . . . . . . . . . . . . . . . . . . . . . . . . . . . . . 18
The Home page . . . . . . . . . . . . . . . . . . . . . . . . . . . . . . . . . . . . . . . . . . . . . . . . . . . 19
Basic Setup Wizard . . . . . . . . . . . . . . . . . . . . . . . . . . . . . . . 20
Starting the Basic Setup Wizard . . . . . . . . . . . . . . . . . . . . . . . . . . . . . . . . . . . . . . . 20
Entering access data for the WiMAX network . . . . . . . . . . . . . . . . . . . . . . . . . . . . . 20
Setting up Internet access . . . . . . . . . . . . . . . . . . . . . . . . . . . . . . . . . . . . . . . . . . . 20
Adjusting the antenna . . . . . . . . . . . . . . . . . . . . . . . . . . . . . . . . . . . . . . . . . . . . . . . 21
Establishing a radio connection with a WiMAX network . . . . . . . . . . . . . . . . . . . . . 21
Precisely aligning the antenna . . . . . . . . . . . . . . . . . . . . . . . . . . . . . . . . . . . . . . . . 22
3
Page 4

Contents
Advanced Settings . . . . . . . . . . . . . . . . . . . . . . . . . . . . . . . . 24
Setting the operating mode . . . . . . . . . . . . . . . . . . . . . . . . . . . . . . . . . . . . . . . . . . . 25
Configuring Internet access . . . . . . . . . . . . . . . . . . . . . . . . . . . . . . . . . . . . . . . . . . 26
Setting up the Internet Connection . . . . . . . . . . . . . . . . . . . . . . . . . . . . . . . . . . 26
Setting up DNS servers . . . . . . . . . . . . . . . . . . . . . . . . . . . . . . . . . . . . . . . . . . . 27
Enabling or disabling the firewall . . . . . . . . . . . . . . . . . . . . . . . . . . . . . . . . . . . . 27
Port Forwarding . . . . . . . . . . . . . . . . . . . . . . . . . . . . . . . . . . . . . . . . . . . . . . . . . 28
Opening the firewall for a selected PC (Exposed Host) . . . . . . . . . . . . . . . . . . 29
LAN configuration . . . . . . . . . . . . . . . . . . . . . . . . . . . . . . . . . . . . . . . . . . . . . . . . . . 30
WiMAX configuration . . . . . . . . . . . . . . . . . . . . . . . . . . . . . . . . . . . . . . . . . . . . . . . 31
Administration . . . . . . . . . . . . . . . . . . . . . . . . . . . . . . . . . . . 32
System password . . . . . . . . . . . . . . . . . . . . . . . . . . . . . . . . . . . . . . . . . . . . . . . . . . 32
Restoring factory settings . . . . . . . . . . . . . . . . . . . . . . . . . . . . . . . . . . . . . . . . . . . . 33
Restart . . . . . . . . . . . . . . . . . . . . . . . . . . . . . . . . . . . . . . . . . . . . . . . . . . . . . . . . . . 34
Updating the firmware . . . . . . . . . . . . . . . . . . . . . . . . . . . . . . . . . . . . . . . . . . . . . . . 34
Status . . . . . . . . . . . . . . . . . . . . . . . . . . . . . . . . . . . . . . . . . . . 35
Internet . . . . . . . . . . . . . . . . . . . . . . . . . . . . . . . . . . . . . . . . . . . . . . . . . . . . . . . . . . 36
Local network LAN . . . . . . . . . . . . . . . . . . . . . . . . . . . . . . . . . . . . . . . . . . . . . . . . . 37
Device status . . . . . . . . . . . . . . . . . . . . . . . . . . . . . . . . . . . . . . . . . . . . . . . . . . . . . 38
Radio status . . . . . . . . . . . . . . . . . . . . . . . . . . . . . . . . . . . . . . . . . . . . . . . . . . . . . . 38
Using the Cisco BWX360 WiMAX Outdoor Modem . . . . . . 40
Appendix . . . . . . . . . . . . . . . . . . . . . . . . . . . . . . . . . . . . . . . . 41
Troubleshooting . . . . . . . . . . . . . . . . . . . . . . . . . . . . . . . . . . . . . . . . . . . . . . . . . . . 41
Other faults and problems . . . . . . . . . . . . . . . . . . . . . . . . . . . . . . . . . . . . . . . . . 43
Before contacting customer service or your provider . . . . . . . . . . . . . . . . . . . . 43
Checking the connection to the CiscoBWX360 WiMAX Outdoor Modem . . . . . . . 43
Configuring the Web browser . . . . . . . . . . . . . . . . . . . . . . . . . . . . . . . . . . . . . . . . . 45
Setting up an HTTP proxy . . . . . . . . . . . . . . . . . . . . . . . . . . . . . . . . . . . . . . . . . 45
Allowing pop-up windows . . . . . . . . . . . . . . . . . . . . . . . . . . . . . . . . . . . . . . . . . 46
Specifications . . . . . . . . . . . . . . . . . . . . . . . . . . . . . . . . . . . . . . . . . . . . . . . . . . . . . 47
Notes on putting into service . . . . . . . . . . . . . . . . . . . . . . . . . . . . . . . . . . . . . . . 47
End User Software License Agreement . . . . . . . . . . . . . . . . . . . . . . . . . . . . . . . . . 48
Open Source Software used in the product . . . . . . . . . . . . . . . . . . . . . . . . . . . . . . 56
Warranty regarding further use of the Open Source Software . . . . . . . . . . . . . 56
Open Source Software used . . . . . . . . . . . . . . . . . . . . . . . . . . . . . . . . . . . . . . . 57
Acknowledgements . . . . . . . . . . . . . . . . . . . . . . . . . . . . . . . . . . . . . . . . . . . . . . 57
Open Source Software Licenses . . . . . . . . . . . . . . . . . . . . . . . . . . . . . . . . . . . . 58
Glossary . . . . . . . . . . . . . . . . . . . . . . . . . . . . . . . . . . . . . . . . 64
Index . . . . . . . . . . . . . . . . . . . . . . . . . . . . . . . . . . . . . . . . . . . 72
4
Page 5

For your safety
For your safety
³ Please read the safety instructions carefully before putting into service.
Safety precautions
General safety instructions
◆ Only pass on the Cisc o BWX36 0 WiM AX Ou t do or Modem to third parties w ith this
user guide and the assembly instructions.
◆ The Cisco BWX360 WiMAX Out door Modem must only be inst alled and put into use
by a qualified electrician in accordance with the supplied installation instructions.
◆ National laws and regulations must be considered before putting the device into
service.
◆ These devices are p r ofes s ion al IT equ ipm en t. Keep the devices beyond the reach
of children.
Safety instructions for connection
◆ Only use undamaged original accessories.
◆ The outdoor modem must only be installed by qualified electricians in accordance
with the assembly instructions.
Safety precautions for the Cisco BWX360 WiMAX Outdoor Modem
◆ The operation of medical appliances may be affected. Be aware of the technical
conditions in your particular environment, e.g. doctor's surgery.
◆ The Cisco BWX360 WiMAX Out do or Mode m ca n interf ere wi th the func ti oni ng of
medical devices such as pacemakers. Keep at least 20 cm between the devices
and the pacemaker. For more information consult your doctor.
◆ Do not operate the indoor unit under the influence of direct heat sources (e.g.
directly in the sun).
◆ The Cisco BWX360 WiMAX Outdoor Modem complies with the regulations on lim-
iting the effect of electromagnetic fields on the general population.
◆ Do not use the devi ces in envi ronments with a poten tial explosion hazard, e. g. auto
paint shops or in a humid environment (bathroom etc.).
◆ Only clean the CiscoBWX36 0 WiMAX Ou tdo or Modem with a so ft anti -st ati c cloth.
Trademarks
◆ Microsoft Windows 2000, Windows XP, Windows Vista and Internet Explorer are
registered trademarks of the Microsoft Corporation.
◆ Mozilla Firefox is a registered trademark of the Mozilla Organization.
5
Page 6

Notes on the user guide
Information on Specific Absorption Rate (SAR)
This device meets the limits for protecting the health of the public from the effecs of
exposure to electromagnetic fields when it is operated in connection with the designated antenna(s) like described in the user manual.
Your device i s a radi o t r ansm itte r and receiver. It is desi gne d and manufactured n ot to
exceed the limits for exposure to emission from electromagnetic fields recommended
by international guidelines from the International Commission on Non-Ionizing Radiation Protection (ICNIRP ). These limi ts are pa rt of comprehensiv e guidelines for the protection of the publi c and est ablish permitted le vels of ex posure to e lectromag netic radi ation for the population. The guidelines were confirmed by independent scientific
organisations t hrough period ic an d t horough eval uation of s cienti fic s tudies . The limi t s
include a substa ntial safety margin d esigned to assu re the safety of all pers ons, regardless of age and health.
The exposure limit employs a unit of measurement known as the Specific Absorption
Rate, or SAR. The SAR limit state d in the internatio nal guideline s is 2.0 W/kg. Tests for
SAR are conducted in all frequency bands with the device transmitting at its highest
power level with minimum possible distance to the body. The actual SAR level of the
device during operation with the designated antenna(s) is below the maximum value
and is additionall y decreased b y a distance to th e device. T his is because th e device is
designed to operate at multiple power levels so as to use only the power required to
enable seamless net work con ne cti on.
Notes on the user guide
This user guide describ es how to set up and co nfigure the Cisc o BWX360 WiMAX Outdoor Modem. Installation of the individual components is dealt with in the assembly
instructions, which you received together with the CiscoBWX360 WiMAX Outdoor
Modem.
³ Please read the user guide carefully before using the devices for the first time.
³ Also note the product information on the Internet at www.cisco.com.
6
Page 7

The Cisco BWX360 WiMAX Outdoor Modem
The Cisco BWX360 WiMAX Outdoor Modem
What is WiMAX?
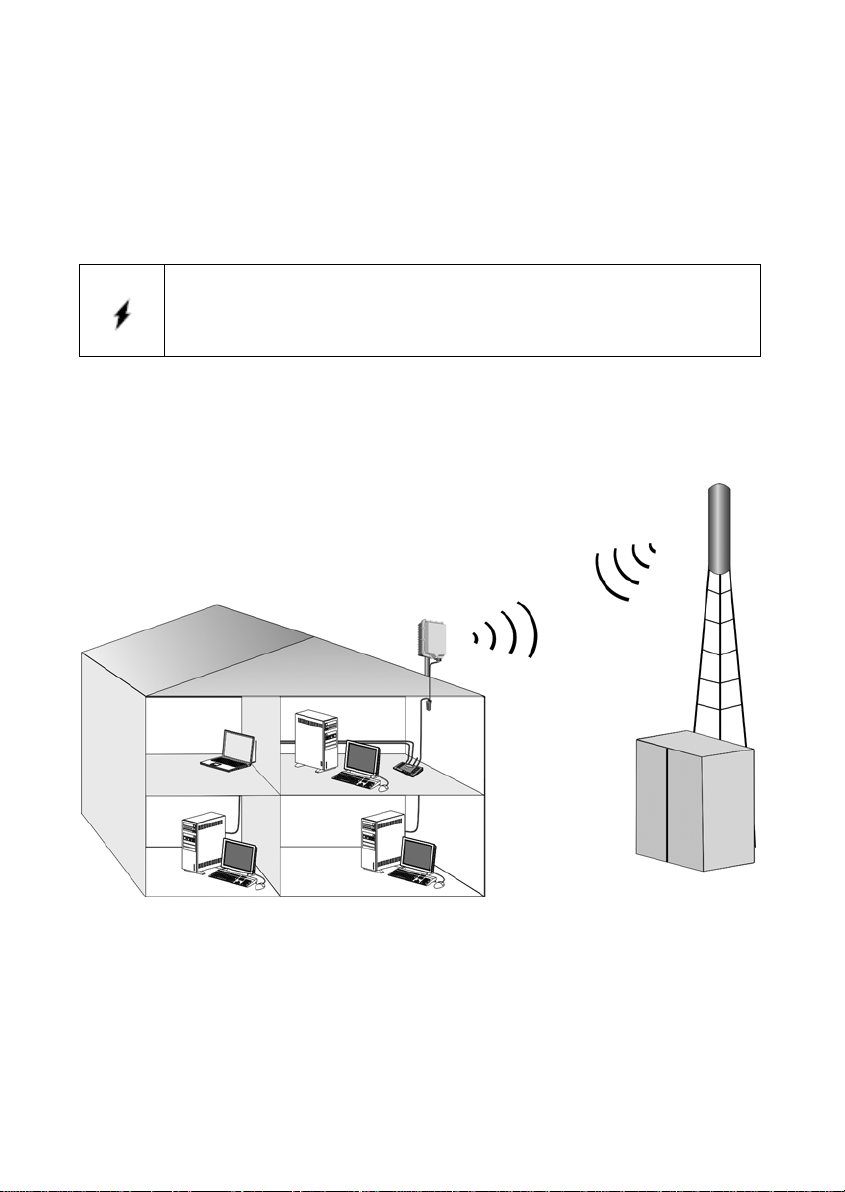
WiMAX stands for "Worldwide Interoperability fo r Microwave Access", a modern wire-
less network technology that enables fast Internet connection even in remote areas.
With WiMAX technology you are no longer dependent on a DSL infrastructure in your
home or place of work. Instead, you connect your PC or network wirelessly to radio
stations operated in your region by your provider. As a result, WiMAX gives you fast,
economical broadband Internet access, even in places that are not connected to the
DSL cable network.
The WiMAX standard IEEE 802.16 generally defines WiMAX technology. Your
Cisco BWX360 WiMAX O ut d oor Mo dem a lready meets the latest IEEE 802.16e-2005
standard, a mobile WiMAX standard that offers many extra possibilities.
The Cisco BWX360 WiMAX Outdoor Modem
With your Cisco BWX360 WiMAX Outdoor Modem, you can make use of everything the
Internet has to offer:
◆ Downloads
– Even large files download quickly to your PC.
– Complex Website designs are no longer characterised by the time they take to
download – you can enj oy flas h anim ation and high -resol ution gra phics imm ediately after clicking on a link.
◆ Audio
– Play back audio files straight from the Internet.
– Listen to the radio via the Internet in superb digital quality.
◆ Video
– View short or longer films you find on the Intern et with out tedio us waiti ng times .
– Watch television via the Internet (IPTV).
– Use "Video on Demand" and order films that are transmitted to you via the
Internet.
◆ Real time
– Ta ke part i n video co nferences and feel as if you are sit ting in th e same room as
the people you are talking to.
– Speak to and see your chat partners.
7
Page 8

Scope of delivery
Product features
◆ Wireless high-speed Internet access with a transmission rate of up to 20Mbps
(14 Mbps downlink, 6 Mbps uplink)
◆ Standards compliant: IEEE 802.16e-2005
◆ Compatible with all usual operating systems
◆ Suitable for home and business facilities
◆ Multi-protocol support: TCP/IP, FTP, HTTP and other Internet related protocols
◆ Compact design and easy installation
◆ DHCP server and routing functions
◆ High performance and Quality of Service
Scope of delivery
◆ 1 Cisco BWX360 WiMAX Outdoor Modem, comprising:
– 1 Outdoor modem (to be installed by an electrician)
– 1 Indoor unit
◆ 1 power lead (two-pin)
◆ 1 Ethernet cable (length 1.8 m)
◆ 1 Set of assembly material, incl. assembly instructions
◆ 1 User guide
8
Page 9

Connectors and LEDs
Scope of delivery
1
1 Connector for the two-pin power lead, see "Switching on the
devices" on page 14.
2 CONNECT The LED shows whether or not the indoor unit is properly con-
nected to the outdoor mode m.
◆ Green: The i ndoor unit is p roperly conne cted to the out door
modem.
3 FAULT The LED shows whether or not the indoor unit is properly con-
nected to the outdoor mode m.
◆ Red: The connection between the indoor unit and the out-
door modem is faulty.
4ON The LED shows that power is being supplied.
◆ Green: The Cisco BWX360 WiMAX Outdoor Modem is
powered correctly.
5IN Ethernet socket for dat a exchange w ith a PC or network (RJ 45,
10/100 Base T), see "Connecting a PC or switch" on page 12.
6OUT Ethernet socket for connection with the outdoor modem (RJ45,
power supply and d at a tra nsm is s ion ), s ee " C on nec tin g t he outdoor modem" on page 12.
7 Clips for wall mounting
2
3
4
5
6
7
9
Page 10
Installing the Cisco BWX360 WiMAX Outdoor Modem
Installing the Cisco BWX360 WiMAX Outd oor
Modem
The Cisco BWX360 WiM AX Outdoo r Modem es sentiall y compri ses three c omponen ts:
◆ Outdoor modem with integrated antennas (X-pol)
◆ Indoor unit
The Cisco BWX360 WiMAX Outdoor Modem must be assembled and
put into service by a qualified electrician.
The information in the enclosed assembly instructions must be noted.
This user guide assumes that the work required for outside installation has already
been carried out.
Therefore, installation is described below starting with how to put the indoor unit into
service.
PC with Cisco BWX360 WiMAX Outdoor
Modem
Base station
10
Page 11

System requirements
Choosing the location
◆ Choose the location so that you can easily establish the following connections:
– Ethernet cable socket, which, f or example, establis hes the con nection to the out-
door modem through a wall duct.
– Ethernet cable socket for connection with a PC or network.
– Connection of the power lead with a mains socket.
◆ First choose the location for the indoor uni t:
– Consider the stated temperature range for the indoor unit when choosing the
location (see "Specifications" on page 47).
◆ The indoor unit can be op erated either on a horizont al surface or mounted on a wall.
Make sure the connec tions cann ot become loose and that the LED s are clearl y visible.
◆ Lay the cables in such a way that nobody can tread on or trip over them.
System requirements
To install and get started with the indoor unit, the following requirements must be fulfilled:
◆ The outdoor modem has been properly installed and is ready for use. The associ-
ated Ethernet cable is fitted with an RJ45 plug and ends close to the indoor unit.
◆ PC with a LAN interface 10/100BaseT or an Ethernet net work
10/100BaseT. The network adapter must support one of the following modes:
10BaseT Half Duplex, 10BaseT Full Duplex, 100BaseT Half Duplex,
100BaseT Full Duplex.
◆ The TCP/IP protocol has to be s et up on the PC ( sta ndard i nst allat ion fo r Windo ws
XP and Windows Vi sta; if yo u are using a dif ferent Windows operating syste m, read
the separate instruc tions on network con figuration on the prod uct CD, if necessary).
Wall mounting (optional)
The indoor unit is fitted with t wo clips f or wall mou nting. W all mount ing is not abs olutely
necessary, but is recommended to make the cable connections mechanically secure.
³ Use screws, anchor fittings and cable clamps to mount the indoor unit on a wall.
Make sure the LEDs are easily visible.
11
Page 12
Wall mounting (optional)
Connecting the Cisco BWX360 WiMAX Outdoor Modem
Set up the connections on the indoor unit in the following order:
1. Connect the outdoor modem.
2. Connect the PC or the switch/hub.
3. Connect the indoor unit to the mains power supply and switch all the devices on.
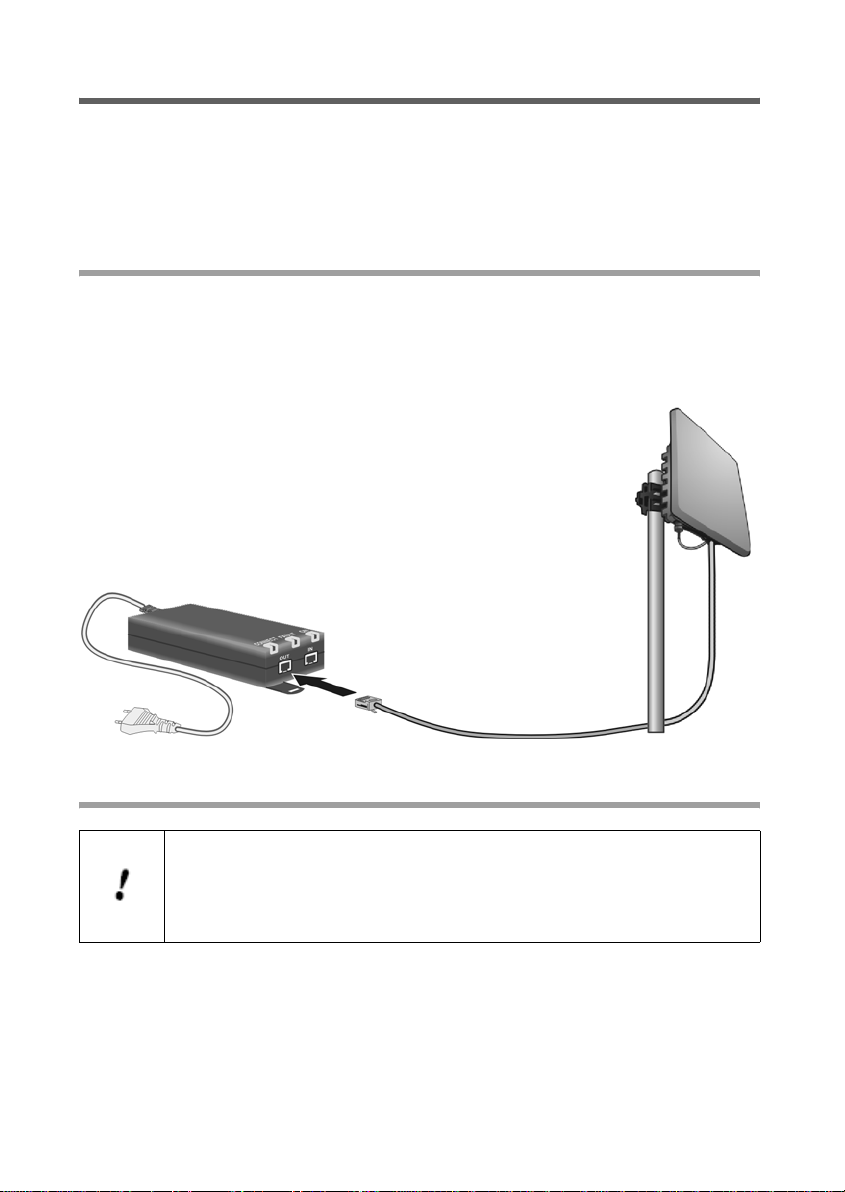
Connecting the outdoor modem
After the outdoor modem has been installed correctly, the associated Ethernet cable
(with RJ45 plug) is available close to the indoor unit.
³ Insert the Ethernet cable plug into the OUT socket on the indoor unit. You should
be able to hear the clips on the RJ45 plug click into place.
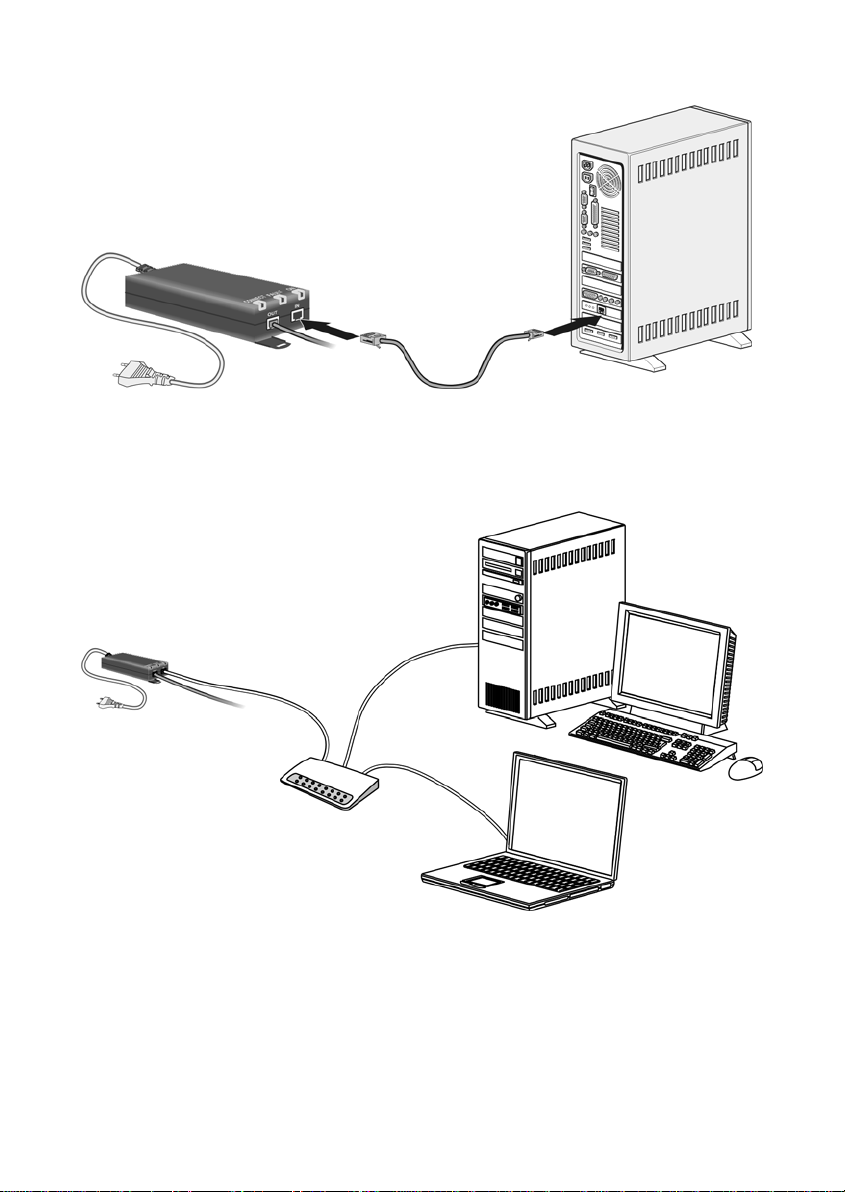
Connecting a PC or switch
Use either the Ethernet cable tha t is supplied or a standard net work cable
(CAT-5) for the connection to the PC or switch. It does not matter if the
Ethernet cable has straight or crossed wiring.
You must use a shielded Ethernet cable.
12
Page 13
Wall mounting (optional)
Connecting the indoor unit to a PC
³ Connect an Ethernet cable plug to the IN socket on the indoor unit.
³ Connect the other plug of the Ethernet cable to the LAN interface on the PC.
Connecting the indoor unit to a switch
³ Connect an Ethernet cable plug to the IN socket on the indoor unit.
³ Connect the other Ethernet cable plug to the switch or hub.
³ For configuration, please refer to the user guide of your switch or hub.
13
Page 14
Wall mounting (optional)
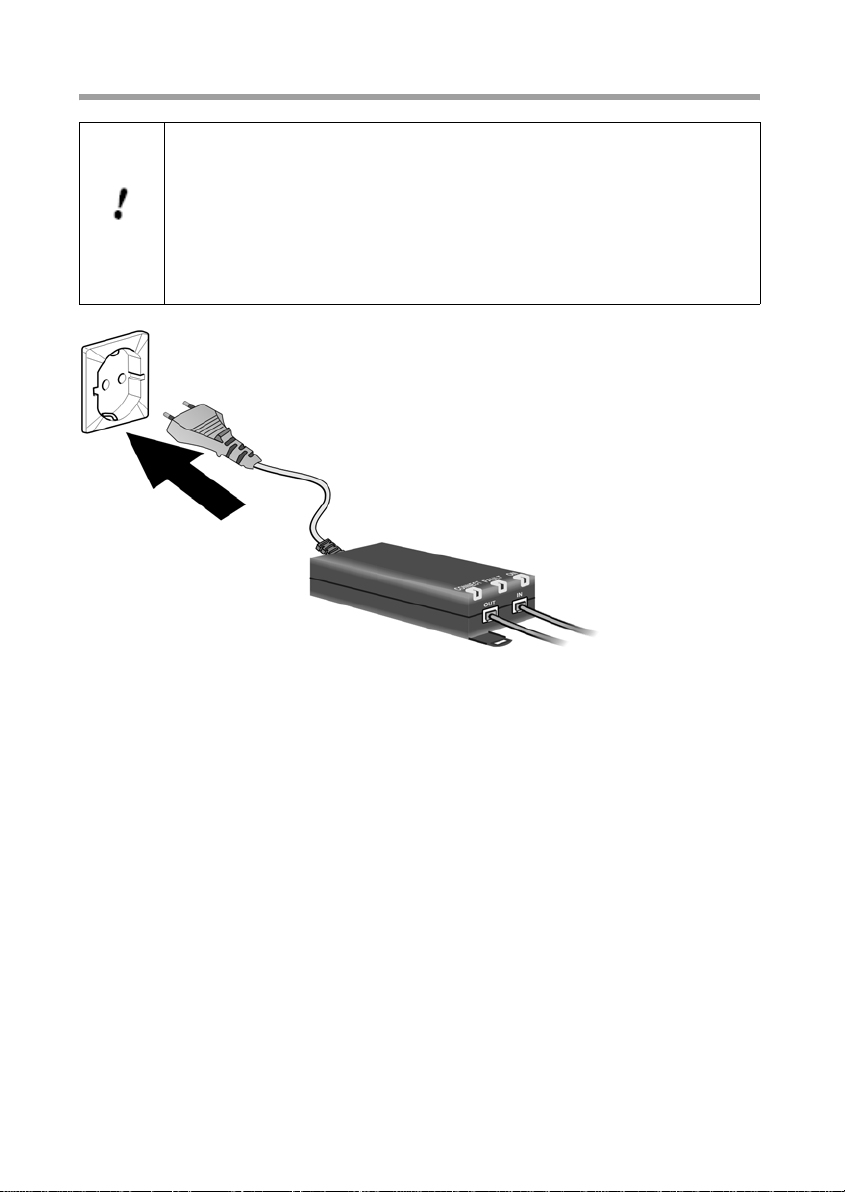
Switching on the devices
Only use the Cisco BWX360 WiMAX Outdoor Modem with the supplied
mains cable.
Refernece number: C39280-Z4-C584
Manufacturer: PhiHong
Type: POE30U-560(G)-S
Input: 100-240V, 0.95A AC
Output: 56V, 0,55A DC
³ Connect the power lead to the indoor unit.
³ Connect the power lead of the indoor unit to the mains power supply. The outdoor
modem is powered via the Ethernet cable and does not re qui re it s own m ai ns con nection.
The system starts booting and performs a self-test.
After the self-t est, the CiscoBWX36 0 WiMAX Outdoo r Modem conti nually attempt s
to register with a base sta tion. Registra tion with th e base st ation may be successf ul
immediately; otherwise, registration will take place when your Cisco BWX360
WiMAX Outdoor Modem is being configured.
³ Check the LEDs during startup :
LEDs during startup:
–The ON power supply LED li ghts up green, an d the Cisco BWX360 Wi MAX Out-
door Modem starts a self-test.
–The FAULT LED (red) and the CONNECT LED ( green) light up for app roximately
1 second and then go out. If the connec tion to the out door mod em is then found
to be free from errors, the CONNECT LED is con tinuously lit up green. If an er ror
occurs, the F AUL T and CO NNECT LEDs sta rt to flash alternately at regular inter-
vals.
14
Page 15

Configuration with the Web browser
Configuration with the Web browser
You do not need to install any software on your PC to configure your Cisco BWX360
WiMAX Outdoor Mod em; the co nfigura tion pro gram is store d on the device. O pen th is
software in the same way as an Internet page in the Web browser and make the
required settings. Your settings are then stored directly on the device.
On startup, the Basic Setup Wizard helps you set up a connection to the WiMAX network and configure your Internet access.
For experienced users:
– IP address: 192.168.2.1
– Subnet mask: 255.255.255.0
Presentation of the configuration program
To configure your Cisco BWX360 WiMAX Outdoor Modem, we recommend the
Microsoft Internet Explorer version 7.0, Mozilla Firefox version 2.0 or their higher versions. However, you can also use most other or older Web browsers.
Number and amount of functions and settings provided by the configuration prog ram may differ specific to a project.
User interface
Launching the user interface
³ Open your Web browser.
³ Enter the IP address of your Cisco BWX360 WiMAX Outdoor Modem in the
address field of your Web browser:
http://192.168.2.1
³ Press Enter (Return).
If a system password has been set up on your Cisco BWX360 WiMAX Outdoor
Modem, the login screen will now open.
Enter the system p a ss word supplied by your prov id er i n th e text box and cl ick Ok.The
start page (H ome) of the user interface open s, in w hi ch you ca n change the language
if necessary (see page 18).
Change the system password later to one of your own (see "System password" on
page 32).
If no system password has been set up on your Cisco BWX360 WiMAX Outdoor
Modem, a security warning will appear first. You should then assign a system p assword
as soon as possible.
³ Confirm the security warning with Ok.
The user interface start page opens.
15
Page 16

User interface
If the login screen does not open:
³ Check the connections; see "Connecting the Cisco BWX360 WiMAX Outdoor
Modem" on page 12.
³ If you use a firewall on the PC, it must allow connection to the CiscoBWX360
WiMAX Outdoor Modem. If applicable, switch off the firewall for a test; if you can
then open the login screen, configure the firewall accordingly. For details, refer to
the user guide for your firewall.
If you have changed the standard settings on your PC, you might not be able to open
the configuration pages.
³ For details on how to find and rectify the fault, see "Troubleshooting" on page 41.
Saving the user interface address
³ You can add the address of the registration page to your favourites/bookmarks so
that you will no longer need to enter the IP address manually in future:
– Internet Explorer: Add to Favorites button
–Firefox: Bookmarks > Add Bookmark
User interface elements
The user interface you op en with the We b browser is divide d into the following s ections:
12
Home
Operating Mode
Internet
...
...
...
Advanced SettingsBasic Setup Wizard Status
Language Logout
3
4
6
5
Tab selection:
1
Open the Home, Basic Setup Wizard, Advanced Settings or Status tabs to
display the contents of each configuration area.
Language button:
2
Select your language. This button is only available on the Home screen.
16
Page 17

User interface
Logout button:
3
The button is only displaye d if a syste m p as sw o rd is set up.
Log off from your Cisco BWX360 WiMAX Outdoor Modem.
Open Help window button:
4
Open the online Help relating to the menu item currently in the workin area.
Menu area:
5
Click the menu items to display the respective pages of the currently open configuration area or a submenu.
Working area:
6
Check the settings on your Cisc o BWX360 WiM AX Outdo or Modem a nd change
them as necessary.
Buttons
Open online H elp.
Click on this button if you require information about the screen you currently have open. The corresponding Help topic is opened.
Logout Button with which you end the connection between the PC and the
Cisco BWX360 WiMAX Outdoor Modem.
Back Return to the previous screen in the Basic Setup Wizard.
Next Move on to the next screen in the Basic Setup Wizard.
Cancel Changed settings are not applied and you return to the highest level.
Ok Save the settings and return to the highest level.
End Save the settings and exit the Basic Setup Wizard.
Y ou will se e other buttons depen ding on the scre en currently open. If you require furth er
information about thes e, open the online Help at the approp riate pla ce usin g the ques tion mark button.
Input fields
On the configuration screens, change the required settings using the following input
fields:
Option fields:
Two or more fields, of which one is activated. As soon as you click in
another option field, it is activated and the one previously selected is
reset. You will find option buttons wherever there is a choice between
several possibilities.
T ext field :
Enter text or digit s. Clic k in the field to activa te i nput mode. You will find
text fields at points where you can specify text or numbers as required,
e.g. a new system password.
17
Page 18

User interface
Setting the language
The user interfac e i s ini tially displayed in the language that ha s bee n set by your o perator. Other languages may be available.
³ If you wish to c hange the preset lan guage, cl ick on the Language button at the top
right. This opens the page for setting the language.
³ Click on the arrow next to the selection field to open it and select your language.
³ Click on Ok to change the language.
Opening online Help
There is an online Help for each screen of the configuration program, which you can
open directly on the screen.
³ Click on the question mark button at the top right.
The online Help is shown in the right pane of the configuration program.
³ If necessary, click on Open Help window to open the online Help in a separate
window.
Menu structure
The menu of the user interface on your Cisco BWX360 WiMAX Out door Modem is split
into the following main areas: Home, Basic Setup Wizard, Advanced Settings and
Status. Under these menu options, you will find the following areas:
Menu Description
Home
Basic Setup Wizard
Advanced Settings
Status
Brief description of all the menus in your Cisco BWX360 WiMAX
Outdoor Modem, as well as the connection status and the language change feature; see "User interface" on page 15.
Establish a connection to the WiMAX network, optimise the
antenna direction and set up your Internet connection, see "Basic
Setup Wizard" on page 20.
Configure your Internet access and your local network and perform administration tasks. For example, you can enter a system
password for access to your Cisco BWX360 WiMAX Outdoor
Modem or change it, see "Configuration with the Web browser" on
page 15.
Obtain information about the operating status of your
Cisco BWX360 WiMAX Outdoor Modem and read off the device
and version numbers as well as IP addresses; see "Status" on
page 35.
Internet See "Internet" on page 36.
Local Network See "Local network LAN" on page 37.
Device Status See "Device status" on page 38.
Radio Status See "Radio status" on page 38.
18
Page 19

The Home page
The Home page
Once you have lo gged i n suc cess fully to the Ci sco BWX 360 Wi MAX Out doo r Mode m,
you will see the Home page for the device software. The s tart screen of fers an overview
of all areas of the configuration program:
Menu Description
Basic Setup Wizard Perform the basic configuration and set up the radio
connection to the WiMAX network (see page20).
Advanced Settings Perform advanced configuration and administration
tasks (see page 24).
Status Obtain informati on on the st atus of your Cisco BWX360
WiMAX Outdoor Modem (see page 35).
In the area to the right of the start screen, you will see the connection status of your
Cisco BWX360 WiMAX Outdoor Modem:
◆ connected = The Cis co BWX360 Wi MAX Out door M odem has est ablished a radi o
connection with a WiMAX network. You will see the connec tion duration in bracket s
and in the format ddd:hh:mm:ss (d=days, h=hours, m=minutes, s=seconds).
◆ disconnected = The Cisco BWX360 W iMAX Outd oor Mo dem is trying to estab lish
a connection with a WiMAX network.
To configure your Cisco BWX360 WiMAX Outdoor Modem, use the Basic Setup Wizard, which will help you establish a radio connection.
Connecting to the Internet manually
Once you have configured your Internet access (see page 20 and page26), you can
establish a manual connection to the Internet on the start screen if you have selected
Connect on demand as the Connection mode.
To establish or end an Internet connection manually:
³ Open the st art screen o f the Cisco BWX36 0 WiMAX Out door Mod em as described
on page 15.
³ If you have already started the user interface, click the Home tab at the top left of
the window.
³ Click Connect to establish a connection to the Internet.
³ Click Disconnect if you no longer require the connection.
19
Page 20

Basic Setup Wizard
Basic Setup Wizard
The Basic Setup Wizard helps you start up your device and guides you step by step
through the configuration process with the most important settings.
The Basic Setup Wizard comprises the following steps:
◆ Entering the access data for the WiMAX network
◆ Configuring the Internet acce ss
◆ Positioning the device
◆ Scanning the frequencies to establish a radio connection with a WiMAX network
◆ Exact alignment of the antenna to optimise the quality of the connection
You can check al l t he configuration settings that you make with the Basic
Setup Wizard later via the Advanced Settings menus and, if necessary,
change them, see "Advanced Settings" on page 24.
Depending on the pre-configurat ion of your device some of the menu
entries and configuration possibilities might be missing in your device.
Starting the Basic Setup Wizard
³ To start the Basic Setup Wizard, click the Basic Setup Wizard tab.
³ Click Next.
Entering access data for the WiMAX network
On this page you enter the data for authentication of your device on the WiMAX base
station. You will need the access data supplied by your WiMAX operator for this.
³ Activate the Authentication option, if this is required by your WiMAX operator.
³ Enter the access data and click Next.
Setting up Internet access
To allow us ers in y ou r loc al ne twork ac ces s to th e In tern et, s et u p th e In tern et c onn ec tion of your device using the information supplied by your Internet provider.
³ Enter the access data and click Next.
Y our Cisc o BWX360 Wi MAX Ou t door M odem can b e used as an Interne t
router or bridge. For more on this see "Setting the operating mode" on
page 25.
20
Page 21

Establishing a radio connection with a WiMAX network
Adjusting the antenna
³ Adjust your Cisco BWX360 WiMAX Outdoor Modem facing towards the base sta-
tion.
³ Click Next.
Establishing a radio connection with a WiMAX network
The Basic Setup Wiz ard will now sca n th e frequencies to esta bli sh an i ni tial rad io c on nection to a WiMAX network.
The frequency scan begins automatically. A progress bar indicates how far the scan
has progressed. In addition, you will see in the Remaining time area roughly how
much time is still needed for the complete scan. Depending on how your
Cisco BWX360 WiMAX Out door Mo dem has been pre configure d by your prov ider , th e
scan can last several minutes before the first radio connection is established.
During the scan, the Cisco BWX360 WiMAX O utdoor M odem must no t be
moved; this is th e only way to guaran tee a com plete sc an with the current
antenna alignment.
As soon as a radio conn ec tio n ha s b een established w ith a WiM AX ne twork , th e sc an
will end. The progress ba r is fully filled in and the display in the Remaining time area
jumps to 0 seconds.
³ If the scan has been success ful, read on in Cha pter "Precisely ali gning the antenn a"
on page 22.
If the scan has not been successful:
The integrated ant enna is a direc tional antenna th is means that it must at leas t be pointing roughly in the direction of a WiMAX network base station in order to establish a
radio connection. The access data must also have been entered correctly.
If the scan was not successful:
³ First check your acc ess dat a by going bac k to the WiMAX co nfigura tion p age (see
page 20).
³ If you have entered your access data correctly, adjust the Cisco BWX360 WiMAX
Outdoor Modem.
³ Turn your Cisco BWX360 WiMAX Outdoor Modem by approx. 20°. Turn or move
the device a little at a time and note the signal strength display. Use this to move
the antenna to the position with the best signal strength.
21
Page 22

Establishing a radio connection with a WiMAX network
Precisely aligning the antenna
Once you have established a wireless connection to a WiMAX network, align your
Cisco BWX360 WiMAX Outdoor Modem precisely using the Basic Setup Wizard.
T ake extra ca re to align the Cisco BWX360 WiMAX Outdoor Modem precisely. The better the c onnec tion q uality, the faster your Internet conn ection will be in the future.
To obtai n precise ali gnment of the Cisc o BWX360 WiMAX Out door Modem, turn it a little at a time.
³ When a connection to a WiMAX network has been established, click on Next to
make fine adjustments to the antenna.
The quality of the ra dio co nnect ion ca n be seen i n the Signal quality area. The signal
quality bar graph indicates the quality of the connection. You will also see the signal
quality shown as a percentage as well as an assessment of the connection quality:
Excellent The wireless connection is at the highest level.
Very good The wireless connection is very good. You can attempt to
improve the connection still furth er by turni ng the antenna
slightly; however, this is not necessary.
Good The wireless connection is already good. Turn the antenna
slightly to further improve the connection.
Sufficient The wireless connectio n has been es tablish ed. Tu rn the antenna
a little at a time to improve the connection.
No connection If you have turned o r moved the anten na too fa r the wirele ss con-
nection to the WiMAX base station will break up. Return the
antenna to the position it was in when the connection was successfully established. The wireless connection to the WiMAX
base station will be restored immediately.
³ If you are unable to check th e displ ay of the signal quality on the s creen w hile al ign-
ing the antenna:
Activate the Audible feedback option to obt ain info rmation about the signal qu ality
by means of beep s. Th e clo ser tog ether t he seq uence of be eps , the b etter th e con nection quality.
³ Tu rn or move the Cisco BWX360 WiMAX Outdoor Modem a littl e at a tim e and note
the signal quality di splay . Use this to move the ant enna to the posi tion with the best
signal quality.
If you have turne d your Cisco BWX360 W iMAX Outdoor Mo dem too far , the co nnection
might break. You should then return to the alignment that provided a connection and
repeat the procedure for estab lishing a con nection to the WiMAX netw ork. Then make
any fine adjustments step by step.
22
Page 23

Establishing a radio connection with a WiMAX network
The connection quality can be detected in two different ways:
◆ CINR (Carrier to Interference and Noise Ratio) measures the si gna l
quality.
◆ RSSI (Received Signal Strength Indication) measures the signal
strength.
The bar indicates either RSSI or CINR values. The used method is preconfigured by your operator. If RSSI is used the bar is labeled Signal
strength.
When your Cisco BWX360 WiMAX Outdoor Modem is optimally aligned:
³ Click End to close the Basic Setup Wizard and apply the settings you have made.
Make sure that in future you r Cisc o BWX360 WiM AX Outd oor Mod em is alw ays in the
set position.
23
Page 24

Advanced Settings
Advanced Settings
In the Advanced Settings menu, you can configure all the options for the
Cisco BWX360 WiMAX Out door Mod em. If required, y ou can als o change th e settings
you made using the Basi c Setup Wizard. T he fol lowing t able c ontai ns the options available in this menu.
Menu Description
Operating Mode
Internet
Local Network Here you can configure your local network, e.g . change the
WiMAX configuration Here you can change the access data for your WiMAX
Administration Here you can do various administration tasks, e.g. assign a
All Advanced Settings pages contain Ok and Cancel buttons.
³ Click Ok to confirm your entries.
³ Click Cancel to close a page without applying the changes.
Here you can define whether your Cisco BWX360 WiMAX
Outdoor Modem w ill be us ed as a router or a brid ge f or the
Internet access (page 25).
Here you can configure your Internet access. This menu
covers all setting options for the Internet (page 26).
private IP address of the Cisco BWX360 WiMAX Outdoor
Modem or make settings for the DHCP server (page 30).
access (page 31).
system password (p age 32) or reset the configuration to the
factory default s (page33 ). You can also load new firmware
(page 34)
24
Depending on the pre-configurat ion of your device some of the menu
entries and configuration possibilities might be missing in your device.
Page 25

Advanced Settings
Setting the operating mode
Via the operating mode, you define the role your Cisco BWX360 WiMAX Outdoor
Modem will play when establishing and administering Internet connections.
You can run your Cisco BWX360 WiMAX Outdoor Modem in the following operating
modes:
Router Your Cisco BWX360 WiMAX Outdoor Modem serves as an Internet router
for the network components connected to the indoor unit LAN port, i.e. it
establishes the connection to the Internet and ensures the transfer of the
communication data to and from the Internet (default).
Bridge The network components initia te and control their In ternet connectio n them-
selves. Your Cisco BWX360 WiMAX Outdoor Modem only allows the communication data to and from the Internet to pass through.
³ To change the operating mode, open the Advanced Settings t ab and select
Operating Mode from the menu.
When you change the operating mode, your device is restarted.
In Bridge mode, the following functions are no longer available:
◆ The DHCP server of the Cisco BWX360 WiMAX Outdoor Modem is deactivated
(see page 30) becaus e the network c omponents receive IP addre sses in the p ublic
network.
If you want to access the config uration progra m of the Cisco BWX360 WiMAX Out door Modem via your PC , yo u m us t co nne ct the PC directly to th e in doo r un it L A N
port. You must also temporarily assign i t a st atic IP a ddress i n the add ress ran ge of
the Cisco BWX360 WiMAX Outdoor Modem. If you want to use the Internet again
after this, reset your PC to “automatic IP address”. For details see the document
“Configuring the local area network” on the product CD.
◆ The firewall of your C isco BWX360 WiMAX O utdoor Modem is disabled and c annot
be enabled (see page 27).
◆ The NA T functi on of your Cisc o BWX360 WiMAX Outdo or Modem is di sabled. This
means that the functions Port Forwarding (see page 28) and Exposed Host (see
page 29) are not available.
If necessary you may have to protect your network components against unwelcome
access from the Internet by appropriate means (e.g. firewall software).
25
Page 26

Advanced Settings
Configuring Internet access
If you have configured the Cisco BWX360 WiMAX Outdoor Modem using the Basic
Setup Wizard, you have also config ured your Internet ac cess. Y ou can check or change
these settings in the Internet menu.
This menu also offers you a wide range of possibilities for setting up security settings
and limiting access to the Internet as well as for providing your own services on the
Internet.
You can carry out the following via the Internet menu:
Internet Connectio n Check and edit the Internet connection of the
Cisco BWX360 WiMAX Outdoor Modem (for further
information see below),
DNS Servers Make DNS server settings (page 27),
Firewall Protect the network against hacker attacks (see page 27),
Port Forwarding Provide your own services on the Internet (page 28),
Exposed Host Opening the firewall for a selected PC (page 29).
Setting up the Internet Connection
You can set up or change the configuration of your Internet connection in this screen.
All the settings you make here must coincid e with the featu res your Internet service provider makes availab le to you. Inc orrect informatio n can lead to p roblems with yo ur Internet connection.
³ Open the Advanc ed Settin gs tab and on the Internet menu select Internet Con-
nection.
³ Enter the data you have been given by your service provider.
³ Select the Protocol used for Internet access.
– PPPoE
– Static
– Obtain automatically
³ Apply the default s ettings for the other p arameters unless y our service provider has
given you ot her data.
Connection mode
For a PPPoE connection (Point-to-Point over Ethernet), specify the Connection
mode:
Always on
This gives the users in your network a constantly active Internet connection.
Only choose this setting if your Internet tariff is not time-dependent.
If necessary you can te rmina te the Interne t conne ction m anual ly (se e pa ge19).
26
Page 27

Advanced Settings
Connect on demand
The Internet connection is only established if an application, e.g. an Internet
browser or an e-mail program, requests it.
PPPoE pass-through
If you activate the PPPo E pass-throu gh function, a PC in th e network can co nnect to
the Internet via its own connection ID. The router puts this connection through.
Setting up DNS servers
DNS (Domain Name System) is a decentralised database on the Internet which allocates clearly u nderstand able Internet names (dom ains) to th e actual addre sses of PCs
and services (e.g. IP a ddresses). The DNS s ervers required for acces s to this databa se
are normally provided by your provider and do not have to be set up specially. But if
necessary you can change them here.
³ Open the Advanced Settings tab and on the Internet me nu sel e c t DNS Servers.
³ Activate the Use custom DNS servers function and enter the IP a ddresses for your
Preferred DNS server and the Alternate DNS server.
Enabling or disabling the firewall
Y our C isco BWX360 WiMAX Outdo or Modem comes w ith an i ntegrated f irewall, which
protects your devic e and netw ork against unau thorised ac cess from the In ternet. If the
firewall is enabled, your device can identify certain events, e.g. suspicious incoming
data packets from the Internet, as attacks and avert them (hacker defence). Your
device’s firewall is enabled by default.
We urgently recommend that you leave the firewall of your
Cisco BWX360 WiMAX Outdoor Modem enabled, otherwise your network will no longer be protected ag ainst hacker att acks from the Internet.
If you still want to disable the firewall:
³ Open the Advanc ed Settin gs tab and on the Internet menu select Firewall.
³ Disable the firewall.
This function is not avail able in Bridge operating mode, see "Configuring
Internet access" on page 26.
PCs in your network should be protecte d by a sep arate firewal l. You can
set up protection against DoS (D enial of Serv ice) atta cks in Bridge mode
via the local network co nfi gura tion, see "LAN configuratio n" on page 30.
27
Page 28

Advanced Settings
Port Forwarding
The Cisco BWX360 WiMAX Outdoor Modem comes with the NAT (Network Address
Translation) function, which is always activated in Router operating mode. With
address mapping, multiple users in the local network can access the Internet via the
public IP address. All the local IP addresses are assigned to the router's public IP
address by default. All IP addresses of PCs in the local network are converted to the
router's public IP address when accessing the Internet.
Most Internet applications can be executed behind the NAT firewall without any problems. However, some app lication s - such as Inte rnet game s - requi re users in the Inte rnet to send requests to users in the local ne twork so that the playe rs can communi cate
with each other. Sometimes these applications also require several ports to communicate through. Such applications do not work if NAT is active.
Using port forwarding (the forwa rding of requests to p articular ports) the router is force d
to send requests from the Internet for a certain service, for example a game, to the
appropriate port(s) on the PC on which the game is running. If you configure Port Forwarding, the CiscoBWX360 WiMAX Outdoor Modem outwardly assumes the role of
the server . It receiv es request s from remote u sers under it s public IP ad dress and auto matically redirects them to local PCs. The private IP addresses of the servers on the
local network remain protected .
Internet service s are addres sed via define d port numbe rs. The Ci sco BWX360 WiMAX
Outdoor Modem needs a mapping table of the port numbers to redirect the service
requests to the serv ers that actually provide the service. Port Forwarding has t o be configured for this purpose.
³ Open the Advanced Settings tab and on the Internet menu select Po rt F orw a rd -
ing.
³ Define the list of services for which you want requests from the Internet to be for-
warded.
Important services are already included in the Predefined applications selection f ield.
The list can hold up to 20 entries.
28
The IP addresses of the PCs for which you set up port forwarding must
remain unchanged. If the IP addresses of the PCs are assigned via the
DHCP server of the Cisco BWX360 WiMAX Outdoor Modem, you must
select the option Never expires as the Lease time when con figuring the
DHCP server or assign static IP addresses to the PCs, see "Configuring
the DHCP server" on page 30.
This function is not avail able in Bridge operating mode, see "Configuring
Internet access" on page 26.
Page 29

Advanced Settings
Opening the firewall for a selected PC (Exposed Host)
You can set up a client in your local network to be a so-called "exposed host". Your
device will then forward all incoming requests from the Internet to this client, with the
exception of request s to the port numbers alr eady define d via port forwarding. You can
then, for example, opera te your o wn W eb s erver on o ne of the clients in your local net work and make it accessible to Internet users.
As the exposed host, the l ocal c lient is direct ly vis ible to t he Intern et and the refore p a rticularly vulnerable to attacks (e.g. hacker attacks). Only activate this function if it is
absolutely necessary (e.g. to operate a Web server) and other functions (e.g. port forwarding) are not adequate . In thi s c as e yo u sh oul d take appropriate meas ures for th e
clients concerned.
³ Open the Advanced Settings tab and on the Internet menu se lect Expose d Host.
³ Define the list of PCs you want to set up as exposed hosts.
³ Activate a PC which yo u want to func tion as th e current expos ed host. O nly one PC
at a time can be selected.
The IP addresses of the PCs you want to s et up as expos ed host s mus t
remain unchanged. If the IP addresses of the PCs are assigned via the
DHCP server of the Cisco BWX360 WiMAX Outdoor Modem, you must
select the option Never expires as the Lease time when con figuring the
DHCP server or assign static IP addresses to the PCs, see "Configuring
the DHCP server" on page 30.
This function is not avail able in Bridge operating mode, see "Configuring
Internet access" on page 26.
29
Page 30

Advanced Settings
LAN configuration
With the help of the LAN configuration you can change the preset values for the computer name and the private IP address for your Cisco BWX360 WiMAX Outdoor
Modem and configure the integrated DHCP server.
³ Open the Advanc ed Settin gs tab and select Local Network.
The preset IP address is 192.168.2.1. This is the private IP address of the
Cisco BWX360 WiMAX Outdoor Modem. This is the address under which the device
can be reached in the local network. It can be freely assigned from the block of available addresses. The IP address under which the Cisco BWX360 WiMAX Outdoor
Modem can be reac he d from outside is as si gne d b y the Internet service prov ide r. The
default Subnet mask for the lo cal network ad ministere d by the CiscoBWX360 WiM AX
Outdoor Modem is 255.255.255.0.
Please note which subnet m ask is set when as signi ng the IP add ress. The pre set sub net mask defines the first three parts of the IP address which must be identical for all
network components (including routers).
We recommen d tha t yo u us e an add res s fro m a bloc k that is re se rve d for private use.
This address block is 192.168.1.1 to 192.168.255.254.
Configuring the DHCP server
The Cisco BWX360 WiM AX Out door Mode m has a D HCP se rver fo r whi ch the facto ry
setting is active. C onsequently , the IP addre sses of the PCs are autom atically assigned
by the Cisco BWX360 WiMAX Outdoor Modem.
◆ If the DHCP server for the Cisco BWX360 WiMAX Outdoor Modem
is activated, you can c onfig ure the n etwork setti ng on the PC so that
the option Obtain an IP address automatically is set up.
◆ If you deactivate the DHCP server, you will have to assign a static IP
address for the PCs that use the network settings.
For more information see the document “Configuring the local area network” on the CD.
³ If the DHCP server is active, you can define a Lease time. The lease time indicates
how long the client may use the allocated IP configuration.
Note:
If you select Never expires, the IP addresses are never changed. Activate this
option if you want to make NAT or firewall settings using the IP addresses of the
PCs; otherwise you have to assign static IP addresses to these PCs.
³ Define the range of IP addresses the Cisco BWX360 WiMAX Outdoor Modem
should use to automatic ally assign IP addresse s to the PCs. Define the Start IP and
the End IP.
30
Page 31

WiMAX configuration
Assigning static IP addresses to individual PCs
Even if you have activated the DHCP server, you can still assign a static IP address to
individual PCs (e.g. when setting up these PCs for NAT functions).
³ Enter the MAC address of the PC to which you want to assign a static IP address
and the IP address you wish to assign to the PC.
Configuring the local network in Bridge operating mode
In Bridge operating mode (see page 25) the Cisco BWX360 Wi MA X Ou tdoor Modem
DHCP server is deactivated. The network components get their IP addresses from a
DHCP server in the public network.
Ageing time for
MAC table
Protection
against DoS
attacks
When a PC in the network is acc essed, y our C isco BWX360 Wi MAX
Outdoor Modem w ri t es the MA C add res s a nd p ort n um ber in a MAC
table to speed up further accesses. The entry in the MAC table is
deleted after a f ixed ti me . If nece ssary you can c hange thi s value v ia
the MAC table ageing time parameter.
DoS (Denial of Service) attacks are attacks on a system in the network to make its services unusable. This is basically done by overloading the system by constantly sending requests. In Bridge mode,
the Cisco BWX360 WiMAX Outdoor Modem provides protection
against DoS attacks, which you can enable or disable via the activate
DOS protection parameter.
WiMAX configuration
On this page you enter the data for authentication of your device on the WiMAX base
station. You will need the access data supplied by your WiMAX operator for this.
If you have executed the Basic Setup Wizard, you will already have entered these
details there. If necessary you can change them here.
³ Open the Advanc ed Settin gs tab and select WiMAX configuration from the
menu.
³ Select Authentication, if authentication is required by your WiMAX operator and
enter or change the required access data.
31
Page 32

Administration
Administration
The user interface Administration menu includes seve ral he lp f ul functions for administering your CiscoBWX360 WiMAX Outdoor Modem.
System Password Changes the system password (page 32)
Factory Reset Reset the Cisco BWX360 WiMAX Outdoor Modem to the
factory settings (page 33)
Restart Reboots the device (page 34)
Firmware Update Updates firmware (page34)
Depending on the pre-configurat ion of your device some of the menu
entries and configuration possibilities might be missing in your device.
System password
The system password is the password for configuring your Cisco BWX360 WiMAX Outdoor Modem and is requested when y ou open the confi guration p ages, see "Laun ching
the user interface" on page 15.
If the device came from your provide r with a preset system pas sword, you ca n change
this passwor d here.
The system password protects your Cisco BWX360 WiMAX Outdoor
Modem and your local network from unauthorised access. For this reason, it is important to set up a password and change the default password.
³ Open the Advanced Settings tab and on the Administration menu select System
Password.
Features of a secure password
A password should be difficult for unauthorised users to work out. Note the following
points when choosing a password:
◆ The more characters a password has, the more secure it is.
◆ Choose a series of characters that is as varied as possible (not AAAA, 0000) and
alternate between letters and numbers.
◆ Do not use any term that could be found in a dictionary.
◆ Do not use sequential charac ter s (not 123 456 , abc d) and no rec ogn is abl e sy ste m
(not 1a2b3c).
◆ Never use a password several times for different applications.
◆ Never save a p assword o n the PC. Inst ead, make a note of it and store it in a secure
place.
◆ Change your passwords regularly.
32
Page 33

Restoring factory settings
Changing the password
³ Enter the current password in the Current password field. If no default system
password has been set, leave this fie l d empty.
³ Enter a new password in the New password field.
– Select any series of characters with a minimum length of 4 and a maximum
length of 20 charac ters. You can use the following cha racters : A–Z, a– z, 0–9 as
well as the following special cha rac ters : ! “ # $ % & ’ ( ) * + , - . / : ; < = > ? @ [ \
] ^ _ { | } ~.
– Note down your new password on a sheet of p aper and store it in s ecure pl ace.
³ Enter your new pa ssw ord in the Confirm new pas sword field again. This entry is
case-sensitive.
The new passw o rd c an on ly be ac ti vated if both entri es ma tch . This detects ty pi ng
errors when the password is entered.
³ Finally, click Ok to accept your change and to activate the new password.
The new password is valid immediat ely for each inst ance the configurati on is called
up.
The configuration of the CiscoBWX360 WiMAX Outdoor Modem
cannot be accessed if you do not enter a valid password. In this
case, you must restore all the factory settings of the CiscoBWX360
WiMAX Outdoor Modem.
Restoring factory settings
Y o u can re set the CiscoBW X360 WiM AX Outd oor Mod em to th e facto ry setti ngs. You
should do this before making the device available to others or exchanging it through
the dealer. Otherwise unauthorised users may use the Internet access data at your
expense.
³ Open the Advanced Settings tab and on th e Administration menu sel ect Factory
reset.
³ Click Ok.
A window will appear prompting you to confirm the procedure.
Please remember t hat when the device is fully reset, all the configuration
settings are returned to the factory settings. This means that you will
have to completely reconfigure the CiscoBWX360 WiMAX Outdoor
Modem.
33
Page 34

Updating the firmware
Restart
If the Cisco BWX360 WiMAX O utdoor Modem is not operating pro perly , you can reb oot
it. It should then be ready for use again.
³ Open the Advanc ed Settin gs tab and on the Administration menu select
Restart.
³ Click Ok to reboot the device.
A window will appear prompting you to confirm the procedure.
Updating the firmware
If your WiMAX provider provides a new downloadable firmware version for your
Cisco BWX360 WiMAX Outdoor Modem with new functions or to fix errors, you can
update your device quickly and easily.
³ First download the relevant firmware file from the Internet and save it on your PC.
Read the information provided carefully.
Only update the fi rmware i f the re is a new ve rsion of th e firmwa re that is
currently installed on your device on the Internet. The firmware version
currently installed is shown under Active image version.
³ Open the Advanc ed Settin gs tab and on the Administration menu select Firm-
ware Update.
³ Enter the path and file name of the firmware file to be installed or click Browse to
select a file on your PC.
³ Click Ok to start the firmware update.
34
Do not disconnect you r Cisco BWX360 WiMAX Outdoor M odem from the
PC or the power supply during the firmware update, as this could damage the device. It m ay t ake u p to fiv e min utes b efore th e d evice is rea dy
for use again.
Page 35

Status
Status
You can check the status of your Cisco BWX360 WiMAX Outdoor Modem with the
pages in the Status menu. The menu is divided into several individual pages opened
by clicking the entries in the menu area. To help with orientation, in the following sections the p ath is placed first so tha t you can qu ickly find th e status m essages descr ibed.
For example, with the following address you can open the settings of your LAN:
Status > Local Network.
If you have problems, before contacting your provider or customer
service, check the status of your Cisco BWX360 WiMAX Outdoor
Modem.
When looking for the fault, your provider or customer service will need
some details that you will find on the status pages.
You will find the most importa nt status information summarised on the homepage.
For detailed information, click an entry in the submenu.
Information on the Status homepage
Connection status The status of the radio connection with the WiMAX network is
displayed as follows:
◆ connected = The Cisco BWX360 WiMAX Outdoor Modem
has established a radio connection with a WiMAX network.
You will see the connection duration in brackets and in the
format ddd:hh:mm:s s (d=d ays, h =hours , m=mi nut es, s= seconds).
◆ disconnected = The Cisco BWX360 WiMAX Outdoor
Modem is trying to est ablish a conn ection with a WiM AX network.
IP address For an existing Internet connection only:
Displays the IP address used by the CiscoBWX360 WiM AX
Outdoor Modem on the Internet.
IP address IP address used by the Cisco BWX360 Wi MAX Outdoor Modem
in your local network.
DHCP server Displays whether the DHCP server of your Cisco BWX360
WiMAX Outdoor Modem is activated. As DHCP server, your
Cisco BWX360 WiMAX Out door Mo dem assign s an IP addre ss
to all the PCs in the network. DHCP must be activated on a PC
for the PC to receive an IP address from the DHCP server. For
more information se e th e document "Configurin g th e l oc al area
network" on the product CD.
System time Displays the current date and time. The date and time are
transmitted to your Cisco BWX360 WiMAX Outdoor Modem
from the WiMAX network.
35
Page 36

Internet
Operating mode Role played by your CiscoBWX360 WiMAX Outdoor Modem
during connection setup to the Internet (Router or Bridge).
Firmware version Version number of the currently installed device software. You
will also need to give your provider this number.
³ If necessary, click the Refresh button to refresh the data in the status display.
Internet
Status > Internet
The connection settings for your Cisco BWX360 WiMAX Outdoor Modem are dis-
played in the Internet submenu.
Connection status The status of t he radi o conn ection w ith the WiMAX n etwork
is displayed as follows:
◆ connected = The Cisco BWX360 WiMAX Outdoor
Modem has established a radio connection with a
WiMAX network. You will see the connection duration in
brackets and in the format ddd:hh:mm:ss (d=days,
h=hours, m=minutes, s=seconds).
◆ disconnected = The Cisco BWX360 WiMAX Outdoor
Modem is trying to est ablish a c onnection with a WiMAX
network.
IP address
Subnet mask
MAC address The MAC address uniquely identif ies a netwo rk co mpone nt
Default gateway For an existing Internet connection only:
DHCP server IP address of the DHCP server with which the
For an existing Internet connection only:
Displays the public IP addres s and subnet mask via which
your Cisco BWX360 WiMAX Outdoor Modem establishes
the connection with the Internet.
within a network, in this case the public MAC address of
your Cisco BWX360 WiMAX Outdoor Modem within the
WiMAX network you use.
Displays the gateway the CiscoBWX3 60 WiM AX Outdoor
Modem uses for connecting to the Internet.
Cisco BWX360 WiMAX Outdoor Modem is connected.
While the Cisco BWX360 WiMAX Outdoor Modem has not
been assigned an IP address by the WiMAX network, the
field stays empty.
36
Page 37

Local network LAN
Preferred DNS server
Alternate DNS server
Address Translation
(NAT)
For an existing Internet connection only:
Displays the domain name server the Cisco BWX360
WiMAX Outdoor Modem uses to convert names to IP
addresses.
Displays whether NAT mode is activated on your
Cisco BWX360 WiMAX Outd oor Modem . NAT converts the
internal IP addre sses of the PCs in yo ur network to public I P
addresses. This main tains the confidentia lity of your internal
IP addresses.
³ If necessary, click the Refresh button to refresh the data in the status display.
Local network LAN
Status > Local Network
The configuration of the local network is displayed in the Local Network submenu.
IP address IP address used by the Cisco BWX360 WiMAX Outdoor
Modem in your local network. Default: 192.168.2.1
Subnet mask Subnet mask of your local network. Default: 255.255.255.0
MAC address The MAC address uniquely identifies a network component
within a network, in this case the local MAC address of your
Cisco BWX360 WiMAX Outdoor Modem within your local network.
DHCP server Displays whether the DHCP server of your Cisco BWX360
WiMAX Outdoor Modem is activated. As DHCP server, your
Cisco BWX360 WiMAX Outdoor Modem assigns an IP
address to all the PCs in the network. If the DHCP server is
activated, you will see the network subscribers that have
received your IP address from the DHCP server in the DHCP
clients field. DHCP must be activated on a PC for the PC to
receive an IP address from the DHCP server. For more information see the docum ent "Configur ing the local are a network"
on the product CD.
³ If necessary, click the Refresh button to refresh the data in the status display.
37
Page 38

Device status
Device status
Status > Device Status
The device status of your CiscoBWX360 WiMAX Outdoor Modem is displayed in the
Device Status submenu.
System uptime Operating time of your CiscoBWX360 WiMAX Outdoor
Modem since it was la st rest arted. Th e operatin g time is g iven
in the format ddd:hh:mm:ss (d=days, h=hours, m=minutes,
s=seconds).
System time Displays the current date and time. This information is trans-
mitted to your Cisco BWX360 WiMAX Ou tdo or Mode m by the
WiMAX network.
Operating Mode Role played by your Cisco BWX360 WiMAX Outdoor Modem
during connection setup to the Internet (Router or Bridge).
Device temperature Current device temperature inside your Cisco BWX360
WiMAX Outdoor Modem. In the event of overheating, the
Cisco BWX360 WiMAX Outdoor Modem switches off.
System Log Error protocol in which you will find information about prob-
lems.
³ If necessary, click the Refresh button to refresh the data in the status display.
Radio status
Status > Radio Status
Information about the radio conne ction to the WiM AX network is d isplayed in t he Radio
Status submenu.
Connected to a base station
Indicates whether or not your Cisco BWX360 WiMAX Outdoor Modem is connected to a base station.
Base station ID
ID number of the base station to which the device is connected.
MAC state
Status of the connection setu p to the ba se st ati on. The information shown he re is
only intended for technic ally ex perienced user s. Under Connec ted to a base st a-
tion is shown whether a connection to a base station exists.
Authentication
Indicates whether an authentication method is used for the WiMAX connection.
Protocol
Protocol used for authentication.
38
Page 39

Radio status
Received power level
Receive level from the WiMAX base station. Values in the range -70 dBm to 10 dBm are considered optimum. You can ensure this by optimising the antenna
direction.
Transmitted power level
Current tran smission pow er.
Carrier to interference and noise ratio
Measurement of the re ception qua lity of the base st ation. The h igher the v alue, the
better the quality of the data transfer to the base station.
Centre frequency of current uplink channel
Currently used uplink frequency. The reading changes frequently during the mea-
surement.
Centre frequency of current downlink channel
Currently used downlink frequency.
Current channel bandwidth
Currently used bandwidth.
Radio port uplink current average throughput
Average approximate uplink throughput in onesecond, moving average
(5 samples).
Radio port downlink current average throughput
Average approximate downlink throughput in one second, moving average
(5 samples).
Current uplink modulation scheme
Currently used uplink modulation type.
Current downlink modulation scheme
Currently used downlink modulation type.
³ If necessary, click the Refresh button to refresh the data in the status display.
39
Page 40

Using the Cisco BWX360 WiMAX Outdoor Modem
Using the Cisco BWX360 WiMAX Outdoor
Modem
When you have finished configu ring your CiscoBWX3 60 WiMAX Out door Modem, us e
it to surf the Internet, send e-mails etc.
As soon as you attempt to access the Internet with a PC connected to the
Cisco BWX360 WiMAX Outdoor Modem (for example, by opening the Web browser
and calling up an Internet site, or by starting your e-mail program and retrieving emails), your Cisco BWX360 WiMAX Outdoor Modem automatically establishes a connection to the Internet or uses the permanent Intern et connection. Whethe r the connection needs to be established or is permanently available depends on your provider's
default settings.
40
Page 41

Appendix
Appendix
Troubleshooting
In the case of netw ork problems t roubleshooti ng may be dif ficult, as m iscellaneous network parameters may be affected. This section only describes problems which are
associated with the CiscoBWX36 0 WiMA X Out do or Mod em .
Symptom Possible cause and solutions
No LED does light up. The Cisco BWX360 WiMAX Outdoor Modem is not
connected to the mains.
³ Check if the indoor unit is connected correctly.
³ Check if the power socket is live.
The CONNECT LED does
not light up.
The Cisco BWX360 WiMAX
Outdoor Modem switches
itself off.
The Cisco BWX360 WiMAX Outdoor Modem is not
registered to a base station.
³ Check the c able connectio ns. If ne cessary, charge
a qualified electrician to check the installation.
The Cisco BWX360 WiMAX Outdoor Modem is not
ready for use.
The device may be too hot. In t his case, the integrated
overheating protector prevents the Cisco BWX360
WiMAX Outdoor Modem from being damaged. If the
temperature rises, the Cisco BWX360 WiMAX Outdoor Modem automatically reduces data transfer to a
minimum. When the temperature exceeds the critical
value, the Cisco BWX360 WiMAX Outdoor Modem
switches itself off.
³ Wait until the Cisco BWX360 WiMAX Outdoor
Modem has cooled down.
³ Check the device status of your Cisco BWX360
WiMAX Outdoor Modem , s ee c hap ter " D ev ice status" on page 38.
³ If the Cisco BWX360 WiMAX Outdoor Modem
does not work after the device ha s been rest arted,
please contact your provider/service technician.
41
Page 42

Troubleshooting
Symptom Possible cause and solutions
The Cisco BWX360 WiMAX
Outdoor Modem can not be
reached via LAN ( Ethernet).
³ If you operate the CiscoBWX360 WiM AX Outdoor
Modem in bridge mode, first check the following:
1. In bridge mode the PC must be connected directly
to the Cisco BWX360 WiMAX Outdoor Modem indoor unit LAN port.
2. To configure the Cisco BWX360 WiMAX Outdoor
Modem the PC must have a static IP address assigned.
³ If you operate the CiscoBWX360 WiM AX Outdoor
Modem in router mode, precede as follows:
1. Check all cable connections.
2. Enter a ping command to your own computer using ping 127.0.0.1, see "Checking the con nec-
tion to the Cisco BWX360 WiMAX Outdoor
Modem" on page 43. If an error is reported, reinstall the TCP/IP network protocol.
3. Enter a ping command to the Cisco BWX360
WiMAX Outdoor Modem using ping
192.168.2.1 (if you did not change the IP address). If errors are reported, e nsure that the di gits
in the first three address parts of the PCs IP address are the same as in the IP address of the
Cisco BWX360 WiMAX Outdoor Modem. If not all
test packets sent will be reported as faulty, change
the Ethernet cables. They may be faulty.
4. Read the document "Configuring the local area
network" on product CD.
You forgot the system password.
No connection to th e con figuration environment is possible.
³ Reset the CiscoBWX3 60 WiMAX Outdoor Mod em
to the factory settings.
³ Check the connection to your Cisco BWX360
WiMAX Outdoor Modem, see page43.
42
Page 43

Checking the connection to the Cisco BWX360 WiMAX Outdoor Modem
Other faults and problems
You are using a firewall on the PC that prevents access to the CiscoBWX360
WiMAX Outdoor Modem
Test this, if necessary, by briefly switching off the firewall. If access is possible, config-
ure the firewall. For details, refer to the user guide for your firewall.
Y ou hav e forgotten the syst em password
If you have assigned your own syste m password or change d and forgotten it, you need
to return your Cisco BWX360 WiMAX Outdoor Modem to the factory settings.
Power failure
No data will be lost.
Before contacting customer service or your provider
³ First exclude all the faults listed in this section.
³ Have the documentation supplied by your provider ready.
³ If you can ope n t he c on f ig urat ion pro gram i n the Web browser, click on the Status
tab.
³ Note the numbe r in the Firmware version field. This is the numb er of the curren tly
installed device software.
³ Open the Local Network submenu and note the entry consisting of numbers and
letters in the MAC address field. The MAC addre ss is use d for the global ly uni que
identification of your device.
³ Leave the PC switched on and the configuration program open when you phone
customer service or your provider. They might need still more information, which
you will find on the status pages.
Checking the connection to the Cisco BWX360 WiMAX
Outdoor Modem
You can check whether the PC is correctly connected to the Cisco BWX360 WiMAX
Outdoor Modem. This can be done as follows:
³ Open the command prompt on the PC:
– Click on Start > Run.
–Enter cmd in the input field and click on OK.
The Command prompt window opens.
³ Check whethe r the Cisco BWX360 WiM AX Outdoor Modem responds with th e ping
command. Enter ping 192.168.2.1 and press Enter.
43
Page 44

Checking the connection to the Cisco BWX360 WiMAX Outdoor Modem
The PC now sends some tes t packe ts via this connecti on and chec ks whether the connection partner responds. The connection partner may respond in the following ways:
◆ Reply from the IP address of your Cisco BWX360 WiMAX Outdoor Modem; sta-
tistics about the connection are presented. If you receive these statistics, the connection to the device is OK.
◆ The request exceeds the time limit; it was not possible either to send or receive
any packets. There is no physical connection between the PC and your
Cisco BWX360 WiMAX Outdoor Modem. Check the following points:
– Are the Ethernet cables both between the Cisco BWX360 WiMAX Outdoor
Modem and the indoor unit as w ell as b etw ee n the ind oor u nit a nd the PC properly connected?
The OUT and IN LEDs on the indoor unit must light up (see page9).
– Has TCP/IP been properly configured on your PC?
If the Cisco BWX360 WiMAX Outdoor Mo dem has the IP add res s 192 .168.2.1,
your PC's IP address must be between 192.168.2.2 and 192.168.2.254. The
subnet mask must be 255.255.255.0.
To find out the IP ad dress of yo ur PC, en ter ipconfig i n the com mand prom pt.
If the Cisco BWX360 WiMAX Outdoor Modem has not responded successfully to the
ping command, you need to adjust the netwo rk settings on the PC. To find out how to
do this, please read the docum ent "Con figuri ng the lo cal are a netw ork" on the prod uct
CD.
If the Cisco BWX360 WiMAX O utdoor Mode m has responded successfully to the ping
command, the netwo rk i s c on figu r ed cor r ect ly. If it is not possible to access the c on fig uration program of your Cisco BWX360 WiMAX Outdoor Modem, check and change
the settings in your W eb bro wser. To find out how to do this, please re ad the nex t chapter.
44
Page 45

Checking the connection to the Cisco BWX360 WiMAX Outdoor Modem
Configuring the Web browser
If you are using a current Web browser but cannot open the configuration program in
it, check the Web browser setti ngs.
We recommend Microsoft Internet Explorer Version 7.0 or Mozilla
Firefox 3.0 as the Web browser.
◆ Do not use an HTTP proxy for accessing your Cisco BWX360 WiMAX Outdoor
Modem.
◆ Popup windows mu st be e nabled for your Cisco BWX360 WiMAX O utdoo r Modem.
The following descriptions relate to Internet Explorer Version 7.0 and Mozilla Firefox
Version 3.0.
Setting up an HTTP proxy
An HTTP proxy is a buffer for Internet pages that have been called up. For example,
once called up, a p age ca n continue to be show n even if y ou are curren tly of fline. Ho wever , this buf fer would prevent the conf igurati on pages being read ag ain when you call
up the configuration for y ou r Cis coBWX36 0 W iMAX O ut do or Mod em ; fo r thi s re as on,
your Cisco BWX360 WiM AX Outdoor Modem can only be configured if the HTTP proxy
is not being used for local page s.
Check the HTTP proxy in the Web browser you wish to use for the configuration.
Internet Explorer 7.0:
³ Open Internet Explorer.
³ Click on Tools and then on Internet Options.
³ Open the Connections tab.
³ Click on LAN settings.
³ If the option Us e proxy se rver for LAN i s activa ted in th e Proxy server area, acti-
vate the selection field Circumvent proxy server for local addresses. If the
option Use proxy server for LAN is not activated, you do not need to make any
settings.
³ Click on OK and then OK again to close the Internet Options window.
45
Page 46

Checking the connection to the Cisco BWX360 WiMAX Outdoor Modem
Firefox 3.0:
³ Open Firefox.
³ Click on Tools and then on Settings.
³ Click on Advanced.
³ Open the Network tab and click on Settings in the Connection area.
³ Select either No proxy or M an ual proxy configura tion . If you have cho se n
Manual proxy configuration, in the No proxy for: field, enter the IP block in which
the IP address of your Cisco BWX360 WiMAX Outdoor Modem is found:
192.168.2.0/24
³ Click on OK and then OK again to close the Settings window.
Allowing pop-up windows
Pop-up windows are sm all window s that are opened ei ther as the result of a n action o r
automatically. The device software for your Cisco BWX360 WiMAX Outdoor Modem
uses pop-up windows to display the online Help, for example.
Many Internet sites , however , call u p distracting p op-up windows for effective a dvertisement placement, for example, withou t detracting from the layout of the site itself. T o pre vent these pop-up windows from opening, current W eb browsers offer pop-up blockers.
If necessary , y ou can configure the pop-up block er to display d esirable pop-up wi ndows
and to block undesirable windows.
If you are using a different pop-up blocker, configure it to allow pop-up
windows for the IP address 192.168.2.1.
Internet Explorer 7.0:
³ Open Internet Explorer.
³ Click on Tools and then on Pop-up Blocker and choose Pop-up Blocker Set-
tings.
³ Enter the IP address of your Cisco BWX360 WiMAX Outdoor Modem as the Web-
site address: 192.168.2.1
³ Click on the Add button.
³ Click on Close to apply the settings.
Firefox 3.0:
³ Open Firefox.
³ Click on Tools and then on Settings.
³ Click on Content.
³ If the Block pop-up windows check box is activated, click to its right on Excep-
tions.
46
Page 47

Specifications
³ Enter the IP address of your Cisco BWX360 WiMAX Outdoor Modem as the Web-
site address: 192.168.2.1
³ Click on the Allow button.
³ Click on Close and on OK to apply the settings.
Specifications
Model Cisco BWX360 WiMAX Outdoor Modem
Dimensions
Outdoor Modem: approx. 228.5 x 208 x 101 mm
Indoor unit: approx. 140 x 65 x 36 mm
Operating temperature
Outdoor Modem: –40 °C to +60 °C
Indoor unit: 0 °C to +40 °C
Network interface 1 Ethernet 10/100BaseT (RJ45, LAN)
Frequency 2.3–2.4 / 2.5–2.7 / 3.4–3.6 GHz
Output power up to 26 dBm at QAM-16
Power consumption 3-6 W on DC input depending on operational state
Bandwidth optional: 3.5 / 5.0 / 7.0 / 8,75 or 10.0MHz
Type of transmission TDD
Modulation technique SOFDMA 512/1024
Subcarrier modulation QPSK, 16/64 QAM in up- and downlink
Antenna type 2 internal antennas (2xRX, 1xTX) for MIMO Matrix
A & B; Type DN1 (EN 302 326-3 V1.2.2)
Antenna gain 10 / 11 dBi (2.6 / 3.5 GHz)
Mains adapter Input: 100–240 V AC, Power over Ethernet (PoE)
Notes on putting into service
This device will only operate on Sprint or Clearwire's U.S. WiMAX network. It is not
intended for use on any other network.
Please observe the legal provisions and local restrictions when putting the
device into service. Please ask your service provider for further information.
THE SPECIFICATIONS AND INFORMATION REGARDING THE PRODUCTS IN
THIS MANUAL ARE SUBJECT TO CHANGE WITHOUT NOTICE. ALL STATEMENTS, INFORMATION, AND RECOMMENDATIONS IN THIS MANUAL ARE
BELIEVED TO BE ACCURATE BUT ARE PRESENTED WITHOUT WARRANTY OF
ANY KIND, EXPRESSED OR IMPLIED. USERS MUST TAKE FULL RESPONSIBILITY FOR THEIR APPLICATION OF ANY PRODUCTS.
NOTWITHSTANDING ANY OTHER WARRANTY HEREIN, ALL DOCUMENT FILES
AND SOFTWARE OF THESE SUPPLIERS ARE PROVIDED "AS IS" WITH ALL
47
Page 48

End User Software License Agreement
FAULTS. CISCO AND THE ABOVE-NAMED SUPPLIERS DISCLAIM ALL WARRANTIES, EXPRESSED OR IMPLIED, INCLUDING, WITHOUT LIMITATION, THOSE OF
MERCHANT ABILITY, FITNESS FOR A PARTICULAR PURPOSE AND NONINFRINGEMENT OR ARISING FROM A COURSE OF DEALING, USAGE, OR TRADE
PRACTICE.
IN NO EVENT SHALL CISCO OR ITS SUPPLIERS BE L IABLE FOR ANY INDIRECT,
SPECIAL, CONSEQUENTIAL, OR INCIDENTAL DAMAGES, INCLUDING, WITHOUT
LIMITATION, LOST PROFITS OR LOSS OR DAMAGE TO DATA ARISING OUT OF
THE USE OR INABILITY TO USE THIS MANUAL, EVEN IF CISCO OR ITS SUPPLIERS HAVE BEEN ADVISED OF THE POSSIBILITY OF SUCH DAMAGES.
The Cisco logo is a trademar k of Cisc o Sys tem s , Inc. All other tradem ark s m enti one d
in this document or Webs ite are the property of the ir respective owne rs. The use of the
word "partner " d oes no t i mp ly a partnership relations hi p between Cisco and any ot her
company.
WiMAX and Mobile WiMAX are trademarks of the WiMAX Forum.
End User Software License Agreement
IMPORTANT: PLEASE READ THIS END USER LICENSE AGREEMENT CAREFULLY.
DOWNLOADING, INSTALLING OR USING CISCO OR CISCO-SUPPLIED SOFTWARE CONSTITUTES ACCEPTANCE OF THIS AGREEMENT.
CISCO SYSTEMS, INC. OR ITS SUBSIDIARY LICENSING THE SOFTWARE
INSTEAD OF CISCO SYSTEMS, INC. ("CISCO") IS WILLING TO LICENSE ITS
SOFTWARE TO YOU ONLY UPON THE CONDITION THAT YOU ACCEPT ALL OF
THE TERMS CONTAINED IN THIS END USER LICENSE AGREEMENT PLUS ANY
ADDITIONAL LIMITATIONS ON THE LICENSE SET FORTH IN A SUPPLEMENTAL
LICENSE AGREEMENT ACCOMPANYING THE PRODUCT (COLLECTIVELY THE
"AGREEMENT"). TO THE EXTENT OF AN Y CONFLICT BETWEEN THE TERMS OF
THIS END USER LICENSE AGREEMENT AND ANY SUPPLEMENTAL LICENSE
AGREEMENT, THE SUPPLEMENTAL LICENSE AGREEMENT SHALL APPLY. BY
DOWNLOADING, INSTALLING, OR USING THE SOFTWARE, YOU ARE BINDING
YOURSELF AND THE BUSINESS ENTITY THAT YOU REPRESENT (COLLECTIVEL Y, "CUSTOMER") TO THE AGREEMENT . IF YOU DO NOT AGREE TO ALL OF
THE TERMS OF THE AGREEMENT , THEN CISCO IS UNWILLING TO LICENSE THE
SOFTWARE TO YOU AND (A) YOU MA Y NOT DOWNLOAD, INSTALL OR USE THE
SOFTWARE, AND (B) YOU MAY RETURN THE SOFTWARE (INCLUDING ANY
UNOPENED CD PACKAGE AND ANY WRITTEN MATERIALS) FOR A FULL
REFUND, OR, IF THE SOFTWARE AND WRITTEN MATERIALS ARE SUPPLIED AS
P ART OF ANOTHER PRODUCT, YOU MAY RETURN THE ENTIRE PRODUCT FOR
A FULL REFUND. YOUR RIGHT TO RETURN AND REFUND EXPIRES 30 DAYS
AFTER PURCHASE FROM CISCO OR AN AUTHORIZED CISCO RESELLER, AND
APPLIES ONLY IF YOU ARE THE ORIGINAL END USER PURCHASER.
The following terms of th e Agreement go vern Custom er's access and use of the Cisco
or Cisco-supplied software ("Software"), except to the extent: (a) there is a separate
signed agreemen t between Cust omer and Cisco go verning Cus tomer's use of th e Soft-
48
Page 49

End User Software License Agreement
ware, or (b) the Sof tware i nclud es a sep arate "cli ck-ac cept" lic ense agreem ent as part
of the installa tion and/or d ownload proc ess. To the extent of a conflict between th e provisions of the foregoing documents, the order of precedence shall be (1) the signed
agreement, (2) the click-accept agreement, and (3) the Agreement.
License. Conditioned upon compliance with the terms and conditions of the Agreement, Cisco gran ts to Cus tomer a none xclus ive and no ntransfera ble lice nse to use for
Customer's internal bu siness purposes th e Software an d the Doc umenta tion for which
Customer has paid the required license fees. "Documentation" means written information (whether cont ain ed in u ser or tec hnical m anual s, tr ainin g materi als, s pecif icatio ns
or otherwise) pertai ning to the Softwa re and made available b y Cisco with the Softwa re
in any manner (includin g on CD-ROM, in print, or onli ne). In order to us e the Softw are,
Customer may be r equired to input a regis trati on number or product aut hori za tio n k ey
and register Customer's copy of the Software online at Cisco's website to obtain the
necessary license key or license file.
Customer's licen se to use the Sof tware shall be lim ited to, and Cu stomer shal l not use
the Software in excess of, a single hardware chassis or card or such other limitations
as are set forth in the applicable Supplemental License Agreement or in the applicable
purchase order whi ch has been a ccepted by Cisco and fo r which Custom er has paid to
Cisco the required license fee (the "Purchase Order").
Unless otherwise expressly provided in the Docume ntation or any a pplicable Supplemental License Agreement, Customer shall use the Software solely as embedded in,
for execution on, or (where the applicable Documentation permits installation on nonCisco equipment) for communication with Cisco equipment owned or leased by Customer and used for Customer's internal business purposes. No other licenses are
granted by implication, estoppel or otherwise.
For evaluation or beta copies for which Cisco does not charge a license fee, the above
requirement to pay license fees does not apply.
General Limitations. This is a license, not a transfer of title, to the Software and D oc umentation, and Cisco ret ains owne rship of all copies of the Soft ware and Docu menta tion. Customer acknowledges that the Software and Documentation contain trade
secrets of Cisco or its suppliers or licensors, including but not limited to the specific
internal design and structure of individual programs and associated interface information. Except as otherwise expressly provided under the Agreement, Customer shall
have no right, and Customer specifically agrees not to:
(i) Transfer, assign or sublicense its license rights to any other person or entity
(other than in compliance with any Cisco relicensing/transfer policy then in
force), or use the Software on unauthorized or secondhand Cisco equipment,
and Customer acknowledges that any attempted transfer, assignment, sublicense or use shall be void;
(ii) Make error correcti ons to or oth erwise modify or adapt the Software or create
derivative works base d upon the So ftware, or permit third p arties to do the same;
(iii) Reverse engineer or decompile, decrypt, disassemble or otherwise reduce
the Software to human-readabl e form, except to the ex tent otherw ise expres sly
permitted under applicable law notwithstanding this restriction;
49
Page 50

End User Software License Agreement
(iv) Use or permit the Software to be used to perform services for third parties,
whether on a service bureau or time sharing basis or otherwise, without the
express written authorization of Cisco; or
(v) Disclose, prov ide, or otherwi se make availab le trade secret s contain ed within
the Software and Docum entation in any form to any thir d p a r ty wit hou t the prior
written consent of Cisco. Customer shall implement reasonable security measures to protect such trade secrets.
T o the extent required by applicable law, and at Customer's written request, Cisco shall
provide Customer with the interfa ce info rm atio n need ed to ach iev e inte rope rab ili ty
between the Software and another independently created program, upon payment of
Cisco's applic able fee, if any . Custom er shall observe strict obligations of confid entiality
with respect to such informati on and shall use suc h information in compliance with an y
applicable terms and conditions upon which Cisco makes such information available.
Software, Upgrades and Additional Copies. For purposes of the Agreement, "Software"
shall include (and the terms and conditions of the Agreement shall apply to) computer
programs, includi ng firmware, as provided to Custo mer by Cisco or an authorized Ci sco
reseller, and any upgrades, updates, bug fixes or modified versions thereto (collectively, "Upgrades") or backup copies of any of the foregoing. NOTWITHSTANDING
ANY OTHER PROVISION OF THE AGREEMENT: (1) CUSTOMER HAS NO
LICENSE OR RIGHT TO MAKE OR USE ANY ADDITIONAL COPIES OR
UPGRADES UNLESS CUSTOMER, AT THE TIME OF MAKING OR ACQUIRING
SUCH COPY OR UPGRADE, ALREADY HOLDS A VALID LICENSE TO THE ORIGINAL SOFTWARE AND HAS PAID THE APPLICABLE FEE FOR THE UPGRADE OR
ADDITIONAL COPIES; (2) USE OF UPGRADES IS LIMITED T O CISCO EQUIPMENT
FOR WHICH CUSTOMER IS THE ORIGINAL END USER PURCHASER OR LESSEE
OR OTHERWISE HOLDS A VALID LICENSE TO USE THE SOFTWARE WHICH IS
BEING UPGRADED; AND (3) THE MAKING AND USE OF ADDITIONAL COPIES IS
LIMITED TO NECESSARY BACKUP PURPOSES ONLY.
Proprietary Notices. Customer agrees to maintain and reproduce all copyright and
other proprietary notices on all copies, in any form, of the Software in the same form
and manner that suc h copyri ght and o ther prop riet ary no tices are inc luded on the Sof tware. Except as expressl y authorize d in the Agreement , Customer sh all not make any
copies or duplicates of any Software without the prior written permission of Cisco.
Term and Termination. The Agreement and the license granted herein shall remain
effective until terminated. Customer may terminate the Agreement and the license at
any time by destroying all copies of Software and any Documentation. Customer's
rights under the Agree ment will termin ate immedia tely without noti ce from Cisco if C ustomer fails to compl y with any provisi on of the Agreement. Upon termination, Cu stomer
shall destroy all copie s of So ftware a nd Doc umen tati on in i ts poss ession o r cont rol. Al l
confidentiality obligations of Cus tomer and all lim itations of li ability and disc laimers and
restrictions of warranty shall survive termination of this Agreement. In addition, the provisions of the sections titled "U.S. Government End User Purchasers" and "General
T erms Ap plicable to the Li mited Wa rranty S tatement and End User Licens e Agreement"
shall survive termination of the Agreement.
Customer Records. Customer grants to Cisco and its independent accountants the
right to examine Customer's books, records and accounts during Customer's normal
50
Page 51

End User Software License Agreement
business hours to verify compliance with this Agreement. In the event such audit discloses non-complianc e with this Ag reement, Cus tomer shal l promptly p ay to Ci sco the
appropriate license fees, plus the reasonable cost of conducting the audit.
Export, Re-Export, Transfer and Use Controls. The Software, Documentation and
technology or direct products thereof (hereafter referred to as Software and Technology), supplied by Cisco under the Agreement are subject to export controls under the
laws and regulations of the United S tates (U.S.). Custom er shall comply with such laws
and regulations governing export, re-export, transfer and use of Cisco Software and
Technology and will obtain all required U.S. and local authorizations, permits, or
licenses. Cisco and Customer each agree to provide the other information, support
documents, and as sist anc e as may reasona bly be req uired by the oth er in connectio n
with securing authorizations or licenses. Information regarding compliance with U.S.
export, re-export, transfer and use may be located at the following URL:
http://www.cisco.com/web/about/doing_business/legal/global_export_trade/
general_export/contract_compliance.html.
U.S. Government End User Purchasers. The Sof tware and Documenta tion qualify as
"commercial items," as that term is defined at Federal Acquisition Regulation ("FAR")
(48 C.F.R.) 2.101, consisting of "commerc ial computer so ftware" and " commercial computer software d ocument ation" as such t erms are used in F AR 1 2.212. Con sistent wi th
FAR 12.212 and DoD F AR Supp. 227.7202-1 through 227.7202-4, and n otwithstanding
any other FAR or ot her co ntra ctual clause to t he contrary in any ag reement into which
the Agreement may be incorpo rated, Customer may provide to Go vernment end user
or, i f the Agreem ent is dire ct, Gove rnment end user will a cquire, th e Soft ware and Doc umentation wi th only tho se rights s et forth in t he Agreement. Use of eith er the Soft ware
or Documenta tion or both cons titutes ag reement by the Governmen t that the Software
and Documentation are "commercial computer software" and "commercial computer
software documentation," and constitutes acceptance of the rights and restrictions
herein.
Limited Warranty
Subject to the limitatio ns and co nditions set forth herein, Cisco war rants tha t commencing from the date o f shipment to Cust omer (but in case of resale by an a uthorized Cisco
reseller , com mencing n ot more th an ninety (90) day s after original shipmen t by Cisc o),
and continuing for a period of the longer of (a) ninety (90) days or (b) the warranty
period (if any) expr ess ly set forth as applicable sp ec ifi cal ly to s of tware in the warranty
card accompany ing th e pr oduct of which the Software is a p art (the " Product ") (if an y):
(a) the media on which the Sof tware is furnish ed will be free of defec ts in material s and
workmanship under normal use; and (b) the Software substantially conforms to the
Documenta tion. Th e date o f shipm ent of a Prod uct by Cisco i s set fo rth on th e pa ckag ing material in which the Product is shipped. Except for the foregoing, the Software is
provided "AS IS". This limit ed warranty extends only to the Customer who is the orig inal
licensee. Customer' s sole an d exclusive remedy an d the entire l iability of Cisco and its
suppliers under this limited warranty will be (i) replacement of defective media and/or
(ii) at Cisco's option, repair, replacement, or refund of the purchase price of the Software, in both cases subject to the condition that any error or defect constituting a
breach of this limited warranty is reported to Cisco or the party supplying the Software
to Customer, if different than Cisco, within the warranty period. Cisco or the party sup-
51
Page 52

End User Software License Agreement
plying the Software to Customer may, at its option, require return of the Software and/
or Documentatio n as a condition to th e remedy . In no e vent does Cisco wa rrant that the
Software is error free or that Customer will be able to operate the Software without
problems or interruptions. In addition, due to the continual development of new techniques for intruding up on and atta cking netwo rks, Cisco do es not warrant tha t the Soft ware or any equipment, system or network on which the Software is used will be free
of vulnerability to intrusion or attack.
Restrictions. T his warranty does not apply if the Sof tware, Product or an y other equipment upon which th e Software is a uthorized to be us ed (a) has bee n altered, except by
Cisco or its aut horized represent ative, (b) has n ot been installe d, operated, rep aired, or
maintained in accordance with instructions supplied by Cisco, (c) has been subjected
to abnormal physical or electrical stress, abnormal environmental conditions, misuse,
negligence, or ac cident; or (d) is lic ensed for bet a, evaluati on, testing or d emonstration
purposes. The Software warranty also does not apply to (e) any temporary Software
modules; (f) any Software not posted on Cisco's Software Center (on Cisco. com URL
where Cisco makes the Software publicly available to licensed customers); (g) any
Software that Cisco expressly provides on an "AS IS" basis on Cisco's Software Center; or (h) any Software for which Cisco does not receive a license fee.
DISCLAIMER OF WARRANTY
EXCEPT AS SPECIFIED IN THIS WARRANTY SECTION, ALL EXPRESSED OR
IMPLIED CONDITIONS, REPRESENTATIONS, AND WARRANTIES INCLUDING,
WITHOUT LIMITATION, ANY IMPLIED WARRANTY OR CONDITION OF MERCHANT ABILITY , FITNESS FOR A P ARTICULAR PURPOSE, NON-INFRINGEMENT,
SATISFACTORY QUALITY, NON-INTERFERENCE, ACCURACY OF INFORMATIONAL CONTENT, OR ARISING FROM A COURSE OF DEALING, LAW, USAGE,
OR TRADE PRACTICE, ARE HEREBY EXCLUDED TO THE EXTENT ALLOWED
BY APPLICABLE LAW AND ARE EXPRESSLY DISCLAIMED BY CISCO, ITS SUPPLIERS AND LICENSORS. TO THE EXTENT AN IMPLIED WARRANTY CANNOT
BE EXCLUDED, SUCH WARRANTY IS LIMITED IN DURATION TO THE EXPRESS
WARRANTY PERIOD. TO THE EXTENT SOME STATES OR JURISDICTIONS DO
NOT ALLOW LIMIT A TIONS ON HOW LONG AN IMPLIED W ARRANTY LASTS, THE
ABOVE LIMIT A TION MA Y NOT APPLY. THIS W ARRANTY GIVES CUST OMER SPECIFIC LEGAL RIGHTS, AND CUSTOMER MAY ALSO HAVE OTHER RIGHTS
WHICH VARY FROM JURISDICTION T O JURISDICTION. This dis c lai me r an d exclu-
sion shall apply even if the express warranty set forth above fails of its essential purpose.
General Terms Applicable to the Limited Warranty Statement and End User
License Agreement
Disclaimer of Liabilities - Limitation of Liability. IF YOU ACQUIRED THIS SOFTWARE IN THE UNITED STATES, LATIN AMERICA, CANADA, JAPAN OR THE CARIBBEAN, NOTWITHSTANDING ANYTHING ELSE IN THIS AGREEMENT TO THE
CONTRARY, ALL LIABILITY OF CISCO, ITS AFFILIA TES, OFFICERS, DIRECTORS,
EMPLOYEES, AGENTS, SUPPLIERS AND LICENSORS COLLECTIVELY, TO CUSTOMER, WHETHER IN CONTRACT, TORT (INCLUDING NEGLIGENCE), BREACH
OF WARRANTY OR OTHERWISE, SHALL NOT EXCEED THE PRICE P AID BY CUS-
52
Page 53

End User Software License Agreement
TOMER TO CISCO FOR THE SOFTWARE THAT GAVE RISE TO THE CLAIM OR IF
THE SOFTWARE IS PART OF ANOTHER PRODUCT, THE PRICE PAID FOR SUCH
OTHER PRODUCT. THIS LIMIT ATION OF LIABILITY FOR SOFTWARE IS CUMULATIVE AND NOT PER INCIDENT (I.E. THE EXISTENCE OF TWO OR MORE CLAIMS
WILL NOT ENLARGE THIS LIMIT).
IF YOU ACQUIRED THIS SOFTWARE IN EUROPE, THE MIDDLE EAST, AFRICA,
ASIA OR OCEANIA, NOTWITHSTANDING ANYTHING ELSE IN THIS AGREEMENT
TO THE CONTRARY, ALL LIABILITY OF CISCO, ITS AFFILIATES, OFFICERS,
DIRECTORS, EMPLOYEES, AGENTS, SUPPLIERS AND LICENSORS COLLECTIVELY, TO CUSTOMER, WHETHER IN CONTRACT, TORT (INCLUDING NEGLIGENCE), BREACH OF WARRANTY OR OTHERWISE, SHALL NOT EXCEED THE
PRICE PAID BY CUSTOMER TO CISCO FOR THE SOFTWARE THAT GAVE RISE
TO THE CLAIM OR IF THE SOFTWARE IS PART OF ANOTHER PRODUCT, THE
PRICE PAID FOR SUCH OTHER PRODUCT. THIS LIMITATION OF LIABILITY FOR
SOFTWARE IS CUMULATIVE AND NOT PER INCIDENT (I.E. THE EXISTENCE OF
TWO OR MORE CLAIMS WILL NOT ENLARGE THIS LIMIT). NOTHING IN THIS
AGREEMENT SHALL LIMIT (I) THE LIABILITY OF CISCO, ITS AFFILIA T ES, OFFICERS, DIRECTORS, EMPLOYEES, AGENTS, SUPPLIERS AND LICENSORS TO
CUSTOMER FOR PERSONAL INJURY OR DEATH CAUSED BY THEIR NEGLIGENCE, (II) CISCO'S LIABILITY FOR FRAUDULENT MISREPRESENTATION, OR
(III) ANY LIABILITY OF CISCO WHICH CANNOT BE EXCLUDED UNDER APPLICABLE LAW.
Disclaimer of Liabilities - Waiver of Consequential Damages and Other Losses.
IF YOU ACQUIRED THIS SOFTWARE IN THE UNITED STATES, LATIN AMERICA,
THE CARIBBEAN OR CANADA, REGARDLESS OF WHETHER ANY REMEDY SET
FORTH HEREIN FAILS OF ITS ESSENTIAL PURPOSE OR OTHERWISE, IN NO
EVENT WILL CISCO OR ITS SUPPLIERS BE LIABLE FOR ANY LOST REVENUE,
PROFIT, OR LOST OR DAMAGED DATA, BUSINESS INTERRUPTION, LOSS OF
CAPITAL, OR FOR SPECIAL, INDIRECT, CONSEQUENTIAL, INCIDENTAL, OR
PUNITIVE DAMAGES HOWEVER CAUSED AND REGARDLESS OF THE THEORY
OF LIABILITY OR WHETHER ARISING OUT OF THE USE OF OR INABILITY TO
USE SOFTWARE OR OTHERWISE AND EVEN IF CISCO OR ITS SUPPLIERS OR
LICENSORS HAVE BEEN ADVISED OF THE POSSIBILITY OF SUCH DAMAGES.
TO THE EXTENT SOME ST ATES OR JURISDICTIONS DO NOT ALLOW LIMIT A TION
OR EXCLUSION OF CONSEQUENTIAL OR INCIDENTAL DAMAGES, THE ABOVE
LIMITATION MAY NOT APPLY TO YOU.
IF YOU ACQUIRED THIS SOFTWARE IN JAP AN, EXCEP T FOR LIABILITY ARISING
OUT OF OR IN CONNECTION WITH DEATH OR PERSONAL INJURY, FRAUDULENT MISREPRESENTATION, AND REGARDLESS OF WHETHER ANY REMEDY
SET FORTH HEREIN F AILS OF ITS ESSENTIAL PURPOSE OR OTHER WISE, IN NO
EVENT WILL CISCO, ITS AFFILIATES, OFFICERS, DIRECTORS, EMPLOYEES,
AGENTS, SUPPLIERS AND LICENSORS BE LIABLE FOR ANY LOST REVENUE,
PROFIT, OR LOST OR DAMAGED DATA, BUSINESS INTERRUPTION, LOSS OF
CAPITAL, OR FOR SPECIAL, INDIRECT, CONSEQUENTIAL, INCIDENTAL, OR
PUNITIVE DAMAGES HOWEVER CAUSED AND REGARDLESS OF THE THEORY
OF LIABILITY OR WHETHER ARISING OUT OF THE USE OF OR INABILITY TO
53
Page 54

End User Software License Agreement
USE SOFTWARE OR OTHERWISE AND EVEN IF CISCO OR ITS SUPPLIERS OR
LICENSORS HAVE BEEN ADVISED OF THE POSSIBILITY OF SUCH DAMAGES.
IF YOU ACQUIRED THIS SOFTWARE IN EUROPE, THE MIDDLE EAST, AFRICA,
ASIA OR OCEANIA, IN NO EVENT WILL CISCO, ITS AFFILIATES, OFFICERS,
DIRECTORS, EMPLOYEES, AGENTS, SUPPLIERS AND LICENSORS, BE LIABLE
FOR ANY LOST REVENUE, LOST PROFIT, OR LOST OR DAMAGED DATA, BUSINESS INTERRUPTION, LOSS OF CAPIT AL, OR FOR SPECIAL, INDIRECT, CONSEQUENTIAL, INCIDENTAL, OR PUNITIVE DAMAGES, HOWSOEVER ARISING,
INCLUDING, WITHOUT LIMITATION, IN CONTRACT, TORT (INCLUDING NEGLIGENCE) OR WHETHER ARISING OUT OF THE USE OF OR INABILITY TO USE
THE SOFTWARE, EVEN IF, IN EACH CASE, CISCO, ITS AFFILIATES, OFFICERS,
DIRECTORS, EMPLOYEES, AGENTS, SUPPLIERS AND LICENSORS, HA VE BEEN
ADVISED OF THE POSSIBILITY OF SUCH DAMAGES. TO THE EXTENT SOME
STATES OR JURISDICTIONS DO NOT ALLOW LIMITATION OR EXCLUSION OF
CONSEQUENTIAL OR INCIDENTAL DAMAGES, THE ABOVE LIMITATION MAY
NOT FULLY APPLY TO YOU. THE FOREGOING WAIVER SHALL NOT APPLY TO
ANY LIABILITY ARISING OUT OF OR IN CONNECTION WITH: (I) DEATH OR PERSONAL INJURY, (II) FRAUDULENT MISREPRESENTATION, OR (III) CISCO'S LIABILITY IN CONNECTION WITH ANY TERMS THAT CANNOT BE EXCLUDED
UNDER APPLICABLE LAW.
For all countrie s and reg ions refe rred to abo ve, Cu stomer ag rees that the lim itation s of
liability and disc laim ers set forth he rein will ap ply reg ardles s of whe ther C ustomer h as
accepted the Software or any other product or service delivered by Cisco. Customer
acknowledges and agrees that Cisco has set its prices and entered into the Agreement
in reliance upon the disclaimers of warranty and the limitations of liability set forth
herein, that the same re flect an allocatio n of risk between the p arties (inclu ding the risk
that a contract remedy may fail of its e ssential purpose and cau se cons equential loss),
and that the same form an essential basis of the bargain between the parties.
Controlling Law, Ju risdiction. If you acquired this So ftware in the United States , Latin
America, or the Caribbean, the Agreement and Hardware and Software warranties
("Warranti es") are controlled by and construed un der the laws of the S tate o f California,
United S tates o f America, not withstandi ng any confl icts of la w provisio ns; and the st ate
and federal court s of C a lif ornia shall have excl us ive jurisdiction over any claim arising
under the Agreement or Warranties. If you acquired this Software in Canada, unless
expressly prohib ited by local law , the Agreemen t and W arran ties are co ntrolled by and
construed under the laws of the Province of Ontario, Can ada, notwiths tanding a ny conflicts of law provisions; and the courts of the Province of Ontario shall have exclusive
jurisdiction over an y c lai m a ris ing under the Agreement or Warranties. If yo u ac qu ired
this Software in Europe, the Middle East, Afric a, Asia or Oceania (excl uding Australia ),
unless expressly proh ibi ted by loca l law, the Agreement and Warranti es are contro lled
by and construed under the laws of England, notwithstanding any conflicts of law provisions; and the English co urt s shal l hav e ex clu si ve juris di cti on ov er any claim arising
under the Agreement or Warranties. In addition, if this Agreement is controlled by the
laws of England, no person who is not a party to this Agreement shall be entitled to
enforce or take th e b enefit of any of its te rms un de r the C on trac t s (R igh t s of Thi rd Pa rties) Act 1999. If you acquired this Software in Japan, unless expressly prohibited by
54
Page 55

End User Software License Agreement
local law, the Agreement and Warranties are controlled by and construed under the
laws of Japan, notwithstanding any conflicts of law provisions; and the Tokyo District
Court of Japan shall have exclusive jurisdiction over an y claim arisin g under the Agreement or W arranti es. If you a cquired th is Sof t ware in Austral ia, un less ex press ly pro hibited by local law , th e Agreement and W arrant ies are controlled by and construed u nder
the laws of the State of New South Wales, Australia, notwithstanding any conflicts of
law provisions; a nd t he State and federal courts of Ne w South Wales sh all have exclusive jurisdiction over any claim arising under the Agreement or Warranties. If you
acquired this Software in any other country, unless expressly prohibited by local law,
the Agreement and Warranties are controlled by and construed under the laws of the
State of California, United States of America, notwithstanding any conflicts of law provisions; and the state and federal courts of California shall have exclusive jurisdiction
over any claim arising under the Agreement or Warranties.
For all countries referred to above, the parties specifically disclaim t he application of
the UN Convention on Contracts for the International Sale of Goods. Notwithstanding
the foregoing, e ither p arty may s eek interim inj unctive relief in any c ourt of approp riat e
jurisdiction with respect to any alleged breach of such party's intellectual property or
proprietary rights. If any portion hereof is found to be void or unenforceable, the remaining provisions of the Agreement and Warranties shall remain in full force and effect.
Except as expressly pro vi ded h erei n, the Agre em ent co ns titu tes th e e nti re a gree me nt
between the parties w ith respect to the license of the Sof tware and Docume ntation and
supersedes any conflicting or additional terms contained in any Purchase Order or
elsewhere, all of which terms are excluded. The Agreement has been written in the
English language, and the parties agree that the English version will govern.
For product warranty terms and other informa tion applicabl e to this pro duct pleas e contact your Service Provider or Cisco.
© 2010 Cisco Systems, Inc. All rights reserved.
55
Page 56

End User Software License Agreement
Open Source Software used in the product
The Cisco BWX360 WiMAX Outdoor Modem contains, among other things, Open
Source Software, licen sed under an Open Source Software License and developed by
third parties. These Open Source Software files are protected by copyright. Your rights
to use the Open Sourc e Sof tware beyon d the m ere execu tion of t he Ci sco p rogram, is
governed by the relevan t Open Source Software license conditions.
Your complianc e wi th tho se lic ens e co ndi tio ns wi ll en titl e yo u to us e the O pen Sourc e
Software as foreseen in the relevant license. In the event of conflicts between Cisco
license condition s and the Open Sourc e Software license con ditions, the Ope n Source
Software condit ions shall prev ail with respe ct to the Open Sou rce Sof tware portions of
the software. The Open Source Software is licensed royalty-free (i.e., no fees are
charged for exerci sing the licens ed rights, wherea s fees may be ch arged for reimburse ment of costs incurred by Cisco).The license conditions can be found in the following
chapters. In addition some license texts can be downloaded from:
◆ The BSD License is available on the Internet at:
http://www.freebsd.org/copyright/license.html
◆ The OpenSSL license is available on the Internet at:
http://www.openssl.org/source/license.html
◆ The zlib license is available on the Internet at:
http://www.zlib.net/zlib_license.html
◆ Boost Software License
http://www.boost.org/LICENSE_1_0.txt
Warranty regarding further use of the Open Source Software
Cisco provides no warranty for the Open Source Software programs contained in this
device, if such programs are used in any manner other than the program execution
intended by Cisco. The licenses listed below define the warranty, if any, from the
authors or licens ors of the Open Source Software. Cisco specif ically dis claims any warranties for defects caused by al teri ng any O pe n So urc e So f tware program or the product's configuration. You have no warranty claims against Cisco in the event that the
Open Source Software infringes the intellectual property rights of a third party.
56
Page 57

Open Source Software used
End User Software License Agreement
Open Source Software Component
wpa_supplicant BSD-license
djbdns public domain
zlib Zlib license
boost lib Boost Software License
expat expat license
openSSL OpenSSL License, SSLeay License
sybyx proprietary
AES and combined encryption /
authentication modes
License
proprietary
Acknowledgements
WPA Supplicant:
Copyright (c) 2003-2007, Jouni Malinen <j@w1.fi> and contributors
All Rights Reserved.
OpenSSL:
This product includes software developed by the OpenSSL Project for use in the
OpenSSL Toolkit. (http://www.openssl.org/)
This product includes cryptographic software written by Eric Young
(eay@cryptsoft.com)
Zlib:
This product includes software developed by Jean-loup Gailly and Mark Adler
sybyx:
This product uses S treaming WBXML P arser developed by MediaSite Inc Research
and Development Group.
57
Page 58

End User Software License Agreement
Open Source Software Licenses
WPA-Supplicant
License: BSD
WP A Supp lic an t
==============
Copyright (c) 2003-2007, Jouni Malinen <j@w1.fi> and contributors
All Rights Reserved.
Redistribution and us e in source and binary form s, with or without modific ation, are per-
mitted provided that the following conditions are met:
1. Redistributions of source code must retain the above copyright notice, this list of
conditions and the followi ng discl aim er.
2. Redistributions in binary form must reproduce the above copyright notice, this list
of conditions and the following disclaimer in the documentation and/or other materials provided with the distribution.
3. Neither the name(s) of the above-liste d copyright holder(s ) nor the names of i ts con-
tributors may be used to endorse or prom ote prod uc t s deri ve d from thi s software
without specific prior written permission.
THIS SOFTWARE IS PROVIDED BY THE COPYRIGHT HOLDERS AND CONTRIBUTORS "AS IS" AND ANY EXPRESS OR IMPLIED WARRANTIES, INCLUDING , BUT
NOT LIMITED TO, THE IMPLIED WARRANTIES OF MERCHANTABILITY AND FITNESS FOR A PARTICULAR PURPOSE ARE DISCLAIMED. IN NO EVENT SHALL
THE COPYRIGHT OWNER OR CONTRIBUTORS BE LIABLE FOR ANY DIRECT,
INDIRECT, INCIDENTAL, SPECIAL, EXEMPLARY, OR CONSEQUENTIAL DAMAGES (INCLUDING, BUT NOT LIMITED TO, PROCUREMENT OF SUBSTITUTE
GOODS OR SERVICES; LOSS OF USE, DATA, OR PROFITS; OR BUSINESS
INTERRUPTION) HOWEVER CAUSED AND ON ANY THEORY OF LIABILITY,
WHETHER IN CONTRACT, STRICT LIABILITY, OR TORT (INCLUDING NEGLIGENCE OR OTHERWISE) ARISING IN ANY WA Y OUT OF THE USE OF THIS SOFTWARE, EVEN IF ADVISED OF THE POSSIBILITY OF SUCH DAMAGE.
OpenSSL
This is a copy of the current LICENSE file inside the CVS repository.
LICENSE ISSUES
The OpenSSL toolkit stays under a dual license, i.e. both the conditions of the
OpenSSL License and the original SSLeay license apply to the toolkit.
See below for the actual license texts. Actually both licenses are BSD-style Open
Source licenses. In case of any license issues related to openSSL please contact
openssl-core@openssl.org.
58
Page 59

End User Software License Agreement
OpenSSL License
Copyright (c) 1998-2005 The OpenSSL Project. All rights reserved.
Redistribution and us e in source and binary form s, with or without modific ation, are per-
mitted provided that the following conditions are met:
1. Redistributions of source code must retain the above copyright notice, this list of
conditions and the following dis cl aim er.
2. Redistributions in binary form must reproduce the above copyright notice, this list
of conditions and the following disclaimer in the documentation and/or other materials provided with the distribution.
3. All advertising materials mentioning features or use of this software must display
the following acknowledgment: "This product includes software developed by the
OpenSSL Project for use in the OpenSSL Toolkit. (http://www.openssl.org/)"
4. The names "OpenSSL T oolkit " and "OpenSSL Project " must not be used to endorse
or promote product s derived from this so ftware without p rior written permiss ion. For
written permission, please contact openssl-core@ openssl.org.
5. Products derived from this s oftw are may no t be called "OpenSSL"no r may " OpenS-
SL" appear in their names with out prior writt en permission of the OpenSSL Proje ct.
6. Redistributions of any form whatsoev er must ret ain the following a cknowled gment:
This product includes software developed by the OpenSSL Project for use in the
OpenSSL Toolkit (http://www.openssl.org/)
THIS SOFTWARE IS PROVIDED BY THE Ope nSSL PROJECT "AS IS" AND ANY
EXPRESSED OR IMPLIED WARRANTIES , INCLUDING, BUT NOT LIMITED TO,
THE IMPLIED WARRANTIES OF MERCHANTABILITY AND FITNESS FOR A
P ARTI CULAR PURPOSE ARE DISCLAIMED. IN NO EVENT SHALL THE OpenSSL PROJECT OR ITS CONTRIBUTORS BE LIABLE FOR ANY DIRECT, INDIRECT , INCIDENT AL, SPECIAL, EXEMPLARY, OR CONSEQUENTIAL DAMAGES
(INCLUDING, BUT NOT LIMITED TO, PROCUREMENT OF SUBSTITUTE
GOODS OR SERVICES; LOSS OF USE, DATA, OR PROFITS; OR BUSINESS INTERRUPTION) HOWEVER CAUSED AND ON ANY THEORY OF LIABILITY,
WHETHER IN CONTRACT, STRICT LIABILITY, OR TORT (INCLUDING NEGLIGENCE OR OTHERWISE) ARISING IN ANY WAY OUT OF THE USE OF THIS
SOFTWARE, EVEN IF ADVISED OF THE POSSIBILITY OF SUCH DAMAGE.
===============================================================
This product includes cryptographic software written by Eric Young
(eay@cryptsoft.com). This product includes software written by Tim Hudson
(tjh@cryptsoft.com).
59
Page 60

End User Software License Agreement
Original SSLeay License
Copyright (C) 1995-1998 Eric Young (eay@cryptsoft.com)
All rights reserved.
This package is an SSL implementation written by Eric Young (eay@cryptsoft.com).
The implementation was written so as to conform with Netscapes SSL.
This library is free for commercial and non-commercial use as long as the following
conditions are aheared to. The following conditions apply to all code found in this distribution, be it the RC4, RSA, lhash, DES, etc., code; not just the SSL code. The SSL
documentation included with this distribution is covered by the same copyright terms
except that the holder is Tim Hudson (tjh@cryptsoft.com).
Copyright remains Eri c Y oun g's, and as su ch any Copyrigh t notices in the code are not
to be removed. If th is p ack age is us ed i n a produc t, Er ic Young should be given attribu tion as the author of the parts of the library used. This can be in the form of a textual
message at program startup or in documentation (online or textual) provided with the
package.
Redistribution and us e in source and binary form s, with or without modific ation, are permitted provided that the following conditions are met:
1. Redistributions of source code must retain the copyright notice, this list of condi-
tions and the following discl aimer.
2. Redistributions in binary form must reproduce the above copyright notice, this list
of conditions and the following disclaimer in the documentation and/or other mate-
rials provided with the distribution.
3. All advertising materials mentioning features or use of this software must display
the following acknowle dgement: "This prod uct includes cry ptographic sof tware writ-
ten by Eric Young (eay@cryptsoft.com)" The word 'crypt ogra phic' can be left out if
the rouines from the library being used are not cryptographic related :-).
4. If you include any Windows specific code (or a d erivati ve there of) from the app s di-
rectory (applicat ion co de) you m ust in clude an ac know ledge ment: " This p roduc t in-
cludes software written by Tim Hudson (tjh@cryptsoft.com)"
THIS SOFTWARE IS PROVIDED BY ERIC YOUNG "AS IS" AND ANY EXPRESS OR
IMPLIED WARRANTIES, INCLUDING, BUT NOT LIMITED TO, THE IMPLIED WARRANTIES OF MERCHANTABILITY AND FITNESS FOR A PARTICULAR PURPOSE
ARE DISCLAIMED. IN NO EVENT SHALL THE AUTHOR OR CONTRIBUTORS BE
LIABLE FOR ANY DIRECT, INDIRECT, INCIDENTAL, SPECIAL, EXEMPLARY, OR
CONSEQUENTIAL DAMAGES (INCLUDING, BUT NOT LIMITED TO, PROCUREMENT OF SUBSTITUTE GOODS OR SERVICES; LOSS OF USE, DATA, OR PROFITS; OR BUSINESS INTERRUPTION) HOWEVER CAUSED AND ON ANY THEORY
OF LIABILITY, WHETHER IN CONTRACT, STRICT LIABILITY, OR TORT (INCLUDING NEGLIGENCE OR OTHERWISE) ARISING IN ANY WAY OUT OF THE USE OF
THIS SOFTWARE, EVEN IF ADVISED OF THE POSSIBILITY OF SUCH DAMAGE.
The licence and distribution terms for any publically available version or derivative of
this code cannot be changed. i.e. this code cannot simply be copied and put under
another distribution lic en ce [incl udi ng the GNU Publ ic Lic en ce .]
60
Page 61

End User Software License Agreement
Zlib:
'zlib' general purpose compression library version 1.1.4, March 11th, 2002
Copyright (C) 1995-2002 Jean-loup Gailly and Mark Adler
This software is provided 'as-is', without any express or implied warranty. In no event
will the authors be held liable for any damages arising from the use of this software.
Permission is granted to anyone to use this software for any purpose, including com-
mercial applications, and to alter it and redistribute it freely, subject to the following
restrictions:
1. The origin of this software m ust not be mi srepresented ; you must not claim that y ou
wrote the original software. If you use this software in a product, an acknowledg-
ment in the product documentation would be appreciated but is not required.
2. Altered source versions must be plainly marked as such, and must not be misrep-
resented as being the original software.
3. This notice may not be removed or altered from any source distribution.
Jean-loup Gailly
jloup@gzip.org
Mark Adler
madler@alumni.caltech.edu
The data format use d by the zlib library is described by RFCs (R equest for Comment s)
1950 to 1952 in the files ftp://ds.internic.net/rfc/rfc1950.txt (zlib format), rfc1951.txt
(deflate format) and rfc1952.txt (gzip format).
This manual is converted from zlib.h by piaip
Visit http://ftp.cdrom.com/pub/infozip/zlib/ for the official zlib web page.
Boost lib
Boost Software License - Version 1.0 - August 17th, 2003
Permission is hereby granted, free of charge, to any person or organization obtaining
a copy of the software an d ac com panying documentation covered by this lic ense (the
"Software") to use, reproduce, display, distribute,execute, and transmit the Software,
and to prepare d erivative w orks of theSof tware, and to permit third-p arties to w hom the
Software is furnished todo so, all subject to the following:
The copyright notices in the Software and this entire statement, including the above
license grant, this restriction and the following disclaimer , must b e included in all copies
of the Software, in whole or in part , and all derivative w orks of the Software , unless such
copies or derivative works are solely in the form of machine-executable object code
generated by a source language processor.
THE SOFTWARE IS PROVIDED "AS IS", WITHOUT WARRANTY OF ANY KIND,
EXPRESS OR IMPLIED, INCLUDING BUT NOT LIMITED TO THE WARRANTIES OF
MERCHANT ABILIT Y, FITNESS FOR A PARTICULAR PURPOSE, TITLE AND NONINFRINGEMENT. IN NO EVENT SHALL THE COPYRIGHT HOLDERS OR ANYONE
DISTRIBUTING THE SOFTWARE BE LIABLE FOR ANY DAMAGES OR OTHER LIABILITY, WHETHER IN CONTRACT, TORT OR OTHERWISE, ARISING FROM, OUT
61
Page 62

End User Software License Agreement
OF OR IN CONNECTION WITH THE SOFTWARE OR THE USE OR OTHER DEALINGS IN THE SOFTWARE.
expat
Copyright (c) 1998, 19 99, 2000 Tha i Open Sou rce Softw are Cent er Ltd an d Clark Coo per
Copyright (c) 2001, 2002, 2003, 2004, 2005, 2006 Expat maintainers.
Permission is hereby granted, free of charge, to any person obtaining a copy of this
software and associated documentation files (the "Software"), to deal in the Software
without restriction, including without limitation the rights to use, copy, modify, merge,
publish, distribute , sublicense, and /or sell copies of the Software, and to permit persons
to whom the Software is furnished to do so, subject to the following conditions:
The above cop yright no tice and this p ermission notice s hall be includ ed in all co pies or
substantial portions of the Software.
THE SOFTWARE IS PROVIDED "AS IS", WITHOUT WARRANTY OF ANY KIND,
EXPRESS OR IMPLIED, INCLUDING BUT NOT LIMITED TO THE WARRANTIES OF
MERCHANT ABILITY , FITNESS FOR A PAR TICULAR PURPOSE AND ONINFRINGEMENT. IN NO EVENT SHALL THE AUTHORS OR COPYRIGHT HOLDERS BE LIABLE FOR ANY CLAIM, DAMAGES OR OTHER LIABILITY, WHETHER IN AN ACTION
OF CONTRACT, TORT OR OTHERWISE, ARISING FROM, OUT OF OR IN CONNECTION WITH THE SOFTWARE OR THE USE OR OTHER DEALINGS IN THE
SOFTWARE.
sybyx
http://sourceforge.net/projects/sybyx/
Copyright (c) 2001 MediaSite Inc Research and Development Group.
All rights reserved.
Copyright (c) 2002 Interactive Intelligence, Inc.
All rights reserved.
Redistribution and us e in source and binary form s, with or without modific ation, are per-
mitted provided that the following conditions are met:
1. Redistributions of source code must retain the above copyright notice, this list of
conditions and the following dis cl aim er.
2. Redistributions in binary form must reproduce the above copyright notice, this list
of conditions and the following disclaimer in the documentation and/or other mate-
rials provided with the distribution.
3. The end-user documentation included with the redistribution, if any, must include
the following acknowledgment:
"This product uses Streaming WBXML Parser developed by MediaSite Inc Re-
search and Development Group"
Alternately , this acknowledgme nt may appear in the software it self, if and w herever
such third-party acknowledgments normally appear.
THIS SOFTWARE IS PROVIDED "AS IS"' AND ANY EXPRESSED OR IMPLIED
WARRANTIES, INCLUDING, BUT NOT LIMITED TO, THE IMPLIED WARRANTIES
62
Page 63

End User Software License Agreement
OF MERCHANTABILITY AND FITNESS FOR A PARTICULAR PURPOSE ARE DISCLAIMED. IN NO EVENT SHALL MEDIASITE INC OR ITS CONTRIBUTO RS BE LIABLE FOR ANY DIRECT , INDIRECT, INCIDENTAL, SPECIAL, EXEMPLAR Y, OR CONSEQUENTIAL DAMAGES (INCLUDING, BUT NOT LIMITED TO, PROCUREMENT
OF SUBSTITUTE GOODS OR SERVICES; LOSS OF USE, DA TA, OR PROFITS; OR
BUSINESS INTERRUPTION) HOWEVER CAUSED AND ON ANY THEORY OF LIABILITY, WHETHER IN CONTRACT, STRICT L IABILITY, OR TORT (INCLUDING NEGLIGENCE OR OTHERWISE) ARISING IN ANY WAY OUT OF THE USE OF THIS
SOFTWARE, EVEN IF ADVISED OF THE POSSIBILITY OF SUCH DAMAGE.
================================================================
Created by: Dima Skvortsov
Modified by: Chris Hubbard
AES and Combined Encryption/Authentica tion Mod es
(http://gladman.plushost.co.uk/oldsite/AES/index.php
http://gladman.plushost.co.uk/oldsite/AES/aes-src-29-04-09.zip
http://gladman.plushost.co.uk/oldsite/AES/aes-modes-src-23-07-09.zip
----------------------------------------------------------------------------------------------------------------Copyright (c) 1998-2008, Brian Gladman, Worcester, UK. All rights reserved.
LICENSE TERMS
The redistribution a nd use of this software (with or wi thout chang es) is allo wed withou t
the payment of fees or royalties provided that:
1. source code distributions include the above copyright notice, this list of conditions
and the following disclaimer;
2. binary distributions include the above copyright notice, this list of conditions and the
following disclaimer in their documentation;
3. the name of the copyright holder is not used to endorse products built using this
software without specific written permission.
DISCLAIMER
This software is provided 'as is' with no explicit or implied warranties in respect of its
properties, including, but not limited to, correctness and/or fitness for purpose.
---------------------------------------------------------------------------------------------------------------Issue Date: 21/07/2009
)
63
Page 64

Glossary
Glossary
Address Translation (NAT)
Network Address Translation. NAT is a method for converting IP addresses (mainly pri-
vate IP addresses) in a network to one or more public IP addresses on the Internet.
With NAT, several network components in a LAN can s hare a public IP add ress to con nect to the Internet. The network components of the local network are hidden behind
the IP address registered on the Int erne t. N AT is often used as part of the firewall in a
network because of this security function.
Bridge
A bridge connects several network segments to form a joint network, e.g. to make a
TCP/IP network. The segments can have different physical characteristics, e.g. differ-
ent linking such as Ethernet and wireless LANs. Local networks can be expanded by
linking individual segments via bridges.
dB
Decibel (a tenth of a Bel). Logari thmic un it of m easu rement for rati os bet ween two cu r-
rents, voltages, sound levels or powers. In order to depict large value differences
clearly and graphically , these are given in dB; e.g. 60 dB corresponds to the factor 1000
relative to the voltage drops.
dBm
Decibel milliwatt. Power level in decibels relative to 1 milliwatt.
DHCP
Dynamic Host Configuration Protocol. DHCP handles the automatic assignment of IP
addresses to network components.
DHCP was developed because in large networks – especially the Internet – the defining of IP addresses is very complex as subscribers frequently move, drop out or new
ones join. A DHCP server automatically assigns the connected network components
(DHCP clients) dynamic IP addresses from a defined IP pool range, thus saving a great
deal of configu ration work. In addit ion, the address b locks can be used more effectivel y:
since not all subscribers are on the network at the same ti me, the same IP ad dress can
be assigned t o different network components in succession as and when required.
DHCP server
There is a DHCP integrated into the Cisco BWX360 WiMAX Outdoor Modem that automatically assigns IP addresses to PCs in the local network.
64
Page 65

Glossary
DNS
Domain Name System. DNS permit s the assign ment of IP addres ses to PC or domain
names that are easi er to rememb er . A DNS server mu st admini ster this in formation fo r
each local network with an Internet connection. As soon as a page on the Internet is
called up, the W eb browser obt ains the c orresponding IP address from t he DNS server
so that it can establish the connection.
On the Internet, the assignme nt of domain names to IP addresses follows a hierarchical
system. A local PC onl y knows the addres s of the local name server . This in turn knows
all the addresses of th e PCs in the local net work and the superord inated name servers ,
which again know addresses and the next superordinated name servers.
Domain name
The domain name is the reference to one or more web servers on the Internet. The
domain name is mapped via the DNS service to the corresponding IP address.
Downlink
Files that your CiscoBWX360 Wi MAX Out do or Modem rece ives and forwar ds to your
local network.
DSL
Digital Subscriber Line. DSL is a techniqu e whereby d ata is tran smitted via the conven-
tional phone line . To do this, you require suitable p hone lines a nd special te chnology to
be set up by a Provider. As these preconditions are not satisfied in all areas, it is not
possible to use DSL in al l location s. In order to make use of high -performanc e Internet
access in these areas as well , technol ogies such as WiMAX, Wi -Fi or sat ellite connections are implemented.
Ethernet
Ethernet is a network technology for local networks (LANs) defined by the IEEE as
standard IEEE 80 2.3. Depending on th e network adapte r used, the trans mission speed
on the Ethernet varies between 10 Mbps and 1 Gbps.
Firewall
Firewalls are used by network operators as protection against unauthorised external
access. This involves a whole bundle of hardware and software actions and technologies that monitor and con trol the data fl ow between the pri vate network to be p rotected
and an unprotected network such as the Internet.
Firmware
Device softw are. To correct errors or update the device, a n ew firmware vers ion can be
loaded onto the device's memory (firmware update).
Flat rate
Flat rate is a particular billing s ys tem f or Inte rnet connections. Th e Provider charges a
set monthly fee for a certain service package.
65
Page 66

Glossary
FTP
File Transfer Protocol. Protocol for exchanging files via the Internet. FTP is used, for
example, to make files available for download or to receive files from other users.
Full duplex
Data transmiss ion operating mo de in which dat a can be sent an d received at the s ame
time.
FXS
Foreign Exchange Station. Phone port to which an analogue terminal (phone, fax or
answer machine) can be connected.
Gateway
A gateway connects networks with one another. In contrast to a Router, a gateway is
not dependent on protocol, i.e. it is also able to establish connections between networks with a different architecture (protocols, application interfaces etc.).
Half duplex
Operating mode for data transfer. Only one party can receive or send data at a ti me.
HTTP
Hypertext Transfer Protocol. Network protocol for the transmission of data, which is
mainly used for transmitting and displaying Internet content.
HTTP proxy
An HTTP proxy is a server that network components use for their Internet traffic. All
requests are sent via the proxy.
Hub
A hub is a central distribution point in a network, to which PCs and other network
devices are conne cted. T he hub forwa rds rec eived da t a to a ll co nnecte d PCs. Fo r th is
reason, in large netw orks, a Switch is rec ommend ed to ensure that dat a is only sent to
the PC requesting it.
IEEE
Institute of Electrical and Electronics Engineers. The IEEE is an international bod y fo r
defining network standards, especially for standardising LAN technologies, transmission protocols and speeds, and wiring.
66
Page 67

Glossary
IEEE 802.16
Sta ndard defined by the IEEE for WiMAX. Similarly to other st andards in the 802 series
(e.g. 802.3 Ethernet, 802.11 WLAN), the WiMAX standard is one of the standards for
networks. The standard has progressed in accordance with new developments; there
are currently two main versions:
◆ IEEE 802.16-2004: WiMAX, w hich specifie s the secure locat ion for connection p art-
ners.
◆ IEEE 802.16e-2005: Mo bile WiMAX, whi ch enables wireless cell s to be exch anged
during data transmission.
IP
Internet Protocol. The protocol is respon sible for addressi ng of subscribers in a network
using IP addresses, and routes data from the sender to the recipient. In doing so, it
decides on the way in which data packets will be forwarded between sender and recipient.
IP address
An IP address is the unique network-wide address of a network component in a network based on the TCP/IP protocol (e.g. in a local network or on the Internet). The IP
address consists of four parts (each of up to three-figure strings of digits from 0–255)
that are separated fro m one another by full stops (e.g . 192.168.2. 1). The IP address is
made up of th e network numbe r and the num ber of the net work component . Depending
on the Subnet mask, one, two or three parts form the network number, the remainder
form the network com ponent number. You can find ou t the IP address of your PC using
the ipconfig command.
There are two different types of IP address:
◆ Private IP address:
IP address of a network component within a local network.
◆ Public IP address:
IP address that uses a network component for accessing the Internet.
IP addresses can be assigned manually or automatically:
◆ Static IP address:
The IP address is manua lly as si gne d to a ne tw ork com po nen t and never changes.
◆ Dynamic IP address:
The IP address is assigned to the network component by a DHCP server. The IP
address of this net work component c an change each ti me it registers with a network
or at specific time intervals.
On the Internet, domain nam es are normall y used inst ead of the IP addre sses. DNS is
used to assign domain names to IP addresses.
IPTV
Internet Protocol Television. You receiv e your provid er's television service via the DSL
connection. To do this, you require an IP TV-capable set-top box and the config urat ion
data of your IPTV provider.
67
Page 68

Glossary
ISP
Internet Service Provider. See Provider.
LAN
Local Area Network, local network. A local network links network components so that
they can exchange d ata and share resources . The phys ical range is restricted to a p articular area (a s ite). A local ne twork can be connect ed to other lo cal networ ks or a wide area network (WAN) such as the Internet.
LED
Light Emitting Diode. An LED is an elec tronic com ponen t (semi-con ducto r) that gene r-
ates light at low power consumption. LEDs are often used as signal lights for display
and UI elements.
Login
Access to a PC or a service, password e.g. for access to the Internet.
MAC address
Media Access Control. The MAC ad dres s is us ed for th e g lob ally unique identific ati on
of a network adapter. It comprises six parts (hexad ec im al n um bers ), e .g. 00-90-96-3400-1A. The MAC address is assigned by th e network adapter ma nufacturer and cannot
be changed.
Mbps
Million bits per second. Specification of the transmission speed in a network.
Network
A network is a group of devices con nec ted in wire d or w irel es s mode so tha t they ca n
share resources su ch as da ta and peripherals. A gene ral d istinction is made betw ee n
local networks (LANs) and wide-area networks (WANs).
Network adapter
The network adapter is the hardware device th at creates the conne ction between a network component and a l ocal network. The connection ca n be wired or wirele ss. An Ethernet network card is an example of a wired network ad apter . A ne twork adapte r has a
unique address, the MAC address.
68
Page 69

Glossary
Network protocol
The network protocol is the standard via which different PCs exchange data in a network. A connection can only be established between PCs in a network if they all use
the same protocol. The TCP/IP network protocol is the most extensive network protocol, which is also us ed for conn ections t o the Interne t. This must be set up o n each PC
from which a network connection is to be established.
Port
Data is exchanged between two applic ations in a net work across a por t. The port number addresses an application within a network component. The combination of IP
address/port number un iquel y iden tifies the reci pient o r se nder of a data pa cket wit hin
a network. Some applic ati ons (e.g . Internet services such as HTTP or FT P) work w it h
fixed port numbers; others are allocated a free port number whenever they need one.
Port forwarding
In port forwarding, the Cisco BWX360 WiMAX Outdoor Modem directs data packets
from the Internet that are addressed to a parti cular Port to the corresponding port of the
appropriate networ k compon ent. This ena bles serv ers withi n the loc al netw ork to offe r
services on the Int ernet without them needing a publi c IP address. See als o: Virtual ser-
ver
Protocol
A protocol describes the agreement s for comm unicating o n a network. It c ontains rules
for opening, administering and closing a connection, as well as about data formats,
time frames and handling possible errors. Communications between two applications
require different protocols at various levels, e.g. the TCP/IP protocols for the Internet.
Provider
A provider (Internet Service Provider) offers access to the Internet for a fee.
RJ
Registered Jack. Standardised connection, also known as a modular jack.
Router
A router direct s data p acket s from one local area network ( LAN) to another via the fast est route. A router en ables th e conn ection betw een ne tworks of dif feren t network tech nologies and this is perform ed on t he b asis of a comm on proto col. Fo r exam ple, it c an
link a local network with WiMAX technology to the Internet.
RSSI
Received Signal Strength Indication. Characteristic value for the signal strength of
radio connection s, used by commu nication devic es for the automa tic selection o f a suitable channel.
69
Page 70

Glossary
Server
A server makes services available to other network components (clients). The term
"server" is often used to refer to a PC. However it can also mean an application that
provides a particular service such as DNS, DHCP or a Web service.
SMTP
Simple Mail Transfer Prot oco l. The SMTP protocol is a TCP/IP protocol and r egu lates
the exchange o f electronic post on the Internet. Y our Provider provides you with access
to an SMTP server.
Subnet
A subnet divides a network into smaller units.
Subnet mask
The subnet mask determines how many parts of the IP addresses of a network represent the network num be r an d ho w ma ny p arts represent the ne twork co mp onent number.
If the subnet mas k in a netwo rk is 255.2 55.255.0, for exampl e, this me ans that th e first
three parts of the IP address make up the network number and only the last p art can
be used to assign network com ponent num bers. The first three part s of the IP addres s
of all network components are in this case always the same.
Switch
A switch is a central distributor in a wired network, which, unlike a hub, provides intelligent distribution of data transfer. The switch only ever forwards a data packet to the
subnet or network co mpone nt the dat a p acket is inten ded fo r. Unneces sary t ransfer of
data in the net work thus avoided.
TAE
Telecommunications connecting unit (German: Telekommunikations-Anschlussein-
heit). Connector for conn ectin g analog ue telec omm unica tions de vice s. F for phon e, N
for additional devices such as fax or answer machines.
TCP
Transmission Control Protocol. TC P is part of the TCP/IP protocol family . TCP hand les
data transport between com m uni ca tion partners (applications). TCP is a sessionbased transmission protocol, i.e. it sets up, monitors and terminates a connection for
transporting data.
TCP/IP
Transmission Control Protocol/Internet Protocol. Protocol family on which the Internet
is based. IP fo rms t he basis of each PC to PC connection. TCP provides app lic at ion s
with a reliable transmission lin k in the form of a con t in uou s data stream. TCP/I P is the
basis on which services such as WWW, Mail and News are built. There are other protocols as well. In order to ac cess the Internet from a PC, TCP/IP must be set up on the
PC.
70
Page 71

Glossary
UDP
User Datagram Protocol. UDP is a Protocol of the TCP/IP protocol family that handles
data transport between two communication partners (applications). Unlike TCP, UDP
is a non-sess ion base d protoco l. It does not es tablis h a f ixed con nection. The reci pient
is responsible for making sure the data is received. The sender is not notified about
whether it i s received or n ot.
Uplink
Data that your CiscoBW X360 WiMAX Outd oor Modem forwards from your PC or local
network to external sites (e.g. to the Internet).
URL
Universal Resource Locator . G lobally un ique a ddress of a do main on th e Internet, e.g.
http://www.sagem-communications.com.
Virtual server
A virtual Server provides a se rvice on the In ternet that runs not on its elf, but on ano ther
network component. The Cisco BWX360 WiMAX Outdoor Modem can be configured
as a virtual server. It will then direct incoming calls for a service via Port forwarding
directly to the appropriate Port of the network component in question.
WAN
Wide Area Network. A WAN is a network that is not restricted to one particular area,
such as the Internet. A WAN is run by one or more public providers to enable private
access. You access the Internet via a Provider.
WiMAX
Worldwide Interoperability for Microwave Access. WiMAX is a modern wireless net-
work technology tha t ena bles fast Internet connec tio n ev en i n rem ote areas where no
other connection possibility (e. g. DSL) is available.
71
Page 72

Index
Index
A
Address Translation . . . . . . . . . . 64
Administration
system passwo rd
Advanced Settings
features
Antenna
adjusting. . . . . . . . . . . . . . . . 21
aligning precisely
connecting
Appendix
specifications
troubleshooting
. . . . . . . . . . . . . . 32
. . . . . . . . . . . 32
. . . . . . . . . . . . . . . . 24
. . . . . . . . . . . 22
. . . . . . . . . . . . . . . 12
. . . . . . . . . . . . . . . . . 41
. . . . . . . . . . . . . 47
. . . . . . . . . . . . 41
B
Base station ID . . . . . . . . . . . . . 38
Basic settings
setting up Internet access. . . . . . 20
starting
Basic Setup Wizard
starting . . . . . . . . . . . . . . . . . 20
Bridge
Bridge mode
LAN configuration . . . . . . . . . . 31
. . . . . . . . . . . . . . . . . 20
. . . . . . . . . . . . . . . . . . . 64
C
Checking connection . . . . . . . . . . 43
Configuration
administration
aligning antenna precise ly
Home
menu structure
opening online Help
resetting to factory setting
setting the language
status
Connecting
Connecting a PC or switch
Connection mode
Connection wizard
establishing a radio connection. . . 21
Connectors
. . . . . . . . . . . . . . 15
. . . . . . . . . . . . . 32
. . . . . . 22
. . . . . . . . . . . . . . . . . . 19
. . . . . . . . . . . . 18
. . . . . . . . . 18
. . . . . . 33
. . . . . . . . . 18
. . . . . . . . . . . . . . . . . . 35
. . . . . . . . . . . . . . . . 12
. . . . . . . 12
. . . . . . . . . . . . 26
. . . . . . . . . . . . . . . . .9
D
dB . . . . . . . . . . . . . . . . . . . . .64
. . . . . . . . . . . . . . . . . . . .64
dBm
Device status
. . . . . . . . . . . . . . . . . . .64
DHCP
DHCP server
Disposal
. . . . . . . . . . . . . . . . . . . .65
DNS
DNS (Domain Name System)
DNS server
Domain name
DoS (Denial of Service)
Downlink
. . . . . . . . . . . . . . . . . . . .65
DSL
. . . . . . . . . . . . . . .38
. . . . . . . . . . . . 30, 64
. . . . . . . . . . . . . . . . . . 6
. . . . .27
. . . . . . . . . . . . . . . .27
. . . . . . . . . . . . . .65
. . . . . . . . .31
. . . . . . . . . . . . . . . . .65
E
Establishing a radio connection . . . .21
Ethernet
Exposed host
. . . . . . . . . . . . . . . . . .65
. . . . . . . . . . . . . . .29
F
Firewall . . . . . . . . . . . . . . . 27, 65
Firmware
Firmware update
Flat rate
FTP
Full duplex
FXS
. . . . . . . . . . . . . . . . .65
. . . . . . . . . . . . .34
. . . . . . . . . . . . . . . . . .65
. . . . . . . . . . . . . . . . . . . .66
. . . . . . . . . . . . . . . .66
. . . . . . . . . . . . . . . . . . . .66
G
Gateway. . . . . . . . . . . . . . . . . .66
H
Hacker defence . . . . . . . . . . . . .27
Half duplex
Home
HTTP
HTTP proxy
Firefox
Internet Explorer
setting up
Hub
. . . . . . . . . . . . . . . .66
. . . . . . . . . . . . . . . . . . .19
. . . . . . . . . . . . . . . . . . .66
. . . . . . . . . . . . . . . .66
. . . . . . . . . . . . . . . . .46
. . . . . . . . . . . .45
. . . . . . . . . . . . . . . .45
. . . . . . . . . . . . . . . . . . . .66
72
Page 73

Index
I
IEEE . . . . . . . . . . . . . . . . . . . 66
IEEE 802.16
Installation
connecting
location
outdoor modem
PC
Switch
switching on
system requirements
Internet
connection mode
menu
protocol
Internet access
setting up
Internet connection
changing configuration. . . . . . . . 26
closing manually
opening manually
setting up
. . . . . . . . . . . . . . . . . . . . . 67
IP
IP address
assigning automatically
assigning static
dynamic
private
public
static
IP address block for DHCP
IPTV
ISP
. . . . . . . . . . . . . . . . . . . . 68
. . . . . . . . . . . . . . . 67
. . . . . . . . . . . . . . . . 10
. . . . . . . . . . . . . . . 12
. . . . . . . . . . . . . . . . . 11
. . . . . . . . . . . . 12
. . . . . . . . . . . . . . . . . . . 12
. . . . . . . . . . . . . . . . . 12
. . . . . . . . . . . . . . 14
. . . . . . . . . 11
. . . . . . . . . . . . . . . . . . 26
. . . . . . . . . . . 26
. . . . . . . . . . . . . . . . . . 26
. . . . . . . . . . . . . . . . 26
. . . . . . . . . . . . . . . 20
. . . . . . . . . . . 19
. . . . . . . . . . . 19
. . . . . . . . . . . . . . . 26
. . . . . . . . . . . . . .15, 67
. . . . . . . 30
. . . . . . . . . .30, 31
. . . . . . . . . . . . . . . . 67
. . . . . . . . . . . . . . .30, 67
. . . . . . . . . . . . . . . . . . 67
. . . . . . . . . . . . . . . . . . 67
. . . . . . 30
. . . . . . . . . . . . . . . . . . . 67
J
Java
allowing
Firefox
Internet Explorer
JavaScript
allowing . . . . . . . . . . . . . . . . 46
Firefox
Internet Explorer
. . . . . . . . . . . . . . . . 46
. . . . . . . . . . . . . . . . . 46
. . . . . . . . . . . 46
. . . . . . . . . . . . . . . . . 46
. . . . . . . . . . . 46
L
LAN . . . . . . . . . . . . . . . . . . . . 68
configuration
. . . . . . . . . . . . . 30
Lease time
LED
LEDs
startup
Local network
Bridge mode
Location
Login
. . . . . . . . . . . . . . . .30
. . . . . . . . . . . . . . . . . . . .68
. . . . . . . . . . . . . . . . . . . . 9
. . . . . . . . . . . . . . . . .14
. . . . . . . . . . . . . .31
. . . . . . . . . . . . . . . . . .11
. . . . . . . . . . . . . . . . . . . .68
M
MAC address. . . . . . . . . . . . . . .68
MAC table
ageing time
Mbps
Menu structure
. . . . . . . . . . . . . . . . .31
. . . . . . . . . . . . . . .31
. . . . . . . . . . . . . . . . . . . .68
. . . . . . . . . . . . . .18
N
NAT . . . . . . . . . . . . . . . . . 28, 64
port forwarding
Network
Network adapter
Network Address T ran sl ation
Network protocol
Notes on user guide
. . . . . . . . . . . . . . . . . .68
. . . . . . . . . . . . .28
. . . . . . . . . . . . .68
. . . . . .28
. . . . . . . . . . . . .69
. . . . . . . . . . . 6
O
Opening online Help. . . . . . . . . . .18
Operating mode
Bridge. . . . . . . . . . . . . . . . . .25
. . . . . . . . . . . . . . . . . .25
Router
P
Password
forgotten
ping command
Pop-up blocker
Firefox . . . . . . . . . . . . . . . . .46
Internet Explorer
Pop-up window
Firefox
Internet Explorer
Port
Port forwarding
setting up
Port number
illustration
PPPoE pass-through
. . . . . . . . . . . . . . . .43
. . . . . . . . . . . . . .43
. . . . . . . . . . . .46
. . . . . . . . . . . . . .46
. . . . . . . . . . . . . . . . .46
. . . . . . . . . . . .46
. . . . . . . . . . . . . . . . . . . .69
. . . . . . . . . . . 28, 69
. . . . . . . . . . . . . . . .28
. . . . . . . . . . . . . . .69
. . . . . . . . . . . . . . . .28
. . . . . . . . . .27
73
Page 74

Index
Product features. . . . . . . . . . . . . .8
Protocol
Provider
Putting into service
. . . . . . . . . . . . . . . . . 69
. . . . . . . . . . . . . . . . . 69
. . . . . . . . . . . 40
R
Radio status . . . . . . . . . . . . . . . 38
. . . . . . . . . . . . . . . . . . 34
Reboot
Resetting
RJ
Router
RSSI
. . . . . . . . . . . . . . . . . 33
. . . . . . . . . . . . . . . . . . . . . 69
. . . . . . . . . . . . . . . . . . 69
. . . . . . . . . . . . . . . . . . . 69
S
Safety precautions . . . . . . . . . . . .5
. . . . . . . . . . . . . . . . . . . 21
Scan
Scope of delivery
Security
Server
Setting the language
Setting up Internet access
SMTP
Specifications
Start scre en
Status
Subnet
Subnet mask
Switch
Switching on the devices
System password
System requirements
. . . . . . . . . . . . . . . . . . .5
disposal
notes on user guide
safety precautions
. . . . . . . . . . . . . . . . . . 70
virtual
. . . . . . . . . . . . . . . . . . 71
. . . . . . . . . . . . . . . . . . . 70
. . . . . . . . . . . . . . . . . . . 35
. . . . . . . . . . . . . . . . . 38
device
Internet
LAN
local network
radio status
. . . . . . . . . . . . . . . . . 36
. . . . . . . . . . . . . . . . . . . 37
. . . . . . . . . . . . . . . . . . 70
. . . . . . . . . . . . . . . . . . 70
forgotten
. . . . . . . . . . . . .8
. . . . . . . . . . . . . . . . .6
. . . . . . . . . .6
. . . . . . . . . . .5
. . . . . . . . . . 18
. . . . . . . 20
. . . . . . . . . . . . . . 47
. . . . . . . . . . . . . . . 19
. . . . . . . . . . . . . 37
. . . . . . . . . . . . . . 38
. . . . . . . . . . . . . . . 70
. . . . . . . . 14
. . . . . . . . . . . . 32
. . . . . . . . . . . . . . . . 43
. . . . . . . . . . 11
T
TAE . . . . . . . . . . . . . . . . . . . .70
TCP
. . . . . . . . . . . . . . . . . . . .70
. . . . . . . . . . . . . . . . . . .70
TCP/IP
Trademarks
Troubleshooting
customer service
other faults
. . . . . . . . . . . . . . . . 5
. . . . . . . . . . . . .41
. . . . . . . . . . .43
. . . . . . . . . . . . . . .43
U
UDP . . . . . . . . . . . . . . . . . . . .71
Updating firmware
Upgrading firmware
Uplink
. . . . . . . . . . . . . . . . . . .71
. . . . . . . . . . . . . . . . . . . .71
URL
User Datagram Protocol see UDP
User interface . . . . . . . . . . . . . .16
. . . . . . . . . . . . . . . . . .19
Home
menu structure
opening online Help
setting the language
. . . . . . . . . . . .34
. . . . . . . . . . .34
. . . . . . . . . . . . .18
. . . . . . . . . .18
. . . . . . . . .18
V
Virtual server . . . . . . . . . . . . . . .71
W
WAN . . . . . . . . . . . . . . . . . . . .71
Web browser
configuring
HTTP proxy
Java
JavaScript
launching user interface
menu structure
pop-up window
user interface
WiMAX
WiMAX network
access data . . . . . . . . . . . . . .20
establishing a connection
scan
. . . . . . . . . . . . . . .45
. . . . . . . . . . . . . .45
. . . . . . . . . . . . . . . . . . .46
. . . . . . . . . . . . . . .46
. . . . . . .15
. . . . . . . . . . . . .18
. . . . . . . . . . . . .46
. . . . . . . . . . . . .16
. . . . . . . . . . . . . . . . . .71
. . . . . .21
. . . . . . . . . . . . . . . . . . .21
74
 Loading...