

Page 1

BWX 120 PCMCIA Modem User Guide
August 1, 2009
Americas Headquarters
Cisco Systems, Inc.
170 West Tasman Drive
San Jose, CA 95134-1706
USA
http://www.cisco.com
Tel: 408 526-4000
800 553-NETS (6387)
Fax: 408 527-0883
Text Part Number: OL-16321-03
Page 2

THE SPECIFICATIONS AND INFORMATION REGARDING THE PRODUCTS IN THIS M ANUAL ARE SUBJECT TO CHA NGE WITHOUT NO TICE. ALL
STATEMENTS, INFORMATION, AND RECOMMENDATIONS IN THIS MANUAL ARE BELIEVED TO BE ACCURATE BUT ARE PRESENTED WITHOUT
WARRANTY OF ANY KIND, EXPRESS OR IMPLIED. USERS MUST TAKE FULL RESPONSI BILITY FOR THEIR APPLICA TION OF ANY PRODUCT S.
THE SOFTWARE LICENSE AND LIMITED WARRANTY FOR THE ACCOMPANYING PRODUCT ARE SET FORT H IN THE INFORMATION PACKET T HAT
SHIPPED WITH THE PRODUCT AND ARE INCORPORATED HEREIN BY THIS REFERENCE. IF YOU ARE UNABLE TO LOCATE THE SOFTWARE LICENSE
OR LIMITED WARRANTY, CONTACT YOUR CISCO REPRESENTATIVE FOR A COPY.
The following information is for FCC compliance of Class A devices: This equipment has been tested and found to comply with the limits for a Class A digital device, pursuant
to part 15 of the FCC rules. These limits are designed to provide reasonable protection against harmful interference when the equipment is operated in a commercial
environment. This equipment generates, uses, and can radiate radio-frequency energy and, if not installed and used in accordance with the instruction manual, may cause
harmful interference to radio communications. Operation of this equipment in a residential area is likely to cause harmful interference, in which case users will be required
to correct the interference at their own expense.
The following information is for FCC compliance of Class B devices: The equipment described in this manual generates and may radiate radio-frequency energy. If it is not
installed in accordance with Cisco’s installation instructions, it may cause interference with radio and television reception. This equipment has been tested and found to
comply with the limits for a Class B digital device in accordance with the specifications in part 15 of the FCC rules. These specifications are designed to provide reasonable
protection against such interference in a residential installation. However, there is no guarantee that interference will not occur in a particular installation.
Modifying the equipment without Cisc o’s writ ten author ization m ay resul t in the equi pment no lo nger comp lyi ng with FCC requi rements for Class A or Class B digital
devices. In that event, your right to use the equ ipment may be limit ed by FCC regul ations , and you may be requir ed to correct a ny interference to radio or television
communications at your own expense.
You can determine whether your equipment is causing interference by turning it off. If the interferen ce stops, it was probably caused by the Cisco equipment or one of its
peripheral devices. If the equipment causes interference to radio or television reception, try to correct the interference by using one or more of the followi ng measures:
• Turn the television or radio antenna unt il the int erference st ops.
• Move the equipment to one side or the other of the televisio n or radi o.
• Move the equipment farther away from the te levision or radio.
• Plug the equipment into an outlet that is on a di fferent cir cuit from the televi sion o r radio. (That is, make certain th e equipment and the te levision or radio are on circuit s
controlled by different circuit breaker s or fuses.)
Modifications to this product no t author ized by Cis co Syst ems, Inc. coul d voi d the FCC appro val and ne gate your authorit y to op erate the pr odu ct.
The Cisco implementation of TCP head er compressi on is an adap tation of a program developed by the Universi ty of Ca lifornia, Berk eley (UCB) as part of UCB ’s public
domain version of the UNIX operatin g system. All rights reserved . Copyri ght © 1981 , Rege nts of the Uni versity of Calif ornia.
NOTWITHSTANDING ANY OTHER WARRANTY HEREIN, ALL DOCUMENT FILES AND SOFTWARE OF THE SE SUPPLIERS ARE PROVIDED “AS IS” WITH
ALL FAULTS. CISCO AND THE ABOVE-NAMED SUPPLIERS DISCLAI M ALL WARRANTIE S, EXPRESSED OR IMPLIED, INCLUDING, WITHOUT
LIMITATION, THOSE OF MERCHANTABILITY, FITNESS FOR A PARTICULAR PURPOSE AND NO NINFRINGEM ENT OR ARISING FROM A COURS E OF
DEALING, USAGE, OR TRADE PRACTICE.
IN NO EVENT SHALL CISCO OR ITS SUPPLIERS BE LIABLE FOR ANY INDIRECT, SPECIAL, CONSEQUENTIAL, OR INCIDENTAL DAMAGES, INCLUDING ,
WITHOUT LIMITATION, LOST PROFITS OR LOSS OR DAMAGE TO DATA ARISING OUT OF THE USE OR INABILITY TO USE THIS MANUAL, EVEN IF CISCO
OR ITS SUPPLIERS HAVE BEEN ADVISED OF THE POSSIBILITY OF SUCH DAMAGE S.
CCVP, the Cisco logo, and Welcome to the Human Network are trademarks of Cisco Systems, Inc.; Changing the Way We Work, Live, Play, and Learn is a service mark of
Cisco Systems, Inc.; and Access Registrar, Aironet, Catalyst, CCDA, CCDP, CCIE, CCIP, CCNA, CCNP, CCSP, Cisco, the CiscoCertified Internetwork Expert logo,
Cisco IOS, Cisco Press, Cisco Systems, Cisco Systems Capital, the Cisco Systems logo, Cisco Unity, E nterpr ise/Sol ver, Ether Chann el, Ether Fast, Ether Switch, Fa st Step ,
Follow Me Browsing, For mShar e, GigaDr iv e, HomeL ink, I nterne t Quot ient , IOS, iP hon e, IP/TV, iQ Exp erti se, the iQ logo, iQ Net Readi ness S cor ecar d, i Quic k Study,
LightStream, Linksys, MeetingPlace, MGX, Networkers, Networking Academy, Network Registrar, PIX, ProConnect, ScriptShare, SMARTnet, StackWise, The Fastest Way
to Increase Your Internet Quotient, and TransPath are registered trademarks of Cisco Systems, Inc. and/or its affiliates in the United States and certain other countries.
All other trademarks mentioned in this document or Website are the property of their respective owners. The use of the word partner does not imply a partnership relationship
between Cisco and any other company. (0711 R)
WiMax and Mobile WiMax are trademarks of the WiMax Forum.
Any Internet Protocol (IP) addresses used in this document are not intended to be actual addresses. Any examples, command display output, and figures included in the
document are shown for illustrative pur poses onl y. Any use of act ual IP addr ess es in ill ustr ativ e conten t is uninten tio nal and coincident al.
BWX 120 PCMCIA Modem User Guide
© 2009 Cisco Systems, Inc. All rights res erved.
Page 3

CONTENTS
CHAPTER
CHAPTER
CHAPTER
CHAPTER
CHAPTER
CHAPTER
CHAPTER
CHAPTER
CHAPTER
1 Safety Information 1-1
2 Regulatory Informat ion 2-1
3 Introduction 3-1
4 Package Inventory 4-1
5 BWX 120 PCMCIA Modem Models 5-1
6 Minimum Computing Requirements 6-1
7 Physical Characteristics 7-2
8 BWX 120 PCMCIA Modem Features 8-1
9 Installing the BWX 120 PCMCIA Modem 9-1
CHAPTER
CHAPTER
CHAPTER
CHAPTER
CHAPTER
CHAPTER
OL-16321-03
10 Accessing the Internet 10-1
11 Removing the BWX 120 PCMCIA Modem 11-1
12 Indicator Light 12-1
13 Troubleshooting 13-1
14 Installing BWX Modem Diagnostics Tool 14-1
15 Troubleshooting Using BWX Mode m Diagnostics Tool 15-1
The Menu Bar 15-1
The Session Menu 15-1
The View Menu 15-1
The Help Menu 15-1
BWX 120 PCMCIA Modem User Guide
iii
Page 4

Contents
The Window Option Buttons 15-2
The Connection Status Window 15-2
The Modem ID 15-2
The Icons 15-3
The Signal Strength and Signal Quality Bars 15-3
How to Increase the St rength and Quality of the Signal 15-4
The History Graphs 15-5
The Parameters 15-5
The Configuration Window 15-6
The Trend Analysis Wi ndow 15-7
The Statistics Window 15-9
The About Window 15-11
CHAPTER
CHAPTER
CHAPTER
CHAPTER
CHAPTER
APPENDIX
APPENDIX
16 Manually Upgrading the BWX Modem Diagnostics Tool 16-1
17 Uninstalling The BWX Modem Diagnostics Tool Software 17-1
18 Care & Maintenance 18-1
19 Upgrading the BWX 120 PCMCIA Modem Software 19-1
20 What Could go Wrong During the BWX 120 PCMCIA Modem Update 20-1
21 BWX 120 PCMCIA Modem - PC Troubleshooting 21-1
PC Operating Systems 21-1
Results of Correc t BWX Modem Diagnostics Tool Installation 21-1
22 End User License Agreement 22-1
BWX 120 PCMCIA Modem User Guide
iv
OL-16321-03
Page 5
CHAPTER
Safety Information
T o optimize safety and expedite installatio n and service, read this section. Follow all warnings, cauti ons,
and instructions marked on the eq uipment and incl uded in this doc ument.
To aid in the prevention of inj ury and da ma ge t o p roper t y, cautionary symbol s have been pla ced in this
document to alert the re ader to known potential ly haza rdous situ ation s, or hazar ds to equipm ent or
procedures. Th e sy mb o ls ar e p lac ed before the informa tio n to which they apply. Howev er, an y s ituation
that involves heavy equipment and electricity can become hazardous, and caution and safety should be
practiced at all times when installing, servicing, or operating the equipment.
Caution Caution Symbol - p ossible e quip ment or p ro pert y d ama ge.
1
Warning
Warning Symbol - could cause personal injury or otherwise be hazardous to your health
Cisco, expressly requires that when us ing Cisco el ectroni c equipm ent always follow the basic safet y
precautions to red uce the risk of elect rical shoc k, fire, and in jury to pe ople and/o r proper ty.
1. Follow all warnings and instructions that come with the equipment.
2. Do not use th e e quip me nt w hil e yo u ar e in a bath tub, shower, pool, or spa . E xpo sure o f th e
equipment to water coul d cause severe electric al shock or seri ous damage to the equip ment.
3. Do not allow any ty pe of liquid to co me in cont ac t with th e eq u ipmen t. Unplu g the equi pmen t fr om
the power source before cleaning . Use a damp clo th for clea ning. Do not use any soaps or liquid
cleaners.
4. Follow all airport and FAA regulations when using the equipment on or near aircra ft.
5. Do not use the BWX 120 PCMCIA Modem near medical equipment, life support equipment, or any
equipment that may be susceptible to any form of radio interference. In such areas, the BWX 120
PCMCIA Modem must be powered off.
6. The driver or operato r o f any vehic le shou ld no t op erat e t h e BWX 1 20 PCMC IA Mo de mwhi le in
control of a vehicle. Doing so will d etr ac t from th e driver or operato r’s control a nd ope rat ion of the
vehicle.
7. Do not disassemble the equipment. Removing covers exposes dangerous voltages or other risks and
also voids th e warrant y . Inco rrect reas sembly can c ause equipm ent damage or electrica l shock. Onl y
an authorized repair technician should service this product.
8. Do not expose the equipment to extreme hot or cold temperatures.
OL-16321-03
BWX 120 PCMCIA Modem User Guide
1-1
Page 6

9. Do not use the equipment under the following conditions:
–
When the equipment has been exposed to water or mo isture .
–
When the equipment has been damaged.
–
When the equi p me nt d oe s no t op er ate p rop er ly o r s hows a di st in ct ch an ge in pe rfo rm an ce.
Chapter 1 Safety Information
BWX 120 PCMCIA Modem User Guide
1-2
OL-16321-03
Page 7

CHAPTER
2
Regulatory Information
The BWX 120 PCMCIA Modem has bee n tested with a t ypical lap top compu ter with a side loading
PCMCIA bay. This BWX 120 PCMCIA Modem must not be co-located or operated in conjunction with
any antenna (other than the one furnished by Cisco and included in the package) or transmitter. Use of
this device in any other configu rat ion m a y excee d t he FCC, E T SI, or oth er r egulat ory b odi es R F
Exposure compliance limit.
If this equipment causes interference to radio or television reception, which can be determined by
turning the equipm ent off and on, t he user should try t o correct the int erfere nce by one or mo re of the
following measures:
1. Re-orient or relocate the receiving antenna,
2. Increase the separat ion bet ween the eq uipm ent and th e receiver,
3. Consult the deal er o r an experie nc ed ra dio tec hn icia n f or addit iona l su gge stions.
FCC guidelines stipu late th at the an ten na should be mor e than 2.5 cm (1” ) from bystande rs and 1. 2 cm
(0.472”) from the user. When in use, the antenna should be pointed vertically upward. When using the
Desktop Antenna with the BWX 120 PCMCIA Modem, a minimum distance of 20 centimeters (8 inches)
is required from the user or bystande r.
OL-16321-03
This product confo rms with the Australia n Standar d for Human Exposur e to Radiati on at a distan ce of
2.5 cm. Closer contact; such as touching the aerial will result in radiation in excess of safe limits.
SAR, or Specific Absorption Rate, is the measurement for the rate at which electromagnetic energy is
absorbed by the hum an bo dy duri ng exposur e. T he FC C sta tes the bo dy SA R limi t is 1. 6 W/kg. The
highest reported SA R value for the B WX 1 20 PCMC IA M odem is 0. 560 W/ kg .
Note This equipment has been tested and found to comply with the limits for a Class B digital device, pursuant
to Part 15 of the FCC Rules. These limits are designed to provide reasonable protection against harmful
interference in a residential installation. This equipment generates, uses and can radiate radio frequency
energy and , if no t insta lled and us ed in a ccordan ce with the instru ctions, may cau se ha rmful i nterferen ce
to radio communications. However, there is no guarantee that interference will not occur in a particular
installation.
BWX 120 PCMCIA Modem User Guide
2-1
Page 8

Chapter 2 Regulatory Information
If this equipme nt doe s ca use har mf ul i nte rf eren ce to ra dio or te levision r ece ptio n, whi ch c an be
determined by tur n in g th e eq uip m en t o ff and on, the user is encou ra ge d to t ry t o co rr ec t the interference
by one or more of the following measures:
> Re-orient or relocate the receiving antenna.
> Increase the separ ation be twe en th e eq uipm en t and re ceiver. Connect the equipment into an outl et on
a circuit different from that to which the receiver is connected.
> Consult the dealer or an experien ced radio /TV te chnici an for help.
BWX 120 PCMCIA Modem User Guide
2-2
OL-16321-03
Page 9

CHAPTER
3
Introduction
Congratulations! Your BWX 120 PCMCIA Modem is a user-friendly, easy-to-install device that helps
you connect wirelessly to the Internet using the PCMCIA port on y our laptop computer. The BWX 120
PCMCIA Modem provides complete broadband Internet access to residential and small or home office
users without the necessity of pro fessional hardware instal lation.
The BWX 120 PCMCIA Modem provide s portable In terne t service. A computer with the BWX 120
PCMCIA Modem can be moved from room-to-room, location-to-location, or even city-to-city as long as
there is coverage and appr opriate reception in the area. This manual will guide you through the simple
process of installing the B WX 120 PCM CIA M o dem a nd its moni tor ing sof tware.
OL-16321-03
BWX 120 PCMCIA Modem User Guide
3-1
Page 10
CHAPTER
4
Package Inventory
Please verify the contents of your BWX 120 PCMCI A Modem pa ckage. Your package should conta in
the following:
• BWX 120 PCMCIA Modem
• BWX 120 PCMCIA Modem Quick Installation Guide
• Installation CD that includes the BWX Modem Diagnostic Tool monitoring software, the PC
drivers*, and the BWX 120 PCMCIA Modem User ’s Guide
* The PC drivers are in two folders, one for Windows
2000 and W indows XP Oper ating Systems. When you in sert the modem, per the installation instructions,
the PC will detect the new drivers and automatically select the correct one.
WinVista Drivers: netnnpcc_vista.inf
netnnpcc_vista.sys
®
Vista Operating Systems and one for Windows
Win2K-XP Drivers: netnnpcc.inf
netnnpcc.sys
If you do not find a ll of th ese it ems i n yo ur pa ck age, n otify yo ur supp lier.
OL-16321-03
BWX 120 PCMCIA Modem User Guide
4-1
Page 11
CHAPTER
5
BWX 120 PCMCIA Modem Models
The BWX 120 PCMCIA Modem mo del indicate s the frequ ency in which th e BWX 120 PCMC IA
Modem will operate (for e xamp le, 3.4 GH z). The f reque ncy number ap pears on th e BWX 120 PCMCIA
Modem’s label. These are described in the tabl e below.
Model Model Number Frequency Range Operating Band
2.3 GHz 2305-2360 BWX 1 20
PCMCIA Modem
2.5-2.6 GHz 2.5-2.6 BWX 12 0
PCMCIA Modem
3.4 GHz 3410-3525 BWX 1 20
PCMCIA Modem
3.5 GHz 3475-3600 BWX 1 20
PCMCIA Modem
2305-2360 MHz International Only
2500-2686 MHz EBS
3410-3525 MHz WLL
3475-3600 MHz WLL
OL-16321-03
BWX 120 PCMCIA Modem User Guide
5-1
Page 12

CHAPTER
6
Minimum Computing Requirements
(See, also Appendix 21, “BWX 12 0 PCMCIA M odem - PC Troublesh ooting ” )
The following table lists the minimum requirements your computer mu st meet before using the BWX
120 PCMCIA Modem.
Operating System
CPU:
RAM:
Hard Drive:
Monitor:
1. If you are going to upgrade your Operatin g System after l oading t he BWX Modem Diagnost ic s Tool soft war e, you must fir st
uninstall BWX Modem Diagnostics Tool prior to upgrading the OS. Otherwise, the BWX 120 PCMCIA Modem will continue
to operate, but the BWX Modem Diagnostics Tool does not work. See Chapter 17, “Uninstalling The BWX Modem
Diagnostics To ol S oft war e” in this Guide.
1
Windows 2000, Windows XP, or Windows Vista-32bits. It is assumed the
latest Windows service pack is installed on the Operating System.
Note The BWX 120 PCMCI A Mode m is n ot su ppo rted o n M acI ntosh or
Linux/Unix systems.
Pentium level or higher
32 MB or the OS minimum, whichever is greater
85 MB free disk spac e fo r the opti onal BWX Mod em Dia gno stics Tool1
monitoring soft ware
256 colors, 800 x 60 0 resol ution
OL-16321-03
BWX 120 PCMCIA Modem User Guide
6-1
Page 13
CHAPTER
7
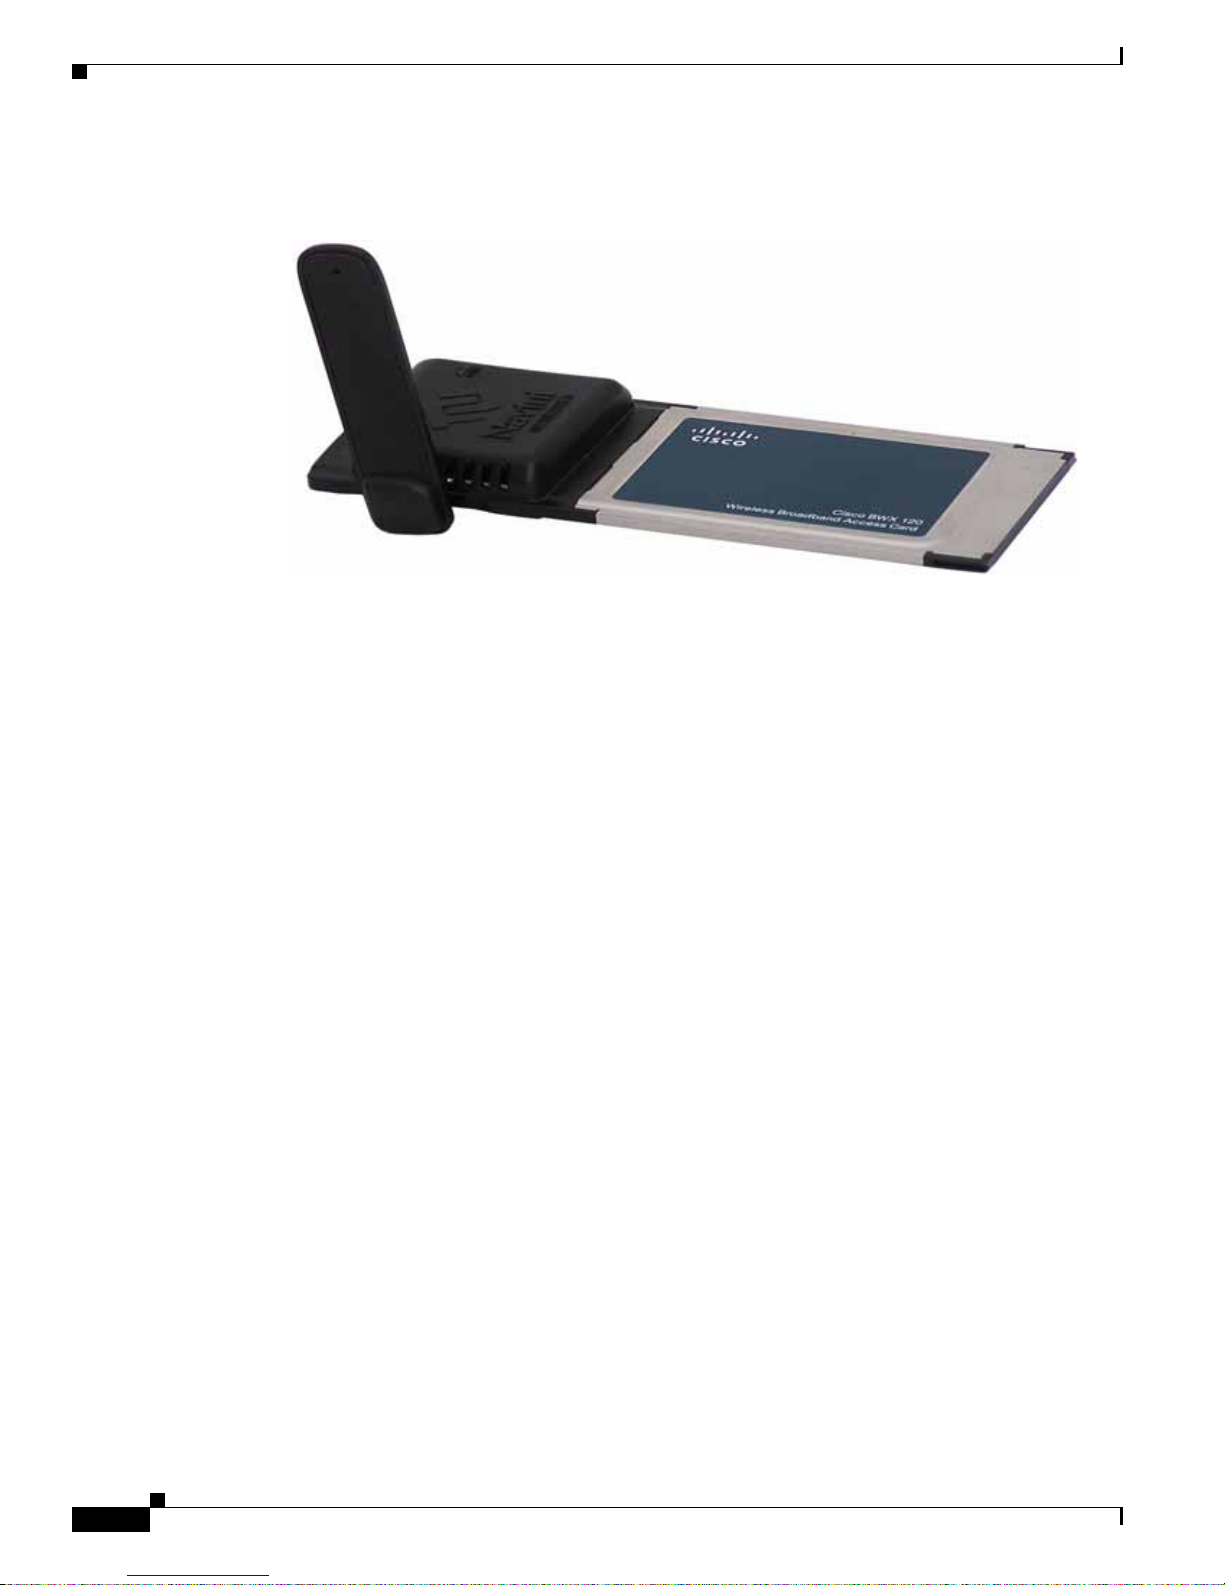
Physical Characteristics
The BWX 120 PCMCIA Modem fits into a stand ard Type II PCMCIA slot. A 68-pin connecto r on the
end of the modem connects it to the laptop.
T wo inverted-F antennas reside inside the BWX 120 PCMCIA Modem. All mo dels also ha ve an e xternal
antenna.
OL-16321-03
BWX 120 PCMCIA Modem User Guide
7-2
Page 14
Chapter 7 Physical Characteristics
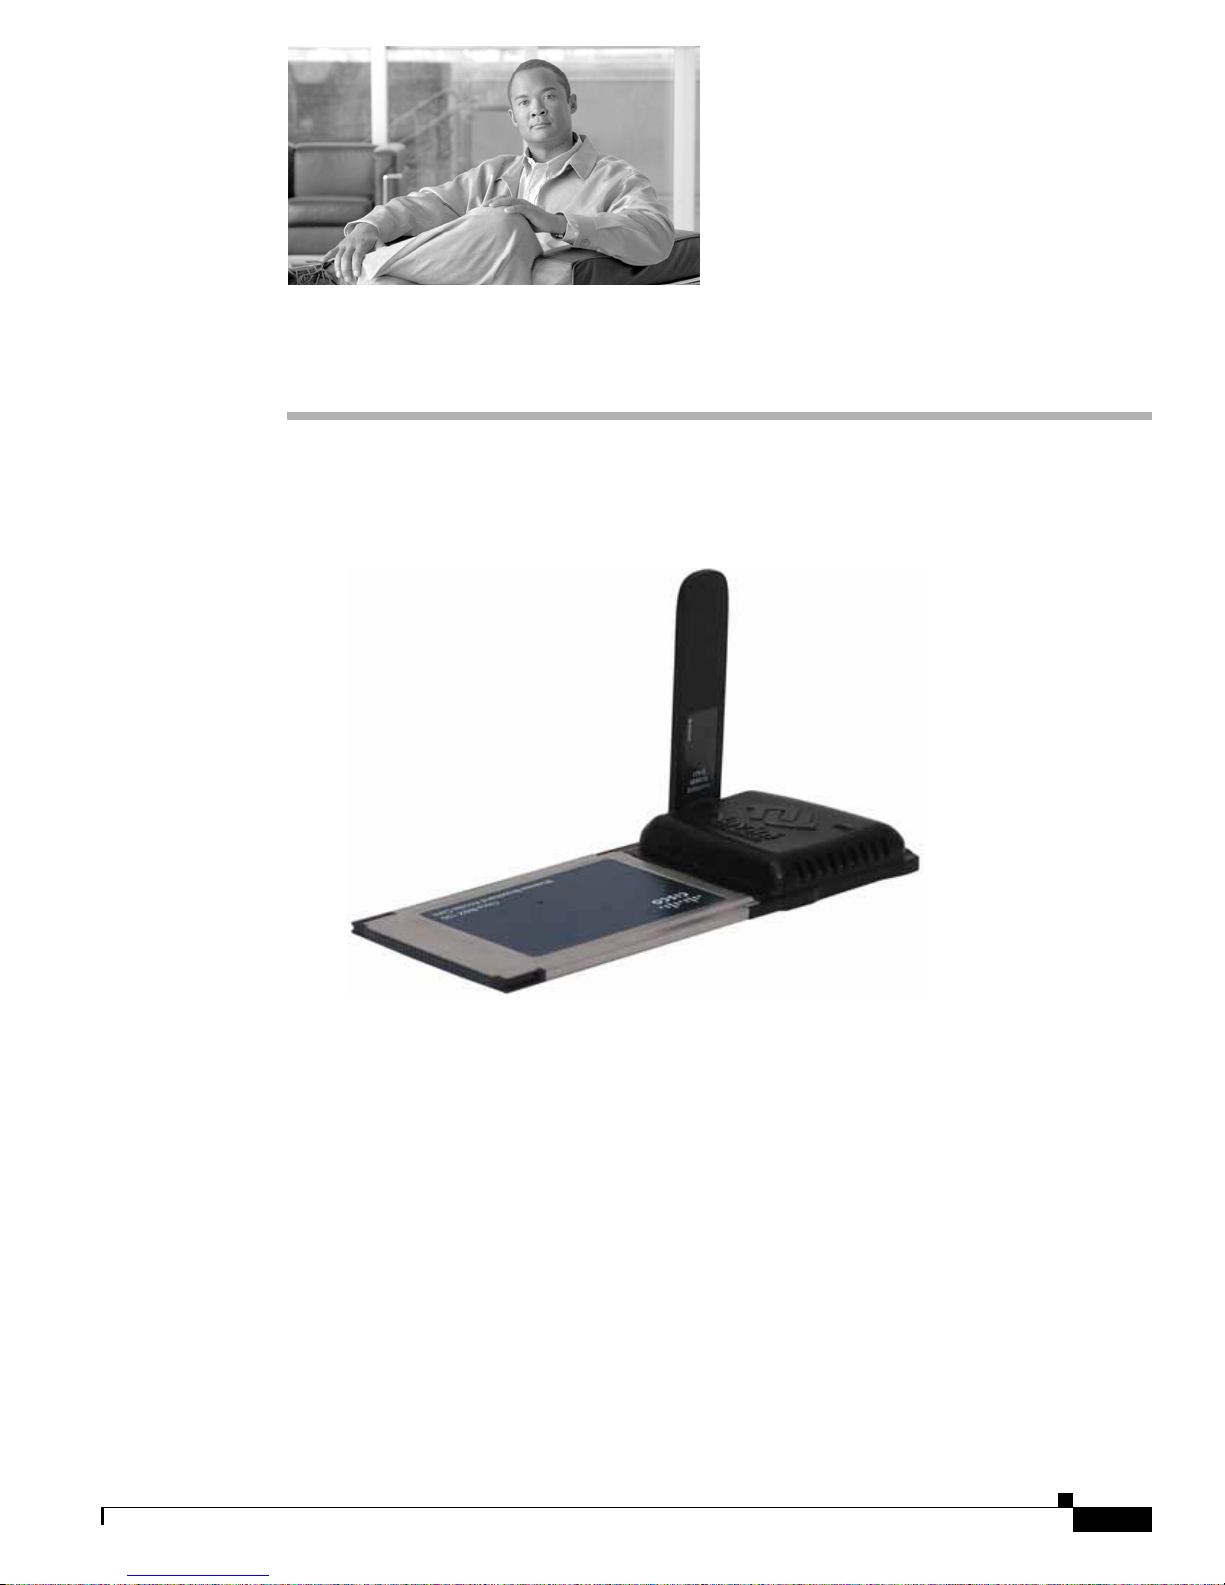
The image below is a picture of th e external antenn a in the upr ight posi tion. To raise the antenna to its
upright position, raise the antenna counterclockwise. Do not turn the antenna beyond its upright position.
BWX 120 PCMCIA Modem User Guide
7-3
OL-16321-03
Page 15

CHAPTER
8
BWX 120 PCMCIA Modem Features
• Simple plug-and-play installation.
• Indicator light showing power on and synchronizati on with a Base Stat ion.
• OFDMA mode will meet IEEE 802.16e air interface standards.
• Portable.
• Works in Non Line of Sight (NLOS) conditions, using Smart Beamforming technology.
• Automated over-the-air software upgrade s.
• Optional accessory: Desktop Antenna. (This item is no longer available).
OL-16321-03
BWX 120 PCMCIA Modem User Guide
8-1
Page 16
CHAPTER
9
Installing the BWX 120 PCMCIA Modem
The following instruct ions explain how to in stall the BWX 120 PCMCIA Modem and its dri ver sof tware
on your computer. Please read all instructions before attempting the installation.
Note The la ptop should be used prefe rably on a desk when the M odem is installed. Using t he laptop with the
Modem close to the bod y, such as on the lap, is undesirab le.
Note The scre enshots shown in these instruct ions were taken fr om a laptop op erati ng with Windows XP. If
you have a Windows 2000 or Vista operating system, the screens you see ma y vary from the scre ens
shown in the instructions.
Step Action Illustration
Step 1
Step 2
Step 3
Insert the modem into the Type II
modem slot on y our c om pute r. Be
sure to insert the end that has the
68-pin connector into th e modem
slot.
Raise the antenna to the upright
position.
The Found New Hardware message
appears indicating the PC sees the
modem.
OL-16321-03
BWX 120 PCMCIA Modem User Guide
9-1
Page 17
Chapter 9 Installing the BWX 120 PCMCIA Modem
Step Action Illustration
Step 4
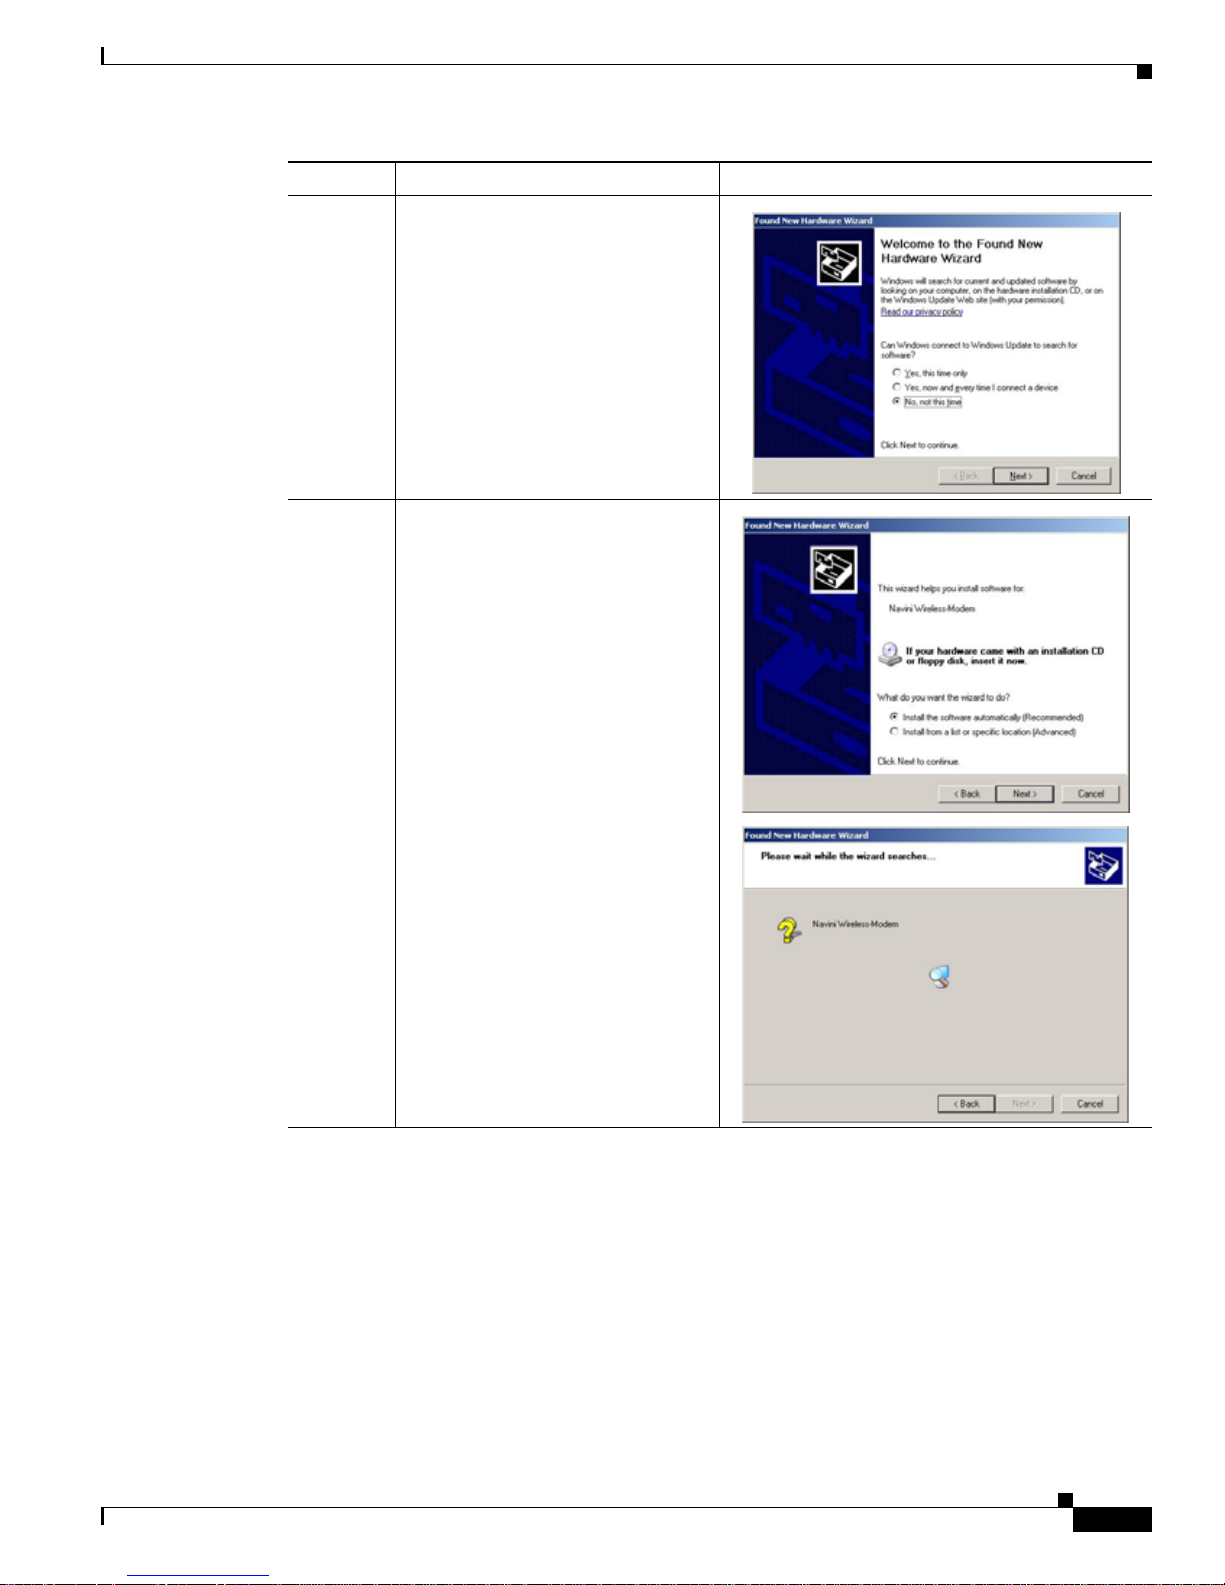
The Welcome to the Found New
Hardware Wizard dialog b ox
appears. Select “No, not this time ”
and click Next. The system responds
with a window requ es ting a C D.
Step 5
Insert the CD that came with the
modem in the CD-R OM dri v e. Sele ct
the Install the software
automatically (Recommended)
option and click Next. The system
responds by searchin g f or a dr iver
until the Hardware Installation
window displays.
OL-16321-03
BWX 120 PCMCIA Modem User Guide
9-2
Page 18
Chapter 9 Installing the BWX 120 PCMCIA Modem
Step Action Illustration
Step 6
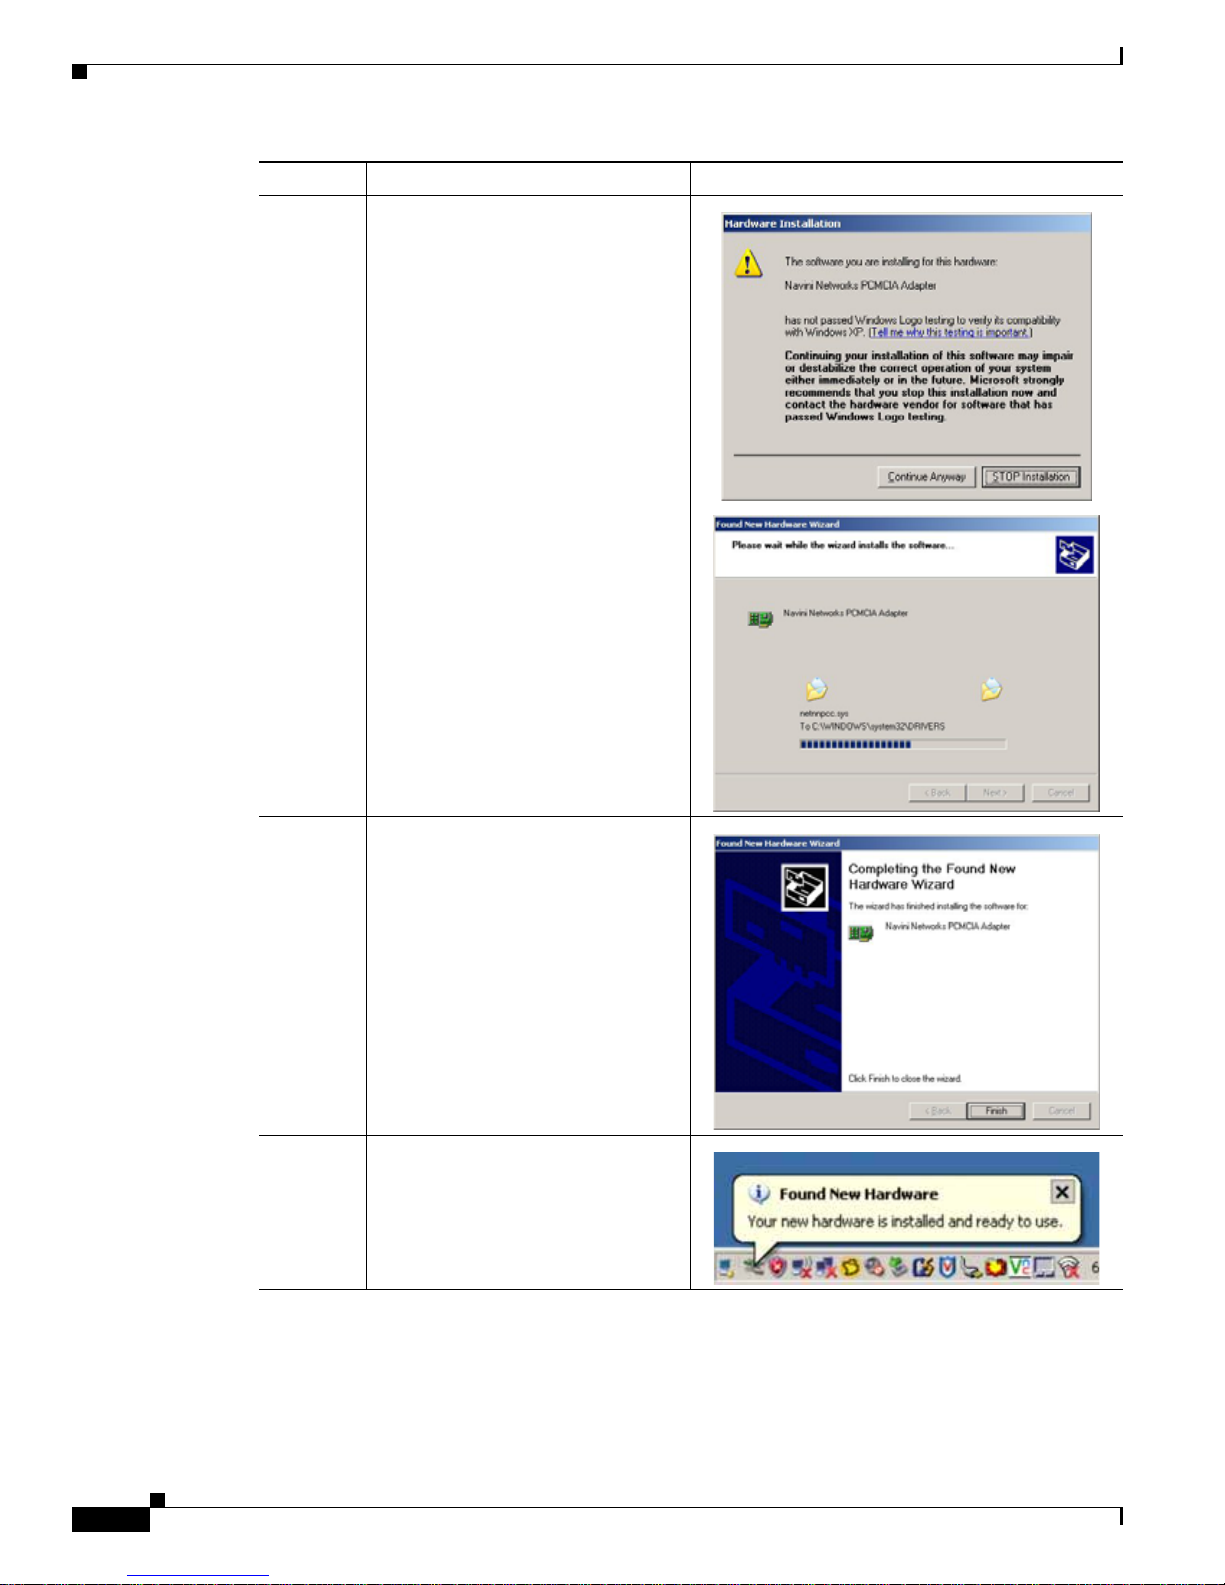
Click Continue Anyway to install
the driver. The system responds by
copying files and displaying t he
Completing the Found New
Hardware Wizard window.
Step 7
Step 8
Click Finish to close the Wizard.
On your Windows Desktop, a
message is displaye d in dica ting t hat
the new hardware is installed and
ready to use.
BWX 120 PCMCIA Modem User Guide
9-3
OL-16321-03
Page 19
CHAPTER
10
Accessing the Internet
Now that your BWX 120 PC MC IA Mode m is i nsta lled an d y our comp uter i s o n, you sho ul d b e ab l e to
access the Internet (that is, assuming you ha ve signed up wi th a Service Pro vider). To access the Internet,
open the Web browser that is installed on yo ur compu ter, (for example, Netscap e, Inte rnet Explo rer,
etc.).
Note The example in the procedure below uses Internet Explorer. The Web page used in the procedure is used
for illustration purposes. The actual Web page you see depends on your Internet browser settings.
To access the Internet,
Step Action Illustration
Step 1
Step 2
Ensure the light on the top of the
modem is blinking. This indicates
that the modem is transmitting data
and is ready for use.
Double-click the Internet Explo rer
icon on your desktop or click
START>All Programs>Internet
Explorer. The system responds by
opening Internet Explorer with a Web
page displayed (refer to illustration
to the right).
Step 3
OL-16321-03
If the Web page does not display,
refer to Chapter 11,
“Troubleshooting.” in this manual for
more information.
BWX 120 PCMCIA Modem User Guide
10-1
Page 20

CHAPTER
11
Removing the BWX 120 PCMCIA Modem
Before you store your BWX 120 PCMCI A Modem in a co mputer case, you should remove the modem
from the PC. Also, tur n the antenna to its original down position. Leaving the modem in the PC or the
antenna in th e uprig ht p osi tio n wh ile stor ing th e PC i n a c omp uter c as e ma y d ama ge the m odem or the
antenna.
To properly remove the BWX 120 PCMCIA Modem from your computer, you must first stop the driver
software. If you do not stop the driver software first, the following wind ow may appear:
To safely remove the BWX 120 PCMCIA Modem, click on the icon indicated in the following
illustration. Depending on y our c omp uter’s setup, this icon is probably locate d in th e lower-right corner
of your comput er.
OL-16321-03
BWX 120 PCMCIA Modem User Guide
11-1
Page 21

CHAPTER
12
Indicator Light
An indicator l ight on the t op of t he B WX 12 0 PCMC IA M od em’s black encas em ent provide s
information about t he BW X 120 PCMCI A M ode m’s operation. W he n th e light b links, the BW X 12 0
PCMCIA Modem is trying to synchronize with a Base Station (BTS). When the light is solid, the BWX
120 PCMCIA Modem ha s ac quir ed syn chron izat ion with a Ba se Sta tion.
Ind ic ato r Light
OL-16321-03
BWX 120 PCMCIA Modem User Guide
12-1
Page 22

CHAPTER
13
Troubleshooting
If you experience difficulties with your Internet connection after you have in stalled the BWX 120
PCMCIA Modem driver software, ple ase review Minimum Computing Requirements and BWX 120
PCMCIA Modem - PC Troubleshooting E nsu re your co mpu t er me ets t hose re qu ire ment s. Al so, review
the installation procedu res and ensure all steps were completed properly. If you are still experiencing
difficulties, troubleshoot using the BWX Modem Diagnostics Tool monitoring software or contact your
Service Provider.
OL-16321-03
BWX 120 PCMCIA Modem User Guide
13-1
Page 23

CHAPTER
14
Installing BWX Modem Diagnostics Tool
The BWX Modem Diagnostics Tool software assists you in solving connec tion probl ems and provides
other valuable information. This software is provided on the Installation CD that came in your Modem
package. This section explains how to install this software.
Note To install BWX Modem Diagnostics Tool on a Windows 2000, you must have administrative privileges.
To c hec k your a c count privileges, o pen y our Co ntro l Pan el. D oub le-cl ick o n th e U ser s and Password s
symbol. You sho uld s ee A dm inist rat or und er the Users tab.
Note The sc re enshot s shown in th e inst ruct ions wer e t aken f rom a l apt op w it h Windows XP. If you have a
Windows 2000 or Vista ope rating s ystem, the screens you see may vary from the scre ens shown in the
instructions.
OL-16321-03
Step Action Illustration
Step 1
Step 2
Step 3
Before installing t he BWX M od em
Diagnostics Too l soft ware, shut
down all programs, including
anti-virus software progr a ms.
Insert the Installation CD into the
CD-ROM drive.
Open the CD by clicking on the My
Computer icon. Double-click the
folder named NavDiag or
Navini_Diagnostics. The system
responds by opening the folder.
BWX 120 PCMCIA Modem User Guide
14-1
Page 24

Chapter 14 Installing BWX Modem Diagnostics Tool
Step Action Illustration
Step 4
Double-click the Windows folder,
Example
then on the file
navdiag_windows.exe*.
The system automatically starts the
installation of BWX Modem
Diagnostics Tool and displays the
Navini Diagnostics Language
window.
Step 5
Step 6
Select a language, and click OK to
continue. The syste m respon ds by
displaying the L ice ns e Agre em e nt
window.
Note BWX Modem Diagnostics
Tool may automatically
attempt to match the
language set on your PC
under Regional Options. The
language selection affects
how the BWX Modem
Diagnostics Tool displays its
screens. If yo u r ece ive an
error message co ncerning the
language, click OK an d the
BWX Modem Diagnostics
Tool defaults to English. At
this time, the BWX Modem
Diagnostics Tool supports
three options:
1. English (U.S .) ,
2. Español (Spain), and
3. Nederlands (Hol la nd) .
Read the Licen sin g Agre emen t.
Select the I Accept option, and click
Next to continue. The system
responds with the C hoo se Ins tall
Folder win dow.
Note If the L ice nse A g re em en t i s
BWX 120 PCMCIA Modem User Guide
14-2
not accepted, you cannot
install the software.
OL-16321-03
Page 25

Chapter 14 Installing BWX Modem Diagnostics Tool
Step Action Illustration
Step 7
Enter the name of the folder where
you wish to install the software.
Click Next to continue. The system
responds with the C hoo se Short cut
Folder
Note The default installation
folder provided by the
software is shown in the
illustration.
Step 8
Step 9
Accept the default and click Next to
continue. The syste m respon ds with
the Pre-Installation Summary
window.
Review the contents for accuracy.
Click Next to continue. The system
responds with the I ntro duct ion
window.
Step 10
Follow the instructio ns on the
Introduction wi ndow and cli ck
Install. The system respond s by
installing the software.
OL-16321-03
BWX 120 PCMCIA Modem User Guide
14-3
Page 26

Chapter 14 Installing BWX Modem Diagnostics Tool
Step Action Illustration
Step 11
If: The WinPcap program is alrea dy
installed in your c om puter.
Then: Do not perfo rm st eps 1 0
through 13.
Otherwise: Follow steps 10 through
13 to install it.
Step 12
Step 13
Click Next to install WinPcap. The
system responds with the License
Agreement window.
Click I Agree. The system responds
by installing the software and
displaying the Instal l Com plete
window.
Note You must agree to the
License agreement to
continue with the Install.
Step 14
BWX 120 PCMCIA Modem User Guide
Click Done to close the window.
14-4
OL-16321-03
Page 27

Chapter 14 Installing BWX Modem Diagnostics Tool
OL-16321-03
BWX 120 PCMCIA Modem User Guide
14-5
Page 28

Troubleshooting Using BWX Modem Diagnostics
Tool
To ope n the BWX Mo dem Diagno stics Tool software application, doubl e-cli ck on the Navini
Diagnostics icon on your desktop.
Navini Diagnostics.lnk
The Menu Bar
The menu bar contains the fol lowing menu types: Sessi on, View, and Help. Thes e menus have options
inside of them for use with the BWX Mo dem Dia gnostics Tool.
CHAPTER
15
The Session Menu
The only purpo se of t he Se ssion m enu i s to c lose the BWX Mod em Di agnos tic s Tool. Click
Session>Close to close the tool.
The View Menu
The View menu is used to view the Connection Status and Configuration of the BWX Mo dem
Diagnostics tool. Please see The Connection Status Window and The Configuration Window in this
manual for more information.
The Help Menu
The Help menu ap pears on th e top right co rner of all the BWX Modem Diag notics Tool windows. The
Help menu gives you two options. The first option, provides help text on the functionality of the BWX
Modem Diagnotics Tool program. The sec ond opt ion, Abo ut NavDiag , i s equivalent to cli cking on the
About icon.
OL-16321-03
BWX 120 PCMCIA Modem User Guide
15-1
Page 29

Chapter 15 Troubleshooting Using BWX Modem Diagnostics Tool
The Window Option Buttons
On the left side of the window, there are five window option buttons: Connection Status, Configuration,
Trend Analysis, Statistics, and About. Each of these windows provides unique capabilities.
The Connection Status Window
The first button, Connect ion Status, c orre spon ds to the d efaul t vi ew:
The Window Option Buttons
The following sections describe the various parts of the Connection Status window.
The Modem ID
In the Modem I D sub -w indow, the Modems ID ap pe ar s as 00:04: 6A:_ _:_ _:_ _
OL-16321-03
BWX 120 PCMCIA Modem User Guide
15-2
Page 30

The Icons
The Icons
Chapter15 Troubleshooting Using BWX Modem Diagnostics Tool
The icons that appear on t he top right side of the wi ndow represe nt t he PC, th e conne ct ion be twee n the
PC and the Modem, the Modem, th e c o nnec tion betwe en the Modem and the Base Station, and the Base
Station to which the Modem is communicating. Check marks over the connections indicate working
connections.
Connection between
Connection between
Modem & Base Station
Connection between
Connection between
PC & Modem
PC & Modem
PC
PC
If the connection betw een the PC an d the Mode m or betwe en the Mo dem an d the Base Stat ion is
interrupted, an "X" is positioned over the corresponding ico n.
Modem & Base Station
Base Station
Modem
Modem
Base Station
The Signal Strength and Signal Quality Bars
Signal Strength and Signal Quality are dynamic bar areas that indicate how well your Modem is
receiving signals fro m the Ba se Stat ion .
In particular, th e Signal Strength bar area graphically represents the strength of the synchronization
signal your Modem is receiving from BTS. The strength of the signal is represented by a group of colored
bars. The higher the pile of bars goes, the stronger the signal is. The color of the bars also gives an
indication of the strength of the sign al. Green lines indicate an excellent signal. Orange lines indicate a
good signal while red lines indicate a weak signal.
BWX 120 PCMCIA Modem User Guide
15-3
OL-16321-03
Page 31

Chapter 15 Troubleshooting Using BWX Modem Diagnostics Tool
The Signal Quality bar area graphically represents the Carrier to Interference + Noise Ratio (CINR) of
the signal received by your BWX 120 PCMCI A Modem. Again, the quality of the signal is r epresented
by a group of colored bars. The higher the pile of bars goes, the better the CINR of the signal. The color
of the bars also gives an indication of the quality of the signal. Green lines indicate an excellent signal
or a CINR greater than 21. Orange lines indicate a good signal or a CINR greater than or equal to 13 but
less than or equal to 21. Red lines indicate a weak signal or an CINR less than 13.
How to Increase the Strength and Quality of the Signal
How to Increase the Strength and Quality of the Sign al
To increase the strength and quality of the signal, change the location of the PC in which the Modem is
inserted. Try moving it closer to a window, to a higher location, away from other wireless devices
(microwave ovens, cordless phones), and away from metal objects (shelves, file cabinets ). As you
reposition your PC, watch the Signal Strength and Quality bars o n the BWX Modem Diagnostics Tool
window. Place your PC in the location where you recei ve the most g reen signal strength and q uality bars.
OL-16321-03
BWX 120 PCMCIA Modem User Guide
15-4
Page 32

The History Graphs
WiMAX ModeWiMAX Mode
The History Graphs
The History graphs plot th e ch ang e i n signal strength and signal quality over time. The graphs cover the
last minute and are updated every second. Read the graphs from right to left. The right side of the graph
represents the most recent status of your Modem.
Chapter15 Troubleshooting Using BWX Modem Diagnostics Tool
The Parameters
At the bottom of the Connec tion Status w indow are four pa ramet ers. These parame ters are BTS ID,
Network ID, Active SW Version, and Standby SW Version.
The BTS ID indicates th e BTS to which th e Modem is currently s ynchroni zed. The Netw ork ID indi cates
the network in whic h the Mo de m is a llowed to o pera te. Ac tive SW Version and Standby SW Version
indicate the version number of the software currently loaded in the “active side” and “standby side” of
the Modem’ s flash memory. The two letters in parenthesis follo wing the relea se number indica te the type
of software load. JD indicat es Joint Det ection. The other t ype of load , Enhance d Null ing (EN) , is no
longer supported .
BWX 120 PCMCIA Modem User Guide
15-5
OL-16321-03
Page 33

Chapter 15 Troubleshooting Using BWX Modem Diagnostics Tool
The Configuration Window
The Configuration window enables you t o update your Mo dem’s software if directed to do so by your
Service Provider. To access the Configuration window, click Configuration.
The Configuration Window
If you must update your Modem’s software, contact your Ser vice Provider to provide yo u with
instructions.
At the bottom of the window is an Allow Customer Satisfaction Reporting check box. This check box is
used to enable local logging on your computer. This log is useful for any technical support that might be
required for your Mode m.
OL-16321-03
BWX 120 PCMCIA Modem User Guide
15-6
Page 34

The Trend Analysis Window
The Trend Analysis Window
The Trend Analysis window lets you view Modem parameters that evolve over time. With this window,
you can select up to three par amete rs to plot. To view the Trend Analysis window, click the Trend
Analysis.
Chapter15 Troubleshooting Using BWX Modem Diagnostics Tool
By selecting one or more (up to 4) parameters and then clicking on th e Pl ot Gra ph button, the following
window appears. This window displays the value of the selected param eters over the last five minutes,
updated once every second. Th e graphi c scroll s from ri ght to left .
BWX 120 PCMCIA Modem User Guide
15-7
OL-16321-03
Page 35

Chapter 15 Troubleshooting Using BWX Modem Diagnostics Tool
WiMAX Mode Stats tabWiMAX Mode Stats tab
There is a second tab associated with the Trend Analysis icon.
The Trend Analysis Window
By selecting one or more (up to 4) pa rameters and then clicking on the Pl ot Gra ph button, the following
window appears.
This window displays the value of the selected parameters over the last five minutes, updated once every
second. The grap hic sc rolls fro m righ t to le ft.
OL-16321-03
BWX 120 PCMCIA Modem User Guide
15-8
Page 36

The Statistics Window
Chapter15 Troubleshooting Using BWX Modem Diagnostics Tool
By clicking on the Show Diagram following window appears. Th is window displays a di agramm atic
representation of the selected metrics.
The Statistics Window
The Statistics window lets you view the current value of selected parameters. These values are updated
as they change over time. To view the Statistics window, click Statistics.
BWX 120 PCMCIA Modem User Guide
15-9
OL-16321-03
Page 37

Chapter 15 Troubleshooting Using BWX Modem Diagnostics Tool
The Statistics Window
OL-16321-03
BWX 120 PCMCIA Modem User Guide
15-10
Page 38

The About Window
The About Window
The About window provides vital information such as the version of the BWX Modem Diagnostics
software currently installed on your computer. It also provides a website address and telephone number
where you can co ntac t y our Se rvic e Provide r. To vi ew the A bou t wi nd ow, click About.
WiMAX ModeWiMAX Mode
Chapter15 Troubleshooting Using BWX Modem Diagnostics Tool
BWX 120 PCMCIA Modem User Guide
15-11
OL-16321-03
Page 39

CHAPTER
16
Manually Upgrading the BWX Mode m
Diagnostics Tool
Upgrades to the BWX Modem Diagnostics Tool are needed to ensure the tool is always up to date with
new software releases. These upgrades must sometime be done manually on the PC that is connec ted to
the Modem.
To u pgr ad e the BW X M ode m D iag nost ics Tool:
Step Action Illustration
Step 1
Step 2
Step 3
Open the BWX Modem
Diagnostics Tool
application by
double-clicking the
Navini Diagnostics
icon on your deskto p.
The system responds
by opening the BWX
Modem Diagnostics
Tool .
Download the software
update from a Web site
or insert the CD that
contains the software in
your CD-ROM drive.
In the right pane, click
Configuration. The
system responds by
displaying
configuration
information.
OL-16321-03
BWX 120 PCMCIA Modem User Guide
16-1
Page 40

Step Action Illustration
Step 4
Click Browse under the
Update Modem
Application heading
and go to the d ire ctor y
where the update is
stored.
Chapter16 Manually Upgrading the BWX Modem Diagnostics Tool
Step 5
Step 6
Select the load and
click Open.
Note The lo ad wi ll
end with a .bin
extension (i.e.,
lm060284.bin).
The “060284”
in this example
is the software
version number
of the load.
The system responds
by displaying the path
to the load in the File
box.
Click Start. The
system responds by
displaying a progress
indicato r showing the
status of the softwa re
update.
BWX 120 PCMCIA Modem User Guide
16-2
OL-16321-03
Page 41

Chapter 16 Manually Upgradi ng the BWX Modem Diagnos ti cs Tool
Step Action Illustration
Step 7
When the update is
complete, click OK in
the Success window.
Step 8
Step 9
Step 10
Step 11
Step 12
Step 13
Wai t 60 se conds fo r
your Modem to re sta rt.
Click Connection
Status. The system
responds by displaying
connection
information.
Ensure the softwa re
version (in this case
060284) appears in the
Active SW Version
field. This fie ld is in the
lower right of the
Connection Status
window. The software
version is displayed as
6.2.84
Repeat steps 1 through
9.
Ensure the softwa re
version (in this case
060284) appears in the
Standby SW Version
field. The software
version is displayed as
6.2.84. Both the Acti ve
and Standby SW
versions should match.
End
OL-16321-03
BWX 120 PCMCIA Modem User Guide
16-3
Page 42

CHAPTER
17
Uninstalling The BWX Modem Diagnostics Tool
Software
If for some reason you need to uninstall th e BWX Modem Diagno stics Tool software, e.g., to upgrade
your Operating System software, follow the procedure below.
Note If you are going to upgrade your PC Operating System after loading the BWX Modem Diagnostics Tool
software, you must first uninstall BWX Modem Diagnostics Tool prior to upgrading the OS. Otherwise,
the BWX Modem Diagnostics Tool does not work.
Note The scre enshots shown in these instruct ions were taken fr om a laptop w ith Windows XP. If you have a
Windows 2000 or Windows Vista operating system, t he screen s you see may vary from the sc reens
shown in the instructions.
OL-16321-03
BWX 120 PCMCIA Modem User Guide
17-1
Page 43

Chapter 17 Uninstalling The B W X Modem Diagnostics To ol Software
Step Action Illustration
Step 1
On your compute r scre en lower le ft
corner, click on Start > Programs >
NavDiag > Uninstall. The system
responds with the Uninstaller
window.
Step 2
Step 3
Click Uninstall. The system
responds with the Uninstall Options
window.
Select the default Complete
Uninstall and click Next. The system
responds with the Uninstall
Complete window.
Note The Uninstall Navini
Diagnostics screen indicates
the application is uninstalled.
OL-16321-03
BWX 120 PCMCIA Modem User Guide
17-2
Page 44

Chapter 17 Uninstalling The BWX Modem Diagnostics Tool Software
Step Action Illustration
Step 4
Click Done to close the Uninstall
window.
Note If any files could not be
removed proceed with step 6;
otherwise, the installation is
complete.
Step 5
Step 6
Step 7
Manually delete the folder NavDiag
under C:\Program File s pa th by
right-clicking t he NavDiag folder
and selecting Delete from the menu.
Click Yes. The system res ponds by
deleting the NavDiag folder.
End
BWX 120 PCMCIA Modem User Guide
17-3
OL-16321-03
Page 45

CHAPTER
18
Care & Maintenance
The BWX 120 PCMCIA Modem is design ed to give you years of trouble -free ser vice. To ensure
operation, read t he f ol lowing ca re a nd ma int ena nc e i nstru cti ons .
• Keep the BWX 120 PCMCIA Modem free of dust and moisture. If the BWX 120 PCMCIA Modem
gets wet, use a towel to dry it immediately.
• Handle the BWX 120 PCMCIA Mo de m gent ly. Dropping it or mishandling it ca n cause dama ge to
the metal/plastic shell or the electronic circuitry.
• Keep the BWX 120 PCMCIA Modem away from high temperatures. Heat can cause damage to the
metal/plastic shell or the electronic circuitry.
• T o c lean the e xtern al areas o f the BWX 120 PCMCIA Modem, us e only an electrica l contac t cleaner
that is non-co nduct ibl e a nd a sof t , dam p, li nt-f ree c lot h. D o n ot u se a ny chem ica ls or a br asives to
clean the BWX 1 20 PCM CIA Mode m. Also use cau tio n ar ound the conne cti on pi n s.
• If there is a problem with the BWX 120 PCMCIA Modem, do not attempt to repair it yourself.
Report the problem to your Service Provider.
• Do not apply adhesive labels to the BWX 120 PCM CI A M odem. Thi s may c ause the BWX 1 20
PCMCIA Modem to become jam med inside the modem slot.
• The BWX 120 PCMCIA Modem shoul d fit easily into the PC slot. Do not force the BWX 120
PCMCIA Modem into the PC slot. Forcing the BWX 120 PCMCIA Modem into the slot may cause
damage to the c onn ect or pi n s.
• If you are going t o up gra de y our c omput er Op erat ing Syst em aft er l oadi n g the BWX M odem
Diagnostics Tool software, you must first uninstall the BWX M odem Dia gno stics Tool prior to
upgrading the OS. Otherwise, NavDiag will not work. See Chapter 17, “Uninstalling T he B WX
Modem Diagnostics Tool Software” in this Guide.
OL-16321-03
BWX 120 PCMCIA Modem User Guide
18-1
Page 46

CHAPTER
19
Upgrading the BWX 120 PCMCIA Modem
Software
There are two different ways to upgrade the software that makes the BWX 120 PCMCIA Modem work.
• Your Service Provid er may perform an over-the-air (OTA) upgrade, where the up-to-date software
files are transferred wi relessly fr om a Ba se Sta tio n to yo ur BWX 120 PCM CI A M odem. Thi s
method will norma ll y b e t ranspa ren t to y ou; in o th er wo rds, y ou shou ld n ot experi enc e a ny
noticeable service interruption.
• Your Service Provider may provide a downloadable Web file or CD-ROM with software that is
installed on your PC and used to upgrade the BWX 120 PCMCIA Modem software. This method is
used only if the BWX 120 PCMCIA Mode m was not inserte d and “on” dur ing the OTA upgrad e
process. If you must upgrade your software using this method, your Service Provider will give you
instructions on what to do. This method takes a minimal amount o f time to complete.
Note If you must upgrade the BWX 120 PCMCIA Modem Driver to the latest driver, Windows tells you that
the current dr iver is the lat est dr iver. Ignore this me ssage, a nd fo rce Windows to upda te the d river.
OL-16321-03
BWX 120 PCMCIA Modem User Guide
19-1
Page 47

CHAPTER
20
What Could go Wrong During the BWX 120
PCMCIA Modem Update
1. If you are using t he c orre ct BWX 1 20 PCM CIA Mo dem, but y ou fo rgot to stop t he BW X Mode m
Diagnostics Tool application before starting the execution of the upgra de proced ure, the fo llowing
message displays.
Click Done to quit the applica tio n. Stop th e B WX M odem Dia gn osti cs Tool, and then execute the
upgrade procedur e agai n.
OL-16321-03
BWX 120 PCMCIA Modem User Guide
20-1
Page 48

Chapter 20 What Could go Wrong During the BWX 120 PCM CI A Modem Update
2. If you get theModem Update Failed message, click Done to stop this application and run the BWX
Modem Diagnostics Tool to see which loads you currently have in the modem. The procedur e
probably failed because the modem was already upgraded.
3. If you get the Modem Not Found message, the BWX 120 PCMCIA Modem is not properly inserted.
Click Done to stop this application, insert the BWX 120 PCMCIA Mo dem, then e xecute the upgrade
procedure again.
BWX 120 PCMCIA Modem User Guide
20-2
OL-16321-03
Page 49

CHAPTER
21
BWX 120 PCMCIA Modem - PC Troubleshooting
PC Operating Systems
Prior to installing BWX Modem Diagnostics Tool monitoring software, please check to insure that the
PC Operating System (OS) meets the criteria given earlier in this manual (Chapter 6, “Minimum
Computing Requirements ”). If these criteria are not met, unpredictable results may occur as a result of
installation. Also, check to see that you have the latest OS updates installed prior to installing BWX
Modem Diagnostics Tool.
Results of Correct BWX Modem Diagnostics Tool Installation
Experienced PC users can check the results of the BWX Modem Diagnostics Tool installation by looking
at the log file that is created during the installation p rocess. The log file is named
Navini_Diagnostics_InstallLog.log. It is located under c:\Program Files\Nav Diag.
Thu Dec 13 15:53:05 CST 2007
Free Memory: 9177 kB
Total Memory: 16320 kB
java.class.path:
C:\Documents and Settings\navini\Local Settings\Temp\I1197581883\InstallerData\IAClasses.zip
C:\Documents and Settings\navini\Local Settings\Temp\I1197581883\Windows\resource\jdglue.zip
C:\Documents and Settings\navini\Local Settings\Temp\I1197581883\InstallerData\Execute.zip
C:\Documents and Settings\navini\Local Settings\Temp\I1197581883\Windows\InstallerData\Execute.zip
C:\Documents and Settings\navini\Local Settings\Temp\I1197581883\InstallerData\Resource1.zip
C:\Documents and Settings\navini\Local Settings\Temp\I1197581883\Windows\InstallerData\Resource1.zip
C:\Documents and Settings\navini\Local Settings\Temp\I1197581883\InstallerData
C:\Documents and Settings\navini\Local Settings\Temp\I1197581883\Windows\InstallerData
ZGUtil.CLASS_PATH:
C:\Documents and Settings\navini\Local Settings\Temp\I1197581883\InstallerData\IAClasses.zip
C:\Documents and Settings\navini\Local Settings\Temp\I1197581883\Windows\resource\jdglue.zip
C:\Documents and Settings\navini\Local Settings\Temp\I1197581883\InstallerData\Execute.zip
C:\Documents and Settings\navini\Local Settings\Temp\I1197581883\InstallerData
sun.boot.class.path:
C:\Documents and Settings\navini\Local Settings\Temp\I1197581883\Windows\resource\jre\lib\rt.jar
C:\Documents and Settings\navini\Local Settings\Temp\I1197581883\Windows\resource\jre\lib\i18n.jar
C:\Documents and Settings\navini\Local Settings\Temp\I1197581883\Windows\resource\jre\lib\sunrsasign.jar
C:\Documents and Settings\navini\Local Settings\Temp\I1197581883\Windows\resource\jre\lib\jsse.jar
C:\Documents and Settings\navini\Local Settings\Temp\I1197581883\Windows\resource\jre\lib\jce.jar
C:\Documents and Settings\navini\Local Settings\Temp\I1197581883\Windows\resource\jre\lib\charsets.jar
OL-16321-03
BWX 120 PCMCIA Modem User Guide
21-1
Page 50

Chapter21 BWX 120 PCMCIA Modem - PC Troubleshooting
Results of Correct BWX Modem D iagnostics Tool Installati on
C:\Documents and Settings\navini\Local Settings\Temp\I1197581883\Windows\resource\jre\classes
java.ext.dirs:
C:\Documents and Settings\navini\Local Settings\Temp\I1197581883\Windows\resource\jre\lib\ext
java.version == 1.5.0_07 (Java 2+)
java.vm.name == Java HotSpot(TM) Client VM
java.vm.vendor == Sun Microsystems Inc.
java.vm.version == 1.5.0_07-b03
java.vm.specification.name == Java Virtual Machine Specification
java.vm.specification.vendor == Sun Microsystems Inc.
java.vm.specification.version == 1.0
java.specification.name == Java Platform API Specification
java.specification.vendor == Sun Microsystems Inc.
java.specification.version == 1.5
java.vendor == Sun Microsystems Inc.
java.vendor.url == http://java.sun.com/
java.class.version == 49.0
java.compiler == null
java.home == C:\Documents and Settings\navini\Local
Settings\Temp\I1197581883\Windows\resource\jre
java.io.tmpdir == C:\DOCUME~1\navini\LOCALS~1\Temp\
os.name == Windows XP
os.arch == x86
os.version == 5.1
path.separator == ;
file.separator == \
file.encoding == Cp1252
user.name == navini
user.home == C:\Documents and Settings\navini
user.dir == C:\Documents and Settings\navini\Local Settings\Temp\I1197581883\Windows
user.language == en
user.region == null
__________________________________________________________________________
Install Begin: Thu Dec 13 15:38:38 CST 2007
Install End: Thu Dec 13 15:51:59 CST 2007
Installed by InstallAnywhere 8.0 Enterprise Build 3063, by Macrovision
User Interactions
-----------------
#Choose Install Folder
#--------------------USER_INSTALL_DIR=C:\\Program Files\\NavDiag
#Choose Shortcut Folder
#---------------------USER_SHORTCUTS=C:\\Documents and Settings\\navini\\Start Menu\\Programs\\NavDiag
Summary
-------
Installation: Successful.
78 Successes
0 Warnings
0 NonFatalErrors
0 FatalErrors
Action Notes:
BWX 120 PCMCIA Modem User Guide
21-2
OL-16321-03
Page 51

Chapter 21 BWX 120 PCMCIA Modem - PC Troubleshooting
Results of Correct BWX Modem Diagnostics Tool Installation
None
Install Log Detail:
Install Action: InstallAnywhere Variable
Status: SUCCESSFUL
Install Action: InstallAnywhere Variable
Status: SUCCESSFUL
Install Action:
Status: SUCCESSFUL
Get Registry Entry: Key: HKEY_LOCAL_MACHINE\SOFTWARE\Navini Networks\NavDiag
Value Name: InstallDirectory
Status: SUCCESSFUL
Install Action: InstallAnywhere Variable
Status: SUCCESSFUL
Check Disk Space: C:\Program Files\NavDiag
Status: SUCCESSFUL
Additional Notes: NOTE - Required Disk Space: 86,437,210; Free Disk Space:
14,382,198,784
Install Directory: C:\Program Files\NavDiag\
Status: SUCCESSFUL
Additional Notes: NOTE - Directory already existed
Make Registry Entry: Key: HKEY_LOCAL_MACHINE\SOFTWARE\Navini Networks
Value Name:
Value Data:
Status: SUCCESSFUL
Make Registry Entry: Key: HKEY_LOCAL_MACHINE\SOFTWARE\Navini Networks\NavDiag
Value Name:
Value Data:
Status: SUCCESSFUL
Make Registry Entry: Key: HKEY_LOCAL_MACHINE\SOFTWARE\Navini Networks\NavDiag
Value Name: InstallDirectory
Value Data: C:\Program Files\NavDiag
Status: SUCCESSFUL
Install Directory: C:\Program Files\NavDiag\config\
Status: SUCCESSFUL
Install File: C:\Program Files\NavDiag\config\NavDiag.lcf
Status: SUCCESSFUL
Install File: C:\Program Files\NavDiag\config\CpeLogging.conf
Status: SUCCESSFUL
Install File: C:\Program Files\NavDiag\config\EPEventDef.txt
Status: SUCCESSFUL
Install File: C:\Program Files\NavDiag\config\NavCli.lcf
Status: SUCCESSFUL
Install File: C:\Program Files\NavDiag\config\NavCli.conf
Status: SUCCESSFUL
OL-16321-03
BWX 120 PCMCIA Modem User Guide
21-3
Page 52

Chapter21 BWX 120 PCMCIA Modem - PC Troubleshooting
Results of Correct BWX Modem D iagnostics Tool Installati on
Install File: C:\Program Files\NavDiag\config\cdiConfigurableInputs.conf
Status: SUCCESSFUL
Install File: C:\Program Files\NavDiag\config\cdiInputCommands.conf
Status: SUCCESSFUL
Install File: C:\Program Files\NavDiag\config\cdi.conf
Status: SUCCESSFUL
Install File: C:\Program Files\NavDiag\config\notifyForward.conf
Status: SUCCESSFUL
Install File: C:\Program Files\NavDiag\config\LogConfig.conf
Status: SUCCESSFUL
Install Directory: C:\Program Files\NavDiag\Uninstall\
Status: SUCCESSFUL
Install Uninstaller: Navini Diagnostics (Install All Uninstaller Components)
Status: SUCCESSFUL
MakeExecutable : resource jar is empty
Status: SUCCESSFUL
Install Directory: C:\Program Files\NavDiag\jre
Status: SUCCESSFUL
Install File: C:\Program Files\NavDiag\Uninstall\Uninstall NavDiag.exe
Status: SUCCESSFUL
Install File: C:\Program Files\NavDiag\Uninstall\Uninstall NavDiag.lax
Status: SUCCESSFUL
Install Directory: C:\Program Files\NavDiag\Uninstall\resource\
Status: SUCCESSFUL
Install File: C:\Program Files\NavDiag\Uninstall\resource\iawin32.dll
Status: SUCCESSFUL
Install File: C:\Program Files\NavDiag\Uninstall\resource\remove.exe
Status: SUCCESSFUL
Make Registry Entry: Key: HKEY_LOCAL_MACHINE\SOFTWARE\Microsoft\Windows\CurrentVersion\Uninstall\Navini
Diagnostics
Value Name: DisplayName
Value Data: Navini Diagnostics
Status: SUCCESSFUL
Make Registry Entry: Key: HKEY_LOCAL_MACHINE\SOFTWARE\Microsoft\Windows\CurrentVersion\Uninstall\Navini
Value Name: UninstallString
Value Data: "C:\Program Files\NavDiag\Uninstall\Uninstall NavDiag.exe"
Status: SUCCESSFUL
Diagnostics
Make Registry Entry: Key: HKEY_LOCAL_MACHINE\SOFTWARE\Microsoft\Windows\CurrentVersion\Uninstall\Navini
Diagnostics
Value Name: ProductID
Value Data: 9df2824d-1eda-11b2-8901-8e873ec0d15a
Status: SUCCESSFUL
Make Registry Entry: Key: HKEY_LOCAL_MACHINE\SOFTWARE\Microsoft\Windows\CurrentVersion\Uninstall\Navini
Diagnostics
Value Name: InstallLocation
BWX 120 PCMCIA Modem User Guide
21-4
OL-16321-03
Page 53

Chapter 21 BWX 120 PCMCIA Modem - PC Troubleshooting
Results of Correct BWX Modem Diagnostics Tool Installation
Value Data: C:\Program Files\NavDiag
Status: SUCCESSFUL
Make Registry Entry: Key: HKEY_LOCAL_MACHINE\SOFTWARE\Microsoft\Windows\CurrentVersion\Uninstall\Navini
Diagnostics
Value Name: InstallDate
Value Data: Thu Dec 13 15:51:43 CST 2007
Status: SUCCESSFUL
Make Registry Entry: Key: HKEY_LOCAL_MACHINE\SOFTWARE\Microsoft\Windows\CurrentVersion\Uninstall\Navini
Diagnostics
Value Name: DisplayVersion
Value Data: 1.0.0.0
Status: SUCCESSFUL
Install Uninstaller: Navini Diagnostics (Install All Uninstaller Components)
Status: SUCCESSFUL
Create LaunchAnywhere: Navini Diagnostics.exe (Install All LaunchAnywhere Java Executable Components)
Status: SUCCESSFUL
MakeExecutable : resource jar is empty
Status: SUCCESSFUL
Install File: C:\Program Files\NavDiag\Navini Diagnostics.exe
Status: SUCCESSFUL
Install File: C:\Program Files\NavDiag\Navini Diagnostics.lax
Status: SUCCESSFUL
Create LaunchAnywhere: Navini Diagnostics.exe (Install All LaunchAnywhere Java Executable Components)
Status: SUCCESSFUL
Install Directory: C:\Program Files\NavDiag\data\
Status: SUCCESSFUL
Additional Notes: NOTE - Directory already existed
Install Directory: C:\Program Files\NavDiag\data\images\
Status: SUCCESSFUL
Install File: C:\Program Files\NavDiag\data\images\billboard.gif
Status: SUCCESSFUL
Install File: C:\Program Files\NavDiag\data\images\splash.gif
Status: SUCCESSFUL
Install File: C:\Program Files\NavDiag\data\images\buttonbar.gif
Status: SUCCESSFUL
Install File: C:\Program Files\NavDiag\data\images\about2.gif
Status: SUCCESSFUL
Install File: C:\Program Files\NavDiag\data\images\about1.gif
Status: SUCCESSFUL
Install File: C:\Program Files\NavDiag\data\images\about.gif
Status: SUCCESSFUL
Install File: C:\Program Files\NavDiag\data\images\uninstall.gif
Status: SUCCESSFUL
Install Directory: C:\Program Files\NavDiag\data\log\
Status: SUCCESSFUL
OL-16321-03
BWX 120 PCMCIA Modem User Guide
21-5
Page 54

Chapter21 BWX 120 PCMCIA Modem - PC Troubleshooting
Results of Correct BWX Modem D iagnostics Tool Installati on
Install Directory: C:\Program Files\NavDiag\data\lib\
Status: SUCCESSFUL
Install File: C:\Program Files\NavDiag\data\lib\ctl.jar
Status: SUCCESSFUL
Install File: C:\Program Files\NavDiag\data\lib\navDiag.jar
Status: SUCCESSFUL
Install File: C:\Program Files\NavDiag\data\lib\log4j.jar
Status: SUCCESSFUL
Install File: C:\Program Files\NavDiag\data\lib\modemConfig.jar
Status: SUCCESSFUL
Install File: C:\Program Files\NavDiag\data\lib\jfreechart.jar
Status: SUCCESSFUL
Install File: C:\Program Files\NavDiag\data\lib\jcommon.jar
Status: SUCCESSFUL
Install File: C:\Program Files\NavDiag\data\lib\jvftp.jar
Status: SUCCESSFUL
Install File: C:\Program Files\NavDiag\data\lib\navCli.jar
Status: SUCCESSFUL
Install Directory: C:\Program Files\NavDiag\data\doc\
Status: SUCCESSFUL
Install Directory: C:\Program Files\NavDiag\jre\
Status: SUCCESSFUL
Additional Notes: NOTE - Directory already existed
Install Directory: C:\Program Files\NavDiag\jre\bin\
Status: SUCCESSFUL
Additional Notes: NOTE - Directory already existed
Install File: C:\Program Files\NavDiag\jre\bin\win32com.dll
Status: SUCCESSFUL
Install Directory: C:\Program Files\NavDiag\jre\lib\
Status: SUCCESSFUL
Additional Notes: NOTE - Directory already existed
Install File: C:\Program Files\NavDiag\jre\lib\comm.jar
Status: SUCCESSFUL
Install File: C:\Program Files\NavDiag\jre\lib\javax.comm.properties
Status: SUCCESSFUL
Install File: C:\Program Files\NavDiag\jre\lib\navcap.jar
Status: SUCCESSFUL
Install Directory: C:\Documents and Settings\navini\Start Menu\Programs\NavDiag\
Status: SUCCESSFUL
Additional Notes: NOTE - Directory already existed
Create Shortcut: C:\Documents and Settings\navini\Start Menu\Programs\NavDiag\Navini Diagnostics.lnk
Status: SUCCESSFUL
Create Shortcut: C:\Documents and Settings\navini\Start Menu\Programs\NavDiag\Uninstall.lnk
Status: SUCCESSFUL
BWX 120 PCMCIA Modem User Guide
21-6
OL-16321-03
Page 55

Chapter 21 BWX 120 PCMCIA Modem - PC Troubleshooting
Results of Correct BWX Modem Diagnostics Tool Installation
Install Directory: C:\Documents and Settings\navini\Desktop\
Status: SUCCESSFUL
Additional Notes: NOTE - Directory already existed
Create Shortcut: C:\Documents and Settings\navini\Desktop\Navini Diagnostics.lnk
Status: SUCCESSFUL
OL-16321-03
BWX 120 PCMCIA Modem User Guide
21-7
Page 56

CHAPTER
22
End User License Agreement
IMPORTANT: PLEASE READ THIS END USER LICENSE AGREEMENT CAREFULLY.
DOWNLOADING, INSTALLING OR USING CISCO OR CISCO-SUPPLIED SOFTWARE CONSTITUTES
ACCEPTANCE OF THIS AGREEMENT.
CISCO SYSTEMS, INC. OR ITS SUBSIDIARY LICENSING THE SOFTWARE INSTEAD OF CISCO
SYSTEMS, INC. (“CISCO”) IS WILLING TO LICENSE ITS SOFTWARE TO YOU ONLY UPON THE
CONDITION THAT YOU ACCEPT ALL OF THE TERMS CONTAINED IN THIS END USER LICENSE
AGREEMENT PLUS ANY ADDITIONAL LIMITATIONS ON THE LICENSE SET FORTH IN A
SUPPLEMENTAL LICENSE AGREEMENT ACCOMPANYING THE PRODUCT (COLLECTIVELY THE
“AGREEMENT”). TO THE EXTENT OF ANY CONFLICT BETWEEN THE TERMS OF THIS END USER
LICENSE AGREEMENT AND ANY SUPPLEMENTAL LICENSE AGREEMENT, THE SUPPLEMENTAL
LICENSE AGREEMENT SHALL APPLY. BY DOWNLOADING, INSTALLING, OR USING THE
SOFTWARE, YOU ARE BINDING YOURSELF AND THE BUSINESS ENTITY THAT YOU REPRESENT
(COLLECTIVELY, “CUSTOMER”) TO THE AGREEMENT. IF YOU DO NOT AGREE TO ALL OF THE
TERMS OF THE AGREEMENT, THEN CISCO IS UNWILLING TO LICENSE THE SOFTWARE TO YOU
AND (A) YOU MAY NOT DOWNLOAD, INSTALL OR USE THE SOFTWARE, AND (B) YOU MAY
RETURN THE SOFTWARE (INCLUDING ANY UNOPENED CD PACKAGE AND ANY WRITTEN
MATERIALS) FOR A FULL REFUND, OR, IF THE SOFTWARE AND WRITTEN MATERIALS ARE
SUPPLIED AS PART OF ANOTHER PRODUCT, YOU MAY RETURN THE ENTIRE PRODUCT FOR A
FULL REFUND. YOUR RIGHT TO RETURN AND REFUND EXPIRES 30 DAYS AFTER PURCHASE
FROM CISCO OR AN AUTHORIZED CISCO RESELLER, AND APPLIES ONLY IF YOU ARE THE
ORIGINAL END USER PURCHASER.
The following terms of the Agreement govern Customer’s access and use of the Cisco or Cisco-supplied
software (“Software”), except to the extent: (a) there is a separate signed agreement between Customer and
Cisco governing Customer’s use of the Software, or (b) the Software includes a separate “click-accept” license
agreement as part of the installation and/or download process. To the extent of a conflict between the
provisions of the foregoing documents, the order of precedence shall be (1) the signed agreement, (2) the
click-accept agreement, and (3) the Agreemen t.
License. Conditioned upon compliance with the terms and conditions of the Agreement, Cisco grants to
Customer a nonexclusive and nontransferable license to use for Customer’s internal business purposes the
Software and the Documentation for wh ich Customer has paid the required license fees. “Documentation”
means written informatio n (whether conta ined in user or te chnical manu als, traini ng materials , specifications or
otherwise) pertaining to the Software and made available by Cisco with the Software in any manner (including
on CD-Rom, or on-line). In orde r to use the So ftware, Custom er may be req uired to input a reg istration nu mber
or product authorization key and regis ter Customer’s copy of the Software online at Cisco’s website to obtain
the necessary license key or license file.
OL-16321-03
BWX 120 PCMCIA Modem User Guide
22-1
Page 57

Chapter 22 End User License A greement
Customer’s license to use the Software shall be limited to, and Customer shall not use the Software in excess of,
a single hardware chassis or card or such other limitations as are set forth in the applicable Supplem enta l
License Agreement or in the applicable purchase order which has been accepted by Cisco and for which
Customer has paid to Cisco the required license fee (the “Purchase Order”).
Unless otherwise expressly provided in the Documentation or any applicable Supplemental License Agreement,
Customer shall use the Software solely as embedded in, for execution on, or (where the applicable
Documentation permits installation on non-Cisco equipment) fo r c om munic a tion wi th Cis co eq uip ment ow ned
or leased by Customer and used for Customer’s internal business purposes. No other licenses are granted by
implication, estoppel or otherwise.
For evaluation or beta copies for which Cisco does not charge a license fee, the above requirement to pay license
fees does not apply.
General Limitations. This is a license, not a transfer of title, to the Software and Documentation, and Cisco
retains ownership of all copies of the Software and Documentation. Customer acknowledges that the Software
and Documentation contain trade secrets of Cisco or its suppliers or licensors, including but not limited to the
specific internal design and structure of individual programs and associated interface information. Except as
otherwise expressly provided under the Agreement, Customer shall have no right, and Customer specifically
agrees not to:
(i) transfer, assign or sublicense its license rights to any other person or entity (other than in compliance
with any Cisco relicensing/transfer policy then in force), or use the Software on unauthorized or
secondhand Cisco equipment, and Customer acknowledges that any attempted transfer, assignment,
sublicense or use shall be void;
(ii) make error correct io ns to or ot her wis e modi fy or adap t the Software or create derivative works based
upon the Software, or permit third parties to do the same;
(iii) reverse engineer or decompile, dec r ypt, disassemble or otherwise reduce the Software to
human-readable form, except to the extent otherwise expressly permitted under applicable law
notwithstanding this restriction;
(iv) use or permit the Software to be used to perform services for third parties, whether on a service bureau
or time sharing basis or otherwise, without the express written authorization of Cisco; or
(v) disclose, provide, or otherwise make available trade secrets contained within the Software and
Documentation in any form to any third party without the prior written consent of Cisco. Customer
shall implement reasonable security measures to protect such trade secrets.
To the extent required by appl icable law , and at Custo mer’s writte n requ est, Cis co shall pr ovide Custom er wi th
the interface information needed to achieve interoperability between the Software and another independently
created program, on payment of Cisco’s applicable fee, if any. Customer shall observe strict obligations of
confidentiality with respect to such information and shall use such information in compliance with any
applicable terms and conditions upon which Cisco makes such information available.
Software, Upgrades and Additional Copies. Fo r purposes of the Agreement, “Software” shall include (and th e
terms and conditions of the Agreement shall apply to) computer programs, including firmware, as provided to
Customer by Cisco or an authorized Cisco reseller, and any upgrades, updates, bug fixes or modified versions
thereto (collectively, “U pgrades”) or backup copies of any of the foregoing. NOTWITHSTANDING ANY
OTHER PROVISION OF THE AGREEMENT: (1) CUSTOMER HAS NO LICENSE OR RIGHT TO MAKE
OR USE ANY ADDITIONAL COPIES OR UPGRADES UNLESS CUSTOMER, AT THE TIME OF MAKING
OR ACQUIRING SUCH COPY OR UPGRADE, ALREADY HOLDS A VALID LICENSE TO THE
ORIGINAL SOFTWARE AND HAS PAID THE APPLICABLE F EE FOR THE UPGRADE OR AD DITIONAL
COPIES; (2) USE OF UPGR ADES IS LIM ITED TO CISCO EQUIPMENT FOR WHICH CUSTOMER IS THE
OL-16321-03
BWX 120 PCMCIA Modem User Guide
22-2
Page 58

Chapter 2 2 End User License Agreement
ORIGINAL END USER PURCHASER OR LESSEE OR OTHERWISE HOLDS A VALID LICENSE TO USE
THE SOFTWARE WHICH IS BEING UPGRADED; AND (3) THE MAKING AND USE OF ADDITIONAL
COPIES IS LIMITED TO NECESSARY BACKUP PURPOSES ONLY.
Proprietary Notices. Customer agrees to ma inta in an d r epr o duc e a ll c o pyr i ght an d o t her p ro prie ta ry notices on
all copies, in any form, of the Software in the same form and manner that such copyright and other proprietary
notices are included on the Software. Except as expressly authorized in the Agreement, Customer shall not make
any copies or duplicates of any Software without the prior written permission of Cisco.
Term and Termination. The Agreement and the license granted herein shall remain effective until terminated.
Customer may te rminate the Agr eement and the li cense at an y time by destro ying all cop ies of So ftware and any
Documentation. Customer’s rights under the Agreement will terminate immediately without notice from Cisco
if Customer fails to comply with a ny pro vision o f the Ag reement. Upon termina tion, Customer shall destroy all
copies of Software and Documentatio n in its possession or control. All confidentiality obligations of Customer
and all limitations of liability and disclaimers and restrictions of warranty shall survive termination of this
Agreement. In addition, the provisions of the sections titled “U.S. Government End User Purchasers” and
“General Terms Applicable to the Limited Warranty Statement and End User License Agreement” shall survive
termination of the Agreement.
Customer Records. Customer grants to Cisco and its inde pend en t acco un tants the right to examine Customer’s
books, records and accounts during Customer’s normal business hours to verify compliance with this
Agreement. In the event such audit discloses non-compliance with this Agreement, Customer shall promptly pay
to Cisco the appropriate license fees, plus the reasonable cost of conducting the audit.
Export, Re-Export, Transfer and Use Controls. The Software, Documentation and tech no logy or direct
products thereof (hereafter referred to as Software and Technology), supplied by Cisco under the Agre ement are
subject to export controls under the laws and regulations of the United States (U.S.). Customer shall comply
with such laws and re gulation s gove rning e xport, r e-expor t, transf er an d use of Cisco Softwa re and Technol ogy
and will obtain all required U.S. and local authorizations, permits, or licenses. Cisco and Customer each agree
to provide the other in formation, sup port docum ents, and as sistance as may reas onably be required b y the other
in connection with securing authorizations or licenses. Information regarding compliance with U.S. export,
re-export, transfer and use may be located at the following URL:
http://www.cisco.com/web/about/doing_business/legal/global_export_trade/general_export/contract_complianc
e.html.
U.S. Government End User Purchasers. The Software and Documentation qualify as “commercial items,” as
that term is defined at Federal Acquisition Regulation (“FAR”) (48 C.F.R.) 2.101, consisting of “commercial
computer software” and “commerci al computer software documentation” as such terms are used in FAR
12.212. Consistent with FAR 12.212 and DoD FAR Supp. 227.7202-1 through 227.7202-4, and
notwithstanding any other FAR or other contractual clause to the contrary in any agreement into which the
Agreement may be incorporated, Customer may provide to Government end user or, if the Agreement is direct,
Government end user will acquire, the Sof tware and Documentation with only those rights set forth in the
Agreement. Use of either the Software or Documentation or both constitutes agreement by the Government that
the Software and Documentation are “ commercial computer software” and “commercial computer software
documentation,” and constitutes acceptance of the rights and restrictions herein.
Limited Warranty
Subject to the limitations and conditions set forth herein, Cisco warrants that commencing from the date of
shipment to Customer (but in case of resale by an authorized Cisco reseller, commencing not more than ninety
BWX 120 PCMCIA Modem User Guide
22-3
OL-16321-03
Page 59

Chapter 22 End User License A greement
(90) days after original shipment by Cisco), and continuing for a period of the long er of (a) ninety (90) days or
(b) the warranty period (if any) expressly set forth as applicable specifically to software in the warranty card
accompanying the product of which the Software is a part (the “Product”) (if any): (a) the media on which the
Software is furnished will be free of defects in materials and workmanship under normal use; and (b) the
Software substantially conforms to the Documentation. The date of shipment of a Product by Cisco is set forth
on the packaging material in w hich the Product is shipped. Except for the foregoing, the Software is provided
“AS IS”. This limited warranty extends only to the Customer who is the original licensee. Customer’s sole and
exclusive remedy and the entire liability of Cisco and its suppliers under this limited warranty will be (i)
replacement of defectiv e med ia an d/or (ii) at Ci sco’s op tion, re pair, r eplacem ent, or refun d of th e purcha se pric e
of the Software, in both cases subject to the conditio n that any error or defect constituting a breach of this
limited warranty is reported to Cisco or the party supplying the Software to Customer, if different than Cisco,
within the war ranty period. Cisco or the party suppl y ing the Software to Customer may, at its option, require
return of the So ftwar e and /or Do cume ntat ion as a c ondit ion to the reme dy. In no ev ent does Cis co warra nt that
the Software is error free or that Customer will be able to operate the Software without problems or
interruptions. In addition, due t o the continual development of new te chniques for intrudin g upon and
attacking networks, Cisco does not warrant that the Software or any equipment, system or network on which
the Software is used will be free of vulnerability to intrusion or attack.
Restrictions. This warranty does not apply if the Software, Product or any other equipment upon which the
Software is authorized to be used (a) has been altered, except by Cisco or its authorized representative, (b) has
not been installed, operated, repaired, or maintained in accordance with instructions supplied by Cisco, (c) has
been subjected to abnormal physical or electrical stress, abnormal environmental conditions, misuse, neglig ence,
or accident; or (d) is licensed for beta, evaluation, testing or demonstration purposes. The Software warranty
also does not apply to (e) any temporary Software modules; (f) any Software not posted on Cisco’s Software
Center (on Cisco.com URL where Cisco makes the Software publicly available to licensed customers); (g) any
Software that Cisco exp ress ly pr ov id es o n an “AS IS ” ba sis on Cisco ’s So ftwa re Cen ter; or (h) a ny So ftwar e for
which Cisco does not receive a license fee.
DISCLAIMER OF WARRANTY
EXCEPT AS SPECIFIED IN THIS WARRANTY SECTION, ALL EXPRESS OR IMPLIED CONDITIONS,
REPRESENTATIONS, AND WARRANTIES INCLUDING, WITHOUT LIMITATION, ANY IMPLIED
WARRANTY OR CONDITION OF MERCHANTABILITY, FITNESS FOR A PARTICULAR PURPOSE,
NON-INFRINGEMENT, SATISFACTORY QUALITY, NON-INTERFERENCE, ACCURACY OF
INFORMATIONAL CONTENT, OR ARISING FROM A COURSE OF DEALING, LAW, USAGE, OR
TRADE PRACTICE, ARE HEREBY EXCLUDED TO THE EXTENT ALLOWED BY APPLICABLE LAW
AND ARE EXPRESSLY DISCLAIMED BY CISCO, ITS SUPPLIERS AND LICENSORS. TO THE EXTENT
AN IMPLIED WARRANTY CANNOT BE EXCLUDED, SUCH WARRANTY IS LIMITED IN DURATION
TO THE EXPRESS WARRANTY PERIOD. TO THE EXTENT SOME STATES OR JURISDICTIONS DO
NOT ALLOW LIMITATIONS ON HOW LONG AN IMPLIED WARRANTY LASTS, THE ABOVE
LIMITATION MAY NOT APPLY. THIS WARRANTY GIVES CUSTOMER SPECIFIC LEGAL RIGHTS,
AND CUSTOMER MAY ALSO HAVE OTHER RIGHTS WHICH VARY FROM JURISDICTION TO
JURISDICTION. This disclaimer and exclusion shall apply even if the express warranty set forth above fails of
its essential purpose.
General Terms Applicable to the Limited Warranty Statement and End User License
Agreement
OL-16321-03
BWX 120 PCMCIA Modem User Guide
22-4
Page 60

Chapter 2 2 End User License Agreement
Disclaimer of Liabilities – Limitation of Liability. IF YOU ACQUIRED THIS SOFTWARE IN THE UNITED
STATES, LATIN AMERICA, CANADA, JAPAN OR THE CARIBBEAN, NOTWITHSTANDING
ANYTHING ELSE IN THIS AGREEMENT TO THE CONTRARY, ALL LIABILITY OF CISCO, ITS
AFFILIATES, OFFICERS, DIRECTORS, EMPLOYEES, AGENTS, SUPPLIERS AND LICENSORS
COLLECTIVELY, TO CUSTOMER, WHETHER IN CONTRACT, TORT (INCLUDING NEGLIGENCE),
BREACH OF WARRANTY OR OTHERWISE, SHALL NOT EXCEED THE PRICE PAID BY CUSTOMER
TO CISCO FOR THE SOFTWARE THAT GAVE RISE TO THE CLAIM OR IF THE SOFTWARE IS PART
OF ANOTHER PRODUCT, THE PRICE PAID FOR SUCH OTHER PRODUCT. THIS LIMITATION OF
LIABILITY FOR SOFTWARE IS CUMULATIVE AND NOT PER INCIDENT (I.E. THE EXISTENCE OF
TWO OR MORE CLAIMS WILL NOT ENLARGE THIS LIMIT).
IF YOU ACQUIRED THIS SOFTWARE IN EUROPE, THE MIDDLE EAST, AFRICA, ASIA OR OCEANIA,
NOTWITHSTANDING ANYTHING ELSE IN T HIS AGREEMENT TO THE CON TRARY, ALL LIABILITY
OF CISCO, ITS AFFILIATES, OFFICERS, DIRECTORS, EMPLOYEES, AGENTS, SUPPLIERS AND
LICENSORS COLLECTIVELY, TO CUSTOMER, WHETHER IN CONTRACT, TORT (INCLUDING
NEGLIGENCE), BREACH OF WARRANTY OR OTHERWISE, SHALL NOT EXCEED THE PRICE PAID
BY CUSTOMER TO CISCO FOR THE SOFTWARE THAT GAVE RISE TO THE CLAIM OR IF THE
SOFTWARE IS PART OF ANOTHER PRODUCT, THE PRICE PAID FOR SUCH OTHER PRODUCT.
THIS LIMITATION OF LIABILITY FOR SOFTWARE IS CUMULATIVE AND NOT PER INCIDENT (I.E.
THE EXISTENCE OF TWO OR MORE CLAIMS WILL NOT ENLARGE THIS LIMIT). NOTHING IN
THIS AGREEMENT SHALL LIMIT (I) THE LIABILITY OF CISCO, ITS AFFILIATES, OFFICERS,
DIRECTORS, EMPLOYEES, AGENTS, SUPPLIERS AND LICENSORS TO CUSTOMER FOR PERSONAL
INJURY OR DEATH CAUSED BY THEIR NEGLIGENCE, (II) CISCO’S LIABILITY FOR FRAUDULENT
MISREPRESENTATION, OR (III) ANY LIABILITY OF CISCO WHICH CANNOT BE EXCLUDED UNDER
APPLICABLE LAW.
Disclaimer of Liabilities – Waiver of Consequential Damages and Other Losses. IF YOU ACQUIRED THIS
SOFTWARE IN THE UNITED STATES, LATIN AMERICA, THE CARIBBEAN OR CANADA,
REGARDLESS OF WHETHER ANY REMEDY SET FORTH HEREIN FAILS OF ITS ESSENTIAL PURPOSE
OR OTHERWISE, IN NO EVENT WILL CISCO OR ITS SUPPLIERS BE LIABLE FOR ANY LOST
REVENUE, PROFIT, OR LOST OR DAMAGED DATA, BUSINESS INTERRUPTION, LOSS OF CAPITAL,
OR FOR SPECIAL, INDIRECT, CONSEQUENTIAL, INCIDENTAL, OR PUNITIVE DAMAGES
HOWEVER CAUSED AND REGARDLESS OF THE THEORY OF LIABILITY OR WHETHER ARISING
OUT OF THE USE OF OR INABILI TY TO USE SOFTWARE OR OTHERWISE AND EVEN IF CISCO OR
ITS SUPPLIERS OR LICENSORS HAVE B EEN ADVISE D OF THE PO SSIBIL ITY O F SUCH D AMAGES . TO
THE EXTENT SOME STATES O R JURISDICTIONS DO NOT ALLOW LIMITATION OR EXCLUSIO N OF
CONSEQUENTIAL OR INCIDENTAL DAMAGES, THE ABOVE LIMITATION MAY NOT APPLY TO
YOU.
IF YOU ACQUIRED THIS SOFTWARE IN JAPAN, EXCEPT FOR LIABILITY ARISING OUT OF OR IN
CONNECTION WITH DEATH OR PERSONAL INJURY, FRAUDULENT MISREPRESENTATION, AND
REGARDLESS OF WHETHER ANY REMEDY SET FORTH HEREIN FAILS OF ITS ESSENTIAL PURPOSE
OR OTHERWISE, IN NO EVENT WILL CISCO , ITS AFFILIATES, OFFICERS, DIRECTORS, EMPLOYEES,
AGENTS, SUPPLIERS AND LICENSORS BE LIABLE FOR ANY LOST REVENUE, PROFIT, OR LOST OR
DAMAGED DATA, BUSINESS INTERRUPTION, LOSS OF CAPITAL, OR FOR SPECIAL, INDIRECT,
CONSEQUENTIAL, INCIDE NTAL, OR PUNITIVE DAMAGE S HOWEVER CAUSED AND REGARDLESS
OF THE THEORY OF LIABILITY OR WHETHE R ARISING OUT OF THE USE OF OR INABILITY TO
USE SOFTWARE OR OTHERWISE AND EVEN IF CISCO OR ITS SUPPLIERS OR LICENSORS HAVE
BEEN ADVISED OF THE PO SSIBILITY OF SUCH DAMAGES.
BWX 120 PCMCIA Modem User Guide
22-5
OL-16321-03
Page 61

Chapter 22 End User License A greement
IF YOU ACQUIRED THIS SOFTWARE IN EUROPE, THE MIDDLE EAST, AFRICA, ASIA OR OCEANIA,
IN NO EVENT WILL CISCO, ITS AFFILIATES, OFFICERS, DIRECTORS, EMPLOYEES, AGENTS,
SUPPLIERS AND LICENSORS, BE LIABLE FOR ANY LOST REVENUE, LOST PROFIT, OR LOST OR
DAMAGED DATA, BUSINESS INTERRUPTION, LOSS OF CAPITAL, OR FOR SPECIAL, INDIRECT,
CONSEQUENTIAL, INCIDE NTAL, OR PUNITIVE DAMAGES, HOWSOEVER ARISING , INCLUDING,
WITHOUT LIMITATION, IN CONTRACT, TORT (INCLUDING NEGLIGENCE) OR WHETHER
ARISING OUT OF THE USE OF OR INABILITY TO USE THE SOFTWARE, EVEN IF, IN EACH CASE,
CISCO, ITS AFFILIATES, OFFICERS, DIRECTORS, EMPLOYEES, AGENTS, SUPPLIERS AND
LICENSORS, HAVE BEEN ADVISED OF THE POSSIBILITY OF SUCH DAMAGES. TO THE EXTENT
SOME STATES OR JURISDICTIONS DO NOT ALLOW LIMITATION OR EXCLUSION OF
CONSEQUENTIAL OR INCIDENTAL DAMAGES, THE ABOVE LIMITATION MAY NOT FULLY APPLY
TO YOU. THE FOREGOING WAIVER SHALL NOT APPLY TO ANY LIABILITY ARISING OUT OF OR
IN CONNECTION WITH: (I) DEATH OR PERSONAL INJURY, (II) FRAUDULENT
MISREPRESENTATION, OR (III) CISCO’S LIABILITY IN CONNECTION WITH ANY TERMS THAT
CANNOT BE EXCLUDED UNDER APPLICABLE LAW.
For all countries and regions referred to above, Customer agree s that the lim itat ion s of liabi lity and disclaime rs
set forth herein will apply regardless of whether Customer has accepted the Software or any other product or
service delivered by Cisco. Customer acknowledges and agrees that Cisco has set its prices and entered into the
Agreement in reliance upon the disclaimers of warranty and the limitations of liability set forth herein, that the
same reflect an allocation of risk between the parties (including the risk that a contract remedy may fail of its
essential purpose and cause consequential loss), and that the same form an essential basis of the bargain
between the parties.
Controlling Law, Jurisdiction. If you acquired this Software in the United States, Latin America, or the
Caribbean, the Agreement and Hardware and Softwa re warranties (“Warranties”) are controlled by and
construed under the laws of the State of California, United States of America, notwithstanding any conflicts of
law provisions; and the state and federal courts of California shall have exclusive jurisdiction over any claim
arising under the Agre ement or Wa rranties. If y ou acquir ed this So ftware in Can ada, unless expressly prohibited
by local law, the Agreement and Warranties are controlled by and construed under the laws of the Province of
Ontario, Canada, notwithstanding any conflicts of law provisions; and the courts of the Province of Ontario
shall have exclusive jurisdiction over an y cla im arising un de r t he Agre ement or Wa rr antie s. If you ac qu ired this
Software in Europe, the Middle Ea st, Africa, Asia or Ocea nia (exc lud ing Australia), unless expressly prohibited
by local law, the Agreement and Warranties are contro lled by and construed under the laws of England,
notwithstanding any conflicts of law provisions; and the English courts shall have exclusive jurisdiction over
any claim arising under the Agreement or Warranties. In addition, if this Agreement is controlled by the laws of
England, no person who is not a pa rty to this Agreement sha ll be entitled to enforce or take the benefi t of any of
its terms under the Contracts (R ig hts of T hir d P arties ) Ac t 19 99. I f you ac qu ire d thi s Softwa re i n Jap an , unl ess
expressly prohibited by local law, the Agreement and Warranties are controlled by and construed under the
laws of Japan, notwithstanding any conflicts of law provisions; and the Tokyo District Court of Japan shall
have exclusive jurisdiction over an y claim arising under the Agreement or Warranties. If you acquired this
Software in Australia, un less ex press ly prohi bited by loc al law, the Ag reement a nd Warr anties are co ntrolled by
and construed under the laws of the Stat e of New So uth Wa le s, Australia , notw ith s tan ding an y co nfli cts of la w
provisions; and the State and federal courts of New South Wales shall have exclusive jurisdiction over any claim
arising under the Agreement o r Warranties . If you acquired th is Software in any othe r country, u nless expressly
prohibited by local law, the Agreement and Warranties are controlled by and construed under the laws of the
State of California, United State s of Americ a, notwith standing any co nflicts of la w pr ovisions ; an d the sta te an d
federal courts of California shall have exclusive jurisdiction over any claim arising under the Agreement or
Warranties.
For all countries referred to above, the parties specifically disclaim the application of the UN Convention on
Contracts for the International Sale of Goods. Notwithstanding the foregoing, either party may seek interim
OL-16321-03
BWX 120 PCMCIA Modem User Guide
22-6
Page 62

Chapter 2 2 End User License Agreement
injunctive relief in any court of appropriate jurisdiction with respect to any alleged breach of such party’s
intellectual property or proprietary rights. If any portion hereof is found to be void or unenforceable, the
remaining provisions of the Agreement and Warran ties shall remain in fu ll forc e and effect. Ex cept a s expre ssly
provided herein, the Agreement constitutes the entire agreement between the parties with respect to the license
of the Software and Documentation and supersedes any conflicting or additional terms contained in an y
Purchase Order or elsewhere, all of which terms are excluded. The Agreement has been written in the English
language, and the parties ag ree that the English version will govern.
Product warranty terms and o ther inform ati on a ppli ca ble to C isc o prod uc ts are availa ble at the follow in g UR L:
http://www.cisco.com/go/warranty
© 1998, 2001, 2003, 2008, 2009 Cisco Systems, Inc. All rights reserved.
78-3621-01M0
BWX 120 PCMCIA Modem User Guide
22-7
OL-16321-03
 Loading...