

Page 1

Cisco Firepower Threat Defense for the
ASA 5508-X and ASA 5516-X Using
Firepower Management Center Quick Start
Guide
First Published: August 10, 2016
Last Updated: December 3, 2018
Warning: You cannot install Firepower Threat Defense 6.3 or subsequent releases on the ASA 5508-X and
5516-X. The final supported Firepower Threat Defense release for these platforms is 6.2.3.
1. Is This Guide for You?
This guide explains how to complete the initial configuration of your Firepower Threat Defense device and how to
register the device to a Firepower Management Center. In a typical deployment on a large network, multiple
managed devices are installed on network segments, monitor traffic for analysis, and report to a managing
Firepower Management Center. The Firepower Management Center provides a centralized management console
with web interface that you can use to perform administrative, management, analysis, and reporting tasks.
For networks that include only a single device or just a few, where you do not need to use a high-powered
multiple-device manager like the Firepower Management Center, you can use the integrated Firepower Device
Manager. Use the Firepower Device Manager web-based device setup wizard to configure the basic features of
the software that are most commonly used for small network deployments as described in
http://www.cisco.com/go/fdm-quick.
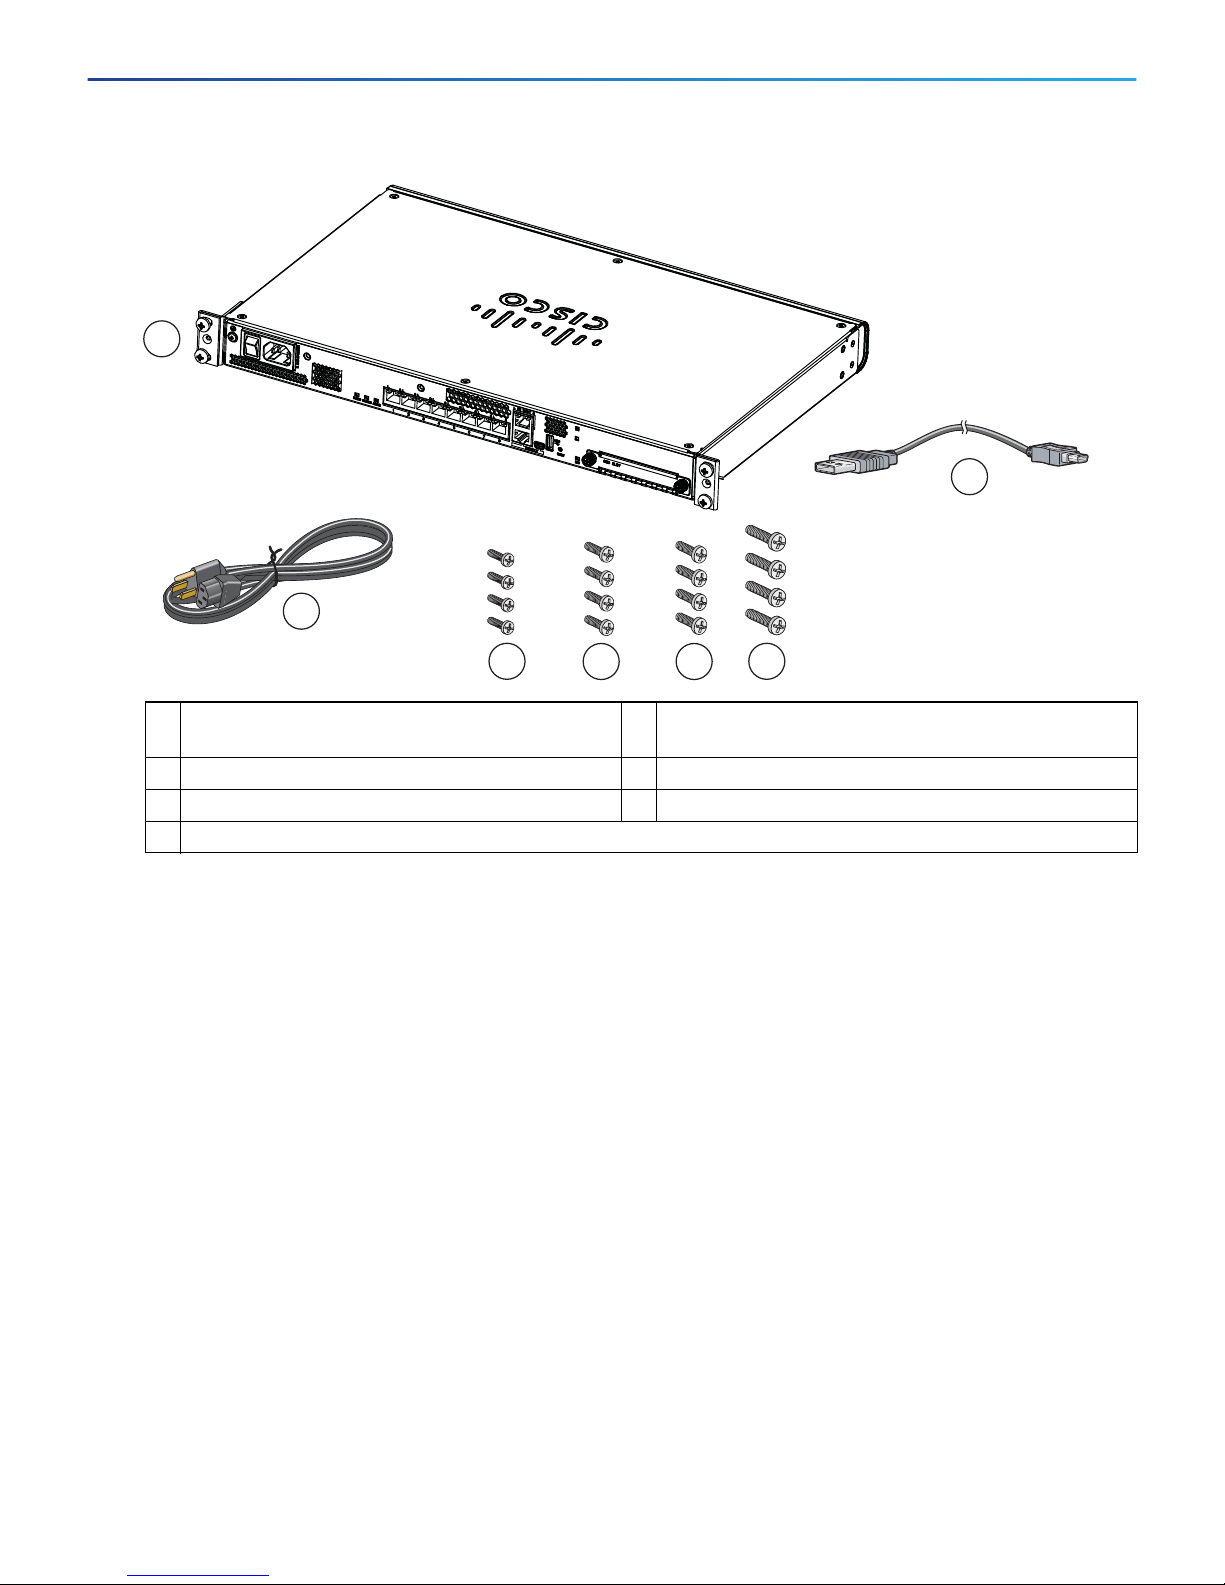
2. Package Contents
This section lists the package contents of the chassis. Note that contents are subject to change, and your exact
contents might contain additional or fewer items.
Cisco Systems, Inc. www.cisco.com
1
Page 2
Cisco Firepower Threat Defense for the ASA 5508-X and ASA 5516-X Using Firepower Management Center Quick Start Guide
1
3
2
353664
6
7
5
4
3. License Requirements
1 ASA 5508-X or ASA 5516-X chassis 2 Blue Console Cable and Serial PC Terminal Adapter
(DB-9 to RJ-45)
3 Power cable 4 4 10-32 Phillips Screws for rack mounting
5 4 12-24 Phillips Screws for rack mounting 6 4 M6 Phillips Screws for rack mounting
7 4 M4 Phillips Screws for rack mounting
3. License Requirements
Firepower Threat Defense devices require Cisco Smart Licensing. Smart Licensing lets you purchase and manage
a pool of licenses centrally. Unlike product authorization key (PAK) licenses, Smart Licenses are not tied to a
specific serial number or license key. Smart Licensing lets you assess your license usage and needs at a glance.
In addition, Smart Licensing does not prevent you from using product features that you have not yet purchased.
You can start using a license immediately, as long as you are registered with the Cisco Smart Software Manager,
and purchase the license later. This allows you to deploy and use a feature, and avoid delays due to purchase order
approval.
When you purchase one or more Smart Licenses for Firepower features, you manage them in the Cisco Smart
Software Manager: http://www.cisco.com/web/ordering/smart-software-manager/index.html. The Smart
Software Manager lets you create a master account for your organization. For more information about the Cisco
Smart Software Manager, see the Cisco Smart Software Manager User Guide.
Your purchase of a Firepower Threat Defense device or Firepower Threat Defense Virtual automatically includes a
Base license. All additional licenses (Threat, Malware, or URL Filtering) are optional. For more information about
Firepower Threat Defense licensing, see the “Licensing the System” chapter of the Cisco Firepower Management
Center Configuration Guide.
2
Page 3
Cisco Firepower Threat Defense for the ASA 5508-X and ASA 5516-X Using Firepower Management Center Quick Start Guide
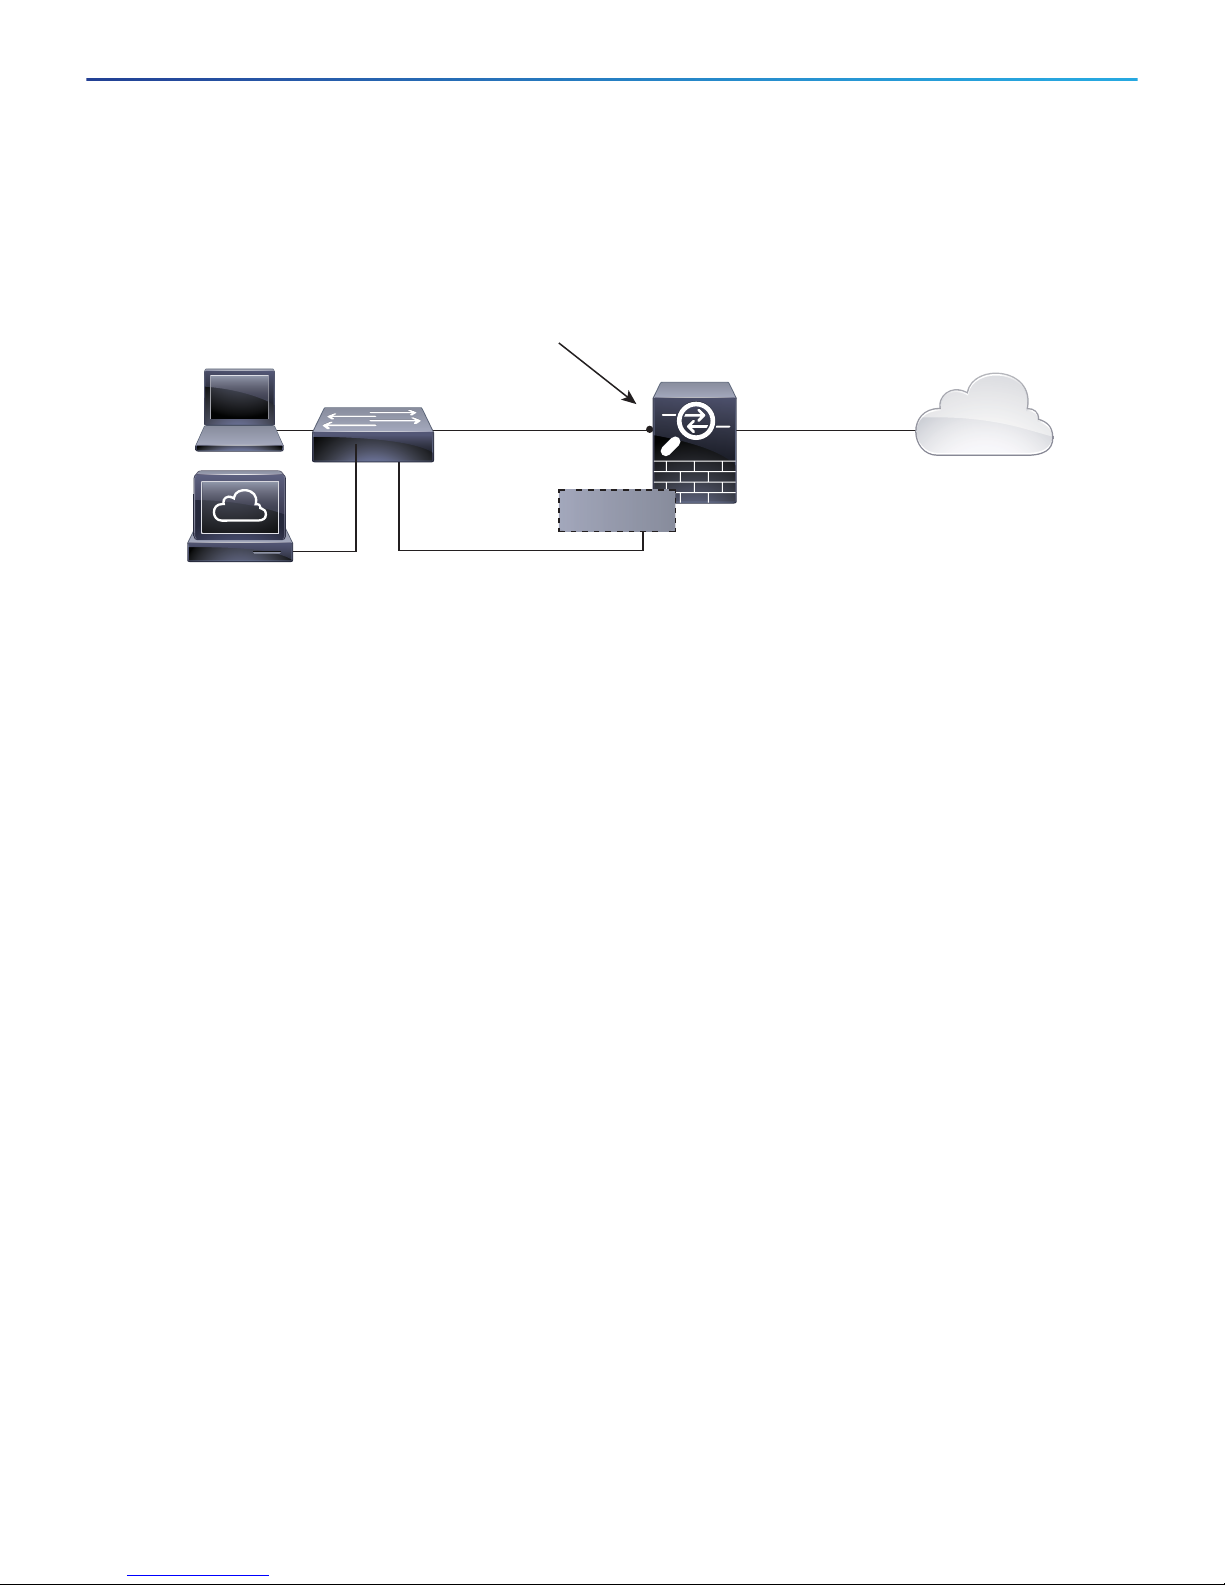
Management
Computer
192.168.45.2
Layer 2
Switch
Firepower
Threat Defense
inside
Management 1/1
IP Address:
192.168.45.45
outside
Management Gateway
GigabitEthernet 1/2
192.168.45.1
GigabitEthernet 1/1
Management
Internet
Firepower
Management Center
192.168.45.44
4. Deploy the Firepower Threat Defense in Your Network
4. Deploy the Firepower Threat Defense in Your Network
The following figure shows the recommended network deployment for Firepower Threat Defense on the ASA
5508-X or ASA 5516-X.
Note: You must use a separate inside switch in your deployment.
The example configuration enables the above network deployment with the following behavior.
inside --> outside traffic flow
outside IP address from DHCP
DHCP for clients on inside.
Management 1/1 is used to set up and register the Firepower Threat Defense device to the Firepower
Management Center.
The Management interface requires Internet access for updates. When you put Management on the same
network as an inside interface, you can deploy the Firepower Threat Defense device with only a switch on the
inside and point to the inside interface as its gateway.
The physical management interface is shared between the Management logical interface and the Diagnostic
logical interface; see the Interfaces for Firepower Threat Defense chapter of the Firepower Management
Center Configuration Guide.
Firepower Management Center access on the inside interface
Note: If you want to deploy a separate router on the inside network, then you can route between management
and inside; see the Interfaces for Firepower Threat Defense chapter of the Firepower Management Center
Configuration Guide for examples of alternate deployment configurations.
To cable the above scenario on the ASA 5508-X or ASA 5516-X, see the following illustration.
Note: The following illustration shows a simple topology using a Layer 2 switch. Other topologies can be used and
your deployment will vary depending on your basic logical network connectivity, ports, addressing, and
configuration requirements.
3
Page 4

Cisco Firepower Threat Defense for the ASA 5508-X and ASA 5516-X Using Firepower Management Center Quick Start Guide
12345678
sL
CONSOLE
GigabitEthernet 1/1
outside, DHCP from Modem
Management 1/1
Default is 192.168.45.45
Layer 2 Switch
WAN Modem
Management Computer
192.168.45.2
Internet
GigabitEthernet 1/2
inside, 192.168.45.1
(Management Gateway)
Firepower
Management Center
192.168.45.44
5. Power on the Firepower Threat Defense Device
Procedure
1. Cable the following to a Layer 2 Ethernet switch:
— GigabitEthernet 1/2 interface (inside)
— Management 1/1 interface (for the Firepower Management Center)
— A local management computer
Note: You can connect inside and management on the same network because the management interface acts
like a separate device that belongs only to Firepower Management.
2. Connect the GigabitEthernet 1/1 (outside) interface to your ISP/WAN modem or other outside device. By
default, the IP address is obtained using DHCP, but you can set a static address during initial configuration.
5. Power on the Firepower Threat Defense Device
Procedure
1. Attach the power cable to the Firepower Threat Defense device and connect it to an electrical outlet.
2. Press the Power button on the back of the Firepower Threat Defense device.
3. Check the Power LED on the front of the Firepower Threat Defense device; if it is solid green, the device is
powered on.
4. Check the Status LED on the front of the Firepower Threat Defense device; after it is solid green, the system
has passed power-on diagnostics.
4
Page 5

Cisco Firepower Threat Defense for the ASA 5508-X and ASA 5516-X Using Firepower Management Center Quick Start Guide
6. Configure the Device for Firepower Management
6. Configure the Device for Firepower Management
The first time you access the CLI, a setup wizard prompts you for basic network configuration parameters that are
required to setup your Firepower Threat Defense device and to register with a Firepower Management Center.
Note that the management IP address and associated gateway route are not included on the Firepower
Management Center web interface in the list of interfaces or static routes for the device; they can only be set by
the setup script and at the CLI.
Before You Begin
Ensure that you connect a data interface to your gateway device, for example, a cable modem or router. For edge
deployments, this would be your Internet-facing gateway. For data center deployments, this would be a back-bone
router.
The Management interface must also be connected to a gateway through which the Internet is accessible. System
licensing and database updates require Internet access.
Procedure
1. Connect to the device, either from the console port or using SSH, for example.
— For a device attached to a monitor and keyboard, log in at the console.
— For access to the management interface of the device, SSH to the Management interface’s default IPv4
address: 192.168.45.45.
2. Log in with the username admin and the password Admin123.
3. When the Firepower Threat Defense system boots, a setup wizard prompts you for the following information
required to configure the system:
— Accept EULA
— New admin password
— IPv4 or IPv6 configuration
— IPv4 or IPv6 DHCP settings
— Management port IPv4 address and subnet mask, or IPv6 address and prefix
— System name
— Default gateway IPv4, IPv6, or both
— DNS setup
— HTTP proxy
— Management mode
4. Review the setup wizard settings. Defaults or previously entered values appear in brackets. To accept
previously entered values, press Enter.
Example:
Please enter 'YES' or press <ENTER> to AGREE to the EULA:
System initialization in progress. Please stand by.
You must change the password for 'admin' to continue.
Enter new password:
Confirm new password:
You must configure the network to continue.
You must configure at least one of IPv4 or IPv6.
Do you want to configure IPv4? (y/n) [y]: y
5
Page 6

Cisco Firepower Threat Defense for the ASA 5508-X and ASA 5516-X Using Firepower Management Center Quick Start Guide
6. Configure the Device for Firepower Management
Do you want to configure IPv6? (y/n) [n]: n
Configure IPv4 via DHCP or manually? (dhcp/manual) [manual]: manual
Enter an IPv4 address for the management interface [192.168.45.45]: 10.133.128.47
Enter an IPv4 netmask for the management interface [255.255.255.0]: 255.255.248.0
Enter the IPv4 default gateway for the management interface []: 10.133.128.1
Enter a fully qualified hostname for this system [firepower]: laurel.example.com
Enter a comma-separated list of DNS servers or 'none' []: 10.33.16.6
Enter a comma-separated list of search domains or 'none' []:
If your networking information has changed, you will need to reconnect.
For HTTP Proxy configuration, run 'configure network http-proxy'
Manage the device locally? (yes/no) [yes]: no
5. Reconnect to your appliance using the new log in credentials.
6. Configure the firewall mode. For example:
Configure firewall mode? (routed/transparent) [routed]
Note: We recommend that you set the firewall mode at initial configuration. Note that the default mode is
routed. Changing the firewall mode after initial setup erases your running configuration. For more information,
see the Transparent or Routed Firewall Mode chapter in the Firepower Management Center Configuration
Guide.
7. Wait for the default system configuration to be processed. This may take a few minutes.
Update policy deployment information
- add device configuration
You can register the sensor to a Management Center and use the Management Center
to manage it. Note that registering the sensor to a Management Center disables
on-sensor FirePOWER Services management capabilities.
When registering the sensor to a Management Center, a unique alphanumeric
registration key is always required. In most cases, to register a sensor
to a Management Center, you must provide the hostname or the IP address along
with the registration key.
'configure manager add [hostname | ip address ] [registration key ]'
However, if the sensor and the Management Center are separated by a NAT device,
you must enter a unique NAT ID, along with the unique registration key.
'configure manager add DONTRESOLVE [registration key ] [ NAT ID ]'
Later, using the web interface on the Management Center, you must use the same
registration key and, if necessary, the same NAT ID when you add this
sensor to the Management Center.
—
Note: The registration key is a user-generated one-time use key that must not exceed 37 characters. Valid
characters include alphanumerical characters (A–Z, a–z, 0–9) and the hyphen (-). You will need to remember
this registration key when you add the device to the Firepower Management Center.
8. Identify the Firepower Management Center appliance that will manage this device using the configure
manager add command.
Remember that the registration key is a user-generated one-time use key which you need to add the device
to the Firepower Management Center’s inventory. The following example shows the simple case:
> configure manager add MC.example.com 123456
Manager successfully configured.
6
Page 7

Cisco Firepower Threat Defense for the ASA 5508-X and ASA 5516-X Using Firepower Management Center Quick Start Guide
7. Register the Device with the Firepower Management Center and Assign Smart Licenses
If the device and the Firepower Management Center are separated by a NAT device, enter a unique NAT ID
along with the registration key, and specify DONTRESOLVE instead of the hostname, for example:
>configure manager add DONTRESOLVE my_reg_key my_nat_id
Manager successfully configured.
The Firepower Management Center and the security appliance use the registration key and NAT ID (instead of
IP addresses) to authenticate and authorize for initial registration. The NAT ID must be unique among all NAT
IDs used to register managed appliances to establish trust for the initial communication and to look up the
correct registration key.
Note: At least one of the security appliances, either the Firepower Management Center or the Firepower
Threat Defense, must have a public IP address to establish the two-way, SSL-encrypted communication
channel between the two appliances.
9. Close the CLI.
> exit
What To Do Next
Register your device to a Firepower Management Center as described in the next section.
7. Register the Device with the Firepower Management
Center and Assign Smart Licenses
Before You Begin
Set up Smart Licensing on your Firepower Management Center. Make sure you have the following a Cisco
Smart Account. You can create one at Cisco Software Central (https://software.cisco.com/).
Make sure you have a base Firepower Threat Defense license added to your Smart Account; for example,
L-ASA5516T-BASE=.
Procedure
1. Log into the Firepower Management Center using an HTTPS connection in a browser, using the hostname or
address entered above. For example, https://MC.example.com.
2. Use the Device Management (Devices > Device Management) page to add the device. For more information,
see the online help or the Managing Devices chapter in the Firepower Management Center Configuration
Guide.
3. Enter the management IP address configured on the device during the CLI setup.
4. Use the same registration key as specified on the device during the CLI setup.
5. Select your Smart Licensing options (Threat, URL, Advanced Malware).
These licenses need to be present in your Smart Account already. You should have a base license for your
appliance in your Smart Account.
6. Click Register and confirm a successful device registration.
What To Do Next
Configure policies and device settings for your device. After you add the device to the Firepower Management
Center, you can use the Firepower Management Center user interface to configure device management
settings and to configure and apply access control policies and other related policies to manage traffic using
your Firepower Threat Defense system.
7
Page 8

Cisco Firepower Threat Defense for the ASA 5508-X and ASA 5516-X Using Firepower Management Center Quick Start Guide
6. Where to Go Next
6. Where to Go Next
For more information about managing the Firepower Threat Defense with the Firepower Management Center,
see the Firepower Management Center configuration guide, or the Firepower Management Center online help.
Cisco and the Cisco logo are trademarks or registered trademarks of Cisco and/or its affiliates in the U.S. and other countries. To
view a list of Cisco trademarks, go to this URL: www.cisco.com/go/trademarks. Third-party trademarks mentioned are the property
of their respective owners. The use of the word partner does not imply a partnership relationship between Cisco and any other
company. (1721R)
© 2016-2018 Cisco Systems, Inc. All rights reserved.
8
 Loading...