

Page 1
Cisco ASA with FirePOWER Services
Easy Setup Guide
1
Connecting PC to ASA
2
Installing ASDM
3
Configuring ASA
You can easily set up your ASA
in this step-by-step guide.
Page 2
1-1 Before You Begin
Before you begin the installation, make sure that you have the following equipment:
●
ASA Chassis
●
AC Power Cable (& Supply with ASA 5506-X)
●
Ethernet Cable x 3
●
PC
Make sure that nothing is connected to the ASA and your PC settings are config
-
ured to use DHCP.
1-2 Connecting PC to ASA
Connecting PC to ASA
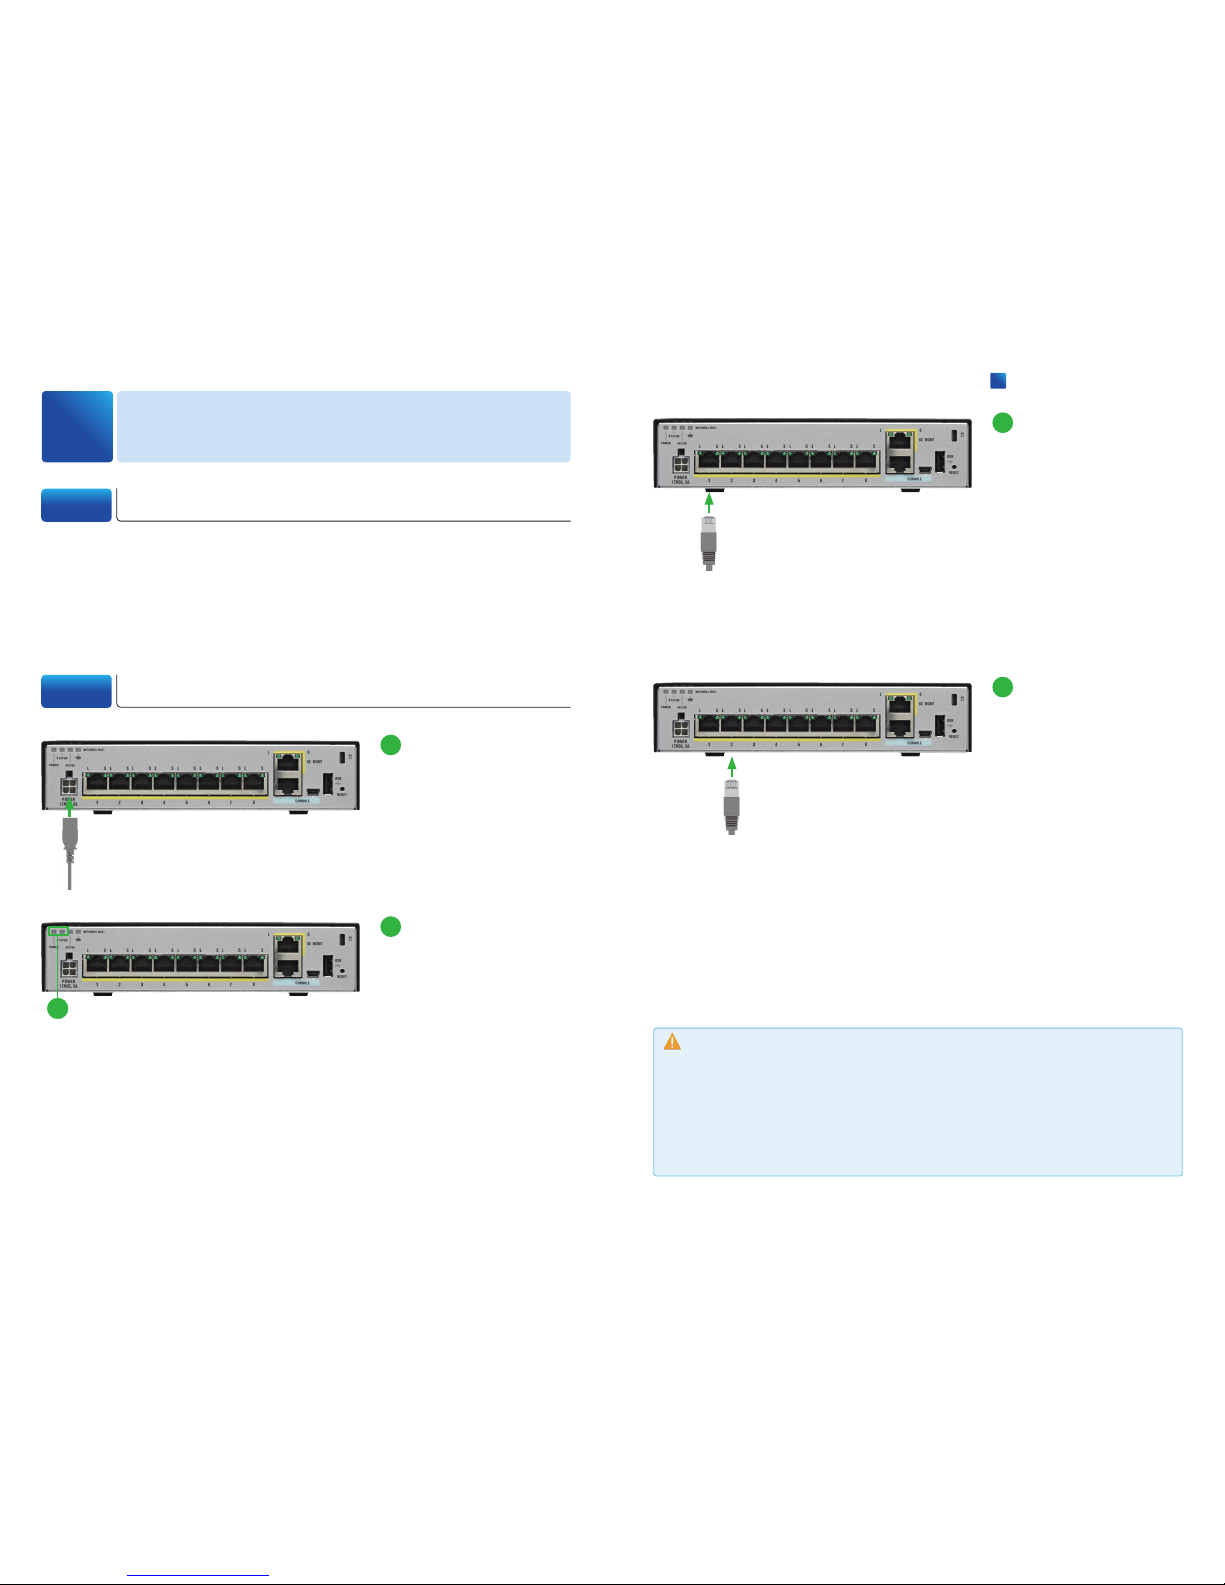
1
1
Connect the AC power ca-
ble to the AC power connector of the ASA and a
grounded AC outlet.
The power turns on automatically when you plug in the power
cable. There is no power button.
2
Confirm that the POWER
LED and STATUS LED are
solid green.
If the POWER LED is solid green,
the device is powered on. After
the STATUS LED is solid green,
the system has passed power-on diagnostics.
2
3
Connect the first Ethernet
cable to the Ethernet port
#1 of the ASA, and the
other end of the cable to
the Ethernet port of your
WAN device.
Wait until the port LEDs on the
ASA and your WAN device are
green or blinking green. Green
LEDs indicate a successful connection.
4
Connect the second Eth-
ernet cable to the Ethernet
port #2 of the ASA, and
the other end of the cable
to the Ethernet port of your
PC.
Wait until the port LEDs on the
ASA and your PC are green or
blinking green. Green LEDs indicate a successful connection.
Caution
At step
❷
, if the STATUS LED does not turn solid green, or turns amber, the ASA failed the
power-on diagnostics, reconnect the AC power cable to the ASA AC power connector and a
grounded AC outlet. Nevertheless the STATUS LED does not turn solid green, or turns amber,
contact your Cisco representative or reseller.
At step
❸
& ❹, the ASA port to connect an Ethernet cable is the RJ-45 Ethernet port, not the
RJ-45 management port. The RJ-45 Ethernet ports are numbered.
Cisco ASA with FirePOWER Services Easy Setup Guide
1
Connecting PC to ASA
Page 3
To configure the ASA, use the Cisco Adaptive Security Device Manager (ASDM).
Follow these steps to download the Cisco ASDM from the ASA and install it to your
PC.
1
2
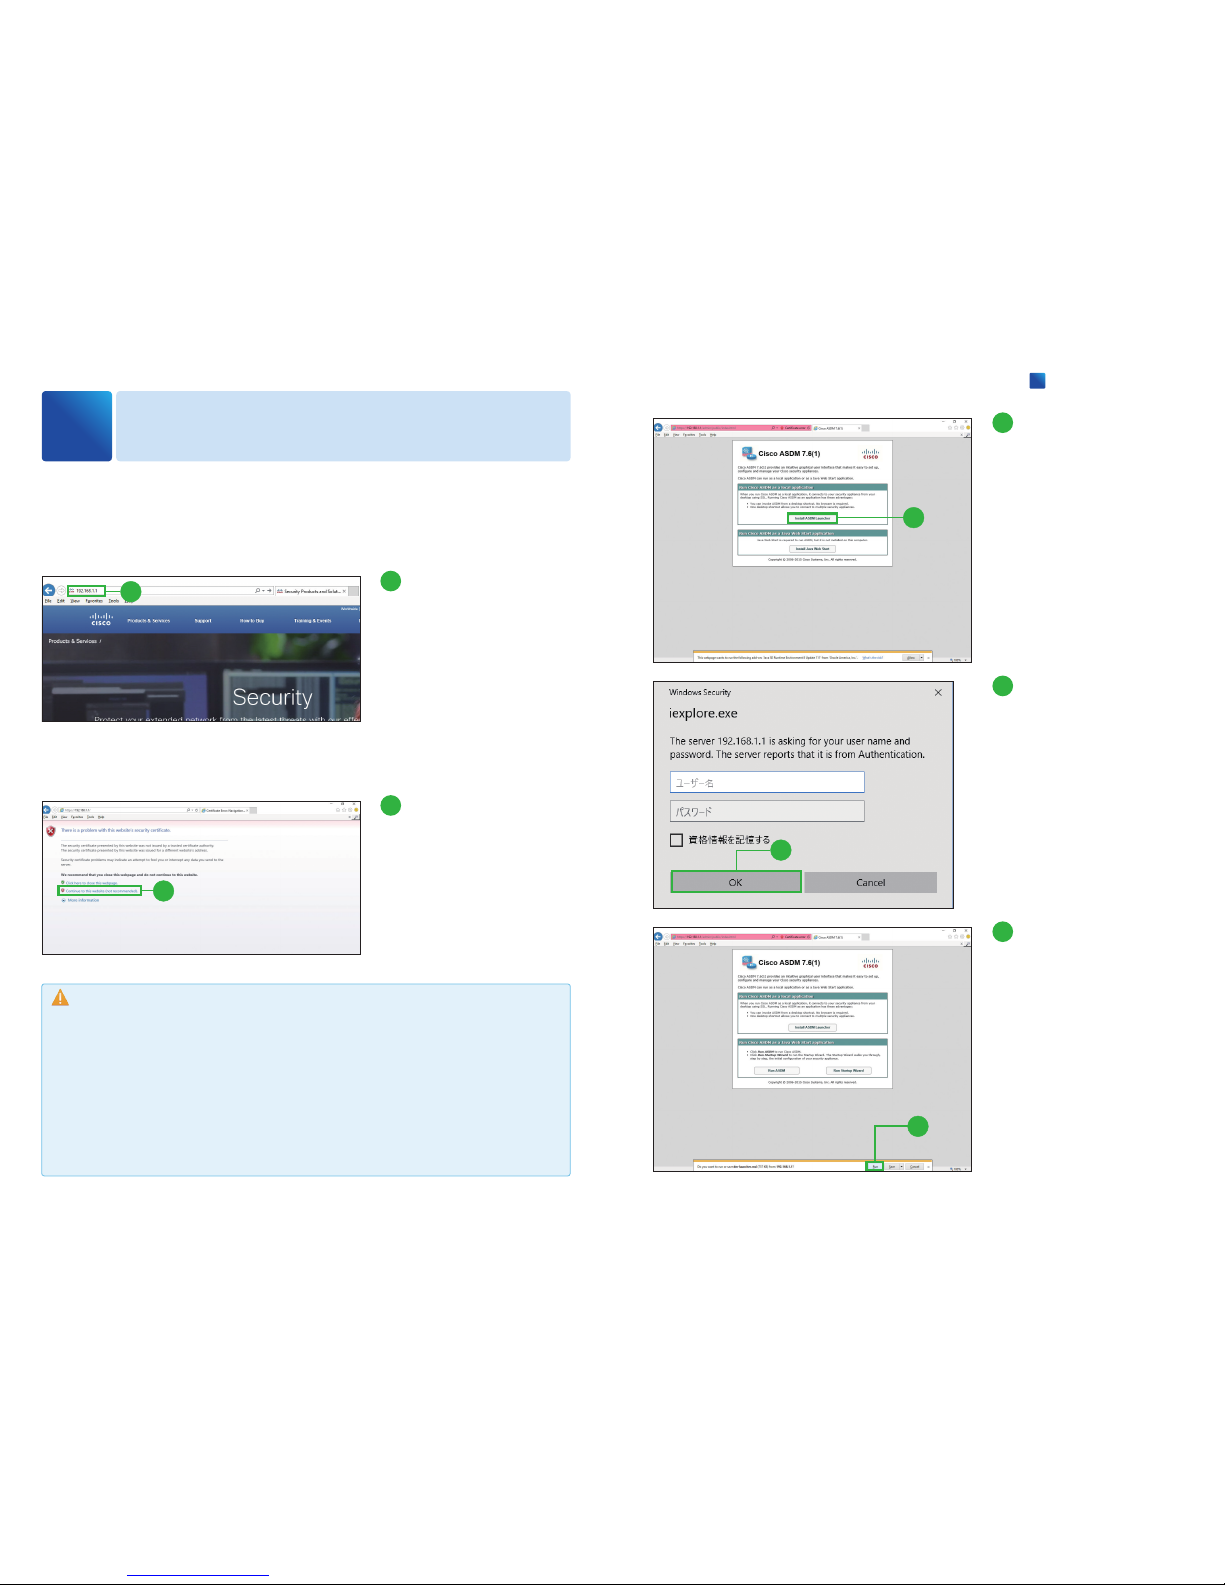
1
Launch a Web browser PC
and enter the IP address
https://192.168.1.1
into the address bar, then
press Enter key.
Depending on your environment, the security certificate
page appears.
2
Click [Continue to this
website (not recommended)
]
.
The Cisco ASDM web page appears.
Installing ASDM
2
3
4
5
3
Click [Install ASDM
Launcher].
Depending on your environment, the authentication dialog
box appears.
4
Click [OK].
Leave the username and password fields empty.
5
Click [Run].
The InstallShield Wizard for
Cisco ASDM Launcher appears.
Caution
If the Cisco ASDM web page does not appear, make sure that:
・
The POWER LED and STATUS LED are solid green.
・
You
connect a straight-through cable to an Ethernet port on the ASA.
・
Any pop-up blockers or proxy settings on your browser are disabled and that any
wireless client is disabled on your PC or laptop.
・
Your PC settings use DHCP. The ASA acts as a DHCP server. If your PC has a static IP ad-
dress, temporarily configure your PC settings to use DHCP.
Cisco ASA with FirePOWER Services Easy Setup Guide
2
Installing ASDM
Page 4
6
7
8
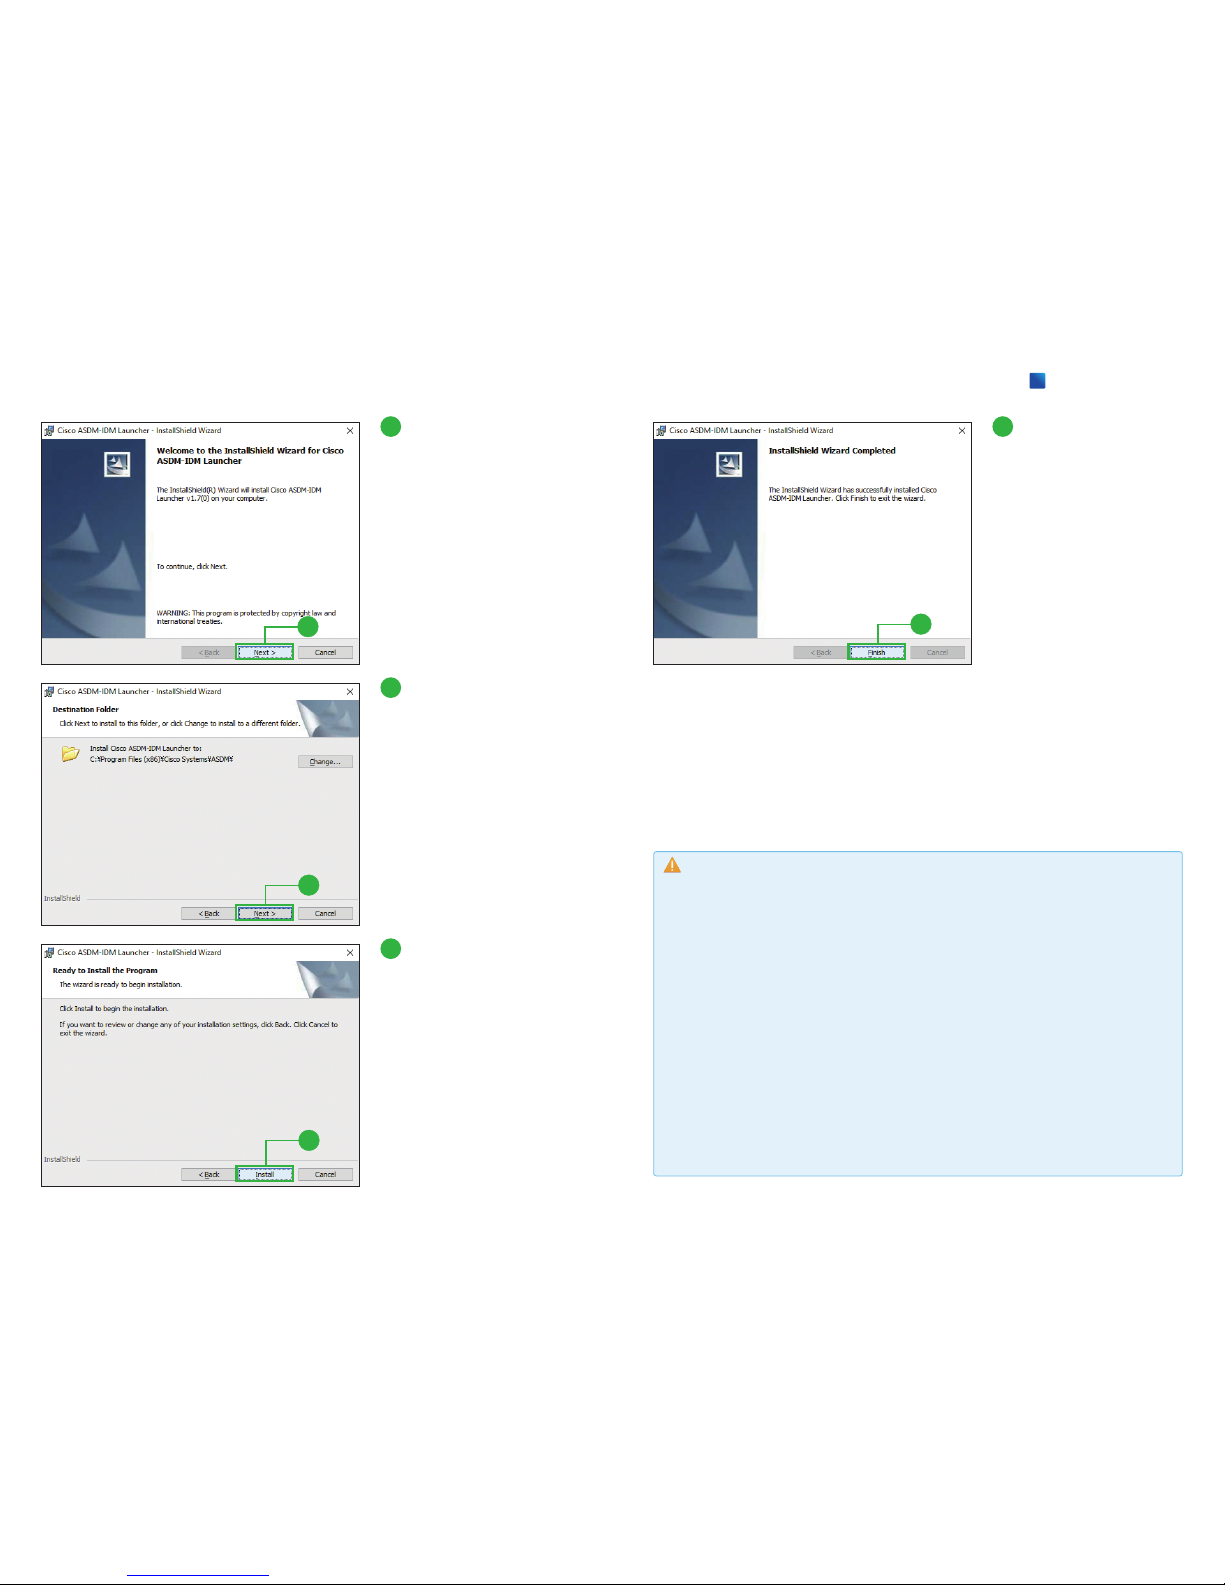
6
Click [Next].
7
Click [Next].
If you want to change the default
installation folder, click [Change]
and enter or choose the desired
installation folder.
8
Click [Install].
9
9
Click [Finish].
The Cisco ASDM Launcher appears.
Caution
Your PC must meet the following requirements to run Cisco ASDM.
●
Microsoft Windows 7, 8:
- Microsoft Internet Explorer
- Mozilla Firefox
- Google Chrome
- Java SE Plug-in 7.0 or later
●
Apple OS X 10.4 and later
- Mozilla Firefox
- Apple Safari
- Google Chrome (64-bit version only)
- Java SE Plug-in 7.0 or later
You can also use Microsoft Windows 8.1, 10 (but they are not officially supported).
Cisco ASA with FirePOWER Services Easy Setup Guide
2
Installing ASDM
Page 5

3-1 Launching ASDM
Now you can launch the Cisco ASDM with the Cisco ASDM Launcher.
1
2
3
1
Click [OK.]
Leave the username and password fields empty. The Security
warning appears.
2
Click [Continue].
3
Click [Cancel].
The main ASDM window appears.
Configuring ASA
3
3-2 Launching Startup Wizard
After launching ASDM, use the Startup Wizard to perform initial configuration.
1
2
1
Click [Startup Wizard] from
the [Wizards] menu bar.
2
Click [Modify existing con-
figuration].
3
Click [Next].
MEMO
At step
❸
, you are prompted to provide the IP address of the ASA FirePOWER module. You can
later set the module IP address to the correct IP address using the Startup Wizard.
3
Cisco ASA with FirePOWER Services Easy Setup Guide
3
Configuring ASA
Page 6

5
4
Click [Next].
You can enter the host name
and the domain name of the
ASA.
5
Select the appropriate op-
tion.
Configure the outside interface
of the ASA. If you use the ASA
behind the existing router,
select [Use DHCP] in most cases. If you use the ASA
instead
of
the existing router, follow the
configuration of the router.
6
Click [Next].
8
Click [Next].
You can specify static routes if
your network has multiple routers.
6
4
7
Click [Next].
8
7
Caution
To the inside interfaces, you
must assign the range of IP
addresses different from the
range assigned to the outside
interface. For example, if the
outside range is 192.168.1.x,
the inside range should be
192.168.10.x, and so on. You
can change the range by se
lecting an interface and clicking
[Edit].
Cisco ASA with FirePOWER Services Easy Setup Guide
3
Configuring ASA
Page 7

10
9
Click [Next].
The ASA can act as a DHCP
server and provide IP addresses to the hosts on your inside
network.
10
Click [Use Port Address
Translation (PAT)].
Select [Use Port Address Translation (PAT)] to share a single
external IP address for devices
on the inside interface. Select
[Use Network Address Translation (NAT)] to share several external IP address for devices on
the inside interface.
11
Click [Next].
13
13
Enter the IP address for
the ASA FirePOWER module.
For example, the
192.168.1.2
works with the default configuration.
14
Enter the IP address of the
Default Gateway.
For example, the
192.168.1.1
works with the default configuration.
15
Click [Next].
15
12
14
12
Click [Next].
You can specify the addresses
of all hosts or networks, which
are allowed to access the ASA
using HTTPS/ASDM, SSH or
Telnet.
9
11
Cisco ASA with FirePOWER Services Easy Setup Guide
3
Configuring ASA
Page 8
16
17
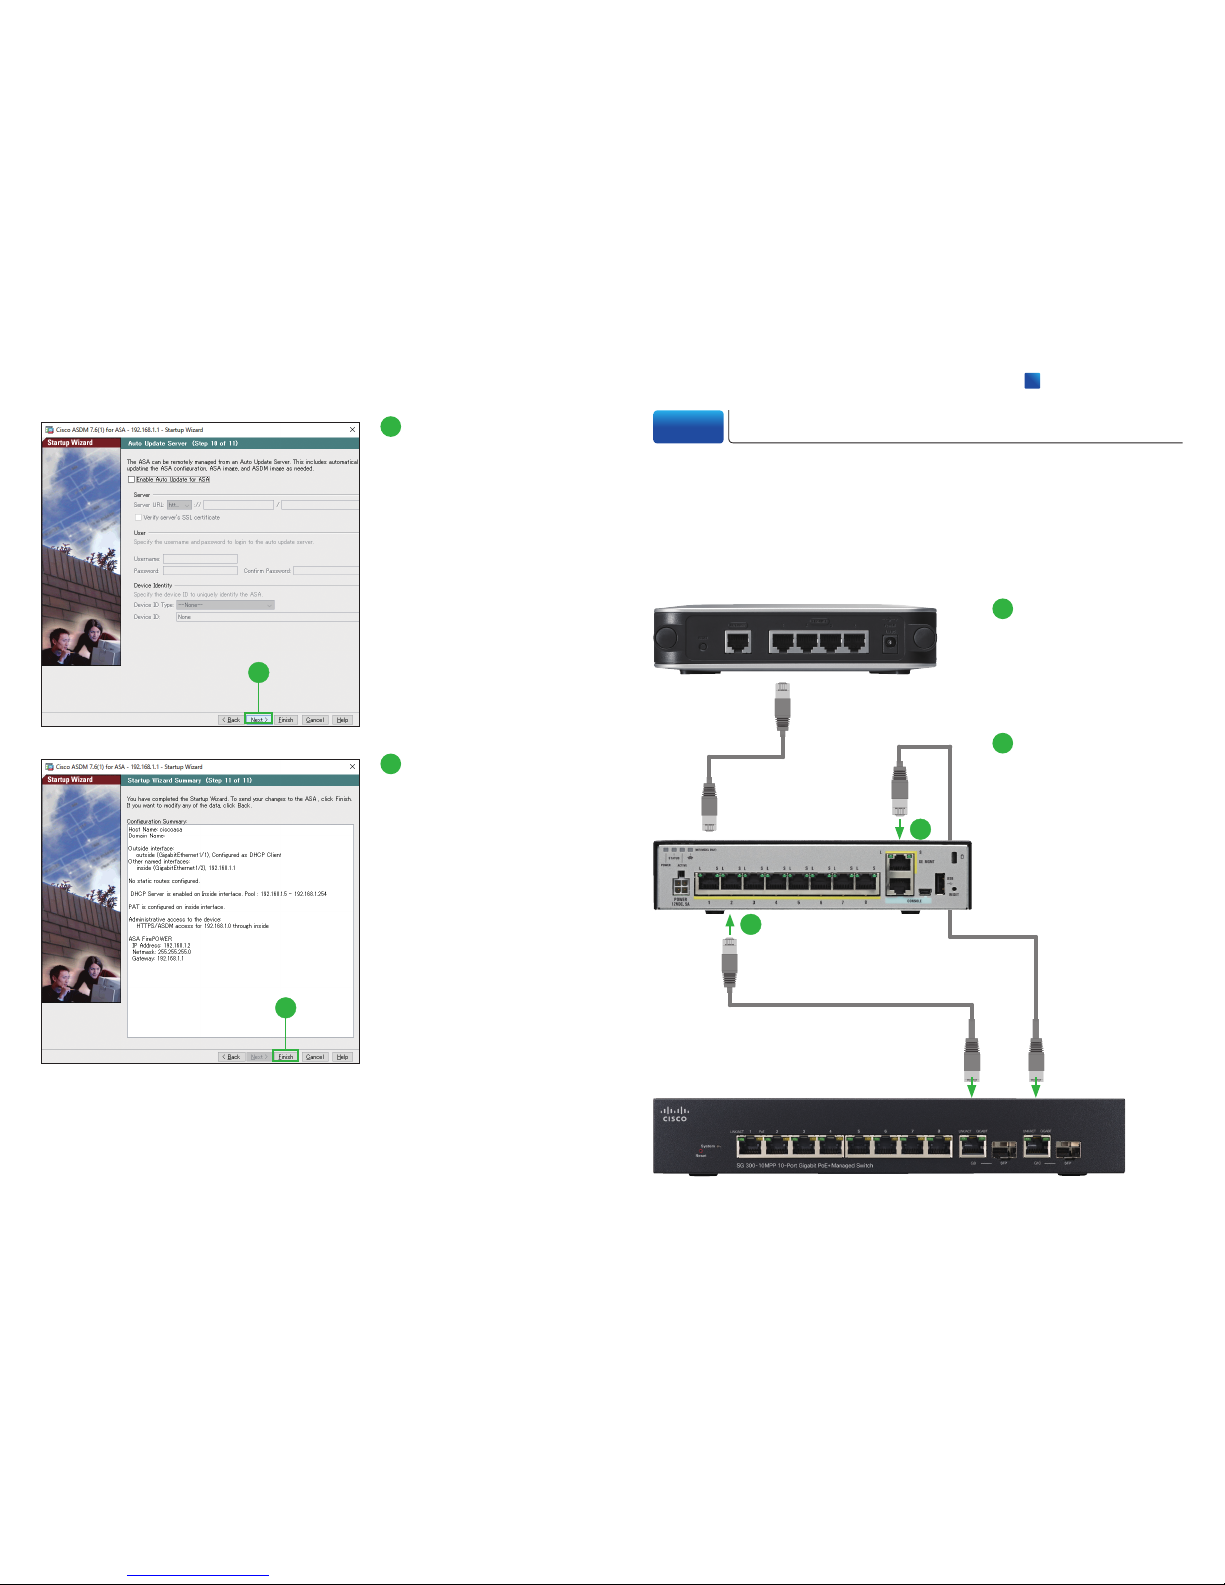
16
Click [Next].
The ASA can be remotely managed from an Auto Update
Server. This includes automatic
updating the ASA configuration,
ASA image, ASDM image as
needed.
17
Click [Finish].
You have completed the Startup
Wizard. To send your changes
to the ASA, click [Finish]. If you
want to modify any of the data,
click [Back].
3-3 Connecting Switch to ASA
After completing the Startup Wizard, exit the ASDM and disconnect the Ethernet
cable from your PC. Then, follow these steps to connect your switch to the ASA.
Make sure that nothing is connected to the switch, its settings are configured to
use DHCP, and the first Ethernet cable is still connected between the ASA and your
WAN device.
1
2
1
Connect the second Eth-
ernet cable to the Ethernet
port #2 of the ASA, and
the other end of the cable
to the Ethernet port of your
switch.
2
Connect the third Ethernet
cable to the Ethernet management port of the ASA,
and the other end of the
cable to the Ethernet port
of your switch.
WAN Device
Switch
Cisco ASA with FirePOWER Services Easy Setup Guide
3
Configuring ASA
Page 9

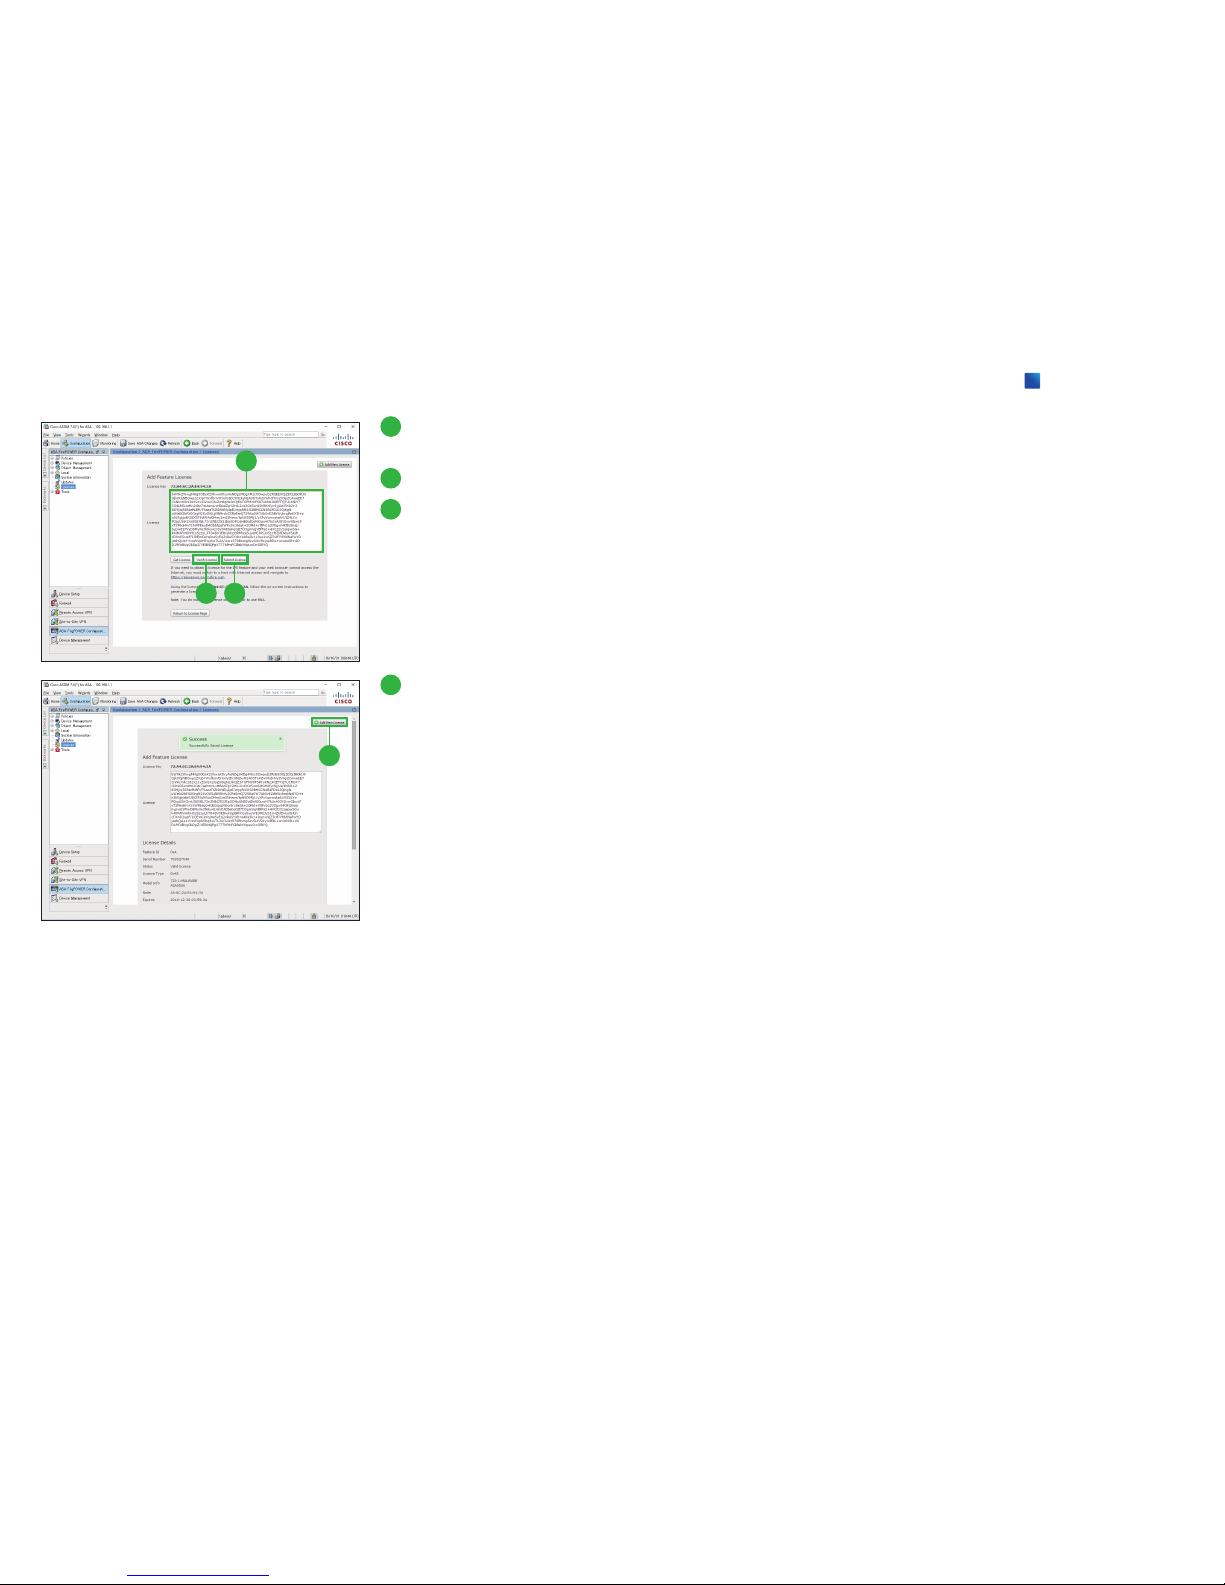
3-4 Install Licenses
Now you can access to the ASA FirePOWER module with the Cisco ASDM. Re-
launch the Cisco ASDM and install the licenses. The Control and Protection licens-
es are provided by default and the Product Authorization Key (PAK) is included on
a printout in your box. If you ordered additional licenses, you should have PAKs for
those licenses in your email.
1
2
1
Launch ASDM and Click
[Configuration].
2
Click [ASA FirePOWER
Configuration].
3
4
3
Click [Licenses].
4
Copy [License Key] text
and get the license from
the licensing portal (see
the MEMO below).
The example of the License Key
is 72:78:DA:6E:D9:93:35.
MEMO
You can get the license (license activation key) from the licensing portal.
1. Go to http://www.cisco.com/go/license.
2. Enter the PAKs separated by commas in the Get New Licenses field, and click Fulfill.
3. You will be asked for the License Key and email address among other fields.
4. Copy the resulting license activation key from either the website display or from the zip file
attached to the licensing email that the system automatically delivers.
Cisco ASA with FirePOWER Services Easy Setup Guide
3
Configuring ASA
Page 10
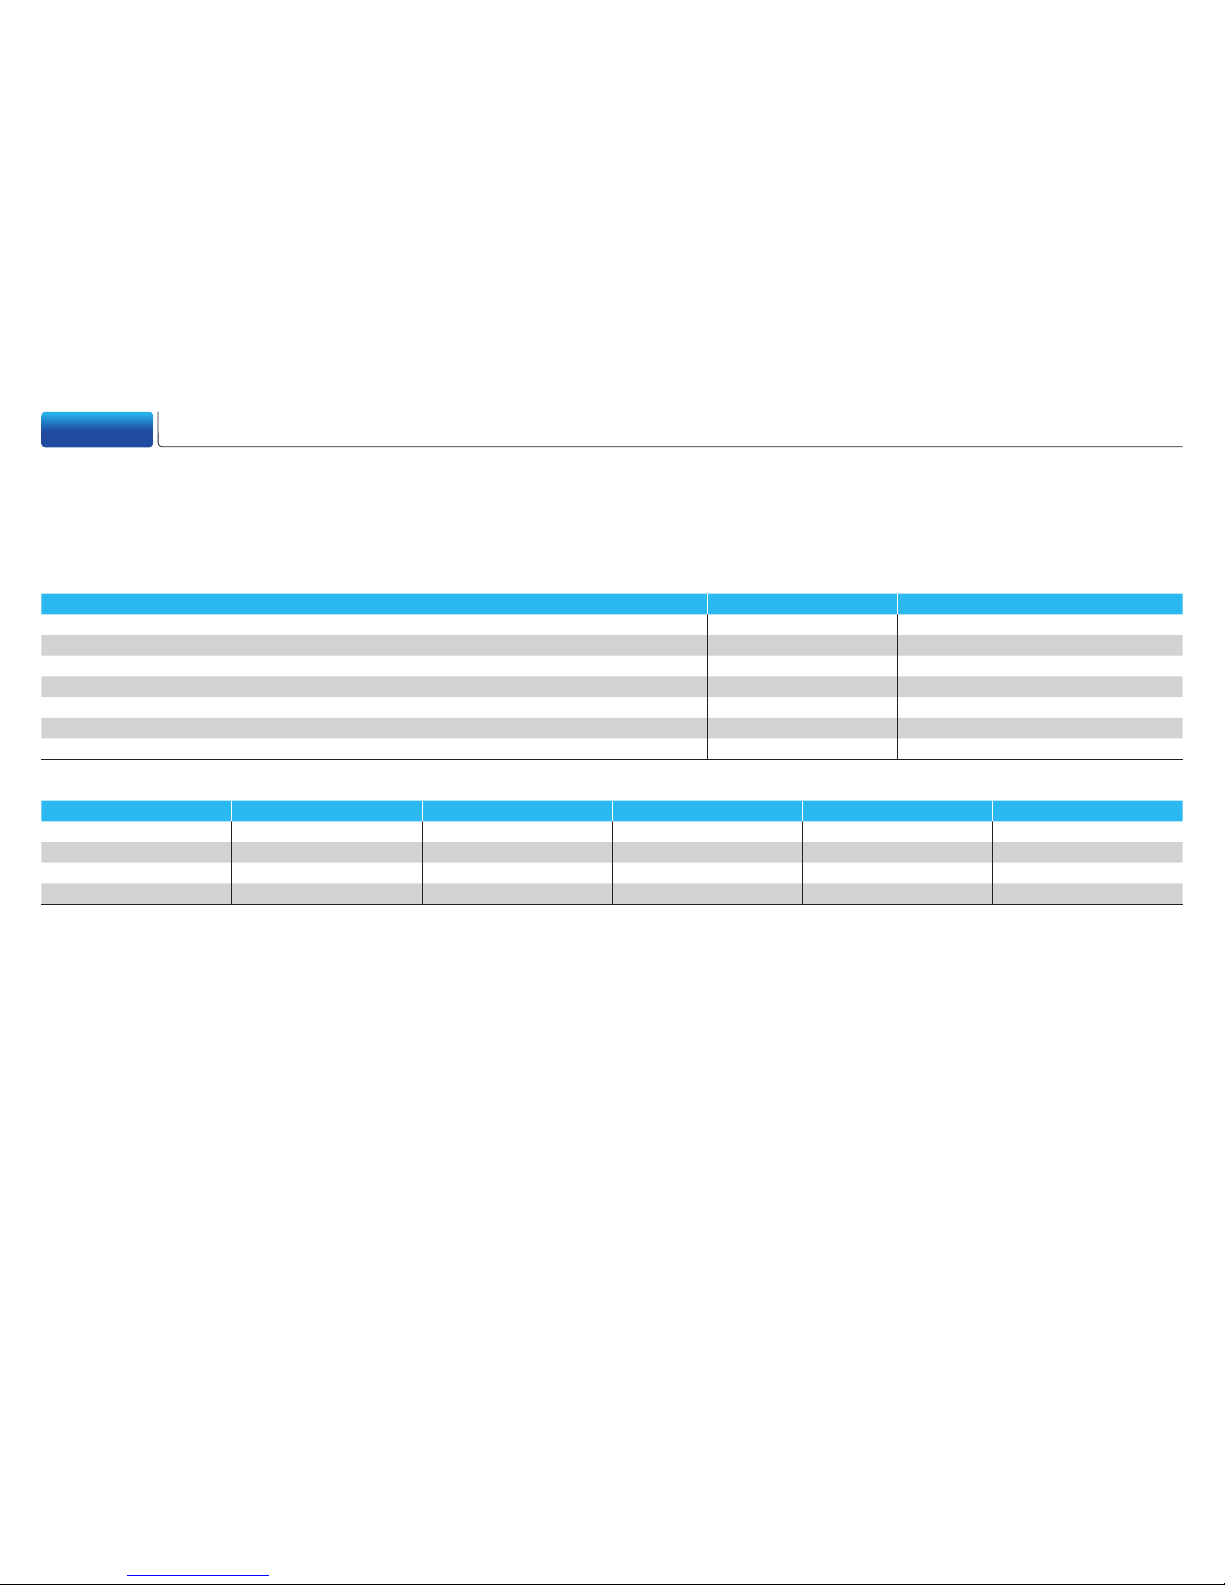
5
8
8
If you have additional li-
censes, click [Add New
License] and repeat the
steps
❺
to ❼.
5
Paste the license activa-
tion key into [License] box.
6
Click [Verify License].
7
Click [Submit License].
76
Cisco ASA with FirePOWER Services Easy Setup Guide
3
Configuring ASA
Page 11
© 2016 Cisco and/or its affiliates. All rights reserved. Cisco and the Cisco logo are trademarks or registered trademarks of Cisco and/or its affiliates in the U.S. and other countries.
To view a list of Cisco trademarks, go to this URL: www.cisco.com/go/trademarks. Third-party trademarks mentioned are the property of their respective owners. The use of the
word partner does not imply a partnership relationship between Cisco and any other company. (1110R)
Appendix Transition Guide Settings
Most Next-Generation Firewalls (NGFWs) reduce risk by providing access control over applications and users. But they dont eliminate threats because attackers can still exploit
open web connections and approved applications. For superior protection, an NGFW must be able to provide deep visibility into and across the network, apply intelligent automation
to identify threats, adapt protections to a dynamic network environment, and quickly scope and recover from attacks to minimize damage. Cisco ASA with FirePOWER Services
delivers all of those capabilities, so upgrade to Cisco
s newest NGFW today and protect your high-value digital assets.
Feature Typical NGFW Cisco ASA withFirePOWER Services
NSS Breach Detection and NGIPS Leadership Position Reports Partial or Not Available Superior
Reputation-Based Proactive Protection Not Available Superior
Intelligent Security Automation Not Available Superior
File Reputation, File Trajectory, Retrospective Analysis Not Available Superior
Application Visibility and Control (AVC) Available Superior
AMP and NGIPS in a Single Device Limited Superior
Threat Feeds Updated Daily from Security Intelligence to Provide Timely Threat Detection Capability Limited Superior
Legacy Models FW + AVC FW + AVC + IPS Current Models FW + AVC FW + AVC + IPS
Cisco ASA 5505 - - Cisco ASA 5506-X 250 Mbps 125 Mbps
Cisco ASA 5510 - - Cisco ASA 5508-X 450 Mbps 250 Mbps
Cisco ASA 5512 300 Mbps 150 Mbps Cisco ASA 5516-X 850 Mbps 450 Mbps
Cisco ASA 5515-X 500 Mbps 250 Mbps Cisco ASA 5516-X 850 Mbps 450 Mbps
 Loading...