

Page 1

Cisco IP Phone 8800 Series User Guide
First Published: July 13, 2015
Americas Headquarters
Cisco Systems, Inc.
170 West Tasman Drive
San Jose, CA 95134-1706
USA
http://www.cisco.com
Tel: 408 526-4000
800 553-NETS (6387)
Fax: 408 527-0883
Page 2

THE SPECIFICATIONS AND INFORMATION REGARDING THE PRODUCTS IN THIS MANUAL ARE SUBJECT TO CHANGE WITHOUT NOTICE. ALL STATEMENTS,
INFORMATION, AND RECOMMENDATIONS IN THIS MANUAL ARE BELIEVED TO BE ACCURATE BUT ARE PRESENTED WITHOUT WARRANTY OF ANY KIND,
EXPRESS OR IMPLIED. USERS MUST TAKE FULL RESPONSIBILITY FOR THEIR APPLICATION OF ANY PRODUCTS.
THE SOFTWARE LICENSE AND LIMITED WARRANTY FOR THE ACCOMPANYING PRODUCT ARE SET FORTH IN THE INFORMATION PACKET THAT SHIPPED WITH
THE PRODUCT AND ARE INCORPORATED HEREIN BY THIS REFERENCE. IF YOU ARE UNABLE TO LOCATE THE SOFTWARE LICENSE OR LIMITED WARRANTY,
CONTACT YOUR CISCO REPRESENTATIVE FOR A COPY.
The following information is for FCC compliance of Class A devices: This equipment has been tested and found to comply with the limits for a Class A digital device, pursuant to part 15
of the FCC rules. These limits are designed to provide reasonable protection against harmful interference when the equipment is operated in a commercial environment. This equipment
generates, uses, and can radiate radio-frequency energy and, if not installed and used in accordance with the instruction manual, may cause harmful interference to radio communications.
Operation of this equipment in a residential area is likely to cause harmful interference, in which case users will be required to correct the interference at their own expense.
The following information is for FCC compliance of Class B devices: This equipment has been tested and found to comply with the limits for a Class B digital device, pursuant to part 15
of the FCC rules. These limits are designed to provide reasonable protection against harmful interference in a residential installation. This equipment generates, uses and can radiate radio
frequency energy and, if not installed and used in accordance with the instructions, may cause harmful interference to radio communications. However, there is no guarantee that interference
will not occur in a particular installation. If the equipment causes interference to radio or television reception, which can be determined by turning the equipment off and on, users are
encouraged to try to correct the interference by using one or more of the following measures:
Reorient or relocate the receiving antenna.
•
Increase the separation between the equipment and receiver.
•
Connect the equipment into an outlet on a circuit different from that to which the receiver is connected.
•
Consult the dealer or an experienced radio/TV technician for help.
•
Modifications to this product not authorized by Cisco could void the FCC approval and negate your authority to operate the product
The Cisco implementation of TCP header compression is an adaptation of a program developed by the University of California, Berkeley (UCB) as part of UCB’s public domain version
of the UNIX operating system. All rights reserved. Copyright©1981, Regents of the University of California.
NOTWITHSTANDING ANY OTHER WARRANTY HEREIN, ALL DOCUMENT FILES AND SOFTWARE OF THESE SUPPLIERS ARE PROVIDED "AS IS" WITH ALL FAULTS.
CISCO AND THE ABOVE-NAMED SUPPLIERS DISCLAIM ALL WARRANTIES, EXPRESSED OR IMPLIED, INCLUDING, WITHOUT LIMITATION, THOSE OF
MERCHANTABILITY, FITNESS FOR A PARTICULAR PURPOSE AND NONINFRINGEMENT OR ARISING FROM A COURSE OF DEALING, USAGE, OR TRADE PRACTICE.
IN NO EVENT SHALL CISCO OR ITS SUPPLIERS BE LIABLE FOR ANY INDIRECT, SPECIAL, CONSEQUENTIAL, OR INCIDENTAL DAMAGES, INCLUDING, WITHOUT
LIMITATION, LOST PROFITS OR LOSS OR DAMAGE TO DATA ARISING OUT OF THE USE OR INABILITY TO USE THIS MANUAL, EVEN IF CISCO OR ITS SUPPLIERS
HAVE BEEN ADVISED OF THE POSSIBILITY OF SUCH DAMAGES.
Any Internet Protocol (IP) addresses and phone numbers used in this document are not intended to be actual addresses and phone numbers. Any examples, command display output, network
topology diagrams, and other figures included in the document are shown for illustrative purposes only. Any use of actual IP addresses or phone numbers in illustrative content is unintentional
and coincidental.
Cisco and the Cisco logo are trademarks or registered trademarks of Cisco and/or its affiliates in the U.S. and other countries. To view a list of Cisco trademarks, go to this URL: http://
www.cisco.com/go/trademarks. Third-party trademarks mentioned are the property of their respective owners. The use of the word partner does not imply a partnership
relationship between Cisco and any other company. (1110R)
©
2015 Cisco Systems, Inc. All rights reserved.
Page 3

CONTENTS
CHAPTER 1
Getting Started 1
Accessibility Features 1
Cisco IP Phone 8811 1
Phone Connections 1
Buttons and Hardware 3
Cisco IP Phone 8841 and 8845 6
Phone Connections 6
Buttons and Hardware 7
Cisco IP Phones 8851 and 8851NR 11
Phone Connections 11
Buttons and Hardware 13
Cisco IP Phone 8861 and 8865 16
Phone Connections 16
Buttons and Hardware 18
Power Save and Power Save Plus 21
Power Save 21
Power Save Plus 21
Additional Information 22
CHAPTER 2
Phone Setup 23
Connect Footstand 23
Adjust the Handset Rest 23
Secure the Phone with a Cable Lock 24
CHAPTER 3
Basic Operations 27
Clean the Phone Display 27
Make Calls 28
Predial a Number 28
Cisco IP Phone 8800 Series User Guide
iii
Page 4

Contents
Place a Call Using the Speakerphone 28
Place a Call Using a Headset 29
Release a Call and Start Another Call 29
Dial an International Number 29
Redial a Number 30
Navigate and Select Items 30
View All Calls on the Phone 31
Answer Calls 31
Answer the Oldest Call First 32
Call Pickup 32
Answer a Call Using PickUp 33
Answer a Call Using Group PickUp and a Phone Number 34
Answer a Call Using Group PickUp and a Group PickUp Number 34
Answer a Call Using Other PickUp 35
Automatically Answer Calls 35
Respond to a Call Waiting Notification 36
Manage Calls 36
Decline a Call 36
Transfer a Call to Another Number 37
Toggle Between Calls Before Completing a Transfer 37
Monitor and Record Calls 38
Call Forward 38
Forward All Calls 38
Mute Phone 39
Hold Calls 39
Swap Between Active and Held Calls 39
Put a Call on Hold by Answering a New Call 40
Respond to a Hold Reversion Notification 40
Determine If a Shared Line Is On Hold 40
Remote Hold 40
Set Up Call Back Notification 41
Call Park 41
Park and Retrieve a Call Using Call Park 42
Park a Call Using Assisted Directed Call Park 42
Park a Call Using Manual Directed Call Park 43
Cisco IP Phone 8800 Series User Guide
iv
Page 5

Contents
Manage Intercom Calls 43
Place a Dedicated Intercom Call 43
Place a Dialable Intercom Call 44
Receive an Intercom Call 44
View Phone Information 44
Video Calls 45
Place a Video Call 46
Stop Video 46
Hide or Show Video 46
Adjust the Picture-In-Picture Position 47
Sign In To the Cisco Unified Communications Self Care Portal 47
CHAPTER 4
Contacts 49
Corporate Directory 49
Search and Dial a Contact 49
Search and Dial a Contact While On a Call 50
Personal Directory 50
Sign In and Out of the Personal Directory 51
Add a Personal Directory Entry from the Phone 51
Search for an Entry in the Personal Directory 51
Dial a Number from the Personal Directory 52
Edit a Personal Directory Entry 52
Delete a Personal Directory Entry 53
Fast Dial 53
Place a Call With a Fast-Dial Button 53
Fast-Dial Codes with Personal Directory 53
Assign a Fast Dial Code to a Personal Directory Entry 54
Place a Call Using a Fast Dial Code 54
Delete a Fast Dial Code 54
Cisco WebDialer 55
Use Cisco WebDialer with Another Online Corporate Directory 55
Change Cisco WebDialer Preferences 55
Sign Out of Cisco WebDialer 56
CHAPTER 5
Call History 57
Cisco IP Phone 8800 Series User Guide
v
Page 6

Contents
Call History Overview 57
View the Call History 59
View Call Record Details 59
Filter the Call History 59
Dial From the Call History 60
Edit a Phone Number 60
Clear the Call History 61
Delete a Call Record 61
CHAPTER 6
CHAPTER 7
Voicemail 63
Voicemail Overview 63
Access Voicemail 63
Check for Voice Messages 64
Listen to Voice Messages 64
Visual Voicemail 65
Advanced Calling Features 67
Conference 67
Add a Third Party to a Conference 68
Join Calls Into a Conference 68
Swap Between Calls Before Completing a Conference 69
View Conference Participants 69
Remove Conference Participants 69
Meet Me Conference 69
Host a Meet Me Conference 70
Join a Meet Me Conference 70
Speed Dial 70
Place a Call with a Speed-Dial Button 71
Use a Speed-Dial Code On Hook 71
Use a Speed-Dial Code Off Hook 71
Pause in Speed Dial 71
Do Not Disturb 72
Turn DND On and Off 73
Malicious Call Identification 73
Trace a Suspicious Call 73
Cisco IP Phone 8800 Series User Guide
vi
Page 7

Contents
Extension Mobility 73
Enable Extension Mobility 74
Mobile Connect 74
Enable Mobile Connect 74
Turn Mobile Connect On or Off for All Remote Destinations from a Desk Phone 75
Switch a Desk Phone Call to a Mobile Phone 75
Switch a Mobile Call to the Desk Phone 75
Hand Off a Call from a Mobile Phone to the Desk Phone 75
Line Status 76
Line Status Indicators 76
View All Calls on Primary Line 77
Actionable Incoming Call Alert 77
Custom Line Filters 77
Add a Line Filter 78
Select an Active Line Filter 79
Delete a Line Filter 79
Duplicate a Line Filter 79
Edit a Line Filter 80
Rename a Line Filter 80
Hunt Groups 80
Sign In and Out of a Hunt Group 81
Display Queue Statistics 81
Barge 81
Set Up Barge Alert 81
Add Yourself to a Call on a Shared Line 82
Enable Privacy on a Shared Line 82
Dismiss the Barge Alert Prompt Window 82
Call Chaperone 82
Record a Chaperoned Call 83
Uniform Resource Identifier Dialing 83
Intelligent Proximity for Mobile Devices 84
Pair a Mobile Device 85
Switch Connected Mobile Devices 85
Delete a Mobile Device 86
Answer a Mobile Call 86
Cisco IP Phone 8800 Series User Guide
vii
Page 8

Contents
Decline a Mobile Call 86
Ignore a Mobile Call 86
Place a Mobile Call 87
Move a Call Between the IP Phone and a Mobile Phone 87
Adjust the Mobile Device Volume 87
Mobile Contacts and Mobile Call History Sharing 87
Check Bluetooth Contact Status 88
Save Bluetooth Contacts 88
Delete Bluetooth Contacts 88
Intelligent Proximity for Tablets 88
Pair a Tablet 89
Move Audio from the Tablet to the Phone 89
Manage Tablet Audio on Phone 89
CHAPTER 8
Advanced Operations 91
Applications 91
View Active Applications 91
Switch to Active Applications 92
Close Active Applications 92
Video Calls and Security 92
Call Functions 92
Agent Greeting 93
Alert Calls 93
Answer 93
Client Matter Code 93
Forced Authorization Code 94
Secure and Nonsecure Indication Tones 94
Shared Lines 94
Feature Buttons and Softkeys 95
Survivable Remote Site Telephony Overview 97
Mobile and Remote Access Through Expressway 99
Phone Features Available for Mobile and Remote Access Through Expressway 100
Sign in with Mobile and Remote Access Through Expressway 101
Cisco Collaboration Problem Reporting Tool 101
Report a Problem with Cisco Collaboration Problem Reporting Tool 102
Cisco IP Phone 8800 Series User Guide
viii
Page 9

Contents
Set Up a VPN Phone for Mobile and Remote Access Through Expressway 102
Set Up a Phone for Use with VPN 103
CHAPTER 9
CHAPTER 10
User Preferences 105
Change the Wallpaper 105
Change the Ringtone 106
Adjust the Brightness 106
Adjust Contrast 107
Change the Font Size 107
Change the Phone Name 108
Adjust the Headset Sidetone 108
Phone Services 109
Line Settings 109
Adjust the Video Exposure 110
Adjust the Video Bandwidth 110
Enable Video through Your Computer 111
Accessories 113
Accessory List 113
View the Accessories List 114
View Accessories Details 114
USB Devices 115
Mobile Device Charging 115
Set Up Wideband for an Analog Headset 117
Bluetooth Headsets 117
Add a Bluetooth Accessory 118
Connect a Bluetooth Accessory 119
Turn On Bluetooth 119
Disconnect a Bluetooth Accessory 120
Delete a Bluetooth Accessory 120
USB Headsets 120
Cisco IP Phone 8800 Key Expansion Module 121
Cisco IP Phone 8800 Key Expansion Module Features 121
Place a Call on the Key Expansion Module 124
Configure KEM Buttons 124
Cisco IP Phone 8800 Series User Guide
ix
Page 10

Contents
Adjust Key Expansion Module Brightness 125
CHAPTER 11
Frequently Asked Questions 127
Why Can't I See All Active Calls on My Phone? 127
How Do I Redirect an Incoming Call? 128
How Do I Silence a Ringing Call If I'm On a Call? 128
How Do I Resume a Call That is On Hold? 128
What Is the Difference Between Buttons on the Left and Those on the Right of the
Screen? 129
Why Do Softkeys Keep Changing? 129
What Is the Best Way to Look at Calls When I Have a Shared Line or Multiple Lines? 129
What Should I Do If I Accidentally Press a Button While on a Call? 130
How Do I Check Missed Calls? 130
How Do I Exit from a Running Application? 130
How Do I Connect Two Calls and then Drop from the Line Myself? 131
What Does the Swap Softkey Do? 131
How Do I Cancel a Conference or Transfer After I Start It? 131
How Can I Combine Two Calls Into a Single Conference Call? 132
CHAPTER 12
CHAPTER 13
Why Does My Phone Not Wake Up? 132
What Do Four Rings in Succession Mean? 132
Why can I not see video on a call?" 133
What Happens to Video When I Put a Call On Hold? 133
Troubleshooting 135
Missing Alert Calls Button 135
Missing All Calls Button 135
Missing Mobile and Remote Access through Expressway Sign-in Window 136
Cannot Sign In to Personal Directory 136
Cannot Access Self Care Portal 137
Security Error Message 137
Report Phone Problems 137
Documentation, Service Requests, and Additional Information 138
Product Safety and Security 139
Safety and Performance Information 139
Cisco IP Phone 8800 Series User Guide
x
Page 11

Contents
Power Outage 139
External Devices 139
Bluetooth Wireless Headset Performance 140
Power Information 140
Phone Behavior During Times of Network Congestion 140
FCC Compliance Statements 140
FCC Part 15.21 Statement 141
FCC RF Radiation Exposure Statement 141
FCC Receivers and Class B Digital Statement 141
Cisco Product Security Overview 141
CHAPTER 14
Warranty 143
Cisco One-Year Limited Hardware Warranty Terms 143
Cisco IP Phone 8800 Series User Guide
xi
Page 12

Contents
Cisco IP Phone 8800 Series User Guide
xii
Page 13

Getting Started
Accessibility Features, page 1
•
Cisco IP Phone 8811, page 1
•
Cisco IP Phone 8841 and 8845, page 6
•
Cisco IP Phones 8851 and 8851NR, page 11
•
Cisco IP Phone 8861 and 8865, page 16
•
Power Save and Power Save Plus, page 21
•
Additional Information, page 22
•
Accessibility Features
Cisco IP Phones provide accessibility features for the vision impaired, the blind, and the hearing and mobility
impaired.
CHAPTER 1
For detailed information about the accessibility features on these phones, see http://www.cisco.com/c/en/us/
support/collaboration-endpoints/unified-ip-phone-8800-series/products-technical-reference-list.html.
You can also find more information about accessibility at this Cisco website:
http://www.cisco.com/web/about/responsibility/accessibility/index.html
Cisco IP Phone 8811
The following sections describe attributes of the Cisco IP Phone 8811.
Phone Connections
Connect your phone to the corporate IP telephony network, using the following diagram.
Cisco IP Phone 8800 Series User Guide
1
Page 14
Phone Connections
Getting Started
4
IEEE 802.3at power enabled.
The Cisco IP Phone 8811 does not support the Cisco IP Phone 8800 Key Expansion Module.Note
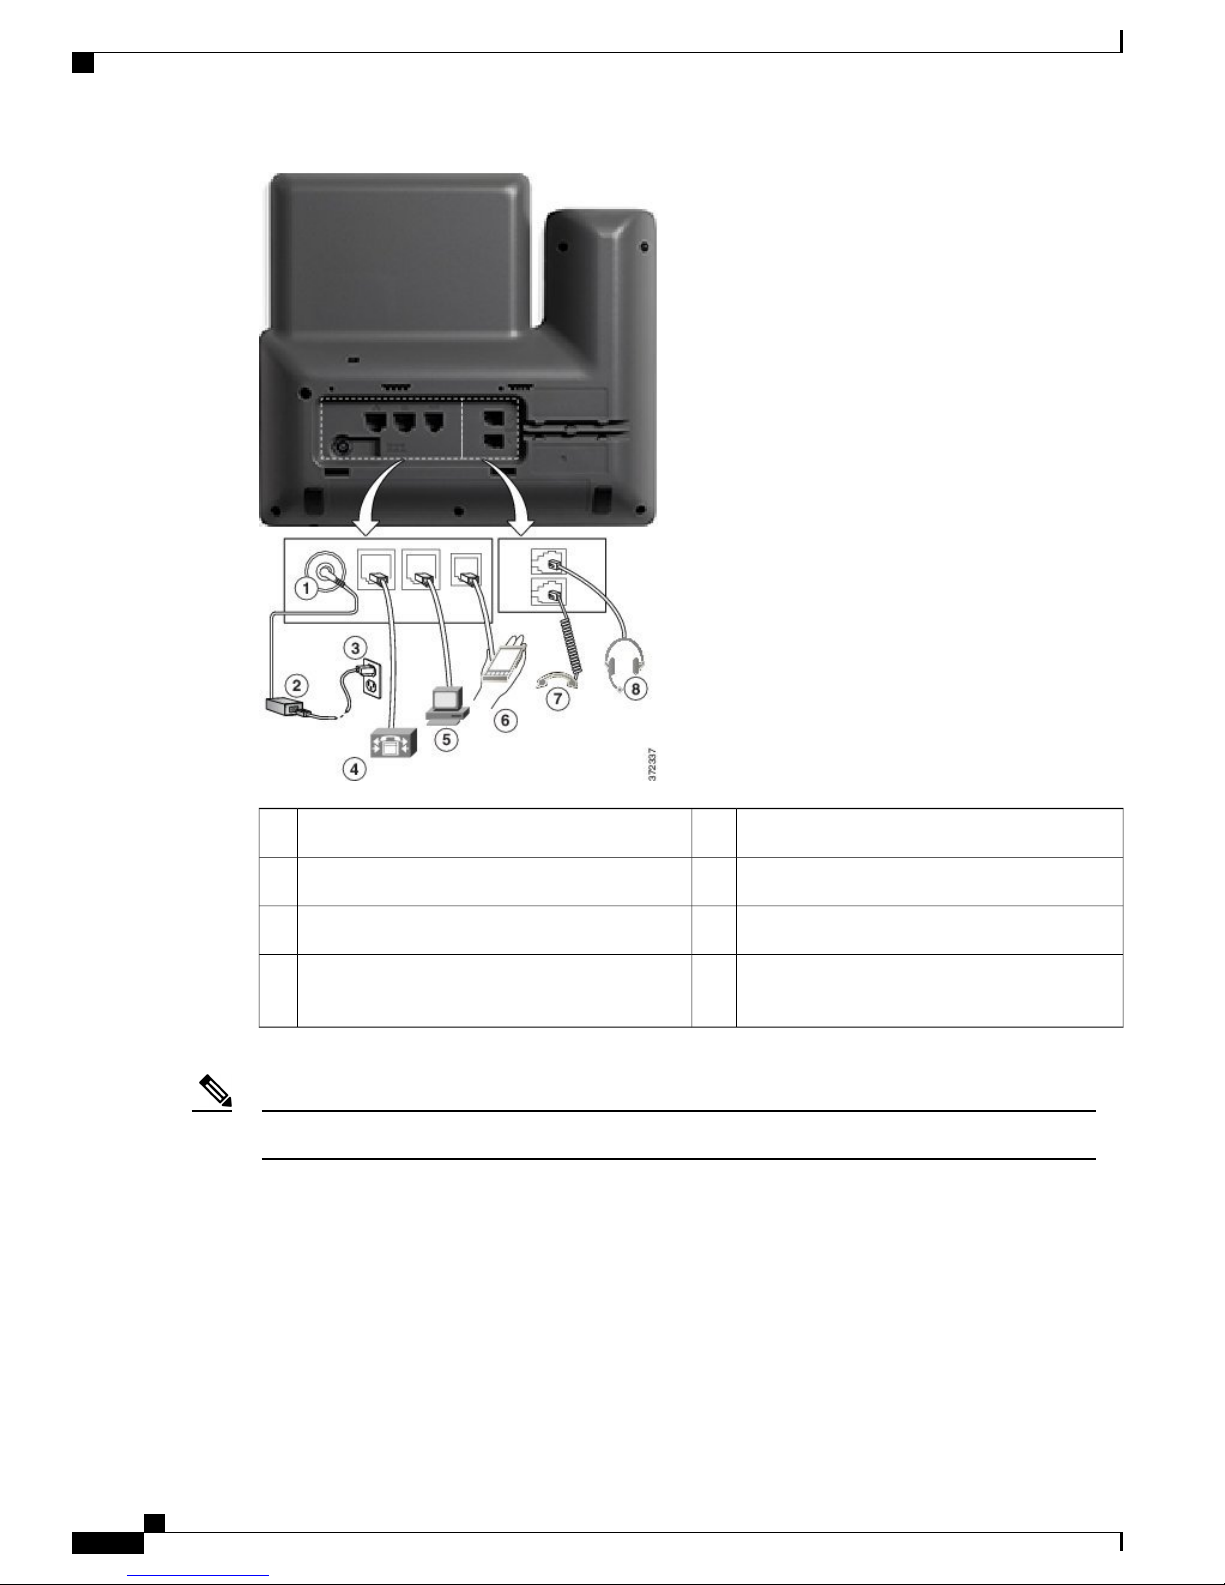
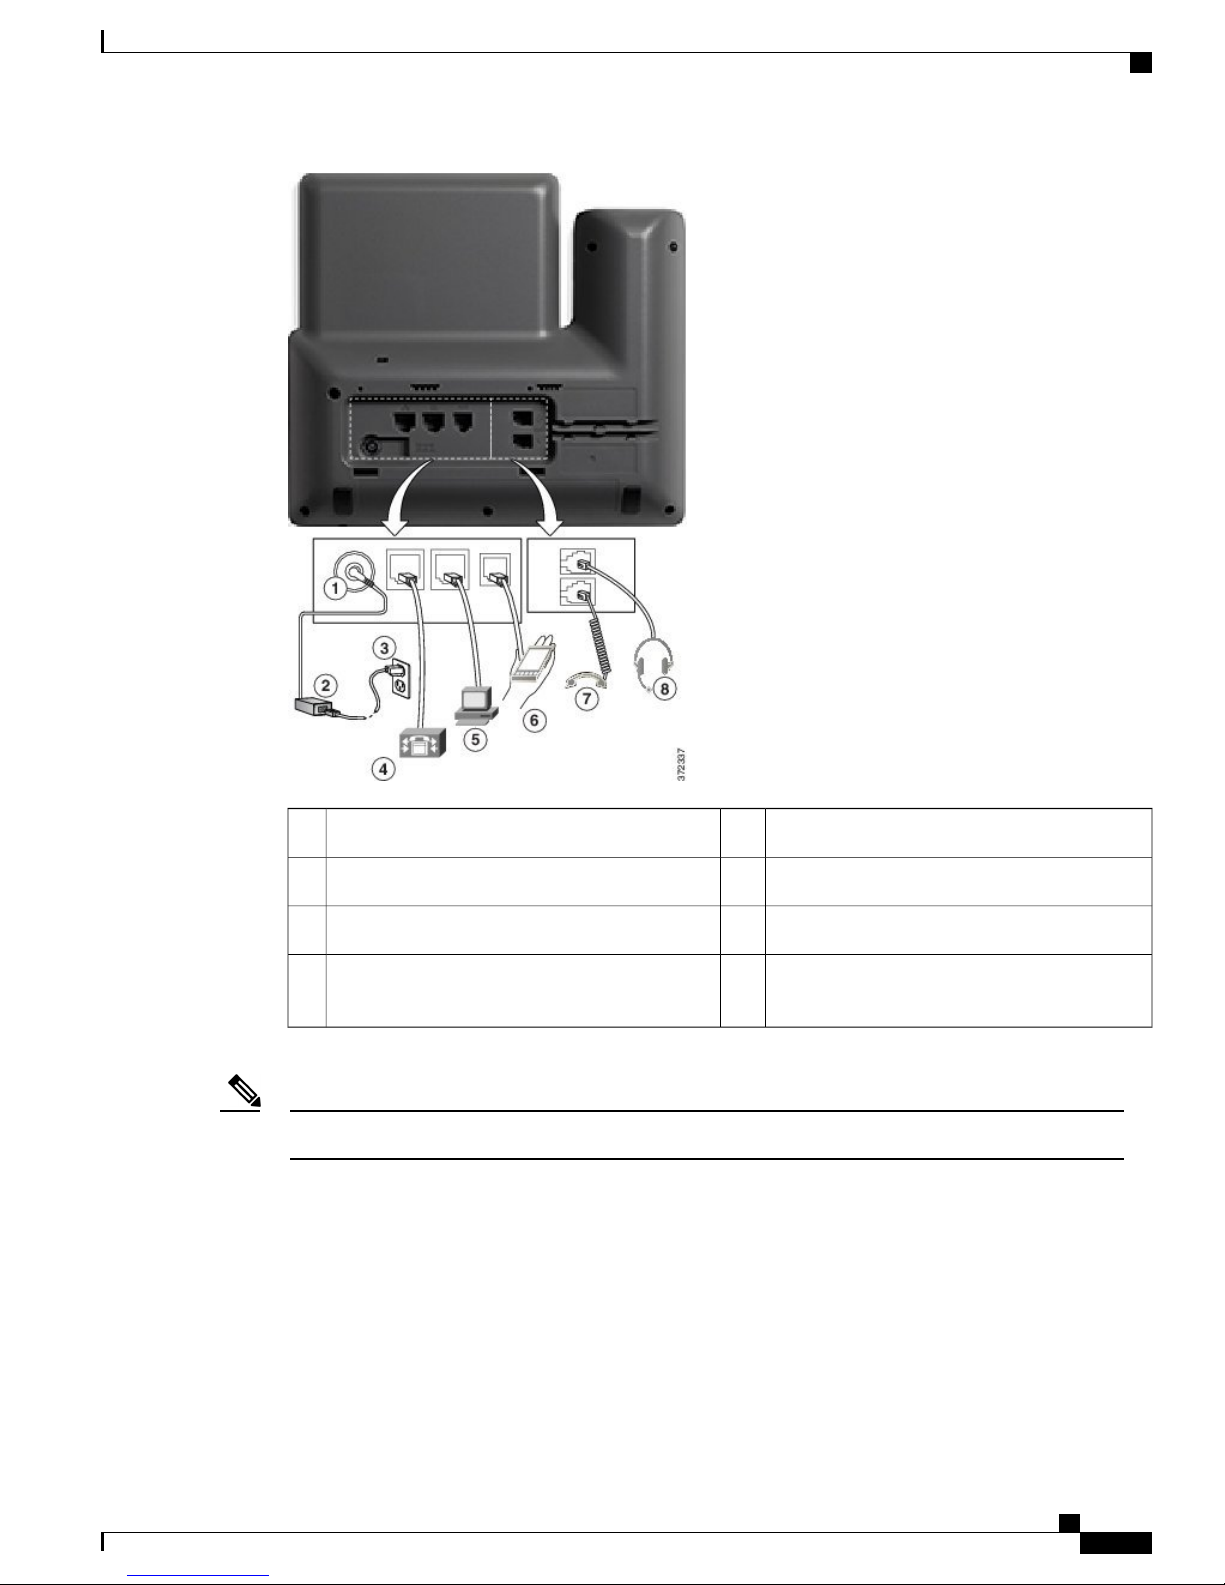
Access port (10/100/1000 PC) connection.5DC adaptor port (DC48V).1
Auxiliary port.6AC-to-DC power supply (optional).2
Handset connection.7AC power wall plug (optional).3
Analog headset connection (optional).8Network port (10/100/1000 SW) connection.
Cisco IP Phone 8800 Series User Guide
2
Page 15

Getting Started
Buttons and Hardware
Buttons and Hardware
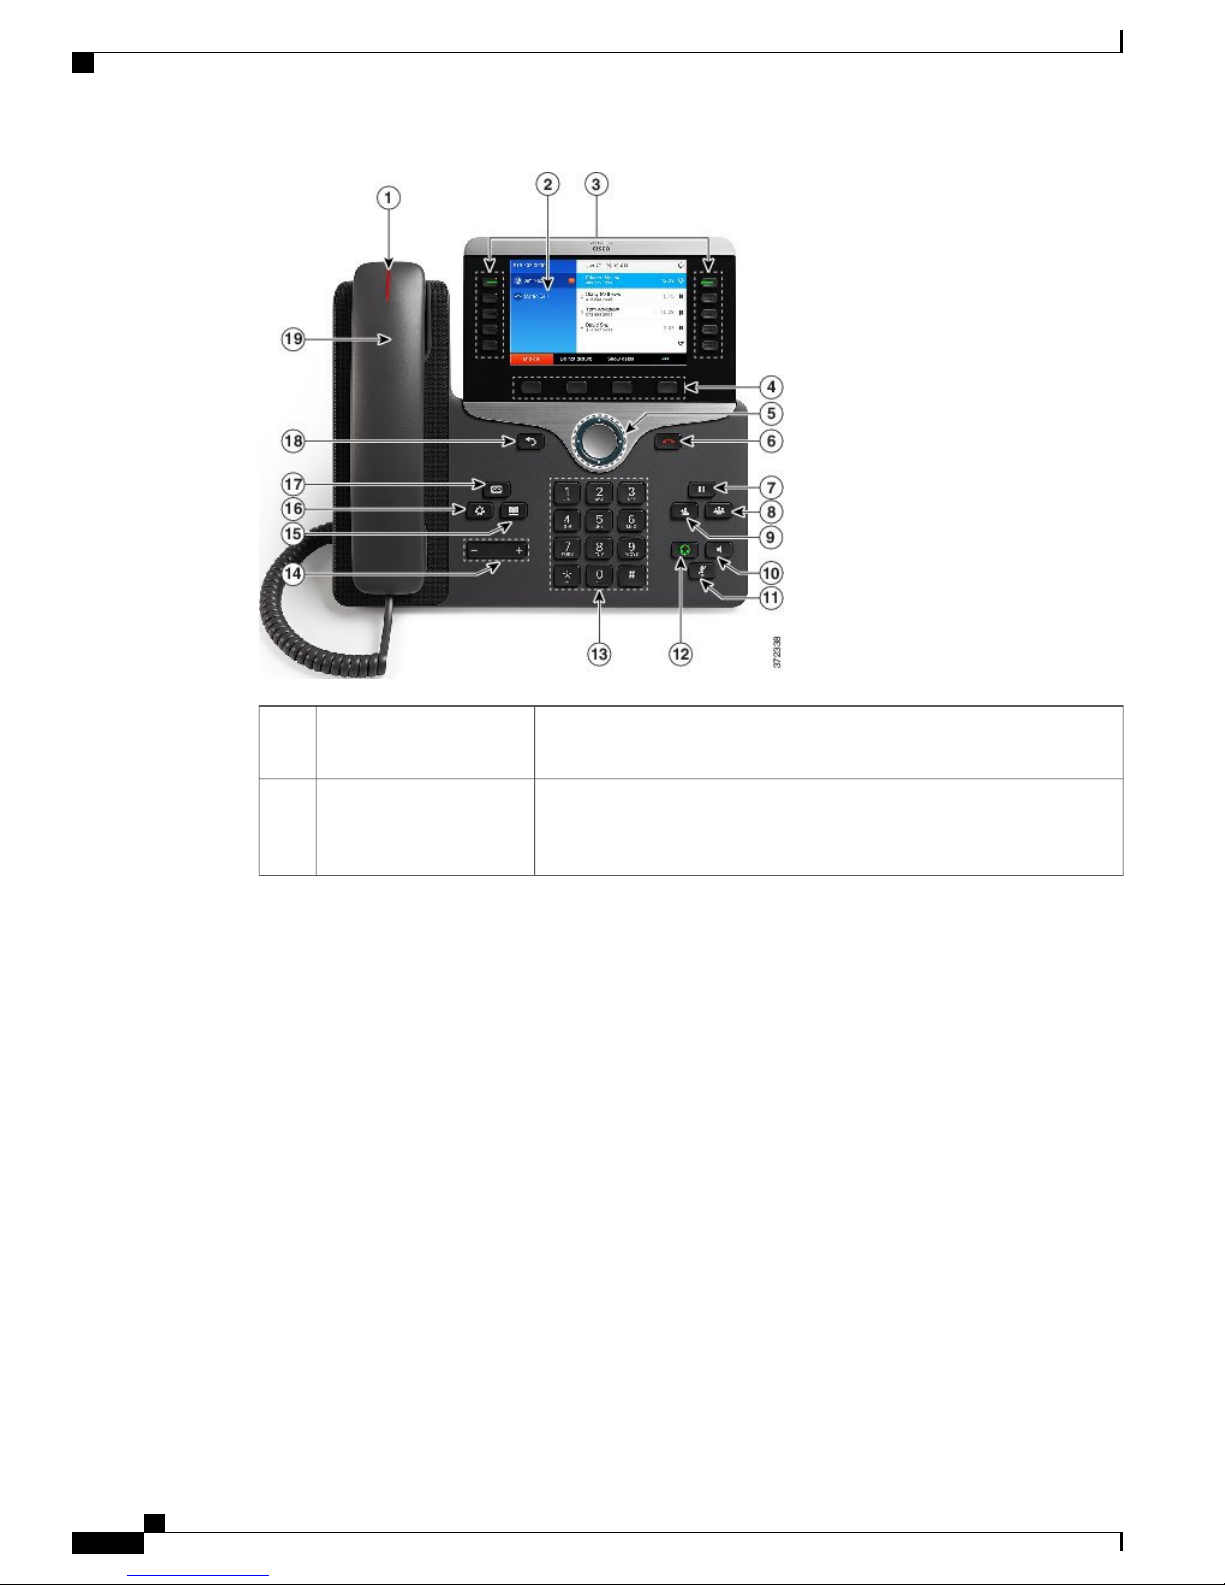
Handset light strip1
Indicates an incoming call (flashing red) or new voice message (steady
red).
Phone screen2
Shows information about your phone such as directory number, active
call and line status, softkey options, speed dials, placed calls, and phone
menu listings. The Cisco IP Phone 8811 screen is grayscale.
Cisco IP Phone 8800 Series User Guide
3
Page 16

Buttons and Hardware
Getting Started
Programmable feature
3
buttons and Session
buttons
Your phone provides quick access to your phone lines, features, and call
sessions:
Programmable feature buttons (left side): Use to view calls on a
•
line or access features such as Speed Dial or All Calls. These buttons
are also called feature buttons.
Session buttons (right side): Use to perform tasks such as answering
•
a call, resuming a held call, or (when not being used for an active
call) initiating phone functions such as displaying missed calls. Each
call on your phone is associated with a session button.
Note
Depending on how your system administrator sets up the phone, the
If you are using a locale that reads right to left, such as Arabic,
the line button and session button locations are swapped.
buttons provide access to:
Phone lines and intercom lines
•
Speed-dial numbers (speed-dial buttons, including the Line Status
•
speed-dial features)
Web-based services (for example, a Personal Address Book button)
•
Call features (for example, a Privacy button)
•
Buttons illuminate to indicate status:
Softkey buttons4
Navigation cluster and
5
Select button
Green, steady: Active call or two-way intercom call
•
Green, flashing: Held call
•
Amber, steady: Privacy in use, one-way intercom call, DND active,
•
or logged into Hunt Group
Amber, flashing: Incoming call or reverting call
•
Red, steady: Remote line in use (shared line or Line Status)
•
Red, flashing: Remote line on hold
•
Depending on how your system administrator sets up the phone, enable
softkey options displayed on your phone screen.
The Navigation cluster and Select button allows you to scroll through
menus, highlight items, and select the highlighted item.
Ends a connected call or session.Release Button6
Cisco IP Phone 8800 Series User Guide
4
Page 17

Getting Started
Buttons and Hardware
Places an active call on hold and resumes the held call.Hold/Resume button7
Creates a conference call.Conference button8
Transfers a call.Transfer button9
Speakerphone button10
Toggles the speakerphone on or off. When the speakerphone is on, the
button is lit.
Mute button11
Toggles the microphone on or off. When the microphone is muted, the
button is lit.
Toggles the headset on or off. When the headset is on, the button is lit.Headset button12
Keypad13
Allows you to dial phone numbers, enter letters, and select menu items
(by entering the item number).
Volume button14
Controls the handset, headset, and speakerphone volume (off hook) and
the ringer volume (on hook).
Contacts button15
Opens or closes the Directories menu. Use the Contacts button to access
personal and corporate directories.
Applications button16
Opens or closes the Applications menu. Use the Applications button to
access call history, user preferences, phone settings, and phone model
information.
Cisco IP Phone 8800 Series User Guide
5
Page 18

Cisco IP Phone 8841 and 8845
Autodials your voice messaging system (varies by system).Messages button17
Returns to the previous screen or menu.Back button18
Phone handset.Handset19
Cisco IP Phone 8841 and 8845
Getting Started
The following sections describe attributes of the Cisco IP Phone 8841 and 8845.
Phone Connections
Connect your phone to the corporate IP telephony network, using the following diagram.
Cisco IP Phone 8800 Series User Guide
6
Page 19
Getting Started
Buttons and Hardware
4
IEEE 802.3at power enabled.
The Cisco IP Phone 8841 and 8845 does not support the Cisco IP Phone 8800 Key Expansion Module.Note
Buttons and Hardware
Cisco IP Phone 8841 and 8845 share the same button and hardware configuration, but the Cisco IP Phone
8845 has a video camera mounted on the top of the phone. The Cisco IP Phone 8841 is shown.
Access port (10/100/1000 PC) connection.5DC adaptor port (DC48V).1
Auxiliary port.6AC-to-DC power supply (optional).2
Handset connection.7AC power wall plug (optional).3
Analog headset connection (optional).8Network port (10/100/1000 SW) connection.
Cisco IP Phone 8800 Series User Guide
7
Page 20
Buttons and Hardware
Getting Started
Handset light strip1
Indicates an incoming call (flashing red) or new voice message (steady
red).
Phone screen2
Shows information about your phone such as directory number, active
call and line status, softkey options, speed dials, placed calls, and phone
menu listings.
Cisco IP Phone 8800 Series User Guide
8
Page 21

Getting Started
Buttons and Hardware
Programmable feature
3
buttons and Session
buttons
Your phone provides quick access to your phone lines, features, and call
sessions:
Programmable feature buttons (left side): Use to view calls on a
•
line or access features such as Speed Dial or All Calls. These buttons
are also called feature buttons.
Session buttons (right side): Use to perform tasks such as answering
•
a call, resuming a held call, or (when not being used for an active
call) initiating phone functions such as displaying missed calls. Each
call on your phone is associated with a session button.
Note
Depending on how your system administrator sets up the phone, the
If you are using a locale that reads right to left, such as Arabic,
the line button and session button locations are swapped.
buttons provide access to:
Phone lines and intercom lines
•
Speed-dial numbers (speed-dial buttons, including the Line Status
•
speed-dial features)
Web-based services (for example, a Personal Address Book button)
•
Call features (for example, a Privacy button)
•
Buttons illuminate to indicate status:
Softkey buttons4
Navigation cluster and
5
Select button
Green, steady: Active call or two-way intercom call
•
Green, flashing: Held call
•
Amber, steady: Privacy in use, one-way intercom call, DND active,
•
or logged into Hunt Group
Amber, flashing: Incoming call or reverting call
•
Red, steady: Remote line in use (shared line or Line Status)
•
Red, flashing: Remote line on hold
•
Depending on how your system administrator sets up the phone, enable
softkey options displayed on your phone screen.
The Navigation cluster and Select button allows you to scroll through
menus, highlight items and select the highlighted item.
Ends a connected call or session.Release Button6
Cisco IP Phone 8800 Series User Guide
9
Page 22

Buttons and Hardware
Getting Started
Places an active call on hold and resumes the held call.Hold/Resume button7
Creates a conference call.Conference button8
Transfers a call.Transfer button9
Speakerphone button10
Toggles the speakerphone on or off. When the speakerphone is on, the
button is lit.
Mute button11
Toggles the microphone on or off. When the microphone is muted, the
button is lit.
Toggles the headset on or off. When the headset is on, the button is lit.Headset button12
Keypad13
Allows you to dial phone numbers, enter letters, and select menu items
(by entering the item number).
Volume button14
Controls the handset, headset, and speakerphone volume (off hook) and
the ringer volume (on hook).
Contacts button15
Opens or closes the Directories menu. Use the Contacts button to access
personal and corporate directories.
Applications button16
Cisco IP Phone 8800 Series User Guide
10
Opens or closes the Applications menu. Use the Applications button to
access call history, user preferences, phone settings, and phone model
information.
Page 23

Getting Started
Autodials your voice messaging system (varies by system).Messages button17
Returns to the previous screen or menu.Back button18
Phone handset.Handset19
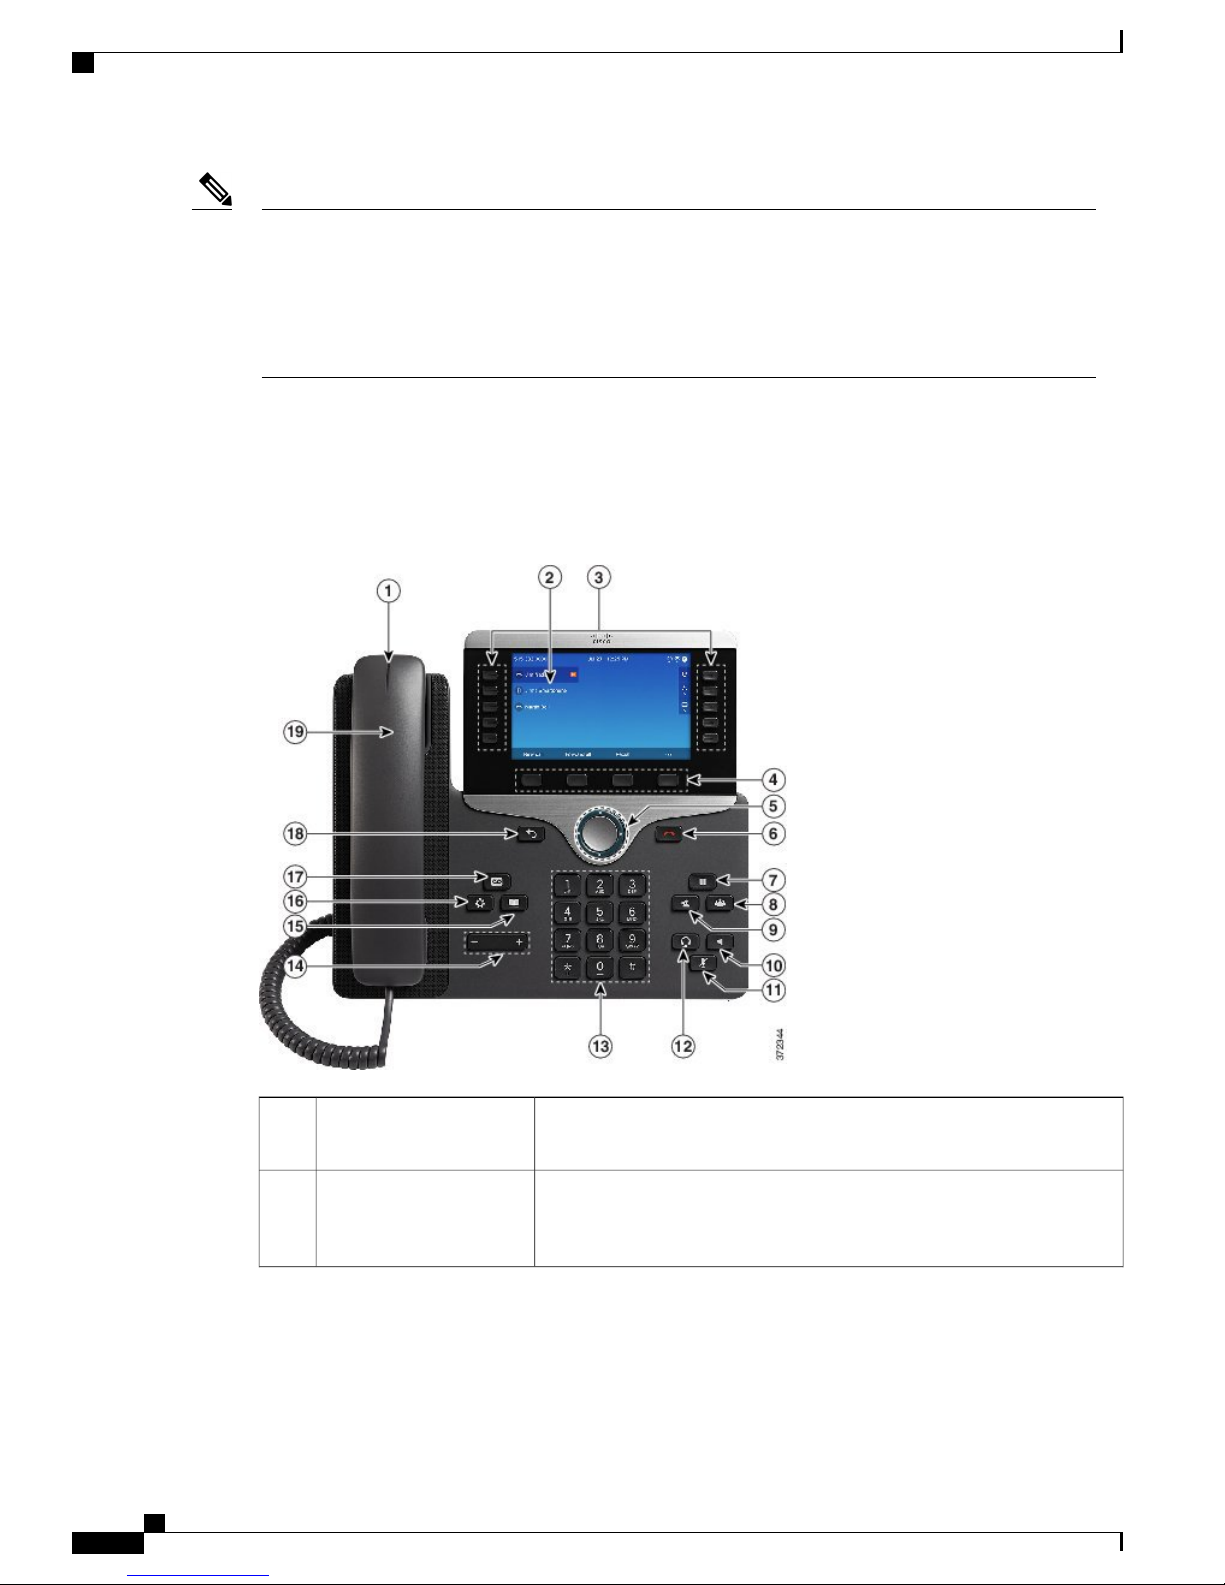
Cisco IP Phones 8851 and 8851NR
Cisco IP Phones 8851 and 8851NR
The following sections describe attributes of the Cisco IP Phones 8851 and 8851NR.
Note
The Cisco IP Phone 8851NR does not support Bluetooth. Other than not supporting Bluetooth, the Cisco
IP Phone 8851 and Cisco IP Phone 8851NR support the same features.
Phone Connections
Connect your phone to the corporate IP telephony network, using the following diagram.
Cisco IP Phone 8800 Series User Guide
11
Page 24

Phone Connections
Getting Started
Note
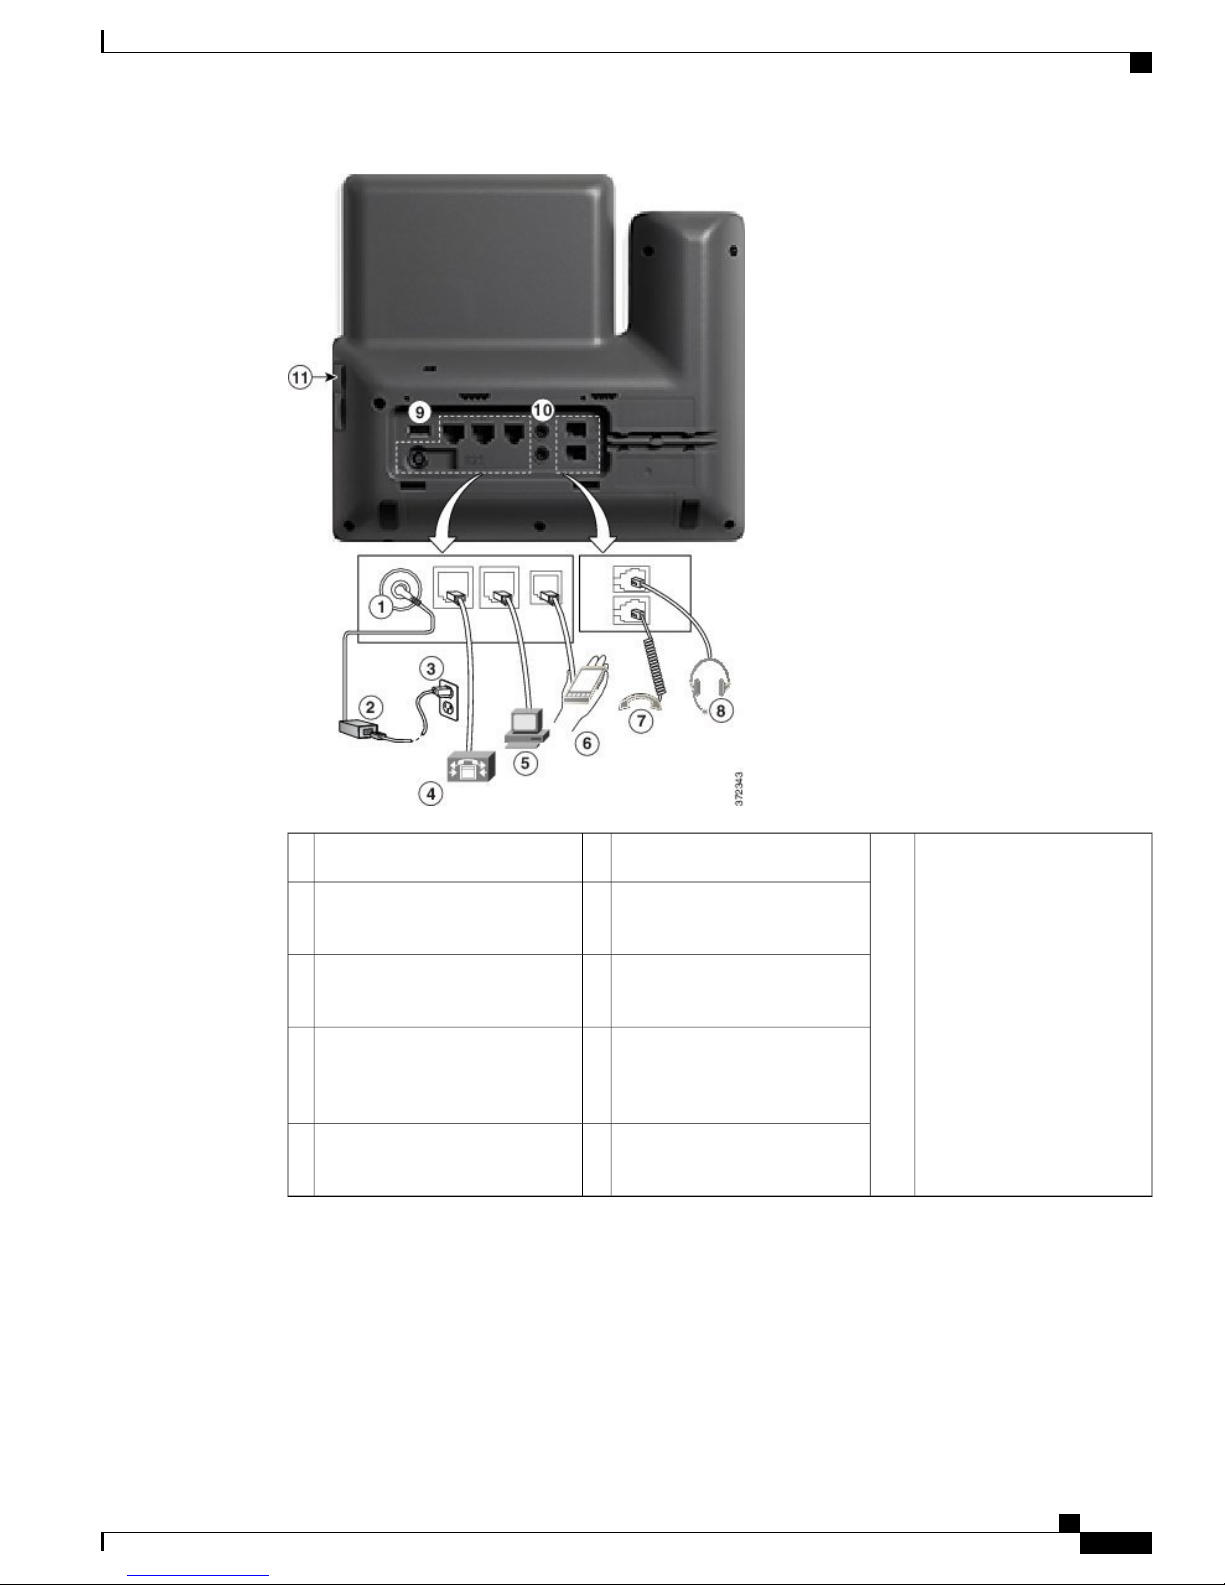
5DC adaptor port (DC48V).1
USB port9Access port (10/100/1000 PC)
connection.
2
Auxiliary port.6AC-to-DC power supply
(optional).
Handset connection.7AC power wall plug (optional).3
Analog headset connection
4
connection. IEEE 802.3at power
8Network port (10/100/1000 SW)
(optional).
enabled.
Each USB port supports the connection of up to five supported and nonsupported devices. Each device
connected to the phone is included in the maximum device count. For example, your phone can support
five USB devices (such as two Cisco IP Phone 8800 Key Expansion Modules, one headset, one hub, and
one other standard USB device) on the side port. Many third-party USB products count as multiple USB
devices, for example, a device containing USB hub and headset can count as two USB devices. For more
information, see the USB device documentation.
Cisco IP Phone 8800 Series User Guide
12
Page 25

Getting Started
Buttons and Hardware
Buttons and Hardware
Handset light strip1
Indicates an incoming call (flashing red) or new voice message (steady
red).
Phone screen2
Shows information about your phone such as directory number, active
call and line status, softkey options, speed dials, placed calls, and phone
menu listings.
Cisco IP Phone 8800 Series User Guide
13
Page 26

Buttons and Hardware
Getting Started
Programmable feature
3
buttons and Session
buttons
Your phone provides quick access to your phone lines, features, and call
sessions:
Programmable feature buttons (left side): Use to view calls on a
•
line or access features such as Speed Dial or All Calls. These buttons
are also called feature buttons.
Session buttons (right side): Use to perform tasks such as answering
•
a call, resuming a held call, or (when not being used for an active
call) initiating phone functions such as displaying missed calls. Each
call on your phone is associated with a session button.
Note
Depending on how your system administrator sets up the phone, the
If you are using a locale that reads right to left, such as Arabic,
the line button and session button locations are swapped.
buttons provide access to:
Phone lines and intercom lines
•
Speed-dial numbers (speed-dial buttons, including the Line Status
•
speed-dial features)
Web-based services (for example, a Personal Address Book button)
•
Call features (for example, a Privacy button)
•
Buttons illuminate to indicate status:
Softkey buttons4
Navigation cluster and
5
Select button
Green, steady: Active call or two-way intercom call
•
Green, flashing: Held call
•
Amber, steady: Privacy in use, one-way intercom call, DND active,
•
or logged into Hunt Group
Amber, flashing: Incoming call or reverting call
•
Red, steady: Remote line in use (shared line or Line Status)
•
Red, flashing: Remote line on hold
•
Depending on how your system administrator sets up the phone, enable
softkey options displayed on your phone screen.
The Navigation cluster and Select button allows you to scroll through
menus, highlight items and select the highlighted item.
Ends a connected call or session.Release Button6
Cisco IP Phone 8800 Series User Guide
14
Page 27

Getting Started
Buttons and Hardware
Places an active call on hold and resumes the held call.Hold/Resume button7
Creates a conference call.Conference button8
Transfers a call.Transfer button9
Speakerphone button10
Toggles the speakerphone on or off. When the speakerphone is on, the
button is lit.
Mute button11
Toggles the microphone on or off. When the microphone is muted, the
button is lit.
Toggles the headset on or off. When the headset is on, the button is lit.Headset button12
Keypad13
Allows you to dial phone numbers, enter letters, and select menu items
(by entering the item number).
Volume button14
Controls the handset, headset, and speakerphone volume (off hook) and
the ringer volume (on hook).
Contacts button15
Opens or closes the Directories menu. Use the Contacts button to access
personal and corporate directories.
Applications button16
Opens or closes the Applications menu. Use the Applications button to
access call history, user preferences, phone settings, and phone model
information.
Cisco IP Phone 8800 Series User Guide
15
Page 28

Cisco IP Phone 8861 and 8865
Autodials your voice messaging system (varies by system).Messages button17
Returns to the previous screen or menu.Back button18
Phone handset.Handset19
Cisco IP Phone 8861 and 8865
Getting Started
The following sections describe attributes of the Cisco IP Phone 8861 and 8865.
Phone Connections
Connect your phone to the corporate IP telephony network, using the following diagram.
Cisco IP Phone 8800 Series User Guide
16
Page 29
Getting Started
Phone Connections
2
(optional).
4
connection. IEEE 802.3at power
enabled.
5
connection.
Handset connection.7AC-to-DC power supply
Analog headset connection
8AC power wall plug (optional).3
(optional).
USB port9Network port (10/100/1000 SW)
Audio In/Out ports10Access port (10/100/1000 PC)
USB port11Auxiliary port.6DC adaptor port (DC48V).1
Cisco IP Phone 8800 Series User Guide
17
Page 30
Buttons and Hardware
Getting Started
Note
Each USB port supports the connection of up to five supported and nonsupported devices. Each device
connected to the phone is included in the maximum device count. For example, your phone can support
five USB devices (such as three Cisco IP Phone 8800 Key Expansion Modules, one hub, and one other
standard USB device) on the side port and five additional standard USB devices on the back port. Many
third-party USB products count as multiple USB devices, for example, a device containing USB hub and
headset can count as two USB devices. For more information, see the USB device documentation.
Buttons and Hardware
The Cisco IP Phone 8861 and 8865 share the same button and hardware configuration, but Cisco IP Phone
8865 has a video camera mounted on the top of the phone. Cisco IP Phone 8861 is shown.
Handset light strip1
Phone screen2
Cisco IP Phone 8800 Series User Guide
18
Indicates an incoming call (flashing red) or new voice message (steady
red).
Shows information about your phone such as directory number, active
call and line status, softkey options, speed dials, placed calls, and phone
menu listings.
Page 31

Getting Started
Buttons and Hardware
Programmable feature
3
buttons and Session
buttons
Your phone provides quick access to your phone lines, features, and call
sessions:
Programmable feature buttons (left side): Use to view calls on a
•
line or access features such as Speed Dial or All Calls. These buttons
are also called feature buttons.
Session buttons (right side): Use to perform tasks such as answering
•
a call, resuming a held call, or (when not being used for an active
call) initiating phone functions such as displaying missed calls. Each
call on your phone is associated with a session button.
Note
Depending on how your system administrator sets up the phone, the
If you are using a locale that reads right to left, such as Arabic,
the line button and session button locations are swapped.
buttons provide access to:
Phone lines and intercom lines
•
Speed-dial numbers (speed-dial buttons, including the Line Status
•
speed-dial features)
Web-based services (for example, a Personal Address Book button)
•
Call features (for example, a Privacy button)
•
Buttons illuminate to indicate status:
Softkey buttons4
Navigation cluster and
5
Select button
Green, steady: Active call or two-way intercom call
•
Green, flashing: Held call
•
Amber, steady: Privacy in use, one-way intercom call, DND active,
•
or logged into Hunt Group
Amber, flashing: Incoming call or reverting call
•
Red, steady: Remote line in use (shared line or Line Status)
•
Red, flashing: Remote line on hold
•
Depending on how your system administrator sets up the phone, enable
softkey options displayed on your phone screen.
The Navigation cluster and Select button allows you to scroll through
menus, highlight items and select the highlighted item.
Ends a connected call or session.Release Button6
Cisco IP Phone 8800 Series User Guide
19
Page 32

Buttons and Hardware
Getting Started
Places an active call on hold and resumes the held call.Hold/Resume button7
Creates a conference call.Conference button8
Transfers a call.Transfer button9
Speakerphone button10
Toggles the speakerphone on or off. When the speakerphone is on, the
button is lit.
Mute button11
Toggles the microphone on or off. When the microphone is muted, the
button is lit.
Toggles the headset on or off. When the headset is on, the button is lit.Headset button12
Keypad13
Allows you to dial phone numbers, enter letters, and select menu items
(by entering the item number).
Volume button14
Controls the handset, headset, and speakerphone volume (off hook) and
the ringer volume (on hook).
Contacts button15
Opens or closes the Directories menu. Use the Contacts button to access
personal and corporate directories.
Applications button16
Cisco IP Phone 8800 Series User Guide
20
Opens or closes the Applications menu. Use the Applications button to
access call history, user preferences, phone settings, and phone model
information.
Page 33

Getting Started
Autodials your voice messaging system (varies by system).Messages button17
Returns to the previous screen or menu.Back button18
Phone handset.Handset19
Power Save and Power Save Plus
Power Save and Power Save Plus
There are two levels of energy-saving modes that your system administrator can set up:
Power Save
Depending on how your system administrator set up your phone, the phone display may go into a power-save
mode (the phone screen appears blank and the Select button is lit white).
To turn on the phone display, press any button or pick up the handset.
Power Save Plus
Your phone supports the Cisco EnergyWise (EW) program, also known as Power Save Plus. Your system
administrator sets up sleep (power down) and wake (power up) times for your phone to save energy. If your
phone goes into the Power Save Plus mode, the Select button is lit white.
Ten minutes before the scheduled sleep time, the Select button lights up and you receive a message that your
phone will power off at a specific time. If enabled by your system administrator, you also hear your ringtone
play. The ringtone plays according to the following schedule:
Power Save: Backlight turns off when not in use for a period of time, reducing the power requirements.
•
Power Save Plus: The phone display goes blank, turning the phone off and on at predetermined times.
•
The power to the phone is significantly reduced.
At 10 minutes before power off, the ringtone plays four times
•
At 7 minutes before power off, the ringtone plays four times
•
At 4 minutes before power off, the ringtone plays four times
•
At 30 seconds before power off, the ring tone plays 15 times or until the phone powers off
•
Cisco IP Phone 8800 Series User Guide
21
Page 34

Additional Information
If your phone is inactive (idle) at the sleep time, you see a message to remind you that your phone is about
to power down. To keep the phone active, you need to press OK in the message or any key on the phone. If
you do not press the button or any key, your phone powers down.
If your phone is active (for example, on a call), your phone waits until it has been inactive for a period of time
before telling you of the pending power shutdown. Before the shutdown happens, you see a message to remind
you that your phone is about to power off.
After your phone goes to sleep, press Select to wake up your phone. After the phone is inactive for a period
of time, a message displays to alert you that the phone is about to power down. At the configured wake time,
your phone powers up.
Wake and sleep times are also linked to the configured days that you normally work. If your requirements
change (for example, your work hours or work days change), contact your system administrator to have your
phone reconfigured.
For more information about EnergyWise and your phone, contact your system administrator.
Additional Information
Getting Started
You can access the Cisco website at this URL: http://www.cisco.com/
Within the Cisco website, you can find the following information:
Quick reference cards, quick start guides, and end-user guides:
•
http://www.cisco.com/c/en/us/support/collaboration-endpoints/unified-ip-phone-8800-series/
products-user-guide-list.html
Licensing information:
•
http://www.cisco.com/c/en/us/support/collaboration-endpoints/unified-ip-phone-8800-series/
products-licensing-information-listing.html
Cisco international websites:
•
Allows access to international Cisco websites from www.cisco.com by clicking the Worldwide [change]
link at the top of the web page.
Cisco IP Phone 8800 Series User Guide
22
Page 35

Phone Setup
Connect Footstand, page 23
•
Adjust the Handset Rest, page 23
•
Secure the Phone with a Cable Lock, page 24
•
Connect Footstand
The phone includes an adjustable footstand. If the phone is placed on a table or desk, the footstand can be
connected to the back of the phone. The footstand enables the phone angle to be adjusted from a minimum
of 35 degrees to a maximum of 50 degrees to ensure an optimal viewing angle.
Adjusting the footstand to the required angle may require more force than you expect.Note
CHAPTER 2
Procedure
Step 1
Step 2
Step 3
Insert the connectors into the slots provided.
Press the footstand until the connectors snap into place.
Adjust the angle by pressing down or pulling up on the footstand. The connectors are made of a flexible
material.
Adjust the Handset Rest
If your phone is wall-mounted, you may need to adjust the handset rest to ensure that the receiver does not
slip out of the cradle.
Cisco IP Phone 8800 Series User Guide
23
Page 36

Secure the Phone with a Cable Lock
Phone Setup
Procedure
Step 1
Step 2
Step 3
Step 4
Step 5
Remove the handset from the cradle and pull the plastic tab from the handset rest.
Rotate the tab 180 degrees.
Hold the tab between two fingers, with the corner notches facing you.
Line up the tab with the slot in the cradle and press the tab evenly into the slot. An extension protrudes from
the top of the rotated tab.
Return the handset to the handset rest.
Secure the Phone with a Cable Lock
You can secure the phone to a desktop with a laptop cable lock. The lock connects to the antitheft security
connector on the back of the phone and the cable can be secured to a desktop.
The security slot can accommodate a lock up to 20 mm wide. Compatible laptop cable locks include the
Kensington laptop cable lock and laptop cable locks from other manufacturers that can fit into the security
slot on the back of the phone.
Procedure
Step 1
Step 2
Step 3
Cisco IP Phone 8800 Series User Guide
24
Wrap the looped end of the cable lock and wrap it around object to which you want to secure your phone.
Pass the lock through the looped end of the cable.
Unlock the cable lock.
Note
There are two kinds of cable locks: keyed and combination. Depending on the type of lock you have,
unlock it by using the key or the correct combination.
Page 37

Phone Setup
Secure the Phone with a Cable Lock
Step 4
Step 5
Step 6
Press and hold the locking button to align the locking teeth.
Insert the cable lock into the lock slot of your phone and release the locking button.
Lock the cable lock.
Note
For keyed locks, turn the key 90 degrees in the clockwise direction and pull the key out of the lock.
For combination locks, rotate the lock 90 degrees and then scramble the combination.
Cisco IP Phone 8800 Series User Guide
25
Page 38

Secure the Phone with a Cable Lock
Phone Setup
Cisco IP Phone 8800 Series User Guide
26
Page 39

Basic Operations
Clean the Phone Display, page 27
•
Make Calls, page 28
•
Navigate and Select Items, page 30
•
View All Calls on the Phone, page 31
•
Answer Calls, page 31
•
Automatically Answer Calls, page 35
•
Respond to a Call Waiting Notification, page 36
•
Manage Calls, page 36
•
Call Forward, page 38
•
Mute Phone, page 39
•
Hold Calls, page 39
•
CHAPTER 3
Set Up Call Back Notification, page 41
•
Call Park, page 41
•
Manage Intercom Calls, page 43
•
View Phone Information, page 44
•
Video Calls, page 45
•
Sign In To the Cisco Unified Communications Self Care Portal, page 47
•
Clean the Phone Display
Phone displays that are not touchscreens can be easily cleaned.
Procedure
Wipe the screen with a soft, dry cloth.
Cisco IP Phone 8800 Series User Guide
27
Page 40

Make Calls
Basic Operations
Caution
Make Calls
If the phone window displays the Unprovisioned message for your primary line, contact your system
administrator to get the primary line set up.
Predial a Number
You can dial a number while your phone is on-hook (without hearing dial tone); this dialing action is called
predial.
Procedure
Step 1
Step 2
Enter a number using the keypad.
Go off-hook using one of the following actions:
•
•
Use only a soft, dry cloth to wipe the phone display. Do not use any liquids or powders on the
phone because they can contaminate phone components and cause failures.
Lift the handset.
Press Call.
•
Press Handset .
•
Press Speakerphone .
Place a Call Using the Speakerphone
Your administrator can configure your phone so that the speakerphone is disabled. If the speakerphone is
disabled, the softkeys are dimmed or blank.
Procedure
Step 1
Step 2
Press Speakerphone .
Enter a number.
Cisco IP Phone 8800 Series User Guide
28
Page 41

Basic Operations
Place a Call Using a Headset
Procedure
Place a Call Using a Headset
Step 1
Step 2
Step 3
Press New Call.
Ensure the headset button is lit. If the headset button is not lit, press Headset .
Enter a number.
Release a Call and Start Another Call
When you are on an active call or dialing, and want to release the call, the following actions occur:
The active call ends.
•
The phone provides dial tone.
•
You can dial the new call.
•
Procedure
Step 1
Step 2
When you are on an active call, press End Call, or while dialing, press Cancel .
Enter the required number and press Call.
Dial an International Number
Plus Dialing allows you to press and hold the star (*) key for at least 1 second to insert a plus (+) sign as the
first digit in a phone number for international dialing. The plus sign applies only for on-hook or off-hook
calling.
When you see phone numbers with the + sign in them, you can select and dial the entry without having to add
digits for international calls.
Procedure
Step 1
Step 2
Press and hold star (*) for at least 1 second.
The plus (+) sign displays as the first digit in the phone number. The corresponding tone stops to indicate that
the * has changed to a + sign. You can only hear the tone in off-hook state.
Dial the number.
Cisco IP Phone 8800 Series User Guide
29
Page 42

Redial a Number
Redial a Number
Redial allows you to call the most recently dialed phone number.
Procedure
Basic Operations
Step 1
Step 2
To place a call from any phone line, press Redial.
To place the call on a specific phone line, select the line to obtain dial tone and press Redial.
Navigate and Select Items
Scroll to highlight an item.
button.
Select an item by number.
Select an item using the Select button.
Navigate to a submenu.
(A right arrow (>) next to the menu
item indicates that a submenu exists.)
Press the corresponding number on the
keypad.
Press Select at the center of the Navigation
cluster and Select button.
Highlight the menu item and press the item
number on the keypad.
Or press the Navigation cluster and Select
button.
ExampleActionTask
Highlight a call from the missed call list.Press the Navigation cluster and Select
Press 2 to select the second item in the
Applications menu.
Highlight the Settings application and press
Select.
Highlight the Network Setup menu, then press
1 to open the submenu.
Select a line to use a calling feature
(when the line is idle).
Cisco IP Phone 8800 Series User Guide
30
Press the line button.
Indicators of your line selection include:
The selected line is displayed on the
•
phone screen header.
On phones with color screens, the color
•
of the icon (on the line label) changes
to blue.
Press the line button and then press Forward
All to forward calls on that line.
Page 43

Basic Operations
View All Calls on the Phone
ExampleActionTask
Select a line to use a calling feature
(when the line has one or more active
calls).
Press the line button.
Indicators of your line selection include:
The selected line is displayed on the
•
phone screen header.
On phones with color screens, the color
•
of the icon (on the line label) changes
to blue.
View All Calls on the Phone
All Calls allows you to view a list, sorted in chronological order (oldest first), of all active calls on all of your
phone lines. You see the normal phone calls as well as shared line, barged calls, and conference calls.
You use this feature if you have multiple lines or if you share lines with other users. With the All Calls view:
All active calls display on one place, making it easy to view and interact with calls on any line.
•
When you lift the handset, the phone selects your primary line, which helps prevent inadvertent use of
•
a shared line for dialing.
You can press the flashing amber session button to answer a ringing call on any line. You do not need
•
to first select the line with the ringing call before answering it.
Press the line button twice and then press
Forward All to forward calls on that line.
Your system administrator sets up the All Calls button depending on your call-handling needs and work
environment.
The All Calls button is the session key with an associated icon. When the icon changes, you have missed a
call. Press the icon to view the call history information for the missed call.
Your system administrator can also set up your primary line to automatically display all calls. Your system
administrator can also set up your phone so that after a call completes, the primary line with the All Calls
view displays.
Procedure
Step 1
Step 2
To view all calls, press All Calls.
If you do not see the All Calls button, press Primary Line.
Answer Calls
Answer allows you to answer the oldest call that is available on all line appearances on your phone, including
Hold Reversion and Park Reversion calls that are in an alerting state. Incoming calls always have priority
over Held or Park Reversion calls.
Cisco IP Phone 8800 Series User Guide
31
Page 44

Answer the Oldest Call First
Your system administrator sets up the Answer button depending on your call-handling needs and work
environment. This feature is typically set up for users who have multiple lines.
When you get a call, you see a notification window on the phone screen, called a call toast. The call toast
remains visible for a preset amount of time. If an incoming call has been call forwarded from another phone,
you may see additional information in the call toast to identify that the call has been forwarded.
If an incoming call has been call forwarded from another phone, you may see additional information to identify
that the call has been forwarded. Your system administrator controls the amount of additional information
that is displayed. Additional information can identify the person who forwarded the call to you and the caller
information.
For more information, contact your system administrator.
Answer the Oldest Call First
Answer allows you to answer the oldest call that is available on all line appearances on your phone, including
Hold Reversion and Park Reversion calls that are in an alerting state. Incoming calls always have priority
over Held or Park Reversion calls.
Your system administrator sets up the Answer button depending on your call-handling needs and work
environment. Typically, the Answer is set up if you have multiple lines.
When you get a call, you see a notification window on the phone screen, called a call toast. The call toast
remains visible for a preset amount of time. Your system administrator sets up the default time.
If an incoming call has been call forwarded from another phone, you may see additional information in the
call toast to identify that the call has been forwarded. Your system administrator controls the amount of
additional information displayed. Additional information can identify the person who forwarded the call to
you and the caller information.
Basic Operations
Call Pickup
Procedure
To answer the oldest incoming call first, press Answer.
Call Pickup allows you to answer a call that is ringing on a coworker’s phone by redirecting the call to your
phone. Your system administrator sets up call groups and can assign you to one or more call groups. Your
system administrator also sets up the Call Pickup softkeys depending on your call-handling needs and work
environment.
You might use Call Pickup if you share call-handling tasks with coworkers.
There are three ways you can pick up a call:
Pickup
Allows you to answer a call that is ringing on another phone within your call pickup group.
If multiple calls are available for pick up, your phone picks up the oldest call first (the call that has been
ringing for the longest time).
Cisco IP Phone 8800 Series User Guide
32
Page 45

Basic Operations
Call Pickup
Group Pickup
Allows you to answer a call on a phone that is outside your call pickup group by:
Using a group pickup number (provided by your system administrator).
•
Dialing the number of the ringing phone.
•
Other Pickup
Allows you to answer a call that is ringing on another phone within in your call pickup group or in an
associated call pickup group.
You can also monitor and pick up ringing calls using Line Status indicators if your system administrator has
set up Line Status indicators on speed-dial buttons for you. Line Status indicators allow you to see if a line
associated with a speed-dial button is idle, in-use, in a Do Not Disturb state, or ringing.
Related Topics
Line Status Indicators, on page 76
Answer a Call Using PickUp
Call PickUp allows you to answer a call ringing on a coworker’s phone by redirecting the call to your phone.
You might use Call PickUp if you share call-handling tasks with coworkers.
There are three ways you can pick up a call:
PickUp: Allows you to answer a call ringing on another phone within your call pickup group.
•
If multiple calls are available for pick up, your phone picks up the oldest call first (the call that has been
ringing for the longest time).
Group PickUp: Allows you to answer a call on a phone that is outside your call pickup group by:
•
Using a group pickup number (provided by your system administrator).
•
Dialing the number of the ringing phone.
•
Other PickUp: Allows you to answer a call ringing on another phone within in your call pickup group
•
or in an associated call pickup group.
Your system administrator sets up your call pickup group and your call pickup softkeys, depending on your
call-handling needs and work environment.
You can also monitor and pick up ringing calls using Line Status indicators if your system administrator has
set up Line Status indicators on speed-dial buttons for you. Line Status indicators allow you to see if a line
that is associated with a speed-dial button is idle, in-use, in a Do Not Disturb state, or ringing.
Procedure
Step 1
Perform one of the following actions:
Press PickUp to transfer a ringing call within your pickup group to your phone.
•
Cisco IP Phone 8800 Series User Guide
33
Page 46

Call Pickup
Basic Operations
If you have multiple lines and want to pick up the call on a nonprimary line, first press the desired line
•
button, then press PickUp.
If your phone supports autopickup, you are connected to the call.
Step 2
If the call rings, press Answer to connect to the call.
Answer a Call Using Group PickUp and a Phone Number
Procedure
Step 1
Step 2
Step 3
Perform one of the following actions:
Press Group PickUp.
•
If you have multiple lines and want to pick up the call on a nonprimary line, first press the desired line
•
button, and then press Group PickUp.
Enter the number of the phone line with the call that you want to pick up.
For example, if the call is ringing on line 12345, enter 12345.
If your phone supports autopickup, you are now connected to the call.
If the call rings, press Answer to connect to the call.
Answer a Call Using Group PickUp and a Group PickUp Number
Procedure
Step 1
Step 2
Step 3
Perform one of the following actions:
Press Group PickUp to answer a call on a phone outside your pickup group.
•
If you have multiple lines and want to pick up the call on another line, first press the desired line button,
•
then press Group PickUp.
Enter the group pickup number.
If your phone supports autopickup, you are now connected to the call.
If the call rings, press Answer to connect to the call.
Cisco IP Phone 8800 Series User Guide
34
Page 47

Basic Operations
Answer a Call Using Other PickUp
Procedure
Automatically Answer Calls
Step 1
Step 2
Perform one of the following actions:
Press OPickUp to answer a call in your pickup group or in an associated group to your phone.
•
If you have multiple lines and want to pick up the call on another line, first press the desired line button,
•
then press OPickUp.
If the call rings, press Answer to connect to the call.
Automatically Answer Calls
Incoming calls can be answered automatically by your phone after one ring. Your administrator sets up the
Auto Answer feature to work with either your speakerphone or headset. For more information, contact your
administrator.
Procedure
Step 1
When your phone is set up to autoanswer calls using your headset,
a) To answer calls automatically with a headset, prepare your phone in the following way:
Ensure that your headset is connected to the phone.
•
Step 2
•
Ensure that the headset button is illuminated.
When you get a call, the call answers automatically and you interact with the caller using the headset.
b)
To end calls or make calls, use the buttons and softkeys. Do not use the headset button .
c)
If you do not want calls to automatically answer on your headset, press the headset button to turn off
the headset and use the handset or speakerphone to make and answer calls.
When your phone is set up to autoanswer calls using the speakerphone,
a) To answer calls automatically on the speakerphone, prepare your phone in the following way:
•
Ensure that the headset button is not illuminated.
Leave the handset in the cradle.
•
When you get a call, the call answers automatically and you interact with the caller using the
speakerphone.
Cisco IP Phone 8800 Series User Guide
35
Page 48

Respond to a Call Waiting Notification
b)
If you do not want calls to answer automatically on your speakerphone, press the headset button to
make and answer calls using a headset or the handset.
Respond to a Call Waiting Notification
Call Waiting provides the following to notify you that a new call is ringing on your phone when you are
talking on another call:
Call Waiting tone (single beep)
•
An amber flashing line button
•
This feature is configured by the administrator.
Procedure
Basic Operations
Step 1
Step 2
Step 3
Step 4
To answer the ringing call, press the flashing amber session button or press Answer to answer the call. You
can also scroll to the call and press Select to answer it. Your phone puts the original call on hold automatically
and connects the ringing call.
If the call is on a different line, you must first press the line button or All Calls, if available, to display the
ringing session and then answer the call.
If the call is on the same line and not visible, as there are many calls, then you must scroll to display the
sessions.
If a programmable feature button is set up by your system administrator to answer calls, you can press the
feature button to answer a ringing call, regardless of the line of the call or the line that is currently visible.
The phone automatically switches the line to display the call.
Manage Calls
Decline a Call
Decline allows you to send an active or ringing call to your voicemail system or to a predetermined phone
number. For more information, contact your system administrator.
You can silence the incoming (ringing) call. Press Volume down once, then let the incoming call go to the
target number (voicemail or predetermined number set up the system administrator).
Cisco IP Phone 8800 Series User Guide
36
Page 49

Basic Operations
Transfer a Call to Another Number
Procedure
Step 1
Step 2
Step 3
To redirect an incoming (ringing) call while on another call, highlight the incoming call, then press Decline.
Otherwise, press Decline to redirect the current, active call.
To redirect an incoming call while not on a call, press Decline.
To redirect a held call, first resume the call and then press Decline.
Transfer a Call to Another Number
Transfer allows you to redirect a connected call from your phone to another number.
You can redirect a single call to another number that you specify.
•
You can connect two calls to each other without remaining on the line yourself.
•
Your system administrator controls the ability to transfer calls from one line to another line.
Procedure
Step 1
Step 2
Step 3
Step 4
Step 5
Verify that you are on an active call (not on hold).
Press Transfer .
Enter the transfer recipient’s phone number or press a speed-dial button.
Wait for the recipient to answer or skip to Step 5 while the call is ringing.
Press Transfer again.
Toggle Between Calls Before Completing a Transfer
After you connect to the transfer recipient, but before you transfer a call to this party, you can press Swap to
toggle between the two calls. This allows you to consult privately with the party on each call before you
complete the transfer.
Procedure
Step 1
Step 2
Call a new conference participant, but do not add the participant to the conference.
Press Swap to toggle between the participant and the conference.
Cisco IP Phone 8800 Series User Guide
37
Page 50

Monitor and Record Calls
Monitor and Record Calls
Monitoring and Recording allows you to monitor and record calls if desired. Your system administrator enables
this feature, which can be set up for automatic recording of all calls or recording of individual calls, when
required.
Procedure
To start or stop recording, press Record on your phone.
You may hear notification tones while you monitor and record calls. By default, the person who monitors the
call and records it (if also configured) does not hear the notification tones.
Call Forward
Call Forward allows you to forward calls from any line on your phone to another number.
There are two types of call-forwarding features that your system administrator may set up on your phone:
Basic Operations
•
•
When forwarding calls from your phone:
•
•
•
Forward All Calls
Unconditional call forwarding (Call Forward All): Applies to all calls that you receive. You can set up
Call Forward All directly on your phone for any line. To set up Call Forward All remotely, go to the
Self Care Portal.
Conditional call forwarding (Call Forward No Answer, Call Forward Busy, Call Forward No Coverage):
Applies to certain calls that you receive, according to conditions, and is set up from the Self Care Portal.
Enter the call forward target number exactly as you would dial it from your phone. For example, enter
an access code or the area code, if necessary.
Call forward is phone-line specific. If a call reaches you on a line where call forwarding is not enabled,
the call rings as usual.
Your system administrator can set up other call-forward options:
Allow calls placed from the call forward target number to your phone to ring through, rather than
◦
be forwarded.
Prevent you from creating a call-forward loop or exceeding the maximum number of links in a
◦
call forwarding chain.
Procedure
Step 1
Step 2
Cisco IP Phone 8800 Series User Guide
38
On any idle line from which you want to forward your calls, press Forward All.
Enter a phone number, or select an entry from the Call History list.
Page 51

Basic Operations
Step 3
Mute Phone
Depending on how your voicemail system is set up, you may be able to press Messages to forward all calls
to voicemail.
Visual confirmation displays for a few seconds to confirm the number to which your calls will be forwarded.
To verify that your calls are forwarded, look for:
•
A Forward All icon in the line label.
The forwarding information in the header.
•
Step 4
To cancel call forwarding, press Forward Off.
Mute Phone
Mute allows you to block audio input for your handset, headset, or speakerphone. This means you can hear
other parties on the call, but they cannot hear you.
When on a video call, muting the audio does not stop the video. To stop your camera from broadcasting video,
close the shutter by turning the shutter counterclockwise.
Procedure
Step 1
Step 2
Press Mute to turn Mute on.
Press Mute again to turn Mute off.
Hold Calls
Hold allows you to put an active call into a held state. Your phone allows one active call at a time; other calls
are put on hold. Hold works with your phone handset as well as with USB headsets.
During a video call, video transmission is blocked until you resume the call.
Procedure
While on an active call, press Hold.
Swap Between Active and Held Calls
Use the line buttons to swap between held and connected calls.
Cisco IP Phone 8800 Series User Guide
39
Page 52

Put a Call on Hold by Answering a New Call
Procedure
If you have a held call and an active call, press the line button for the held call to resume that call and place
the other call on hold automatically.
Put a Call on Hold by Answering a New Call
If you are already on a call and receive a new call, answering the new call puts the first call on hold
automatically.
Procedure
Press flashing amber line button or press Answer to answer the ringing call.
Respond to a Hold Reversion Notification
Basic Operations
Hold Reversion notifies you when a call is left on hold.
A Hold Reversion notification is similar to a new call notification and includes these cues:
Single ring, repeating at intervals
•
Flashing amber line button
•
Flashing message indicator on the handset
•
Visual notification on the phone screen
•
Procedure
Press the flashing amber line button or Answer to resume the held call.
Determine If a Shared Line Is On Hold
If a call on a shared line has been put on hold remotely by another user, a pulsing red line button and the Hold
icon are displayed.
Remote Hold
When you place a call on hold while using a shared line, the line button pulses green and the phone displays
the Hold icon. When another phone places a call on hold, the line button pulses red and the phone displays
the Remote Hold icon.
Cisco IP Phone 8800 Series User Guide
40
Page 53

Basic Operations
Set Up Call Back Notification
Procedure
Set Up Call Back Notification
Step 1
Step 2
Step 3
Call Park
Press Callback while listening to the busy tone or ring sound.
Press Exit to exit the confirmation screen.
Your phone alerts you when the line is free.
Press Call to place the call again.
Call Park allows you to use your phone to park (temporarily store) a call, which you can then retrieve from
another phone (such as a phone at a coworker’s desk or in a conference room).
There are two ways you can park a call:
Park
Allows you to park an active call that you answered on your phone, and retrieve it using another phone
in the Cisco Unified Communications Manager system.
Directed Call Park
Allows you to park and retrieve an active call in two different ways:
Assisted Directed Call Park: Allows you to park an active call using a feature button, which your
•
system administrator sets up as a speed-dial line.
With this type of directed call, you can monitor the status of the line (in-use or idle) using Line
Status indicators.
Manual Directed Call Park: Allows you to park an active call by transferring it to a Directed Call
•
number, which your system administrator sets up.
You retrieve the call at another phone by dialing a park retrieval prefix number (provided by your
system administrator) and then dialing the Directed Call number you used to park the call.
Your system administrator sets up either the Directed Call Park or the Park feature on your phone, but not
both.
Related Topics
Line Status, on page 76
Cisco IP Phone 8800 Series User Guide
41
Page 54

Park and Retrieve a Call Using Call Park
Park and Retrieve a Call Using Call Park
Procedure
Basic Operations
Step 1
Step 2
Step 3
During a call, press Park, and then hang up.
Your phone displays the number where the system parked the call. The parked call is put on hold, and you
can press Resume to resume the call on your phone.
From any other Cisco IP Phone in your network, enter the number where the call is parked to retrieve the call.
If you do not retrieve the call within a certain amount of time (set by your system administrator) you receive
an alert tone, at which time you can:
Press Answer to answer the call on your phone.
•
Retrieve the call from another phone.
•
If you fail to retrieve or answer the call within a specified amount of time, the call is redirected to another
destination (set up by your system administrator), such as voicemail. If the call gets redirected, it can no longer
be retrieved by using Call Park.
Park a Call Using Assisted Directed Call Park
Procedure
Step 1
Step 2
During a call, press BLF Directed Call Park on a line that displays an idle Line Status indicator.
Retrieve the call from any other Cisco IP Phone in your network as follows:
a) Enter the park retrieval prefix.
b) Dial the Directed Call number.
Step 3
Cisco IP Phone 8800 Series User Guide
42
If you do not retrieve the call within the time that your system administrator has set, you receive an incoming
call with notification of CallPark Reversion. At that time, you can press answer to answer the call. The other
phones can no longer retrieve that call.
Press Resume to resume the call on your phone.
•
Retrieve the call from another phone.
•
Page 55

Basic Operations
Park a Call Using Manual Directed Call Park
Procedure
Park a Call Using Manual Directed Call Park
Step 1
Step 2
Step 3
Step 4
Step 5
During a call, press Transfer .
Enter the Directed Call number where you will park the call.
Press Transfer again to finish parking the call and then hang up.
Retrieve the call from any other Cisco IP Phone in your network as follows:
a) Enter the park retrieval prefix.
b) Dial the Directed Call number.
If you do not retrieve the call within the time that your system administrator has set, you receive an alert tone.
At that time, you can:
Press Resume to resume the call on your phone.
•
Retrieve the call from another phone.
•
Manage Intercom Calls
Intercom allows you to place and receive one-way calls using a dedicated or dialable intercom line.
When you place an intercom call, the recipient’s phone autoanswers with mute activated (whisper mode) and
broadcasts your message through the recipient’s speakerphone, headset, or handset, if one of these devices is
active.
After receiving the intercom call, the recipient can initiate two-way audio (connected mode) to allow for
further conversation.
Place a Dedicated Intercom Call
Intercom allows you to place and receive one-way calls using a dedicated or dialable intercom line.
When you place an intercom call, the recipient phone autoanswers with mute activated (whisper mode) and
broadcasts your message through the recipient’s speakerphone, headset, or handset, if one of these devices is
active.
After receiving the intercom call, the recipient can initiate two-way audio (connected mode) to allow for
further conversation.
Procedure
Step 1
Press Intercom.
Note
Your phone enters whisper mode until the recipient accepts the intercom call. If you are on an active
call, that call is placed on hold.
Cisco IP Phone 8800 Series User Guide
43
Page 56

Place a Dialable Intercom Call
Basic Operations
Step 2
Step 3
Listen for the intercom alert tone, then begin speaking.
Press Intercom to end the call.
Place a Dialable Intercom Call
Procedure
Step 1
Step 2
Step 3
Step 4
Press Intercom.
Enter the intercom code.
Note
Listen for the intercom alert tone, then begin speaking.
Press Intercom to end the call.
Your phone enters whisper mode until the recipient accepts the intercom call. If you are on an active
call, that call is placed on hold.
Receive an Intercom Call
Intercom allows you to place and receive one-way calls using a dedicated or dialable intercom line.
After receiving the intercom call, the recipient can initiate two-way audio (connected mode) to allow for
further conversation.
Procedure
Step 1
Step 2
When an intercom call comes to your phone, you receive a message on your phone screen, an audible alert,
and your phone answers the intercom call with mute activated. You can handle the intercom call in one of
these ways:
Listen to the intercom caller in whisper mode. Any current call activity you are already engaged in
•
continues simultaneously. In whisper mode, the intercom caller cannot hear you.
Press Intercom to switch to connected mode. In connected mode, you can speak to the intercom caller.
•
Press Intercom to end the call.
View Phone Information
Phone Information allows you to view the following information for your phone:
Model Number
•
Cisco IP Phone 8800 Series User Guide
44
Page 57

Basic Operations
Video Calls
IP Address
•
Host Name
•
Active Load
•
Last Upgrade
•
Active Server
•
Stand-by-Server
•
You can access the Report a Problem feature from the Phone Information window. See the "Cisco Collaboration
Problem Reporting Tool" section for more information.
Procedure
Step 1
Step 2
Step 3
Video Calls
Press Applications .
Select Phone Information.
Press Exit to return to the Applications screen.
You can press Show detail to view the upgrade process during an upgrade.Note
The Cisco IP Phone 8845 and 8865 support video calls with a built-in video camera. Use the camera to
collaborate with friends and coworkers or to hold face-to-face meetings over your phone.
Both parties on a call must have a phone with video capabilities to have a video call.
A video call includes the following features:
• PIP—Displays a smaller picture of the outgoing video, allowing you to see incoming and outgoing video
at the same time. You can select from 4 PIP positions: Right bottom, Right top, Left top, and Left bottom.
You can also turn PIP off.
• Hide Video—Moves the displayed video behind the active call. The video in PIP is not displayed. Use
this feature to view the phone desktop during a video call.
• Swap—Toggles the views in the PIP view. The Swap soft key is grayed out when PIP is off.
• Self-view Video—Select Self-view to view your image as it appears on video.
The Cisco IP Phone 8845 and 8865 have manual shutters. When you are on an active call, turn the shutter
clockwise to open the shutter and transmit video. Turn the shutter counterclockwise to close the shutter and
stop the video transmission. Closing the shutter during a video call does not end the call.
We recommend that you close the camera shutter after each call to ensure that you do not send unwanted
video to the next caller.
During a video call, the softkey features display on the phone screen. But they disappear from the screen after
10 seconds if you do not press a button. Press any softkey, and the softkey features reappear.
Cisco IP Phone 8800 Series User Guide
45
Page 58

Place a Video Call
Related Topics
Adjust the Video Exposure, on page 110
Adjust the Video Bandwidth, on page 110
Enable Video through Your Computer, on page 111
Place a Video Call
The Cisco IP Phone 8845 and 8865 support video calls. On an audio call, open the shutter on the video camera
to create a video call. For a video call, both parties require a phone with a camera.
Procedure
Basic Operations
Step 1
Step 2
Step 3
Enter a number when the phone is idle.
Lift the handset or press New call, Headset , or Speakerphone .
Open the video camera shutter.
Stop Video
During a video call, you can stop your video camera from broadcasting when you need visual privacy. Audio
is not affected.
Procedure
Step 1
Step 2
Close the camera shutter by turning the shutter counterclockwise.
Open the camera shutter by turning the shutter clockwise to continue video.
Hide or Show Video
Your system administrator sets up the default softkey (either Show Video or Hide Video) and the default view
(video hidden or video displayed).
When you engage the Hide or Show Video feature, the displayed video will move to the background and be
displayed with a blurred effect.
Procedure
Step 1
Step 2
Cisco IP Phone 8800 Series User Guide
46
To hide the video, press Hide Video.
To show the video, press Show video.
Page 59

Basic Operations
Adjust the Picture-In-Picture Position
You can adjust Picture-In-Picture (PIP) placement using the PIP softkey. Select from four positions: Right
bottom, Right top, Left top, and Left bottom. You can also use the Navigation cluster and Select button to
adjust the PIP placement. Press and hold the Navigation cluster in one direction to speed up PIP placement.
Press Swap to toggle between the full-screen view and the picture-in-picture (PIP) view.
Procedure
Adjust the Picture-In-Picture Position
Step 1
Step 2
Press PIP to move the picture-in-picture (PIP) window to a different quadrant of the screen. As you press
PIP, the softkey changes to display the current PIP position.
To disable PIP, press PIP five times.
Sign In To the Cisco Unified Communications Self Care Portal
Your phone is a network device that can share information with other network devices in your company,
including your personal computer. You can use your computer to sign in to the Cisco Unified Communications
Self Care Portal, where you can control features, settings, and services for your phone. For example, you can
manage your phone display language, set up services, add entries to your personal address book, and set up
speed-dial codes.
Before you can access any of your options, such as Speed Dial or Personal Address Book, you must sign in.
When you are finished using portal, you must sign out.
In some cases, you can access the Cisco Unified Communications Self Care Portal without having to sign in.
For more information, contact your system administrator.
For assistance in using the portal, see the Cisco Unified Communications Self Care Portal User Guide, located
at http://www.cisco.com/en/US/products/sw/voicesw/ps556/products_user_guide_list.html.
Procedure
Step 1
Step 2
Step 3
Step 4
Step 5
Step 6
Step 7
Obtain the portal URL, user ID, and default password from your system administrator.
Typically, the portal URL is http://<ip_address or hostname>/ucmuser.
Open a web browser on your computer and enter the URL.
If prompted to accept security settings, select Yes or Install Certificate.
Enter your user ID in the Username field.
Enter your password in the Password field.
Select Login.
To sign out, select Logout.
Cisco IP Phone 8800 Series User Guide
47
Page 60

Sign In To the Cisco Unified Communications Self Care Portal
Basic Operations
Cisco IP Phone 8800 Series User Guide
48
Page 61

Contacts
Corporate Directory, page 49
•
Personal Directory, page 50
•
Fast Dial, page 53
•
Fast-Dial Codes with Personal Directory, page 53
•
Cisco WebDialer, page 55
•
Corporate Directory
The Corporate Directory menu contains corporate contacts that you can access on your phone. Your system
administrator sets up and maintains the directory.
CHAPTER 4
Search and Dial a Contact
Procedure
Step 1
Step 2
Step 3
Step 4
Step 5
Press Contacts .
Use the Navigation cluster and Select button to scroll and select Corporate Directory.
Select one or all of these search criteria to search for a coworker:
First Name
•
Last Name
•
Enter the search criteria information, press Submit, and select a contact.
To dial, perform one of these actions:
Press Call.
•
Press Select.
•
Cisco IP Phone 8800 Series User Guide
49
Page 62

Search and Dial a Contact While On a Call
From the keypad, press the number that displays in the upper right corner of the contact label.
•
•
Press Speakerphone .
•
Press Headset .
Pick up the handset.
•
Search and Dial a Contact While On a Call
Procedure
Contacts
Step 1
Step 2
Step 3
Step 4
Step 5
Press Contacts .
Use the Navigation cluster and Select button to scroll and select Corporate Directory.
Select one or both of these search criteria to search for a coworker:
First Name
•
Last Name
•
Enter the search criteria information and press Search .
Press Call.
The phone puts the existing call on hold and makes the new call.
Personal Directory
The personal directory contains a list of your personal contacts. You can assign fast-dial codes to your personal
directory entries for fast-dialing.
You can set up your personal directory from your phone or from the Cisco Unified Communications Self
Care Portal. Use your phone to assign fast-dial codes to the directory entries. For more information, see the
Cisco Unified Communications Self Care Portal User Guide, located at http://www.cisco.com/c/en/us/td/docs/
voice_ip_comm/cucm/useroptions/10_5_1/CUCM_BK_U437D0F8_00_self-care-user-guide-1051.html .
Cisco IP Phone 8800 Series User Guide
50
Page 63

Contacts
Sign In and Out of the Personal Directory
Procedure
Sign In and Out of the Personal Directory
Step 1
Step 2
Step 3
Step 4
Press Contacts .
Select Personal Directory.
Enter the user ID and PIN, and press Submit.
Select Log Out, press Select, and then press OK.
Add a Personal Directory Entry from the Phone
Procedure
Step 1
Step 2
Step 3
Step 4
Step 5
Step 6
Step 7
Step 8
Press Contacts .
Sign in to Personal Directory.
Select Personal Address Book.
Press Submit.
Press New. You may need to press More first.
Enter the nickname information.
You can also enter a name.
Press Phones and enter the phone numbers.
Make sure you include any required access codes, such as 9 or 1.
Press Submit to add the entry to your personal directory.
Search for an Entry in the Personal Directory
Procedure
Step 1
Step 2
Step 3
Step 4
Press Contacts .
Sign in to Personal Directory.
Select Personal Address Book.
Select one or all of the following:
Last Name
•
First Name
•
Cisco IP Phone 8800 Series User Guide
51
Page 64

Dial a Number from the Personal Directory
Nickname
•
Contacts
Step 5
Enter the search criteria information and press Submit.
Dial a Number from the Personal Directory
Procedure
Step 1
Step 2
Step 3
Step 4
Step 5
Press Contacts .
Sign in to Personal Directory.
Select Personal Directory and search for an entry.
Select the personal address book entry that you want to dial.
Press Call.
Edit a Personal Directory Entry
Procedure
Step 1
Step 2
Step 3
Step 4
Step 5
Step 6
Step 7
Step 8
Press Contacts .
Sign in to Personal Directory.
Select Personal Address Book and search for an entry.
Press Select.
Press Edit.
Modify the entry information.
Press Phones to modify a phone number.
Pres Update.
Cisco IP Phone 8800 Series User Guide
52
Page 65

Contacts
Delete a Personal Directory Entry
Procedure
Delete a Personal Directory Entry
Step 1
Step 2
Step 3
Step 4
Step 5
Step 6
Step 7
Press Contacts .
Sign in to Personal Directory.
Select Personal Address Book and search for an entry.
Press Select.
Press Edit.
Press Delete.
You may need to press More first.
Press OK to confirm the deletion.
Fast Dial
Fast Dial allows you dial a phone number from the Fast Dial service on your phone.
Place a Call With a Fast-Dial Button
Procedure
Step 1
Step 2
Step 3
Step 4
Press Fast Dial.
Sign in to Personal Directory.
Select Personal Fast Dials.
Select a fast-dial code and then press the Dial softkey.
Fast-Dial Codes with Personal Directory
You manage the fast-dial codes with Personal Directory using the Contacts menu on your phone.
Cisco IP Phone 8800 Series User Guide
53
Page 66

Assign a Fast Dial Code to a Personal Directory Entry
Assign a Fast Dial Code to a Personal Directory Entry
Procedure
Contacts
Step 1
Step 2
Step 3
Step 4
Step 5
Step 6
Step 7
Press Contacts .
Select Personal Directory.
Select Personal Address Book.
Enter the name and press Submit.
Press Select and then press FastDial.
Select a number and press Select.
Scroll to an unassigned fast-dial index and press Submit.
Place a Call Using a Fast Dial Code
Procedure
Step 1
Step 2
Step 3
Step 4
Press Contacts .
Sign in to Personal Directory.
Select Personal Fast Dials and scroll to a fast-dial code.
Note
Select the required fast-dial code and press Call.
To get more fast-dial codes, press
Next.
Delete a Fast Dial Code
Procedure
Step 1
Step 2
Step 3
Step 4
Step 5
Cisco IP Phone 8800 Series User Guide
54
Press Contacts .
Sign in to the Personal Directory.
Select Personal Fast Dials and search for a fast-dial code.
Select the required code and press Remove.
Select the index and press Remove.
Page 67

Contacts
Cisco WebDialer
Cisco WebDialer allows you to make calls on your Cisco IP Phone to directory contacts by selecting items
in a web browser.
For more information, contact your system administrator.
Use Cisco WebDialer with Another Online Corporate Directory
Procedure
Cisco WebDialer
Step 1
Step 2
Step 3
Step 4
Step 5
In a web browser, type the address of the Cisco WebDialer-enabled page:
https://[CUCM IP]/webdialer/Webdialer
When prompted, enter your user ID and password.
If you are using Cisco WebDialer for the first time, review preferences on the Make Call window.Note
Choose a line or a phone.
If you have one phone with a single line, the appropriate phone and line are automatically selected.
If you have more than one phone of the same type, the list identifies the phone by device type and MAC
address. To display the MAC address on your phone, select Applications > Phone Information.
Enter the phone number you want to dial, and select Dial.
Select Hang up or hang up the handset after your call completes.
Change Cisco WebDialer Preferences
Procedure
Step 1
Step 2
Initiate a call using Cisco WebDialer to access the Make Call window.
Select one of the following options from the Make Call window:
Preferred language
•
Preferred device
•
Step 3
Step 4
Step 5
Choose a line or a phone.
Note
If you have an Extension Mobility profile, select Extension Mobility from the Calling Device drop-down
menu.
Ensure that you do not select Do not display call information nor Disable Auto Close.
If you have one phone with a single line, the appropriate phone and line are automatically selected.
If you have more than one phone of the same type, the list identifies the phone by device type and
MAC address. To display the MAC address on your phone, select Applications > Phone Information.
Cisco IP Phone 8800 Series User Guide
55
Page 68

Sign Out of Cisco WebDialer
Contacts
Note
If you select Do not display call information, the Make Call Window is not displayed when you
next use the phone. If you select Disable auto close, the call window does not automatically close
after 15 seconds.
Sign Out of Cisco WebDialer
Procedure
Step 1
Step 2
Access the Make Call or Hang Up window.
Select Sign Out.
Cisco IP Phone 8800 Series User Guide
56
Page 69

Call History
Call History Overview, page 57
•
View the Call History, page 59
•
View Call Record Details, page 59
•
Filter the Call History, page 59
•
Dial From the Call History, page 60
•
Edit a Phone Number, page 60
•
Clear the Call History, page 61
•
Delete a Call Record, page 61
•
Call History Overview
CHAPTER 5
Call History allows you to view information about the last 150 calls on your phone. The Call History lists
individual calls and call groups chronologically from the most recent call to the oldest one. If your phone has
multiple lines, calls on all lines are added together. The oldest calls over the 150-call limit are dropped from
the history.
In the Call History screen, the line information (such as “Line: 5623”) displays in the upper-right corner to
indicate the line name or number for which the call history is displayed.
If set up by your administrator, you see icons beside each Call History entry. The icon shows the status
(Unknown, Idle, Busy, or DND) of the person who made the call.
For each call record or call group, an icon to the left of the caller ID shows the call type:
•
Received:
•
Placed:
•
Missed:
On the Cisco IP Phone 8811, the icon is gray.Note
Cisco IP Phone 8800 Series User Guide
57
Page 70

Call History Overview
Call History
If the caller ID is unavailable, “Unknown” is displayed, and the phone number is listed.
Calls for the same caller ID and phone number are grouped together only when if they occur in chronological
order and do not have calls associated. For each group, the time of the latest call and the number of calls (such
as “(3)”) are displayed:
Incoming (Received) and outgoing (Placed) calls are grouped together.
•
Missed calls are grouped together in a separate group.
•
For each individual call record or call group, the phone number is listed in blue and is contact sensitive for
touch dialing.
Hunt group and multiparty calls show an icon to the right of the caller ID that differentiates the call from a
normal call, and these calls are not grouped even when they are next to each other in the list.
A plus (+) symbol on entries in call history, redial, or call directory indicates that your phone is set up to list
international calls. For more information, contact your system administrator.
The received and placed calls from shared lines are logged in the Call History. To view all the call history
logs, open the Call History screen. The following table describes the call state, icon, and tag for shared lines.
TagCall IconCall State
PlacedLocally placed calls
ReceivedLocally received calls
Remote PlacedRemotely placed calls
Remote ReceivedRemotely received calls
Missed calls
Note
On the Cisco IP Phone
Missed
8811, the icon is gray.
Your Call History list displays the status of monitored lines, if the feature is enabled by your system
administrator. Each call history item in the Call History lists displays an icon to identify the state of the line.
The following states are available:
Offline
•
Idle
•
Busy
•
DND
•
Cisco IP Phone 8800 Series User Guide
58
Page 71

Call History
View the Call History
Procedure
View the Call History
Step 1
Step 2
Step 3
Step 4
Press Applications .
Select Recents.
Scroll and select a call record or call group.
Press Exit to return to the Applications screen.
View Call Record Details
Procedure
Step 1
Step 2
If you are on a connected call, press Show Detail to show the Call Details screen. This screen displays single
call information and call duration and updates each second.
If you are not on a connected call, follow the steps below.
a)
Press Applications and select Recents.
b) Select a call record or group and press Show Detail.
Note
c) Press Return to return to the Call History screen.
d) Press Exit to return to the Applications screen.
When you are on a call record, you can keep the Navigation cluster and Select button highlighted
to display the call details.
Filter the Call History
Procedure
Step 1
Step 2
Step 3
Step 4
Press Applications and select Recents.
To sort calls for a specific line, select the required phone line and view the individual calls.
To sort by missed calls for a specific line, select the required phone line press Missed Calls.
Press Exit to return to the Applications screen.
Cisco IP Phone 8800 Series User Guide
59
Page 72

Dial From the Call History
Dial From the Call History
Procedure
Call History
Step 1
Step 2
If the phone is not in idle state, perform the following steps:
a)
Press Applications and select Recents.
b) Select the call record that you want to dial and perform one of the following:
Press Call.
•
Pick up the handset.
•
Press Details.
•
•
Press Speakerphone or Headset .
If the phone is in idle state, press down on the Navigation cluster and Select button to display the On-Hook
Dialing screen.
Edit a Phone Number
Procedure
Step 1
Step 2
Step 3
Step 4
Step 5
Press Applications and select Recents.
Press All Lines or the required line.
Select the call you want to edit and press EditDial.
Note
Press Call to dial the number.
Press Return to return to the Call History list.
Press the Navigation pad right or left to move the
cursor.
Press to delete the character to the left of the cursor.
Cisco IP Phone 8800 Series User Guide
60
Page 73

Call History
Clear the Call History
Procedure
Clear the Call History
Step 1
Step 2
Step 3
Step 4
Press Applications and select Recents.
Select All Lines or the required line.
Press Clear list and then press Delete to delete the call history list.
Press Cancel to go back to the Call History screen.
Delete a Call Record
Procedure
Step 1
Step 2
Step 3
Step 4
Step 5
Press Applications and select Recents.
Highlight the individual call record or call group that you want to delete.
Press Delete to delete an individual call record or all calls in a group.
A Delete Record alert message appears for verification.
Press Delete to delete the record.
Press Exit to return to the Applications screen.
Cisco IP Phone 8800 Series User Guide
61
Page 74

Delete a Call Record
Call History
Cisco IP Phone 8800 Series User Guide
62
Page 75

Voicemail
Voicemail Overview, page 63
•
Access Voicemail, page 63
•
Check for Voice Messages, page 64
•
Listen to Voice Messages, page 64
•
Visual Voicemail, page 65
•
Voicemail Overview
Voice messages are stored on your voicemail system. Your company determines the voicemail system your
phone uses.
To access your voicemail, your administrator needs to configure your voicemail account and configure your
phone to access voicemail from the Messages button. For more information, contact your administrator.
For information about the commands that your voicemail service supports, see the voicemail service user
documentation.
CHAPTER 6
Access Voicemail
Procedure
Step 1
Step 2
Press Messages.
Follow the voice prompts.
Cisco IP Phone 8800 Series User Guide
63
Page 76

Check for Voice Messages
Check for Voice Messages
Procedure
Check for voice messages in any of these ways:
Look for a solid red light on your handset.
•
You can set up the visual message waiting lamp using the Self Care Portal.
Look for a colored box beside the line button.
•
The colored background indicates that there are new voice messages and the number of missed calls
and voice mail messages displays in the box.
Note
When you select a line with a Message icon, the Login screen displays on the phone screen.
Note
If there are more than 99 new voice messages, the message count is replaced by a plus (+) sign.
On the Cisco IP Phone 8811, the box is
gray.
If you had selected Yes in the Remember me screen when you last logged in, the messages list
is displayed.
Voicemail
If call forwarding is set up on a line that has new voice messages, the Call Forward icon replaces the
Message icon on the line label.
Note
Listen for a stutter tone (if available) from your handset, headset, or speakerphone when you place a
•
call.
The stutter tone is line-specific. You hear it only when using the line that has new voice messages.
You can set up audible message waiting tones using the Self Care Portal.
On the Cisco IP Phone 8811, the Call Forward icon is
gray.
Listen to Voice Messages
After you listen to your new voice messages, the message indicators are updated on the phone screen. If there
are no new voice messages, the Message icon is removed from the line label, and the Voicemail icon is
removed from the right side of the phone screen.
Procedure
Step 1
To listen to voice messages, do one of the following:
•
Press Messages . The Login screen displays.
Note
If you selected Yes in the Remember me screen when you last logged in, the messages list
displays.
Select a line with colored box beside it. The box indicates the number of messages waiting.
•
Cisco IP Phone 8800 Series User Guide
64
Page 77

Voicemail
The Cisco IP Phone 8881 displays a gray box.
•
Press the line button and then Voicemail .
Visual Voicemail
Step 2
Follow the prompts to listen to your voice message.
Visual Voicemail
Visual Voicemail is an alternative to audio voicemail. You use the screen on your phone to work with your
messages, rather than respond to audio prompts. You can view a list of your messages and play your messages.
You can also compose, reply to, forward, and delete messages.
For more information, see Quick Start Guide for Visual Voicemail at http://www.cisco.com/c/en/us/support/
unified-communications/unity-connection/products-user-guide-list.html.
Cisco IP Phone 8800 Series User Guide
65
Page 78

Visual Voicemail
Voicemail
Cisco IP Phone 8800 Series User Guide
66
Page 79

CHAPTER 7
Advanced Calling Features
Conference, page 67
•
Meet Me Conference, page 69
•
Speed Dial, page 70
•
Do Not Disturb, page 72
•
Malicious Call Identification, page 73
•
Extension Mobility, page 73
•
Mobile Connect, page 74
•
Line Status, page 76
•
View All Calls on Primary Line , page 77
•
Actionable Incoming Call Alert, page 77
•
Custom Line Filters, page 77
•
Hunt Groups, page 80
•
Barge , page 81
•
Call Chaperone, page 82
•
Uniform Resource Identifier Dialing, page 83
•
Intelligent Proximity for Mobile Devices, page 84
•
Intelligent Proximity for Tablets, page 88
•
Conference
Conference allows you to talk simultaneously with multiple parties in an ad hoc meeting.
When you are talking on a call, use Conference to dial another party and add them to the call.
If you have multiple phone lines, you can alternately use Conference to combine two calls across two lines.
For example, if you have a call on Line 1 and a call on Line 2, you can combine the calls into a conference.
Cisco IP Phone 8800 Series User Guide
67
Page 80

Add a Third Party to a Conference
As the conference host, you can remove individual participants from the conference. The conference ends
when all participants hang up.
Add a Third Party to a Conference
Procedure
Advanced Calling Features
Step 1
Step 2
Step 3
Step 4
Start with a connected call that is not on hold.
Press Conference and do one of the following:
Enter the phone number for the party you want to add and press Call.
•
Press a speed-dial button.
•
Press Speed Dial, enter a speed-dial number, and press Speed Dial again.
•
Press Active Calls and select a call.
•
Select a call from the Call History.
•
Wait for the party to answer or skip to step 4 while the call is ringing.
Press Conference.
The conference begins.
Join Calls Into a Conference
The conference is established on the line that had the active call.
Your system administrator controls the ability to transfer calls from one line to another line.
Procedure
Step 1
Step 2
Step 3
Step 4
Cisco IP Phone 8800 Series User Guide
68
Start with two connected calls.
Make sure that one of the calls is active (not on hold). If both calls are on hold, resume one call.
Press Conference .
Press the line button for the other (held) call or if the held call is on another line:
a) Press Active Calls.
b) Choose a call from the list.
c) Press Conference.
The conference begins. The conference is established on the line that had the active call.
Page 81

Advanced Calling Features
Swap Between Calls Before Completing a Conference
Swap Between Calls Before Completing a Conference
You can consult privately with the conference and another person, before adding the person into the conference.
Procedure
Step 1
Step 2
Call a new conference participant, but do not add the participant to the conference.
You must wait until the call is connected.
Press Swap to toggle between the participant and the conference.
View Conference Participants
You can view the details of the last 16 participants who joined the conference.
Procedure
While in a conference, press Show Details to view a list of participants.
Note
When you place a call to another party and the person that you called creates a conference with a
third phone, the Show Details softkey displays only for the person who created the conference.
Remove Conference Participants
Procedure
Step 1
Step 2
While in a conference, press Show Details.
Highlight the participant that you want to remove, then press Remove.
Meet Me Conference
Meet Me allows you to call a predetermined number at a scheduled time to host or join a Meet Me conference.
The Meet Me conference begins when the host connects. Participants who call the conference before the host
has joined hear a busy tone and must dial again.
The conference ends when all participants hang up; the conference does not automatically end when the host
disconnects.
Cisco IP Phone 8800 Series User Guide
69
Page 82

Host a Meet Me Conference
Host a Meet Me Conference
Procedure
Advanced Calling Features
Step 1
Step 2
Step 3
Step 4
Obtain a Meet Me phone number from your system administrator.
Distribute the Meet Me phone number to participants.
When you are ready to start the meeting, lift the handset to get a dial tone and press Meet Me.
Dial the Meet Me phone number.
Join a Meet Me Conference
Procedure
Step 1
Step 2
Dial the Meet Me phone number that the conference host provides.
If you hear a busy tone, the host has not yet joined the conference. In this case, hang up and try your call
again.
Speed Dial
Speed Dial allows you to press a button and enter a preset code to place a call. Before you can use Speed Dial
features on your phone, you must set up speed-dial in the Self Care Portal.
Depending on setup, your phone can support these Speed Dial features:
Speed-dial buttons: Allow you to quickly dial a phone number from one or more line buttons set up for
•
speed dialing.
If your system administrator has set up the Line Status feature, you can monitor the status of a speed-dial
line by using the line status indicators.
Speed-dial codes: Allow you to dial a phone number from a code (sometimes referred to as abbreviated
•
dialing).
You can use also use Speed Dial to reach telephone numbers that require a Forced Authorization Code (FAC),
Client Matter Code (CMC), or additional digits (such as a user extension, a meeting access code, or a voicemail
password). These numbers usually require you to input pause characters in the digit string.
Related Topics
Pause in Speed Dial, on page 71
Cisco IP Phone 8800 Series User Guide
70
Page 83

Advanced Calling Features
Place a Call with a Speed-Dial Button
Before You Begin
Before you can use speed-dial buttons on your phone, you must set up Speed Dial in the Self Care Portal.
Procedure
To place a call, press a speed-dial button on the left side of your phone.
Use a Speed-Dial Code On Hook
Before You Begin
Before you can use speed-dial codes on your phone, you must set up Speed Dial in the Self Care Portal.
Place a Call with a Speed-Dial Button
Procedure
Enter the speed-dial code and press Speed Dial.
Use a Speed-Dial Code Off Hook
Before You Begin
Before you can use speed-dial codes on your phone, you must set up Speed Dial in the Self Care Portal.
Procedure
Step 1
Step 2
Lift the handset and press Speed Dial.
Enter the speed-dial code and press Speed Dial again to complete the call.
Pause in Speed Dial
You can use Speed Dial to reach destinations that require a Forced Authorization Code (FAC), Client Matter
Code (CMC), dialing pauses, or additional digits (such as a user extension, a meeting access code, or a voice
mail password). When you press the configured Speed Dial, the phone establishes the call to the destination
number and sends the specified FAC, CMC, and additional digits with dialing pauses inserted.
To include dialing pauses in the speed dial, include a comma (,) as part of the speed-dial string. This comma
specifies a pause of 2 seconds. It also allows you to separate FAC and CMC from the other digits in the
speed-dial string.
Cisco IP Phone 8800 Series User Guide
71
Page 84

Do Not Disturb
Advanced Calling Features
Be aware of the following requirements when you include FAC and CMC in the speed-dial string:Note
FAC must always precede CMC in the speed-dial string.
•
A speed-dial label is required for speed dials with FAC and DTMF digits.
•
Only one comma is allowed between FAC and CMC digits in the string.
•
Each comma you include represents an additional pause of 2 seconds. For example, two commas (,,) represent
a pause of 4 seconds.
Note
Before you configure the speed-dial, try to dial the specified digits manually at least once to ensure that
the digit sequence is correct.
The phone does not save the FAC, CMC, or additional digits from the speed dial in the call history. If you
press Redial after connecting to a destination using the speed-dial, the phone prompts you to enter any required
FAC, CMC, or DTMF digits manually.
Example 1
Consider the following requirements to access voicemail:
Called number to access voicemail: 8000
•
PIN: 123456# after announcement of 2 seconds
•
Voicemail response: Enter option 3 to read latest message after a pause of 6 seconds (while the automated
•
announcement lists the available options)
To set up the speed-dial to access this voice mailbox, specify the following speed-dial string:
8000,123456#,,,3
Example 2
Consider the following call requirements
Called number: 95556543
•
FAC: 1234
•
CMC: 9876
•
Automated phone system response, required 4 seconds after the call is connected: 56789#
•
To access this destination, specify the following speed-dial string:
95556543,1234,9876,,56789#
Do Not Disturb
Do Not Disturb (DND) allows you to turn off one of the following incoming call indicators:
Cisco IP Phone 8800 Series User Guide
72
Page 85

Advanced Calling Features
The ringer on your phone
•
The ringer and any visual notification that you have an incoming call
•
When DND is enabled, your incoming calls forward to another number, such as your voicemail, if it is set up
and the call is not saved or listed in your Call History.
The DND feature affects all lines on a phone. The feature does not affect intercom or 911 calls.
You can change your DND options from the Self Care Portal. For information on customizing your Do Not
Disturb options, see the Cisco Unified Communications Self Care Portal User Guide, located at http://
www.cisco.com/en/US/products/sw/voicesw/ps556/products_user_guide_list.html.
Turn DND On and Off
Procedure
Turn DND On and Off
Step 1
Step 2
Press DND to turn on DND.
Visual confirmation displays briefly.
Press DND again to turn off DND.
Visual confirmation displays briefly.
Malicious Call Identification
Malicious Call Identification (MCID) allows you to identify an active call as suspicious, which initiates a
series of automated tracking and notification messages.
Trace a Suspicious Call
Procedure
Press Report Caller to send a silent notification message to your system administrator.
When the silent notification message is sent, your phone provides both a visual and audible confirmation.
Extension Mobility
Cisco Extension Mobility (EM) allows you to configure a different Cisco IP Phone as your own temporarily.
After you sign in to EM, the phone adopts your user profile, including your phone lines, features, established
services, and web-based settings. Your system administrator sets up EM for you.
The Cisco Extension Mobility ChangePIN feature allows you to change your PIN from your Cisco IP Phone.
Cisco IP Phone 8800 Series User Guide
73
Page 86

Enable Extension Mobility
Enable Extension Mobility
Procedure
Advanced Calling Features
Step 1
Step 2
Step 3
Step 4
Step 5
Step 6
Step 7
Press Applications .
Select Extension Mobility (name can vary, including EM Service).
Enter your user ID and PIN (provided by your system administrator).
Select a device profile if prompted.
Press Applications to sign out.
Select Extension Mobility.
Press Yes when prompted to sign out.
Mobile Connect
Mobile Connect allows you to use your mobile phone to handle calls that are associated with your desk phone
number.
When using Cisco Mobile Connect, you must add your mobile and other phones that you want to use to make
and receive calls using the same directory numbers as your desk phone. These phones are called remote
destinations. You can also define access lists to restrict or allow calls from certain numbers to be sent to your
mobile phone.
When you enable Mobile Connect:
Your desk phone and remote destinations (your mobile phones) receive calls simultaneously.
•
When you answer the call on your desk phone, the remote destinations stop ringing, are disconnected,
•
and display a missed call message.
When you answer the call on one remote destination, the other remote destinations and desk phone stop
•
ringing and are disconnected, and a missed call message is shown on the other remote destinations.
When you answer the call on one remote destination and then switch the call to a Cisco Unified device
•
that shares lines, the Cisco Unified devices that share the same line display a Remote In Use message.
Enable Mobile Connect
Procedure
Step 1
Step 2
Cisco IP Phone 8800 Series User Guide
74
Press Mobility to display the current remote destination status (Enabled or Disabled).
Press Select to change the status.
Page 87

Advanced Calling Features
Turn Mobile Connect On or Off for All Remote Destinations from a Desk Phone
Turn Mobile Connect On or Off for All Remote Destinations from a Desk Phone
Procedure
Step 1
Step 2
Press Mobility or To Mobile to display the current remote destination status (Enabled or Disabled).
Press Select to change the status.
Switch a Desk Phone Call to a Mobile Phone
Procedure
Step 1
Step 2
Step 3
Press Mobility.
Press Select to send a call to mobile phone.
Answer the in-progress call on your mobile phone.
Note
You cannot use the same phone line for any other calls, but if your desk phone supports multiple
lines, you can use another line to make or receive calls.
Switch a Mobile Call to the Desk Phone
Procedure
Step 1
Step 2
Hang up the call on your mobile phone to disconnect the mobile phone, but not the call.
Press the line on your desk phone to resume the call on your desk phone within 5 to 10 seconds and start
talking on the desk phone.
Hand Off a Call from a Mobile Phone to the Desk Phone
Procedure
Step 1
While on your mobile phone, enter the access code for the hand off feature.
For more information, contact your system administrator.
Cisco IP Phone 8800 Series User Guide
75
Page 88

Line Status
Advanced Calling Features
Step 2
Step 3
Hang up the call on your mobile phone to disconnect the mobile phone, but not the call.
Press Answer on your desk phone within 10 seconds and start talking on the desk phone.
For more information, contact your system administrator. The Cisco Unified devices that share the same line
display a Remote In Use message.
Line Status
Line Status indicators allow you to view the state of a phone line that is associated with a speed-dial button.
Your system administrator sets up Line Status indicators on your phone.
Line Status Indicators
Line Status indicators show the state of a line.
IndicatorIcon
Line is in use.
Line is idle.
Line is ringing. (Only for Call Pickup.)
Line is in a Do Not Disturb (DND) state.
Line Status indicators can be set up on speed-dial buttons by your system administrator and can be used with
these features:
Speed Dial
Allows you to monitor the status of (and dial) a specific number on a speed-dial button. If the monitored
line is unavailable, the Line Status button changes to a normal speed-dial button.
Directed Call Park
Allows you to monitor the line status of and dial a Directed Call Park number on a speed-dial button.
Call Pickup
Allows you to monitor the line status of (and pick up a ringing call on) a ringing call on a
speed-dial button.
Your system administrator can also set up your phone to play an audible alert when a call rings on the monitored
line.
Cisco IP Phone 8800 Series User Guide
76
Page 89

Advanced Calling Features
Related Topics
Call Park, on page 41
Speed Dial, on page 70
View All Calls on Primary Line
View All Calls on Primary Line allows you to view the All Calls filter on your primary line, once you have
finished a call.
With this feature, a list of active calls displays on your primary line, sorted in chronological order from oldest
to recent. You also see the normal phone calls, shared line, barged calls, and conference calls. But unlike the
View All Calls feature, you do not have to select All Calls to retrieve the list of active calls.
View All Calls On Primary Line is an optional feature so contact your administrator to enable it. Request that
both the Show All Calls on Primary Line and the Revert to All Calls features are enabled.
If you enable just the Revert All Calls feature, the phone displays the All Calls filter view, but it does not
default to your primary line. And if primary line or Alerting Calls filter is selected, reverting to All Calls fails.
View All Calls on Primary Line
Note
View All Calls on Primary Line reverts to the primary line when you lift the handset, or activate the
headset, or speaker phone. You remain on a shared line if you dial directly from the keypad. You also
remain on a shared line if you select the Down button on the Navigation Cluster, a Session key, or the
New Call softkey. Revert to All Calls requires either All Calls PLK or Show All Calls on Prime Line.
Actionable Incoming Call Alert
The Actionable Incoming Call Alert displays an actionable alert instead of a toast alert when you receive an
incoming call. In addition to displaying incoming caller details, the actionable alert allows you to answer,
ignore, or divert the call.
Your administrator configures the Actionable Incoming Call Alert. By default, this actionable alert is disabled.
Note
If both the Custom Line Filters and the Actionable Incoming Call Alert features are enabled, actionable
call alerts apply only to the lines that are covered by filters.
Custom Line Filters
Custom Line Filters enable you to reduce alert activity by filtering it to high-priority lines by allowing you
to set the alerting call notification priority on a subset of lines covered by an alert filter. The custom filter
generates either traditional pop-up alerts or actionable alerts for incoming calls on the selected lines. For each
filter, only the subset of lines under coverage will generate an alert. If a filter is turned off, lines under its
coverage will not show alert notifications.
If this feature has been configured, there are three, selectable, filter types available to you:
Cisco IP Phone 8800 Series User Guide
77
Page 90

Add a Line Filter
Advanced Calling Features
All Calls (on all lines)
•
Daily schedule
•
Custom user
•
The administrator configures the default line filter, which is visible to you as the Daily schedule filter. Even
if the administrator has not configured the default filter, the all calls filter and custom filter options are available
to you. If you have not created any custom filters all provisioned lines are covered by the default line filter if
it exists, or all calls if it does not.
You cannot edit either the All Calls filter or the Daily schedule filter, but you can use the Daily schedule filter
as a template for a new, custom filter by duplicating and then editing the duplicate filter.
You save the custom filters directly to your phone so that you can quickly select and change coverage. You
can define a maximum of 20 custom filters, but only one filter may be active at a time.
Note
If both the Custom Line Filters and the Actionable Incoming Call Alert features are enabled, actionable
call alerts apply only to the lines that are covered by filters.
Add a Line Filter
Procedure
Step 1
Step 2
Step 3
Step 4
Step 5
Step 6
On your phone, go to Applications > Settings.
Highlight Call notifications, and press Select.
The current filter displays next to the option.
Highlight Add new filter and press Select.
The maximum number of custom filters is 20. If you have already created the maximum number of custom
filters, delete a filter before continuing with this procedure.
Press Select a second time to make the text editable.
The Show incoming call notification for selected lines screen with available phone lines displays.
Accept the default name for the new filter, or enter a new one.
Select the lines to add to the new filter.
All available lines are displayed in the list. If you require a line that is not in the list, contact your administrator.
Step 7
Step 8
Cisco IP Phone 8800 Series User Guide
78
Click Apply.
To view the filter, press Back.
Page 91

Advanced Calling Features
Select an Active Line Filter
Procedure
Select an Active Line Filter
Step 1
Step 2
Step 3
On your phone, select Applications > Settings.
Highlight Call notifications, and press Select.
The currently available filter options display.
Highlight the filter to apply and press Select.
Delete a Line Filter
Procedure
Step 1
Step 2
Step 3
On your phone, go to Applications > Settings.
Highlight Call notifications, and press Select.
Highlight the filter to be deleted and press Delete.
The filter is deleted and no longer appears in the list of filters.
Duplicate a Line Filter
Procedure
Step 1
Step 2
Step 3
Step 4
Step 5
Step 6
Step 7
Step 8
On your phone, go to Applications > Settings.
Highlight Call notifications, and press Select.
Highlight the filter to be duplicated and press Duplicate.
Highlight the duplicated filter and press Edit.
(Optional) Enter a new name for the filter.
Add or remove available lines from the filter.
Click Apply.
To view the filter, press Back.
Cisco IP Phone 8800 Series User Guide
79
Page 92

Edit a Line Filter
Edit a Line Filter
Procedure
Advanced Calling Features
Step 1
Step 2
Step 3
Step 4
Step 5
Step 6
Step 7
On your phone, go to Applications > Settings.
Highlight Call notifications, and press Select.
Highlight the filter to be edited and press Edit.
You cannot edit the Daily schedule filter. For more information, contact your administrator.Note
(Optional) Enter a new name for the filter.
Add or remove available lines from the filter.
Click Apply.
To view the filter, press Back.
Rename a Line Filter
Procedure
Step 1
Step 2
Step 3
Step 4
Step 5
Step 6
On your phone, go to Applications > Settings.
Highlight Call notifications, and press Select.
Highlight the filter to be renamed and press Edit.
Enter a new name for the filter.
Click Apply.
To view the filter, press Back.
Hunt Groups
Hunt Groups are used to share the call load in organizations that receive a large number of incoming calls.
Your system administrator sets up a hunt group with a series of directory numbers. When the first directory
number in the hunt group is busy, the system hunts for the next available directory number in the group and
directs the call to that phone.
If you are a member of a hunt group, you sign in to a hunt group when you want to receive calls, and you sign
out of the group when you want to prevent calls from ringing on your phone.
Your administrator sets up the Queue Status button so that you can view statistics about the queue for the
hunt group.
Calls in the group call queue display the same call identification number, no matter which group phone accesses
the list.
Cisco IP Phone 8800 Series User Guide
80
Page 93

Advanced Calling Features
Sign In and Out of a Hunt Group
Signing out of a hunt group does not prevent direct calls from ringing your phone.
Procedure
Sign In and Out of a Hunt Group
Step 1
Step 2
Press Hunt Group to sign in.
Visual confirmation displays briefly.
Press Hunt Group again to sign out.
Display Queue Statistics
Use the queue statistics to check the status of the hunt group queue.
Procedure
Step 1
Step 2
Step 3
Press Queue Status.
The Queue status window appears.
To refresh the statistics, press Update.
To exit, press Exit.
Barge
Barge allow you to add yourself to nonprivate calls on a shared line. You access the Barge function using the
Merge softkey. A conference call is set up with yourself and the participants of the nonprivate call on the
Cisco Unified Communications Manager.
Set Up Barge Alert
By default, the Barge Alert option is set to Off and you can barge into an eligible shared lined without receiving
a prompt. When the Barge Alert is set to On, an alert prompt is displayed.
Procedure
Step 1
Step 2
On your phone, go to Applications > Settings.
At the Barge Alert menu item, click On to enable the alert or Off to enable Barge.
By default, the barge alert prompt is toggled Off.
Cisco IP Phone 8800 Series User Guide
81
Page 94

Add Yourself to a Call on a Shared Line
Add Yourself to a Call on a Shared Line
Procedure
Press the line button for the shared line.
Enable Privacy on a Shared Line
Privacy allows you to prevent others who share your line from seeing information about your calls.
Privacy applies to all shared lines on your phone. If you have multiple shared lines and Privacy is enabled,
others cannot view any of your shared lines.
If the phone that shares your line has Privacy enabled, you can make and receive calls using the shared line
as usual.
Advanced Calling Features
Procedure
Step 1
Step 2
Press Privacy to enable the feature.
Visual confirmation displays on your phone screen for as long as the feature is enabled.
Press Privacy again to turn off the feature.
Dismiss the Barge Alert Prompt Window
When the Prompt for Barge feature is enabled on your phone, you see a pop-up window when you start to
barge into a call.
Procedure
Press No to cancel the barge, or press any line or session key.
Note
The alert closes automatically if the phone opens a new window, if a new alert window opens, or if
the current session is no longer available for barge.
Call Chaperone
Call Chaperone allows an authorized Call Chaperone user (the chaperone) to supervise (chaperone) and record
a call. Chaperoned calls have a minimum of three parties: the calling party, the chaperone, and the called
party. To determine if you are an authorized chaperone, contact your system administrator.
The chaperone answers a call, creates a conference call, and remains on the conference call to chaperone and
record the call. Cisco IP Phones that are set up with the Call Chaperone feature also have a Record button.
Cisco IP Phone 8800 Series User Guide
82
Page 95

Advanced Calling Features
When the chaperone hangs up the call, the entire conference ends.
The chaperone can perform only the following tasks while chaperoning the call:
Record the call.
•
Conference in one participant. A chaperone can conference the first participant only; subsequent
•
participants can be added to the conference only by the other participants in the conference.
End the call.
•
Record a Chaperoned Call
Procedure
Record a Chaperoned Call
Step 1
Step 2
Step 3
Step 4
Step 5
Step 6
Answer an incoming call.
Record displays if the system determines that the call must be chaperoned and recorded.
Press Conference to create a conference call.
Enter the phone number for the party you want to add and press Call.
When the called party answers, press Conference.
The conference begins.
Press Record to begin recording the conference call.
Alternatively, you can begin recording the call before the conference call is established. In this case, press
Conference after answering the incoming call. The call gets put on hold automatically, and the recording
stops while you set up the conference call. The recording restarts automatically when the conference call is
established.
Press End Call to end the chaperoned call; all parties are disconnected.
Uniform Resource Identifier Dialing
You can place calls using Uniform Resource Identifier (URI) Dialing, using the alphanumeric URI address
as a directory number; for example, bob@cisco.com. You must enter the URI address to select the contact.
The phone screen displays the call information for the URI call. The phone stores the URI call information
in the Call History and the Details page. When you receive a call with a URI address, the URI address is stored
in your Call History. Press Redial to call the most recently dialed URI address.
Depending upon how the administrator configures your phone, you may see either the URI or the Directory
Number (DN) displayed for the incoming call alerts, call sessions and call history. If the phone is set to display
the DN but only the URI is available, then the URI displays. If the phone is set to display the URI and only
the DN is available, then the DN displays.
URI calls cannot be placed using the soft keypad.Note
Cisco IP Phone 8800 Series User Guide
83
Page 96

Intelligent Proximity for Mobile Devices
To place an on-hook call using a URI address, you need to press the ABC softkey to switch the keypad mode.
To place an off-hook call using a URI address, the URI address must be stored in your Call History or Speed
Dial list.
Advanced Calling Features
Note
When you enter a URI address to place a call, do not pause for more then 10 seconds between key presses.
After 10 seconds of inactivity, the phone assumes that it has the complete address and attempts to place
the call.
When you dial or receive a call through URI dialing, the call window and incoming call alert display the
complete URI address.
When you enter a URI address, the maximum length is 254 characters. You can enter the complete domain
name to override the default domain.
URI dialing works with the other features of your phone:
You can configure a URI address as a speed dial entry to place a call.
•
You can configure the Call Forward All destination using the Speed Dial or Call History entries.
•
You can initiate a conference call and add multiple parties using URI Dialing if the URI address is stored
•
in the Speed Dial list or Call History.
You cannot use URI addresses during Meet Me conferences or for Group Call Pickup.
•
You can initiate a transfer call using URI dialing if the URI address is stored in the Speed Dial list or
•
Call History.
You can monitor the state (in-use or idle) of a call using URI Dialing associated with Speed Dial or Call
•
History.
You can initiate URI Dialing when a busy or unavailable party becomes available.
•
You can hide the display of the URI address information.
•
When the phones are connected to the Cisco Unified Communications Manager Express and Survivable
•
Remote Site Telephony (CME/SRST), the URI Dialing functions are disabled. The ABC softkey does
not appear on the phone screen.
Intelligent Proximity for Mobile Devices
Intelligent Proximity allows you to pair your mobile device to use the mobile line through your Cisco IP
Phone. Once the mobile device is paired, you can place and receive calls on the mobile line from your Cisco
IP Phone, with either the handset or the speaker. You can also use calling features such as hold and redial
with the mobile line.
Note
Cisco IP Phone 8811, 8841, and 8851NR do not support Bluetooth or Intelligent Proximity for Mobile
Devices.
You can share your mobile contacts and call history with the Cisco IP Phone, and move calls between your
mobile device and Cisco IP Phone. You can also view signal strength and battery level of the mobile device
on the Cisco IP Phone.
Cisco IP Phone 8800 Series User Guide
84
Page 97

Advanced Calling Features
Pair a Mobile Device
Note
You may experience some variances for feature availability due to the operating system and other differences
in mobile devices.
Pair a Mobile Device
You can connect one mobile device and one Bluetooth headset at the same time. You cannot connect one
mobile device and one tablet at the same time. You can pair multiple mobile devices with the phone, but only
one mobile device and one Bluetooth headset can be active at the same time.
Note
When you connect your Bluetooth headset and your mobile device at the same time, the Bluetooth headset
cannot be used to answer the audio from the mobile device.
Cisco IP Phone 8811, 8841, and 8851NR do not support Bluetooth or Pair a Mobile Device.Note
You pair the device with the phone to establish a communication path. After you pair your mobile device to
your Cisco IP Phone, the phone automatically connects to the mobile device when the device is in range, and
disconnects from the mobile device when the device is out of range. When the mobile device disconnects, the
mobile line is gray and displays not connected.
Procedure
Step 1
Step 2
Step 3
Step 4
Step 5
Step 6
Put the mobile device in discoverable mode.
For more information about discoverable mode, see your mobile device documentation.Note
On your Cisco IP Phone, press Applications.
Select Bluetooth > Add Bluetooth.
Add new device and select the mobile device from the available devices list to pair.
Verify the passkey on the mobile device and the Cisco IP Phone.
When you are prompted to save mobile contacts, choose to make your mobile device contacts and call history
available on your Cisco IP Phone.
Switch Connected Mobile Devices
If you have more than one paired mobile device in range of your Cisco IP Phone, you can choose which
mobile device to connect.
Cisco IP Phone 8800 Series User Guide
85
Page 98

Delete a Mobile Device
Procedure
Advanced Calling Features
Step 1
Step 2
Press the Applications button and select Bluetooth.
Select a mobile device from the available devices list.
The previously connected mobile device is disconnected, and the selected mobile device is connected.
Delete a Mobile Device
Procedure
Step 1
Step 2
Select the mobile device in the available devices list.
Press Delete.
Answer a Mobile Call
Procedure
Select Answer.
Decline a Mobile Call
Procedure
Select Decline.
The call ends.
Ignore a Mobile Call
Procedure
Select Ignore.
The call ends.
Cisco IP Phone 8800 Series User Guide
86
Page 99

Advanced Calling Features
Place a Mobile Call
Procedure
Place a Mobile Call
Step 1
Step 2
Step 3
Select a mobile line.
Enter a ten digit number or select a contact from the call history.
Press Call.
Move a Call Between the IP Phone and a Mobile Phone
Use your Cisco IP Phone to move an active call to or from your mobile device.
Procedure
Step 1
Step 2
To move the call from your Cisco IP Phone to your mobile device, select Move audio.
To move the call from your mobile device to your Cisco IP Phone, select Move audio.
Adjust the Mobile Device Volume
Volume controls on your Cisco IP Phone and mobile device are synchronized. Synchronization only occurs
when there is an active call.
Procedure
While on a call, adjust the volume on either the desk phone or on your mobile device to adjust the mobile
device volume.
Mobile Contacts and Mobile Call History Sharing
A paired mobile device displays in Bluetooth > Accounts as Bluetooth. This account remains until the
mobile device is unpaired.
Mobile Contacts can be checked from the Recents menu on the IP phone; Mobile Call History sharing can
be found using the New Call softkey.
Note
Cisco IP Phone 8811, 8841, and 8851NR do not support Bluetooth or Mobile Contacts and Mobile Call
History Sharing.
Cisco IP Phone 8800 Series User Guide
87
Page 100

Intelligent Proximity for Tablets
Check Bluetooth Contact Status
The contacts automatically synchronize to the Cisco IP phone when the mobile device connected. The contacts
update when a call ends or when the mobile device reconnects. You do not need to manually synchronize the
contacts.
Procedure
Advanced Calling Features
Step 1
Step 2
Step 3
Press Contacts.
Select Settings.
Select Phone Book Access.
Save Bluetooth Contacts
Use this procedure if your Bluetooth Phone Book Access Profile option is set to No.
Note
This procedure only applies to Cisco IP Phone 8851 and 8861. Cisco IP Phone 8851NR does not support
Bluetooth.
Procedure
On the Contacts screen, select your mobile phone and check Save.
Delete Bluetooth Contacts
Use this procedure if your Bluetooth Phone Book Access Profile option is Save.
Note
This procedure only applies to Cisco IP Phone 8851 and 8861. Cisco IP Phone 8851NR does not support
Bluetooth.
Procedure
On the Contacts screen, select your mobile phone and check Delete.
Intelligent Proximity for Tablets
If you have a tablet, you can pair the tablet to the phone using Bluetooth. After pairing, audio from a soft
client phone call on the tablet can be played on the phone . There are no phone call management options for
calls from tablets.
The phone supports connections from Android and iOS tablets.
Cisco IP Phone 8800 Series User Guide
88
 Loading...