

Page 1

Cisco Wireless IP Phone 8821 and 8821EX User Guide
First Published: January 15, 2016
Last Modified: April 11, 2016
Americas Headquarters
Cisco Systems, Inc.
170 West Tasman Drive
San Jose, CA 95134-1706
USA
http://www.cisco.com
Tel: 408 526-4000
800 553-NETS (6387)
Fax: 408 527-0883
Page 2

THE SPECIFICATIONS AND INFORMATION REGARDING THE PRODUCTS IN THIS MANUAL ARE SUBJECT TO CHANGE WITHOUT NOTICE. ALL STATEMENTS,
INFORMATION, AND RECOMMENDATIONS IN THIS MANUAL ARE BELIEVED TO BE ACCURATE BUT ARE PRESENTED WITHOUT WARRANTY OF ANY KIND,
EXPRESS OR IMPLIED. USERS MUST TAKE FULL RESPONSIBILITY FOR THEIR APPLICATION OF ANY PRODUCTS.
THE SOFTWARE LICENSE AND LIMITED WARRANTY FOR THE ACCOMPANYING PRODUCT ARE SET FORTH IN THE INFORMATION PACKET THAT SHIPPED WITH
THE PRODUCT AND ARE INCORPORATED HEREIN BY THIS REFERENCE. IF YOU ARE UNABLE TO LOCATE THE SOFTWARE LICENSE OR LIMITED WARRANTY,
CONTACT YOUR CISCO REPRESENTATIVE FOR A COPY.
The following information is for FCC compliance of Class A devices: This equipment has been tested and found to comply with the limits for a Class A digital device, pursuant to part 15
of the FCC rules. These limits are designed to provide reasonable protection against harmful interference when the equipment is operated in a commercial environment. This equipment
generates, uses, and can radiate radio-frequency energy and, if not installed and used in accordance with the instruction manual, may cause harmful interference to radio communications.
Operation of this equipment in a residential area is likely to cause harmful interference, in which case users will be required to correct the interference at their own expense.
The following information is for FCC compliance of Class B devices: This equipment has been tested and found to comply with the limits for a Class B digital device, pursuant to part 15
of the FCC rules. These limits are designed to provide reasonable protection against harmful interference in a residential installation. This equipment generates, uses and can radiate radio
frequency energy and, if not installed and used in accordance with the instructions, may cause harmful interference to radio communications. However, there is no guarantee that interference
will not occur in a particular installation. If the equipment causes interference to radio or television reception, which can be determined by turning the equipment off and on, users are
encouraged to try to correct the interference by using one or more of the following measures:
Reorient or relocate the receiving antenna.
•
Increase the separation between the equipment and receiver.
•
Connect the equipment into an outlet on a circuit different from that to which the receiver is connected.
•
Consult the dealer or an experienced radio/TV technician for help.
•
Modifications to this product not authorized by Cisco could void the FCC approval and negate your authority to operate the product
The Cisco implementation of TCP header compression is an adaptation of a program developed by the University of California, Berkeley (UCB) as part of UCB’s public domain version
of the UNIX operating system. All rights reserved. Copyright©1981, Regents of the University of California.
NOTWITHSTANDING ANY OTHER WARRANTY HEREIN, ALL DOCUMENT FILES AND SOFTWARE OF THESE SUPPLIERS ARE PROVIDED "AS IS" WITH ALL FAULTS.
CISCO AND THE ABOVE-NAMED SUPPLIERS DISCLAIM ALL WARRANTIES, EXPRESSED OR IMPLIED, INCLUDING, WITHOUT LIMITATION, THOSE OF
MERCHANTABILITY, FITNESS FOR A PARTICULAR PURPOSE AND NONINFRINGEMENT OR ARISING FROM A COURSE OF DEALING, USAGE, OR TRADE PRACTICE.
IN NO EVENT SHALL CISCO OR ITS SUPPLIERS BE LIABLE FOR ANY INDIRECT, SPECIAL, CONSEQUENTIAL, OR INCIDENTAL DAMAGES, INCLUDING, WITHOUT
LIMITATION, LOST PROFITS OR LOSS OR DAMAGE TO DATA ARISING OUT OF THE USE OR INABILITY TO USE THIS MANUAL, EVEN IF CISCO OR ITS SUPPLIERS
HAVE BEEN ADVISED OF THE POSSIBILITY OF SUCH DAMAGES.
Any Internet Protocol (IP) addresses and phone numbers used in this document are not intended to be actual addresses and phone numbers. Any examples, command display output, network
topology diagrams, and other figures included in the document are shown for illustrative purposes only. Any use of actual IP addresses or phone numbers in illustrative content is unintentional
and coincidental.
Cisco and the Cisco logo are trademarks or registered trademarks of Cisco and/or its affiliates in the U.S. and other countries. To view a list of Cisco trademarks, go to this URL: http://
www.cisco.com/go/trademarks. Third-party trademarks mentioned are the property of their respective owners. The use of the word partner does not imply a partnership
relationship between Cisco and any other company. (1110R)
©
2016 Cisco Systems, Inc. All rights reserved.
Page 3

CONTENTS
CHAPTER 1
Your Phone 1
The Cisco Wireless IP Phone 8821 and 8821EX 1
Getting Started 3
Turn On Your Phone 3
Sign In to Your Phone 3
Turn Off Your Phone 4
Lock the Phone Keypad 4
Unlock the Phone Keypad 4
Self Care Portal 5
Speed-Dial Numbers 6
Buttons and Hardware 7
Navigation 11
Phone Screen Features 11
Clean the Phone Screen 11
Differences Between Phone Calls and Lines 11
Out-of-Range Alerts 12
CHAPTER 2
Phone Batteries 12
Bluetooth and Your Phone 12
Additional Help and Information 13
Cisco One-Year Limited Hardware Warranty Terms 13
Battery Warranty 13
Phone Setup 15
Phone Hardware Installation 15
Install the Phone Battery 15
Phone Battery Charging 17
Spare Battery Charging 17
Prepare the Power Adapter 18
Cisco Wireless IP Phone 8821 and 8821EX User Guide
iii
Page 4

Contents
Charge the Battery with the AC Power Supply 18
Charge the Battery with the USB Cable and a USB Port on Your PC 19
Phone Configuration 20
Add the Phone to the Wi-Fi Network 20
Connect the Phone to the Cisco Unified Communications Manager 21
Set the Username and Password 22
CHAPTER 3
Calls 23
Access the Phone App 23
Make Calls 24
Make a Call 24
Make an Emergency Call 24
Make a Call with a Headset 24
Make a Call with the Speakerphone 25
Make a Call with a Phone or Video Address 25
Redial a Number 26
Return a Recent Call 26
Make a Call from the Phone App with a Favorite 26
Speed Dial 27
Dial an International Number 27
Get Notified When a Contact is Available 27
Calls That Require a Billing Code or Authorization Code 28
Secure Calls 28
Answer Calls 28
Answer a Call 28
Answer Call Waiting 28
Decline a Call 29
Ignore a Call 29
Silence Incoming Calls on Your Phone 29
Answer a Coworker's Phone (Call Pickup) 30
Answer a Call Within Your Group (Pickup) 30
Answer a Call From Another Group (Group Pickup) 30
Answer a Call from an Associated Group (Other Pickup) 30
Trace a Suspicious Call 31
Control the Phone Ringer for a Single Incoming Call 31
Cisco Wireless IP Phone 8821 and 8821EX User Guide
iv
Page 5

Contents
End a Call 32
Mute Your Audio 32
Hold Calls 32
Put a Call on Hold 32
Answer a Call Left on Hold for Too Long 32
Swap Between Active and Held Calls 33
Call Park 33
Place a Call on Hold with Call Park 33
Retrieve a Call on Hold with Call Park 34
Forward Calls From Your Phone 34
Turn Off Call Forward From Your Phone 35
Transfer a Call to Another Person 35
Conference Calls and Meetings 35
Add Another Person to a Call 35
View and Remove Conference Participants 36
Scheduled Conference Calls (Meet Me) 36
Host a Meet Me Conference 36
Join a Meet Me Conference 37
Intercom Calls 37
Make an Intercom Call 37
Answer an Intercom Call 38
Supervise and Record Calls 38
Set up a Supervised Call 38
Record a Call 39
Prioritized Calls 39
Make a Priority Call 40
Answer a Priority Call 40
Answer a Priority Call While on Another Call 40
Multiple Lines 41
CHAPTER 4
Shared Lines 41
Add Yourself to a Call on a Shared Line (Barge) 41
Add Yourself to a Call on a Shared Line (cBarge) 41
Get Notified Before You Join a Call on a Shared Line 42
Contacts 43
Cisco Wireless IP Phone 8821 and 8821EX User Guide
v
Page 6

Contents
Access the Contacts App 43
Corporate Directory 43
Search and Dial a Contact from the Corporate Directory 44
Find Contact Information for a Coworker from Your Phone 44
Personal Directory 44
Sign In and Out of a Personal Directory 44
Search for a Contact in Your Personal Directory 45
Add a New Contact to Your Personal Directory 45
Find Contact Information for a Personal Directory Contact from Your Phone 46
Edit a Contact in Your Personal Directory 46
Call a Contact from Your Personal Directory 46
Remove a Contact from Your Personal Directory 47
Local Contacts 47
CHAPTER 5
Search for a Contact in Your Local Contacts List 47
Add a New Contact to Your Local Contacts List 47
Find Contact Information for a Local Contact from Your Phone 48
Edit a Contact in Your Local Contacts List 48
Call a Contact from Your Local Contacts List 48
Remove a Contact from Your Local Contacts List 49
Remove all Local Contacts 49
Favorites 49
Add a Contact to Your Favorites List 49
Delete a Contact from Your Favorites List 50
Recent Calls 51
Access the Recents App 51
New Voicemail Message and Missed Calls Indicators 51
Voicemail List 51
Access Your Voicemail Service 52
Missed Calls List 52
View Your Missed Calls 52
Find Details About a Missed Call 52
Return a Missed Call 53
Create a New Local Contact from a Missed Call Record 53
Delete a Missed Call Entry 53
Cisco Wireless IP Phone 8821 and 8821EX User Guide
vi
Page 7

Contents
Clear the Missed Calls List 54
Recents Calls List 54
View Your Recent Calls 54
Find Details About a Recent Call 55
Return a Recent Call from Recents 55
Create a New Local Contact from a Recents Call Record 55
Delete a Call Record 56
Clear the Recent Calls List 56
CHAPTER 6
CHAPTER 7
Applications 57
Apps and the Application Button 57
Use the Push to Talk Application 57
Settings 59
Access the Settings App 59
Access Phone Settings 59
Make the Phone Vibrate for an Incoming Call 60
Select Where You Hear the Ringtone 60
Change the Ringtone 60
Adjust the Headset Feedback 61
Turn Off the Keypad Sounds 61
Adjust the Screen Brightness 61
Change the Font Size 61
Control the LED Indicator Light 62
Change the Screen Display Timeout 62
Change the Wallpaper 62
Automatically Lock the Keypad 63
Date and Time Settings 63
Control the Date and Time Manually 63
Control the Date and Time Automatically 64
Set the Time Zone Automatically 64
Set the Time 65
Set the Date 65
Set Time Zone 65
Use a 12-Hour or 24-Hour Clock 66
Cisco Wireless IP Phone 8821 and 8821EX User Guide
vii
Page 8

Contents
Set the Date Format 66
Access Wi-Fi Settings 66
Access Bluetooth Settings 67
Turn On Bluetooth 67
Add a New Bluetooth Device 67
Connect a Bluetooth Device 68
Rename a Bluetooth Device 68
Disconnect Bluetooth Device 69
Delete a Bluetooth Device 69
Access Admin Settings 69
Adjust the Volume in a Call 70
Adjust the Ringtone Volume 70
CHAPTER 8
CHAPTER 9
Accessories 71
Supported Accessories 71
Headsets 71
Standard Headsets 72
Bluetooth Headsets 72
Cisco Wireless IP Phone 8821 Desktop Charger 72
Set Up the Desktop Charger 73
Charge Your Phone with the Desktop Charger 73
Charge Your Spare Battery with the Desktop Charger 74
Cisco Wireless IP Phone 8821 Multicharger 74
Set Up the Multicharger 74
Charge Your Phone with the Multicharger 75
Charge Your Spare Battery with the Multicharger 75
Secure the Charger with a Cable Lock 75
Troubleshooting 77
viii
General Troubleshooting 77
Find Information About Your Phone 79
Hardware Diagnostics 79
Perform Audio Diagnostics 79
Perform Keypad Diagnostics 79
Perform WLAN Diagnostics 80
Cisco Wireless IP Phone 8821 and 8821EX User Guide
Page 9

Contents
WLAN Diagnostics Fields 80
Get a List of Neighbors 82
Neighbor List Fields 82
CHAPTER 10
Product Safety and Security 85
Safety and Performance Information 85
Safety Guidelines 86
Battery Safety Notices 86
Hazardous Environments 88
Power Outage 88
Regulatory Domains 88
Health-Care Environments 88
External Devices Usage 88
Phone Behavior During Times of Network Congestion 89
SAR 89
Compliance Statements 90
Compliance Statements for the European Union 90
CE Marking 90
RF Exposure Statement for the European Union 90
Compliance Statements for the USA 90
SAR Statement 90
RF Exposure Information 90
General RF Exposure Compliance 91
Part 15 Radio Device 92
Canadian Compliance for Cisco Wireless IP Phone 882x Series 92
Canadian RF Exposure Statement 92
Compliance Statements for New Zealand 92
Permit to Connect (PTC) General Warning 92
Use of IP Networks with the PSTN 93
The Use of Voice Compression Through the PSTN 93
Echo Cancellation 93
Compliance Statements for Taiwan 94
DGT Warning Statement for Cisco Wireless IP Phone 882x Series 94
Compliance Statement for Argentina 94
Compliance Statement for Brazil 94
Cisco Wireless IP Phone 8821 and 8821EX User Guide
ix
Page 10

Contents
Cisco Product Security Overview 95
Important Online Information 95
Cisco Wireless IP Phone 8821 and 8821EX User Guide
x
Page 11

CHAPTER 1
Your Phone
The Cisco Wireless IP Phone 8821 and 8821EX, page 1
•
Getting Started, page 3
•
Self Care Portal, page 5
•
Buttons and Hardware, page 7
•
Additional Help and Information, page 13
•
The Cisco Wireless IP Phone 8821 and 8821EX
The Cisco Wireless IP Phone 8821 and 8821EX are 802.11 dual-band wireless devices that provide
comprehensive voice communications in conjunction with Cisco Unified Communications Manager and with
Cisco Aironet 802.11b/g and Cisco Aironet 802.11a access points (APs) in a private business communications
network.
The Cisco Wireless IP Phone 8821EX is not currently supported.Note
The phones are qualified Bluetooth wireless devices (Qualified Device ID [QDID] B014396). The phones
provide voice communication over the same wireless LAN that your computer uses, allowing you to place
and receive phone calls, put calls on hold, transfer calls, make conference calls, and so on. Both phones have
Ingress Protection 67 (IP 67) level protection, which indicates dust-tight equipment that is protected against
splashing water.
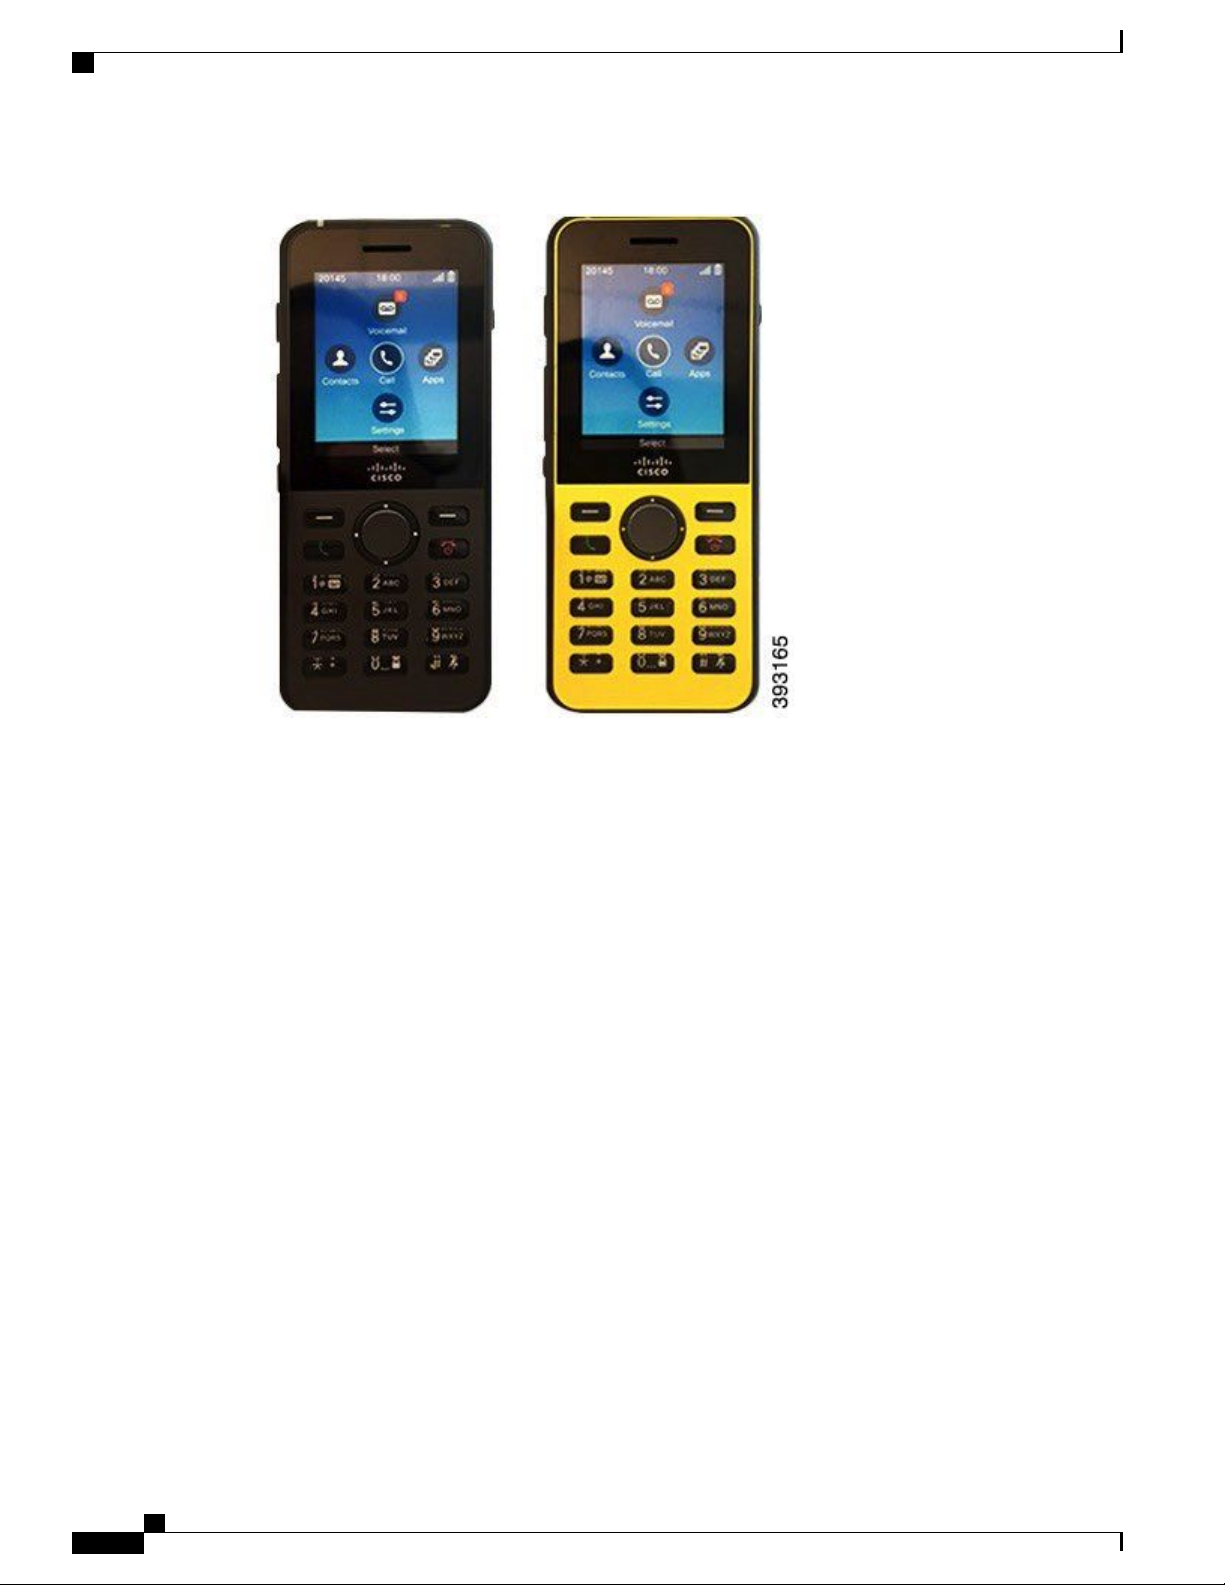
The Cisco Wireless IP Phone 8821EX is certified for Potentially Explosive Atmosphere ATEX Class I Zone
2, North America Class I Division 2/Zone 2. The phone is certified for use in potentially explosive environments
where flammable gasses, vapors or liquids may be present. The phone has an industry-standard yellow styling
that offers fast recognition in emergency situations.
The following figure shows the Cisco Wireless IP Phone 8821 on the left and the Cisco Wireless IP Phone
8821EX on the right.
Cisco Wireless IP Phone 8821 and 8821EX User Guide
1
Page 12
The Cisco Wireless IP Phone 8821 and 8821EX
Figure 1: Cisco Wireless IP Phone 8821 and 8821EX
Your Phone
These phones, like other network devices, must be configured and managed. The phones support G.711,
G.722, G.729a, G.729ab, MP3, WAV, iLBC, iSAC, OPUS, and AMR WB codecs. The phones also support
uncompressed wideband (16 bits, 16 kHz) audio.
The phones are hearing aid compatible (HAC) but do not have any TTY features. They have a centered “dot”
or “nib” on the 5 key that is a tactile identifier.
The physical characteristics include:
Resistance to damage from dropping the phone
•
Tolerance of antibacterial and alcohol-based wipes
•
Latex- and lead-free
•
Shockproof and vibration-proof
•
USB 1.1 interface
•
IP 67 level protection, which indicates dust-tight equipment that is protected against splashing water
•
Cisco Wireless IP Phone 8821EX only:
•
ATEX Zone 1/Class 2 certification prevents ignition of surrounding gas vapors by the phone.
◦
CSA Division 2/Zone 2 certification provides access to mobile collaborative communications.
◦
Industry-standard yellow styling offers fast recognition in emergency situations.
◦
In addition to basic call-handling features, your phone can provide enhanced productivity features that extend
your call-handling capabilities.
Depending on the configuration, your phone supports:
Cisco Wireless IP Phone 8821 and 8821EX User Guide
2
Page 13

Your Phone
Use of Bluetooth wireless headsets, including certain hands-free call features
•
Wireless access to your phone number and the corporate directory
•
A local phone book that can store up to 200 contacts and speed-dial hot keys that can be assigned to
•
phone book contacts
Access to network data, XML applications, and web-based services
•
Online customizing of phone features and services from your Self Care portal
•
Related Topics
Hazardous Environments, on page 88
Getting Started
Your phone is powered by a rechargeable Lithium ion battery. Before you can use your phone, you must
install the battery in the phone and charge the battery.
Make sure you read the battery safety information in Product Safety and Security, on page 85.
Your phone needs to connect to the corporate wireless network and the IP telephony network. Your
administrator might set up your new wireless phone, or you might have to set it up.
After the phone is set up, you can use the phone.
Getting Started
Related Topics
Phone Setup, on page 15
Phone Batteries, on page 12
Turn On Your Phone
Your phone automatically turns the power off when you are not using it to conserve battery power. You need
to turn the phone back on in order to use it.
When you turn the phone on, you may need to enter a username and password to access the wireless network.
After the phone authenticates and registers with the call control system, the main screen displays and you can
make or receive calls.
Procedure
Press and hold Power/End Call for 4 seconds.
Sign In to Your Phone
You may need to enter your username and password to access the phone functions. You may also need to
enter other information, as required by your wireless security requirements. Contact your administrator for
assistance.
Cisco Wireless IP Phone 8821 and 8821EX User Guide
3
Page 14

Turn Off Your Phone
Your Phone
Procedure
Step 1
Step 2
Step 3
Enter your user ID.
Enter your password.
Press <button name>.
Related Topics
Set the Username and Password, on page 22
Turn Off Your Phone
Your phone turns off automatically after a period of inactivity. But you can also turn it off manually.
Procedure
Step 1
Step 2
Press and hold Power/End Call for 4 seconds.
Press Power off.
Related Topics
Change the Screen Display Timeout , on page 62
Lock the Phone Keypad
You can lock the keypad so that you don't press keys by mistake.
Before You Begin
You must be on the home screen.
Procedure
Press and hold Zero (0) until you see the message that the keypad is locked.
Related Topics
Automatically Lock the Keypad, on page 63
Unlock the Phone Keypad
If you lock the keypad, you need to unlock it to use the phone.
Cisco Wireless IP Phone 8821 and 8821EX User Guide
4
Page 15
Your Phone
Self Care Portal
Procedure
Step 1
Step 2
Press Unlock.
Press Zero (0) .
Self Care Portal
You can customize some phone settings with the Self Care portal web site, which you access from your
computer. Your administrator gives you the Self Care portal URL, your user ID, and password.
In the Self Care portal, you can control features, line settings, and phone services for your phone.
Phone features include speed dial, do not disturb, and your personal address book.
•
Line settings affect a specific phone line (directory number) on your phone. Line settings can include
•
call forwarding, visual and audio message indicators, ring patterns, and other line-specific settings.
Phone services can include special phone features, network data, and web-based information (such as
•
stock quotes and movie listings). You must subscribe to a phone service using the Self Care portal before
you access it on your phone.
The following table describes some specific features that you configure using the Self Care portal. For more
information, see the Self Care portal documentation for your call control system.
DescriptionFeatures
Call forward
Additional phones
Speed dial
You specify the number that will receive calls when call forward is enabled on the
phone. You can use the Self Care portal to set up more complicated call forward
functions, for example, when your line is busy.
You specify additional phones (your mobile and other phones) that you want to use
to make and receive calls with the same directory numbers as your desk phone. You
can also define blocked and preferred contacts to restrict or allow calls from certain
numbers to be sent to your mobile phone. When you set up additional phones, you can
also set up the following features:
• Single number reach—You specify if the additional phone should ring when
someone calls your desk phone.
• Mobile calls—If the additional phone is a mobile phone, you can set it up to
allow you to transfer mobile calls to your desk phone or desk phone calls to your
mobile phone.
You assign phone numbers to speed-dial numbers so that you can quickly call that
person.
Cisco Wireless IP Phone 8821 and 8821EX User Guide
5
Page 16

Speed-Dial Numbers
Speed-Dial Numbers
When you dial a number on your phone, you enter a series of digits. When you set up a speed-dial number,
the speed-dial number must contain all the digits you need to make the call. For example, if you need to dial
9 to get an outside line, you put the number 9 and then the number you want to dial.
You can also add other dialed digits to the number. Examples of additional digits include a meeting access
code, an extension, a voicemail password, an authorization code, and a billing code.
The dial string can contain the following characters:
0 to 9
•
pound (#)
•
asterisk (*)
•
• comma (,)—This is the pause character, and gives a 2- second delay in the dialing. You can have several
commas in a row. For example, two commas (,,) represent a pause of 4 seconds.
Your Phone
Note
The rules for dial strings are:
Use the comma to separate the parts of the dial string.
•
An authorization code must always precede a billing code in the speed-dial string.
•
One comma is required between the authorization code and the billing code in the string.
•
A speed-dial label is required for speed dials with authorization codes and additional digits.
•
Before you configure the speed dial, try to dial the digits manually at least once to ensure that the digit sequence
is correct.
Your phone does not save the authorization code, billing code, or extra digits from the speed dial in the
call history. If you press Redial after connecting to a destination using speed dial, the phone prompts you
to enter any required authorization code, billing code, or additional digits manually.
Example
To set up a speed-dial number to call a person at a specific extension, and if you need an authorization code
and billing code, consider the following requirements:
You need to dial 9 for an outside line.
•
You want to call 5556543.
•
You need to input the authorization code 1234.
•
You need to input the billing code 9876.
•
You must wait for 4 seconds.
•
After the call is connected, you must dial the extension 56789#.
•
In this scenario, the speed dial number is 95556543,1234,9876,,56789#.
Cisco Wireless IP Phone 8821 and 8821EX User Guide
6
Page 17
Your Phone
Related Topics
Calls That Require a Billing Code or Authorization Code, on page 28
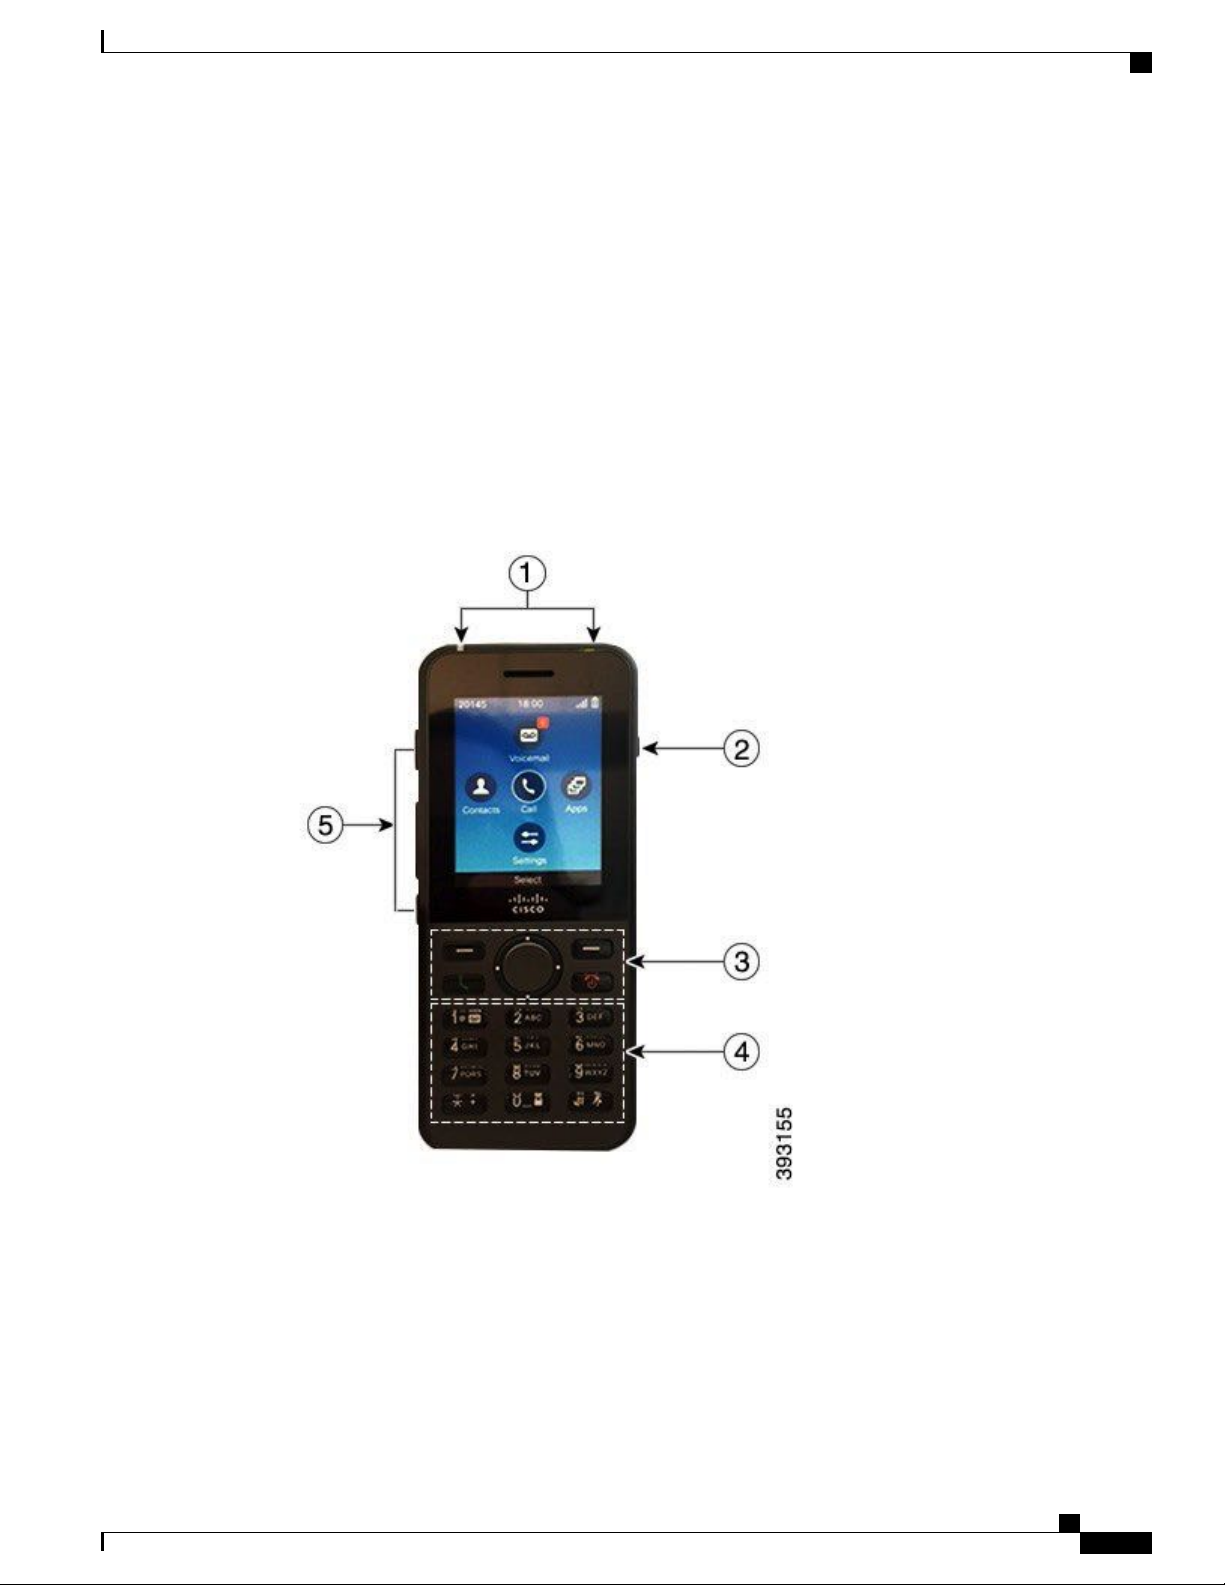
Buttons and Hardware
Your wireless phone has many buttons and hardware features that you will use regularly. Use the following
figure and table to identify the important button and hardware features. The figure shows the Cisco Wireless
IP Phone 8821, but the Cisco Wireless IP Phone 8821EX is similar in appearance. The table describes the
functions of the keys on the phones.
Figure 2: Cisco Wireless IP Phone 8821 Buttons and Hardware
Buttons and Hardware
Cisco Wireless IP Phone 8821 and 8821EX User Guide
7
Page 18
Buttons and Hardware
Indicator light (LED)
1
Headset port
Your Phone
DescriptionName or GroupingItem
Indicator light—Use the light to identify states:
• Solid red—the phone is connected to the AC power source and battery
is charging.
• Solid green—the phone is connected to the AC power source and
battery is fully charged.
• Fast blinking red—There is an incoming call. Phone can be charging
or fully charged.
• Slow blinking red—There is a voice message. When phone is connected
to the AC power source, the red light displays longer than when using
only the battery.
Slow blinking green (every 2 seconds): The phone is using only battery
•
power. The phone is registered with the wireless network and is within
service coverage area.
Headset port with cover Remove the protective cover and plug in a headset
or ear buds.
Speaker button2
Speaker Toggle the speaker mode on or off for the phone.
Cisco Wireless IP Phone 8821 and 8821EX User Guide
8
Page 19
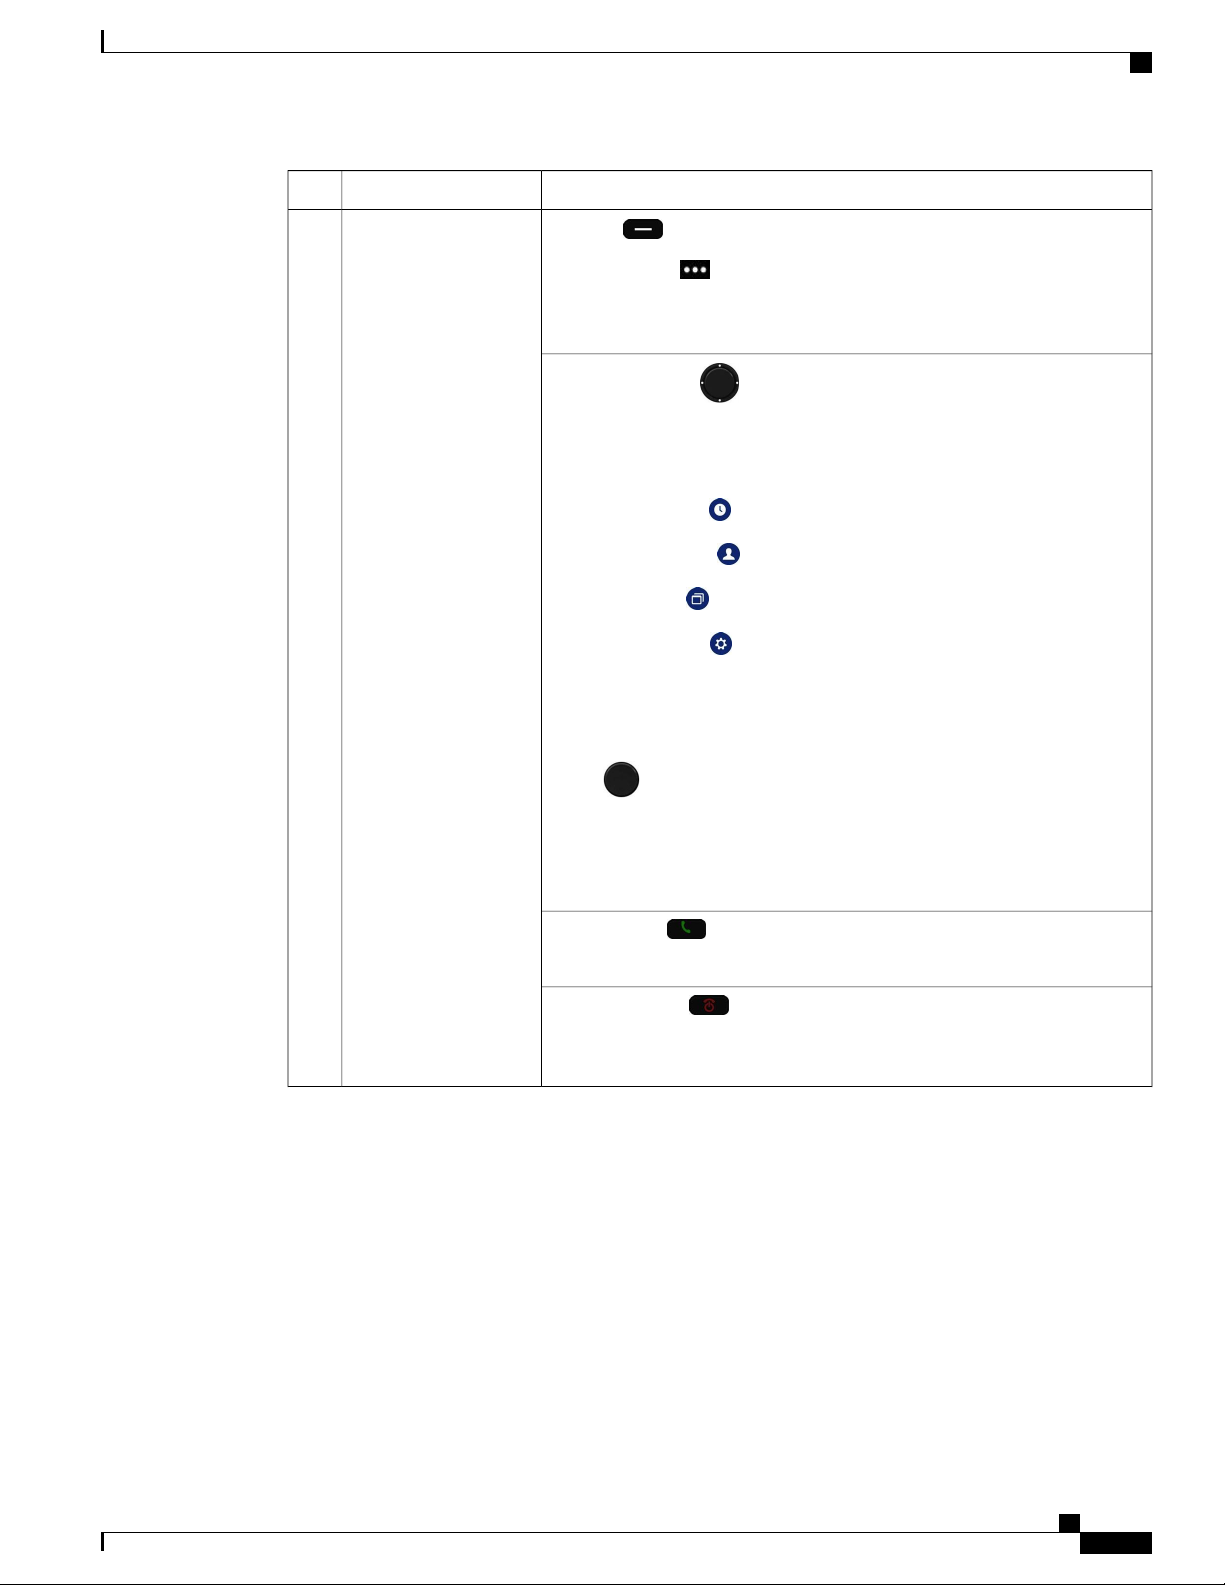
Your Phone
Softkey buttons
3
Navigation cluster
Call control buttons
Buttons and Hardware
DescriptionName or GroupingItem
Softkeys
•
The More softkey accesses a list of menus or functions.
The softkey can activate the option displayed on the screen.
•
Navigation cluster Navigation ring and Select button
Navigation ring (outer ring):
Move up, down, left, or right for these home screen apps:
•
◦
Recents
◦
Contacts
◦
Apps
◦
Settings
Scroll up and down menus to highlight options and to move left and
•
right through phone numbers and text entries.
Select button (center of the cluster):
Make a call from the main screen
•
Select a menu item, a softkey, a call, or an action.
•
Answer/Send Answer a ringing call or, after dialing a number, place
the call.
Power/End Call Turn the phone on or off, end a connected call, or
silence the ring during an incoming call. When you use menus or when you
are in an app, it acts as a shortcut to return to the main screen.
Cisco Wireless IP Phone 8821 and 8821EX User Guide
9
Page 20

Buttons and Hardware
Your Phone
DescriptionName or GroupingItem
Keypad4
Dial numbers, enter letters, and choose menu items by number.
One (1)
• Enter “1” when you dial a number.
Access voice mail.
•
Enter these special text characters: ! @ < > $ % ^ &
•
Asterisk (*)
Before you enter an international phone number, press and hold for a
•
few seconds to add the plus (+) symbol to the phone number.
Enter these special text characters: * + - / = \ : ;
•
Zero (0)
• Enter “0” when you dial a number.
Lock the kepad
•
•
Enter a space or these special text characters: , . ‘ “ | _ ~ ’
Pound (#)
Press to silence the phone ringer. If configured, the phone will vibrate
•
instead.
Enter these special text characters: # ? ( ) [ ] { }
•
Application Use with XML applications, such as Push to Talk.Left Side Buttons5
Volume
When the phone is idle, change the ring volume, turn on the vibrate
•
option, or turn off the ringer.
When you have an incoming (ringing) call, press the button once to
•
silence the ringer.
During a call, control the speaker volume for the active handset,
•
headset, or speaker.
When the phone is docked in the desktop charger, control the volume
•
of the charger speaker.
Mute Toggle the mute feature on or off.
Cisco Wireless IP Phone 8821 and 8821EX User Guide
10
Page 21

Your Phone
Navigation
You use the outer ring of the Navigation cluster to scroll through menus. You use the inner Select button of
the Navigation cluster to select menu items.
Each item in a menu has an index number. You can enter the index number with the keypad to select the menu
item.
Phone Screen Features
Navigation
The phone screen shows information about your phone such as directory number, active call and line status,
softkeys, speed dials, and placed calls. The screen is made up of three sections: the header row, the middle
section, and the footer row.
At the top of the screen is the header row. The header row displays the phone number, current date and time,
as well a number of icons. The icons display when features are active.
The middle of the phone screen displays the home screen with its application (app) icons. When you select
an app, the information for the app displays on the screen.
The bottom row of the screen is the softkey labels. Each label indicates the action for the softkey button below
the screen.
Clean the Phone Screen
Procedure
Wipe the screen with a soft, dry cloth.
Differences Between Phone Calls and Lines
We use the terms lines and calls in very specific ways to explain how to use your phone. Here is an explanation
of the differences.
Lines
Each line corresponds to a directory number or intercom number that others can use to call you. Your
phone supports up to six lines. To see your phone lines, press Phone to open the line view. You
have as many lines as you have directory numbers with phone line icons in the line view list.
Cisco Wireless IP Phone 8821 and 8821EX User Guide
11
Page 22

Out-of-Range Alerts
Calls
Each line can support multiple calls, typically up to four calls. Your phone can support up to 24 connected
calls, but your system administrator can adjust this number according to your needs. Only one call can
be active at any time; other calls are automatically placed on hold.
Here is an example: If you have two lines and each line supports four calls, then you could have up to eight
connected calls at one time. Only one of those calls is active and the other seven are held calls.
Out-of-Range Alerts
Your system administrator can configure your phone to send you an audible alert (beep) when you are out of
range of the wireless network. When you hear the alert, the (no signal) icon displays on the phone screen.
When you are out of range of the wireless network, you cannot use the phone for features requiring a wireless
network connection, such as making and receiving calls.
If your system administrator enabled the out-of-range alert, depending on the configuration, you might hear
a beep only once, or every 10, 30, or 60 seconds until you are back within range of the wireless network.
To reconnect to the wireless network after you hear the alert, move to another location until you see the signal
Your Phone
icon on the phone screen again.
Phone Batteries
Your phone contains a Lithium ion battery. The fully charged battery provides the following hours of service:
up to 13 hours of talk time.
•
up to 200 hours of standby time
•
Note
If you use a Bluetooth wireless headset, the headset reduces the talk time and standby time for the battery.
In addition, how the administrator configures your phone can affect the battery life.
If you require longer talk times, you will find it useful to have a spare, charged battery.
Bluetooth and Your Phone
You can use a Bluetooth headset with your phone.
Bluetooth connections work best when you're within 3 to 6 feet (1 to 2 meters) from your phone, but you
might be able to be as far away as 66 feet (20 meters). The Bluetooth connection can degrade if you have a
barrier (wall, door, window), large metal object, or other electronic devices between your phone and the
connected device.
To connect a headset to your phone with Bluetooth, you start by pairing the headset with your phone. You
can pair up to x Bluetooth headsets with the phone. After the headset is paired, the phone connects to the
headset when the headset is turned on. The last Bluetooth headset connected with the phone is the headset
that the phone uses.
Cisco Wireless IP Phone 8821 and 8821EX User Guide
12
Page 23

Your Phone
Related Topics
Bluetooth Headsets, on page 72
Access Bluetooth Settings, on page 67
Additional Help and Information
If you have questions about the functions available on your phone, you should contact your administrator.
The Cisco web site (http://www.cisco.com) contains more information about the phones and call control
systems.
For quick start guides, accessory guides, and end-user guides in English, follow this link:
•
http://www.cisco.com/c/en/us/support/collaboration-endpoints/unified-ip-phone-8800-series/
products-user-guide-list.html
For guides in languages other than English, follow this link:
•
http://www.cisco.com/c/en/us/support/collaboration-endpoints/unified-ip-phone-8800-series/
tsd-products-support-translated-end-user-guides-list.html
Additional Help and Information
For licensing information, follow this link:
•
http://www.cisco.com/c/en/us/support/collaboration-endpoints/unified-ip-phone-8800-series/
products-licensing-information-listing.html
Related Topics
Troubleshooting, on page 77
Cisco One-Year Limited Hardware Warranty Terms
Special terms apply to your hardware warranty and services that you can use during the warranty period.
This warranty does not apply to phone batteries.
Your formal Warranty Statement, including the warranties and license agreements applicable to Cisco software,
is available on Cisco.com at the following URL: http://www.cisco.com/go/hwwarranty.
Battery Warranty
Cisco Wireless IP Phone 8821 and 8821EX User Guide
13
Page 24

Battery Warranty
Your Phone
Cisco Wireless IP Phone 8821 and 8821EX User Guide
14
Page 25

Phone Setup
Phone Hardware Installation, page 15
•
Phone Configuration, page 20
•
Phone Hardware Installation
Before you can use your phone, you must install and charge the battery. The battery may already be installed
in your phone, or you may have to install it yourself.
You must read the safety information in Product Safety and Security, on page 85 before you use, install, or
charge the phone.
The battery may already be charged using one of the supported charging methods. If the battery isn't charged,
you must charge the battery before you can set up the phone.
You can secure the phone with a cable lock.
CHAPTER 2
Install the Phone Battery
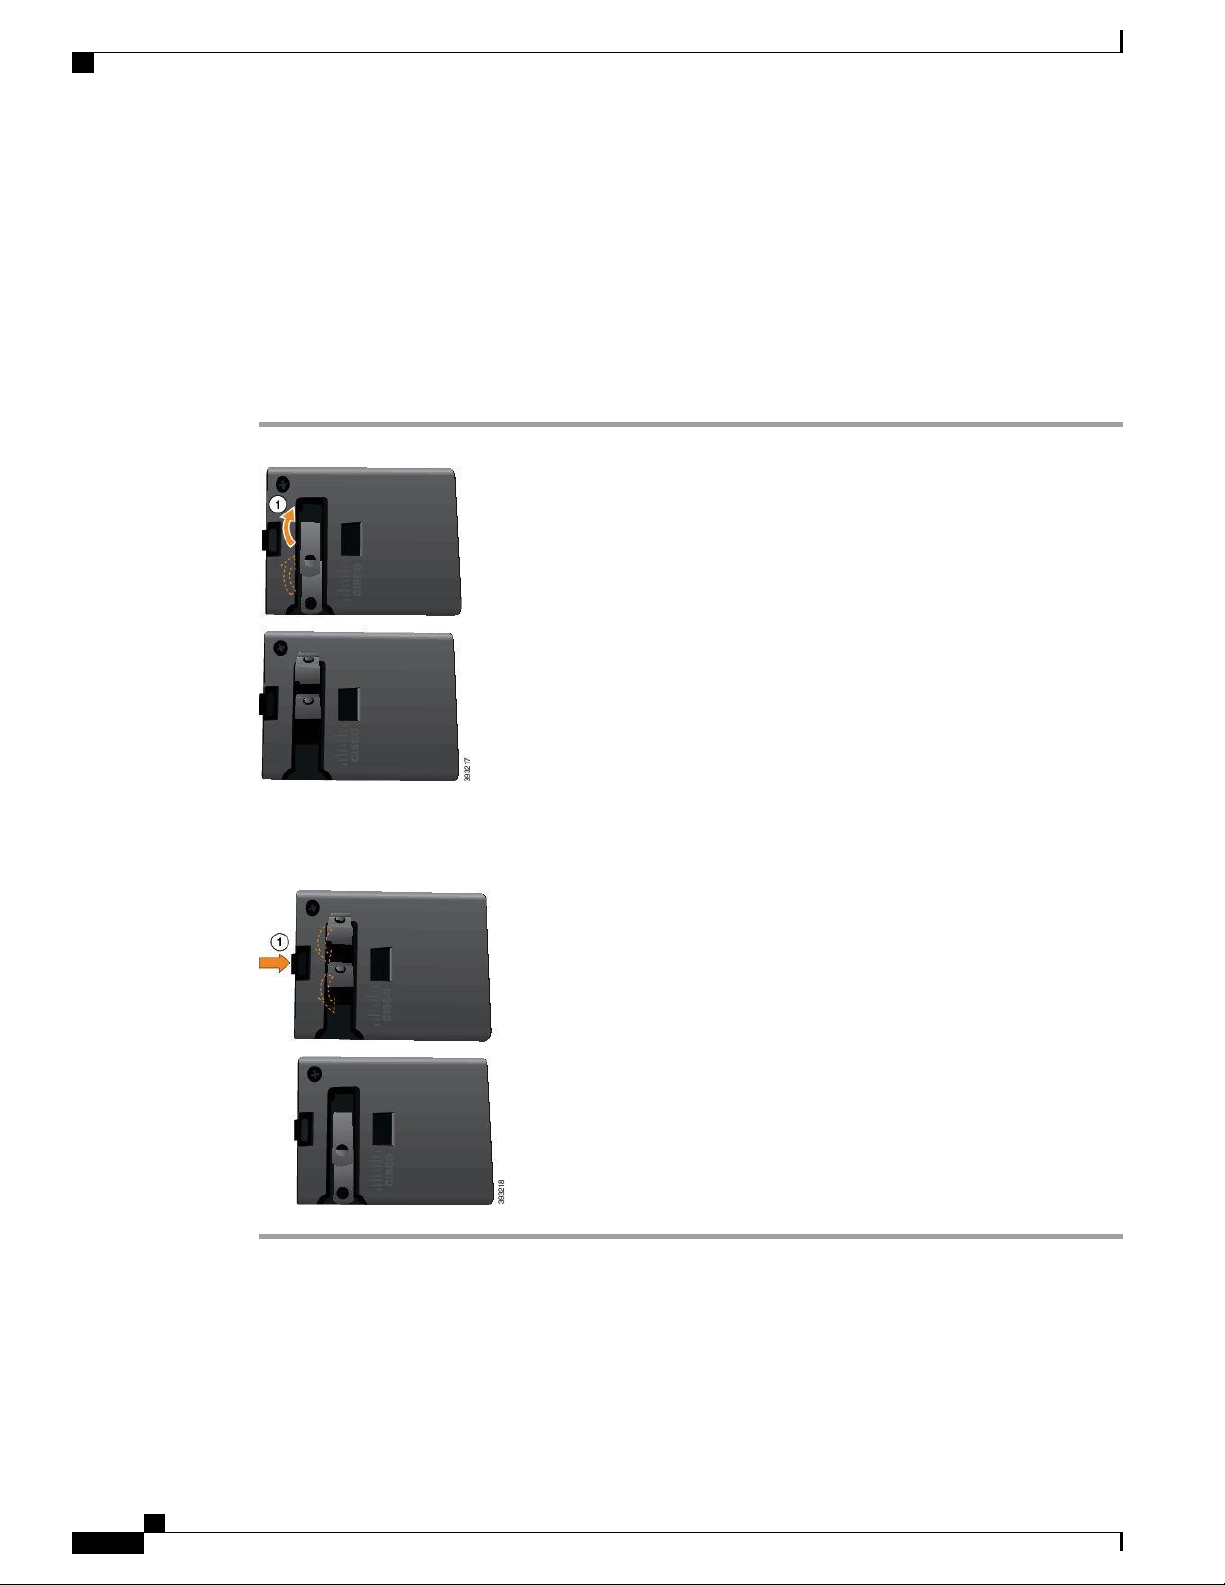
Procedure
Step 1
Remove the cover from the battery compartment.
Cisco Wireless IP Phone 8821 and 8821EX User Guide
15
Page 26
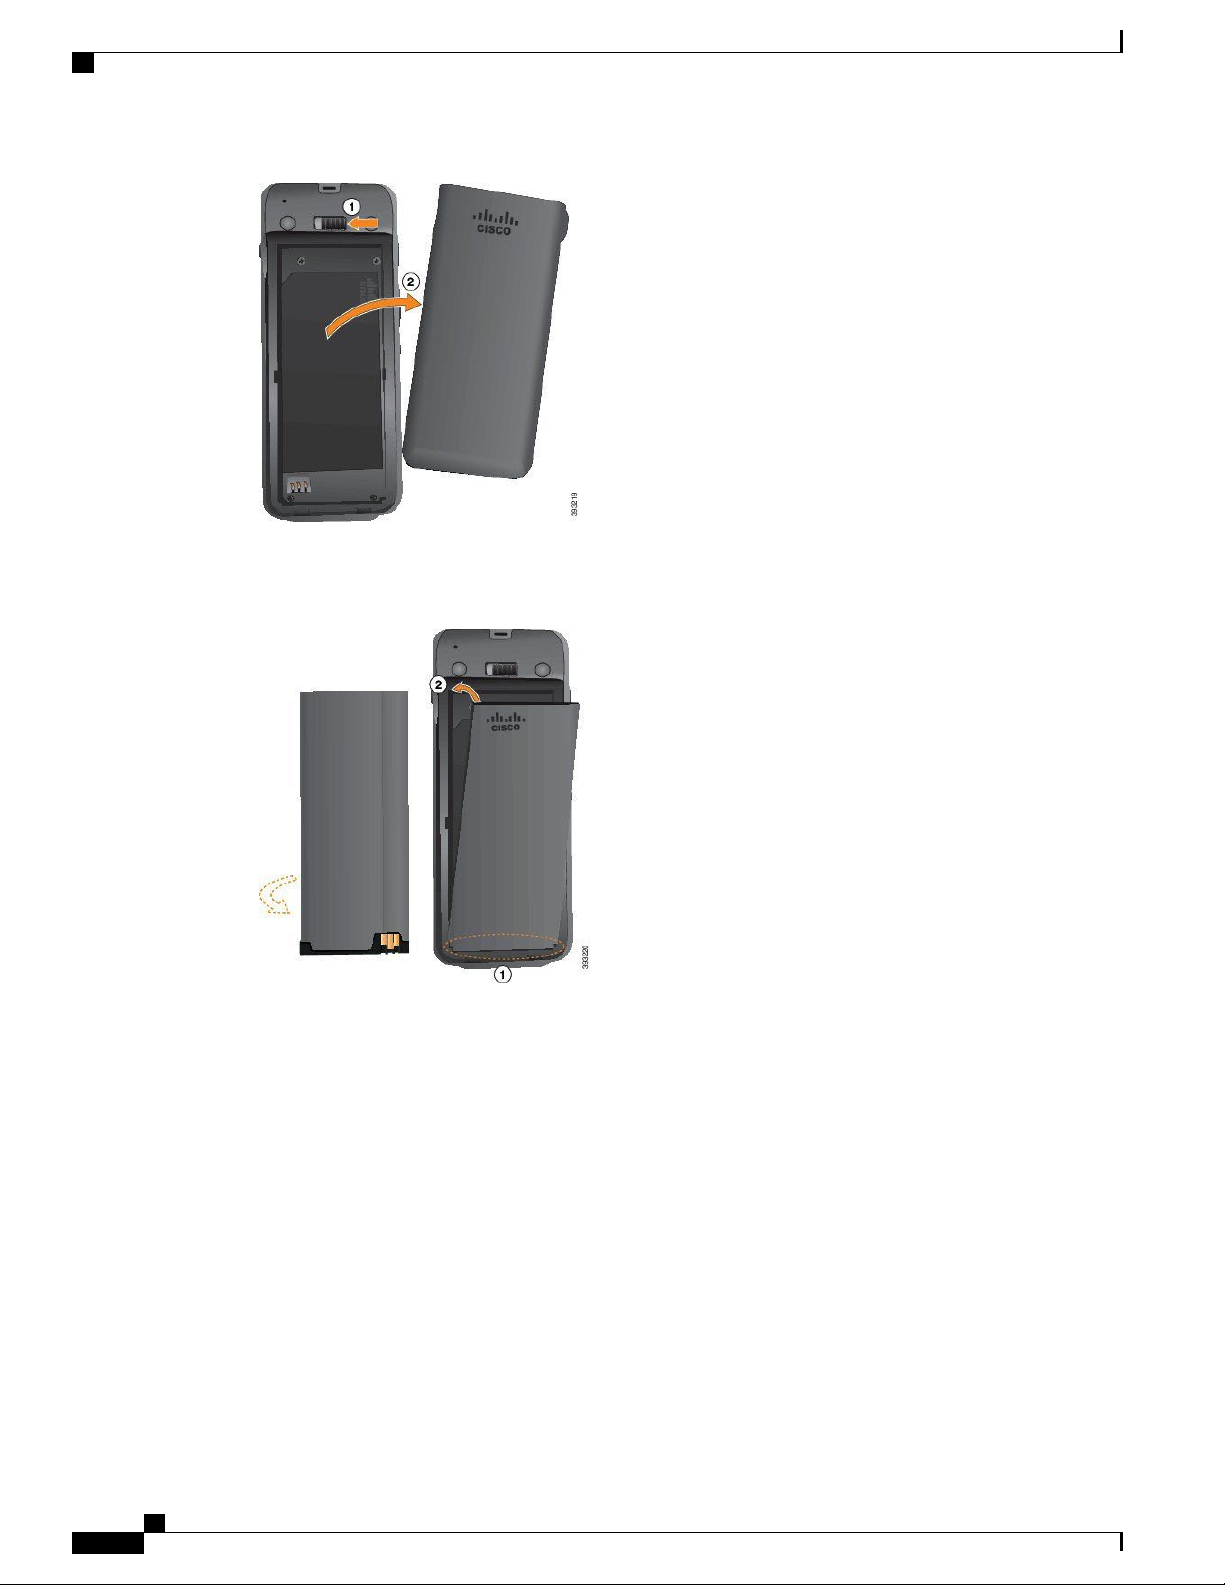
Install the Phone Battery
a) Push the locking catch to the left to release the cover.
b) Lift and remove the cover of the battery compartment.
Phone Setup
Step 2
Step 3
Install the battery.
a) Align the battery to the bottom of the battery compartment. Make sure that the metal contacts on the phone
and battery face each other.
b) Press the battery into the battery compartment until it locks in place. Make sure that it is flat in the
compartment.
Replace the cover to the battery compartment.
Cisco Wireless IP Phone 8821 and 8821EX User Guide
16
Page 27
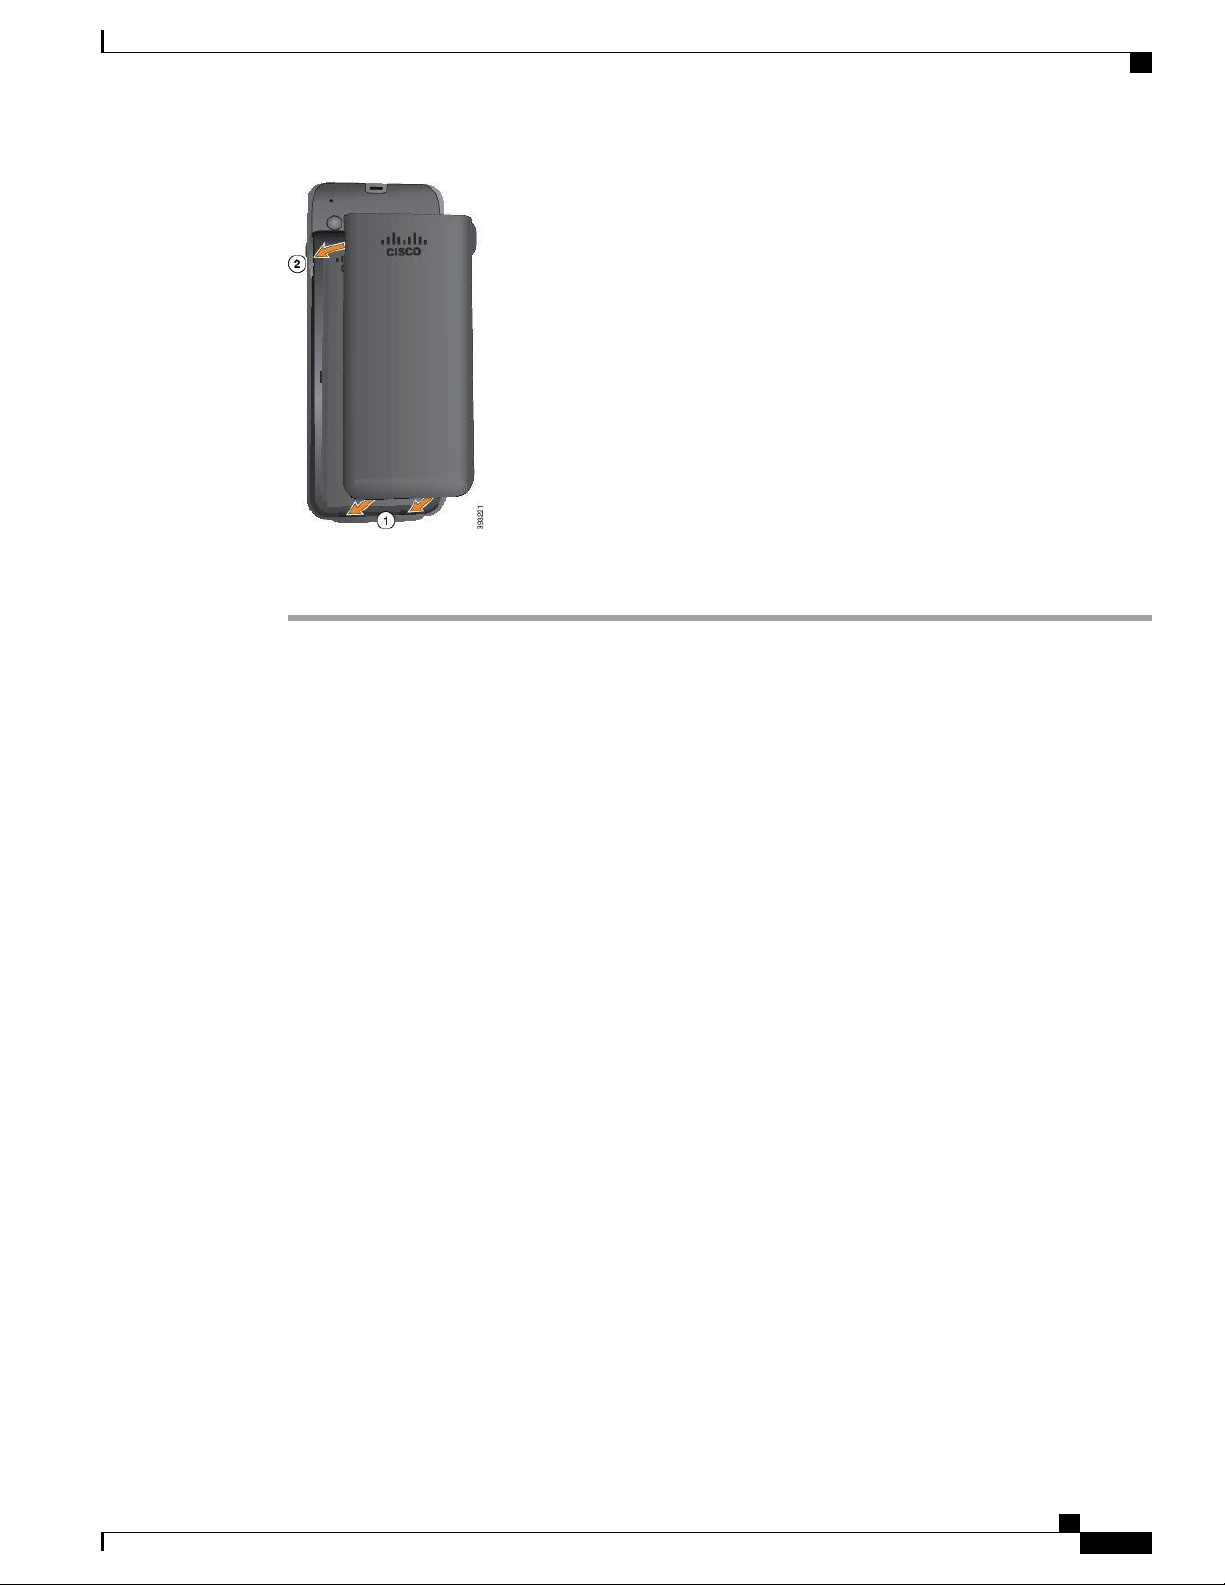
Phone Setup
Phone Battery Charging
a) Align the tabs at the bottom of the cover into the notches on the phone.
b) Press the cover firmly against the phone until it clicks in place.
Phone Battery Charging
You can charge the battery using any of the following options:
• USB cable—You can charge the phone with an AC power adapter or your computer.
• Desktop charger—You can use the phone and charge it at the same time.
• Multicharger—You can charge several phones at the same time.
Explosion Hazard: Do not charge the phone battery in a potentially explosive atmosphere. Statement xxx
Related Topics
Desktop Charger
Multicharger
Spare Battery Charging
If you require longer talk times, you will find it useful to have a spare, charged battery. You can charge a
spare battery in the desktop charger or multicharger.
Related Topics
Desktop Charger
Multicharger
Cisco Wireless IP Phone 8821 and 8821EX User Guide
17
Page 28
Phone Battery Charging
Prepare the Power Adapter
The power adapter for your phone is compact. Before you use the power adapter, you have to unfold the
prongs. After you use the adapter, you can fold in the prongs.
The power adapter for your region may also require an additional clip to allow the adapter to be plugged into
the electrical outlet.
Procedure
Phone Setup
Step 1
Step 2
Step 3
Step 4
Catch the edge of a prong with your finger and pull the prong up until it clicks into position.
(Optional) Install the international power clip.
(Optional) Before you close the adapter, remove the international power clip.
(Optional) Hold the lever on the top of the adapter down and press the prongs down to close the adapter.
Charge the Battery with the AC Power Supply
You can charge your phone using an AC power supply. When you use the power supply to charge your phone,
the battery can take up to 3 hours to fully charge.
Cisco Wireless IP Phone 8821 and 8821EX User Guide
18
Page 29
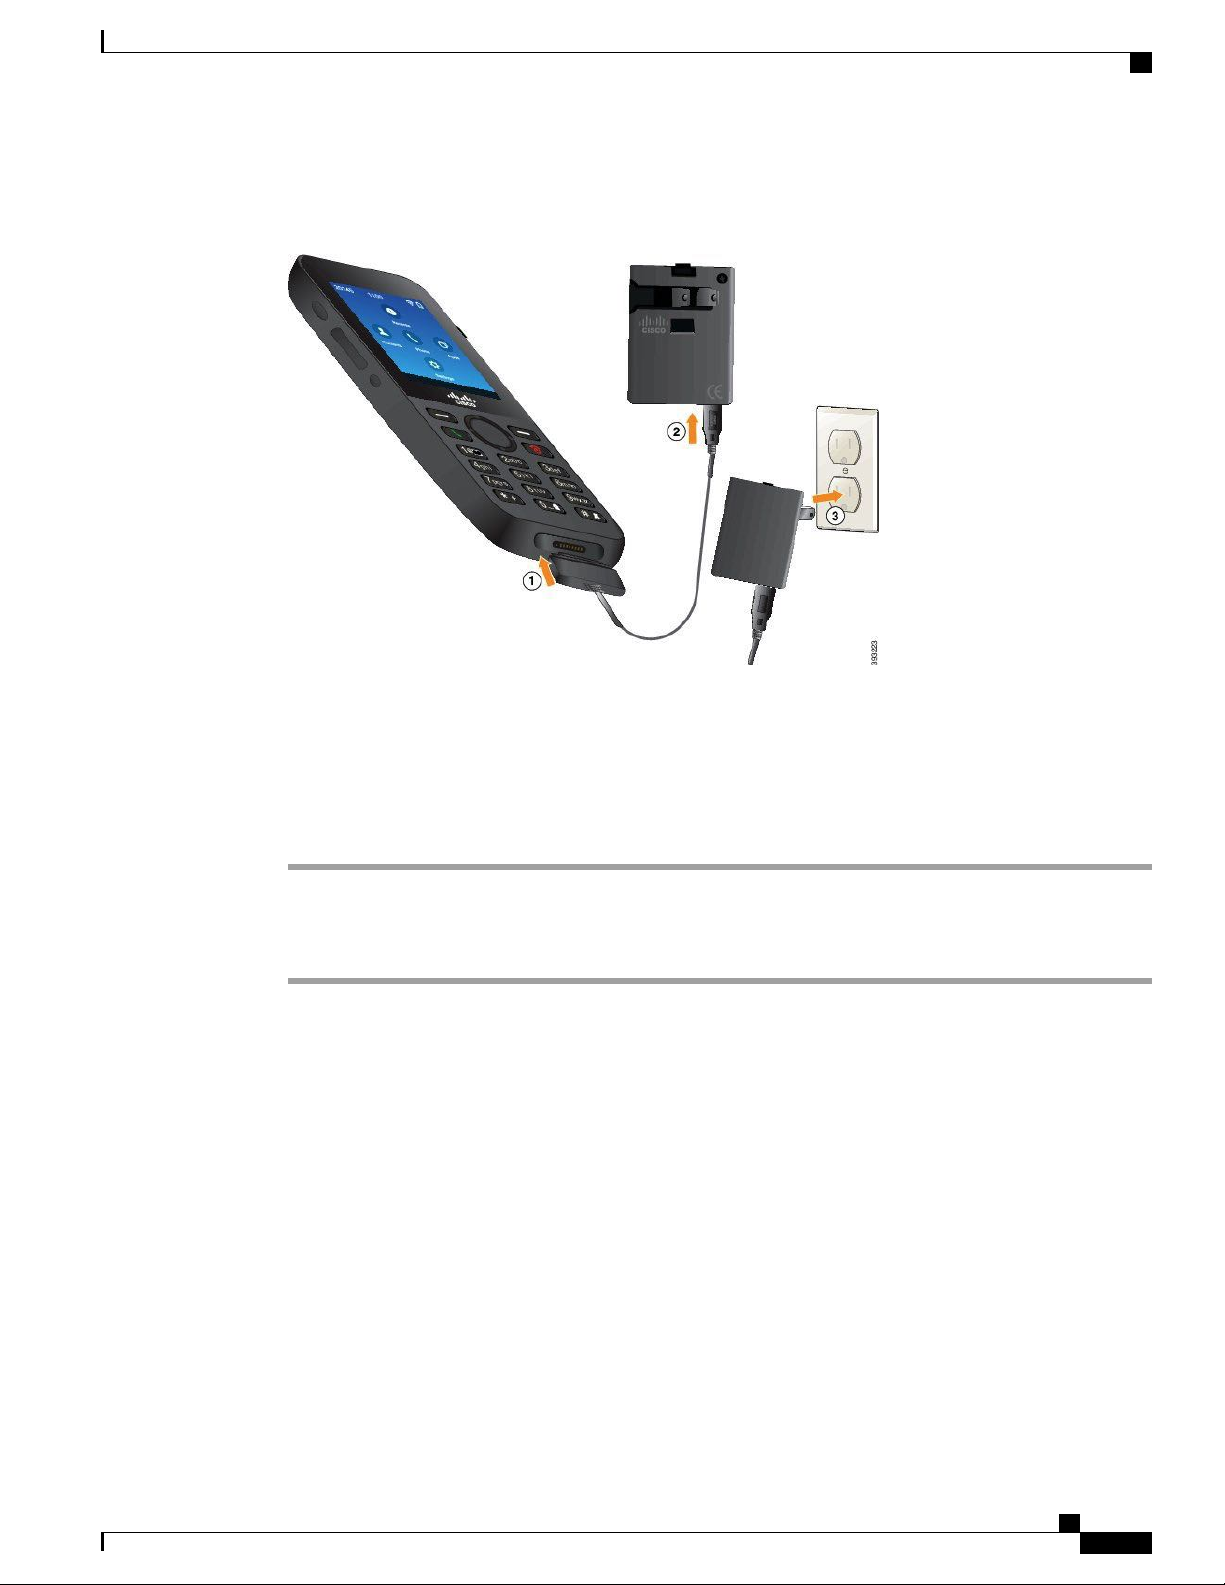
Phone Setup
Phone Battery Charging
The wide connector on the USB cable connects to the phone using magnets to hold it secure. It has pins that
you need to align correctly. If you hold the phone so that the screen is towards you, the battery icon on the
connector is visible.
Before You Begin
You need the USB power cable supplied with your phone.
You need to prepare the power adapter for use as described in Prepare the Power Adapter, on page 18.
Procedure
Step 1
Step 2
Step 3
Plug USB cable into the bottom of the phone with the pins aligned.
Plug the USB cable into the power adapter.
Plug the power adapter into the electrical outlet.
Charge the Battery with the USB Cable and a USB Port on Your PC
You can charge your phone using your computer. When you use the computer to charge your phone, the
battery can take up to 6 hours to fully charge.
The wide connector on the USB cable connects to the phone using magnets to hold it secure. It has pins that
you need to align correctly. If you hold the phone so that the screen is towards you, the battery icon on the
connector is visible.
Cisco Wireless IP Phone 8821 and 8821EX User Guide
19
Page 30
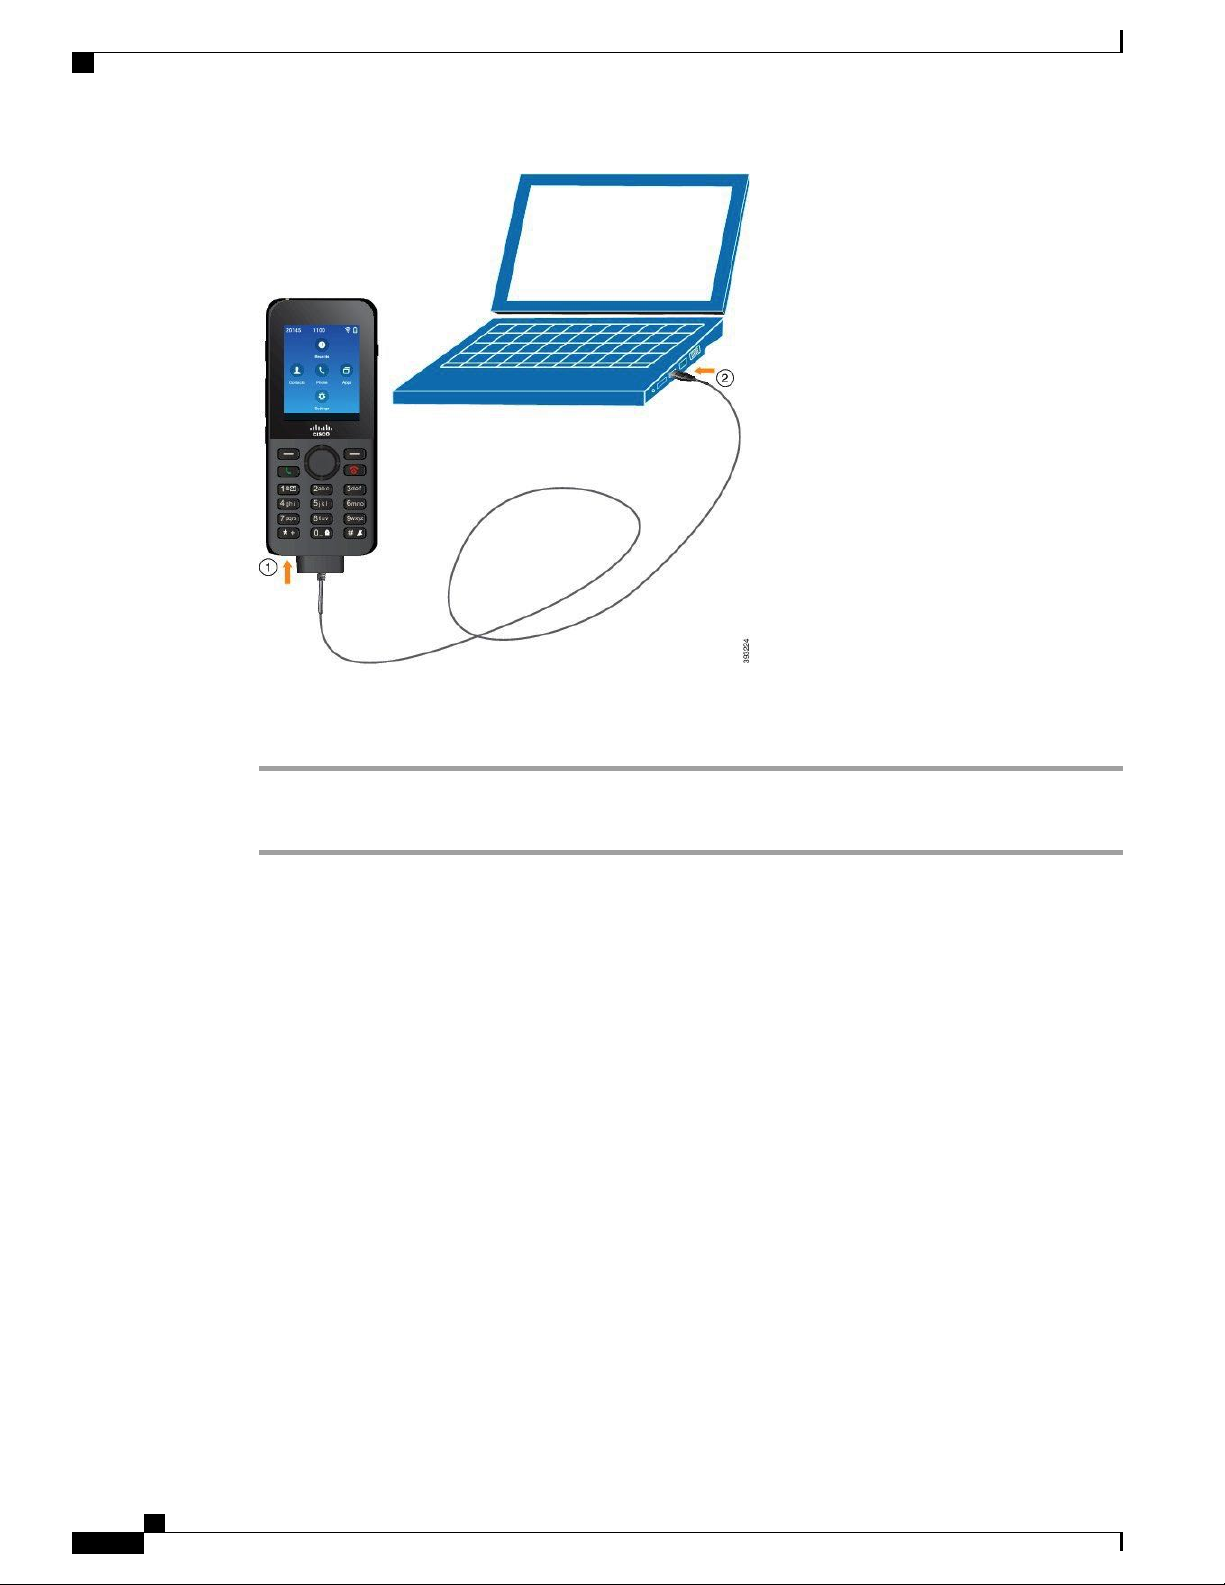
Phone Configuration
Phone Setup
Procedure
Step 1
Step 2
Connect the long connecter of the USB cable to the bottom of the phone with the pins aligned.
Plug the other end into the USB port in the computer.
Phone Configuration
Phone configuration uses one of these methods:
Your administrator sets up the phone. When this happens, you don't need to do any configuration. Your
•
administrator may lock your access to the configuration menus.
You set up the phone for your Wi-Fi network and to connect to the call control system. When this
•
happens, your administrator gives you the information you need to enter in the phone.
Add the Phone to the Wi-Fi Network
Before You Begin
You need the following information about the Wi-Fi network:
SSID
•
Security type (for example, WEM, WPA)
•
Cisco Wireless IP Phone 8821 and 8821EX User Guide
20
Page 31

Phone Setup
PIN or passkey for the selected security type
•
Procedure
Connect the Phone to the Cisco Unified Communications Manager
Step 1
Step 2
Step 3
Step 4
Step 5
Step 6
Step 7
Step 8
Step 9
Step 10
Step 11
Access the Settings app.
Select Wi-Fi.
Select a profile.
Select WLAN configuration.
Select the SSID field.
Enter the SSID for your wireless network.
Press More and select Set.
Select Security Mode and set the required security type.
If security is set to WEP, do the following steps:
a) Select WEP key.
b) Enter the password.
c) Press More and select Set.
Click Save.
Exit to the home screen.
What to Do Next
Set up the phone to connect to the call control system.
Connect the Phone to the Cisco Unified Communications Manager
Before You Begin
You need the IP address of the Cisco Unified Communications Manager TFTP server.
•
The phone must be configured in the Cisco Unified Communications Manager
•
The phone must be connected to the Wi-Fi network.
•
Cisco Wireless IP Phone 8821 and 8821EX User Guide
21
Page 32

Set the Username and Password
Procedure
Phone Setup
Step 1
Step 2
Step 3
Step 4
Step 5
Step 6
Step 7
Step 8
Step 9
Access the Settings app.
Select Wi-Fi.
Select a profile.
Select Network configuration > IPv4
Select Alternate TFTP and set to On.
Select TFTP Server 1 and enter the TFTP IP address for the Cisco Unified Communications Manager.
Press More and select Set.
In the Trust list window, press More and select Erase.
Exit to the home screen.
The phone connects to the Cisco Unified Communications Manager. After the connection is made, the phone
downloads the configuration file and, if necessary, upgrades the firmware to a new firmware load.
Set the Username and Password
When you power on your phone for the first time in some networks, you may need to set your username and
password to access the wireless network. Contact your administrator for assistance.
Procedure
Step 1
Step 2
Step 3
Step 4
Step 5
Step 6
Step 7
Step 8
From the home screen, select Settings.
Select Wi-Fi.
Select a profile.
Select WLAN configuration.
Select Username or Password.
Enter your username or password in the New Username or New Password field.
Note
You can use up to 32 alphanumeric characters for the
password.
Press More and select Save.
Press Power/End Call .
Related Topics
Sign In to Your Phone, on page 3
Cisco Wireless IP Phone 8821 and 8821EX User Guide
22
Page 33

Calls
Access the Phone App, page 23
•
Make Calls, page 24
•
Answer Calls, page 28
•
End a Call, page 32
•
Mute Your Audio, page 32
•
Hold Calls, page 32
•
Forward Calls From Your Phone, page 34
•
Transfer a Call to Another Person, page 35
•
Conference Calls and Meetings, page 35
•
Intercom Calls, page 37
•
Supervise and Record Calls, page 38
•
CHAPTER 3
Prioritized Calls, page 39
•
Multiple Lines, page 41
•
Access the Phone App
We make it easy for you to make and receive calls with the Phone app.
Procedure
Use one of these ways to access the Phone app:
•
From the home screen, press the Select button to select Phone .
•
Press Answer/Send to make a call or to answer an incoming call.
Enter a number using the keypad to make a call.
•
Cisco Wireless IP Phone 8821 and 8821EX User Guide
23
Page 34

Make Calls
Make Calls
Make a Call
Calls
Your Cisco Wireless IP Phone works just like a regular phone. But we make it easier for you to make calls.
You can easily make a call from the home screen or from the Phone app.
Procedure
Step 1
Step 2
Enter a phone number.
Press Answer/Send .
Make an Emergency Call
You can make an emergency call from your phone, even if you are not signed in. When you start to dial the
emergency number, the list of emergency numbers displays although you cannot select the number.
If you try to dial a number that is not in the list of emergency numbers, the phone does not dial the number.
Procedure
Step 1
Step 2
Step 3
If your phone is not turned on, press Power/End Call for 4 seconds to power on the phone.
Use the keypad to enter your emergency number.
Press Answer/Send .
Make a Call with a Headset
You can make a call using a headset. If you disconnect the headset during a call, the phone continues the call
on the speakerphone.
Before You Begin
You have a wired or Bluetooth headset connected to the phone.
Cisco Wireless IP Phone 8821 and 8821EX User Guide
24
Page 35

Calls
Make a Call with the Speakerphone
Procedure
Step 1
Step 2
Step 3
Step 4
Access the Phone app.
(Optional) Select a line.
Enter a phone number.
Press Answer/Send .
Related Topics
Headsets, on page 71
Make a Call with the Speakerphone
You can make a call with the speakerphone built into the phone. When your phone is in the desktop charger,
you use the speakerphone built into the charger.
Procedure
Step 1
Step 2
Step 3
Step 4
Press and hold to activate the speaker.
Dial the phone number.
Press Answer/Send to place your call.
Press and hold again to turn off speaker mode.
Related Topics
Desktop Charger
Make a Call with a Phone or Video Address
Sometimes, instead of just having someone’s phone number, you might also have a phone or video address
that you can use to place the call instead.
These addresses might look like an email address, such as username1@example.com, or it might contain
numbers like username2@209.165.200.224.
Cisco Wireless IP Phone 8821 and 8821EX User Guide
25
Page 36

Redial a Number
Calls
Procedure
Step 1
Step 2
Step 3
Step 4
Step 5
Access the Phone app.
(Optional) Select a line.
Press More and select ABC, and you’ll be able to enter text using the keypad.
Press a number on the keypad to see the available options, and then press the number again to move through
the choices.
For example, press the number 1 three times to enter the @ symbol.
Press Answer/Send .
Redial a Number
You can call the most recently dialed phone number from the home screen or from the Phone app.
Procedure
Step 1
Step 2
Step 3
(Optional) Access the Phone app.
(Optional) Select a line.
Press Redial.
Return a Recent Call
You can return a recent call with the Recents list in the Phone app.
Procedure
Step 1
Step 2
Step 3
Step 4
Access the Phone app.
Select a line.
Select an entry from your Recents list.
Press Answer/Send .
Make a Call from the Phone App with a Favorite
You can easily call a contact in your Favorites list.
Cisco Wireless IP Phone 8821 and 8821EX User Guide
26
Page 37

Calls
Speed Dial
Before You Begin
You must set up a favorite (a frequently-dialed number) in your Favorites list in the Contacts app.
Procedure
Step 1
Step 2
Step 3
Step 4
Access the Phone app.
(Optional) Select a line.
Press More and select Favorites.
Select an entry and press Call.
Related Topics
Favorites, on page 49
Speed Dial
Dial an International Number
You can dial international calls when you prefix the phone number with a plus (+) sign.
Procedure
Step 1
Press and hold star (*) for at least 1 second.
The plus (+) sign is displayed as the first digit in the phone number. If you are off-hook, you hear that the dial
tone changes when the + signs is displayed.
Step 2
Step 3
Dial the number.
Press Answer/Send .
Get Notified When a Contact is Available
If you call someone and their line is busy or they do not answer, you can be notified with a message and a
special ringtone when they are available.
Procedure
Step 1
Press Call back.
Cisco Wireless IP Phone 8821 and 8821EX User Guide
27
Page 38

Calls That Require a Billing Code or Authorization Code
Calls
Step 2
Step 3
Press Exit.
When you see the message that the person is available or hear the special ring tone, press Call.
Calls That Require a Billing Code or Authorization Code
Your administrator may require that you enter a billing code or authorization code (or both codes) after you
dial a phone number. The billing code, called a Client Matter Code, is used for accounting or billing purposes.
The authorization code, called a Forced Authorization Code, controls access to certain phone numbers.
When a billing code is required, the phone displays Enter Client Matter Code, the dialed number
changes to “********”, and you hear a special tone.
When an authorization code is required, the phone displays Enter Authorization Code, the dialed
number changes to “********”, and you hear a special tone. For security reasons, the phone displays a “*”
instead of the number entered.
When both a billing code and an authorization code are required, you are prompted for the authorization code
first. Then you are prompted for the billing code.
Related Topics
Speed-Dial Numbers, on page 6
Secure Calls
Your administrator can take steps to protect your calls from tampering by people outside your company. When
you see a lock icon displayed on your phone during a call, your phone call is secure. Depending upon how
your phone is configured, you may have to sign in before you call somebody or hear a security tone played
over your handset.
Answer Calls
Your Cisco Wireless IP Phone works just like a regular phone. But we make it easier for you to answer calls.
Answer a Call
Procedure
Press Answer or Answer/Send .
Answer Call Waiting
When you have an incoming call while you are on an active call, you hear a single beep. You can answer the
new call and automatically hold the active call.
Cisco Wireless IP Phone 8821 and 8821EX User Guide
28
Page 39

Calls
Decline a Call
Procedure
Step 1
Step 2
Decline a Call
Ignore a Call
Press Answer or Answer/Send .
(Optional) If you have more than one call waiting, select an incoming call.
When you get an incoming call that you don't want to answer, you can decline the call, which sends the call
to voicemail.
Procedure
Press Decline or Power/End Call .
When you get an incoming call that you don't want to answer, you can ignore the call. The call shows up in
your call list.
Procedure
Press the Up or Down arrow on the Navigation cluster or the Select button.
Silence Incoming Calls on Your Phone
If you're busy and don't want to be disturbed, you can silence incoming calls. If you do this, the phone won't
ring, but you will see a visual alert. So, you can still choose to answer the call. If you don't answer the call,
the call goes to your voicemail instead.
Procedure
Choose one of these options:
From the My Cisco Spark - Self Care portal, turn on Do Not Disturb.
•
From your phone,
•
1
Access the Phone app.
2
(Optional) Select a line
3
Press More and select Do not disturb
Cisco Wireless IP Phone 8821 and 8821EX User Guide
29
Page 40

Answer a Coworker's Phone (Call Pickup)
Related Topics
Control the Phone Ringer for a Single Incoming Call, on page 31
Answer a Coworker's Phone (Call Pickup)
If you share call handling tasks with your coworkers, you can answer a call that is ringing on a coworker’s
phone. First, your administrator has to assign you to at least one call group.
Answer a Call Within Your Group (Pickup)
You can answer a call that rings on another phone within your call pickup group. If multiple calls are available
for pickup, you'll answer the call that has been ringing for the longest time.
Procedure
Calls
Step 1
Step 2
Step 3
Access the Phone app.
Press More and select Pickup.
Press Answer.
Answer a Call From Another Group (Group Pickup)
Group Pickup allows you to answer a call on a phone that is outside your call pickup group. You can use the
group pickup number to pick up the call, or you can use the number of the phone line that is ringing.
Procedure
Step 1
Step 2
Step 3
Step 4
Step 5
Step 6
Access the Phone app.
(Optional) Select a line.
Press More and select Group pickup.
Enter the group pickup number or enter the number of the phone line with the call that you want to pick up .
Press More and select Call.
Press Answer.
Answer a Call from an Associated Group (Other Pickup)
You can pick up a call ringing on a phone in another call group.
Cisco Wireless IP Phone 8821 and 8821EX User Guide
30
Page 41

Calls
Trace a Suspicious Call
Procedure
Step 1
Step 2
Step 3
Step 4
Access the Phone app.
(Optional) Select a line.
Press More and select Other pickup.
Press Answer.
Trace a Suspicious Call
If you receive unwanted or harassing calls, use malicious call identification (MCID) to alert your administrator.
Your phone sends a silent notification message to your administrator with information about the call.
Procedure
Step 1
Step 2
Press More and select Report caller.
End the call.
Control the Phone Ringer for a Single Incoming Call
You can silence the phone ringer for an individual call.
Procedure
Do one of the following actions:
•
Press Volume down.
•
Press Pound (#) for 2 seconds to turn the ringer off or on.
Related Topics
Adjust the Ringtone Volume
Make the Phone Vibrate for an Incoming Call, on page 60
Select Where You Hear the Ringtone, on page 60
Silence Incoming Calls on Your Phone, on page 29
Cisco Wireless IP Phone 8821 and 8821EX User Guide
31
Page 42

End a Call
End a Call
Procedure
Do one of the following actions:
•
From the Phone app, press More and select End call.
•
Press Power/End Call .
Mute Your Audio
You can mute the phone so that you can hear the other caller but they cannot hear you. The Mute button is
located below the Volume key on the side of the phone.
Calls
Procedure
Step 1
Step 2
Press Mute .
Press Mute again to turn mute off.
Hold Calls
You can put an active call on hold and then resume the call when you're ready.
Put a Call on Hold
Procedure
Step 1
Step 2
Access the Phone app.
Press Hold.
Answer a Call Left on Hold for Too Long
You can be notified when a call is left on hold. The notification is similar to an incoming call notification and
includes these cues:
Single ring, repeating at intervals
•
Cisco Wireless IP Phone 8821 and 8821EX User Guide
32
Page 43

Calls
Flashing message indicator on the handset
•
Visual notification on the phone screen
•
Procedure
Press Answer to resume the held call.
Swap Between Active and Held Calls
When you are on a call, you can access a held call. The phone places the original call on hold.
Procedure
Swap Between Active and Held Calls
Step 1
Step 2
Step 3
Step 4
Access the Phone app.
Press the right Navigation key.
Select the held call.
Press Resume.
Call Park
You can use your phone to park (temporarily store) a call. You can then retrieve the call from another phone
(such as a phone at a coworker’s desk or in a conference room).
There are two ways you can park a call: call park and directed call park. You'll only have one type of call
park available on your phone.
If the call remains parked for too long, you receive an alert tone. You can answer the call or retrieve it from
another phone. If you do not answer the call within a certain length of time, it is routed to another destination
(such as voicemail), as set by your administrator.
Place a Call on Hold with Call Park
You can park an active call that you answered on your phone and then use another phone in the call control
system to retrieve the call.
You can park only one call at the call park number.
Before You Begin
Your call must be active.
Cisco Wireless IP Phone 8821 and 8821EX User Guide
33
Page 44

Forward Calls From Your Phone
Procedure
Calls
Step 1
Step 2
Access the Phone app.
Press More and select Park.
The phone displays the call park extension.
Retrieve a Call on Hold with Call Park
You can pick up a parked call from anywhere in your network.
Before You Begin
You need the call park extension.
Procedure
Step 1
Step 2
Step 3
Access the Phone app.
(Optional) Select a line.
Dial the call park extension.
Forward Calls From Your Phone
You can forward calls from any line on your phone to another number. Call forward is phone-line specific.
If a call reaches you on a line where call forwarding is not enabled, the call rings as usual.
There are two ways of forwarding your calls:
Forward all calls
•
Forward calls in special situations, such as when the phone is busy or there is no answer.
•
Verify that your calls are forwarded by looking for the Forward all icon in the line label.
Procedure
Step 1
Step 2
Step 3
Step 4
Access the Phone app.
(Optional) Select a line.
Press More and select Forward all.
Enter the number to receive the calls or select an entry from your Recents call list.
Cisco Wireless IP Phone 8821 and 8821EX User Guide
34
Page 45

Calls
Turn Off Call Forward From Your Phone
Procedure
Turn Off Call Forward From Your Phone
Step 1
Step 2
Step 3
Access the Phone app.
(Optional) Select the forwarded line.
Press More and select Forward off.
Transfer a Call to Another Person
When you transfer a call, you can stay on the original call until the other person answers. This gives you an
opportunity to talk privately with the other person before removing yourself from the call. If you don't want
to talk, then transfer the call without waiting for the other person to answer.
Procedure
Step 1
Step 2
Step 3
Step 4
Access the Phone app.
Press More and select Transfer.
Enter the number to call or select an entry from your recent calls.
Press Transfer.
Conference Calls and Meetings
You can talk with several people in a single call. You can dial another person and add them to the call. If you
have multiple phone lines, you can join two calls across two lines.
When you add more than one person to a conference call, wait a few seconds between adding participants.
As the conference host, you can remove individual participants from the conference. The conference ends
when all participants hang up.
Add Another Person to a Call
You can add another person to an active call to create a conference.
Cisco Wireless IP Phone 8821 and 8821EX User Guide
35
Page 46

View and Remove Conference Participants
Procedure
Calls
Step 1
Step 2
Step 3
Step 4
Access the Phone app.
Press More and select Conference.
Do one of these actions.
Dial a number and wait for the person to answer.
•
Select an entry from your Recents list or Favorites list and wait for the person to answer.
•
Select another held call on the same line.
•
Press the right Navigation key, select a line, and select a held call on that line.
•
Press Merge.
View and Remove Conference Participants
When you are in a conference call, you can view the conference participants. If you are the conference owner,
you can remove a participant from the conference. The screen displays a star (*) beside the conference owner.
Before You Begin
You are in an active conference call.
Procedure
Step 1
Step 2
Step 3
Press More and select Details.
(Optional) Select Update to refresh the participant list.
(Optional) Select a participant and press Remove.
Scheduled Conference Calls (Meet Me)
You can host or join a conference call at a scheduled time.
The conference call does not start until the host dials in and ends when all participants hang up. The conference
does not automatically end when the host hangs up.
Host a Meet Me Conference
Before You Begin
Get a meet me phone number from your administrator, and distribute the number to the conference participants.
Cisco Wireless IP Phone 8821 and 8821EX User Guide
36
Page 47

Calls
Intercom Calls
Procedure
Step 1
Step 2
Step 3
Step 4
Access the Phone app.
Press More and select Meet me.
Enter the meet me number.
Enter the host password for the meeting.
Join a Meet Me Conference
You cannot join a meet me conference until the conference hosts dials in. If you hear a busy tone, the host
has not dialed into the conference. Hang up and try your call again.
Procedure
Step 1
Step 2
Step 3
Access the Phone app.
Press More and select Meet me.
Enter the meet me number.
Intercom Calls
You can place and receive one-way calls using an intercom line.
When you place an intercom call, the recipient’s phone answers the call automatically with mute activated
(whisper mode).Your message is broadcast through the recipient’s speakerphone, headset, or handset, if one
of these devices is active.
After receiving the intercom call, the recipient can start two-way audio (connected mode) to allow for further
conversation.
Make an Intercom Call
When you place an intercom call, your phone enters whisper mode until the recipient accepts the intercom
call. In whisper mode, the other person can hear you, but you can't hear them. If you are on an active call, that
call is placed on hold.
Cisco Wireless IP Phone 8821 and 8821EX User Guide
37
Page 48

Answer an Intercom Call
Procedure
Calls
Step 1
Step 2
Step 3
Access the Phone app.
Select Intercom line.
Dial the target intercom number.
Answer an Intercom Call
You can answer an intercom call to talk to the other person.
Before You Begin
You receive a message on your phone screen, and an audible alert. Your phone answers the intercom call in
whisper mode.
Procedure
Step 1
Step 2
Access the Phone app.
Select the intercom call.
Supervise and Record Calls
You can supervise and record a call. But you must have a minimum of three people on a line: the person
calling, the chaperone, and the person called.
The chaperone answers a call, creates a conference call, and monitors and records the conversation.
The chaperone performs the following tasks:
Record the call.
•
Conference in the first participant only; Other participants add people as needed.
•
End the call.
•
The conference ends when the chaperone hangs up the call.
Set up a Supervised Call
When you have a call to chaperone, the incoming call indicates that the call requires supervision.
Before You Begin
You must be part of the chaperone hunt group.
Cisco Wireless IP Phone 8821 and 8821EX User Guide
38
Page 49

Calls
Record a Call
Procedure
Step 1
Step 2
Step 3
Press More and select Conference.
Dial the person to add to the call.
After the person answers, press Merge.
Record a Call
You can record a call. You might hear a notification tone as you record the call. The recording stops when
you press the Stop recording softkey or end the call.
Procedure
Step 1
Step 2
Press Record.
Press Stop recording when the recording can be stopped.
Prioritized Calls
In your job, you might need to handle urgent or critical situations using your phone. You can identify calls
as being very important, and thus have a higher priority than normal calls. The priorities range from level 1
(low) to level 5 (high). This system of priorities is called Multilevel Precedence and Preemption (MLPP).
Your administrator sets up the priorities that you can use and determines if you need special sign-in information.
When a high-priority call rings on your phone, you see the priority level on the phone screen. If you are on a
call when a high-priority call comes to your phone, the high-priority call preempts the current call and you
hear a special preemption ringtone. You should hang up from your current call to answer the high-priority
call.
When you are on a high-priority call, the priority of the call does not change when you:
Put the call on hold
•
Transfer the call
•
Add the call to a three-way conference
•
Answer the call using call pickup
•
Table 1: Multilevel Precedence and Preemption Priority Levels
Priority LevelMLPP icon
Level 1—Priority call
Cisco Wireless IP Phone 8821 and 8821EX User Guide
39
Page 50

Make a Priority Call
Make a Priority Call
Calls
Priority LevelMLPP icon
Level 2—Medium priority (Immediate) call
Level 3—High priority (Flash) call
Level 4—Flash Override
Level 5—Executive Override
To make a priority call, you might need to sign in with your special credentials. You have three chances to
enter these credentials, and you're notified if you've entered them incorrectly.
Procedure
Step 1
Step 2
Step 3
Step 4
Step 5
Access the Phone app.
Press More and select Prec level.
Select a priority level.
Enter the phone number.
Press Answer/Send .
Answer a Priority Call
If you hear a special ring that's faster than usual, you are receiving a priority call.
Procedure
Press Answer.
Answer a Priority Call While on Another Call
If you hear a continuous tone that interrupts your call, you or your coworker are receiving a priority call. Hang
up immediately and let the higher priority call go to the intended person.
Cisco Wireless IP Phone 8821 and 8821EX User Guide
40
Page 51

Calls
Multiple Lines
Procedure
Step 1
Step 2
Press End call.
Press Answer.
Multiple Lines
If you share phone numbers with other people, you could have multiple lines on your phone. When you have
multiple lines, you have more calling features available to you.
Shared Lines
You can share the same phone number with one or more of your coworkers. For example, as an administrative
assistant, you might be responsible for screening calls for the person that you support.
When you share a phone number, you can use that phone line just like you would any other line, but you
should be aware of a few special characteristics about shared lines:
•
•
•
The shared phone number appears on all phones that share the number.
If your coworker answers a call on the shared line, the shared line icon displays in red on your phone.
If you put a call on hold, your shared line icon is white. But your coworker sees the line in red.
Add Yourself to a Call on a Shared Line (Barge)
You or your coworker can join a call on the shared line.
Procedure
Step 1
Step 2
Select a shared line that is in use.
Press More and select Barge.
Add Yourself to a Call on a Shared Line (cBarge)
You or your coworker can join a call on the shared line.
Cisco Wireless IP Phone 8821 and 8821EX User Guide
41
Page 52

Shared Lines
Calls
Procedure
Step 1
Step 2
Step 3
Select a shared line that is in use.
Press More and select cBarge.
Press Yes.
Get Notified Before You Join a Call on a Shared Line
You can set up your phone to alert you when you barge into a call. By default, the alert prompt is turned Off.
Procedure
Step 1
Step 2
Step 3
Access the Settings app.
Select Barge alert.
Press On to turn on the alert.
Cisco Wireless IP Phone 8821 and 8821EX User Guide
42
Page 53

Contacts
Access the Contacts App, page 43
•
Corporate Directory, page 43
•
Personal Directory, page 44
•
Local Contacts, page 47
•
Favorites, page 49
•
Access the Contacts App
You can access the Contacts app from the home screen. The Contacts app gives you access to the following
directories and lists:
• Corporate directory—a directory of the people in your company
CHAPTER 4
• Personal directory—a directory of your personal contacts. The directory is stored in the call control
system and you can access your personal directory from other phones in your phone network.
• Local contacts—a directory of your personal contacts that is stored in the phone memory.
• Favorites—a list of contacts that you regularly dial
Procedure
From the home screen, press the left arrow of the navigation cluster to select Contacts.
Corporate Directory
You can look up a coworker's number from your phone, which makes it easier to give them a call. Your
administrator sets up and maintains the directory.
Cisco Wireless IP Phone 8821 and 8821EX User Guide
43
Page 54

Search and Dial a Contact from the Corporate Directory
Search and Dial a Contact from the Corporate Directory
Procedure
Contacts
Step 1
Step 2
Step 3
Step 4
Step 5
Access the Contacts app.
Select Corporate directory.
Enter the search criteria
Press More and select Submit.
Press More and select Call.
Find Contact Information for a Coworker from Your Phone
Procedure
Step 1
Step 2
Step 3
Step 4
Step 5
Access the Contacts app.
Select Corporate directory.
Enter the search criteria
Press More and select Submit.
Press More and select Details.
Personal Directory
Use the personal directory to store the contact information for friends, family, or coworkers. You can add
your own contacts to the personal directory.
You can set up your personal directory from your phone or from the Self Care portal.
Sign In and Out of a Personal Directory
Before You Begin
Before you can sign in to your personal directory, you need your user ID and PIN. Contact your administrator
if you don't know this information.
Cisco Wireless IP Phone 8821 and 8821EX User Guide
44
Page 55

Contacts
Search for a Contact in Your Personal Directory
Procedure
Step 1
Step 2
Step 3
Step 4
Step 5
Access the Contacts app.
Select Personal directory.
Enter your user ID and PIN.
Press More and select Log in.
Press More and select Log out to sign out of your personal directory.
Search for a Contact in Your Personal Directory
Procedure
Step 1
Step 2
Step 3
Step 4
Access the Contacts app.
Select Personal directory.
Enter the search criteria.
(Optional) Select an entry and press Details.
Add a New Contact to Your Personal Directory
You can add a contact to your Personal Directory.
Procedure
Step 1
Step 2
Step 3
Step 4
Step 5
Access the Contacts app.
Select Personal Directory.
Press More and select Add new.
Enter the contact information.
Press More and select Save.
Cisco Wireless IP Phone 8821 and 8821EX User Guide
45
Page 56

Contacts
Find Contact Information for a Personal Directory Contact from Your Phone
Find Contact Information for a Personal Directory Contact from Your Phone
Procedure
Step 1
Step 2
Step 3
Step 4
Step 5
Access the Contacts app.
Select Personal Directory.
Select a contact.
Press Details.
Press More and select Details.
Edit a Contact in Your Personal Directory
Procedure
Step 1
Step 2
Step 3
Step 4
Step 5
Access the Contacts app.
Select Personal Directory.
Select a contact.
Press Details.
Press More and select Edit contact.
Call a Contact from Your Personal Directory
Procedure
Step 1
Step 2
Step 3
Step 4
Step 5
Cisco Wireless IP Phone 8821 and 8821EX User Guide
46
Access the Contacts app.
Select Personal Directory.
Select a contact.
Press Details.
Press More and select Call.
Page 57

Contacts
Remove a Contact from Your Personal Directory
Procedure
Remove a Contact from Your Personal Directory
Step 1
Step 2
Step 3
Step 4
Access the Contacts app.
Select Personal directory.
Search for a contact.
Press More and select Delete.
Local Contacts
You can create a list of local contacts. The local contacts list is stored in the phone memory.
Search for a Contact in Your Local Contacts List
Procedure
Step 1
Step 2
Step 3
Step 4
Access the Contacts app.
Select Local contacts.
Enter the search criteria.
(Optional) Select an entry and press Details.
Add a New Contact to Your Local Contacts List
You can add a contact to your Local Contacts list.
Procedure
Step 1
Step 2
Step 3
Step 4
Step 5
Access the Contacts app.
Select Local contacts.
Press More and select Add new.
Enter the contact information.
Press More and select Save.
Cisco Wireless IP Phone 8821 and 8821EX User Guide
47
Page 58

Find Contact Information for a Local Contact from Your Phone
Find Contact Information for a Local Contact from Your Phone
Procedure
Contacts
Step 1
Step 2
Step 3
Step 4
Access the Contacts app.
Select Local contacts.
Search for a contact.
Press More and select Deatils.
Edit a Contact in Your Local Contacts List
Procedure
Step 1
Step 2
Step 3
Step 4
Access the Contacts app.
Select Local contacts.
Search for a contact.
Press More and select Edit contact.
Call a Contact from Your Local Contacts List
Procedure
Step 1
Step 2
Step 3
Step 4
Step 5
Cisco Wireless IP Phone 8821 and 8821EX User Guide
48
Access the Contacts app.
Select Local contacts.
Select a contact.
Press Details.
Press More and select Call.
Page 59

Contacts
Remove a Contact from Your Local Contacts List
Procedure
Remove a Contact from Your Local Contacts List
Step 1
Step 2
Step 3
Step 4
Access the Contacts app.
Select Local contacts.
Search for a contact.
Press More and select Delete.
Remove all Local Contacts
Procedure
Step 1
Step 2
Step 3
Access the Contacts app.
Select Local contacts.
Press More and select Delete all.
Favorites
You can add frequently-called numbers to your favorites list, and assign a speed-dial code to the number.
Add a Contact to Your Favorites List
Before You Begin
The contact must exist in your local contacts list.
Procedure
Step 1
Step 2
Step 3
Step 4
Step 5
Step 6
Access the Contacts app.
Select Favorites.
Select an unassigned entry.
Press Assign.
Select a local contact.
Press Assign.
Cisco Wireless IP Phone 8821 and 8821EX User Guide
49
Page 60

Delete a Contact from Your Favorites List
Delete a Contact from Your Favorites List
Procedure
Contacts
Step 1
Step 2
Step 3
Step 4
Access the Contacts app.
Select Favorites.
Select an assigned entry.
Press More and select Unassign.
Cisco Wireless IP Phone 8821 and 8821EX User Guide
50
Page 61

Recent Calls
Access the Recents App, page 51
•
New Voicemail Message and Missed Calls Indicators, page 51
•
Voicemail List, page 51
•
Missed Calls List, page 52
•
Recents Calls List, page 54
•
Access the Recents App
You can access the Recents app from the home screen. From the Recents app, you can see your voicemail
messages, missed calls, and recent calls.
Procedure
CHAPTER 5
From the home screen, press the up arrow of the navigation cluster to select Recents .
New Voicemail Message and Missed Calls Indicators
In the home screen, you can see that you have new voicemail or missed calls. The red box on the Recents
icon on the home screen shows the number of unheard voicemail messages and missed calls.
In the Recents list, you can see the number of unheard voicemail messages and the number of missed calls.
When you have an unheard voicemail message, you could also hear a stutter tone played when you access a
phone line. This stutter tone is line-specific. You only hear it when using a line that has voice messages.
Voicemail List
???
Cisco Wireless IP Phone 8821 and 8821EX User Guide
51
Page 62

Access Your Voicemail Service
Access Your Voicemail Service
You can access the Voicemail service to hear your voicemail messages.
Procedure
Recent Calls
Step 1
Step 2
Access the Recents app.
Select Voicemail.
Missed Calls List
You use the Missed Calls lists to see the 150 most recent individual calls and call groups. If your phone has
multiple lines, your administrator can set up the Missed Calls list so that calls on all lines are in one list.
Calls in the Missed Calls list are grouped together if they are from the same number and are consecutive.
View Your Missed Calls
Procedure
Step 1
Step 2
Step 3
Access the Recents app.
Select Missed Calls.
Select a phone line or All missed.
Find Details About a Missed Call
Procedure
Step 1
Step 2
Step 3
Step 4
Step 5
Cisco Wireless IP Phone 8821 and 8821EX User Guide
52
Access the Recents app.
Select Missed Calls.
Select a line or All missed.
Select a missed call entry.
Press More and select Details.
Page 63

Recent Calls
Return a Missed Call
Procedure
Return a Missed Call
Step 1
Step 2
Step 3
Step 4
Step 5
Access the Recents app.
Select Missed Calls.
Select a line or All missed.
Select a missed call entry.
Press More and select Call.
Create a New Local Contact from a Missed Call Record
You can add the person associated with a missed call record to your local contacts list.
Procedure
Step 1
Step 2
Step 3
Step 4
Step 5
Access the Recents app.
Select Missed Calls.
Select a line or All missed.
Select a missed call entry.
Press More and select Create new local contact.
Delete a Missed Call Entry
You can delete an entry from your Missed Call list.
Procedure
Step 1
Step 2
Step 3
Step 4
Step 5
Step 6
Access the Recents app.
Select Missed Calls.
Select a line or All missed.
Select a missed call entry.
Press More and select Delete.
Press Yes to confirm the deletion.
Cisco Wireless IP Phone 8821 and 8821EX User Guide
53
Page 64

Clear the Missed Calls List
Clear the Missed Calls List
You can delete all entries from your Missed Call list.
Procedure
Recent Calls
Step 1
Step 2
Step 3
Step 4
Step 5
Access the Recents app.
Select Missed Calls.
Select a line or All missed.
Press More and select Clear list.
Press Yes to confirm the deletion.
Recents Calls List
You use the Recents lists to see the 150 most recent individual calls and call groups. If your phone has multiple
lines, your administrator can set up the Recents list so that calls on all lines are in one list.
Calls in the Recents list are grouped together if they are to and from the same number and are consecutive.
View Your Recent Calls
Procedure
Step 1
Step 2
Step 3
Access the Recents app.
Select Recents.
Select a line or All recents.
Cisco Wireless IP Phone 8821 and 8821EX User Guide
54
Page 65

Recent Calls
Find Details About a Recent Call
Procedure
Find Details About a Recent Call
Step 1
Step 2
Step 3
Step 4
Step 5
Access the Recents app.
Select Recents.
Select a line or All recents.
Select a call entry.
Press More and select Details.
Return a Recent Call from Recents
Procedure
Step 1
Step 2
Step 3
Step 4
Step 5
Access the Recents app.
Select Recents.
Select a line or All recents.
Select a call entry.
Press More and select Call.
Create a New Local Contact from a Recents Call Record
You can add the person associated with a Recents call record to your local contacts list.
Procedure
Step 1
Step 2
Step 3
Step 4
Step 5
Access the Recents app.
Select Recents.
Select a line or All recents.
Select a missed call entry.
Press More and select Create new local contact.
Cisco Wireless IP Phone 8821 and 8821EX User Guide
55
Page 66

Delete a Call Record
Delete a Call Record
You can delete an individual call from your Recent Calls list.
Procedure
Recent Calls
Step 1
Step 2
Step 3
Step 4
Step 5
Step 6
Access the Recents app.
Select Recents.
Select a line or All recents.
Select an entry.
Press More and select Delete.
Press Yes to confirm the deletion.
Clear the Recent Calls List
You can clear all the entries from your Recent Calls list.
Procedure
Step 1
Step 2
Step 3
Step 4
Step 5
Access the Recents app.
Select Recents.
Select a line or All recents.
Press More and select Clear List.
Press Yes to confirm the deletion.
Cisco Wireless IP Phone 8821 and 8821EX User Guide
56
Page 67

Applications
Apps and the Application Button, page 57
•
Use the Push to Talk Application, page 57
•
Apps and the Application Button
You can use the Apps app to access special services on the phone.
You can use the Application button to start applications such as Push to Talk or other services on your
phone. The Application button is located on the left side of the phone.
Depending on how your system administrator sets up the button, you may be able to use it from the main
screen only, or you may use it from any menu or service, or even when the phone is locked.
The button can also be configured to start an application immediately after you press it or only after you hold
it for several seconds.
For more information, contact your system administrator.
CHAPTER 6
Use the Push to Talk Application
You can use the Push to Talk service to communicate (similar to a two-way radio) with members of your
organization. Your administrator must set up the Push to Talk service, and then you must subscribe to the
service in the Self Care portal.
Your system administrator provides detailed information about how to use your Push to Talk service.Note
Procedure
Step 1
Step 2
From the home screen, select Apps .
Select Push to Talk.
Use Application to start and end a transmission depending on how your service is configured.
•
Cisco Wireless IP Phone 8821 and 8821EX User Guide
57
Page 68

Use the Push to Talk Application
Use Talk and Stop to send and receive audio.
•
Applications
Cisco Wireless IP Phone 8821 and 8821EX User Guide
58
Page 69

Settings
Access the Settings App, page 59
•
Adjust the Volume in a Call, page 70
•
Adjust the Ringtone Volume, page 70
•
Access the Settings App
You use the Settings app to set up, manage, and customize your phone.
Menu entries that are gray mean that your administrator has restricted access to the menu.
Procedure
From the home screen, press the down arrow of the navigation cluster to select Settings .
CHAPTER 7
Related Topics
Find Information About Your Phone, on page 79
Get Notified Before You Join a Call on a Shared Line, on page 42
Access Phone Settings
You can customize your phone from the Phone settings menu.
Procedure
Step 1
Step 2
Access the Settings app.
Select Phone settings.
Cisco Wireless IP Phone 8821 and 8821EX User Guide
59
Page 70

Access Phone Settings
Make the Phone Vibrate for an Incoming Call
You can set your phone to vibrate when you have an incoming call. The vibration can be set differently based
on whether you have the phone ringer turned off or on.
Procedure
Settings
Step 1
Step 2
Step 3
Step 4
Access the Settings app.
Select Phone settings > Sounds > Vibrate
Select Vibrate on ring and press On to set the phone to vibrate when the phone rings. Or, press Off so that
the phone does not vibrate when the phone rings.
Select Vibrate on silent and press On to set the phone to vibrate when the ringer is turned on. Or, press Off
so that the phone does not vibrate when the ringer is turned on.
Select Where You Hear the Ringtone
You can adjust where you hear the ringtone: in the headset only, in the speaker only, or in both the Headset
and the speaker.
Procedure
Step 1
Step 2
Step 3
Step 4
Access the Settings app.
Select Phone settings > Sounds > Ringer output
Select the setting required.
Press Set.
Change the Ringtone
You can change the sound that you hear for incoming calls and you can set a different ringtone for each phone
line.
Procedure
Step 1
Step 2
Step 3
Step 4
Step 5
Step 6
Cisco Wireless IP Phone 8821 and 8821EX User Guide
60
Access the Settings app.
Select Phone settings > Sounds > Ringtone
(Optional) Select a line.
Select a ringtone.
Press Play to hear the ringtone.
Press Set.
Page 71

Settings
Adjust the Headset Feedback
When you use a headset, you can hear your own voice in the earpiece, which is called headset sidetone or
headset feedback. You can control the amount of headset sidetone on your phone.
Procedure
Access Phone Settings
Step 1
Step 2
Step 3
Access the Settings app.
Select Phone settings > Sounds > Headset sidetone
Select one of the options.
Turn Off the Keypad Sounds
You can turn off the sounds on the keypad so that you don't hear sounds when you press a button.
Procedure
Step 1
Step 2
Step 3
Access the Settings app.
Select Phone settings > Sounds > Keypad tone
Press On to turn the tones on.
Adjust the Screen Brightness
You can adjust the brightness of the phone display.
Procedure
Step 1
Step 2
Step 3
Step 4
Access the Settings app.
Select Phone settings > Display > Brightness
Use the arrow keys of the Navigation cluster to adjust the brightness.
Press Save.
Change the Font Size
You can adjust the font size used on the phone screen. If you set the font size smaller, more text displays on
the screen. If you set the font size larger, less text displays on the screen.
Cisco Wireless IP Phone 8821 and 8821EX User Guide
61
Page 72

Access Phone Settings
Procedure
Settings
Step 1
Step 2
Step 3
Access the Settings app.
Select Phone settings > Display > Font size
Select the setting required.
Control the LED Indicator Light
Procedure
Step 1
Step 2
Step 3
Access the Settings app.
Select Phone settings > LED coverage indicator
Press Off to turn off the indicator.
Change the Screen Display Timeout
You can set up your phone to turn off the screen after a specific period of inactivity. When you turn off the
screen, the phone uses less battery power.
Procedure
Step 1
Step 2
Step 3
Access the Settings app.
Select Phone settings > Display > Sleep.
Choose the setting required.
Related Topics
Turn Off Your Phone, on page 4
Change the Wallpaper
You can change the wallpaper (background) for your phone. But, you must be careful that the wallpaper you
select. You should avoid wallpapers that will not clearly show white text.
The following wallpapers are not suitable for the phone:
Whale tail
•
Green leaves
•
Beach scene
•
Cisco Wireless IP Phone 8821 and 8821EX User Guide
62
Page 73

Settings
Wheat field
•
Procedure
Access Phone Settings
Step 1
Step 2
Step 3
Step 4
Step 5
Access the Settings app.
Select Phone settings > Display > Wallpaper
Select a wallpaper.
Press Preview to view the wallpaper.
Press Save.
Automatically Lock the Keypad
You can set the keypad to automatically lock. If you set the phone to automatically lock the keypad, the keypad
locks when the phone screen turns off.
Procedure
Step 1
Step 2
Step 3
Access the Settings app.
Select Phone settings > Keypad > Auto lock
Press On.
Related Topics
Lock the Phone Keypad, on page 4
Date and Time Settings
You can manage some of the date and time settings on your phone. Typically, the phone automatically sets
the date, time, and time zone using the information from the call control system. But, you may need to override
the automatic settings.
Control the Date and Time Manually
When the phone date and time is controlled manually, you can change the following settings:
Automatic time zone
•
Time
•
Date
•
Time zone
•
12- or 24-hour date format
•
Cisco Wireless IP Phone 8821 and 8821EX User Guide
63
Page 74

Access Phone Settings
Procedure
Date format
•
Settings
Step 1
Step 2
Step 3
Step 4
Access the Settings app.
Select Phone settings > Date and Time
Select Automatic date and time.
Press Off.
Control the Date and Time Automatically
When the phone date and time is controlled automatically, you can change the following settings:
Automatic time zone
•
Procedure
Step 1
Step 2
Step 3
Step 4
Access the Settings app.
Select Phone settings > Date and Time
Select Automatic date and time.
Press On.
Set the Time Zone Automatically
You can set up your phone to automatically or manually set the time zone. When the Automatic time zone
field is set to On, you cannot change the time zone that your phone uses. When the Automatic time zone field
is set to Off, you can set the time zone that your phone uses.
Procedure
Step 1
Step 2
Step 3
Step 4
Access the Settings app.
Select Phone settings > Date and Time > Automatic time zone
Press Off to enable you to set the time zone manually.
Press Set.
Cisco Wireless IP Phone 8821 and 8821EX User Guide
64
Page 75

Settings
Set the Time
Access Phone Settings
Procedure
Step 1
Step 2
Step 3
Step 4
Set the Date
Step 1
Step 2
Step 3
Step 4
Set Time Zone
Access the Settings app.
Select Phone settings > Date and Time > Time
Enter the time using the keypad. Use the right and left navigation keys to move between the fields.
Press Set.
You can set the date
Procedure
Access the Settings app.
Select Phone settings > Date and Time > Date
Enter the date using the keypad. Use the right and left navigation keys to move between the fields.
Press Set.
Step 1
Step 2
Step 3
Step 4
You can set the time zone.
Procedure
Access the Settings app.
Select Phone settings > Date and Time > Time zone
Select the correct time zone.
Press Set.
Cisco Wireless IP Phone 8821 and 8821EX User Guide
65
Page 76

Access Wi-Fi Settings
Use a 12-Hour or 24-Hour Clock
Procedure
Settings
Step 1
Step 2
Step 3
Step 4
Access the Settings app.
Select Phone settings > Date and Time
Select Use 24-hour format.
Press Off for 12-hour format or press On for 24-hour format.
Set the Date Format
You can set your phone to display the date in one of the preset formats.
Procedure
Step 1
Step 2
Step 3
Step 4
Access the Settings app.
Select Phone settings > Date and Time > Date format
Select the required format.
Press Set.
Access Wi-Fi Settings
You access the Wi-Fi menu to set up wireless connections to your phone.
Your administrator may restrict access to this menu.
Procedure
Step 1
Step 2
Cisco Wireless IP Phone 8821 and 8821EX User Guide
66
Access the Settings app.
Select Wi-Fi.
Page 77

Settings
Access Bluetooth Settings
Procedure
Access Bluetooth Settings
Step 1
Step 2
Access the Settings app.
Select Bluetooth.
Related Topics
Bluetooth Headsets, on page 72
Bluetooth and Your Phone, on page 12
Turn On Bluetooth
Before you can use Bluetooth, you must turn on the ability for the phone to use Bluetooth.
When you use Bluetooth, your phone battery has less talk time.Note
Procedure
Step 1
Step 2
Step 3
Access the Settings app.
Select Bluetooth > Bluetooth.
Press On.
Add a New Bluetooth Device
You can add up to x Bluetooth devices.
Before You Begin
Bluetooth must be turned on.
Procedure
Step 1
Step 2
Step 3
Step 4
Make sure that the Bluetooth device is discoverable.
Access the Settings app.
Select Bluetooth.
Select Add Bluetooth device.
Cisco Wireless IP Phone 8821 and 8821EX User Guide
67
Page 78

Access Bluetooth Settings
The phone searches for any Bluetooth devices in range. This scan can take a couple of minutes.
Step 5
Step 6
Select a device from the list and press Pair.
(Optional) Enter the passkey for the device.
Connect a Bluetooth Device
After you pair and connect a Bluetooth device to your phone, the device automatically connects when it is
turned on and close to your phone. Only one Bluetooth device can be connected to the phone. But, if you have
two Bluetooth devices turned on, the phone uses the most recently connected device. You can change which
device the phone uses.
Before You Begin
Bluetooth must be turned on and the device needs to be already added to the Bluetooth device list.
Procedure
Settings
Step 1
Step 2
Step 3
Step 4
Access the Settings app.
Select Bluetooth.
Select a device from the list.
Press More and select Connect.
Rename a Bluetooth Device
Procedure
Step 1
Step 2
Step 3
Step 4
Access the Settings app.
Select Bluetooth.
Select a device from the list.
Press More and select Rename.
Cisco Wireless IP Phone 8821 and 8821EX User Guide
68
Page 79

Settings
Disconnect Bluetooth Device
Procedure
Access Admin Settings
Step 1
Step 2
Step 3
Step 4
Access the Settings app.
Select Bluetooth.
Select a device from the list.
Press More and select Disconnect.
Delete a Bluetooth Device
Procedure
Step 1
Step 2
Step 3
Step 4
Access the Settings app.
Select Bluetooth.
Select a device from the list.
Press More and select Delete.
Access Admin Settings
Step 1
Step 2
Your administrator may restrict access to this menu. For information about this menu, see the Cisco Wireless
IP Phone 8821 and 8821EX Administration Guide.
Procedure
Access the Settings app.
Select Admin Settings.
Cisco Wireless IP Phone 8821 and 8821EX User Guide
69
Page 80

Adjust the Volume in a Call
Adjust the Volume in a Call
Procedure
Press Volume up and down to adjust the phone, headset, or speakerphone volume when the phone is in
use.
Adjust the Ringtone Volume
Procedure
Settings
Press Volume up and down to adjust the ringer volume when the phone is not in use.
Cisco Wireless IP Phone 8821 and 8821EX User Guide
70
Page 81

Accessories
Supported Accessories, page 71
•
Headsets, page 71
•
Cisco Wireless IP Phone 8821 Desktop Charger, page 72
•
Cisco Wireless IP Phone 8821 Multicharger, page 74
•
Secure the Charger with a Cable Lock, page 75
•
Supported Accessories
The phones support the following accessories:
Headsets:
•
Standard headsets that use a 2.5 mm jack
◦
CHAPTER 8
Headsets
Bluetooth headsets
◦
Desktop charger
•
Multicharger
•
For more information on other accessories, see the Cisco Wireless IP Phone 882x Series Accessory Guide.
You can use wired and Bluetooth headsets with your phone. For information about the supported headsets,
see the Cisco Wireless IP Phone 8821 Series Accessory Guide.
Although Cisco performs some internal testing of third-party wired and Bluetooth wireless headsets for use
with the Cisco Wireless IP Phone 8821 and 8821EX, Cisco does not certify or support products from headset
or handset vendors. Because of the inherent environmental and hardware inconsistencies in the locations
where phones are deployed, there is not a single “best” solution that is optimal for all environments. We
recommend that customers test the headsets that work best in their environment before deploying a large
number of units in their network.
Cisco Wireless IP Phone 8821 and 8821EX User Guide
71
Page 82

Standard Headsets
We recommend the use of good quality external devices, like headsets that are screened against unwanted
radio frequency (RF) and audio frequency (AF) signals. Depending on the quality of these devices and their
proximity to other devices such as cell phones and two-way radios, some audio noise may still occur.
The primary reason that a particular headset would be inappropriate for the phone is the potential for an audible
hum. This hum can be heard by either the remote party or by both the remote party and you, the phone user.
Some potential humming or buzzing sounds can be caused by a range of outside sources, for example, electric
lights, electric motors, or large PC monitors. In some instances, the mechanics or electronics of various headsets
can cause remote parties to hear an echo of their own voice when they speak to phone users.
Related Topics
Make a Call with a Headset, on page 24
Standard Headsets
You can use a wired headset with your phone. The headset requires a 2.5 mm, 3-band, 4-connector plug.
If you plug a headset into the phone during an active call, the audio path automatically changes to the headset.
Accessories
Bluetooth Headsets
You can use a Bluetooth headset with your phone.
Using Bluetooth wireless headsets likely increases battery power consumption on your phone and may result
in reducing battery life.
For a Bluetooth wireless headset to work, it does not need to be within direct line-of-sight of the phone, but
some barriers, such as walls or doors, and interference from other electronic devices, can affect the connection.
Related Topics
Access Bluetooth Settings, on page 67
Bluetooth and Your Phone, on page 12
Cisco Wireless IP Phone 8821 Desktop Charger
You can use the Cisco Wireless IP Phone 8821 Desktop Charger to charge your phone and spare phone battery.
The charger has these features:
Works on line power or from a charged spare phone battery.
•
Contains a speakerphone that the docked phone can use.
•
The phone volume buttons control the volume of the speakerphone
◦
The charger has a Mute button built into it on the lower right corner. When the speakerphone is
◦
muted, the Mute button lights red.
Charges the docked phone battery.
•
If the phone is turned on when you put it into the charger, the LED on the top of the phone lights
◦
red and you see a message on the screen.
Cisco Wireless IP Phone 8821 and 8821EX User Guide
72
Page 83

Accessories
Set Up the Desktop Charger
If the phone is turned off or the battery is too weak when you put the phone into the charger, the
◦
LED on the top of the phone lights red and you see a power plug displayed on the screen.
You do not need to remove the phone from its case.
◦
Charges a spare battery in the additional charging port behind the main phone charging port.
•
To the right of the phone is the Battery LED.
◦
The Battery LED lights red while the charger recharges the spare battery.
◦
The Battery LED lights green when the spare battery is fully charged.
◦
Can be secured with a standard laptop cable lock.
•
Provides a USB port to connect your phone to the Ethernet to install certificates. For more information
•
on using the USB port, see Cisco Wireless IP Phone 8821 and 8821EX Administration Guide.
Do not attempt to use the USB port to provide power to the desktop charger.Note
Set Up the Desktop Charger
You should place the desktop charger on a stable work surface.
Before You Begin
You need the cable that is provided with the charger. This cable has a plug on one end and a USB connector
on the other end.
You need the power adapter that comes with the phone.
Procedure
Step 1
Step 2
Plug the plug end of the cable into the desktop charger.
Plug the USB end of the cable into the power adapter and plug the power adapter into the electrical outlet.
Charge Your Phone with the Desktop Charger
When the phone is charging, the LED on the top of the phone lights red, and a message or icon displays on
the phone screen. When the battery is fully charged, the LED turns off.
If your phone has a protective case, you don't need to remove the case before you charge the phone in the
desktop charger. You adapt the charger to fit the phone.
The bottom of the phone has charging pins that need to be aligned with the connector in the bottom of the
charger cradle. When the phone is correctly placed in the charger, it is held in place with magnets.
Cisco Wireless IP Phone 8821 and 8821EX User Guide
73
Page 84

Charge Your Spare Battery with the Desktop Charger
Procedure
Accessories
Step 1
Step 2
Step 3
Step 4
(Optional) Use a thin screwdriver to pry out the charging cup if your phone is in a protective case.
Place your phone in the charging slot with the screen facing towards you.
Make sure that the LED on the phone lights red. If the LED does not light up, remove the phone and reinsert
it into the charger.
When you remove the phone from the charger, lift the phone forward and up to disconnect the connecter from
the magnets.
(Optional) Slide the charging cup into the charger so that the cup is flush with the charger.
Charge Your Spare Battery with the Desktop Charger
You can charge a spare battery in the desktop charger.
When the battery is charging, the spare battery LED on the charger lights red. When the battery is charged,
the spare battery LED on the charger lights green.
Procedure
Step 1
Step 2
Hold the battery so that the Cisco label faces you, and the arrows on the battery point down.
Place the spare battery in the slot behind the phone cradle and press down firmly.
Cisco Wireless IP Phone 8821 Multicharger
The Cisco Wireless IP Phone 8821 Multicharger can charge up to six phones and six spare batteries at the
same time.
The multicharger can be placed on a work surface or mounted on a wall with the wall mount kit. You can
also secure the multicharger with a standard laptop cable lock.
Set Up the Multicharger
Procedure
Step 1
Step 2
Step 3
Cisco Wireless IP Phone 8821 and 8821EX User Guide
74
Plug the jack end of the power cord into the multicharger.
Plug the other end of the power cord into the electrical outlet.
Place the multicharger on a stable work surface.
Page 85

Accessories
Charge Your Phone with the Multicharger
When the phone is charging, the LED beside the phone lights red. When the battery is fully charged, the LED
turns off.
If your phone has a protective case, you don't need to remove the case before you charge the phone in the
multicharger. You adapt the multicharger to fit the phone.
The bottom of the phone has charging pins that need to be aligned with the connector in the bottom of the
multicharger cradle.
Procedure
Charge Your Phone with the Multicharger
Step 1
Step 2
Step 3
Step 4
(Optional) Use a thin screwdriver to pry out the charging cup if your phone is in a protective case.
Place your phone in the empty charging slot.
Make sure that the LED on the phone lights red. If the LED does not light up, remove the phone and reinsert
it into the multicharger.
When you remove the phone from the multicharger, lift the phone forward and up to disconnect the connecter
from the magnets.
(Optional) Slide the charging cup into the multicharger so that the cup is flush with the multicharger.
Charge Your Spare Battery with the Multicharger
You can charge a spare battery in the multicharger.
When the battery is charging, the Battery LED beside the battery lights red. When the battery is charged, the
Battery LED lights green.
Procedure
Place the battery in an empty spare battery slot, aligning the battery contacts with the charger connecter.
If the Battery LED does not light red, remove the battery and reinsert it into the battery slot.
Secure the Charger with a Cable Lock
You can secure your desktop charger with a laptop cable lock up to 20 mm wide.
Cisco Wireless IP Phone 8821 and 8821EX User Guide
75
Page 86

Secure the Charger with a Cable Lock
Procedure
Accessories
Step 1
Step 2
Step 3
Step 4
Step 5
Step 6
Take the looped end of the cable lock and wrap it around the object to which you want to secure your phone.
Pass the lock through the looped end of the cable.
Unlock the cable lock.
Press and hold the locking button to align the locking teeth.
Insert the cable lock into the lock slot of your desktop charger and release the locking button.
Lock the cable lock.
Cisco Wireless IP Phone 8821 and 8821EX User Guide
76
Page 87

Troubleshooting
General Troubleshooting, page 77
•
Find Information About Your Phone, page 79
•
Hardware Diagnostics, page 79
•
Get a List of Neighbors, page 82
•
General Troubleshooting
You can troubleshoot some general problems with your phone. If your problem is not discussed below, contact
your administrator.
CHAPTER 9
ExplanationSymptom
You cannot complete a call
One or more of the following factors might apply:
Your phone is out of the wireless network access point service
•
area.
Note
You must log in to the Extension Mobility service.
•
You must enter a client matter code or forced authorization
•
code after you dial a number.
Your phone has time-of-day restrictions that prevent you from
•
using some features during certain hours of the day.
When roaming with your phone, a green blinking
light indicates that the phone is still within the
wireless service coverage area.
Cisco Wireless IP Phone 8821 and 8821EX User Guide
77
Page 88

General Troubleshooting
Troubleshooting
ExplanationSymptom
The main screen is not active
The Settings menu is unresponsive
Conference fails
One of these messages appears on the status line:
Network busy: Not enough available bandwidth exists in
•
wireless network to complete this call. Try again later.
Leaving service area: Phone is out of range of its
•
associated access point and wireless network.
Locating network services: Phone is searching for
•
a wireless network access point.
Authentication failed: Authentication server did
•
not accept the security credentials.
Configuring IP: Phone is waiting for DHCP to assign
•
an IP address.
Your administrator might have disabled access to the Settings app
on your phone.
Conference requires multiple selected calls. Be sure that you have
selected at least one call in addition to the active call, which is
selected automatically. Conference also requires the selected calls
to be on the same line. If necessary, transfer calls to one line before
joining them.
The softkey that you want to use does
not appear
Barge fails and results in a fast busy
tone
You are disconnected from a call that
you joined using Barge
One or more of the following factors might apply:
•
You must press More to reveal additional functions.
You must change the line state (for example, place a call or
•
have a connected call).
Your phone is not configured to support the feature associated
•
with that softkey.
One or more of the following factors might apply:
You cannot barge an encrypted call if the phone you are using
•
is not configured for encryption. When your barge attempt
fails for this reason, your phone plays a fast busy tone.
You cannot barge a call on another Cisco Wireless IP Phone.
•
You are disconnected from a call that you joined using Barge if
the call is put on hold, transferred, or turned into a conference call.
The other party might have call forwarding enabled.Call back fails
Cisco Wireless IP Phone 8821 and 8821EX User Guide
78
Page 89

Troubleshooting
Find Information About Your Phone
ExplanationSymptom
The phone shows an error message
when you attempt to set up Call
Forward All
Your phone may reject your attempt to set up Call Forward All
directly on the phone if the target number that you enter would
create a Call Forward All loop or would exceed the maximum
number of links permitted in a Call Forward All chain (also known
as a maximum hop count).
Find Information About Your Phone
Your administrator may ask for information about your phone. This information uniquely identifies the phone
for troubleshooting purposes. The information in the menu is read-only. For more information about the menu,
see the Cisco Wireless IP Phone 8821 and 8821EX Administration Guide.
Procedure
Step 1
Step 2
Access the Settings app.
Select Phone information.
Hardware Diagnostics
You can run some diagnostic tests on your phone.
Perform Audio Diagnostics
You can check that the audio on your phone is working correctly.
Procedure
Step 1
Step 2
Step 3
Perform Keypad Diagnostics
Access the Settings app.
Select Admin settings > Diagnostics > Audio.
now what?
You can check that the keypad on your phone is working correctly.
Cisco Wireless IP Phone 8821 and 8821EX User Guide
79
Page 90

Perform WLAN Diagnostics
Procedure
Troubleshooting
Step 1
Step 2
Step 3
Access the Settings app.
Select Admin settings > Diagnostics > Keypad.
Press any key to check if it works correctly.
Perform WLAN Diagnostics
You can check the Wi-Fi connection for your phone.
Procedure
Step 1
Step 2
Step 3
WLAN Diagnostics Fields
Access the Settings app.
Select Admin settings > Diagnostics > WLAN.
Select an access point.
The phone lists the access points in order, from the strongest signal to the weakest or offline access point.
The following table describes the fields in the WLAN Diagnostics screen.
DescriptionField
AP name
BSSID
SSID
Last RSSI
Beacon interval
Capability
Name of the access point (AP) to which the phone is
associated
The Service Set Identifier (SSID) that the phone is
using.
The frequency that the phone is using.Frequency
The channel that the phone is using.Current channel
Last Received Signal Strength Indicator (RSSI) that
the phone received.
Number of time units between beasona. A time unit
is 1.024 milliseconds.
Cisco Wireless IP Phone 8821 and 8821EX User Guide
80
Page 91

Troubleshooting
Perform WLAN Diagnostics
DescriptionField
Basic rates
Optional rates
Supported HT MCS
Supported VHT (rx) rates
Supported VHT (tx) rates
DTIM period
Country code
Power constraint
Power limit
Data rates required by the AP at which the station
must be capable of operating.
Data rates supported by the AP that are optional for
the station to operate at.
A two-digit country code. Country information might
not be displayed if the country information element
(IE) is not present in the beacon.
List of supported channels (from the country IE).Channels
Channel utilization
Station count
Admission capacity
UAPSD supported
Proxy ARP
Percentage of time, normalized to 255, in which the
AP sensed the medium was busy, as indicated by the
physical or virtual carrier sense (CS) mechanism.
Total number of spanning tree algorithms (STAs)
currently associated with this BSS.
An unsigned integer that specifies the remaining
amount of medium time available through explicit
admission control, in units of 32 microseconds per
second.
Support for Wi-Fi Multimedia Extensions.WMM supported
Unscheduled Automatic Power Save Delivery
(UAPSD) is supported by the AP. May only be
available if WMM is supported. This feature is critical
to talk time and achieving maximum call density on
the wireless IP phone.
CCX-compliant AP supports responding to IP ARP
requests on behalf of the associated station. This
feature is critical to standby time on the wireless IP
phone.
Cisco Wireless IP Phone 8821 and 8821EX User Guide
81
Page 92

Get a List of Neighbors
Troubleshooting
DescriptionField
Version of CCX if the AP is CCX compliant.CCX version
AC: Best effort, AC: Background, AC: Video, and
AC: Audio
Admission control
•
AIFSN
•
ECWMin
•
ECWMax
•
TXOpLimit
•
Access Category information for each AC (one set
for best effort, background, video, and audio):
• Admission control—If yes, admission control
must be used prior to transmission using the
access parameters specific for this AC.
• AIFSN—Number of slots after an SIFS duration
a non-AP STA should defer before invoking a
backoff or starting a transmission.
• ECWMin—Encodes value of CWmin in an
exponent form to provide the minimum amount
of time in a random backoff.
• ECWMax—Encodes value of CWmax in an
exponent form to provide the maximum amount
of time in a random backoff.
• TXOpLimit—Interval of time in which a
particular quality of service (QoS) station has
the right to initiate
Get a List of Neighbors
You can see a list of all available access points (neighbors). The phone shows the active access point as the
first in the list of neighbors.
Procedure
Step 1
Step 2
Step 3
Neighbor List Fields
Access the Settings app.
Select Admin settings > Neighbor list.
(Optional) Select an entry to see the details of the neighbor.
The following table describes the fields in the Neighbor list screen.
DescriptionField
Name of the access pointAP name
Cisco Wireless IP Phone 8821 and 8821EX User Guide
82
Page 93

Troubleshooting
Neighbor List Fields
DescriptionField
BSSID
Service Set Identifier (SSID) for the access pointSSID
Access point channelChannel
Received Signal Strength Indicator (RSSI) for the access pointRSSI
CU
Cisco Wireless IP Phone 8821 and 8821EX User Guide
83
Page 94

Neighbor List Fields
Troubleshooting
Cisco Wireless IP Phone 8821 and 8821EX User Guide
84
Page 95

Product Safety and Security
Safety and Performance Information, page 85
•
Compliance Statements, page 90
•
Cisco Product Security Overview, page 95
•
Important Online Information, page 95
•
Safety and Performance Information
Read the following safety notices before installing or using your wireless IP phone.
CHAPTER 10
Warning
Warning
IMPORTANT SAFETY INSTRUCTIONS
This warning symbol means danger. You are in a situation that could cause bodily injury. Before you
work on any equipment, be aware of the hazards involved with electrical circuitry and be familiar with
standard practices for preventing accidents. Use the statement number provided at the end of each warning
to locate its translation in the translated safety warnings that accompanied this device. Statement 1071
SAVE THESE INSTRUCTIONS
To see translations of the warnings that appear in this publication, refer to the statement number in the
Regulatory Compliance and Safety Information for the Cisco Wireless IP Phone 8821 Series and Peripheral
Devices at the following URL: http://www.cisco.com/c/dam/en/us/td/docs/voice_ip_comm/cuipph/882x/
english/RCSI/RCSI-0266-book.pdf
Read the installation instructions before connecting the system to the power source. Statement 1004Warning
Voice over IP (VoIP) service and the emergency calling service do not function if power fails or is disrupted.
After power is restored, you might have to reset or reconfigure equipment to regain access to VoIP and
the emergency calling service. In the USA, this emergency number is 911. You need to be aware of the
emergency number in your country. Statement 361
Cisco Wireless IP Phone 8821 and 8821EX User Guide
85
Page 96

Safety Guidelines
Product Safety and Security
Warning
Warning
Ultimate disposal of this product should be handled according to all national laws and regulations. Statement
1040
The plug-socket combination must be accessible at all times because it serves as the main disconnecting
device. Statement 1019
Safety Guidelines
The following are safety guidelines for using the Cisco Wireless IP Phone 882x Series in specific environments:
Do not use this product as the primary communications tool in healthcare environments, as it may use
•
an unregulated frequency band that is susceptible to interference from other devices or equipment.
The use of wireless devices in hospitals is restricted to the limits set forth by each hospital.
•
The use of wireless devices in hazardous locations is limited to the constraints posed by the safety
•
directors of such environments.
The use of wireless devices on airplanes is governed by the Federal Aviation Administration (FAA).
•
Battery Safety Notices
Warning
Caution
These battery safety notices apply to the batteries that are approved by the Cisco Wireless IP Phone
manufacturer.
There is the danger of explosion if the battery is replaced incorrectly. Replace the battery only with the
same or equivalent type recommended by the manufacturer. Dispose of used batteries according to the
manufacturer’s instructions. Statement 1015
Do not touch or bridge the metal contacts on the battery. Unintentional discharge of the batteries can cause
serious burns. Statement 341
Explosion Hazard: Do not charge the phone battery in a potentially explosive environment.Warning
Cisco Wireless IP Phone 8821 and 8821EX User Guide
86
Page 97

Product Safety and Security
Battery Safety Notices
Caution
Do not dispose of the battery pack in fire or water. The battery may explode if placed in a fire.
•
Do not disassemble, crush, puncture, or incinerate the battery pack.
•
Handle a damaged or leaking battery with extreme care. If you come in contact with the electrolyte,
•
wash the exposed area with soap and water. If the electrolyte has come in contact with the eye, flush
the eye with water for 15 minutes and seek medical attention.
Do not charge the battery pack if the ambient temperature exceeds 104 degrees Fahrenheit (40 degrees
•
Celsius).
Do not expose the battery pack to high storage temperatures (above 140 degrees Fahrenheit, 60
•
degrees Celsius).
When discarding a battery pack, contact your local waste disposal provider regarding local restrictions
•
on the disposal or recycling of batteries.
To obtain a battery, contact your local dealer. Use only the batteries that have a Cisco part number.
Battery
CP-BATT-8821=
Use only the Cisco power supply that is compatible with your phone. To order your power supply, contact
your local dealer and refer to the list of Cisco part numbers.
Argentina
CP-PWR-8821-AR=
Australia
CP-PWR-8821-AU=
Brazil
CP-PWR-8821-BZ=
Europe
CP-PWR-8821-CE=
Korea
CP-PWR-8821-KR=
Japan
CP-PWR-8821-JP=
Switzerland
CP-PWR-8821-SW=
North America
CP-PWR-8821-NA=
Cisco Wireless IP Phone 8821 and 8821EX User Guide
87
Page 98

Hazardous Environments
United Kingdom
Product Safety and Security
CP-PWR-8821-UK=
Note
The battery and power supply are not provided with your phone. To order the battery and power supply,
contact your local dealer.
Hazardous Environments
Note
The Cisco Wireless IP Phone 8821EX is ATEX Class 1 Zone 2 and CSA Class 1 Division 2 certified equipment.
This means the phone can be operated in an area in which an explosive gas atmosphere is not likely to occur
in normal operation and if it does occur, is likely to do so only infrequently and will exist for a short period
only.
Explosion Hazard: Do not charge the phone battery in a potentially explosive atmosphere.
Power Outage
The ability to access emergency service through the phone depends on the wireless access point being powered.
If there is an interruption in the power supply, Service and Emergency Calling Service dialing will not function
until power is restored. In the case of a power failure or disruption, you may need to reset or reconfigure
equipment before using the Service or Emergency Calling Service dialing.
Regulatory Domains
The radio frequency (RF) for this phone is configured for a specific regulatory domain. If you use this phone
outside of the specific regulatory domain, the phone will not function properly, and you might violate local
regulations.
Health-Care Environments
This product is not a medical device and uses an unlicensed frequency band that is susceptible to interference
from other devices or equipment.
External Devices Usage
The following information applies when you use external devices with the wireless phone.
Cisco recommends the use of good quality external devices (such as headsets) that are shielded against
unwanted radio frequency (RF) and audio frequency (AF) signals.
Cisco Wireless IP Phone 8821 and 8821EX User Guide
88
Page 99

Product Safety and Security
Depending on the quality of these devices and their proximity to other devices such as mobile phones or
two-way radios, some audio noise may still occur. In these cases, Cisco recommends that you take one or
more of the following actions:
Cisco cannot guarantee the performance of the system because Cisco has no control over the quality of external
devices, cables, and connectors. The system will perform adequately when suitable devices are attached using
good quality cables and connectors.
Phone Behavior During Times of Network Congestion
Move the external device away from the source of the RF or AF signals.
•
Route the external device cables away from the source of the RF or AF signals.
•
Use shielded cables for the external device, or use cables with a better shield and connector.
•
Shorten the length of the external device cable.
•
Apply ferrites or other such devices on the cables for the external device.
•
Caution
In European Union countries, use only external headsets that are fully compliant with the EMC Directive
[89/336/EC].
Phone Behavior During Times of Network Congestion
Anything that degrades network performance can affect Cisco IP Phone voice and video quality, and in some
cases, can cause a call to drop. Sources of network degradation can include, but are not limited to, the following
activities:
Administrative tasks, such as an internal port scan or security scan
•
Attacks that occur on your network, such as a Denial of Service attack
•
SAR
This product's SAR value meets applicable national SAR limits
of 1.6W/kg. The specific values can be found in the product
datasheet.
When carrying the product or using it while worn on your body,
either use an approved accessory such as a holster or otherwise
maintain a distance of 5 cm from the body to ensure compliance
with RF exposure requirements. Note that the product may be
transmitting even if you are not making a phone call.
Cisco Wireless IP Phone 8821 and 8821EX User Guide
89
Page 100

Compliance Statements
Compliance Statements
Compliance Statements for the European Union
CE Marking
For the Cisco Wireless IP Phone 882x Series, the following CE mark and class-2 identifier are affixed to the
equipment and packaging:
Product Safety and Security
RF Exposure Statement for the European Union
This device has been evaluated and found compliant in accordance with EU EMF Directive 1999/519/EC.
Compliance Statements for the USA
SAR Statement
The Cisco Wireless IP Phone 782x Series handsets have been tested for body-worn Specific Absorption Rate
(SAR) compliance using the specific belt-clip/holster configuration provided with the handset. The FCC has
established the detailed body-worn SAR requirements and has established that these requirements have been
met with the specific belt-clip/holster provided with the handset. Other belt-clip/holsters or similar accessories
that have not been tested may not comply and therefore should be avoided.
RF Exposure Information
The radio module has been evaluated under FCC Bulletin OET 65C (01-01) and found to be compliant to the
requirements as set forth in 47 CFR Sections 2.1091, 2.1093, and 15.247 (b) (4) addressing RF Exposure from
radio frequency devices. This model meets the applicable government requirements for exposure to radio
frequency waves.
This wireless phone contains a radio transceiver. The radio transceiver and antenna have been designed to
meet the RF emission requirements for human exposure as specified by the FCC as well as by other agencies
from other countries. These guidelines were developed by the industry based on guidance from the World
Health Organization (WHO). These industry standards have been developed to include additional safety
margins to ensure that the user is exposed to the least amount of RF radiation.
The radio transceiver uses a non ionization type of radiation as opposed to an ionized radiation such as an
X-Ray wave.
Cisco Wireless IP Phone 8821 and 8821EX User Guide
90
 Loading...