

Page 1
Cisco 827-4V Router Conguration
With SIP for Go2Call Service
This le provides instructions for setting up Cisco 827-4V Router and SIP for Go2Call service.
The following example uses Cisco 827-4V gateway with four FXS/FXO ports and SIP protocol. Prior to
the conguration, you must obtain:
-IP address and Internet service from your local ISP provider
-Account with Go2Call and up to 4 different PIN number
-Cisco 827-4V with all necessary voice cards and modules
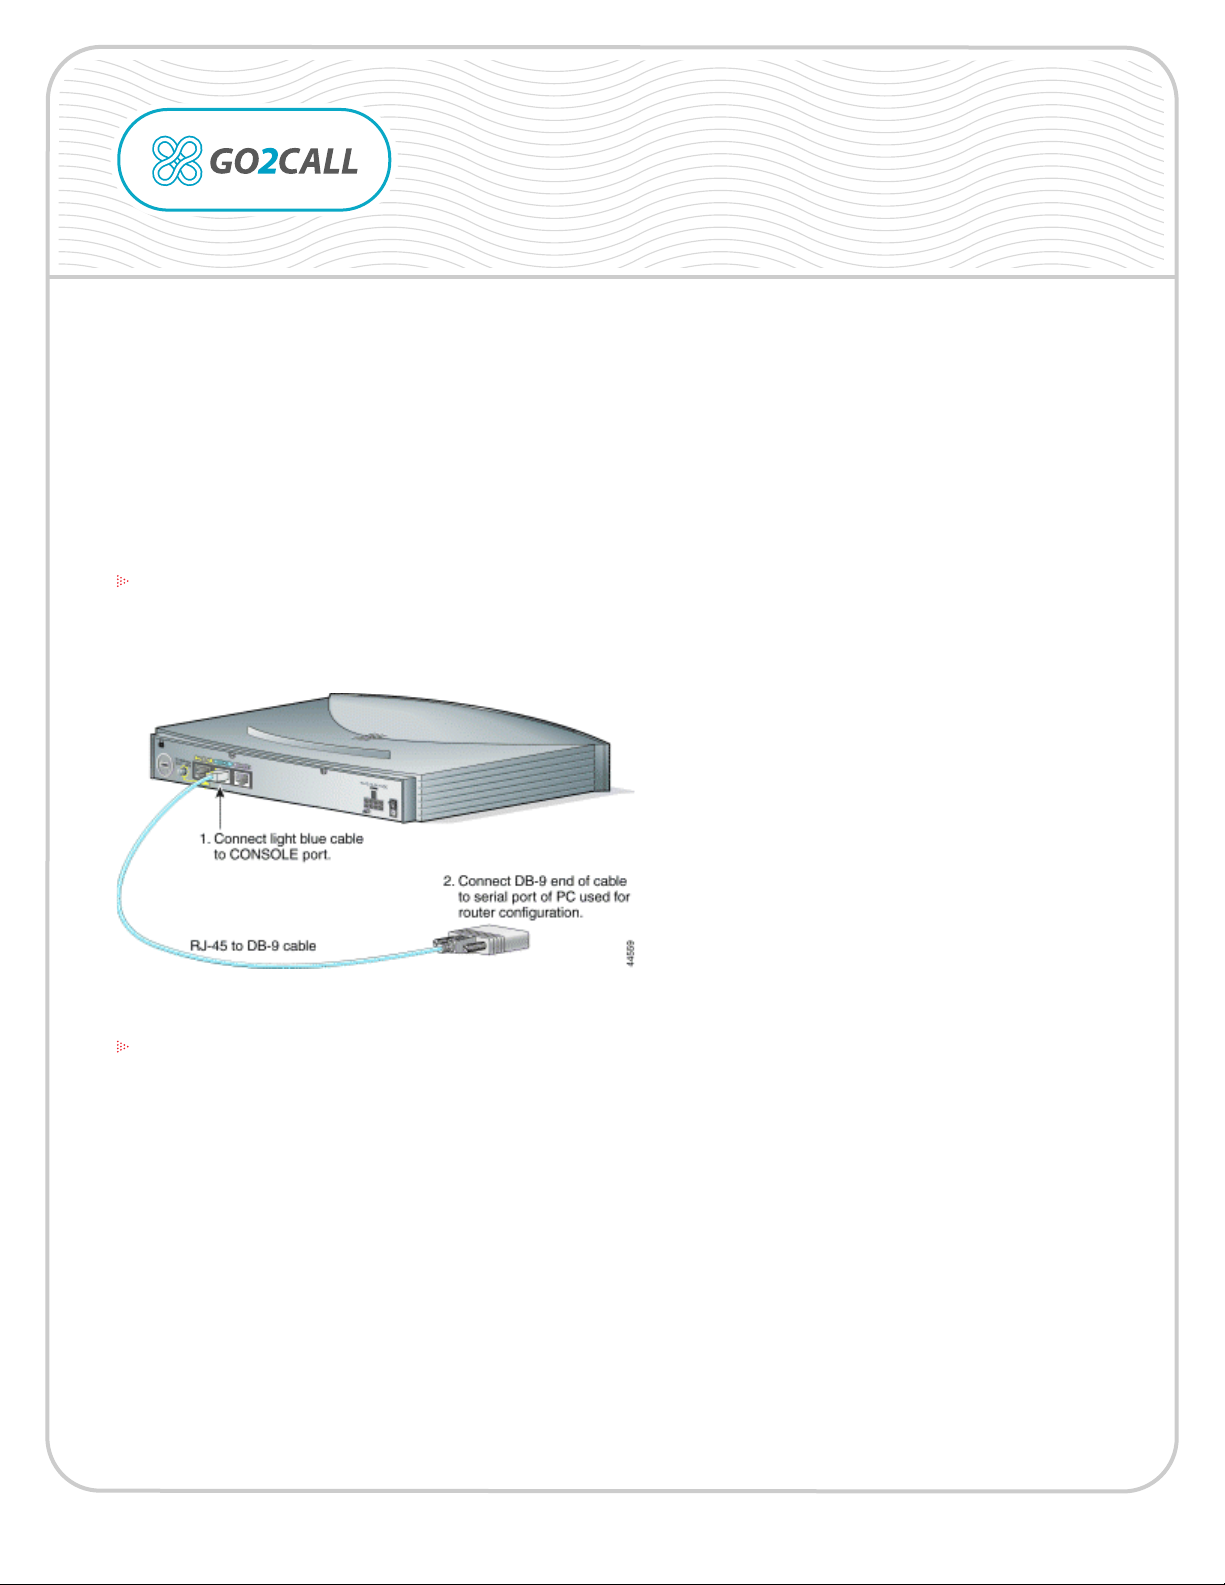
STEP 1 Connecting to the PC
Use the blue console cable and DB-9 adaptor. Connect one end of the cable to the Console port on the
router, and the other end with DB-9 adaptor to COM 1 or COM2 port on PC.
STEP 2 Terminal Programs
Start any terminal program on the PC (for example, Hyper Terminal). Use the following terminal Settings:
9600 baud rate
No parity
8 data bits
1 stop bot
No ow control
This will power up the router. You will know it has booted up successfully if your receive this prompt:
Router>
page 1 of 4
Copyright © 1999-2005 Go2Call.com, Inc. and/or its suppliers. All rights reserved. “Go2Call” and all associated logos are trademarks, registered as applicable, of Go2Call.com, Inc., and may not be reproduced without Go2Call’s permission. Other product
and company names herein may be the trademarks of their owners. This document is provided “as-is” by Go2Call.com, Inc. for the user ’s internal and non-commercial use. Go2Call.com, Inc. does not promise that the information herein is accurate or
complete and all use of such information is solely at the user’s risk. All warranties disclaimed.
Page 2

Cisco 827-4V Gateway Conguration
With Go2Call Prepaid Voice Service
STEP 3 General Set-up
To congure the General set-up of your device, enter the following command:
Router> enable
Router# cong terminal
Router(cong-t)# enable secret password ßThis is to set up a password. Change “password” with any word
that you want to use for a password.
Router(cong-t)# hostname R1 ßSet up the prompt for the router. Change “R1” to any name.
R1(cong-t)# line vty 0 4
R1(cong-line)# password pass1 ß This is the telnet password. Change “pass1” with any desire password.
R1(cong-line)# login
R1(cong-line)# exit
R1# write mem
All changes will now be saved.
STEP 4 Setting the IP Address and Connectivity
Enter the following command to set the IP Address:
R1# cong ter
R1(cong-t)# interface eth 0
R1(cong-if)# ip addr 192.168.1.100 255.255.255.0 ßEnter in your IP address and network mask for the local network
here.
R1(cong-if)# no shut
R1(cong-if)# exit
R1(cong-t)# ip route 0.0.0.0 0.0.0.0 192.168.1.1 ßEnter your default gateway on the local network here.
R1(cong-t)# ^Z
R1# write mem
To test the IP connectivity, rst connect the Ethernet cable to the Ethernet port on the router.
Then enter the following:
R1# ping 216.52.153.203
Type escape sequence to abort.
Sending 5, 100-byte ICMP Echos to 216.52.153.203, timeout is 2 seconds:
!!!!!
Success rate is 100 percent (5/5), round-trip min/avg/max = 28/30/32 ms
If you do not see the above output to signal success, check the network connection (Ethernet cable
should go from the router to the hub/switch and the IP address must be entered correctly).
page 2 of 4
Copyright © 1999-2005 Go2Call.com, Inc. and/or its suppliers. All rights reserved. “Go2Call” and all associated logos are trademarks, registered as applicable, of Go2Call.com, Inc., and may not be reproduced without Go2Call’s permission. Other product
and company names herein may be the trademarks of their owners. This document is provided “as-is” by Go2Call.com, Inc. for the user ’s internal and non-commercial use. Go2Call.com, Inc. does not promise that the information herein is accurate or
complete and all use of such information is solely at the user’s risk. All warranties disclaimed.
Page 3

Cisco 827-4V Gateway Conguration
With Go2Call Prepaid Voice Service
STEP 5 Enabling VoIP
To enable VoIP, copy and paste the following output once you are in cong-t mode: R1(cong-t)#. These
are the changes that need to be made:
YourGwName ßReplace with your Gateway name or Company name.
12345678900x ßReplace with your PIN number.
X.X.X.X ßReplace with your IP address from the Ethernet port.
** If your Cisco 827-4v has a public ip address then use:
session target ipv4: 216.52.153.209
** If your Cisco 827-4v is behind NAT (has private IP address) then use:
session target ipv4: 216.52.153.217
Here is the list of the private IP addresses on the Internet:
10.0.0.0 - 10.255.255.255
172.16.0.0 - 172.31.255.255
192.168.0.0 - 192.168.255.255
Go through and make the necessary changes, as indicated in red:
voice-port 1
connection plar 723
station-id number 123456789001 Change with your PIN
!
voice-port 2
connection plar 723
station-id number 123456789002 Change with your PIN
!
voice-port 3
connection plar 723
station-id number 123456789003 Change with your PIN
!
voice-port 4
connection plar 723
station-id number 123456789004 Change with your PIN
!
page 3 of 4
Copyright © 1999-2005 Go2Call.com, Inc. and/or its suppliers. All rights reserved. “Go2Call” and all associated logos are trademarks, registered as applicable, of Go2Call.com, Inc., and may not be reproduced without Go2Call’s permission. Other product
and company names herein may be the trademarks of their owners. This document is provided “as-is” by Go2Call.com, Inc. for the user ’s internal and non-commercial use. Go2Call.com, Inc. does not promise that the information herein is accurate or
complete and all use of such information is solely at the user’s risk. All warranties disclaimed.
Page 4

Continued:
Cisco 827-4V Gateway Conguration
With Go2Call Prepaid Voice Service
dial-peer voice 1 pots
port 1
!
dial-peer voice 2 pots
port 2
!
dial-peer voice 3 pots
port 3
!
dial-peer voice 4 pots
port 4
!
dial-peer voice 100 voip
destination-pattern 723
session protocol sipv2
session target ipv4:216.52.153.209
dtmf-relay rtp-nte
codec g723r63 byte 48
exit
!
gateway
exit
Exit and save the settings:
R1(cong-t)# ^Z
R1# write mem
STEP 6 Review the Conguration
You will see the entire router conguration. Verify it with the above cong.
R1# show run
Pick up the phone connected to P1 to P4 port and make a call:
For the USA and Canada dial: 1 + phone_number
For any other country dial: 011 + country_code + phone_number
page 4 of 4
Copyright © 1999-2005 Go2Call.com, Inc. and/or its suppliers. All rights reserved. “Go2Call” and all associated logos are trademarks, registered as applicable, of Go2Call.com, Inc., and may not be reproduced without Go2Call’s permission. Other product
and company names herein may be the trademarks of their owners. This document is provided “as-is” by Go2Call.com, Inc. for the user ’s internal and non-commercial use. Go2Call.com, Inc. does not promise that the information herein is accurate or
complete and all use of such information is solely at the user’s risk. All warranties disclaimed.
 Loading...