

Page 1

CHAPTER
42
Cisco IP Phone Configuration
Cisco IP phones as full-featured telephones can plug directly into your IP
network. Y ou can use the Cisco CallManager Administration phone conf iguration
panes to configure the following Cisco IP phones and devices:
• Cisco IP Phone 7900 Family
• Cisco IP Phone model 30 VIP
• Cisco IP Phone model 12 SP+
• H.323 clients
• CTI ports
Once you add a Cisco IP phone to Cisco CallManager Administration,
information from the RIS D ata Coll ector serv ice disp lays on th e Phone
Configuration pane. When available, the IP address of t he de vice an d the name of
the Cisco CallManager with which the device registered display.
The following topics provide information about working with and configuring
Cisco IP phones in Cisco CallManager Administration:
• Configuring Cisco IP Phones, page 42-2
78-13310-01
• Finding a Phone, page 42-26
• Configuring Directory Numbers, page 42-27
• Phone Button Template Configuration, page 43-1
• Phone Configuration Settings, page 42-12
• Phone Configuration Checklist, Cisco CallManager System Guide
Cisco CallManager Administration Guide
42-1
Page 2

Configuring Cisco IP Phones
Configuring Cisco IPPhones
You can add phones to the Cisco CallManager database automatically using
auto-registration, manually using the phone configuration panes, or in groups
with the Bulk Administration Tool (BAT). By enabling auto-registration, you can
automatically add a Cisco IP phone to the Cisco CallManager database when you
connect the phone to your IP telephony network. During auto-registration,
Cisco CallManager assigns the next available sequential directory number to the
phone. In many cases, you might not want to use auto-registration; for example,
if you want to assign a specific directory number to a phone. If you do not use
auto-registration, you must manually add phones to the Cisco CallManager
database or use the Bulk Administration Tool (BAT). BAT, a plug-in application,
enables system administrators to perform batch add, modify, and delete
operations on large numbers of Cisco IP phones. Refer to the Bulk Administration
Tool Guide for Cisco CallManager for detailed instructions on using BAT.
Once you add a Cisco IP phone to Cisco CallManager Administration, the RIS
Data Collector service displays the device name, registration status, and the IP
address of the Cisco CallManager to which it is registered on the Phone
Configuration pane.
For information on how to configure phones as well as H.323 clients and CTI
ports from Cisco CallManager Administration, see the following topics:
Chapter 42 Cisco IP Phone Configuration
42-2
• Cisco IP Phone Configuration, page 42-1
• Displaying the MAC Address of a Phone, page 42-3
• Adding a Phone, page 42-4
• Deleting a Phone, page 42-10
• Resetting a Phone, page 42-7
• Updating a Phone, page 42-9
• Copying an Existing Phone, page 42-6
• Phone Configuration Settings, page 42-12
• Configuring Speed Dial Buttons, page 42-20
• Speed Dial Configuration Settings, page 42-22
• Cisco I P Phones, Cisco CallManager System Guide
• Phone Configuration Checklist, Cisco CallManager System Guide
Cisco CallManager Administration Guide
78-13310-01
Page 3

Chapter 42 Cisco IP Phone Configuration
Displaying the MAC Address of a Phone
The Media Access Control (MAC) address comprises a unique, 12-character,
hexadecimal number that identifies a Cisco IP phone or other hardware device.
Locate the number on a label on the bottom of the phone (for example,
000B6A409C405 for Cisco IP Phone 7900 Family models or
SS-00-0B-64-09-C4-05 for Cisco IP Phone models SP 12+ and 30 VIP).
Cisco CallManager makes the MAC address a required field for Cisco IP phone
device configuration. When entering the MAC address in Cisco CallManager
fields, do not use spaces or dashes and do not include the "SS" that may precede
the MAC address on the label.
T o display the MA C address when the phone is po wered on, perform the following
steps:
• Cisco IP Phone 7960 and 7940 models—Press Settings, us e the arrow but tons
to highlight the Network Configuration menu option, and press the Select
softkey.
• Cisco IP Phone 7910 — Press Settings, use the arrow buttons to locate
Network Config options, and press 6 on the phone keypad to be gin displaying
the Network Config options; then, use the arrow keys to scroll the Network
Config option display to the MAC address.
Configuring Cisco I P Phones
78-13310-01
• Cisco IP Phone models 12 SP+ and 30VIP—Press ** to display the MAC
address on the second line of the LCD display.
For more information about displaying additional configuration settings on
Cisco I P phones, refer to the Cisco IP Phone 7900 Family Administration Guide
and the individual Getting Started publications provided with Cisco IP phones.
Related Topics
• Cisco IP Phone Configuration, page 42-1
• Adding a Phone, page 42-4
• Updating a Phone, page 42-9
• Cisco I P Phones, Cisco CallManager System Guide
• Phone Configuration Checklist, Cisco CallManager System Guide
Cisco CallManager Administration Guide
42-3
Page 4

Configuring Cisco IP Phones
Adding a Phone
Before a Cisco IP phone can be used, you must use this procedure to add the
phone to Cisco CallManager. You can also use this procedure to configure H.323
clients or CTI ports. H.323 clients can be Symbol NetVision phones or Microsoft
NetMeeting clients. CTI ports designate virtual devices used by
Cisco CallManager applications such as Cisco SoftPhone and
Cisco AutoAttendant.
Note If you are planning to use a TAPI application to control CTI port devices using
the Cisco T A PI Service Provider (TSP), then you may o nly conf igure one line
per CTI port device.
Procedure
Step 1 Choose Device > Add a Device.
The Add a New Device pane displays.
Step 2 From the Device Type drop-down list box, choose Phone and click Next.
Chapter 42 Cisco IP Phone Configuration
42-4
The Add a New Phone pane displays.
Step 3 From the Phone type drop-down list, choose the appropriate phone type
(Cisco IP Phone model, H.323 client, or CTI port) and click Next. Once you
choose a phone type, you cannot modify it.
The Phone Configuration pane displays.
Step 4 Enter the appropriate settings as described in Table 42-1.
Only the settings appropriate to the chosen phone type appear on your pane.
Step 5 Click Insert.
A message displays stating that the phone has been added to the database.
Step 6 To add a directory number to this phone, click OK and enter the appropriate
settings on the Directory Number Configuration pane as described in the
“Directory Number Configuration Settings” section on page 42-32. To return to
the Phone Configuration pane, click Cancel.
Cisco CallManager Administration Guide
78-13310-01
Page 5
Chapter 42 Cisco IP Phone Configuration
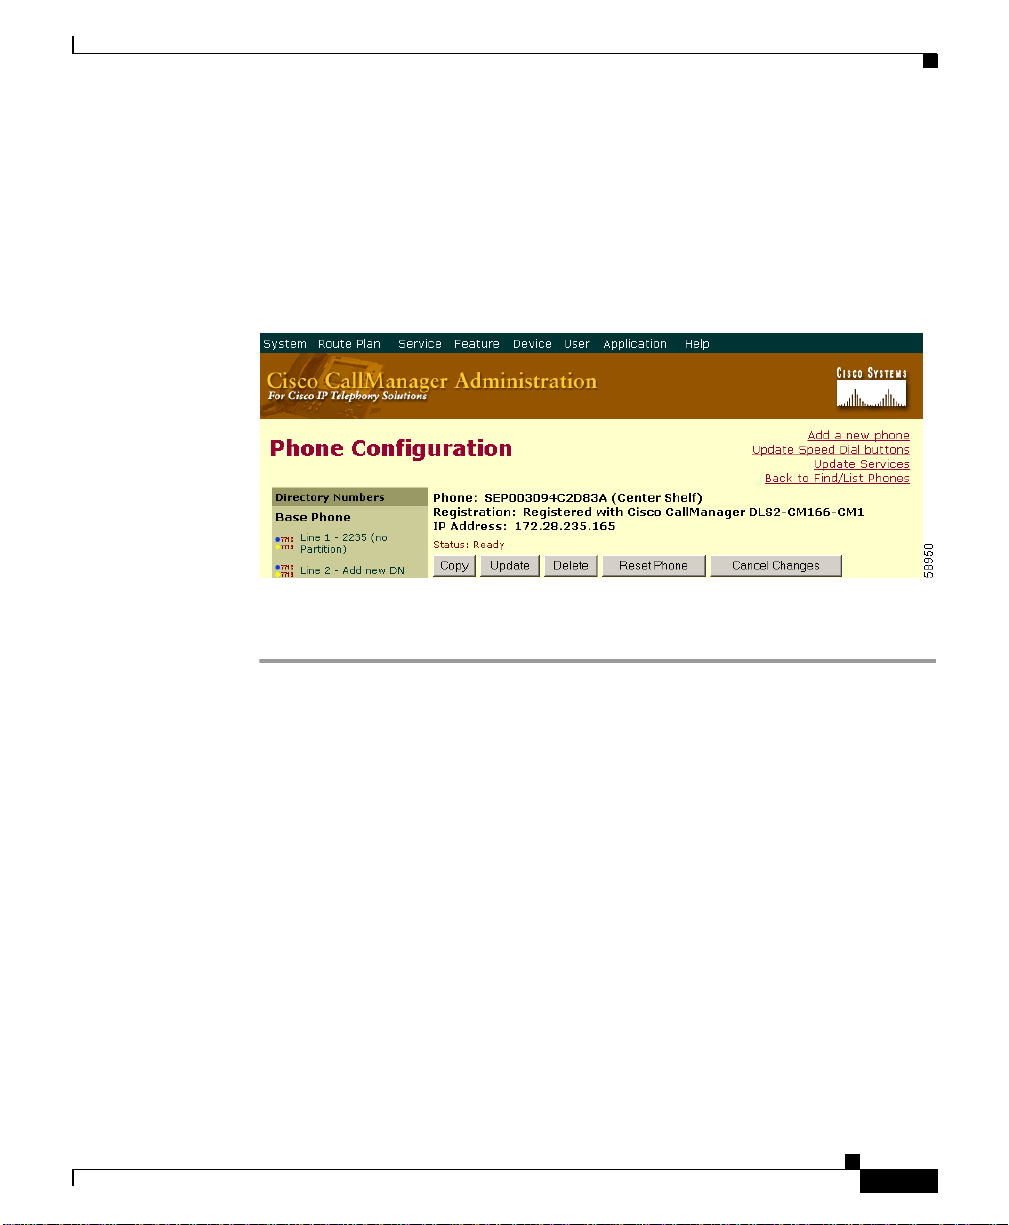
Once you add a Cisco IP phone to Cisco CallManager Administration,
information from the RIS D ata Coll ector serv ice disp lays on th e Phone
Configuration pane. When available, the IP address of the device and the name of
the Cisco C allManager with which the device registered display as illustrated in
Figure 42-1.
Figure 42-1 Phone Configuration Pane
Configuring Cisco I P Phones
78-13310-01
Step 7
Reset the phone after making changes to apply the new settings. Refer to the
“Resetting a Phone” section on page 42-7.
Next Steps
If you want to configure speed-dial buttons to this phone, see the “Configuring
Speed Dial Buttons” section on page 42-20. If you want to configure services for
this phone, see the “Configuring Cisco IP Phone Services” section on page 42-22.
Related Topics
• Cisco IP Phone Configuration, page 42-1
• Resetting a Phone, page 42-7
• Adding a Directory Number, page 42-28
• Deleting a Phone, page 42-10
• Updating a Phone, page 42-9
• Phone Configuration Settings, page 42-12
• Configuring Speed Dial Buttons, page 42-20
Cisco CallManager Administration Guide
42-5
Page 6

Configuring Cisco IP Phones
• Cisco I P Phones, Cisco CallManager System Guide
• Phone Configuration Checklist, Cisco CallManager System Guide
Copying an Existing Phone
If you want to manually add several similar phones to the Cisco CallManager
database, you can add one and then copy its basic settings to apply to another
phone. You must change at least the Media Access Control (MAC) address before
inserting the new phone into the database.
Perform the following procedure to copy phone settings.
Procedure
Step 1 Choose Device > Phone.
The Find and List Phones pane displays.
Step 2 Enter search criteria to locate a specific phone and click Find.
A list of phones that match the search criteria appears.
Step 3 Click the Copy icon for the phone whose settings you want to copy.
Chapter 42 Cisco IP Phone Configuration
42-6
The Phone Configuration pane displays.
Step 4 Enter the MAC address of the new phone.
Note For information on obtaining the MAC addres s, see the “Displaying
the MAC Address of a Phone” section on page 42-3.
Step 5 Update the appropriate settings as described in Table 42-1.
Step 6 Click Insert.
A message displays stating that the phone has been added to the database.
Step 7 To add a directory number to this phone, click OK and enter the appropriate
settings on the Directory Number Configuration pane as described in the
“Directory Number Configuration Settings” section on page 42-32. To return to
the Phone Configuration pane, click Cancel.
Cisco CallManager Administration Guide
78-13310-01
Page 7

Chapter 42 Cisco IP Phone Configuration
Related Topics
• Cisco IP Phone Configuration, page 42-1
• Finding a Phone, page 42-26
• Adding a Phone, page 42-4
• Resetting a Phone, page 42-7
• Updating a Phone, page 42-9
• Deleting a Phone, page 42-10
• Phone Configuration Settings, page 42-12
• Configuring Speed Dial Buttons, page 42-20
• Adding a Directory Number, page 42-28
• Cisco I P Phones, Cisco CallManager System Guide
• Phone Configuration Checklist, Cisco CallManager System Guide
Resetting a Phone
Configuring Cisco I P Phones
78-13310-01
You must reset a Cisco IP phone after you add a directory number or update its
settings for your changes to take affect. Perform the following procedure to reset
a Cisco IP phone using Cisco CallManager.
Note If a call is in progress, the phone does not reset until the call finishes.
Procedure
Step 1 Choose Device > Phone.
The Find and List Phones pane displays.
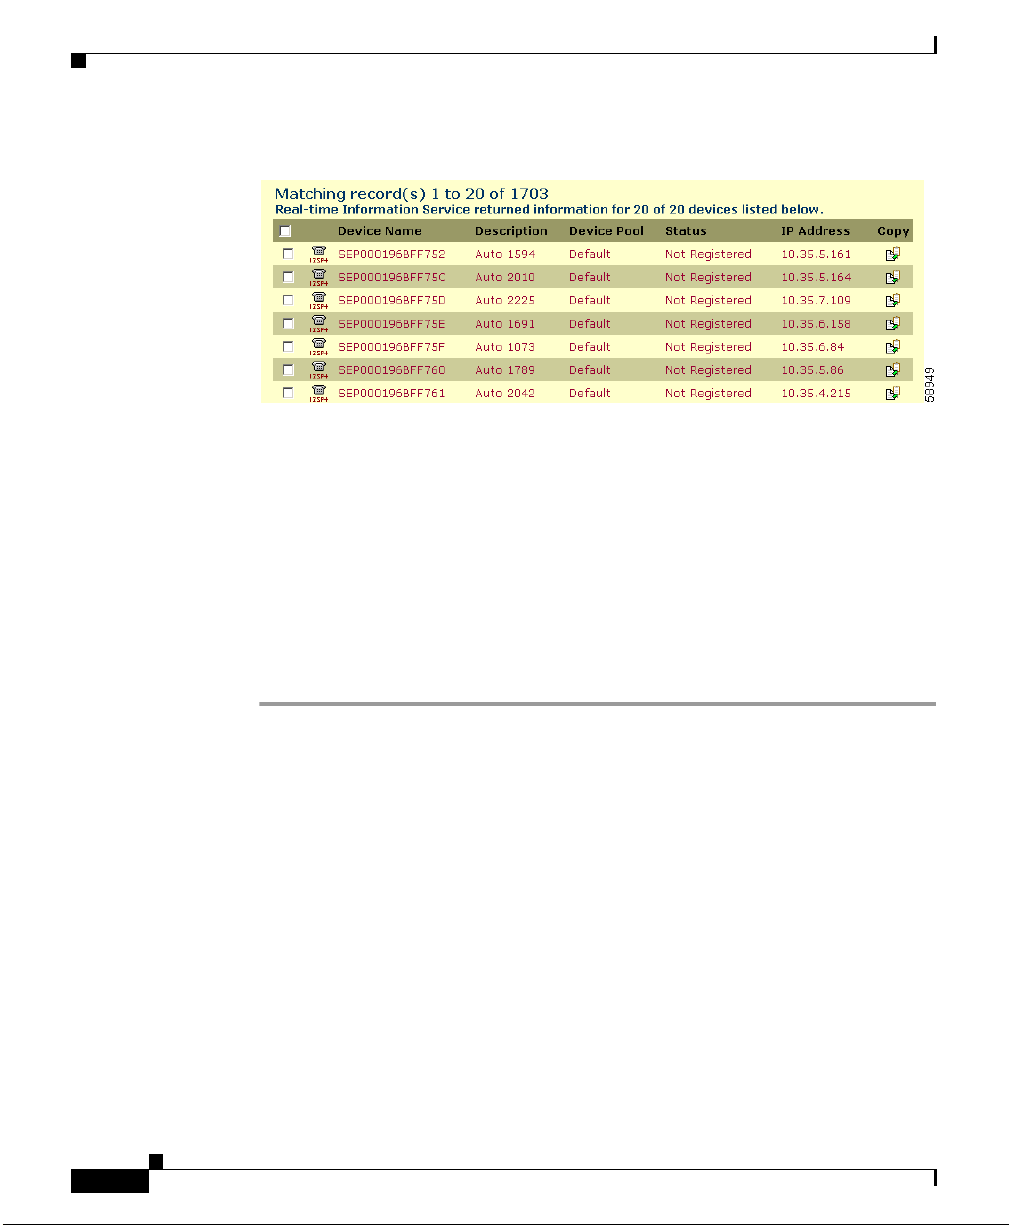
Step 2 Enter search criteria to locate a specific phone and click Find.
A list of phones that match the search criteria appears as illustrated in
Figure 42-2.
Cisco CallManager Administration Guide
42-7
Page 8
Configuring Cisco IP Phones
Figure 42-2 Find and List Phones Pane
Chapter 42 Cisco IP Phone Configuration
Step 3
Check the check boxes next to the phones you want to reset. To select all of the
phones on the pane, check the check box in the matching records title bar.
Step 4 Click Reset Selected.
The Reset Device pane displays.
Step 5 Click one of the following items:
• Restart Device—Restarts the selected devices without shutting them down
(reregisters the phones with Cisco CallManager).
• Reset Device—Shuts down the selected devices and brings them back up
(performs a complete shutdown and reinitialization of the phones).
Related Topics
• Cisco IP Phone Configuration, page 42-1
• Adding a Phone, page 42-4
• Updating a Phone, page 42-9
• Cisco I P Phones, Cisco CallManager System Guide
• Phone Configuration Checklist, Cisco CallManager System Guide
42-8
Cisco CallManager Administration Guide
78-13310-01
Page 9

Chapter 42 Cisco IP Phone Configuration
Updating a Phone
Perform the following procedure to update a Cisco IP phone from
Cisco CallManager.
Procedure
Step 1 Choose Device > Phone.
The Find and List Phones pane displays.
Step 2 Enter search criteria to locate a specific phone, and click Find.
A list of phones that match the search criteria appears.
Step 3 From the list, click the nam e of the phone you want to upd ate.
The Phone Configuration pane displays.
Step 4 Update the appropriate settings as described in Table 42-1.
Step 5 Click Update.
Step 6 Click Reset Phone to reset or restart the phone and apply the new settings.
Configuring Cisco I P Phones
78-13310-01
Restarting the phone re-registers the phones with Cisco CallManager without
shutting the phone down. Resett ing the phone shu ts down the phone and brings it
back up (performs a complete shut-down and re-initialization of the phones).
Related Topics
• Cisco IP Phone Configuration, page 42-1
• Adding a Phone, page 42-4
• Resetting a Phone, page 42-7
• Phone Configuration Settings, page 42-12
• Configuring Speed Dial Buttons, page 42-20
• Speed Dial Configuration Settings, page 42-22
• Finding a Phone, page 42-26
• Cisco I P Phones, Cisco CallManager System Guide
• Phone Configuration Checklist, Cisco CallManager System Guide
Cisco CallManager Administration Guide
42-9
Page 10
Configuring Cisco IP Phones
Deleting a Phone
Perform the following procedure to delete a Cisco IP phone from
Cisco CallManager.
Procedure
Step 1 Choose Device > Phone.
The Find and List Phones pane displays.
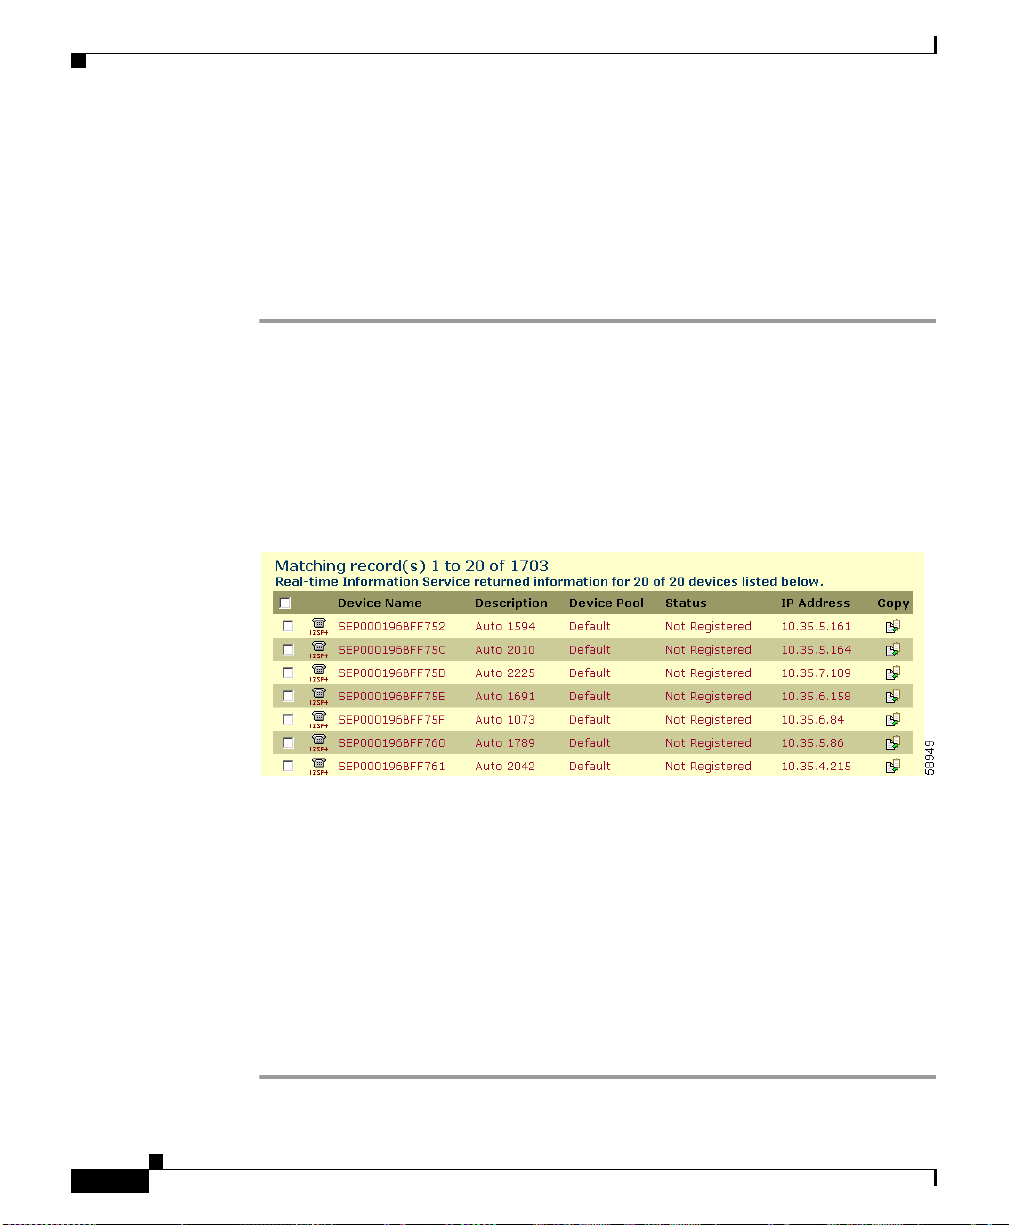
Step 2 Enter search criteria to locate a specific phone and click Find.
A list of phones that match the search criteria appears as illustrated in
Figure 42-2.
Figure 42-3 Find and List Phones Pane
Chapter 42 Cisco IP Phone Configuration
42-10
Step 3 Perform one of the following actions:
• Check the check boxes next to the phones you want to delete and clicking
Delete Selected.
• Delete all of the phones on the pane by checking the check box in the
matching records title bar and clicking Delete Selected.
• Choose the name of the phone you want to delete from the list to display its
current settings, and click Delete.
A confirmation dialog displays.
Step 4 Click OK.
Cisco CallManager Administration Guide
78-13310-01
Page 11

Chapter 42 Cisco IP Phone Configuration
Related Topics
• Cisco IP Phone Configuration, page 42-1
• Finding a Phone, page 42-26
• Adding a Phone, page 42-4
• Cisco I P Phones, Cisco CallManager System Guide
• Phone Configuration Checklist, Cisco CallManager System Guide
Configuring Cisco I P Phones
78-13310-01
Cisco CallManager Administration Guide
42-11
Page 12

Configuring Cisco IP Phones
Phone Configuration Settings
Table 42-1 describes the available settings on the Phone Configuration pane.
Note The Product-Specific Configuration section contains model-specific fields
defined by the phone manufacturer. Cisco CallManager dynamically
populates the fields with default values.
To view field descriptions and help for product-specific configuration items,
click the “i” information icon to the right of the Product Specific
Configuration heading to display help in a popup window.
If you need more information, refer to the documentation for the specific
phone that you are configuring or contact the manufacturer.
Table 42-1 Phone Configuration Settings
Field Description
MAC Address Enter the Media Access Control (MAC) address that
Device Name Enter a name to identify software-based telephones. The
Description Identify the purpose of the device. You can enter the user
Chapter 42 Cisco IP Phone Configuration
identifies Cisco IP phones (hardware phones only). The
value must be 12 hexadecimal characters.
Refer to the “Displaying the MAC Address of a Phone”
section on page 42-3 for information on how to access
the MAC address.
value can include 1 to 15 characters, including
alphanumeric, dot, dash, and underscores.
Cisco C allManager makes this field available only for
H.323 clients and CTI ports.
name (such as John Smith) or the phone location (such as
Lobby) in this field.
42-12
Cisco CallManager Administration Guide
78-13310-01
Page 13

Chapter 42 Cisco IP Phone Configuration
Table 42-1 Phone Configuration Settings (continued)
Field Description
Device Pool Choose the device pool to which you wa nt this phone
Media Resource
Group List
Calling Search Space Choose th e appropriate calling search space. A calling
Configuring Cisco I P Phones
assigned. The device pool defines sets of common
characteristics for devices, such as region, date/time
group, and Cisco CallManager group for
auto-registration.
The value you choose overrides the default value for this
type of device. Refer to the “Device Defaults
Configuration” section on page 6-1.
Choose the appropriate Media Resource Group List. A
Media Resource Group List comprises a prioritized
grouping of media resource groups. An application
selects the required media resource, such as a Music On
Hold server, among the available media resources
according to the priority order defined in a Media
Resource Group List.
If you select <none>, Cisco CallManager uses the Media
Resource Group defined in the device pool.
For more information, refer to the “Media Resource
Management” section in the Cisco CallManager System
Guide.
search space comprises a collection of partitions that are
searched to determine how a dialed number should be
routed.
78-13310-01
Cisco CallManager Administration Guide
42-13
Page 14

Configuring Cisco IP Phones
Table 42-1 Phone Configuration Settings (continued)
Field Description
User Hold Audio
Source
Network Hold Audio
Source
Chapter 42 Cisco IP Phone Configuration
To specify the audio source played when a user initiates
a hold action, click the drop-down arrow and choose an
audio source from the list that displays.
If you do not choose an audio source, Cisco CallManager
uses the audio source defined in the device pool or the
system default if the device pool does not specify an
audio source ID.
Note You define audio sources in the Music On
Hold Audio Source Configuration pane. For
access, choose Service > Music On Hold.
To specify the audio source played when the network
initiates a hold action, click the drop-dow n arrow and
choose an audio source from the list that displays.
If you do not choose an audio source, Cisco CallManager
uses the audio source defined in the device pool or the
system default if the device pool does not specify an
audio source ID.
42-14
Note You define audio sources in the Music On
Hold Audio Source Configuration pane. For
access, choose Service > Music On Hold.
Location Choose the appropriate location for this Cisco IP phone.
The location specifies the total bandwidth available for
calls to and from this location. A location setting of
None means that the locations feature does not keep track
of the bandwidth consumed by this Cisco IP phone.
Cisco CallManager Administration Guide
78-13310-01
Page 15

Chapter 42 Cisco IP Phone Configuration
Table 42-1 Phone Configuration Settings (continued)
Field Description
Phone Button
Template
Expansion Module 1 Choose the appropriate template, if your phone is
Expansion Module 2 Choose the appropriate template, if your phone is
Phone Load Name Enter the custom software for the Cisco IP Phone.
Configuring Cisco I P Phones
Choose the appropriate phone button template. The
phone button template determines the configuration of
buttons on a phone and identifies which feature (line,
speed dial, and so on) is used for each button.
The value you enter overrides the default value for this
type of device. Refer to the “Device Defaults
Configuration” section on page 6-1.
Cisco CallManager does not make this field av ailable for
H.323 clients or CTI ports.
connected to a Cisco IP Phone 7914 Expansion Module.
connected to a second Cisco IP Phone 7914 Expansion
Module.
The value you enter ove rrides the default value for the
current model. For more information, see the “Device
Defaults Configuration” section on page 6-1.
78-13310-01
Module 1 Load
Name
Module 2 Load
Name
This field is not available for H.323 clients or CTI ports.
Enter the custom software for the Cisco IP Phone 7914
Expansion Module, if applicable.
The value you enter ove rrides the default value for the
current model.
Enter the custom software for the second
Cisco IP Phone 7914 Expansion Module, if applicable.
The value you enter ove rrides the default value for the
current model.
Cisco CallManager Administration Guide
42-15
Page 16

Configuring Cisco IP Phones
Table 42-1 Phone Configuration Settings (continued)
Field Description
Outgoing Caller ID
Pattern
Calling Party
Selection
Caller ID
Presentation
Display IE Delivery To enable delivery of the display incoming exclusion
Chapter 42 Cisco IP Phone Configuration
Enter the number to send as Caller ID for outgoing calls.
For example, in North America:
• NNNXXXX = Variable Caller ID, where XXXX is
equal to an extension number or directory number (X
is a number from 0 to 9), and NNN is the office code.
The Central Office (CO) appends the number with
the area code if you do not specify it.
• 5555000 = Fixed Caller ID. Use when you want the
Corporate number to be sent instead of the exact
extension from which the call is placed. The CO
appends the number with the area code if you do not
specify it.
From the following list, choose which v alue displays if a
call to this device is forwarded or transferred:
• Originator—Send the directory number of the
calling device.
• First Redirect Number—Send the directory number
of the redirecting device.
• Last Redirect Number—Send the directory number
of the last device to redirect the call.
Choose whether the central office transmits or blocks
caller ID.
Choose Allowed if you want the central office to send
caller ID.
Choose Restricted if you do not want the central of fice to
send caller ID.
(IE) in SETUP and CONNECT messages for the calling
and called party name delivery service, check the
Display IE Delivery check box.
42-16
By default, the Display IE Delivery check box is
unchecked.
Cisco CallManager Administration Guide
78-13310-01
Page 17

Chapter 42 Cisco IP Phone Configuration
Table 42-1 Phone Configuration Settings (continued)
Field Description
Media Termination
Point Required
Information Enter the location (URL) of the help text for the
Directory Enter the server from which the phone obtains directory
Messages Enter the location (URL) from which the phone obtains
Configuring Cisco I P Phones
If a media termination poin t is used t o impleme nt
features that H.323 does not support (such as hold and
transfer), check the Media Termination Point Required
check box. If a media termination point is not used to
implement features that H.323 does not support, unch eck
the check box.
Use this check box for H.323 devices that do not support
the H.245 Empty Capabilities Set message.
information (i) button. Leave this field blank to accept
the default setting.
Cisco C allManager only displays this field for
Cisco IP Phone 7960 and 7940 models.
information. Leave this field blank to accept the default
setting.
Cisco C allManager only displays this field for
Cisco IP Phone 7960 and 7940 models.
messaging information. Leave this field blank to accept
the default setting.
78-13310-01
Cisco C allManager only displays this field for
Cisco IP Phone 7960 and 7940 models.
Services Enter the location (URL) for Cisco IP Phone Services.
Leave this field blank to accept the default setting.
Cisco C allManager only displays this field for
Cisco IP Phone 7960 and 7940 models.
Cisco CallManager Administration Guide
42-17
Page 18

Configuring Cisco IP Phones
Table 42-1 Phone Configuration Settings (continued)
Field Description
Idle Enter the URL to display on the Cisco IP Phone 7960
Idle Timer (seconds) Enter the amount of time (in seconds) that you want to
Authentication
Server
Chapter 42 Cisco IP Phone Configuration
and Cisco IP Phone 7940 LCD when the phone has not
been used for the time specified in Idle Timer field. For
example, you can display a logo on the LCD when the
phone has not been used for 5 minutes.
Leave this field blank to accept the default setting.
Cisco C allManager only displays this field for
Cisco IP Phone 7960 and 7940 models.
elapse before the URL specified in the Idle field displays.
Leave this field blank to accept the default setting.
Cisco C allManager only displays this field for
Cisco IP Phone 7960 and 7940 models.
Enter the URL the phone uses to validate requests made
to the phone web server. If you do not provide an
authentication URL, the advanced features on the 7960
and 7940 that require authentication will not function.
By default, this URL accesses a Cisco IP Phone User
Options pane configured during installation.
Leave this field blank to accept the default setting.
42-18
Cisco CallManager Administration Guide
78-13310-01
Page 19

Chapter 42 Cisco IP Phone Configuration
Table 42-1 Phone Configuration Settings (continued)
Field Description
Proxy Server Enter the host and port (for example,
Enable Extension
Mobility Feature
Configuring Cisco I P Phones
proxy.cisco.com:80) used to proxy HTTP requests for
access to non-local host addresses from the phone HTTP
client.
If the phone receives a URL such as www .cisco.com in a
service and the phone is not configured in the cisco.com
domain, the phone uses the proxy server to access the
URL. If the phone is configured in cisco.com domain, the
phone accesses the URL without using the proxy because
it is in the same domain as the URL.
If you do not configure this URL, the phone attempts to
connect directly to the URL.
Leave this field blank to accept the default setting.
Check this check box to enable Extension Mobility.
Note The items under the Extension Mobility
(Device Profile) Information heading show
current device information regarding the
login status of the device.
78-13310-01
You must enable this feature on a device-by-device basis.
Log Out Profile Choose the device profile you want to be the default
logout device profile of the device. Choosing <Use
Current Device Settings> creates an autogenerated
device profile as the default device profile.
If you choose <Select a User Device Profile>, you can
then assign a user device profile that has already been
defined; this user device profile becomes the default
device profile for this device.
If a user device profile is chosen as the default device
profile, that user de vice pr ofile is loaded onto the device
when the device is logged out (when no user is logged
in).
Cisco CallManager Administration Guide
42-19
Page 20

Configuring Cisco IP Phones
Table 42-1 Phone Configuration Settings (continued)
Field Description
Log In User ID Cisco C allManager populates this field with the user ID
of the user who is currently logged into this de vice. I f no
user is logged into the device, <None> displays.
Log In Time Cisco CallManager populates this field with the
maximum duration specified for the login to be in ef fect.
Once the time is reached, the system automatically logs
out the device.
Log Out Time Cisco CallManager populates this field with the time
specified for the logout to be in effect.
Configuring Speed Dial Buttons
You can configure speed-dial buttons for phones in the Cisco CallManager
Administration if you want to provide speed dial buttons for users or if you are
configuring phones that do not have a specific user assigned to them. Users can
change the speed-dial buttons on their phones using the Cisco IP Phone User
Options panes.
Chapter 42 Cisco IP Phone Configuration
42-20
Procedure
Step 1 From the Phone Configuration pane, click the Update Speed Dial buttons link at
the top of the pane.
Note To display the Phone Configuration pane, choose Device > Phone.
Enter your search criteria and click Find. Choose the phone for which
you want to configure speed-dial buttons.
Step 2 Enter the appropriate settings as described in Table 42-2.
Step 3 Click Update to apply the changes or click Update and Close to apply the
changes and close the dialog.
Cisco CallManager Administration Guide
78-13310-01
Page 21

Chapter 42 Cisco IP Phone Configuration
Related Topics
• Cisco IP Phone Configuration, page 42-1
• Resetting a Phone, page 42-7
• Adding a Directory Number, page 42-28
• Updating a Directory Number, page 42-29
• Cisco I P Phones, Cisco CallManager System Guide
• Phone Features, Cisco CallManager System Guide
• Phone Configuration Checklist, Cisco CallManager System Guide
Configuring Cisco I P Phones
78-13310-01
Cisco CallManager Administration Guide
42-21
Page 22

Configuring Cisco IP Phones
Speed Dial Configuration Settings
Table 42-2 describes the speed-dial button configuration settings.
Table 42-2 Speed Dial Configuration Settings
Field Description
Speed Dial This field identifies the speed-dial butto n on the phone or
on the Cisco IP Phone 7914 Expansion Module.
Number Enter the number you want dialed when the user presses
the speed-dial button.
Label Enter the text you want to appear for the speed dial
button.
This field is not available for the Cisco IP Phone 7910.
Related Topics
• Cisco IP Phone Configuration, page 42-1
• Adding a Directory Number, page 42-28
Chapter 42 Cisco IP Phone Configuration
• Updating a Directory Number, page 42-29
• Configuring Speed Dial Buttons, page 42-20
• Cisco I P Phones, Cisco CallManager System Guide
• Phone Features, Cisco CallManager System Guide
• Phone Configuration Checklist, Cisco CallManager System Guide
Configuring Cisco IPPhone Services
From a Cisco IP Phone 7960/7940, users can access information services, such as
weather, stock quotes, or other services available to their company. Using the
Cisco CallManager Administration, you can set up the available services for
phones. Users can modify the services using the Cisco IP Phone User Options
panes. For information about the Cisco IP Phone User Options panes, refer to the
Cisco IP Phone 7960/7940 User Guide. For more information on maintaining
services in Cisco CallManager Administration, see the “Cisco IP Phone Services
Configuration” section on page 35-1.
Cisco CallManager Administration Guide
42-22
78-13310-01
Page 23

Chapter 42 Cisco IP Phone Configuration
Subscribing to a Service
Perform the following steps to subscribe to new services for a phone.
Before You Begin
Add the services to Cisco CallManager. For more information, see t he “Adding a
Cisco IP Phone Service” section on page 35-2.
Procedure
Step 1 Choose Device > Phone.
The Find and List Phones pane displays.
Step 2 Enter search criteria to locate a specific phone and click Find.
A list of phones that match the search criteria appears.
Step 3 Choose the phone to which you want to add a service.
The Phone Configuration pane displays.
Step 4 On the upper, right side of the pane, click the Up date Services link.
Step 5 From the Select a Service drop-down list box, choose the servi ce you want to add
to the phone.
Configuring Cisco I P Phones
78-13310-01
Step 6 Click Continue.
The pane displays with the service yo u chose. If you want to choose a different
service, click Back and repeat Step 5.
Step 7 Click Subscribe.
The service appears in the Your Subscribed Services list.
Related Topics
• Resetting a Phone, page 42-7
• Updating Services, page 42-24
• Unsubscribing from a Service, page 42-25
• Adding a Cisco IP Phone Service, page 35-2
• Phone Configuration Checklist, Cisco CallManager System Guide
Cisco CallManager Administration Guide
42-23
Page 24

Configuring Cisco IP Phones
Updating Services
Step 1 Choose Device > Phone.
Step 2 Enter search criteria to locate a specific phone and click Find.
Step 3 Choose the phone for which you want to update a service.
Step 4 On the upper, right side of the pane, click the Up date Services link.
Step 5 From the Your Su bscribed Se rvices list, choose a service.
Step 6 Update the appropriate parameter and click Update.
Chapter 42 Cisco IP Phone Configuration
Perform the following steps to update a service. You can update the service name
and service parameter values, if necessary.
Procedure
The Find and List Phones pane displays.
A list of phones that match the search criteria appears.
The Phone Configuration pane displays.
42-24
Related Topics
• Cisco IP Phone Configuration, page 42-1
• Resetting a Phone, page 42-7
• Unsubscribing from a Service, page 42-25
• Adding a Cisco IP Phone Service, page 35-2
• Phone Configuration Checklist, Cisco CallManager System Guide
Cisco CallManager Administration Guide
78-13310-01
Page 25

Chapter 42 Cisco IP Phone Configuration
Unsubscribing from a Service
Perform the following steps to unsubscribe from a service.
Procedure
Step 1 Choose Device > Phone.
The Find and List Phones pane displays.
Step 2 Enter search criteria to locate a specific phone and click Find.
A list of phones that match the search criteria appears.
Step 3 Choose the phone from which you want to delete a service.
The Phone Configuration pane displays.
Step 4 On the upper, right side of the pane, click the Up date Services link.
Step 5 From the Your Su bscribed Se rvices list, choose a service.
Step 6 Click Unsubscribe.
A warning message verifies that you want to unsubscribe from the service.
Step 7 Click OK to unsubscribe or click Cancel to restore your previous settings.
Configuring Cisco I P Phones
78-13310-01
Related Topics
• Cisco IP Phone Configuration, page 42-1
• Resetting a Phone, page 42-7
• Subscribing to a Service, page 42-23
• Adding a Cisco IP Phone Service, page 35-2
• Phone Configuration Checklist, Cisco CallManager System Guide
Cisco CallManager Administration Guide
42-25
Page 26

Finding a Phone
Finding a Phone
Because you might have thousands of Cisco IP phones in your network,
Cisco CallManager lets you search for phones b ased on specif ied criteria. F ollo w
these steps to search for a specific Cisco IP phone in the Cisco CallManager
database.
Tips For methods to limit your search, refer to the “Phone Search” section in the
Cisco CallManager System Guide.
This list does not include analog phones and fa x machines connected to gate w ays
(such as a Cisco VG200). The list only includes phones configured in
Cisco CallManager Administration.
Procedure
Step 1 Choose Device > Phone.
The Find and List Phones pane displays.
Chapter 42 Cisco IP Phone Configuration
42-26
Step 2 Choose the field you want to use to locate a phone.
Note To find all phones registered in the database, choose Device Name
from the list of fields, and choose “is not empty” from the list of
patterns; then, click Find.
Step 3 Choose the appropriate search pattern for your text search. If you do not want to
perform a text search, choose “is empty.”
Step 4 Enter your search text in the Find field, if any.
Step 5 If you choose calling search space or device pool in Step 2, the options available
in the database display. From the drop-down list box below the Find button, you
can choose one of these options.
Step 6 Click Find.
A list of devices matching the criteria appears. The field you selected in Step 2
determines how the devices in the list are sorted.
This pane also lists the total number of devices and panes on this pane.
Cisco CallManager Administration Guide
78-13310-01
Page 27

Chapter 42 Cisco IP Phone Configuration
Step 7 To view the next set of discovered devices, click Next.
Note You can delete or reset multiple phones from the Find and List Phones
pane by checking the check boxes next to the appropriate phones and
clicking Delete Selected to delete the phones or clicking Reset
Selected to reset the phones. You can choose all of the phones on the
pane by checking the check box in the matching records title bar.
Related Topics
• Configuring Cisco IP Phones, page 42-2
• Cisco I P Phones, Cisco CallManager System Guide
• Phone Configuration Checklist, Cisco CallManager System Guide
Configuring Directory Numbers
Configuring Directory Numbers
78-13310-01
Using Cisco CallManager, you can configure and modify directory numbers
assigned to specific phones. These sections provide instructions for working with
directory numbers.
Use this area of Cisco CallManager Administration to perform tasks such as
adding or removing directory numbers, configuring call forward, call pickup, and
call waiting, setting the display text that appears on the called party phone when
a call is placed from a line, and disabling ring on a line .
Related Topics
• Adding a Directory Number, page 42-28
• Deleting a Directory Number, page 42-30
• Updating a Directory Number, page 42-29
• Directory Number Configuration Settings, page 42-32
Cisco CallManager Administration Guide
42-27
Page 28

Configuring Directory Numbers
Adding a Directory Number
Follow these instructions to add a directory number to a specific phone. You can
configure the call waiting, call forward, and call pickup phone features while
adding the directory number.
Before You Begin
You must add a Cisco IP phone to Cisco CallManager before adding a directory
number. See the “Adding a Phone” section on page 42-4 for details.
Procedure
Step 1 Choose Device > Phone.
The Find and List Phones pane displays.
Step 2 Enter search criteria to locate a specific phone and click Find.
A list of phones that match the search criteria displays.
Step 3 Click the device name to which you want to add a directory number.
Chapter 42 Cisco IP Phone Configuration
42-28
The Phone Configuration pane displays.
Step 4 In the Directory Numbers list, click an unassigned line, such as Line 1 or Line 2.
The Configure a Directory Number pane displays.
Step 5 Enter the appropriate settings as described in Table 42-3.
Step 6 Click Insert.
A message displays stating that the directory number has been added to the
database.
Step 7 Click OK to display the Phone Config urati on pane. Click Cancel to return to the
Directory Number Configuration pane.
Note You must restart the device before your changes take affect.
Cisco CallManager Administration Guide
78-13310-01
Page 29

Chapter 42 Cisco IP Phone Configuration
Related Topics
• Cisco IP Phone Configuration, page 42-1
• Finding a Phone, page 42-26
• Adding a Phone, page 42-4
• Deleting a Directory Number, page 42-30
• Updating a Directory Number, page 42-29
• Directory Number Configuration Settings, page 42-32
• Cisco I P Phones, Cisco CallManager System Guide
• Phone Features, Cisco CallManager System Guide
• Phone Configuration Checklist, Cisco CallManager System Guide
Updating a Directory Number
Follow these instructions to update a directory number assigned to a specific
phone.
Configuring Directory Numbers
78-13310-01
Procedure
Step 1 Choose Device > Phone.
The Find and List Phones pane displays.
Step 2 Enter search criteria to locate a specific phone.
A list of phones that match the search criteria displays.
Step 3 Click the name of the phone to update.
The Phone Configuration pane displays.
Step 4 From the Directory Numbers list, click the line you want to update.
The Directory Number Configuration pane displays.
Note If your phone uses a Cisco IP Phone 7914 Expansion Module, the
Directory Numbers list displays the lines for the phone and for the
Cisco IP Phone 7914 Expansion Module.
Cisco CallManager Administration Guide
42-29
Page 30

Configuring Directory Numbers
Step 5 Update the appropriate settings as described in Table 42-3.
Step 6 Click Update.
Step 7 Click Restart Devices.
Related Topics
• Cisco IP Phone Configuration, page 42-1
• Finding a Phone, page 42-26
• Adding a Phone, page 42-4
• Adding a Directory Number, page 42-28
• Deleting a Directory Number, page 42-30
• Directory Number Configuration Settings, page 42-32
• Cisco I P Phones, Cisco CallManager System Guide
• Phone Features, Cisco CallManager System Guide
• Phone Configuration Checklist, Cisco CallManager System Guide
Chapter 42 Cisco IP Phone Configuration
Deleting a Directory Number
Perform the following procedure to delete a directory number from a specific
phone.
Procedure
Step 1 Choose Device > Phone.
The Find and List Phones pane displays.
Step 2 Enter the search criteria to locate a specific phone and click Find.
A list of phones that match the search criteria displays.
Step 3 Choose the device name that contains the directory number you want to delete.
The Phone Configuration pane displays.
Cisco CallManager Administration Guide
42-30
78-13310-01
Page 31

Chapter 42 Cisco IP Phone Configuration
Step 4 From the Directory Numbers list, choose the line you want to delete.
The Directory Number configuration pane displays.
Step 5 Click Delete.
A message appears verifying that you want to delete the line.
Step 6 Click OK.
The Phone Configuration pane displays with the line deleted.
Step 7 Click Reset Phone to reset or restart the phone and apply the new settings.
Restarting the phone re-registers the phones with Cisco CallManager without
shutting the phone down. Resett ing the phone shu ts down the phone and brings it
back up (performs a complete shut-down and re-initialization of the phones).
Related Topics
• Cisco IP Phone Configuration, page 42-1
• Finding a Phone, page 42-26
Configuring Directory Numbers
78-13310-01
• Adding a Directory Number, page 42-28
• Updating a Directory Number, page 42-29
• Resetting a Phone, page 42-7
• Cisco I P Phones, Cisco CallManager System Guide
• Phone Configuration Checklist, Cisco CallManager System Guide
Cisco CallManager Administration Guide
42-31
Page 32

Configuring Directory Numbers
Directory Number Configuration Settings
Table 42-3 describes the fields available on the Directory Number Configuration
Settings pane.
Table 42-3 Directory Number Configuration Settings
Field Description
Directory Number Enter a dialable phone number. Values can include
numeric characters and route pattern wildcards and
special characters except for (.) and (@). The directory
number you enter can appear in more than one partition.
If the words Shared Line appear in red next to the
directory number, the di rectory number appears o n more
than one device in the same partition. Refer to the
“Directory Numbers” section in the Cisco CallManager
System Guide for more information.
Partition Choose the partition to which the directory number
belongs. Make sure the directory number you enter in the
Directory Number field is unique within the partition you
choose.
Voice Message Box Enter the voice mailbox you want to associate with this
line. When a call is forwarded to voice mail, the
Cisco CallManager sends the number you enter here to
your voice-mail application. The voice-mail system then
leaves voice-mail messages in the configured mailbox.
Chapter 42 Cisco IP Phone Configuration
42-32
By default, the Cisco CallManager Administration enters
the directory number in this field.
During auto-registration, Cisco CallManager applies the
default mask value you entered in the the Voice Message
Box Mask field on the Cisco CallManager Configuration
pane to this field.
For example, if you enter 97281XXXXX in the Voice
Message Box Mask field and you enter 30000 in the
Voice Message Box field, Cisco CallManager ide ntifies
the voice message box for this directory number as
9728130000.
Cisco CallManager Administration Guide
78-13310-01
Page 33

Chapter 42 Cisco IP Phone Configuration
Table 4 2-3 Directory Number Configuration Settings (continued)
Field Description
Calling Search Space Choose th e appropriate calling search space. A calling
Call Waiting Choose the appropriate call-waiting settings. This field
Active Auto Answer
for this Directory
Number
Call Pickup Group Choose the number that can be dialed to answer calls to
Forward All Enter the directory number to which all calls are
Configuring Directory Numbers
search space comprises a collection of partitions that are
searched for numbers called from this directory number .
The value you choose applies to all devices using this
directory number.
Changes cause update of the numbers listed in the Call
Pickup Group field.
determines whether this directory number uses call
waiting when a line is busy (On), responds with a busy
signal (Off), or uses the system-wide default setting
(Default).
The value you choose applies to all devices using this
directory number.
Check the check box to enable the user to answer calls
automatically when the user enables the headset button
on the Cisco IP Phone 7960/7940.
You cannot activate auto answer for a directory number
with a shared line appearance. The Cisco CallManager
automatically unchecks and disables this check box if
you are configuring a directory number with a shared line
appearance.
this directory number (in the specified partition).
forwarded. You can enter any dialable phone number,
including an outside destination.
The value you enter applies to all devices using this
directory number.
78-13310-01
Cisco CallManager Administration Guide
42-33
Page 34

Configuring Directory Numbers
Table 4 2-3 Directory Number Configuration Settings (continued)
Field Description
Forward Busy Enter the directory number to which a call is forwarded
Forward No Answer Enter the directory number to which a call is forwarded
Forward On Failure Enter the directory number to which a call is forwarded
Chapter 42 Cisco IP Phone Configuration
when the line is in use. You can enter any dialable phone
number, including an outside destination.
The value you enter applies to all devices using this
directory number.
when no one answers after four rings. You can enter any
dialable phone number, including an outside destination.
The value you enter applies to all devices using this
directory number.
when a CTI application fails.
42-34
Cisco CallManager Administration Guide
78-13310-01
Page 35

Chapter 42 Cisco IP Phone Configuration
Table 4 2-3 Directory Number Configuration Settings (continued)
Field Description
Calling Search Space Choose the calling search space to use when forwarding
Display Enter the text that you want to appear on the called party
Configuring Directory Numbers
to the specified destination.
You can configure calling search space for Forward All,
Forward Busy, Forward No Answer, and Forward on
Failure directory numbers. The v alue you choose applies
to all devices using this directory number.
If you set the Forward All Calling Search Space field to
<none>, Cisco CallManager uses the calling search
spaces of the line and the phone when the user forwards
calls using the Cisco IP Phone User Options panes or the
CFwdAll softkey on the phone. If you want to restrict
users from forwarding calls on their phones, you must
choose a restrictive calling search space from the
Forward All Calling Search Space field; for example:
Y ou ha ve two calling search spaces: Building and PSTN.
The Buiding calling search space only allows users to
call within the building, while the PST N callin g search
space allows users to call within and outside the building.
You assign the phone to the PSTN calling search space
and the line on your phone to the Building calling search
space. If you set the Call Forward All calling search
space to <none>, the Cisco CallManager can forward
calls to any number within the PSTN or building calling
search spaces. T o prev ent the user from forw arding calls
to numbers outside the building, set the Call Forward All
calling search space to Building.
phone when a call is placed from this line; typically, use
the user name or the directory number. You can enter up
to 30 alphanumeric characters.
Leave this field blank to display the extension.
The value you enter applies only to the current device.
78-13310-01
Cisco CallManager Administration Guide
42-35
Page 36

Configuring Directory Numbers
Table 4 2-3 Directory Number Configuration Settings (continued)
Field Description
Disable ring on this
line
External Phone
Number Mask
Related Topics
• Cisco IP Phone Configuration, page 42-1
• Resetting a Phone, page 42-7
Chapter 42 Cisco IP Phone Configuration
To stop the phone from ringing to indicate incoming
calls, check the check box.
This setting only applies to the current device.
Enter the phone number (or mask) used to send Caller ID
information when placing a call from this line.
You can enter a maximum of 30 number and “X”
characters. The Xs represent the directory number and
must appear at the end of the pattern. For example, if you
specify a mask of 972813XXXX, an external call from
extension 1234 displays a caller ID numb er of
9728131234.
42-36
• Adding a Directory Number, page 42-28
• Updating a Directory Number, page 42-29
• Cisco I P Phones, Cisco CallManager System Guide
• Phone Features, Cisco CallManager System Guide
• Phone Configuration Checklist, Cisco CallManager System Guide
Cisco CallManager Administration Guide
78-13310-01
 Loading...