

Page 1
KIT TRIO CAR
•ISTRUZIONI D’USO
•MODE D’EMPLOI
•BEDIENUNGSANLEITUNG
•INSTRUCTIONS FOR USE
•INSTRUCCIONES DE USO
•INSTRUÇÕES PARA A UTILIZAÇÃO
•GEBRUIKSAANWIJZINGEN
•Ο∆ΗΓΙΕΣ ΧΡΗΣΗΣ
•BRUGSANVISNING
•KÄYTTÖOHJEET
•NÁVOD K POUŽITÍ
•BRUKSANVISNING
•ANVÄNDNINGSINSTRUKTIONER
•INSTRUKCJE SPOSOBU UŻYCIA
•HASZNÁLATI UTASÍTÁS
•UPUTE ZA UPORABU
•ИНСТРУКЦИЯ
•NÁVOD NA POUŽITIE
•NAVODILA ZA UPORABO
•KULLANIM ÖNERILERI
•INSTRUCŢIUNI DE
UTILIZARE
Page 2
1
2
1 2
OK
NO!
NO!
NO! NO!
3
5
4
6
OK
OK
2
Page 3
7
8
9
11
13
NO! OK
OK
10
12
14
CLACK!
OK
3
Page 4
15
16
17
19
21
18
20
22
NO!
OK
4
Page 5
23
24
25
28
26
29
2
1
30 31
27
5
Page 6

I
I
K T C
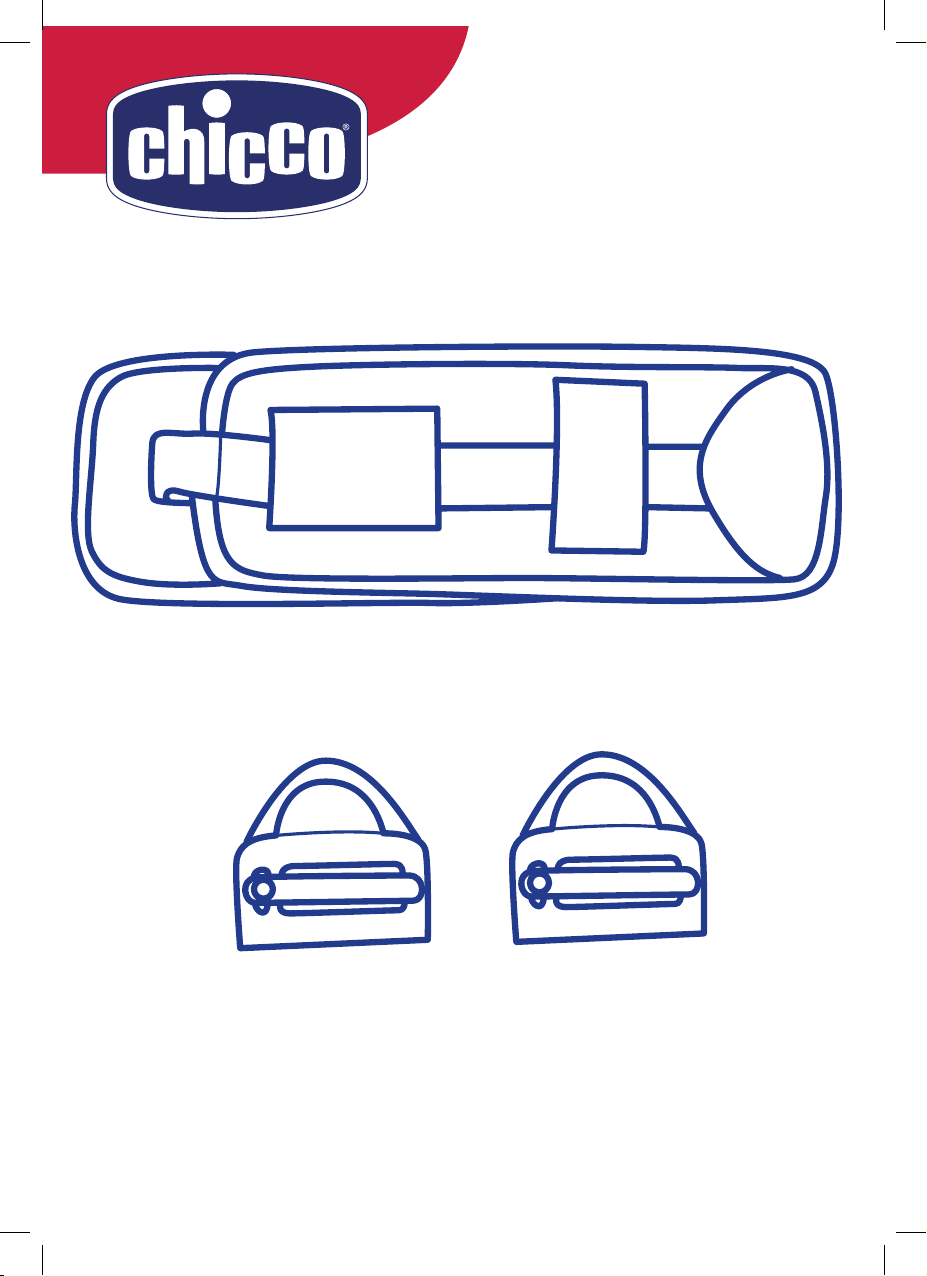
COMPONENTI
1. Cintura addominale
2. Fibbie per fi ssaggio cintura auto
IMPORTANTISSIMO:
LEGGERE MOLTO ATTENTAMENTE
• Leggere attentamente queste istruzioni prima di utilizzare il
prodotto.
• QUESTO PRODOTTO PUO’ ESSERE MONTATO E UTILIZZATO
ESCLUSIVAMENTE CON UNA SACCA A MARCHIO CHICCO.
• QUESTO PRODOTTO PUO’ ESSERE MONTATO E UTILIZZATO
ESCLUSIVAMENTE CON I MODELLI DI SACCA PREDISPOSTI PER POTERLO INSTALLARE: VERIFICARE SUL MANUALE
D’ISTRUZIONI DELLA VOSTRA SACCA SE E’ PREDISPOSTA PER
L’INSTALLAZIONE DI “KIT TRIO CAR”.
• Per il montaggio e l’installazione del prodotto seguire scrupolosamente le istruzioni. Evitare che qualcuno utilizzi il prodotto
senza aver letto le istruzioni.
• Conservare questo manuale insieme al prodotto.
• Nessun prodotto di sicurezza in auto può garantire la totale sicurezza del bambino in caso d’incidente, ma l’utilizzo di questo
prodotto riduce il rischio d’infortunio e di morte del bambino.
• Un utilizzo non corretto del prodotto aumenta il rischio di seri
danni al bambino, non solo in caso d’incidente, ma anche in
altre situazioni.
• Nel caso in cui il prodotto fosse danneggiato, deformato o fortemente usurato, deve essere sostituito: potrebbe aver perso le
caratteristiche originali di sicurezza.
• Non effettuare modifi che o aggiunte al prodotto senza l’approvazione del costruttore. Non installare accessori, parti di ricambio e componenti non forniti dal costruttore.
• Non lasciare mai il bambino incustodito nella sacca in auto per
nessun motivo.
• Non lasciare mai la sacca sul sedile dell’auto non agganciata:
potrebbe urtare e ferire i passeggeri.
• Nel caso in cui l’auto fosse rimasta ferma sotto il sole, ispezionare accuratamente la sacca prima di accomodare il bambino,
verifi cando che alcune parti di essa non si siano surriscaldate: in
tal caso lasciarle raffreddare prima di far sedere il bambino, in
modo da evitare che possa scottarsi.
• In seguito ad un incidente anche lieve, la sacca e KIT TRIO CAR
possono subire danni non visibili ad occhio nudo: perciò bisogna sostituirli comunque.
• Non utilizzare prodotti per la sicurezza in auto di seconda mano:
potrebbero avere subito danni strutturali non visibili ad occhio
nudo, ma compromettenti la sicurezza del prodotto.
• La società ARTSANA declina ogni responsabilità per un uso improprio del prodotto.
AVVISO IMPORTANTE
1. Questo é un dispositivo di ritenuta bambini “Universale”,
omologato secondo Regolamento N°44, emendamenti serie
04. Adatto all’impiego generale nei veicoli e compatibile con la
maggior parte, ma non tutti, i sedili di veicolo.
2. La perfetta compatibilità é più facilmente ottenibile nei casi
in cui il costruttore del veicolo dichiara nel manuale veicolare
che il veicolo prevede l’installazione di dispositivi di ritenuta
bambini “Universali” per la fascia di età in questione.
3. Questo dispositivo di ritenuta é stato classifi cato “Universale” secondo criteri di omologazione più severi rispetto a modelli
precedenti che non dispongono del presente avviso.
4. Adatto solamente per l’impiego nei veicoli dotati di cintura
di sicurezza a 3 punti, statica o con arrotolatore, omologata in
base al Regolamento UN/ECE N°16 o altri standard equivalenti.
5. In caso di dubbio, contattare il produttore del dispositivo di
ritenuta oppure il rivenditore.
KIT TRIO CAR è un componente che consente di fi ssare e utilizzare le sacche Chicco predisposte (si veda il manuale della sacca) all’interno della vostra automobile, per trasportare in auto il
bambino in modo corretto nei primi mesi di vita.
E’ un prodotto omologato secondo la norma europea ECE R44/04
nel “Gruppo 0”, per il trasporto di bambini da 0 a 10 Kg di peso,
indicativamente fi no a 6 mesi di età.
Dopo aver montato KIT TRIO CAR sulla sacca, la sacca può essere
fi ssata in auto.
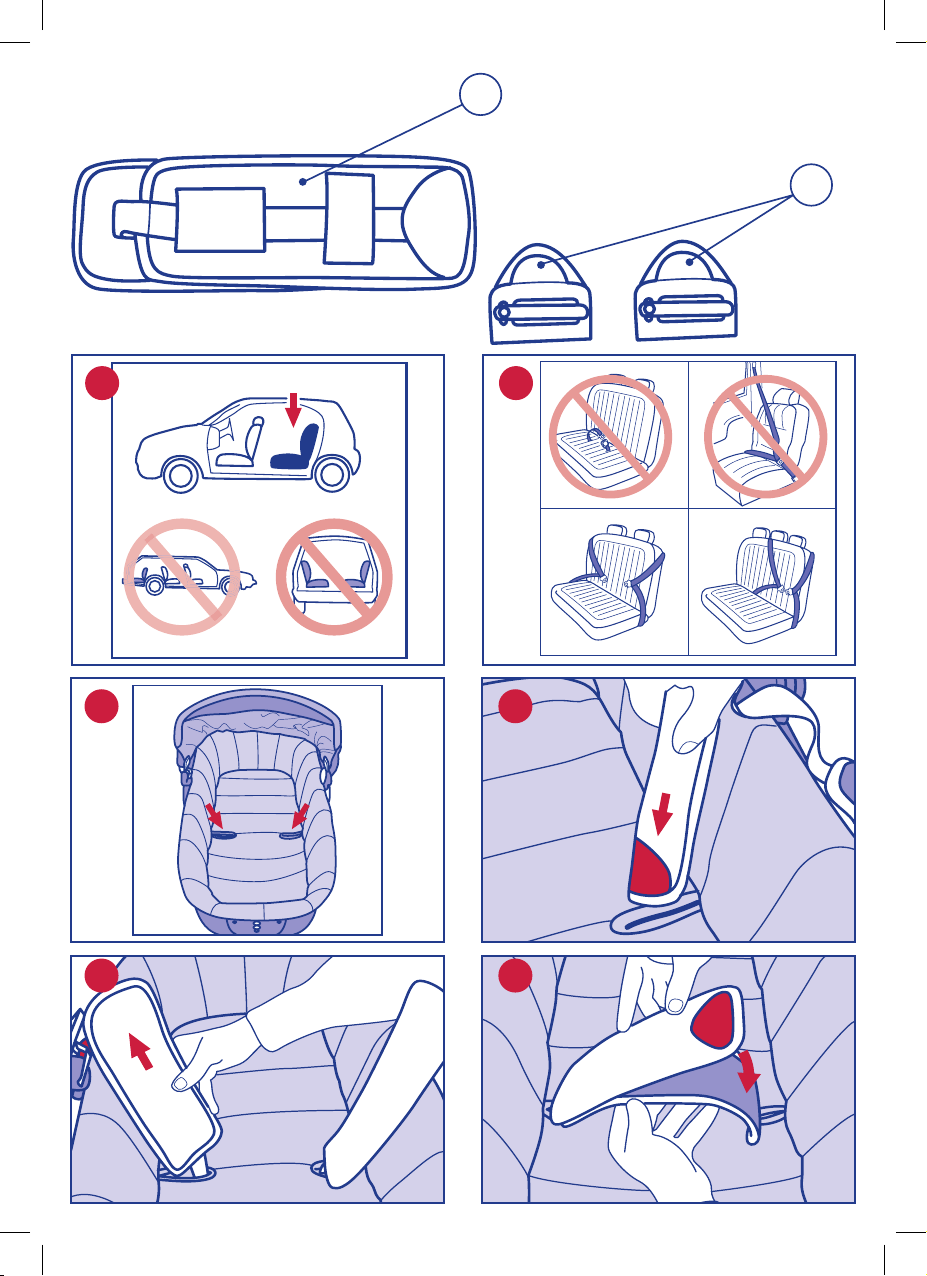
REQUISITI DEL SEDILE AUTO
ISTRUZIONI D’USO
Per poter agganciare la sacca al sedile, il sedile deve avere i seguenti requisiti:
- deve essere rivolto in senso di marcia (Fig. 1);
- deve essere un sedile posteriore dotato di almeno 2 cinture passeggero a 3 punti di ancoraggio (Fig. 2), omologate secondo la
norma UNI/ECE 16, o altra norma equivalente.
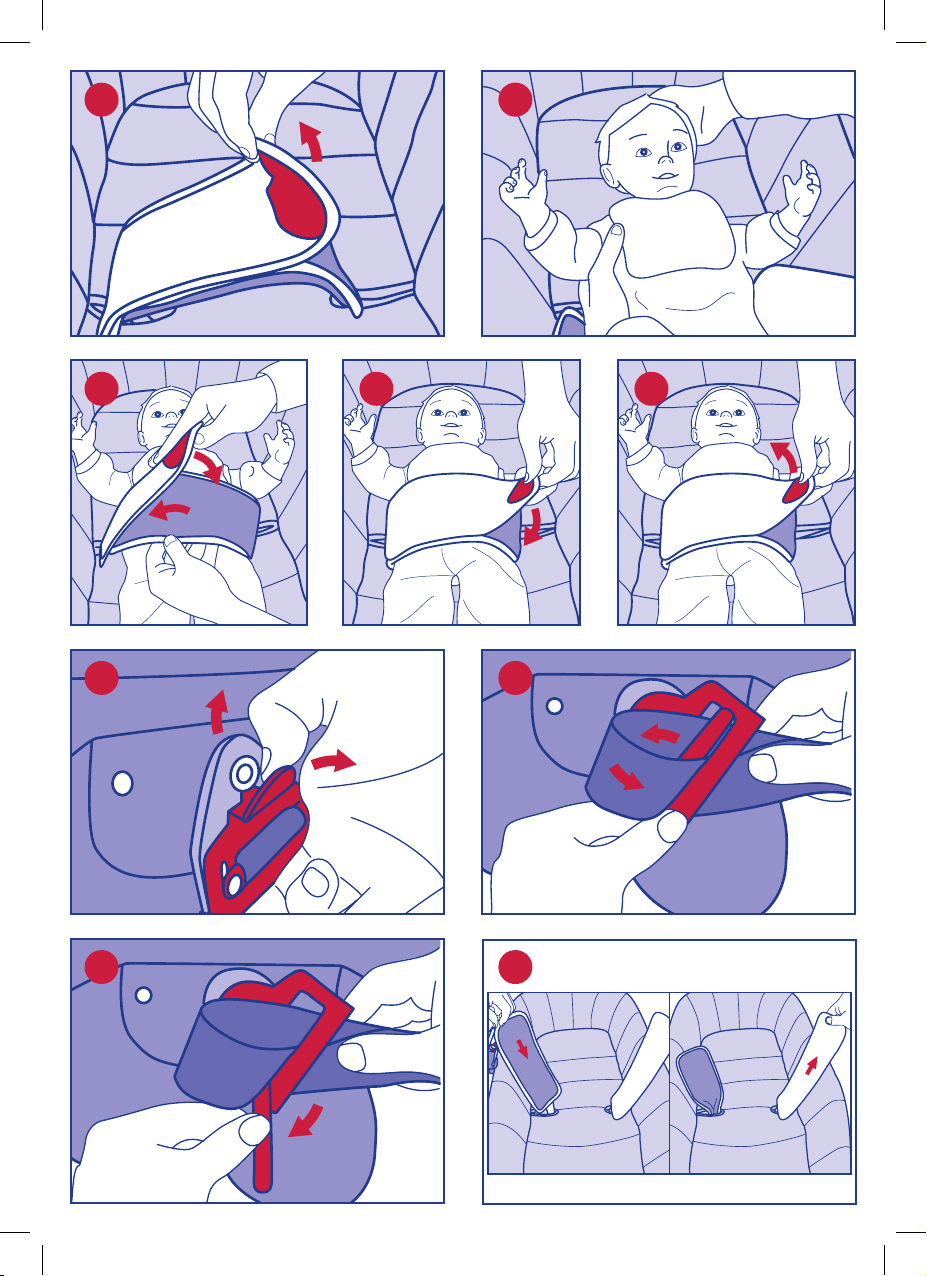
MONTAGGIO DEL KIT TRIO CAR SULLA SACCA
Se KIT TRIO CAR è stato acquistato separatamente dalla sacca,
seguire le seguenti istruzioni di montaggio, prima di posizionare
la sacca in auto.
Cintura addominale
La cintura addominale dovrà essere infi lata nei due fori ricavati
nella base della sacca (Fig. 3).
Piegare la fascia con il bollo rosso in modo che il velcro sia all’interno, infi larla nel foro di destra (Fig. 4), ed estrarla dal foro
di sinistra (Fig. 5).
Chiudere la cintura sovrapponendo la fascia con il bollo rosso all’altra fascia (Fig. 6).
ATTENZIONE! Verifi care che la cintura non risulti attorcigliata
(Fig. 7).
Fibbie per cintura auto
Per agganciare le due fi bbie ai perni posti alle estremità della
sacca (Fig. 8), infi lare ciascuna fi bbia nel rispettivo perno spingendola (Fig. 9) e tirare la fi bbia verso il basso fi no a sentire uno
scatto (Fig. 10).
ATTENZIONE! Non montare le fi bbie al rovescio! (Fig. 11).
Ora la sacca è pronta per essere posizionata in auto.
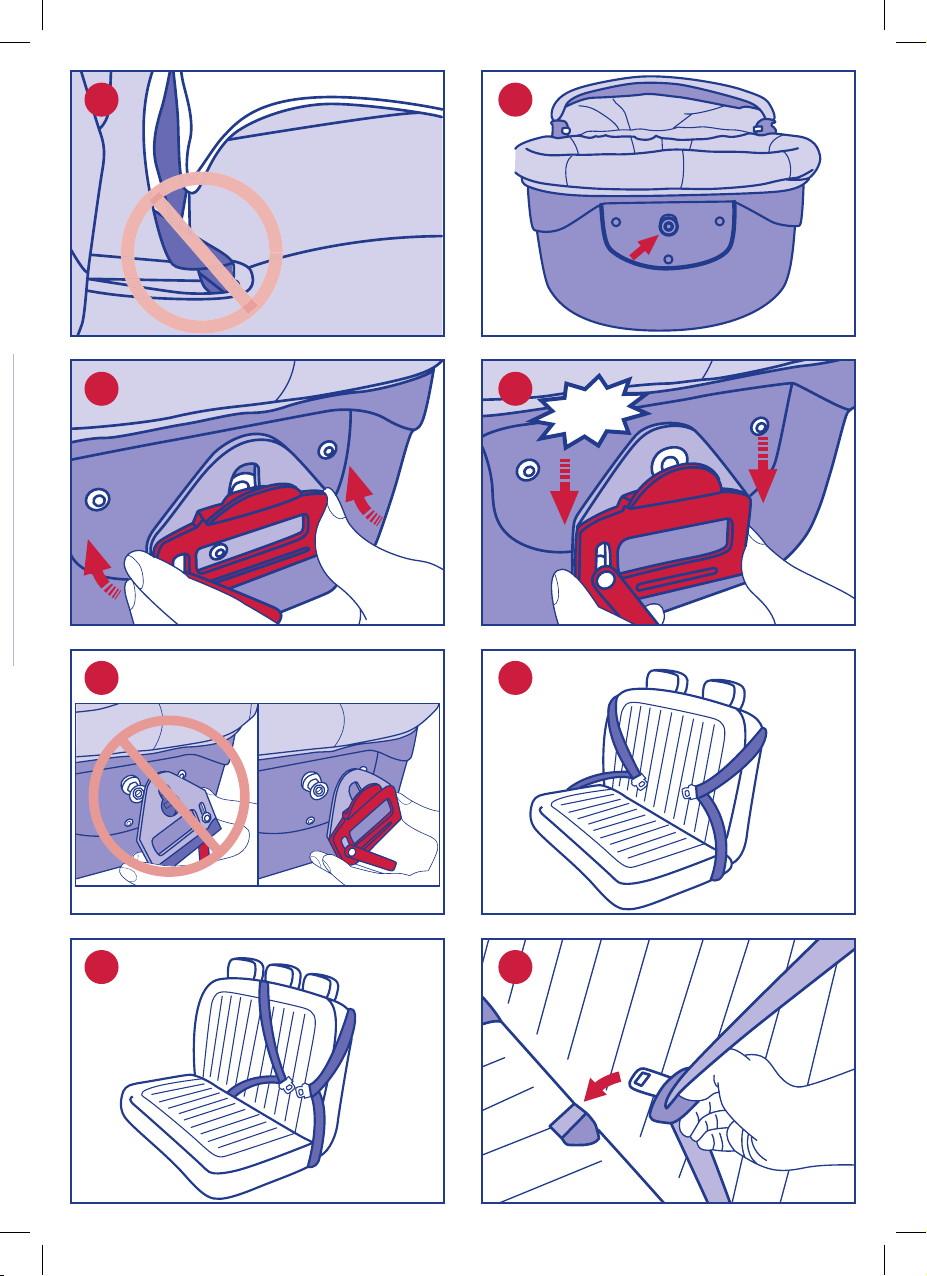
FISSAGGIO DELLA SACCA IN AUTO:
LA PRIMA VOLTA
Per fi ssare la sacca al sedile posteriore, bisogna posizionarla al
centro e agganciarla mediante le cinture dei due posti esterni
(Fig. 12). Se il sedile posteriore della vostra auto è dotato di cintura a 3 punti anche nel posto centrale, la sacca può essere montata
anche di lato, occupando il posto centrale e il laterale, agganciata
con le cinture di questi due sedili (Fig. 13).
1. Estrarre e agganciare le due cinture auto alle rispettive fi bbie
del sedile (Fig. 14).
2. Reclinare completamente lo schienale della sacca, come illustrato nel manuale d’uso della sacca.
ATTENZIONE! Non utilizzare mai la sacca in auto con il suo schienale rialzato! Non è garantita la sicurezza del prodotto!
3. Qualora le fi bbie montate sulla sacca fossero rivestite da una
copertura in tessuto, rimuoverla (Fig. 15).
4. Posizionare la sacca sul sedile nella direzione della lunghezza
(Fig. 16), in modo che sia tutta ben aderente al sedile.
5. Eseguire su entrambi i lati le seguenti operazioni:
- impugnare la cintura auto e creare un’asola (Fig. 17);
- Impugnare la fi bbia della sacca e ruotare verso l’esterno la barra
rossa della fi bbia (Fig. 18).
Infi lare nella fi bbia l’asola della cintura creata (Fig. 19) e ruotare la
barra rossa nella posizione iniziale, in modo che s’infi li all’interno
dell’asola stessa (Fig. 20).
Tirare la cintura auto verso l’arrotolatore, premendo la sacca contro il sedile, in modo da fi ssarla bene (Fig. 21).
ATTENZIONE! Verifi care che la sacca sia ben aderente al sedile.
ATTENZIONE! Verifi care che le cinture siano ben tese (Fig. 22).
6
Page 7

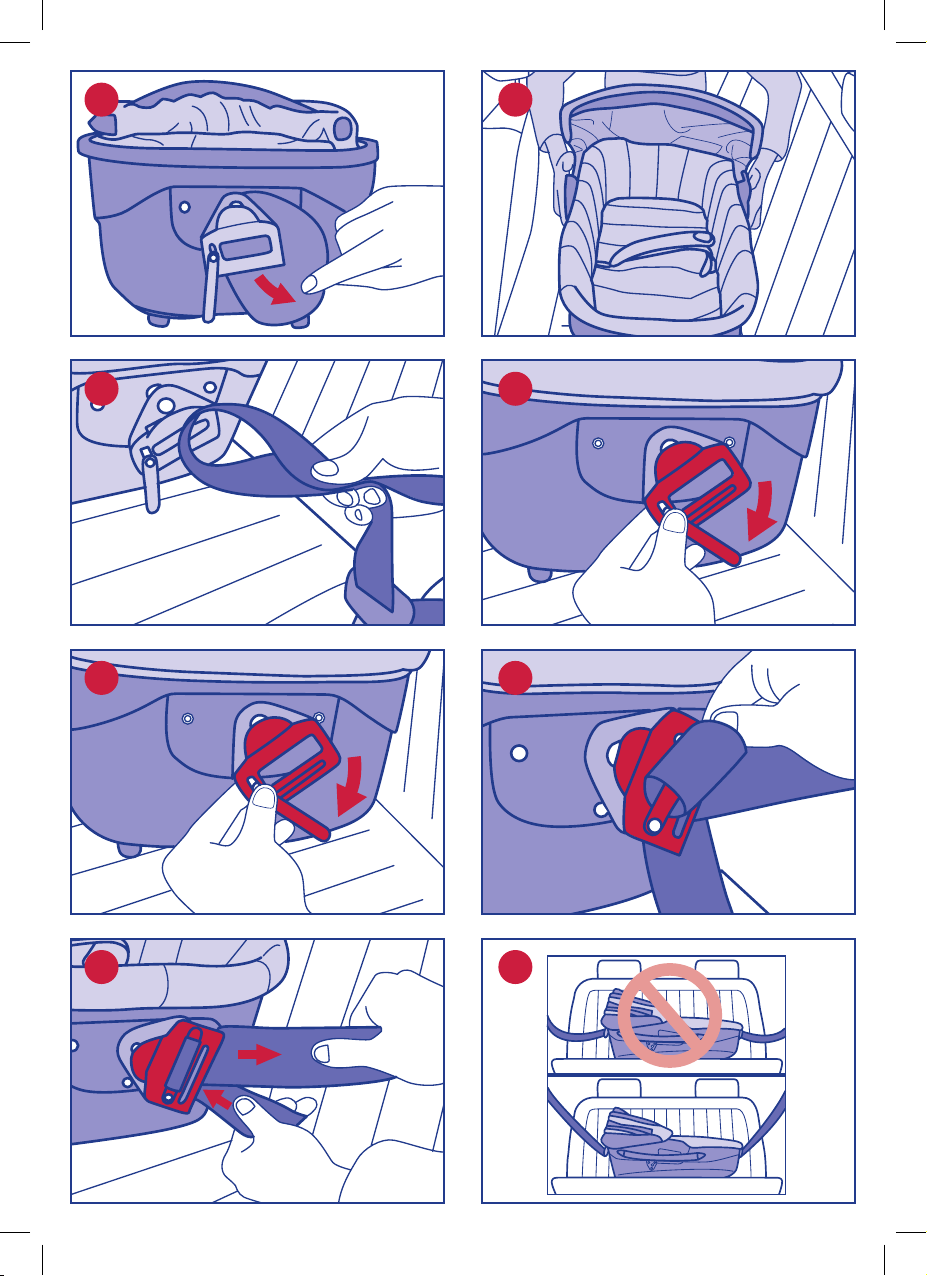
Aprire la cintura addominale, tirando la fascia con il bollo rosso
POSIZIONAMENTO DEL BAMBINO
(Fig. 23).
Far sdraiare il bambino nella sacca (Fig. 24).
Far passare sopra la vita del bambino prima la fascia di destra della cintura, poi quella di sinistra (Fig. 25).
Unire le due patelle in modo da far aderire la cintura alla vita del
bambino, ma senza stringere troppo (Fig. 26).
PRELIEVO DEL BAMBINO
Aprire la cintura addominale imbottita della sacca, tirando la fascia con il bollo rosso (Fig. 27).
SGANCIO DELLA SACCA DAL SEDILE
Eseguire sui due lati della sacca le seguenti operazioni.
Sganciare la fi bbia dalla sacca, tirando la linguetta rossa della fi bbia verso l’esterno e spingendo la fi bbia verso l’alto (Fig. 28), in
modo da liberare la sacca dalla cintura. La fi bbia rimane fi ssata
alla cintura dell’auto.
ATTENZIONE! Non utilizzare mai la cintura dell’auto per allacciare un passeggero, senza aver tolto da essa la fi bbia di KIT TRIO
CAR: potrebbe essere pericoloso!
Per rimuovere la fi bbia dalla cintura, allentare l’asola della cintura
(Fig. 29) e ruotare la barra rossa in modo da liberarla (Fig. 30).
FISSAGGIO DELLA SACCA IN AUTO:
DOPO LA PRIMA VOLTA
Per agganciare nuovamente la sacca sul sedile, quando le due
fi bbie sono rimaste già fi ssate alle due cinture auto, eseguire le
seguenti operazioni.
Verifi care che le due cinture auto siano agganciate.
Per fi ssare le fi bbie alla sacca, fare riferimento alle istruzioni del
paragrafo “MONTAGGIO DEL KIT TRIO CAR SULLA SACCA - Fibbie per cintura auto”.
Tirare la cintura auto verso l’arrotolatore, premendo la sacca contro il sedile, in modo da fi ssarla bene (Fig. 21).
ATTENZIONE! Verifi care che la sacca sia ben aderente al sedile.
ATTENZIONE! Verifi care che le cinture siano ben tese (Fig. 22).
SMONTAGGIO DEL KIT TRIO CAR DALLA SACCA
Al termine del periodo di utilizzo in auto della sacca, o per l’utilizzo fuori dall’auto, KIT TRIO CAR può essere smontato seguendo
le seguenti operazioni.
Cintura addominale
Aprire la cintura tirando la fascia con il bollo rosso (Fig. 23).
Sfi lare la fascia prima dal foro di sinistra da sotto, poi da quello di
destra da sopra (Fig. 31).
Fibbie per cintura auto
Tirare la linguetta rossa della fi bbia verso l’esterno e spingere la
fi bbia verso l’alto (Fig. 28)
PULIZIA DEL PRODOTTO
Pulire la cintura e le fi bbie esclusivamente a mano, usando un
panno inumidito con acqua. Non usare solventi o altri detergenti.
ATTENZIONE! Controllare periodicamente tutte le parti della
sacca e di KIT TRIO CAR, assicurandosi che nessuna parte sia danneggiata o molto usurata.
AVVERTENZE: DA LEGGERE PRIMA DEL VIAGGIO
• Queste istruzioni devono essere conservate con cura insieme
al prodotto e facilmente reperibili.
• Il prodotto deve essere installato seguendo scrupolosamente
le istruzioni fornite.
• Non agganciare mai il prodotto utilizzando una cintura auto a
solo due punti di ancoraggio.
• Installare il prodotto solo su sedili correttamente fi ssati alla
struttura dell’auto e rivolti verso la parte anteriore della vettura.
• Non lasciare sedili auto pieghevoli, ribaltabili o rotanti non
ben agganciati e assicurarsi che non siano trasportati in auto
oggetti non ben fi ssati, soprattutto sul ripiano posteriore: in
caso di incidente o brusca frenata potrebbero urtare e ferire
i passeggeri.
• Installare il prodotto in modo da evitare che un sedile mobile
o la portiera possano interferire con esso. Evitare che nessuna
parte del prodotto rimanga impigliata tra le portiere o sfreghi
contro punti taglienti.
• Assicurarsi sempre che la cintura dell’auto sia correttamente
tesa, che non sia attorcigliata o in posizioni non corrette.
• Non utilizzare il prodotto se alcune parti risultano rotte o
mancanti.
• Non interporre nessun oggetto (cuscini, coperte, etc.) tra il
sedile auto e la sacca, o tra la sacca e il bambino.
• Non mettere oggetti pesanti sopra il prodotto.
• Assicurarsi che tutti i passeggeri della vettura utilizzino la
cintura di sicurezza, per la propria sicurezza, ma anche perché
durante il viaggio, potrebbero urtare il bambino.
• Tenere i sacchetti di plastica lontani dal bambino, per evitare
rischi di soffocamento.
• Verifi care regolarmente lo stato d’usura del prodotto e la
presenza di eventuali rotture. In caso di danneggiamenti non
utilizzare più il prodotto e tenerlo fuori dalla portata dei bambini.
• Quando non si trasporta il bambino, la sacca deve essere lasciata agganciata, oppure va riposta nel bagagliaio.
• La società ARTSANA declina ogni responsabilità per un uso
improprio del prodotto.
Per ulteriori informazioni e per richieste di ricambi contattare il
Servizio Clienti Artsana:
posta: ARTSANA SPA
Servizio Clienti
Via Saldarini Catelli n.1
22070 Grandate COMO – ITALY
telefono: (0039) 031 382000
e-mail: info@artsana.it
sito: www.chicco.com
7
Page 8

F
I
K T C
ELEMENTS
1. Ceinture abdominale
2. Boucles de fi xation à la ceinture de sécurité auto
TRES IMPORTANT: LIRE TRES ATTENTIVEMENT
• Lire attentivement ces instructions avant de se servir du produit.
• POUR UTILISER CE PRODUIT, Y MONTER EXCLUSIVEMENT
UNE NACELLE CHICCO.
• POUR UTILISER CE PRODUIT, Y MONTER EXCLUSIVEMENT
LES MODELES DE NACELLE PREVUS POUR POUVOIR Y ETRE
INSTALLES : VERIFIER SUR LA NOTICE D’INSTRUCTIONS DE
VOTRE NACELLE SI ELLE EST PREVUE POUR L’INSTALLATION
DU “KIT TRIO CAR”.
• Pour le montage et l’installation du produit, suivre scrupuleusement les instructions. Ne laisser personne s’en servir avant
d’avoir lu les instructions.
• Conserver cette notice avec le produit.
• Aucun produit pour la sécurité en voiture ne peut garantir la
totale sécurité de l’enfant en cas d’accident, mais l’emploi de ce
produit réduit le risque de blessures et de mort de l’enfant.
• L’utilisation non correcte du produit accroît les risques de blessures graves à l’enfant, et ce non seulement en cas d’accident
mais dans d’autres situations également.
• En cas de dommages, de déformations ou de forte usure du produit, le remplacer : ses caractéristiques de sécurité pourraient
être compromises.
• Ne faire aucun ajout ou modifi cation au produit sans l’accord
préalable du fabricant. Ne pas installer d’accessoires, de pièces
de rechange ou d’éléments non fournis par le fabricant.
• Ne jamais laisser l’enfant sans surveillance dans le siège auto,
pour quelque raison que ce soit.
• Ne jamais laisser la nacelle sur le siège auto sans l’accrocher :
elle pourrait heurter et blesser les passagers.
• Si on laisse la voiture immobile au soleil, inspecter soigneusement la nacelle avant d’y mettre l’enfant, pour s’assurer qu’elle
ne présente pas de point surchauffé, sinon la laisser refroidir
avant d’y installer l’enfant pour éviter qu’il ne se brûle.
• Après un accident même léger, la nacelle et le KIT TRIO CAR
pourraient présenter des dommages invisibles à l’œil nu, par
conséquent, les remplacer de toute façon.
• Ne pas se servir de produits d’occasion pour la sécurité en voiture : ils pourraient présenter des dommages structuraux invisibles à l’œil nu susceptibles d’en compromettre la sécurité.
• La société ARTSANA décline toute responsabilité en cas d’utilisation impropre du produit.
AVIS IMPORTANT
1. Ceci est un dispositif de retenue “Universel” pour enfant, homologué conformément à la norme N°44, amendements série
04. Il est adapté à une utilisation générale dans les véhicules et
compatible avec la majeure partie (sauf exceptions) des sièges
de voitures.
2. La parfaite compatibilité est plus facilement obtenue lorsque le
constructeur du véhicule déclare dans le manuel d’instructions que
le véhicule prévoit l’installation de dispositifs de retenue “Universel” pour la tranche d’âge en question.
3. Ce dispositif de retenue est classé “Universel” sur la base de
critères d’homologation plus stricts par rapport à des modèles
précédents qui ne disposent pas de cet avertissement.
4. Adapté uniquement pour l’utilisation dans des véhicules
dotés de ceinture de sécurité à 3 points, statique ou à enrouleurs, homologuée conformément à la norme UN/ECE N°16 ou
autres standards équivalents.
5. En cas d’incertitude, contacter le fabricant du dispositif de
retenue ou le revendeur.
L’élément KIT TRIO CAR permet de fi xer les nacelles Chicco prévues à cet effet (voir la notice d’instructions de la nacelle) en voiture pour y transporter l’enfant en position correcte pendant ses
premiers mois de vie.
C’est un produit homologué conformément à la norme européenne ECE R44/04, “Groupe 0”, pour le transport d’enfants de 0
à 10 Kg, jusqu’à un âge d’environ 6 mois.
Une fois le KIT TRIO CAR monté sur la nacelle, on peut fi xer celleci dans la voiture.
CONDITIONS REQUISES POUR LE SIEGE AUTO
MODE D’EMPLOI
Pour pouvoir adapter la nacelle au siège de la voiture, ce dernier
doit satisfaire les conditions suivantes:
- il doit être tourné dans le sens de la marche (Fig. 1);
- il doit s’agir d’un siège arrière muni d’au moins 2 ceintures passagers à 3 points d’ancrage (Fig. 2) et homologué conformément
à la norme UNI/ECE 16 ou à une autre norme équivalente.
MONTAGE DU KIT TRIO CAR SUR LA NACELLE
Si on achète le KIT TRIO CAR séparément de la nacelle, suivre les
instructions de montage suivantes avant de mettre cette dernière
dans la voiture.
Ceinture abdominale
Enfi ler la ceinture abdominale dans les deux trous qui se trouvent
à la base de la nacelle (Fig. 3).
Plier la courroie avec la marque rouge de façon à ce que le velcro
soit à l’intérieur, puis l’enfi ler dans le trou de droite (Fig. 4) et
l’extraire par le trou de gauche (Fig. 5).
Fermer la ceinture en superposant la courroie avec la marque
rouge sur l’autre courroie (Fig. 6).
ATTENTION! Contrôler si la ceinture n’est pas entortillée (Fig. 7).
Boucles pour ceinture auto
Pour accrocher les deux boucles aux ergots qui se trouvent aux
extrémités de la nacelle (Fig. 8), les enfi ler chacune sur son ergot
respectif en la poussant (Fig. 9) et tirer la boucle vers le bas jusqu’au déclic (Fig. 10).
ATTENTION! Ne pas monter les boucles à l’envers! (Fig. 11).
La nacelle est prête à être mise dans la voiture.
FIXATION DE LA NACELLE DANS LA VOITURE : LA
PREMIERE FOIS
Pour fi xer la nacelle au siège arrière, la poser au centre de celuici et l’accrocher à l’aide des ceintures des deux places latérales
(Fig. 12). Si le siège arrière de la voiture est muni d’une ceinture
à 3 points à la place centrale également, on peut aussi monter
la nacelle sur une place latérale en lui faisant occuper les places
centrale et latérale en l’accrochant à l’aide des ceintures de ces
deux sièges (Fig. 13).
1. Extraire et accrocher les deux ceintures auto aux boucles respectives du siège (Fig. 14).
2. Incliner complètement le dossier de la nacelle, comme indiqué
dans la notice d’instructions de celle-ci.
ATTENTION! Ne jamais se servir de la nacelle en voiture avec le
dossier relevé! Dans ce cas, la sécurité du produit ne serait pas
garantie!
3. Si les boucles montées sur la nacelle ont un revêtement en
tissu, enlever celui-ci (Fig. 15).
4. Mettre la nacelle sur le siège dans le sens de la longueur (Fig.
16), en la faisant bien adhérer au siège.
5. Procéder comme suit des deux côtés :
- prendre la ceinture auto et former un œillet (Fig. 17);
- prendre la boucle de la nacelle et tourner la barre rouge de la
boucle vers l’extérieur (Fig. 18).
Enfi ler l’œillet formé avec la ceinture dans la boucle (Fig. 19) et
tourner la barre rouge en position initiale en l’enfi lant à l’intérieur
de l’œillet (Fig. 20).
Tirer la ceinture auto vers l’enrouleur, en poussant la nacelle contre le siège pour bien la fi xer (Fig. 21).
8
Page 9
ATTENTION! Contrôler si la nacelle adhère bien au siège.
ATTENTION! Contrôler si les ceintures sont bien tendues (Fig.
22).
POUR POSITIONNER L’ENFANT
Ouvrir la ceinture abdominale, en tirant la courroie avec la marque rouge (Fig. 23).
Allonger l’enfant dans la nacelle (Fig. 24).
Faire passer d’abord la courroie de droite de la ceinture par-dessus la taille de l’enfant puis celle de gauche (Fig. 25).
Joindre les deux rotules pour faire adhérer la ceinture à la taille de
l’enfant, mais sans serrer trop fort (Fig. 26).
POUR ENLEVER L’ENFANT
Ouvrir la ceinture abdominale rembourrée de la nacelle en tirant
sur la courroie avec la marque rouge (Fig. 27).
POUR DETACHER LA NACELLE DU SIEGE
Procéder aux opérations suivantes des deux côtés de la nacelle.
Décrocher la boucle de la nacelle en tirant sur la languette rouge
de la boucle vers l’extérieur et en poussant la boucle vers le haut
(Fig. 28), de façon à libérer la nacelle de la ceinture. La boucle
reste fi xée à la ceinture de la voiture.
ATTENTION! Ne jamais se servir de la ceinture de la voiture pour
accrocher un passager avant d’en avoir enlevé la boucle du KIT
TRIO CAR : cela pourrait être dangereux!
Pour enlever la boucle de la ceinture, desserrer l’œillet de la ceinture (Fig. 29) et tourner le pivot rouge pour la libérer (Fig. 30).
FIXATION DE LA NACELLE DANS LA VOITURE : APRES
LA PREMIERE FOIS
Pour raccrocher la nacelle au siège quand les deux boucles sont
encore fi xées aux deux ceintures auto, procéder comme suit.
Contrôler si les deux ceintures auto sont accrochées.
Pour fi xer les boucles à la nacelle, suivre les instructions du paragraphe “MONTAGE DU KIT TRIO CAR SUR LA NACELLE - Boucles
pour ceinture auto”.
Tirer la ceinture auto vers l’enrouleur, en poussant la nacelle contre le siège pour bien la fi xer (Fig. 21).
ATTENTION! Contrôler si la nacelle adhère bien au siège.
ATTENTION! Contrôler si les ceintures sont bien tendues (Fig.
22).
DEMONTAGE DU KIT TRIO CAR
DE LA NACELLE
A la fi n de la période d’utilisation de la nacelle dans la voiture, ou
pour s’en servir hors de la voiture, démonter le KIT TRIO CAR en
procédant comme suit.
Ceinture abdominale
Ouvrir la ceinture en tirant sur la courroie avec la marque rouge
(Fig. 23).
Désenfi ler la courroie du trou de gauche d’abord par en-dessous,
puis par celui de droite par en-dessus (Fig. 31).
Boucles pour ceinture auto
Tirer sur la languette rouge de la boucle vers l’extérieur puis pousser la boucle vers le haut (Fig. 28)
NETTOYAGE DU PRODUIT
Nettoyer la ceinture et les boucles uniquement à la main, en se
servant d’un chiffon imbibé d’eau. Ne pas utiliser de solvants ou
autres détergents.
ATTENTION! Contrôler périodiquement toutes les parties de la
nacelle et du KIT TRIO CAR en s’assurant qu’elles ne présentent
aucun signe de détérioration ou d’usure excessive.
AVERTISSEMENTS : A LIRE AVANT LE VOYAGE
• Conserver soigneusement ces instructions avec le produit et
de façon à pouvoir les trouver facilement.
• Pour installer le produit, suivre scrupuleusement les instructions données.
• Ne jamais accrocher le produit en se servant d’une ceinture
auto à deux points d’ancrage seulement.
• N’installer le produit que sur des sièges correctement fi xés à la
structure de la voiture et tournés vers l’avant de celle-ci.
• Ne jamais laisser de sièges auto pliants, inclinables ou tournants non accrochés et s’assurer qu’on ne transporte pas dans
la voiture d’objets mal fi xés, surtout sur le plateau arrière: en
cas d’accident ou de coup de frein brutal, ils pourraient heurter et blesser les passagers.
• Installer le produit en évitant toute interférence de celui-ci
avec un siège mobile ou une portière. Ne pas laisser une partie
du produit coincée entre les portières ou frotter contre des
endroits coupants.
• Toujours contrôler si la ceinture de la voiture est correctement
tendue, et si elle n’est pas entortillée ou ne prend pas de positions incorrectes.
• Ne pas se servir du produit s’il y a des parties cassées ou manquantes.
• Ne pas mettre d’objets (coussins, couvertures, etc.) entre le
siège auto et la nacelle, ou entre la nacelle et l’enfant.
• Ne pas poser d’objets lourds sur le produit.
• Contrôler si tous les passagers de la voiture mettent leur ceinture de sécurité, autant pour leur propre sécurité que parce
qu’ils pourraient heurter l’enfant pendant le voyage.
• Tenir les sacs en plastique hors de portée de l’enfant pour éviter tout risque d’étouffement.
• Vérifi er régulièrement l’état d’usure du produit et la présence
de ruptures éventuelles. En cas de détériorations, ne pas utiliser le produit et le tenir hors de portée des enfants.
• Laisser la nacelle attachée même quand on ne transporte pas
l’enfant, ou la mettre dans le coffre à bagages.
• La société ARTSANA décline toute responsabilité en cas d’utilisation impropre du produit.
Pour plus d’informations, et pour les demandes de pièces de rechange, contacter le Service Client CHICCO:
adresse: CHICCO
Rue Gay Lussac
ZI Mitry Compans
77292 Mitry Mory Cedex
téléphone: 01 64 67 44 88
e-mail: info@chicco.fr
site: www.chicco.com
9
Page 10

D
I
K T C
1. Beckengurt
2. Gurtschlösser zur Befestigung des Autogurts
BESONDERS WICHTIGER HINWEIS!
SEHR SORGFÄLTIG LESEN!
• Lesen Sie diese Gebrauchsanleitung vor Verwendung des Produktes
sorgfältig durch.
• DIESES PRODUKT DARF AUSSCHLIESSLICH MIT EINEM KINDERWAGENAUFSATZ DER MARKE CHICCO MONTIERT UND VERWENDET WERDEN.
• DIESES PRODUKT DARF AUSSCHLIESSLICH MIT DEN ZUR MONTAGE GEEIGNETEN KINDERWAGENAUFSATZ-MODELLEN MONTIERT UND VERWENDET WERDEN: ÜBERPRÜFEN SIE AUF DER GEBRAUCHSANLEITUNG IHRES KINDERWAGENAUFSATZES, OB ER
FÜR DIE INSTALLATION VON „KIT TRIO CAR“ GEEIGNET IST.
• Halten Sie sich bei Montage und Installation des Produktes genau an
die Anleitungen. Achten Sie darauf, dass keiner das Produkt verwendet, ohne die Gebrauchsanleitung gelesen zu haben.
• Bewahren Sie diese Gebrauchsanleitung zusammen mit dem Produkt auf.
• Kein Sicherheitsprodukt für das Auto kann Ihrem Kind bei einem
Unfall vollkommene Sicherheit gewährleisten; der Gebrauch dieses
Produktes schränkt die Gefahr von Verletzung /Tod des Kindes jedoch ein.
• Durch einen nicht korrekten Gebrauch dieses Produkts erhöht sich
die Gefahr schwerwiegender Schäden für Ihr Kind, und zwar nicht
nur im Fall eines Crashs, sondern auch in anderen Situationen.
• Wenn das Produkt aus irgendeinem Grund beschädigt, verformt oder
stark abgenutzt sein sollte, darf es nicht mehr benutzt werden: Die
Sicherheitsfaktoren könnten nicht mehr gegeben sein.
• Nehmen Sie ohne Zustimmung des Herstellers keinerlei Veränderungen am Produkt vor. Montieren Sie stets nur Zubehör-, Ersatz- oder
Bauteile, die vom Hersteller für dieses Produkt vorgesehen sind.
• Lassen Sie das Kind niemals im Kinderwagenaufsatz ohne Aufsicht
im Auto.
• Den Kinderwagenaufsatz niemals unbefestigt auf dem Autositz positionieren: Er könnte auf die Insassen prallen und sie verletzen.
• Falls Ihr Fahrzeug länger in der Sonne stand, vergewissern Sie sich
bitte, bevor Sie das Kind im Kinderwagenaufsatz unterbringen, dass
keines der Kinderwagenaufsatzteile überhitzt ist: Lassen Sie das Produkt bitte abkühlen, bevor Sie das Kind hineinlegen, damit es nicht
zu Verbrennungen kommen kann.
• Bei einem - wenn auch noch so leichten - Unfall können der Kinderwagenaufsatz und KIT TRIO CAR Schäden davontragen, die mit
bloßem Auge nicht zu erkennen sind: Sie sind daher in jedem Fall
zu ersetzen.
• Verwenden Sie keine Auto-Sicherheitsprodukte aus zweiter Hand:
Sie könnten strukturelle Schäden aufweisen, die mit bloßem Auge
nicht zu erkennen sind, jedoch die Sicherheit des Produktes beeinträchtigen.
• Die Gesellschaft ARTSANA übernimmt bei unsachgemäßer Verwendung dieses Produktes keine Haftung.
1. Dies ist eine „Universal“- Rückhalteeinrichtung für Kinder. Sie ist
nach der Regelung Nr. 44, Änderungsserie 04, zugelassen für die allgemeine Verwendung in Fahrzeugen und passt auf die meisten, aber
nicht auf alle PKW-Sitze.
2. Der ordnungsgemäße Sitz der Einrichtung kann vorausgesetzt
werden, wenn der Fahrzeughersteller im Fahrzeughandbuch erklärt,
dass das Fahrzeug für den Einbau einer „Universal“-Rückhalteeinrichtung für Kinder der betreffenden Altersgruppe geeignet ist.
3. Diese Rückhalteeinrichtung für Kinder wurde nach strengeren
Bedingungen in die Klasse „Universal“ eingestuft als die früheren
Ausführungen, die diese Aufschrift nicht tragen.
4. Nur geeignet, wenn das Fahrzeug mit Dreipunkt-/Statik-/Retraktor-Sicherheitsgurten ausgerüstet ist, die nach ECE-Regelung Nr. 16
oder anderen vergleichbaren Normen zugelassen sind.
5. Im Zweifelsfall kann der Hersteller der Rückhalteeinrichtung für
Kinder oder der Fachhändler befragt werden.
BESTANDTEILE
WICHTIGER HINWEIS
Das Zuberhörteil KIT TRIO CAR ermöglicht es, die dafür geeigneten
Chicco-Kinderwagenaufsätze (siehe Gebrauchsanleitung des Kinderwagenaufsatzes) im Inneren Ihres Wagens zu befestigen und zur
korrekten Beförderung Ihres Kindes in seinen ersten Lebensmonaten
zu verwenden.
Es handelt sich um ein nach der Europanorm ECE R44/04 „Gruppe
0“ für den Transport von Kindern mit 0 bis 10 kg Körpergewicht zugelassenes Produkt. Es kann für Kinder bis zum Alter von ca. 6 Monaten
verwendet werden.
Nachdem KIT TRIO CAR am Kinderwagenaufsatz montiert wurde,
kann der Kinderwagenaufsatz im Auto fi xiert werden.
ERFORDERLICHE EIGENSCHAFTEN DES FAHRZEUGSITZES
Damit der Kinderwagenaufsatz am Sitz befestigt werden kann, muss
das Fahrzeugsitz folgende Anforderungen erfüllen:
- Er muss in Fahrtrichtung ausgerichtet sein (Abb.1).
- Es muss sich dabei um einen Rücksitz mit mindestens zwei 3-PunktPassagier-Sicherheitsgurten handeln (Abb.2), die nach der ECE-Regelung 16 oder einer anderen vergleichbaren Norm zugelassen sind.
Falls KIT TRIO CAR nicht gleichzeitig mit dem Kinderwagenaufsatz
erworben wurde, befolgen Sie die Montageanleitungen, bevor der
Kinderwagenaufsatz im Auto positioniert wird.
Beckengurt
Der Beckengurt ist in die beiden Öffnungen an dem Kinderwagenaufsatz-Boden einzuführen (Abb.3).
Biegen Sie das Gurtteil mit der roten Markierung so, dass sich der
Klettverschluss innen befi ndet, führen Sie es in die rechte Öffnung
(Abb. 4) ein und ziehen Sie es aus der linken Öffnung wieder heraus
(Abb. 5).
Schließen Sie den Gurt, indem Sie das Gurtteil mit der roten Markierung über das andere Gurtteil legen (Abb. 6).
WARNUNG! Vergewissern Sie sich, dass der Gurt nicht verdreht ist
(Abb. 7).
Gurtschlösser für Autosicherheitsgurte
Um die beiden Gurtschlösser an den sich an den Enden des Kinderwagenaufsatzes befi ndenden Stiften zu befestigen (Abb.8), jedes Gurtschloss in den entsprechenden Stift einführen und schieben (Abb.9)
und das Gurtschloss so lange nach unten ziehen, bis es hörbar einrastet (Abb.10).
WARNUNG! Montieren Sie die Gurtschlösser nicht verkehrt herum!
(Abb. 11).
Nun kann der Kinderwagenaufsatz im Auto positioniert werden.
Um den Kinderwagenaufsatz auf dem Rücksitz zu befestigen, ist er in
der Mitte zu positionieren und mit den Sicherheitsgurten der beiden
äußeren Sitze zu fi xieren (Abb.12). Sollte der Rücksitz Ihres Autos auch
am mittleren Sitzplatz mit 3 Punkt-Sicherheitsgurten ausgestattet
sein, kann der Kinderwagenaufsatz auch seitlich montiert werden, indem er sowohl den mittleren als auch den seitlichen Sitzplatz ausfüllt
und mit den Sicherheitsgurten dieser Sitze festgeschnallt wird (Abb.
13).
1. Die beiden Autogurte herausziehen und an den entsprechenden
Gurtschlössern des jeweiligen Sitzes befestigen (Abb. 14).
2. Die Rückenlehne des Kinderwagenaufsatzes vollständig zurückklappen, wie in der Kinderwagenaufsatz-Gebrauchsanleitung angegebenen.
WARNUNG! Der Kinderwagenaufsatz darf im Auto niemals mit hochgestellter Rückenlehne verwendet werden, da die Sicherheit des Produktes dann nicht mehr gewährleistet ist!
3. Sollten die auf dem Kinderwagenaufsatz montierten Gurtschlösser
mit Stoff überzogen sein, ist dieser Bezug zu entfernen (Abb.15).
4. Den Kinderwagenaufsatz der Länge nach auf dem Sitz positionieren
(Abb. 16), so dass er vollständig und sicher auf dem Sitz aufl iegt.
5. Auf beiden Seiten sind folgende Handgriffe auszuführen:
- Den Autogurt in die Hand nehmen und zur Schlaufe legen (Abb. 17).
- Das Gurtschloss des Kinderwagenaufsatzes in die Hand nehmen und
die rote Stange des Gurtschlosses nach außen drehen (Abb. 18).
Führen Sie die aus dem Autogurt gebildete Schlaufe in das Gurtschloss
ein (Abb. 19) und drehen Sie die rote Stange wieder in die Ausgangsposition, so dass sie sich ins Innere der Schlaufe einfügt (Abb. 20).
10
GEBRAUCHSANLEITUNG
MONTAGE VON KIT TRIO CAR AUF DEM
KINDERWAGENAUFSATZ
ERSTMALIGE BEFESTIGUNG DES
KINDERWAGENAUFSATZES IM AUTO:
Page 11
Ziehen Sie nun den Autogurt in Richtung des Retraktors und drücken
Sie dabei den Kinderwagenaufsatz gegen den Autositz, damit er sicher
fi xiert wird (Abb. 21).
WARNUNG: Stellen Sie sicher, dass der Kinderwagenaufsatz fest auf
dem Autositz aufl iegt.
WARNUNG: Stellen Sie sicher, dass die Gurte korrekt gespannt sind
(Abb. 22).
Den Beckengurt öffnen und dazu am Gurtteil mit der roten Markierung ziehen (Abb. 23).
Das Kind in den Kinderwagenaufsatz legen (Abb. 24).
Zuerst den rechten Teil des Gurts und anschließend den linken Teil
über die Taille des Kindes
führen (Abb. 25).
Die beiden Gurtteile so miteinander verbinden, dass der Gurt ohne zu
starken Druck an der Taille des Kindes anliegt (Abb. 26).
Den gepolsterten Beckengurt des Kinderwagenaufsatzes öffnen; dabei
am Gurtteil mit der roten Markierung ziehen (Abb. 27).
Nehmen Sie auf beiden Seiten folgende Handgriffe vor:
Das Gurtschloss vom Kinderwagenaufsatz lösen; dabei die rote Zunge
des Gurtschlosses nach außen ziehen und das Gurtschloss nach oben
drücken (Abb. 28), um den Kinderwagenaufsatz so vom Sicherheitsgurt zu trennen. Das Gurtschloss bleibt am Autosicherheitsgurt.
WARNUNG! Verwenden Sie den Autogurt niemals zum Anschnallen
eines Insassen, ohne vorher das KIT TRIO CAR-Gurtschloss davon entfernt zu haben - andernfalls könnte seine Sicherheit gefährdet sein!
Um das Gurtschloss vom Sicherheitsgurt zu lösen, die Gurtschlaufe
lockern (Abb. 29) und die rote Stange so drehen, dass das Gurtschloss
abgenommen werden kann (Abb. 30).
BEFESTIGUNG DES KINDERWAGENAUFSATZES IM AUTO:
Um den Kinderwagenaufsatz erneut auf dem Autositz zu fi xieren,
nachdem die beiden Gurtschlösser bereits an den beiden Autosicherheitsgurten befestigt wurden, ist folgendermaßen vorzugehen:
Sicherstellen, dass die beiden Sicherheitsgurte des Autos eingerastet
sind.
Zur Befestigung der Gurtschlösser am Kinderwagenaufsatz die Anleitungen des Absatzes “MONTAGE VON KIT TRIO CAR AUF DEM
KINDERWAGENAUFSATZ - Gurtschlösser für Autosicherheitsgurte“
beachten.
Ziehen Sie den Autogurt in Richtung des Retraktors und drücken Sie
dabei den Kinderwagenaufsatz gegen den Autositz, damit er sicher
fi xiert wird (Abb. 21).
WARNUNG: Stelle Sie sicher, dass der Kinderwagenaufsatz fest auf
dem Autositz aufl iegt.
WARNUNG: Stellen Sie sicher, dass die Gurte korrekt gespannt sind
(Abb. 22).
SO WIRD KIT TRIO CAR VOM KINDERWAGENAUFSATZ
Soll der Kinderwagenaufsatz nicht mehr im Auto verwendet oder außerhalb des Autos eingesetzt werden, kann KIT TRIO CAR abmontiert
werden. Gehen Sie dabei folgendermaßen vor:
Beckengurt
Öffnen Sie den Gurt, indem Sie am Gurtteil mit der roten Markierung
ziehen (Abb. 23).
Ziehen Sie das Gurtteil zuerst von unten aus der linken Öffnung und
anschließend von oben aus der rechten Öffnung (Abb. 31).
Gurtschlösser für Autosicherheitsgurte
Ziehen Sie die rote Zunge des Gurtschlosses nach außen und drücken
Sie das Gurtschloss nach oben (Abb. 28).
Gurt und Gurtschlösser sind ausschließlich mit einem mit Wasser
befeuchteten Tuch von Hand zu reinigen. Keine Lösungsmittel oder
andere Reinigungsmittel verwenden.
WARNUNG! Kontrollieren Sie regelmäßig den Zustand sämtlicher
Bauteile von Kinderwagenaufsatz und KIT TRIO CAR, um sicherzustellen, dass keines davon beschädigt oder abgenutzt ist.
UNTERBRINGUNG DES KINDES
SO NEHMEN SIE DAS KIND AUS DEM
KINDERWAGENAUFSATZ
SO LÖSEN SIE DEN KINDERWAGENAUFSATZ VOM
AUTOSITZ
NACH DEM ERSTEN MAL
ABMONTIERT
REINIGUNG DES PRODUKTS
HINWEISE: BITTE VOR DER FAHRT DURCHLESEN!
• Diese Gebrauchsanleitung muss sorgfältig zusammen mit dem
Produkt aufbewahrt werden und immer griffbereit sein.
• Halten Sie sich beim Einbau des Produktes genau an die mitgelieferten Anleitungen.
• Befestigen Sie das Produkt niemals mit einem 2-Punkt-Sicherheitsgurt.
• Das Produkt darf nur auf korrekt im Wagen arretierten Autositzen
befestigt werden, die zum vorderen Wagenteil hin ausgerichtet
sind.
• Achten Sie darauf, dass zusammenklappbare, umklappbare oder
drehbar Fahrzeugsitze stets sicher befestigt sind und dass vor allem auf der Hutablage keine unbefestigten Gegenstände transportiert werden: Bei Unfall oder Vollbremsung könnten sie auf die
Passagiere prallen und sie verletzen.
• Installieren Sie das Produkt so, dass es nicht durch einen beweglichen Sitz oder durch die Autotür beeinträchtigt wird. Achten Sie
darauf, dass kein Teil des Produktes zwischen den Türen einklemmen oder gegen scharfe Stellen scheuern kann.
• Vergewissern Sie sich stets, dass der Autogurt korrekt gespannt
und nicht verdreht ist und nicht falsch angelegt wurde.
• Verwenden Sie das Produkt nicht mehr, wenn Teile davon beschädigt sind oder fehlen.
• Legen Sie keine Gegenstände (Kissen, Decken usw.) zwischen Autositz und Kinderwagenaufsatz bzw. zwischen Kinderwagenaufsatz
und Kind.
• Legen Sie keine schweren Gegenstände auf das Produkt.
• Stellen Sie sicher, dass sämtliche Insassen des Wagens den Sicherheitsgurt anlegen - zu ihrer eigenen Sicherheit, aber auch, weil sie
während der Fahrt auf das Kind prallen könnten.
• Die Kunststoffbeutel für Kinder unzugänglich aufbewahren: Erstikkungsgefahr!
• Überprüfen Sie regelmäßig den Zustand des Produktes. Sollten
Schäden oder Verschleiß erkannt werden, das Produkt nicht mehr
verwenden und für Kinder unzugänglich aufbewahren.
• Solange das Kind nicht transportiert wird, den Kinderwagenaufsatz
in seiner Befestigung lassen oder im Kofferraum unterbringen.
• Die Gesellschaft ARTSANA übernimmt bei unsachgemäßer Verwendung dieses Produktes keine Haftung.
Für weitere Informationen wenden Sie sich bitte an
CHICCO Babyausstattung GmbH
Postfach 2086
D-63120 Dietzenbach
www.chicco.com
11
Page 12
GB
I
K T C
COMPONENTS
1. Lap belt
2. Buckles for the fi tting of the car seat belt
IMPORTANT NOTICE!
READ CAREFULLY
• Please read these instructions carefully before using the product.
• THIS PRODUCT CAN ONLY BE FITTED TO AND USED WITH A
CHICCO CARRYCOT.
• THIS PRODUCT CAN ONLY BE FITTED TO AND USED WITH
CARRYCOT MODELS SUITABLE FOR ITS INSTALLATION:
CHECK WITH THE INSTRUCTION MANUAL OF YOUR CARRYCOT AS TO WHETHER IT IS SUITABLE TO BE FITTED WITH THE
“KIT TRIO CAR”.
• Carefully follow the instructions for the assembly and installation of this product. Do not let anyone use this product without
having fi rst read the instructions.
• Keep this manual together with the product.
• No safety car product can guarantee total safety to baby in the
event of a knock; however, the use of this product reduces the
risk of injury and death.
• Incorrect use of the product increases the risk of serious injury
to baby, not only in case of a knock, but also in other situations
as well.
• If the product is damaged, deformed or worn, it must be replaced: it might have lost its original safety characteristics.
• Do not make any modifi cations or additions to the product
without the manufacturer’s approval. Do not use accessories,
spare parts or components not supplied by the manufacturer.
• Never leave your child unattended in the carrycot in the car for
any reason.
• Never leave the carrycot on the car seat unfastened: it might
knock into the other passengers injuring them.
• If the car has been left in the sun for a long time, check the car
seat before placing your child in it, as some parts could be very
hot, and should be allowed to cool down.
• After an accident, even a slight one, the carrycot and KIT TRIO
CAR could have been damaged, even if this is not visible to the
naked eye. It is recommended that they be replaced.
• Do not use second-hand car safety devices. They may have suffered structural damage, even if this is not visible to the naked
eye.
• ARTSANA declines all responsibility for the incorrect use of this
product.
IMPORTANT NOTICE
1. This is a „Universal“ child restraint. It is approved to Regulation No. 44.04 series of amendments, for general use in vehicles and it will fi t most, but not all car seats.
2. A correct fi t is likely if the vehicle manufacturer has declared
that the vehicle is capable of accepting a “Universal” child restraint for this age group.
3. This child restraint has been classifi ed as “Universal“ under
more stringent conditions than those applied to earlier designs,
which do not carry this notice.
4. Only suitable in vehicles fi tted with a 3-point, static or 3point retractor safety belts, approved to UN/ECE Regulation
No. 16 or other equivalent standard.
5. If in doubt, consult either the child restraint manufacturer
or the retailer.
HOW TO USE KIT TRIO CAR
KIT TRIO CAR is a component that allows you to fi t and use suitable Chicco carrycots (see carrycot manual) inside the car for the
correct car transportation of the child in the fi rst months of its
life. This product is approved to norm ECE R44/04 for “Group 0”,
for the transportation of babies weighing from 0 to 10 Kg, indicatively until 6 months of age.
After fi tting KIT TRIO CAR to the carrycot, the carrycot can be
fi tted in the car.
CAR SEAT REQUIREMENTS
In order to fi t the carrycot to the car seat, the car seat must comply with the following requirements:
- it must be facing forward (Fig. 1);
- It must be a rear seat fi tted with at least two 3-point safety
belts (Fig. 2), approved to norm UNI/ECE 16, or equivalent.
HOW TO FIT KIT TRIO CAR
TO THE CARRYCOT
If KIT TRIO CAR has been purchased separately from the carrycot,
please follow these assembly instructions before fi tting the carrycot in the car.
Lap belt
The lap belt must be threaded through the two slots at the base
of the carrycot (Fig. 3).
Fold the strap with the red sticker so as to leave the Velcro inside,
then thread it through the right-hand slot (Fig. 4), and pull it out
of the left-hand slot (Fig. 5).
Fasten the belt by placing the strap with the red sticker on top of
the other one (Fig. 6).
WARNING! Check that the belt is not twisted (Fig. 7).
Buckles for car safety belt
To fasten the two buckles to the pins at the two ends of the carrycot (Fig. 8), fi t each buckle to its pin by pressing it down (Fig. 9)
and pull the buckle down until you hear it click (Fig. 10).
WARNING! Do not fi t buckles the wrong way round! (Fig. 11).
Now the carrycot is ready to be fi tted in the car.
HOW TO FIT THE CARRYCOT IN THE CAR: FIRST TIME
To fi t the carrycot to the rear car seat, it must be placed in the
middle and fastened by means of the safety belts of the two
external seats (Fig. 12). If the rear middle seat of your car has a
3-point safety belt, then the carrycot can be fi tted also laterally
taking up the middle and side places and fastened by means of
the safety belts of these two seats. (Fig. 13).
1. Remove and fasten the two car safety belts to their respective
buckles (Fig. 14).
2. Completely recline the carrycot’s backrest, as shown in the carrycot manual.
WARNING! Never use he carrycot in the car with its backrest in
an upright position! In this position the product’ s safety cannot
be ensured!
3. If the carrycot buckles have a fabric cover, remove it (Fig. 15).
4. Place the carrycot on the seat lengthwise (Fig. 16), so that it
adheres to the seat.
5. Carry out the following operations on both sides:
- Hold the car safety belt and fold it to make an eyelet (Fig. 17);
- Hold the carrycot buckle and turn its red bar outwards (Fig.
18).
Thread the belt eyelet you have created through the buckle (Fig.
19) and turn the red bar back to its initial position, so that it passes through the eyelet (Fig. 20).
Pull the car safety belt towards the retractor, whilst at the same
time pressing the carrycot against the seat, in order to fasten it
securely (Fig. 21).
WARNING! Check that the carrycot is well adherent to the seat.
WARNING! Check that the belts are properly tightened (Fig. 22).
HOW TO PLACE THE CHILD IN THE CARRYCOT
Unfasten the lap belt, by pulling the strap with the red sticker
(Fig. 23).
Place the child in the carrycot (Fig. 24).
Place the belt’s right-hand strap over the child’s waist, then the
left-hand one (Fig. 25).
12
Page 13
Join the two belt ends so that the belt adheres to the child’s waist
without being too tight (Fig. 26).
HOW TO REMOVE THE CHILD FROM THE CARRYCOT
Unfasten the padded lap belt of the carrycot by pulling the strap
with the red sticker (Fig. 27).
HOW TO UNFASTEN THE CARRYCOT FROM THE CAR
SEAT
Perform the following operations on both carrycot sides.
Unfasten the carrycot buckle by pulling the red tab of the buckle
outwards and pushing the buckle upwards (Fig. 28), so as to release the carrycot from the car belt. The buckle remains fastened
to the car belt.
WARNING! Never use the car safety belt to fasten a passenger,
without fi rst removing the KIT TRIO CAR buckle: it could be dangerous!
To remove the buckle from the car safety belt, loosen the belt
eyelet (Fig. 29) and turn the red pin so as to release it (Fig. 30).
HOW TO FIT THE CARRYCOT IN THE CAR: AFTER THE
FIRST TIME
To fi t the carrycot back to the seat, when the two buckles are
already fastened to the car safety belts, perform the following
operations.
Check that the two car belts are fastened.
To fasten the buckles to the carrycot, read the instructions contained in the paragraph “HOW TO FIT KIT TRIO CAR TO THE CARRYCOT - Buckles for the car safety belt”.
Pull the car safety belt towards the retractor, while pressing the
carrycot against the seat, in order to fi t it properly (Fig. 21).
WARNING! Check that the carrycot adheres to the seat.
WARNING! Check that the belts are properly tightened (Fig. 22).
HOW TO REMOVE KIT TRIO CAR FROM THE
CARRYCOT
When you no longer wish to use the carrycot in the car, or if you
wish to use it outside the car, KIT TRIO CAR can be removed as
follows.
Lap belt
Unfasten the belt by pulling the strap with the red sticker (Fig.
23).
Unthread the strap fi rst from the left-hand slot by pulling it
downwards and then from the right-hand one by pulling it upward (Fig. 31).
Buckles for the car seat belts
Pull the red tab of the buckle outwards and push the buckle upwards (Fig. 28)
HOW TO CLEAN THE PRODUCT
Belt and buckles must be cleaned only by hand, using a damp
cloth. Use only water; do not use either solvents or any other
detergents.
WARNING! Periodically check all carrycot and KIT TRIO CAR
components to make sure that no part is damaged or severely
worn.
WARNING:
READ BEFORE LEAVING ON A CAR TRIP
• These instructions must be carefully kept in their special compartment, from which they can be easily retrieved.
• The product must be fi tted exactly as described in the instructions provided.
• Never fi t the product with a two-point safety belt.
• Fit the product only to car seats that are properly secured to
the car chassis facing forward.
• Any foldable, collapsible, or revolving car seats should be
properly secured. Ensure also that there are no loose objects
in the car - especially at the back: in case of a knock or sudden
braking, they might otherwise hit into the passengers injuring them.
• When installing the product to the vehicle ensure that movable seats or the car doors do not interfere with it. Make sure
that no part of the car seat is caught in the car doors or rubs
against cutting edges.
• Check that the car safety belt is always correctly tightened
and not twisted or otherwise incorrectly positioned.
• Do not use the product if some of its parts are broken or missing.
• Do not interpose anything, e.g. pillows or blankets, between
the car seat, or place between the child seat and the carrycot,
or between the carrycot and the child.
• Do not place any heavy objects on the product.
• Always ensure that all passengers in the car wear safety belts
for their own safety and because, while travelling, they could
knock against the child.
• Keep the plastic bags away from the child to prevent the risk
of suffocation.
• Regularly check the product for signs of wear or damage. In
case of damage, do not use the product and keep it out of
reach of children.
• When the child is not in the car, the carrycot must remain fi tted in place or it should be stored in the trunk.
• ARTSANA declines all responsibility for the incorrect use of
this product.
Please contact Artsana’s Customer Service for further information and to order any replacement parts:
Postal address: ARTSANA SPA
Servizio Clienti
Via Saldarini Catelli n.1
22070 Grandate COMO - ITALY
Telephone: (0039) 031 382000
E-mail: info@artsana.it
Web site: www.chicco.com
13
Page 14
E
I
K T C
COMPONENTES:
1. Cinturón abdominal
2. Hebillas de enganche cinturón de seguridad
MUY IMPORTANTE:
LEER CON LA MÁXIMA ATENCIÓN
• Leer atentamente estas instrucciones antes de utilizar el producto.
• ESTE PRODUCTO SE PUEDE INSTALAR Y UTILIZAR EXCLUSIVAMENTE CON UN CAPAZO MARCA CHICCO.
• ESTE PRODUCTO SE PUEDE INSTALAR Y UTILIZAR EXCLUSIVAMENTE CON LOS MODELOS DE CAPAZO EQUIPADOS PARA
LA INSTALACIÓN DEL KIT: COMPROBAR SI EL MANUAL DE
INSTRUCCIONES DE SU CAPAZO INDICA QUE EL MISMO ES
IDÓNEO PARA LA INSTALACIÓN DEL “KIT TRÍO CAR”
• Para el montaje y la instalación del producto, seguir exactamente las instrucciones. Evitar que alguien utilice el producto sin
haber leído previamente este folleto.
• Conservar este manual junto con el producto.
• Ningún producto de seguridad para auto puede garantizar la
total seguridad del niño en caso de accidente; sin embargo, la
utilización de este producto reduce el riesgo de heridas graves o
muerte del pequeño.
• Utilizar el producto en forma no correcta puede aumentar el
riesgo para el niño y no sólo en caso de accidente sino también
en otras situaciones.
• Si por cualquier motivo el producto presentara daños, deformaciones o desgaste excesivo, reemplazar de inmediato: podría
haber perdido las características de seguridad originales.
• No modifi car o incorporar partes adicionales al producto sin la
expresa aprobación del fabricante. No usar partes de recambio
o componentes no originales.
• Bajo ningún concepto se debe dejar al niño en el capazo sin vigilancia.
• No dejar el capazo apoyado en el asiento sin enganchar: podría
golpear y herir a los pasajeros.
• Si el automóvil ha quedado expuesto a los rayos del sol por un
tiempo prolongado, verifi car cuidadosamente el estado del capazo y de todos sus componentes: esperar a que se enfríe antes
de colocar nuevamente al bebé ya que podría quemarse.
• Después de un accidente, aunque sea leve, el capazo y el KIT
TRÍO CAR podrían haber sufrido daños no perceptibles a simple
vista: por lo tanto, se deben sustituir.
• No utilizar productos de seguridad para auto de segunda mano;
su estructura podría haber sufrido daños no perceptibles a simple vista pero que pueden comprometer la seguridad del producto.
• La sociedad ARTSANA declina toda responsabilidad por el uso
impropio del producto
AVISO IMPORTANTE
1. Éste es un dispositivo de retención para niños “Universal”,
homologado de acuerdo al Reglamento N°44, enmiendas serie
04. Es apto para su uso general en vehículos y es compatible
con la mayoría, pero no todos, los modelos de asientos de los
vehículos.
2. La perfecta compatibilidad se obtiene cuando el fabricante
del vehículo declara expresamente en el manual que ha sido
prevista la instalación de dispositivos de retención “Universales” para niños cuya edad está comprendida dentro del rango
considerado.
3. Éste dispositivo de retención ha sido clasifi cado como
“Universal” según los más severos criterios de homologación
respecto de los modelos precedentes que no cuentan con la
presente indicación.
4. Apto únicamente para su uso en vehículos que posean cinturón de seguridad de 3 puntos de sistema estático o con enrolla-
do, homologado de acuerdo con el Reglamento UN/ECE N°16
u otro estándar equivalente.
5. Ante la duda, consultar al fabricante del dispositivo de sujeción o al establecimiento donde lo adquirió.
INSTRUCCIONES DE USO
El KIT TRÍO CAR es un componente que permite instalar los capazos Chicco equipados al efecto (ver el manual del capazo) en
el automóvil, para transportar al bebé en forma correcta en sus
primeros meses de vida.
Es un producto homologado como “Grupo 0”, para el transporte
de niños de 0 hasta 10 kg de peso, de acuerdo con la norma europea ECE R44/04, es decir, hasta los 6 meses de edad.
Después de aplicar el KIT TRÍO CAR al capazo, éste puede ser instalado en el asiento del coche.
REQUISITOS DEL ASIENTO
Para poder instalar el capazo en el asiento, éste deberá tener los
siguientes requisitos:
- estar siempre en la dirección de marcha (Fig. 1);
- tratarse de un asiento posterior y con al menos 2 cinturones
de seguridad de 3 puntos (Fig. 2), homologados según norma
UNI/ECE 16, u otra norma equivalente.
MONTAJE DEL KIT TRÍO CAR EN EL CAPAZO
Si el KIT TRÍO CAR se compró separado del capazo, seguir las siguientes instrucciones para su montaje, antes de colocar el capazo en el coche.
Cinturón abdominal
Insertar el cinturón abdominal en los orifi cios de la base del capazo (Fig. 3).
Doblar el lado con la marca roja de tal forma que el Velcro quede
en el interior, insertar en el orifi cio de la derecha (Fig. 4) y extraer
por el de la izquierda (Fig. 5).
Cerrar el cinturón colocando el lado con la marca roja encima del
otro lado (Fig. 6).
CUIDADO: Verifi car que el cinturón no esté retorcido (Fig. 7).
Hebillas del cinturón de seguridad
Para enganchar las dos hebillas en los pernos del capazo (Fig. 8),
insertarlas, cada una en su perno, ejerciendo una suave presión
(Fig. 9) y luego tirar la hebilla hacia abajo hasta escuchar el “click”
de enganche (Fig. 10).
CUIDADO: ¡No montar las hebillas al revés! (Fig. 11).
Ahora el capazo está listo para ser instalado en el automóvil.
COMO INSTALAR EL CAPAZO POR PRIMERA VEZ
Para instalar el capazo en el asiento posterior, situar el capazo en el medio del asiento y enganchar con los cinturones de
seguridad de los asientos laterales (Fig. 12). Si el asiento posterior tiene un cinturón de seguridad de 3 puntos también en
su parte central, el capazo se puede instalar sobre un lado, para
que ocupe el asiento lateral y el central, enganchando con los
cinturones de los dos asientos (Fig. 13).
1. Extraer y enganchar los dos cinturones en las respectivas hebillas del asiento (Fig. 14).
2. Reclinar completamente el respaldo del capazo, como indica
el manual de uso.
¡ATENCIÓN: Por razones de seguridad, en el automóvil se recomienda no utilizar nunca el capazo con el respaldo levantado!.
3. Si las hebillas del capazo estuviesen forradas, quitar el forro
(Fig. 15).
4. Colocar el capazo a lo largo del asiento (Fig. 16) para que adhiera perfectamente al mismo.
5. Efectuar por ambos lados las siguientes operaciones:
- con el cinturón de seguridad formar un ojal (Fig. 17);
- agarrar la hebilla del capazo y girar hacia afuera la barra roja de
la hebilla (Fig. 18).
Insertar en la hebilla el ojal creado con el cinturón (Fig. 19) y lue-
14
Page 15
go girar la barra roja en la posición inicial para que quede bien
insertada dentro del ojal (Fig 20).
Tirar el cinturón de seguridad hacia el enrollador, empujando el
capazo contra el asiento para que quede bien anclado (Fig. 21).
CUIDADO: Verifi car que el capazo adhiera perfectamente al
asiento.
CUIDADO: Verifi car que las correas queden bien tensas (Fig. 22).
POSICIONAMIENTO DEL NIÑO
Para soltar el cinturón abdominal, tirar de la banda con el botón
rojo (Fig. 23).
Recostar al bebé en el capazo (Fig. 24).
Pasar la banda derecha del cinturón sobre la cintura del bebé y
luego la izquierda (Fig. 25).
Unir los dos terminales para que el cinturón adhiera bien a la cintura del bebé, pero sin apretar demasiado (Fig. 26).
PARA SACAR AL NIÑO
Desabrochar el cinturón abdominal acolchado del capazo, tirando de la banda con el botón rojo (Fig. 27).
DESENGANCHAR EL CAPAZO DEL ASIENTO
Efectuar en ambos lados del capazo las siguientes operaciones:
Desenganchar la hebilla del capazo tirando hacia afuera la lengüeta roja de la hebilla y empujando la misma hacia arriba (Fig.
28) para soltar el capazo. La hebilla quedará aplicada al cinturón
de seguridad del coche.
¡ATENCIÓN! No volver a utilizar el cinturón de seguridad para
pasajeros sin haber quitado la hebilla del KIT TRÍO CAR: ¡podría
resultar peligrosa!
Para quitar la hebilla del cinturón de seguridad, afl ojar el ojal (Fig.
29) y girar el perno rojo para soltarla (Fig. 30).
INSTALACIÓN DEL CAPAZO EN EL AUTOMÓVIL
(DESPUÉS DE LA PRIMERA VEZ)
Para volver a instalar el capazo en el asiento, una vez que las hebillas ya estén fi jadas en los dos cinturones de seguridad, efectuar
las siguientes operaciones:
Verifi car que los dos cinturones estén enganchados.
Para ajustar las hebillas al capazo, ver las instrucciones, “MONTAJE DEL KIT TRÍO CAR AL CAPAZO - Hebillas para cinturón de
seguridad auto”.
Tirar del cinturón de seguridad del coche hacia el enrollador, empujando el capazo contra el asiento para que quede bien anclado
(Fig. 21).
CUIDADO: Verifi car que el capazo adhiera perfectamente al
asiento.
CUIDADO: Verifi car que las correas queden bien tensas (Fig. 22).
DESMONTAJE DEL KIT TRÍO CAR
Cuando ya no se utilice el capazo en el automóvil, o cuando se
utilice simplemente fuera de éste, el KIT TRÍO CAR se puede quitar efectuando las operaciones siguientes:
Cinturón abdominal
Abrir el cinturón tirando de la banda con el botón rojo (Fig. 23).
Sacar antes la correa del orifi cio sobre el lado izquierdo, deslizándola por la parte de abajo y luego del orifi cio de la derecha, por
arriba (Fig. 31).
Hebillas cinturón de seguridad auto
Tirar la lengüeta roja de la hebilla hacia afuera y empujar la hebilla hacia arriba (Fig. 28).
LIMPIEZA DEL PRODUCTO
El cinturón y las hebillas se lavan únicamente a mano, utilizando un paño humedecido con agua. No usar disolventes u otros
detergentes.
CUIDADO: Verifi car periódicamente la estructura del capazo y los
componentes del KIT TRÍO CAR para comprobar si alguna de sus
partes resulta dañada o excesivamente desgastada.
LEER ANTES DE EMPRENDER EL VIAJE
ADVERTENCIAS:
• Conservar estas instrucciones junto con el producto para futuras consultas.
• El producto se debe instalar exclusivamente siguiendo las instrucciones proporcionadas.
• No enganchar nunca el producto si el cinturón de seguridad
del automóvil es sólo de dos puntos.
• Instalar este producto únicamente sobre asientos correctamente fi jados a la estructura del automóvil y mirando en la
dirección de marcha.
• No dejar asientos de tipo plegable, con ruedas u otros, ni
tampoco objetos o cosas sueltas en la bandeja posterior del
automóvil: en caso de accidente o de un frenazo repentino,
podrían herir a los pasajeros.
• Instalar el producto en una posición que evite interferencias
entre éste y un asiento móvil o la puerta. Evitar también que
una parte cualquiera del producto quede pillada con las puertas o roce contra puntas cortantes.
• Controlar siempre la correcta colocación del cinturón de seguridad, que esté bien estirado y que no esté retorcido.
• No utilizar el producto si algunas de sus partes faltan o resultan dañadas.
• No utilizar complementos como almohadones, mantas etc.
entre el capazo y el asiento del automóvil o entre el capazo
y el niño.
• No apoyar objetos pesados sobre el capazo.
• Verifi car que todos los pasajeros usen el cinturón de seguridad, por su propia seguridad y también porque durante el viaje
podrían colisionar con el niño.
• Mantener las bolsas de plástico lejos del alcance de los niños
para prevenir riesgos de asfi xia.
• Verifi car periódicamente el estado de desgaste del producto y
eventuales roturas. Si estuviera dañado, no volver a utilizar el
producto y dejarlo fuera del alcance de los niños.
• Cuando el niño no está a bordo, el capazo tiene que estar enganchado o guardado en el maletero.
• La sociedad ARTSANA declina toda responsabilidad por el uso
impropio del producto.
Para más información, contactar con el Servicio de Atención al
cliente de Chicco Española
correo: CHICCO ESPAÑOLA, S.A.
C/ Industrias, 10
28923 ALCORCÓN (MADRID)
Teléfono atención al consumidor: 902 11 70 93
página web: www.chicco.es
15
Page 16

P
I
K T C
COMPONENTES
1. Cinto abdominal
2. Fivelas para a fi xação com o cinto de segurança do automóvel
IMPORTANTÍSSIMO!
LEIA COM A MÁXIMA ATENÇÃO
• leia atentamente estas instruções, antes de utilizar o produto
• ESTE PRODUTO SÓ PODE SER MONTADO E UTILIZADO EXCLUSIVAMENTE EM ALCOFAS DA MARCA CHICCO.
• ESTE PRODUTO SÓ PODE SER MONTADO E UTILIZADO EXCLUSIVAMENTE NOS MODELOS DE ALCOFAS QUE PREVÊEM A SUA
INSTALAÇÃO. VERIFIQUE NO MANUAL DE INSTRUÇÕES DA
SUA ALCOFA SE ESTA ESTÁ PREVIAMENTE PREPARADA PARA A
INSTALAÇÃO DO “KIT TRIO CAR”.
• Efectue a montagem e a instalação do produto seguindo escrupulosamente as instruções. Não permita que alguém possa utilizar o
produto sem ter lido as instruções.
• Conserve este manual junto ao produto.
• Nenhum dispositivo de retenção pode garantir a segurança total
da criança em caso de acidente, mas a utilização deste produto
reduz o risco de ferimentos e morte da criança.
• Uma utilização incorrecta do produto aumenta o risco de lesões
graves para a criança, não só em caso de acidente, mas também
noutras situações.
• Se o produto estiver danifi cado, deformado ou excessivamente
desgastado, deve ser substituído: poderá ter perdido as características originais de segurança.
• Nunca efectue modifi cações ou acréscimos no produto sem a
aprovação do fabricante. Não utilize acessórios, peças de substituição e componentes não fornecidos pelo fabricante.
• Nunca deixe a criança na alcofa sem vigilância, por nenhum motivo.
• Nunca deixe a alcofa no banco do automóvel sem estar devidamente fi xada: poderá embater nos passageiros do veículo e ferilos.
• Se o veículo tiver fi cado parado ao sol por muito tempo, inspeccione cuidadosamente a alcofa antes de colocar a criança; algumas
partes poderão estar excessivamente quentes: deixe-as arrefecer
antes de instalar a criança, de modo a evitar queimaduras.
• Após um acidente, ainda que ligeiro, a alcofa e o KIT TRIO CAR
podem ter sofrido danos não visíveis a olho nu, por isso é necessário substituí-los.
• Não utilize cadeiras ou alcofas auto em segunda mão. Poderão ter
sofrido danos estruturais não visíveis a olho nu mas que comprometem a segurança do produto.
• A sociedade ARTSANA declina qualquer responsabilidade pelo
uso impróprio do produto.
AVISO IMPORTANTE
1. Este é um dispositivo de retenção para crianças, do tipo “Universal”, homologado segundo o Regulamento N°44, extensão
série 04. É indicado para a utilização generalizada em veículos
e compatível com a maior parte, mas não todos, os modelos de
bancos de automóvel.
2. A perfeita compatibilidade é mais facilmente conseguida no
caso do fabricante do veículo declarar no manual do mesmo que
este prevê a instalação de dispositivos de retenção para crianças,
tipo “Universal”, para a faixa etária em questão.
3. Este dispositivo de retenção é classifi cado como “Universal”,
segundo critérios de homologação mais rigorosos do que modelos precedentes que não dispõem do presente aviso.
4. Indicado exclusivamente para a utilização em veículos equipados com cintos de segurança de 3 pontos, estáticos ou com
enrolador, homologados segundo o Regulamento UN/ECE N°16
ou outras normas standard equivalentes.
5. Em caso de dúvida, contacte o produtor do dispositivo de retenção ou o seu revendedor.
KIT TRIO CAR é um componente que permite fi xar e utilizar as
alcofas Chicco predispostas para o efeito (consulte o manual da
alcofa), no interior do seu automóvel e transportar a criança, de
modo correcto, durante os primeiros meses de vida.
Este produto foi homologado segundo a norma europeia ECE
R44/04 relativa ao “Grupo 0”, para o transporte de crianças de 0
a 10 Kg de peso (a título indicativo, até 6 meses de idade, aproximadamente).
Depois de ter montado KIT TRIO CAR na alcofa, esta pode ser fi xada no banco do automóvel.
REQUISITOS NECESSÁRIOS DO BANCO DO
AUTOMÓVEL
INSTRUÇÕES PARA A UTILIZAÇÃO
Para poder fi xar a alcofa no banco, este deve ter os seguintes requisitos:
- deve estar virado no sentido da marcha (Fig. 1);
- deve ser um banco traseiro equipado, pelo menos com 2 cintos de
segurança com 3 pontos de fi xação (Fig. 2), homologados segundo
a norma UNI/ECE 16, ou outras normas equivalentes.
MONTAGEM DO KIT TRIO CAR NA ALCOFA
Se o KIT TRIO CAR tiver sido adquirido separadamente da alcofa,
siga as seguintes instruções para a montagem, antes de colocar a
alcofa no automóvel:
Cinto abdominal
O cinto abdominal deve ser introduzido nos dois orifícios que se
encontram no fundo da alcofa (Fig.3).
Dobre a correia com o selo vermelho de modo a que o velcro fi que
na parte de dentro, introduza-a no orifício da direita (Fig. 4), e retire-a pelo orifício da esquerda (Fig. 5).
Feche o cinto, sobrepondo a correia com o selo vermelho sobre a
outra (Fig. 6).
ATENÇÃO! Certifi que-se de que o cinto não fi ca torcido (Fig. 7).
Fivelas para o cinto de segurança do automóvel
Para encaixar as duas fi velas nos pernes que se encontram nas extremidades da alcofa (Fig. 8), introduza cada fi vela no respectivo
perne, empurrando-a (Fig. 9) e puxando-a para baixo até ouvir um
estalido (Fig. 10).
ATENÇÃO! Não monte as fi velas ao contrário! (Fig. 11).
Agora a alcofa está pronta para ser instalada no automóvel.
FIXAÇÃO DA ALCOFA NO AUTOMÓVEL:
A PRIMEIRA VEZ
Para fi xar a alcofa no banco traseiro, é necessário colocá-la ao centro e fi xá-la com os cintos dos dois bancos laterais (Fig. 12). Se o
banco traseiro central do seu automóvel também estiver equipado
com um cinto com 3 pontos de fi xação, a alcofa pode ser instalada
também de lado, ocupando o banco central e o lateral, fi xando-a
com os cintos destes dois bancos (Fig. 13).
1. Estique os dois cintos de segurança do automóvel de modo a
fechá-los (Fig. 14).
2. Recline completamente o encosto da alcofa, conforme ilustrado
no manual de instruções da alcofa.
ATENÇÃO! Nunca utilize a alcofa no automóvel com o encosto
levantado! A segurança do produto não poderá ser garantida!
3. Se as fi velas montadas na alcofa, estiverem revestidas com um
forro de tecido, retire-o (Fig. 15).
4. Coloque a alcofa ao comprido (Fig. 16), de modo a que esteja
toda bem aderente ao banco.
5. Efectue em ambos os lados, as seguintes operações:
- Pegue no cinto de segurança do automóvel e faça uma presilha
(Fig. 17);
- Pegue na fi vela da alcofa e rode para fora a barra vermelha da
fi vela (Fig. 18).
Introduza na fi vela a presilha que fez com o cinto (Fig. 19) e rode
a barra vermelha para a posição inicial, de modo a introduzi-la no
interior da própria presilha (Fig. 20).
Puxe o cinto do automóvel na direcção do enrolador, premindo a
alcofa contra o banco, de modo a fi xá-la bem (Fig. 21).
16
Page 17

ATENÇÃO! Verifi que se a alcofa está bem aderente ao banco.
ATENÇÃO! Verifi que se os cintos estão bem esticados (Fig. 22).
COMO COLOCAR A CRIANÇA
Abra o cinto abdominal, puxando pela correia com o selo vermelho
(Fig. 23).
Deite a criança na alcofa (Fig. 24).
Faça passar pela cintura da criança primeiro a correia direita do cinto e em seguida a da esquerda (Fig. 25).
Una as duas correias de modo a que adiram bem à cintura da criança, mas sem a apertarem demasiado (Fig. 26).
COMO RETIRAR A CRIANÇA
Abra o cinto abdominal acolchoado da alcofa, puxando pela correia com o selo vermelho (Fig. 27).
COMO RETIRAR A ALCOFA DO BANCO
Efectue as seguintes operações, em ambos os lados da alcofa:
Desencaixe a fi vela da alcofa, puxando para fora a lingueta vermelha e empurrando a fi vela para cima (Fig. 28), de modo a soltar a
alcofa do cinto. A fi vela permanecerá presa ao cinto de segurança
do automóvel.
ATENÇÃO! Os passageiros nunca devem utilizar os cintos de segurança do automóvel sem ter retirado a fi vela do KIT TRIO CAR:
poderá ser perigoso!
Para remover a fi vela, alargue a presilha do cinto (Fig. 29) e rode o
perno vermelho de modo a soltá-la (Fig. 30).
FIXAÇÃO DA ALCOFA NO AUTOMÓVEL: DEPOIS DA
PRIMEIRA VEZ
Para fi xar de novo a alcofa no banco do automóvel, quando as duas
fi velas estiverem já fi xadas nos dois cintos de segurança do automóvel, efectue as seguintes operações:
Verifi que se os dois cintos de segurança do automóvel estão fechados.
Para fi xar as fi velas na alcofa, siga as instruções do parágrafo
“MONTAGEM DO KIT TRIO CAR NA ALCOFA - Fivelas para o cinto
de segurança do automóvel”.
Puxe o cinto do automóvel na direcção do enrolador, pressionando
a alcofa contra o banco, de modo a fi xá-la bem (Fig. 21).
ATENÇÃO! Verifi que se a alcofa está bem aderente ao banco.
ATENÇÃO! Verifi que se os cintos estão bem esticados (Fig. 22).
DESMONTAGEM DO KIT TRIO CAR
Quando deixar de utilizar a alcofa no automóvel, ou quando pretender utilizá-la fora do automóvel, KIT TRIO CAR pode ser desmontado, efectuando as seguintes operações:
Cinto abdominal
Abra o cinto puxando pela correia com o selo vermelho (Fig. 23).
Desenfi e a correia primeiro do orifício da esquerda, por baixo, e em
seguida pelo orifício da direita, por cima (Fig. 31).
Fivelas para o cinto de segurança do automóvel
Puxe para fora a lingueta vermelha e empurre a fi vela para cima
(Fig. 28).
LIMPEZA DO PRODUTO
Limpe o cinto e as fi velas exclusivamente à mão, com um pano humedecido em água. Não utilize solventes ou outros detergentes.
ATENÇÃO! Controle regularmente todos os componentes da alcofa e do KIT TRIO CAR, certifi cando-se de que nenhum componente
esteja danifi cado ou deteriorado.
ADVERTÊNCIAS: PARA LER ANTES DE VIAJAR
• Estas instruções devem ser guardadas cuidadosamente junto
ao produto e facilmente acessíveis.
• Este produto deve ser instalado respeitando escrupulosamente
as instruções fornecidas.
• Nunca fi xe este produto, utilizando para o efeito um cinto de
segurança do automóvel apenas com dois pontos de fi xação.
• Instale o produto exclusivamente em bancos correctamente fi xados à estrutura do veículo e virados para a frente do mesmo.
• Não deixe bancos rebatíveis, amovíveis ou giratórios do automóvel mal fi xados. Certifi que-se de que não transporta no automóvel objectos não fi xados, sobretudo na prateleira posterior
que, em caso de acidente ou travagem brusca, podem embater
nos passageiros do veículo e feri-los.
• Instale o produto de modo a evitar que um banco móvel ou a porta do veículo possam interferir com o mesmo. Evite que qualquer
um dos componentes da cadeira fi que entalado nas portas ou em
contacto com pontos cortantes.
• Certifi que-se sempre de que o cinto de segurança do automóvel
se encontra devidamente esticado, sem estar torcido nem em
posições incorrectas.
• Não utilize o produto se estiver danifi cado ou se faltarem peças.
• Não coloque nenhum objecto (almofadas, mantas, etc.) entre o
banco do automóvel e a alcofa nem entre a alcofa e a criança.
• Não coloque objectos pesados por cima da alcofa.
• Certifi que-se de que todos os passageiros do veículo utilizam o
cinto de segurança, para sua própria segurança e porque, durante a viagem, poderão embater gravemente contra a criança.
• Mantenha os sacos de plástico fora do alcance das crianças,
para evitar riscos de asfi xia.
• Verifi que com regularidade a integridade do produto e a existência de eventuais danos. No caso de detectar algum componente danifi cado, não utilize o produto e mantenha-o fora do
alcance das crianças.
• Quando não transportar a criança, a alcofa deve permanecer
fi xada ou então, deverá ser retirada e guardada no porta-bagagens.
• A sociedade ARTSANA declina qualquer responsabilidade pelo
uso impróprio do produto.
Para mais informações, agradecemos que nos contacte para:
correio: Farsana Portugal, SA
Atendimento ao Consumidor
R. Humberto Madeira, nº 9
Queluz-de-Baixo
2745-663 BARCARENA
telefone: 800201977
e-mail: info@farsana.pt - site: www.chicco.pt
17
Page 18

NL
I
K T C
1. Buikgordel
2. Gespen voor autogordels
HEEL BELANGRIJK: LEES DIT AANDACHTIG
• Lees deze gebruiksaanwijzingen voor gebruik van het product goed
door.
• DIT ARTIKEL MAG ALLEEN GEMONTEERD EN GEBRUIKT WORDEN MET EEN CHICCO DRAAGMAND
• DIT ARTIKEL DIENT UITSLUITEND GEMONTEERD EN GEBRUIKT TE
WORDEN MET DE VOORGESCHN°REVEN MODELLEN DRAAGMANDEN. OM HET TE KUNNEN INSTALLEREN: CONTROLEER IN
DE GEBRUIKSAANWIJZIGING VAN UW DRAAGMAND OF DEZE
GESCHIKT IS VOOR DE INSTALLATIE VAN DE ”KIT TRIO CAR”.
• Houd precies de montage- en installatieaanwijzingen aan. Zorg
ervoor dat niemand dit artikel gebruikt zonder eerst de aanwijzigingen gelezen te hebben.
• Bewaar deze gebruiksaanwijzing tesamen met het artikel.
• Geen enkel veiligheidsproduct dat in de auto gebruikt wordt, kan
de totale veiligheid van het kind bij een ongeluk garanderen, maar
het gebruik van dit artikel kan wel het risico op letsels en op de
dood van het kind verminderen.
• Een onjuist gebruik van het artikel verhoogt het gevaar van ernstig
letsel aan het kind, niet alleen bij ongevallen, maar ook in andere
situaties.
• Vervang het artikel als het beschadigd, vervormd of sterk versleten
is: het zou zijn oorspronkelijke veiligheidskenmerken verloren kunnen hebben.
• Breng geen wijzigingen of toevoegingen aan het artikel aan zonder
toestemming van de fabrikant. Installeer geen toebehoren, onderdelen of componenten die niet door de fabrikant geleverd zijn.
• Laat het kind nooit, om geen enkel reden, zonder toezicht alleen in
de draagmand in de auto.
• Laat de draagmand nooit op de autozitting zonder vastgehaakt te
zijn: het zou tegen passagiers kunnen aanstoten en letsel kunnen
veroorzaken.
• Inspecteer de draagmand goed alvorens het kind erin te leggen,
indien de auto in de zon stil heeft gestaan, controleer of er geen
oververhitte delen zijn: laat die delen in dat geval eerst afkoelen alvorens het kind erin te zetten, zodat het zich niet kan verbranden.
• De draagmand en de KIT TRIO CAR kunnen tengevolge van zelfs
een licht ongeval schade oplopen, die met het blote oog niet zichtbaar is: daarom moeten ze in ieder geval vervangen worden.
• Gebruik geen tweedehands veiligheidsartikelen in de auto: zij zou-
den structurele schade kunnen hebben opgelopen die niet met het
blote oog zichtbaar is, maar die de veiligheid van het artikel in gevaar zou kunnen brengen.
• Artsana acht zich niet aansprakelijk voor oneigenlijk gebruik van
het artikel.
1. Dit is een “Universele” draagmand voor kinderen, goedgekeurd
volgens Reglement N° 44, amendementen serie 04. Geschikt
voor algemeen gebruik in voertuigen en compatibel met de
meeste, maar niet alle, autozittingen.
2. De draagmand is bijna altijd compatibel indien de voertuigfabrikant in het gebruikershandboek van het voertuig de installatie
van “Universele” draagmanden voor kinderen in deze leeftijdsgroep al voorzien heeft.
3. Deze draagmand is als “Universeel” geclassifi ceerd volgens
strengere goedkeuringscriteria dan de vorige modellen zonder
deze mededeling.
4. Alleen geschikt voor gebruik in voertuigen uitgerust met 3puntsveiligheidsgordel,
statisch of met opwikkelaar, goedgekeurd op basis van Reglement
UN/ECE n°16 of gelijkwaardige standaard.
5. Neem contact op met de fabrikant van de draagmand of met de
winkelier, in geval van twijfel.
COMPONENTEN
BELANGRIJKE MEDEDELING
KIT TRIO CAR is een component dat het mogelijk maakt de beschreven Chicco draagmanden (zie het instructieboekje van de
draagmand) in uw auto te bevestigen en te gebruiken. Het vervoeren van het kind in de eerste levensmaanden kan zo op een juiste
wijze plaatsvinden.
Deze draagmand is goedgekeurd als “Groep 0”, voor het vervoer van
kinderen van 0 tot 10 kg, volgens de Europese norm ECE R44/04. Ze
is dus geschikt voor kinderen tot ongeveer 6 maanden.
Na de montage van de KIT TRIO CAR aan de draagmand, kan de
draagmand in de auto bevestigd worden.
De draagmand kan op de autozitting bevestigd worden, met de volgende beperkingen: de zitting moet:
- gericht zijn in de rijrichting (Fig. 1);
- zich op de achterbank van de auto bevinden en uitgerust zijn met
minimaal 2 gordels met 3 verankeringspunten (Fig. 2), goedgekeurd
volgens de UNI/ECE 16 of een andere gelijkwaardige norm.
MONTAGE VAN DE KIT TRIO CAR AAN DE DRAAGMAND
Als de KIT TRIO CAR los van de draagmand is gekocht, volg dan
de volgende instructies vóór de draagmand in de auto wordt geplaatst.
Buikgordel
De buikgordel moet door de twee openingen in de bodem van de
draagmand worden gehaald (Fig. 3).
Buig de strook met het rode merk zo dat de klittenband zich aan de
binnenzijde bevindt, steek de strook dan via de rechteropening (Fig.
4) door naar de linkeropening (Fig. 5).
Sluit de gordel door de strook met het rode merk bovenop de andere strook te plaatsen (Fig. 6).
OPGELET! Controleer of de gordel niet gedraaid is (Fig. 7).
Gespen voor autogordels
Voor het vastkoppelen van de twee gespen in de pinnen die zich aan
de uiteinden van de draagmand (Fig.8 ) bevinden, dient men elk van
de gespen in de bijbehorende pin te steken door deze naar beneden
door te duwen (Fig. 9) totdat men een klik hoort (Fig. 10).
OPGELET! Monteer de gespen niet omgekeerd!(Fig. 11).
De draagmand is nu gereed om in de auto geplaatst te worden.
BEVESTIGING VAN DE DRAAGMAND IN DE AUTO: DE
Om de draagmand op de achterbank te bevestigen, is het nodig de
draagmand op het midden van de achterbank te zetten en deze met
de gordels van de buitenste plaatsen (Fig. 12) vast te koppelen.
Als de achterbank van de auto ook in het midden met een 3 puntsgordel is uitgerust, kan de draagmand ook aan een zijde gemonteerd
worden. Zij neemt dan de middelste en een zijwaartse zitting in beslag en wordt vastgekoppeld aan de gordels van deze twee plaatsen
(fi g. 13).
1. De twee autogordels uittrekken en vastmaken aan de bijbehorende gespen van de stoelen (fi g. 14).
2. Stel de rugleuning van de draagmand geheel naar beneden zoals
geïllustreerd in de gebruiksaanwijzing van de draagmand.
OPGELET! Gebruik de draagmand nooit in de auto met de rugleuning in de hoogste stand! De veiligheid van het product is dan niet
gegarandeerd!
3. Indien de op de draagmand gemonteerde gespen met stof bekleed zouden zijn, verwijder deze dan (Fig.15).
4. Plaats de draagmand op de zitting in de lengte (Fig. 16), zodat ze
goed aansluit op de zitting.
5. Voer aan beide zijden de volgende handelingen uit:
- pak de autogordel vast en vorm een lus (Fig. 17);
- pak de gesp van de draagmand vast en draai de rode staaf van de
gesp naar buiten (Fig. 18). Steek in de gesp de lus van de gecreëerde
gordel (Fig.19) en draai de rode staaf in de beginpositie zodat deze
zich in de lus steekt (Fig. 20).
Trek de autogordel in de richting van de opwikkelaar, druk tegelijkertijd de draagmand tegen de zitting aan zodat ze goed vastzit
(Fig.21).
18
GEBRUIKSAANWIJZINGEN
BENODIGDE VEREISTEN AUTOSTOEL
EERSTE KEER
Page 19

OPGELET! Controleer of de draagmand goed aansluit op de zitting.
OPGELET! Controleer of de gordels goed aangespannen zijn
(Fig.22).
PLAATSING VAN HET KIND
Open de buikgordel door aan de strook met het rode merk te trekken (Fig. 23).
Leg het kind in de draagmand (Fig. 24).
Haal boven het middel van het kind eerst de strook door de rechteropening en vervolgens door de linkeropening (Fig. 25).
Verenig de beide delen zo dat de gordel op het middel van het kind
aansluit, maar zonder echter te strak te zitten (Fig. 26).
HET KIND UIT DE DRAAGMAND PAKKEN
Open de beklede buikgordel in de draagmand door aan de strook
met het rode merk te trekken (Fig. 27).
LOSMAKEN VAN DE DRAAGMAND UIT DE AUTOZITTING
Voer aan beide zijden van de draagmand de volgende handelingen
uit.
Maak de gesp van de draagmand los door het rode lipje van de gesp
naar buiten te trekken en de gesp naar boven te drukken (Fig. 28),
zodat de draagmand vrijkomt uit de gordel. De gesp blijft aan de
autogordel bevestigd.
OPGELET! Gebruik nooit de autogordel om een passagier vast te
maken zonder van deze gordel de KIT TRIO CAR gesp te hebben verwijderd: dat zou gevaarlijk kunnen zijn!
Om de gesp van de gordel te kunnen verwijderen, dient men de
lus van de gordel te verslappen (Fig. 29) en de rode pin zodanig te
draaien dat de gesp vrij komt (Fig. 30).
VASTMAKEN VAN DE DRAAGMAND IN DE AUTO: NA DE
EERSTE KEER
Om de draagmand opnieuw op de autozitting vast te maken, indien
de eerder bevestigde gespen aan de autogordels niet zijn verwijderd,
dient men de volgende handelingen uit te voeren.
Controleer of de de twee autogordels vastgemaakt zijn.
Voor het bevestigen van de gespen aan de draagmand, wordt verwezen naar de instructies van de paragraaf “ MONTAGE VAN DE KIT
TRIO CAR OP DE DRAAGMAND - Gespen voor autogordels”.
Trek de autogordel naar de opwikkelaar, druk de draagmand tegen
de autozitting aan zodat ze goed vastzit (Fig. 21).
OPGELET! Controleer of de draagmand goed op de autozitting aansluit.
OPGELET! Controleer of de gordels gespannen zijn (Fig. 22).
VERWIJDERING VAN DE KIT TRIO CAR UIT DE DRAAGMAND
Bij het beëindigen van het gebruik van de draagmand in de auto of
voor gebruik buiten de auto kan de KIT TRIO CAR verwijderd worden
door als volgt te werk te gaan
Buikgordel
Open de gordel door aan de strook met het rode merk te trekken
(Fig. 23).
Trek de strook eerst van beneden uit, uit de linkeropening en daarna
van boven uit, uit de rechteropening (Fig. 31).
Gespen voor de autogordel
Trek het rode lipje van de gesp naar buiten en druk de gesp naar
boven (Fig.28).
REINIGING VAN HET PRODUCT
Gebruik voor het reinigen van de gordels en de gespen enkel een
met water bevochtigde doek. Gebruik geen oplos- of andere reinigingsmiddelen.
OPGELET! Controleer geregeld alle delen van de draagmand om er
verzekerd van te zijn dat geen enkel deel beschadigd of erg versleten is.
WAARSCHUWINGEN: LEES DEZE VOOR DE REIS
• Deze gebruiksaanwijzigingen moeten goed bewaard worden op
de daarvoor bestemde en gemakkelijk bereikbare plaats.
• De draagmand moet precies volgens de verstrekte aanwijzingen
geïnstalleerd worden.
• Bevestig deze draagmand nooit met een autogordel met slechts
twee verankeringspunten.
• Installeer het artikel alleen op goed aan de auto bevestigde en
naar de voorkant van het voertuig gerichte autozittingen.
• Laat opvouwbare, opklapbare of draaiende autozittingen nooit
onbevestigd en wees er van verzekerd dat er, vooral op de hoedenplank, geen losse voorwerpen in de auto vervoerd worden: ze
zouden de passagiers bij een ongeluk of bruusk remmen kunnen
stoten en verwonden.
• Installeer het artikel zodanig dat een mobiele zitting of portier
niet in de weg zitten. Zorg ervoor dat er geen enkel deel van de
draagmand tussen de portieren verstrikt raakt of tegen scherpe
punten aankomt.
• Wees er van verzekerd dat de autoriem altijd goed gespannen is
en niet gedraaid of in verkeerde positie zit.
• Gebruik het artikel niet indien er delen gebroken zijn of ontbreken.
• Plaats geen voorwerpen (kussens, dekens, enz.) tussen de autozitting en de draagmand of tussen de draagmand en het kind.
• Plaats geen zware voorwerpen op de draagmand.
• Wees er van verzekerd dat alle passagiers in het voertuig de autogordel gebruiken, voor hun eigen veiligheid maar ook omdat ze
tijdens de reis tegen het kind zouden kunnen aanstoten.
• Houd plastic zakjes uit de buurt van het kind, om verstikkingsgevaar te voorkomen.
• Controleer het artikel regelmatig op slijtage en eventuele breuken. Gebruik het artikel niet indien het beschadigd is en houd het
buiten het bereik van kinderen.
• De draagmand moet ook indien er geen kind vervoerd wordt,
vastgehaakt blijven of anders in de bagageruimte opgeborgen
worden.
• ARTSANA acht zich niet aansprakelijk voor een oneigenlijk gebruik van het artikel.
Voor nadere informatie en verzoeken om onderdelen kunt u contact
opnemen met de Pharsana Klantenservice:
postadres: PHARSANA NV
Maccabilaan 34
2660 Hoboken - BELGIE
telefoon: (0032) 3 828 08 80
Site: www.chicco.com
19
Page 20

GR
I
K T C
Κοιλιακή ζώνη
Αγκράφες για τη στερέωση των ζωνών ασφαλείας του αυτοκινήτου
ΣΗΜΑΝΤΙΚΗ ΠΑΡΑΤΗΡΗΣΗ! ∆ΙΑΒΑΣΤΕ ΠΡΟΣΕΚΤΙΚΑ
• Παρακαλώ διαβάστε προσεκτικά αυτές τις οδηγίες, πριν
χρησιμοποιήσετε το προϊόν.
• ΑΥΤΟ ΤΟ ΠΡΟΙΟΝ ΜΠΟΡΕΙ ΝΑ ΕΦΑΡΜΟΣΘΕΙ ΚΑΙ ΝΑ ΧΡΗΣΙΜΟΠΟΙΗΘΕΙ
ΜΟΝΟ ΜΕ ΕΝΑ ΠΟΡΤ-ΜΠΕΜΠΕ ΤΗΣ CHICCO.
• ΑΥΤΟ ΤΟ ΠΡΟΪΟΝ ΜΠΟΡΕΙ ΝΑ ΕΦΑΡΜΟΣΘΕΙ ΚΑΙ ΝΑ ΧΡΗΣΙΜΟΠΟΙΗΘΕΙ
ΑΠΟΚΛΕΙΣΤΙΚΑ ΜΕ ΤΑ ΜΟΝΤΕΛΑ ΤΩΝ ΠΟΡΤ-ΜΠΕΜΠΕ ΣΤΑ ΟΠΟΙΑ
ΠΡΟΒΛΕΠΕΤΑΙ Η ΤΟΠΟΘΕΤΗΣΗ ΤΟΥ: ΣΥΜΒΟΥΛΕΥΤΕΙΤΕ ΤΙΣ Ο∆ΗΓΙΕΣ
ΧΡΗΣΗΣ ΤΟΥ ΠΟΡΤ-ΜΠΕΜΠΕ ΣΑΣ ΓΙΑ ΝΑ ∆ΙΑΠΙΣΤΩΣΕΤΕ ΕΑΝ
ΠΡΟΒΛΕΠΕΙ ΤΗΝ ΤΟΠΟΘΕΤΗΣΗ ΤΟΥ “KIT TRIO CAR”.
• Ακολουθήστε προσεκτικά τις οδηγίες για τη συναρμολόγηση και την
τοποθέτηση του προϊόντος. Μην επιτρέπετε σε κανένα να χρησιμοποιεί
το προϊόν, χωρίς να έχει πρώτα διαβάσει τις οδηγίες.
• Φυλάξτε αυτό το εγχειρίδιο μαζί με το προϊόν.
• Κανένα προϊόν ασφαλείας αυτοκινήτου δεν μπορεί να εγγυηθεί την
απόλυτη ασφάλεια του παιδιού, σε περίπτωση ατυχήματος, αλλά η
χρήση αυτού του προϊόντος μειώνει την πιθανότητα τραυματισμού ή
θανάτου.
• Η μη σωστή χρήση του προϊόντος αυξάνει τον κίνδυνο σοβαρού
τραυματισμού του παιδιού, όχι μόνο σε περίπτωση ατυχήματος, αλλά και
σε άλλες περιπτώσεις.
• Σε περίπτωση που το προϊόν έχει υποστεί ζημιά , έχει παραμορφωθεί ή
παρουσιάζει έντονη φθορά, πρέπει να αντικαθίσταται: Μπορεί να έχει
χάσει τα κατασκευαστικά χαρακτηριστικά ασφαλείας.
• Μην κάνετε τροποποιήσεις ή προσθήκες στο προϊόν, χωρίς την έγκριση
του κατασκευαστή. Μην χρησιμοποιείτε αξεσουάρ, ανταλλακτικά ή
στοιχεία που δεν προμηθεύονται από τον κατασκευαστή.
• Μην αφήνετε ποτέ το παιδί χωρίς επίβλεψη στο πορτ- μπεμπέ, στο
αυτοκίνητο, για κανέναν λόγο.
• Μην αφήνετε ποτέ το πορτ -μπεμπέ στο κάθισμα του αυτοκινήτου χωρίς
να είναι δεμένο. Μπορεί να χτυπήσει τους επιβάτες τραυματίζοντάς
τους.
• Σε περίπτωση που το αυτοκίνητο μείνει για μεγάλο διάστημα στον ήλιο,
ελέγξτε προσεκτικά το πορτ-μπεμπέ, πριν τοποθετήσετε το παιδί σας
γιατί κάποια σημεία μπορεί να είναι πολύ ζεστά και να πρέπει να τα
αφήσετε να κρυώσουν.
• Μετά από ένα ατύχημα, ακόμα και πολύ μικρό, το πορτ-μπεμπε και το
KIT TRIO CAR μπορεί να έχουν υποστεί ζημιά ακόμα και αν δεν φαίνεται
με γυμνό μάτι: Συνίσταται να τα αντικαταστήσετε.
• Μην χρησιμοποιείτε μεταχειρισμένα προϊόντα ασφαλείας αυτοκινήτου:
Μπορεί να έχουν υποστεί κατασκευαστικές ζημιές ακόμα και αν δεν
φαίνονται με γυμνό μάτι.
• Η εταιρεία Artsana δεν αναλαμβάνει καμία ευθύνη, σε περίπτωση μη
σωστής χρήσης του προϊόντος.
1. Αυτή είναι μία “Παγκόσμια” συσκευή μεταφοράς παιδιών. Είναι
εγκεκριμένη σύμφωνα με τον Κανονισμό αρ. 44, σειρά 04, για γενική
χρήση σε οχήματα και συμβατή με τα περισσότερα, αν και όχι με όλα,
καθίσματα των οχημάτων.
2. Η συσκευή είναι απολύτως συμβατή, εάν ο κατασκευαστής του
οχήματος δηλώνει ότι το όχημα είναι ικανό να δεχτεί μία “Παγκόσμια”
συσκευή μεταφοράς παιδιών για τη συγκεκριμένη ηλικία.
3. Αυτή η συσκευή μεταφοράς έχει καταταχθεί ως “Παγκόσμια” σύμφωνα
με πιο αυστηρά κριτήρια έγκρισης από αυτά που αναφερόντουσαν σε
προηγούμενα μοντέλα που δεν διαθέτουν αυτή την ειδοποίηση.
4. Κατάλληλη για χρήση μόνο εάν το κάθισμα του οχήματος είναι
εφοδιασμένο με ζώνη ασφαλείας 3 σημείων , στατική ή τυλισσόμενη,
εγκεκριμένη σύμφωνα με τον Κανονισμό UN/ECE αρ. 16 ή με άλλους
ανάλογους κανονισμούς.
5. Σε περίπτωση αμφιβολίας, επικοινωνήστε με τον κατασκευαστή της
συσκευής μεταφοράς ή με τον πωλητή.
Το KIT TRIO CAR είναι ένα αξεσουάρ που σας επιτρέπει να στερεώσετε
και να χρησιμοποιήσετε τα πορτ- μπεμπέ Chicco, που προβλέπουν την
τοποθέτησή του (βλ. οδηγίες χρήσης του πορτ-μπεμπέ) στο εσωτερικό
του αυτοκινήτου, για να μεταφέρετε το παιδί σας με σωστό τρόπο κατά
τους πρώτους μήνες της ζωής του.
Είναι ένα προϊόν εγκεκριμένο σύμφωνα με την ευρωπαϊκή οδηγία ECE
R44/04, ως “ομάδα 0”, για τη μεταφορά παιδιών βάρους από 0 έως 10
Ο∆ΗΓΙΕΣ ΧΡΗΣΗΣ ΤΟΥ “KIT TRIO CAR”
ΕΞΑΡΤΗΜΑΤΑ
ΣΗΜΑΝΤΙΚΗ ΕΙ∆ΟΠΟΙΗΣΗ
κιλά, ηλικίας μέχρι 6 μηνών περίπου. Αφού τοποθετήσετε το KIT TRIO CAR
στο πορτ-μπεμπέ, το πορτ-μπεμπέ μπορεί να στερεωθεί στο αυτοκίνητο.
ΑΠΑΡΑΙΤΗΤΑ ΧΑΡΑΚΤΗΡΙΣΤΙΚΑ ΤΟΥ ΚΑΘΙΣΜΑΤΟΣ ΤΟΥ
Για να μπορέσετε να στερεώσετε το πορτ-μπεμπέ στο κάθισμα, το
κάθισμα πρέπει να έχει τα εξής χαρακτηριστικά:
Πρέπει να είναι στραμμένο προς τα εμπρός (Σχέδιο 1).
Πρέπει να είναι ένα πίσω κάθισμα, εφοδιασμένο με τουλάχιστον 2 ζώνες
ασφαλείας 3 σημείων στερέωσης (Σχέδιο 2), εγκεκριμένες σύμφωνα με
την οδηγία UNI/ECE 16 ή άλλη ανάλογη οδηγία.
ΠΩΣ ΝΑ ΕΦΑΡΜΟΣΕΤΕ ΤΟ KIT TRIO CAR ΣΤΟ
Αν το KIT TRIO CAR έχει αγοραστεί χωριστά από το πορτ-μπεμπέ,
εκτελέστε τις ακόλουθες οδηγίες τοποθέτησης, πριν στερεώσετε το
πορτ-μπεμπέ στο αυτοκίνητο.
Κοιλιακή ζώνη
Η κοιλιακή ζώνη πρέπει να εισαχθεί στις δύο σχισμές που βρίσκονται στη
βάση του πορτ-μπεμπέ. (Σχέδιο 3). ∆ιπλώστε την ταινία με το κόκκινο
σήμα, έτσι ώστε το velcro να βρίσκεται στο εσωτερικό, έπειτα περάστε
την στη δεξιά σχισμή (Σχέδιο 4) και βγάλτε την από την αριστερή σισμή
(Σχέδιο 5).
Κλείστε τη ζώνη, τοποθετώντας την ταινία με το κόκκινο σήμα πάνω από
την άλλη ταινία (Σχέδιο 6).
ΠΡΟΕΙ∆ΟΠΟΙΗΣΗ!Βεβαιωθείτε ότι η ζώνη δεν είναι μπερδεμένη
(Σχέδιο 7).
Αγκράφες για ζώνη αυτοκινήτου
Για να εφαρμόσετε τις δύο αγκράφες στις βάσεις που βρίσκονται στα
άκρα του πορτ-μπεμπέ (Σχέδιο 8), εισάγετε την κάθε αγκράφα στην
αντίστοιχη βάση πιέζοντάς την (Σχέδιο 9) και τραβήξτε την αγκράφα
προς τα κάτω μέχρι να ακούσετε ένα κλικ. (Σχέδιο 10)
ΠΡΟΕΙ∆ΟΠΟΙΗΣΗ! Μην τοποθετείτε τις αγκράφες από την αντίθετη
μεριά! (Σχέδιο 11).
Τώρα το πορτ-μπεμπέ είναι έτοιμο για να τοποθετηθεί στο αυτοκίνητο.
ΠΩΣ ΝΑ ΣΤΕΡΕΩΣΕΤΕ ΤΟ ΠΟΡΤ-ΜΠΕΜΠΕ ΣΤΟ ΑΥΤΟΚΙΝΗΤΟ:ΤΗΝ
Για να στερεώσετε το πορτ-μπεμπε στο πίσω κάθισμα του αυτοκίνητου,
πρέπει να το τοποθετήσετε στο κέντρο και να το στερεώσετε με τις ζώνες
των δύο εξωτερικών καθισμάτων(Σχέδιο 12). Αν το πίσω κάθισμα του
αυτοκινήτου σας είναι εφοδιασμένο και με ζώνη 3 σημείων, το πορτμπεμπέ μπορεί να τοποθετηθεί και στο πλάι, καταλαμβάνοντας την
κεντρική και την πλαϊνή θέση, και να δεθεί με τις ζώνες των δύο αυτών
καθισμάτων (Σχέδιο 13).
1. Βγάλτε και δέστε τις δύο ζώνες του αυτοκινήτου στις αντίστοιχες
αγκράφες (Σχέδιο 14).
2. Κλίνετε εντελώς την πλάτη του πορτ-μπεμπέ, όπως φαίνεται στις
οδηγίες χρήσης του πορτ-μπεμπέ.
ΠΡΟΕΙ∆ΟΠΟΙΗΣΗ!Μην χρησιμοποιείτε ποτέ το πορτ-μπεμπέ στο
αυτοκίνητο με την πλάτη σε όρθια θέση! Σε αυτή τη θέση η ασφάλεια
του προϊόντος δεν είναι εγγυημένη!
Αν οι αγκράφες του πορτ-μπεμπέ έχουν υφασμάτινη 3. επένδυση,
αφαιρέστε την. (Σχέδιο 15)
4. Τοποθετήστε το πορτ-μπεμπέ στο κάθισμα κατά μήκος (Σχέδιο 16),
έτσι ώστε να εφάπτεται με το κάθισμα.
Εκτελέστε τις ακόλουθες ενέργειες και στις δύο πευρές:
Πιάστε τη ζώνη του αυτοκινήτου και φτιάξτε μία θηλειά (Σχέδιο 17).
Πιάστε την αγκράφα του πορτ-μπεμπέ και στρέψτε προς τα έξω την
κόκκινη μπάρα (Σχέδιο 18).
Εισάγετε στην αγκράφα τη θηλειά που έχετε φτιάξει (Σχέδιο 19) και
στρέψτε την κόκκινη μπάρα στην αρχική της θέση, έτσι ώστε να εισαχθεί
στο εσωτερικό της θηλειάς (Σχέδιο 20).
Τραβήξτε τη ζώνη του αυτοκινήτου προς το μηχανισμό τύλιξής της,
πιέζοντας παράλληλα το πορτ-μπεμπέ προς το κάθισμα, έτσι ώστε να
στερεωθεί με ασφάλεια (Σχέδιο 21).
ΠΡΟΕΙ∆ΟΠΟΙΗΣΗ! Βεβαιωθείτε ότι το πορτ-μπεμπέ εφαρμόζει καλά στο
κάθισμα.
ΠΡΟΕΙ∆ΟΠΟΙΗΣΗ!Βεβαιωθείτε ότι οι ζώνες είναι καλά τεντωμένες
(Σχέδιο 22)
ΠΩΣ ΝΑ ΤΟΠΟΘΕΤΗΣΕΤΕ ΤΟ ΠΑΙ∆Ι ΣΤΟ ΠΟΡΤ ΜΠΕΜΠΕ
Ανοίξτε την κοιλιακή ζώνη, τραβώντας τη λωρίδα με το κόκκινο σήμα
(Σχέδιο 23).
Τοποθετήστε το παιδί στο πορτ-μπεμπέ (Σχέδιο 24).
Περάστε τη δεξιά λωρίδα της ζώνης πάνω από τη μέση του παιδιού και
μετά την αριστερή (Σχέδιο 25).
Ενώστε τα άκρα των δύο λωρίδων, έτσι ώστε να εφαρμόσει η ζώνη στη
μέση του παιδιού, αλλά χωρίς να είναι πολύ σφιχτή. (Σχέδιο 26).
20
ΑΥΤΟΚΙΝΗΤΟΥ
ΠΟΡΤ-ΜΠΕΜΠΕ
ΠΡΩΤΗ ΦΟΡΑ
Page 21

ΠΩΣ ΝΑ ΒΓΑΛΕΤΕ ΤΟ ΠΑΙ∆Ι ΑΠΟ ΤΟ ΠΟΡΤ ΜΠΕΜΠΕ
Ανοίξτε την επενδυμένη κοιλιακή ζώνη του πορτ-μπεμπέ , τραβώντας τη
λωρίδα με το κόκκινο σήμα (Σχέδιο 27).
ΠΩΣ ΝΑ ΑΦΑΙΡΕΣΕΤΕ ΤΟ ΠΟΡΤ-ΜΠΕΜΠΕ ΑΠΟ ΤΟ ΚΑΘΙΣΜΑ ΤΟΥ
Εκτελέστε τις ακόλουθες ενέργειες και στις δύο πλευρές του πορτμπεμπέ:
Βγάλτε την αγκράφα από το πορτ-μπεμπέ, τραβώντας το κόκκινο κλιπ
της αγκράφας προς τα έξω και πιέζοντας την αγκράφα προς τα επάνω
(Σχέδιο 28), έτσι ώστε να ελευθερωθεί το πορτ-μπεμπέ από τη ζώνη
του αυτοκινήτου. Η αγκράφα θα παραμείνει στερεωμένη στη ζώνη του
αυτοκινήτου.
ΠΡΟΕΙ∆ΟΠΟΙΗΣΗ! Μην χρησιμοποιείτε ποτέ τη ζώνη ασφαλείας του
αυτοκινήτου για να δεθεί ένας επιβάτης, χωρίς πρώτα να έχετε αφαιρέσει
την αγκράφα του KIT TRIO CAR. Μπορεί να είναι επικίνδυνο!
Για να αφαιρέσετε την αγκράφα από τη ζώνη ασφαλείας του αυτοκινήτου,
χαλαρώστε τη θηλειά της ζώνης (Σχέδιο 29) και στρέψτε την κόκκινη
βάση, έτσι ώστε να απελευθερωθεί (Σχέδιο 30)
ΠΩΣ ΝΑ ΣΤΕΡΕΩΣΕΤΕ ΤΟ ΠΟΡΤ-ΜΠΕΜΠΕ ΣΤΟ ΑΥΤΟΚΙΝΗΤΟ: ΜΕΤΑ
Για να στερεώσετε και πάλι το πορτ-μπεμπέ στο κάθισμα, όταν οι δύο
αγκράφες είναι ήδη στερεωμένες στις ζώνες ασφαλείας του αυτοκινήτου,
εκτελέστε τις ακόλουθες ενέργειες: Βεβαιωθείτε ότι οι δύο ζώνες του
αυτοκινήτου είναι δεμένες.
Για να στερεώσετε τις αγκράφες στο πορτ-μπεμπέ, διαβάστε τις οδηγίες
που περιέχονται στην παραγράφο “ΠΩΣ ΝΑ ΕΦΑΡΜΟΣΕΤΕ ΤΟ KIT
TRIO CAR ΣΤΟ ΠΟΡΤ-ΜΠΕΜΠΕ”,”Αγκράφες για τη ζώνη ασφαλείας του
αυτοκινήτου”.
Τραβήξτε τη ζώνη του αυτοκινήτου προς το μηχανισμό τύλιξής της,
πιέζοντας παράλληλα το πορτ-μπεμπέ προς το κάθισμα, έτσι ώστε να
στερεωθεί καλά (Σχέδιο 21).
ΠΡΟΕΙ∆ΟΠΟΙΗΣΗ! Βεβαιωθείτε ότι το πορτ-μπεμπέ εφαρμόζει καλά στο
κάθισμα.
ΠΡΟΕΙ∆ΟΠΟΙΗΣΗ!Βεβαιωθείτε ότι οι ζώνες είναι καλά τεντωμένες
(Σχέδιο 22).
ΠΩΣ ΝΑ ΑΦΑΙΡΕΣΕΤΕ ΤΟ ΚΙΤ TRIO CAR ΑΠΟ
Όταν δεν θέλετε να χρησιμοποιείτε πλέον το πορτ- μπεμπέ στο
αυτοκίνητο ή επιθυμείτε να το χρησιμοποιήσετε εκτός αυτοκινήτου, το
ΚΙΤ TRIO CAR μπορεί να αφαιρεθεί, με τον ακόλουθο τρόπο:
Κοιλιακή ζώνη
Ανοίξτε τη ζώνη, τραβώντας τη λωρίδα με το κόκκινο σήμα. (Σχέδιο 23).
Βγάλτε τη λωρίδα, πρώτα από την αριστερή σχισμή, τραβώντας προς τα
κάτω, και μετά από τη δεξιά, τραβώντας προς τα επάνω. (Σχέδιο 31).
Αγκράφες για ζώνη ασφαλείας του αυτοκινήτου
Τραβήξτε το κόκκινο κλιπ της αγκράφας προς τα έξω και πιέστε την
αγκράφα προς τα επάνω (Σχέδιο 28).
Η ζώνη και οι αγκράφες πρέπει να καθαρίζονται αποκλειστικά στο χέρι,
χρησιμοποιώντας ένα βρεγμένο πανάκι. Χρησιμοποιήτε μόνο νερό, μην
χρησιμοποιείτε διαλυτικά ή άλλα απορρυπαντικά.
ΠΡΟΕΙ∆ΟΠΟΙΗΣΗ!Ελέγχετε τακτικά όλα τα τμήματα του πορτ-μπεμπέ και
του ΚΙΤ TRIO CAR για να βεβαιωθείτε ότι κανένα τμήμα τους δεν είναι
κατεστραμμένο ή πολύ φθαρμένο.
ΠΡΟΕΙ∆ΟΠΟΙΗΣΕΙΣ: ∆ΙΑΒΑΣΤΕ ΠΡΙΝ ΤΑΞΙ∆ΕΨΕΤΕ ΜΕ ΤΟ
• Αυτές οι οδηγίες πρέπει να φυλάσσονται προσεκτικά στην ειδική
θήκη τους μαζί με το προϊόν σε μέρος με εύκολη πρόσβαση.
• Το προϊόν πρέπει να τοποθετείται ακριβώς όπως περιγράφεται στις
παρεχόμενες οδηγίες χρήσης.
• Μην τοποθετείτε ποτέ το προϊόν, χρησιμοποιώντας μία ζώνη
ασφαλείας δύο σημείων στερέωσης.
• Τοποθετήστε το προϊόν μόνο σε καθίσματα αυτοκινήτου σωστά
στερεωμένα στο πλαίσιο του αυτοκινήτου και στραμμένα μπροστά.
• Πτυσσόμενα, ανατρεπόμενα ή περιστρεφόμενα καθίσματα
αυτοκινήτου, πρέπει να είναι καλά στερεωμένα. Βεβαιωθείτε
επίσης ότι δεν μεταφέρονται αντικείμενα μη καλά στερεωμένα στο
αυτοκίνητο, ιδιαίτερα στο πίσω μέρος. Σε περίπτωση ατυχήματος ή
απότομου φρεναρίσματος μπορεί να προσκρούσουν στους επιβάτες
και να τους τραυματίσουν.
• Όταν τοποθετήσετε το προϊόν στο όχημα, βεβαιωθείτε ότι τυχόν
κινητά καθίσματα ή οι πόρτες του οχήματος δεν επηρεάζουν τη
λειτουργία του. Βεβαιωθείτε ότι κανένα τμήμα του καθίσματος του
αυτοκινήτου δεν είναι πιασμένο στις πόρτες του αυτοκινήτου και ότι
δεν τρίβεται σε αιχμηρά αντικείμενα.
ΑΥ ΤΟ Κ Ι Ν Η Τ Ο Υ
ΤΗΝ ΠΡΩΤΗ ΦΟΡΑ
ΤΟ ΠΟΡΤ-ΜΠΕΜΠΕ
ΠΩΣ ΝΑ ΚΑΘΑΡΙΣΕΤΕ ΤΟ ΠΡΟΪΟΝ
ΑΥΤΟΚΙΝΗΤΟ
• Βεβαιωθείτε ότι η ζώνη ασφαλείας του αυτοκινήτου είναι πάντα
σωστά τεντωμένη και όχι μπερδεμένη ή βρίσκεται σε λάθος θέσεις.
• Μην χρησιμοποιείτε το προϊόν, αν ορισμένα από τα τμήματά του είναι
σπασμένα ή απουσιάζουν.
• Μην χρησιμοποιήτε τίποτα (π.χ. μαξιλάρια, κουβέρτες, κτλ) ανάμεσα
στο κάθισμα του αυτοκινήτου ή τοποθετείτε ανάμεσα στο κάθισμα
του παιδιού και του πορτ μπεμπέ ή ανάμεσα στο πορτ-μπεμπέ και το
παιδί.
• Μην τοποθετείτε βαριά αντικείμενα πάνω από το προϊόν.
• Πάντα να βεβαιώνεστε ότι όλοι οι επιβάτες του οχήματος
χρησιμοποιούν τη ζώνη ασφαλείας τόσο για τη δική τους ασφάλεια
αλλά και γιατί μπορεί κατα τη διάρκεια ταξιδιού να τραυματίσουν το
παιδί.
• Φυλάξτε τις πλαστικές σακούλες μακριά από τα παιδιά, για να
αποφύγετε τον κίνδυνο ασφυξίας.
• Ελέγχετε τακτικά το προϊόν για σημάδια φθοράς ή καταστροφής. Σε
περίπτωση καταστροφής, μην χρησιμοποιείτε το προϊόν και φυλάξτε
το μακριά από τα παιδιά.
• Όταν το παιδί δεν είναι στο αυτοκίνητο, το πορτ-μπεμπέ πρέπει να
παραμένει δεμένο ή να τοποθετείται στο πορτ-μπαγκάζ.
• Η εταιρεία ARTSANA δεν αναλαμβάνει καμία ευθύνη για τη μη σωστή
χρήση του προϊόντος.
Για περισσότερες πληροφορίες και για την παραγγελία ανταλλακτικών
επικοινωνήστε με το Τμήμα Εξυπηρέτησης Πελατών της ARTSANA:
∆ιεύθυνση: ARTSANA SPA - Τμήμα Εξυπηρέτησης Πελατών
Via Saldarini Catelli 1 - 22070 Grandate COMO - ITALY
Τηλέφωνο: (0039) 031 382000
e-mail: info@artsana.it
website: www.chicco.com
21
Page 22

DK
I
K T C
DELE
1. Mavesele
2. Spænder til fastgøring af bilens sikkerhedssele
YDERST VIGTIGT: LÆS MEGET NØJE
• Læs nøje denne vejledning, inden produktet tages i anvendelse.
• DETTE PRODUKT MÅ KUN MONTERES OG ANVENDES MED
EN POSE AF MÆRKET CHICCO.
• DETTE PRODUKT MÅ KUN MONTERES OG ANVENDES MED
DE MODELLER SOM ER FREMSTILLET TIL DENNE INSTALLATION: KONTROLLER BRUGSANVISNINGEN PÅ JERES POSE, OM
DEN ER BEREGNET TIL INSTALLATION AF “KIT TRIO CAR”.
• For så vidt angår montage og installation af produktet, skal anvisningerne følges nøje. Undgå, at produktet tages i anvendelse,
før brugsanvisningen er gennemlæst.
• Opbevar denne vejledning sammen med produktet.
• Intet sikkerhedsprodukt til anvendelse i bil kan garantere total
sikkerhed for barnet i tilfælde af uheld, men anvendelse af dette
produkt formindsker risikoen for uheld og for barnedød.
• Ikke korrekt anvendelse af produktet forøger risikoen for alvorlig
fare for barnet, ikke kun i tilfælde af uheld, men også i andre
situationer.
• I de tilfælde hvor produktet er beskadiget, deform eller meget
slidt, skal det udskiftes: det kan have mistet sine originale sikkerhedskarakteristika.
• Udfør ikke ændringer eller tilføjelser på produktet uden fabrikantens godkendelse. Installer ikke ekstraudstyr, reservedele
elle andre dele, som ikke er leveret og godkendt af fabrikanten.
• Efterlad ikke barnet under nogen omstændighed i posen uden
opsyn i bilen.
• Efterlad aldrig posen på bilsædet i ikke fastspændt stand: den vil
kunne støde imod og såre de andre passagerer.
• I det tilfælde at bilen har stået stille i solen, kontroller da nøje
posen, inden barnet placeres heri, og kontroller, at delene ikke
er blevet overophedede: i dette tilfælde skal den afkøles, inden
barnet placeres deri, for at undgå at det brænder sig.
• Efter selv et lettere uheld, kan posen og KIT TRIO CAR være blevet udsat for skader, som ikke er synlige med det blotte øje, de
skal derfor under alle omstændigheder udskiftes.
• Anvend aldrig brugte sikkerhedsprodukter: de kan have været
udsat for strukturelle skader, som ikke er synlige med det blotte
øje, men som alligevel kan gå ud over produktets sikkerhed.
• Virksomheden ARTSANA fratager sig ethvert ansvar i tilfælde af
ukorrekt anvendelse af produktet.
VIGTIG MEDDELELSE
1. Dette er en “universal” indretning til fastgørelse af børn. Den
er godkendt i henhold til forordning nr. 44, tilføjelser serie 04.
Den er egnet til generel anvendelse i køretøjer og kan tilpasses
til størstedelen, men dog ikke alle typer af bilsæder.
2. Den perfekte tilpasningsevne er lettest at opnå, i de tilfælde
hvor bilproducenten i bilens manual erklærer, at dette køretøj
er forudset til installation af “universelle” fastgørelsesindretninger af børn i den omhandlede aldersgruppe.
3. Denne fastgørelsesindretning er klassifi ceret som “universal”
i henhold til strengere godkendelseskriterier, end dem der var
gældende for de tidligere modeller, som ikke var udstyret med
denne meddelelse.
4. Er kun egnet til brug i køretøjer med sikkerhedsseler bestående af 3 punkter, statisk eller med oprulning, og godkendt i
henhold til forordning UN/ECN nr. 16 eller andre tilsvarende
standarder.
5. I tvivlstilfælde bedes henvendelse rettet til producenten af
fastgørelsesindretningen eller til salgsstedet.
BRUGSANVISNING
Kit Trio Car er et produkt, som gør det muligt at fastgøre og an-
vende de dertil beregnede Chicco poser (der henvises til posens
brugsanvisning) i Deres bil, til at transportere barnet på korrekt
vis i dets første måneder.
Det er et produkt, som er godkendt i henhold til den europæiske
norm ECE R44/04 for “gruppe 0”, til transport af børn fra 0 til 10
kg, svarende til når barnet er ca. 6 måneder gammel.
Efter at have monteret KIT TRIO CAR på posen, kan posen fastgøres til bilen.
KRAV TIL BILSÆDET
For at kunne fastgøre posen til sædet, skal sædet opfylde følgende krav:
- det skal være vendt i kørselsretningen (fi g. 1),
- det skal være et bagsæde, som er forsynet med mindst to passagerseler bestående af tre fastgørelsespunkter (fi g. 2), godkendt
i henhold til norm UNI/ECE 16 eller anden tilsvarende norm.
MONTAGE AF KIT TRIO CAR PÅ POSE
Hvis KIT TRIO CAR er købt særskilt fra posen, skal følgende montagevejledning følges, inden posen placeres i bilen.
Mavesele
Maveselen skal føres ind i de to huller, som er lavet på posens
bund (fi g. 3).
Fold stykket med det røde mærke, på en sådan måde at velcrobåndet befi nder sig på den indvendige side, før den gennem hullet til højre (fi g. 4), og træk den ud af hullet til venstre (fi g. 5).
Luk selen ved at placere stykket med det røde mærke ovenpå det
andet (fi g. 6).
VIGTIGT! Kontroller, at selen ikke er snoet (fi g. 7).
Spænder til bilens seler
For at fastgøre de to spænder til tapperne, som er placeret yderst
på posen (fi g. 8), føres hvert spænde ind i hver sin tap (fi g. 9) og
der trækkes nedad i spændet, indtil der høres et klik (fi g. 10).
VIGTIGT! Monter ikke spænderne med bagsiden udad (fi g. 11).
Posen er nu klar til at blive placeret i bilen.
FASTGØRELSE AF POSEN I BIL: DEN FØRSTE GANG
For at fastgøre posen til bagsædet, skal den placeret i midten og
den fastgøres ved hjælp af de to yderpladsers seler (fi g. 12). Hvis
jeres bils bagsæde er udstyret med en sikkerhedssele bestående
af 3 punkter også på midterpladsen, kan posen også monteres på
siden ved at optage midter- og sidepladsen, fastgjort med disse
to sæders seler (fi g. 13).
1. Træk i og fastgør bilens to sikkerhedsseler i sædets dertil beregnede spænder (fi g. 14).
2. Sørg for at tilbagelæne posens ryglæn fuldstændigt, som vist i
posens brugsanvisning.
VIGTIGT! Anvend aldrig posen i bil med ryglænet hævet! Der kan
ikke garanteres for produktets sikkerhed!.
3. I det tilfælde at spænderne, som er monteret på posen, måtte
være betrukket med stof, skal dette fjernes (fi g. 15).
4. Placer posen på sædet på den lange led (fi g. 16), på en sådan
måde at den sidder godt fast opad sædet.
5. Udfør følgende operationer på begge sider:
- tag fat om bilens sikkerhedssele og skab en løkke (fi g. 17),
- tag fat om posens spænde og drej spændets røde stang udad
(fi g. 18).
Før selens tidligere nævnte løkke ind i spændet (fi g. 19) og drej
den røde stang hen i begyndelsespositionen, på en sådan måde
at den bliver ført ind i selve løkken (fi g. 20).
Træk i bilens sikkerhedssele mod oprulleren, ved samtidig at trykke posen mod sæden på en sådan måde, at den bliver fastgjort
ordentligt (fi g. 21).
VIGTIGT: Kontroller, at posen sidder ordentligt opad sædet.
VIGTIGT: kontroller, at selerne er i korrekt spænd.
PLACERING AF BARNET
Åbn maveselen ved at trække i stykket med det røde mærke (fi g.
23).
Læg barnet ned i posen (fi g. 24).
22
Page 23

Få først selens højre del til at passere over barnets liv og derefter
den venstre (fi g. 25).
Sæt de to dele sammen på en sådan måde, at selen sidder godt
fast om barnets liv, men uden at den strammer for meget (fi g.
26).
UDTAGNING AF BARNET
Åbn posens forede mavesele ved at trække i delen med det røde
mærke (fi g. 27).
UDTAGNING AF POSEN FRA SÆDET
Udfør følgende operationer på begge posens sider.
Løsen posens spænde fra ved at trække spændets røde tap udad
og ved derefter at skubbe spændet opad (fi g. 28), på en sådan
måde at posen frigøres fra selen. Spændet forbliver fastgjort til
bilens sele.
VIGTIGT! Brug aldrig bilens sikkerhedssele til at fastgøre en passager med, førend KIT TRIO CAR er fjernet: det kan være farligt!
For at fjerne spændet fra sikkerhedsselen, løsnes selens løkke (fi g.
29) og den røde tap drejes, på en sådan måde at den frigøres (fi g.
30).
FASTGØRELSE AF POSEN I BIL: EFTER DEN FØRSTE
GANG
For at fastgøre posen til sædet igen, når de to spænder er forblevet fastgjort til bilens to seler, følges nedenstående anvisninger.
Kontroller, at bilens to sikkerhedsseler er fastspændte.
For at fastgøre spænderne til posen, henvises der til anvisningerne i afsnittet
“MONTAGE AF KIT TRIO CAR PÅ POSE - spænder til bilens sikkerhedssele”.
Træk bilens sikkerhedssele mod oprulleren, ved at trykke posen
mod sæden, på en sådan måde at den fastgøres ordentligt (fi g.
21).
VIGTIGT! Kontroller, at posen er placeret godt op ad bilens
sæde.
VIGTIGT! Kontroller, at selerne er i korrekt spænd (fi g. 22).
AFMONTERING AF KIT TRIO CAR AF POSE
Efter at man er færdig med at anvende posen i bil eller på grund
af anvendelse udenfor bilen, kan KIT TRIO CAR afmonteres ved at
følge nedenstående anvisninger.
Mavesele
Åbn selen ved at trække i delen med det røde mærke (fi g. 23). Tag
den ud, først fra hullet til venstre nedenfra og derefter fra højre
ovenfra (fi g. 31).
Spænder til bilens sele
Træk spændets røde tap udad og skub spændet opad (fi g. 28)
RENGØRING AF PRODUKTET
Selen og spænderne må kun rengøres ved håndvask ved brug af
en klud som er fugtet med vand. Brug ikke opløsningsmidler eller
andre rengøringsmidler.
VIGTIGT! Efterse jævnligt alle posens og KIT TRIO CAR’s dele, og
sørg for, at ingen af delene er beskadigede eller meget slidte.
BEMÆRKNINGER: SOM SKAL LÆSES, INDEN
PRODUKTET TAGES I ANVENDELSE
• Nærværende brugsanvisning skal opbevares nøje og på et
sted, hvor den er let at konsulteres.
• Produktet skal installeres ved nøje at følge de medfølgende
anvisninger.
• Fastgør aldrig produktet ved hjælp af en sikkerhedssele bestående af to fastgørelsespunkter.
• Fastgør kun produktet til bilsæder, som er korrekt fastgjorte til
bilens struktur og vendt i kørselsretningen.
• Efterlad aldrig bilsæder, som er sammenklappelige, roterende
eller som kan lænes tilbage, som ikke er ordentligt fastgjorte,
og sørg for, at der ikke transporteres ting, som ikke er ordentlig
fastgjorte, især på hattehylden: i tilfælde af uheld eller hård
opbremsning vil de kunne støde ind i og såre bilens passagerer.
• Installer produktet på en sådan måde, at fl ytbare sæder eller
bilens dør ikke står i vejen. Undgå, at enhver del af produktet
kommer i klemme mellem bilens dør eller gnider mod skærende dele.
• Sørg altid for, at bilens sikkerhedssele er i korrekt spænd og at
de ikke er snoede eller befi nder sig i en ikke korrekt position.
• Brug ikke produktet, hvis nogle ad delene er ødelagte eller
mangler.
• Placer intet (puder, tæpper osv.) mellem bilsædet og posen
eller mellem posen og barnet.
• Placer ikke tunge genstande ovenpå produktet.
• Sørg for, at alle bilens passagerer anvender sikkerhedsseler,
både for egen sikkerhed men også da de under kørsel kan
støde mod barnet.
• Hold plastikposer langt fra barnet for at undgå kvælningsfare.
• Kontroller jævnligt produktets stand for slitage og for eventuelle brud. I tilfælde af beskadigelse må produktet ikke længere
anvendes, og skal holdes langt udenfor børnenes rækkevidde.
• Når barnet ikke transporteres, skal posen være fastgjort eller
placeret i bagagerummet.
• Virksomheden ARTSANA fratager sig ethvert ansvar i tilfælde
af ukorrekt brug af produktet.
For yderligere oplysning og anmodning om reservedele kontaktes
Artsana’s kundeservice:
Post: ARTSANA SPA
Kundeservice
Via Saldarini Catelli 1
22070 Grandate Como - Italy
Telefon: (0039) 031 38 20 00
E-mail: info@artsana.it
Hjemmeside: www.chicco.com
23
Page 24

FIN
I
K T C
OSAT
1. Lantiovyö
2. Soljet auton turvavyöhön kiinnittämiseksi
ERITTÄIN TÄRKEÄÄ :
LUE HYVIN HUOLELLISESTI
• Lue ohjeet huolella ennen tuotteen käyttöönottoa.
• TUOTTEESEEN VOIDAAN ASENTAA JA SITÄ SAADAAN KÄYTTÄÄ AINOASTAAN CHICCO -MERKKISEN PUSSIN KANSSA.
• TUOTTEESEEN SAA ASENTAA JA SIINÄ SAA KÄYTTÄÄ YKSINOMAAN SITÄ VARTEN VALMISTETTUJA PUSSIMALLEJA. TARKISTA PUSSISI KÄYTTÖOHJEESTA, VOIDAANKO SIIHEN ASENTAA “KIT TRIO CAR”.
• Seuraa tuotetta kootessasi ja asentaessasi tarkasti ohjeita. Älä
anna kenenkään käyttää tuotetta ennen ohjeiden lukemista.
• Säilytä käyttöohjeita tuotteen yhteydessä.
• Mikään auton turvalaite ei voi taata lapselle täydellistä suojaa
onnettomuuden sattuessa, mutta tuotteen käyttö vähentää
lapsen loukkaantumis- ja kuolemanvaaraa.
• Tuotteen asiaton käyttö lisää lapsen mahdollisuutta loukkaantua vakavasti, ei ainoastaan onnettomuuden sattuessa, vaan
myös muissa tilanteissa.
• Mikäli tuote on vahingoittunut, muuttanut muotoaan tai hyvin
kulunut, se on vaihdettava uuteen, koska se on saattanut menettää alkuperäiset turvaominaisuutensa.
• Älä lisää tuotteeseen mitään äläkä tee siihen muutoksia ilman
valmistajan lupaa. Älä asenna tuotteeseen mitään muita kuin
valmistajalta saatuja lisä- tai varaosia tai muita komponentteja.
• Älä koskaan jätä lasta minkään syyn takia vartioimatta pussissa
autoon.
• Älä koskaan jätä pussia auton penkille kiinnittämättä sitä, koska
se saattaisi kolhia ja vahingoittaa matkustajia.
• Mikäli auto on ollut pitkään pysäköitynä auringossa, tutki pussi
tarkkaan, ennenkuin asetat lapsen siihen, varmistaen etteivät
mitkään sen osista ole ylikuumentuneet. Mikäli näin on käynyt,
anna niiden jäähtyä ennenkuin asetat lapsen pussiin, jotta hän
välttyisi polttamasta itseään.
• Lievänkin onnettomuuden seurauksena pussi ja KIT TRIO CAR
saattavat vahingoittua silmin erottamattomalla tavalla, joten
ne on joka tapauksessa vaihdettava uusiin.
• Älä hanki käytettyjä auton turvalaitteita. Niiden runko on saat-
tanut vahingoittua, vaikka se ei näkyisi paljaalla silmällä ja tällöin ne eivät välttämättä ole enää täysin turvallisia.
• ARTSANA ei vastaa tuotteen asiattoman käytön aiheuttamista
seurauksista.
TÄRKEÄ TIEDOTUS
1. Tämä on “Universaali” lasten turvaistuin, hyväksytty säädöksen nro 44 sarjan 04 muutosten mukaisesti. Sopii yleiseen ajoneuvokäyttöön ja solveltuu melkein kaikkiin auton penkkeihin.
2. Täydellinen soveltuvuus saavutetaan helpommin silloin, kun
ajoneuvon valmistaja ilmoittaa ajoneuvon käsikirjassa, että
ajoneuvoon voidaan asentaa “Universaali” kyseesä olevalle ikäluokalle tarkoitettu turvaistuin.
3. Istuin on luokiteltu “Universaaliksi” tiukempien hyväksymisvaatimusten mukaan kuin edelliset mallit, joissa ei ole kyseistä
tiedotusta.
4. Soveltuu käytettäväksi ainoastaan sellaisissa ajoneuvoissa,
joissa on UN/ECE 16 normin tai muiden vastaavien standardien
mukainen 3-pisteturvavyö, joko staattinen tai rullavyö.
5. Jos olet epätietoinen, ota yhteyttä turvaistuimen valmistajaan tai jälleenmyyjään.
KÄYTTÖOHJEET
KIT TRIO CAR on osa, jota tarvitaan Chicco pussien (katso pussin
käyttöohjetta) kiinnittämiseen ja käyttöön autossasi, jotta lasta
voitaisiin kuljettaa autossa asianmukaisesti hänen ensimmäisinä
elinkuukausinaan.
Tuote on hyväksytty eurooppalaisen normin ECE R44/04 mukaisesti “Ryhmässä 0” eli siinä saa kuljettaa 0 - 10 kg painoisia
lapsia, likimääräisesti 6 kuukauden ikään saakka.
Kun KIT TRIO CAR on asennettu pussiin, pussi voidaan kiinnittää
autoon.
AUTON PENKKIÄ KOSKEVAT
VAATIMUKSET
Jotta pussi voitaisiin kiinnittää auton penkkiin, penkin on täytettävä seuraavat vaatimukset:
- penkin on oltava käännetty ajosuuntaan (kuva 1);
- sen on oltava takapenkki, joka on varustettu vähintään kahdella
matkustajalle tarkoitetulla 3-pisteturvavyöllä (Kuva 2), jotka on
hyväksytty UNI/ECE 16 tai jonkin vastaavan normin mukaisesti.
KIT TRIO CAR -OSAN ASENTAMINEN
PUSSIIN
Jos et ole ostanut KIT TRIO CAR - OSAA yhdessä pussin kanssa,
seuraa alla olevia kokoamisohjeita ennenkuin asetat pussin autoon.
Lantiovyö
Lantiovyö on pujotettava pussin jalustassa sijaitseviin kahteen
aukkoon (kuva 3).
Taita punaisella leimalla merkitty nauha siten, että tarranauha on
sisäpuolella. Pujota nauha
sisään oikeanpuoleisesta aukosta (Kuva 4) ja vedä se sitten ulos
vasemmanpuoleisesta aukosta (Kuva 5).
Sulje vyö asettamalla punaisella leimalla merkitty nauha toisen
nauhan päälle (Kuva 6).
HUOMIO! Tarkista, ettei vyö ole kierteillä (Kuva 7).
Soljet auton turvavyöhön
Kiinnittääksesi molemmat soljet pussin ääripäissä sijaitseviin
tappeihin (Kuva 8), pujota kumpikin solki vastaavaan tappiin
työntämällä solkea (Kuva 9) ja vetämällä sitä alaspäin, kunnes se
loksahtaa paikalleen (Kuva 10).
HUOMIO! Älä asenna solkia nurinpäin! (Kuva 11).
Nyt pussi on valmis asennettavaksi autoon.
PUSSIN KIINNITTÄMINEN AUTOON: ENSIMMÄINEN
KERTA
Kiinnittääksesi pussin takapenkille aseta pussi keskimmäiselle
penkille ja kiinnitä se molempien laitimmaisten penkkien turvavöillä (Kuva 12). Mikäli myöskin autosi keskimmäinen takapenkki
on varustettu 3-pisteturvavyöllä, voit asentaa pussin myös toiselle sivulle siten, että se käyttää sekä keski- että sivupenkkiä ja
kiinnitetään näiden molempien penkkien turvavöillä (Kuva 13).
1. Vedä esiin ja kiinnitä molemmat auton turvavyöt penkkien vastaaviin solkiin (Kuva 14).
2. Laske pussin selkänoja täysin alas pussin käyttöohjeessa kuvatulla tavalla.
HUOMIO! Älä koskaan käytä pussia autossa selkänoja ylhäällä,
koska tuotteen turvallisuus ei ole tällöin taattu!
3. Mikäli pussin soljet on päällystetty kankaalla, poista kangas
(Kuva 15).
4. Aseta pussi penkille pituussuunnassa (Kuva 16) niin, että se
myötäilee hyvin penkkiä.
5. Suorita alla olevat toimenpiteet molemmilla sivuilla:
- tartu auton turvavyöhön ja muodosta siitä lenkki (Kuva 17);
- Tartu pussin solkeen ja käännä soljen punaista tankoa ulospäin
(Kuva 18).
Pujota muodostamasi vyön lenkki solkeen (Kuva 19) ja käännä
punainen tanko alkuasentoon siten, että se pujottautuu lenkin
sisään (Kuva 20).
Vedä auton turvavyötä kelaa kohti painaen pussia istuinta vasten,
niin että pussi kiinnittyy hyvin (Kuva 21).
HUOMIO! Tarkista, että pussi myötäilee kunnolla penkkiä.
HUOMIO! Varmista, että vyöt ovat sopivan kireällä (Kuva 22).
24
Page 25

Avaa lantiovyö vetämällä punaisella leimalla merkittyä nauhaa
LAPSEN ASETTAMINEN PUSSIIN
(Kuva 23)
Aseta lapsi makuulle pussiin (Kuva 24).
Aseta lapsen vyötärön yli ensin vyön oikeanpuoleinen ja sitten
vasemmanpuoleinen nauha
(Kuva 25).
Yhdistä molemmat topatut osat siten, että vyö myötäilee lapsen
vyötäröä, muttei kiristä liikaa (Kuva 26).
LAPSEN NOSTAMINEN POIS PUSSISTA
Avaa pussin topattu lantiovyö vetämällä punaisella leimalla merkittyä nauhaa (Kuva 27).
PUSSIN IRROTTAMINEN AUTON PENKISTÄ
Suorita pussin molemmilla sivuilla seuraavat toimenpiteet:
Irrota solki pussista vetämällä soljen punaista kielekettä ulospäin
ja työtämällä solkea ylöspäin (Kuva 28) siten, että vyö irtoaa pussista. Solki jää kiinni auton turvavyöhön.
HUOMIO! Älä koskaan anna kenenkään auton matkustajan käyttää auton turvavyötä ennenkuin olet irrottanut siitä KIT TRIO
CAR -soljen, joka saattaisi olla vaarallinen!
Irrottaaksesi soljen turvavyöstä löysennä vyön lenkkiä (Kuva 29)
ja kierrä punaista tappia siten, että solki vapautuu (Kuva 30).
PUSSIN KIINNITYS AUTOON ENSIMMÄISEN KERRAN
JÄLKEEN
Kiinnittääksesi pussin uudelleen auton penkkiin, silloin kun molemmat soljet ovat jo kiinni auton molemmissa turvavöissä, suorita alla olevat toimenpiteet.
Tarkista, että molemmat auton turvavyöt on kiinnitetty.
Kiinnittääksesi soljet pussiin seuraa kappaleen “KIT TRIO CAR
-OSAN ASENTAMINEN PUSSIIN - Soljet auton turvavyöhön”
ohjeita.
Vedä auton turvavyötä kelaa kohti, painaen pussia istuinta vasten
siten, että se kiinnittyy hyvin (Kuva 21).
HUOMIO! Tarkista, että pussi myötäilee kunnolla auton penkkiä.
HUOMIO! Varmista, että turvavyöt ovat sopivan tiukalla (Kuva
22).
KIT TRIO CAR -OSAN IRROTTAMINEN PUSSISTA
Kun pussia ei enää käytetä autossa tai sitä halutaan käyttää
muualla kuin autossa, KIT TRIO CAR -OSA voidaan irrottaa alla
mainituilla toimenpiteillä.
Lantiovyö
Avaa vyö vetämällä punaisella leimalla varustettua nauhaa (Kuva
23).
Pujota nauha ulos ensin vasemmanpuoleisesta aukosta alakautta
ja sitten oikeanpuoleisesta aukosta yläkautta (Kuva 31).
Auton turvavöihin tarkoitetut soljet
Vedä nauhan punaista kielekettä ulospäin ja työnnä solkea ylöspäin (Kuva 28).
TUOTTEEN PUHDISTAMINEN
Puhdista vyö ja soljet ainoastaan käsin, käyttäen veteen kostutettua liinaa. Älä käytä liuotteita tai muita pesuaineita.
HUOMIO! Tarkista säännöllisesti kaikki pussin ja KIT TRIO CAR
-KOMPONENTIN osat, varmistaen, ettei mikään osista ole vahin-
goittunut tai hyvin kulunut.
VAROTOIMENPITEET: LUE ENNEN
MATKALLE LÄHTÖÄ
• Säilytä ohjeet huolella tuotteen yhteydessä siten, että ne ovat
helposti saatavissa.
• Tuote on asennettava tarkkaan annettuja ohjeita seuraten.
• Älä koskaan kiinnitä tuotetta sellaisilla auton turvavöillä, jois-
sa on ainoastaan 2 kiinnityspistettä.
• Asenna tuote ainoastaan sellaisiin auton penkkeihin, jotka on
kiinnitetty asianmukaisesti auton runkoon ja käännetty auton
etupäätä kohti.
• Tarkista, että taitettavat, käännettävät tai kierrettävät auton
penkit on kiinnitetty kunnolla ja varmista, ettei autossa kuljeteta irrallisia esineitä, varsinkaan sen takaikkunalla, koska ne
saattaisivat onnettomuuden sattuessa tai äkkijarrutuksessa
kolhia ja vahingoittaa matkustajia.
• Asenna tuote siten, ettei mikään liikkuva penkki tai auton ovi
kosketa siihen. Vältä minkään tuotteen osan jäämistä auton
ovien väliin tai hankautumista teräviä kohtia vasten.
• Varmista aina, että auton turvavyö on asianmukaisen kireällä,
eikä ole kierteillä tai väärässä asennossa.
• Älä käytä tuotetta, mikäli jotkut sen osista ovat rikki tai puuttuvat.
• Älä aseta mitään esinettä (tyynyjä, peitteitä jne) auton istuimen ja pussin tai pussin ja lapsen väliin.
• Älä aseta tuotteen päälle painavia esineitä.
• Varmista, että kaikki ajoneuvon matkustajat käyttävät turvavyötä, sekä oman turvallisuutensa tähden että siksi koska he
saattaisivat muutoin tönäistä lasta matkan aikana.
• Tukehtumisvaaran välttämiseksi pidä muovipussit poissa lapsen lähettyviltä.
• Tarkista säännöllisesti tuotteen kulumisaste ja siinä mahdollisesti esiintyvät rikkoutumat. Mikäli tuote on vahingoittunut,
sitä ei saa käyttää ja se on pidettävä poissa lasten ulottuvilta.
• Kun lasta ei kuljeteta autossa, pussi on pidettävä kiinnitettynä
penkkiin tai pantava tavarasäiliöön.
• ARTSANA ei vastaa tuotteen asiattomasta käytöstä.
Mikäli haluat lisätietoja tai tarvitset varaosia ota yhteyttä Artsanan asiakaspalveluun:
postiosoite: ARTSANA SPA
Servizio Clienti
Via Saldarini Catelli 1
22070 Grandate COMO - ITALY
puhelin: (0039) 031 382000
sähköposti: info@artsana.it <mailto:info@artsana.it>
kotisivu www.chicco.com <http://www.chicco.com>
25
Page 26

CZ
I
K T C
1. Břišní pás
2. Přezky na autopás
VELMI DŮLEŽITÉ! POZORNĚ SI PROČTĚTE
• Pozorně si pročtěte tento návod dříve než začnete výrobek
používat.
• TENTO VÝROBEK MŮŽE BÝT PŘIPEVNĚN A POUŽÍVÁN
VÝHRADNĚ NA KORBIČCE ZNAČKY CHICCO.
• TENTO VÝROBEK MŮŽE BÝT PŘIPEVNĚN A POUŽÍVÁN
VÝHRADNĚ NA KORBIČKÁCH, KTERÉ JSOU K TOMU
UZPŮSOBENY: OVĚŘTE SI V PŘÍSLUŠNÉM NÁVODU K POUŽITÍ,
ZDA JE KORBIČKA URČENA K MONTÁŽI SYSTÉMU “KIT TRIO
CAR”.
• Při montáži a připevňování výrobku se přesně řiďte tímto
návodem. Nedovolte, aby kdokoliv používal výrobek, aniž by
se obeznámil s tímto návodem.
• Uschovejte tento návod spolu s výrobkem.
• Žádné zádržné zařízení do auta nezaručí úplnou bezpečnost
dítěte v případě nehody, ale použití tohoto výrobku snižuje
riziko zranění nebo smrti dítěte.
• Nesprávné použití výrobku zvyšuje riziko vážného zranění
dítěte, a to nejen v případě nehody, ale i jiných situacích.
• Pokud je výrobek poškozený, deformovaný nebo velmi
opotřebovaný, musí být vyměněn: nemusí už splňovat
původní požadavky na bezpečnost.
• Na výrobku nesmí být provedena žádná úprava nebo změna,
bez předchozího souhlasu výrobce. Nepoužívejte doplňky,
náhradní díly nebo části, které nejsou dodávány výrobcem.
• Ve vozidle nikdy nenechávejte dítě v korbičce bez dozoru.
• Nikdy nenechávejte korbičku nepřipevněnou k sedadlu vozidla: mohla by zasáhnout a zranit osoby ve vozidle.
• Pokud auto zůstalo dlouho stát na slunci, dříve než do
korbičky uložíte dítě, pozorně ji zkontrolujte, zda nejsou
některé její části rozpálené: případně ji nechte vychladnout
dříve než znovu dítě uložíte, mohlo by se spálit.
• I při malé dopravní nehodě může dojít k poškození korbičky a
systému KIT TRIO CAR, třeba i neznatelnému pouhým okem:
proto je nutné je v každém případě vyměnit.
• Nepoužívejte bezpečnostní zádržné zařízení do auta zakoupené jako použité, mohlo dojít k vážnému poškození jeho
struktury, i když není viditelné pouhým okem, ale které mohlo snížit jeho celkovou bezpečnost.
• Společnost Artsana nenese žádnou odpovědnost za nesprávné nebo nevhodné používání výrobku.
1. Jedná se o “univerzální” dětské zádržné zařízení, které bylo
schváleno podle 4. verze evropské normy ECE 44. Je vhodné
pro běžné použití ve vozidlech a je použitelné na většině sedadel vozidla, i když ne na všech.
2. Zádržné zařízení je plně kompatibilní, pokud výrobce v
příručce k vozidlu uvádí, že se pro dané vozidlo předpokládá
použití dětských zádržných zařízení univerzálního typu pro
danou věkovou kategorii.
3. Toto zádržné zařízení bylo klasifi kováno jako “univerzální”,
protože vyhovuje přísnějším požadavkům pro homologaci
oproti předcházejícím modelům, které takto označeny nejsou.
4. Je vhodné pouze pro použití ve vozidlech, vybavených
tříbodovými bezpečnostními pásy, pevnými nebo s automatickým navíjením, které byly schváleny dle dispozic
normy UN/ECE č. 16 nebo jiné jí odpovídající normy.
5. V případě jakýchkoliv pochybností se obraťte na výrobce
sedačky nebo na příslušnou prodejnu.
Systém KIT TRIO CAR umožňuje připevnit a používat ve vozidle
SOUČÁSTI
DŮLEŽITÉ OZNÁMENÍ
NÁVOD K POUŽITÍ
korbičky Chicco, které jsou k tomu uzpůsobeny (viz návod k
použití dané korbičky), k přepravě dítěte v prvních měsících
života.
Tento výrobek byl schválen podle evropské normy ECE R44/04
pro “skupinu 0”, tj. pro přepravu dětí s váhou do 10 kg, což
zhruba odpovídá do 6 měsíců věku.
Po připevnění systému KIT TRIO CAR na korbičku, ji můžete
připevnit do vozidla.
Abyste mohli připevnit korbičku k sedadlu, toto sedadlo musí
splňovat následující požadavky:
- musí být otočeno ve směru jízdy (obr. 1)
- musí to být zadní sedadlo, které je vybaveno alespoň dvěma
tříbodovými bezpečnostními pásy (obr. 2), schválenými dle
dispozic normy UN/ECE 16 nebo jiné jí odpovídající normy.
Pokud jste zakoupili systém KIT TRIO CAR samostatně, pak
dříve než korbičku umístíte do vozidla, proveďte následující
úkony.
Břišní pás
Břišní pás musí být protažen oběma otvory na dně korbičky
(obr. 3). Přeložte pás s červenou tečkou tak, aby byl suchý zip
uvnitř, vsuňte jej do otvoru na pravé straně (obr. 4) a vytáhněte
jej otvorem na straně levé (obr. 5).
Pás zapnete tak, že položíte pás s červenou tečkou přes druhý
konec pásu (obr. 6).
POZOR! Ověřte si, zda pás není nikde překroucen (obr. 7).
Přezky na autopás
Přezky připevněte na čepy na obou koncích korbičky takto
(obr. 8): nasuňte přezku na příslušný čep, zatlačte na ni (obr. 9)
a zatáhněte za ni směrem dolů, dokud neuslyšíte, že zacvakla
(obr. 10).
POZOR! Dbejte, abyste přezky nepřipevnili naopak! (obr. 11).
Nyní můžete korbičku připevnit do vozidla.
Položte korbičku doprostřed zadního sedadla a připevněte ji
bezpečnostními pásy obou bočních míst (obr. 12). Pokud je
i prostřední místo na zadním sedadle vybaveno tříbodovým
bezpečnostním pásem, můžete korbičku připevnit na jednu
stranu sedadla, tj. zabrat prostřední a boční místo sedadla a
připevnit ji pásy těchto dvou míst (obr. 13).
1. Zapněte bezpečnostní pásy do příslušných upínacích spon
na sedadle (obr. 14).
2. Úplně sklopte zádovou opěrku korbičky tak, jak je uvedeno
v příslušném návodu k použití.
POZOR! Nikdy nepoužívejte korbičku v autě, pokud je opěrka
zad zvednutá! V tom případě totiž není zaručena bezpečnost
výrobku!
3. Pokud jsou přezky na korbičce uloženy v látkových krytech,
tak přezky vytáhněte (obr. 15).
4. Položte korbičku na zadní sedadlo (obr. 16) tak, aby byla
opřená po celé délce.
5. Na obou stranách korbičky proveďte následující pokyny:
- uchopte autopás a udělejte na něm smyčku (obr. 17);
- uchopte přezku korbičky a vytočte směrem ven červený
jazýček přezky (obr. 18).
Smyčku pásu protáhněte přezkou (obr. 19), přetočte zpět
červený jazýček přezky tak, aby procházel smyčkou pásu (obr.
20).
Zatáhněte za pás směrem k navíječi, současně přitiskněte
korbičku na sedadlo a dobře pás napněte (obr. 21).
POZOR! Zkontrolujte, zda korbička dobře přiléhá na sedadlo.
POZOR! Zkontrolujte, zda jsou pásy dobře napnuty (obr. 22).
Zatáhněte za pás s červenou tečkou a pás rozepněte (obr. 23).
Uložte dítě do korbičky (obr. 24).
Přes bříško dítěte přetáhněte nejprve pravý konec a pak levý
konec pásu (ob. 25).
Pásy natáhněte tak, aby obepínaly bříško dítěte a přitlačte je k
26
POŽADAVKY NA SEDADLO VOZIDLA
PŘIPEVNĚNÍ SYSTÉMU KIT TRIO CAR NA KORBIČKU
PŘIPEVNĚNÍ KORBIČKY DO VOZIDLA: POPRVÉ
ULOŽENÍ DÍTĚTE
Page 27

sobě. Dbejte, abyste pásy neutáhli příliš těsně (obr. 26).
Zatáhněte za konec pásu s červenou tečkou a uvolněte tak
polstrovaný břišní pás korbičky (obr. 27).
Na obou stranách korbičky proveďte následující úkony.
Zatáhněte za červený jazýček přezky směrem ven, současně
zatlačte přezku směrem nahoru (obr. 28) a vyhákněte ji od
korbičky. Přezka zůstane připevněna na autopásu.
POZOR! Nikdy nepoužívejte bezpečnostní pás k připásání osoby, pokud jste z něj neodstranili přezku systému KIT TRIO CAR:
může to být nebezpečné!
Pokud chcete přezku z autopásu odstranit, povolte smyčku
na pásu (obr. 29), vytočte červený jazýček a přezku odstraňte
(obr. 30).
PŘIPEVNĚNÍ KORBIČKY DO VOZIDLA: DALŠÍ POUŽITÍ
Pokud obě přezky zůstaly připevněny k autopásům a chcete
znovu připevnit korbičku do vozidla, postupujte následovně.
Ověřte si, zda jsou oba bezpečnostní pásy zapnuty.
Při upevňování přezek na korbičku se řiďte pokyny uvedenými
v bodu “ PŘIPEVNĚNÍ SYSTÉMU KIT TRIO CAR NA KORBIČKU Přezky na autopás”.
Zatáhněte za pás směrem k navíječi, současně přitiskněte
korbičku na sedadlo a dobře pás napněte (obr. 21).
POZOR! Zkontrolujte, zda korbička dobře přiléhá na sedadlo.
POZOR! Zkontrolujte, zda jsou pásy dobře napnuty (obr. 22).
ODSTRANĚNÍ SYSTÉMU KIT TRIO CAR Z KORBIČKY
Pokud již nechcete korbičku používat pro převoz ve vozidle, je
možné systém KIT TRIO CAR odstranit. Řiďte se následujícími
pokyny.
Břišní pás
Zatáhněte za konec pásu s červenou tečkou a pás rozepněte
(obr. 23).
Pás vyvlékněte nejprve na levé straně a pak na pravé straně
(obr. 31).
Přezky na autopás
Zatáhněte za červený jazýček přezky směrem ven a zatlačte
přezku směrem nahoru (obr. 28).
Pás a přezky čistěte pouze hadříkem namočeným ve vodě.
Nepoužívejte ředidla ani jiné čistící prostředky.
POZOR! Pravidelně kontrolujte všechny části korbičky a systému KIT TRIO CAR a ověřte si, zda není některá část poškozená
nebo velmi opotřebovaná.
UVOLNĚNÍ DÍTĚTE
UVOLNĚNÍ KORBIČKY OD SEDADLA
ČIŠTĚNÍ VÝROBKU
mezi sedadlo a korbičku nebo mezi korbičku a dítě.
• Nepokládejte na korbičku těžké předměty.
• Ujistěte se, zda všichni spolujezdci mají zapnutý pás, a to
jak pro jejich vlastní bezpečnost, tak i proto, že během cesty
v případě nehody by mohli dítě zranit.
• Uchovávejte igelitové sáčky mimo dosah dítěte, abyste
odstranili riziko udušení.
• Pravidelně kontrolujte stupeň opotřebení výrobku a zda
není rozbitý. Pokud je poškozený, výrobek nepoužívejte a
uložte jej mimo dosah dětí.
• I když nevezete dítě s sebou, korbička musí být připevněna
k sedadlu nebo ji můžete uložit do kufru.
• Společnost ARTSANA nenese odpovědnost za nesprávné
nebo nevhodné používání výrobku.
UPOZORNĚNÍ: PŘEČTĚTE PŘED POUŽITÍM
• Tento návod pečlivě uschovejte spolu s výrobkem tak, aby
byl snadno k dispozici.
• Výrobek musí být připevněn přesně podle uvedených
pokynů.
• Nikdy nepřipevňujte tento výrobek pouze dvoubodovým
bezpečnostním pásem.
• Výrobek upevněte pouze na sedadla, která jsou správně
připevněna na kostru vozidla a otočena po směru jízdy.
• Nenechávejte sklopné nebo otáčivé části sedadel
nezajištěny a ujistěte se, zda nevezete volně ležící předměty
a to především na zadní odkládací desce: v případě nehody
nebo prudkého zabrždění by mohly zasáhnout a zranit
osoby ve vozidle.
• Připevněte výrobek do vozidla tak, aby se nemohl dostat do
styku se dveřmi auta nebo s předním sedadlem, když je posunete dozadu. Dbejte, aby žádná část výrobku nezůstala
přivřená dveřmi a nedotýkala se ostrých hran.
• Ověřte si, zda je bezpečnostní pás vozidla správně napnut,
zda není nikde překroucen nebo špatně protažen.
• Výrobek nepoužívejte, pokud některá jeho část chybí nebo
je poškozená.
• Nevkládejte žádný předmět (např. polštářky nebo deky)
Žádosti o další informace nebo náhradní díly adresujte na
Službu klientům Artsany:
adresa: ARTSANA SPA
Servizio clienti
Via Saldarini Catelli 1
22070 Grandate COMO - ITÁLIE
telefon: (0039) 031 382000
e-mail: info@artsana.it
webové stránky: www.chicco.com
27
Page 28

N
I
K T C
KOMPONENTER
1. Mavebelte
2. Spenner for festing av bilbelte
MEGET VIKTIG: LES MEGET NØYE
• Les nøye disse instruksjoner før du bruker produktet.
• DETTE PRODUKTET KAN MONTERES OG BRUKES KUN MED
BARNEVOGNKURV MED CHICCO VAREMERKE.
• DETTE PRODUKTET KAN KUN MONTERES OG BRUKES MED
BARNEVOGNKURV MODELLER BEREGNET TIL DETTE BRUK.
• For montering og installering av produktet må du følge instruksjonene. Unngå at noen bruker produktet uten å ha lest instruksjonene.
• Oppbevar denne håndboken sammen med produktet.
• Ikke noe produkt for sikkerhet i bil kan garantere en total sikkerhet for barnet i tilfelle ulykke, men bruket av dette produktet
minsker ulykkesrisikoen, og at barnet omkommer.
• Ukorrekt bruk av produktet øker risikoen for allvorlige skader på
barnet, ikke bare i ulykkestilfelle, men også i andre situasjoner.
• Hvis produktet er skadet, deformert eller meget slitt må det
byttes ut: det kan ha tapt noen av de opprinnelige sikkerhetspregene.
• Ikke modifi ser eller sett ekstra utstyr på produktet uten godkjennelse av produsenten. Ikke installer tilbehør, reservedeler
elle komponenter som ikke er levert av produsenten.
• La aldri barnet være ubevoktet i barnevognkurven.
• La aldri barnevognkurven være på bilsetet uten å sette den fast:
den kan støte passasjerene og skade dem.
• Hvis bilen har stått i solen, må kurven undersøkes nøye før man
legger i barnet, og kontrollere at ingen deler er blitt overopphetet: i dette tilfellet må du la dem kjølne før du legger i barnet
sånn at det ikke brenner seg.
• Etter en ulykke, selv liten, kan barnevognkurven KIT TRIO CAR
få skader som ikke er synlige med det blotte øye: derfor må den
byttes ut i ethvert tilfelle.
• Ikke bruk brukte produkter for sikkerhet i bil: de kan ha fått
strukturelle skader som ikke er synlige med det blotte øye, men
kompromittere sikkerheten av produktet.
• Firma ARTSANA frasier seg alt ansvar ved uegnet bruk av produktet.
VIKTIG MEDDELELSE
1. Dette er en “Universal” fastspenningsanordning for barn.
Den er godkjent i overensstemmelse med Vedtekt NR. 44, forbedringsserie 04. Egnet for generelt bruk i kjøretøyer og passer
til de fl este, men ikke til alle bilsetene i bilen.
2. Den perfekte kompatibilitet fi nner lettere sted hvis kjøretøyskonstruktøren har erklært i manualen for kjøretøyet, at
kjøretøyet er forutsett for installering av “Universal” fastspenningsanordning for barn i denne aldersgruppen.
3. Denne fastspenningsanordningen er blitt klassifi sert “Universal” på grunn av strenge kriterier ved godkjenning i forhold til
de modeller som er blitt brukt før, og hvor ikke følgende meddelelse følger med.
4. Passer kun til kjøretøyer utstyrt med 3-punkts sikkerhetsbelte, statisk eller med retraksjon, godkjent i overensstemmelse
med norm UN/ECE NR. 16 eller andre tilsvarende standarder.
5. I tilfelle tvil, ta kontakt enten med produsenten av fastspenningsanordningen eller forhandleren.
BRUKSANVISNING
KIT TRIO CAR er en komponent som gjør det mulig å feste og
bruke Chicco barnevognkurver (se håndbok for barnevognkurv)
forutsett for bil, og transportere barnet korrekt i bilen i de første
månedene etter fødselen.
Det er et produkt som er godkjent i henhold til den europeiske
normen ECE R 44/04, i “Gruppe 0” for transport av barn med en
vekt på 0 til 10 kg, indikativt til barn helt opp til 6 måneder. Etter å ha montert KIT TRIO CAR på barnevognkurven, kan kurven
festes i bilen.
BILSETET MÅ HA DISSE KRAV
For å kunne hekte barnevognkurven til setet, må setet ha følgende rekvisitter:
det må peke med kjøreretningen (Fig. 1);
det må fi nnes et baksete utstyrt med minst 2 passasjerbelter med
3 festepunkter (Fig. 2), godkjent i
henhold til norm UNI/ECE 16, eller annen tilsvarende norm.
MONTERING AV KIT TRIO CAR PÅ
BARNEVOGNKURVEN
Hvis KIT TRIO CAR ikke er kjøpt samtidig med barnevognkurven,
utfør følgende instruksjoner for montering før du setter barnevognkurven i bilen.
Mavebelte
Mavebeltet må stikkes inn i de to sprekkene som fi nnes på basisen
på barnevognkurven (Fig. 3). Brett båndet med det røde merket
slik at borrelåseen er innvendig og stikk det inn i sprekken til høyre (Fig. 4), og dra det ut av hullet til venstre (Fig. 5).
Steng beltet ved å sette båndet med det røde merket over det
andre båndet (Fig. 6).
ADVARSEL! Kontroller at beltet ikke er vridd (Fig. 7).
Spenner for bilbelte
For å hekte de to spennene til de to tappene som sitter på endene
på barnevognkurven (Fig. 8), stikk inn hver spenne i den respektive tappen ved å skyve på det (Fig. 9) og dra spennen nedover til
man hører et klikk (Fig. 10).
ADVARSEL! Ikke monter spennene vrangt! (Fig. 11).
Nå er barnevognkurven klar til å settes i bilen.
FESTING AV BARNEVOGNKURVEN I BIL: DEN FØRSTE
GANGEN
For å feste barnevognkurven til baksetet må man sette det på
midten og hekte det fast med det de to beltene på de utvendige
stedene (Fig. 12). Hvis baksetet på bilen også er utstyrt med 3punkts sikkerhetsbelte på midten, kan kurven også monteres på
siden ved å oppta plassen på midten og den ved siden av hektet
fast med beltene på disse to setene (Fig. 13).
Dra ut og hekt de to bilbeltene til de respektive spennene på setet
(Fig. 14).
Bøy rygglenet på barnevognkurven helt ned som illustrert i
bruksanvisningen for kurven.
ADVARSEL! Bruk aldri kurven i bilen med rygglenet opprett! Sikkerheten på produktet er ikke garantert!
3. Hvis spennene på barnevognkurven er overtrekt med stoff må
dette fjernes (Fig. 15).
4. Sett barnevognkurven på lengden på setet (Fig. 16), slik at den
sitter tett inntil setet.
Utfør følgende operasjoner på begge endene:
ta tak i bilbeltet og gjør en løkke (Fig. 17);
ta tak i spennen på kurven og vri den røde spennenålen utover
(Fig. 18).
Stikk den løkken som er gjort inn i spennen (Fig. 19) og vri den
røde nålen i opprinnelig posisjon, slik at den stikkes inn i selve
løkken (Fig. 20).
Dra bilbeltet mot opprulleren, ved å trykke barnevognkurven mot
setet slik at den festes godt (Fig. 21).
ADVARSEL! Kontroller at kurven sitter godt mot setet.
ADVARSEL! Kontroller at beltene er godt spent (Fig. 22).
PLASSERING AV BARNET
Åpne mavebeltet ved å dra i båndet med det røde merket (Fig.
23).
Legg barnet i barnevognkurven (Fig. 24).
La først det høyre båndet på beltet passere over livet på barnet og
siden det venstre (Fig. 25).
28
Page 29

Sett sammen de to klaffene slik at beltet sitter inntil livet på barnet, uten å stramme for mye (Fig. 26).
TA UT BARNET
Åpne det vatterte mavebeltet på barnevognkurven ved å dra i
båndet med det røde merket (Fig. 27).
AVHEKTING AV BARNEVOGNKURVEN FRA SETET
Utfør følgende operasjoner på begge sidene på barnevognkurven.
Hekt opp spennen på kurven ved å dra i den røde tungen på spennen utover og skyv spennen oppover (Fig. 28), slik at kurven blir
løsgjort fra beltet. Spennen forblir festet til bilbeltet.
ADVARSEL! Bruk aldri bilbeltet for å spenne fast en passasjer uten
å ha tatt spennen på KIT TRIO CAR av bilbeltet: det kan være farlig!
Løsne løkken på beltet (Fig. 29) og vri den røde tappen slik at den
blir løsgjort (Fig. 30) for å ta spennen av beltet.
FESTING AV BARNEVOGNKURVEN I BIL: ETTER DEN
FØRSTE GANGEN
For å hekte barnevognkurven på setet på nytt når de to spennene
er festet til de to bilbeltene må følgende operasjoner utføres.
Kontroller at de to bilbeltene er hektet fast.
For å feste spennene til kurven, les instruksjonene i paragraf
“MONTERING AV KIT TRIO CAR PÅ BARNEVOGNKURVEN Spenner for bilbelte”.
Dra bilbeltet mot opprulleren, ved å trykke kurven mot setet sånn
at den festes godt (Fig. 21).
ADVARSEL! Kontroller at kurven sitter godt mot setet.
ADVARSEL! Kontroller at beltene er godt spent (Fig. 22).
DEMONTERING AV KIT TRIO CAR FRA
BARNEVOGNKURVEN
Når det er slutt på perioden for bruk av barnevognkurven i bilen,
eller for å bruke den uten bil, kan KIT TRIO CAR demonteres ved
å utføre følgende operasjoner.
Mavebelte
Åpne beltet ved å dra i båndet med det røde merket (Fig. 23).
Dra ut båndet først fra den venstre sprekken nedenfra, siden fra
den til høyre ovenfra Fig. 31).
Spenner for bilbelte
Dra i den røde tungen på spennen utad og skyv spennen oppover
(Fig. 28).
RENGJØRING AV PRODUKTET
Rengjør beltet og spennene kun for hånd ved å bruke en klut fuktet med vann. Bruk ikke løsningsmidler eller andre vaskemidler.
ADVARSEL! Kontroller periodisk alle deler på barnevognkurven
og KIT TRIO CAR, og forsikre deg om at ingen del er skadet eller
mye slitt.
ADVARSLER: MÅ LESES FØR REISEN
• Disse instruksjonene må oppbevares nøye sammen med produktet og være lett tilgjengelige.
• Produktet må installeres ved å følge instruksjonene som følger
med.
• Sett aldri fast produktet ved å bruke bilbelte med bare to festepunkter.
• Installer produktet kun på seter korrekt festet til bilstrukturen
og som peker fremover i bilen.
• Fest godt bilseter som kan bøyes, legges ned eller svinges og
forsikre deg om at gjenstander som er transportert i bilen er
godt fastsatt, særskilt i bakhyllen: i tilfelle ulykke eller bråbremsing, kan de støte til passasjerene og skade dem.
• Installer produktet slik at man unngår at et rørlig sete eller
at bildøren kan innvirke på det. Unngå at ingen deler av produktet blir sittende fast i bildører, eller gnisser mot skarpe
kanter.
• Kontroller alltid at bilbeltet er korrekt spent, at det ikke er
vridd eller i ukorrekt posisjon.
• Ikke bruk produktet hvis noen deler skulle vise seg være skadet
eller forsvunnet.
• Ikke sett noen gjenstand (puter, tepper, osv.) mellom bilsetet
og kurven, eller mellom barnevognkurven og barnet.
• Ikke legg tunge gjenstander på produktet.
• Forsikre seg om at alle passasjerene i bilen bruker sikkerhetsbelte, for sin egen sikkerhet, men også fordi de kan støte barnet under reisen.
• Hold plastposer langt fra barnet for å unngå risiko for kveling.
• Kontroller regelmessig slitasjetilstanden på produktet og om
det fi nnes eventuelle brudd. Bruk ikke produktet mer i tilfelle
skader, men hold det utenfor rekkevidde for barn.
• Når man ikke transporterer barnet, må barnevognkurven være
fastsatt eller legges i bagasjerommet.
• Firma ARTSANA frasier seg alt ansvar ved uegnet bruk av produktet.
For nærmere opplysninger og ved forespørsler om reservedeler,
sett deg i forbindelse med Artsana kundeservice:
post: ARTSANA SPA
Kundeservice
Via Saldarini Catelli. n.1
22070 Grandate COMO - ITALY
telefon: (0039) 031 382000
e-mail: info@artsana.it
adresse: www.chicco.com
29
Page 30

S
I
K T C
BESTÅNDSDELAR
1. Höftbälte
2. Bälteslås för fastsättning av bilbälte
MYCKET VIKTIGT:
LÄS DET FÖLJANDE MYCKET UPPMÄRKSAMT
• Läs noga dessa instruktioner innan produkten tas i bruk.
• DENNA PRODUKT KAN UTESLUTANDE MONTERAS OCH ANVÄNDAS MED EN LIGGKORG MED MÄRKET CHICCO.
• DENNA PRODUKT KAN UTESLUTANDE MONTERAS OCH
ANVÄNDAS MED DE LIGGKORGSMODELLER SOM ÄR FÖRBEREDDA FÖR ATT KUNNA INSTALLERA DEN: KONTROLLERA I
BRUKSANVISNINGEN SOM MEDFÖLJER DIN LIGGKORG OM
DEN ÄR FÖRBEREDD FÖR INSTALLATIONEN AV “KIT TRIO
CAR”.
• Följ noga instruktionerna för monteringen och för installeringen
av produkten. Låt inte någon person använda produkten utan
att ha läst instruktionerna.
• Förvara denna handbok tillsammans med produkten.
• Ingen produkt för säkerhet i bil kan garantera total säkerhet för
barnet i händelse av en olycka, men användningen av denna
produkt minskar risken för olycksfall och livsfara för barnet.
• En felaktig användning av produkten ökar risken för att barnet
kan skada sig allvarligt, inte endast i händelse av en olycka, men
även i andra situationer.
• Om produkten har skadats, deformerats eller är starkt sliten
ska den bytas ut, eftersom den kan ha förlorat sina ursprungliga
säkerhetsegenskaper.
• Utför inga ändringar eller tillsatser på produkten utan tillverkarens godkännande. Installera inga tillbehör, reservdelar eller
delar som inte levererats av tillverkaren.
• Lämna inte, av någon som helst anledning, barnet utan tillsyn
i liggkorgen.
• Lämna inte liggkorgen på bilsätet utan att den är fastspänd: den
skulle kunna stöta mot passagerarna och skada dem.
• Om bilen har stått stilla i solsken, ska liggkorgen granskas noga
innan barnets placeras i den och kontrollera att inga delar av
den har överhettats: om så skulle vara fallet ska dessa få svalna
innan barnet placeras i liggkorgen, för att undvika att barnet
bränner sig.
• Till följd av en olycka, även en lätt olycka, kan liggkorgen och
KIT TRIO CAR utsättas för skador som inte är synliga med blotta
ögat: därför är det nödvändigt att byta ut dem i vilket fall som
helst.
• Använd inte produkter för säkerhet i bil som köpts i andra hand.
De skulle kunna ha utsatts för mycket farliga skador på stommen som inte är synliga med blotta ögat, men som äventyrar
produktens säkerhet.
• Företaget Artsana avsäger sig allt ansvar för en oriktig användning av produkten
VIKTIGT MEDDELANDE
1. Detta är en “Universal” fastspänningsanordning för barn, som
är godkänd enligt Standard Nr. 44, rev. serie 04. Den är lämplig
för allmän användning i fordon och är kompatibel med de fl esta
bilsäten, men inte med alla.
2. Det är lättare att erhålla en perfekt kompatibilitet i de fall
när fordonets tillverkare uppger i fordonets handbok att fordonet är förberett för montering av “Universala” barnfastspänningsanordningar för den aktuella åldern.
3. Denna fastspänningsanordning har klassifi cerats “Universal”
enligt kriterier för godkännande som är strängare i förhållande
till föregående modeller som inte förfogar över detta meddelande.
4. Den är endast lämplig för användning i fordon som är försedda med 3 - punktsbälte som är statiskt eller försett med
upprullningsautomatik och godkänt enligt Standarden UN/ECE
Nr. 16 eller andra motsvarande standarder.
5. I händelse av tvivel, kontakta tillverkaren för fastspänningsanordningen eller återförsäljaren.
INSTRUKTIONER FÖR ANVÄNDNINGEN
KIT TRIO CAR är ett tillbehör som gör det möjligt att spänna fast
och använda de Chicco liggkorgar som är förberedda för detta
ändamål (se liggkorgens bruksanvisning) inne i Din bil, för att
transportera barnet i bilen på ett korrekt sätt under dess första
månader.
Det är en produkt som är godkänd i “Grupp 0” i enlighet med
europanormen ECE R44/04, för transport av barn med en kroppsvikt från 0 till 10 Kg, approximativt med barn upp till 6 månader.
Efter att ha monterat KIT TRIO CAR på liggkorgen, kan liggkorgen
sättas fast i bilen.
KRAV PÅ BILSÄTET
För att kunna spänna fast liggkorgen på bilsätet, är det nödvändigt att bilsätet uppfyller följande krav:
- det ska vara framåtvänt i färdriktningen (Figur 1),
- det ska vara ett bakre bilsäte som är försett med minst 2 stycken
3-punkt passagerarbälten (Figur 2), som är godkända enligt normen UNI/ECE 16, eller annan motsvarande norm.
MONTERING AV KIT TRIO CAR PÅ LIGGKORGEN
Om KIT TRIO CAR har inte har köpts tillsammans med liggkorgen
ska Du följa monteringsinstruktionerna här under, innan liggkorgen placeras i bilen.
Höftbälte
Höftbältet ska föras in i de två hålen som fi nns på liggkorgen basdel (Figur 3).
Vik bandet med det röda märket på så sätt att kardborrbandet
kommer på insidan, för in det i hålet till höger (Figur 4), och dra
ut det från hålet till vänster (Figur 5).
Stäng bältet genom att lägga bandet med det röda märket på det
andra bandet (Figur 6).
VARNING! Kontrollera att bältet inte har snott sig (Figur 7).
Bälteslås för bilbälte
För att koppla fast de två bälteslåsen på stiften som är belägna
vid liggkorgens ändar (Figur 8), för Du in varje bälteslås i det
respektive stiftet genom att skjuta (Figur 9) och dra bälteslåset
nedåt till Du hör ett “klick” (Figur 10).
VARNING! Montera inte bälteslåsen omvänt! (Figur 11).
Liggkorgen är nu klar för att placeras i bilen.
HUR LIGGKORGEN SÄTTS FAST I BILEN: FÖRSTA
GÅNGEN
För att sätta fast liggkorgen på baksätet, är det nödvändigt att
placera den i mitten och spänna fast den med hjälp av de två yttre
platsernas bilbälten (Figur 12). Om baksätet i Din bil är försett
med ett 3- punktsbälte även på mittplatsen, kan liggkorgen även
monteras på sidan, genom att uppta mittplatsen och sidoplatsen
och fastspännas med hjälp av bilbältena på dessa två bilsäten
(Figur 13).
1. Dra ut och spänn fast de två bilbältena på bilsätets respektive
bälteslås (Figur 14).
2. Fäll ner liggkorgens rygg helt och hållet, såsom det visas i liggkorgens bruksanvisning.
VARNING! Använd inte liggkorgen i bilen med uppfälld rygg!
Produkten säkerhet garanteras inte i detta fall!
3. Om bälteslåsen som monterats på liggkorgen är beklädda med
ett överdrag i tyg, ska detta tas bort (Figur 15).
4. Placera liggkorgen på bilsätet i längdriktning (Figur 16), på så
sätt att hela liggkorgen ligger an ordentligt mot bilsätet.
5. Utför följande arbetsmoment på båda sidorna:
- grip tag i bilbältet och gör en ögla (Figur 17),
- grip tag i liggkorgens lås och vrid låsets röda spak utåt (Figur
18).
För in öglan som gjorts på bältet i låset (Figur 19) och vrid den
30
Page 31

röda spaken till utgångsläget, på så sätt att den förs in inne i
själva öglan (Figur 20).
Dra bilbältet mot upprullningsautomatiken, genom att trycka
liggkorgen mot bilsätet, på så sätt att den spänns fast ordentligt
(Figur 21).
VARNING! Kontrollera att liggkorgen ligger an ordentligt mot
bilsätet.
VARNING! Kontrollera att bältena är ordentligt spända (Figur
22).
HUR BARNET PLACERAS
Öppna höftbältet, genom att dra i bandet med det röda märket
(Figur 23).
Lägg barnet raklångt i liggkorgen (Figur 24).
Låt först bandet till höger på bältet löpa ovanför barnets midja
och därefter bandet till vänster (Figur 25).
Sätt ihop de två tygplösarna på så sätt att bältet ligger an mot
barnets midja, men utan att trycka för mycket (Figur 26).
HUR BARNET TAS UR
Öppna liggkorgens vadderade höftbälte genom att dra i bandet
med det röda märket (Figur 27).
HUR LIGGKORGEN TAS BORT FRÅN BILSÄTET
Utför följande arbetsmoment på liggkorgens båda sidor.
Lossa liggkorgens bälteslås genom att dra det röda låsblecket
på bälteslåset utåt och skjuta bälteslåset uppåt (Figur 28), så
att liggkorgen frigörs från bältet. Bälteslåset förblir fastsatt på
bilbältet.
VARNING! Använd inte bilbältet för att spänna fast en passagerare, utan att först ha tagit bort bälteslåset på KIT TRIO CAR från
bilbältet: det skulle kunna vara farligt!
För att ta bort bälteslåset från bältet, lossar Du på bältets ögla
(Figur 29) och vrider det röda stiftet så att det frigörs (Figur 30).
HUR LIGGKORGEN SÄTTS FAST I BILEN: EFTER DEN
FÖRSTA GÅNGEN
För att på nytt spänna fast liggkorgen på bilsätet, när de två bälteslåsen har förblivit fastsatta på de två bilbältena, förfar Du på
följande sätt.
Kontrollera att de två bilbältena är fastspända.
För att sätta fast bälteslåsen på liggkorgen, hänvisas till instruktionerna i avsnittet “MONTERING AV KIT TRIO CAR PÅ LIGGKORGEN - Bälteslås för bilbälte”.
Dra bilbältet mot upprullningsautomatiken, genom att trycka
liggkorgen mot bilsätet, på så sätt att den spänns fast ordentligt
(Figur 21).
VARNING! Kontrollera att liggkorgen ligger an ordentligt mot
bilsätet.
VARNING! Kontrollera att bältena är ordenligt spända (Figur
22).
HUR KIT TRIO CAR TAS BORT FRÅN LIGGKORGEN
När liggkorgen inte längre ska användas i bilen, eller om den ska
användas utanför bilen, kan KIT TRIO CAR demonteras genom att
följa arbetsmomenten här under.
Höftbälte
Öppna bältet genom att dra i bandet med det röda märket (Figur
23).
Dra ut bandet, först från hålet till vänster, underifrån, och därefter
från hålet till höger, ovanifrån (Figur 31).
Bälteslås för bilbälte
Dra bälteslåsets röda låsbleck utåt och skjut bälteslåset uppåt
(Figur 28)
RENGÖRING AV PRODUKTEN
Bältet och bälteslåsen får endast rengöras för hand, genom att
använda en duk som fuktats i vatten. Använd inte lösningsmedel
eller andra rengöringsmedel.
VARNING! Kontrollera regelbundet alla delar på liggkorgen och
på KIT TRIO CAR och försäkra Dig om att ingen del har skadats
eller är alltför sliten.
VARNINGAR: LÄS DESSA VARNINGAR FÖRE
BILFÄRDEN
• Dessa instruktioner ska förvaras med omsorg tillsammans
med produkten och de ska vara lättåtkomliga.
• Produkten ska installeras genom att noga följa de instruktioner som medföljer.
• Spänn inte fast produkten genom att använda ett bilbälte
med endast två fastsättningspunkter.
• Installera endast produkten på bilsäten som är korrekt fastsatta på bilens stomme och vända mot fordonets främre del.
• Fällbara, tippbara eller roterande bilsäten får inte lämnas slarvigt fastkopplade och försäkra Dig om att inga föremål som
inte är ordentligt fastsatta transporteras i bilen, i synnerhet
på den bakre hyllan: i händelse av en olycka eller en tvär inbromsning skulle dessa kunna stöta mot passagerarna och
skada dem.
• Installera produkten på så sätt att ingen rörlig stol eller bildörr kan komma i beröring med den. Se till att ingen del av
produkten kommer i kläm mellan bildörrarna eller skaver
mot vassa punkter.
• Försäkra Dig alltid om att bilbältet är korrekt spänt, att det
inte har snott sig eller kommit i felaktiga lägen.
• Använd inte produkten om någon delar har gått sönder eller
fattas.
• Sätt inte något föremål (kuddar, täcken, o.s.v.) mellan bilsätet
och liggkorgen, eller mellan liggkorgen och barnet.
• Lägg inga tunga föremål ovanpå produkten.
• Försäkra Dig om att alla passagerare i fordonet använder säkerhetsbältet, för deras egen säkerhet, men även för att de
skulle kunna stöta till barnet under bilfärden.
• Håll plastpåsar utom räckhåll för barnet, för att undvika risk
för kvävning.
• Kontrollera regelbundet produktens slitningsskick och att det
inte fi nns några delar som gått sönder. I händelse av skador
får produkten inte användas längre och den ska hållas utom
räckhåll för barn.
• När barnet inte transporteras ska liggkorgen lämnas fastkopplad, eller läggas i bagageutrymmet.
• Företaget ARTSANA avsäger sig allt ansvar för en oriktig användning av produkten.
För ytterligare informationer och för efterfrågan om reservdelar,
kontakta Artsana Kundtjänst:
post: ARTSANA SPA
Servizio Clienti
Via Saldarini Catelli n.1
22070 Grandate COMO - ITALY
telefon: (0039) 031 382000
e-mail: info@artsana.it
hemsida: www.chicco.com
31
Page 32

PL
I
K T C
ELEMENTY SKŁADOWE
1. Pas brzuszny
2. Sprzączki do umocowania na pasie samochodowym
BARDZO WAŻNE: PROSZĘ UWAŻNIE PRZECZYTAĆ.
• Przed przystąpieniem do użytkowania produktu, należy uważnie
przeczytać niniejszą instrukcję.
• Produkt ten może być montowany i stosowany tylko i wyłącznie do
gondol Chicco.
• Produkt ten może być montowany i stosowany tylko i wyłącznie do
gondol przystosowanych do jego instalowania: należy sprawdzić w
instrukcji obsługi gondoli, czy jest przystosowana do zainstalowania
“zestawu trio car”.
• W trakcie montażu oraz instalowania produktu, należy stosować się
dokładnie do instrukcji. Produkt nie powinien być używany przez
osoby, które nie przeczytały instrukcji.
• Proszę przechowywać niniejszą instrukcję wraz z produktem.
• W razie wypadku żadne samochodowe urządzenie zabezpieczające
nie może zagwarantować dziecku całkowitego bezpieczeństwa,
ale użycie tego produktu zmniejsza ryzyko odniesienia obrażeń lub
śmierci dziecka.
• Nieprawidłowe użycie produktu zwiększa ryzyko poważnych obrażeń
dziecka nie tylko w razie wypadku, ale też w innych sytuacjach.
• Jeśli produkt został uszkodzony, zdeformowany lub mocno zużyty,
należy go wymienić: możliwe jest, iż utracił on swe oryginalne cechy
charakterystyczne zapewniające bezpieczeństwo.
• Produkt nie powinien być modyfi kowany lub uzupełniany bez uprzedniej zgody producenta. Nie stosować akcesoriów, części zamiennych
lub elementów, które nie zostały dostarczone przez producenta.
• Nie pozostawiać nigdy dziecka bez opieki, z żadnego powodu, w
znajdującej się w samochodzie gondoli.
• Nie pozostawiać nigdy niezaczepionej gondoli na siedzeniu samochodowym; może ona uderzyć i zranić pasażerów.
• Jeśli samochód pozostawał przez dłuższy czas na słońcu, przed ulokowaniem dziecka należy dokładnie sprawdzić gondolę, czy niektóre
jej części nie są zbyt nagrzane; jeśliby to miało miejsce, przed umieszczeniem dziecka należy gondolę ochłodzić, aby uniknąć poparzeń.
• W wyniku nawet małego wypadku samochodowego, gondola oraz
ZESTAW TRIO CAR mogą zostać uszkodzone w sposób niewidoczny
gołym okiem; dlatego też mimo wszystko należy je wymienić.
• Nie stosować używanych samochodowych urządzeń
zabezpieczających: ich struktura mogła ulec uszkodzeniom, które są
niewidoczne gołym okiem, ale powodują utratę cech zapewniających
bezpieczeństwo produktu.
• Spółka Artsana uchyla się od jakiejkolwiek odpowiedzialności w razie
nieprawidłowego użycia produktu.
1. Jest to „Uniwersalne” urządzenie zabezpieczające dla dzieci,
posiadające homologację zgodnie z Przepisem Nr 44 oraz poprawkami z serii 04. Nadaje się do ogólnego zastosowania w samochodach
i przystosowane jest do większości - lecz nie wszystkich - siedzeń
samochodowych.
2. Dokładne przystosowanie jest łatwo osiągalne wówczas, kiedy
producent samochodu oświadcza w podręczniku pojazdu, iż w samochodzie przewidziane jest instalowanie „Uniwersalnych” dziecięcych
urządzeń zabezpieczających dla danej grupy wiekowej.
3. Niniejsze urządzenie zabezpieczające zostało zakwalifi kowane
jako „Uniwersalne” zgodnie z kryteriami homologacyjnymi znacznie
bardziej wymagającymi w stosunku do kryteriów poprzednich modeli, które nie przytaczają niniejszej informacji.
4. Może być stosowane tylko i wyłącznie w pojazdach wyposażonych
w trzypunktowy pas bezpieczeństwa - statyczny lub bezwładnościowy
- posiadający homologację zgodnie z Przepisem UN/ECE Nr 16 lub
inną równorzędną normą.
5. W razie wątpliwości, należy skontaktować się z producentem
niniejszego urządzenia zabezpieczającego lub jego sprzedawcą.
ZESTAW TRIO CAR jest to element, który pozwala umocować przysto-
WAŻNA INFORMACJA
INSTRUKCJA OBSŁUGI
32
sowane do tego gondole Chicco (Patrz instrukcja gondoli) w Waszym
pojeździe, w celu prawidłowego przewożenia w samochodzie dziecka
w jego pierwszych miesiącach życia.
Produkt ten posiada homologację zgodnie z europejskim przepisem
ECE R44/04 dla “Grupy 0”, to znaczy zatwierdzony jest on do przewozu
dzieci o wadze od 0 do 10 Kg, mniej więcej w wieku do 6 miesięcy.
Po zamontowaniu ZESTAWU TRIO CAR na gondoli może ona być montowana w samochodzie.
WYMAGANA CHARAKTERYSTYKA SIEDZENIA
Aby móc zaczepić gondolę na siedzeniu samochodowym, powinno
ono spełniać następujące wymagania:
powinno być zwrócone w kierunku zgodnym z kierunkiem jazdy (Rys.
1);
- powinno to być tylne siedzenie wyposażone w co najmniej dwa
trzypunktowe pasażerskie pasy bezpieczeństwa (Rys. 2), posiadające
homologację zgodnie z przepisem UNI/ECE 16 lub inną równorzędną
normą.
Jeśli ZESTAW TRIO CAR nie został zakupiony wraz z gondolą, przed umieszczeniem jej w samochodzie, należy zastosować się do poniższych
instrukcji montażowych.
Pas brzuszny
Pas brzuszny powinien być przeciągnięty przez dwa otwory znajdujące
się na dnie gondoli (Rys. 3).
Zagiąć taśmę oznaczoną czerwonym znakiem tak, aby rzep znajdował
się wewnątrz, po czym wsunąć ją w prawy otwór (Rys. 4) i wyciągnąć ją
z lewego otworu (Rys. 5).
Zapiąć pas nakładając taśmę oznaczoną czerwonym znakiem na drugą
taśmę (Rys. 6).
UWAGA! Sprawdzić, czy pas nie jest zaplątany (Rys. 7).
Sprzączki do pasa samochodowego
Aby zaczepić dwie sprzączki o sworznie znajdujące się na końcach gondoli (Rys. 8), należy wsunąć każdą sprzączkę na odpowiedni sworzeń
dociskając (Rys. 9), po czym pociągnąć sprzączkę do dołu, aż do momentu, gdy da się usłyszeć charakterystyczny odgłos oznaczający
blokadę (Rys. 10).
UWAGA! Nie montować sprzączek na odwrót! (Rys. 11).
Gondola jest teraz przygotowana do umieszczenia w samochodzie.
Aby umocować gondolę na tylnym siedzeniu, należy umieścić ją
po środku i zaczepić przy pomocy dwóch skrajnych pasów samochodowych (Rys. 12). Jeśli również środkowe miejsce na tylnym
siedzeniu Waszego pojazdu wyposażone jest w trzypunktowy pas
bezpieczeństwa, gondola może być umieszczana także z boku,
zajmując środkowe i boczne miejsce, po zaczepieniu jej przy pomocy
pasów tych dwóch siedzeń (Rys. 13).
1. Wyjąć i zaczepić dwa pasy samochodowe o odpowiednie sprzączki
na siedzeniu (Rys. 14).
2. Opuścić całkowicie oparcie gondoli, jak pokazano w instrukcji
obsługi gondoli.
UWAGA! Nie należy nigdy używać gondoli w samochodzie, jeśli jej
oparcie jest uniesione! Nie gwarantuje się wówczas bezpieczeństwa
produktu!
3. Jeśli na sprzączkach gondoli znajdują się pokrowce z materiału,
należy je zdjąć (Rys. 15).
4. Umieścić gondolę na siedzeniu wzdłużnie (Rys. 16) tak, aby była dobrze dociśnięta do siedzenia.
5. Wykonać po obu stronach następujące czynności:
- uchwycić pas samochodowy i zrobić pętelkę (Rys. 17);
- uchwycić sprzączkę wózka i obrócić do zewnątrz czerwony pręt
sprzączki (Rys. 18).
Wsunąć do sprzączki zrobioną z pasa pętelkę (Rys. 19) i obrócić czerwony pręt umieszczając go w pierwotnej pozycji tak, aby znalazł się
wewnątrz pętelki (Rys. 20).
Pociągnąć pas samochodowy w kierunku zwijarki, dociskając gondolę
do siedzenia, aby dobrze go umocować (Rys. 21).
UWAGA! Sprawdzić, czy gondola przylega dobrze do siedzenia.
UWAGA! Sprawdzić, czy pasy są dobrze naprężone (Rys. 22).
Odpiąć pas brzuszny, pociągając taśmę oznaczoną czerwonym znakiem
(Rys. 23).
MONTAŻ ZESTAWU TRIO CAR NA GONDOLI
MOCOWANIE GONDOLI W SAMOCHODZIE: PO RAZ PIERWSZY
SAMOCHODOWEGO
UMIESZCZANIE DZIECKA
Page 33

Położyć dziecko w gondoli (Rys. 24).
Przeciągnąć ponad talią dziecka najpierw prawą taśmę pasa, a
następnie lewą (Rys. 25).
Złączyć dwie osłony na końcach tak, aby pas przylegał do talii dziecka,
nie ściskając zbytnio (Rys. 26).
Odpiąć wyściełany pas brzuszny wózka, pociągając taśmę oznaczoną
czerwonym znakiem (Rys. 27).
Wykonać po obydwóch bokach wózka następujące czynności:
Zdjąć sprzączkę z gondoli, odciągając czerwony języczek sprzączki do
zewnątrz i popychając sprzączkę do góry (Rys. 28) tak, aby uwolnić
gondolę od pasa. Sprzączka pozostaje umocowana na pasie samochodowym.
UWAGA! Nie używać nigdy pasa samochodowego w celu zapięcia
pasażera, jeśli nie została usunięta sprzączka ZESTAWU TRIO CAR:
mogłoby to okazać się niebezpieczne!
Aby usunąć sprzączkę z pasa, należy poluzować pętelkę pasa (Rys. 29) i
obrócić czerwony sworzeń tak, aby ją zwolnić (Rys. 30).
MOCOWANIE GONDOLI W SAMOCHODZIE: KOLEJNY RAZ
Aby ponownie zaczepić wózek na siedzeniu, kiedy dwie sprzączki
zostały już umocowane na pasach samochodowych, należy wykonać
następujące czynności:
Sprawdzić, czy dwa pasy samochodowe zostały zaczepione.
Aby umocować sprzączki na wózku, należy odnieść się do instrukcji
przytoczonych w paragrafi e “ MONTAż zestawu TRIO CAR na gondoli
- Sprzączki do pasa samochodowego”.
Pociągnąć pas samochodowy w kierunku zwijarki, dociskając gondolę
do siedzenia, aby dobrze ją umocować (Rys. 21).
UWAGA! Sprawdzić, czy gondola przylega dobrze do siedzenia.
UWAGA! Sprawdzić, czy pasy są dobrze naprężone (Rys. 22).
Po zakończeniu użytkowania gondoli w samochodzie, lub też w celu jej
użycia poza samochodem, ZESTAW TRIO CAR może być zdemontowany
w następujący sposób.
Pas brzuszny
Odpiąć pas pociągając taśmę oznaczoną czerwonym znakiem (Rys.
23).
Wysunąć taśmę najpierw od dołu z lewego otworu, a następnie od góry
z prawego otworu (Rys. 31).
Sprzączki do pasa samochodowego
Pociągnąć czerwony języczek sprzączki do zewnątrz i popchnąć
sprzączkę do góry (Rys. 28).
Czyścić pas oraz sprzączki tylko i wyłącznie ręcznie, przy użyciu
zwilżonej w wodzie szmatki. Nie używać rozpuszczalników lub innych
detergentów.
UWAGA! Okresowo należy kontrolować wszystkie części gondoli oraz
ZESTAWU TRIO CAR upewniając się, czy żaden element nie jest uszkodzony lub mocno zużyty.
PRZESTROGI: DO PRZECZYTANIA PRZED PODRÓŻĄ
• Niniejsza instrukcja powinna być starannie przechowywana wraz z
produktem i łatwa do znalezienia.
• Produkt powinien być instalowany dokładnie według niniejszej
instrukcji.
• Nie mocować nigdy produktu przy użyciu dwupunktowego pasa
samochodowego.
• Instalować produkt tylko na siedzeniach prawidłowo umocowanych
do struktury samochodu oraz zwróconych w kierunku jazdy.
• Nie pozostawiać składanych, opuszczanych lub obrotowych siedzeń
samochodowych źle zaczepionych i upewnić się czy w samochodzie
nie są przewożone źle umocowane przedmioty, przede wszystkim na tylnej półce: w razie kolizji lub gwałtownego hamowania
mogłyby one uderzyć i zranić pasażerów.
• Instalować produkt tak, aby nie stykało się z nim ruchome siedzenie
lub drzwiczki samochodu. Należy unikać, aby części produktu były
przycinane drzwiami samochodu lub też żeby ocierały się o ostre
punkty lub krawędzie.
• Należy zawsze upewnić się, czy pas samochodowy jest prawidłowo
naprężony oraz czy nie jest on zaplątany i czy nie znajduje się w
nieprawidłowej pozycji.
WYJMOWANIE DZIECKA
ODCZEPIANIE GONDOLI
DEMONTAŻ ZESTAWU TRIO CAR Z GONDOLI
CZYSZCZENIE PRODUKTU
• N ie należy używać produktu jeśli jego niektóre części są uszkodzone
lub niekompletne.
• Nie kłaść niczego (poduszek, koców, itp.) między siedzeniem samochodowym a gondolą lub między gondolą a dzieckiem.
• Nie kłaść ciężkich przedmiotów na produkcie.
• Należy upewnić się, czy wszyscy pasażerowie pojazdu używają
pasów bezpieczeństwa dla ich własnego bezpieczeństwa, jak
również ze względu na to, iż podczas podróży mogliby uderzyć
dziecko.
• W celu uniknięcia ryzyka zaduszenia, przechowywać plastikowe
torby poza zasięgiem ręki dziecka.
• Kontrolować okresowo stopień zużycia produktu oraz obecność
ewentualnych uszkodzeń. W razie uszkodzenia produktu, nie powinno się go stosować i należy przechowywać go poza zasięgiem
dziecka.
• Kiedy nie jest przewożone dziecko, gondola powinna pozostać
umocowana lub też należy ja umieścić w bagażniku.
• Spółka ARTSANA uchyla się od jakiejkolwiek odpowiedzialności
wynikającej z nieprawidłowego użycia produktu.
W celu uzyskania dodatkowych informacji oraz w celu złożenia
zamówień dotyczących części zamiennych, należy skontaktować się:
adres pocztowy: Baby ColleCtion
ul. Miła 12
05-090 Raszyn Rybie
telefon: (22) 720 22 14,
serwis wózków Chicco: (22) 716 22 91
e-mail: info@chicco.pl, serwis@chicco.pl
strona web: www.chicco.pl
33
Page 34

H
I
K T C
1. Biztonsági öv
2. A biztonsági öv rögzítő csatjai
KÉRJÜK, HOGY FIGYELMESEN OLVASSA EL AZ
ALÁBBIAKAT:
• A termék használata előtt fi gyelmesen olvassa el a tájékoztatót.
• A TERMÉKET KIZÁRÓLAG CHICCO MÓZESKOSÁRRAL SZABAD
FELSZERELNI ÉS HASZNÁLNI.
• A TERMÉKET KIZÁRÓLAG A BESZERELÉSRE ELŐKÉSZÍTETT
MÓZESKOSÁRRAL SZABAD FELSZERELNI ÉS HASZNÁLNI:
ELLENŐRIZZE A MÓZESKOSÁR KEZELÉSI UTASÍTÁSÁN, HOGY
ALKALMAS-E A “KIT TRIO CAR”-FÉLE BESZERELÉSRE.
• A termék felszerelésénél és beállításánál gondosan kövesse
a használati utasítást. Kérjük, hogy ne használja a terméket a
használati utasítás elolvasása nélkül.
• Tárolja a füzetet a termékkel együtt.
• Semmilyen biztonsági felszerelés sem garantálja gyermeke
teljes biztonságát balesetkor, de a termék használata csökkenti az esetleges sérülés súlyosságát és a halálesetek
számát.
• A termék helytelen használata növeli a sérülés súlyosságát
nemcsak balesetkor, hanem más esetekben is.
• A károsodott, eldeformálódott vagy nagyon elhasználódott
terméket ki kell cserélni: mivel biztonságvédelmi szempontból az már nem tökéletes.
• A gyártó beleegyezése nélkül tilos módosítani vagy kiegészíteni a terméket. Kizárólag a gyártó által forgalmazott
tartozékokat, pótalkatrészeket szerelje fel.
• Soha ne hagyja felügyelet nélkül a gyermeket a mózeskosárban.
• A kocsiülésben mindig rögzítse a mózeskosarat: ellenkező esetben a többi utast megütheti vagy megsebesítheti.
• Ha az autó hosszabb ideig a napon áll, akkor a baba betétele
előtt gondosan vizsgálja meg a mózeskosarat és ellenőrizze,
hogy az egyes részek nem forrósodtak-e fel: ha igen, akkor
hagyja lehűlni, nehogy a baba megégesse magát.
• Még könnyebb baleset esetén is szemmel nem észlelhető
károsodást szenvedhet a mózeskosár és a KIT TRIO CAR: ilyen
esetben ki kell cserélni.
• Ne szereljen fel már más által használt mózeskosarat: esetleg
szabad szemmel nem látható károsodás történhetett a vázban, amely a gyermek biztonságát veszélyeztetné.
• Az ARTSANA vállalat elhárít minden felelősséget a helytelen
használatból származó károkért.
1. A 44. sz. Szabályzat, 04. módosítása “Univerzális”
gyermekrögzítőként hitelesíti a terméket, mely a legtöbb
autó ülésével kompatíbilis.
2. A tökéletes kompatibilitás abban az esetben érvényes, ha
a jármű gyártója kijelenti, hogy a járműbe beszerelhető az
“Univerzális” gyermekrögzítő.
3.A gyermekrögzítő az előző modellekhez képest, szigorúbb
elbírálási szempontok alapján az “Univerzális” besorolást
kapta.
4. Csak a 16. sz. UN/ECE vagy ezzel egyenértékű előírás alapján engedélyezett statikus, 3 pontos vagy visszahúzható
biztonsági övvel rendelkező járművekben használható.
5. Probléma esetén fordulon a biztonsági rögzítő gyártójához
vagy forgalmazójához.
KIT TRIO CAR olyan tartozék, amely segítségével az erre
előkészített Chicco mózeskosarakat lehet rögzíteni és használni (lásd a mózeskosár használati utasítását) az autóban, hogy a
babát a legmegfelelőbb módon szállíthassa.
A terméket az európai ECE R44/04-ás előírás 0 és 10 kg közötti
gyermekek szállítására “0-ás Csoport”-ként hitelesíti, és a gyer-
TARTOZÉKOK
FONTOS FIGYELMEZTETÉS
HASZNÁLATI UTASÍTÁS
mekek körülbelül 6 hónapos korig használhatják.
A KIT TRIO CAR-t szerelje a mózeskosárra, majd a mózeskosarat
az autóba.
A mózeskosár autósülésre szereléséhez ez utóbbinak az alábbi
jellemzőkkel kell rendelkeznie:
- a menetiránnyal szembe nézzen (1. ábra);
- hátsó ülés legyen, legalább 2 db, 3 pontos biztonsági övvel (2. ábra), melyet az UNI/ECE 16 számú, vagy más ezzel
egyenértékű előírás hitelesít.
Ha a KIT TRIO CAR-t nem a mózeskosárral együtt vásárolta, akkor kövesse az alábbi felszerelési utasításokat, mielőtt a mózeskosarat az autóba helyezné.
Biztonsági öv
A biztonsági övet a mózeskosár alsó részén kialakított két
résen kell átvezetni (3. ábra).
A pirossal jelölt szalagot hajtsa úgy, hogy a tépőzár belülre
kerüljön, majd bújtassa a jobboldali résbe (4. ábra) és húzza ki
a baloldali résen át (5. ábra).
Kapcsolja be az övet úgy, hogy a pirossal jelölt szalagot a másik
szalagra teszi (6. ábra).
FIGYELEM! Az övnek nem szabad megcsavarodni (7. ábra).
Autóöv-csat
A mózeskosár szélére helyezett csapokhoz (8. ábra) kapcsolja
a két csatot úgy, hogy mindegyik csatot a megfelelő csapba
tolja (9. ábra) ás a csatot kattanásig lefelé húzza (10. ábra).
FIGYELEM! A csatokat ne kapcsolja be fordítva (11. ábra).
A mózeskosár ezáltal az autóba helyezhető.
A MÓZESKOSÁR ELSŐ BESZERELÉSE AZ AUTÓBA:
A mózeskosár hátsó ülésre való helyezéséhez tegye azt középre
és a két szélső ülés övével rögzítse (12. ábra). Ha járművének
hátsó ülésén a középső ülésre is 3 pontos biztonsági öv van
felszerelve, akkor a mózeskosarat oldalra is elhelyezheti úgy,
hogy a középső és az egyik oldalülést elfoglalja és ezek biztonsági övével rögzíti a mózeskosarat (13. ábra).
1. Kapcsolja be a két biztonsági övet a megfelelő csatokhoz
(14. ábra).
2. Döntse teljesen hátra a mózeskosár hátlapját, ahogy ezt
használati utasítás mutatja.
FIGYELEM! Soha ne használja a mózeskosarat az autóban felemelt hátlappal! A termék nem biztonságos ebben a helyzetben!
3. Ha a mózeskosárra szerelt csaton szövetborítás lenne, akkor
ezt el kell távolítani (15. ábra).
4. A mózeskosarat hosszirányban helyezze a kocsiülésre (16.
ábra), és ügyeljen arra, hogy megfelelően illeszkedjen az üléssel.
5. Mindkét szélén végezze el az alábbi műveleteket:
- fogja meg a biztonsági övet és hozzon létre egy hurkot (17.
ábra);
- fogja meg a mózeskosár csatját és fordítsa kifelé a csat piros
részét (18. ábra).
A csatba bújtassa az övvel készített hurkot (19. ábra) és fordítsa
a piros részt a kiinduló helyzetbe úgy, hogy a hurok belsejébe
kerüljön (20. ábra).
A biztonsági övet húzza a feltekercselő felé miközben a mózeskosarat az üléshez nyomja, így megfelelően fogja rögzíteni
(21. ábra).
FIGYELEM! Ellenőrizze, hogy a mózeskosár megfelelően illeszkedik az üléshez.
FIGYELEM! Ellenőrizze, hogy az övek feszességét (22. ábra).
A piros színnel jelölt szalag meghúzásával kapcsolja ki az övet
(23. ábra).
A gyermeket fektesse a mózeskosárba (24. ábra).
Vezesse a baba dereka fölött először az öv jobboldali szalagját,
majd a baloldalit (25. ábra).
34
AZ AUTÓSÜLÉS JELLEMZŐI
A KIT TRIO CAR FELSZERELÉSE A
MÓZESKOSÁRRA
A GYERMEK ELHELYEZÉSE
Page 35

A két rátétet tegye egymásra úgy, hogy az öv a baba derekát
átfogja, de ne szorítsa (26. ábra).
A pirossal megjelölt szalag meghúzásával nyissa szét a mózeskosár kipárnázott hasi övét (27. ábra).
A MÓZESKOSÁR LESZERELÉSE AZ ÜLÉSRŐL
A mózeskosár mindkét szélén végezze el az alábbi
műveleteket.
A csat piros nyelvét húzza kifelé és a csatot nyomja felfelé (28.
ábra) a mózeskosár csatjának kikapcsolásához, így azt leveheti
az övről. A csat a biztonsági övön marad.
FIGYELEM! Soha ne használja a biztonsági övet az utas bekapcsolására anélkül, hogy a KIT TRIO CAR csatját levette volna:
veszélyes lehet!
Az övcsat levételéhez lazítsa meg az öv hurkát (29. ábra) és a
piros csapot fordítsa el addig, amíg az övet nem tudja kihúzni
(30. ábra).
A MÓZESKOSÁR RÖGZÍTÉSE AZ AUTÓBAN: A
Ha ismét az ülésre kívánja rögzíteni a mózeskosarat és a két
csat már két biztonsági övhöz lett rögzítve, akkor kövesse az
alábbi lépéseket.
Ellenőrizze, hogy a két biztonsági öv be van-e csatolva.
A csatokat rögzítse a mózeskosárhoz “A KIT TRIO CAR FELSZERELÉSE A MÓZESKOSÁRRA-Biztonsági öv csatja” pont
szerint.
A biztonsági övet húzza a feltekercselő felé és közben nyomja
a mózeskosarat az üléshez, így fogja a megfelelő módon rögzíteni azt (21. ábra).
FIGYELEM! Ellenőrizze, hogy a mózeskosár helyesen illeszkedik-e az üléshez.
FIGYELEM! Ellenőrizze, hogy az övek feszesek-e (22. ábra).
A KIT TRIO CAR LESZERELÉSE A MÓZESKOSÁRRÓL
Amikor a mózeskosarat már nem használja az autóban, illetve
ha azt nem az autóban kívánja használni, a KIT TRIO CAR-t az
alábbiak szerint szerelje le.
Biztonsági öv
A pirossal jelölt szalag meghúzásával kapcsolja ki az övet (23.
ábra).
Húzza ki a szalagot először az alsó bal résből, majd a felső jobb
résből (31. ábra).
Autóöv-csat
Húzza kifelé a csat piros nyelvét, és a csatot nyomja felfelé (28.
ábra).
Az övet és a csatot kizárólag kézzel,nedves kendővel tisztítsa.
Ne használjon oldó- vagy más mosószert.
FIGYELEM! Rendszeresen ellenőrizze a mózeskosár és a KIT
TRIO CAR minden részét, hogy időben észrevegye az esetleges
károsodást vagy kopást.
A GYERMEK KIVÉTELE
TOVÁBBIAKBAN
A TERMÉK TISZTÍTÁSA
ne csípődjön az ajtóba, illetve ne dörzsölődjön éles felülethez.
• Mindig ellenőrizze, hogy a biztonsági öv feszes legyen, ne
csavarodjon meg vagy haladjon rossz helyen.
• Ne használja a hiányos vagy sérült terméket.
• Semmit (párnát, takarót, stb.) ne tegyen az autóülés és a
mózeskosár, illetve a mózeskosár és a gyermek közé.
• Ne támasszon nehéz tárgyakat a termékhez.
• Ellenőrizze, hogy a kocsi többi utasa is használja a biztonsági övet saját biztonsága és a gyermek biztonsága
érdekében.
• A műanyagtasakot tartsa távol gyermekétől.
• Rendszeresen ellenőrizze a termék kopását és az esetleges
károsodásokat. Ha ez bekövetkezett, ne használja a terméket és tartsa azt távol a gyermekektől.
• Ha nem szállít gyermeket, akkor a terméket hagyja rögzítve,
vagy pedig tegye a csomagtartóba.
• Az ARTSANA vállalat elhárít minden felelősséget a helytelen használatból származó károkért.
FIGYELMEZTETÉS:
• Az útmutatót tartsa a termékkel együtt, könnyen
hozzáférhető helyen.
• A terméket a mellékelt használati utasítás gondos betartásával kell felszerelni.
• Soha ne használja a terméket csak két pontos biztonsági
övvel rendelkező autóülésen.
• A terméket a kocsi vázához megfelelően rögzített ülésen és
a kocsi eleje felé felszerelve használja.
• Ne hagyja az összecsukható, hátradönthető vagy elfordítható kocsiüléseket rögzítés nélkül, valamint
ellenőrizze, hogy a kocsiban ne legyenek szabadon mozgó
tárgyak, főleg a hátsó ablakban: balesetkor vagy hirtelen
fékezéskor megsebesíthetik az autóban ülőket.
• A terméket úgy kell beszerelni, hogy mozgó ülés vagy ajtó
ne érjen hozzá. Arra is vigyázzon, hogy semmilyen része
UTAZÁS ELŐTT OLVASSA EL
Egyéb információért és alkatrészért forduljon az Artsana vállalathoz:
postacím: ARTSANA SPA
Servizio Clienti
Via Saldarini Catelli 1
22070 Grandate COMO - ITALIA
telefon: (0039) 031 382000
e-mail: info@artsana.it
honlap: www.chicco.com
35
Page 36

HR
I
K T C
1. trbušni pojas
2. kopče za privezivanje pojasa vozila
IZUZETNO VAŽNO! PAŽLJIVO PROČITATI
• Pažljivo pročitati ove upute prije uporabe proizvoda.
• OVAJ PROIZVOD MOŽE BITI UGRAĐEN I KORIŠTEN ISKLJIČIVO
SA VREĆOM KOJA NOSI ZAŠTITNI ZNAK PROIZVOĐAČA CHICCO.
• OVAJ PROIZVOD MOŽE BITI UGRAĐEN I KORIŠTEN ISLJUČIVO SA
MODELIMA VREĆA KOD KOJIH JE PREDVIĐENA TAKVA UGRADNJA:
PROVJERITI U PRIRUČNIKU ZA UPORABU VAŠE VREĆE JE LI VREĆA
PREDVIĐENA ZA UGRADNJU DODATKA “KIT TRIO CAR”.
• Prilikom sastavljanja i ugradnje proizvoda treba brižljivo sli-
jediti upute koje daje proizvođač. Treba izbjeći da netko koristi
proizvod a da prethodno nije pročitao upute.
• Ovaj priručnik treba brižljivo čuvati zajedno sa proizvodom.
• Niti jedna sigurnosna naprava u vozilu ne jamči bezuvjetnu sig-
urnost djetetu u slučaju prometne nezgode, ali uporaba ovog
proizvoda smanjuje mogućnost ozljede ili smrti djeteta.
• Neodgovarajuća uporaba proizvoda povećava opasnost od
ozbiljnog ozljeđivanja djeteta, ne samo u slučaju prometne
nezgode, već i u drugim slučajevima.
• U slučaju da proizvod iz bilo kojeg razloga bude oštećen,
izobličen ili znatno istrošen, mora biti zamijenjen: naime,
moguće je da je izgubio svoje prvobitne sigurnosne značajke.
• Proizvod se nesmije mijenjati ili upotpunjavati osim ako to nije
odobreno od strane proizvođača. Stoga nije dopuštena ugradnja dodatnih dijelova, rezervnih dijelova i sastavnih dijelova
koje ne isporučuje proizvođač.
• Nemojte dijete nikada i ni iz kojeg razloga ostavljati unutar
vozila u vreći i bez nadzora.
• Nemojte nikada ostaviti neprivezanu vreću u vozilu: mogla bi
udariti i ozljediti putnike.
• Ako vozilo miruje pod suncem duže vrijeme, brižljivo provjerite
stanje vreće; utvrdite nisu li se neki njezini dijelovi pregrijali:
u tom slučaju ostavite da se ohlade prije nego li posjednete
dijete u vozilo, kako biste izbjegli opekotine.
• Čak i lakša prometna nesreća može prouzročiti vreći i dodatku
KIT TRIO CAR oštećenja koja nisu vidljiva golim okom. Stoga se
u svakom slučaju preporučuje njihova zamjena.
• Nemojte koristiti polovne proizvode za sigurnost djeteta u
vozilu: moguće je da su ti proizvodi pretrpili izuzetno opasna
oštećenja koja nisu vidljiva golim okom, ali utječu na sigurnost
proizvoda.
• Poduzeće ARTSANA otklanja svaku odgovornost u slučaju nep-
rimjerene uporabe ovog proizvoda.
1. Ova naprava za pridržavanje djeteta je “univerzalne” vrste i
usklađena je sa pravilom br. 44, ispravke iz skupine 04. Prikladna je za ugradnju općenito u vozila i svojom izradom odgovara
velikoj većini sjedala, ali ne i sjedalima u svim vrstama vozila.
2. Savršenu usklađenost je lakše ostvariti ako je proizvođač
u priručniku za uporabu vozila istaknuo da je predviđena
mogućnost ugradnje “univerzalnih” naprava za pridržavanje
prikladnih za određenu dob djeteta.
3. Ova naprava za pridržavanje djeteta je klasifi cirana kao
“univerzalna” po strožim kriterijima službenog usklađivanja
od onih za prethodne verzije koje nisu upotpunjene ovom
napomenom.
4. Naprava je prikladna samo za ugradnju u vozila koja imaju
sigurnosni pojas na tri točke, nepomične vrste ili sa smotavanjem, službeno usklađen sa Pravilom UN/ECE br. 16 ili sa drugim
istovrijednim standardom.
5. U slučaju nedoumice, potražite savjet proizvođača ove
naprave ili prodavača.
KIT TRIO CAR je dodatak koji omogućuje uporabu za to
predviđenih vreća Chicco (vidjeti priručnik za uporabu vreće)
ugradnjom u vaše vozilo, sa namjenom prevoženja djeteta u
vozilu tijekom njegovih prvih mjeseca života.
SASTAVNI DIJELOVI
VAŽNA NAPOMENA
UPUTE ZA UPORABU
Proizvod je službeno namjenjen, u skladu sa europskim pravilom ECE R44/04, za prijevoz djece od 0 do 10 kg težine, indikativno u dobnoj skupini do 6 mjeseci. Nakon ugradnje na vreću
dodatka KIT TRIO CAR, vreća može biti učvršćena u vozilo.
Kako bi bilo moguće učvrstiti vreću na sjedalo vozila, sjedalo
mora imati ove značajke:
mora biti okrenuto u smjeru kretanja vozila (Slika 1);
mora biti riječ o stražnjem sjedalu opremljenom sa najmanje 2
sigurnosna pojasa za putnike sa po 3 uporišne točke (Slika 2),
službeno odobrenim u skladu sa pravilom UNI/ECE 16 ili drugim
istovrijednim pravilom.
U slučaju da je KIT TRIO CAR kupljen odvojeno od vreće, prije
postavljanja vreće u vozilo, postupiti po uputama za sastavljanje
koje slijede.
Trbušni pojas
Trbušni pojas treba uvući kroz dva otvora na dnu vreće (Slika 3).
Saviti vrpcu sa crvenom oznakom na način da “čičak vrpca” bude
okrenuta prema unutra, a nakon toga provući vrpcu kroz desni
otvor (Slika 4) i izvući kroz lijevi otvor (Slika 5).
Privezati pojas na način da se vrpca sa crvenom oznakom postavi preko druge vrpce (Slika 6).
OPREZ! Provjeriti kako pojas ne bi bio zapetljan (Slika 7).
Kopče za pojas vozila
Kako bi se pričvrstile dvije kopče na klinove koji se nalaze
na krajevima vreće (Slika 8), uvući guranjem svaku kopču na
pripadajući klin (Slika 9) i povući kopču prema dolje sve dok se
ne začuje zvuk okidanja (Slika 10).
OPREZ! Nemojte ugraditi kopče naopako! (Slika 11)
Sada je vreća spremna za postavljanje u vozilo.
Prilikom ugradnje na stražnje sjedalo, treba postaviti vreću na
sredinu sjedala i privezati je pomoću pojaseva koji pripadaju
bočnim sjedaćim mjestima (Slika 12). Ako je stražnje sjedalo
vašeg vozila i na središnjem sjedaćem mjestu opremljeno
sigurnosnim pojasom na tri uporišne točke, vreća može biti
ugrađena i bočno, na način da zauzima središnje i bočno mjesto
i da je privezana pomoću pojaseva koji pripadaju tim sjedaćim
mjestima (Slika 13).
Izvući i privezati dva sigurnosna pojasa vozila na odgovarajuće
kopče koje se nalaze na sjedalu (Slika 14).
Postaviti leđni naslon vreće u potpuno spušteni nagib, po uputama za uporabu vreće.
OPREZ! Nemojte nikada koristiti u vozilu vreću koja ima podignuti leđni naslon! U tom slučaju nisu zajamčena sigurnosna svojstva proizvoda!
U slučaju da su kopče kojima je opremljena vreća presvučene
tkaninom, otkloniti tu tkaninu (Slika 15).
Postaviti po dužini vreću na sjedalo (Slika 16), tako da cijela dobro prijanja uz sjedalo.
Na dvijema stranama obaviti ove postupke:
uhvatiti šakom pojas vozila i napraviti ušku (Slika 17);
uhvatiti šakom kopču vreće i zakrenuti prema vani crveni štapić
na kopči (Slika 18);
Uvući u kopču ušku izrađenu od pojasa (Slika 19) i okrenuti
crveni štapić u početni položaj, na način da on bude uvučen u
samu ušku (Slika 20).
Povući sigurnosni pojas vozila prema napravi za smotavanje,
potiskujući vreću prema sjedalu, na način da bude dobro
učvršćena (Slika 21).
OPREZ! Provjeriti je li vreća dobro pripijena uz sjedalo vozila.
OPREZ! Provjeriti jesu li pojasevi dobro zategnuti (Slika 22).
Otvoriti trbušni pojas povlačenjem vrpce sa crvenom oznakom
(Slika 23).
Postaviti dijete u vreću na ležeći položaj (Slika 24).
Povući preko struka djeteta, najprije vrpcu pojasa sa desne
strane, a nakon toga vrpcu pojasa sa lijeve strane (Slika 25).
Spojiti dva završetka na način da pojas bude pripijen uz struk
djeteta, ali tako da dijete ne bude previše zategnuto (Slika 26).
36
ZNAČAJKE SJEDALA VOZILA
UGRADNJA KIT TRIO CAR NA VREĆU
UGRADNJA VREĆE U VOZILO: PRVI PUT
POSTAVL JANJE DJETETA
Page 37

Otvoriti podstavljeni trbušni pojas vreće povlačenjem vrpce sa
crvenom oznakom (Slika 27).
Na dvijema bočnim stranama vreće obaviti ove zahvate: odvojiti
kopču od vreće, povlačenjem crvenog jezička na kopči prema
vani i povlačenjem same kopče prema gore (Slika 28), na način
da se vreća oslobodi od pojasa. Kopča ostaje spojena na sigurnosni pojas vozila.
OPREZ! Nemojte nikada koristiti sigurnosni pojas vozila za
privezivanje putnika, ako prethodno niste otklonili sa njega
kopču koja spada u KIT TRIO CAR: to bi moglo biti opasno!
Kako biste otklonili kopču sa pojasa, otpustite zategnutost uške
pojasa (Slika 29) i okrećite crveni klin na način da se kopča oslobodi (Slika 30).
UGRADNJA VREĆE U VOZILO: NAKON PRVOG PUTA
Kako biste ponovno učvrstili vreću na sjedalo, u slučaju ako su
dvije kopče ostale privezane na dva pojasa vozila, obaviti ove
zahvate: provjeriti jesu li dva pojasa vozila privezana; prilikom
privezivanja kopči na vreću slijediti upute iz odjeljka “UGRADNJA SETA KIT TRIO CAR NA VREĆU” - Kopče za pojas vozila”.
Povući sigurnosni pojas vozila prema napravi za smotavanje,
potiskujući vreću prema sjedalu, na način da bude čvrsto
učvršćena (Slika 21).
OPREZ! Provjeriti je li vreća odgovarajuće pripijena uz sjedalo.
OPREZ! Provjeriti jesu li pojasevi pravilno zategnuti (Slika 22).
Po okončanu razdoblja uporabe vreće u vozilu, ili prilikom uporabe vreće izvan vozila, KIT TRIO CAR može biti rasklopljen slijedom ovih postupaka:
Trbušni pojas
Otvoriti pojas povlačenjem vrpce sa crvenom oznakom (Slika
23).
Izvući vrpcu najprije od ispod, kroz otvor na lijevoj strani, a nakon toga od iznad, kroz otvor na desnoj strani (Slika 31).
Kopče za pojas vozila
Povući prema vani crveni jezičak kopče i gurnuti kopču prema
gore (Slika 28).
Čistiti pojas i kopče isključivo ručno, pomoću krpe navlažene
vodom. Nesmiju se koristiti sredstva za rastvaranje ili druga
sredstva za pranje.
OPREZ! Povremeno treba provjeravati sve dijelove vreće i KIT
TRIO CAR, kako niti jedan sastavni dio ne bi bio oštećen ili znatno istrošen.
PODIZANJE DJETETA
ODVAJANJE VREĆE OD SJEDALA
ODVAJANJE KIT TRIO CAR OD VREĆE
ČIŠĆENJE PROIZVODA
dijelovi ili su neki dijelovi razbijeni.
• Između vreće i vozila ili između vreće i djeteta nesmiju se
postavljati predmeti (jastuci, deke i slično).
• Nije dopušteno postavljanje teških predmeta na proizvod.
• Imajte na umu da svi putnici u vozilu trebaju koristiti sig-
urnosne pojaseve, zbog svoje sigurnosti i zbog toga jer bi
tijekom putovanja mogli slučajno gurnuti i ozljediti dijete.
• Plastične vrećice treba držati na prikladnoj udaljenosti od
djeteta, kako bi se izbjegla opasnost od gušenja.
• Povremeno treba provjeravati stanje istrošenosti proizvoda,
kako bi se otkrili možebitni razbijeni dijelovi. U slučaju da je
proizvod oštećen, nije dopuštena njegova uporaba i tada
treba pohraniti proizvod na prikladnoj udaljenosti od dohvata djeteta.
• Kada dijete nije u vozilu, vreća treba biti privezana ili odložena
u prtljažnik vozila.
• Poduzeće ARTSANA otklanja svaku odgovornost u slučaju
neprimjerene uporabe ovog proizvoda.
PREPORUKE: PROČITATI PRIJE ODLASKA NA PUTOVANJE
• Ove upute za uporabu treba brižljivo čuvati i spremiti na
prikladno mjesto tako da budu uvijek pri ruci.
• Prilikom ugradnje treba brižljivo slijediti upute koje daje
proizvođač.
• Ovaj proizvod nesmije biti ugrađen u vozilo jedino pomoću
sigurnosnog pojasa na dvije uporišne točke.
• Proizvod mora biti ugrađen samo na sjedala koja su ispravno
učvršćena na sklop vozila i postavljena licem prema prednjoj
strani vozila.
• Provjerite jesu li u vozilu odgovarajuće učvršćena sjedala
na rasklapanje, preklapanje ili rotirajuća sjedala: ako nisu
učvršćena, to bi moglo predstavljati opasnost u slučaju
prometne nezgode. Imajte na umu da prijevoz predmeta
koji nisu učvršćeni, posebno ako se nalaze na stražnjoj polici,
može u slučaju nezgode ili naglog kočenja naškoditi putnicima.
• Prilikom ugradnje, vodite računa o tome da pomično sjedalo
ili vrata vozila ne bi smjela utjecati na ispravnost ugradnje
proizvoda. Imajte na umu da niti jedan dio proizvoda nesmije ostati zakočen vratima vozila i nesmije se trljati na oštre
predmete.
• Provjerite vrpcu sigurnosnog pojasa; mora biti ispravno zategnuta, nesmije biti zapetljana i nesmije biti neispravno
smještena.
• Proizvod se nesmije koristiti ako nedostaju neki njegovi
Za sve dodatne informacije i prilikom traženja rezervnih dijelova, obratiti se Službi za usluge kupcima poduzeća Artsana:
pošta: ARTSANA SPA
Servizio Clienti
Via Saldarini Catelli n. 1
22070 Grandate COMO - ITALY
telefon: (0039) 031 382000
e-mail: info@artsana.it
37
Page 38

RO
I
K T C
1.Centură abdominală
2. Cataramă pentru fi xarea centurii auto
IMPORTANT: CITIŢI CU MULTĂ ATENŢIE
COMPONENTE
• Citiţi cu atenţie aceste instrucţiuni înainte de a utiliza produsul.
• ACEST PRODUS POATE FI MONTAT ŞI UTILIZAT NUMAI CU UN
COŞ PENTRU LANDOU DE MARCĂ CHICCO.
• ACEST PRODUS POATE FI MONTAT ŞI UTILIZAT NUMAI CU MOD-
ELELE DE COŞURI PENTRU LANDOU CREEATE PENTRU A PUTEA
FI INSTALATE: VERIFICAŢI ÎN MANUALUL DE INSTRUCŢIUNI AL
COŞULUI DUMNEAVOSTRĂ DACĂ ESTE PREVĂZUT PENTRU INSTALAREA “KITULUI TRIO CAR”.
• Pentru montarea şi instalarea produsului respectaţi instrucţiunile.
Evitaţi ca oricine să utilizeze produsul fără a fi citit instrucţiunile.
• Păstraţi acest manual împreună cu instrucţiunile.
• Nici un produs de reţinere în autovehicol nu poate da garanţie
de totală securitate a copilului în caz de accident, însă utilizarea
acestui produs reduce riscul de accidentare şi moarte a copilului.
• Utilizarea incorectă a produsului măreşte riscul de producere de
daune importante copilului, nu numai în caz de accident, ci şi
în alte situaţii.
• În cazul în care produsul este stricat, deformat sau foarte uzat,
trebuie să fi e înlocuit: se poate să fi pierdut caracteristicile originale de securitate.
• Nu efectuaţi modifi cări sau adăugări produsului fără aprobarea
constructorului. Nu instalaţi accesorii, părţi de schimb şi componente care nu sînt furnizate de constructor.
• Nu lăsaţi copilul nesupravegheat în coşul auto pentru nici un
motiv.
• Nu lăsaţi niciodată coşul pe scaunul autovehicolului fără să fi e
fi xat: poate lovi şi răni pasagerii.
• În cazul în care autovehicolul a rămas oprit în soare, inspectaţi cu
atenţie coşul înainte de a aşeza copilul, verifi cînd ca păr ţile acestuia să nu fi e fi erbinţi: în acest caz lăsaţi să se răcească înainte de
a aşeza copilul, pentru a evita arsurile.
• Ca urmare a unui accident chiar uşor, coşul şi KITUL TRIO CAR
pot suferi daune care nu pot fi vazute: deci trebuiesc oricum
înlocuite.
• Nu utilizaţi produse de reţinere pentru autovehicol la mîna a
doua: acestea pot să fi suferit daune structurale care nu se văd,
însă care compromit securitatea produsului.
• Societatea ARTSANA nu-şi asumă nici o responsabilitate în cazul
folosinţei necorespunzătoare ale produsului.
1. Acesta este un dispozitiv de reţinere a copilului “Universal”,
omologat în conformitate cu Regulamentul n° 44, amendamentele serie 04, pentru a fi folosit în general în vehicole şi
compatibil cu majoritatea acestora, dar nu cu toate scaunele
automobilelor.
2. Perfecta compatibilitate este mai uşor de obţinut în cazul în
care constructorul vehicolului declară în manualul vehicolului
că vehicolul prevede instalarea de dispozitive de reţinere a copiilor “Universale” pentru grupa de vîrstă în chestiune.
3. Acest dispozitiv de reţinere a fost clasifi cat “Universal” în baza
criteriilor de omologare cele mai severe faţă de modelele precedente care nu dispun de acest aviz.
4. Se va folosi doar în vehicolele dotate cu centură de siguranţă
cu 3 puncte, statica sau cu rotor, omologată în baza Regulamentului UN/ECE N° 16 sau alte standarde echivalente.
5. În caz de neclarităţi, contactaţi producatorul dispozitivului de
reţinere sau vînzătorul.
KITUL TRIO CAR este un produs care permite fi xarea şi utilizarea
coşurilor pentru landou Chicco prevăzute (a se vedea manualele
AVIZ IMPORTANT
INSTRUCŢIUNI DE FOLOSINŢĂ
coşurilor) pentru a fi fi xate în interiorul autovehicolelor, pentru
transportul copiilor în mod corect în primele luni de viaţă.
Este un produs omologat în conformitate cu norma europeană
ECE R44/04 în “Grupa 0”, pentru transportul copiilor între 0 şi 10
Kg, indicativ pîna la vîrsta de 6 luni.
După montarea KITULUI TRIO CAR în coş, acesta poate fi montat
în autovehicol.
CONDIŢII DE ÎNDEPLINIT DIN PARTEA SCAUNULUI
Pentru a putea fi xa coşul pe scaun, scaunul trebuie să
îndeplinească următoarele condiţii:
- trebuie să fi e îndreptat în sensul de deplasare (Fig. 1);
- trebuie să fi e un scaun posterior dotat cu cel puţin 2 centuri cu
3 puncte de ancorare (Fig. 2), omologate în baza normativei UNI/
ECE 16 sau o altă normă echivalentă.
Dacă KITUL TRIO CAR a fost cumpărat separat de coş, executaţi
următoarele instrucţiuni de montare, înainte de a poziţiona coşul
in autovehicol.
Centura abdominală
Centura abdominală trebuie să fi e introdusă în cele două găuri de
la baza coşului (Fig. 3).
Îndoiţi hamul cu eticheta roşie astfel încît velcro (ariciul) să fi e în
interior, introduceţi-l în gaura din dreapta (Fig. 4), şi extrageţi-l din
gaura din stînga (Fig. 5).
Închideţi centura suprapunînd hamul cu eticheta roşie pe cealalt
ham (Fig. 6).
ATENŢIUNE! Verifi caţi ca centura să nu fi e răsucită (Fig. 7).
Cataramele pentru centurile auto
Pentru a cupla cele două catarame la încuietorile poziţionate la
extremităţile coşului (Fig. 8), introduceţi fi ecare cataramă în respectiva încuietoare împingînd-o (Fig. 9) şi trăgînd catarama în
jos pînă se aude un click (Fig. 10).
ATENŢIUNE ! Nu montaţi cataramele încrucişate! (Fig. 11).
Acum coşul este gata pentru a fi poziţionat în autovehicol.
Pentru fi xarea coşului pe scaunul posterior, este necesar să îl
poziţionaţi în centru şi să îl fi xaţi cu centurile celor două locuri
posterioare laterale (Fig. 12). Dacă locul posterior central este
dotat cu centură de siguranţă cu 3 puncte, coşul poate fi montat şi lateral, ocupînd locul central şi lateral, fi ind fi xat cu centurile
acestor două locuri. (Fig. 13):
1. Extrageţi şi fi xaţi cele două centuri ale autovehicolului de respectivele catarame ale scaunului (Fig. 14).
2. Înclinaţi complect spătarul coşului, aşa cum este ilustrat în
manualul de folosinţă al acestuia.
ATENŢIUNE! Nu utilizaţi niciodata coşul in autovehicol cu spătarul
acestuia drept! Nu este garantată siguranţa produsului!
3. În cazul în care hamurile coşului sînt acoperite de o învelitoare
de material textil,îndepărtaţi-o (Fig. 15).
4. Puneţi coşul pe scaun în lungime (Fig. 16), astfel incît să adere
bine la scaun.
5. Executaţi pe amîndoua laturile următoarele operaţii:
- prindeţi centura autovehicolului şi faceţi o buclă (Fig. 17);
- Prindeţi catarama coşului şi rotiţi înspre exterior bara roşie a
cataramei (Fig. 18).
- Introduceţi în cataramă bucla creată (Fig. 19) şi rotiţi bara roşie în
poziţia iniţială, în aşa fel încît să treacă prin buclă (Fig. 20). Trageţi
de centura autovehiculului înspre mecanismul retractor, apăsînd
simultan coşul pe scaun, pentru a-l fi xa cît mai bine (Fig.21).
ATENŢIUNE! Verifi caţi aderenţa coşului la scaun.
ATENŢIUNE! Verifi caţi ca centurile să fi e bine intinse (Fig. 22).
Deschideţi centura abdominala, trăgînd de hamul cu eticheta
roşie (Fig. 23).
Aşezaţi copilul în coş (Fig. 24).
Treceţi pe deasupra bazinului copilului mai întîi hamul din dreapta al coşului. Apoi pe cel din stînga (Fig. 25).
38
AUTOVEHICOLULUI
MONTAREA KITULUI TRIO CAR ÎN COŞ
FIXAREA COŞULUI ÎN AUTOVEHICOL:
PRIMA DATĂ
POZIŢIONAREA COPILULUI
Page 39

Uniţi cele două capete în aşa fel încît centura să adere la corpul
copilului, însă fără a-l strînge prea tare (Fig. 26).
Deschideţi centura abdominală a coşului, trăgînd de hamul cu
eticheta roşie (Fig. 27).
Efectuaţi pe amîndouă laturile coşului următoarele operaţiuni :
Decuplaţi catarama de pe coş, trăgînd de limba roşie înspre
exterior şi împingînd catarama în sus (Fig. 28), în aşa fel încît se
eliberează coşul de centură. Catarama rămîne fi xată de centura
maşinii.
ATENŢIUNE! Nu utilizaţi niciodată centura autovehicolului pentru
a lega un pasager fără a fi decuplat de pe ea centura KITULUI TRIO
CAR : poate fi periculos!
Pentru a îndepărta catarama de pe centură, slăbiţi bucla centurii
(Fig. 29) şi rotiţi încuietoarea roşie în aşa fel încît se eliberează (Fig.
30).
FIXAREA COŞULUI IN AUTOVEHICOL: A DOUA OARĂ
Pentru a fi xa iarăşi coşul pe scaun, cînd cataramele au rămas deja
fi xate pe cele două centuri ale maşinii, efectuaţi următoarele
operaţiuni:
Veri fi caţi ca cele două centuri auto să fi e cuplate.
Pentru fi xarea cataramelor de coş, urmăriţi instrucţiunile din paragraful “MONTAREA KITULUI TRIO CAR PE COŞ - Cataramele pentru
centurile autovehicolelor”.
Trageţi centura auto înspre rotor, apăsînd coşul înspre scaun, în
aşa fel încît să fi e bine fi xat (Fig. 21).
ATENŢIUNE! Verifi caţi aderenţa coşului la scaun!
ATENŢIUNE! Verifi caţi ca centurile auto să fi e bine întinse (Fig. 22).
DEMONTAREA KITULUI TRIO CAR DE PE COŞ
La sfîrşitul perioadei de utilizare a coşului în autovehicol, sau pentru a-l folosi în afara autovehicolului, KITUL TRIO CAR poate di demontat conform următoarelor operaţiuni:
Centura abdominală
Deschideţi centura trăgînd de hamul cu eticheta roşie (Fig. 23).
Desfaceţi hamul întîi din gaura din stînga de jos, dupa care din
cea din dreapta de sus (Fig. 31).
Cataramele pentru centurile autovehicolului
Trageţi limba roşie înspre exterior împingînd catarama în sus. (Fig.
28)
Curăţiţi centura şi cataramele numai manual, folosind o cîrpă
umezită cu apă. Nu folosiţi solvenţi sau detergenţi.
ATENŢIUNE!
Controlaţi periodic toate părţile coşului şi KITULUI TRIO CAR, asigurîndu-vă ca nici o parte să nu fi e stricată sau uzată.
LUAREA COPILULUI
DESFACEREA COŞULUI DE PE SCAUN
CURĂŢIREA PRODUSULUI
• Nu aşezaţi obiecte grele pe produs.
• Asiguraţi-vă ca toţi pasagerii autovehicolului să folosească
centura de siguranţă, pentru propria securitate dar şi pentru
că în timpul voiajului pot lovi copilul.
• Ţineti pungile de plastic departe de copil, pentru a evita riscul
de sufocare.
• Veri fi caţi cu regularitate gradul de uzură a produsului şi
prezenţa eventualelor rupturi. În caz de daune nu utilizaţi produsul şi păstraţi-l departe de copil.
• Cînd nu transportaţi copilul, coşul trebuie să fi e lăsat legat, sau
va fi pus in portbagaj.
• Societatea ARTSANA nu răspunde în nici un fel pentru folo-
sirea necorespunzătoare a produsului.
AVERTISMENTE: A FI CITITE INAINTE DE VOIAJ.
• Aceste instrucţiuni trebuie să fi e păstrate cu grijă în respectivul
locaş şi uşor de găsit.
• Produsul trebuie să fi e instalat ducînd la îndeplinire
instrucţiunile furnizate.
• Nu legaţi niciodată acest produs folosind o centură auto cu
doar două puncte de ancorare.
• Instalaţi produsul numai pe scaune corect fi xate la structura
autovehicolului şi îndreptate spre partea anterioară a vehicolului.
• Nu lăsaţi scaunele auto pliante, articulate sau rotante fără să
fi e bine fi xate, în special în partea din spate: în caz de accident
sau frînare bruscă pot lovi şi răni pasagerii.
• Instalaţi produsul în aşa fel încît un scaun mobil sau portiera sa
nu-l atingă pe acesta. Evitaţi ca nici o parte a produsului să nu
rămînă prinsă între portieră sau să se frece de parţi ascuţite.
• Asiguraţi-vă întotdeauna ca centura autovehicolului să fi e cor-
ect întinsă, să nu fi e răsucită sau în poziţii incorecte.
• Nu utilizaţi produsul dacă anumite parţi sînt rupte sau lipsă.
• Nu puneţi nici un obiect (perne, pături, etc.) între scaunul au-
tovehicolului şi coş, sau între coş şi copil.
Pentru ulterioare informaţii sau pentru a cere piese de schimb
contactaţi Serviciul pentru Clienţi Artsana:
poştă:
ARTSANA SPA
Servizio Clienti
Via Saldarini Catelli n.1
22070 Grandate COMO - ITALIA
telefon: (0039) 031 382000
e-mail: info@artsana.it <mailto:info@artsana.it>
sito: www.chicco.com <http://www.chicco.com>
secţiunea “scrivici”
39
Page 40

RUS
I
K T C
1. Поясной ремень
2. Замки для крепления автомобильного ремня
ОЧЕНЬ ВАЖНО! ВНИМАТЕЛЬНО ПРОЧТИТЕ
• Перед использованием изделия внимательно прочтите настоящую
инструкцию.
• НАСТОЯЩЕЕ ИЗДЕЛИЕ МОЖЕТ БЫТЬ ИСПОЛЬЗОВАНО ТОЛЬКО С
ЛЮЛЬКОЙ МАРКИ CHICCO.
• НАСТОЯЩЕЕ ИЗДЕЛИЕ МОЖЕТ БЫТЬ ИСПОЛЬЗОВАНО ТОЛЬКО
С ТЕМИ МОДЕЛЯМИ ЛЮЛЕК, НА КОТОРЫЕ ПРЕДУСМОТРЕНА
УСТАНОВКА ДАННОГО ПРИСПОСОБЛЕНИЯ: ПРОВЕРЬТЕ, УКАЗАНО
ЛИ В ИНСТРУКЦИИ К ВАШЕЙ ЛЮЛЬКЕ, ЧТО НА НЕЁ ПРЕДУСМОТРЕНА
УСТАНОВКА “KIT TRIO CAR”.
• Сторого придерживайтесь данной инструкции при монтаже
и установке изделия. Не допускайте, чтобы кто бы то ни было
пользовался изделием, предварительно не ознакомившись с
инструкцией.
• Храните настоящую инструкцию вместе с изделием.
• Ни одно приспособление для безопасности в автомобиле не
может гарантировать полнейшую безопасность ребёнка в
случае аварии, но применение данного изделия уменьшает риск
серьёзных травм и смерти.
• Неправильное использование изделия увеличивает риск
серьёзных травм у ребёнка не только в случае аварии, но и в
любых иных ситуациях.
• Если изделие имеет повреждения, деформации или сильно
изношено, замените его, т. к. оно может уже не обладать
первоначальными характеристиками безопасности.
• Не модифицировать изделие и ничего к нему не добавлять
без одобрения производителя. Не устанавливать аксессуары,
запасные части и компоненты других производителей.
• Никогда ни по каким причинам не оставляйте ребёнка одного в
авто-люльке без присмотра.
• Никогда не оставляйте люльку непристёгнутой к автомобильному
сиденью: она может ударить пассажиров и поранить их.
• Если автомобиль в течение длительного времени находился под
солнцем, внимательно обследуйте люльку, прежде чем поместить
в неё ребёнка, чтобы убедиться, что некоторые её части не
накалились: во избежание ожогов у ребёнка подождите, пока они
остынут.
• Вследствие аварии, даже небольшой, люлька и KIT TRIO CAR могли
получить повреждения, незаметные невооружённому глазу: в
любом случае необходимо заменить их.
• Не пользуйтесь приспособлениями для безопасности, бывшими
в употреблении: они могут иметь повреждения структуры,
незаметные невооружённому глазу, но компрометирующие
безопасность изделия.
• Фирма “Артсана” снимает с себя любую ответственность при
неправильном использовании изделия.
1. Данное приспособление для безопасности ребёнка
“универсального” типа сертифицировано в соответсвии с Нормой
№ 44, поправка серии 04. Предназначено для использования в
транспортных средствах и совместимо практически с любыми,
но не со всеми, автомобильными сиденьями.
2. Идеальная совместимость с автомобильным сиденьем
возможна в том случае, если производитель в инструкции к
автомобилю указывает, что на данное транспортное средство
предусмотрена установка приспособления для безопасности
ребёнка “универсального” типа соответствующей возрастной
группы.
3. Данное приспособление для безопасности классифицировано
как “универсальное” в соответствии с более строгими критериями
сертификации по сравнению с предыдущими моделями, не
имеющими данного примечания.
4. Предназначено только для использования в транспортных
средствах, оснащённых ремнём безопасности с креплением в
трёх точках, статическим или инерционным, сертифицированным
в соответствии с требованиями положения UN/ECE № 16 или на
основании других равнозначных положений.
5. По всем интересующим Вас вопросам обращайтесь к
производителю или к продавцу.
СОСТАВНЫЕ ЧАСТИ
ПРИМЕЧАНИЕ
KIT TRIO CAR - это набор крепёжных принадлежностей, с помощью
которых можно укрепить в салоне автомобиля те люльки Chicco,
на которые предусмотрена установка данного приспособления
(смотрите инструкцию к люльке). Применение данного изделия
даёт возможность правильно перевозить в автомобиле ребёнка в
первые месяцы его жизни.
Это изделие сертифицировано для “Группы 0” и предназначено для
перевозки в автомобиле детей весом до 10 кг (примерный возраст
- до 6 месяцев) в соответствии с европейской нормой ЕСЕ R44/04.
Зафиксировав KIT TRIO CAR на люльке, люльку можно прикрепить к
автомобильному сиденью.
Автомобильное сиденье, на котором будет укреплена люлька,
должно соответствовать следующим требованиям:
- оно должно быть обращено по ходу движения (Рис. 1)
- должно быть задним сиденьем, оснащённым хотя бы двумя
пассажирскими ремнями безопасности с креплением в 3-х
точках (Рис. 2), имеющими сертификат UNI/ECE 16 или другой ему
равнозначный.
Если вы приобрели KIT TRIO CAR отдельно от люльки,
придерживайтесь инструкции по монтажу, прежде чем разместить
люльку в автомобиле.
Поясной ремень
Поясной ремень должен быть введён в два отверстия, находящиеся
у основания люльки (Рис.3). Свернуть лямку с красным кругом
таким образом, чтобы “липучки” находились внутри, ввести лямку в
правое отверстие (Рис. 4) и вывести её из левого (Рис. 5).
Застегнуть ремень, наложив лямку с красным кругом на другую
лямку (Рис. 6).
ВНИМАНИЕ! Убедиться, что ремень не перекручен (Рис. 7).
Замки для автомобильного ремня
Чтобы закрепить два замка на стержнях, расположенных на
торцовых сторонах люльки (Рис. 8), надеть каждый замок на
соответствующий стержень (Рис. 9) и потянуть их вниз до тех пор,
пока не услышите щелчок (Рис. 10).
ВНИМАНИЕ! Не крепите замки обратной стороной! (Рис. 11).
Теперь люльку можно укрепить в автомобиле.
Чтобы укрепить люльку на заднем автомобильном сиденьи,
необходимо разместить её в центре и пристегнуть ремнями двух
внешних боковых сидений (Рис. 12). Если центральное сиденье
вашего автомобиля тоже оснащено трёхточечным ремнём, то
люльку можно установить не сторого по центру, а сбоку, занимая
часть бокового и центрального сидений, и укрепить ремнями этих
двух сидений (Рис. 13).
1. Введите два автомобильных ремня в соответствующие замки и
застегните их (Рис. 14).
2. Полностью опустите спинку люльки, следуя прилагаемой к ней
инструкции.
ВНИМАНИЕ! Никогда не используйте в автомобиле люльку с
поднятой спинкой! Не гарантируется безопасность изделия!
3. Если замки на люльке обшиты тканью, снимите с них обшивку
(Рис. 15).
4. Разместите люльку вдоль сиденья (Рис. 16) так, чтобы она хорошо
к нему примыкала.
5. С обеих сторон проделайте следующее:
- возьмите автомобильный ремень и создайте петлю (Рис. 17);
- возьмите замок люльки и поверните наружу красный
стержень замка (Рис. 18). Введите в замок петлю, полученную из
автомобильного ремня (Рис. 19), и поверните в исходное положение
красный стержень так, чтобы он прошёл внутрь петли (Рис. 20).
Потяните автомобильный ремень в сторону его катушки, прижав
люльку к сиденью, чтобы хорошо её зафиксировать (Рис. 21).
ВНИМАНИЕ! Проверьте, чтобы люлька хорошо примыкала к
сиденью.
ВНИМАНИЕ! Контролируйте, чтобы ремни были хорошо натянуты
(Рис. 22).
Расстегните поясной ремень, потянув лямку с красным кругом (Рис.
23).
Уложите ребёнка в люльку (Рис. 24).
40
ИНСТРУКЦИЯ ПО ЭКСПЛУАТАЦИИ
ТРЕБОВАНИЯ К АВТОМОБИЛЬНОМУ СИДЕНЬЮ
КРЕПЛЕНИЕ KIT TRIO CAR К ЛЮЛЬКЕ
КРЕПЛЕНИЕ ЛЮЛЬКИ В АВТОМОБИЛЕ
В ПЕРВЫЙ РАЗ
РАЗМЕЩЕНИЕ РЕБЁНКА
Page 41

Проведите над животом ребёнка сначала правую лямку ремня,
затем левую (Рис. 25).
Соедините обе накладки так, чтобы ремень хорошо прилегал к
животу ребёнка, но не стягивал его (Рис. 26).
Расстегните стёганый поясной ремень люльки, потянув лямку с
красным кругом (Рис. 27).
С обеих сторон люльки выполните следующие действия:
Отстегните замок от люльки, потянув наружу красный язычок
замка и толкнув вверх замок (Рис. 28) так, чтобы освободить люльку
от ремня. Замок останется прикреплённым к автомобильному
ремню.
ВНИМАНИЕ! Пассажиры ни в коем случае не должны пристёгиваться
автомобильным ремнём, предварительно не сняв с него замок от
KIT TRIO CAR: это опасно!
Чтобы снять замок с ремня, ослабьте петлю ремня (Рис. 29) и
поверните красный стержень, чтобы извлечь замок (Рис. 30).
Чтобы снова укрепить люльку на сиденьи, когда два замка остались
зафиксированными на автомобильных ремнях, выполните
следующие действия:
Проверьте, чтобы два ремня безопасности были пристёгнуты.
Чтобы закрепить замки на люльке, следуйте указаниям, описанным
в разделе “КРЕПЛЕНИЕ KIT TRIO CAR К ЛЮЛЬКЕ - Замки для
автомобильного ремня”.
Потяните автомобильный ремень в сторону его катушки, прижав
люльку к сиденью, чтобы хорошо её зафиксировать (Рис. 21).
ВНИМАНИЕ! Проверьте, чтобы люлька хорошо примыкала к
сиденью.
ВНИМАНИЕ! Контролируйте, чтобы ремни были хорошо натянуты
(Рис. 22).
По окончании периода использования в автомобиле люльки или
для использования вне автомобиля KIT TRIO CAR можно снять с
люльки, выполнив следующие операции:
Поясной ремень
Расстегнуть ремень, потянув лямку с красным кругом (Рис. 23).
Вынуть лямку из левого отверстия снизу, затем из правого
отверстия сверху (Рис. 31).
Замки для автомобильного ремня
Потянуть наружу красный язычок замка и толкнуть вверх замок
(Рис. 28).
Ремень и замки чистить только вручную тканью, увлажнённой в
воде. Не применять растворители и другие моющие средства.
ВНИМАНИЕ! Периодически контролируйте состояние всех частей
люльки и KIT TRIO CAR, чтобы убедиться, что они не сильно
изношены и неповреждены.
КАК ВЗЯТЬ РЕБЁНКА ИЗ ЛЮЛЬКИ
КАК ОТСТЕГНУТЬ ЛЮЛЬКУ ОТ СИДЕНЬЯ
ПОВТОРНОЕ КРЕПЛЕНИЕ ЛЮЛЬКИ В АВТОМОБИЛЕ
ДЕМОНТАЖ KIT TRIO CAR С ЛЮЛЬКИ
УХОД ЗА ИЗДЕЛИЕМ
• Не подкладывать подушки, одеяла и пр. под люльку на сиденье
автомобиля и не класть их в люльку под ребёнка.
• Не помещать тяжёлые предметы на изделие.
• Следить, чтобы все пассажиры автомобиля были пристёгнуты
ремнями безопасности для собственной безопасности, а также
чтобы в пути не упасть на ребёнка.
• Держать вдали от детей полиэтиленовые пакеты во избежание
удушения.
• Регулярно проверять состояние изделия (износ, повреждения).
Если изделие повреждено, не пользоваться им и держать его
вдали от дететй.
• В поездках без ребёнка люлька должна быть всегда пристёгнута
к сиденью или находиться в багажнике.
• Фирма “Артсана” снимает с себя любую ответственность при
неправильном использовании изделия.
МЕРЫ ПРЕДОСТОРОЖНОСТИ: ПРОЧЕСТЬ ПЕРЕД ПОЕЗДКОЙ
• Хранить настоящую инструкцию вместе с изделием, чтобы она
была всегда под рукой.
• При установке изделия строго придерживаться настоящей
инструкции.
• Никогда не пристёгивать это изделие автомобильным ремнём с
креплением только в двух точках.
• Устанавливать изделие только на автомобильных сиденьях,
надёжно прикреплённых к структуре авто и обращённых по
ходу автомобиля.
• Не оставлять складные, откидные или вращающиеся
автомобильные сиденья незафиксированными и не перевозить
в салоне незакреплённые предметы, особенно в углублении у
заднего стекла: в случае аварии или при резком торможении
это может привести к травмированию пассажиров.
• При креплении изделия не допускать, чтобы мобильные
сиденья или дверца автомобиля соприкасались с ним. Следить,
чтобы части изделия не были зажаты дверцей автомобиля или
находились в контакте с режущими поверхностями.
• Всегда контролировать, чтобы ремень безопасности был хорошо
натянут, не был перекручен или неправильно проведён.
• Не пользоваться изделием, если некоторые его части
повреждены или отсутствуют.
За информацией и запчастями обращаться в отдел по обслуживанию
клиентов Артсана:
почтовый адрес: ARTSANA SPA
Servizio Clienti
Via Saldarini Catelli n. 1
22070 Grandate COMO - ITALY
телефон: (0039) 031 382000
электронный адрес: info@artsana.it
сайт: www.chicco.com раздел “servizi”
41
Page 42

SK
I
K T C
1. Brušný pás
2. Upevňovacie spony pásu auta
VEĽMI DÔLEŽITÉ: PREČÍTAŤ VEĽMI POZORNE
• Pred použitím výrobku si veľmi pozorne prečítajte tento
návod.
• VÝROBOK MÔŽE BY Ť ZMONTOVANÝ A POUŽITÝ VÝHRADNE S
KORBOU ZNAČKY CHICCO.
• VÝROBOK MÔŽE BY Ť ZMONTOVANÝ A POUŽITÝ VÝHRADNE S
MODELMI KORIEB, KTORÉ SÚ PRISPÔSOBENÉ NA INŠTALÁCIU:
SKONTROLUJTE V NÁVODE VÁŠEJ KORBY, ČI JE PRISPÔSOBENÁ PRE INŠTALÁCIU “KIT TRIO CAR”.
• Pri montáži a inštalácii výrobku sa riaďte návodom. Výrobok
sa nesmie použiť bez prečítania návodu.
• Tento návod si odložte spolu s výrobkom.
• Žiadny bezpečnostný výrobok nemôže zabezpečiť úplnú
bezpečnosť dieťaťa v prípade nehody, ale použitie tohto
výrobku zníži riziko zranenia alebo usmrtenia dieťaťa.
• Nesprávne použitie výrobku zvyšuje riziko a znižuje
bezpečnosť dieťaťa a to nie iba v prípade nehody, ale aj v inej
situácii.
• Poškodený, zdeformovaný, alebo veľmi opotrebovaný
výrobok vymeňte: môže stratiť svoje vlastnosti bezpečnosti.
• Na v ýrobku nesmie byť prevedená žiadna úprava bez súhlasu
výrobcu. Príslušenstvo, náhradné diely a prvky nahradzujte
iba pôvodnými od výrobcu.
• Nenechávajte dieťa nikdy vkorbe bez dozoru.
• Nenechávajte korbu nikdy voľne položenú na sedadle auta:
mohla by naraziť do cestujúcich a zraniť ich.
• Keď bolo vozidlo dlhší čas vystavené na slnku, pred uložením
dieťaťa do korby ju pozorne skontrolujte, hlavne či nie sú niektoré časti prehriate: v tom prípade ich nechajte vychladnúť,
aby sa dieťa nepopálilo a až potom ho uložte do korby.
• V prípade aj nie vážnej nehody sa korba a KIT TRIO CAR môžu
poškodiť. Aj keď vadu nevidíte voľným okom, treba ich v
tomto prípade vymeniť.
• Nepoužívajte výrobky pre bezpečnosť v aute z druhej ruky:
mohli by mať voľným okom neviditeľné štrukturálne vady,
ktoré by mohli ohroziť bezpečnosť výrobku.
• Spoločnosť ARTSANA nepreberá na seba žiadnu
zodpovednosť za nesprávne používanie výrobku.
DÔLEŽITÉ OZNÁMENIE
1. Toto je “Univerzálne”, zariadenie na upevnenie detí, ho-
mologované podľa Predpisu č.44, vylepšenia série 04. Vhodné pre použitie vo vozidlách a kompatibilné s väčšinou, nie
so všetkými, sedadlami vozidiel.
2. Úplná kompatibilnosť sa ľahšie dosiahne vtedy, keď výrob-
ca vozidla uvedie v návode k použitiu vozidla, že vozidlo je
prispôsobené na inštaláciu “Univerzálneho” zariadenia pre
upevnenie detí daného veku.
3. Toto vybavenie pre upevnenie bolo pomenované “Univer-
zálne” podľa prísnejších homologačných kritérií v porovnaní
s predchádzajúcimi modelmi, ktoré nemajú toto oznámenie.
4. Vhodné iba pre použitie vo vozidlách s pevným alebo
navíjacím trojbodovým bezpečnostným pásom, homologovaným podľa Predpisu UN/ECE č.16 alebo iného ekvivalentného štandardu.
5. V prípade pochybnosti sa spojte s výrobcom, alebo pre-
dajcom výrobku.
INFORMÁCIE K OBSLUHE
KIT TRIO CAR je prvok, ktorý umožňuje upevniť a použiť
prispôsobené korby Chicco (viď návod korby) vo vašom aute
pre správny prevoz novonarodeného a niekoľko mesačného
PRVKY
dieťaťa v aute.
Výrobok je homologovaný podľa európskej normy ECE R44/04
“Skupiny 0”, pre prevoz detí o váhe od 0 do 10 Kg, to znamená
približne do 6.-tich mesiacov.
Po namontovaní KIT TRIO CAR na korbu, tato môže byť upevnená v aute.
POŽIADAVKY NA SEDADLO AUTA
Aby sa korba mohla pripevniť na sedadlo, sedadlo musí spĺnať
tieto požiadavky:
- musí byť obrátené do smeru jazdy (Obr. 1);
- sedadlo musí byť zadné a vybavené najmenej dvoma trojbodovými bezpečnostnými pásmi (Obr. 2), homologovanými
podľa normy UNI/ECE 16, alebo inej ekvivalentnej normy.
Keď boli KIT TRIO CAR a korba zakúpené zvlášť, pred umiestnením korby do auta sa riaďte týmto návodom pre montáž.
Brušný pás
Brušný pás sa musí pretiahnuť cez dva otvory na spodnej časti
korby (Obr. 3).
Pás s červeným označením zohnite tak, aby bol suchý zips z
vnútornej strany, pretiahnite ho cez pravý otvor (Obr. 4), a vytiahnite ho cez ľavý otvor (Obr. 5).
Pás upevníte tak, že pruh s červeným označením z vrchu
priložíte na druhý pruh (Obr. 6).
POZOR! Skontrolujte, aby pás nebol pokrútený (Obr. 7).
Spony bezpečnostného pásu
Dve spony pripnite na kolíky, ktoré sa nachádzajú na krajoch
korby tak, (Obr. 8), že sponu zasuniete do príslušného kolíka,
zatlačíte (Obr. 9) a sponu potiahnete smerom dolu až pokiaľ
nezacvakne (Obr. 10).
POZOR! Dbajte nato, aby ste nenamontovali spony naopak!
(Obr. 11).
Takto je korba pripravená na umiestnenie do auta.
Korbu položte do stredu zadného sedadla a upevnite ju pásmi,
nachádzajúcimi sa na dvoch okrajových miestach (Obr. 12). V
prípade že zadné sedadlo vášho auta je vybavené trojbodovým
pásom aj na strednom sedadle, korba môže byť umiestnená aj
z boku na stredné a bočné miesto a pripevnená pásmi týchto
dvoch sedadiel (Obr. 13).
1. Vytiahnite a upnite dva pásy auta na príslušné spony sedadla (Obr. 14).
2. Operadlo korby úplne sklopte, tak ako je to znázornené v
návode k obsluhe korby.
POZOR! Nikdy nepoužívajte korbu v aute so zdvihnutým operadlom! V opačnom prípade nezodpovedáme za bezpečnosť
výrobku!
3. V prípade, že spony na korbe sú pokryté látkou, odstráňte
ju (Obr. 15).
4. Korbu umiestnite na sedadlo pozdĺžne (Obr. 16) tak, aby do-
bre priľahla na sedadlo.
5. Na obidvoch stranách preveďte nasledovné úkony:
- Chyťte pás auta a vytvorte slučku (Obr. 17);
- Chyťte sponu korby a točte smerom von červenú tyčku spony
(Obr. 18).
Strčte do spony vytvorenú slučku pásu (Obr. 19) a červenú
tyčku točte do pôvodnej polohy tak, aby sa vsunula do slučky
(Obr. 20).
Pás auta ťahajte smerom k navijáku a zároveň korbu tlačte na
sedadlo až pokiaľ nie je pevne upevnená (Obr. 21).
POZOR! Skontrolujte, či korba dobre prilieha na sedadlo.
POZOR! Skontrolujte, či sú pásy dobre napnuté (Obr. 22).
Ťahajte pruh s červenou značkou a odpojte brušný pás (Obr.
23).
42
MONTÁŽ KIT TRIO CAR-u NA KORBU
UMIESTNENIE KORBY DO AUTA: PRVÝ KRÁT
ULOŽENIE DIEŤAŤA
Page 43

Položte dieťa do korby (Obr. 24).
Cez pás dieťaťa pretiahnite najprv pravý a potom ľavý pruh
pásu (Obr. 25).
Spojte dve patky tak, aby pás dobre priliehal na pás dieťaťa;
dávajte pozor, aby ste dieťa príliš nestlačili (Obr. 26).
VYBRATIE DIEŤAŤA
Potiahnutím pruhu s červenou značkou odopnite vyvatovaný
brušný pás korby (Obr. 27).
ODPOJENIE KORBY ZO SEDADLA
Na obidvoch stranách korby preveďte tieto úkony.
Potiahnutím červeného jazýčka spony smerom von a stlačením
spony dohora odopnite sponu od korby (Obr. 28) tak, aby sa
korba uvoľnila. Spona zostáva upevnená na páse auta.
POZOR! Pás auta v žiadnom prípade nepoužívajte pre upevnenie spolucestujúceho skôr než ste neodstránili sponu KIT TRIO
CAR: mohlo by to byť nebezpečné!
Pre odstránenie spony uvoľnite slučku pásu (Obr. 29) a točte
červeným kolíkom až do úplného uvoľnenia spony (Obr. 30).
UPEVNENIE KORBY V AUTE : PO PRVOM RAZE
Pre ďalšie zachytenie korby na sedadlo, keď dve spony už boli
upevnené na dva pásy auta, preveďte nasledovné úkony.
Skontrolujte, či dva pásy auta sú prichytené.
Pre upevnenie spôn ku korbe sa riaďte návodom v odstavci
“MONTÁŽ KIT TRIO CAR NA KORBU - Spony pre pás auta”.
Pás auta ťahajte smerom k navijáku a zároveň korbu tlačte na
sedadlo až pokiaľ nie je pevne upevnená (Obr. 21).
POZOR! Skontrolujte, či korba dobre prilieha na sedadlo.
POZOR! Skontrolujte, či sú pásy dobre napnuté (Obr. 22).
DEMONTÁŽ KIT TRIO CAR OD KORBY
Keď korbu v aute, alebo mimo auta nepoužívate, KIT TRIO CAR
môžte demontovať. Pri demontáži sa riaďte nasledovnými
úkonmi:
Brušný pás
Potiahnutím pruhu s červenou značkou pás odpojte (Obr. 23).
Pruh najprv vytiahnite zospodu z ľavého otvoru a potom zvrchu z pravého otvoru (Obr. 31).
Spony pre pás auta
Potiahnutím červeného jazýčka spony smerom von a stlačením
spony dohora (Obr. 28)
ČISTENIE VÝROBKU
Pás a spony čistite iba ručne vlhkou handrou. Nepožívajte roztoky alebo čistiace prášky.
POZOR! Pravidelne kontrolujte všetky časti korby a KIT TRIO
CAR a dávajte pozor, aby žiadna časť nebola poškodená alebo
príliš upotrebovaná.
• Nepoužívajte v ýrobok, ak je niektorá z jeho častí poškodená,
alebo chýbajúca.
• Medzi sedadlo auta a korbu a medzi korbu a dieťa
nevkladajte žiadne predmety (vankúše, deky a pod.).
• Neklaďte na výrobok ťažké predmety.
• Dospelí musia mať počas jazdy pripnutý bezpečnostný
pás; spolucestujúci bez bezpečnostného pásu sa stáva
nebezpečným pre seba a pre dieťa, lebo aj počas jazdy by
mohol do dieťaťa naraziť.
• Držte z dosahu dieťaťa sáčky z umelej hmoty. Zabránite tak
riziku zadusenia.
• Pravidelne kontrolujte v akom stave sa výrobok nachádza.
V prípade prílišného opotrebovania alebo poškodených
častí výrobok nepoužívajte a držte ho z dosahu detí.
• Aj keď je korba prázdna, musí byť správne upevnená alebo
uložená v odkladacom priestore.
• Spoločnosť ARTSANA nepreberá na seba zodpovednosť
pre nesprávne používanie výrobku.
UPOZORNENIA: PRED CESTOU POZORNE PREČÍTAŤ
• Tento návod musí byť starostlivo odložený a ľahko
prístupný.
• Výrobok musí byť nainštalovaný presne podľa návodu k
použitiu, dodaného výrobcom.
• Nepripevňujte výrobok iba dvojbodovým bezpečnostným
pásom auta.
• Výrobok umiestňujte iba na sedadlá, ktoré sú správne upevnené ku kostre auta a otočené smerom do vnútra auta.
• Nenechávajte uvoľnené sklápacie alebo otočné sedadlá
a ubezpečte sa, či sú predmety, ktoré prevážate dobre
upevnené, hlavne na priestore pod zadným oknom; v prípade nehody alebo náhleho zabrzdenia by sa mohli stať
nebezpečnými pre spolucestujúcich.
• Výrobok umiestnite tak, aby doňho nenarážali pohyblivé
sedadlo alebo dvere auta. Zabráňte tomu, aby sa niektorá
časť výrobku zasekla medzi dvere, alebo aby sa trela o ostré
miesta.
• Ubezpeč te sa, aby bezpečnostný pás auta bol správne natiahnutý, nepokrútený, alebo nesprávne upevnený.
Pre ďalšie informácie a pre vyžiadanie náhradných súčiastok
kontaktujte Servizio Clienti Artsana: (servis zákazníkom p.prekl.)
pošta: ARTSANA SPA
Servizio Clienti
Via Saldarini Catelli n.1
22070 Grandate COMO - ITALY
telefón: (0039) 031 382000
e-mail: info@artsana.it
stránka: www.chicco.com
43
Page 44

SLO
I
K T C
SESTAVNI DELI
1. Trebušni pas
2. Sponke za pritrditev avtomobilskega pasu
POMEMBNO OBVESTILO! NATANČNO PREBERITE
• Pred uporabo proizvoda natančno preberite ta navodila.
• PROIZVOD LAHKO NAMESTITE IN UPORABLJATE IZKLJUČNO
S KOŠARO CHICCO.
• PROIZVOD LAHKO NAMESTITE IN UPORABLJATE IZKLJUČNO
S KOŠARO, KI JE PREDVIDENA ZA NAMESTITEV: PREVERITE V
PRIROČNIKU Z NAVODILI ZA VAŠO KOŠARO, ALI LAHKO NANJO NAMESTITE “KIT TRIO CAR”.
• Natančno preberite navodila za montažo in namestitev.
Nihče naj ne uporablja izdelka, ne da bi predhodno prebral
navodila.
• Navodila shranite skupaj s proizvodom.
• Noben varnostni proizvod v avtomobilu ne zagotavlja
popolne varnosti otroka v primeru nesreče, vendar pa uporaba tega proizvoda zmanjšuje možnost poškodb in smrti
otroka.
• Nepravilna uporaba povečuje tveganje resnih poškodb
otroka, ne samo v primeru trčenja, ampak tudi v drugih primerih.
• V primeru, da je proizvod poškodovan, deformiran ali zelo
obrabljen, ga je treba zamenjati: lahko ne zagotavlja več
dovolj prvotne varnosti.
• Ničesar ne spreminjajte in ne dodajajte proizvodu brez odo-
britve proizvajalca. Ne montirajte dodatne opreme, rezervnih
in sestavnih delov, ki jih ni dobavil proizvajalec.
• Nikoli ne pustite otroka brez varstva v košari v avtomobilu.
• Nikoli ne imejte košare na sedežu avtomobila nepritrjene:
lahko bi udarila in ranila druge potnike.
• Če je avtomobil stal dalj časa na soncu, preverite, da ni košara
prevroča, preden vanjo posadite otroka, sicer počakajte, da
se najprej ohladi.
• Ob prometni nesreči, tudi lažji, sta se košara in KIT TRIO CAR
lahko poškodovala, čeprav je to nevidno. Priporočamo, da ju
zamenjate.
• Ne uporabljajte proizvoda iz druge roke: lahko bi bila
poškodovana struktura, kar s prostim očesom ni vidno, varnost proizvoda pa ne bi bila več zagotovljena.
• Družba Artsana zavrača vsako odgovornost v primeru nep-
rimerne uporabe proizvoda.
1. To je univerzalni otroški avtosedež, homologiran po pravil-
niku št. 44, izboljšave v seriji 04. Primeren je za uporabo v
vozilih in ga lahko namestite na večino, ne pa na vse avtomobilske sedeže.
2. Primerna namestitev je možna pri avtomobilih, ki jih je
proizvajalec označil, da so predvidena za namestitev univerzalnih avtosedežev za otroke za to starostno skupino.
3. Avtosedež je označen kot univerzalen in sicer pod strožjimi
kriteriji kot predhodni modeli, ki ne nosijo te oznake.
4. Primeren je samo za uporabo v vozilih, ki so opremljena s
tri točkovnimi pasovi, ki so statični ali na navoj, homologirani
na osnovi Pravilnika UN/ECE štev.16 ali drugimi enakovrednimi standardi.
5. Če ste v dvomih, se obrnite na proizvajalca avtosedeža ali
na prodajalca.
KIT TRIO CAR je izdelek. ki omogoča namestitev in uporabo
ustrezne Chicco košare (glej priročnik za košaro) v notranjosti
vašega avtomobila, za pravilen transport otroka v prvih mesecih življenja.
POMEMBNO OBVESTILO
NAVODILA ZA UPORABO
Proizvod je homologiran po evropskih normah ECE R44/04 za
“Skupino 0”, za transport otroka od 0 do 10 kg teže, oziroma do
6 meseca starosti.
Potem, ko ste montirali KIT TRIO CAR na košaro, namestite
košaro v avtomobil.
Za namestitev košare na sedež, mora biti imeti sedež naslednje lastnosti:
- mora biti obrnjen v smeri vožnje (Slika 1);
- mora biti eden od zadnjih sedežev, opremljen z najmanj
dvema tritočkovnima varnostnima pasovoma (Slika 2), homoligiran po normativu UNI / ECE 16, ali drugih ustreznih
standardih.
Če niste KIT TRIO CAR kupili hkrati s košaro, se ravnajte po
naslednjih navodilih za montažo, preden namestite košaro v
avtomobil.
Trebušni pas
Trebušni pas povlecite skozi dve odprtini na dnu košare (slika
3).
Zložite trak z rdečo nalepko tako, da bo sprijemalno zapiralo
notranji strani, nato ga povlecite skozi desno odprtino (Slika 4)
in ga izvlecite iz leve odprtine (Slika 5).
Zaprite pas tako, da položite trak z rdečo nalepko na vrh drugega (Slika 6).
POZOR! Preverite, da pas ni zavit (Slika 7).
Sponke za avtomobilski pas
Za pričvrstitev obeh sponk na zatiča na robovih košare (Slika
8), vtaknite vsako sponko v zatič in potisnite navzdol (Slika 9),
dokler se slišno ne zaskoči (Slika 10).
POZOR! Ne montirajte sponk v napačni smeri! (Slika 11).
Zdaj lahko košaro namestite v avtomobil.
Košaro namestite na zadnji sedež, v sredino in jo pripnite s
pomočjo dveh varnostih pasov s stranskih sedežev (Slika 12).
Če je zadnji sedež na sredini opremljen s tritočkovnim varnostnim pasom, lahko košaro namestite tudi bočno in sicer
na srednji in stranski sedež in jo zapnete z varnostnima pasovoma teh dveh sedežev (Slika 13).
1. Izvlecite in pripnite oba avtomobilska pasova v njihove zaponke na sedežu. (Slika 14).
2. Popolnoma nagnite hrbtišče košare, tako kot je prikazano v
navodilih za uporabo košare.
POZOR! Nikoli ne uporabljajte košare v avtomobilu s privzdignjenim hrbtiščem! Varnost proizvoda ni zagotovljena!
3. Če so zaponke na košari preoblečene s tekstilom, le-tega
odstranite (Slika 15).
4. Namestite vrečo na sedež po dolgem (Slika 16), tako, da se
cela popolnoma prilega sedežu.
5. Na obeh straneh naredite naslednje:
- primite avtomobilski varnostni pas in naredite zanko (Slika
17);
- primite zaponko košare ter obrnite navzven rdeči jeziček zaponke (Slika 18).
Vstavite v zaponko zanko, ki ste jo naredili z varnostnim pasom
(Slika 19) ter nato obrnite rdeči jeziček v prvotni položaj, tako
da bo šel skozi zanko (Slika 20).
Potegnite avtomobilski varnostni pas proti navoju, obenem
potisnite košaro proti sedežu in tako varno namestite košaro
(Slika 21).
POZOR! Preverite, ali se košara dobro prilega sedežu.
POZOR! Preverite, da so pasovi dobro nategnjeni (Slika 22).
Odpnite trebušni pas, tako da povlečete trak z rdečo nalepko
(Slika 23).
44
LASTNOSTI AVTOSEDEŽA
MONTAŽA KIT TRIO CAR NA KOŠARO
NAMESTITEV KOŠARE V AVTOMOBIL: PRVIČ
NAMESTITEV OTROKA V KOŠARO
Page 45

Položite otroka v košaro (Slika 24).
Desni pas potegnite preko otrokovega života, nato še levi pas
(Slika 25).
Spnite oba dela tako, da se bo pas prilegal otrokovemu životu,
ne da bi ga preveč stiskal (Slika 26).
JEMANJE OTROKA IZ KOŠARE
Odpnite podložen trebušni pas košare, tako da potegnete za
trak z rdečo nalepko (Slika 27).
ODSTRANITEV KOŠARE S SEDEŽA
Na obeh straneh košare naredite naslednje:
Odpnite zaponko košare tako, da potegnete rdeči jeziček
zaponke ven in pritisnete zaponko navzgor (Slika 28). Tako
odpnete košaro. Zaponka je še vedno pritrjena na avtomobilski varnostni pas.
POZOR! Nikoli ne pripnite potnika z avtomobilskim varnostnim pasom, ne da bi prej odstranili zaponko KIT TRIO CAR:
lahko bi bilo nevarno!
Za odstranitev zaponke s pasu, zrahljajte zanko pasu (Slika 29)
in obrnite rdeči zatič (Slika 30).
NAMESTITEV VREČE V AVTOMOBIL: PO PRVEM
POSTOPKU
Za ponovno namestitev košare na sedež, potem ko sta obe
zaponki ostali že fi ksirani na avtomobilski varnostni pas, se
ravnajte po naslednjih navodilih:
Preverite, ali sta oba avtomobilska pasova pripeta.
Za pritrditev zaponk na košaro upoštevajte navodila
“MONTAŽA KIT TRIO CAR NA KOŠARO Sponke za avtomobilski pas«.
Potegnite avtomobilski pas proti navoju, košaro močno pritisnite ob sedež, tako da bo varno pritrjena (Slika 21).
POZOR! Preverite, ali se košara dobro prilega sedežu.
POZOR! Preverite, da so pasovi dobro nategnjeni (Slika 22).
ODSTRANITEV KIT TRIO CAR S KOŠARE
Ko ne želite več uporabljati košare v avtu ali jo želite uporabljati izven njega, lahko KIT TRIO CAR odstranite.
Trebušni pas
Odpnite pas tako, da potegnete trak z rdečo nalepko (Slika
23).
Izvlecite trak najprej iz odprtine na levi spodaj, potem iz odprtine na desni zgoraj (Slika 31).
Sponke za avtomobilski pas
Potegnite rdeči jeziček na zaponki navzven ter potisnite zaponko navzgor (Slika 28).
ČIŠČENJE
Pas in zaponke čistite samo ročno z vlažno krpo. Uporabljajte
le vodo in nobenega razredčila in drugih detergentov.
POZOR! Občasno preglejte vse dele košare in KIT TRIO CAR ter
se prepričajte, da ni noben del poškodovan ali močno obrabljen.
OPOZORILA: PREBERITE PRED POTOVANJEM
• Navodila skrbno shranite skupaj s proizvodom.
• Proizvod mora biti nameščen natančno po danih navo-
dilih.
• Nikoli ne pripnite proizvoda z varnostnim pasom na samo
dve točki.
• Montirajte proizvod samo na sedeže, ki so pravilno pritrjeni
na avtomobilsko strukturo ter obrnjeni v smeri vožnje.
• Zložljivih in vrtljive sedeže dobro zavarujte. V avtomobilu
ne prevažajte predmetov, ki niso pritrjeni, predvsem ne na
zadnji polici: v primeru trka ali hitrega zaviranja bi lahko
udarili ali poškodovali potnike.
• Proizvod montirajte tako, da v njegovi bližini ni preno-
snih sedežev ali vrat. Preverite da ni noben njegov del
preščipnjen med vrati in da ne drgne ob ostre površine.
• Vedno se prepričajte da je avtomobilski varnostni pas
pravilno napet, da ni zavit, ali pa v nepravilni legi.
• Ne uporabljajte proizvoda, če so nekateri njegovi deli zlom-
ljeni ali če manjkajo.
• Ne dajajte nobenega predmeta (blazine, pokrivala, itd.)
med avtomobilski sedež in košaro, ali med košaro in otroka.
• Ne postavljajte težkih predmetov na proizvod.
• Prepričajte se, da so vsi potniki v avtomobilu privezani z
varnostnimi pasovi, ker je to pomembno za njihovo varnost pa tudi za varnost otroka, saj bi med potovanjem lahko udarili ob otroka.
• Plastične vrečke hranite izven dosega otrok, da preprečite
zadušitve.
• Redno preverjajte obrabljenost proizvoda in prisotnost
morebitnih okvar. V primeru poškodbe ne uporabljajte več
tega proizvoda ter ga držite izven dosega otrok.
• Tudi kadar ne prevažate otroka, mora biti košara pritrjena,
ali pa jo premestite v prtljažnik.
• Družba ARTSANA odklanja vsako odgovornost pri nepravil-
ni uporabi proizvoda.
Za vse ostale informacije in zahteve za rezervne dele se obrnite na Servis Clienti Artsana:
pošta: ARTSANA SPA
Servizio Clienti
Via Saldarini Catelli n.1
22070 Grandate COMO - ITALY
telefon: (0039) 031 382000
e-mail: info@artsana.it
spletna stran: www.chicco.com
<http://www.chicco.com>
45
Page 46

TR
I
K T C
1. Bel Kemeri
2. Kemer bloke edici kancalar
ÇOK ÖNEMLİ ! ÇOK DİKKATLİCE OKUYUNUZ
PARÇALARI
• Ürünü kullanmadan önce bu bilgileri dikkatlice okuyunuz.
• BU ÜRÜN SADECE CHICCO MARKALI BİR PORTBEBE İLE
BİRLİKTE MONTE EDİLİR VE KULLANILIR.
• BU ÜRÜN YALNIZCA TAKILMAYA UYGUN PORTBEBE
MODELLERİ İLE BİRLİKTE MONTE EDİLİR VE KULLANILABİLİR:
HEYBENİZİN KULLANMA KILAVUZUNDA “KİT TRİO CAR”
ÜZERİNE TAKILMAYA UYGUN OLDUĞUNU KONTROL EDİNİZ.
• Ürünün montajı ve takılması için kullanım kılavuzunu dik-
katlice okuyunuz. Kullanım kılavuzunu okumadan ürünü
kullanmayınız.
• Bu kullanım kılavuzunu ürün ile birlikte saklayınız.
• Hiçbir güvenlik ürünü herhangi bir çarpışma anında bebeğin
tam güvenliğini garanti edemez. Bu ürünün kullanımı ölüm
ve sakatlanma riskini azaltır.
• Ürünün yanlış kullanımı, yalnız kaza esnasında değil başka
durumlarda da çocuğun ciddi olarak tehlikeye maruz kalması
ihtimalini arttırır.
• Hasar görmüş, deforme olmuş veya aşınmış ürünleri
kullanmayınız.
• İthalatçı fi rma onayı alınmaksızın ürün üzerinde değişiklik
veya ilaveler yapmayınız. İthalatçı fi rma tarafından temin ed-
ilmeyen, aksesuar, yedek parça veya aksam takmayınız.
• Çocuğu portbebe üzerinde hiçbir nedenle yalnız
bırakmayınız.
• Portbebe’yi asla kilitlenmemiş biçimde araba koltuğu üzeri-
nde bırakmayınız; yolculara çarparak yaralanmalarına sebep
olabilir.
• Aracın güneş altında kalması durumunda, çocuğu oturt-
madan önce portbebeyi dikkatli bir şekilde kontrolden geçi-
rin, bazı aksamının kızmamış olduğunu kontrol ediniz; ısınmış
olması halinde çocuğun yanmasını önlemek için iskemlenin
soğumasını bekleyiniz.
• Hafi f de olsa bir kazayı takiben portbebe ve KIT TRIO CAR
çıplak gözle görülemeyecek yapısal zarar görmüş olabilir; bu
nedenle değiştirilmesi gerekir.
• Araçta güvenlik yönünden asla ikinci el ürün kullanmayınız;
gözle görülemeyen ancak ürünün güvenliğini tehlikeye sokan yapısal zarara uğramış olabilir.
• Artsana Firması ürünün hatalı kullanımından ötürü ortaya
çıkabilecek her türlü sorumluluktan muaftır.
1. Bu ürün bebekler için “Evrensel” bir ürün olup 44 sayılı
Yönetmelik,04 seri hükümlerine uygun olarak onaylanmıştır.
Genel olarak araçlarda ve her kısmı ile olmasa da araç
koltuklarının belli başlı aksamı ile uyumludur.
2. Mükemmel uyum, araç imalatçısı tarafından aracın
kitabında sözkonusu yaş grubu için “Evrensel” addedilen
bebek kavrama aygıtlarının takılmasının öngörüldüğü husu-
sunda beyanda bulunulduğu takdirde sağlanabilir.
3. Bu kavrayıcı ürün, bu uyarının bulunmadığı önceki mod-
ellere nazaran en katı onaylama ilkelerine göre “Evrensel”
olarak sınıfl andırılmıştır.
4.Yalnızca 3 statik uçlu veya rulolu emniyet kemerlerini havi
araçlarda kullan
diğer standartlara uygun olarak onaylanmıştır.
5. Tereddüt halinde portbebe ithalatçı fi rması veya satış
bayiliği ile temasa geçiniz.
KİT TRİO CAR, bebeğin ilk aylarında uygun bir şekilde taşınması
için portbebeleri (portbebe kullanım kılavuzuna bakınız)
otomobilinizin içine takmanızı ve kullanmanızı sağlayan bir
ÖNEMLİ UYARI
ılacak olup, UN/ECE No. 16 veya eşdeğerli
KULLANIM TALİMATI
üründür.
Bu ürün, ECE R44/04 Avrupa standartları çerçevesinde, 0 ila
10Kg. arası ağırlıktaki çocuklar için idealdir. 6 aylığa kadar
çocukların taşınması için “0 Grup” olarak onaylanmıştır.
KİT TRİO CAR portbebe monte edildikten sonra portbebe araca
sabit bir şekilde takılabilir.
OTO KOLTUĞUNDA ARANAN ÖZELLİKLER
Portbebe’nin koltuğa takılması için, koltuğun aşağıdaki özel-
likleri olması gerekir:
- gidiş yönüne doğru yerleştirilmeli (çizim.1)
- en azından 3 emniyetkemeri noktası ile arka koltuğa takılmalı
(çizim.2), koltuk UNI/ECE 16 veya eşdeğerli normlara uygun
olarak onaylanmış olmalıdır.
KIT TRIO CAR’IN PORTBEBE’YE MONTE EDİLMESİ
KİT TRİO CAR portbebe’den ayrı satın alınmış ise, portbebe araca yerleştirmeden önce aşağıdaki montaj talimatına uyulması
gerekir:
Bel kemeri
Bel kemeri portbebenin altında açılmış iki delikten geçirilme-
lidir (çizim 3).Kırmızı işaretli şeridi, velkro içeri gelecek şekilde
katlayıp sağdaki delikten geçiriniz (çizim 4) ve soldaki delikten
çıkartınız (çizim 5).
Kırmızı işaretli şeridi diğer şeridin üzerine getirerek kemeri
kapatınız (çizim 6).
DİKKAT! Kemerin kıvrılmamış olmasına dikkat ediniz (Çizim 7).
Emniyet kemeri
İki kemeri portbebeye dış kenarlarında bulunan desteklere
(çizim 8) kancalamak için, her bir kemere ait oldu
iterek sokunuz (çizim 9) ve kemerden tık sesi duyuncaya kadar
aşağıya doğru itiniz (çizim 10).
DİKKAT! Emniyet Kemerlerini ters takmayınız (çizim 11).
Şimdi portbebe araca yerleştirilmeye hazırdır.
PORTBEBE’NİN ARAÇA SABİTÇE TAKILMASI:
Portbebe aracın arka koltuğuna sabitleştirmek için koltuğun
ortasına yerleştirerek kenarlardaki koltukların kemerleri
vasıtasıyla kilitlenmesi gerekir (çizim 12). Aracınızın orta
koltuğu üç uçlu kemerle mücehhez ise portbebe , orta ve kenar yeri işgal ederek ve bu iki koltuğun kemerlerine kilitlenerek
yan olarak da monte edilebilir (çizim 13).
1. Emniyet Kemerini çekerek iskemlenin tokalarına takınız(çizim
14).
2. Portbebenin sırt kısmını, kullanım kılavuzunda gösterildiği
şekilde tamamen eğiniz.
DİKKAT! Portbebeyi araçta sırtlığı kalkık olarak asla
kullanmayınız ! Ürünün güvenliği garanti değildir !
3. Portbebe üzerine monte edilmiş kilitler kumaşla kaplı ise
kumaşı çıkartı
4. Portbebe koltuğa iyice oturması için (çizim 16) uzunlamasına
yerleştiriniz.
5. Her iki kenar üzerinde aşağıdaki işlemleri gerçekleştiriniz:
- Araç kemerini alarak bir ilmek yaratınız (çizim 17);
- Portbebenin kilidi elinize alarak tokanın kırmızı çubuğunu
dışa doğru çeviriniz (çizim 18);
Yar at ılan ilmeği tokaya sokunuz (çizim 19) ve kırmızı çubuğu,
ilmeğin içine girmesi için başlangıç pozisyonuna çeviriniz
(çizim 20).
Heybeyi iyice sabitleştirmek için koltuğa doğru bastırarak araç
kemerini kemer sarıcıya doğru
DİKKAT! Heybenin koltuğa iyice oturmuş olduğunu kontrol
ediniz.
DİKKAT! Kemerlerin iyice gergin olmasını kontrol ediniz (çizim
22).
Bel kemerini, kırmızı işaretli şeridi çekerek açınız (çizim 23).
Bebeği portbebeye yatırınız (çizim 24).
Kemerin önce sağ sonra sol şeridini bebeğin beli üzerinden
geçiriniz (çizim 25).
İki şeridi, kemerin bebeğin beline çok sıkmamasına dikkat
46
nız (çizim 15).
BEBEĞİN YERLEŞTİRİLMESİ
İLK KEZ
çekiniz (çizim 21).
ğu yuvaya
Page 47

ederek iyice oturtarak birleştiriniz (çizim 26).
Kırmızı işaretli şeridi çekerek portbebenin bel kemerini açınız
(çizim 27).
PORTBEBENİN KOLTUKTAN ÇIKARTILMASI
Portbebe iki kenarında aşağıda belirtilen işlemleri yerine getiriniz:
Kırmızı dilini dışa doğru çekerek ve tokayı yukarı doğru iterek
heybenin tokasını ayırınız (çizim 28), bu şekilde heybe kemerden kurtulmuş olur. Toka araç kemerine takılı kalır.
DİKKAT! KİT TRİO CAR tokasını çıkartmadan aracın kemerini
yolcu bağlamak için asla kullanmayın, tehlikeli olabilir!
Tok ay ı kemerden çıkartmak için kemerin ilmeğini gevşetiniz (
çizim 29) ve kurtarmak için kırmızı dili çeviriniz (çizim 30).
PORTBEBE ARACA SABİTÇE TAKILMASI: İLK DEFADAN
Her iki toka aracın iki kemeri üzerinde takılı kaldığı zaman
portbebe yeniden koltuk üzerine kancalamak için aşağıda be-
lirtilen doğrultuda hareket ediniz:
Aracın iki kemerinin de takılı luduğunu kontrol ediniz.
Tokaları portbebeye takmak için “KİT TRİO CAR’IN HEYBEYE
TAKILMASI - Araç kemeri için tokalar” paragrafındaki talimat
çerçevesinde hareket ediniz.
Portbebeye iyice sabitleştirmek için koltuğa doğru bastırarak
araç kemerini kemer sarıcıya doğru çekiniz (çizim 21).
DİKKAT! Portbebenin koltuğa iyice oturmuş olduğunu kontrol
ediniz.
DİKKAT! Kemerlerin iyice gergin olmasını kontrol ediniz (çizim
22).
KİT TRİO CAR’IN PORTBEBEDEN ÇIKARILMASI
Portbebe araçta kullanılması sona erince veya araç dışında
kullanılacağı zaman, KİT TRİO CAR aşağıda belirtilen işlemler
yerine getirilerek sökülebilir.
BEL kemeri
Kırmızı işaretli şeridi çekerek kemeri açınız (çizim 23).
Şeridi önce alttaki sol delikten sonra üstteki sağ delikten
çıkartınız (çizim 31).
EMNİYET KEMERİ
Şeridin kırmızı dilini dışa doğru çekerek ve tokayı yukarı doğru
iterek heybenin tokasını ayırınız (çizim 28).
Kemer ve tokaları, suyla ıslatılmış bir bez kullanarak sadece
elde temizleyiniz. Çamaşır suyu veya diğer başka deterjan
kullanmayınız.
DİKKAT! Portbebenin ve KİT TRİO CAR’ın tüm parçalarını periyodik olarak kontroldan geçiriniz, hen tarafının zarar görmemiş
veya aşınmamış olmasından emin olunuz.
BEBEĞİN KALDIRILMASI
SONRA
ÜRÜNÜN TEMİZLENMESİ
• Aracın emniyet kemerinin daima gerektiğince gergin
olmasına dikkat edin, kıvrılmış veya düzgün olmayan bir
pozisyonda bulunmamasına özen gösterin.
• Bazı aksamı kırık veya eksik ise ürünü kullanmayın.
• Araç koltuğu ile portbebe arasına veya portbebe ile çocuk
arasına herhangi bir cisim (örneğin yastık, battaniye v.s.)
koymayın.
• Ürün üzerine ağır herhangi bir cisim koymayın.
• Araçta bulunan bütün yolcuların gerek kendi güvenlikleri
açısından gerek yolculuk esnasında bebeğe çarpmaları ihtimaline karşı emniyet kemerlerinin takılı olmasına dikkat
edin.
• Boğulma tehlikesini önlemek için naylon torbaları çocuk-
lardan uzak tutun.
• Ürünün aşınma durumunu ve muhtemel kırıkların mev-
cudiyetini muntazam olarak kontrol edin. Hasar görmüş
olması halinde artık ürünü kullanmayın ve çocukların
erişemeyecekleri bir yere kaldırın.
• Çocuk taşınmadığı portbebe takılı olarak bırakılmalı veya
bagajda muhafaza edilmelidir.
• ARTSANA Şirketi mamulün hatalı kullanımından ötürü so-
rumlu değildir.
UYARILAR: YOLCULUĞA ÇIKMADAN ÖNCE
• Bu talimatlar dikkatle ve kolaylıkla ulaşılabilecek şekilde,
ürünle birlikte saklanmalıdır.
OKUNMALIDIR
• Ürün verilen talimatlara harfi yen uyularak takılmalıdır.
• Bu oto koltuğunu asla iki ankoraj uçlu araba emniyet ke-
meri kullanarak takmayın.
• Ürünü sadece aracın şasisine düzgün bir şekilde takılı
koltuklar üzerine ve aracın içine doğru dönük olarak takın.
• Araç koltuklarını katlanılır tipte açık veya ruloları iyice
kancalanmamış olarak bırakmayın ve özellikle de arka
cam önünde iyice sabitleştirilmemiş herhangi bir cisim
taşınmamasına özen gösterin; bir kaza vukuunda veya ani
fren yapıldığı takdirde yolculara çarpar ve yaralanmalarına
neden olabilir.
• Oto koltuğunu araca monte ederken seyyar bir koltuğun
veya kapının iskemleyi engellememesine özen gösterin.
İskemlenin hiç bir noktasının kapılar arasına sıkışmamasına
veya kesici noktalara sürtünmemesine dikkat edin.
Daha ziyade bilgi talep edildiği veya yedek parça istemleri için
adresi aşağıda kayıtlı Müşteri Servisi ile temasa geçiniz:
posta: ARTSANA SPA
Servizio Clienti
Via Saldarini Catelli n.1
22070 Grandate COMO - ITALY
Telefon: (0039) 031 382000
e.mail: info@artsana.it
sito . www.chicco.com
47
Page 48

50386.L.4
ARTSANA S.p.A. - Via Saldarini Catelli, 1 - 22070 Grandate (CO) - Italy
Tel. (+39) 031 382 111 - Fax (+39) 031 382 400 - www.chicco.com
Cod. 69603 06/03 46 062058 100 000
 Loading...