

CHICCO CUOCIPAPPA SANOVAPORE User Manual

Cuocipappa
Sanovapore
PureSteam Cooker
El Cocinero Sano Vapor
Coze Papa Vapor Saudável
Babykostkokare Sund Ånga
Cuiseur de Bouillie VapeurSaine
Breikocher Gesundes Garen
Keukenrobot Gezonde Stoom
Πολυσυσκευή κουζίνας Υγιεινός Ατμός
Sağlıklı Buhar Mama pişirici mutfak blenderi
Cuocipappa “Здоровая Пища”
5
3
4
6
2
1
7
8
9
11
10
12
9B
9A
A
B
D
C
C1
C2

(IT) Questo prodotto è conforme alla Direttiva EU 2002/96/EC.
Il simbolo del cestino barrato riportato sull’apparecchio indica che il prodotto,
alla ne della propria vita utile, dovendo essere trattato separatamente dai
ri uti domestici, deve essere conferito in un centro di raccolta di erenziata
per apparecchiature elettriche ed elettroniche oppure riconsegnato al rivenditore al momento dell’acquisto di una nuova apparecchiatura equivalente.
L’utente è responsabile del conferimento dell’apparecchio a ne vita alle
appropriate strutture di raccolta. L’adeguata raccolta di erenziata per l’avvio
successivo dell’apparecchio dismesso al riciclaggio, al trattamento e allo
smaltimento ambientalmente compatibile contribuisce ad evitare possibili
e etti negativi sull’ambiente e sulla salute e favorisce il riciclo dei materiali di
cui è composto il prodotto. Lo smaltimento abusivo del prodotto da parte
dell’utente comporta delle sanzioni amministrative di cui al D.lgs. n. 22/1997
(art.50 e seguenti del D.lgs 22/97).Per informazioni più dettagliate inerenti
i sistemi di raccolta disponibili, rivolgersi al servizio locale di smaltimento
ri uti, o al negozio in cui è stato e ettuato l’acquisto.
(GB) This product complies with EU Directive 2002/96/EC.
The crossed bin symbol on the appliance indicates that the product, at the
end of its life, must be disposed of separately from domestic waste, either by
taking it to a separate waste disposal site for electric and electronic appliances
or by returning it to your dealer when you buy another similar appliance. The
user is responsible for taking the appliance to a special waste disposal site at
the end of its life. If the disused appliance is collected correctly as separate
waste, it can be recycled, treated and disposed of ecologically; this avoids
a negative impact on both the environment and health, and contributes
towards the recycling of the product’s materials. For further information
regarding the waste disposal services available, contact your local waste
disposal agency or the shop where you bought the appliance.
(FR) Ce produit est conforme à la Directive EU 2002/96/EC.
Le symbole de la poubelle barrée sur l’appareil indique que ce produit, à la
n de sa propre vie utile, devra être traité séparément des autres déchets
domestiques ; il faudra donc l’apporter dans un centre de collecte sélective
pour les appareillages électriques et électroniques, ou bien le remettre au
revendeur lors de l’achat d’un nouvel appareillage équivalent. L’utilisateur est
responsable du retour de l’appareil, à la n de sa vie, aux structures de collecte
appropriées. Une collecte sélective adéquate, visant à envoyer l’appareil que
l’on n’utilise plus au recyclage, au traitement et à l’élimination compatible
avec l’environnement, contribue à éviter les e ets négatifs possibles sur
l’environnement et sur la santé, et favorise le recyclage des matériaux dont
le produit est composé. Pour obtenir des renseignements plus détaillés sur
les systèmes de collecte disponibles, s’adresser au service local d’élimination
des déchets, ou bien au magasin où l’appareil a été acheté.
(DE) Dieses Produkt entspricht der EU-Richtlinie 2002/96/EC.
Die durchgestrichene Abfalltonne, die auf diesem Gerät abgebildet ist, bedeutet, dass dieses Produkt nach dem Ende seiner Betriebszeit getrennt von den
Haushaltsabfällen zu entsorgen ist. Entweder sollte es an einer Sammelstelle
für elektrische und elektronische Altgeräte abgegeben werden oder, bei Kauf
eines neuen Geräts, dem Verkäufer zurückgegeben werden. Der Verbraucher
ist in jedem Falle verantwortlich für die ordnungsgemäße Entsorgung des
Geräts nach Ende der Betriebszeit. Nur bei Abgabe des Geräts an einer
geeigneten Sammelstelle ist es möglich das Produkt so zu verarbeiten, zu
recyceln und umweltgerecht zu entsorgen, dass einerseits Werksto e und
Materialien wieder verwendet werden können und andererseits negative
Folgen für Umwelt und Gesundheit ausgeschlossen werden. Nähere Auskunft
bekommen Sie bei ihrem örtlichen Amt für Abfallentsorgung oder in der
Verkaufsstelle dieses Geräts.
(ES)Este producto es conforme a la Directiva 2002/96/EC.
El símbolo de la papelera barrada que se encuentra en el aparato indica
que el producto, al nal de su vida útil, deberá eliminarse separadamente
de los desechos domésticos y por lo tanto deberá entregarse a un centro
de recogida selectiva para aparatos eléctricos y electrónicos o al vendedor
cuando compre un nuevo aparato similar. El usuario es responsable de
entregar el aparato agotado a las estructuras apropiadas de recogida. La
adecuada recogida selectiva para el envío sucesivo del aparato fuera de uso
al reciclaje, al tratamiento y a la eliminación compatible con el ambiente,
contribuye a evitar posibles efectos negativos en el ambiente y en la salud
y favorece el reciclaje de los materiales de los que está compuesto el
producto. Para informaciones más detalladas inherentes a los sistemas de
recogida disponibles, diríjase al servicio local de eliminación de desechos,
o a la tienda donde compró el aparato.
(PT) Este produto é conforme à Directiva EU 2002/96/EC.
O símbolo do lixo com a barra contido no aparelho indica que o produto,
ao terminar a própria vida útil, deve ser eliminado separadamente dos lixos
domésticos, e deve ser levado a um centro de recolha diferenciada para
aparelhagens eléctricas e electrónicas ou entregue ao revendedor onde for
comprada uma nova aparelhagem equivalente. O utente é responsável pela
entrega do aparelho às estruturas apropriadas de recolha no m da sua vida
útil. A recolha apropriada diferenciada para o posterior encaminhamento
do aparelho inutilizado à reciclagem, ao tratamento e à eliminação compatível com o ambiente, contribui para evitar possíveis efeitos negativos
no ambiente e na saúde e facilitar a reciclagem dos materiais com os quais
o produto é composto.Para informações mais detalhadas inerentes aos
sistemas de recolha disponíveis, procure o serviço local de eliminação de
lixos, ou dirija-se à loja onde foi efectuada a compra.
(NL) Dit product is conform de EU-richtlijn 2002/96/EC.
Het symbool met de doorstreepte vuilnisbak op het apparaat geeft aan
dat het product op het einde van zijn levenscyclus afzonderlijk van het
gewoon huishoudelijk afval moet worden afgedankt en hiervoor naar een
centrum voor gescheiden afvalophaling voor de recyclage van elektrische
en elektronische apparatuur wordt gebracht of wordt terugbezorgd aan de
verkoper op het moment waarop een nieuw gelijkaardig apparaat wordt
aangekocht. De gebruiker is er verantwoordelijk voor het apparaat op het
einde van de levenscyclus naar een structuur voor afvalophaling te brengen.
De correcte gescheiden afvalophaling met het oog op de daaropvolgende
recyclage, verwerking en milieuvriendelijke afdanking van het apparaat
draagt bij tot het voorkomen van mogelijke negatieve invloeden op het
milieu en de gezondheid en bevordert de recyclage van de materialen
waaruit het product is samengesteld. Voor meer gedetailleerde informatie
over de recyclage van dit product en de beschikbare ophaalsystemen,
wendt u zich tot de lokale dienst voor afvalophaling of de winkel waar u
het product hebt gekocht.
(GR) Το προϊόν αυτό είναι σύμφωνο με τον Ευρωπαϊκό Κανονισμό 2002/96/EC
Το σύμβολο με τον διαγραμμένο κάδο που υπάρχει στη συσκευή υποδεικνύει
ότι το προϊόν, στο τέλος της ωφέλιμης ζωής του πρέπει να διατίθεται ξεχωριστά
από τα οικιακά απορρίματα και να μεταφέρεται σε κάποιο κέντρο συλλογής
ηλεκτρικών και ηλεκτρονικών συσκευών ή να επιστρέφεται στον μεταπωλητή
κατά την αγορά μιας καινούργιας αντίστοιχης συσκευής. Ο χρήστης έχει την
ευθύνη μεταφοράς της συσκευής στον κατάλληλο χώρο συλλογής κατά το
τέλος της ωφέλιμης ζωής της. Η κατάλληλη διαδικασία συλλογής επιτρέπει
την ανακύκλωση, επεξεργασία και οικολογική διάθεση των άχρηστων
συσκευών και συμβάλλει στην αποφυγή αρνητικών επιπτώσεων για το
περιβάλλον και την υγεία. Για περισσότερες πληροφορίες σχετικά με τα
διαθέσιμα συστήματα συλλογής, παρακαλούμε απευθυνθείτε στις κατά
τόπους δημόσιες υπηρεσίες καθαριότητας ή στο κατάστημα από το οποίο
αγοράσατε τη συσκευή.
(TR) Bu ürün EU 2002/96/EC Direkti ne uygundur.
Cihazın üzerinde bulunan üzeri çizili sepet sembolü, ürünün kullanım
ömrünün sonunda ev atıklarından ayrı olarak bertaraf edilmesi gerektiği
doğrultusunda, elektrikli ve elektronik cihazların yeniden dönü türülmesi için
ayrı tırmalı bir çöp toplama merkezine götürülmesi veya benzer yeni bir cihaz
satın alındığında ürünün satıcıya teslim edilmesi gerektiğini belirtir. Kullanıcı,
cihazın kullanım ömrünün sonunda, cihazın uygun toplama merkezlerine
tesliminden sorumludur. Kullanım ömrünün sonuna ula mı cihazın çevreye
uygun yeniden dönü türülme, i lenme ve bertaraf edilmesine yönelik
uygun ayrı tırmalı çöp toplama, çevre ve sağlık üzerindeki olası olumsuz
etkilerin önlenmesine katkıda bulunur ve ürünün olu tuğu malzemelerin
yeniden dönü türülmesini sağlar. Mevcut çöp toplama sistemleri ile ilgili
daha detaylı bilgi için yerel atık bertaraf etme hizmetine veya ürünü satın
almı oldu¤unuz mağazaya ba vurunuz.
(SE) Denna produkt stämmer överens med Direktiv EU 2002/96/EC.
Symbolen med en överkryssad korg på apparaten indikerar, att produkten i
slutet av dess livslängd skall separeras från hushållsavfallet. Den skall tas till
en uppsamlingsplast för elektriska och elektroniska apparater eller lämnas
tillbaka till återförsäljaren när man köper en liknande produkt. Användaren är
ansvarig för att apparaten i slutet av dess livslängd lämnas över till en lämplig
uppsamlingsplats. En lämplig sorterad avfallshantering gör att apparaten
kan återvinnas för sortering och hantering som står i överensstämmelse
med miljöbestämmelserna och därigenom bidrar till att negativa e ekter
på miljön och hälsan undviks och underlättar återvinning av materialen
som produkten består av. För en mer detaljerad information gällande
disponibla uppsamlingssystem så vänd Er till lokala avfallshanterare eller
till a ären där produkten köptes.
(ВГ) Този продукт е в съответствие с Директива EU 2002/96/ЕС
Символът, изобразяващ зачертан контейнер, поставен върху уреда
посочва, че апарата, след крайната му употреба, поради необходимостта
да бъде третиран отделно от домакинските отпадъци, трябва да бъде
предаден в специалните депа за разделно събиране на електрически
и електронни аппарати или върнато в магазина при закупуването на
нова еквивалентна апаратура. Потребителят е отговорен за предаването
на излезлия от употреба апарат в определените депа за събиране.
Правилното разделно събиране, целящо следващо пренасочване на
апарата оставен за рециклиране, третиране и съобразено екологично
изхвърляне, допринася за предотвратяването на евентуални
вредни въздействия върху здравето и околната среда и улеснява
рециклирането на материалите, от които е съставен апарата. За поподробна информация , относно депата за събиране на разположение,
се обърнете към местните компетентни органи или към магазина, от
който сте извършили покупката.

I
Cuocipappa
Sanovapore
Prima dell’uso, leggere e conservare con cura que
ste istruzioni per ogni ulteriore riferimento.
INDICE
I. PRESENTAZIONE DEL PRODOTTO
II. CONTENUTO CONFEZIONE
III. LEGENDA
IV. AVVERTENZE E MISURE DI SICUREZZA
V. PREPARAZIONE DEL PRODOTTO
VI. ISTRUZIONI PER L’USO
VII. PULIZIA E MANUTENZIONE
VIII. VASETTI PER OMOGENEIZZATI
IX. ANOMALIE
X. DATI TECNICI
I. PRESENTAZIONE DEL PRODOTTO
Gentile cliente,
Ti ringraziamo e ci congratuliamo per la tua scelta; con
Cuocipappa Sanovapore hai acquistato un elettrodomestico sicuro e ideale per preparare la pappa al tuo
bambino e accompagnarlo durante tutto il periodo dello
svezzamento.
Il vapore è il modo più naturale che c’è di cucinare; è
per questo che Cuocipappa Sanovapore cucina a Vapore
Intenso perché mantiene al meglio i principi nutritivi degli alimenti preservandone le caratteristiche organolettiche e, soprattutto, il sapore.
Di volta in volta potrai dare al tuo bimbo la pappa che
più gli piace scegliendo in tutta tranquillità tra le ricette
proposte nel ricettario che trovi nella confezione perché
sono state selezionate grazie all’aiuto di pediatri specialisti della nutrizione e di mamme come te.
Se poi queste ricette non bastassero, puoi sempre personalizzartele secondo i gusti del tuo bimbo componendone e inventandone di nuove: basta solo scegliere
gli ingredienti che preferisci, freschi e genuini, e a prepararli ci penserà Cuocipappa Sanovapore. Inoltre, grazie
allo speciale design delle lame, Cuocipappa Sanovapore
omogeneizza riducendo la quantità di bollicine d’aria
che sono fonte di coliche per tuo bambino. In più, potrai
sminuzzare a piacere la pappa del tuo bimbo ottenendo
omogeneizzati della densità che preferisce. Inoltre, per
venire poi in contro alle tue esigenze potrai sempre conservare la pappa che hai preparato in frigorifero grazie
ai pratici vasetti contenuti nella confezione e quando
deciderai di servirla al tuo bimbo, ti basterà riscaldarla
con la funzione di scongelamento e riscaldamento del
Cuocipappa Sanovapore (seguire le indicazioni riportate
di seguito per sapere come fare queste operazioni).
II. CONTENUTO DELLA CONFEZIONE
1 Robot da cucina Cuocipappa Sanovapore.
1 Cestello trasparente per la cottura degli alimenti.
1 Cestello per riscaldare i vasetti della pappa.
1 Separatore trasparente da utilizzare quando si omogeneizza/trita gli alimenti.
1 Spatola per raccogliere la pappa dal boccale.
1 Manuale istruzioni d’uso.
1 Ricettario.
2 Vasetti per la conservazione della pappa.
2 Cappucci protezione lame
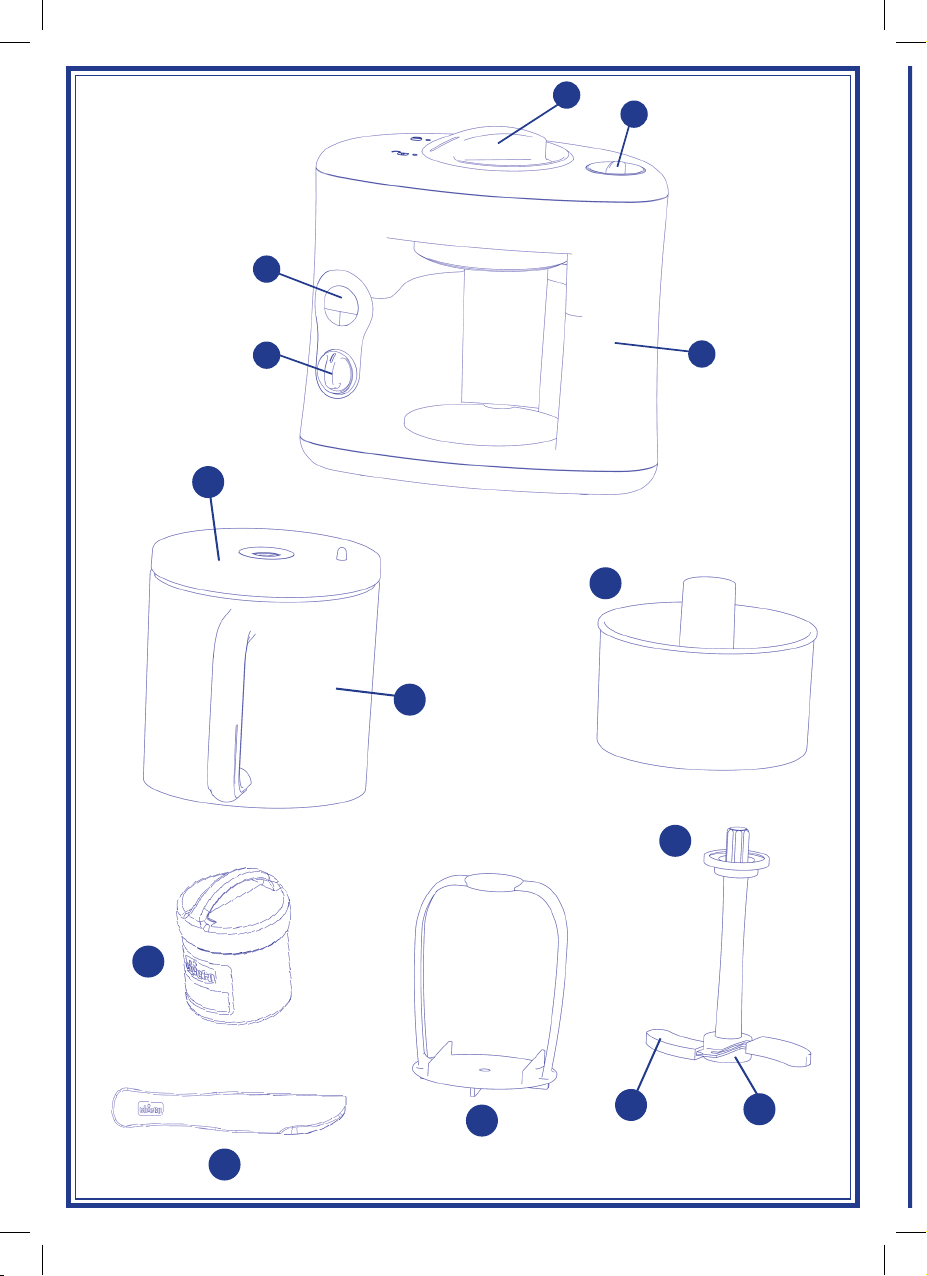
III. LEGENDA
1 BASE
2 MANOPOLA ACCENSIONE/SPEGNIMENTO
CALDAIA/MOTORE
3 DISPLAY LUMINOSO
4 COPERCHIO CALDAIA
5 MANOPOLA DI FISSAGGIO BOCCALE
6 COPERCHIO TRASPARENTE DEL BOCCALE
7 CESTELLO COTTURA
8 BOCCALE
9 GRUPPO LAME
9a LAME
9b CAPPUCCI DI PROTEZIONE LAME
10 SPATOLA
11 VASETTI PER OMOGENEIZZATI
12 CESTELLO RISCALDA VASETTI PER
OMOGENEIZZATI
IV. AVVERTENZE E MISURE DI SICUREZZA
L’uso di qualsiasi apparecchio elettrico compor-
ta l’osservanza di alcune regole fondamentali. In
particolare:
- L’installazione elettrica del locale deve essere conforme alle norme di sicurezza vigenti.
- Collegare l’apparecchio ad una presa di corrente facilmente accessibile.
- Non tirare il cavo di alimentazione o l’apparecchio
stesso per staccare la spina dalla presa di corrente.
- Questo apparecchio è destinato ad un utilizzo esclusivamente domestico e deve essere utilizzato conformemente alle istruzioni d’uso. Ogni altro uso è da
considerarsi improprio e quindi pericoloso.
- Non lasciare l’apparecchio esposto ad agenti atmosferici (pioggia, sole, ecc.).
- Non immergere mai l’apparecchio in acqua o in altro
liquido.
- Non toccare mai l’apparecchio con mani bagnate o
umide.
- Non toccare l’apparecchio se questo cade accidentalmente in acqua; staccare subito la spina e non utilizzarlo successivamente, rivolgersi a personale tecnicamente competente e qualifi cato o a Artsana S.p.A.
- In caso di guasto e / o cattivo funzionamento dell’apparecchio, spegnerlo e staccare la spina dalla presa di
corrente, non tentare di manometterlo ma rivolgersi
esclusivamente a personale tecnicamente competente e qualifi cato a Artsana S.p.A.
- Prima di utilizzare l’apparecchio verifi care sempre che
il prodotto e tutti i suoi componenti non siano danneggiati. In caso contrario non utilizzare l’apparecchio
ma rivolgersi a personale qualifi cato o al rivenditore.
- Assicurarsi che il voltaggio e la frequenza (vedi dati di
targa posti sotto l’apparecchio) corrispondano a quelli
della vostra rete elettrica.
- Attenzione: per motivi di sicurezza, l’apparecchio deve sempre essere collegato ad un impianto
provvisto di un effi ciente collegamento di terra.
- Assicurarsi che la spina di alimentazione sia sempre
staccata dalla presa di corrente e che l’apparecchio si
completamente freddo prima di spostarlo, riporlo, pulirlo, fare operazioni di manutenzione o tra un utilizzo
e l’altro.
- Posizionare sempre l’apparecchio solo su superfi ci piane e stabili. Non appoggiare mai l’apparecchio sopra o
vicino a superfi ci calde, cucine a gas o piastre elettriche, o su superfi ci delicate o a portata dei bambini
- Non lasciare mai l’apparecchio incustodito mentre è
in funzione.
- Prima di ogni utilizzo verifi care che tutti i componenti
(in particolare il boccale trasparente e la base) siano
correttamente assemblati.

- Si sconsiglia di utilizzare questo apparecchio, per tritare alimenti particolarmente duri, come ad esempio
cibi ancora surgelati in quanto le lame si potrebbero
danneggiare in modo irreparabile.
- Durante la fase di riscaldamento e cottura a
vapore, dal boccale fuoriesce vapore bollente che
potrebbe essere causa di scottature e la caldaia, il
contenitore e tutte le parti a contatto con il vapore diventano molto calde: prestare sempre la
massima attenzione e manipolare l’apparecchio
con cautela.
- Non aprire o cercare di aprire i coperchi della caldaia
e del boccale durante il funzionamento dell’apparecchio.
- Fare sempre particolare attenzione quando si maneggia il gruppo lame; le lame sono molto taglienti.
Rimuovere sempre la spina del cavo di alimentazione
dalla presa di corrente prima di accedere alle lame.
- Al fi ne di evitare l’eventuale ossidazione delle lame
pulire a fondo ed asciugare accuratamente il gruppo
lame subito dopo ogni utilizzo.
- L’apertura dell’apparecchio è possibile solo con l’ausilio di utensili speciali. Per la eventuale sostituzione
del cavo di alimentazione rivolgersi esclusivamente a
personale tecnicamente qualifi cato o a Artsana S.p.A.
- Riparazioni errate, eseguite da personale non qualifi cato, possono causare danni o infortuni agli utilizzatori.
- Per lo smaltimento dell’imballo degli accessori soggetti ad usura o dell’apparecchio stesso, operare la
raccolta differenziata facendo riferimento alle specifi che legislazioni vigenti in ogni paese.
- Apparecchio conforme ai requisiti delle direttive CE di
pertinenza e successivi aggiornamenti.
- L’apparecchio, i suoi accessori e gli elementi dell’imballaggio (sacchetti in plastica, scatole cartone, ecc.)
non sono giocattoli pertanto non devono essere lasciati alla portata dei bambini in quanto potenziali
fonti di pericolo.
V. PREPARAZIONE DEL PRODOTTO
PRIMA DEL PRIMO UTILIZZO: togliere dall’apparecchio
e dagli accessori gli imballi e rimuovere il manuale di
istruzioni, il ricettario e i fogli contenenti le avvertenze
che vanno letti attentamente e conservati per futuro riferimento.
IMPORTANTE: è buona norma che ogni prodotto
destinato a venire in contatto con sostanze alimentari venga sempre pulito accuratamente pri-
ma del primo uso.
A tale scopo, preparare l’apparecchio come indicato al
capitolo VI. ISTRUZIONI PER L’USO ed effettuare un ciclo di riscaldamento a vuoto inserendo 150 ml di acqua
potabile di rubinetto nella caldaia. Lasciare raffreddare
l’apparecchio, quindi rimuovere il boccale(8), buttare via
l’acqua residua rimasta e lavare accuratamente boccale
(8) cestello di cottura (7), coperchio trasparente del boccale (6) e gruppo lame (9) come indicato al capitolo VII.
PULIZIA E MANUTENZIONE. Prima di effettuare il ciclo
di pulizia verifi care di aver rimosso dal boccale (8) gli
eventuali componenti contenuti all’interno ad eccezione
del cestello di cottura (7).
ATTENZIONE! A fi ne riscaldamento l’apparecchio
è molto caldo, prestare la massima attenzione.
VI. ISTRUZIONI PER L’USO
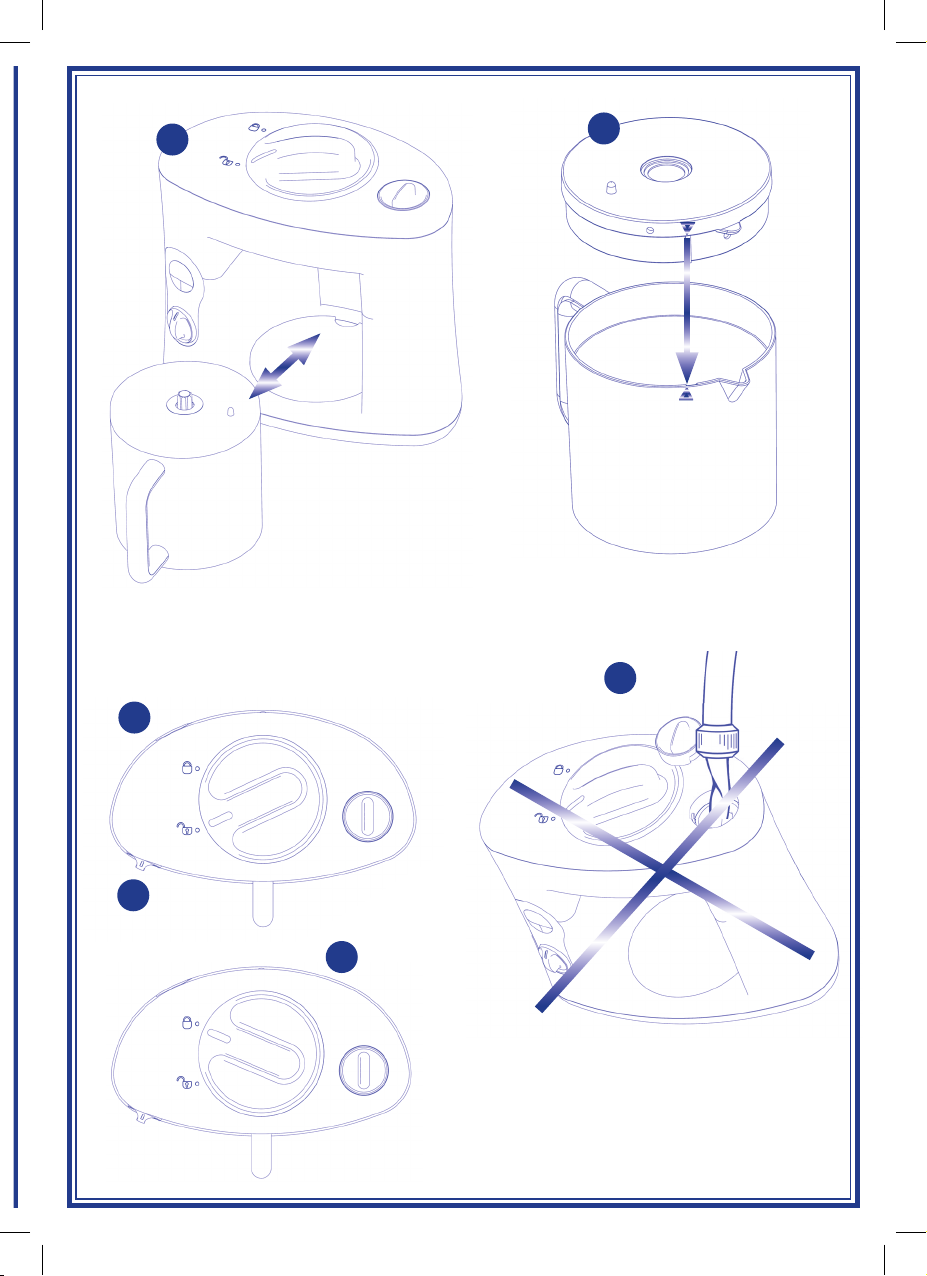
IL BOCCALE
Per sbloccare e rimuovere il boccale (8) dalla base (1):
i. Posizionare la manopola di accensione / spegnimento
(2) in posizione centrale in corrispondenza dello “0”.
Nota: per motivi di sicurezza, il boccale (8) con
coperchio deve essere rimosso solo se la manopola di accensione / spegnimento (2) è posta in
corrispondenza dello “0”.
iI. Ruotare la manopola di fi ssaggio boccale (5) in senso
antiorario (fi g. C1) ed estrarre il boccale (8) dalla sua
sede sfi landolo e tirandolo in dietro (fi g.A).
Per aprire il coperchio trasparente del boccale (6):
i. Rimuovere il coperchio trasparente del boccale (6)
sollevandolo.
Per chiudere il coperchio trasparente del boccale (6):
i. Inserire il coperchio nel boccale (6) avendo cura di far
coincidere le tacche di riferimento (fi g.B).
Per inserire il boccale con coperchio nella base:
i. Afferrare il boccale dalla maniglia e infi larlo nella base
come indicato (fi g.A) avendo cura di posizionarlo bene
in fondo al suo alloggiamento (se posizionato correttamente, il boccale si fi ssa sull’apposito rialzo ricavato
nella base d’appoggio).
ii. Ruotare la manopola di fi ssaggio (5) in senso orario
(fi g. C2) per bloccare il boccale (8).
ATTENZIONE! Per motivi di sicurezza, l’apparec-
chio non può funzionare se il boccale (8) non è
correttamente montato sulla base (1).
IL GRUPPO LAME
Per rimuovere il gruppo lame (9) dal boccale (8):
i. Verifi care se i cappucci di protezione lame (9b) sono
fi ssati al gruppo lame (9).
ii. Estrarre il gruppo lame (9) dal boccale sollevando-
lo(8).
iii. Afferrare con cautela ciascun cappuccio di protezione
lame (9b) e sfi larlo dalla lama.
Per fi ssare il gruppo lame (9) al boccale (8):
i. Verifi care se i cappucci di protezione lame (9b) sono
fi ssati al gruppo lame (9).
ii. Afferrare con cautela gruppo lame (9) e inserirlo nel
boccale (8) facendo attenzione a centrarlo bene sul
perno metallico che spunta sul fondo del boccale (8).
ATTENZIONE!
Prestare sempre molta attenzione alle lame in
quanto sono molto affi late.
PRIMA DI METTERE IN FUNZIONE L’APPARECCHIO
VERIFICARE SEMPRE CHE:
- sia stato rimosso ciascun cappuccio di protezione
gruppo lame (9b);
- il gruppo lame (9) sia correttamente inserito nel boccale (8);
- il boccale (8) sia correttamente bloccato sulla base
(1), (la manopola di fi ssaggio boccale (5) sia correttamente bloccata nella posizione di chiusura (fi g.C2)).
LA PREPARAZIONE DELLA PAPPA
COME SI CUOCE
Cuocipappa Sanovapore cuoce a vapore frutta, verdura,
carne, pesce, riso, ecc.
Il suo sistema di cottura a Vapore Intenso, convoglia
e mantiene il fl usso di vapore nel cestello; per questo è
ideale per lo svezzamento dei bambini, in quanto permette di conservare l’apporto proteico e vitaminico degli
alimenti.
Il processo di cottura si interrompe automaticamente
all’esaurimento dell’acqua inserita nella caldaia.
Per stabilire i corretti tempi di cottura (e la necessaria
quantità di acqua), fare riferimento al ricettario fornito.
Assicurarsi che l’apparecchio non sia collegato
alla rete elettrica e che la leva dell’interruttore sia
verticale, in corrispondenza dello “0”.
• Svitare il coperchio caldaia (4) ruotandolo in senso
antiorario e sollevarlo.
• Versare l’acqua nella caldaia utilizzando un vasetto
per omogeneizzati (11) come dosatore.
ATTENZIONE! Non inserire mai acqua nella cal-
daia direttamente dal rubinetto (fi g.D).
• Non riempire mai la caldaia eccessivamente ed in ogni
caso mai oltre la guarnizione posta all’imboccatura.
• Chiudere a fondo il coperchio della caldaia ruotandolo
in senso orario.
• Staccare dalla base (1) il boccale (8)e togliere il coperchio trasparente (6).
• Estrarre il cestello cottura (7) dal boccale (8).
• Assicurarsi della presenza e del corretto assemblaggio del gruppo lame (9) e che ciascun cappuccio di
protezione (9b) di queste sia stato rimosso (vedere la
sezione: GRUPPO LAME).
• Nel cestello cottura (7) inserire gli alimenti tagliati
a dadini o rondelle avendo cura di non riempirlo eccessivamente. Si raccomanda di non superare il bordo
superiore del cestello e di non pressare gli alimenti.
• Inserire il cestello (7) nel boccale(8) e chiudere il coperchio (6), quindi fi ssare il boccale (8) alla base (1)
come indicato alla sezione: BOCCALE.
• Inserire la spina nella presa di corrente; così facendo
si accende il display (3) con evidenziate le cifre “00”;
questo indica che l’apparecchio è collegato alla rete
elettrica e pronto all’uso.
ATTENZIONE!ATTENZIONE! Non utilizzare mai
la funzione di cottura senza aver inserito nel boccale (8) il cestello cottura (7).
• Selezionare il tempo di cottura desiderato utilizzando
gli appositi tasti (5 per aumentare il tempo di cottura;
6 per diminuirlo). Il tempo di cottura può variare
da 1 a 30 minuti massimo (se non si programma un
tempo di cottura specifi co, il Cuocipappa Sanovapore
automaticamente selezionerà un tempo di cottura di
30 minuti).
• Attivare la funzione di cottura a vapore ruotando la
manopola di accensione (5) verso sinistra: sul display
(3) si accenderà il pittogramma
caldaia è in funzione e allo stesso tempo verrà visua-
che indica che la
lizzato il conto alla rovescia che indica quanto tempo
manca alla fi ne della cottura.
• Il processo di cottura si interrompe automaticamente
una volta terminato il conto alla rovescia: quando accade ciò, il Cuocipappa Sanovapore emette un segnale
acustico (5 “bip” consecutivi) e sul display (3) lampeggia il simbolo
.
• Se l’acqua nella caldaia si esaurisce prima dello scadere del tempo di cottura selezionato, il Cuocipappa
Sanovapore interrompe automaticamente il processo
di cottura emettendo un allarme acustico (un “bip”
continuo per 10 secondi): sul display si spegne l’icona che indica la cottura e cominciano a lampeggiare
l’icona “aggiungere acqua” e quanto rimane ancora
del tempo di cottura selezionato all’inizio.
• Nel caso in cui si volesse modifi care il tempo di cottura una volta che la cottura sia già cominciata, è suffi ciente premere i pulsanti 5 (per aumentare) o
6
(per ridurre) per regolarlo a piacimento (mai oltre 30
minuti).
• Terminata la cottura, ruotare la manopola di accensione (2) nella posizione centrale in corrispondenza dello
“0“.
• Scollegare la spina dalla presa di corrente.
• Rimuovere il boccale (8) dalla base (2) e aprire il coperchio trasparente (6) prestando molta attenzione
in quanto queste parti potrebbero essere molto calde
(vedere la sezione: BOCCALE).
• Rimuovere il cestello cottura (7) facendo attenzione
perché potrebbe scottare; si consiglia di maneggiarlo
utilizzando un comune guanto da forno o una presina.
• Estrarre il cestello (7) dal boccale (8).
• L’acqua di cottura depositata sul fondo del boccale
può esser buttata via o conservata, in base alle proprie
preferenze o seguendo i consigli del ricettario.
COME SI OMOGENEIZZA
Il Cuocipappa Sanovapore permette di omogeneizzare
tutti gli alimenti solitamente utilizzati per lo svezzamento: frutta, verdura, carne, pesce, riso, ecc.
Grazie allo speciale design delle sue lame, negli omo-
geneizzati che prepara Cuocipappa Sanovapore si riduce la quantità di bollicine d’aria che sono causa di
coliche per i bimbi.
Assicurarsi che l’apparecchio non sia collegato
alla rete elettrica e che la manopola di accensione
(2) sia verticale, in corrispondenza dello “0”.
• Staccare dalla base (1) il boccale (8) e togliere il coperchio (6) (vedere la sezione: BOCCALE).
• Estrarre il cestello cottura (7) dal boccale (8) (se caldo,
maneggiare il cestello cottura come indicato nella sezione COME SI CUOCE).
• Assicurarsi del corretto assemblaggio del gruppo lame
(9) (e che ciascun cappuccio di protezione (9b) sia stato rimosso; vedere la sezione: GRUPPO LAME).
• Versare nel boccale (8) alimenti tagliati a dadini o rondelle.
ATTENZIONE! Per un corretto funzionamento
dell’apparecchio non inserire mai nel boccale
(8) alimenti duri (per esempio congelati) o una
quantità di cibo superiore a quella contenuta del
cestello di cottura.
• Inserire il coperchio trasparente (6) sul boccale (8)
e fi ssare il boccale sulla base (1) (vedere la sezione:
BOCCALE).
• Inserire la spina nella presa di corrente; così facendo
si accende il display (3) con evidenziate le cifre “00”;
questo indica che l’apparecchio è collegato alla rete
elettrica e pronto all’uso.
• Selezionare la funzione di omogeneizzazione ruotando
a fondo la manopola di accensione (2) verso destra;
sul display (3) a destra si accenderà una spia che
indica che le lame (9a) sono in funzione.
Per ridurre gli alimenti alla consistenza desiderata,
mantenere la manopola (2) in questa posizione
per circa 10 secondi e rilasciarla per altri ca. 10
secondi nella posizione verticale; ripetere questa
operazione più volte aggiungendo se necessario
del liquido. Si consiglia di attendere almeno 10
secondi tra un azionamento e l’altro e di non
azionare le lame per un periodo di tempo superiore a 10 secondi.
• Per rimuovere la pappa dal boccale (8) utilizzare la pratica spatola (10) inclusa nella confezione. Non usare le
mani in quanto le lame (9a) sono molto taglienti.
Si raccomanda di verifi care sempre la temperatura
degli alimenti e di uniformarla mescolandoli un pò
prima di somministrarli al bambino.

COME SI RISCALDANO E SCONGELANO GLI
ALIMENTI
Cuocipappa Sanovapore, grazie al suo “vapore intenso”
consente di riscaldare e di scongelare pappe preparate
in precedenza.
Se si riscaldano pappe conservate nel vasetto
• Per preparare il Cuocipappa Sanovapore a riscaldare
le pappe, seguire le istruzioni descritte alla sezione:
COME SI CUOCE. In dettaglio: a) inserire nel cestello
riscalda vasetti per omogeneizzati (12) il vasetto per
omogeneizzati (11) senza coperchio; b) inserire il cestello riscalda vasetti con dentro il vasetto all’interno del boccale vuoto facendo attenzione a centrare
il perno situato sul fondo del boccale nella apposita
sede sotto al cestello riscalda vasetti. Non inserire
vasetti di dimensione superiore a quelle del cestello
porta vasetti.
• Nota Bene: la quantità di acqua da inserire nella caldaia per riscaldare o scongelare varia a seconda della
temperatura e della quantità di pappa da riscaldare,
pertanto occorre seguire queste indicazioni di massima:
- Riscaldare: per 80 g di alimento occorrono circa 15
minuti di cottura; per 120 g di alimento occorrono circa 20 minuti; se la pappa è inserita in vasetti appena
estratti dal frigorifero, raddoppiare questi tempi.
- Scongelare: impostare il tempo di cottura a 20 minuti
circa; a seconda della compattezza e della quantità
di pappa da scongelare potrebbe essere necessario
ripetere questa operazione. Una volta che la pappa è
scongelata, si può procedere alla sua cottura / riscaldamento seguendo le indicazioni specifi che.
- Terminato il ciclo di riscaldamento, estrarre il cestello
riscalda vasetti prestando la massima attenzione in
quanto potrebbe essere molto caldo. Si consiglia di
maneggiarlo con guanti o presine da forno.
Se si riscaldano alimenti a pezzetti
- Per preparare il Cuocipappa Sanovapore a riscaldare
alimenti a pezzetti, seguire le istruzioni descritte alla
sezione: COME SI CUOCE. Per i tempi di riscaldamento, seguire quanto indicato per le pappe conservate
nel vasetto.
ATTENZIONE! Per motivi di ordine igienico e bio-
logico non riscaldare mai i cibi più di una volta o
per un periodo di tempo superiore ad un’ora.
VII. PULIZIA E MANUTENZIONE
Per una corretta pulizia del Cuocipappa Sanovapore è
necessario procedere separando il boccale (8) ed i suoi
accessori dalla base (1).
ATTENZIONE! Non immergere o bagnare mai la
base (1) con acqua o altri liquidi. Mai porre la base
(1) sotto l’acqua corrente.
PULIZIA DEL GRUPPO BASE / CALDAIA / MOTORE
Disinserire l’apparecchio dalla rete elettrica staccando la
spina dalla presa di corrente.
Lasciar raffreddare l’apparecchio.
Pulire l’apparecchio unicamente con un panno umido.
Non inserire la base (1) in lavastoviglie o sotto l’acqua
corrente.
PULIZIA DEL BOCCALE E DEGLI ACCESSORI IN
PLASTICA
Il boccale (8) e gli altri accessori in plastica (coperchio,
cestello, manico, spatola, vasetti per omogeneizzati, cestello riscalda vasetti) possono essere lavati a mano con
un comune detergente per stoviglie (non utilizzare prodotti abrasivi) o in lavastoviglie.
Si raccomanda di lavare il boccale (8) solo dopo
aver rimosso il gruppo lame (9) e tutti i componenti eventualmente contenuti al suo interno.
PULIZIA DEL GRUPPO LAME
Per evitare/ridurre il rischio di ossidazione e corrosione
delle lame, la pulizia e asciugatura del gruppo lame (9)
deve essere sempre effettuata subito dopo ogni utilizzo.
Prima di rimuovere il gruppo lame (9) dal boccale (8),
risciacquarlo abbondantemente e rimuovere i residui di
cibo.
Smontare il gruppo lame (9) come indicato nelle istruzioni per l’uso alle sezione dedicata al gruppo lame.
Sfi lare ciascun cappuccio di protezione lame (9b) (qualora fossero ancora montati).
Pulire la superfi cie delle lame (9a) con acqua e
sapone o detersivo neutro facendo molta attenzione alla parte tagliente. Detergenti aggressivi,
come per esempio candeggina o varechina, possono attaccare la composizione dell’acciaio, macchiandolo e ossidandolo irreparabilmente.
E’ assolutamente da evitare l’uso di detersivi che
contengano cloro o suoi composti.
Risciacquare con abbondante acqua corrente e asciugare
subito con un panno morbido (non abrasivo).
Si sconsiglia il lavaggio delle lame in lavastoviglie perché
l’ambiente umido all’interno di questa, unito alla presenza di sali, può provocare fenomeni ossidanti.
MANUTENZIONE DELLA CALDAIA
Durante il normale utilizzo dell’apparecchio all’interno
della caldaia si formano depositi di calcare che accumulandosi potrebbero pregiudicare il corretto funzionamento dell’apparecchio, pertanto devono essere periodicamente rimossi.
Per effettuare questa operazione non utilizzare prodotti
decalcifi canti (liquidi, polveri, pastiglie, ecc.) normalmente presenti in commercio in quanto potrebbero contenere sostanze tossiche o non idonee al contatto con gli
alimenti ma procedere come indicato qui di seguito.
Assicurarsi che l’apparecchio non sia collegato
alla rete elettrica e che la manopola di accensione
(2) sia verticale, in corrispondenza dello “0”.
Svitare il coperchio della caldaia (4) ruotando in senso
antiorario.
Riempire la caldaia con acqua ed aceto bianco in parti uguali utilizzando un vasetto per omogeneizzati (11)
come dosatore.
Non riempire mai la caldaia eccessivamente ed in ogni
caso mai oltre la guarnizione posta all’imboccatura.
Lasciar riposare per almeno una notte.
Svuotare e risciacquare bene la caldaia con acqua.
In caso di depositi di calcare particolarmente resistenti o
abbondanti, ripetere l’operazione aumentando la quantità di aceto.
Non inserire mai acqua nella caldaia direttamente dal
rubinetto (fi g.D).
Effettuare un ciclo di riscaldamento a vuoto inserendo
150 ml di acqua nella caldaia.
Lasciare raffreddare l’apparecchio, buttare via l’acqua
residua rimasta nel boccale e lavare accuratamente il
boccale (8), il vasetto per omogeneizzati (11) e il gruppo
lame (9) come indicato all’inizio della sezione pulizia e
manutenzione.
ATTENZIONE! Prima di effettuare il ciclo di pu-
lizia verifi care di aver rimosso dal boccale (8): il
cestello di cottura (7), il vasetto per omogeneiz-
zati (11), e ciascun cappuccio di protezione lame
(9b) (per eseguire queste operazioni, seguire le indicazioni riportate nel capitolo: ISTRUZIONI PER
L’USO.
La frequenza con cui rimuovere i depositi di calcare dipende dall’uso più o meno intensivo del prodotto e dalla
durezza dell’acqua. Più l’utilizzo del prodotto è intenso
e/o più l’acqua è dura, più frequentemente deve essere
rimosso il calcare.
Si consiglia di effettuare comunque le operazioni qui descritte almeno una volta ogni 15 giorni.
VIII. VASETTI PER OMOGENEIZZATI
Nella confezione del Cuocipappa Sanovapore sono inclusi 2 praticissimi vasetti per la conservazione e il trasporto
degli omogeneizzati. Questi vasetti sono di plastica resistente agli urti e possono essere utilizzati sia in frigorifero
sia per riscaldare la pappa (con Cuocipappa Sanovapore,
a “bagnomaria” – metodo tradizionale – o nel microonde).
I vasetti sono dotati di una scala graduata per misurare i
liquidi o la pappa all’interno.
Quando si utilizzano i vasetti per omogeneizzati per riscaldare la pappa seguire le seguenti indicazioni.
• Durante il riscaldamento della pappa togliere
sempre il coperchio dai vasetti.
• Non mettere il vasetto direttamente su piastre
riscaldanti, fi amme libere o in forno.
• Non riscaldare l’omogeneizzato più di una volta
e/o per più di un’ora.
Alla fi ne del riscaldamento:
• Manipolare con cautela il vasetto per non scot-
tarsi (potrebbe essere molto caldo).
• Alla fi ne del riscaldamento mescolare sempre
l’omogeneizzato in modo da uniformarne la tem-
peratura.
• Verifi care sempre che la pappa non sia troppo
calda prima di somministrarla al bambino.
IX. ANOMALIE DI FUNZIONAMENTO
SE IL CUOCIPAPPA SANOVAPORE NON FUNZIONA
• Verifi care che la spina sia correttamente inserita nella
presa di corrente.
• Verifi care che il cavo e il prodotto non siano visibil-
mente danneggiati.
• Verifi care che il display sia acceso.
• Verifi care che il boccale (8) sia montato correttamen-
te sulla base (1) (controllare che i vari indicatori siano allineati come descritto nel capitolo istruzioni per
l’uso alla sezione: il boccale).
• Verifi care che il coperchio trasparente (6) sia monta-
to correttamente sul boccale (controllare che i vari
indicatori siano allineati come descritto nel capitolo
istruzioni per l’uso alla sezione: il boccale).
• Verifi care che la manopola di fi ssaggio del boccale (5)
sia ruotata correttamente (come descritto nel capitolo delle istruzioni per l’uso, alle sezione: il boccale).
• Se il prodotto non dovesse ancora funzionare, rivol-
gersi al rivenditore.
SE SI INSERISCE TROPPO CIBO O CIBO TROPPO
DURO NEL CUOCIPAPPA SANOVAPORE
L’inserimento nel boccale di quantità di cibo in eccesso o
di cibo particolarmente duro potrebbe causare il blocco
della rotazione delle lame. In tale caso procedere come
segue.
• Non insistere azionando il motore in quanto potrebbe
danneggiarsi in modo irreparabile.
• Scollegare l’apparecchio dalla rete elettrica staccando
la spina del cavo di alimentazione dalla presa di corrente.
• Rimuovere il boccale (8) seguendo le indicazioni nel
capitolo istruzioni per l’uso alla sezione: il boccale, e
con cautela sbloccare lame aiutandosi con un utensile
in legno (es.: cucchiaio da cucina).
• Rimuovere la quantità di pappa in eccesso dal boccale
e/o rimuovere completamente gli alimenti eccessivamente duri.
ATTENZIONE!
• Si raccomanda di non inserire mai le mani nel
boccale (8) per sbloccare il gruppo lame (9), potreste ferirvi seriamente.
• L’inserimento nel boccale (8) di cibo partico-
larmente duro potrebbe causare la rottura delle
lame con grave pericolo per l’utilizzatore.
X. DATI TECNICI
Modello: 06560
Tensione di alimentazione: 230-240 V ~ 50Hz
Potenza caldaia: 300 W
Potenza motore: 175 W
Cicli di funzionamento frullatore: 10sec. ON–10 sec. OFF
= apparecchio conforme alle direttive
CE vigenti applicabili.
= ATTENZIONE!
= leggere le istruzioni
= attenzione: uscita vapore bollente
= Non smaltire questo prodotto come nor-
male rifi uto urbano. Operare la raccolta
differenziata come richiesto dalle vigenti
leggi
ARTSANA si riserva il diritto di modifi care in qualsiasi
momento e senza preavviso quanto descritto nel presente manuale di istruzioni.
La riproduzione, la trasmissione, la trascrizione nonché la
traduzione in altra lingua anche parziale in qualsiasi forma di questo manuale, sono assolutamente vietate senza la previa autorizzazione scritta da parte di ARTSANA.
Artsana S.p.A. Via Saldarini Catelli, 1 - 22070 Grandate
(Como) - Italy
www.chicco.com
Made in China
Rev. 00-06-20060925

GB
Instructions for
PureSteam Cooker
Please read carefully these instructions before use
and keep them for future reference.
INDEX
I. PRODUCT PRESENTATION
II. PACK CONTENT
III. KEY
IV. WARNINGS AND SAFETY MEASURES
V. HOW TO PREPARE THE EQUIPMENT
VI. HOW TO USE THE EQUIPMENT
VII. CLEANING AND MAINTENANCE
VIII. BABY FOOD JARS
IX. OPERATING ANOMALIES
X. TECHNICAL DATA
I. PRODUCT PRESENTATION
Dear Customer,
Thank you and congratulations on your purchase.
PureSteam Cooker is a safe appliance that is ideal for
preparing baby food throughout the weaning period.
Steaming is the most natural cooking method. This is
why PureSteam Cooker uses an Intense Steam Cooking
method which allows to preserve the nutritional values
of food and its organoleptic characteristics, especially
fl avour.
You will be able to feed your baby with the food he prefers choosing recipes from the recipe book included in
the package. All recipes have been selected by paediatricians specialising in nutrition and by mothers just like
you.
Should these recipes not be enough, you can always modify them to meet your baby’s taste and work out your
own recipes using the ingredients you prefer - PureSteam
Cooker will then take care of preparing baby’s food for
you.
PureSteam Cooker cutting blades have been specifi cally
designed to blend food, while reducing the amount of air
bubbles, which cause colic in children. You will also be
able to mince or blend food to obtain the consistency
preferred by your baby. The package includes practical
jars to help you preserve baby food safely and store it in
the fridge . When you decide to feed your baby, you will
just need to warm it up using PureSteam Cooker defrosting or warming up function (please follow the instructions provided below to perform these operations).
II. PACK CONTENT
1 Kitchen PureSteam Cooker.
1 Transparent cooking rack.
1 Rack for warming up baby food jars.
1 Transparent separator, to be used when
mashing/mincing foodstuffs.
1 Spatula to collect baby food from the jug.
1 Instructions booklet.
1 Recipe book.
2 Food jars for storing food.
2 Blade covers.
III. KEY
1 BASE
2 BOILER/MOTOR ON/OFF SWITCH
3 LUMINOUS DISPLAY
4 BOILER LID
5 KNOB FOR LOCKING THE JUG
6 TRANSPARENT JUG LID
7 COOKING RACK
8 JUG
9 BLADE UNIT
9a BLADES
9b BLADE COVERS
10 SPATULA
11 BABY FOOD JARS
12 RACK FOR WARMING UP BABY FOOD JARS
IV. WARNINGS AND SAFETY MEASURES
Using an electrical appliance requires to follow some
basic safety rules. In particular:
- Your home power system must always conform to safety
regulations in force.
− Plug the equipment to a mains socket that is easily
accessible.
− Do not pull the mains cable or the appliance to unplug
the equipment from the mains.
− This appliance has been designed for domestic use only.
PureSteam Cooker must be used only for the purposes
described in this instruction booklet; any other use should
be considered improper and potentially dangerous.
− Do not leave the appliance exposed to outdoor conditions
(rain, sun, etc.).
− Never submerge the equipment in water or any other
liquid.
− Never touch the appliance with wet or damp hands.
− Do not touch the equipment if it has fallen accidentally
in the water. Should this happen, unplug the equipment
immediately and do not use it; contact a qualifi ed technician or one of Artsana S.p.A.’s authorised retailers.
− If the equipment is damaged and / or not working correctly, switch it off and disconnect the plug from the mains
socket; do not attempt to open the product, contact a
qualifi ed technician or one of Artsana S.p.A.’s authorised
retailers.
- Before using the equipment, check that the product
and all of its components are not damaged. Should any
part be damaged, do not use the product and contact a
qualifi ed technician or one of Artsana S.p.A.’s authorised
retailers.
- Ensure that the equipments’ voltage and frequency (see
the rating voltage plate located underneath the equipment) correspond to the voltage and frequency of the
mains.
Warning: for safety reasons, the equipment must
always be connected to a power system having a
safe and effi cient ground connection.
- Ensure that the plug is always disconnected from the
mains socket, and that the equipment is completely cold
before moving, storing or cleaning it, or before carrying
out maintenance operations, or when not in use.
- Place the equipment only on fl at, stable surfaces. Never
place the equipment on top of or near hot surfaces, gas
rings or electric hot plates, or on delicate surfaces within
the reach of children.
- Never leave the equipment unattended when in use.
- Before use, always check that all the components (in
particular the transparent jug and base) are assembled
correctly.
- This equipment should not be used to mince very hard
foodstuffs, such as frozen food: it could cause permanent
damage to the blades.
During the warming up and steam cooking phases,
the jug releases hot steam that could cause burns.
The boiler, jug and all the parts that come in contact

with the steam may become very hot: always handle
the equipment with the maximum care.
- Do not open or attempt to open the boiler and jug lids
while the equipment is working.
- Always handle the blade unit very carefully: the blades
are very sharp. Always unplug the equipment from the
mains socket before touching the blades.
- To prevent the blades from becoming oxidized, always
clean and dry the blade unit thoroughly after use.
- The equipment can be opened only with special tools. To
replace the power cable, contact a qualifi ed technician
or one of Artsana S.p.A.’s authorised retailers.
- Improper mending carried out by unqualifi ed technicians
may cause damage or injuries to the user.
- Dispose of any packaging, worn accessories, and/or the
equipment according to waste regulations in force in
each country.
- This equipment complies to EC regulations and subsequent modifi cations.
- Keep the equipment, accessories, and all packaging (such
as plastic bags, cardboard boxes, etc.) out of children’s
reach, as they may be hazardous.
V. HOW TO PREPARE THE EQUIPMENT
PRIOR TO FIRST USE: Remove the equipment and its accessories from the packaging. Read carefully the instruction
booklet, recipe book and warnings, and keep them for future
reference.
IMPORTANT: All products coming into contact with
foodstuffs should always be cleaned thoroughly
before use.
To this end, prepare the equipment as indicated in chapter
VI. HOW TO USE THE EQUIPMENT, pour 150 ml of drinking
water into the boiler and perform a warming up cycle
without placing any food in PureSteam Cooker. Let the
equipment cool down fi rst, then remove the jug (8) and
any residual water. Clean the jug (8), the cooking rack (7),
the transparent lid of the jug (6) and the blade units (9)
thoroughly, as indicated in chapter VII. CLEANING AND
MAINTENANCE. Before carrying out a cleaning cycle, check
that the jug (8) and all internal components but the cooking
rack (7) have been removed.
WARNING! At the end of the warming up cycle, the
equipment is very hot. Always pay the maximum
attention.
VI. HOW TO USE THE EQUIPMENT
JUG
To unlock and remove the jug (8) from the base (1):
i. Move the ON/OFF switch (2) to the central position
“0”..
Note: For safety reasons, the jug (8) and lid can be
removed only if the ON/OFF switch (2) is in the “0”
position.
ii. Turn the knob for locking the jug (5) anticlockwise (diag.
C1) and remove the jug (8) from its housing, pulling it
from the rear (diag. A).
To open the transparent lid of the jug (6):
i. Remove the transparent lid of the jug (6) by lifting it.
To close the transparent lid of the jug (6):
i. Fit the lid to the jug (6), taking care that the notches
coincide (diag. B).
To insert the jug and lid into the base:
i. Hold the jug from the handle and insert it into the base,
as shown in diagram A, taking care to fi tting the jug
properly in its housing (if it is positioned correctly, the jug
locks onto the raised support located on the base).
ii. Turn the locking knob (5) clockwise (diag. C2) to lock the
jug into position (8).
WARNING! For safety reasons, the equipment cannot
be operated if the jug (8) is not fi tted correctly on
the base (1).
BLADE UNIT
Removing the blade unit (9) from the jug (8):
i. Check that the blade covers (9b) are fi xed to the
blade unit (9).
ii. Remove the blade unit (9) from the jug by lifting
the unit (8).
iii. Hold carefully each of the blade covers (9b) and
remove it from the blade.
Fastening the blade unit (9) to the jug (8):
i. Check that the blade covers (9b) are fi xed to the
blade unit (9).
ii. Hold the blade unit (9) carefully, and insert it into
the jug (8) paying attention to place it in a central
position on the raised metal joint located at the
bottom of the jug (8).
WARNING!
- The blades are very sharp: . Always handle with
care.
BEFORE OPERATING THE EQUIPMENT, ALWAYS CHECK
THAT:
- Each blade cover has been removed from the blade unit
(9b);
- The blade unit (9) is fi tted correctly into the jug (8);
- The jug (8) is locked correctly on the base (1), (the knob
for locking the jug (5) must be blocked correctly in the
close position (diag.C2)).
HOW TO PREPARE BABY FOOD
STEAM COOKING
PureSteam Cooker steam cooks vegetables, fruit, meat,
fi sh, rice, etc.
Its intense steam cooking method conveys and maintains a steam fl ow into the cooking rack. This is why it
is ideal in the weaning period, because it preserves food
proteins and vitamins.
The cooking process is automatically stopped when there is no water left in the boiler.
Please refer to the Recipe Book supplied to decide the
correct cooking time (and the necessary quantity of water).
Ensure the equipment is disconnected from the
mains and that the ON/OFF switch is in a vertical
position, on “0”.
• Unscrew the lid of the boiler (4) by turning it anticlockwise
and lift it.
• Pour the correct amount of water into the boiler using
a baby food jar as a measuring cup (11).
WARNING! Do not pour water into the boiler directly
from the tap (diag. D).
• Never overfi ll the boiler and, in any case, never exceed
the transparent washer located at the opening.
• Close the lid of the boiler tightly, turning it clockwise.
• Remove the jug (8) from the base (1) and take off the
transparent lid (6).
• Remove the cooking rack (7) from the jug (8).
Ensure the blade unit (9) is in place, that it has been
fi tted correctly into position and that
each blade unit cover (9b) has been removed (see
section: BLADE UNIT).
• Place the diced or sliced food into the cooking rack (7),
taking care not to fi ll it excessively. It is recommended
not to exceed the upper rim and to avoid pressing the
food.
• Insert the rack (7) into the jug (8) and close the lid (6),
then fi t the jug (8) onto the base (1), as shown in the
JUG section.
• Connect the plug to the mains; the display (3) will switch
on, showing the digits “00”, indicating that the equipment
is connected to the mains and ready for use.
WARNING! Never use the cooking function unless
the cooking rack (7) is fi tted to the jug (8).
• Select the desired cooking time pressing the appropriate
buttons (5 to increase the cooking time;
6
to decrease
it). The cooking time can vary from 1 to 30 minutes
maximum (unless a specifi c cooking time is selected,
PureSteam Cooker will automatically select 30 minutes
cooking time).
• Activate the steam cooking function by turning the
ON/OFF switch (5) left. The display (3) will show the
pictogram, indicating that the boiler is operating. At the
same time, the countdown will be displayed, indicating
how long the cooking cycle will last.
• The cooking process stops automatically when the countdown ends. At this point PureSteam Cooker will emit
an acoustic signal (5 consecutive “beeps”), and the
symbol will fl ash on the display (3).
• If the boiler runs out of water before the selected cooking
time has passed, PureSteam Cooker will automatically
stop the cooking process and emit an acoustic signal (a
continuous “beep” for 10 seconds). The icon indicating
the cooking function on the display will switch off and
the “add water” icon and residual time of the cooking
function selected at the beginning will start to fl ash.
• In case you wish to modify the cooking time after the
cooking cycle has already started, simply press the +
button (to increase the time) or – button (to decrease
it) to make the adjustments you wish (never over 30
minutes).
• At the end of the cooking cycle, turn the ON/OFF switch
(2) to the central position “0“.
• Disconnect the plug from the mains socket.
• Remove the jug (8) from the base (2) and open the
transparent lid (6). Handle these parts with extreme care
since they could be very hot (see the JUG section).
• Remove the cooking rack (7) paying maximum attention
since it may be very hot. It is recommended to carry out
this operation using an oven glove or a pot holder.
• Remove the rack (7) from the jug (8).
• The cooking water on the bottom of the jug can be
disposed of or used, as you wish, or as indicated in the
Recipe Book.
HOW TO BLEND FOOD
PureSteam Cooker allows you to blend all the foodstuffs
generally used during the weaning period: vegetables, fruit,
meat, fi sh, rice, etc.
The blades of PureSteam Cooker have been specially designed to reduce the quantity of air bubbles in baby food,
which cause colic to children.
Ensure that the equipment is disconnected from
the mains, and that the ON/OFF switch (2) is in a
vertical position, in the “0” position.
- Remove the jug (8) from the base (1) and take off the
lid (6) (see the JUG section).
- Remove the cooking rack (7) from the jug (8) (if it is
hot, handle the cooking rack as indicated in the section
STEAM COOKING).
- Ensure the blade unit (9) is fi tted correctly (and that
each blade cover (9b) has been removed; see the section
BLADE UNIT).
- Put the diced or sliced food into the jug (8).
WARNING! For the correct operation of the applian-
ce, never place hard food (for example frozen food)
into the jug (8), and do not exceed the quantity of
food that can be placed into the cooking rack.
- Fit the transparent lid (6) onto the jug (8) and fi x the jug
to the base (1) (see the JUG section).
- Connect the plug to the mains socket; the display (3)
will switch on, showing the digits “00”; this indicates that
the equipment is connected to the mains and ready for
use.
- Select the blending function, turning the ON/OFF switch
(2) to the right; the display (3) will show the symbol:
on the right, indicating that the blades (9a) are
operating.
To blend the foodstuffs to the desired consistency,
keep the knob (2) in this position for approximately
10 seconds, then release the knob to its vertical
position for approximately 10 seconds; repeat this
operation several times, adding some liquid if necessary. It is recommended to wait at least 10 seconds
between one blending cycle and another; do not
operate the blades for periods of time exceeding
10 seconds.
- Remove the food from the jug (8) with the practical
spatula (10) supplied. Do not remove the content with
your hands to avoid potential harm from sharp blades
(9a).
Always check food temperature before feeding your
baby; it is recommended to stir the food before use
to even temperature.
HOW TO WARM UP AND DEFROST FOOD
The “intense steam cooking” function of PureSteam Cooker
allows you to warm up and defrost the food you have
prepared in advance.
Warming up baby food contained in jars
• To prepare PureSteam Cooker for warming up baby’s
food, follow the instructions contained in the STEAM
COOKING section. In detail: a) insert the baby food jar
(11) without lid into the baby food rack (12); b) insert
the food jar rack containing the food jar into the empty
jug, paying attention to to lock the joint located on the
bottom of the jar into the appropriate housing located
under the food jar rack. The size of the food jars should
not be bigger than the food jar rack.
• Important: The quantity of water to be poured into the
boiler to warm up or defrost food varies depending on
the temperature and quantity of food. It is recommended
to follow the instructions indicated below:
- Warming up food: 80 gr. of food require a cooking cycle
of approximately 15 minutes; 120 gr. of food require a
cooking cycle of approximately 20 minutes. If the food is
stored in jars that have just been taken out of the fridge,
double the time indicated above.
- Defrosting food: Set a cooking time of approximately 20
minutes. It may be necessary to repeat this operation,
depending on the thickness and quantity of food to
be defrosted. When baby’s food is defrosted, it can be
cooked / warmed up following the specifi c instructions
supplied.
• At the end of the warming up cycle, remove the food jar
rack paying special attention since it can be very hot. It is
recommended to perform this operation using an oven
glove or pot holder.
Warming up diced food
• To prepare PureSteam Cooker for warming up diced
food, follow the instructions contained in the STEAM
COOKING section. To set the warming up time, follow

the instructions provided regarding baby food jars.
WARNING! For hygiene and health reasons, never
warm up food more than once, or for more than
one hour.
VII. CLEANING AND MAINTENANCE
To clean PureSteam Cooker thoroughly, it is necessary
to separate the jug (8) and its accessories from
the base (1).
WARNING! Never wet or submerge the base (1)
in water or other liquids. Never place the base (1)
under running water.
HOW TO CLEAN THE BASE / BOILER / MOTOR UNIT
- Disconnect the equipment from the mains, unplugging
the power cable from the mains socket.
- Allow the equipment to cool down completely.
- Clean the equipment only with a damp cloth.
- Do not clean the base (1) in a dishwasher or under running
water.
HOW TO CLEAN THE JUG AND PLASTIC ACCESSORIES
- The jug (8) and other plastic accessories (lid, rack, handle,
spatula, food jars, food jar rack) can be hand-washed
with a domestic washing-up liquid (do not use abrasive
products), or in a dishwasher.
It is recommended to clean the jug (8) only after
removing the blade unit (9) and all the components
contained inside.
HOW TO CLEAN THE BL ADE UNIT
To prevent/reduce the risk of blade oxidization/corrosion,
clean and dry the blade unit (9) immediately after use.
Before extracting the blade unit (9) from the jug (8), rinse
it thoroughly and remove any food residues.
Disassemble the blade unit (9), as indicated in the instructions under the BLADE UNIT section.
- Remove each blade cover (9b) (in case they are still
fi tted).
Clean blades’ surface (9a) with water and soap, or
a neutral detergent, handling the sharp edges very
carefully. Aggressive detergents, such as bleaching
agents or chlorine, may damage the steel, staining
it and oxidizing it permanently.
Do not use any chlorine based detergents or chlorine
compounds.
- Rinse thoroughly under running water, and dry immediately with a soft (non abrasive) cloth.
- It is recommended not to wash the blades in a dishwasher,
since the damp environment of the dishwasher, coupled
with the presence of salts, could oxidise the blade unit.
BOILER MAINTENANCE
Normal use of the equipment can cause the formation of
lime-scale residues inside the boiler. This may noticeably
impair the performance of the product and, therefore, the
lime-scale residues should periodically be removed.
To descale the boiler, do not use any commercial descaling
agents (liquids, powders, tablets etc.), as they might contain
toxic substances unsuitable for contact with foodstuffs, but
proceed as indicated below.
Ensure the equipment is disconnected from the
mains, and that the ON/OFF switch (2) is in a vertical
position, on “0”.
Unscrew the lid of the boiler (4), turning it anticlockwise.
Fill the boiler with a solution made of equal parts of water
and white vinegar, using a baby food jar (11) as measuring
unit.
Never fi ll the boiler excessively and, in any case, do not fi ll
it over the washer located at the opening.
Leave the solution for at least one night.
Empty the boiler and rinse thoroughly with water.
In case of particularly resistant or abundant scale residues,
repeat the operation increasing the amount of vinegar.
Never pour water into the boiler directly from the tap
(diag. I).
Carry out a warming up cycle without food, fi lling the boiler
with 150 ml of water.
Let the equipment cool, throw away the residual water left
in the jug and then wash thoroughly the jug (8), baby food
jar (11) and blade unit (9), as indicated at the beginning of
the CLEANING AND MAINTENANCE section.
WARNING! Before carrying out the cleaning cycle,
check that the cooking rack (7), baby food jar (11)
and each blade cover (9b) have been removed from
the jug (8) (see instructions in section “HOW TO
USE THE EQUIPMENT” to perform this operation).
The frequency at which descaling should be carried out
depends on the use of the equipment and on the hardness
of the water; the more often the equipment is used, and /or
the harder the water, the more frequent should descaling
be performed.
In any case, it is recommended to descale the equipment
at least once every 15 days.
VIII. BABY FOOD JARS (11)
The PureSteam Cooker pack also includes 2 very practical jars for storing and carrying baby food. These jars are
made of shock-resistant plastic, and can be used both in
the fridge and to warm up baby food (by bain marie heating with PureSteam Cooker, – traditional method – or in
a microwave oven).
The jars feature a graduated scale for measuring liquids
or baby food inside the jar. Follow the guidelines provided below to warm up baby food in the jars.
- Before warming up baby food, always remove
the lid from the jar.
- Do not place the jars directly onto gas rings,
warming plates, electric ovens, etc.
- Do not warm up baby food more than once and/
or for more than one hour.
After warming up baby food:
- Handle the jar with care to avoid burning your-
self (the jar can be very hot).
- At the end of the warming cycle, always stir the
jar’s content to even food temperature.
- Always check the food temperature before fee-
ding baby.
IX.OPERATING ANOMALIES
IF PureSteam Cooker DOES NOT OPERATE
- Check that the plug is connected to the mains socket
correctly.
- Check that the power cable and appliance are not visibly
damaged.
- Check that the display is switched on.
- Check that the jug (8) is fi tted correctly to the base (1)
(ensure that the various notches are aligned, as described
in the chapter “How to Use the Equipment”, in the “Jug”
section).
- Check that the transparent lid (6) is fi tted correctly to
the jug (ensure that the various notches are aligned, as
described in the chapter “How to Use the Equipment”,
in the “Jug” section).
- Check that the jug locking knob (5) is turned to the

correct position (as described in the chapter “How to
Use the Equipment”, in the “Jug” section).
- If the appliance still does not work, contact one of
Artsana’s authorised retailers.
IF TOO MUCH FOOD OR EXCESSIVELY HARD FOOD IS
PLACED IN PureSteam Cooker
Filling the jug with excessive quantities of food, or particularly hard food, could block the blades. Should this happen,
proceed as follows.
• Do not insist, trying to operate the motor: it may damage
it permanently.
• Disconnect the equipment from the mains, unplugging
the power cable from the mains socket.
• Remove the jug (8), following the instructions contained
in the chapter “How to use the Equipment”, in the “Jug”
section. Unblock the blades carefully, using a wooden
utensil (i.e.: a wooden spoon).
• Remove excess food from the jug and/or remove any
food that is too hard.
WARNING!
• It is recommended not to unblock the blade unit
(9) by inserting your hands into the jug (8) to avoid
injuring yourself seriously.
• Placing particularly hard food into the jug (8) may
lead to blades being damaged and may be dangerous
for the user.
X. TECHNICAL DATA
Model: 06560
Mains voltage: 230-240 V ~ 50Hz
Boiler power: 300 W
Motor power: 175 W
Blender operating cycles: 10 sec. ON – 10 sec. OFF
= Equipment complying toto EC regulations in force
applicable.
= WARNING!
= Please read the instructions.
= WARNING: Hot steam outlet.
= Do not dispose of this product as a normal urban
refuse. Dispose of it according to special waste disposal regulations in force in your area.
ARTSANA reserves the right to modify at ant time and
without prior notice the contents of these instructions.
The reproduction, transmission, copying, as well as the
translation into another language, of any part of these
instructions, are absolutely forbidden without the previous written authorization by ARTSANA.
Artsana S.p.A. Via Saldarini Catelli, 1 - 22070 Grandate
(Como) - Italy
www.chicco.com
Made in China
Rev. 00-06-20060925

Robot De Cocina
E
El Cocinero Sano
Vapor
Antes del uso, leer estas instrucciones y
conservarlas para futuras consultas.
ÍNDICE
I. PRESENTACIÓN DEL PRODUCTO
II. CONTENIDO DE LA CAJA
III. LEYENDA
IV. ADVERTENCIAS Y MEDIDAS DE SEGURIDAD
V. PREPARACIÓN DEL PRODUCTO
VI. INSTRUCCIONES DE USO
VII. LIMPIEZA Y MANTENIMIENTO
VIII. TARRITOS PARA HOMOGENEIZADOS
IX. ANOMALÍAS
X. DATOS TÉCNICOS
I. PRESENTACIÓN DEL PRODUCTO
Estimado cliente,
Te agradecemos tu elección y nos alegramos de que hayas
adquirido El Cocinero Sano Vapor, un electrodoméstico
seguro e ideal para preparar la papilla a tu hijo y
acompañarlo durante todo el período del destete.
El vapor es la manera más natural para cocinar; por
eso, El Cocinero Sano Vapor cocina al Vapor Intenso,
porque así se mantienen mejor los principios nutritivos
de los alimentos y se conservan sus características
organolépticas originales y, sobre todo, su sabor.
Podrás darle a tu hijo la papilla que prefi era cada
vez, eligiendo con total tranquilidad entre las recetas
propuestas en el recetario incluido en la caja, porque han
sido seleccionadas con la ayuda de pediatras especialistas
de la nutrición y de madres como tú. Si las recetas no
son sufi cientes, puedes personalizarlas según los gustos
de tu hijo, componiendo e inventando otras nuevas:
simplemente elige los ingredientes que prefi eras, frescos
y genuinos, y el Robot de Comida Baby Pappa Cocina
Sana Comida Sana se encargará de prepararlos. Además,
gracias al especial diseño de las cuchillas, el Cuecepapilla
Comida Sana homogeneiza reduciendo la cantidad de
burbujas de aire que pueden provocar cólicos a tu hijo.
Podrás también triturar la papilla de tu hijo obteniendo
homogeneizados con la densidad que más le guste. Para
satisfacer tus exigencias se han incluido en la caja unos
prácticos tarritos para que puedas conservar la papilla que
has preparado en el frigorífi co, y cuando quieras dársela
a tu hijo, será sufi ciente con calentarla con la función de
descongelado y calentamiento dEl Cocinero Sano Vapor
(seguir las indicaciones correspondientes para saber
como realizar estas operaciones).
II. CONTENIDO DE LA CAJA
1 Robot de cocina Baby Pappa Comida Sana.
1 Cesta transparente para cocer los alimentos.
1 Cesta para calentar los tarritos de papilla.
1 Separador transparente para utilizarlo cuando se
homogeneiza/tritura el alimento.
1 Espátula para recoger la papilla de la jarra.
1 Manual de instrucciones de uso.
1 Recetario.
2 Tarritos para conservar la papilla.
2 Capuchones de protección para las cuchillas.
III. LEYENDA
1 BASE
2 MANIVELA ENCENDIDO/APAGADO CALDERA/
MOTOR.
3 PANTALLA LUMINOSA.
4 TAPA DE LA CALDERA.
5 MANIVELA DE FIJACIÓN DE LA JARRA.
6 TAPA TRANSPARENTE DE LA JARRA.
7 CESTA DE COCCIÓN.
8 JARRA.
9 CUCHILLAS.
9a CUCHILLAS
9b CAPUCHONES DE PROTECCIÓN DE LAS
CUCHILLAS.
10 ESPÁTULA.
11 TARRITOS PARA HOMOGENEIZADOS.
12 CESTA PARA CALENTAR LOS TARRITOS DE
HOMOGENEIZADOS.
IV. ADVERTENCIAS Y MEDIDAS DE SEGURIDAD
La utilización de un aparato eléctrico conlleva la
observación de algunas reglas fundamentales. En
particular:
- La instalación eléctrica del local debe ser conforme a
las normas de seguridad vigentes.
- Conectar el aparato a una toma de corriente de fácil
acceso.
- No tirar del cable de alimentación ni del aparato para
desconectar el enchufe de la toma de corriente.
- Este aparato está destinado a un uso exclusivamente
doméstico y debe ser utilizado conformemente a
las instrucciones de uso. Cualquier otro uso debe
considerarse impropio y por lo tanto peligroso.
- No dejar el aparato expuesto a agentes atmosféricos
(lluvia, sol, etc.).
- No sumergir nunca el aparato en agua ni en ningún
otro líquido.
- No tocar nunca el aparato con las manos mojadas ni
húmedas.
- No tocar el aparato si éste cae accidentalmente en el
agua; desconectar inmediatamente el enchufe de la
toma de corriente, no utilizarlo y dirigirse a personal
técnico competente y cualifi cado o a Artsana S.p.A.
- En caso de avería y / o mal funcionamiento del
aparato, apagarlo desconectando el enchufe de la
toma de corriente, no intentar manipularlo y dirigirse
exclusivamente a personal técnico competente y
cualifi cado o a Artsana S.p.A.
• Antes de utilizar el aparato verifi car siempre que el
producto y todos sus componentes no presenten
daños. En caso contrario no utilizar el aparato y dirigirse
a personal cualifi cado o al distribuidor.
• Asegurarse de que el voltaje y la frecuencia (ver datos
en la placa de identifi cación situada bajo el aparato)
correspondan a los de la red eléctrica.
Atención: por motivos de seguridad, el aparato
debe estar siempre conectado a una instalación
provista de una conexión de tierra efi caz.
• Desconectar siempre el enchufe de alimentación de
la toma de corriente y dejar enfriar completamente
el aparato antes de volver a utilizarlo y/o antes de
moverlo, guardarlo, limpiarlo o realizar operaciones de
mantenimiento.
• Colocar siempre el aparato sólo sobre superfi cies
planas y estables; no apoyarlo nunca sobre superfi cies
calientes ni cerca de ellas, cocinas de gas ni placas
eléctricas, como tampoco sobre superfi cies delicadas
o al alcance de los niños.
• No dejar nunca el aparato sin vigilancia mientras esté
funcionando.
• Antes de cada uso verifi car que todos los componentes
(en especial la jarra transparente y la base) estén

correctamente montados.
• No se aconseja la utilización de este aparato para
triturar alimentos particularmente duros, como por
ejemplo aquéllos que estén todavía congelados, ya que
las cuchillas podrían dañarse de manera irreparable.
Durante la fase de calentamiento y cocción al
vapor, sale vapor hirviendo de la jarra que podría
causar quemaduras, y la caldera, el contenedor
y todas las partes en contacto con el vapor se
calientan mucho: prestar siempre la máxima
atención y manipular el aparato con precaución.
• No abrir ni intentar abrir las tapas de la caldera y de la
jarra durante el funcionamiento del aparato.
• Prestar siempre una atención especial cuando se
manejan las cuchillas; están muy afi ladas. Desconectar
siempre el enchufe del cable de alimentación de la
toma de corriente antes de tocar las cuchillas.
• Limpiar a fondo las cuchillas y secarlas bien
inmediatamente después de cada uso para evitar que
puedan oxidarse.
• Para abrir el aparato se necesita la ayuda de
herramientas especiales. Si es necesario sustituir el
cable de alimentación dirigirse exclusivamente a
personal técnico cualifi cado o a Artsana S.p.A.
• Las reparaciones erradas, realizadas por personal no
cualifi cado, pueden causar daños o accidentes a los
usuarios.
• Eliminar el embalaje, los accesorios gastados y el
aparato mismo respetando el medio ambiente y según
la legislación específi ca vigente en cada país.
• Aparato conforme a los requisitos establecidos por las
directivas CE pertinentes y sucesivas enmiendas.
• El aparato, sus accesorios y los elementos del embalaje
(bolsas de plástico, cajas de cartón, etc.) no son
juguetes por lo que no deben dejarse al alcance de los
niños, ya que son fuentes potenciales de peligro.
V. PREPARACIÓN DEL APARATO
ANTES DEL PRIMER USO: quitar el embalaje, sacar el
aparato y sus accesorios, el manual de instrucciones, el
recetario y las hojas con las advertencias que es necesario
leer atentamente y conservar para futuras consultas.
IMPORTANTE: es aconsejable limpiar
cuidadosamente cualquier producto destinado a
entrar en contacto con sustancias alimentarias
antes de la primera utilización.
Para ello, preparar el aparato siguiendo las instrucciones
del capítulo VI. INSTRUCCIONES DE USO y efectuar un
ciclo de calentamiento vacío introduciendo 150 ml de
agua potable del grifo en la caldera. Dejar que el aparato
se enfríe, quitar la jarra (8), tirar los restos de agua y
lavar cuidadosamente la jarra (8) la cesta de cocción
(7), la tapa transparente de la jarra (6) y las cuchillas (9)
siguiendo las instrucciones del capítulo VII. LIMPIEZA
Y MANTENIMIENTO. Antes de efectuar el ciclo de
limpieza asegurarse de haber sacado de la jarra (8) los
componentes que podría contener, exceptuando la cesta
de cocción (7).
¡ATENCIÓN! Al terminar el calentamiento el
aparato estará muy caliente, prestar la máxima
atención.
VI. INSTRUCCIONES DE USO
LA JARRA
Para desbloquear y retirar la jarra (8) de la base (1):
i. Colocar la manivela de encendido / apagado (2) en
posición central sobre el símbolo “0”.
Nota: por motivos de seguridad, la jarra (8) con
su tapa deben ser retiradas sólo si la manivela
de encendido / apagado (2) está situada en la
posición “0”.
ii. Girar la manivela de fi jación de la jarra (5) en sentido
contrario al de las agujas del reloj (fi g. C1) y sacar la
jarra (8) de su lugar deslizándola y tirando de ella hacia
atrás (fi g.A).
Para abrir la tapa transparente de la jarra (6):
i. Quitar la tapa transparente de la jarra (6)
levantándola.
Para cerrar la tapa transparente de la jarra (6):
i. Ponerle la tapa a la jarra (6) teniendo cuidado de hacer
coincidir las muescas de referencia (fi g.B).
Para colocar la jarra con la tapa en la base:
i. Coger la jarra por el asa e introducirla en la base como
se indica en la (fi g.A) teniendo cuidado de colocarla bien
hasta el fondo en su lugar (si se coloca correctamente,
la jarra se fi ja en el relieve correspondiente de la base
de apoyo).
ii. Girar la manivela de fi jación (5) en el sentido de las
agujas del reloj (fi g. C2) para bloquear la jarra (8).
¡ATENCIÓN! Por motivos de seguridad, el
aparato no puede funcionar si la jarra (8) no está
correctamente montada sobre la base (1).
LAS CUCHILLAS
Para sacar las cuchillas (9) de la jarra (8):
i. Verifi car que los capuchones de protección de las
cuchillas (9b) estén fi jados sobre las mismas (9).
ii. Extraer las cuchillas (9) de la jarra levantándolas (8).
iii. Coger con precaución cada uno de los capuchones de
protección de las cuchillas (9b) y sacarlo de la cuchilla.
Para fi jar las cuchillas (9) a la jarra (8):
i. Verifi car que los capuchones de protección de las
cuchillas (9b) estén fi jados a las mismas (9).
ii. Coger con precaución las cuchillas (9) e introducirlas
en la jarra (8) teniendo cuidado de centrarlas bien en el
perno metálico que sobresale del fondo de la jarra (8).
¡ATENCIÓN!
- Prestar siempre mucha atención con las cuchillas,
ya que están muy afi ladas.
ANTES DE HACER FUNCIONAR EL APARATO
VERIFICAR SIEMPRE QUE:
- se hayan quitado todos los capuchones de protección
de las cuchillas (9b);
- las cuchillas (9) estén correctamente introducidas en la
jarra (8);
- la jarra (8) esté correctamente bloqueada en la
base (1), (la manivela de fi jación de la jarra (5) esté
correctamente bloqueada en la posición de cierre (fi g.
C2)).
LA PREPARACIÓN DE LA PAPILLA
CÓMO SE CUECE
Cuecepapilla Comida Sana cuece al vapor fruta, verdura,
carne, pescado, arroz, etc.
Su sistema de cocción al vapor intenso, que dirige el fl ujo
de vapor y lo mantiene en la cesta, es ideal para el destete
de los niños, ya que permite conservar todas las proteínas
y vitaminas de los alimentos.
El proceso de cocción se interrumpe automáticamente
cuando se termina el agua introducida en la caldera.
Para establecer los tiempos de cocción correctos (y
la cantidad necesaria de agua), consultar el recetario
incluido.
Asegurarse de que el aparato no esté conectado
a la red eléctrica y que la palanca del interruptor
esté en posición vertical, sobre el símbolo “0”.
• Desenroscar la tapa de la caldera (4) haciéndola girar en
sentido contrario al de las agujas del reloj y levantarla.
• Verter el agua en la caldera utilizando un tarrito para
homogeneizados (11) como dosifi cador.
¡ATENCIÓN! No introducir nunca agua en la
caldera directamente del grifo (fi g.D).
• No llenar excesivamente la caldera y en cualquier caso,
no llenarla nunca más allá de la junta situada en la
embocadura.
• Cerrar hasta el tope la tapa de la caldera haciéndola
girar en el sentido de las agujas del reloj.
• Sacar de la base (1) la jarra (8) y quitar la tapa
transparente (6).
• Extraer la cesta de cocción (7) de la jarra (8).
• Asegurarse de la presencia y del correcto ensamblaje de
las cuchillas (9) así como de que todos los capuchones
de seguridad (9b) de las mismas hayan sido quitados
(ver la sección: CUCHILLAS).
• Introducir en la cesta de cocción (7) los alimentos
cortados en cubitos o ruedecitas, teniendo cuidado
de no llenarla excesivamente. Se aconseja no superar
el borde superior de la cesta y no presionar los
alimentos.
• Introducir la cesta (7) en la jarra (8) y cerrar la tapa (6),
fi jar la jarra (8) a la base (1) siguiendo las instrucciones
de la sección: JARRA.
• Meter el enchufe en la toma de corriente; la pantalla
se encenderá (3) mostrando las cifras “00”; esto indica
que el aparato está conectado a la red eléctrica y listo
para ser usado.
¡ATENCIÓN! No utilizar nunca la función de
cocción sin haber introducido en la jarra (8) la
cesta de cocción (7).
• Seleccionar el tiempo de cocción deseado utilizando
los correspondientes botones (
tiempo de cocción;
de cocción puede variar de 1 a 30 minutos como
máximo (si no se programa un tiempo de cocción
específi co, el Cuecepapilla Comida Sana seleccionará
automáticamente un tiempo de cocción de 30
minutos).
• Activar la función de cocción al vapor girando la
manivela de encendido (5) hacia la izquierda: en la
pantalla (3) se encenderá el pictograma
que la caldera está funcionando y al mismo tiempo se
visualizará la cuenta atrás que muestra el tiempo que
falta para el fi nal de la cocción.
• El proceso de cocción se interrumpe automáticamente
cuando termina la cuenta atrás: cuando esto ocurre, el
Robot de Cocina Baby Pappa Comida Sana emite una
señal acústica (5 “bips” consecutivos) y en la pantalla
(3) parpadea el símbolo
• Si se termina el agua de la caldera antes de que acabe
el tiempo de cocción seleccionado, el Robot de Cocina
Baby Pappa Comida Sana interrumpe automáticamente
el proceso de cocción, emitiendo una alarma acústica
(un “bip” continuo durante 10 segundos): en la pantalla
se apaga el icono que indica la cocción y comienzan
a parpadear el icono “añadir agua” y lo que queda del
tiempo de cocción seleccionado al inicio.
• Si se quiere modifi car el tiempo de cocción una vez que
la misma haya comenzado, es sufi ciente con apretar
los botones
regularlo según se desee (nunca más de 30 minutos).
• Una vez terminada la cocción, girar la manivela de
encendido (2) y colocarla en posición central, sobre el
símbolo “0“.
• Desconectar el enchufe de la toma de corriente.
• Sacar la jarra (8) de la base (2) y abrir la tapa
6 para disminuirlo). El tiempo
5 (para aumentar) o 6 (para reducir) para
5para aumentar el
que indica
.
transparente (6) prestando mucha atención ya que
estas partes podrían estar muy calientes (ver la sección:
JARRA).
• Sacar la cesta de cocción (7) prestando atención porque
podría quemar; se aconseja manejarla utilizando un
guante normal para el horno o un agarrador.
• Extraer la cesta (7) de la jarra (8).
• El agua de cocción depositada en el fondo de la jarra
se puede tirar o bien conservarla, según se desee o
siguiendo los consejos del recetario.
CÓMO SE HOMOGENEIZA
El Robot de Cocina Baby Pappa Comida Sana permite
homogeneizar todos los alimentos que se utilizan
normalmente para el destete: fruta, verdura, carne,
pescado, arroz, etc.
Gracias al diseño especial de sus cuchillas, en los
homogeneizados que prepara El Cocinero Sano Vapor se
reduce la cantidad de burbujas de aire que pueden causar
cólicos a los niños.
Asegurarse de que el aparato no esté conectado a
la red eléctrica y de que la manivela de encendido
(2) esté en posición vertical, sobre el símbolo “0”.
• Sacar de la base (1) la jarra (8) y quitar la tapa (6) (ver
la sección: JARRA).
• Extraer la cesta de cocción (7) de la jarra (8) (si está
caliente, manejar la cesta de cocción siguiendo las
instrucciones de la sección CÓMO SE CUECE).
• Asegurarse de que las cuchillas estén correctamente
ensambladas (9) (y de que todos los capuchones de
protección (9b) hayan sido quitados; ver la sección:
CUCHILLAS).
• Verter en la jarra (8) los alimentos cortados en daditos
o ruedecitas.
¡ATENCIÓN! Para que el aparato funcione
correctamente no introducir nunca en la jarra (8)
alimentos duros (por ejemplo congelados) o una
cantidad de alimento superior a la contenida en la
cesta de cocción.
• Ponerle la tapa transparente (6) a la jarra (8) y fi jar ésta
última a la base (1) (ver la sección: JARRA).
• Meter el enchufe en la toma de corriente; se encenderá
la pantalla (3) mostrando las cifras “00”; esto indica
que el aparato está conectado a la red eléctrica y listo
para ser usado.
• Seleccionar la función de homogeneización girando
hasta el tope la manivela de encendido (2) hacia la
derecha; en la parte derecha de la pantalla (3) se
encenderá una luz indicadora roja
las cuchillas (9a) están funcionando.
Para reducir los alimentos a la consistencia
deseada, mantener la manivela (2) en esta posición
durante unos 10 segundos y soltarla durante otros
10 segundos aproximadamente, dejándola en
posición vertical; repetir esta operación varias
veces, añadiendo líquido si fuera necesario. Se
aconseja dejar al menos 10 segundos de intervalo
antes de volver a accionar las cuchillas y no
accionarlas de modo continuado durante más de
10 segundos.
• Para sacar la papilla de la jarra (8) utilizar la práctica
espátula (10) incluida en la caja. No utilizar las manos
ya que las cuchillas (9a) están muy afi ladas.
Se aconseja verifi car siempre la temperatura de
los alimentos y uniformarla mezclándolos antes
de dárselos al niño.
CÓMO SE CALIENTAN Y SE DESCONGELAN LOS
ALIMENTOS
El Cuecepapilla Comida Sana, gracias a su “vapor intenso”
permite calentar y descongelar papillas preparadas
que indica que

previamente.
Si se calientan papillas conservadas en un tarrito
• Para preparar El Cocinero Sano Vapor para calentar las
papillas, seguir las instrucciones de la sección: CÓMO
SE CUECE. Concretamente: a) introducir en la cesta
calienta tarritos de homogeneizados (12) el tarrito
para homogeneizados (11) sin la tapa; b) introducir
la cesta calienta tarritos con el tarrito dentro en el
interior de la jarra vacía, teniendo cuidado de centrar
el perno situado en el fondo de la jarra en su lugar
correspondiente debajo de la cesta calienta tarritos.
No introducir tarritos de dimensiones superiores a las
de la cesta porta tarritos.
• Nota: la cantidad de agua que hay que introducir
en la caldera para calentar o descongelar varía
según la temperatura y la cantidad de papilla que se
desea calentar, por lo que es necesario seguir estas
indicaciones generales:
- Calentar: para 80 g de alimento se necesitan unos
15 minutos de cocción; para 120 g de alimento se
necesitan unos 20 minutos; si la papilla se encuentra en
un tarrito que se acabe de sacar del frigorífi co duplicar
estos tiempos.
- Descongelar: programar el tiempo de cocción a 20
minutos aproximadamente; según la consistencia y la
cantidad de papilla que se desee descongelar podría ser
necesario repetir esta operación. Una vez que la papilla
esté descongelada, se puede proceder a su cocción /
calentamiento siguiendo las indicaciones específi cas.
• Una vez terminado el ciclo de calentamiento, extraer la
cesta calienta tarritos, prestando la máxima atención
ya que podría estar muy caliente. Se aconseja manejarla
con guantes o agarrador de horno.
Si se calientan alimentos en trocitos
• Para preparar el Cuecepapilla Comida Sana para
calentar alimentos en trocitos, seguir las instrucciones
de la sección: CÓMO SE CUECE. Para los tiempos de
calentamiento, seguir las mismas instrucciones que
para las papillas conservadas en tarritos.
¡ATENCIÓN! Por motivos higiénicos y biológicos
no calentar nunca los alimentos más de una vez
ni durante un período de tiempo superior a una
hora.
VII. LIMPIEZA Y MANTENIMIENTO
Para una correcta limpieza dEl Cocinero Sano Vapor es
necesario separar la jarra (8) y sus accesorios de la base
(1).
¡ATENCIÓN! No mojar nunca la base (1) ni
sumergirla en agua u otros líquidos. No meter
nunca la base (1) bajo el agua corriente.
LIMPIEZA DEL GRUPO BASE / CALDERA /
MOTOR
• Desconectar el aparato de la red eléctrica
sacando el enchufe de la toma de corriente.
• Dejar que el aparato se enfríe.
• Limpiar el aparato únicamente con un paño
húmedo.
• No introducir la base (1) en el lavavajillas ni bajo
el agua corriente.
LIMPIEZA DE LA JARRA Y DE LOS ACCESORIOS DE
PLÁSTICO
• La jarra (8) y el resto de accesorios de plástico (tapa,
cesta, mango, espátula, tarritos para homogeneizados,
cesta calienta tarritos) se pueden lavar a mano con un
detergente común para vajillas (no utilizar productos
abrasivos) o en el lavavajillas.
Se aconseja lavar la jarra (8) sólo después de haber
retirado las cuchillas (9) y todos los componentes
que tenga en su interior.
LIMPIEZA DE LAS CUCHILLAS
• Para evitar/reducir el riesgo de oxidación y corrosión
de las cuchillas, la limpieza y el secado de las mismas
(9) deben ser siempre efectuados inmediatamente
después de cada uso.
• Antes de retirar las cuchillas (9) de la jarra (8),
aclararlas abundantemente para quitar los residuos de
alimentos.
• Desmontar las cuchillas (9) siguiendo las instrucciones
de uso de la sección dedicada a las mismas.
• Sacar todos los capuchones de protección de las
cuchillas (9b) (en caso de que estuvieran aún
montados).
Limpiar la superfi cie de las cuchillas (9a) con agua
y jabón neutro teniendo mucho cuidado con la
parte afi lada. Los detergentes agresivos, como por
ejemplo la lejía, pueden atacar la composición
del acero, manchándolo y oxidándolo de manera
irreparable.
Se debe evitar absolutamente el uso de
detergentes u otros productos que contengan
cloro o compuestos de cloro.
• Aclarar con abundante agua corriente y secar
inmediatamente con un paño suave (no abrasivo).
• No se aconseja lavar las cuchillas en el lavavajillas cuyo
ambiente húmedo unido a la presencia de sales, puede
oxidarlas.
MANTENIMIENTO DE LA CALDERA
Debido al uso normal del aparato, en el interior de la
caldera se forman depósitos de cal que al acumularse
podrían perjudicar el correcto funcionamiento del aparato,
y por lo tanto deben ser eliminados periódicamente.
Para efectuar esta operación no utilizar productos
descalcifi cantes (líquidos, polvos, pastillas, etc.)
normalmente disponibles en los comercios, ya que podrían
contener sustancias tóxicas o no idóneas para el contacto
con los alimentos. Proceder en el modo siguiente.
Asegurarse de que el aparato no esté conectado a
la red eléctrica y de que la manivela de encendido
(2) esté en posición vertical, sobre el símbolo “0”.
• Desenroscar la tapa de la caldera (4) girando en sentido
contrario al de las agujas del reloj.
• Llenar la caldera con agua y vinagre blanco a partes
iguales utilizando un tarrito para homogeneizados (11)
como dosifi cador.
• No llenar nunca la caldera excesivamente y en
cualquier caso nunca más allá de la junta situada en la
embocadura.
• Dejar reposar durante una noche por lo menos.
• Vaciar la caldera y aclararla bien con agua.
• En caso de depósitos de cal especialmente resistentes
o abundantes, repetir la operación aumentando la
cantidad de vinagre.
• No introducir nunca en la caldera el agua directamente
del grifo (fi g.I).
• Efectuar un ciclo de calentamiento en vacío
introduciendo 150 ml de agua en la caldera.
• Dejar que el aparato se enfríe, tirar los restos de agua
que queden en la jarra y lavar cuidadosamente la jarra
(8), el tarrito para homogeneizados (11) y las cuchillas
(9) siguiendo las instrucciones del inicio de la sección
limpieza y mantenimiento.
¡ATENCIÓN! Antes de efectuar el ciclo de
limpieza, sacar de la jarra (8): la cesta de cocción
(7), el tarrito para homogeneizados (11), y todos
los capuchones de protección de las cuchillas
 Loading...