


1.5 HP 7” BRIDGE TILE SAW

 Model 98265

SET UP AND OPERATING INSTRUCTIONS
Note: Stand (SKU 98328) and Diamond Blade sold separately.
Visit our website at: http://www.harborfreight.com
Read this material before using this product. Failure to do so can result in serious injury. SAVE THIS MANUAL.
Copyright© 2008 by Harbor Freight Tools®. All rights reserved. No portion of this manual or any artwork contained herein may be reproduced in any shape or form without the express written consent of Harbor Freight Tools. Diagrams within this manual may not be drawn proportionally. Due to continuing improvements, actual product may differ slightly from the product described herein. Tools required for assembly and service may not be included.
For technical questions or replacement parts, please call 1-800-444-3353.
Manual Revised 10f

SAVE THIS MANUAL
Keep this manual for the safety warnings and precautions, assembly, operating, inspection, maintenance and cleaning procedures.
Write the product’s serial number in the back of the manual near the assembly diagram (or month and year of purchase if product has no number). Keep this manual and the receipt in a safe and dry place for future reference.
IMPORTANT SAFETY
INFORMATION
In this manual, on the labeling, and all other information provided with this product:
This is the safety alert symbol. It is used to alert you to potential personal injury
hazards. Obey all safety messages that follow this symbol to avoid possible injury or death.
DANGER indicates a hazardous situation which, if not avoided, will result
in death or serious injury.
WARNING indicates a hazardous situation
which, if not avoided, could result in death or serious injury.
CAUTION, used with the safety alert
symbol, indicates a hazardous situation which, if not avoided, could result in minor or moderate injury.
NOTICE is used to address practices not
related to personal injury.
CAUTION, without the safety alert symbol, is
used to address practices not related to personal injury.
General Tool Safety Warnings
WARNING Read all safety warnings and instructions. Failure to follow the warnings and instructions may result in electric shock, fire and/or serious injury.
Save all warnings and instructions for future reference.
1.KEEP GUARDS IN PLACE and in working order.
2.REMOVE ADJUSTING KEYS AND WRENCHES. Form habit of checking to see that keys and adjusting wrenches are removed from tool before turning it on.
3.KEEP WORK AREA CLEAN. Cluttered areas and benches invite accidents.
4.DON’T USE IN DANGEROUS ENVI-
RONMENT. Don’t use power tools in damp or wet locations, or expose them to rain. Keep work area well lighted.
5.KEEP CHILDREN AWAY. All visitors should be kept safe distance from work area.
6.MAKE WORKSHOP KID PROOF with padlocks, master switches, or by removing starter keys.
7.DON’T FORCE TOOL. It will do the job better and safer at the rate for which it was designed.
8.USE RIGHT TOOL. Don’t force tool or attachment to do a job for which it was not designed.
Page 2 |
For technical questions, please call 1-800-444-3353. |
SKU 98265 |

RECOMMENDED MINIMUM WIRE GAUGE FOR EXTENSION CORDS
(120 VOLT)
NAMEPLATE |
EXTENSION CORD |
|||
AMPERES |
|
LENGTH |
|
|
(at full load) |
25’ |
50’ |
100’ |
150’ |
0 – 6 |
18 |
16 |
16 |
14 |
6.1 – 10 |
18 |
16 |
14 |
12 |
10.1 – 12 |
16 |
16 |
14 |
12 |
12.1 – 16 |
14 |
12 |
Do not use. |
|
TABLE A
9.USE PROPER EXTENSION CORD.
Make sure your extension cord is in good condition. When using an extension cord, be sure to use one heavy enough to carry the current your product will draw. An undersized cord will cause a drop in line voltage resulting in loss of power and overheating. Table A shows the correct size to use depending on cord length and nameplate ampere rating. If in doubt, use the next heavier gauge. The smaller the gauge number, the heavier the cord.
10.WEAR PROPER APPAREL. Do not wear loose clothing, gloves, neckties, rings, bracelets, or other jewelry which may get caught in moving parts. Nonslip footwear is recommended. Wear protective hair covering to contain long hair.
11.ALWAYS USE SAFETY GLASSES. Also use face or dust mask if cutting operation is dusty. Everyday eyeglasses only have impact resistant lenses, they are NOT safety glasses.
12.SECURE WORK. Use clamps or a vise to hold work when practical. It’s safer than using your hand and it frees both hands to operate tool.
13.DON’T OVERREACH. Keep proper footing and balance at all times.
14.MAINTAIN TOOLS WITH CARE. Keep tools sharp and clean for best and safest performance. Follow instructions for lubricating and changing accessories.
15.DISCONNECT TOOLS before servicing; when changing accessories, such as blades, bits, cutters, and the like.
16.REDUCE THE RISK OF UNINTENTION-
AL STARTING. Make sure switch is in off position before plugging in.
17.USE RECOMMENDED ACCESSORIES. Consult the owner’s manual for recommended accessories. The use of improper accessories may cause risk of injury to persons.
18.NEVER STAND ON TOOL. Serious injury could occur if the tool is tipped or if the cutting tool is unintentionally contacted.
19.CHECK DAMAGED PARTS. Before further use of the tool, a guard or other part that is damaged should be carefully checked to determine that it will operate properly and perform its intended function – check for alignment of moving parts, binding of moving parts, breakage of parts, mounting, and any other conditions that may affect its operation.
A guard or other part that is damaged should be properly repaired or replaced.
20.DIRECTION OF FEED. Feed work into a blade or cutter against the direction of rotation of the blade or cutter only.
21.NEVER LEAVE TOOL RUNNING UNAT-
TENDED. TURN POWER OFF. Don’t leave tool until it comes to a complete stop.
SKU 98265 |
For technical questions, please call 1-800-444-3353. |
Page 3 |
GROUNDING INSTRUCTIONS
TO PREVENT
ELECTRIC SHOCK
AND DEATH FROM INCORRECT
GROUNDING WIRE
CONNECTION
READ AND FOLLOW THESE
INSTRUCTIONS:
110-120 V~ Grounded Tools: Tools
with Three Prong Plugs
1.In the event of a malfunction or breakdown, grounding provides a path of least resistance for electric current to reduce the risk of electric shock. This tool is equipped with an electric cord having an equipment-grounding conductor and a grounding plug. The plug must be plugged into a matching outlet that is properly installed and grounded in accordance with all local codes and ordinances.
2.Do not modify the plug provided – if it will not fit the outlet, have the proper outlet installed by a qualified electrician.
3.Improper connection of the equipmentgrounding conductor can result in a risk of electric shock. The conductor with insulation having an outer surface that is green with or without yellow stripes is the equipment-grounding conductor. If repair or replacement of the electric cord or plug is necessary, do not connect the equipment-grounding conductor to a live terminal.
4.Check with a qualified electrician or service personnel if the grounding instructions are not completely understood, or if in doubt as to whether the tool is properly grounded.
5.Use only 3-wire extension cords that have 3-prong grounding plugs and
3-pole receptacles that accept the tool’s plug.
6.Repair or replace damaged or worn cord immediately.
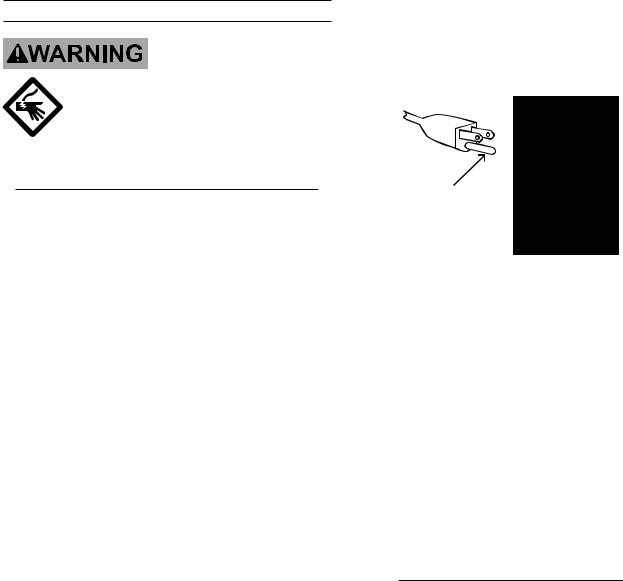
125 V~ 3-Prong Plug and Outlet
(for up to 125 V~ and up to 15 A)
7.This tool is intended for use on a circuit that has an outlet that looks like the one illustrated above in 125 V~ 3-Prong Plug and Outlet. The tool has a grounding plug that looks like the plug illustrated above in 125 V~ 3-Prong Plug and Outlet.
8.The outlet must be properly installed and grounded in accordance with all codes and ordinances.
9.Do not use an adapter to connect this tool to a different outlet.
Tile Saw Safety Warnings
For Your Own Safety Read Instruction
Manual Before Operating Saw
1.Wear eye protection.
2.Use saw-blade guard and spreader for every operation for which it can be used, including all through sawing.
3.Keep hands out of the line of saw blade.
4.Use an appropriate push-stick when required.
5.Know how to reduce risk of kickback.
Page 4 |
For technical questions, please call 1-800-444-3353. |
SKU 98265 |
6.Do not perform any operation freehand.
7.Never reach around or over saw blade.
8.Make sure the workpiece is supported at all times while sawing. Use a roller stand (not provided) with larger workpieces if necessary.
9.To properly understand all safety warnings, be familiar with the following safety terms and equipment:
a.Featherboard – A block with “fingers“ that hold the workpiece against the fence while sawing.
b.Through-sawing – A cut made from one side of a board to the opposite side, without stopping.
c.Ripcut or Ripping - A cut made parallel to (along with) the grain of the wood.
d.Crosscut or Crosscutting - A cut made perpendicular (at a 90° angle) to the grain of the wood.
e.Push-stick – A narrow strip of wood or other soft material with a notch cut
into one end and which is used to push short pieces of material through saws. It provides a safe distance between the hands and the cutting tool. Must be narrower than the cut width to prevent contact with the blade.
f.Freehand – Feeding a workpiece through the saw without using a fence or guided support to guide it. NOT A
SAFE METHOD.
g.Kerf – The gap made by the saw in the workpiece.
h.Kickback – A sudden reaction to a pinched, bound, or misaligned blade, causing an uncontrolled workpiece to lift up and out of the saw toward the operator.
i.Spreader – A metal plate that follows the saw blade to keep the kerf (gap) from
closing on the saw blade. Spreaders, except riving knives, must be aligned to the blade after blade adjustment to prevent binding.
j.Riving Knife – A spreader mounted on the same mechanism as the blade. Generally more effective than simple spreaders.
10.As noted previously, Kickback is a sudden reaction to a pinched, bound, or misaligned blade, causing an uncontrolled workpiece to lift up and out of the saw toward the operator.
Kickback is usually a result of tool misuse and can be limited or avoided by following the precautions below:
•Fence must be completely parallel to the saw blade.
•Workpiece must be free from flaws
(such as loose knots) and from foreign objects (such as nails and screws).
•Support large workpieces along their entire length. Large workpieces tend to bend, grabbing the blade.
•Do not use a dull, damaged, or pitchcovered blade.
•Do not use fence as a guide when crosscutting.
•Do not ripcut a twisted or warped workpiece, or workpiece without straight edge to guide along fence.
•Maintain control of the workpiece. Do not allow the workpiece to rest against the moving blade without holding onto it.
•If the blade binds or a cut is interrupted, turn off the power switch and hold the workpiece still until the blade stops.
Correct the cause of blade binding before proceeding.
•Before continuing an unfinished cut, center the blade in the pre-cut kerf and
SKU 98265 |
For technical questions, please call 1-800-444-3353. |
Page 5 |
check that the saw teeth are not engaged into the workpiece before turning on the saw.
•Push the wood stock past the blade prior to release.
11.Check guards for proper operation with saw disconnected from power before each use. Do not disable any guard. Do not operate saw if any movable guard does not move freely and close instantly.
Make sure any movable guard does not touch the blade in all angles, depths of cut, and positions.
12.Keep the guard in place while throughsawing. Verify that the spreader lines up with the blade to prevent binding.
13.Construct an appropriate Push Stick out of wood according to the guidelines on the following page.
Page 6 |
For technical questions, please call 1-800-444-3353. |
SKU 98265 |

Handle Notch
•Must be far enough down the stick to allow
a comfortable and firm grip.
•Must be deep enough to prevent hand from slipping down the stick.
•Do not cut more than
halfway into the stick to prevent weakening.
•Corners may be rounded to increase comfort.
Stick Length
•Must be long enough to keep hand clear of blade.
•At least 6” from end of handle to closest part of notch.
Essential Straight Push-stick Features and
Functions
Note: Straight style (traditional) stick shown. A different stick design may be used if it properly
protects against all hazards.
Diagram not to scale.
• Push sticks must be made from sturdy, defect-free, plywood or normal wood to prevent unexpected
breakage. Material must be at least 1/4” thick, but no thicker than the finished wood.
• Inspect push stick before use and do not use a damaged or deteriorated push stick.
• Push stick dimensions will vary depending on the application and user.
NOT
TO
At
SCALE
Least
6”
Notch
•Must be right (90°) angle, cut at 30°-40° from the angle of the stick to keep hands out of the line of the blade.
•The lower lip of the notch must be no longer than the workpiece is thick.
.
90°
30°-40° |
than |
|
|
workpiece |
|
Less |
|
thickness |
|
|
|
SKU 98265 |
For technical questions, please call 1-800-444-3353. |
Page 7 |
 Loading...