

Page 1

GETTING TO KNOW YOUR
2020 CORVETTE
chevrolet.com
Review this Quick Reference Guide for an overview of some important features in your
Chevrolet Corvette. Some optional equipment described in this guide may not be included in your
vehicle. More information can be found in your Owner’s Manual and at my.chevrolet.com.
For easy reference, keep this guide with your Owner’s Manual in your glove box.
Certain restrictions, precautions, and safety procedures apply to your vehicle.
Please read your Owner’s Manual for complete instructions.
Page 2

INSTRUMENT PANEL
PARK
Power Folding
MirrorF/Window
Controls
Manual Shift
Paddles
Turn Signal
Lever/Exterior
Lamps Control
Customizable
Instrument
Cluster
Windshield
Wipers Lever
Head-Up
Display
Controls
2
Hood Release/
Trunk Release
F
Buttons
SYMBOLS
Stability Control Off
Low Tire Pressure
Brake System
Antilock Brake System
Stability Control Active
Cruise
Control/
Z-Mode
Buttons
Electric
Parking
Brake
Switch
Audio
Favorite
Station
Buttons
Door Ajar
Cruise Control
Electric Parking Brake
Charging System
Oil Pressure
Steering
Wheel
Adjustment
Control
Audio
Volume
Buttons
Driver Information
Center/Heated
Steering WheelF/
Voice Recognition
Control Buttons
Engine Coolant Temperature
Service Electric
Parking Brake
Traction Control Off
Low Fuel
Page 3

Engine
2
Start/Stop
Button
NFC Bluetooth
Pairing Hotspot
Infotainment
System
Touchscreen
Performance Data Recorder
SD Card Slot
(in glove box)
F
Glove Box
Button
Transmission
Shift Controls
Transmission Temperature
Airbag Readiness
Check Engine
Driver Safety Belt Reminder
Front Lift System
F
Optional equipment
Traction Control &
StabiliTrak Off/Front
Lift SystemF/Curb View
CameraF Buttons
Driver Mode
Control
Passenger Seat
Belt Reminder
Security
Lamps On
Reminder
Climate Controls/
Heated & Ventilated
SeatF Controls
Power Outlet
Refer to your Owner’s Manual to
learn about the information being
relayed by the lights and gauges
of the instrument cluster.
See Introduction in your
Accessory
Owner’s Manual.
3
Page 4

REMOTE KEYLESS ENTRY TRANSMITTER (KEY FOB)
X2
X2
Lock
Press to lock all doors and
the fuel door. Press again to
fold the power mirrorsF.
Unlock
Press to unlock the driver’s
door and the fuel door only
or all doors, based on vehicle
settings.
Press and hold for 3 seconds to open all
windows.
To enable automatic mirror foldingF
when using the Lock and Unlock buttons,
go to Settings > Vehicle > Comfort and
Convenience > Remote Mirror Folding.
[
Remote Vehicle Start
Press twice to start the engine from outside the vehicle. The turn signal lamps will
flash. After entering the vehicle, turn on
the ignition.
Note: To change or enable some Remote Keyless
Entry settings, go to Settings > Vehicle > Remote
Lock, Unlock, Start.
Hood Release
Press twice to release the hood.
Hatch/Trunk Release
Press twice to release the hatch/trunk.
Lower Convertible Top
Press and release the Unlock button
and then press and hold the button
to lower the top.
Press and release the Lock button and
then press and hold the button to
open the engine compartment.
Vehicle Locator/Panic Alarm
Press and release to locate your vehicle.
The horn sounds and lights flash 3 times.
Press and hold to activate the alarm.
Press again to cancel the alarm.
KEY RELEASE
If vehicle power is lost, press the button on
the side of the transmitter to pull out the
key. Use the key to open the door. Pull the
looped cord below the instrument panel to
open the hood for access to the battery.
See Keys, Doors and Windows in your Owner’s Manual.
KEYLESS ACCESS SYSTEM
The Keyless Access System enables operation of
the doors, hatch/trunk, and hood without removing the Remote Keyless Entry (RKE) transmitter
from your pocket or purse. The transmitter must
be within 3 feet of the hatch/trunk, hood or door
being unlocked.
KEYLESS UNLOCKING
With the RKE transmitter within range:
Press the driver’s door handle touchpad (A) to unlock the driver’s door only or all doors.
Press the passenger’s door handle touchpad to unlock all doors.
KEYLESS LOCKING
With the RKE transmitter within range:
Press the touchpad on any door handle to lock all doors immediately.
F
Optional equipment
4
See Keys, Doors and Windows in your Owner’s Manual.
A
F
Page 5

KEYLESS ACCESS SYSTEM
PASSIVE LOCKING
To have all doors lock automatically after a short delay when the ignition is off, the
RKE transmitter is removed from the vehicle, and all doors are closed, go to Settings >
Vehicle > Remote Lock, Unlock, Start > Passive Door Lock.
To have the driver’s door or all doors unlock
when using the touchpad on the driver’s door
handle, go to Settings > Vehicle > Remote
Lock, Unlock, Start > Passive Door Unlock.
HATCH/TRUNK ACCESS
The vehicle must be in Park.
Press the X2 button twice on the RKE
transmitter, the button on the driver’s
door, or the touchpad (A) above the license
plate with the vehicle unlocked or, if locked,
with the RKE transmitter within range.
When closing the hatch/trunk, set the
decklid into the power latch. The latch will
close automatically.
HOOD ACCESS
The vehicle must be in Park.
Press the X2 button twice on the RKE
transmitter, the button on the driver’s
door, or the touchpad (B) in the driver-side
grille opening below the headlamp.
When closing the hood, set the hood striker
into the latch and then press on the front
edge of the hood until the latch clicks twice.
AUXILIARY DOOR RELEASES
If the vehicle battery is weak or disconnected,
the doors can be opened manually.
From inside the vehicle, pull the driver’s or
passenger’s door release handle (C) on the
floor near each door opening.
From outside the vehicle, use the mechanical
key from the RKE transmitter with the key
cylinder located rearward of the driver’s door
handle in the air inlet (D) to open the driver’s
door, or the key cylinder behind the license
plate to open the hatch/trunk.
A
B
C
D
F
Optional equipment
See Keys, Doors and Windows in your Owner’s Manual.
5
Page 6

KEYLESS (PUSHBUTTON) START
The Remote Keyless Entry transmitter must be in the vehicle to turn on the ignition.
STARTING THE ENGINE/ON
With the transmission in Park, press the
brake pedal and then press the ENGINE
START/STOP button to start the engine. The
green button indicator will illuminate.
Note: If the Remote Keyless Entry transmitter battery is
weak, place the transmitter in the rear cupholder in the
center console to enable the engine to start. Replace
the transmitter battery as soon as possible.
STOPPING THE ENGINE/OFF
Shift to Park and press the ENGINE START/STOP button to turn off the engine.
ACCESSORY MODE
With the engine off and the brake pedal not depressed, press the ENGINE START/
STOP button to place the ignition in accessory mode to operate the radio, windows
and other accessories. The amber button indicator will illuminate.
See Driving and Operating in your Owner’s Manual.
BATTERY TIPS
BATTERY LOCATION
The battery is located under a cover in the underhood compartment. To access the
battery, remove the left and right side shields first before removing the cover assembly.
BATTERY CHARGER
If the vehicle is not driven weekly, or the battery is disconnected or drained, use the optional battery maintainer to charge the battery. To operate the battery maintainer, plug it into a
standard electrical outlet and into the vehicle’s underhood accessory power outlet.
WINDOW PROGRAMMING
To provide a tight seal, window indexing automatically lowers the window slightly when
the door is opened and then automatically raises the window when the door is closed.
If battery power is disconnected, program the power windows:
1. Close all doors and start the vehicle.
3. Partially open the window to be programmed and then fully close the window.
Continue to hold up the window switch briefly after the window has closed.
4. Fully open the window. Continue to hold down the window switch briefly after the
window has opened.
Note: The power windows’ express-close feature and the power convertible top
the windows are programmed.
F
See Vehicle Care in your Owner’s Manual.
F
will not operate until
See Keys, Doors and Windows in your Owner’s Manual.
6
F
Optional equipment
Page 7
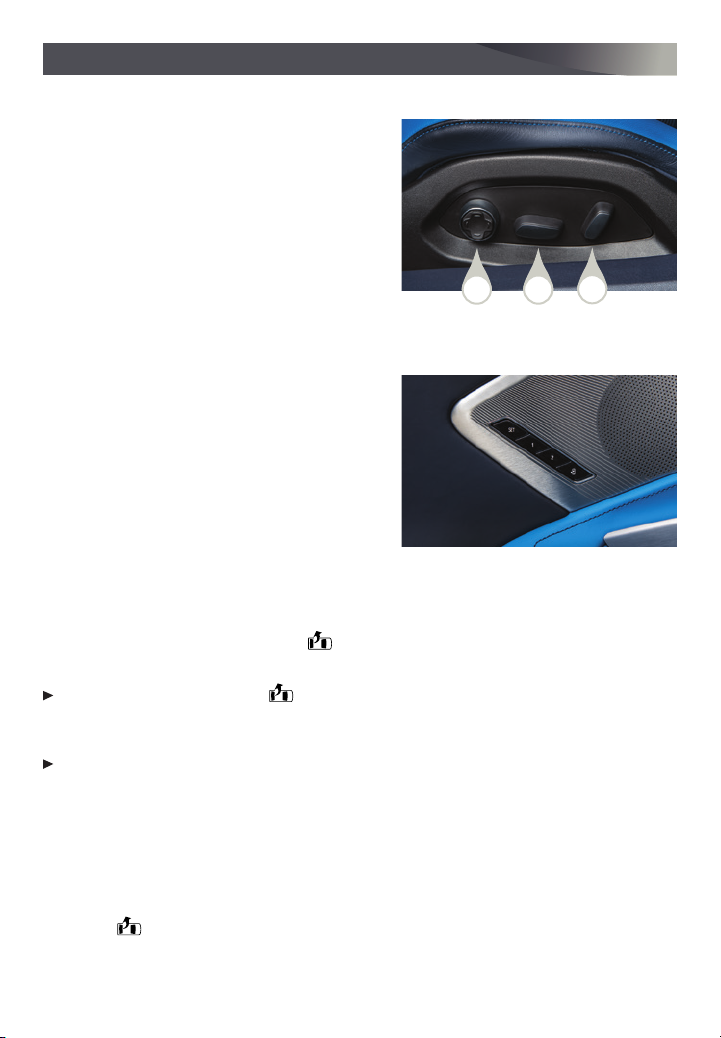
POWER SEATS
SEAT ADJUSTMENTS
A. Seat Cushion Adjustment
Move the horizontal control to move the seat
forward or rearward and to tilt, raise or lower
the seat.
B. Seatback Adjustment
Move the vertical control to recline or raise the
seatback.
C. Lumbar/Side Bolster Adjustment
Press the round control forward or rearward to
adjust the lumbar support and up or down to adjust the side bolsters.
SET DRIVER’S SEAT MEMORY POSITIONS
1. With the vehicle On and in Park, adjust the
driver’s seat, power outside mirrors, and
power steering columnF to the desired
positions.
2. Press and release the SET button on the
driver’s door. A beep will sound.
3. Immediately press and hold button 1 or 2
until two beeps sound. Use the button that
matches the Driver Information Center
welcome message indicating driver 1 or 2. To
identify each Remote Keyless Entry transmitter, one has a chrome flag and the other
has a black flag.
To store seat and power steering column positions for more clearance when exiting the
vehicle, repeat these steps using the EXIT button instead of button 1 or 2.
RECALL DRIVER’S SEAT MEMORY POSITIONS
Press and hold button 1, 2 or EXIT until the set position is reached.
The memory/exit positions can be programmed to be recalled automatically when the
ignition is turned on/off (for exit recall, the driver’s door must be opened).
To set the automatic recall options, go to Settings > Vehicle > Seating Position > Seat
Entry Memory and Seat Exit Memory.
SET PASSENGER’S SEAT MEMORY POSITIONS
1. With the vehicle On and in Park, adjust the passenger’s seat to the desired position.
2. Press and release the SET button on the passenger’s door. A beep will sound.
3. Immediately press and hold button 1 or 2 until two beeps sound.
To store a seat position for more clearance when exiting the vehicle, repeat these steps
using the EXIT button instead of button 1 or 2.
F
F
F
F
See Seats and Restraints in your Owner’s Manual.
C
B
A
F
Optional equipment
7
Page 8
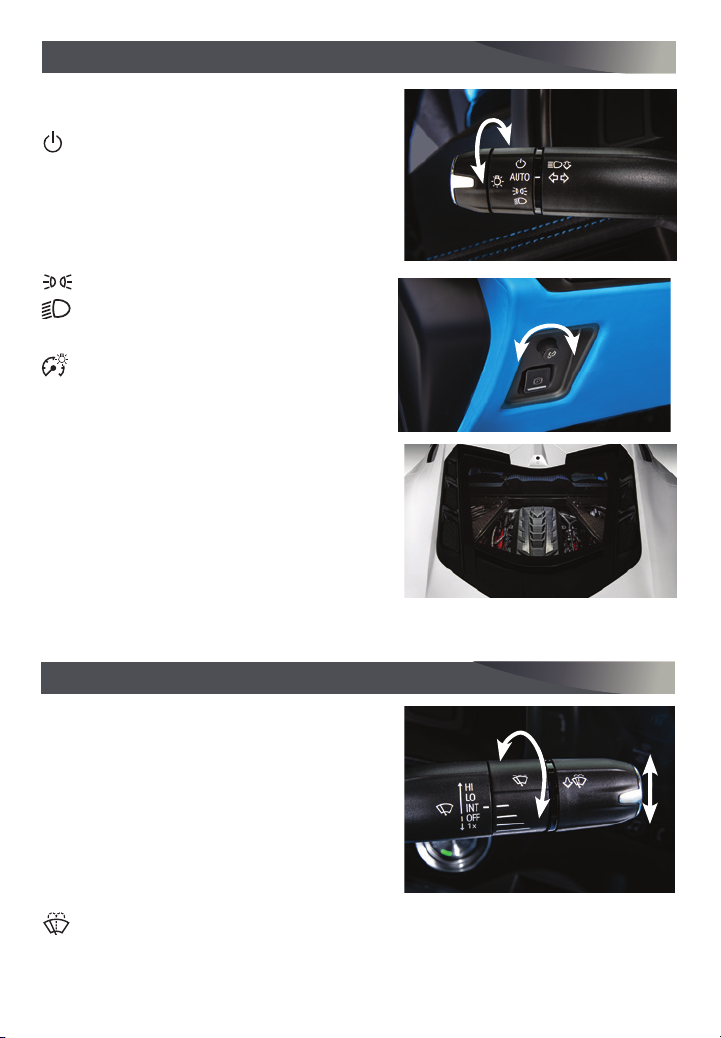
LIGHTING
EXTERIOR LAMPS
Rotate the band to operate the exterior lamps.
Off/On
AUTO Automatic Headlamp System
Automatically activates the Daytime Running
Lamps (DRLs) or the headlamps and other
exterior lamps depending on outside light
conditions.
Parking Lamps
Headlamps
INTERIOR LIGHTING
Instrument Brightness Control
Rotate the knob to brighten or dim the
instrument panel lighting during nighttime use.
ENGINE COMPARTMENT LAMPS
The engine compartment lamps will turn on
briefly when any door is unlocked or opened, or
when the engine compartment is opened.
The lamps will turn off when all doors and the
engine compartment are closed, the doors are
locked, the vehicle begins to move after shifting
out of Park, or the ignition is turned On.
F
See Lighting in your Owner’s Manual.
WINDSHIELD WIPERS
Move the lever up/down to activate the wipers.
HI Fast Wipes
LO Slow Wipes
INT Intermittent Wipes
Rotate the band up for more frequent wipes or
down for less frequent wipes.
OFF
1x Single wipe
Washer Fluid
Pull the lever to spray washer fluid on the
windshield.
F
Optional equipment
8
See Instruments and Controls in your Owner’s Manual.
Page 9
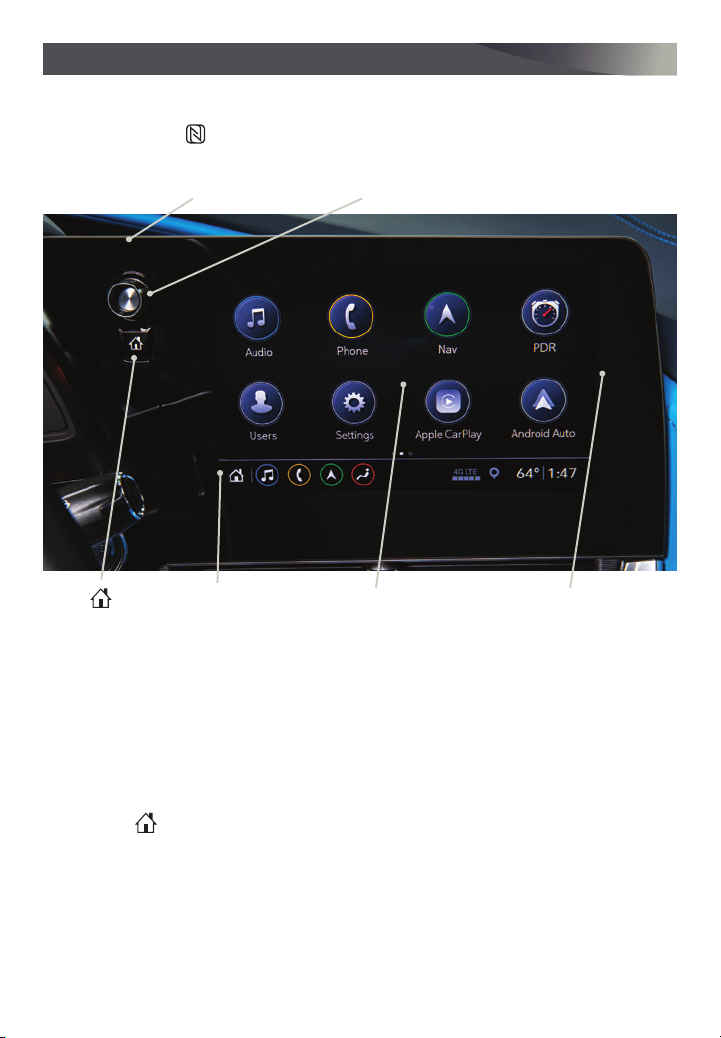
INFOTAINMENT SYSTEM
Read your Owner’s Manual for important information about using the infotainment system while driving.
NFC Bluetooth Pairing
Hotspot (requires
compatible smartphone)
Home
Page Views
Applications Tray:
Shortcuts to
applications
Power/Volume/
Mute/Unmute
speakers
ApplicationsF:
Touch a screen icon to
access an application
Additional Page Views:
Swipe to view additional
pages (if available)
The infotainment system uses a Bluetooth or USB connection to link to a compatible
device, such as a smartphone or portable audio player, and offers hands-free voice
control. You can use simple gestures on the touchscreen, such as tap, drag and swipe,
tointeract with the system. For assistance, call 1-855-478-7767 or visit
my.chevrolet.com/learn.
MANAGING HOME PAGE ICONS
1. Press the Home button.
2. To enter edit mode, touch and hold the Home page icon to move.
3. Continue holding the icon and drag it to the desired position, and then release.
See your Infotainment System Manual.
F
Optional equipment
9
Page 10

INFOTAINMENT SYSTEM
STORING FAVORITES
Radio stations from all bands (AM, FM or SiriusXMF) can be stored in any order. The audio
source options are on the left side of the audio screen.
1. Display the desired radio station.
2. Select the desired page of favorite screen buttons.
3. Touch and hold one of the favorite screen buttons until a beep is heard.
VOICE RECOGNITION
Control the music source, enter a navigation destinationF, make phone calls hands-free
(after pairing your Bluetooth-enabled phone), and perform other tasks using the natural
voice recognition system.
1. Press the Press to Talk button on the steering wheel.
2. The system will play a prompt followed by a beep.
3. After the beep, say what you want it to do using natural speech.
Examples: “Call Dave” or “Tune to 99.5 FM.” Say “Help” for assistance.
BLUETOOTH VOICE RECOGNITION
Bluetooth voice recognition allows access to the voice recognition commands on a
compatible, paired cell phone; e.g. Siri or Google Assistant.
To activate Bluetooth Voice Recognition, press and hold the Press to Talk button
for a few seconds.
APPLE CARPLAY
Apple CarPlay capability is available through a compatible smartphone using the Apple
CarPlay icon on the Home page of the infotainment system. No app is required.
1. Connect your unlocked, compatible phone by plugging the Lightning cable into a USB
data port. Use your device’s factory-provided Lightning cable. Aftermarket cables may
not work.
2. The Apple CarPlay icon will illuminate. Touch the icon to have your apps displayed.
Press the Home button to exit Apple CarPlay. To return to the last page viewed in
Apple CarPlay, press and hold the Home button.
ANDROID AUTO
Android Auto capability is available through a compatible smartphone using the Android
Auto icon on the Home page of the infotainment system.
1. Download the Android Auto app to your phone from the Google Play Store.
2. Connect your unlocked, compatible phone by plugging the phone USB cable into a
USBdata port. Use your device’s factory-provided USB cable. Aftermarket cables may
not work.
3. The Android Auto icon will illuminate. Touch the icon to have your apps displayed.
Press the Home button to exit Android Auto. To return to the last page viewed in
Android Auto, press and hold the Home button.
See your Infotainment System Manual.
F
Optional equipment
10
Page 11
INFOTAINMENT SYSTEM
F
APPS
Connected apps are available for download to the infotain ment system through the Apps
icon on the Home page. Downloading and using the apps requires internet connec tivity,
and may require a data plan. For more information, visit my.chevrolet.com/learn.
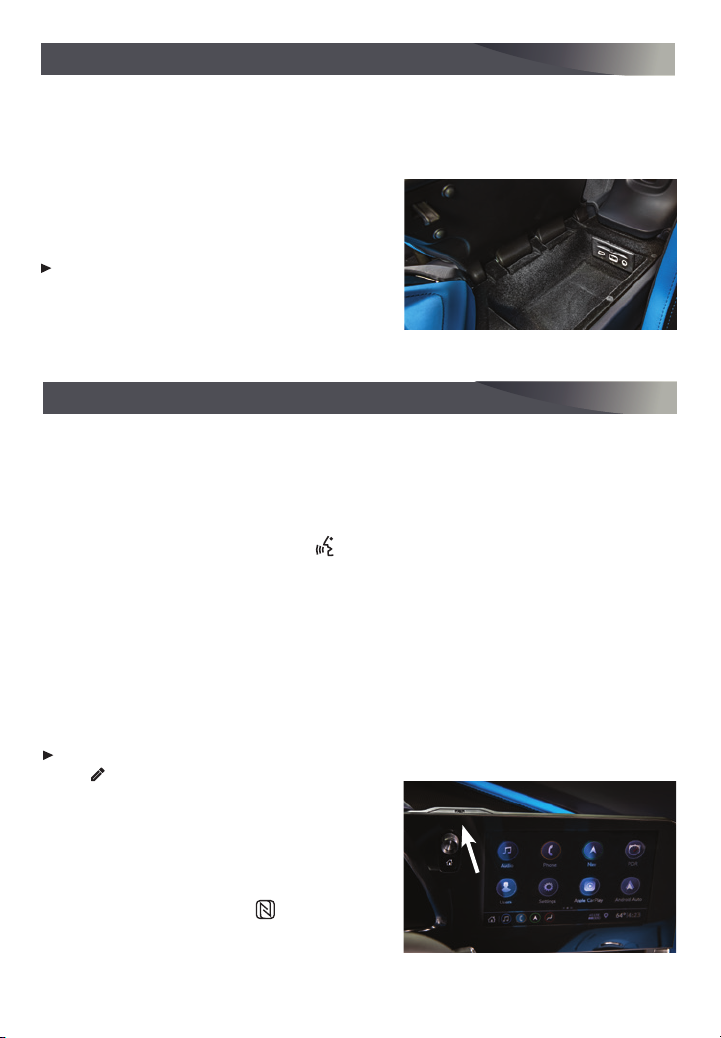
PORTABLE AUDIO DEVICES
An iPod®, iPhone®, MP3 Player, or a USB flash
drive can be connected to the USB data ports in
the center console storage compartment.
To play a device, touch Audio on the
infotainment screen and then touch USB
from the sources list or touch More to view
the USB option.
See your Infotainment System Manual.
BLUETOOTH® SYSTEM
Read your Owner’s Manual for important information about using the Bluetooth system while driving.
Before using a Bluetooth-enabled device in the vehicle, it must be paired with the invehicle Bluetooth system. The pairing process is disabled when the vehicle is moving. Not
all devices will support all functions. Visit my.chevrolet.com/learn for more information.
PAIR A PHONE
1. To use voice recognition, press the Press to Talk button; after the prompt, say
“Pair phone”; or to use the infotainment screen, select the Phone icon > Connect
Phone > Add Phone.
2. From your phone’s Bluetooth settings, select the name on the infotainment screen.
3. Follow the pairing instructions.
4. When pairing is complete, the phone screen is displayed.
SECONDARY PHONE
A secondary phone can be paired to the Bluetooth system. The system connects to the
phone that is set to First to Connect. The secondary phone can only receive calls.
To set the first and secondary phones, go to Settings > System > Phones and select
the Information icon.
NFC PAIRING
1. To use Near Field Communication (NFC) pairing, unlock your smartphone and enable NFC.
Check your smartphone user’s information for
NFC compatibility.
2. Hold the phone next to the NFC icon above
the infotainment screen.
3. After pairing is initiated, follow the pairing
instructions.
F
Optional equipment
See your Infotainment System Manual.
11
Page 12
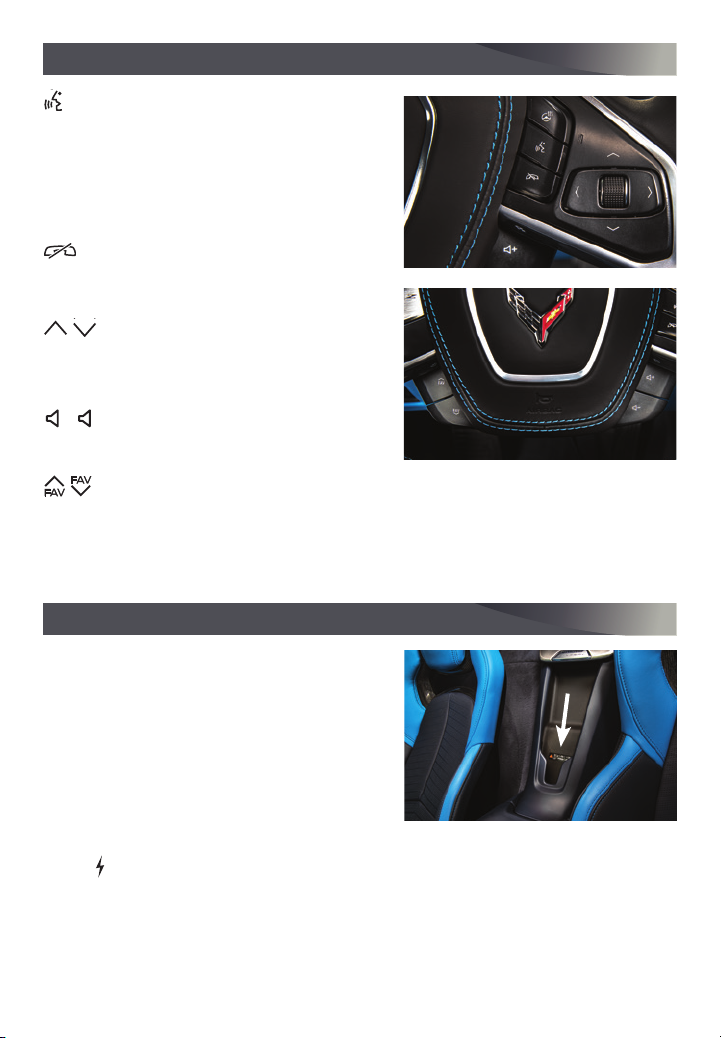
AUDIO STEERING WHEEL CONTROLS
Press to Talk
Press to answer an incoming call or to use
natural voice recognition with the Bluetooth or
OnStar® system.
Press and hold to activate Bluetooth Voice
Recognition (Siri or Google Assistant) on a
paired, compatible mobile phone.
End Call/Mute
Press to end or decline a call.
Press to mute/unmute the speakers.
Radio Station Seek
With the Audio menu displayed in the Driver
Information Center, rotate the thumbwheel to
seek the next or previous radio station.
+
Volume
–
Press the top or bottom button to adjust the
volume.
Next/Previous Favorite Station
Press the top or bottom button to go to the next or previous favorite radio station or
track.
See your Infotainment System Manual.
WIRELESS CHARGING
The Wireless Charging system for smartphones
is located between the driver’s and passenger’s
seatbacks. Visit my.chevrolet.com/learn to
check device compatibility. See your phone retailer for details on required phone accessories.
1. The vehicle must be On, or Retained Accessory
Power must be active.
2. Remove all objects from the charging pocket.
3. Place the smartphone, screen facing out, in
the pocket.
4. The battery charging symbol will appear on the infotainment screen when charging.
If not charging, remove the device for 3 seconds and rotate it 180 degrees before
placing it in the pocket again.
F
Optional equipment
12
F
See Instruments and Controls in your Owner’s Manual.
Page 13
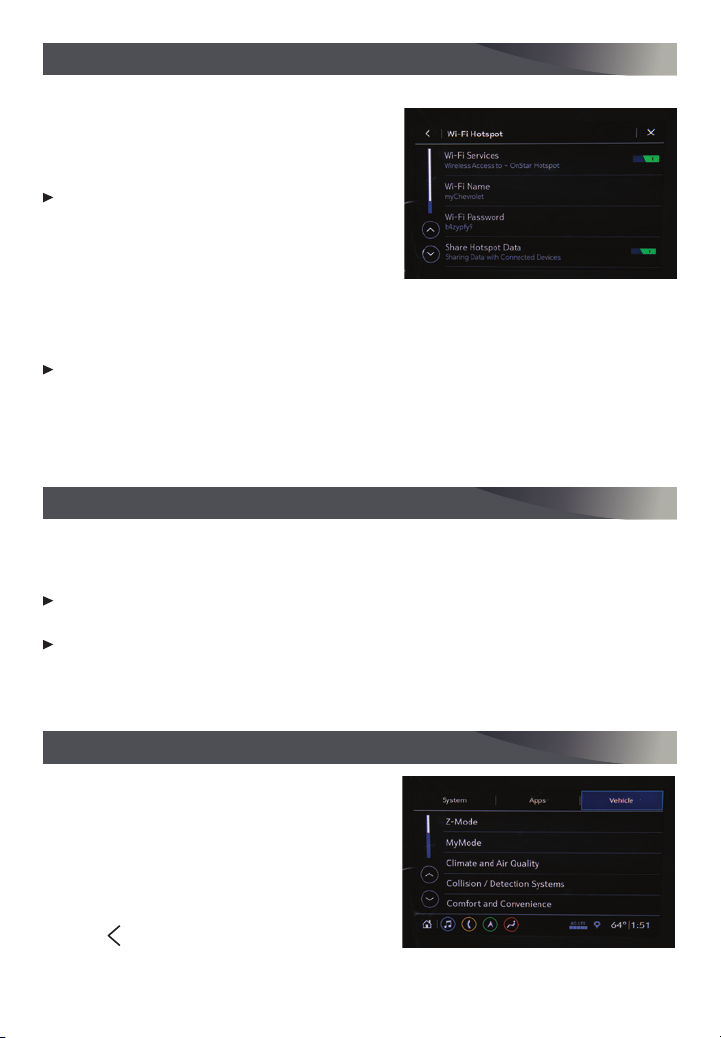
4G LTE WI-FI® HOTSPOT
WI-FI HOTSPOT
With the vehicle’s available 4G LTE Wi-Fi
hotspot, up to 7 devices (smartphones, tablets
and laptops) can be connected to high-speed
internet.
To retrieve the name and password for the
hotspot, select the Wi-Fi icon on the infotainment screen or go to Settings > System >
Wi-Fi Hotspot.
OVER-THE-AIR SOFTWARE UPDATES
The infotainment system can download and install vehicle software updates through
the vehicle’s 4G LTE Wi-Fi hotspot, if active, or a secured Wi-Fi hotspot. The system will
prompt for certain updates to be downloaded and installed.
To check updates manually, go to Settings > System > Vehicle Software > Updates.
Follow the on-screen prompts.
Note: For more information on Wi-Fi use, system limitations, and software updates, visit
my.chevrolet.com/learn.
F
See your Infotainment System Manual.
VALET MODE
Valet Mode can be used when it’s desired that only an authorized user have access to
personalized features on the infotainment screen, glovebox and center console storage
compartment.
To lock/unlock the infotainment screen, glove box and center console storage
compartment, select Settings > Vehicle > Valet Mode and enter a passcode.
To set the Performance Data RecorderF (PDR) to automatically record in Valet Mode, go
to the PDR menu and select Settings > Automatic Recording > While in Valet Mode Only.
See Instruments and Controls in your Owner’s Manual.
VEHICLE CUSTOMIZATION
Some vehicle features can be customized
using the Settings menus and the infotainment screen icons. The Settings menus include
System, Apps, and Vehicle.
1. Select Settings on the Home page.
2. Select the desired menu item.
3. Select the desired feature and setting.
4. Press to exit each menu.
F
Optional equipment
See Instruments and Controls in your Owner’s Manual.
13
Page 14
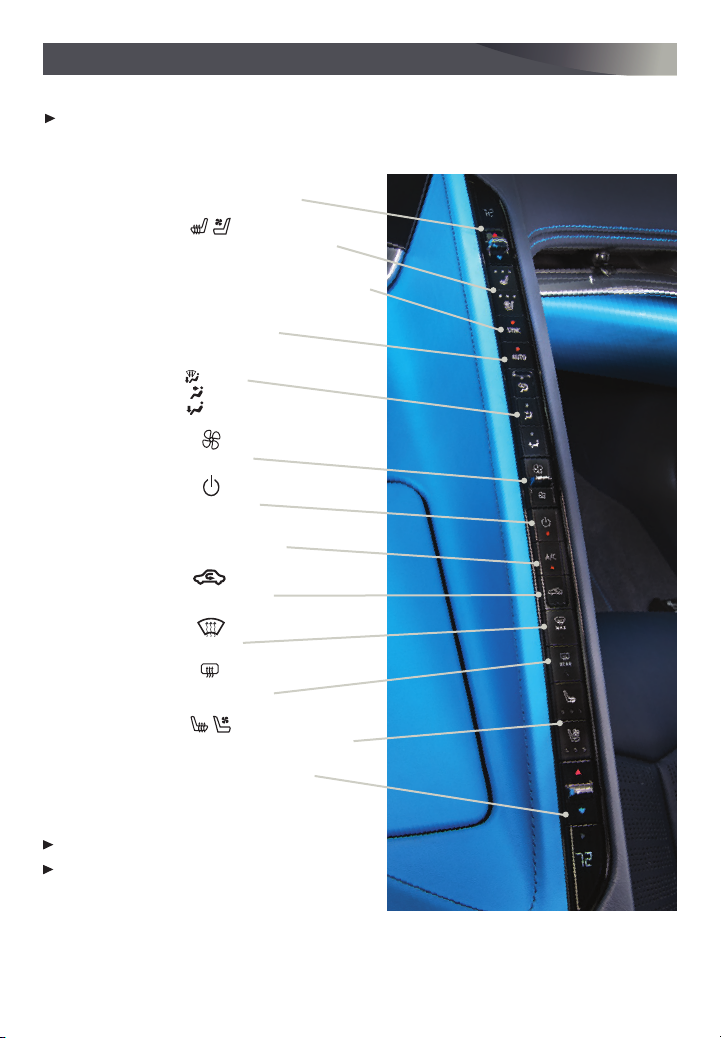
CLIMATE CONTROLS
REAR
CLIMATE CONTROL DISPLAY
Select the Climate icon on the Home page of the infotainment screen to view the
climate control display. Settings can be changed using the screen buttons or the
controls on the center console.
Driver’s Temperature Control
Driver’s Heated/Ventilated Seat Controls
Synchronize passenger’s settings to driver’s settings
Air Conditioning Control
SYNC
AUTO
Automatic Operation
Air Delivery Modes:
Defog
Vent
Floor
Fan Control
Power On/Off
A/C
F
Defrost
F
Recirculation Mode
Rear Window Defog
Passenger’s Heated/Ventilated Seat Controls
Passenger’s Temperature Control
AUTOMATIC OPERATION
Press AUTO.
Set the temperature.
The system automatically controls the fan
speed, air delivery, air conditioning and recirculation to reach the set temperature. Allow time for the system to reach the desired
temperature. If a function is manually adjusted, the Auto indicator turns off and automatic operation for that function is canceled.
F
Optional equipment
14
See Climate Controls in your Owner’s Manual.
Page 15
COUPE ROOF PANEL
It may be necessary to have two people remove
the roof panel. Refer to your Owner’s Manual for
complete instructions.
The roof panel is secured with two front
levers and one rear lever. To unlock the roof
panel, pull the two front levers outward and
then press the button on the front of the rear
lever and pull it down.
When removed, secure the roof panel with
the interior facing forward and the rear pins
in the lower receivers on the rear storage compartment floor. Push each front corner
of the panel forward until it clicks into the upper receivers. If not properly secured,
damage to the panel may occur.
During roof panel installation, install the rear edge of the panel first.
Note: A Corvette Accessory Roof Panel Storage BagF is available to protect the panel when not installed
on the vehicle.
See Keys, Doors and Windows in your Owner’s Manual.
CONVERTIBLE TOP OPERATION
Before operating the power convertible top,
ensure that the roof and tonneau cover are clear
of any objects and that the trunk is closed. When
possible, operate the convertible top when the
vehicle is stopped. If necessary, the top can be
operated at vehicle speeds up to 30 mph.
POWER TOP OPERATION
1. Start the vehicle.
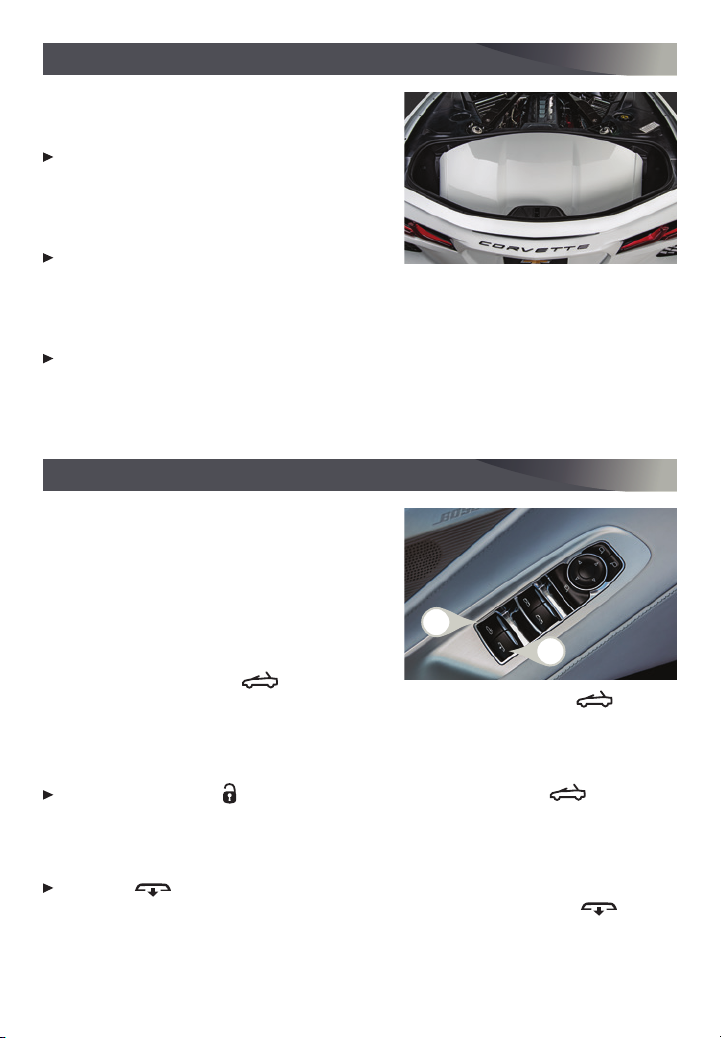
2. Press and hold down the Convertible
Top button (A) on the driver’s door to lower the top; pull and hold up the button
to raise the top. The windows will lower automatically.
3. A chime will sound when the top is completely lowered or raised.
The top also may be opened using the Remote Keyless Entry transmitter.
Press and release the Unlock button and then press and hold the Convertible
Top button to lower the top.
Note: After a loss of vehicle power, program the power windows in order to operate the convertible top.
REAR WINDOW OPERATION
Press the Midglass button (B) on the driver’s door to lower the rear window. To
help deflect the wind, the rear window will not lower completely. Pull the button
to raise the rear window. The window can be lowered with the convertible top up or
down.
F
Optional equipment
F
A
B
See Keys, Doors and Windows in your Owner’s Manual.
15
Page 16

ROADSIDE ASSISTANCE
1-800-CHEV-USA (1-800-243-8872) TTY Users: 1-888-889-2438
As the owner of a new Chevrolet, you are automatically enrolled in the Chevrolet
Roadside Assistance program for up to 5 years/60,000 miles, whichever occurs first,
at no expense to you. Chevrolet’s Roadside Assistance toll-free number is staffed by a
team of trained advisors who are available 24 hours a day, 365 days a year, to contact a
service provider for light services (fuel delivery, jump-starts, flat tire and lock-outs) or
make arrangements to tow your vehicle to the nearest Chevrolet dealer for any repairs.
ONSTAR® ROADSIDE ASSISTANCE
If you have a current OnStar Safety & Security Plan, push the blue OnStar button or red
Emergency button to get the help you need. An OnStar advisor will use GPS technology
to pinpoint your vehicle location and contact the nearest service provider.
To learn more about OnStar services, push the blue OnStar button, visit onstar.com, call
1-888-4-ONSTAR (1-888-466-7827), or refer to your Owner’s Manual.
MYCHEVROLET MOBILE APP
Download the myChevrolet app to your compatible smartphone (or device) and, if your
vehicle is properly equipped, you can start or turn off your engine, lock or unlock your
doors, view key diagnostic information, set parking information and more.
The app is available on select Apple and Android devices. Service availability, features
and functionality vary by vehicle, device and data plan. Device data connection required.
Visit onstar.com for more details. Download the mobile app from your compatible mobile
device’s app store.
CHEVROLET OWNER CENTER
Get to know your vehicle inside and out with the Chevrolet Owner Center. Check out
personalized information, including an online Owner’s Manual and helpful how-to videos,
track your service history and warranty status, review your current OnStar Vehicle
Diagnostics report (active OnStar account required) and more. Create an account today
atmy.chevrolet.com.
We recommend always using ACDelco or GM Genuine Parts.
Certain restrictions, precautions and safety procedures apply to your vehicle. Please read your Owner’s Manual
for complete instructions. All information contained in this guide is based on the latest information available at
the time of printing and is subject to change without notice. Copyright 2019 General Motors. All rights reserved.
!23428867=A!
16
23428867 A
 Loading...