


BUILT - IN COOKING APPLIANCES
User Manual

congratulations
Congratulations and thank you for choosing our Built-in Cooking Appliance. We are sure you will find your new appliance a pleasure to use and a great asset to your cooking. Before you use the appliance, we recommend that you read through the whole user manual which provides
a description of the product and its functions.
To avoid the risks that are always present when you use a cooking appliance, it is important that the appliance is installed correctly and that you read the safety instructions carefully to avoid misuse and hazards. For future reference, please store this booklet in a safe place. This appliance complies to the requirements of Australian Standard AS/NZ 60335.2.6
Record model and serial number here:
Model:..................................................................
Serial number:.........................................................
The symbols you will see in this booklet have these meanings:
 warning
Indicates information concerning your personal safety
 caution
Indicates information on how to avoid damaging the appliance
tips & information
Indicates tips and information about use of the appliance
environmental tips
Indicates tips and information about economical and ecological use of the appliance
tips & information
Important – check for any damage or marks
If you find the appliance is damaged or marked, you must report it within 7 days if you wish to claim for damage/ marks under the manufacturer’s warranty. This does not affect your statutory rights.
environmental tips
Information on disposal for users
•Most of the packing materials are recyclable. Please dispose of those materials by contacting your local authorities and ask for the correct method of disposal.
Contents |
|
Description of your appliance............................... |
4 |
EOC617................................................................... |
4 |
EOC627................................................................... |
4 |
EOC647................................................................... |
4 |
EGC627................................................................... |
4 |
EXC617..................................................................... |
4 |
EXC627..................................................................... |
5 |
63K906.................................................................... |
4 |
63K914.................................................................... |
4 |
Before operating your appliance for the first time... |
5 |
Setting the time............................................................ |
5 |
Preparing your appliance for the first time......................... |
5 |
Installing your oven accessories...................................... |
6 |
Using your oven.................................................... |
7 |
Understanding your oven functions.................................. |
7 |
Cooling/venting fan..................................................... |
8 |
Condensation.............................................................. |
8 |
Operating your oven temperature selector......................... |
8 |
Pre-heating your appliance............................................. |
8 |
Operating the programmable clock..................... |
9 |
3 button programmable clock......................................... |
9 |
Cooking guide..................................................... |
10 |
Oven shelf location.................................................... |
10 |
Choosing the best oven settings.................................... |
11 |
Roasting meat....................................................... |
12 |
Roasting poultry and fish......................................... |
12 |
Grilling guide...................................................... |
13 |
Grilling hints.............................................................. |
13 |
Guide to better grilling................................................ |
13 |
Turbo Grill (Multi-function models only)............................ |
13 |
Dealing with cooking problems........................ |
14 |
Cleaning your appliance.................................... |
15 |
Enamel..................................................................... |
15 |
Stainless Steel............................................................ |
15 |
Glass....................................................................... |
15 |
Painted Control Panel................................................. |
15 |
Oven....................................................................... |
15 |
Grill ....................................................................... |
15 |
Cleaning your oven accessories.................................... |
15 |
Cleaning your oven door................................... |
17 |
Solving problems................................................ |
18 |
Installation.......................................................... |
19 |
Cabinet construction for your appliance.......................... |
20 |
Oven Dimensions....................................................... |
20 |
Underbench Ovens.................................................... |
20 |
Separate Grill Underbench Ovens................................. |
21 |
Separate Grill Wall Ovens.......................................... |
22 |
Hard wiring detail...................................................... |
22 |
Warranty.................................................................. |
23 |
general safety
An important read to avoid an electric shock or fire Grill warnings
Meanings of symbols used in this manual are shown below:  This symbol indicates never to do this
 This symbol indicates always do this
The appliance is NOT suitable for use by children, without supervision.
Young children should be supervised to ensure they do not play with this appliance.
This appliance is not intended for use by persons (including children) with reduced physical, sensory or mental capabilities, or lack of experience and knowledge, unless they have been given supervision or instruction concerning use of the appliance by
a person responsible for their safety.
During use this appliance becomes hot. Care should be taken to avoid touching hot external and internal surfaces when in use. Use oven gloves. Children should be kept away to avoid burns and scalds.
This appliance must NOT be used as a space heater.
DO NOT spray aerosols in the vicinity of this appliance while it is in operation.
DO NOT store flammable materials in the appliance storage drawer or near this appliance e.g. Aerosols.
Ensure all specified vents, openings and airspaces are not blocked in order to avoid a fire.
DO NOT line the bottom of the oven or grill with foil or cookware.
DO NOT MODIFY THIS APPLIANCE.
Oven warnings
During use the appliance becomes hot. Care should be taken to avoid touching hot surfaces inside the oven.
Switch the appliance off before removing the oven light glass for globe replacement.
To avoid an accident, ensure that oven shelves and fittings are always inserted into the appliance in accordance with the instructions.
Do not use the door as a shelf.
Do not push down on the open oven door.
DO NOT leave grill on unattended.
The grill door must be left fully open whilst grilling in a separate grill wall oven.
The grill drawer must be left approx. two finger widths ajar whilst grilling in a separate grill underbench oven.
Always turn the grill off immediately after use as fat left there may catch fire.
Do not cover the insert with foil, as fat left there may catch fire.
Always keep the grill dish clean as any fat left may catch fire.
To avoid a fire, ensure that grill trays and fittings are always inserted into the appliance in accordance with the instructions.
Do not place thick portions of food under the grill. Foods may curl, catch and ignite.
Accessible parts may become hot when grill is in use. Children should be kept away.
Installation, cleaning and servicing
Only authorised personnel must install and carry out servicing this appliance. (Certificate of Compliance to be retained)
Before using the appliance, ensure that all packing materials are removed from the appliance.
In order to avoid any potential hazard, the enclosed installation instructions must be followed.
Ensure that all specified vents, openings and airspaces are not blocked.
Where the appliance is built into a cabinet, the cabinet material must be capable of withstanding 70°C.
Always ensure the appliance is switched off before cleaning or replacing parts.
Do not use steam cleaners, as this may cause moisture build up.
Always clean the appliance immediately after any food spillage.
To maintain safe operation, it is recommended that the product be inspected every five years by an authorised serviceperson.
This appliance must be earthed.
2 CONTENTS Built-in Cooking |
Built-in Cooking GENERAL SAFETY 3 |
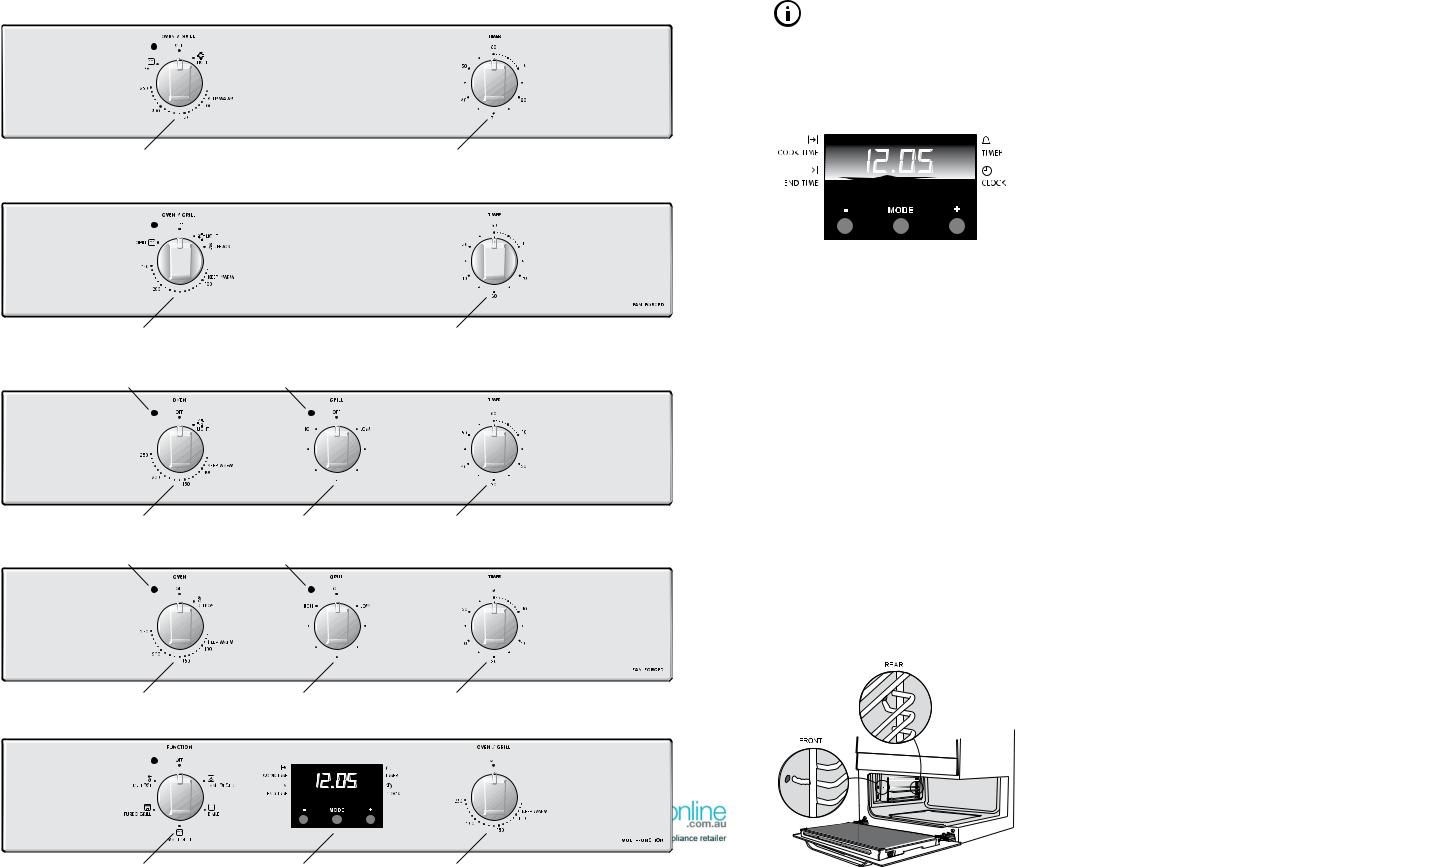
description of your appliance
Model: EOC617 Underbench Oven Conventional
|
|
|
|
|
|
|
|
|
|
|
|
|
|
|
|
|
|
|
|
|
|
|
|
|
|
|
|
|
|
|
|
Oven/Grill Temperature Selector |
One Hour Timer |
|
|
|
|||
Model: EOC627/63K906 Underbench Oven Fan Forced
Oven/Grill Temperature Selector One Hour Timer
Model: EXC617 Separate Grill Wall Oven Conventional
Oven Indicator Light Grill Indicator Light
|
|
|
|
|
|
|
|
|
|
|
|
|
|
|
|
|
|
|
|
|
|
|
|
|
|
|
|
|
|
|
|
|
|
|
|
|
|
|
|
|
|
|
|
|
|
|
|
Oven Temperature Selector |
Grill Temperature Selector |
One Hour Timer |
|
|
|
||||||
Model: EGC627/EXC627 Separate Grill Underbench Fan Forced/Separate Grill Wall Oven Fan Forced
Oven Indicator Light |
Grill Indicator Light |
|
|
|
|||||||
|
|
|
|
|
|
|
|
|
|
|
|
|
|
|
|
|
|
|
|
|
|
|
|
|
|
|
|
|
|
|
|
|
|
|
|
|
|
|
|
|
|
|
|
|
|
|
|
|
|
|
|
|
|
|
|
|
|
|
|
Oven Temperature Selector |
Grill Temperature Selector |
One Hour Timer |
Model: EOC647/63K914 Underbench Oven Multifunction 5
|
|
|
|
|
|
|
|
|
|
|
|
|
|
|
|
|
|
|
|
|
|
|
|
|
|
|
|
|
|
|
|
|
|
|
|
|
|
|
|
|
|
|
|
|
|
|
|
|
|
Function Selector |
3 Button Programmable Timer |
Oven/Grill Temperature Selector |
|
|
|||||
before operating your appliance for the first time
tips & information
Setting the time
If you have purchased a model fitted with an electronic or programmable timer, you must set the time of day before you can operate your appliance.
3 Button Electronic Clock
•After the appliance has been electrically connected ‘12.00’ will be displayed and the ‘clock indicator’ will flash.
•To set the time of day, press the – or + buttons. 5 seconds after the last change, the “clock indicator” will disappear, confirming the time has been set.
Note: The clock has a 24-hour display.
Preparing your appliance for the first time
•Please remove all internal boxes and bags from the oven before operation.
•Please wipe out the oven interior prior to operation with warm soapy water and polish dry with a soft clean cloth. Do not close the oven door until the oven is completely dry.
•New appliances can have an odour during first operation. It is recommended to ‘run in’ your oven before you cook for the first time. Run the oven at 180°C for 2–4 hours and ensure that the room is well ventilated.
Installing your oven accessories
The type of oven furniture you receive is dependant on the model you have purchased.
1. Side racks
Separate grill wall ovens come with side racks that are to be fitted to the smaller “grill cavity”.
These can be attached to either side in the following manner.
•Insert the largest peg into rear access hole provided.
See diagram above.
•Then locate the front peg into the front access hole and push in firmly.
2. Shelves and trays
Your oven comes with formed “easy clean” runners.
The shelves are designed to travel freely on runners without being pulled out accidentally. Make sure you have the shelf in the correct orientation before you slide it in. Otherwise it could become jammed.
•Locate the rear edge of the shelf in the recess between
2 formed runner. See diagram below.
Note: The Top ‘Ledge’ is not a shelf position
Note the orientation of the side and rear features
•With the front edge raised, begin to slide the shelf into the oven. Lower the front edge as you push the shelf completely in.
•The grill/baking tray for underbench oven models sits into a wire carrier that fits into the oven exactly like the shelves.
•The grill/baking tray for separate grill wall oven models slides into the wire runners in a similar manner.
•When fully inserted, the shelf/tray should not interfere with the closed oven door.
4 DESCRIPTION OF YOUR APPLIANCE Built-in Cooking |
Built-in Cooking BEFORE OPERATING YOUR APPLIANCE 5 |

before operating your appliance for the first time
•To insert the grill tray in a separate grill underbench, fully open the grill drawer and position the tray so that the slots on the outer edges fit on the tabs on the slides.
Separate grill underbench
•Always remove unnecessary trays and dishes from oven when roasting or baking.
using your oven
Understanding your oven functions
Your oven will have a selection of the following functions. Refer to “Description of your appliance” (page 4) to confirm what functions are available to you.
Fan Forced
Heat comes from the element surrounding the fan. This fan circulates the hot air around the oven cavity so that you can put your food in different places in the oven and still cook them at the same time.
You can use the “fan forced” function for multi-shelf cooking, reheating cooked foods, pastries and complete oven meals. It will cook at a lower temperature and be faster than baking. Please note that some variation in browning is normal.
Bake
Heat comes from the element below the food. The element is controlled by the thermostat and will turn on and off to maintain the set temperature.
The “bake” function can be used to add extra browning to the bases of pizzas, pies and pastries. Cook in the lower half of the oven when you are using only one shelf.
Defrost
The “defrost” function uses low temperature air that is circulated by the fan. You can defrost (thaw) your food before you cook it. You can also use “defrost” to raise your yeast dough and to dry fruit, vegetables and herbs.
Turbo Grill
“Turbo grill” offers you the benefits of both “bake” and traditional “grill” functions. The grill element turns on and off to maintain the set temperature while the fan circulates the heated air. The oven door remains closed. You can use “Turbo grill” for large cuts of meat. This gives you a result that is similar to “rotisserie” cooked meat. Put your food on a shelf in the second lowest shelf position. Put the grill dish on the lowest shelf position to catch any spills. When using “Turbo grill” it is not necessary to turn the food over during the cooking cycle. Set temperature to 180°C.
Grill
The “grill” directs radiant heat from the powerful upper element onto the food. You can use the “grill” function for tender cuts of meat, steak, chops, sausages, fish, cheese toasties and other quick cooking foods. Grill with the oven door closed. Preheat your grill for 3 minutes to get the best results. This will help seal in the natural juices of steak, chops etc. for a better flavour. You can slide your grill dish into either of the 2 spaces within the upper pairs of support rails.
Maxi Grill
“Maxi grill” directs radiant heat from 2 powerful upper elements onto the food. You can use the “maxi grill” function for tender cuts of meat, steak, chops, sausages, fish, cheese toasties and other quick cooking foods. Grill with the oven door closed.
“Maxi grill” allows you to take full advantage of the large grill dish area and will cook faster than normal “grill”. For best results it is recommended to preheat your grill for 3 minutes. This will help seal in the natural juices of steak, chops etc. for a better flavour. You can slide your grill dish into either of the 2 spaces within the upper pairs of support rails.
6 BEFORE OPERATING YOUR APPLIANCE Built-in Cooking |
Built-in Cooking USING YOUR OVEN 7 |
using your oven |
operating the |
|
programmable clock |
Separate Grill
The “grill” directs radiant heat from the powerful upper elements onto the food. You can use the “grill” function for tender cuts of meat, steak, chops, sausages, fish, cheese toasties and other quick cooking foods. Grill with the oven door open. Preheat your grill for 3 minutes to get the best results. This will help seal in the natural juices of steak, chops etc. for a better flavour. The grill dish is to be positioned between the upper pair of support rails.
Cooling/Venting fan
Your built-in appliance is fitted with a cooling fan. It will operate whenever you are using your oven or grill and will blow warm air across the top of the oven door. In some appliances the cooling fan may continue to operate after the appliance is turned off. This is to cool the product.
Condensation
Excess condensation may fog the oven door. This may happen when you are cooking large quantities of food from a cold start. You can minimize condensation by:
•Keeping the amount of water used whilst cooking to a minimum.
•Making sure that the oven door is firmly closed.
•Baking custard in a baking dish that is slightly smaller than the water container.
•Cooking casseroles with the lid on.
Note: If you are using water in cooking, this will turn to steam and may condense outside your appliance. This is not a problem or fault with your oven.
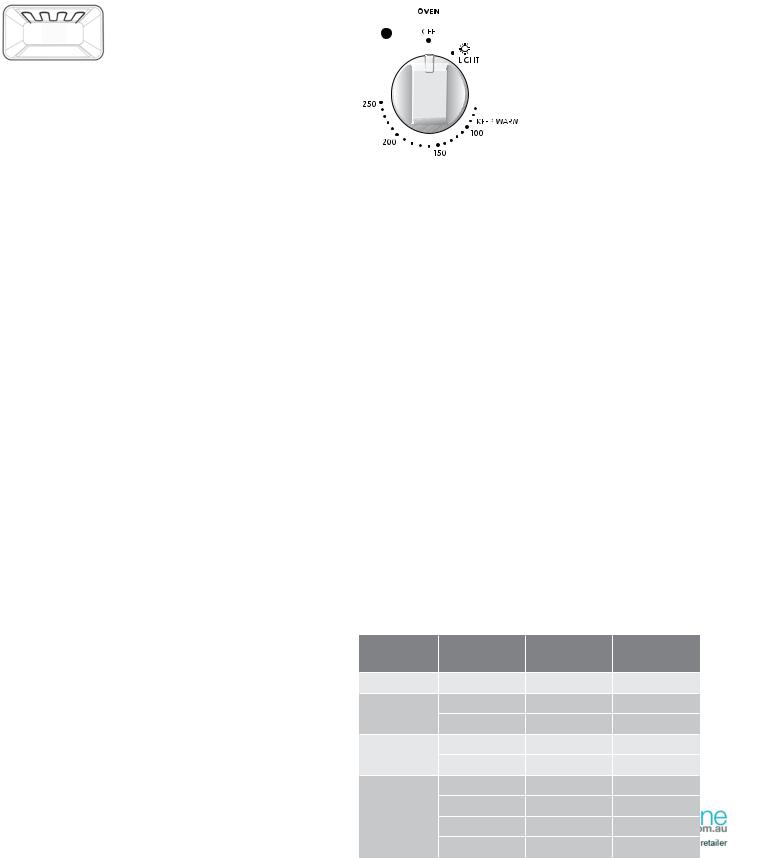
Operating your oven temperature selector
A thermostat controls the temperature in your appliance. The temperature can be selected within the specified range. To set the temperature, turn the temperature selector in a clockwise direction to the desired setting. An indicator light above the temperature selector will come on. When the temperature is reached, the heating source switches itself off
and the indicator light goes out. When the oven temperature falls below the desired setting, the heating source switches on and the indicator light comes on again. Once the food is cooked, turn the temperature selector back in an anti-
clockwise direction. Do not force it right round in a clockwise direction as this will result in damage to the thermostat.
Note: For multifunction ovens the desired cooking function must be selected before the oven will operate. Once the desired function has been selected, use the temperature selector to set the required temperature.
Pre-heating your appliance
Pre-heating your oven is recommended in cooking and grilling functions. For best results when baking you must preheat your oven for 30 minutes.
With “Fan Forced”
1.It is recommended to preheat your appliance when cooking or baking.
2.Set the desired temperature, by rotating your oven temperature selector.
When the indicator light above the temperature selector goes out, the oven has reached the desired temperature, place your food into the oven, close the door and set the timer if you desire.
With “grill”
Preheat the grill for at least 3 minutes to obtain best results. This will help to seal the natural juices of steak, chops and other meats for a better flavour.
Setting temperatures
The following table displays the temperature settings for recipes which do not show actual temperatures.
|
Oven |
Temperature |
Temperature |
|
|
ºC |
ºF |
|
Cool |
80 |
175 |
Low Heat |
Very slow |
100 – 110 |
210 – 230 |
|
Slow |
130 – 140 |
265 – 285 |
Moderate |
Moderately slow |
150 – 160 |
300 – 320 |
Heat |
Moderate |
170 – 180 |
340 – 355 |
|
|||
High Heat |
Moderately hot |
190 – 200 |
375 – 390 |
|
Hot |
200 – 210 |
390 – 410 |
|
Very hot |
220 – 230 |
430 – 450 |
|
Extremely hot |
240 – 250 |
465 – 480 |
3 button programmable timer
General features
Your 3 button programmable timer has the following features:
•Timer – your 3 button programmable timer allows you to set a countdown time that will beep when the set time has elapsed.
•Cooking duration – You can set a cooking duration.
A timer will count down the preset cooking time, beep when the time has elapsed and turn the oven off.
•End cooking time – you can set a cooking finish time.
A timer will count down the preset cooking time, beep when the finish time has been reached and turn the oven off.
•Delayed start cooking time – You can combine the cooking time and stop cooking time to switch the oven on and off at a specific time during the day.
Note: Your 3 button programmable timer only operates with your main oven.
Setting the time of day
You must set the time of day before you can operate your appliance. When power is supplied to your oven “12.00“ will be displayed and the “clock” indicator  will flash.
1.To set the time of day in hours and minutes, press the – or + buttons. 5 seconds after the last change, the “clock” indicator  will disappear, confirming the time has been set.
Note: The clock has a 24-hour display.
Setting the timer
1.Press the “mode“ button until the “timer” indicator  begins flashing.
2.Set the countdown time you want by using the – and + buttons. 5 seconds after the last change the “timer” indicator  will stop flashing, confirming the timer has been set.
3.To stop the beeper, press any button.
Setting the cooking duration
1.Check the clock displays the correct time of day.
2.Select the desired oven function and temperature. The oven indicator light will glow and the heating source will come on.
3.Press the “mode“ button until the “cook time” indicator  begins flashing.
4.Set the cooking duration you want by using the – or + buttons. 5 seconds after the last change, the “cook time” indicator  will stop flashing, and the time of day will be displayed.
Note: Do not forget to add preheating time if necessary.
Setting the cooking end time
1.Check the clock displays the correct time of day.
2.Select the desired oven function and temperature. The oven indicator light will glow and the heating source will come on.
3.Press the “mode“ button until the “end time” indicator  begins flashing.
4.Enter the time of day you want to finish cooking by pressing the – or + buttons. 5 seconds after the last change, the “end time” indicator  will stop flashing and the current time of day will be displayed.
Setting the delayed start cooking time
1.Program the “cook time“ and “end time“ as described in the relevant sections. Once both the “cook time“ and
“end time“ have been set, the “cook time“ and “end time” indicators will stop flashing and the current time of day will be displayed.
To check or cancel settings
1.To check your settings, press the mode button until the setting you want is displayed. A red light will flash next to the mode (cook time, end time etc) that is currently on display.
2.To cancel “delayed start” press the mode button until a light flashes next to “end time”. Press and hold the –
button until the clock no longer reverses (you will hear a beep). If you have left the temperature and function knobs at a setting the oven will start once the “end time” light stops flashing.
3.To cancel “auto shut off” press the mode button until a light flashes next to “cook time”. Press and hold the
– button until the clock no longer reverses at (“0:00”
and you will hear a beep). This automatically cancels “delayed start”. If you have left the temperature and function knobs at a setting, the oven will start once the “cook time” light stops flashing. Because you have cancelled “auto off” the oven will continue to heat until you manually turn it off.
On completion of cooking
The oven will turn off, the timer will beep and the “end time“ and/or “cook time“ indicators will flash.
1.Turn the function and temperature controls to the off position.
2.Press any button to stop the timer from beeping.
8 USING YOUR OVEN Built-in Cooking |
Built-in Cooking OPERATING THE PROGRAMMABLE CLOCK 9 |
 Loading...