

Page 1

CHATTANOOGA
®
GROUP INC.
Intelect
P.N. 78343 Rev. A
Legend Series
Service Manual
Page 2

I NEED TO KNOW . . .
Go to page
Warranty Information ..............................3
How the unit works..................................6
What might be wrong with my unit......25
What the error messages mean ...........26
Special Key Combinations....................27
CHATTANOOGA
GROUP INC.
How to calibrate the unit.......................38
How to open the unit ...............................9
How the boards interconnect ...............36
Where the connectors are.....................11
What the signals are..............................11
Part numbers..........................................46
How to get service help...........................3
How to close the unit...............................9
Technical Specifications.......................43
First look on this page to quickly find where to go in the manual
for more information !
Innovation starts here TM 2 Intelect® Legend Series Service Manual
Page 3

CHATTANOOGA
GROUP INC.
Intelect® Legend Two Year Limited Warranty
The Chattanooga Group Inc. (“Company”) warrants that the Intelect® Legend
Ultrasound or Stim (“Product”) excluding accessories is free of defects in material and
workmanship.
This warranty shall remain in effect for two (2) years from the date of the original
consumer purchase of this and extends to any owner of the product during the warranty
period. Accessories that are included as standard with the product (as listed in the user’s
manual) are warranted for 90 days. Ultrasound applicators 2cm
warranted for one (1) year. If this product fails to function during the two year warranty period
because of a defect in material or workmanship, the company or the selling dealer will replace
or repair this product without charge within a period of 30 days from the date on which the
defective product is returned to the company or dealer. The company or the dealer will ship
the replacement or the repaired product to the owner.
All repairs must be performed by a service center authorized by the Chattanooga
Group, Inc. Any modifications or repairs performed by unauthorized centers or groups will
void this warranty. To participate in warranty coverage, the product’s warranty registration
card (included with the product) must be filled out and returned to the Chattanooga Group,
Inc. by the original owner within 10 business days of purchase.
This warranty does not cover:
Replacement parts or labor furnished by anyone other than the Company, the dealer
or an approved Company service agent.
Defects or damage caused by labor furnished by someone other than Company, the
dealer or an approved Company service agent.
Any malfunction or failure in the product while it is in the possession of the owner
during the warranty period if the malfunction or failure is not caused by a defect in material or
workmanship or if the malfunction or failure is caused by unreasonable use, applications in
which the product was not intended or the failure to provide reasonable and necessary
maintenance.
The Company shall Not be Liable for Incidental or Consequential Damages.
To Obtain Service:
From Company or the selling dealer under this warranty, the owner must do or abide
by the following:
• A written claim must be made within the warranty period to Company or the
selling dealer.
• If the claim is made to the Company, the written claim should be sent to:
Chattanooga Group INC.
Australian Warehouse
Dingley Victoria 3172
Phone: (03) 9558 3825
Fax: (03) 9558 2491
• The product must be returned to Company or the selling dealer by the owner.
This warranty gives you specific legal rights, and you may also have other rights
which vary from state to state.
The Company does not authorize any person or representative to create for it any
other obligation or liability in connection with the sale of the Product. Any representation or
agreement not contained in the warranty shall be void and of no effect.
2
, 5cm2 or 10cm2 are
Innovation starts here TM 3 Intelect® Legend Series Service Manual
Page 4

CHATTANOOGA
GROUP INC.
Start Here
About This Manual
This manual is intended to cover the Intelect® Legend Ultrasound and
Stim units and their accessories only.
The purpose of this service manual is to give a qualified technician
enough information to troubleshoot problems to the board level. Because of
the complexity and construction of these boards it is not recommended that
problems be traced to the component level. Some problems may be due to a
misunderstanding of how the machine operates. Thus it is important to read
the operators manual first to gain familiarity with how the machine operates
under normal circumstances.
Since this service manual is intended to assist in isolating the problem
to a circuit board, we will not cover the functions performed on each board in
detail.
This manual presents a brief theory of operation of each board and
accessory in the unit. It contains a troubleshooting guide for common
problems. This guide is not meant to cover every possible problem that a
service technician might encounter, but rather to give examples of what may
be seen. The manual also contains diagrams of the connector layout of each
board, a system diagram of how the unit is wired, and a list of signals carried
on each wire. Also included are calibration procedures for the unit, parts lists
and information on obtaining service.
Important !
The specifications and information put forth in this manual were in
effect at the time of publication. However, owing to Chattanooga Group’s
policy of continuous improvement, changes to these may be made at any time
without obligation on the part of Chattanooga Group, Inc.
Specifically, as there are improvements made to the circuit boards in
these units the connector
names may change. However, the location and
function of the connector will not likely change. Use reasonable judgment
and contact Chattanooga Group when in doubt.
Chattanooga Group, Inc., obviously cannot be responsible for work
performed on their units by individuals or other companies not approved or
authorized to perform service on Chattanooga Group equipment. Always try
to resolve any problems through your dealer or Chattanooga Group’s
customer service department FIRST.
Please read and understand the following precautions before
using or servicing a unit.
Innovation starts here TM 4 Intelect® Legend Series Service Manual
Page 5

CHATTANOOGA
GROUP INC.
PRECAUTIONARY INSTRUCTIONS
As with any electrical device, use extreme caution while working
inside the devices. Some of the circuits produce high voltages which
may be accessible while servicing the unit. Be especially mindful of jewelry
and tools that may accidentally come in contact with components inside the
unit.
Most of the electronic components incorporated in the unit are
electrostaticly sensitive. Always wear a static grounding strap and work
on a static dissipative surface.
CAUTION: Read, understand and practice the precautionary and
operating instructions contained in the unit’s manual and in this service
manual. Know the limitations and hazards associated with using any
ultrasound device. Observe the precautionary and operational decals placed
on the unit.
CAUTION: Do not operate the Intelect
to any unit other than Chattanooga Group, Inc., devices. Do not operate the
unit in an environment of short-wave diathermy use.
®
Legend Unit when connected
WARNING: Federal Law restricts this device to sale by, or on the order
of, a physician or licensed practitioner. This device should be used only under
the continued supervision of a physician or licensed practitioner.
CAUTION: The ultrasound generator should be routinely checked
before each use to determine that all controls function normally; especially
that the intensity control does properly adjust the intensity of the ultrasonic
power output in a stable manner. Also, determine that the treatment time
control does actually terminate ultrasonic power output when the timer
reaches zero.
CAUTION: Use of controls or adjustments or performance of
procedures other than those specified in the unit’s manual or in this service
manual may result in hazardous exposure to ultrasonic energy.
CAUTION: DO NOT use sharp objects such as a pencil point or ball
point pen to operate the buttons on the control panel as damage may result.
WARNING: Explosion hazard if used in the presence of flammable
anesthetics. The warning symbol for this hazard is prominently displayed on
the cabinet.
WARNING: For continued protection against fire hazard, replace fuses
only with ones of the same type and rating.
WARNING: Make certain that the unit is electrically grounded by
connecting only to a grounded electrical service receptacle conforming to the
applicable national and local electrical codes.
WARNING: This device should be kept out of the reach of children.
Innovation starts here TM 5 Intelect® Legend Series Service Manual
Page 6

CHATTANOOGA
GROUP INC.
Theory of Operation
Overview
To better understand the details in the following paragraphs, a quick
look at the operation of the entire system is helpful.
The unit is powered by a desktop switching power supply which
accepts 100-240VAC and delivers a regulated 12-16VDC. Each board within
the unit has its own local regulation as required by the particular board
functions.
The user interface consists of the membrane switch panel on the top of
the case and the LCD parameter screen for the Stim unit or LED displays for
the Ultrasound unit. Choices presented on the LCD screen are selected via
the membrane switches for the Stim unit while selections are made directly
from the membrane switches and reflected in the LED displays on the
Ultrasound unit. After a treatment is started on the Stim unit, the LCD screen
returns to a display showing the status of the outputs. The LED displays
constantly reflect the status of the Ultrasound unit. Alarms and feedback of
keypresses are provided by a beeper located inside the case.
Connection for the ultrasound applicator and for electrode lead wires
are made to panels on the side of the unit. The rear of the unit has the power
supply input connector, the fuse and the fan.
Accessories supplied with all Ultrasound units include at least one
applicator and ultrasound gel. Stim units have electrode leads and
electrodes.
The Control Boards
• The Ultrasound Control Board
The signals controlling the Ultrasound Generator Board are carried
through a 40 conductor cable from JP5 on the Control Board to J1 on the US
Generator Board. Refer to the signal list. The signals include address and
data lines, handshake lines and power supply controls.
Connector JP6 is for the membrane switches. JP1 is the power supply
connector and supplies power from the desktop power supply.
JP2 is the output power connector for the Ultrasound Generator Board.
JP4 supplies power to the fan and JP3 is for the beeper.
• The Stim Control Board
The signals controlling the Stim Board leave JP7 on the Control Board
and go through a 40 conductor cable to JP1 on the Stim Board. See the
Signal List for details. Signals include address and data lines, handshake
lines, and power supply control signals.
Connector JP4 is for the LCD screen. It is mounted directly behind the
board and against the front panel. JP9 carries power for the
electroluminescent backlighting.
Connector JP10 is for the membrane switches. JP1 is the power
supply connector and supplies power from the desktop power supply.
JP2 is the output power connector for the Stim Board.
Innovation starts here TM 6 Intelect® Legend Series Service Manual
Page 7

CHATTANOOGA
GROUP INC.
JP3 supplies power to the fan and JP6 is for the beeper.
The Stim Board
The Stim Board’s function is to generate various output waveforms
under the direction of the Control Board. Due to the variety of waveforms
commonly used in electrotherapy, there are different waveform generators on
the board, all controlled by a common Digital Signal Processor (DSP).
• The Sine Wave Generators
There are two of these on each Stim Board, one for channel 1 and the
other for channel 2. Each is identical except for their connections to the
output jacks. Under control of the DSP, Programmable Array Logic (PAL)
devices generate a driving signal which is fed to an amplifier. The output
amplitude of the amplifier is determined by a programmable power supply,
also controlled by the DSP. The resulting output is filtered and routed by
relays to the appropriate connector on the board.
These same generators are used to develop the VMS, or Biphasic
output, the Premod output, the Interferential output and the Russian output.
• The Hi-Volt Generator
The Hi-Volt output is only available from channel 2 of the unit. Under
control of the DSP, timing information is generated by a PAL. This is used to
control the charging and discharging of a transformer. The discharges are
routed through relays to obtain the proper polarity and connect them to the
proper output connector on the board.
JP2 on the Stim Board determines whether the board operates as
channels 1&2 or 3&4 on a CPS 400. This jumper
must be set for channels
1&2 for the unit to operate properly. See the board drawing in the Signal Lists
section for jumper configuration.
The Ultrasound Board
The Ultrasound Board uses a Phase Locked Loop (PLL) that is set by a
PAL based on control by the Control Board to generate a stable high
frequency signal. This signal is used to drive an amplifier whose output is
filtered and drives the transducer. The amplitude of the amplifier output is
determined by its programmable power supply. Other circuitry monitors the
temperature of the transducer as well as voltage and current of the drive to
the transducer.
The Ultrasound Board is controlled by signals from connector JP5 of
the Control Board that are carried through a 40 conductor cable to J1 on the
Ultrasound Board. The signals consist of address and data lines as well as
handshake lines. There are also signals for turning off the power supplies on
the Ultrasound Board when it is not generating output.
The power for the Ultrasound Board is through J2. Connector J3 is the
output of the Ultrasound Board which ultimately drives the transducer in the
applicator.
Innovation starts here TM 7 Intelect® Legend Series Service Manual
Page 8

CHATTANOOGA
GROUP INC.
The Ultrasound Applicator
The Ultrasound Applicator comes in several models, depending on the
surface area of the transducer and the shape of the face of the transducer.
The circuitry within all of them is the same.
Connection to the Applicator is through a triaxial cable. The center
conductor carries the drive to the transducer while the inner shield is the
return. The outer shield is used to monitor the transducer temperature using
a thermistor inside the Applicator.
A small circuit board inside the Applicator holds components for
transducer temperature sensing and the memory device. The memory device
stores the frequency and power information for the transducer. The memory
device communicates via the two shields of the cable.
The Membrane Switch Panel
The membrane switch panel connects to JP6 on the Ultrasound Control
Board and JP10 on the Stim Control Board. The switches are electrically
arranged such that one side of all the switches have a common return. The
other side of the switches are brought out individually to the connector. The
switch activations are buffered and latched on the Control Boards.
The LCD Parameter Screen
The LCD parameter screen mounts between the Control Board and the
top of the case. The interface between the LCD and the Stim Control Board’s
JP4 is a bi-directional 8-bit bus along with handshake signals. There is a
separate connection via JP9 for supplying power to the electroluminescent
backlight of the LCD. There is a module mounted on the Control Board which
generates the necessary voltage for this.
The LED Interface
The LED displays mount on the solder side of the Ultrasound Control
Board so as to show through the overlay on the case. They are soldered
directly to the board and therefore are not replaceable.
Innovation starts here TM 8 Intelect® Legend Series Service Manual
Page 9

CHATTANOOGA
GROUP INC.
General Service Procedures
Preventing damage to the case
The plastic case of the Intelect units is quite durable, as are the
membrane switch overlays. To remove the screws and open the case for
servicing it will be necessary to place the unit upside down. Be sure the work
surface is covered so that the unit isn’t scratched. Also be careful with tools
that may scratch the case or overlays.
Location of screws
There are 6 screws that hold the case together and all of them are
accessible from the bottom of the unit. These screws are distinguished from
others on the bottom in that they are all recessed into the plastic case.
Remove all 6 screws.
Opening the Case
Flip the unit back over and carefully lift the top of the case off the
bottom. The top of the case can be opened from the left and put on the right
side of the bottom without disconnecting the cables. If you do need to remove
any cables, NOTE THE ORIENTATION of these cables BEFORE unplugging
them because pin 1 is not marked on all the PC Boards. Mark the cable or
connector and the board before unplugging with a permanent marker, tape or
other means if you need to. You will also need to make note of which small 2wire connector is for the fan and which is for the beeper. If these become
swapped when assembling the unit, the beeper will sound continuously
whenever the power is on.
Special Tools
Almost any operation can be performed without any special tools. If
you need to replace the EPROMs or PALs on any of the boards, you
MUST
use a special tool to remove the parts. Attempting to remove these IC’s in
any other way can damage the socket and make the entire circuit board
unusable. The preferred tool is Burndy QILEXT-1, sold by Newark Electronics
as type 290N, P/N 95F3004.
Closing the case
Re-assemble the unit taking care to properly install any cables you may
have disconnected. When lowering the top down onto the bottom, be careful
not to capture any wires in the edge of the case. If you are having difficulty it
may be necessary to align one side of the case and then force the other side
to align. Also notice that the metal plates on either side must align with plastic
structures inside the case. After all this work look around the edge of the case
one last time to be sure everything looks OK. Now the back panel may have
fallen into the cabinet while aligning the top and bottom - don’t panic.
Carefully lift the rear edge of the top just enough to allow you to pull the panel
back into its slot in the top and bottom of the case.
Hold the unit together and flip it over (once again be sure the table is
covered so that the case isn’t scratched) and put the 6 screws back in place.
Don’t overtighten the screws, tighten them just until the edges of the case
seat together.
Innovation starts here TM 9 Intelect® Legend Series Service Manual
Page 10

Signal Lists
®
Intelect
Ultrasound Control Board
Below is a simple drawing showing the approximate locations of the
connectors and the position of pin 1 on each connector.
JP1
Legend US Control
PIN 1
JP2
CHATTANOOGA
GROUP INC.
PIN 1
PIN 1
PIN 1
JP3
JP5
JP4
PIN 1
PIN 1
JP6
Below are tables showing the signals for each connector on the Control
Board. The columns are arranged as pin number, signal description, type of
signal and any other notable information about the signal.
JP1 US Control Board
Pin # Signal Name Type
1 Battery In Power Unused
2 Battery In Power Unused
3 Power Supply In Power +8 to +18 VDC
4 Power Supply In Power +8 to +18 VDC
5 Ground
6 Ground
JP2 US Control Board
Pin # Signal Name Type
1 Power Out Power +8 to +18 VDC
2 Power Out Power +8 to +18 VDC
3 Ground
4 Ground
Innovation starts here TM 10 Intelect® Legend Series Service Manual
Page 11

CHATTANOOGA
GROUP INC.
JP3 US Control Board
Pin # Signal Name Type
1 Unregulated Power Power +8 to +18VDC,
Current Limited
2 Buzzer On Output Open Collector, Active
Low
JP4 US Control Board
Pin # Signal Name Type
1 Unregulated DC Power 8-18VDC
2 Fan On Output Open Collector, Active
Low
JP5 US Control Board
Pin # Signal Name Type
1 Ground
2 US Data Line 0 Bi-Directional Digital
3 Ground
4 US Data Line 1 Bi-Directional Digital
5 Ground
6 US Data Line 2 Bi-Directional Digital
7 Ground
8 US Data Line 3 Bi-Directional Digital
9 Ground
10 US Data Line 4 Bi-Directional Digital
11 Ground
12 US Data Line 5 Bi-Directional Digital
13 Ground
14 US Data Line 6 Bi-Directional Digital
15 Ground
16 US Data Line 7 Bi-Directional Digital
17 Ground
18 No Connection
19 Ground
20 US Address Line 0 Output Digital
21 Ground
22 US Address Line 1 Output Digital
23 Ground
24 No Connection
25 Ground
26 No Connection
27 Ground
28 No Connection
29 Ground
30
31 Ground
US Strobe
Output Digital Active Low
Innovation starts here TM 11 Intelect® Legend Series Service Manual
Page 12

CHATTANOOGA
GROUP INC.
32 US Board Enable Output Digital Active Low
33 Ground
34 US Read/Write Output Digital Active Low
35 Ground
36 No Connection
37 Ground
38 US Power Down 1 Output Digital
39 Ground
40 US Power Down 2 Output Digital
JP6 US Control Board
Pin # Signal Name Type
1 Ground
2 Switch 0 Input Digital Active Low
3 Switch 1 Input Digital Active Low
4 Switch 2 Input Digital Active Low
5 Switch 3 Input Digital Active Low
6 Switch 4 Input Digital Active Low
7 Switch 5 Input Digital Active Low
8 Switch 6 Input Digital Active Low
9 Switch 7 Input Digital Active Low
10 Switch 8 Input Digital Active Low
11 Switch 9 Input Digital Active Low
12 Switch 10 Input Digital Active Low
Innovation starts here TM 12 Intelect® Legend Series Service Manual
Page 13
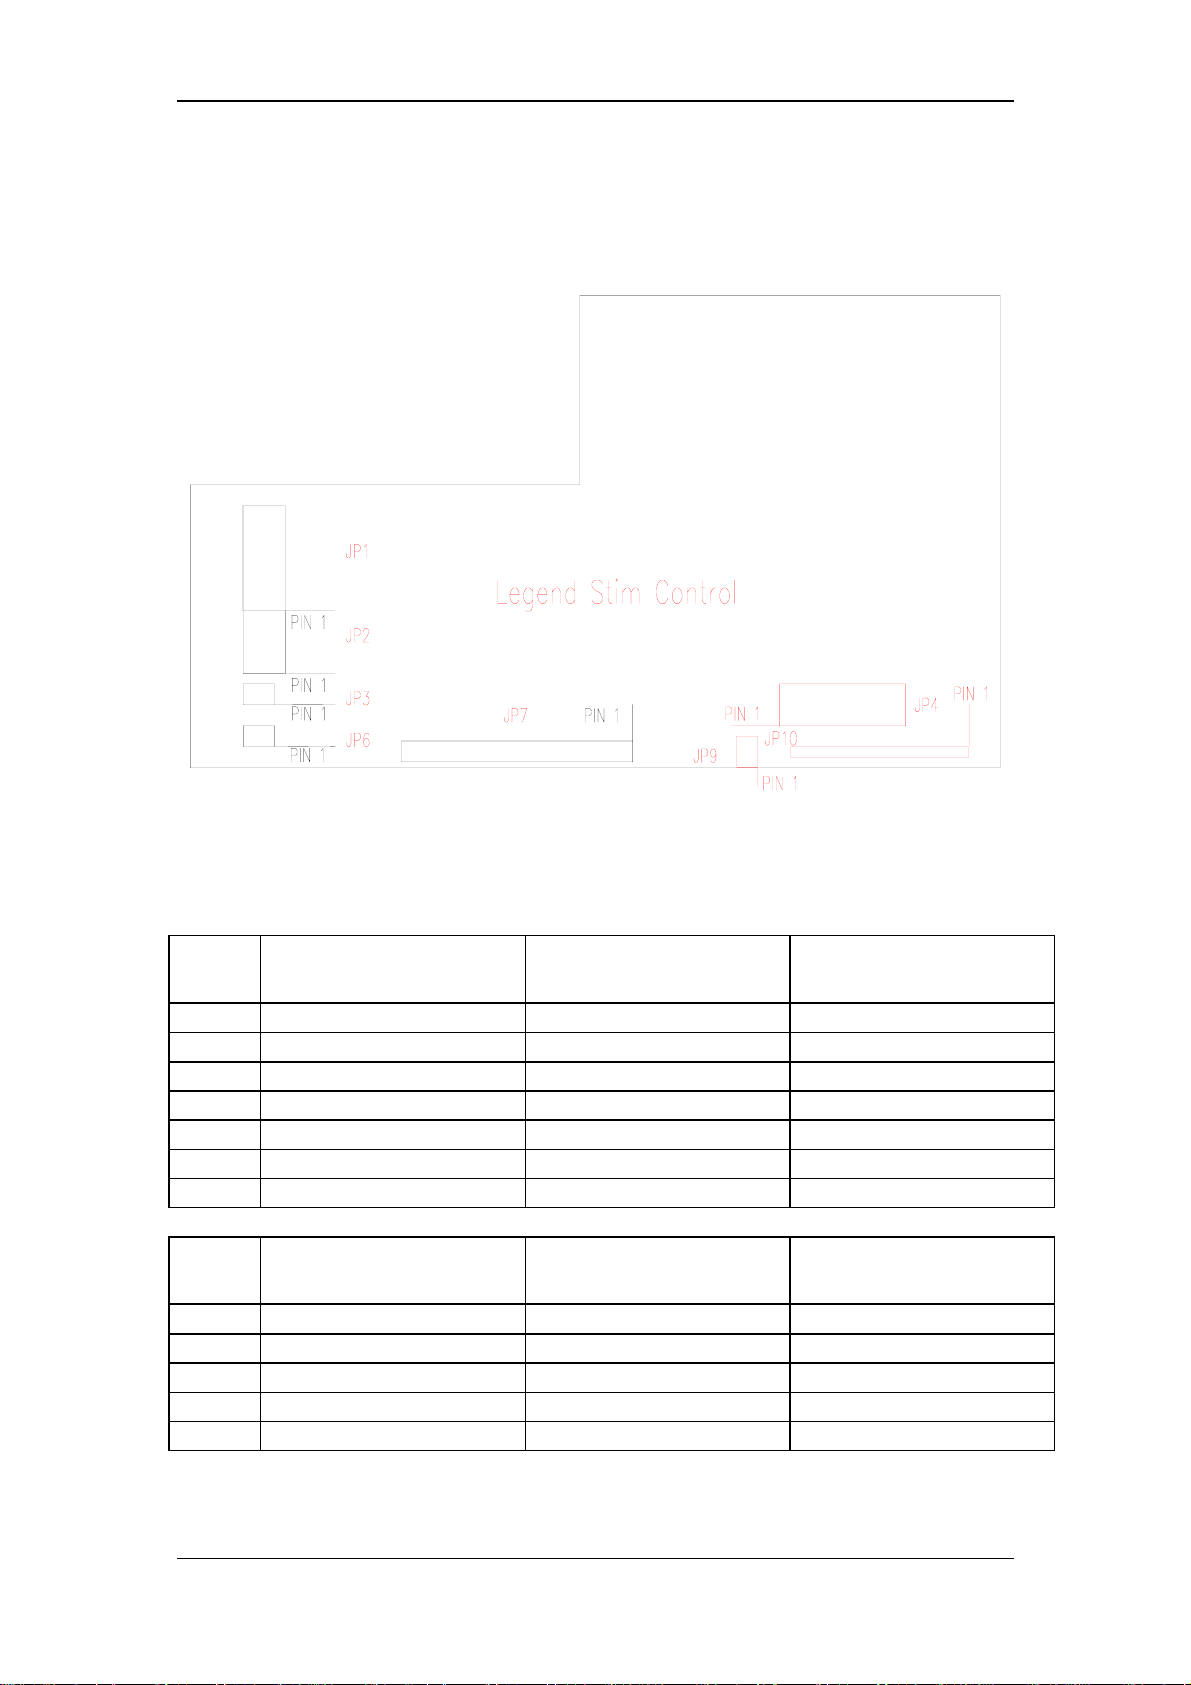
Intelect
®
Legend Stim Control Board
Below is a simple drawing showing the approximate locations of the
connectors and the position of pin 1 on each connector.
CHATTANOOGA
GROUP INC.
Below are tables showing the signals for each connector on the Control
Board. The columns are arranged as pin number, signal description, type of
signal and any other notable information about the signal.
JP1 Stim Control
Board
Pin # Signal Name Type
1 Battery In Power Unused
2 Battery In Power Unused
3 Power Supply In Power +8 to +18 VDC
4 Power Supply In Power +8 to +18 VDC
5 Ground
6 Ground
JP2 Stim Control
Board
Pin # Signal Name Type
1 Power Out Power +8 to +18 VDC
2 Power Out Power +8 to +18 VDC
3 Ground
4 Ground
Innovation starts here TM 13 Intelect® Legend Series Service Manual
Page 14

CHATTANOOGA
GROUP INC.
JP3 Stim Control
Board
Pin # Signal Name Type
1 Unregulated Power Power +8 to +18VDC,
Current Limited
2 Buzzer On Output Open Collector, Active
Low
JP4 Stim Control
Board
Pin # Signal Name Type
1 Ground
2 Ground
3 VCC Power +5 Volts
4 LCD Bias Power -6 to -18 VDC, varies
with contrast
5 LCD Write Output Digital Active Low
6 LCD Read Output Digital Active Low
7 LCD Chip Enable Output Digital Active Low
8 LCD Command / Data
Select
9 No Connection
10 LCD Reset Output Digital Active Low
11 LCD Data Line 0 Bi-Directional Digital
12 LCD Data Line 1 Bi-Directional Digital
13 LCD Data Line 2 Bi-Directional Digital
14 LCD Data Line 3 Bi-Directional Digital
15 LCD Data Line 4 Bi-Directional Digital
16 LCD Data Line 5 Bi-Directional Digital
17 LCD Data Line 6 Bi-Directional Digital
18 LCD Data Line 7 Bi-Directional Digital
19 Ground
20 No Connection
JP6 Stim Control
Output Digital - Data is Active
Low
Board
Pin # Signal Name Type
1 Unregulated DC Power 8-18VDC
2 Fan On Output Open Collector, Active
Low
JP7 Stim Control
Board
Pin # Signal Name Type
1 Dual Port RAM Input Digital Active Low
Innovation starts here TM 14 Intelect® Legend Series Service Manual
Page 15

CHATTANOOGA
GROUP INC.
Interrupt
2 Address Line 0 Output Digital
3 Ground
4 Address Line 1 Output Digital
5 Dual Port RAM Busy Input Digital Active Low
6 Address Line 2 Output Digital
7 Ground
8 Address Line 3 Output Digital
9 Dual Port RAM
Output Digital
Read/Write
10 Address Line 4 Output Digital
11 Ground
12 Address Line 5 Output Digital
13 Dual Port RAM Output
Output Digital Active Low
Enable
14 Address Line 6 Output Digital
15 Ground
16 Address Line 7 Output Digital
17 Dual Port RAM Chip
Output Digital Active Low
Enable Board 1
18 Address Line 8 Output Digital
19 Dual Port RAM Chip
Active Low
Enable Board 2
20 Address Line 9 Output Digital
21 Ground
22 Patient Disconnect Output Digital
23 Stim Channel 1
Output Digital
Power-Down
24 No Connection
25 Ground
26 Stim Data Line 0
27 MicroCurrent Probe
Input Digital
Switch
28 Stim Data Line 1 Bi-Directional Digital
29 Ground
30 Stim Data Line 2 Bi-Directional Digital
31 Ground
32 Stim Data Line 3 Bi-Directional Digital
33 Ground
34 Stim Data Line 4 Bi-Directional Digital
35 Stim Channel 2
Output Digital
Power-Down
36 Stim Data Line 5 Bi-Directional Digital
37 Ground
38 Stim Data Line 6 Bi-Directional
39 Stim Reset Output Digital Active Low
40 Stim Data Line 7 Bi-Directional Digital
Innovation starts here TM 15 Intelect® Legend Series Service Manual
Page 16

CHATTANOOGA
GROUP INC.
JP9 Stim Control
Board
Pin # Signal Name Type
1 Backlight Power Power Approx. 100VAC,
Approx. 400Hz
2 Ground
JP10 Stim Control
Board
Pin # Signal Name Type
1 Ground
2 Switch 0 Input Digital Active Low
3 Switch 1 Input Digital Active Low
4 Switch 2 Input Digital Active Low
5 Switch 3 Input Digital Active Low
6 Switch 4 Input Digital Active Low
7 Switch 5 Input Digital Active Low
8 Switch 6 Input Digital Active Low
9 Switch 7 Input Digital Active Low
10 Switch 8 Input Digital Active Low
11 Switch 9 Input Digital Active Low
12 Switch 10 Input Digital Active Low
13 Switch 11 Input Digital Active Low
14 Switch 12 Input Digital Active Low
15 Switch 13 Input Digital Active Low
16 Switch 14 Input Digital Active Low
17 Switch 15 Input Digital Active Low
Innovation starts here TM 16 Intelect® Legend Series Service Manual
Page 17

Ultrasound Generator Board
Below is a simple drawing showing the approximate locations of the
connectors and the position of pin 1 on each connector.
CHATTANOOGA
GROUP INC.
J1
PIN 1
PIN 1
J2
Ultrasound Generator Board
J3
Below are tables showing the signals for each connector on the Control
Board. The columns are arranged as pin number, signal description, type of
signal and any other notable information about the signal
J1 Ultrasound
Generator Board
Pin # Signal Name Type
1 Ground
2 US Data Line 0 Bi-Directional Digital
3 Ground
4 US Data Line 1 Bi-Directional Digital
5 Ground
6 US Data Line 2 Bi-Directional Digital
7 Ground
8 US Data Line 3 Bi-Directional Digital
9 Ground
10 US Data Line 4 Bi-Directional Digital
11 Ground
12 US Data Line 5 Bi-Directional Digital
13 Ground
14 US Data Line 6 Bi-Directional Digital
15 Ground
16 US Data Line 7 Bi-Directional Digital
17 Ground
18 No Connection
19 Ground
PIN 1
Innovation starts here TM 17 Intelect® Legend Series Service Manual
Page 18

CHATTANOOGA
GROUP INC.
20 US Address Line 0 Input Digital
21 Ground
22 US Address Line 1 Input Digital
23 Ground
24 No Connection
25 Ground
26 No Connection
27 Ground
28 No Connection
29 Ground
30
31 Ground
32 US Board Enable Input Digital Active Low
33 Ground
34 US Read/Write Input Digital Active Low
35 Ground
36 No Connection
37 Ground
38 US Control Circuitry
39 Ground
40 US Amplifier Power
US Strobe
Power Down
Down
J2 Ultrasound
Input Digital Active Low
Input Digital
Input Digital
Generator Board
Pin # Signal Name Type
1 DC Power Input Input 8-18 VDC
2 DC Power Input Input 8-18 VDC
3 Ground
4 Ground
J3 Ultrasound
Generator Board
Pin # Signal Name Type
1 US Generator Output Output 0-50V, 1-3 MHz Sine
Wave
2 Ground
3 Calibration Read/Write
OR
Ground
4 Ground
Bi-Directional 5V Digital During
Read
12V Digital During
Write
Innovation starts here TM 18 Intelect® Legend Series Service Manual
Page 19

Stim Board
Below is a simple drawing showing the approximate locations of the
connectors and the position of pin 1 on each connector.
Jumper for Ch. 1&2
Jumper for Ch. 3&4
Stim Board
CHATTANOOGA
GROUP INC.
JP1
JP2
PIN 1
PIN 1
PIN 1
J2
J3 J4 J5
PIN 1PIN 1PIN 1
PIN 1
J1
Below are tables showing the signals for each connector on the Control
Board. The columns are arranged as pin number, signal description, type of
signal and any other notable information about the signal. Note that the
jumper on JP2 MUST be positioned for channels 1&2 for the Stim unit to
operate.
JP1 Stim Board
Pin # Signal Name Type
1 Dual Port RAM
Interrupt
2 Address Line 0 Input Digital
3 Ground
4 Address Line 1 Input Digital
5 Dual Port RAM Busy Output Digital Active Low
6 Address Line 2 Input Digital
7 Ground
8 Address Line 3 Input Digital
9 Dual Port RAM
Read/Write
10 Address Line 4 Input Digital
11 Ground
12 Address Line 5 Input Digital
13 Dual Port RAM Output
Enable
14 Address Line 6 Input Digital
Output Digital Active Low
Input Digital
Input Digital Active Low
Innovation starts here TM 19 Intelect® Legend Series Service Manual
Page 20

CHATTANOOGA
GROUP INC.
15 Ground
16 Address Line 7 Input Digital
17 Dual Port RAM Chip
Enable Board 1
18 Address Line 8 Input Digital
19 Dual Port RAM Chip
Enable Board 2
20 Address Line 9 Input Digital
21 Ground
22 Patient Disconnect Input Digital
23 Stim Channel 1
Power-Down
24 No Connection
25 Ground
26 Stim Data Line 0
27 MicroCurrent Probe
Switch
28 Stim Data Line 1 Bi-Directional Digital
29 Ground
30 Stim Data Line 2 Bi-Directional Digital
31 Ground
32 Stim Data Line 3 Bi-Directional Digital
33 Ground
34 Stim Data Line 4 Bi-Directional Digital
35 Stim Channel 2
Power-Down
36 Stim Data Line 5 Bi-Directional Digital
37 Ground
38 Stim Data Line 6 Bi-Directional
39 Stim Reset Input Digital Active Low
40 Stim Data Line 7 Bi-Directional Digital
JP2 Stim Board Header for
Input Digital Active Low
Active Low
Input Digital
Output Digital
Input Digital
Jumper
Pin # Signal Name Type
1 Channel 3&4 Select Input Jumper Pin 2 to Here
if this board is for Ch.
3&4 in a 4-Ch. Unit
2 Dual Port RAM Chip
Enable
3 Channel 1&2 Select Input Jumper Pin 2 to Here
Input Digital Active Low
if this board is for Ch.
1&2 in ANY Unit
Innovation starts here TM 20 Intelect® Legend Series Service Manual
Page 21

CHATTANOOGA
GROUP INC.
J1 Stim Board
Pin # Signal Name Type
1 Power Input Input 8-18 VDC
2 Power Input Input 8-18 VDC
3 Ground
4 Ground
J2 Stim Board
Pin # Signal Name Type
1 Hi-Volt Probe Output Output Stim Output, 0-500V
Pulses
2 Hi-Volt Probe Pot Top Output Not Used
3 Hi-Volt Probe Pot
Wiper
4 Ground
Input Not Used
J3 Stim Board
Pin # Signal Name Type
1 Channel 2 Output Low Stim Output 0-100V Peak,
Depends on waveform
2 No Connection
3 Channel 2 Output Hi Stim Output 0-100V Peak,
Depends on waveform
J4 Stim Board
Pin # Signal Name Type
1 Channel 1 Output Low Stim Output 0-100V Peak,
Depends on waveform
2 No Connection
3 Channel 1 Output Hi Stim Output 0-100V Peak,
Depends on waveform
J5 Stim Board (Not Used on
Legend Series)
Pin # Signal Name Type
1 Microcurrent Probe
Output
2 Microcurrent Probe
LED Anode
3 Microcurrent Probe
Switch
4 Microcurrent Probe
Pot Top
5 Microcurrent Probe
Pot Wiper
6 Ground
Stim Output -60 to 60V Peak or DC
Not Used
Input Digital
Not Used
Not Used
Innovation starts here TM 21 Intelect® Legend Series Service Manual
Page 22

CHATTANOOGA
7 No Connection
8 Channel 1 Output Low Not Used
GROUP INC.
Innovation starts here TM 22 Intelect® Legend Series Service Manual
Page 23

My Problem Is With . . .
Go to page
Error Messages......................................26
Special Key Combinations....................27
Power-On................................................28
No Output ...............................................29
Head Detection and ..............................30
Data Reading
CHATTANOOGA
GROUP INC.
Applicator Overheating.........................31
Head Warming........................................32
Display....................................................33
No Display, Garbled Display,
Black Display
Settings Return to Defaults after..........34
adjustments
None of the above ! ...................................35
Find the topic that best describes your problem and turn to
that section for troubleshooting help !
This troubleshooting guide will help you through a process of elimination. The key is to
gather as many clues as possible. Observe the behavior of as many aspects of the unit’s
operation as possible. If there is no clear path or conclusion, use the information you have
gathered as well as the theory of operation to guide you.
Innovation starts here TM 23 Intelect® Legend Series Service Manual
Page 24

CHATTANOOGA
GROUP INC.
Intelect Legend Stim Error Messages Explained
Below is a list of the messages displayed on the LCD screen when an
error is detected, as well as a brief explanation of the source of the message.
“Channels Needed for This Mode are Busy”
Either no channels are open to run a new signal, or the dedicated
channel for HiVolt is already being used.
“Over Current Fault on Channels X-X”
Where X is a channel number. Indicates that a severe overcurrent
was detected on the specified channel(s).
Intelect Legend US Error Messages Explained
Below is a list of the codes displayed on the LEDs when an error is
detected.
HHH
The applicator has reached a temperature that is too high, and the
US output has been stopped.
noHd
No ultrasound applicator detected.
E03
An attempt to set up an address on the onewire device failed.
E04
An attempt to read data from the ultrasound applicator failed.
E05
An attempt to program the ultrasound applicator failed. This only
occurs during calibration.
E06
The ultrasound applicator memory is full. This only occurs during
calibration.
E07
The memory device in the ultrasound applicator is not the proper
type.
E08
The ultrasound applicator is uncalibrated.
Innovation starts here TM 24 Intelect® Legend Series Service Manual
Page 25

Special Key Combinations
Intelect® Legend Stim
Here is a list of the key combinations available for adjusting LCD screen
contrast and saving presets.
Adjust the Contrast UP
Channel 1 & Intensity Up
Adjust the Contrast DOWN
Channel 1 & Intensity Down
Save Current Output Settings
Pause & Enter
Intelect® Legend US
Here is the key combination for saving presets.
CHATTANOOGA
GROUP INC.
Save Current Settings
Intensity Up & Display (Watts / W/cm
2
)
Innovation starts here TM 25 Intelect® Legend Series Service Manual
Page 26

CHATTANOOGA
GROUP INC.
Problems Powering Up The Unit
If there is an indicator on the power supply, does it turn off when you turn the
power switch on? (If there is no indicator use a voltmeter to monitor the power
supply output.)
Yes - Try another power supply. If the results are the same, open the
case of the unit and unplug the power connector to each board, one at a
time, until the unit comes on properly. That will be the bad board.
No - Does it remain on?
Yes - Is there any indication that power is getting to the unit, such
as the LCD or LEDs briefly flash or the beeper ticks?
Yes - Unplug everything but the power from the Control
Board and see if it comes on. If not, then it is bad. If it did,
the Stim board or US Generator Board is bad.
No - Check the fuse on the rear of the unit. Replace if
blown.
No - Check the AC power source and the power cord. It could also
be a bad power supply.
Innovation starts here TM 26 Intelect® Legend Series Service Manual
Page 27

CHATTANOOGA
GROUP INC.
No Ultrasound Output
First, check that the duty cycle or intensity is not so low that you can’t observe
water movement on the applicator head. If there is some movement, but not as
high as expected, use an ultrasound power meter to test the output. If it is low,
then follow the Applicator Calibration Procedure in this manual.
If there is absolutely no output, try another applicator. Any Chattanooga Group
applicator from an Intelect
®
Legend or CPS unit that has the same connector will
work.
Did swapping the applicator fix the problem?
Yes - The applicator is bad.
No - The generator board is probably bad. Also check the connector and
harness inside the unit.
If you do not have another applicator, you can check for output on the Ultrasound
Generator Board using an oscilloscope. Refer to the Ultrasound Generator Board
drawing and signal list in this manual. If there is output at the board connector,
the applicator is bad.
No Stim Output
Does the display change when a treatment is selected?
No - The Stim Board is probably bad. Also check the connector and
harness inside the unit.
Yes - First be sure the leads and electrodes are good. If possible test the
output with a resistor.
Next be sure the output type is available at the channel you are
monitoring. For example, HiVolt is only available from channel 2. See the
manual.
Also check the output harnesses and connectors or monitor the output at
the connector on the Stim Board.
If these checks do not reveal the source of the problem and there is no
output in one or more treatment modes, the Stim Board is faulty.
Innovation starts here TM 27 Intelect® Legend Series Service Manual
Page 28

CHATTANOOGA
GROUP INC.
Applicator Detection and Data Reading Problems
To help diagnose these problems, keep in mind how the unit operates.
The unit determines whether an applicator is connected based on the voltage
from the thermistor in the applicator. If the applicator is unplugged, the voltage
rises to 5V from its normal 2-3V. This is sensed and the unit will then try to get
the memory device in the applicator to acknowledge a reset signal. If this fails,
the message “noHd” is displayed. On the other hand, if the voltage drops low, it
is interpreted as the head overheating and “HHH” is displayed. This is also what
would happen if the applicator was shorted.
The voltage can be monitored WHILE THE ULTRASOUND GENERATOR
IS NOT RUNNING by measuring the voltage on the output pin of the connector
on the Ultrasound Generator Board. Refer to the board drawings and signal lists.
The calibration data is read both at start-up and when US is selected.
Errors E03, E04, E07 and E08 are due to problems in the communications at
these times. This can be caused by either the Applicator or the Ultrasound
Generator Board. The easiest way to determine which is bad is by trying another
Applicator. The unit will continue to give error messages if the Ultrasound
Generator Board is defective. If this is not possible, monitoring the output line
while the unit is trying to read the calibration data can help determine which
component is bad. Under normal conditions, a fast pulse train is seen as the
data is passed from the Applicator to the Generator Board with an amplitude of
5V. If the amplitude is 12V, the Ultrasound Generator Board is faulty. If the
pulse train is not observed, unplug the applicator and try pressing the Frequency
button while monitoring the output. If a single 5V pulse is observed, the
Applicator is bad. If no activity is seen then the Ultrasound Generator Board is
bad.
During calibration of the Applicator, an error message E06 means that
there is no more room in the memory device to store the calibration data. The
Applicator will have to be replaced. An E05 message could be due to either the
Applicator or the Ultrasound Generator Board. Use the information in the
previous paragraph to diagnose which it is.
Applicator Overheating
This is not normally due to any malfunction of the unit, but rather is related
to the coupling of the head to the patient. If good coupling (contact) to the skin is
not maintained during treatment the head can heat up. If the head gets too hot,
the unit will pause the treatment and display “HHH” in the display. The only part
that would be bad under these circumstances would be the Applicator.
For problems related to the Head Warming feature, refer to that section.
Innovation starts here TM 28 Intelect® Legend Series Service Manual
Page 29

CHATTANOOGA
GROUP INC.
Head Warming Problems
Usually an explanation of exactly how this feature works will help you
determine if the problem is due to the Applicator or the Ultrasound Generator
Board.
When Head Warming is selected, the ultrasound output is turned on at
half the maximum output for the head size, and the frequency is set to 3 MHz.
The head temperature is monitored and when it reaches a temperature slightly
above skin temperature the output is reduced to a level of about 10% of
maximum to maintain the temperature. If the temperature rises above the skin
temperature while at the 10% level, the output is turned off until the temperature
falls back down. On the other hand, if the temperature rises to the maximum
head temperature, the unit will display “HHH” and the output will be turned off to
protect the crystal in the Applicator. Bear these facts in mind: at any time Head
Warming is on the output can be off, at 10% or 50% of maximum and the unit is
functioning normally. Reaching “HHH” occasionally would not be abnormal but
could indicate that the Applicator is extremely inefficient. Recalibration (see the
Applicator Calibration Procedure) or replacement would be required to correct
this.
If the head never warms up, check for output at 3 MHz by selecting 3.3MHz,
Continuous and pressing Start. Is there output at 3 MHz?
Yes - Something is malfunctioning on the Ultrasound Generator Board.
No - Remember that Head Warming uses the 3 MHz output. The
Applicator may need to be recalibrated for 3 MHz operation (see the
Applicator Calibration Procedure) or be replaced.
Display Related Problems
Stim unit LCD
Is the LCD screen completely black?
Yes - Adjust the contrast. Is the problem corrected?
No - The LCD screen should be replaced.
No - Is the LCD screen garbled ? (lines, odd text, etc.)
Yes - Is the problem consistent? (If there is a line across the
screen, is it always in the same place?)
Yes - The problem is most likely the LCD display.
No - The problem is usually the Control Board.
No - Is the LCD screen completely blank?
Innovation starts here TM 29 Intelect® Legend Series Service Manual
Page 30

Yes - Are there other signs that the unit is functioning such
as the fan runs when a treatment is selected and the
intensity increased? If not, check the items in the Power-On
section. Otherwise, try adjusting the contrast. If that doesn’t
correct the problem, it could be in either the LCD or the
Control Board. Check the signals on JP4 (refer to the signal
list) to help determine which it might be.
No - See the section titled “My Problem Isn’t Described
Here” for some additional troubleshooting tips. Your
problem will be either a defective Control Board or LCD
screen, or possibly the connection between them.
Ultrasound unit LEDs
Are any LEDs working?
Yes - The Control Board is faulty.
CHATTANOOGA
GROUP INC.
No - Are there other signs that the unit is functioning such as the fan runs
when Start is pressed and the intensity increased? If not, check the items
in the Power-On section. If those checks reveal that there is power to the
Control Board, then it is faulty.
Settings Return to Defaults After Adjustments
This is usually caused by a faulty Membrane Switch. If a switch sticks, the
function it performs can cause changes in the parameters selected and other odd
behavior.
Occasionally this can be due to a defective Control Board as well.
Innovation starts here TM 30 Intelect® Legend Series Service Manual
Page 31

CHATTANOOGA
GROUP INC.
My Problem Isn’t Described Here !
While we have tried to make this manual as complete as possible and
include as much troubleshooting help as we can, there will still be some problems
which haven’t been foreseen or are so rare as to not be included.
Some tips:
•Always begin by reading the Theory of Operation and review the Signal
Lists. By understanding what the unit is supposed to be doing and how the
circuit boards communicate, you can usually probe some of the signals and/or
swap some boards and determine the source of the problem.
•Observe the unit’s operation and find as many details of the problem as
possible, such as the mode it occurs in, settings, etc.
•Is the problem repeatable or intermittent?
•Consider parts that may wear as more likely to fail.
•Examine the circuit boards carefully for signs of failed components such
as oily residue underneath an electrolytic capacitor, charred or broken
components.
•Replace the complete circuit board, do not attempt to repair it.
Innovation starts here TM 31 Intelect® Legend Series Service Manual
Page 32

These pages have the wiring diagrams for the Intelect® Legend Ultrasound
and Intelect
®
Legend Stim units. Refer to them for connection information and
part numbers.
CHATTANOOGA
GROUP INC.
Wiring Diagrams
®
Intelect
Innovation starts here TM 32 Intelect® Legend Series Service Manual
Legend Ultrasound
Page 33

CHATTANOOGA
GROUP INC.
®
Intelect
Innovation starts here TM 33 Intelect® Legend Series Service Manual
Legend Stim
Page 34

CHATTANOOGA
GROUP INC.
Calibration Procedures
These calibration procedures apply to calibration of the Intelect® Legend
Ultrasound and Intelect
®
Legend Stim units. Following it is a calibration
procedure for the ultrasound applicators.
Intelect® Legend Stim
Calibration Procedure
Equipment Required:
Oscilloscope
Scope Probe (X10)
(2) 510-ohm Loads
A. Unit Startup and Fan Testing
1. Plug the 510-ohm loads into the output jacks. With the unit properly
plugged into its power supply, turn the unit on. The unit should beep once,
time and output screen should display and the fan should be blowing
inward. Check for excessive fan noise.
B. Stimulator Test
1. IFC: Connect scope probe across load on Channel 1. Press IFC and
heading of menu should display: Ch1-2: IFC. Press Up Intensity arrow to
increase Output to 50ma and press Start. Screen should change to opening
display listing: Channel 1 IFC at top and timer display in large letters
counting down from 15:00 and Output at 50ma. Below the output is: Ch2
IFC. Verify waveform is similar to that shown below with oscilloscope.
Move the oscilloscope probe to the Channel 2 load and verify that the
waveform is similar to that shown below using the oscilloscope. Press
Pause and observe the output. Main display will show a P beside the
output and output will drop to 0.0ma . Press Pause to restart and Stop to
reset.
IFC waveform; ‘scope set to 20V/div & .2mSec/div
Innovation starts here TM 34 Intelect® Legend Series Service Manual
Page 35

CHATTANOOGA
2. Premod: With the oscilloscope probe on channel 2, press Channel 2
button. Press Premod and observe: Channel 2 Premod. Adjust output
with Intensity arrow to 50ma and press Start. Main screen should display
Channel 2 Premod with timer counting down from 15:00 and 50ma as
output with Ch1 - Avail below. Verify waveform is similar to that below
using the oscilloscope. Press Stop to reset.
GROUP INC.
Premod Waveform; ‘scope set to 10V/div, 1mSec/div
3. HiVolt: Press HiVolt and Main Menu should display at top: Ch2: High
Volt. Time should be set to 20:00 and Int should now read 0v. Press Enter
to select Probe. Output must display 0v. Press Enter again to select Pads.
Increase Output with the Intensity up button to 500. Press Start and verify
that the output waveform is similar to that shown below. Press Enter and
use Main Menu down button to move to Polarity. Toggle polarity from
positive to negative and observe that the waveform changes as shown
below. Press Stop upon successful completion.
Positive
Negative
Hi-Volt Waveforms; ‘scope set to 50V/div, 20uSec/div
4. Russian: Press Channel 1 button. Press Russian & observe: Channel 1
Russian . At Mode, press Enter and select CoContract and press Enter
again. Main Menu heading must say: Ch1-2: Russian. Move down to
Cycle Time with the arrow keys and press Enter. Select Continuous and
press Enter again. Increase Intensity with the arrow key to maximum
100ma and press Start. Verify on Main screen that both Channels reach
100 by pressing the Channel 1 and 2 button. Verify that the output
Innovation starts here TM 35 Intelect® Legend Series Service Manual
Page 36

waveform on both channels is similar to that shown below using the
oscilloscope.
CHATTANOOGA
GROUP INC.
Russian Waveform; ‘scope set to 50V/div, 5mSec/div
Press pause to pause the operation and then press the Up and Down Time
buttons to confirm that the time changes. Set the treatment time to 1 minute
and push Start. Upon completion, you should hear 2 beeps, a pause, and
then 2 more beeps to indicate end of treatment. The output must be at zero
at this time.
C. Screen Intensity Adjustment
1. Hold Channel 1 and Intensity up or down button to adjust the screen for
proper display.
Remove power; Test is complete!
Intelect® Legend US
Calibration Procedure
Note: All caps indicate a front panel button.
1. Plug the applicator and appropriate power supply into the unit. Plug the
power supply into an appropriate outlet and turn the unit on. It should beep
and the LEDs should illuminate, then fill with default time, duty cycle, and
frequency.
2. Unplug the applicator. The message ‘noHd’ should appear in the treatment
time display. Plug the applicator back in, press a key and observe that the
message disappears.
3. Press HEAD WARM. The fan should start and output will be displayed on the
LEDs. Pressing it a second time will stop the fan and the output will return to
0.0.
4. Press the FREQUENCY button and verify that 1 MHz and 3 MHz LEDs are
illuminated. Leave 1 MHz selected.
Innovation starts here TM 36 Intelect® Legend Series Service Manual
Page 37

CHATTANOOGA
GROUP INC.
5. Press DUTY CYCLE until Continuous is illuminated, noting that each LED is
functioning. Use the INTENSITY up button to set the output to 2.0W/cm
2
.
The fan should begin running. Press START. By applying a small amount of
water to the transducer, verify that there is ultrasound output.
6. Observe that the treatment time counts down on the LEDs. Press PAUSE.
The output should stop, the fan should stop and the treatment timer should
stop counting down. Press START and the output should resume. Press
STOP and verify that the output stops, the treatment timer is reset back to the
default, the output display is reset back to 0.0 and the fan stops.
7. Use the TIME up button to verify that the treatment time will not go above 15
minutes. Use the DOWN button to set the time back to 1 minute. Select 10%
Duty Cycle using the DUTY CYCLE button, increase the intensity to maximum
and press START. While the unit is running, press the DISPLAY button and
verify that the displayed power changes from 2.0 W/cm
2
to 10.0 Watts
(assuming a 5cm applicator is attached). Allow the unit to run until treatment
time runs out. Two beeps should be heard followed by another two beeps
and then the display will clear back to the default.
8. Testing complete.
Intelect® Legend Applicator
Calibration Procedure
1. Put unit into calibration mode. Turn the unit ON while holding down the Intensity UP
button. It is not necessary to hold the button down after the initial beep sound.
2. The Min/Sec display should read CAL0 indicating that the machine is in calibration
mode and at the first calibration step.
3. Place the applicator into the Ultrasound power meter.
4. Select the calibration frequency using the FREQUENCY button (1MHz or 3MHz).
5. Set the Head Size using the DUTY CYCLE button.
10% = 1cm applicator
20% = 2cm applicator
50% = 5cm applicator
Continuous = 10cm applicator
6. Once Applicator size and Frequency are chosen, push the START button. This will
begin the scan and calibration. The zero in CAL0 will flash while the scan is in progress.
Do not disturb the machine while it is scanning.
7. When the scan is complete the display will change to CAL1.
8. Re-zero the Ultrasound power meter.
9. Using the Intensity UP button, increase the output until the power meter reads 4
(four) watts.
Innovation starts here TM 37 Intelect® Legend Series Service Manual
Page 38

CHATTANOOGA
GROUP INC.
10. Push the START button. The unit will hold the settings in memory. The display will
change to CAL2.
11. If you are satisfied with the calibration, push START.
12. The unit will beep to indicate that the new calibration values have been stored in the
applicator.
13. The display will change to CAL0 and is now ready for the next calibration.
14. After both frequencies have been calibrated and before removing the applicator
head from the power meter, check the accuracy of the power calibration. Cycle the
power to the unit off and then back on. Select continuous duty cycle and increase the
output to the settings listed. Verify that the power indicated on the UPM-DT-10 power
meter is within the indicated range. Check power at both 1 MHz and 3.3 Mhz.
Head size Power level Output range
2
2 cm
4 watts 3.44-4.56
2
5 cm
10 watts 8.6-11.4
2
10 cm
10 watts 8.6-11.4
15 watts 12.9-17.1
20 watts 17.2-22.8
2 watts 1.72-2.28
5 watts 4.3-5.7
5 watts 4.3-5.7
15. Calibration complete. If you are not satisfied with the calibration and wish to start
over, turn the machine OFF and begin at step one listed above.
.
Innovation starts here TM 38 Intelect® Legend Series Service Manual
Page 39

Technical Specifications
Listed here are the specifications for the Intelect® Legend Ultrasound.
Dimensions: 8.25” x 11” x 2.5”
Weight: 2 lb.
Applicators: 2, 5, & 10 cm²
Power: 90V-264V, 47-63Hz
2 cm² Applicator
Frequency (Mhz): 1.0 MHz, 3.3 MHz (all +/- 5%)
Power (watts): 0.2 watt to 4 watts
ERA (cm²): 1.8 cm²
Effective Radiating Area: 1.8 cm² +/-0.4 cm²
Maximum beam
non-uniformity ratio: 6.0:1
Beam type: Collimating
5 cm² Applicator
Frequency (Mhz): 1.0 MHz, 3.3 MHz (all +/- 5%)
Power (watts): 0.4 watt to 10 watts
ERA (cm²): 4.0 cm²
Effective Radiating Area: 4.0 cm² +/-1.0 cm²
Maximum beam
non-uniformity ratio: 6.0:1
Beam type: Collimating
10 cm² Applicator
Frequency (Mhz): 1.0 MHz, 3.3 MHz (all +/- 5%)
Power (watts): 1 MHz: .1 watt to 20 watts, 3.3 MHz: 1-10 watts
ERA (cm²): 8.5 cm²
Effective Radiating Area: 8.5 cm² +/-1.5 cm²
Maximum beam
non-uniformity ratio: 6.0:1
Beam type: Collimating
Duty Cycle
Pulsed: 10%, 20%, 50%
Continuous: 100%
Pulse Duration:
5 msec +20% (50% duty cycle, pulsed mode)
2 msec +20% (20% duty cycle, pulsed mode)
CHATTANOOGA
GROUP INC.
Innovation starts here TM 39 Intelect® Legend Series Service Manual
Page 40

Ultrasonic Power:
10 cm² crystal at 1.0 MHz: Variable from 1 watt to 20 watts
10 cm² crystal at 3.3 MHz: Variable from 1 watt to 10 watts
5 cm² crystal: Variable from 0.4 watt to 10 watts
2 cm² crystal: Variable from 0.2 watt to 4 watts
CHATTANOOGA
GROUP INC.
Innovation starts here TM 40 Intelect® Legend Series Service Manual
Page 41

CHATTANOOGA
GROUP INC.
Listed here are the specifications for the Intelect
®
Legend Stim.
Interferential
Output Channels: 1 & 2
Amplitude: 0-50 mA RMS into a 500 ohm load
Current Limit: 50 mA RMS
Voltage (max.): 200 Volts Peak to Peak
Carrier Frequency: 5000 Hz
Beat Frequencies: 0-200 Hz
Premod
Channels: 1 & 2
Amplitude: 0-50 mA RMS into a 500 ohm load
Current Limit: 50 mA RMS
Voltage (max.): 200 Volts Peak to Peak
Carrier Frequency: 2000-5000 Hz
Beat Frequency: 0-200 Hz
Russian
Channels: 1 & 2
Amplitude: 0 to 100 mA RMS into a 500 ohm Load
(During On-Time of Burst)
Current Limit: 50 mA Average
Voltage (max.): 200 Volts Peak to Peak
Carrier Frequency: 2500 Hz
Burst Frequency: 20-100 Hz
Duty Cycle: 10% to 50%
HiVolt
Description: The output is a fast-rising dual pulse with approximately 75
microseconds spacing between pulses.
Pulse duration: First peak is 5 microseconds at one-half pulse height and
second peak is 8 microseconds at one-half pulse height. These
measurements are with a load impedance of 1,000 ohms. Pulse duration
varies according to body impedance (load resistance).
Channel: 2 Only
Voltage Current: 0-500 Volts
Output Current: 0-2500 milliamps peak
Frequency: 1-120 pulses per second
Innovation starts here TM 41 Intelect® Legend Series Service Manual
Page 42

CHATTANOOGA
GROUP INC.
Parts List
The following is a list of replaceable parts for the Intelect® Legend
Ultrasound and Intelect
®
Legend Stim units with their Chattanooga Group part
numbers.
78211 Intelect Ultrasound Control Board Assembly
78811 Intelect Stim Control Board Assembly
77001 Ultrasound Generator Board Assembly
78321 Stim Generator Board Assembly
78234 2cm Applicator Assembly
78233 5cm Applicator Assembly
78232 10cm Applicator Assembly
78105 40 Conductor Cable Assembly, Control Bd to US Generator Bd
71741 3- Ampere Slo-Blo Fuse
72315 4- Ampere Slo-Blo Fuse
77007 LCD Screen
78108 Fan for CPS Ultrasound or Stim
78215 Intelect Ultrasound Membrane Switch
78217 Intelect Stim Membrane Switch
78121 120VAC Power Cord
78082 Intelect Ultrasound or Stim Power Supply
78113 UL-544 Power Supply
78107 Buzzer for Intelect Stim or Ultrasound
78023 Power Switch
78109 Ultrasound Output Harness
78092 Stim Output Harness
78097 Stim HiVolt Output Harness
Innovation starts here TM 42 Intelect® Legend Series Service Manual
 Loading...