

Page 1

Operating Instructions
and Service Manual
“ELEVATE”
1-800-998-5018
www.championchair.com
Page 2

1 OM00ELV8 Rev 3 effective 110118
CONTENTS
ITEM PAGE
Contents 1
In-Service Information 2
Special notes 3,4
Chair capacity information 5
Receiving new chairs 6-10
New chair inspection 6
New chair assembly 7
Attaching the upholstery 8,9
To report damage 10
Return authorization 10
Storage 10
In-service procedures 11
Operating instructions 11-18
Safe operation of the chair 11-13
Caster brakes 14
Arm rest adjustment 15
Use of remote control handset 15
Rapid adjustment of seated and recumbent positions 15
Adjusting individual parts of the chair 15
Handset 16
Trendelenburg foot switches 17
Central brake 17
Battery unit 18
Setting height of chair 18
Optional chair accessories 19-21
Comfort T2 Multifunctional Table 19
IV pole (4 prong) 19
Push bar 20
Universal holder for tablets and smartphones 20
USB charging unit for smart devices 21
Transparent protecting plastic cover for legrest 21
General maintenance and care of chairs 22
General Cleaning Precautions 22
General cleaning 22, 23
General disinfecting/infection control - vinyl 24
Safety Inspection & Troubleshooting 25
Routine safety inspection 25
Checking the electronic control 25
Recycling of used parts and special waste disposal 25
Warranty procedure 26
Service information 27
Parts identification 27
Service Parts Form 28
Service Parts 29
Page 3

2 OM00ELV8 Rev 3 effective 110118
In-Service Information
It is very important to Champion that our customers review all the materials in the in-service
package they receive.
By reviewing the in-service materials provided, you increase the useful life of the products by
helping to prevent their improper use, which may lead to premature damage and wear. You are
also helping to validate your warranty, as warranties cover material and workmanship failures, not
misuse or abuse. Use these in-service tools for new employees and as a “refresher” for current
employees.
The following resources are available for you to assist your staff and patients in operating the chairs
properly.
Website: www.championchair.com
Operators Manuals on CD
Vinyl Cleaning Manual also on CD
YouTube: www.youtube.com/user/ChampionChair1992
Field Sales Reps
In House Sales Reps
Network of Service Technicians
In House Service Team
You should receive an Operator’s Manual in printed form or on CD with each shipment of chairs you
receive from Champion. If you did not or would like information on any of these additional
resources, please contact Champion’s customer service department at 800-998-5018.
NOTE: Not all chair functions, options and/or accessories are covered in the CD.
NOTE: The information contained in this document is subject to change without notice.
Page 4
3 OM00ELV8 Rev 3 effective 110118
WELCOME!
Champion Manufacturing Inc. would like to thank you for selecting our products. We take great care
in making certain that our products leave the factory in flawless condition. Our products are
properly packaged to arrive in that same condition.
We hope that our product will contribute to your patient’s well-being, relaxation and comfort during
treatment. We welcome your suggestions. Please inform Champion Customer Service (800-998-5018)
if you have any special wishes or questions concerning our product. Our staff will be glad to advise
you and provide further assistance. We hope that you enjoy using your chair and thank you for placing
your confidence in us.
SPECIAL NOTES
WARNING/ CAUTION These terms refer to actions that may result in injury to your
patient or staff member and/ or damage to your product. Damage caused by improper operation
of your chair is not covered by your warranty.
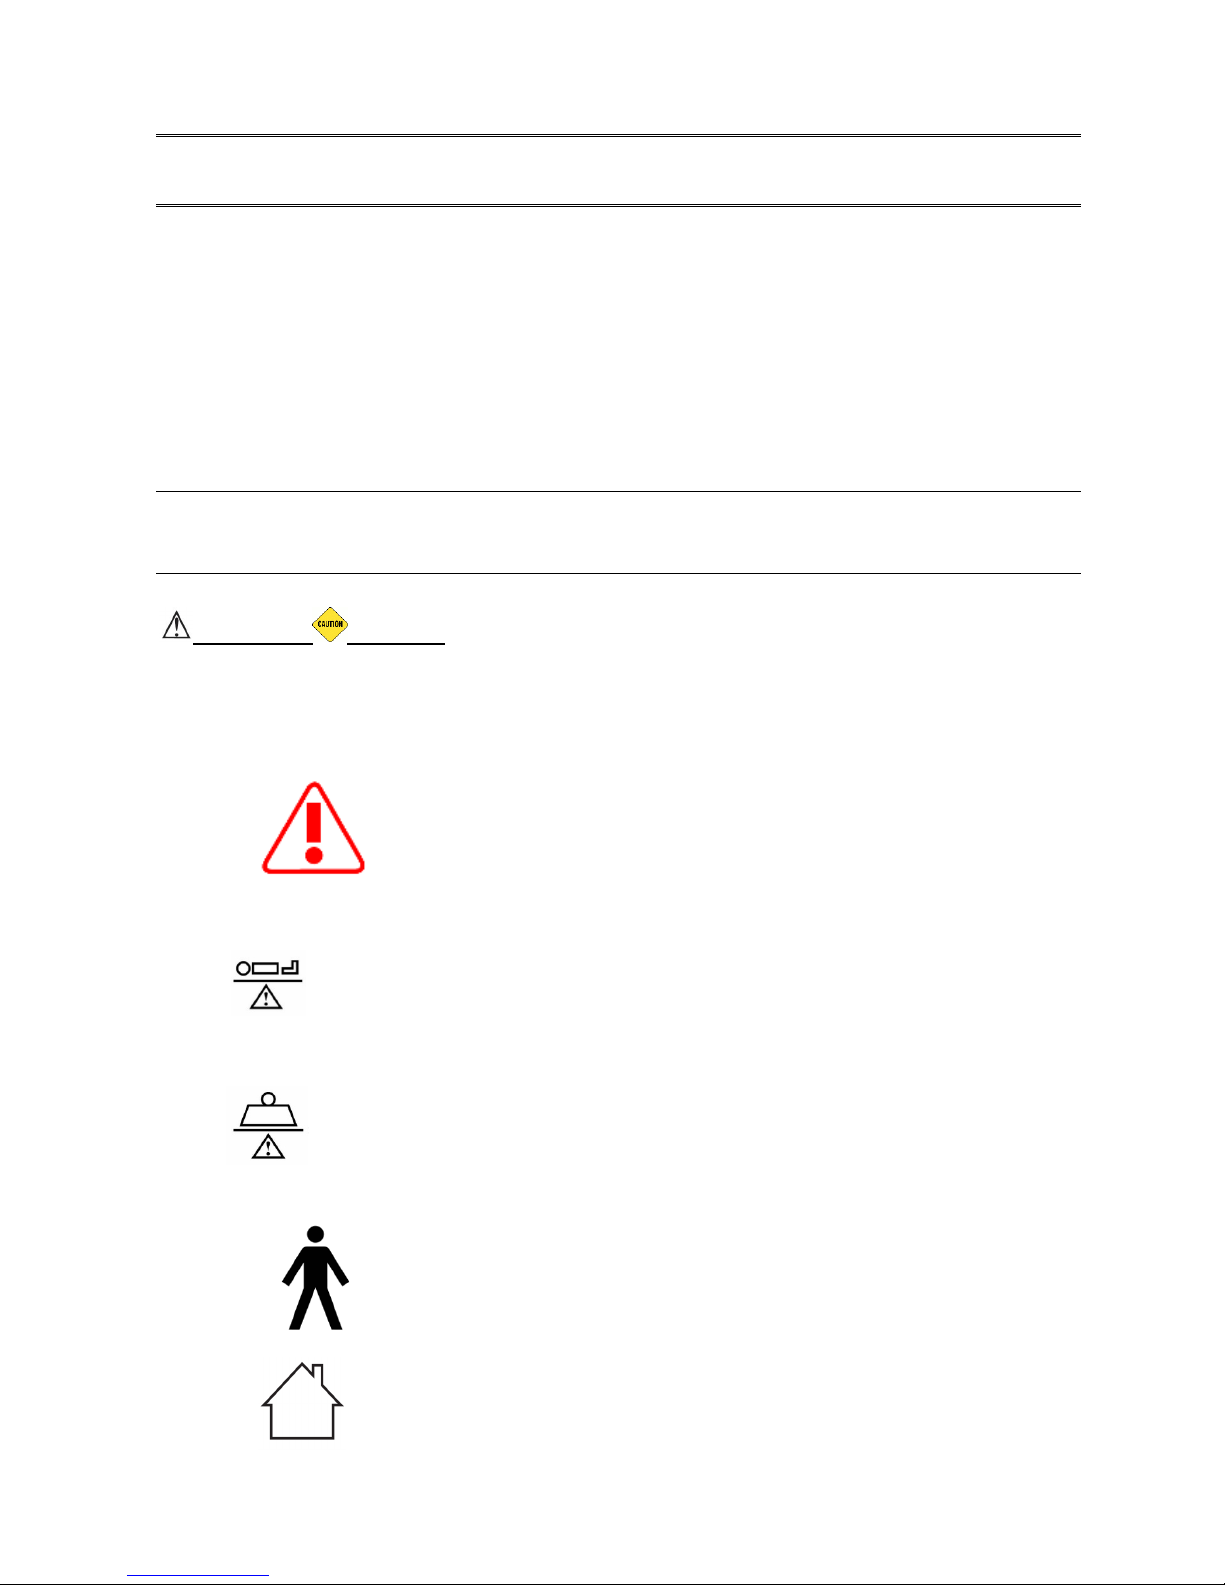
Symbols used in the Operating instructions and on the chair
This symbol marks information, which is relevant for the safety and
must be observed.
Maximum patient weight (lbs)
Safe working load (lbs)
Degree of protection against electric shock type B applied part
For indoor use only
Page 5
4 OM00ELV8 Rev 3 effective 110118
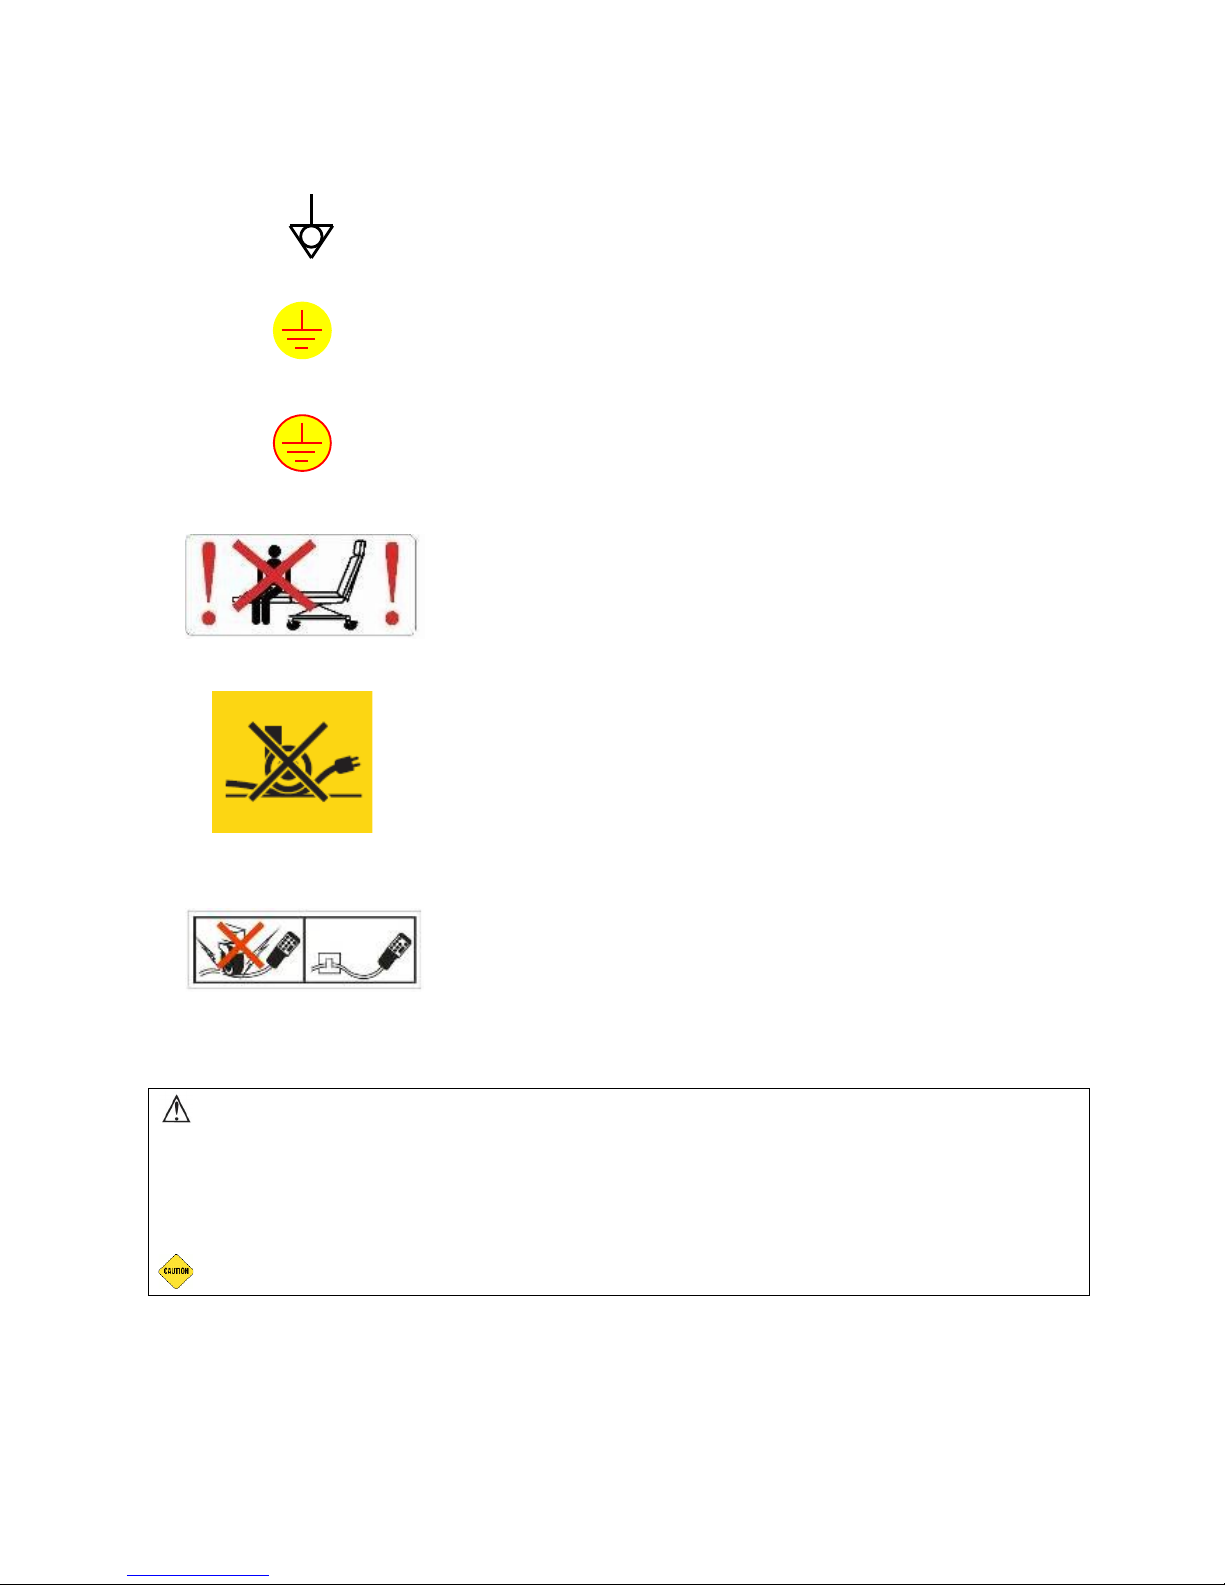
Equipotential connector (*)
Measuring earth point
Protecting network
Please do not sit to the leg rest
Do not drive onto the mains cable
Do not drive onto the handset cable
WARNING: This recliner is designed to meet the needs of a wide range of patients.
Some patients, due to their unique medical condition, may need assistance as they sit
down or rise from a seated position. It is the responsibility of the care provider to
assess these needs and provide assistance to frail, weak, or otherwise unsteady
patients. Failure to follow these instructions can result in patient falls with potentially
serious injury resulting.
CAUTION: The Elev8 is NOT designed to transport patients.
Page 6

5 OM00ELV8 Rev 3 effective 110118
CHAIR CAPACITY INFORMATION
ELV8:
Maximum patient weight: 200 kg (440 lbs)
Page 7

6 OM00ELV8 Rev 3 effective 110118
RECEIVING NEW CHAIRS
CAUTION: New chair inspection must be done by someone who has read and
understands the instruction pages. Improper operation of the chair may damage the
chair and void your warranty.
CAUTION: Before plugging chair into wall outlet, it should be checked for condensation on the
electrical components and dried if necessary. The chair should reach room temperature prior to
plugging it in.
New chair inspection
1. Remove all packing material including foam wrap and poly bag. If desired, the bag may
be replaced after examination.
2. Examine chair surfaces for damage.
Page 8
7 OM00ELV8 Rev 3 effective 110118
New chair assembly
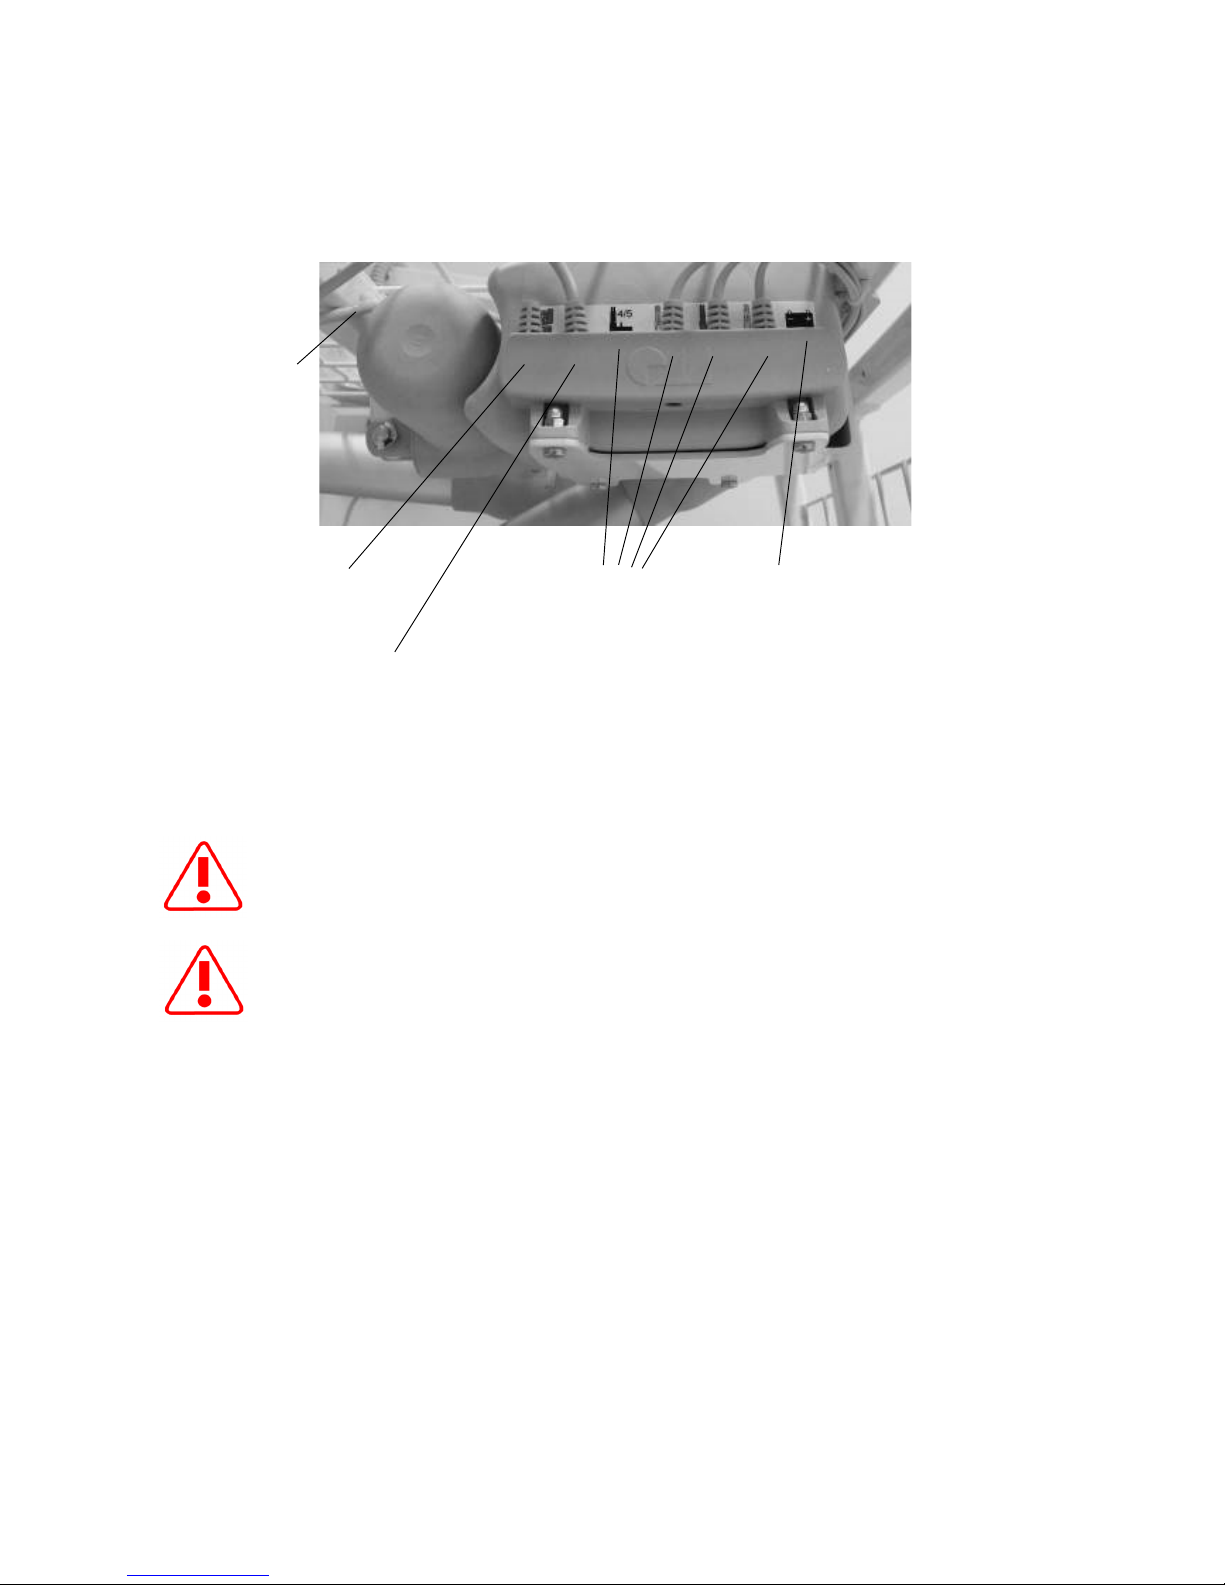
1. Verify the handset connection plug is appropriately inserted into the receptacle suitable on
the electronic box found under the seat. (Figure 1)
Before switching the chair on, it should be checked whether condensation
(possible with a temperature change) is present on the electrical components.
If there is precipitation, then the chair has to be allowed to reach room
temperature.
The control box does not work without closing plugs that should be connected
tightly into the proper socket on the left side (Figure 1)
Power cable
Closing plug OR
Emergency stop
switch connector
Handset
Motor connectors (*)
(In case of less motors
are connected end cap
must be connected)
Battery unit connector (*)
(In case of no Battery unit
end cap must be
connected)
Figure 1
Electronic control system
Page 9
8 OM00ELV8 Rev 3 effective 110118
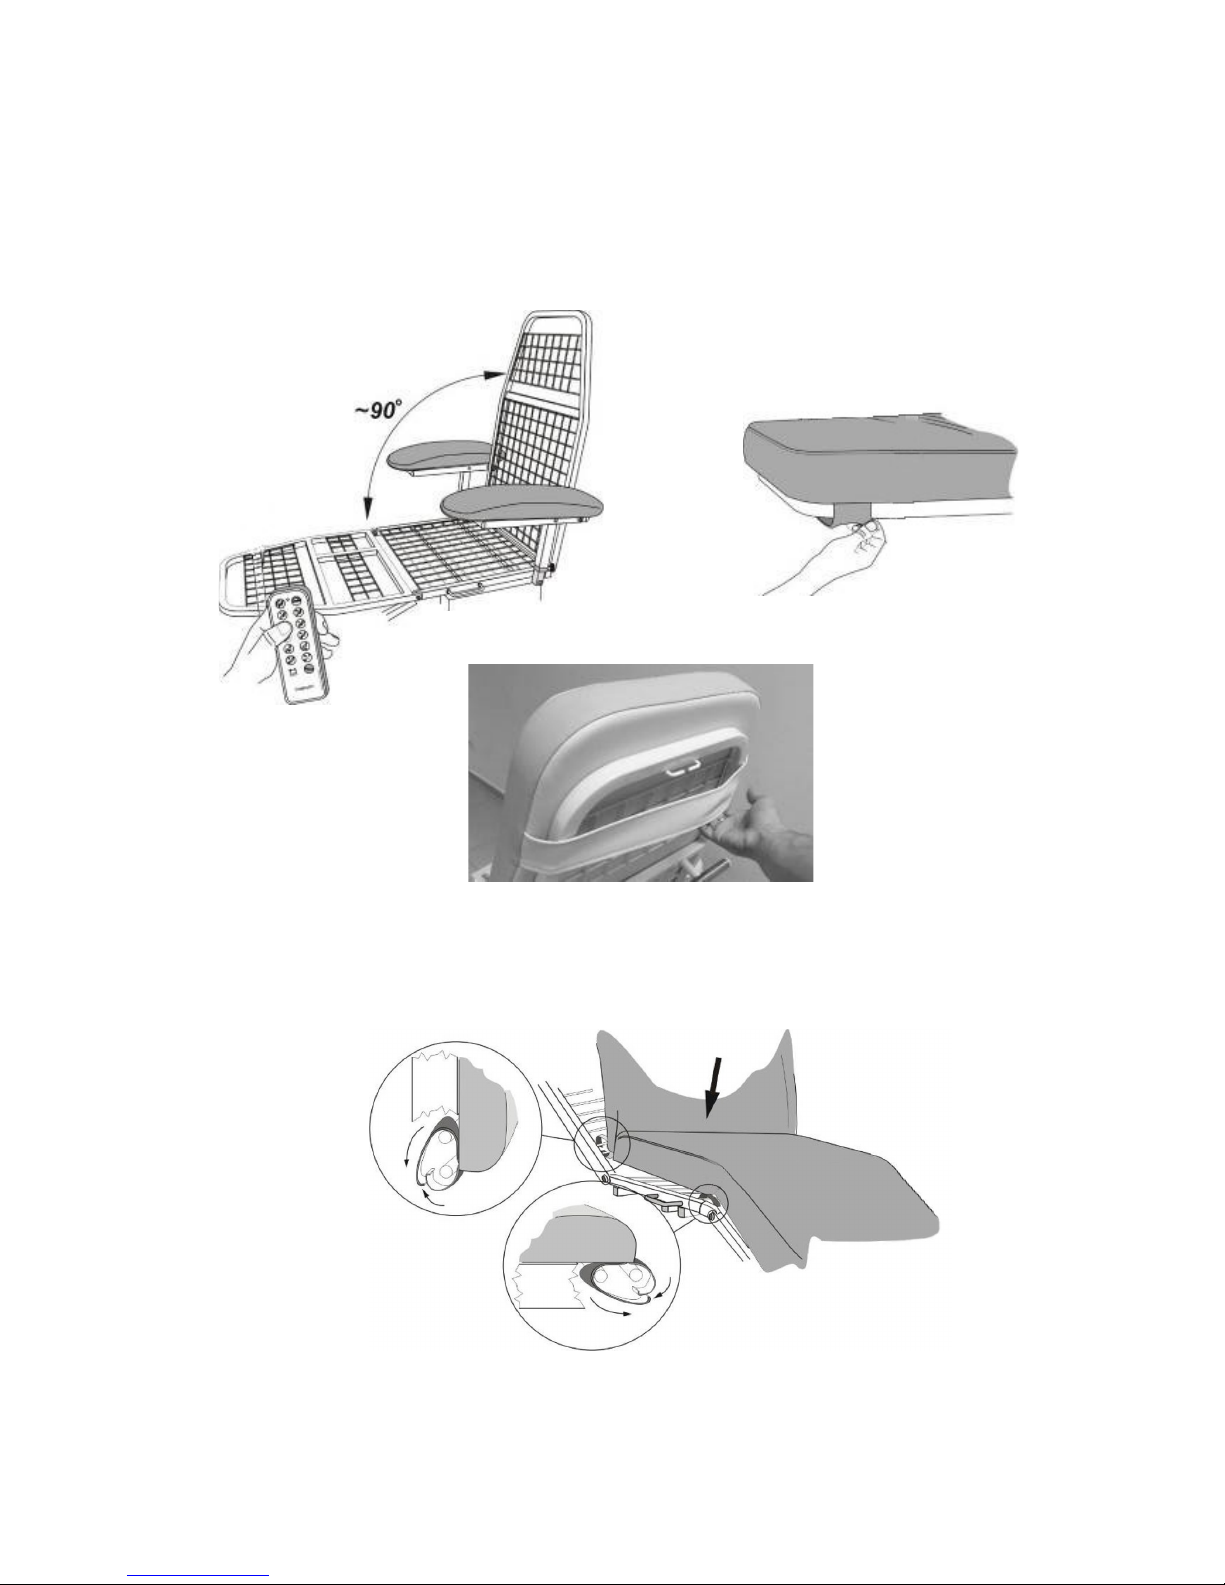
Attaching the upholstery:
1. Using the handset, adjust the chair so the leg rest is in line with the seat plate and the
backrest is vertical (Figure 2). This is the easiest position in which to attach the
upholstery.
2. Pull the two straps on the back of the upholstery onto the frame (Figure 3, Figure 4).
Figure 4
3. With the velcro straps found on the two sides of the sitting part of the upholstery,
secure the upholstery to the frame (Figure 5).
Figure 2
Figure 3
Figure 4
Figure 5
Page 10

9 OM00ELV8 Rev 3 effective 110118
4. Attach the headrest pillow to the backrest by inserting the leather strip through the
guide (Figure 6).
5. Secure the armrest strap included in the accessories to the armrest. The armrest strap
is used to position the remote control handset.
Check whether the mains or the handset cable is not stretched or ends
up under the wheels or another object while operating the chair.
3. Using the handset operate all chair functions. Position the chair such that sufficient space
is available to enable unhindered adjustment of the chair in any position and access from
all sides.
WARNING: The power chair must be plugged into a properly grounded outlet and
must not be modified in any way. If the 3 prong plug does not fit your outlet, have one
installed that meets your local codes by an electrician. DO NOT use a (3) prong to (2)
prong plug adapter. Consult an electrician if you are unsure that the outlets are
properly grounded.
CAUTION: Operating the recliner mechanism when the chair back or footrest is
restricted and cannot move up and down freely will damage your mechanism. Be
certain that the chair DOES NOT make contact with the walls, counters or other
furniture or equipment.
Figure 6
Page 11

10 OM00ELV8 Rev 3 effective 110118
To report damage
1. If the freight carrier is still at your location (it is your right to hold the freight carrier
while you thoroughly inspect your delivery), note any damage on the bill of lading. Be
sure to keep shipping cartons, pallets and other shipping materials to prove damage to
the freight carrier. It is also important to save an undamaged carton and pallet in case
the chair must be returned to the factory.
2. Call Champion’s customer service immediately to report the damage: 800-998-5018.
3. All claims must be filed by the consignee and reported to Champion Manufacturing Inc.
within 5 days of receipt of the shipment.
Return authorization
1. Champion customer service must authorize all returns. Champion customer service will
issue a return authorization number by fax or email. The customer does have the right
to refuse any damaged chair from the carrier at the time of delivery.
2. All returns must be sent prepaid by the sender with the exception of provable shipping
damage.
Storage
1. Cover chair and store in a dry area.
2. DO NOT place objects on top of the chair that may damage the vinyl.
3. DO NOT double stack cartons of chairs.
The equipment and its packaging have to be protected from moisture. The top of the factory
cardboard packaging may not be loaded. The equipment packaged on the wooden rack in the
cardboard box may not be tilted from the horizontal position, which is marked on the box, while storing
or moving it.
Page 12

11 OM00ELV8 Rev 3 effective 110118
IN-SERVICE PROCEDURES
Before chairs are put into service, all personnel should review this manual.
In the belief that an actual demonstration of the product is more effective than written instructions,
an on-site in-service by a Champion representative may be available depending upon the delivery
circumstances.
It is extremely important that chairs are operated properly and used in the manner in which they
were designed. Certain improper methods of operating the chair can damage the chair and void the
warranty. In the event that you do not receive your in-service packet, call customer service to
obtain one: 800-998-5018.
CAUTION: DO NOT overload chair. Observe the specified maximum weight
capacity for the chair model that you have selected.
OPERATING INSTRUCTIONS
Safe operation of the chair
Always check whether the power cord
and the handset cable are intact
before switching the unit on.
For a long working life and in order to guarantee user safety, we recommend that the
following points be observed:
● Position the chair in such a way that it is accessible from all sides and does not knock
against walls or other equipment when fully extended.
Not keeping safety distances around the chair during backrest adjustment could result in the
chair backrest being driven into the wall behind the chair, this may cause additional dynamic
overload on the backrest of the chair and lead to pivot bolt damage.
Emergency shut off of the chair:
In an emergency, disconnect the chair’s power plug and the battery plug
from control unit in order to shut off the
chair. The power plug and
battery plug must always be accessible during operations so that it is
possible to shut down the chair at any time.
Page 13

12 OM00ELV8 Rev 3 effective 110118
The below picture makes the installation instructions evident:
Please keep the prescribed safety distances around the chair in
order to avoid any damages of the frame!
Do not use the chair for patient transfer!
The Manufacturer shall not take responsibility for any
consequences of misplacement and abnormal use.
● The brakes must always be locked when chair is not being moved, to ensure a
firm hold. Otherwise, there is a risk of accident.
● The chair should always be entered or existed from the side with the armrest folded up at
telescopic version.
● Do not sit on the armrests or load it with too heavy weight.
Figure 25 Expected safe operational environment
Page 14

13 OM00ELV8 Rev 3 effective 110118
● The chair should not be entered or exited over the legrest, because stepping on the legrest
can cause the chair to tip over or be damaged.
● Do not sit onto the backrest when it is folded back, because the chair can tip over.
● Prevent the power cord from being damaged, because a damaged cable can cause fire
or electric shock:
- the power cord should not end up under the therapy chair wheels or another heavy
object,
- don’t leave the power cord near a source of heat, for example a heater,
- when pulling the power cord out of the outlet hold the plug not the cord.
• Replace handset immediately if key pad membranes are damaged to avoid further damage
or short circuits caused by liquids entering the handset.
Do not open the cover of the control box, because its protection
cannot be set up again and voids the warranty!
Always check whether the power cord and the handset cord are
intact before switching the unit on.
Page 15

14 OM00ELV8 Rev 3 effective 110118
OPERATING INSTRUCTIONS
Caster Brakes
Always set the caster brakes before allowing your patient to get in or out of the chair. Release the
caster brakes only when the chair is being relocated; and reset the caster brakes upon arriving at
your destination. Never assume that the caster brakes have been set; check to ensure that the
caster brakes are engaged before helping anyone in or out of the recliner.
Armrest adjustment
The height of the armrest can be adjusted by pulling the indexing plunger on the telescoping rail,
moving the armrest up or down and then pushing it back again. By loosening the knurled knob directly
under the armrest, the armrest can be rotated and slipped (*) up and down along its longitudinal axis.
The distance between the armrests can be adjusted by rotating the armrest.
The enhanced mobility of the armrests makes it possible to comfortably seat differently sized patients.
Folding the armrest up to the backrest facilitates entering the chair from the side (Figure 7).
Figure 7 Telescopic armrest
(chair appearance may vary from photo)
Flexible height adjustable armrest for universal medical applications provides more flexible
adjustability of the armrest in order to achieve the most suitable rest position during treatment.
(Figure 8)
Figure 8 Flexible height adjustable armrest (*) for universal medical applications
- longitudinal adjustment
- height adjustable feature
- additional hinge of armrest
- rotating the armrest
Page 16

15 OM00ELV8 Rev 3 effective 110118
OPERATING INSTRUCTIONS
Use of the remote control handset
The adjustment of the chair is done by using the handset (Figure 10). The chair moves only as long
as a button of the handset is depressed. The control of the chair makes it possible that more than
one motor is active at any time. Depressing any button is signalled by a LED on the handset.
More than two minutes of uninterrupted pressing of the button should be
avoided!
After 2 minutes
of continuous operation of the motors, an 18 minute
pause must be observed.
Rapid adjustment of seated and recumbent positions
The control of the chair makes possible to adjust the entering and bed positions rapidly and easily
by using the handset’s buttons in the yellow field.
Trendelenburg position
Adjusting the chair to Trendelenburg position rapidly can be done by using the handset’s button in
the red field.
During the rapid adjustments three motors (leg rest, the angle of the seat and the back) work
together. By operating the individual motors separately, we can deviate from the previously
adjusted position.
Adjusting the individual parts of the chair
With the help of the handset, the patient can adjust the chair according to individual comfort
requirements. In order to move the individual part of the chair (backrest, seat tilt, leg rest) use
the▼▲ buttons. The motors of the chair, which control the movements, automatically switch off
when the end positions are reached.
CAUTION: DO NOT overload chair. Observe the specified maximum weight limit for
the recliner model that you have selected.
Page 17

16 OM00ELV8 Rev 3 effective 110118
OPERATING INSTRUCTIONS
Figure 9
Remote control handset
LED indicates
battery charging (*)
OR
Power on (*)
Backrest up
LED indicates
button pressing
Backrest down
Seat tilt down
Seat tilt up
Legrest down
Legrest up
BED position
Head-down position
ENTRY/LEAVE
ENTRY / LEAVE position
Seat height down
Seat height up
Page 18

17 OM00ELV8 Rev 3 effective 110118
OPERATING INSTRUCTIONS
Trendelenburg foot-switches
Independently of the handset the Trendelenburg foot-switches can be used to place the chair into the
Trendelenburg position (Figure 10). Trendelenburg foot-switches on both sides of underframe allows
hands-free operation for the staff in case of emergency situations and also prevents unintended
misuse by the patient.
Central brake
The central brake can be simply
locked by pedal (Figure 11).
TRB foot switch
on both sides of
underframe
Figure 10
Trendelenburg foot-switches
push to unlock
(green opened
padlock symbol)
brake pedal
Figure 11
brake pedal
push to lock
(red locked
padlock symbol)
Page 19

18 OM00ELV8 Rev 3 effective 110118
OPERATING INSTRUCTIONS
Battery unit
The chair is equipped with a Battery unit to ensure the operation of chair during power failure
assuring the patient’s comfort. In this case
• the handset operates,
• the Trendelenburg foot-switches on the bottom frame operate from battery,
The battery charge is indicated by CHARGE LED on the handset (Figure 9).
If the yellow CHARGE LED on the handset is lighting continuously the battery unit is charged. If the
yellow CHARGE LED is fleshing the battery unit is charging.
In case of power failure use the electronic adjustments only for Emergency or exiting the chair in
order to save battery capacity.
Note! In case of battery back-
up operation depressing any button of
the handset signalled by a short sound!
After 2 minutes of continuous battery operation the battery should
be charged by plugging chair into wall outlet
. Do not connect the
battery onto external charge device.
Setting height of chair
Figure 12
Motorized seat
height adjustment
Motorized height
adjustment column
Page 20

19 OM00ELV8 Rev 3 effective 110118
OPTIONAL(*) CHAIR ACCESSORIES
Accessories are features that may be ordered for your Champion chairs at any time. Some
installation may be required. Accessories can be installed in the factory or in the field by the facility.
Comfort-T2 Multifunctional table
(*)
It can be mounted on either side of
the chair (Figure 13).
WARNING
: DO NOT use table as a seat.
IV pole (4 prong)
(*)
It can be installed onto either side of chair
and the height is adjustable (Figure 14).
Figure 13
Comfort-T2 Multifunctional table
Figure 14
IV pole holder
By pushing the release
button, the IV pole can
be easily removed
IV pole (4 prong)
height adjustable
IV pole can be installed
onto either side of chair
Page 21

20 OM00ELV8 Rev 3 effective 110118
OPTIONAL(*) CHAIR ACCESSORIES
Push bar (*)
Allows for easy repositioning of the chair (Figure 15).
Universal holder for tablets and smartphones
(*)
The chair can be equipped with a universal mobile phone and tablet holder for smart devices from
4” to 10.1” screen dimensions. It can be installed onto both sides of chair. (Figure 16).
Figure 15
Push bar
Figure 16
Tablet & smartphone holder
Tablet and smartphone
holder with flexible arm
360°
120 - 200 mm
4 – 10.1” sizes
Rotatable joint
It can be 360° rotated which
is convenient for video
Page 22

21 OM00ELV8 Rev 3 effective 110118
OPTIONAL (*) CHAIR ACCESSORIES
USB charging unit for smart devices (*)
The chair can be equipped with an USB charging unit to charge Patient’s mobile phone or tablet. It
can be installed onto both sides of chair. (Figure 17).
Note:
If the USB charger socket is out of use please insert the
protecting plug in to the socket to avoid liquid ingress.
Transparent protecting plastic cover for leg rest (*)
The plastic cover is attached by hook and loop straps onto upholstered leg rest. Removable for easy
disinfection and cleaning. (Figure 18)
Your chair’s appearance may not look like the chair pictured.
Figure 17
USB charging socket
protecting plug
Figure 18
Transparent protecting plastic
cover for the leg rest
Page 23

22 OM00ELV8 Rev 3 effective 110118
GENERAL MAINTENANCE AND CARE OF CHAIRS
WARNING: Never clean or maintain your chair with an occupant in the chair.
Keeping the chair clean is the main maintenance requirement.
Routine maintenance and periodic safety check is required to keep your chairs performing at their
best. Each facility should check their chairs and set their own maintenance schedule.
If a part becomes worn or broken, see the sections regarding service and warranty for information,
please reference service and warranty section of this manual.
GENERAL CLEANING PRECAUTIONS
WARNING: When solvent type cleaners are being used, care should be exercised.
KEEP AWAY from fire or flame and use in a well ventilated area.
CAUTION: High pressure wash or “hosing down” chairs is not recommended.
CAUTION: Use of vinyl “conditioners” or “protectants” is not recommended. Vinyl
“conditioner” or “protectants” can cause plasticizers to migrate out of the vinyl causing
it to become embrittled. This will prematurely age your vinyl and is not covered under
warranty.
Some institutional cleaners or disinfectants may cause discoloration of the vinyl. Use of cleaners,
other than those recommended by the vinyl manufacturer, is at the clinics own risk. Follow the
vinyl manufacturer’s cleaning recommendations. Certain medications may produce a
metabolite in the patient’s perspiration which can stain or discolor fabric. If you have any questions,
please call Champion’s Customer Service Department at 800-998-5018 with the serial number from
your chair. The serial number can be found on the frame base, on the back, to the left hand side.
Page 24

23 OM00ELV8 Rev 3 effective 110118
GENERAL CLEANING
First clean on a daily basis the upholstery with warm water and mild soap using damp cloth.
Regular and careful cleaning of the upholstery with water in addition to a mild soap can prevent
hardening and embrittlement of the upholstered parts from such materials as detergent, sweat,
skin oils, hair spray, hand creams and similar things may affect the leather during treatment.
Before cleaning or disinfecting, always unplug the power cord from the wall outlet!
Never clean the chair in wash tunnel or with a high-
pressure cleaner nor spray liquids
onto it.
Do not use any solvents such as benzene or similar substances.
Avoid ingress of liquid or disinfectant into the electronic control box, motors and
remote control
handset. Cleaning of the mechanical parts (motor actuating rods,
bolts and joints) is not required and not recommended. Abrasive cleaners should not
be used.
IMPORTANT: For specific cleaning instructions, please see manufacturer’s cleaning
instructions included in the Vinyl Cleaning Instructions also on the in-service disk.
CAUTION: Limit use of strong active solvent cleaners per manufacturer’s
instructions; unlimited use may remove the protective finish on the material
Page 25

24 OM00ELV8 Rev 3 effective 110118
GENERAL DISINFECTING/INFECTION CONTROL - VINYL
Note: Infection control standards are the responsibility of the facility. Bleach solution
recommendations from a vinyl manufacturer are not intended to supersede the facility’s infection
control standards. Information from the vinyl manufacturer is meant to establish an upper limit
beyond which damage might occur.
A solution of up to 10% bleach and water may be used.
WARNING: NEVER mix ammonia, or a cleaner with ammonia, with bleach as
dangerous compounds may result.
CAUTION:
Do not
use an iodine based solution since vinyl is an iodinophil material
and will stain under this condition. If a solution other than a bleach solution is used and
you are uncertain if it is iodine based, please test on a hidden portion (bottom back
flap) of the vinyl.
All vinyl manufacturers recommend use of bleach and water as a disinfectant. For standards
specific to your particular vinyl, consult your vinyl cleaning instructions located in a separate file on
this disk. For your disinfection standard consult your facility’s standard. For maximum allowable
bleach concentration consult information specific to the vinyl your chair is upholstered with per the
manufacturer’s cleaning instructions.
If you are using disinfection agents other than bleach and water; do not hesitate to call Champion’s
Customer Service for assistance in determining whether there may be any concerns about that
agent and the vinyl that you have chosen.
For any upholstery that is not Champion approved, the facility is responsible for
obtaining cleaning instructions on that specific covering. This would include all COM
(Customers Own Material) or Custom vinyls.
If you do not know what vinyl your recliner is upholstered in, call Champion’s Customer
Service 800-998-5018 with the serial number of your chair to obtain assistance.
Page 26

25 OM00ELV8 Rev 3 effective 110118
SAFETY INSPECTION AND TROUBLESHOOTING
Routine Safety Inspection
The following inspections and maintenance work should be done in every two years with the
Technical Safety Inspection.
• The hinges and joints of the leg rest, backrest and armrest should be inspected.
• The knurled knob of the armrest should be inspected.
• The wheels should be checked to see whether they are securely fastened to the frame.
• If the knurled knobs or the mechanical parts of the armrests are damaged, they should be repaired
immediately or exchanged.
Checking the electronic control
Replace hand set immediately if keypad membranes are damaged to avoid further damage and short
circuits caused by liquids entering the handset.
If the motors do not move change the handset. If the moving is still not
possible change the control unit.
The control box does not work without closing plugs that should be connected
tightly into the proper socket on the left side (Figure 1).
If you change a fuse or to check/repair inside the electronic control box, the
power cord must be disconnected from the wall-socket and battery back-
up
must be disconnected from the control box. This
provides total isolation of
the chair from the main voltage.
Recycling of used parts and special waste disposal
When the equipment is first commissioned, when it is taken out of service and during the exchange
of replacement parts, the following points should be considered:
• The packaging is not special waste and should be recycled.
• Parts exchanged or replaced after the chair has been used for treatment are to be treated as
special waste. After disinfections, the parts are to be returned for recycling or disposed of as
special waste.
• In the event of any questions about the disposal of parts and compliance with legal requirements,
please obtain information from your local disposal company.
Page 27

26 OM00ELV8 Rev 3 effective 110118
WARRANTY PROCEDURE
File a Warranty Claim
Calling customer service may institute a warranty claim. At that time you will be asked to provide:
● your name and facility name
● your phone, fax number, email address
● the serial number of your product, and
● the nature of your problem
Having the above information available at the time that you call will speed the process. In order to
provide prompt accurate service it may be necessary to request further information about the chair
function to accurately define the problem.
Warranty Coverage
Your coverage is per the Champion warranty. A copy of the current warranty was provided with this
manual for your convenience. Please read this document.
Warranty Does Not Apply If:
● Repairs have been made that were not authorized or under the
direction of Champion Manufacturing Inc.’s service department.
● Required repairs are due to normal wear and tear.
● Product has been abused, improperly used or maintained.
● Alterations have been made to the chair.
● Improper cleaning agents or methods have been used.
● Repairs have been made with parts other than Genuine Champion repair parts.
Whether your claim is covered under warranty may not always be determined at the time of your
call. Where the possibility of improper use exists, a determination will be made upon receipt of
damaged components or product. In these cases, components or product will be shipped with the
express understanding that if damage is not covered by warranty all costs are the responsibility of
your facility.
Service Parts will not be sold if your chairs are outside of the product lifetime of eight (8) years
unless
• Chairs have been inspected and replacement parts verified as installed properly by an
approved Champion technician for an extended life certificate.
Page 28

27 OM00ELV8 Rev 3 effective 110118
SERVICE INFORMATION
The mission of the Service Department is to get your chair up and running as quickly as possible. It
is critical that the Service Department know what product you have, and exactly what is wrong with
the product. If you have questions or problems, you should never hesitate to call for assistance:
800-998-5018.
The most timely and cost effective way for your chair to be repaired is for the Service Department
to work with your maintenance department or equipment technician.
Determining the Problem
What is wrong with the chair should be determined by troubleshooting. The Service Department
will assist you with this by asking you questions about the chair function.
Serial Number
The chair serial number identifies the precise configuration of your chair; this is critical to receiving
correct components and instructions. This number is required to process your request.
The serial number is located in the back of the chair on the lower left side on the label entitled
Champion Manufacturing -Serial #xxxxxx.
No parts will be shipped without a Serial Number to which they will be installed.
PARTS IDENTIFICATION
To identify worn or damaged components please refer to appropriate product schematics.
To obtain repair part numbers refer to the parts listing key using the schematics page and item
number.
Parts orders may be placed by using the convenient fax order form in this manual or by calling
Customer Service 800-998-5018.
When placing an order by phone you will be asked to provide:
● your name and facility name
● your phone, fax number, email address
● the serial number of your product, and
● the nature of your problem
Having the above information available at the time you call will expedite the process. In order to
provide prompt, accurate service it may be necessary to request further information about the chair
function to accurately define the problem.
Page 29

28 OM00ELV8 Rev 3 effective 110118
SERVICE PARTS FORM
Champion Manufacturing
2601 Industrial Parkway, Elkhart, IN 46514
Tel.: –800-998-5018
Fax: –574-293-5760
Customer name: _________________________________________
Customer address: ________________________________________
Tel: _________________ Fax: __________________
Ordering spare parts for Serial Number _______________________
Pieces
Art.-Nr.
Description
E8-ARMHAS
Armrest height adjusting stirrup
E8-BATTERY
Battery unit
E8-ELECCBX
Electronic control box without reading lamp connector
E8-PWRCBL
Power cable (Nema 5-15)
E8-FOIL
Foil of the handset
E8-HNDST
Handset
E8-CSTRCB
7,5 cm twin wheel castor for central operating brake system
E8-PDLCBR
Pedal for central brake, right
E8-PDLCBL
Pedal for central brake, left
E8-BKRSTMTR
Backrest motor
E8-SEATTMTR
Seat tilt motor
E8-LGRSTMTR
Leg rest motor
E8-SEATHMTR
Seat height motor
E8-ARMMECH
Armrest mechanism for easy patient transfer
E8-ARMS
Arms (vinyl only)
E8-PAD
Pad (vinyl only)
E8-PILLOW
Pillow (vinyl only)
E8-ARMSTRP
Arm rest strap for handset (vinyl only)
Date: ____________________ Signature: ________________________
Page 30

SERVICE PARTS
Figure
Art.-No.
Description
Figure
Art.-No.
Description
Electronic parts
Electronic control
Motors
Backrest
Seat tilt motor
Leg rest
Seat height
Parts for tilt-up armrest
Armrest
transfer
Mechanical parts
7,5 cm twin
system
Pedal for central
Pedal for
E8-BATTERY
Battery unit
E8-ELECCBX
box without
reading lamp
connector
E8-PWRCBL
Power cable
(Nema 5-15)
E8-FOIL
Foil of the
handset
E8-HNDST
E8-BKRSTMTR
Handset
motor
E8-SEATTMTR
E8-LGRSTMTR
E8-ARMMECH
E8-CSTRCB
E8-PDLCBL
29 OM00ELV8 Rev 3 effective 110118
motor
mechanism
for easy
patient
wheel castor
for central
operating
brake
central
brake, left
E8-SEATHMTR
E8-ARMHAS
motor
Armrest height
adjusting stirrup
E8-PDLCBR
brake, right
 Loading...