

Page 1

Installation/Operation Manual with Service Replacement Parts
For machines beginning with S/N D3684 and above
Door-type Extended Hood
Dishwasher
Models:
D-HBTM5, DHBTCM5
High Temperature Extended Hood with
Built-in Booster Heater
D-H1TM5, DH1TCM5
High Temperature Extended Hood without
Built-in Booster Heater
www.championindustries.com
Champion Industries, INC.
3765 Champion Boulevard, Winston-Sale, NC 27105
P.O. Box 4149 Winston-Salem, NC 27115-4149
1-800 232-8591 Fax: 1-800-661-1556
Issued 1.18.10
Manual P/N 113492 Rev. G
2674 N. Service Road, Jordan Station
Ontario, Canada L0R 1S0
1-800 263-5798 Fax: 1-905 562-4618
Printed in U.S.A.
Page 2

For future reference, record your dishwasher information in the box below.
Model Number__________________________ Serial Number_______________________
Voltage________________Hertz_____________ Phase__________________
Service Agent __________________________________ Tel:______________________
Parts Distributor _________________________________ Tel:______________________
National Service Department
In Canada: In the USA:
Toll-free: 800/ 263-5798 Toll-free: 800/ 858-4477
Tel: 905/ 562-4195 Tel: 336/ 661-1556
Fax: 905/ 562-4618 Fax: 336/ 661-1660
email: service@moyerdiebellimited.com email: service@championindustries.com
ATTENTION:
The model no., serial no., voltage, Hz
and phase are needed to identify your
machine and to answer questions.
The machine data plate is located
on the front panel of the machine
Please have this information ready
if you call for service assistance.
The USGBC and the CaGBC Member Logos are trademarks owned by the U.S. Green Building Council and The Canadian Green
Building Council, respectively, and are used by permission. The logos signify only that Champion Industries and Moyer Diebel
are a USGBC member and a CaGBC member respectively. USGBC and CaGBC do not review, certify nor endorse the products
COPYRIGHT © 2010 All rights reserved Printed in the USA
or services offered by its members.
Page 3
ATTENTION:
Complete the back of the POSTAGE PAID WARRANTY CARD below, then cut along
the dashed lines and mail immediately to make sure that your machine warranty is validated.
USE CANADIAN WARRANTY CARD IN CANADA AND USA WARRANTY CARD IN THE UNITED STATES.
NO POSTAGE
NECESSARY
IF MAILED
IN THE
UNITED STATES
BUSINESS REPLY MAIL
FIRST-CLASS MAIL PERMIT NO. 2101 WINSTON-SALEM, NC
POSTAGE WILL BE PAID BY ADDRESSEE
CHAMPION INDUSTRIES INC
PO BOX 4149
WINSTON-SALEM, NC 27119-0981
Page 4
IMPORTANT IMPORTANT
Model
WARRANTY REGISTRATION CARD
WARRANTY REGISTRATION CARD
Date of Installation:
Company Name:
Serial #
Address:
Telephone #: ( ) ---
Contact:
Installation Company:
Address:
Telephone #:
Contact:
(Street) State or Province Zip Code
This Card Must Be Returned to Validate Machine Warranty:
Model
Date of Installation:
Company Name:
Address:
Telephone #: ( ) ---
Contact:
Installation Company:
Address:
Telephone #:
Contact:
This Card Must Be Returned to Validate Machine Warranty:
(Street) State or Province Zip Code
Serial #
IMPORTANT IMPORTANT
Page 5

Revision History
Revision History
A revision might be a part number change, new instructions, or information that was not available
at the time of printing. We reserve the right to make changes to this manual without notice and
without incurring any liability by making changes. Dishwasher owners may request a revised
manual at no charge by calling (800) 858-4477 in the USA or (800) 263-5798 in Canada.
Revision Date Pages Serial No. Effectivity Description
7.1.02 All D3694 Release of First Edition
10.18.02 3 D3864 Revised rated amp listing
10.18.02 11,15 D3864 Added control panel decal
10.18.02 13,15,17,24 D3864 Revised cycle times
10.18.02 33 D3864 Added new panel P/N 327262
10.18.02 35,37 D3864 Added new door P/N's
10.24.02 44,45 D3864 Revised rinse arm bearing P/N's
Bearing 112164 replaced by
113514, 0707452 replaced by
414111.
10.24.02 45 D3864 Added new rinse arm P/N 414110.
10.24.02 47 D3864 Added water deector P/N 327283.
10.24.02 54,55 D3864 Added bushing P/N 100171.
10.24.02 60,61 D3864 Added new control panel.
10.24.02 63 D3864 Added new timer bd. P/N 113547.
12.18.02 63 D3957 Added timer bd. kit P/N 900911
to convert bds. to P/N 113597.
2.5.03 49,61 _____ Replaced P/N 108391 w/ 113622.
2.5.03 63 _____ Vendor change for overloads
Square D in place of Siemans.
1.29.04 15 _____ Revised cycle time instructions.
2.3.04 52,53 D4237 Added PRV and line strainer
2.3.04 67 D4237 Update schematic to Rev. K
3.5.04 39 D4410 Changed door safety switch
P/N 112659 to P/N 113721.
3.5.04 39 D4410 Added door handle and kit
P/N 900860
9.3.09 67 _____ Update schematic to Rev. M
i
Page 6

Revision History (continued)
Revision History (continued)
Revision Date Pages Serial No. Effectivity Description
1.06.10 All D09117934 Release of Second Edition
ii
Page 7

Model Descriptions
Model Numbers
Model Descriptions
D-HBT - Straight-through with built-in booster
D-HBTC - Corner with built-in booster
D-H1T - Straight-through without built-in booster
D-H1TC - Corner without built-in booster
Standard Equipment
Automatic Tank Fill and start
Adjustable cycle selector switch
Combination dishwasher for dishes, pots, pans and utensils
Built-in electric booster heater (DHBT, DHBTC only) in 40˚F/22˚C rise for 140˚F/60˚C supply water
Specied as straight-through or corner operation
2-door lift system
Electric tank heat
Low-water tank heat protection
Door safety switch
Automatic electric drain
Common utility connection
Chemical connection provisions
Stainless steel front and side panels
2" O.D. gravity drain connection
Mounted water pressure regulating valve (DHBT, DHBTC)
Interchangeable upper and lower spray arms
Stainless steel rinse arms
Two dish racks (1 peg, 1 at-bottom)
Options and Accessories
Built-in electric booster heater (DHBT, DHBTC only) in 70˚F/39˚C rise for 110˚F/43˚C supply water
Externally mounted steam booster (steam booster 40˚F/22˚C - 70˚F/39˚C rise)
Steam injector or steam coil tank heat (steam booster 40˚F/22˚C - 70˚F/39˚C rise)
Single Source gas booster heater
Additional dish racks:
Peg rack P/N 101285
Flat-bottom P/N 101273
Sheet Pan P/N 113281
3/4" NPT Pressure Regulating Valve (PRV) P/N 107550
3/4" NPT Line Strainer P/N 110768
iii
Page 8

Limited Warranty
LIMITED WARRANTY
Champion Industries Inc. (herein referred to as Champion), P.O. Box 4149, Winston-Salem, North Carolina 27115,
and P.O. Box 301, 2674 N. Service Road, Jordan Station, Canada, L0R 1S0, warrants machines, and parts,
as set out below.
Warranty of Machines: Champion warrants all new machines of its manufacture bearing the name
"Champion" and installed within the United States and Canada to be free from defects in material and workman
ship for a period of one (1) year after the date of installation or fteen (15) months after the date of shipment by
Champion, whichever occurs rst. [See below for special provisions relating to glasswashers.] The warranty
registration card must be returned to Champion within ten (10) days after installation. If warranty card is not
returned to Champion within such period, the warranty will expire after one year from the date of shipment.
Champion will not assume any responsibility for extra costs for installation in any area where there are
jurisdictional problems with local trades or unions.
If a defect in workmanship or material is found to exist within the warranty period, Champion, at its election,
will either repair or replace the defective machine or accept return of the machine for full credit; provided;
however, as to glasswashers, Champion's obligation with respect to labor associated with any repairs shall end
(a) 120 days after shipment, or (b) 90 days after installation, whichever occurs rst. In the event that Champion
elects to repair, the labor and work to be performed in connection with the warranty shall be done during regular
working hours by a Champion authorized service technician. Defective parts become the property of Champion.
Use of replacement parts not authorized by Champion will relieve Champion of all further liability in connection
with its warranty. In no event will Champion's warranty obligation exceed Champion's charge for the machine.
The following are not covered by Champion's warranty:
a. Lighting of gas pilots or burners.
b. Cleaning of gas lines.
c. Replacement of fuses or resetting of overload breakers.
d. Adjustment of thermostats.
e. Adjustment of clutches.
f. Opening or closing of utility supply valves or switching of electrical supply current.
g. Cleaning of valves, strainers, screens, nozzles, or spray pipes.
h. Performance of regular maintenance and cleaning as outlined in operator’s guide.
i. Damages resulting from water conditions, accidents, alterations, improper use, abuse,
tampering, improper installation, or failure to follow maintenance and operation procedures.
j. Wear on Pulper cutter blocks, pulse vanes, and auger brush.
Examples of the defects not covered by warranty include, but are not limited to: (1) Damage to the exterior or
interior nish as a result of the above, (2) Use with utility service other than that designated on the rating plate,
(3) Improper connection to utility service, (4) Inadequate or excessive water pressure, (5) Corrosion from
chemicals dispensed in excess of recommended concentrations, (6) Failure of electrical components due to
connection of chemical dispensing equipment installed by others, (7) Leaks or damage resulting from such
leaks caused by the installer, including those at machine table connections or by connection of chemical
dispensing equipment installed by others, (8) Failure to comply with local building codes, (9) Damage
caused by labor dispute.
Warranty of Parts: Champion warrants all new machine parts produced or authorized by Champion to be free
from defects in material and workmanship for a period of 90 days from date of invoice. If any defect in
material and workmanship is found to exist within the warranty period Champion will replace the defective
part without charge.
DISCLAIMER OF WARRANTIES AND LIMITATIONS OF LIABILITY. CHAMPION'S WARRANTY IS ONLY TO THE EXTENT REFLECTED ABOVE. CHAMPION MAKES NO OTHER WARRANTIES, EXPRESS OR IMPLIED, INCLUDING,
BUT NOT LIMITED, TO ANY WARRANTY OF MERCHANTABILITY, OR FITNESS OF PURPOSE. CHAMPION SHALL
NOT BE LIABLE FOR INCIDENTAL OR CONSEQUENTIAL DAMAGES. THE REMEDIES SET OUT ABOVE ARE
THE EXCLUSIVE REMEDIES FOR ANY DEFECTS FOUND TO EXIST IN CHAMPION DISHWASHING MACHINES AND
CHAMPION PARTS, AND ALL OTHER REMEDIES ARE EXCLUDED, INCLUDING ANY LIABILITY FOR INCIDENTALS
OR CONSEQUENTIAL DAMAGES.
Champion does not authorize any other person, including persons who deal in Champion dishwashing machines
to change this warranty or create any other obligation in connection with Champion Dishwashing Machines.
iv
Page 9

Table of Contents
Table of Contents
Model DHBT, DH1T Extended Hood Door-type Dishwashers
Revision History .................................................................................................................. i
Model Descriptions .............................................................................................................. iii
Limited Warranty ................................................................................................................. iv
Installation ............................................................................................................. 1
Operation ............................................................................................................... 13
Cleaning ................................................................................................................. 18
Maintenance .......................................................................................................... 20
Troubleshooting .................................................................................................... 22
Service Replacement Parts .................................................................................. 23
Electrical Schematic ............................................................................................. 65
v
Page 10

Blank Page
This Page
Intentionally
Left Blank
vi
Page 11
Installation
5-1/2" [140mm]
Control
Cabinet
WASH
WARNING!
TURN OFF POWER BEFORE
SERVICING MACHINE
RINSE PRESSURE
Receiving
!!ATTENTION!!
Use caution when moving or lifting the dishwasher to prevent damaging the dishwasher
or the installation site. Check doorway and passageway clearance before moving the dishwasher.
Remove dishwasher front panel and check under the machine base for obstructions before moving.
1. Inspect the dishwasher for shipping damage
2. Check the dishwasher interior for curtains, panels and other supplies.
3. Lift the dishwasher off the shipping pallet and move the machine near its permanent location.
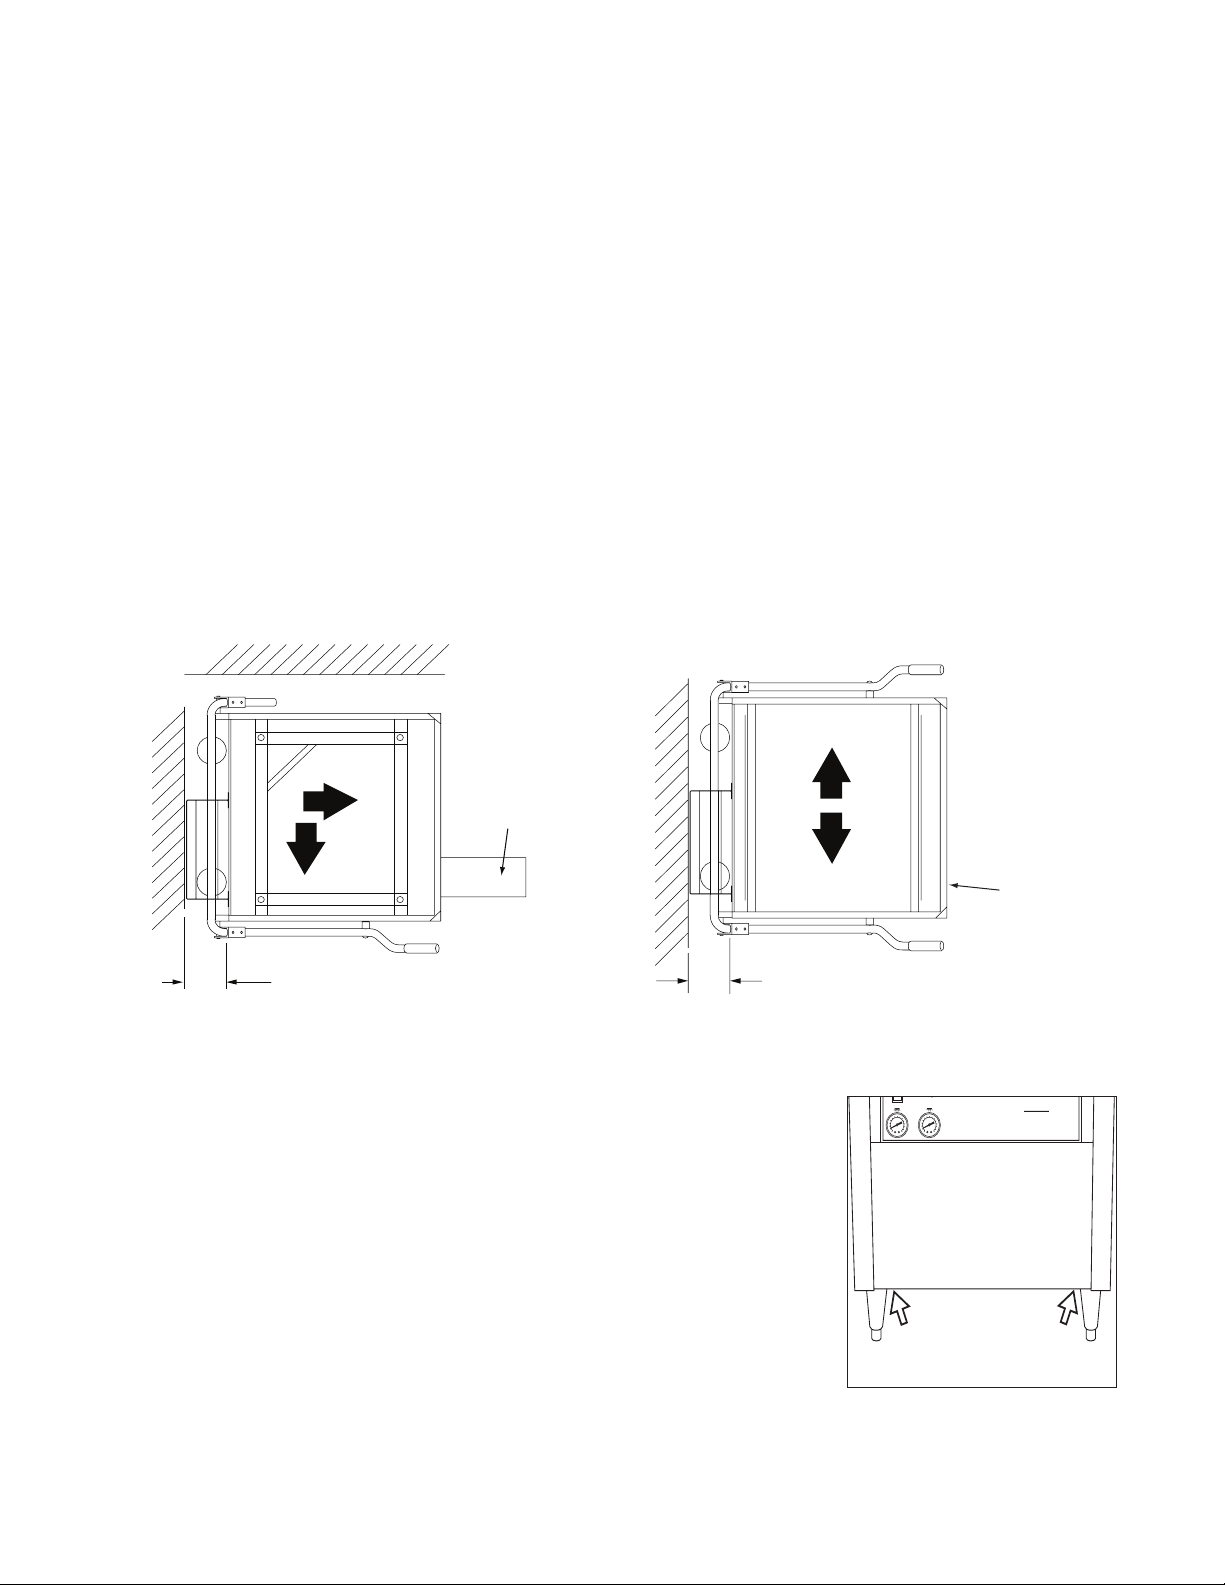
4. Leave a minimum of 5-1/2" between walls and the rear of the dishwasher.
5. Level the dishwasher side-to-side and front-to-back using a bubble level.
The dishwasher legs are adjusted by screwing them in or out.
6. Do not remove tags attached to the utility connections.
7. Remove the protective film from the dishwasher exterior.
8. Remove any foreign material from the dishwasher interior.
Front
Control
Cabinet
5-1/2" [140mm] Min.
DHBTC, DH1TC
Corner Configuration
Straight-through Configuration
DHBT, DH1T
Remove two front panel screws
in preparation for utility connections
1
Page 12
Installation
Electrical Connections
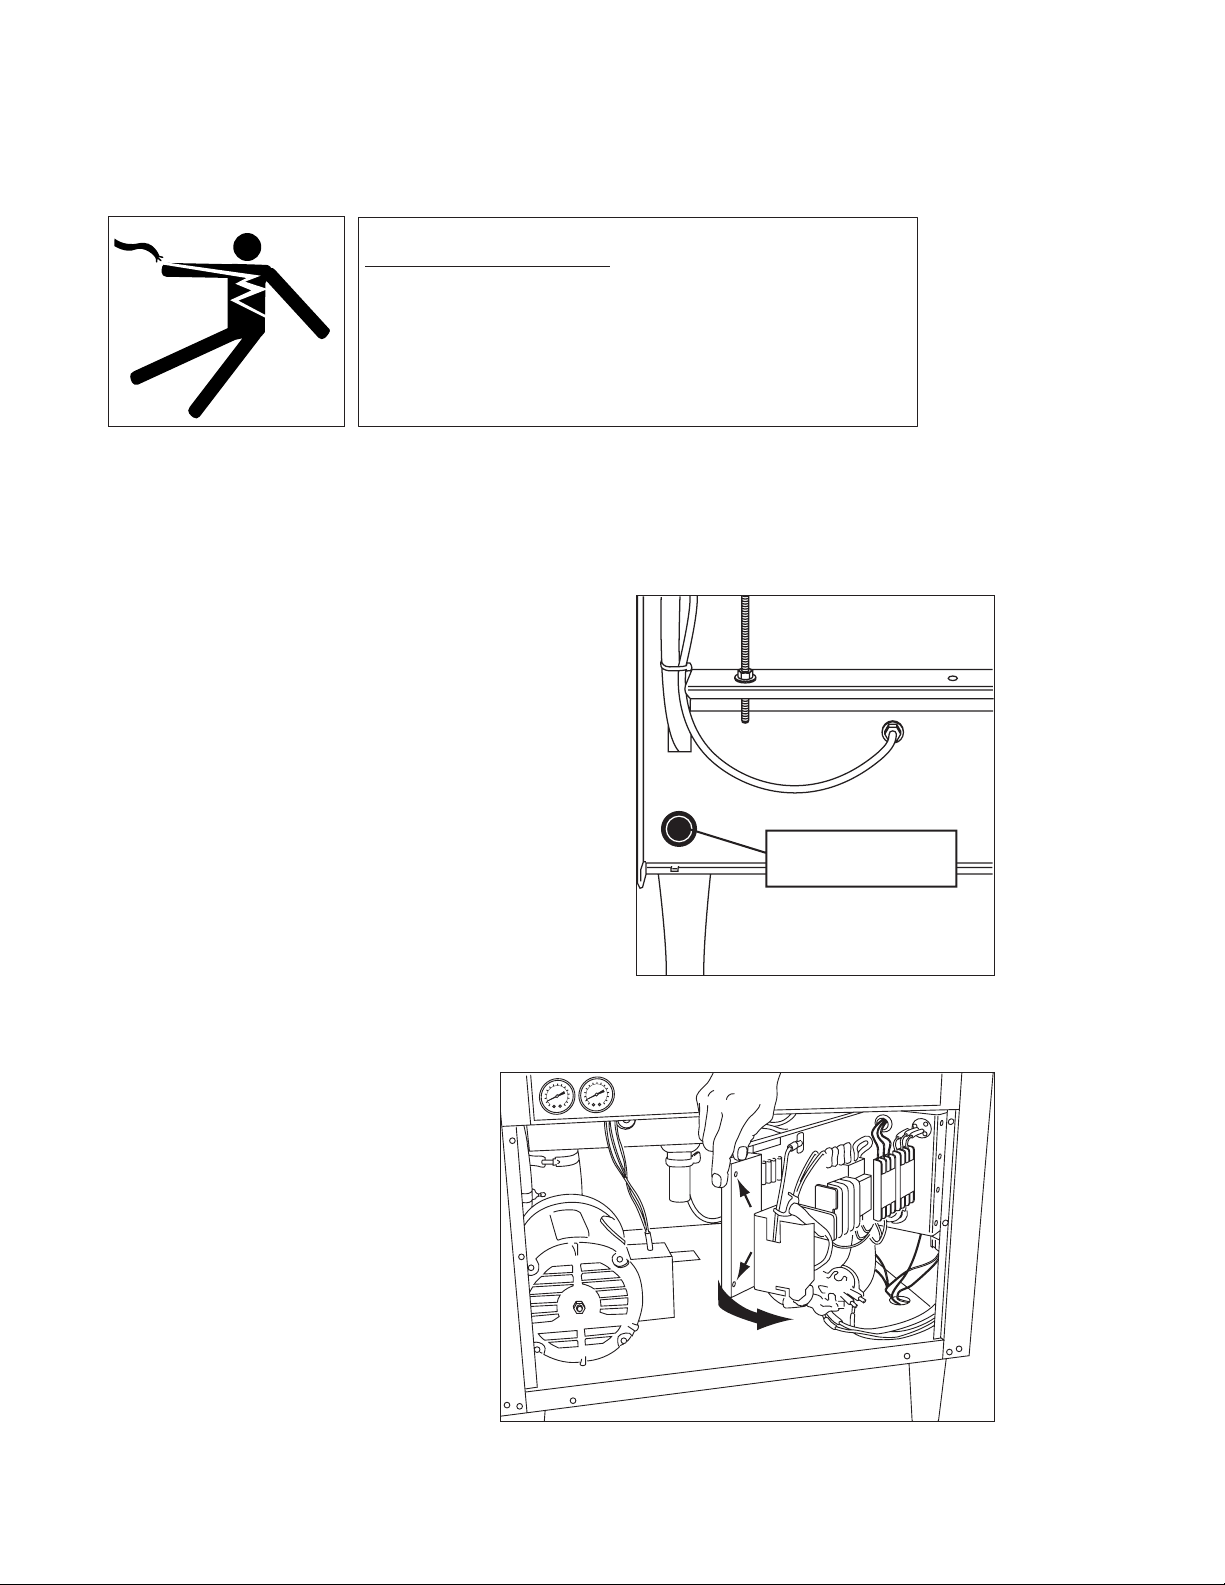
WARNING:
Electrocution or serious injury may result when working on an
energized circuit.
Disconnect power at the main breaker or service disconnect
switch before working on the circuit.
Lock-out and tag the breaker to indicate that work is being
performed on the circuit.
ATTENTION
A qualified electrician must connect the main incoming power to the dishwasher in accordance with all
local codes and regulations or in the absence of local codes in accordance with the National Electrical
Code.
1. A knockout is provided at the lower right rear
corner (machine viewed from the front) for the
electrical service connection. A fused
disconnect switch or circuit breaker (supplied
by others) is required to protect the power
supply circuit.
2. Remove two screws on the control
panel support and swing the panel
forward to gain access to the main
terminal block.
Electrical knockout
lower rear corner
2
Page 13
MACHINE ELECTRICAL CONNECTION
!!ATTENTION!!
Electrical and grounding connections
must comply with the National Electrical Code
or in the absence of a National Code then
all Local Electrical Codes.
A qualified electrician MUST compare the
electrical power supply with the machine
electrical specifications stamped on the
MACHINE ELECTRICAL
CONNECTION PLATE
located on the base of dishwasher near the
main terminal block.
Installation
Electrical Connections
3. Three phase or single phase incoming power
connections are made at the bottom of the
main terminal block. The main terminal block is
located on the right front post of the dishwasher.
Main Terminal Block
Electrical Power Connection
3
Page 14
Installation
Hot Water Connections
NOTE:
Only qualified personnel should make dishwasher plumbing connections.
Connections must meet local plumbing and sanitary codes.
Improper installation is not covered by the dishwasher warranty.
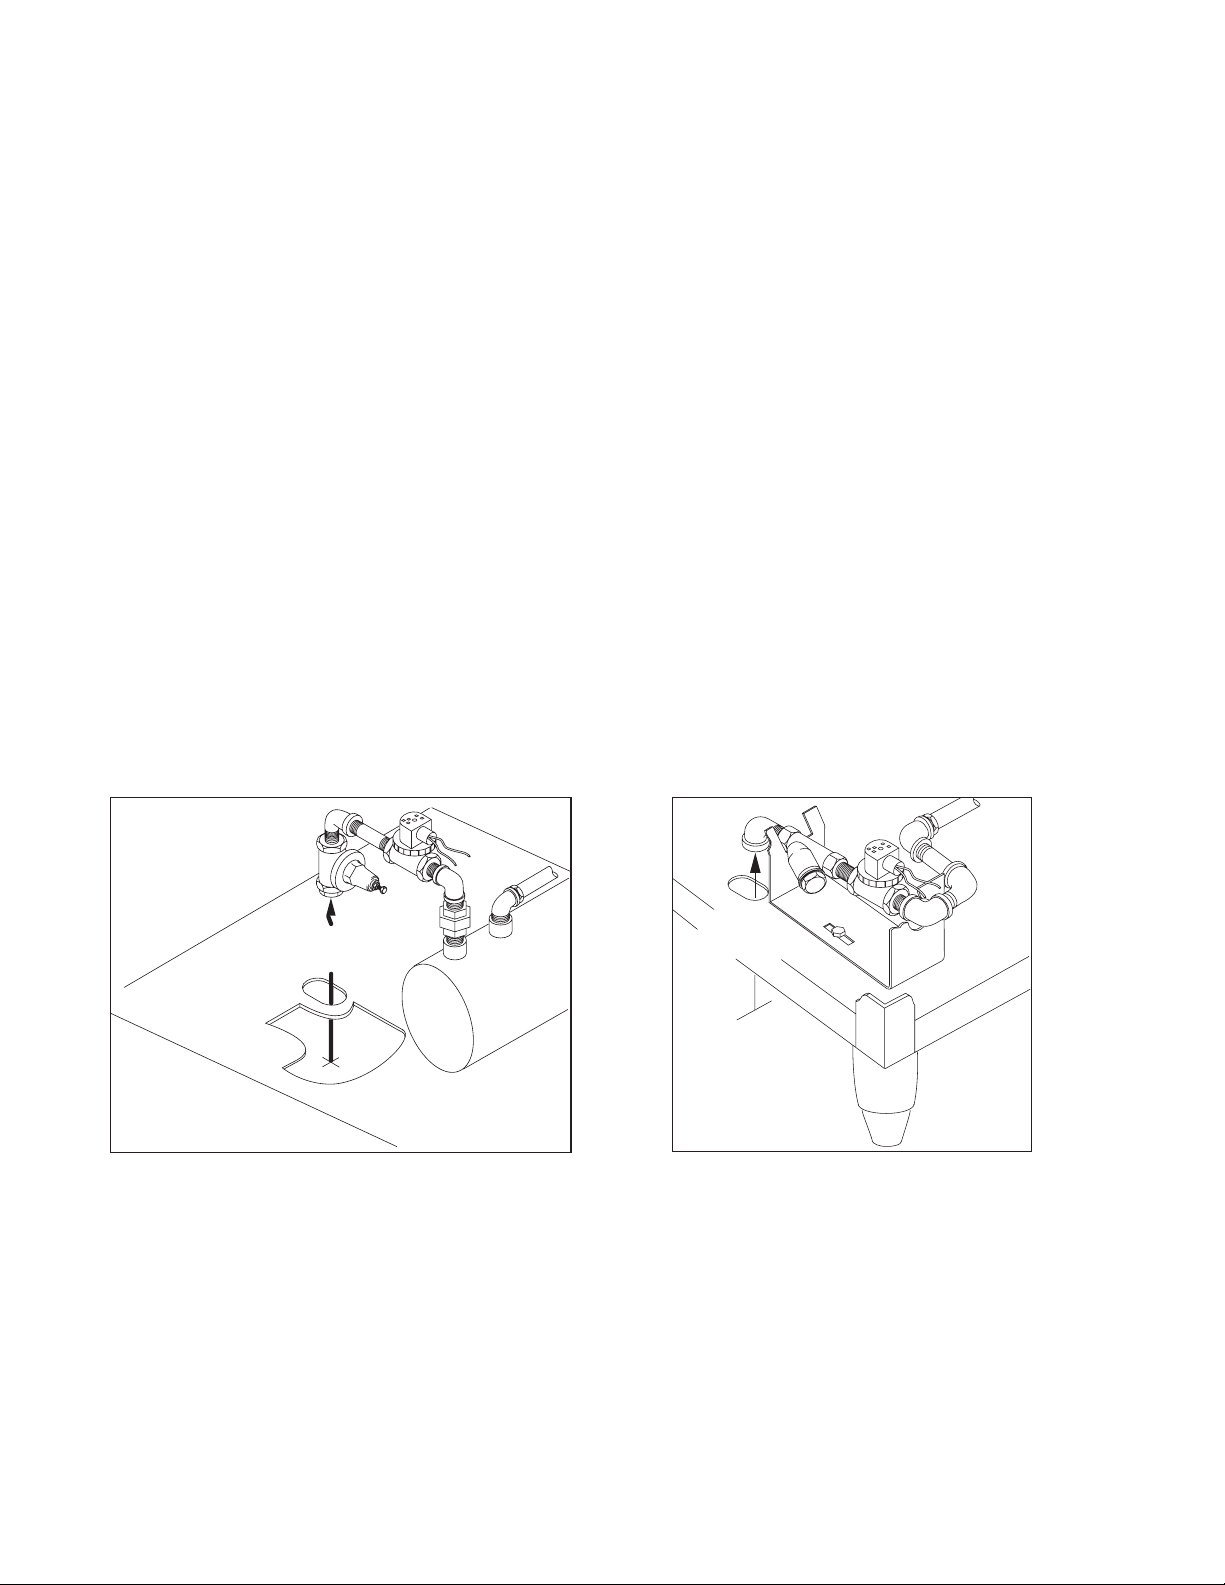
Hot Water Requirements:
1. Connect a 3/4" NPT hot water supply line to the line strainer located above the base of
the dishwasher. Refer to the illustrations below.
2. For a dishwasher without a booster heater, the hot water connection must supply a
minimum of 180°F/82°C measured at the dishwasher.
3. For a 40°F/22°C rise booster heater, the hot water connection must supply a minimum of
140°F/60°C measured at the dishwasher.
4. For a 70°F/39°C rise booster heater, the hot water connection must supply a minimum of
110°F/43°C measured at the dishwasher.
5. For a wash tank hot water coil heated dishwasher, the hot water connection must
supply a minimum of 185°F/85°C measured at the dishwasher
6. Install a pressure regulating valve (PRV) before the dishwasher supply connection to
maintain a flowing pressure of 20-25 PSI/137.8-172.4 kPa. (Sold separately for DH1T).
7. Install a service shut-off valve in the supply line, as close to the dishwasher as possible.
The size of the valve must be the same size or larger as the supply line.
8-7/8"
8-7/8"
[225 mm]
FLOOR
DHBT, DHBTC 3/4" NPT Hot Water
Connection
[225 mm]
FLOOR
DH1T, DH1TC 3/4" NPT Hot Water
Connection
4
Page 15
Installation
Drain Connections
1. All models are GRAVITY DRAIN machines equipped with a 2" O.D. hose connection.
2. The maximum flow rate is 15 U.S. gpm/56.8 Lpm.
3. Drain height for all models must not exceed 8-7/8" [225mm] above the finished floor.
4. The drain connection is made to the dishwasher from underneath the machine. An access
hole is provided in the machine base.
Vent
2" O.D.
Hose Fitting
Ventilation Connections
NOTE:
DO NOT VENT THE DISHWASHER INTO
WALLS, CEILINGS OR ENCLOSED PLACES.
1. The dishwasher is equipped with a vent
stack at the rear of the machine.
2. Typical venting requires a vent hood for the
machine.
3. DO NOT CONNECT A VENT STACK TO
THE DISHWASHER VENT.
5
Page 16
Installation
Steam Coil Tank Heat and Steam Booster Heater
The illustration below details a steam heated machine consisting of a tank heat steam coil and a mounted
steam booster for the final rinse. Contact the factory for steam injector tank heat details.
NOTE:
Only qualified personnel should make dishwasher steam connections.
Connections must meet local plumbing and sanitary codes. Improper installation is not covered by the
dishwasher warranty.
Steam Requirements:
2A: 3/4" NPT hot water supply (140˚F/60˚C) at 68 GPH at 20 PSI flowing pressure.
3A: 1/2" NPT cold water tempering (85˚F/30˚C) max 25 PSI if equipped.
4A: 3/4" NPT final rinse hot water (180-195˚F/82-91˚C) at 324 GPH at 20 PSI flowing pressure.
5A: 2" O.D. drain hose connection.
5B: 3/4" NPT booster relief to open drain.
6A: 1" NPT Booster 50 Lb/Hr / Tank Heat 25 Lb/Hr consumption.
7-10 PSI, 11-14 PSI, 15-30 PSI flowing pressure.
7A: 3/4" NPT condensate return to boiler (no back-pressure).
3
1'-4
"
12"
1'-4
10"
12"
4
1
3
4
7A
5
"
8
87"
DOOR
UP
5'-7
1
2
1'-0
3
4
"
4
"
1
"
11"
2
1A
5A
2 HP
1'-1
1
4
2'-1
"
1
"
4
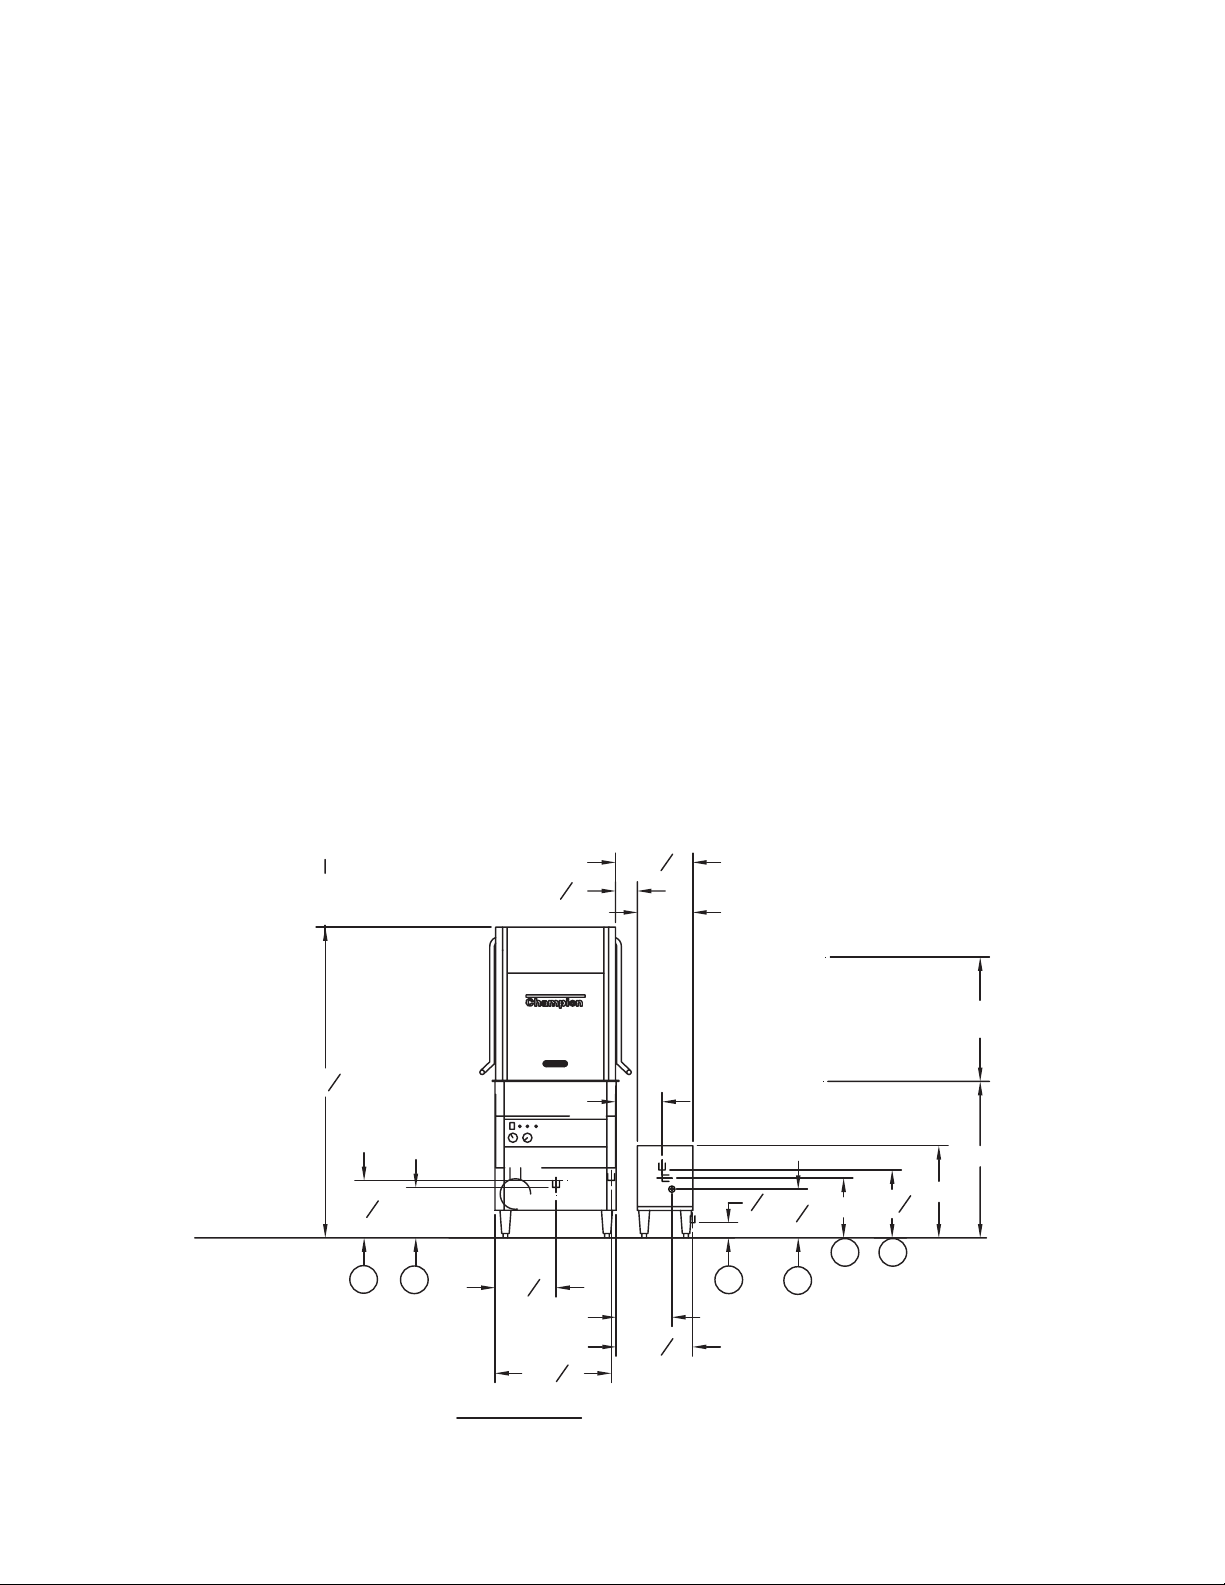
FRONT VIEW
27"
CLEARANCE
34"
20"
"
13"
5
10
"
8
2A
3
1'-2
"
4
6A
5B
6
Page 17

Installation
Single Source Gas Booster Heater
The illustration below details a single source gas heated machine consisting of a tank heat
hot water coil and a gas-powered booster heater for the final rinse. The gas-powered booster
provides hot water for the hot water coil and the final rinse. The booster will run on natural gas
or propane which is specified at the time of order.
NOTE:
Only qualified personnel should make dishwasher gas connections.
Connections must meet local gas and sanitary codes. Improper installation is not covered by the
dishwasher warranty.
Single Source Requirements:
1A: Gas booster electrical requirements are 15A @ 120V/60/1
2A: 3/4" NPT hot water supply 140˚F/60˚C for 40˚F/22˚C rise and 110˚F/43˚C for 70˚F/39˚C rise
at 20-22 PSI flowing pressure.
3A: 2" O.D. machine drain hose connection,
3B: 3/4" NPT relief valve to open drain,
3C: 1/2"NPT vent to open drain.
4A: Natural gas,40˚F/22˚C rise requires 58,000 BTU/HR., 70˚F/39˚C rise requires 105,000 BTU/HR.
Hatco Model PMG-60 requires 1/2" NPT, Hatco Model PMG-100 requires 3/4" NPT
5A: Gas flue connection is 4" diameter at the rear of the booster. Refer to the Hatco
Gas Booster Installation and Operating Instructions.
CLEARANCE
3
31
"
8
7
25
"
16
5
19
"
8
1
1
10
"
8
"
4
2
5
3B
4
2
1
7
"
8
1B
2 HP
11"
1
13
"
4
1
25
"
4
1
12
"
2
1A
3A
27"
34"
87"
DOOR
UP
7
67
16
"
FRONT VIEW
7
Page 18
Installation
Purging Air from the Dishwasher/Booster Heater System
CAUTION:
PERMANENT DAMAGE to the hot water recirculating pump can
occur if the air is not purged from the dishwasher/booster heater
system prior to placing the dishwasher into service.
Follow the instructions carefully to prevent damage to the
dishwasher hot water recirculating pump.
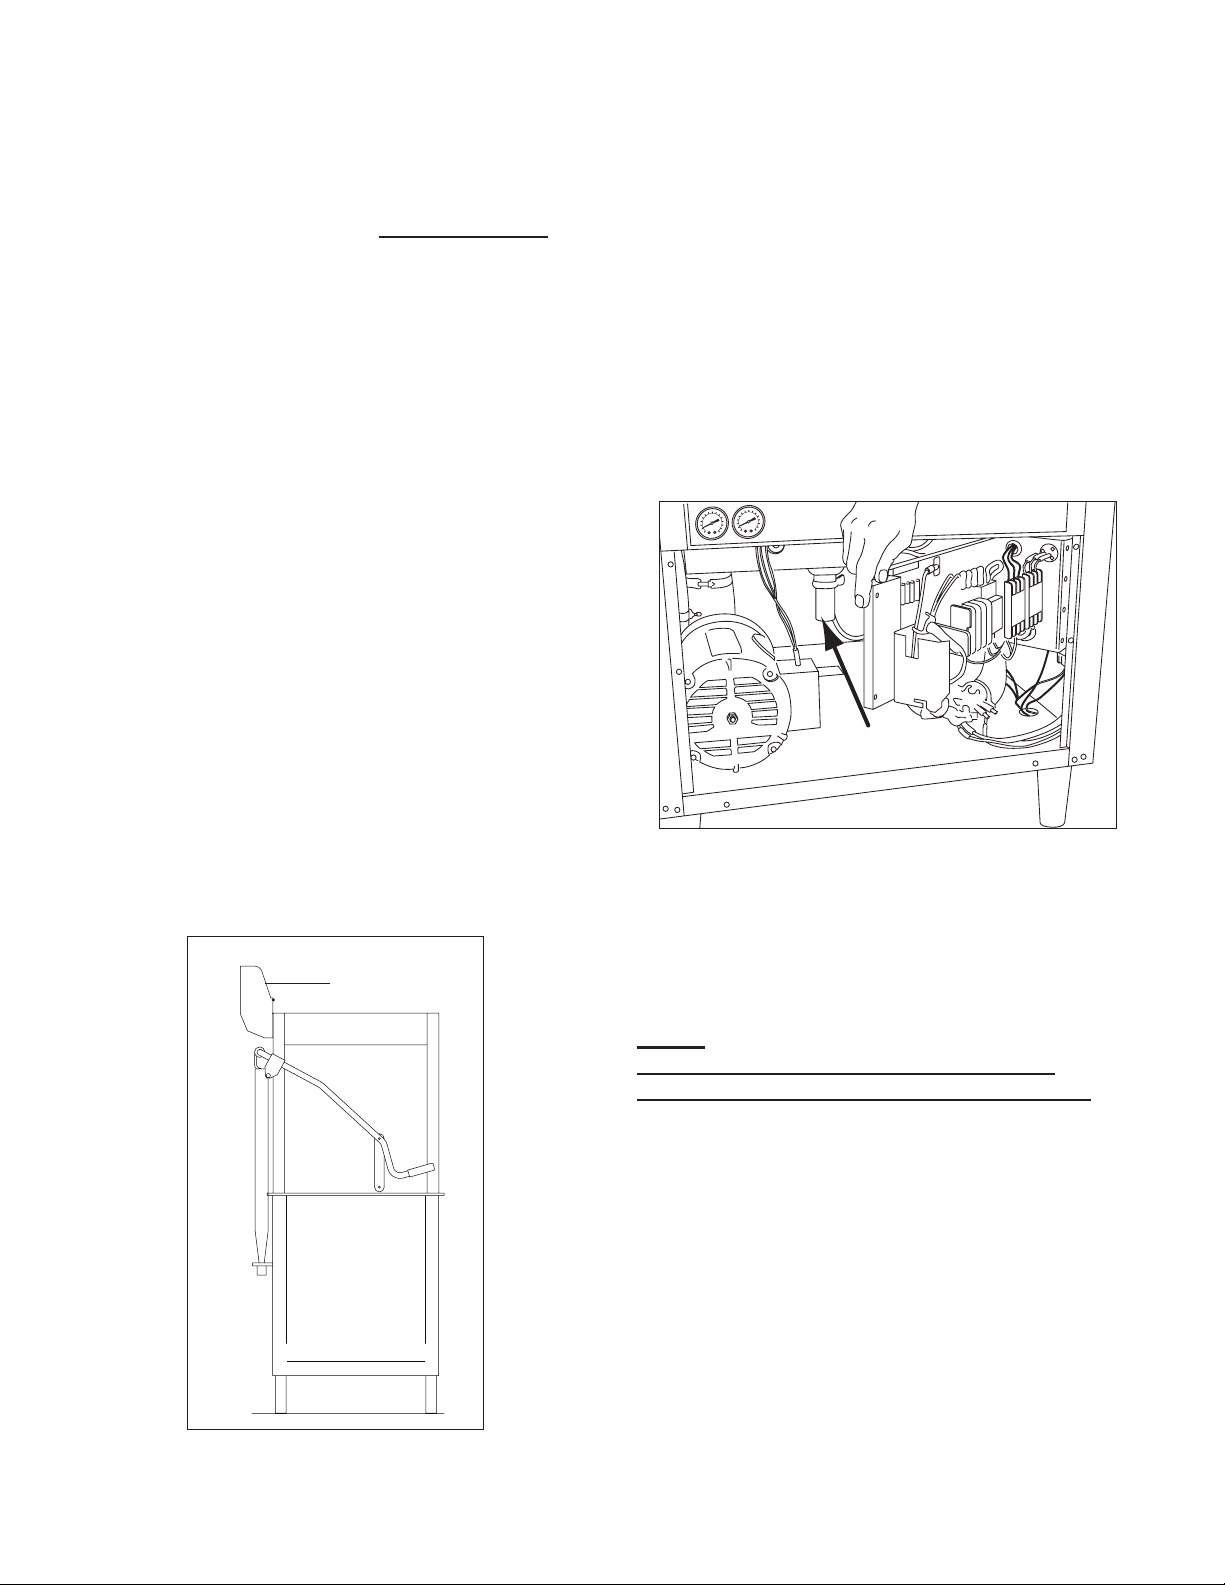
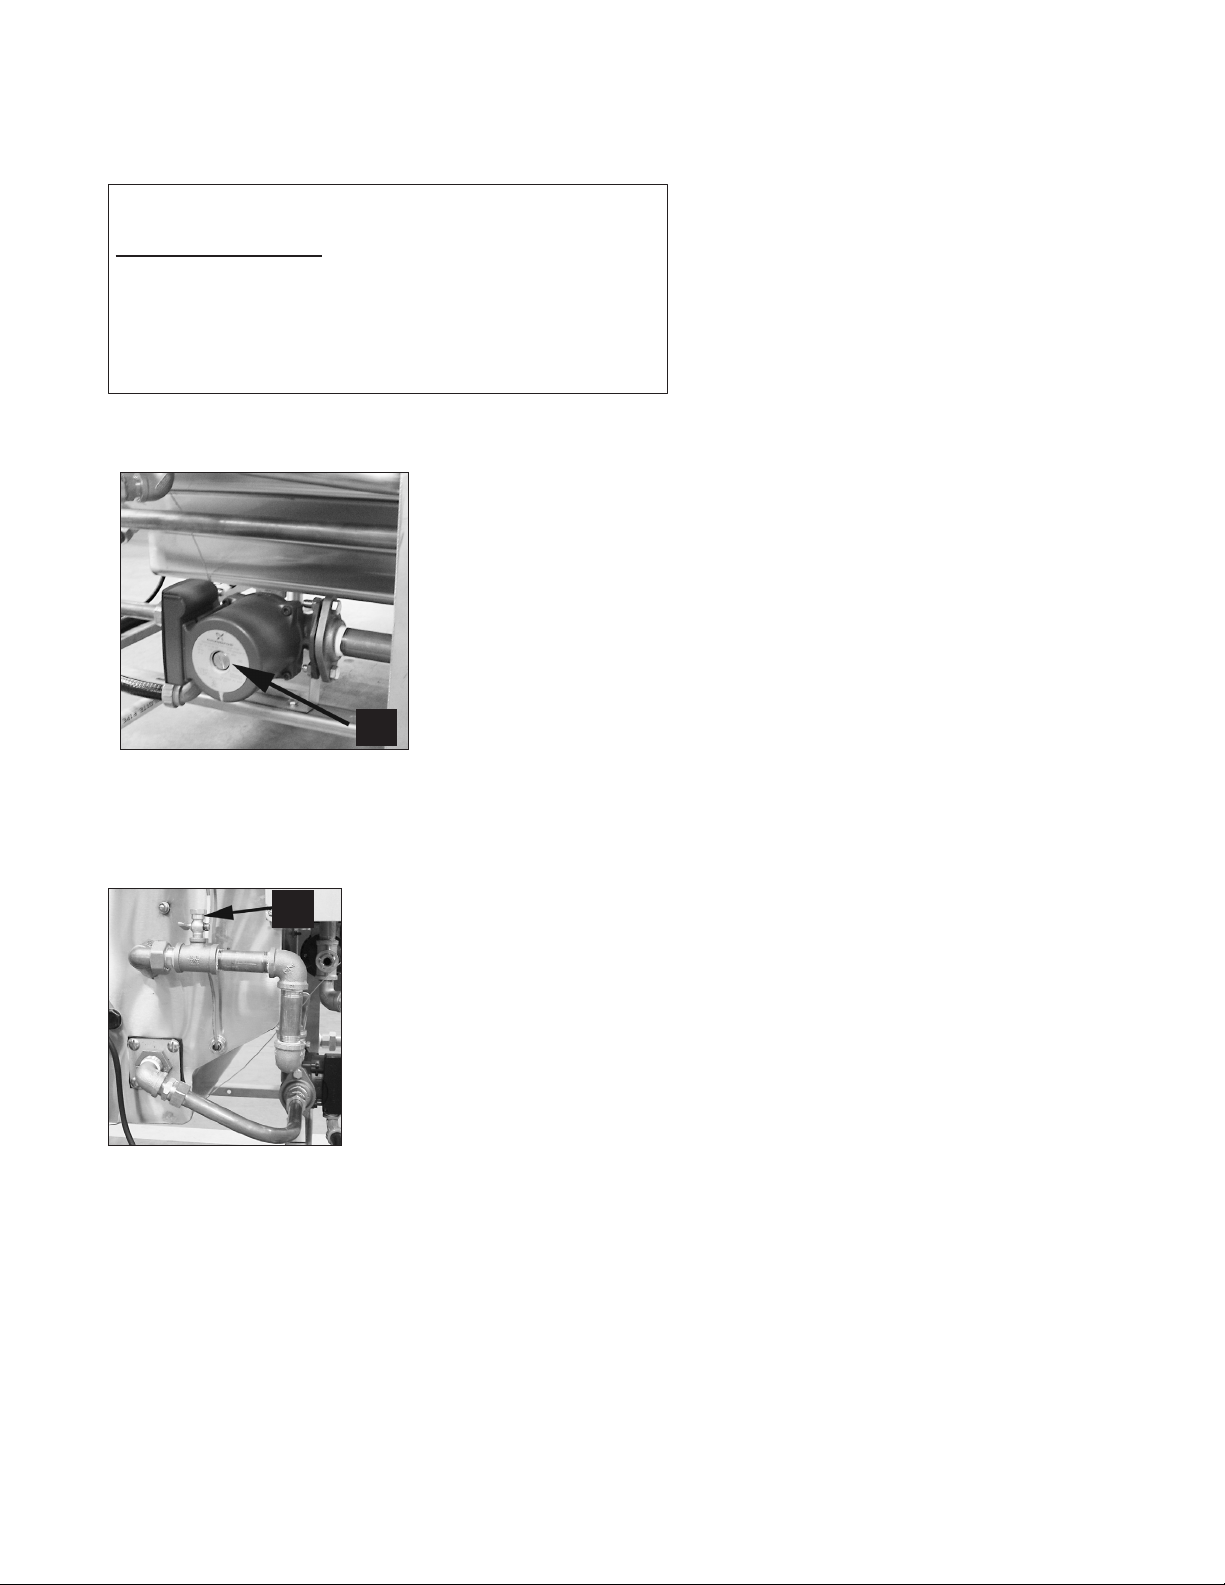
Follow the procedure below to purge the air from the
system. Plumbing and electrical service connections
must be completed before purging the system.
To purge the air:
1. Make sure the dishwasher main power switch is
OFF.
B
The dishwasher recirculating pump is
located on the base of the machine.
A
The air purge petcock is
located behind the dishwasher
lower front panel.
2. Make sure the main water supply valve located
at the booster heater is OFF.
3. Open petcock (A) on the inlet side of the
dishwasher hot water heater coil.
4. Remove the silver plug located in the center of
the recirculating pump.
5. Turn the main water supply valve ON. Water
will begin to ll the booster heater and the
dishwasher
heater coil.
6. Water and air will begin to ow out of the
purge petcock and the recirculating pump and
eventually only water will be observed.
7. Turn the booster heater power switch ON.
8. Turn the dishwasher power switch ON. The
dishwasher wash tank will begin to ll with water.
9. Continue to observe the petcock and the
recirculating pump and make sure that there is a
steady
stream of water is owing from (A) and (B).
10. Replace the silver plug (B) in the center of the
recirculating pump then close the petcock (A).
11. Turn the dishwasher power switch OFF.
12. Purging is complete.
8
Page 19
Installation
1/4" NPT Rinse aid
Injection Point
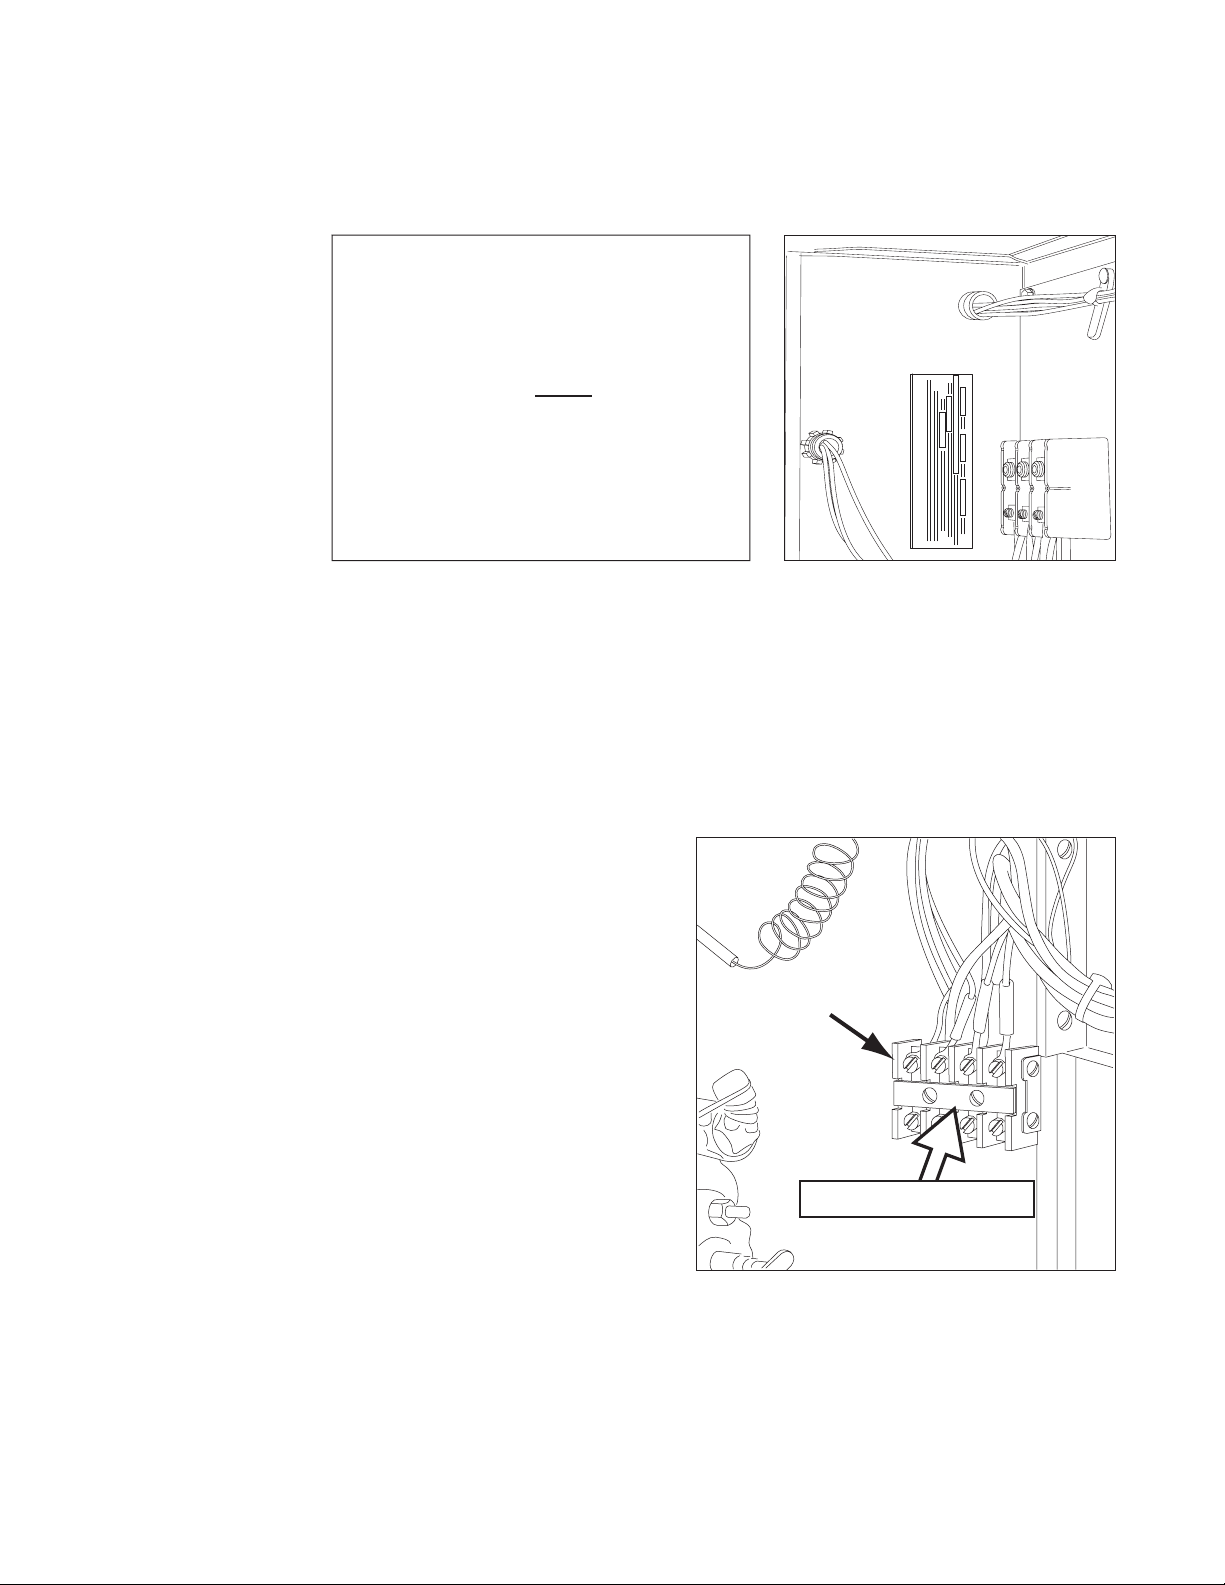
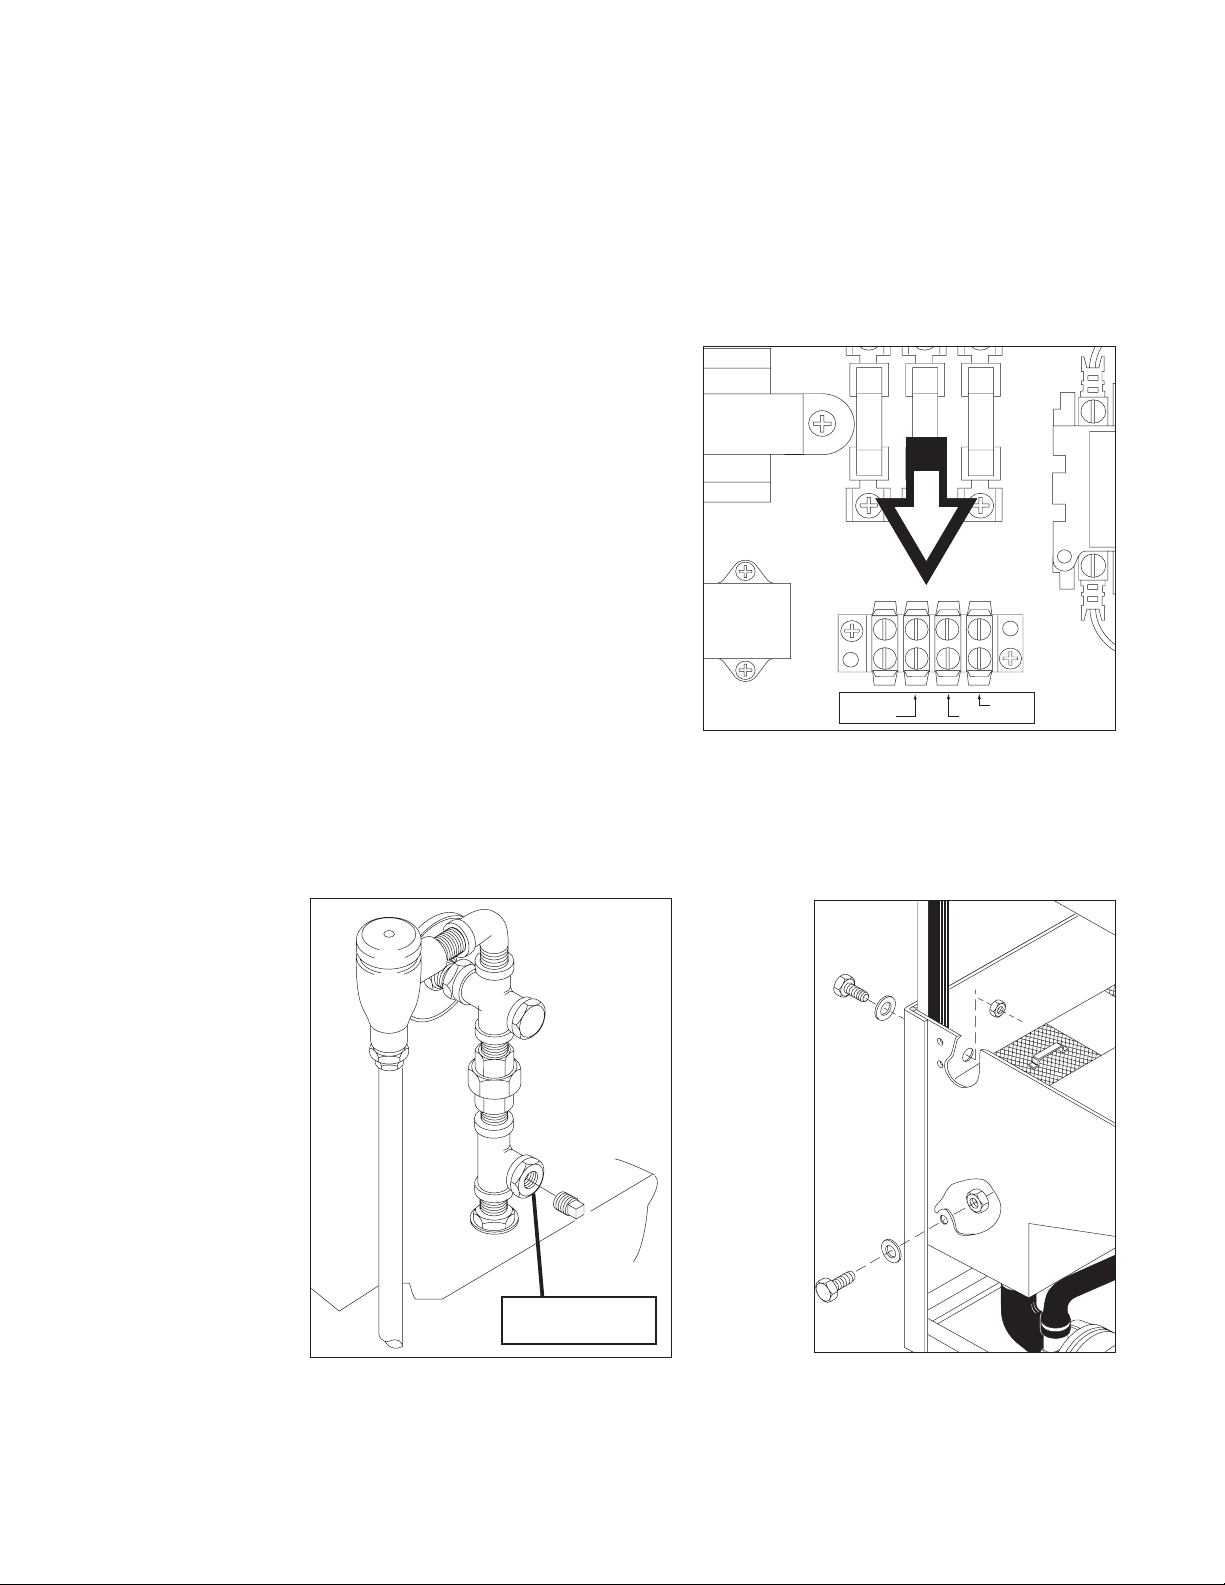
Chemical Connections
1. Use a qualified detergent/chemical supplier for detergent/chemical and dispensing
equipment needs.
2. Labeled detergent control circuit connection terminals are provided in the control cabinet
for detergent and rinse agent dispensing equipment (supplied by others).
3. The illustration below shows the terminal board for the machine.
4. The signal connection points include:
• Detergent signal 120VAC, 1A max load.
• Rinse aid/Sanitizer signal 120VAC, 1A load.
• Vent Fan 120VAC, 1Amp max amp load
5. A 1/2" detergent probe injection point is
provided at the rear and left side of the
dishwasher.
6. Detergent may be added manually if the
dishwasher is not equipped with dispensing
equipment. Consult the chemical supplier for
recommended dosing amounts.
7. A 1/4" NPT rinse-aid injection point is provided
in the final rinse piping located at the top rear
of the dishwasher. Consult a chemical supplier
for the proper liquid rinse-aid.
A chemical connection terminal board is provided to
RINSE
COMMON
supply chemical dispenser signal voltages.
DETERGENT
A rinse-aid injection point is provided at
the top of the dishwasher.
Two detergent injection fittings are
provided in the wash tank.
9
Page 20
Installation
Door Safety Switch
Dishwasher access doors are equipped with a door safety switch that automatically
stops the dishwasher pump if a door is raised while the dishwasher is running. In
addition, the dishwasher will not start if a door is left open.
1. If the dishwasher is running and a door is raised, then lighted in-cycle light
goes out and the pump stops.
2. Check the interior of the dishwasher for a dish rack still in the machine.
This dish rack must be washed again to ensure it is washed and sanitized
completely.
3. To restart the dishwasher, make sure all doors are closed.
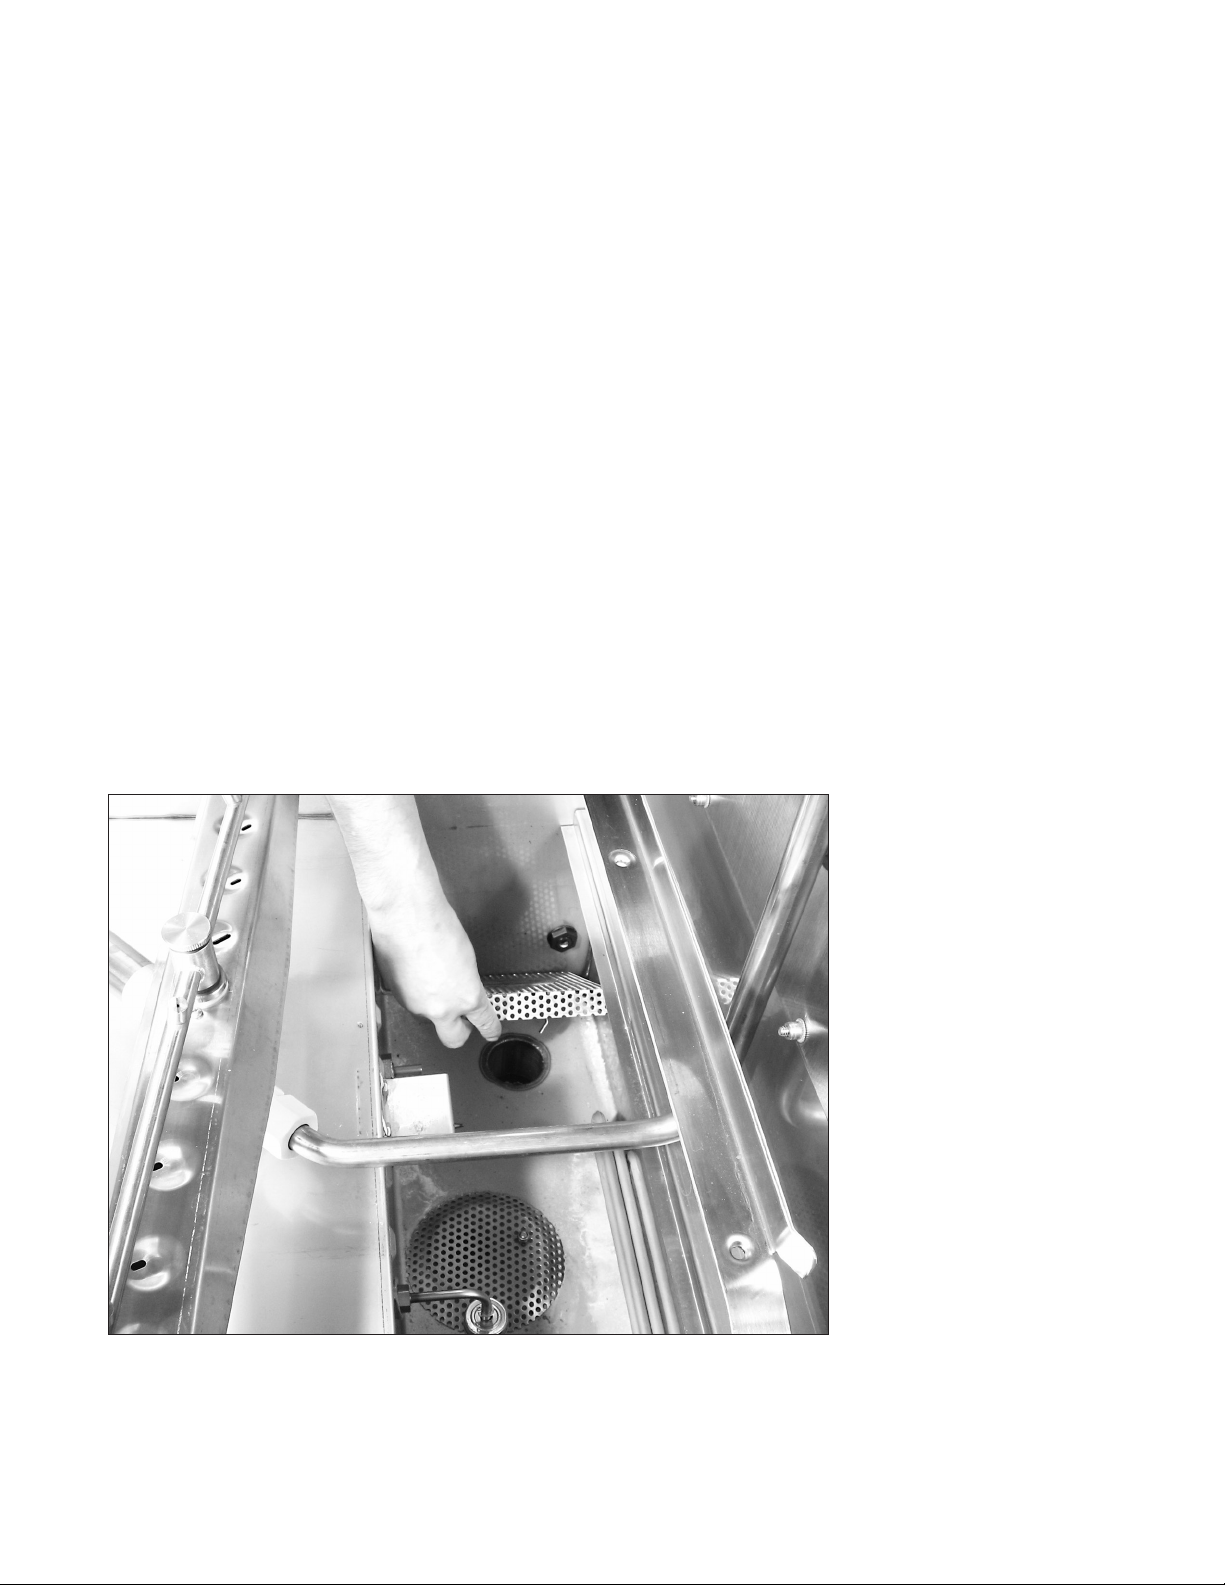
Pump Intake Screen and Float Switch
Refer to the photo below and note the location of the pump intake screen and dual float
switch.
1. Make sure the pump intake screen is installed by sliding it on the bracket located above
the wash pump intake.
2. Make sure the float ball on the float switch moves freely on the float stem.
3. Check the interior of the tank for any foreign objects and make sure the drain screen is
clean.
Make sure tank is clean, the pump intake screen is installed and the float switch
moves freely.
10
Page 21
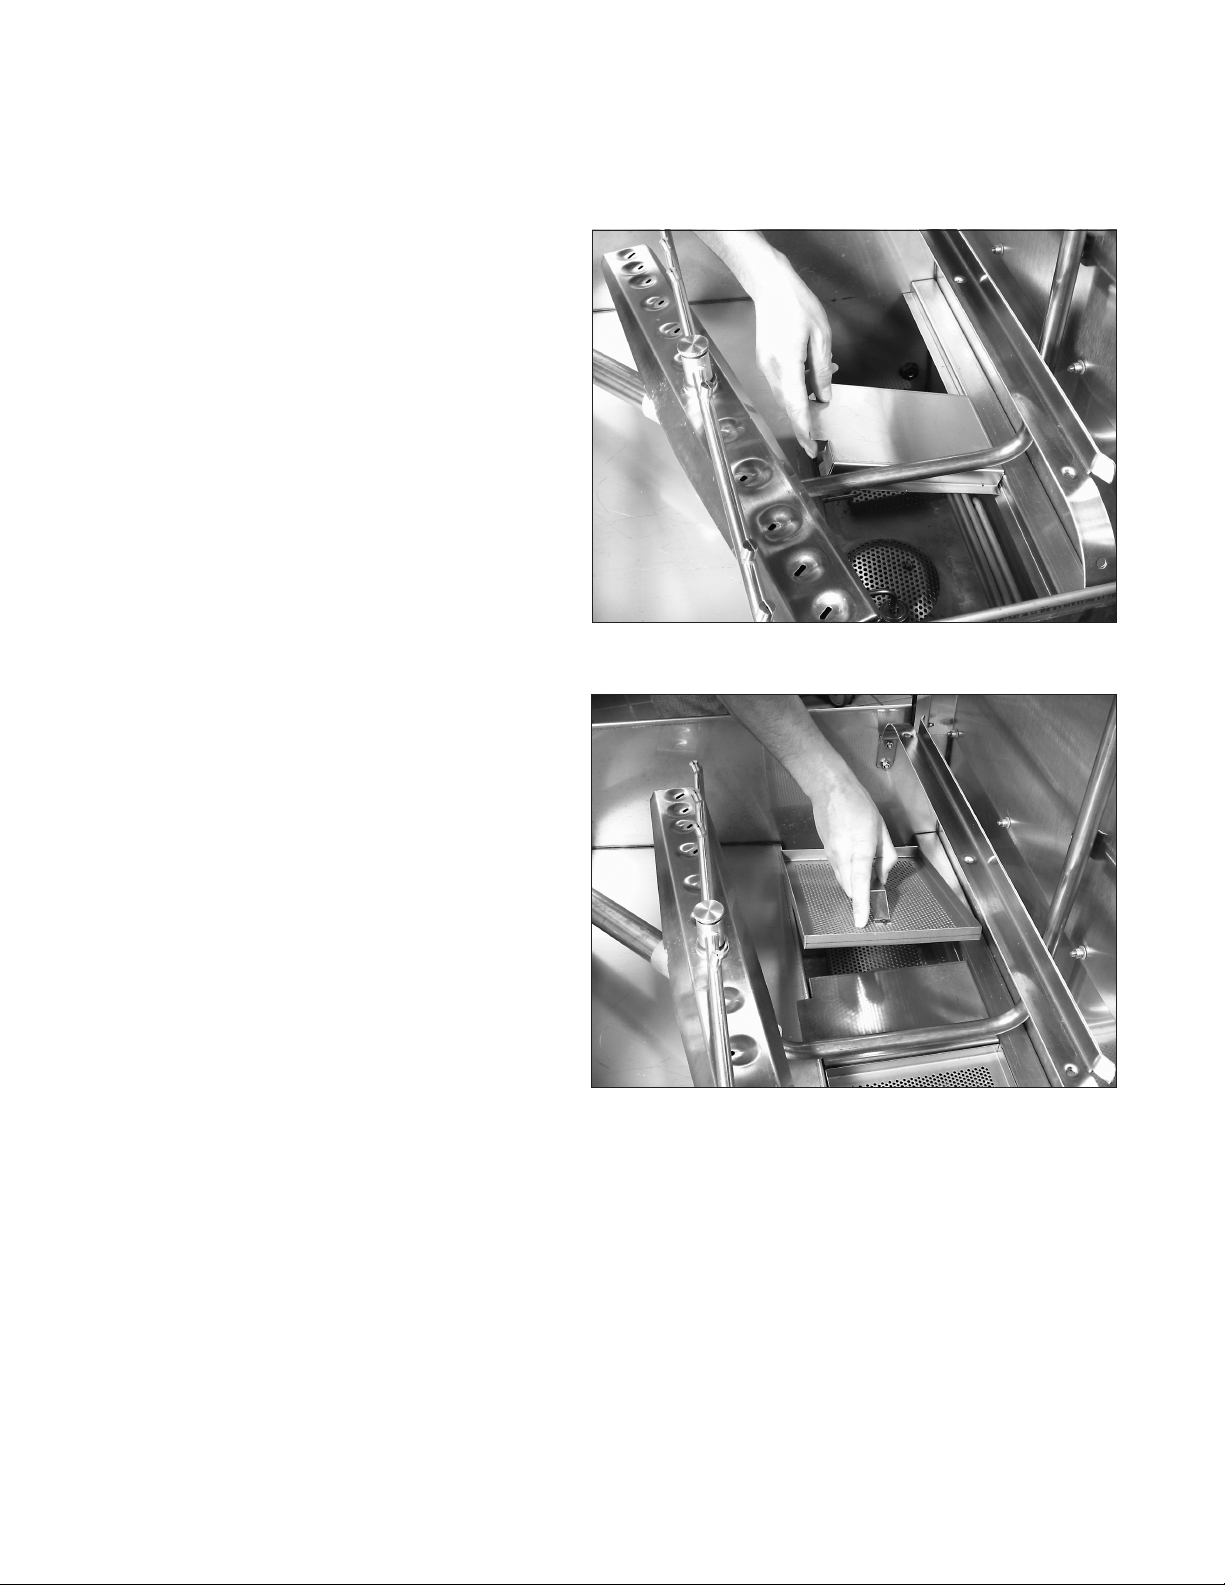
4. Make sure the scrap screen
support is positioned across the
wash tank and installed in the
brackets at the front and rear of
the tank.
Installation
Scrap Screens and Screen Support
5. Install the scrap screens.
11
Page 22

Initial Start-Up
20-22 PSI
150°F/66°C
180-195°F
Check list
1. Remove white protective film from the dishwasher exterior.
2. Install lower panels to the dishwasher.
3. Remove any foreign material from inside of the machine.
4. Check dishwasher drain/overflows are closed and in securely seated.
5. Install scrap screens, spray arms.
6. Turn main utilities to the dishwasher ON. (Power, water).
7. Make sure doors are closed.
8. Turn dishwasher power switch ON.
9. Check that the wash tank water temperature reaches a minimum of 150˚F/60˚C.
10. Open and close the door to start an automatic wash and final rinse cycle.
11. During the final rinse check that the final rinse water temperature reaches a minimum
of 180˚F/82˚C during the final rinse.
12. Make sure that the final rinse pressure gauge indicates 20-22 PSI during the final rinse.
13. Check for leaks.
14. Push the Power Switch OFF. The dishwasher should drain for 10 minutes.
15. Check that floor drain handles the water volume leaving the dishwasher.
82-91°C
100
40
80
20
60
40
0
20
Wash
Temperature
120
140
160
60
180
100
80
200
220
60
40
120
100
40
80
20
0
20
Final Rinse
Temperature
140
160
60
180
80
100
200
220
10
20
CHAMPION INDUSTRIES, INC.
WINSTON-SALEM,NC
0
30
40
PSI
50
60
Final Rinse
Pressure
12
Page 23
Operation
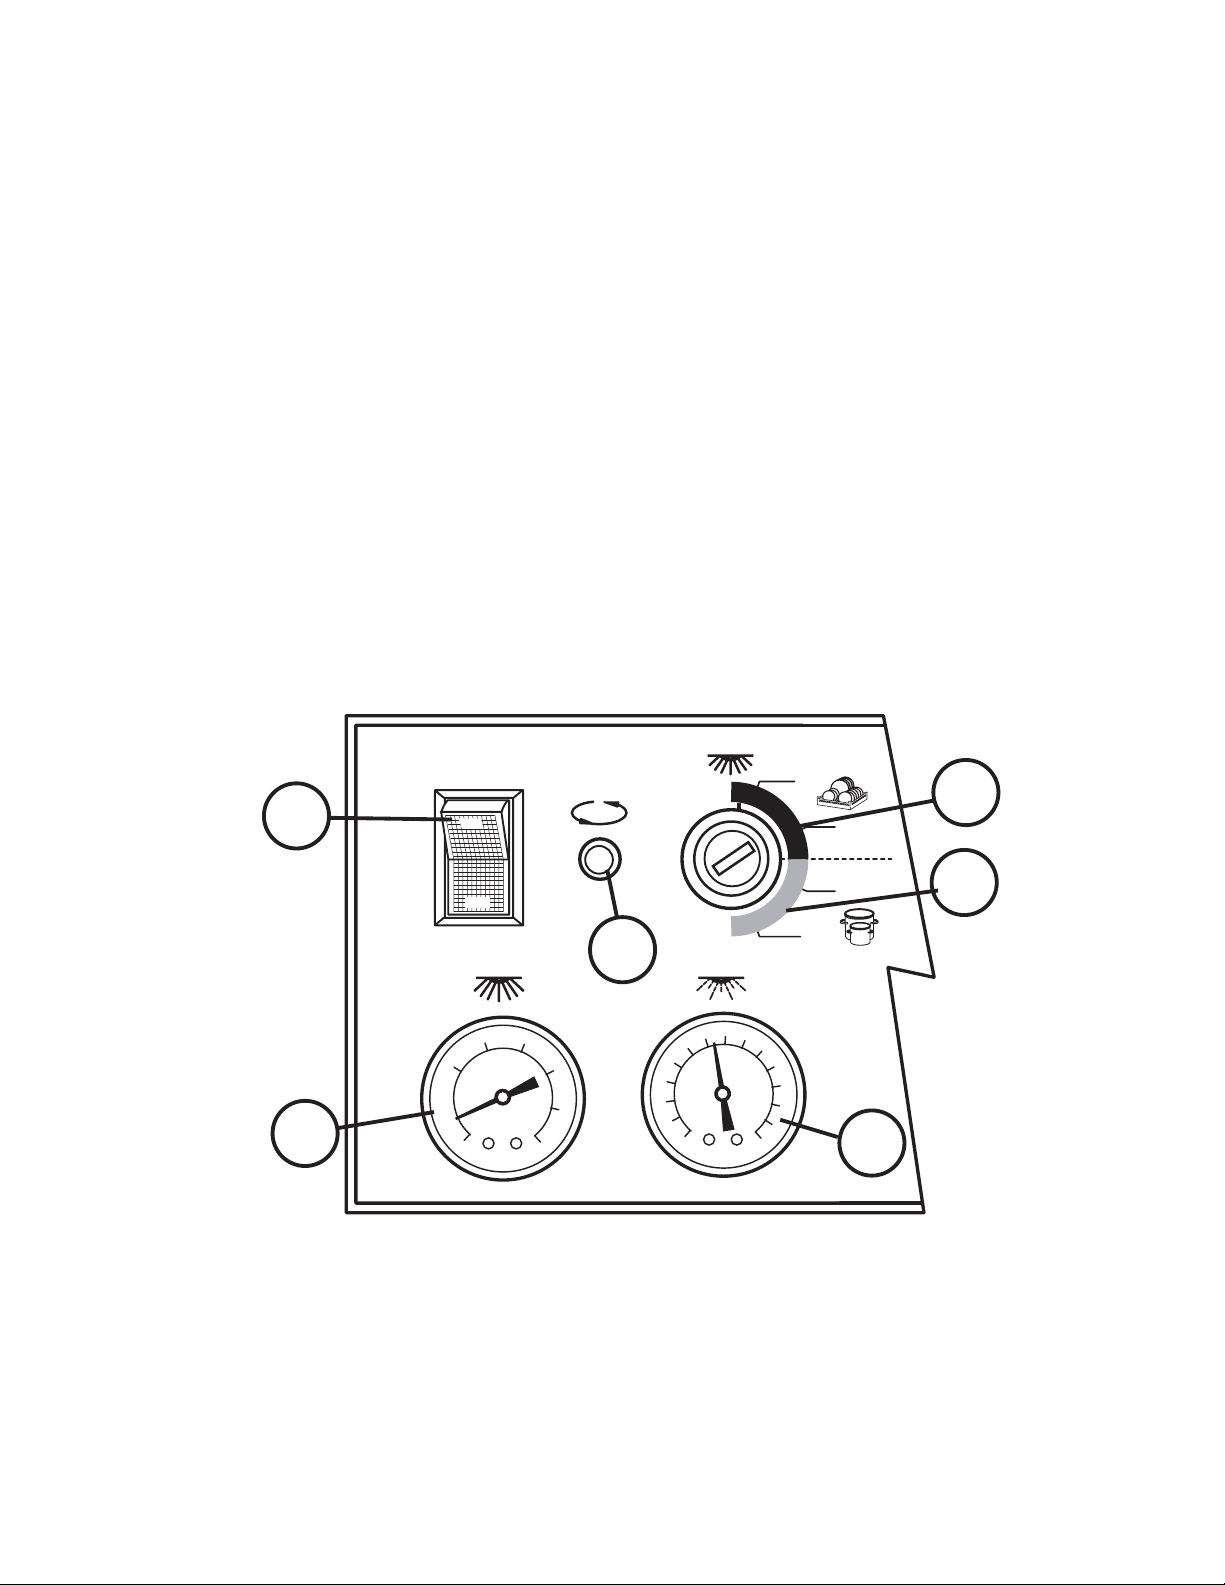
Control Panel
Refer to the illustration below and the explanation of the control panel controls
located at the lower front of the dishwasher.
A: ON/OFF power switch
B: In-cycle light
C: Wash cycle selector for dishes
D: Wash cycle selector for pots and pans
E: Wash water temperature gauge
F: Final rinse water pressure gauge
A
E
POWER
ON
OFF
WASH TEMPERATURE
CYCLE
B
WASH CYCLE
RINSE PRESSURE
1 MIN
6 MIN
2 MIN
3 MIN
C
D
F
13
Page 24

Operation
Operation
The following steps describe the operation of the dishwasher.
1. Make sure the main power and
water supplies are turned on and
the dishwasher doors are closed.
2. Push the power switch to the ON
position.
The power switch will illuminate and
the machine will fill with water.
POWER
ON
OFF
WASH TEMPERATURE
CYCLE
WASH CYCLE
1 MIN
2 MIN
3 MIN
6 MIN
RINSE PRESSURE
3. Wait approximately 10 minutes for
the wash tank temperature gauge
to reach a minimum of 150˚F/60˚C.
The booster heater is heating the
final rinse water at the same time.
4. Prescrap the dishes and load them
into the dish racks for washing.
Load plates glasses and bowls
in a peg rack. Spread silverware
and utensils evenly in a single layer
in a flat bottom rack.
5. Bake sheets should be loaded
vertically in special bake sheet
racks.
6. DO NOT OVERLOAD DISH
RACKS.
POWER
ON
OFF
WASH TEMPERATURE
CYCLE
WASH CYCLE
1 MIN
2 MIN
3 MIN
6 MIN
RINSE PRESSURE
14
Page 25

Setting the Wash Cycle Selector Switch The selector switch provides 4 time options, 2 for dishes and 2 for pots and
pans. To select a time cycle:
1. Make sure the power is on.
2. Make sure the cycle light is out.
The time cycle cannot be changed
if the dishwasher is actively running
POWER
CYCLE
ON
WASH CYCLE
a timed cycle.
3. Make sure all doors are closed.
4. Turn the wash cycle selector knob to
OFF
WASH TEMPERATURE
RINSE PRESSURE
either 1, 2, 3, or 6 minute setting.
Open the dishwasher doors to
lock-in the selected time cycle. The
time cycle will run when the doors
are closed for the next automatic
cycle.
NOTE:
The time cycle will not change if the
selector switch is turned when the doors
are open.
Refer to the information below for the
cycle time breakdowns.
1 Minute Wash Cycle
2 Minute Wash Cycle
Wash = 44 seconds
Final Rinse = 10 seconds
Dwell = 14 seconds
Total Cycle = 68 seconds
Wash = 96 seconds
Final Rinse = 13 seconds
Dwell = 11 seconds
Total Cycle = 120 seconds
3 Minute Wash Cycle
Wash = 156 seconds
Final Rinse = 13 seconds
Dwell = 11 seconds
Total Cycle = 180 seconds
6 Minute Wash Cycle
Wash = 96 seconds
Final Rinse = 13 seconds
Dwell = 11 seconds
Total Cycle = 360 seconds
NOTE:
The 1 and 2 minute time cycles are
designated for dishes and the 3 and 6
minute cycles are designated for
pots and pans.
Operation
Operation
1 MIN
2 MIN
3 MIN
6 MIN
15
Page 26

Operation
Operation (continued)
6. Load a dish rack into the dishwasher
and close the doors.
7. The cycle will begin automatically
and the cycle light will illuminate.
8. Open the doors and the cycle will
automatically stop.
9. Close the doors and the cycle
will resume where it left off.
10. Check the final rinse
temperature during the final
rinse making sure that the minimum
temperature of 180-195˚F/82-91˚C
is maintained.
POWER
ON
WASH TEMPERATURE
WASH CYCLE
CYCLE
RINSE PRESSURE
150
100
50
200
1 MIN
2 MIN
3 MIN
6 MIN
11. Check the final rinse pressure
gauge during the final rinse
and make sure the pressure
gauge indicates between
20-22 PSI.
12. The cycle light will go out when
the final rinse is complete.
13. Open the doors and remove the
clean rack of wares.
14. Repeat the process for additional
racks.
16
POWER
ON
WASH TEMPERATURE
0
CYCLE
250
WASH CYCLE
1 MIN
2 MIN
3 MIN
6 MIN
RINSE PRESSURE
Page 27

Operation Summary
ACTION RESULT
Operation
1. Push ON/OFF switch UP to the ON position.
2. Wait 10 minutes for water to reach
proper temperature.
3. Prescrap and load wares into the
dish racks.
4. Open the doors, insert a dish rack of soiled ware
and close the doors.
Opening the doors anytime during the automatic
cycle stops the dishwasher. Closing the doors
will resume the cycle where it left off.
5. Check the final rinse temperature gauge and
final rinse pressure gauge during the final rinse
portion of the timed cycle.
6. The selected automatic cycle ends.
7. Open the doors, remove the cleaned wares,
insert another rack of soiled wares and close
the dishwasher doors.
The power switch illuminates, machine fills
automatically and wash water begins to heat. DHBT
booster begins to heat.
Wash water temperature gauge should
indicate minimum of 150˚F/60˚C.
Wares should be placed edgewise in a peg
rack. Cups and bowls should be placed
upside down in flat bottom rack. Silverware or
utensils should be placed in a single layer in a flat
bottomed rack.
The in-cycle light will illuminate and complete the
selected time cycle set on the wash selector switch.
Cycle times are 1, 2, 3, and 6 minutes.
The final rinse temperature must maintain a
minimum of 180-195˚F/82-91˚C during the final
rinse and a flowing pressure of 20-22 PSI.
The in-cycle light goes out.
The selected automatic cycle begins again.
8. Push the power switch DOWN to the OFF
position.
9. Clean the dishwasher after each meal period or
after 2 hours of continuous operation, whichever
occurs first.
10. Spray the interior of the dishwasher with fresh
water. Clean the scrap screens and pump
intake strainer. Clean the spray arms.
11. Wipe the exterior of the machine with a soft
cloth and mild detergent.
12. DO NOT HOSE THE EXTERIOR OF THE
MACHINE WITH WATER.
The dishwasher automatic electric drain valve opens
for 10 minutes to drain the dishwasher.
Periodic cleaning reduces detergent consumption
and improves the overall performance of the
dishwasher.
17
Page 28

Cleaning
Cleaning
Cleaning your dishwasher is the best maintenance you can perform.
The cleaning intervals below are the minimum requirements for most dishwashers.
You may need to clean your dishwasher more often when washing heavily soiled wares
or during long hours of continuous operation.
POWER
ON
OFF
To Drain
The automatic drain valve will open for 10 minutes
to drain the dishwasher when the Power Switch is
turned off.
Daily or every 2 hours of operation
1. Turn power switch to OFF. The automatic electric drain valve will open for 10 minutes.
2. Flush the interior of the dishwasher with fresh water.
3. Clean Scrap screens and pump intake screen
4. Remove wash and rinse spray arm assemblies. Flush with fresh water.
Every 8 hours of operation or at the End-of-the-day.
1. Turn power switch to OFF. The automatic electric drain valve will open for 10 minutes.
2. Flush the interior of the dishwasher with fresh water.
3. Clean Scrap screens and pump intake screen
4. Remove wash and rinse spray arm assemblies. Flush with fresh water.
5. Check rinse nozzles and clean with a paperclip if needed.
6. Clean the exterior of the machine with a soft cloth and mild detergent
DO NOT HOSE THE EXTERIOR WITH WATER.
7. Flip power switch on and immediately off to drain machine again.
8. Reassemble the machine and leave doors open to aid overnight drying.
9. Do not leave water in wash tank overnight.
18
Page 29

Cleaning
De-liming
De-liming
Lime (scale) deposits are the result of minerals contained in the water feeding the dishwasher and
appear as a white haze on the surface of the dishwasher. Severe scaling can appear as a granular
deposit. These deposits are a result of the mineral content in the geographic area of the machine's
location.
WARNING:
Death or injury can result from toxic fume when de-liming agents
come in contact with Chlorine Bleach, or other chemicals that contain
iodine, bromine, or fluorine.
USE EXTREME CAUTION WHEN HANDLING ANY DE-LIMING AGENT
CAUTION:
De-liming agents can cause chemical burns.
Wear rubber gloves, eye protection and any other protective
clothing as instructed by a qualified chemical supplier and follow
the instructions provided by the chemical supplier.
19
Page 30

Maintenance
Maintenance
Weekly
1. Inspect all water lines for leaks and tighten at joints if required.
2. Clean any detergent residue from the exterior of the machine.
3. Check that the drain/overflow pipes seat tightly in their drains.
4. Clean any accumulated scale from the heating element.
5. Inspect the spray arms for any damage or missing parts.
6. Inspect the final rinse arms for missing parts.
7. Check that float switch moves freely.
Monthly
1. Inspect interior of machine for lime deposits and clean.
2. Check that the drains flow freely.
3. Clean any accumulated scale from the heating element.
4. Inspect the rinse spray arms and ensure all plugs are installed.
5. Inspect the final rinse arms for missing parts
6. Inspect the pawl bar and drive assembly for damage or missing parts.
7. Check that float switch moves freely.
8. Check the door guides and door operation.
9. Check the operation of temperature and pressure gauges
10. Perform complete operation check.
Yearly
1. Contact authorized service agent to perform complete maintenance
review of machine.
2. Correct any abnormal situations as recommended.
20
Page 31

Before calling for service check the following conditions.
1. Dishwasher main power and water supply is on.
2. Machine has been assembled correctly.
3. Drain is closed.
4. Screens and pump intake screen are clear.
5. Doors are closed and secure.
Condition Cause Solution
Troubleshooting
Troubleshooting
Dishwasher will not run.
Machine washes
constantly.
Low or no water.
Water fills constantly
Wash motor won’t run
Wash tank water temp
is low when in use.
Door not closed.
Main power OFF
Dishwasher Power OFF.
Timer or door switch
defective
Main water supply off.
PRV setting incorrect
Solenoid strainer clogged.
Solenoid valve defective.
Drain valve defective
Stuck or defective float.
Defective ckt. bd.
Defective fill valve
Defective drain valve
Defective float switch
Tripped motor overload
Defective motor
Incoming water temp at
machine too low
Defective thermometer
Defective thermostat
Defective heater
Defective solenoid valve
Heater element limed up
Close door completely.
Check breaker on panel.
Turn dishwasher ON.
Contact Service Agent
Open supply valve.
Adjust the PRV setting
Clean strainer.
Contact Service Agent.
Contact Service Agent.
Clean or replace.
Contact Service Agent
Reset motor overload
Replace motor
Increase water
temperature
Contact Service Agent
Contact Service Agent
Contact Service Agent
Contact Service Agent
Clean element
21
Page 32

Troubleshooting
Troubleshooting (continued)
Condition Cause Solution
Insufficient pumped
spray pressure
Insufficient or no final
rinse spray pressure
Insufficient final rinse
or no final rinse.
Low final rinse
temperature.
Clogged pump intake
screen.
Clogged spray arm.
Scrap screen full.
Pump motor rotation wrong
Defective pump seal.
Main water supply off.
PRV setting incorrect
Solenoid strainer clogged.
Solenoid valve defective.
Clogged rinse nozzles.
Defective PRV.
PRV setting wrong.
Clogged rinse nozzle or
rinse arm.
Incoming water line too
small.
Clogged line strainer.
Low incoming water
temperature.
Defective thermostat
Defective thermometer.
Clean.
Clean.
Clean.
Reverse L1 and L2.
Replace pump seal.
Open supply valve.
Adjust the PRV setting
Clean strainer.
Contact Service Agent.
Clean with paperclip.
Replace.
Set to 20-22 PSI flowing.
Clean nozzle with paperclip
and flush arm.
Increase line size.
Clean strainer.
Booster thermostat setting
low.
Replace thermostat.
Replace thermometer.
Poor wash results.
22
Detergent not added to tank
Wares incorrectly loaded.
in dishrack.
Clogged screens .
Clogged spray arms.
Thermostat defective.
End plugs missing.
Water temperature low.
Heater elements limed up
Check detergent suppy.
Reposition wares or
reduce amount of wares.
Clean screens..
Clean spray arms.
Contact Service Agent.
Check spray arms.
Check incoming water
temperature.
De-lime dishwasher.
Page 33

Service Replacement Parts
Service Replacement Parts
Illustration Page
DHBT, DH1T Panels ...................................................................................................................................24
DHBT, DH1T Doors ....................................................................................................................................26
DHBTC, DH1TC Doors ...............................................................................................................................28
Door Handle and Spring Assembly.............................................................................................................30
Track Assembly ..........................................................................................................................................32
Wash and Rinse Spray Piping ....................................................................................................................34
Wash and Rinse Spray Arms ......................................................................................................................36
Scrap Screens and Drain Assembly ...........................................................................................................38
Wash Tank Heat and Thermostats .............................................................................................................40
Electric Booster Assembly ..........................................................................................................................42
K2 Steam Booster Assembly ......................................................................................................................44
Hot Water Coil Tank Heat Assembly ...........................................................................................................46
Single Source Gas Booster Piping .............................................................................................................48
DHBT Lower Fill Piping Assembly ..............................................................................................................50
DHBT, DH1T Upper Fill Piping Assembly ...................................................................................................52
DH1T Lower Fill Piping Assembly ..............................................................................................................54
Pump Assembly ..........................................................................................................................................56
Control Panel Assembly .............................................................................................................................58
Control Cabinet Assembly ..........................................................................................................................60
Dish racks, PRV .........................................................................................................................................62
23
Page 34

DHBT, DH1T Panels
10
11
10
4
3
2
1
9
11
9
12
10
8
7
6
9
8
5
7
6
24
Page 35

DHBT, DH1T Panels
Item Part Description Qty
No. No.
1 321929 RH PANEL, NO CUT-OUT 1
2 324588 PANEL, INSTRUMENT (PRIOR TO S/N D3864) 1
--- 327262 PANEL, INSTRUMENT (BEGIN W/ S/N D3864) 1
--- 327344 PANEL, INSTRUMENT (CORNER) (BEGIN D3864) 1
3 113051 LABEL, PANEL OVERLAY (PRIOR TO D3864) 1
--- 113525 LABEL, PANEL OVERLAY (BEGIN D3864) 1
--- 113567 LABEL, PANEL CORNER (BEGIN D3864) 1
4 322074 PANEL, FRONT LOWER 1
5 321941 LH PANEL, WITH CUT-OUT 1
6 108418 PLUG, PLASTIC 2
7 109034 WASHER, 13/16' X 1-3/16" FIBER 2
8 108417 NUT, PLASTIC 2
9 100779 SCREW, 1/4-20 X 5/8" TRUSS HD. 6
10 0504822 SCREW, 8/32 X 1/2" PAN HD. 4
11 100763 SCREW, 10-32 X 1-1/4" RD. HD. 2
12 112587 FOOT, CAST GREY 4
25
Page 36

DHBT, DH1T Doors
1
2
3
4
5
6
8
10
9
26
27
24
19
18
16
24
23
25
20
11
7
15
12
16
11
13
12
16
10
14
17
17
15
20
21
26
22
20
21
Page 37

DHBT, DH1T Doors
Item Part Description Qty
No. No.
1 100141 GRIP NUT, 1/4-20 SST 2
2 317345 BRACKET, DOOR CATCH 1
3 325921 HOOK, DOOR CATCH 1
4 108053 PLUG, CORNER POST 2
5 107970 SCREW, 8/32 X 1" FILISTER 48
6 112704 DOOR GUIDE, SIDE DOOR LEFT 2
7 112705 DOOR GUIDE, SIDE DOOR RIGHT 2
8 112703 DOOR GUIDE, FRONT DOOR LEFT 1
9 112702 DOOR GUIDE, FRONT DOOR RIGHT 1
10 100073 SCREW, 1/4-20 X 1/2" TRUSS HD., SST 3
11 111090 REED, SWITCH MAGNETIC 2
12 108954 GRIP NUT, 6-32 6
13 322790 DOOR, FRONT (PRIOR TO S/N D3864 1
--- 327248 DOOR, FRONT (BEGIN WITH S/N D3864) 1
14 108966 HANDLE, DOOR 1
15 106382 SCREW, 6-32 X 3/8" TRUSS HD., SST 4
16 108954 GRIP NUT, 6-32 4
17 111026 MAGNET, REED SWITCH 2
18 325633 SIDE DOOR, UPPER 2
19 322788 SIDE DOOR, LOWER (PRIOR TO S/N D3864) 2
--- 328239 SIDE DOOR, LOWER (BEGIN WITH S/N D3864) 2
20 100097 SCREW, 10-32 X 1/2" TRUSS HD., SST 16
21 107966 GRIP NUT, 10-32 SST 2
22 322077 SPLASH GUARD (PRIOR TO S/N D3864) 2
--- 324620 SPLASH BAFFLE, SIDE DOOR (BEGIN S/N D3864) 2
23 323006 DOOR STOP (PRIOR TO S/N D3864) 2
--- 327321 DOOR STOP (BEGIN WITH S/N D3864) 2
24 107893 SHOCK ABSORBER 8
25 112723 BOLT, 5/16-18 X 15" FULL THREAD 2
26 323305 ANGLE, DOOR STOP 2
27 112772 STOP, DELRIN SPLASH BAFFLE 2
--- 113564 NAMEPLATE, DUAL PERFORMANCE 1
ATTACHED TO FRONT DOOR (NOT SHOWN)
(BEGIN WITH S/N D3864)
27
Page 38

DHBTC, DH1TC Doors
4
3
1
2
4
3
13
13
12
11
6
8
9
9
9
8
10
5
7
8
14
19
20
15
15
16
16
17
12
5
21
21
22
22
22
24
23
22
24
23
28
Page 39

DHBTC, DH1TC Doors
Item Part Description Qty
No. No.
1 108053 PLUG, CORNER POST 2
2 107970 SCREW, 8-32 X 1" FILISTER HD. SST 32
3 112704 GUIDE, DOOR LEFT 2
4 112705 GUIDE, DOOR RIGHT 2
5 325633 DOOR, SIDE UPPER 2
6 322788 DOOR, LOWER SIDE (PRIOR TO S/N D3864) 1
--- 327252 DOOR, LOWER SIDE (BEGIN W/ S/N D3864) 1
7 323221-S DOOR, LOWER FRONT (PRIOR TO S/N D3864) 1
--- 327295 DOOR, LOWER FRONT (BEGIN W/ S/N D3864) 1
8 100007 SCREW, 10-32 X 3/8" TRUSS HD., SST 6
9 104985 NUT, PLAIN 10-32 6
10 322077 SPLASH GUARD, PRIOR TO D3864
11 323006 STOP, DOOR (PRIOR TO S/N D3864) 1
--- 327321 STOP, DOOR (BEGIN W/ S/N D3864) 1
12 100740 BOLT, 5/16-18 X 1" HEX HD., SST 2
13 107893 SHOCK ABSORBER 6
14 323224 BRACKET, CORNER DOOR LIFT (PRIOR D3864) 1
--- 327242 BRACKET, CORNER DOOR LIFT (BEGIN D3864) 1
--- 327256 BRACKET, FRONT DOOR (BEGIN D3864) 1
15 323305 ANGLE, DOOR STOP 2
NO LONGER USED --
16 112772 STOP, DELRIN SPLASH BAFFLE 2
17 100097 SCREW, 10-32 X 1/2" TRUSS HD., SST 8
18 327260 SIDE DOOR LIFT (BEGIN D3864) NOT SHOWN 1
19 113916 DOOR CONNECT, HANDLE 1
20 100755 SCREW, 1/4-20 X 1/2" FLAT HD., SST 4
21 111090 SWITCH, MAGNETIC REED 2
22 108954 GRIP NUT, 6-32 W/NYLON INSERT SST 8
23 106382 SCREW, 6/32 X 3/8" TRUSS HD., SST 4
24 111090 MAGNET, REED SWITCH 2
29
Page 40

Door Handle and Spring Assembly
1
2
2
3
28
29
3
4
5
6
6
7
7
9
9
8
8
5
1
10
10
14
15
16
17
18
18
19
20
21
20
22
23
13
10
14
13
10
11
11
11
11
12
12
24
25
25
26
26
26
27
24
24
26
27
24
No longer used after S/N D5748
See Door Assemblies for Reed Switch
Replacement.
30
Page 41

Door Handle and Spring Assembly
Item Part Description Qty
No. No.
1 112723 BOLT, 5/6-18 X 15" 2
2 108066 SPRING, EXTENSION 2
3 107397 BLOCK, SPRING HOOK 2
4 113757 DOOR HANDLE, STD. (BEGIN S/N D4185) 1
--- 112860 DOOR HANDLE, CORNER (PRIOR S/N D4185) 1
5 107347 BOLT, M6 X 45 MM HEX HD., SST 4
6 107396 BLOCK, UPPER PIVOT 2
7 107393 PIN, PIVOT 2
8 107962 GRIP, HANDLE 2
9 107395 BLOCK, LOWER PIVOT 2
10 107420 NUT, PLAIN M6 8
11 107436 SCREW, M6 X 16 MM 6
12 107399 SUPPORT, PIVOT BLOCK 2
13 108368 GASKET, BACKING 2
14 304811 PLATE, BACKING 2
15 100740 BOLT, 5/16-18 X 1" HEX. HD., SST 2
16 107966 GRIP NUT, 10-32 W/NYLON INSERT, SST 8
17 322077 GUARD, SPLASH 2
18 100097 SCREW, 10-32 X 1/2" TRUSS HD., SST 8
19 0509264 BUSHING, SIDE DOOR 2
20 0509274 NUT, ACORN 5/16-18 SST 2
21 0309167 LIFT, BAR DOOR STD. 2
--- 322926 LIFT, BAR DOOR CORNER 2
22 102376 WASHER, FLAT 2
23 104002 BOLT, 5/16-18 X 1-1/2" SST 2
24 100154 NUT, PLAIN 5/16-18 SST 4
25 106013 WASHER, LOCK 5/16-18 SPLIT 2
26 102376 WASHER, FLAT 5/16-18 SST 4
27 321927 SPRING, ANCHOR BRACKET 1
28 113721 SWITCH, REED STD. (BEGIN S/N D5748) 1
--- 0509199 SWITCH, DOOR SAFETY (PRIOR TO D5748) 1
29 0309451 BRACKET, DOOR SWITCH (PRIOR TO D5748) 1
--- 328173 BRACKET, DOOR SWITCH STD. (BEGIN S/N D5748) 1
--- 900860 KIT, DOOR HANDLE CONVERSION TO 113757 A/R
31
Page 42

Track Assembly
1
2
2
3
1
4
Straight-through
Track Assembly
3
2
3
4
4
2
3
4
6
2
8
1
6
7
8
9
10
7
4
6
6
6
6
7
32
9
10
11
7
5
11
Corner Track Assembly
7
9
10
7
8
3
9
10
8
Page 43

Track Assembly
STRAIGHT-THROUGH TRACK CONFIGURATION
Item Part Description Qty
No. No.
1 0309472 TRACK, REAR 1
2 100073 BOLT, 1/4-20 X 1/2" TRUSS HD., SST 8
3 106482 WASHER, LOCK 1/4" SPLIT SST 8
4 100003 NUT, PLAIN 1/4" HEX HD., SST 8
CORNER TRACK CONFIGURATION
Item Part Description Qty
No. No.
1 0309469 GUIDE, RIGHT HAND 1
2 0309472 TRACK, REAR 1
3 0309468 GUIDE, LEFT HAND 1
4 0309470 SUPPORT, RACK 1
5 0309471 TRACK, FRONT 1
6 106727 SCREW, 10-32 X 5/8" FLAT HD., SST 8
7 107966 GRIP NUT, 10-32 W/NYLON INSERT, SST 8
8 100073 BOLT, 1/4-20 X 1/2" TRUSS HD., SST 8
9 106482 WASHER, LOCK 1/4" SPLIT, SST 8
10 100003 NUT, PLAIN 1/4-20 HEX HD., SST 8
11 0309473 SPACER 2
33
Page 44

Wash and Rinse Spray Piping
12
10
3
2
7
8
5
1
6
4
7
5
2
34
13
11
9
10
3
8
FRONT
LEFT SIDE
Page 45

Wash and Rinse Spray Piping
Item Part Description Qty
No. No.
1 325632 MANIFOLD, RINSE 1
2 113027 CONNECTOR, RINSE ARM 2
3 113028 CONNECTOR, TOP RINSE ARM 2
4 0507445 SPINDLE, WASH ARM 2
5 109864 SUPPORT, WASH ARM 2
6 113252 STANDPIPE, WASH 1
7 100736 BOLT, 1/4-20 X 3/4" HEX HD., SST 2
8 107967 GRIP NUT, 1/4-20 SST 3
9 109854 GASKET, WASH STANDPIPE 1
10 100740 BOLT, 5/16-18 X 1" HEX HD., SST 4
11 106013 WASHER, LOCK 5/16" SPLIT, SST 4
12 102376 WASHER FLAT, 5/16" SST 8
13 100154 NUT, PLAIN 5/16-18, SST 4
35
Page 46

Wash and Rinse Spray Arms
2
1
2
3
4
3
Prior to S/N D3863
1
3
Beginning with S/N D3863 and above
4
3
5
6
7
36
8
Page 47

Wash and Rinse Spray Arms
Item Part Description Qty
No. No.
1 0507443 SPINDLE, RINSE ARM 2
2 0508376 NOZZLE, RINSE ARM (PRIOR TO S/N D3864) 12
3 113514 BEARING, RINSE ARM (REPLACES 112164) 4
4* 414111 RINSE ARM ASSY, (INCLUDES 2 & 3)
(PRIOR TO S/N D3864) 2
---- 414110 RINSE ARM ASSY COMPLETE (BEGIN D3864) 2
5 0507444 NUT, RINSE ARM 2
6 109835 SCREW, #8 X 1/2" PAN HD., SST 4
7 0707452-S WASH ARM ASSY, (INCLUDES 6 & 8) 2
8 0507446 BEARING, WASH ARM 2
* 0707453 IS NO LONGER AVAILABLE AS A COMPLETE RINSE ARM ASSY.
REPLACEMENT NOZZLES AND BEARINGS ARE STILL AVAILABLE FOR THAT ASSY.
TO REPLACE THE COMPLETE RINSE ARM ASSY ORDER P/N 414111.
37
Page 48

Scrap Screens and Drain Assembly
17
4
15
1
23
4
5
16
11
14
6
13
7
8
9
8
38
10
12
11
Page 49

Scrap Screens and Drain Assembly
Item Part Description Qty
No. No.
1 305164 SCREEN, SCRAP 10" 2
2 324582 PLATE, FILLER 1
3 100736 BOLT, 1/4-20 X 3/4" HEX HD., SST 4
4 106026 WASHER, FLAT 1/4" SST 8
5 107967 GRIP NUT, 1/4-20 W/NYLON INSERT 1
6 304816 STRAINER 1
7 205988 CONNECTOR, ELECTRIC DRAIN VALVE 1
8 104165 CLAMP, HOSE 2
9 205990 HOSE, RUBBER 1
10 113315 ELECTRIC DRAIN VALVE (BEGIN S/N D2964) 1
11 107340 CLAMP, HOSE 2
12 113048 HOSE, OVERFLOW 1
13 324573 OVERFLOW, FLANGE WELDMENT 1
14 113047 GASKET, DRAIN FLANGE 1
15 106482 WASHER, LOCK 1/4 SPLIT, SST 4
16 100003 NUT, PLAIN HEX HD., 1/4-20 SST 4
17 327283 DEFLECTOR, WATER (BEGIN S/N D3851) 1
--- 327098 SUPPORT, DRAIN VALVE (NOT SHOWN) 1
---- 900830 KIT, DRAIN VALVE
(FROM S/N D1848 THROUGH S/N D2963) A/R
39
Page 50

Wash Tank Heat and Thermostats
7
8
16
5
7
8
16
Thermostat bracket detail
12
4
11
19
5
18
18
10
3
2
1
14
13
15
17
20
6
4
3
9
40
Page 51

Wash Tank Heat and Thermostats
Item Part Description Qty
No. No.
1 113622 THERMOMETER, 4FT. CAPILLARY 1
2 109069 THERMOSTAT W/CAPILLARY 1
3 201041 WASHER 3
4 201029 NUT, LOCK 1/2" 3
5 322076 BRACKET, DUAL THERMOSTAT 1
6 110561 THERMOSTAT, FIXED HIGH-LIMIT 1
7 106482 WASHER, LOCK 1/4" SPLIT, SST 4
8 100003 NUT, PLAIN 1/4-20 HEX HD., SST 4
9 100740 BOLT, 5/16-18 X 1" HEX HD., SST 4
10 108345 GASKET 1
11 102376 WASHER, FLAT 5/16 SST 8
12 106013 WASHER, LOCK 5/16" SPLIT, SST 4
13 100154 NUT, PLAIN 5/16-18 SST 4
14 0509637 HEATER, 3KW 115V/1PH 1
PRIOR TO S/N D09117987
--- 113479 HEATER, 4.7KW 208-240/380-415V/1-3PH 1
--- 113480 HEATER, 4.7KW 460V/3PH 1
--- 113481 HEATER, 4.7KW 575V/3PH 1
BEGIN WITH S/N D09117987 AND ABOVE
--- 114178 HEATER, 5.2KW 208-240/380-415V/1-3PH 1
--- 114179 HEATER, 5.2KW 460V/3PH 1
--- 114180 HEATER, 5.2KW 575V/3PH 1
15 100007 SCREW, 10-32 X 3/8" TRUSS HD., SST 4
16 107966 GRIP NUT, 10-32 W/NYLON INSERT, SST 4
17 111092 SWITCH, FLOAT 1
18 104882 WASHER 2
19 107089 NUT, JAM 1/2-13 1
20 111151 C-CLIP, FLOAT SWITCH 2
41
Page 52

Electric Booster Assembly
TO UPPER PIPING
5
9
8
10
3
6
7
FROM FILL VALVE
4
11
1
12
1
2
2
42
Page 53

Electric Booster Assembly
Item Part Description Qty
No. No.
1 100740 BOLT, 5/16-18 X 1" HEX HD., SST 2
2 102376 WASHER, FLAT 5/16" SST 2
3 108954 GRIP NUT, 6-32 W/NYLON INSERT, SST 2
4 110562 THERMOSTAT, HIGH LIMIT SNAP 1
--- 110563 COMPOUND, HEAT SINK A/R
5 109069 THERMOSTAT, CONTROL W/CAPILLARY 1
6 100003 NUT, PLAIN 1/4-20 SST 3
7 106482 WASHER, LOCK 1/4" SPLIT, SST 5
8 111334 HEATER, 9KW 208-240/380-415V 40°RISE (1-3 PH) 1
--- 108579 HEATER, 9KW 480V/3PH 40°RISE 1
--- 111122 HEATER, 9KW 575V/3PH 40°RISE 1
9 111266 HEATER, 18KW 208-240/380-415V 70°RISE (1-3PH) 1
--- 111267 HEATER, 18KW 480V/3PH 70°RISE 1
--- 111600 HEATER, 18KW 575V/3PH 70°RISE 1
10 109985 SEAL, ELECTRIC HEATER 1
11 100210 PLUG, 1/8" SST 1
12 0509042 TANK, BOOSTER 1
43
Page 54

k2 Steam Booster Assembly
13
31
14
17
13
16
18
21
22
12
4
22
11
28
7
4
29
9
28
25
4
27
20
8
5
19
23
6
5
26
18
3
23
24
15
24
3
1
4
10
5
28
30
26
18
4
28
27
29
18
19
24
4
18
10
23
4
25
12
44
13
2
31
2
5
3
Page 55

Item Part Description Qty
No. No.
1 110189 BOOSTER, K2 SPIREX 1
2 315596 BRACKET, BOOSTER SUPPORT 2
3 105725 COUPLING REDUCING, 1" X 3/4" NPT BI 2
4 102442 ELBOW, 3/4" NPT X 90° BRASS 5
5 105803 NIPPLE, CLOSE 3/4" NPT BI 3
6 106485 UNION ELL, 3/4" NPT X 90° FEMALE BI 1
7 107502 UNION ELL, 3/4" NPT X 90° MALE BI 1
8 109887 VALVE, SOLENOID 3/4" NPT STEAM 1
--- 108516 KIT, SOLENOID COIL REPAIR 3/4" NPT A/R
--- 109903 KIT, REPAIR DIAPHRAGM 3/4" NPT VALVE A/R
9 105731 STREET ELL, 3/4" NPT BI 1
10 105738 ELBOW, REDUCING 3/4" X 1/2" NPT BI 1
11 105794 NIPPLE, 1/2" NPT X 6" LG. BI 1
12 111386 UNION ELL, 1/2" NPT X 90° FEMALE BI 1
13 112430 STREET ELL, 3/4" NPT X X 90° FORGED BRASS 1
14 112387 PRESSURE REGULATOR/LINE STRAINER 3/4" NPT 1
15 103427 ELBOW, 1/2" X 90° COPPER 1
16 102662 NIPPLE, 3/4" NPT X 6-1/2" LG. BRASS 1
17 102521 TEE, 3/4" NPT BRASS 1
18 100184 NIPPLE, CLOSE 3/4" NPT 6
19 102526 TEE, 3/4" X 3/4" X 1/2" NPT BRASS 2
20 104649 RELIEF VALVE 3/4" NPT 125 PSI 1
21 100571 UNION, 3/4" NPT BRASS 1
22 102470 NIPPLE, 3/4" NPT X 3" BRASS 2
23 107736 UNION, 1/2" X 1/2" NPT MALE COPPER 2
24 107380 FORM TO FIT, TUBING 1/2" TYPE L COPPER 2
25 104749 BALL VALVE, 1/2" NPT M X F 1
26 102525 TEE, 3/4" X 1/2" X 3/4" NPT BRASS 1
27 111437 VALVE, 3/4" NPT HOT WATER 1
--- 111472 KIT, SOLENOID COIL REPAIR 3/4" VALVE A/R
--- 109903 KIT, REPAIR DIAPHRAGM 3/4" NPT VALVE A/R
28 102651 NIPPLE, 3/4"NPT X 2" LG. BRASS 2
29 109879 COMPRESSION FITTING, 3/4" X 7/8" OD 1
30 109069 THERMOSTAT, WITH CAPILLARY (NOT SHOWN) 1
31 102444 ELBOW, STREET, 3/4" X 90° BRASS CAST 1
K2 Steam Booster Assembly
45
Page 56

Hot Water Coil Tank Heat Assembly
NOT SHOWN
2
1
4
3
3
5
3
9
2
1
5
12
6
11
3
5
5
5
1
7
4
3
2
8
5
17
12
15
15
3
6
11
5
11
5
GRUNDFOS
3
313
10
14
16
14
9
19
46
Page 57

Hot Water Coil Tank Heat Assembly
Item Part Description Qty
No. No.
1 322280 COIL WELDMENT, STEAM/HOT WATER 1
2 100585 LOCKNUT, 1/" NPT BRASS 2
3 100184 NIPPLE, CLOSE 3/4" NPT BRASS 6
4 107418 TEE, 3/4" X 3/4" X 1/4" BRASS 1
5 102442 ELBOW, 3/4" NPT BRASS 5
6 100571 UNION, 3/4" NPT BRASS 2
7 112437 NEEDLE VALVE, 1/4" NPT M X F BRASS 1
8 109879 COMPRESSION FITTING, 7/8" OD X 3/4" NPT BRASS 1
9 102490 NIPPLE, 3/4" NPT X 3-1/2" LG. BRASS 2
10 109925 COMPRESSION FITTING, 5/8" OD X 1/2" MPT 1
11 102660 NIPPLE, 3/4" NPT X 6" LG. BRASS 2
12 102690 NIPPLE, 3/4" NPT X 16-1/2" LG. BRASS 1
13 100853 CHECK VALVE, 3/4" NPT BRASS 1
14 102396 REDUCING BUSHING, 1" X 3/4" NPT BRASS 2
15 111860 FLANGE KIT, FLANGES, GASKETS, BOLTS 1
16 111854 CIRCULATION PUMP 1
17 102653 NIPPLE, 3/4" NPT X 4" LG. BRASS 1
18 323041 PUMP SUPPORT BRACKET 1
19 102446 ELBOW REDUCING, 3/4" X 1/2" X 90° BRASS 1
47
Page 58

Single Source Gas Booster Piping
ON
APOLLO
OFF
STANDARD REAR
FLUE EXHAUST
OPT. RIGHT HAND
END FLUE EXHAUST
s"CLOSEs"CLOSE
10
110° HOT WATER IN TO BOOSTER
AND RETURN FROM TANK HEAT COIL
2
3
H
2
11
2
2
12
H
H
17
17
s"CLOSE
16
19
20 15
18
24
21
11
10
2
WATER RETURN FROM COIL
22
13
IN
OUT
2
14
2
4
5
22
14
1
5
11
7
4
13
HOT WATER RETURN FROM
COIL TO BOOSTER
25
HOT WATER IN FROM
BOOSTER TO COIL
26
HOT WATER OUT
TO FINAL RINSE
HOT WATER OUT
TANK HEAT COIL
48
HOT WATER OUT TO MACHINE
FINAL RINSE AND COIL
13
25
9
H
11
6
23
6
7
4
Page 59

Single Source Gas Booster Piping
Item Part Description Qty
No. No.
1 102521 TEE, 3/4" NPT BRASS 1
2 100184 NIPPLE, CLOSE 3/4" NPT BRASS 7
3 107550 PRESSURE REGULATING VALVE 3/4" NPT BRONZE 1
4 102651 NIPPLE, 3/4" NPT X 2" LG. BRASS 2
5 102669 NIPPLE, 3/4" NPT X 8-1/2" LG. BRASS 1
6 102660 NIPPLE, 3/4" NPT X 6" LG. BRASS 2
7 102442 ELBOW, 3/4" NPT X 90° BRASS 2
8 102678 NIPPLE, 3/4" NPT X 11-1/2" LG. BRASS 1
9 106911 UNION ELL, 3/4" NPTF X 90° BRASS 1
10 100571 UNION, 3/4" NPT BRASS 2
11 102525 TEE, 3/4" X 1/2" X 3/4" NPT BRASS 4
12 110768 LINE STRAINER, 3/4" NPT BRONZE 1
13 109879 COMPRESSION FITTING, 7/8" OD X 3/4" NPT BRASS 2
14 112228 VALVE, ANGLE, DRAIN BRASS 1
15 105779 UNION, 3/4" NPT BI 1
16 105752 TEE, 3/4" NPT BI 1
17 105803 NIPPLE, 3/4" NPT CLOSE BI 2
18 113003 NIPPLE, 3/4" NPT X 13" LG. BI 1
19 105806 NIPPLE, 3/4" NPT X 2" LG. BI 1
20 100113 CAP, 3/4" NPT SST 1
21 105731 STREET ELL, 3/4" NPT 90° BI 1
22 100118 UNION ELL MALE, 3/4" NPT X 90° BRASS 1
23 102526 TEE, 3/4" X 3/4" X 1/2" NPT BRASS 1
24 102504 PLUG, 1/2" NPT BRASS 1
25 109925 COMPRESSION FITTING, 5/8" OD X 1/2" NPT BRASS 2
26 102392 BUSHING, 3/4" X 1/2" NPT BRASS 1
H ---------- SUPPLIED BY HATCO WITH BOOSTER
49
Page 60

DHBT Lower Fill Piping Assembly
TO UPPER
15
16
14
13
2
3
1
5
19
17
18
4
12
5
9
11
8
10
6
5
7
5
2
PIPING
CUSTOMER
WATER
INLET
50
Page 61

DHBT Lower Fill Piping Assembly
Item Part Description Qty
No. No.
1 107550 VALVE, PRESSURE REGULATING 3/4" 1
2 102444 STREET ELL, 3/4" X NPT BRASS 2
3 102651 NIPPLE, 3/4" X 2" BRASS 1
4 111437 VALVE, 3/4" NPT HOT WATER 1
5 100184 NIPPLE, CLOSE 3/4" NPT BRASS 4
6 102525 TEE, 3/4" X 1/2" X 3/4" BRASS 1
7 100571 UNION 3/4" NPT X BRASS 1
8 102388 BUSHING REDUCING, 1/2" X 1/4" BRASS 1
9 112437 VALVE, NEEDLE 1/4" 1
10 109879 COMPRESSION FITTING 3/4" NPT X 7/8" OD 1
11 205824 TUBE, FINAL RINSE 1
12 107065 CONNECTOR, MALE 1/4" OD X 1/4" NPT 1
13 107928 TUBING, HIGH DENSITY 3FT.
14 111100 ELBOW, FEMALE 1/4" OD X 1/8" MPT 1
15 109812 GAUGE, PRESSURE 0-60 PSI 1
16 109816 OVERLAY, GAUGE 20-30 PSI 1
17 111472 COIL, SOLENOID 120VAC A/R
18 109903 KIT, VALVE REPAIR A/R
19 110768 STRAINER, LINE 3/4" BRONZE 1
51
Page 62

DHBT, DH1T Upper Fill Piping Assembly
15
3
9
10
16
12
11
7
4
3
14
8
2
WATER IN FROM
LOWER PIPING
8
13
5
6
1
52
Page 63

DHBT, DH1T Upper Fill Piping Assembly
Item Part Description Qty
No. No.
1 100156 LOCKNUT, 3/4" NPT BRASS 1
2 100571 UNION 3/4" NPT BRASS 1
3 102392 BUSHING, RED. 3/4" NPT X 1/2" BRASS 1
(PRIOR TO S/N D3699)
--- 100171 BUSH, RED., FACE 3/4" NPT X 1/2" BRASS 1
(BEGIN WITH S/N D3700) 1
4 100599 CROSS, 3/4" NPT BRASS 1
5 108181 BUSHING, RED. 3/4" X 1/4" NPT PLASTIC 1
6 107463 PLUG, 1/4" NPT PLASTIC 1
7 102444 ELBOW, STREET 3/4" NPT 90° BRASS 1
8 100184 NIPPLE, CLOSE 3/4" NPT BRASS 1
9 113222 VACUUM BREAKER, 3/4" NPT BRONZE 1
10 109925 COMPRESSION FITTING, 1/2" NPT X 5/8" OD BRASS 1
11 102489 NIPPLE, 3/4" NPT X 2-1/2" LG. BRASS 1
12 104682 THERMOMETER, 1/2" NPT 1
13 102521 TEE, 3/4" NPT BRASS 1
14 102505 PLUG, 3/4" NPT BRASS 1
15 113223 KIT, REPAIR VACUUM BREAKER 3/4" 1
16 102392 BUSHING, REDUCING 3/4" NPT X 1/2" BRASS 1
(BEGIN WITH S/N D3700)
53
Page 64

DH1T Lower Fill Piping Assembly
CUSTOMER
TO UPPER
11
PIPING
10
WATER IN
1
20
19
2
7
3
6
15
5
4
6
9
8
1
12
13
14
18
17
16
54
Page 65

Item Part Description Qty
No. No.
1 102444 STREET ELL, 3/4" NPT BRASS 2
2 0309340 BRACKET, PLUMBING SUPPORT 1
3 110768 STRAINER, LINE 3/4" BRASS 1
4 111437 VALVE, 3/4" NPT HOT WATER, 12OVAC 1
5 109903 KIT, REPAIR VALVE, 3/4" NPT HOT WATER A/R
--- 111472 COIL. SOLENOID 12OVAC, 3/4" NPT HOT WATER A/R
6 100184 NIPPLE, CLOSE 3/4"NPT BRASS 2
7 102442 ELBOW, 3/4" NPT BRASS 1
8 102470 NIPPLE, 3/4" NPT X 3" LG. BRASS 1
9 102392 BUSHING, REDUCING 3/4" X 1/2" NPT BRASS 1
10 109925 COMPRESSION FITTING, 1/2" NPT X 5/8" OD BRASS 1
11 205824 TUBE, 1/2" COPPER FORMED 1
12 102525 TEE, RED., 3/4" X 1/2" X 3/4" NPT 1
13 102388 BUSHING, RED., 1/2" X 1/4" NPT BRASS 1
14 101261 STREET ELL, 1/4" NPT BRASS 1
15 112437 NEEDLE VALVE, 1/2" MPT BRASS 1
16 107065 ADAPTER, 1/4" OD X 1/4" MPT PLASTIC 1
17 107928 TUBING, HIGH DENSITY 3 FT.
18 111100 ELBOW, FEMALE 1/4: OD X 1/8" NPT 1
19 109812 GAUGE, PRESSURE 0-60 PSI 1
20 109765 OVERLAY, GAUGE 1
DH1T Lower Fill Piping Assembly
55
Page 66

Pump Assembly
29
30
27
28
26
25
24
31
32
14
20
23
22
21
19
5
18
16
17
6
4
12
13
11
10
9
8
2
7
1
3
56
Page 67

Item Part Description Qty
No. No.
1 324580 STRAINER 1
2 107966 GRIP NUT, 10-32 W/NYLON INSERT 1
3 104203 CLAMP, HOSE 2
4 104165 CLAMP, HOSE 1
5 107340 CLAMP, HOSE 1
6 112383 HOSE, PUMP DISCHARGE 1
7 0508515 HOSE, SUCTION 1
8 100734 BOLT, 1/4-20 X 1/2" HEX HD., SST 1
9 106482 WASHER, LOCK 1/4" SPLIT SST 1
10 110247 NUT, HEX JAM 7/16-20 1
11 110248 WASHER, FLAT 1
12 107463 PLUG, 1/4" 1
13 107137 BOLT, 10-32 X 7/8" HEX HD., SST 11
14 100194 GRIP NUT, 10-32 11
15 0501505 WASHER, LOCK INTERNAL SST #8 (NOT SHOWN) 11
16 109651 VOLUTE 1
17 113513 IMPELLER 1
18 109653 GASKET, O-RING 1
19 111111 SEAL, PUMP 1
20 109649 FLANGE ASSY, 1HP 1
21 107690 NUT, JAM 3/8-16 4
22 106407 WASHER, LOCK 3/8" SPLIT 4
23 109648 PLATE, BACKING 1
24 109654 PUMP, SLINGER WASHER 1
25 110734 STUD, 3/8-16 X 1-3/8" 4
26 110422 MOTOR, 2HP 208-240/460V/60/3 1
--- 110421 MOTOR, 2HP 115/208-240/60/1 1
--- 112163 MOTOR, 1.4HP 115/208-240/50/1 1
--- 0507708 MOTOR, 1.4HP 575/60/3 1
27 100739 BOLT, 5/16-18 X 3/4" HEX HD., SST 4
28 102376 WASHER, FLAT 5/6" SST 4
29 106013 WASHER, LOCK 5/16-18 SST 4
30 100142 GRIP NUT, 5/16-18 4
31 100754 SCREW, FLAT 10-32 X 1/2" SST 4
32 110270 WASHER, COUNTERSUNK SST 4
Pump Assembly
--- 900173 KIT, PUMP ASSY LESS MOTOR A/R
--- 452281 PUMP/MOTOR ASSY COMPLETE 2HP A/R
(208-240/460/60/3)
--- 452282 PUMP/MOTOR ASSY COMPLETE 2HP A/R
(115/208-240/60/1)
--- 452283 PUMP/MOTOR ASSY COMPLETE /1.4HP A/R
575V/60/3PH
57
Page 68

Control Panel Assembly
Prior to
S/N D3864
8
POWER
CYCLE
60
170
2
70
80
180
90
190
95
100
200
105
210
C
220
F
OFF
1
WASH
160
50
140
40
120
100
80
7
20
0
NSF
60
MODEL W
20
P/N 108391
3
WASH CYCLE
RINSE PRESSURE
40
psi
20
CHAMPION INDUSTRIES, INC.
WINSTON-SALEM, NC
0
USG
4
1 MIN
6 MIN
60
80
100
6
5
2 MIN
4 MIN
11
9 10
POWER
CYCLE
ON
4
1
OFF
3
TEMPERTURE
RINSE PRESSUREWASH
3 MIN
6 MIN
6
5
11
70
80
60
170
160
180
50
140
40
120
100
80
7
20
0
NSF
60
MODEL W
20
P/N 108391
90
190
95
100
200
105
210
C
220
F
20
CHAMPION INDUSTRIES, INC.
0
40
psi
WINSTON-SALEM, NC
USG
60
80
10
9
100
8
Beginning with S/N D3864 and above
58
Page 69

Control Panel Assembly
Item Part Description Qty
No. No.
1 0501361 SWITCH, ON/OFF (PRIOR TO D3863) 1
--- 111980 CIRCUIT BRKER, ON/OFF (BEGIN WITH D3863) 1
2 112390 LIGHT, RED (PRIOR TO D3863-NO LONGER USED) 1
3 112391 LIGHT, AMBER (PRIOR TO D3863) 1
--- 106364 PILOT, LIGHT 120V GREEN (BEGIN D3863) 1
4 113054 SWITCH, TIME SELECT, 4 POSITION 1
5 113055 CONTACT BLOCK, NO 1
6 113056 CONTACKT BLOCK NC 2
7 112086 OVERLAY, WASH 150°F 1
8 113622 THERMOMETER, 4FT. CAPILLARY 1
9 109812 GAUGE, PRESSURE 0-60 PSI 1
10 109756 OVERLAY, 20-30 PSI 1
--- 113051 LABEL, PANEL OVERLAY (DHT/TC) PRIOR TO D3863 1
--- 113525 LABEL, PANEL OVERLAY (BEGIN WITH D3863) 1
--- 113567 LABEL, PANEL OVERLAY CORNER MODEL 1
(BEGIN WITH D3863)
59
Page 70

Control Cabinet Assembly
10
17
Main Power Fuse Block
mounted on machine base
(115V/1 phase only)
6 7
5
16
4
3
14
15
Main Power Transformer
mounted on machine base
(208V-575V/1 or 3 phase)
2
8
60
WASH
OUTPUT
RINSE
OUTPUT
T3
T4
HEATERS
OUTPUT
LAMP
OUTPUT
T5
T6
10
JB1
L1
POWER
JB3
F1
N
H
T7
T1
T2
T8
DOOR SW.
START SW.
FLOAT SW.
JB2
U1
L3 L4
FILL RINSE WASH
L2
T10
T9
EXT. WASH
9
10
11
3
2
1
13
1
Page 71

Item Part Description Qty
No. No.
1 900911 TIMER BOARD (PRIOR TO D3863) 1
--- 113597 TIMER BOARD (BEGIN WITH D3863) 1
2 106925 BLOCK, FUSE 30A 3P 1
3 100922 FUSE, 20A (DHBT) 208-240/380-415/3 3
--- 100913 FUSE, 10A (DHBT) 480V/3 3
--- 100922 FUSE, 2OA (DH1T) 208-240/380-415/3 3
--- 100913 FUSE, 10A (DHIT) 480V/3 3
--- 100929 FUSE, 30A (DH1T) 115V/1 3
--- 100929 FUSE, 30A (DH1T) 208-240/1 3
--- 100929 FUSE, 30A (DHBT) 208-240V/1 3
4 111904 CONTACTOR, BOOSTER HTR., 40A 3P ALL MODELS 1
5 111904 CONTACTOR, BOOSTER HTR., 40A 3P ALL MODELS 1
6 108122 CONTACTOR, WASH MOTOR., 12A 3P ALL MODELS 1
7 112691 STARTER,OVERLOAD WASH 208-240V3 1
--- 110805 STARTER, OVERLOAD WASH 480V/3 1
--- 110805 STARTER, OVERLOAD WASH 380-415V/3 1
--- 112692 STARTER, OVERLOAD WASH 575V/3 1
--- 111632 STARTER, OVERLOAD WASH (DH1T) 115V/1 1
--- 111632 STARTER, OVERLOAD WASH (DH1T) 208-240V/1 1
8 107366 BOARD, TERMINAL 1
9 112382 RELAY, 3PDT, 10A 120VAC COIL 1
10 111068 RELAY, 2PDT, 10A 120VAC COIL 2
11 113314 TIMER, INFINTEC (DRAIN TIMER) 1
12 0509564 LABEL, CHEMICAL CONNECTIONS (NOT SHOWN) 1
13 111833 BLOCK, TERMINAL 3P (MAIN POWER) 1
14 109064 TRANSFORMER, 250VA, 208-240-480V/60/1&3 1
--- 111521 TRANSFORMER 250VA, 575V/60/3 1
15 112424 KIT, FUSE BLOCK 1
16 112484 FUSE 1.5A 208-240V/1&3 2
--- 112483 FUSE, 1.8A 380-415V/3 2
--- 112887 FUSE, .5A 480V/3 2
17 106042 BLOCK, FUSE 2P 115V ONLY 1
18 107289 FUSE, 2.5A, 115V ONLY 2
--- 103310 WIRE LUG, GROUND (NOT SHOWN) 1
Page 72

Dish racks, PRV
1
2
3
62
Page 73

Dish racks, PRV
Item Part Description Qty
No. No.
1 101273 RACK FLAT BOTTOM 1
2 101285 RACK, PEG 1
3 107550 VALVE, PRESSURE REGULATING (PRV) 1
63
Page 74

Blank Page
This Page
Intentionally
Left Blank
64
Page 75

L2L1 L3
ON SINGLE PHASE
MACHINES OMIT L3.
L1
L2
L1
L2
L3
L1
L2
L1 3330
L2
L3
L1
L2 31
L3 32
DIAGRAM STATE
1MOL
24
1M
50
25
50
1MOL
1M
24 27
25
26
ELECTRIC TANK HEAT
FUH
FUH
FUH
30
31
31
32
30
HC1
HC1
HC1
33
34
34
35
33
34
35
ELECTRIC BOOSTER HEAT IF USED (SEE NOTE3)
BC1
L1
L2
BC1
L1
L2
L3
BC1
L1 36
L2
L3
36
37
36
37
38
37
38
POWER OFF
DOORS CLOSED
TANKS EMPTY
END OF CYCLE
27
28
28
29
4.7kW
4.7kW
4.7kW
1MTR
1MTR
NOTE 1: IF SUPPLY VOLTAGE IS 115V, T1 IS NOT
USED. WIRES #1 AND 2 ARE CONNECTED TO THE
FUSE BLOCK IN PLACE OF WIRES #39 AND 40.
NOTE 2: DS1 NOT USED ON CORNER MACHINE
MODELS.
! ATTENTION - VERY IMPORTANT ! -
VERIFY CIRCUIT BOARD PART NUMBER AND JUMPER
POSITION SETTINGS (JB1, JB2, JB3) PER MACHINE
MODEL AND SERIAL NUMBER AS INDICATED IN TABLE
BELOW. IMPROPER JUMPER SETTINGS MAY CAUSE
ERRATIC OPERATION.
Model
DH1T, DHBT Up to D3857 112676 Rev. C
DH1T, DHBT
DLF
DH1T, DHBT
E* - Energy Star Qualified Product, starting with serial# D08016801
DS1
SEE NOTE 2
4
1CRA
4
11
4
Ω
15k
4
S/N Part No.
D3858-D08016801
ALL
D08016801-UP
DS2
42
6
SS
32
1
7
4
1M
5
FSW
4.7k Ω
113597 Rev. G
113597 Rev. G
113597 Rev. H
1CR
6
X000
00X0
000X
X000
Machine Board Jumper Settings
JB1 JB2 JB3
Open
Closed
Open
Closed
Open
Closed
Closed
Open
4
2
H
T2
N
T1
T7
9
T8
10
4
T9
11
T10
11
58 57
41
Open
Open
Open
Closed
START
SWITCH
DOOR
SWITCH
FLOAT
SWITCH
EXTENDED
WASH
NOTE 3: THE kW RATING OF THE BOOSTER
ELEMENT IS DEPENDENT ON THE VOLTAGE AND
DEGREE RISE OF THE SYSTEM. SINGLE PHASE
MACHINES W/ ELECTRIC BOOSTER ARE 40° RISE
ONLY. 40° RISE UNITS USE 7.5/10 OR 9 kW
ELEMENTS. 70° RISE UNITS USE 13.5/18 OR 17.7
kW ELEMENTS.
BLACK JUMPER SHOWN CLOSED.
LIFT & REMOVE TO OPEN.
PRINTED CIRCUIT BOARD
CLOSED JUMPER SHOWN FROM SIDE
F1
FUSE 1A
5 X 20 MM
FAST ACTING
WHITE BASE
POWER
LED
JB3
JB1
5758
LEDs
RINSEFILL
WASH
JB2
120V FAN SIGNAL
(IF USED)
TO CONTACTOR COIL
SUPPLIED BY OTHERS
43
DETERG.
SIGNAL
WASH
OUTPUT
RINSE
OUTPUT
HEATERS
OUTPUT
LAMP
OUTPUT
(IF USED)
T3
T4
T5
T6
PCB
LINE
LOAD
T1 NOT USED WITH
115V LINE SUPPLY
SEE NOTE 1
TSDT
1
4
12
15
17
22
2CRA
1CRB
1CRC
TSHC
TSBC
44
3CRA
DTV
13
16
ELECTRIC HEAT ONLY
AS
AS
23
55
3CR
18
20
L1
L2
L3
39
T1
IT
10 MINUTE
1 2 3
14
1M
RWV
HCHL
BCHL
RINSE
SIGNAL
1
56
1MOL
19
21
FUT
DV
LT2
2CR
HC1
BC1
PER LOCAL ELECTRICAL CODE
L1
L2
L3
FUT
40
GND
2
1CR
2CR
DOOR SWITCH RELAY
RINSE AID SIGNAL RELAY
3CR POWER ON RELAY
1M
1MOL
1MTR
AS
BC1
BCHL
2
DS1
DS2
DTV
2
DV
F1
WASH MOTOR CONTACTOR
WASH MOTOR OVERLOAD
WASH MOTOR
ARC SUPPRESSOR
BOOSTER TANK CONTACTOR OR STEAM VALVE
BOOSTER TANK HIGH LIMIT
DOOR SAFETY SWITCH, FRONT DOOR
DOOR SAFETY SWITCH, SIDE DOORS
DRAIN TEMPERING VALVE
DRAIN VALVE
TIMER BOARD FUSE
FSW FLOAT SWITCH
FUH
FUT
HC1
HCHL
IT
JB1
JB2
JB3
LT2
PCB
RWV
TANK HEAT FUSES
TRANSFORMER FUSES
TANK HEAT CONTACTOR OR STEAM VALVE
TANK HEAT HIGH LIMIT
INTERVAL TIMER, 10 MINUTE
RINSE TIME SELECT JUMPER
CYCLE SELECT JUMPER
CYCLE SELECT JUMPER
CYCLE LIGHT
POWER SWITCH CKT BKR
RINSE WATER VALVE
CYCLE TIME SELECTOR SWITCHSS
T1 LINE:120V TRANSFORMER
TSBC
TSDT
TSHC
2
(IF USED)
TO TEST INPUTS T8 AND T9 A METER
CAPABLE OF READING DC VOLTAGES MUST
BE USED.
1.) SET METER TO READ DC VOLTAGE
2.) PLACE BLACK LEAD TO T2
3.) PLACE RED LEAD TO TERMINAL BEING TESTED
i.e. PLACE RED LEAD TO T8 TO TEST DOOR SW.
4.) AN OPEN SWITCH WILL READ 4.7-5.3VDC
A CLOSED SWITCH WILL READ 0-1VDC
BOOSTER TANK THERMOSTAT
DRAIN TEMPERING THERMOSTAT
WASH TANK THERMOSTAT
2
ON SINGLE PHASE
MACHINES OMIT L3.
CUSTOMER TO SUPPLY RATED VOLTAGE/PHASE/Hz,
AS SPECIFIED PER ORDER,TO DISCONNECT SWITCH.
ALL POWER SUPPLIED TO EACH CONNECTION POINT
MUST COMPLY WITH ALL LOCAL ELECTRIC CODES.
J.NEWTON
DATE SHEET
6MAY99
SCALEDR.BY
DESCRIPTIONREV.
I
ADD JUMPER SETTING / SERIAL NUMBER INFORMATION
J
NONE
1
OF
1
ADDED SURGE SUPPRESSORS
K
CORRECTED JB1 JUMPER SETTING TO CLOSED
DATE
1 NOV02
17MAR03
29JAN04
BY
MJM
JAM
WB
REV. DESCRIPTION
REMOVED SURGE SUPPRESSOR FROM DOOR SWITCH
L
REVISED BOARD, ADDED CONNECTION TO JB3
M
DATE
14DEC04
18JAN08
JAM
JAM
BY
The Dishwashing Machine Specialists
D-H1/BTE - ELECTRONIC CONTROLS
STEAM/ELECTRIC- 1 & 3 PHASE
B
701648 M
REV.
 Loading...