

Page 1
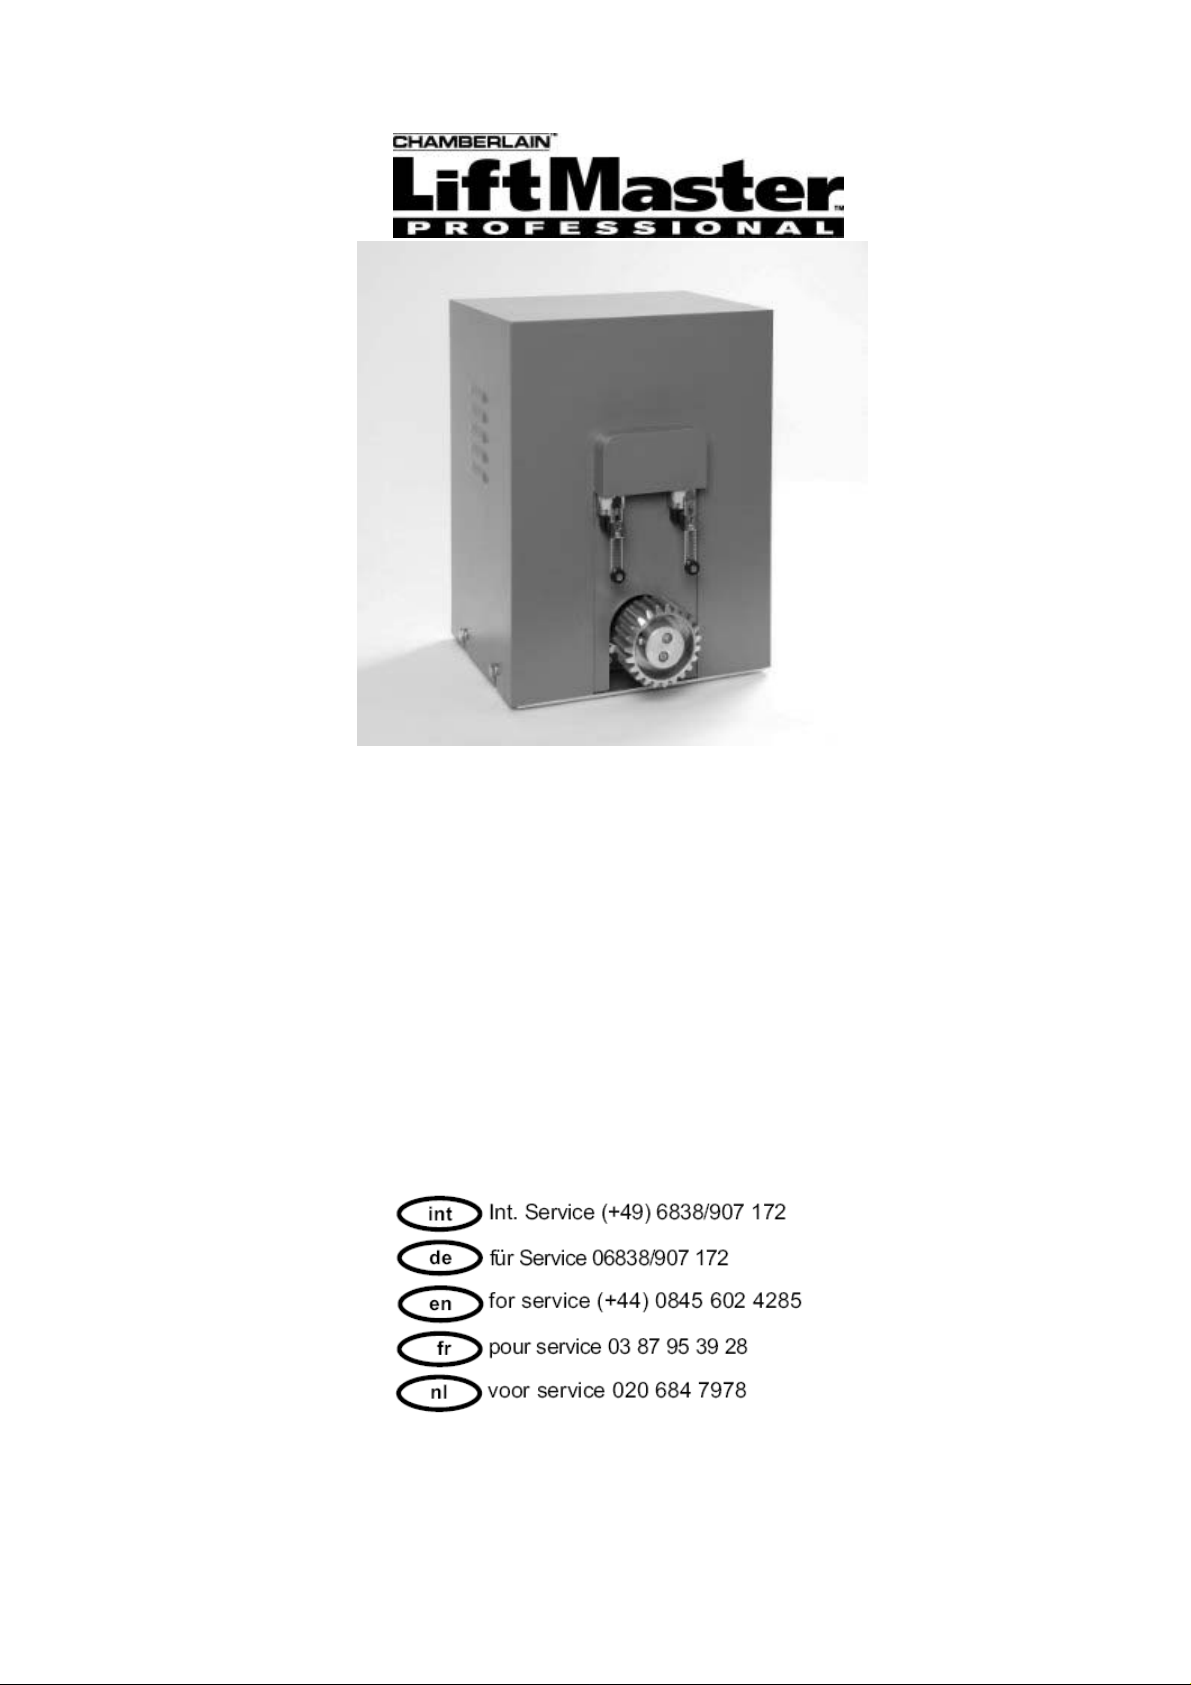
SLIDING GATE OPERATOR
Installation SLY3500
For gates up to 5.500kg
www.liftmaster.de
Email: info@chamberlain.de
Chamberlain GmbH
Alfred Nobel Strasse 4
D-66793 Saarwellingen
Germany 11/2008
Page 2
BEFORE YOU BEGIN
Make sure to leave sufficient space.
Windload: Even light wind may cause the motor to reverse (safety-reverse) as the forces effecting the gate are very
high. This applies especially to solid panel gates.
Gate Size: Gate size is an important factor. Wind can slow down gate or distort it, leading to higher amount of
required force.
Gate weight: Specification of gate weight represents only a rough parameter, which can vary according to actual
demand. Operation is important.
Influence of temperature: Low outdoor temperatures can impede or even prevent starting torque (gro und
deformation etc.). High outdoor temperatures can lead to premature initiation of temperature protection switch.
Notice: Motors are not designed to run permanent run (continuous operation). O utside temperature and gate
represent important parameters for actual operating duration.
Attention: This product may only be installed from professional installers. Only qualified and trained electricians may
connect, programme and service the controls. Qualified and trained electricians meet the following requirements:
- have knowledge of the general and specific safety and accident prevention regulations,
- have knowledge of the relevant electrical regulations,
- are trained in the use and care of appropriate safety equipment,
- are capable of recognising the dangers associated with electricity.
Page 3

Model Number: SLY3500 SLY3500E1 SLY3500E2
g
Controller none EWS2T CB400
Max. Gate weight (kg) 5500kg 5500kg 3500kg
Motor Protection Switch yes yes yes
Hold to run function no no yes
Automatic function no no yes
IR-Sensor no no yes
Automatic close no no yes*
Flashing Light no no yes*
Safety edges no no yes*
Emergency Stop no possible yes*
Radio no external external
External Light switching function no no yes*
Traffic light with Red-Light no no yes*
Technical Data
Voltage 415V
Phases 3
Frequency 50Hz
Current (nominal) 1,79A
Power 0,75 kW
Motor Protection Switch adjust to 2.1
Torque (max.) 150Nm
Gear Reduction 1:40
Duty Cycle Rating 60%
Temperature Range -25/+55°C
IP-Rating IP55
Gate Speed 10m/min
Sprocket 90mm / Module 4
Wei
ht 41kg
INSTALLATION OF DRIVE
The base for the drive can either be concreted or, if
appropriate, made of steel.
The concrete plinth needs to be of an appropriate size
(approx. 80cm long x 80cm wide x 100cm deep).
Notice: Precisely determine the height of the plinth
(motor mounting socket) and the distance from the gate
prior to installation. You are advised to work as
precisely as possible.
MOUNTING MOTOR AND GEAR UNIT
The weight of the gate should not be borne by the cog
wheel! Position the drive via the adjustment holes such
that its location vis-à-vis the rack bar complies with the
installation dimensions.
MOUNTING RACK BAR
The easiest way to fit the rack bar is to first place it on
the motor's drive cog, disengage the motor and, by
pushing the gate further with the rack bar, screwing the
bar bit by bit firmly in position. In this way, you ensure
that the rail bar engages with the cog wheel in an
optimum manner. While doing this, do not forget to
mark each fixing point.
Notice: Steel racks are recommended (320001 = 1m)
For gates with weights above 3.000kg it is
recommended to use two steel racks.
The tooth racks should be fitted as shown with an
overlap from rack to rack. For two rack mounting the
M8 screw must be replaced with a longer type to suit
the application.
* requires optional ZM-SKS-B plug in card
Page 4
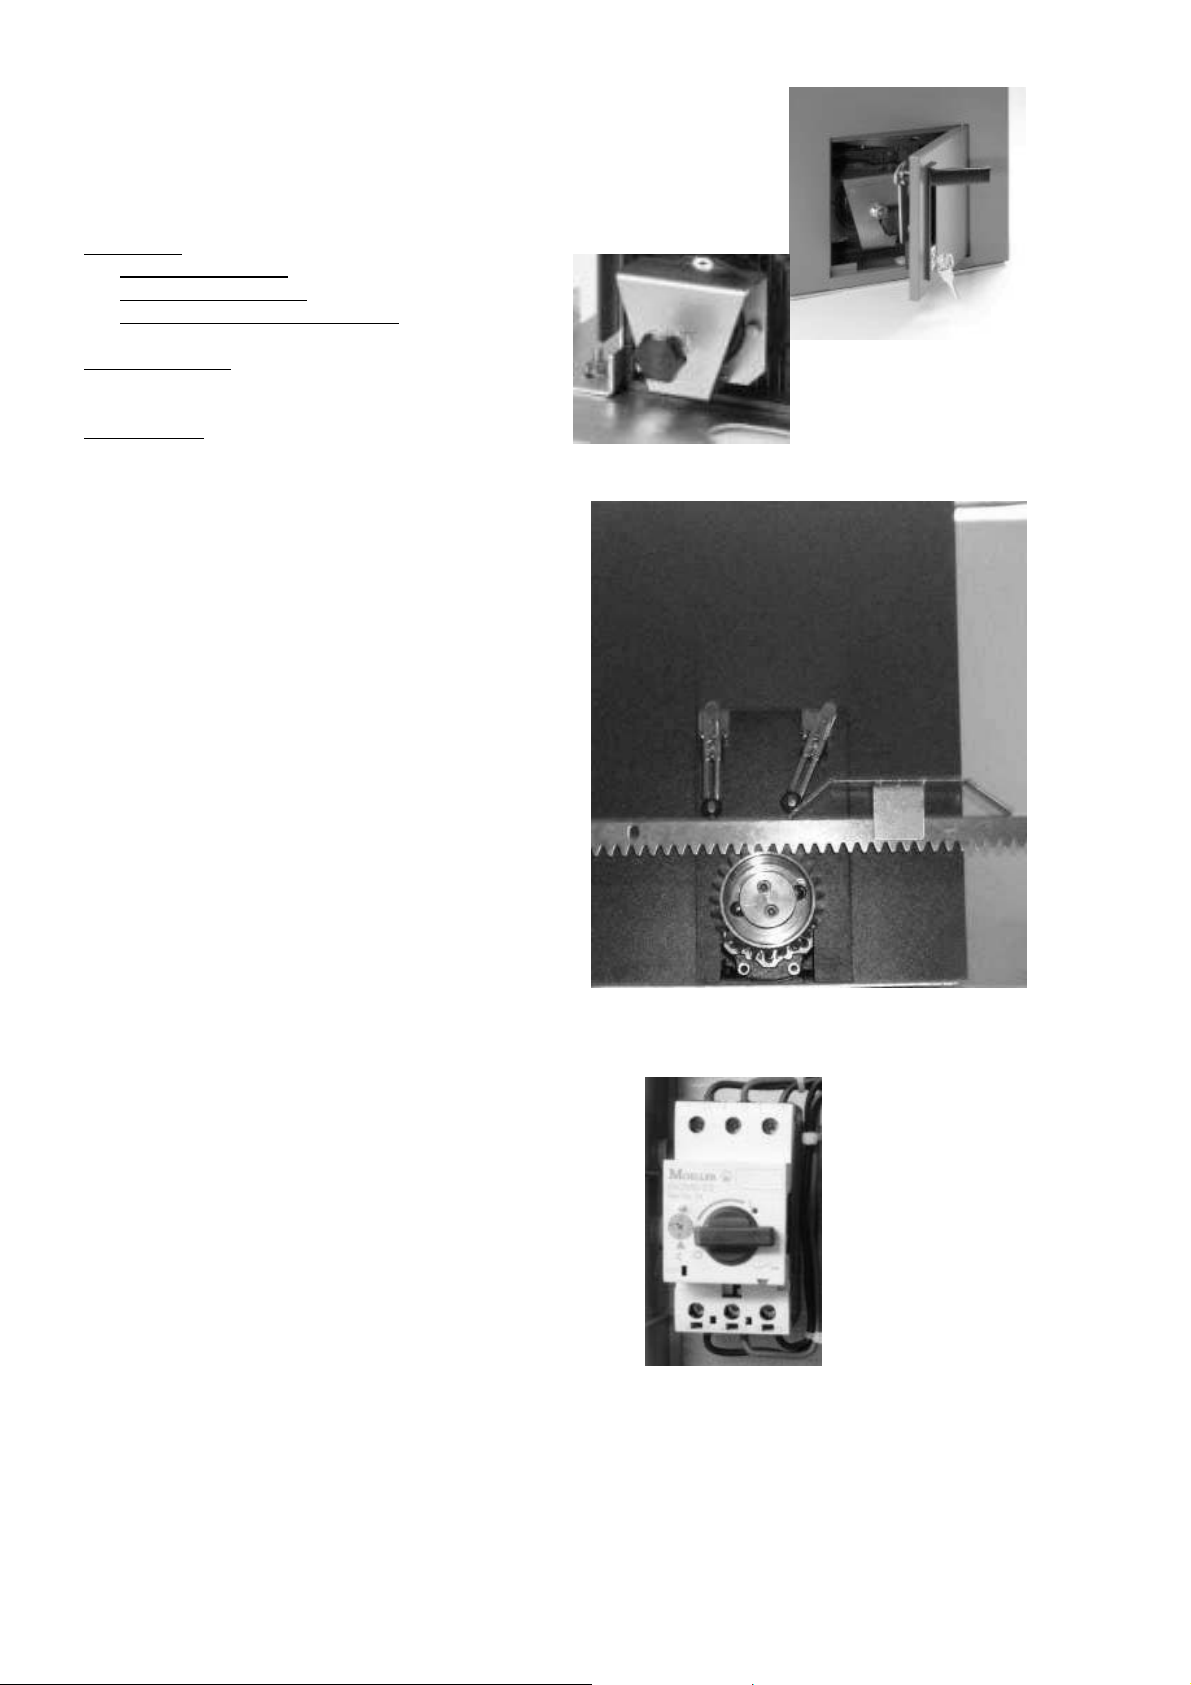
DRIVE RELEASE MECHANISM (MANUAL
OPERATION)
The drive is equipped with a lockable release
mechanism to enable the gate to be operated
manually during a power out.
Open Door
1. Open lock with key
2. Push on lock to open
3. Turn opening lever into position
Disengage gear:
Turn knob fully inside (clockwise).
Engage gear:
Turn knob outside (anti-clockwise).
Notice: For full engagement of gear it is important to
turn the knob completely outside (anti-clockwise).
FITTING LIMIT SWITCHES (TO GATE)
• The drive should be disengaged before this part of
the assembly work is carried out.
• Slide the gate into the closed position.
• Mount the limit switch bracket such that the roller of
the first switch is situated approximately in the
middle of the bracket. Repeat this process for the
open position. The bracket must be mounted with
screws immediately.
INITIAL OPERATION
Check gate functionality manually when the drive has
been
disengaged. Electrical operation is only possible with
a controller.
Electrical connections:
See electrical wiring diagram
Always ensure that the mechanical and electrical
safety requirements relevant to the given system are
complied with. A sliding gate can also be secured by
implementing on-site measures (fence, wall, etc.).
Motor Protection Switch
The motor protection switch protects the motor. Turn
large lever to ON (I) for power. The switch turns the
power OFF automatically in case of a motor overload.
The correct adjustment value is to 2.1.
Notice: Do never turn the adjustment higher than 2.1
MAINTENANCE WORK (monthly)
The drive mechanics are generally maintenance-free.
Check at regular intervals that the gate hardware and
the drive are all firmly in place.
• Disengage the drive and check gate functionality.
Only an easy-running gate will work well with a
drive. A drive is no substitute for a poorly
functioning gate.
• Inspect for oil leakage on gear box.
• Inspect for damage to electrical wiring
Page 5
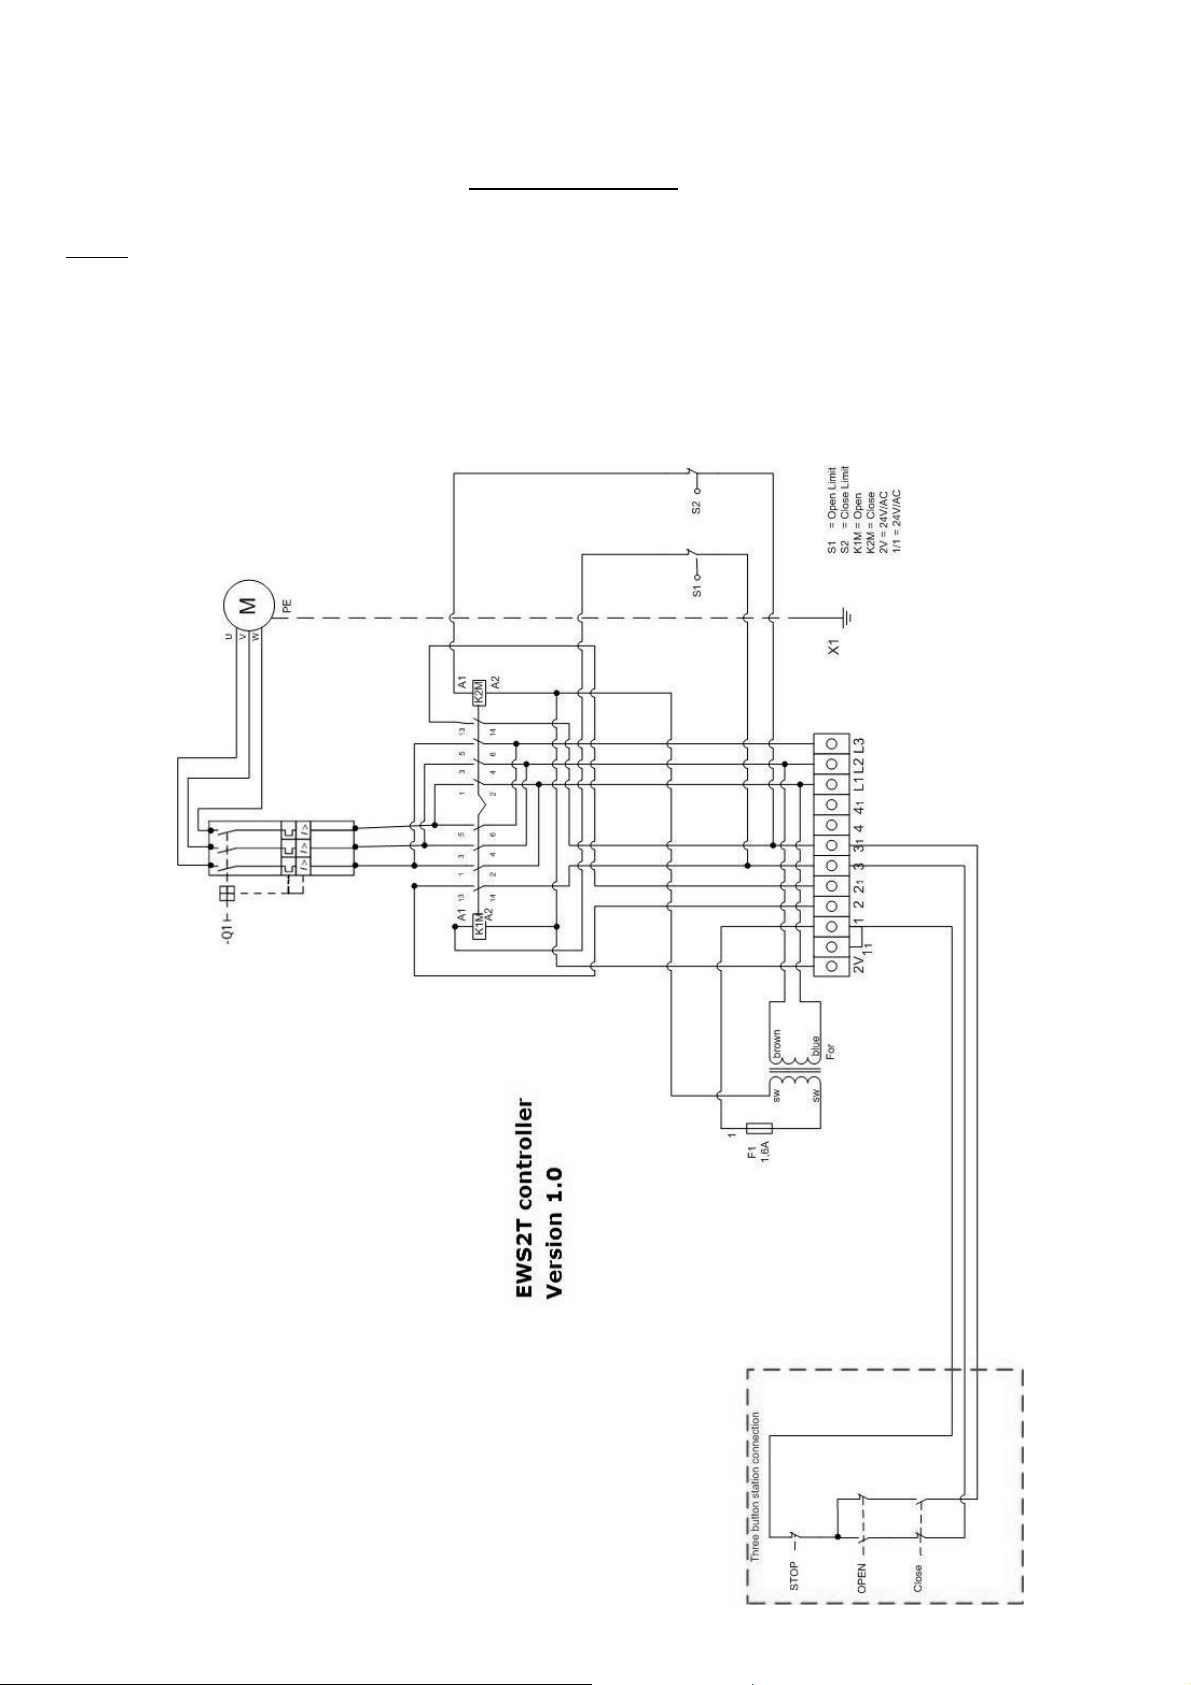
Electrical Installation
The gate can be moved in the hold-to run mode. Open-Stop-Close using push buttons.
Notice:
• See wiring diagram for electrical connection.
Accessories:
• 3-Button station
• Emergency Stop Switch
• External 2-channel radio receiver 8002E
A change in wiring of the control board to allow constant movement of the gate is not allowed.
Control Board EWS2T
Page 6

Declaration of Conformity
Automatic Gate Opener Models……… SLY3500, SLY3500E
are in conformity to the applicable sections of Standards:
EN55014 • EN61000-3 • EN60555, EN60335-1 • ETS300 683 • EN60335-1: 2002 • EN60335-2-103:
2003 • EN55014-1: 2000 + A1 + A2 • EN55014-2: 2001 • EN61000-3-2: 2000 • EN61000-3-3: 1995 +
A1 • EN 301 489-3, V1.3.1 • EN13241-1
per the provisions & all amendments
of the EU Directives .................................2006/95/EC, 2004/108/EC, 1999/5/EG
Automatic Gate Opener Models , when installed and maintained according to all the Manufacturer’s
instructions in combination with a Gate, which has also been installed and maintained according to all
the Manufacturer’s instructions, meets the provisions of EU Directive 89/392/EEC and all
amendments.
Harry Naumann
Manager, Regulatory Affairs
Chamberlain GmbH
D-66793 Saarwellingen
Germany
February, 2008
Declaration of Incorporation
I, the undersigned, hereby declare that the equipment
specified above and any accessory listed in the manual
conforms to the above Directives and Standards.
Page 7

CONTROL BOARD KIT
CB400
for
AC SLIDING GATE OPERATORS
-Installation Instructions-
www.liftmaster.de
Email: info@chamberlain.de
Chamberlain GmbH
Alfred Nobel Strasse 4
D-66793 Saarwellingen
Germany
Page 8

Attention:
This product may only be installed from professional installers. Only qualified and trained electricians
may connect, programme and service the controls. Qualified and trained electricians meet the
following requirements:
- have knowledge of the general and specific safety and accident prevention regulations,
- have knowledge of the relevant electrical regulations,
- are trained in the use and care of appropriate safety equipment,
- are capable of recognising the dangers associated with electricity.
Scope of these instructions:
These instructions describe the installation and options for the product CB400 (control board
AS210B): Some features require the optional ZM-SKS plug in logic board to work. This manual should
only be used together with SLY2500 and SLY3500 operators!
For mechanical installation of the operator use the instruct ion included with the operator.
Page 9

FEATURES
Type of gate motor used SLY2500 SLY3500
Motor Voltage 230Volt 400Volt
Controller (CB400 kit) AS210B AS210B
Max. Gate weight (kg) 2500kg 3500kg
Motor Protection Switch no yes
Thermal protection (internal) yes no
Hold to run function yes yes
Automatic function yes yes
IR-Sensor yes yes
Radio external external
Automatic close yes* yes*
Flashing Light yes* yes*
Safety edges yes* yes*
Emergency Stop yes* yes*
External Light switching function yes* yes*
Traffic light with Red-Light yes* yes*
IMPORTANT:
BEFORE the installation of control board make sure it is checked if your control motor
requires to be set for 400Volt, 3-Phase or
* requires ZM-SKS-B plug in card
230Volt, 1-Phase (X4 terminal).
A. Test button OPEN direction (S01) /
A. Test button CLOSE direction (S02)
X1: Terminals Mains
X2: Terminals Motor / safety circuit of drive
X3: Terminals Command devices
X4: Terminals Selection 230V / 400V
X5: Terminals Limit switches
X6: Terminals for 3-way switch
X7: Plug-in socket for ZM-SKS-B circuit card
X8: Plug-in socket for spiral cable
X9: Terminals for traffic light / yard light
(only in connection with a ZM SKS B plug-
in circuit card)
X10: Terminals for press-and-release
CLOSE- OPEN
X11: Not used
Page 10

Installation of control board:
The assembly instructions assume that there
is no control board pre-installed.
General steps:
1. Remove cover of operator
2. Remove control board box cover
3. Compare general pre-assembly of
control board
• Picture 1: 230Volt 1-Phase motor
assembly
• Picture 2: 400Volt 3-Phase motor
with motor protection switch
installed
4. Install the control board holders
• 4 pieces into the marked holes
• See picture 3
Pic. 3
Pic. 1
Pic. 2
Page 11

Circuit diagram for mains
connection and motor
400 V / 3-phase
F1 Thermal fuse, control voltage
F2 Thermal overload protection for motor
K1 Protection OPEN
K2 Protection CLOSE
M Motor (400 V / 50 Hz / 3-phase)
S3 Safety limit switch OPEN (NC contact)
S4 Safety limit switch CLOSE (NC contact)
S7 Safety switch, emergency manual
operation
(NC contact)
T1 Transformer
X1 Terminal block for mains connection
X2 Terminal block for motor
X4 Terminal block for mains voltage
selection
1+2 = 230Volt
2+3 = 400Volt
Picture of general wiring 400Volt shows:
• Connection to motor via motor
protection switch
• Limit switch connected (right side)
• Ground wire connected to board
Not shown:
Connect mains to:
• L1 = L
• L2.= L
• L3 = L
• PE = PE
ATTENTION:
Terminal X4 must have a jumper between
terminals 2+3 installed! (Picture 1)
Pic. 1
Page 12

Circuit diagram for mains
connection and motor
230V / 1-phase
F1 Thermal fuse, control voltage
F2 Thermal overload protection for motor
K1 Protection OPEN
K2 Protection CLOSEM Motor (230 V / 50
Hz)
S3 Safety limit switch OPEN (normally
closed contact)
S4 Safety limit swit ch CLOSE (normally
closed contact)
S7 Safety switch, emergency manual
operation (normally closed contact)
T1 Transformer
X1 Terminal block for mains connection
X2 Terminal block for motor
X4 Terminal block for mains voltage
selection
Picture of general wiring 1-Phase 230Volt
motor
• Connection to motor via motor
protection switch
• Limit switch connected (right side)
• Ground wire connected to board
Not shown:
Connect mains to:
L2 = L- 230Volt
L1 = N Neutral
PE = PE
ATTENTION:
Terminal X4 must have a jumper
between terminals 1+2 installed!
(Picture 1)
Pic. 1
Page 13

GENERAL CONNECTIONS:
Terminals X5 and X2
Limit switches
1. Limit switch OPEN
2. Limit switch CLOSE
xx??
3.
4. Pre-limit switch CLOSE (after activation th e
door does not reverse)
5. Thermal overload protection for motor
6. Emergency operation (normally closed
contact)
7. Safety limit switch CLOSE
8. Safety limit switch OPEN
Terminal block X3
Safety Devices and Commands
14 + 15 STOP Input
12 + 13 OPEN Direction Input
10 + 11 CLOSE Direction Input
7, 8 + 9 Safety Edges Closed Direction.
Requires the ZM-SKS module
5 + 6 Output 24Volt DC , max . 150mA
5= +
6= -3 + 4 Radio input (Automatic operation)
Requires the ZM-SKS module
1 + 2 Photocell Close connection
Requires the ZM-SKS module
EXAMPLE:
OPEN/ STOP CLOSE (4 lead solution)
EXAMPLE:
OPEN / CLOSE
X5
X3
X2
Terminal block X9
1 + 2 Dry Contact for red light traffic light
or other lights
X9
Page 14

EXTERNAL SAFETY- DEVICES
Connection (wiring) examples:
Requires optional ZM-SKS-B module to be
installed
1. For optoelectric safety edges:
Closing direction
Settings: Dipswitch 1 = OFF
Terminal 9: +12Volt
Terminal 8: Signal
Terminal 7: Ground
2. For 8.2KOhm safety edges
Closing direction
Settings: Dipswitch 1 = ON
Terminal 7+ 8
3. For pneumatic safety edges
Closing direction
Settings: Dipswitch 1 = ON
Dipswitch 2 = ON
8.2KOhm resistor in place
Terminal 7+8
4. For relay photocell with 3-wire
technology
Closing direction
Terminal 5: +24Volt
Terminal 6: Ground
Terminal 2: Signal
Notice: A 4-wire photocell requires a
jumper to be added
5. For relay photocell with 4-wire
technology
OPENING direction
Terminal 14+15: Signal
Terminal 5 : + 24VDC
Terminal 6 : - 24VDC
MORE OPTIONS:
• For Chamberlain 2-wire photocells the
optional 600213-2 interface box is
required. Three more photocells or safety
edges may be connected and monitored
independently, Type suitable 8.2KOhm
type or mixed with 2-wire Chamberlain
photocells. The interface box can be
connected to any terminal and connected
to the safety output protecting the opening
OR the closing direction. The box is IP55
and can be located outside.
Page 15

OTHER SETTINGS
X6 Socket
Socket for an external 3-way switch.
If the terminal is not used by a connector plug
the stop jumper marked on J4 must be
inserted.
X8 Socket
Socket for coiled (spiral) cable.
If the terminal is not used by a connector plug
the jumper marked on J3 must be inserted.
X7 Socket
Socket for the ZM-SKS plug in board.
If the terminal is not used by the module the
jumper marked J5 must be inserted.
X10 Socket
Terminal for press and release full open
and full close.
Opening direction: J1
Closing direction: J2
• J1 and J2 jumper OPEN if ZM-SKS board is
used.
• J1 and J2 jumper CLOSED if not
connected.
WARNING:
If jumper J2 is inserted the safety edge output
does NOT revers and stop the closing
direction!
X11 Socket
No Function
Page 16

Dimensions of circuit
167 x 85 x 190
board:
Power supply via L1, L2,
L3, PE:
230 V or 400 V, 50 / 60
Hz; - max. power input
2200 W - 3.2 A; duty cycle
60% for a maximum
running time of 120 s
Fuse protection: 10A K type
Consumption of the
max. 100 mA
controls alone:
Control voltage: 24 V
DC, max. 250 mA;
protected by self-resetting
fuse for external sensor
systems; all control
voltage inputs are
galvanically isolated from
the supply
Control inputs: 24V
DC, all input
connections must be
potential-free; minimum
signal duration for input
control command >100 ms
Control outputs: 24 V
Safety circuit / emergency
off:
DC, max. 150 mA
all input connections must
be potential-free; if the
safety circuit is
interrupted, no further
electrically powered
movement of the drive is
possible, not even in dead-
man mode.
Input -safety contact
edge:*
for 8.2 kW electrical safety
contact edges, terminating
resistor and for dynamic
optical systems
Relay outputs:* if inductive loads are
connected (e.g. additional
relays or brakes), they
must be fitted with
appropriate interference
suppression devices (freewheeling diodes, varistors,
resistor-capacitor
elements). Potential-free
normally open contact;
min. 10 mA ; max. 230V
AC / 4A.Contacts used
once for power switching
can not be subsequently
used for connecting small
currents.
Temperature range: In operation: -10°C ...
+45°CIn storage: -25°C ...
+70°C
Air humidity: up to 80% not condensing
gk 8.1 .xorppa :thgieW
Guidelines: Standards
Declaration of Conformity
Gate Control Board for SLY2500 and 3500……… AS210B is in conformity to the applicable sections
of Standards:
EN55014 • EN61000-3 • EN60555, EN60335-1 • ETS300 683 • EN60335-1: 2002 • EN60335-2-103:
2003 • EN55014-1: 2000 + A1 + A2 • EN55014-2: 2001 • EN61000-3-2: 2000 • EN61000-3-3: 1995 +
A1 • EN 301 489-3, V1.3.1 • EN13241-1
per the provisions & all amendments
of the EU Directives .................................2006/95/EC, 2004/108/EC, 1999/5/EG
Automatic Gate Opener Models , when installed and maintained according to all the Manufacturer’s
instructions in combination with a Gate, which has also been installed and maintained according to all
the Manufacturer’s instructions, meets the provisions of EU Directive 89/392/EEC and all
amendments.
Harry Naumann
Manager, Regulatory Affairs
Chamberlain GmbH
D-66793 Saarwellingen
Germany
July, 2008
Declaration of Incorporation
I, the undersigned, hereby declare that the equipment
specified above and any accessory listed in the manual
conforms to the above Directives and Standards.
W1-704200A
 Loading...