

Page 1
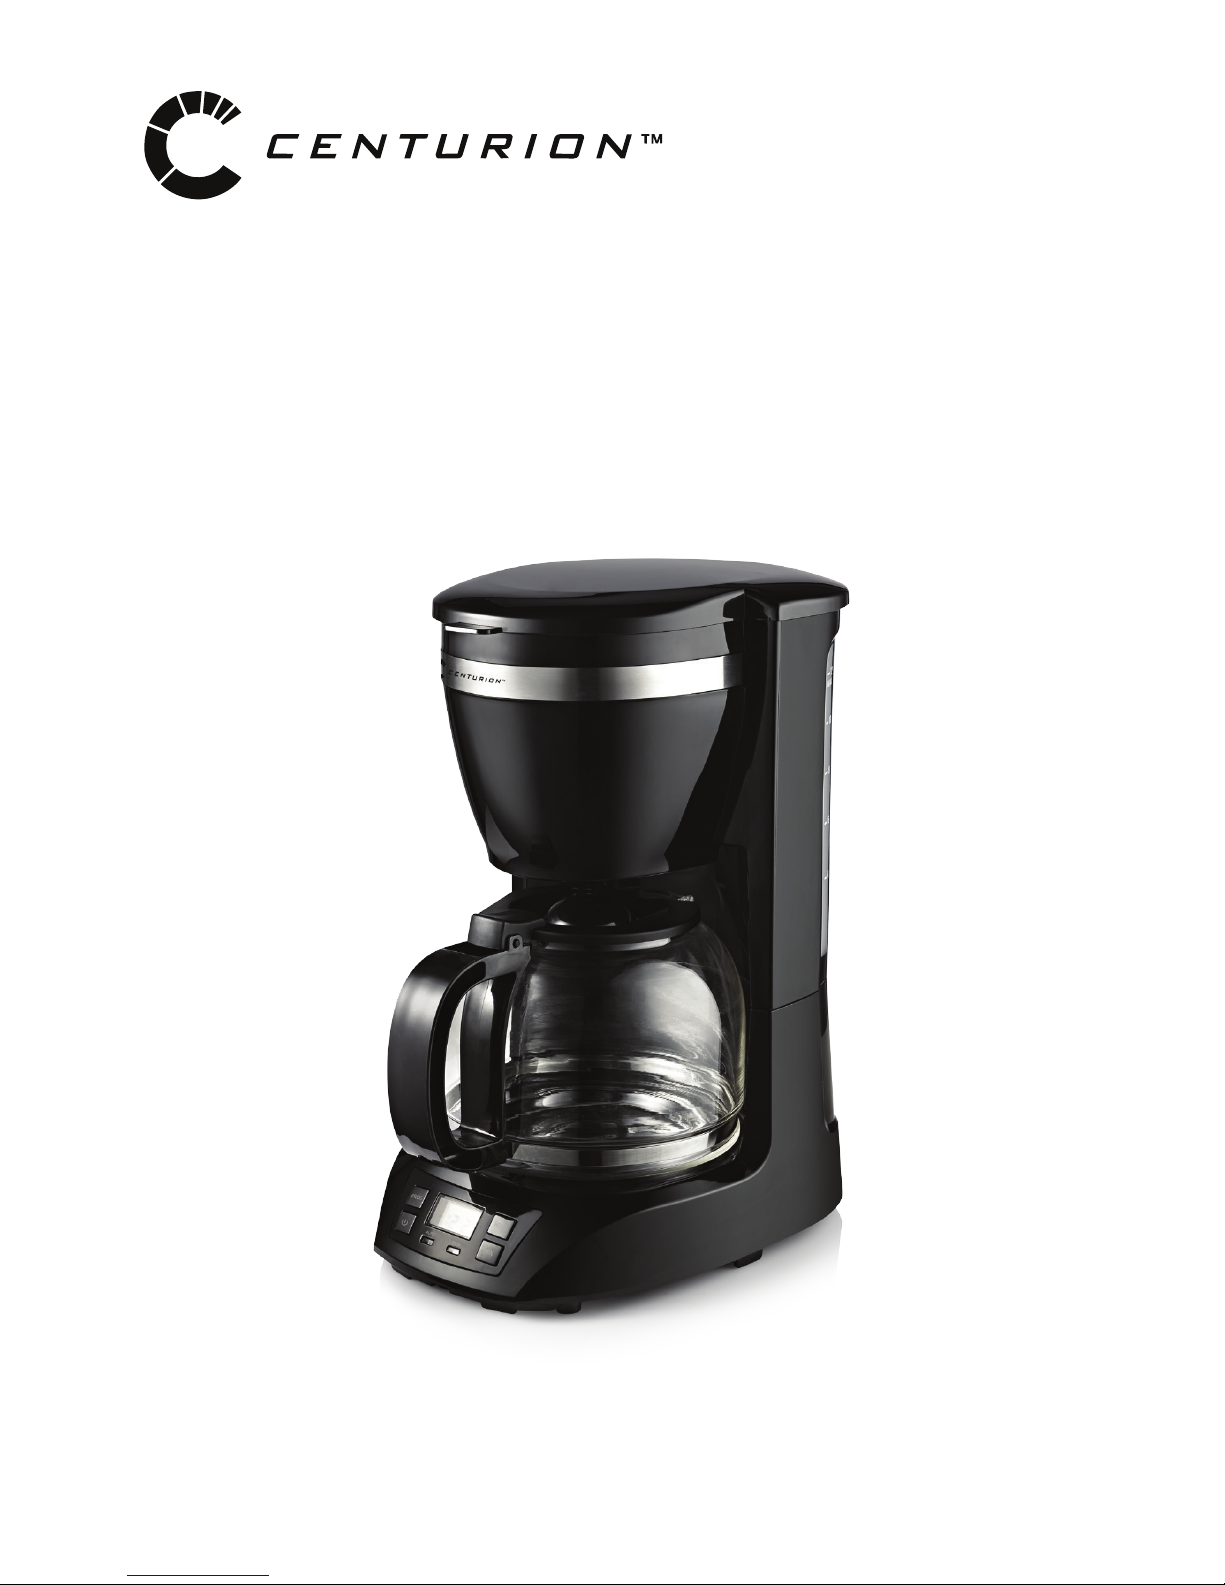
INSTRUCTION MANUAL
COFFEE MAKER (KE240)
Svenska, sida 3-11
English, page 13-21
Page 2

Page 3

Svenska // 3
SÄKERHETSFÖRESKRIFTER
När du använder elektriska produkter ska säkerhetsföreskrifterna
alltid följas. Läs hela manualen noggrant och spara den för
framtida bruk.
• Läs alla instruktioner.
• Kontrollera att spänningen i ditt vägguttag överensstämmer
med vad som anges på produktens typskylt. Typskylten nns
på undersidan av apparaten.
• För att undvika risk för brand, elektrisk stöt eller personskador
- doppa inte enheten, dess sladd eller kontakt i vatten eller
annan vätska.
• Dra ut kontakten från vägguttaget när du inte använder
apparaten och innan rengöring. Låt enheten svalna innan
du sätter i eller tar bort lösa delar och innan du rengör den.
Kontakten används som huvudströmbrytare.
• Använd aldrig en apparat med skadad sladd eller kontakt, om
apparaten inte fungerar som den ska, eller har skadats på
något sätt. Lämna apparaten till auktoriserad serviceverkstad
för undersökning och reparation.
• Användning av tillbehör som inte rekommenderas av
tillverkaren kan orsaka brand, elstöt eller personskada.
• Låt inte sladden hänga över kanten av bordet eller bänken och
låt inte sladden nudda den varma ytan.
• Placera inte på eller i närheten av varma källor, exempelvis en
ugn eller spis.
• Kannan är designad för användning till den här enheten. Den
får inte användas på någon annan värmeplatta.
• Rengör inte kannan med rengöringsmedel, stålull eller andra
slipande rengöringsmedel.
• För att stänga av apparaten helt; tryck på OFF och dra ut
kontakten från vägguttaget. Dra alltid i kontakten, inte i
sladden.
Page 4

4 // Svenska
• Skållning kan uppstå när locket till kaffebryggaren lyfts upp vid
bryggning. Var försiktig så du inte bränner dig av ångan.
• Vissa delar av apparaten blir varma under användning så rör
dem inte med händerna. Använd handtag och knoppar.
• Lämna inte en tom kanna på värmeplattan – då kan den
spricka.
• Använd inte enheten om kannan visar någon form av sprickor
eller om den har ett löst handtag. Använd endast kannan
med denna produkt. Kannan är ömtålig så var försiktig när du
använder den.
• Placera inte en varm kanna på ett varmt eller kallt underlag.
• Låt inte kaffebryggaren köras utan vatten.
• Denna enhet kan användas av barn från 8 år och uppåt om
de övervakas och har fått instruktioner om användning av
apparaten på ett säkert sätt och om de förstår riskerna vid
användning av produkten. Rengöring och underhåll får inte
utföras av barn om de inte är över 8 år och övervakade. Håll
enheten och dess sladd utom räckhåll för barn under
8 år. Enheten kan användas av personer med nedsatt fysisk,
sensorisk eller psykisk förmåga eller brist på erfarenhet och
kunskap om de har getts handledning och instruktioner om
användning av produkten på ett säkert sätt och förstår riskerna
med att använda produkten. Barn får inte leka med produkten.
• Noggrann övervakning är nödvändig när apparaten används
av eller nära barn eller arbetsoförmögna individer.
• Använd inte apparaten utomhus.
• Använd inte apparaten för annat än vad den är avsedd för.
• Denna apparat är endast ämnad för hushållsbruk.
Page 5
Svenska // 5
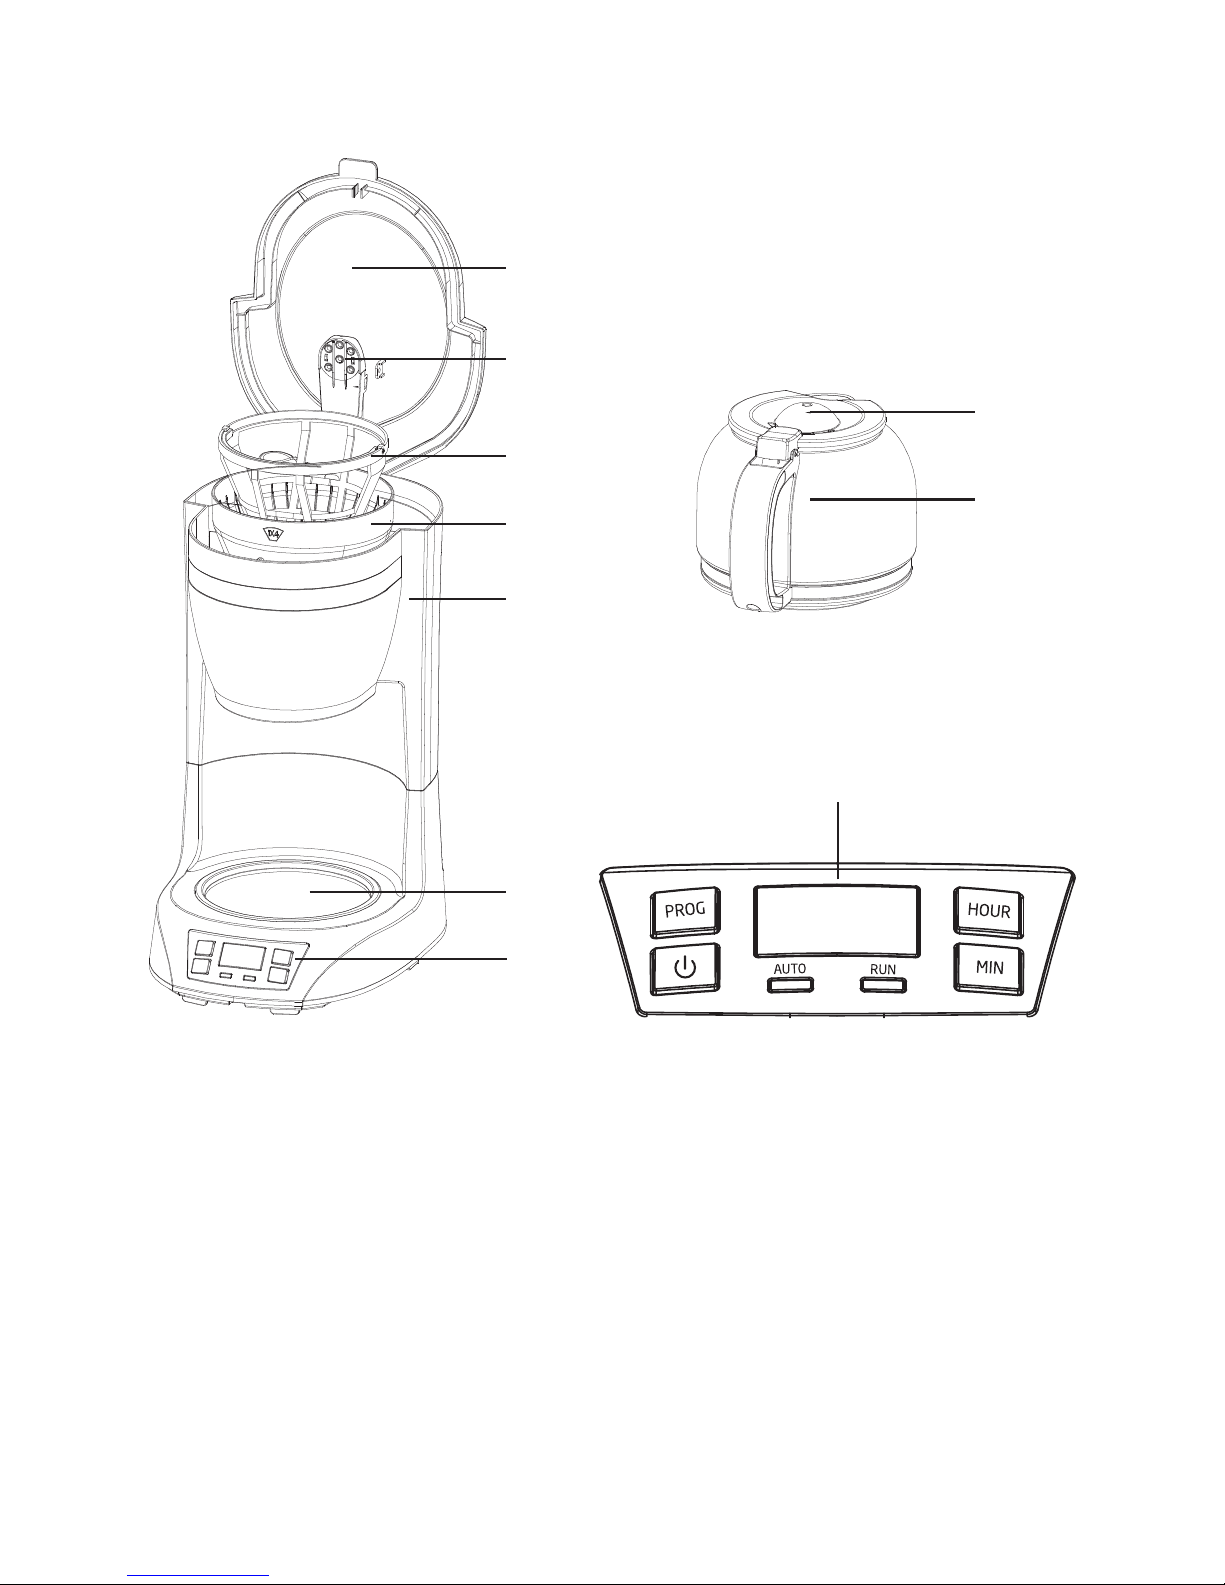
LÄR KÄNNA DIN KAFFEBRYGGARE
1. Lock
2. Vattenrör
3. Flergångslter
4. Uppsamlingstratt
5. Vattenbehållare
6. Värmeplatta
7. Kontrollpanel
8. Kaffekannans lock
9. Kaffekanna
FÖRE FÖRSTA ANVÄNDNING
Kontrollera att alla tillbehör är kompletta och att enheten inte är
skadad. Häll vatten i vattentanken till maxnivån och brygg vatten
utan kaffe några gånger. Häll sedan ut vattnet och rengör alla
löstagbara delar noggrant med varmt vatten.
1
2
3
4
5
6
8
9
7
7
Page 6

6 // Svenska
ANVÄNDA DIN KAFFEBRYGGARE
1. Öppna locket och fyll vattenbehållaren med dricksvatten.
Vattennivån får inte överskrida MAX-nivån som är markerad
på insidan av behållaren.
2. Placera ltret i uppsamlingstratten och säkerställ att den är
monterad korrekt. Säkerställ även att ltret sitter korrekt på
plats.
3. Tillsätt kaffe i ltret. Vanligtvis behöver en kopp kaffe ett slätt
mått med kaffe men du kan dosera efter personlig smak.
Stäng sedan locket.
4. Placera kaffekannan på värmeplattan.
5. Sätt i kontakten i vägguttaget. LCD-displayen visar 12:00 och
skiljetecknet blinkar.
6. Tryck på ON/OFF-knappen och RUN-indikatorn lyser rött.
Enheten startar sedan.
7. Bryggningsprocessen kan avbrytas genom att du trycker
på ON/OFF-knappen två gånger när som helst under
bryggningsprocessen, och bryggningsindikatorn (RUN) släcks.
RUN-texten på displayen kommer då att försvinna. OBS: Du
kan ta ut kannan, hälla upp och servera kaffe när som helst.
Apparaten kommer sluta droppa automatiskt men tiden kan
inte överskrida 30 sekunder.
8. Om du vill servera kaffe direkt ska du ta ut kannan och servera
när bryggningsprocessen är klar. OBS: Kaffet som bryggts är
mindre än den mängd vatten du tillsatte eftersom viss del av
vattnet absorberas av kaffepulvret.
9. Om du inte vill servera kaffet direkt när bryggningsprocessen
är klar låter du kontakten vara inkopplad och apparaten
påslagen. Kaffet hålls då varmt av värmeplattan. Det är inte
rekommenderat att hålla kaffet uppvärmt mer än en timma. För
optimal kaffesmak bör det serveras direkt efter bryggning.
10. Stäng alltid av kaffebryggaren med ON/OFF-knappen och dra
ut kontakten från vägguttaget när den inte används.
Page 7
Svenska // 7
TIDSINSTÄLLD START
Om du inte vill att kaffebryggaren ska starta direkt, till exempel om
klockan nu är 17.10 och du vill att den ska starta 20.15 följer du
steg 1-5 ovan och sedan ställer du in starttiden enligt följande:
1. Tryck på PROG-knappen en gång, CLOCK visas i det övre
högra hörnet i displayen.
2. Tryck på HOUR och MIN-knapparna era gånger för att ställa
in den nuvarande tiden (aktuell tid), som i exemplet är 17.10
(se g. 1). OBS: Tidscykeln är 24 timmar.
3. Tryck på PROG-knappen igen och ordet TIMER visas i det
övre vänstra hörnet på displayen.
4. Ställ in den tidsfördröjda starten genom att trycka på HOUR
och MIN upprepade gånger, tills den når 20:15 enligt exemplet
(se g. 2).
5. Tryck på ON/OFF-knappen två gånger och AUTO-indikatorn
lyser upp. Efter ca 10 sekunder visar LCD-displayen den
nuvarande tiden och du kan se den inställda starttiden genom
att trycka på PROG. OBS: Du kan avbryta den tidsinställda
starten genom att trycka på ON/OFF. Om du vill ändra tiden
för den fördröjda starten följer du steg 1-4 igen. När tiden nåtts
kommer indikatorn AUTO att släckas medan RUN-indikatorn
tänds och enheten börjar brygga kaffe.
CLOCK
Fig. 1
17:10
TIMER
Fig. 2
20:15
Page 8

8 // Svenska
MINNE
Om strömmen har avbrutits eller om kontakten oavsiktligt har
dragits ur under användning kommer enheten automatiskt att
fortsätta från den tid den blev avbruten så länge avbrottet inte
överskrider 15 sekunder; även om man inte tryckt på någon
knapp. Om avbrottet är längre än 15 sekunder kommer displayen
visa standardinställning och apparaten måste startas om.
RENGÖRING OCH UNDERHÅLL
FÖRSIKTIG: Koppla ur apparaten innan rengöring. För att skydda
dig mot elektrisk stöt, sänk inte ned kontakt, sladd eller enhet i
vatten eller andra vätskor. Säkerställ att kontakten är urkopplad
från vägguttaget efter varje användning.
1. Rengör alla löstagbara delar efter varje användning i varmt
vatten.
2. Torka av utsidan av apparaten med en mjuk, fuktig trasa för att
få bort äckar.
3. Ånga kan bildas i området ovanför uppsamlingstratten och
droppa ner under bryggning. För att kontrollera detta – torka
av området med en ren, mjuk trasa efter varje användning.
4. Använd en fuktig trasa för att försiktigt torka av värmeplattan.
Använd aldrig slipande eller starka rengöringsmedel för att
rengöra den.
5. Återinsätt alla delar och spara för nästa användning. Filtret kan
användas era gånger.
Page 9

Svenska // 9
TA BORT KALKAVLAGRINGAR
För att din kaffebryggare ska fungera effektivt bör du regelbundet
ta bort de kalkavlagringar som kan bildas. Hur ofta du behöver
göra det beror på vattenkvaliteten där du bor och hur ofta du
använder apparaten. Exempel på avkalkning:
1. Fyll vattenbehållaren med vatten och avkalkningsmedel
till MAX-nivån (måttet av vatten och avkalkning är 4:1,
vänligen se instruktionerna för avkalkningsmedlet). Använd
hushållsavkalkning. Du kan också använda citronsyra istället
för avkalkning (en del vatten och tre delar citronsyra).
2. Placera kannan på värmeplattan; säkerställ att mittlinjen på
kaffekannan linjerar med mitten på bryggningsbehållaren.
3. Tryck på ON/OFF-knappen en gång och RUN-indikatorn lyser
rött. Efter en tid rinner vatten igenom automatiskt.
4. Efter att motsvarigheten till en kopp ltrerats stänger du av
apparaten genom att trycka på ON/OFF-knappen. RUNindikatorn släcks.
5. Lämna lösningen att verka i 15 minuter och repetera steg
3-5 igen.
6. Stäng av apparaten genom att trycka på ON/OFF-knappen en
gång och häll ut vattnet tills vattentanken är helt tom.
7. Skölj genom att köra apparaten med enbart vatten minst
tre gånger.
Page 10

10 // Svenska
TIPS FÖR GOTT KAFFE
1. En ren kaffebryggare är avgörande för välsmakande kaffe.
Rengör enheten regelbundet enligt vad som beskrivs i
avsnittet ”Rengöring och underhåll”. Använd alltid fräscht,
kallt vatten.
2. Förvara oanvänt kaffe i ett kallt, torrt utrymme. Öppnad
förpackning ska slutas tätt och förvaras i kyl för att bevara
sin färskhet.
3. För optimal kaffesmak – köp hela kaffebönor och nmal
dem precis innan bryggning.
4. Återanvänd inte kaffepulver då det kraftigt reducerar
kaffesmaken. Att värma upp kaffe är inte rekommenderat
då kaffe har sin bästa smak precis efter bryggning.
5. Rengör kaffebryggaren när över-extraktion orsakat oljighet.
Små oljedroppar på ytan av bryggt, svart kaffe beror på
extraktion av olja från kaffepulvret.
6. Oljighet kan förekomma mer frekvent om kraftigt rostat
kaffe används.
TEKNISKA SPECIFIKATIONER
Strömförsörjning/Frekvens 220-240V, 50/60Hz
Effekt 900W
Energiförbrukning i standby-läge < 0.5W
Energiförbrukning i aktivt läge 900 ± 10% W (max)
Vattentankskapacitet 1.5 L (ca 12 koppar)
Bryggtid för max antal koppar < = 12 min
Storlek engångslter 1x4
Page 11

Svenska // 11
MILJÖ
Waste of Electrical and Electronic Equipment (WEEE)
- WEEE-direktivet 2012/19/EU
Den här symbolen på produkten eller i instruktionerna
betyder att den elektriska och elektroniska
utrustningen ska slängas separat från annat
hushållsavfall när den inte fungerar längre. Inom EU
nns separata återvinningssystem för avfall. Kontakta
lokala myndigheter eller din återförsäljare för mer
information.
LAG OCH SÄKERHET
Detta märke nns på produkten och i manualen för
att visa att den uppfyller de europeiska säkerhetsoch elektromagnetiska kraven. Denna produkt är
tillverkad enligt gällande regler för elektromagnetiska
fält (EMF), vilket innebär att den är säker att använda
så länge säkerhetsanvisningarna följs. Produkten
är tillverkad enligt gällande EU-lagstiftning, som
begränsar användning av skadliga ämnen i elektriska
och elektroniska produkter (Europaparlamentets och
rådets direktiv 2011/65/EU).
FÖRBEHÅLL
Vi förbehåller oss rätten att justera eventuella tryckfel
samt fortlöpande ändra och förbättra produkten och
medföljande material.
Page 12

Page 13

English // 13
SAFETY PRECAUTIONS
When using electrical appliances, basic precautions should
always be followed, including the following. Read the manual
carefully and save it for future reference.
• Read all instructions.
• Make sure that your outlet voltage corresponds to the voltage
stated on the rating label of the coffee maker (rating label is
located on the bottom of the unit).
• To protect against re, electric shock and injury to persons, do
not immerse unit, cord or plug into water or other liquid.
• Unplug from outlet when not in use and before cleaning.
Allow to cool before putting on or taking off parts, and before
cleaning the appliance. The power cord is used as main
power switch.
• Do not operate any appliance with a damaged cord or plug or
after the appliance malfunctions, or has been damaged in any
manner. Return appliance to an authorized service facility for
examination, repair or adjustment.
• The use of accessory not recommended by the appliance
manufacturer may result in re, electric shock or injury to
persons.
• Do not let cord hang over edge of table or counter, or touch
the hot surface.
• Do not place on or near a hot gas or electric burner, or in
a heated oven.
• The container is designed for use with this appliance. It must
never be used on a range top.
• Do not clean container with cleansers, steel wool pads, or
other abrasive material.
• To disconnect, turn any control to OFF, remove plug from wall
outlet. Always hold the plug and never pull the cord.
Page 14

14 // English
• Scalding may occur if the cover is removed during the brewing
cycles. Be careful not to get burned by the steam.
• Some parts of appliance are hot when operated so do not
touch with hand. Use handles or knobs only.
• Never leave the empty carafe on the keeping warm plate
otherwise the carafe is liable to crack.
• Never use the appliance if the carafe shows any signs of
cracks or carafe having a loose or weakened handle. Only
use the carafe with this appliance. Use carefully as the
carafe is very fragile.
• Do not set a hot container on a hot or cold surface.
• Do not let the coffee maker operate without water.
• This appliance can be used by children aged from 8 year
and above if they have been given supervision or instruction
concerning use of the appliance in a safe way and if they
understand the hazards involved. Cleaning and user
maintenance shall not be made by children unless they are
older than 8 and supervised. Keep the appliance and its cord
out of reach of children aged less than 8 years. Appliances can
be used by persons with reduced physical, sensory or mental
capabilities or lack of experience and knowledge if they have
been given supervision or instruction concerning use of the
appliance in a safe way and understand the hazards involved.
Children shall not play with appliance.
• Close supervision is necessary when any appliance is used by
or near children, or incapacitated individuals.
• Do not use outdoors.
• Do not use appliance for other than intended use.
• This appliance is intended for household use only.
Page 15

English // 15
KNOW YOUR COFFEE MAKER
1. Top Cover
2. Sprayer
3. Washable Filter
4. Funnel
5. Water Tank
6. Keeping Warm Plate
7. Control Panel
8. Carafe Lid
9. Carafe
BEFORE FIRST USE
Check that all accessories are complete and the unit is not
damaged. Add water into water tank to the max level and brew
water for several times without coffee powder, then discard the
water. Clean all detachable parts thoroughly with warm water.
1
2
3
4
5
6
8
9
7
7
Page 16

16 // English
USING YOUR COFFEE MAKER
1. Open the top lid and ll the water tank with drinking water.
The water level should not exceed MAX level marked inside
the tank.
2. Place the funnel into the funnel support and make sure the
funnel is assembled correctly. Then put the lter correctly.
3. Add coffee powder into the lter. Usually a cup of coffee need
a level spoon of coffee powder, but you may adjust according
to personal taste. Then close the top lid.
4. Place the carafe on the keeping warm plate.
5. Plug the power cord into the outlet. The LCD will display
“12:00” and the colon will ash.
6. Press ON/OFF button, the RUN indicator will be illuminated
red. The appliance will begin working.
7. The brewing process can be interrupted by pressing the
ON/OFF button twice at any time during operation, and the
brew indicator will be extinguished. And the RUN letter on
the LCD will disappear. Note: You can take out the carafe,
pour and serve at any time. The appliance will stop dripping
automatically. But the time cannot exceed 30 seconds.
8. If you want to serve the coffee immediately, you shall remove
out the carafe to serve when nish brewing. Note: The coffee
you get is less than the water you have added, as some water
is absorbed by coffee ground.
9. When the process is nished, if you do not want to serve
immediately, do not unplug the power, and keep the switch
on, the coffee can be kept warm in the keeping warm plate,
suggest the time of keeping warm is not more than 1 hour.
For an optimum coffee taste, serve it just after brewing.
10. Always turn the coffee maker off and unplug the power cord
from the electrical outlet when the coffee maker is not in use.
Page 17

English // 17
AUTOMATIC START FUNCTION
If you do not want the coffee maker to start operation immediately,
for example now it is 5:10 P.M., you hope that the coffee maker
will automatically start at 8:15 in the evening, rst follow steps 1 to
5 of above section, then you can set the automatic start function
as follows:
1. Press PROG button one time, the word CLOCK is showed at
the upper right corner on the display.
2. Press the HOUR and MIN button continuously to set the
present time (real clock), that is 17:10 (see g. 1).
Note: The time cycle is 24 hours.
3. Press the PROG button once again and the word TIMER
shows on the upper left corner of the display.
4. Set the delayed starting time by pressing HOUR and MIN
button repetitively, that is 20:15 (see g. 2).
5. Press the ON/OFF button twice, the indicator of AUTO is
illuminated. After about 10 seconds, the LCD will display
the current clock. You may see the automatic start time by
pressing PROG.
Note: You may cancel the automatic start function by pressing
ON/OFF. If you want to change the automatic start time, only
follow the above 1-4 steps again. When the time is due the
indicator of AUTO will go out, while the indicator of RUN turn
on and unit starts brewing.
CLOCK
Fig. 1
17:10
TIMER
Fig. 2
20:15
Page 18

18 // English
MEMORY
If the power supply has been broken off or unplug the power cord
unintentionally during operation, the appliance will be continued
previous operation automatically from the point when the
disconnection occurred provided that the pause does not exceed
15 seconds, even without pressing any button. In the event the
pause time exceeds 15 seconds, the display shows the default
setting, the appliance must be re-started.
CLEANING AND MAINTENANCE
CAUTION: Be sure to unplug this appliance before cleaning. To
protect against electrical shock, do not immerse cord, plug or unit
in water or liquid. After each use, always make sure the plug is
rst removed from wall outlet.
1. Clean all detachable parts after each use in hot, studsy water.
2. Wipe the product’s exterior surface with a soft, damp cloth to
remove stains.
3. Water droplets may buildup in the area above the funnel and
drip onto the product base during brewing. To control the
dripping, wipe off the area with a clean, dry cloth after each
use of the product.
4. Use a damp cloth to gently wipe the keeping warm plate.
Never use abrasive cleaner to clean it.
5. Replace all parts and keep for next use. The lter is washable.
Page 19

English // 19
REMOVING MINERAL DEPOSITS
To keep your coffee maker operating efciently, you should clean
away the mineral deposits left by the water regularly according
to the water quality in your area and the frequency use the
appliance, the details are as follows:
1. Fill the water tank with water and descaler to the MAX level in
the gauge of coffee maker (the scale of water and descaler is
4:1, the detail refers to the instruction of descaler). Please use
“household descaler”, you can use the citric acid instead of the
descaler (the one hundred parts of water and three parts of
citric acid).
2. Place the carafe on the keeping warm plate; pay attention to
let centerline of carafe aligns with that of brew basket.
3. Press the ON/OFF button once and the RUN indicator
will be illuminated in red. After a while, water will drop out
automatically.
4. After percolate the equivalent of one cup and then switch off
the appliance by pressing the ON/OFF button again. The RUN
indicator will be extinguished.
5. Leave the solution work for 15 minutes, repeat the steps of
3-5 again.
6. Turn the appliance on by pressing the ON/OFF button once
and run off the water until the water tank is completely empty.
7. Rinse by operating the appliance with water at least 3 times.
Page 20

20 // English
HINTS FOR GREAT TASTING COFFEE
1. A clean coffee maker is essential for making great-tasting
coffee. Regularly clean the coffee maker as specied in the
“Cleaning and Maintenance” section. Always use fresh, cold
water in the coffee maker.
2. Store unused coffee powder in a cool, dry place. After opening
a package of coffee powder, reseal it tightly and store it in a
refrigerator to maintain its freshness.
3. For an optimum coffee taste, buy whole coffee beans and
nely grind them just before brewing.
4. Do not reuse coffee powder since this will greatly reduce the
coffee avor. Reheating coffee is not recommended as coffee
is at its peak avor immediately after brewing.
5. Clean the coffee maker when over-extraction causes oiliness.
Small oil droplets on the surface of brewed, black coffee are
due to the extraction of oil from the coffee powder.
6. Oiliness may occur more frequently if heavily roasted coffees
are used.
TECHNICAL SPECIFICATIONS
Rated Voltage/Frequency 220-240V, 50/60Hz
Power Effect 900W
Energy Consumption in Standby Mode < 0.5W
Energy Consumption in Active Mode 900 ± 10% W (max)
Water Tank Capacity 1.5 L (12 cups GS)
Brewing Time for Maximum Cups < = 12 min
Filter Size (Disposable Filter) 1x4
Page 21

English // 21
ENVIRONMENT
Waste of Electrical and Electronic Equipment (WEEE)
- WEEE Directive 2012/19/EU
This symbol on the product or in the instructions
means that the electrical and electronic equipment
must be disposed of separately from other household
waste when it does not work anymore. The EU has
separate waste collection systems, contact your local
dealer or authority for more information.
LAW AND SAFETY
This product has been manufactured according to
current regulations for electromagnetic elds (EMF),
which means that it is safe to use if used according to
safety instructions.
The product is manufactured according to current
regulations within the EU legislation, limiting the use
of hazardous substances in electrical and electronic
equipment (RoHS Directive 2011/65/EU).
RESERVATIONS
We reserve the right to correct any typographical
errors, and reserve the right to make ongoing
changes and improvements to the product and related
materials.
Page 22

Page 23

Page 24

Imported by Netlogic AB
www.netlogic.se
 Loading...