

Page 1

Central Brass
C O M P A N Y
A Division of Pioneer Industries, Inc.
Installation Guide
Two Handle Cast Brass Kitchen Faucet:
0120 Series • 100122 Series • 280122 Series•
0121 Series • 100123 Series • 280123 Series•
0122 Series • 180122 Series • 80122 Series•
0123 Series • 180123 Series • 80123 Series•
0125 Series • 200122 Series•
0126 Series • 200123 Series•
0127 Series•
0128 Series•
This product meets the following standards:
ASME A112.18.1 •
ANSI A117.1 •
CUPC / IAPMO LISTED / ADA COMPLIANT•
CONTAINS NO MORE THAN 0.25% WEIGHTED AVERAGE •
LEAD CONTENT
Central Brass Company © 2011
REV-11 10, 11
Page 2

Thank You For Choosing Central Brass Products
Thank you for purchasing this quality product.
Central Brass products are rigorously tested to provide long service under
normal conditions. Prior to installation, familiarize yourself with this products
diagram.
Make sure that you have all of the illustrated parts for your Central Brass
product before installation.
Care Instructions
Central Brass products are designed and engineered under strict quality
standards. The Central Brass Collection of PVD nishes feature a strong
and durable surface that will keep your xture looking exquisite for a
lifetime.
To ensure the beautiful appearance of your Central Brass product, please
adhere to the following simple care instructions:
Use clean water to clean the surface of the faucet and dry with a 100% •
cotton cloth.
You may also use any non-abrasive wax, along with a soft cotton cloth •
to brighten the surface and provide future protection of the nish.
Do not use detergents, harsh cleaners, abrasive cleaners, cloths, and •
cleaning agents.
2
REV-11 10, 11
Page 3

CENTRAL BRASS LIMITED WARRANTY
The Central Brass Company provides to the original consumer the following
warranties for Genuine Central Brass manufactured products and components
used in commercial or residential applications.
Central Brass Company will replace, free of charge, to the original consumer
purchaser, any and all parts that prove defective under normal installation, use,
and service. This warranty does not cover damage or defects due to normal
wear and tear, misuse, abuse, accident, or improper installation. Replacement
parts can be obtained from your local dealer or directly from Central Brass
Company. Central Brass Company recommends using a certied plumber for
all faucet installation and repair. Dated proof of purchase must accompany all
warranty claims.
FAUCET WARRANTY
The Faucet, dened as any metal cast, forged, stamped or formed portion of the
product, not including moving parts or other components covered under other
Central Brass warranties, is warranted against manufacturing defects for the life
of the product.
CARTRIDGE WARRANTY
Genuine Central Brass cartridges incorporated in Central Brass products are
warranted against manufacturing defects for a period of ve (5) years from the
date of purchase.
SENSOR FAUCETS
The mechanics of the Central Brass Sensor Faucets are warranted for ve (5)
years from the date of installation. The electronics and solenoid are warranted
for a period of one (1) year from the date of installation.
FINISH WARRANTY - COMMERCIAL
PVD nishes installed in public or commercial areas are warranted not to
corrode, tarnish or discolor for a period of ve (5) years from date of purchase.
FINISH WARRANTY – RESIDENTIAL
PVD nishes installed in residential use applications are warranted not to
corrode, tarnish or discolor for the life of the product.
3
REV-11 10, 11
Page 4
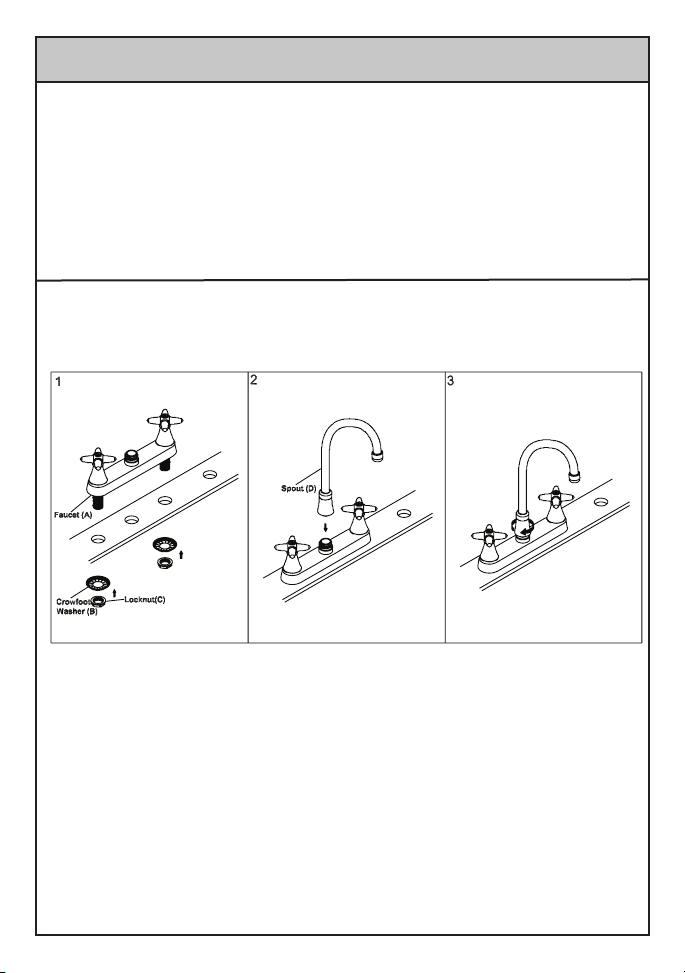
Faucet Installation
If the handles are not installed on the body, Install the handle to the 1.
faucet body (A). Apply plumbers putty under neath of the faucet (A).
Place the faucet through the mounint surface. Slide the crowfoot
washer (B) through shank from underneath of the mounting surface.
Tighten the locknut (C) with the help of 1-3/32” socket set.
Install spout (D) to the faucet body (A). If you are installing rigid spout 2.
then use adjustable wrench to install the spout (D).
Ensure the handle moves in correct direction.3.
4
REV-11 10, 11
Page 5
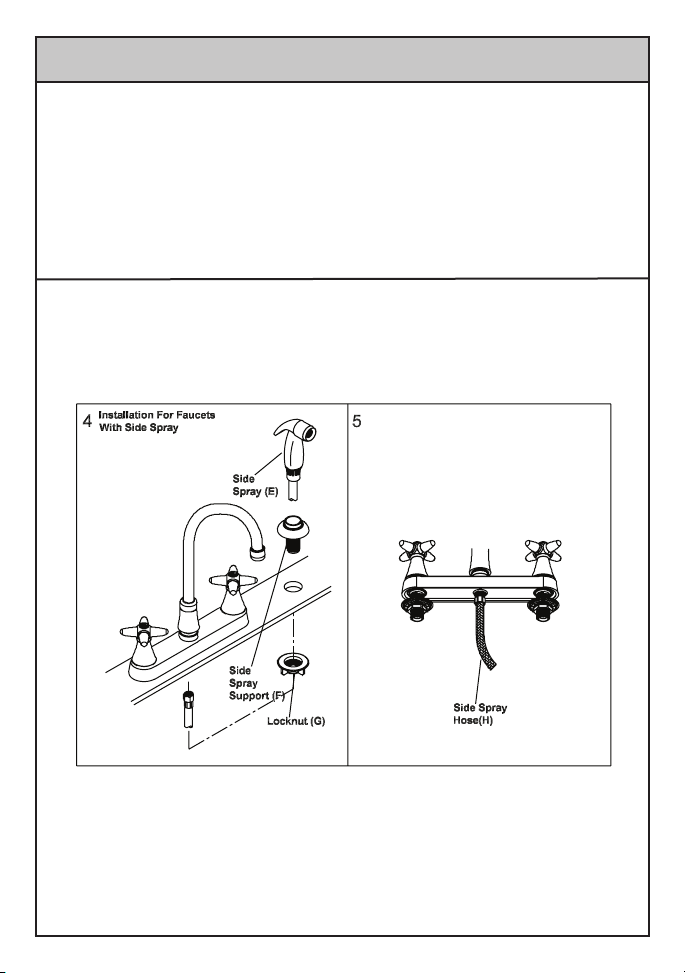
Faucet Installation
For the Faucets with Side Spray
4. Apply plumbers putty underneath of the side spray support (F). Tighten
the locknut (G) from underneath of the mounting surface. Do not
overtighten.
5. Slide the side spray hose (H) through side spray support (F). Place
teon tape at threaded connections. Connect side spray hose to the
faucet body from underneath of the mounting surface. Use adjustable
wrench to tighten the side spray hose nut.
5
REV-11 10, 11
Page 6
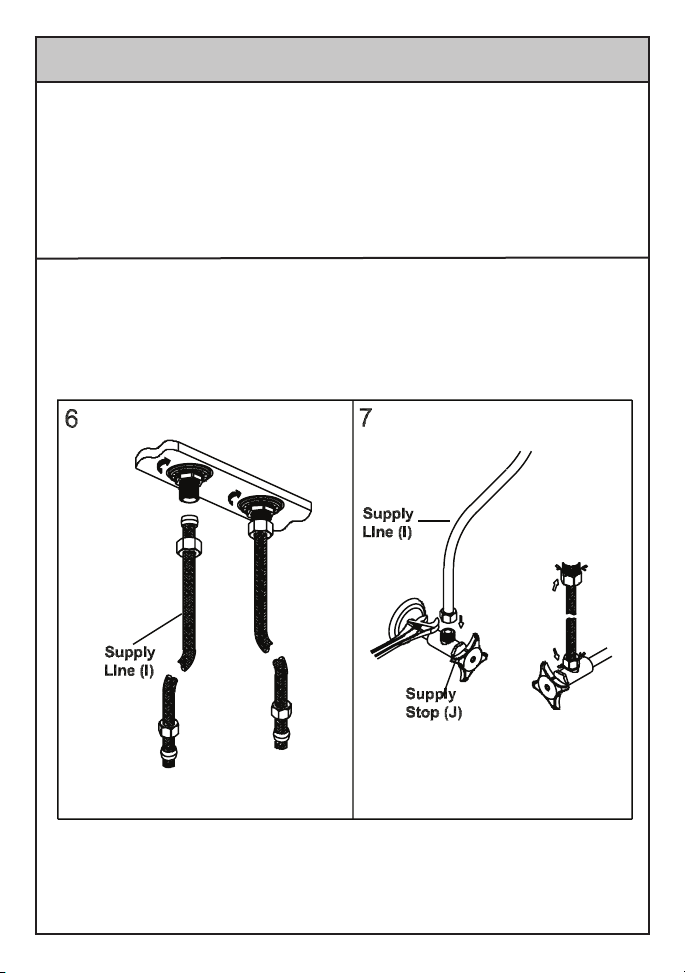
Faucet Installation
6. Connect the faucet shank to inlet supply lines (I).
7. Connect the supply stops (J) to the inlet supply lines (I) (left is hot water
supply and right is cold water supply). Make sure inlet supply lines (I)
are securely tighten. Do not overtighten. Turn on water. Check for any
leaks. Make sure all the connections are secure.
6
REV-11 10, 11
Page 7
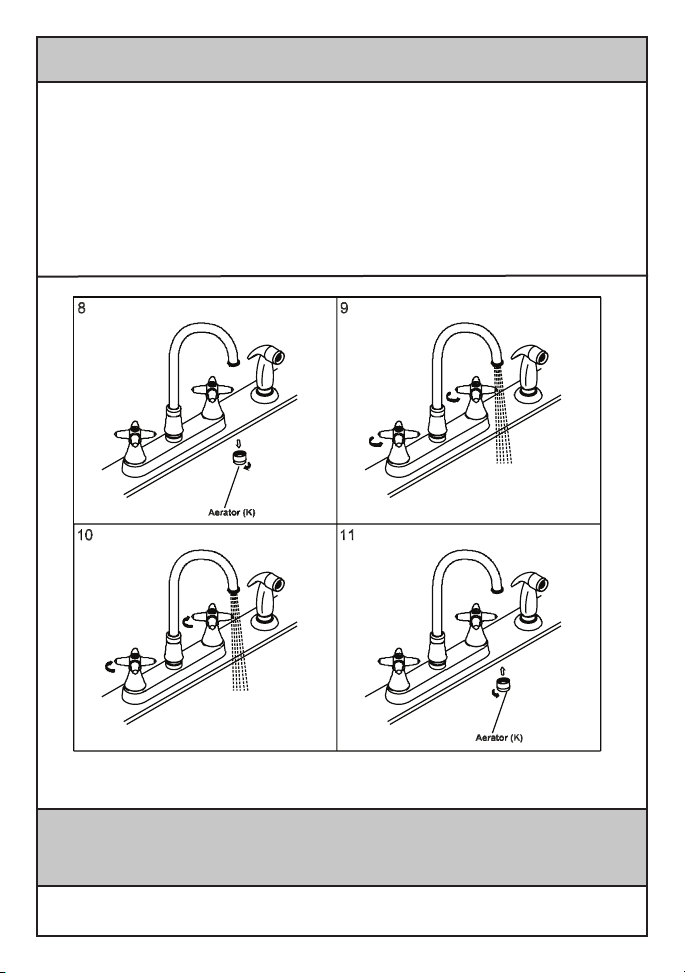
Faucet Installation
8. Remove aerator (K).
9. Open the handles.Flush and allow water to run at full ow for at
least one minute. For Faucets with Side Spray:- Turn on side spray
to ensure the water diverts completely from spout to side spray.
10. Close the handles.
11. Replace aerator (K).
For more care information or trouble shooting inquiries about your
Central Brass product, please see the contact information on the back page.
7
REV-11 10, 11
Page 8

Central Brass
C O M P A N Y
A Division of Pioneer Industries, Inc.
Telephone: (800) 321-8630 | (216) 883-0220 | Fax: (800) 338-9414
6892 Snowville Road | Brecksville, Ohio 44141
Hours: M - F, 7:30am to 5:00pm EST
www.centralbrass.com
8
REV-11 10, 11
 Loading...