

Page 1

Pyxis SupplyStation® System v9.x
®
Pyxis
JITrBUD Enhanced System
Installation Guide
October 2009
Part Number: 128700-01
Company Confidential—
Do Not Reproduce
Page 2

October 2009
l
Pyxis SupplyStation
System v9.x Pyxis®
JITrBUD Enhanced System
Installation Guide
Part Number: 128700-01
Pyxis, MedStation,
ParAssist,
ProcedureStation,
ScanAssist and
StockStation are trademarks
or registered trademarks of
CareFusion Corporation or
one of its subsidiaries.
All other trademarks are the
property of their respective
owners.
CareFusion
San Diego, CA
1.800.367.9947
carefusion.com
®
Pyxis SupplyStation® System v9.x Pyxis® JITrBUD
Enhanced System Installation Guide
Changes in equipment, software, or procedures occur periodically; information
describing these changes will be included in future editions of the guide.
The information in this document is subject to change and does not represent a
commitment on the part of CareFusion to provide additional services or
enhancements.
COMPANY CONFIDENTIAL—Duplication or reproduction of this material is
strictly prohibited without written consent from CareFusion. This document is
intended for use by CareFusion personnel only.
Information to User
Caution: Any changes or modifications not expressly approved by the party
responsible for compliance could void the user’s authority to operate the
equipment.
FCC
This device complies with Part 15 of the FCC Rules. Operation is subject to the
following two conditions: (1) this device may not cause harmful interference,
and (2) this device must accept any interference received, including
interference that may cause undesired operation.
© 2009
CareFusion Corporation or
one of its subsidiaries
All rights reserved.
Canadian Notice (Avis Canadien)
This Class A digital apparatus complies with Canadian ICES-003.
Cet appareil numérique de la classe A est conforme à la norme NMB-003 du
Canada.
Page 3

Contents
7
Contents
About This Guide................................................................... v
Chapter 1—Overview ............................................................ 7
Introduction ............................................................................................................ 8
Parts List................................................................................................................. 9
Additional Parts ............................................................................................ 11
Quick Start Checklist............................................................................................ 12
Chapter 2—Installing the JITrBUD Enhanced Hardware . 13
Preparing for the Installation................................................................................ 14
Tools Needed................................................................................................ 14
Obtaining Equipment Keys ..........................................................................14
Unpacking the Hardware Kit........................................................................ 14
Shutting Down the SupplyStation ................................................................ 14
Performing the Installation................................................................................... 15
Installing the JITrBUD Enhanced Hardware on a SupplyStation ................ 15
Setting the Frequency ................................................................................... 16
4
4
5
Chapter 3—Installing JITrBUD Enhanced Transceivers.. 17
Preparing the JITrBUD Enhanced Transceivers .................................................. 18
Identifying JITrBUD Enhanced Transceivers.............................................. 18
Configuring and Associating JITrBUD Enhanced Transceivers.................. 18
Mounting Options................................................................................................. 21
Adjusting the Size of the JITrBUD Mounting Bracket ................................ 21
Full-size Mounting Bracket ...............................................................21
Shorter Mounting Bracket.................................................................. 22
Removing the JITrBUD Enhanced Transceiver From the Mounting Bracket .
23
Attaching or Installing JITrBUD Enhanced Transceivers ................................... 25
Installing a JITrBUD Enhanced Transceiver on a Large Bin....................... 25
Installing a JITrBUD Enhanced Transceiver on a Small Bin....................... 27
Installing a JITrBUD Enhanced Transceiver on a Wire Rack ..................... 28
Installing a JITrBUD Enhanced Transceiver on a Shelf .............................. 32
Attaching a JITrBUD Enhanced Transceiver to a Wall ............................... 34
Uninstalling JITrBUD Enhanced Transceivers.................................................... 37
Upgrading to SupplyStation 9.x ........................................................................... 38
Chapter 4—Troubleshooting .............................................. 41
Troubleshooting Tips ...........................................................................................42
Changing the Battery............................................................................................ 43
8
8
1
Pyxis SupplyStation® System v9.x Pyxis® JITrBUD Enhanced System Installation Guide iii
Page 4

Contents
a
a
t
f
r
l
in
iv Company Confidential—Do Not Reproduce
Page 5

About This Guide
This guide provides hardware installation instructions for installing a Pyxis
JITrBUD enhanced system on a Pyxis SupplyStation® v9.x system.
This document and associated software are intended for use by CareFusion
personnel only.
For additional information or assistance, call the Technical Support Center (TSC)
at 1.800.625.6535 (from the United States, Canada, and Puerto Rico).
®
Pyxis SupplyStation® System v9.x Pyxis® JITrBUD Enhanced System Installation Guide v
Page 6

Chapter 2—About This Guide
a
t
Defined Terms
The following table identifies the defined terms used throughout this document
for certain products and product features.
Product/Feature Defined Term
Pyxis® JITrBUD device enhanced base transceiver
®
JITrBUD device enhanced transceiver
Pyxis
®
JITrBUD enhanced wireless open-access
Pyxis
inventory management system
®
JITrBUD Main PC
Pyxis
®
ScanAssist™ system
Pyxis
®
Pyxis SupplyStation
system
JITrBUD enhanced base
JITrBUD enhanced transceiver
JITrBUD system
JITrBUD Main
ScanAssist
SupplyStation
Conventions
This document uses the following conventions:
Text
• The names of document titles and cross references are formatted in italics.
• The names of buttons, menu commands, and icons are formatted in
• The names of keys on the keyboard or JITrBUD enhanced transceiver are
formatted in
SMALL CAPS.
Icons
bold.
f
r
This document uses the following symbols:
Notes contain supplementary information or emphasize a point or procedure.
Caution indicates a potentially hazardous situation which, if not avoided,
could result in minor or moderate injury. Caution is also used to alert
against unsafe practices that could result in unpredictable results or data
loss.
vi Company Confidential—Do Not Reproduce
Page 7

Chapter 1
Overview
This chapter provides an overview of the JITrBUD enhanced system and contains
the following sections:
Introduction............................................................................................... 8
Parts List ................................................................................................... 9
Quick Start Checklist............................................................................... 12
s
Pyxis SupplyStation® System v9.x JITrBUD Enhanced System Installation Guide 7
Page 8

Chapter 1—Overview
Introduction
This document provides instructions for installing the JITrBUD enhanced system
hardware on a SupplyStation v9.x.
Features of the JITrBUD enhanced system include the following:
• The ability to attach the JITrBUD enhanced transceiver to a number of
surfaces, such as:
Large and small bins
•
Wire racks
•
Smooth surfaces, such as walls or shelves
•
• Replaceable battery
• A tricolored LED provides feedback:
Green—indicates acknowledgement for Take and Return actions. Also
•
indicates that the JITrBUD enhanced transceiver has been associated with
a JITrBUD enhanced base. See Configuring and Associating JITrBUD
Enhanced Transceivers on page 18.
Amber—indicates that a JITrBUD enhanced transceiver is no longer
•
associated with a base transceiver.
Red—indicates that the battery is low. See Changing the Battery on
•
page 43 for instructions on replacing the CR2335 lithium battery.
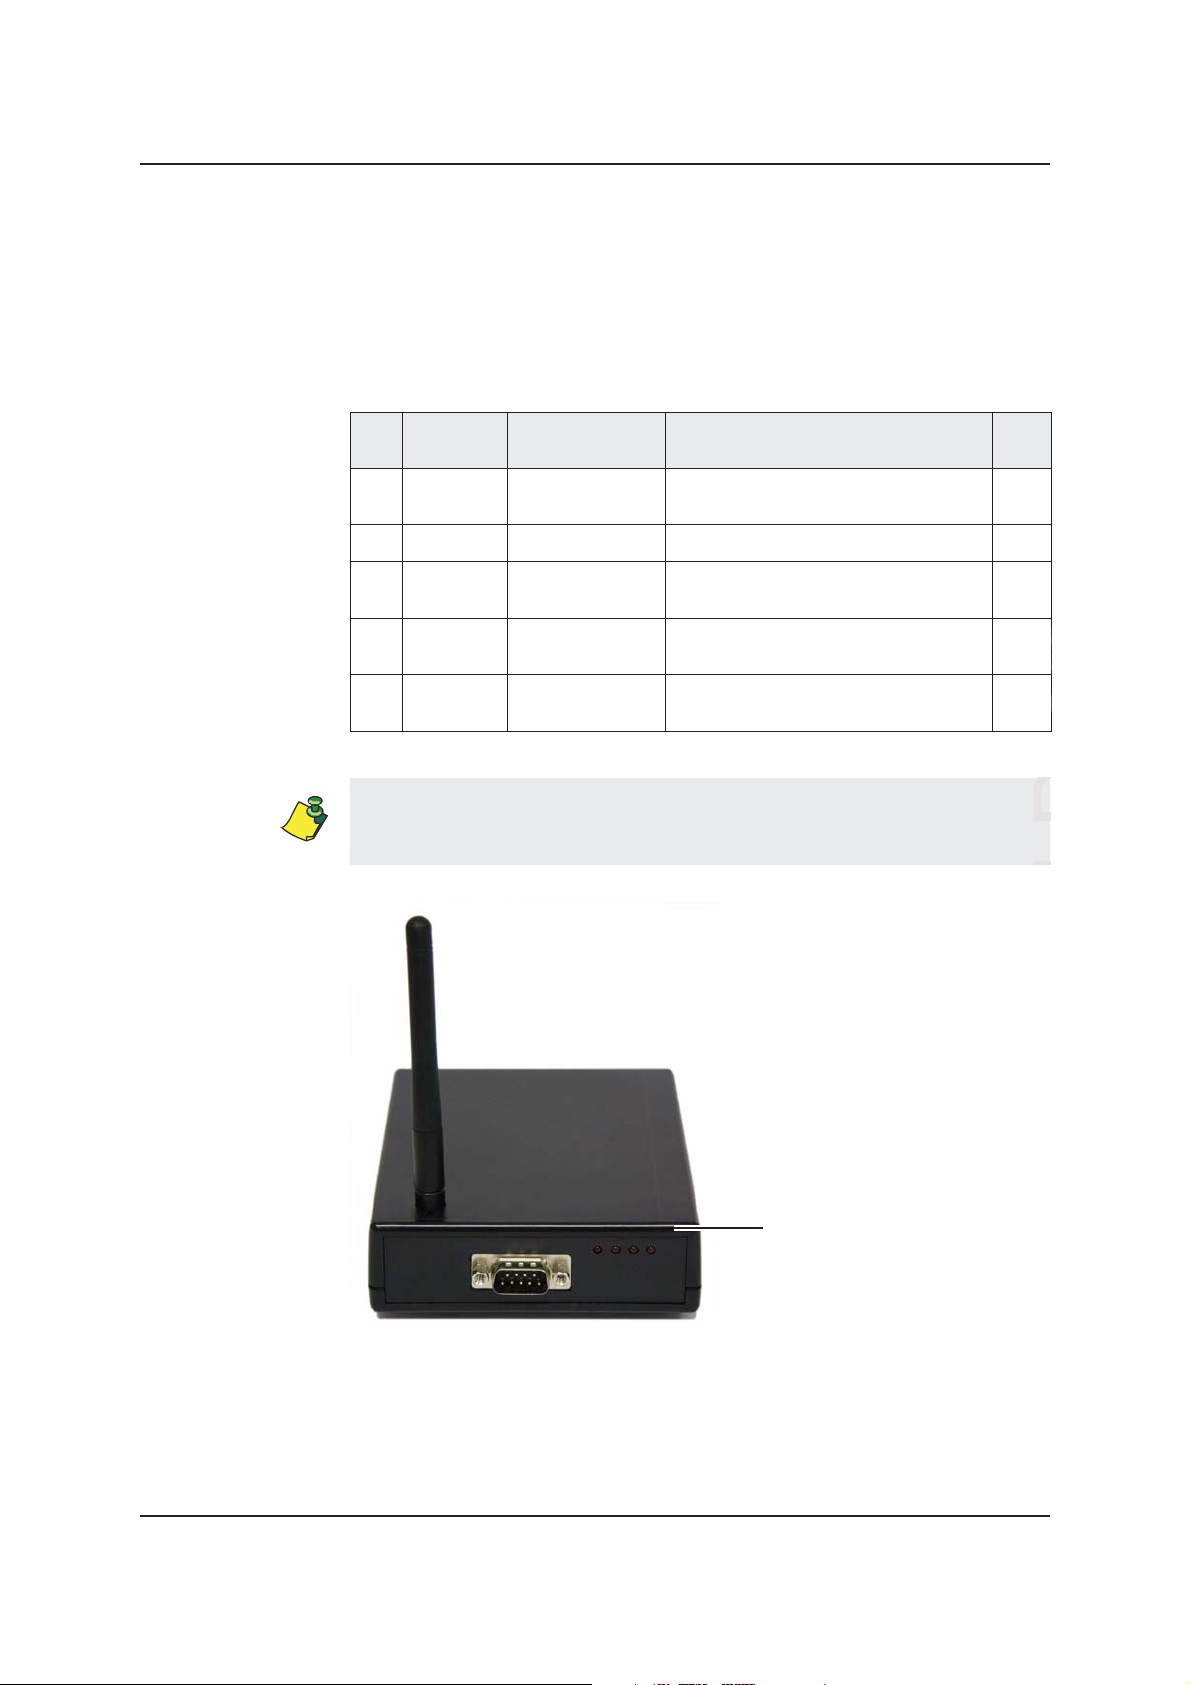
• Fewer parts—only one JITrBUD enhanced base for communication between
the JITrBUD enhanced transceivers and translator.
This guide describes JITrBUD enhanced transceivers, as shown in the following
photograph:
Note the following visual differences between the JITrBUD enhanced transceiver
and the previous version:
• The JITrBUD enhanced transceiver has an LED between the Take and Return
buttons
• The edges of the JITrBUD enhanced transceiver are more rounded.
• The JITrBUD enhanced transceiver is slightly smaller: 2.60 in. (66.15mm) x
1.66 in. (42.15mm) x 0.51 in. (12.5mm).
8 Company Confidential—Do Not Reproduce
Page 9
Parts List
Parts List
The following section provides parts lists for the various components of the
JITrBUD system upgrade.
Table 1: Upgrade Parts List
128716-01 KIT,ROHS,UPGRADE,JITRBUD II
Part
Item
Number Common Name Description Qty
A 120549-01 12-foot PyxiBus
cable
B 121063-01 6-foot DB-9 cable ASSY,ROHS,CABLE,DB9,6FT,M/F 1
C 124959-01 Translator ASSY,ROHS,TRANSLATOR,RS232 TO
D 128700-01 JITrBUD Install
Guide
E 150269-01 JITrBUD enhanced
base
The JITrBUD upgrade kit, which includes the JITrBUD enhanced base, is
ordered separately from the JITrBUD enhanced transceivers. See the following
table for part numbers and descriptions for the JITrBUD enhanced transceivers.
ASSY,ROHS,CABLE,INTERFACE,PYX
IBUS,12 FT
PYXIBUS,V2.0,JB,INTL
GUIDE,ROHS,INSTALL,PYXIS,
JITRBUD
KIT,ROHS,BASE,JITRBUD II,DOM 1
1
1
1
E. JITrBUD enhanced base
Pyxis SupplyStation® System v9.x JITrBUD Enhanced System Installation Guide 9
Page 10

Chapter 1—Overview
a
a
t
Table 2: Parts List JITrBUD Enhanced Transceivers
PN 320533-01 KIT,ROHS,JITRBUD II,20 PACK,DOM
Part
Number
Item
Common Name Description Qty
F 320423-01 JITrBUD enhanced
G 150260-01 Mounting bracket BRACKET,ROHS,MOUNTING,
H 320436-01
transceiver with
battery
®
VELCRO
tape
ASSY,ROHS,XCVR,JITRBUD II,DOM 20
JITRBUD II,UNIV
VELCRO,ROHS,MOUNTING,JITRBUD II20
F. JITrBUD enhanced
transceiver with battery
G. Mounting bracket
20
f
r
l
®
H. VELCRO
10 Company Confidential—Do Not Reproduce
tape
in
Page 11
Parts List
a
t
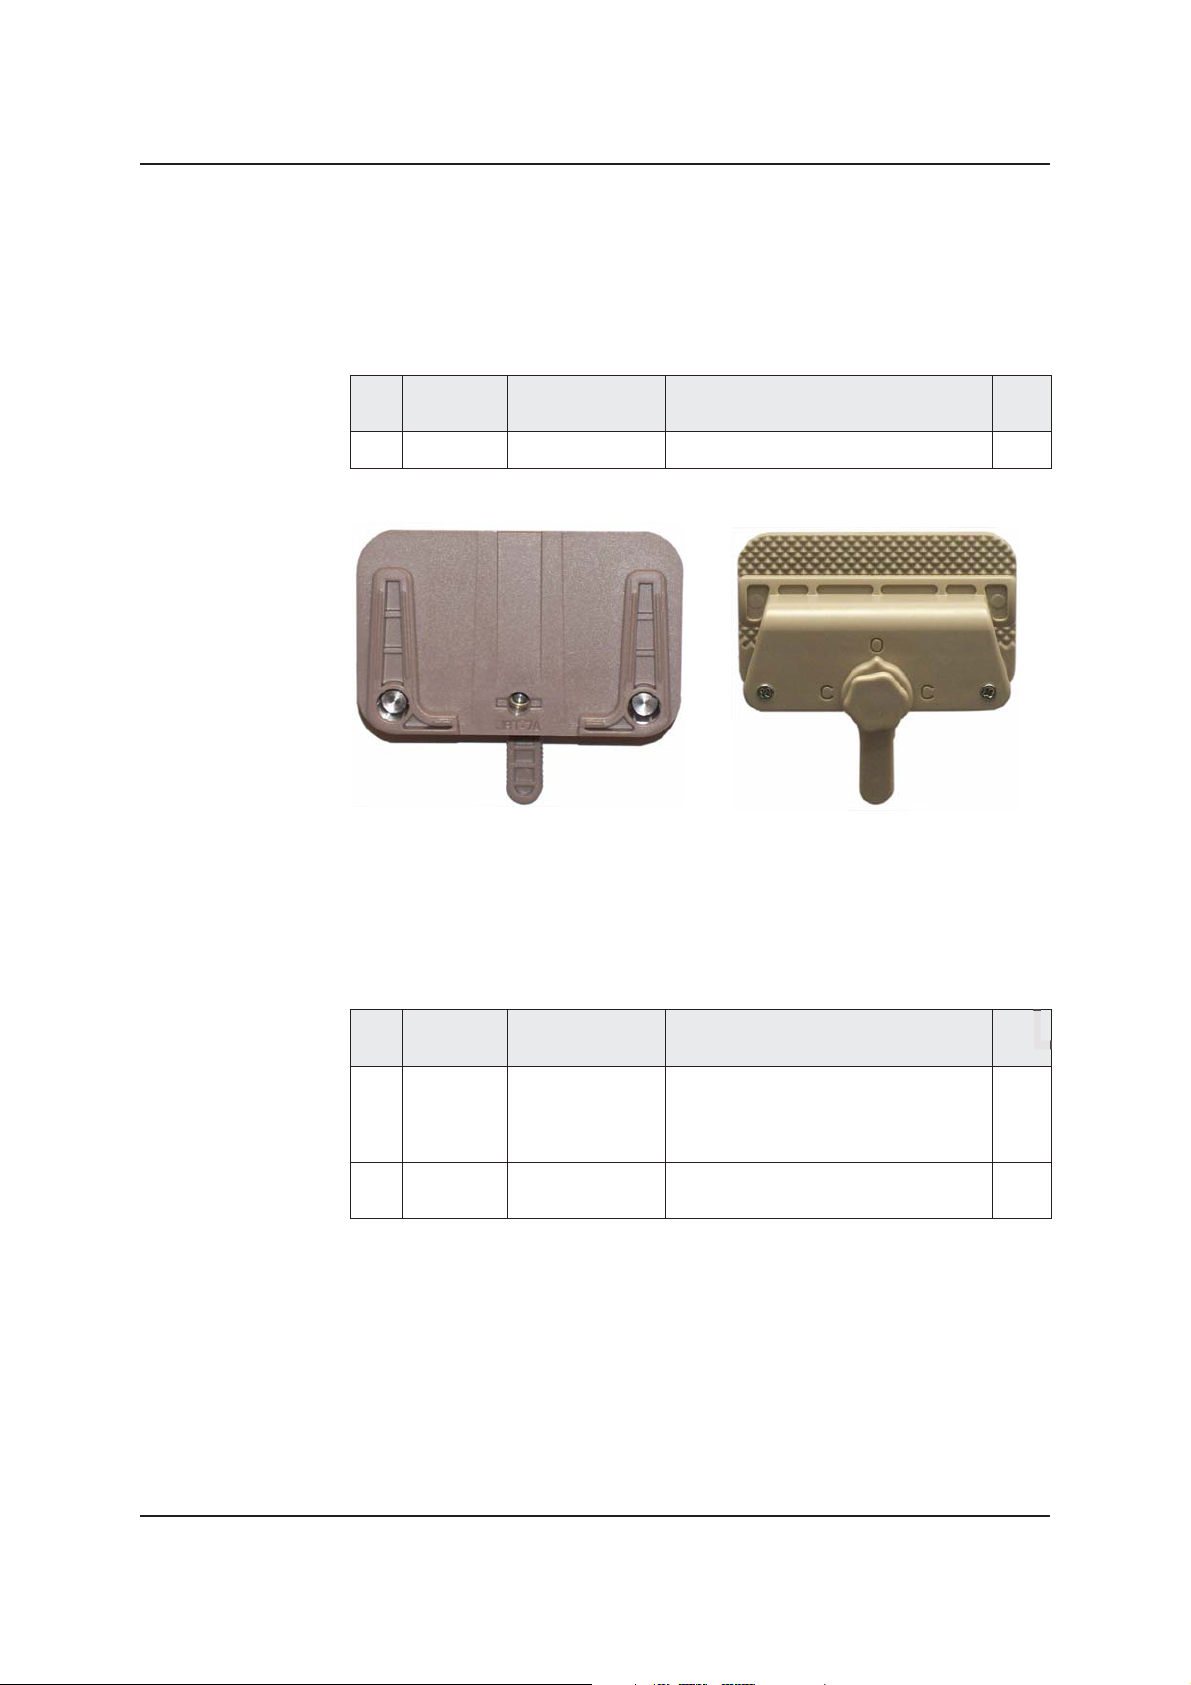
Additional Parts
A clamp can be helpful for mounting JITrBUD enhanced transceivers on wire
racks.
Table 3: Clamp Parts List
Part
Number
Item
I 320469-01 Clamp CLAMP,ROHS,JITRBUD II 1
Common Name Description Qty
f
Clamp Front
You may also order JITrBUDs enhanced transceivers and brackets individually.
Order the transceivers individually for replacement scenarios.
Table 4: Replacement Parts List
Part
Item
Number
F 150291-01 JITrBUD enhanced
G 150260-01 Mounting bracket BRACKET,ROHS,MOUNTING,
Common Name Description Qty
transceiver with
bracket and
®
Ve l cr o
tape
ASSY,ROHS,XCVR,JITRBUD II,DOM 1
JITRBUD II,UNIV
Clamp back
20
r
Pyxis SupplyStation® System v9.x JITrBUD Enhanced System Installation Guide 11
Page 12

Chapter 1—Overview
a
a
t
Quick Start Checklist
The following checklist summarizes how to prepare for and perform the
installation. Detailed instructions follow the checklist.
Prepare for the upgrade as follows:
❏
❏
Obtain an escort from the Materials department.
❏
Unpack the JITrBUD kit.
❏
Perform a proper software shutdown before turning the unit off using the
switch.
❏
Install the PyxiBus kit
❏
Connect cables to the PyxiBus kit, enhanced base, and translator
❏
Configure and associate the JITrBUD enhanced base.
❏
Attach the JITrBUD enhanced transceivers to the appropriate surfaces.
On/Off
f
r
l
in
12 Company Confidential—Do Not Reproduce
Page 13

Chapter 2
Installing the JITrBUD
Enhanced Hardware
This chapter describes the steps for installing the JITrBUD enhanced base on a
SupplyStation v9.x.
®
For information on installing a JITrBUD Main, see the Pyxis SupplyStation
System v9.x Install and Support Guide (PN 127578-05).
Tools Needed ........................................................................................... 14
Obtaining Equipment Keys ..................................................................... 14
Unpacking the Hardware Kit .................................................................. 14
Shutting Down the SupplyStation............................................................ 14
Installing the JITrBUD Enhanced Hardware on a SupplyStation .......... 15
Setting the Frequency.............................................................................. 16
Pyxis SupplyStation® System v9.x Pyxis® JITrBUD Enhanced System Installation Guide 13
Page 14

Chapter 2—Installing the JITrBUD Enhanced Hardware
Preparing for the Installation
This section provides information and instructions that you need before doing the
upgrade.
Tools Needed
The following tools are needed for the upgrade:
• Grounding strap
• Screwdriver (optional)
Obtaining Equipment Keys
CareFusion personnel must contact the hospital materials department to obtain the
keys for the equipment being serviced. The materials department maintains
control of all keys for Supply units needing service.
Unpacking the Hardware Kit
Unpack all the components and make sure you have everything by comparing the
kit items you received with the Parts List on page 9.
Shutting Down the SupplyStation
Perform the following steps to shut down the SupplyStation.
Prevent ESD damage to system components. Use a grounding strap when
working with electronics. Failure to do so may result in unpredictable
results, data loss, or hardware damage.
To shut down the SupplyStation
To avoid database corruption or damage, be sure to perform an orderly
software shutdown before turning off the main unit with the On/Off switch.
1. Shut down the software and turn off the power switch on the SupplyStation
unit.
2. After powering down the unit, unplug the AC power source.
e
14 Company Confidential—Do Not Reproduce
Page 15
Performing the Installation
Performing the Installation
The following subsections provide detailed instructions for installing the
JITrBUD enhanced hardware on the SupplyStation v9.x.
Item numbers refer to the Parts List on page 9 of this guide.
Installing the JITrBUD Enhanced Hardware on a
SupplyStation
Perform the following steps to install the JITrBUD enhanced hardware on a
SupplyStation system.
To install the JITrBUD enhanced hardware
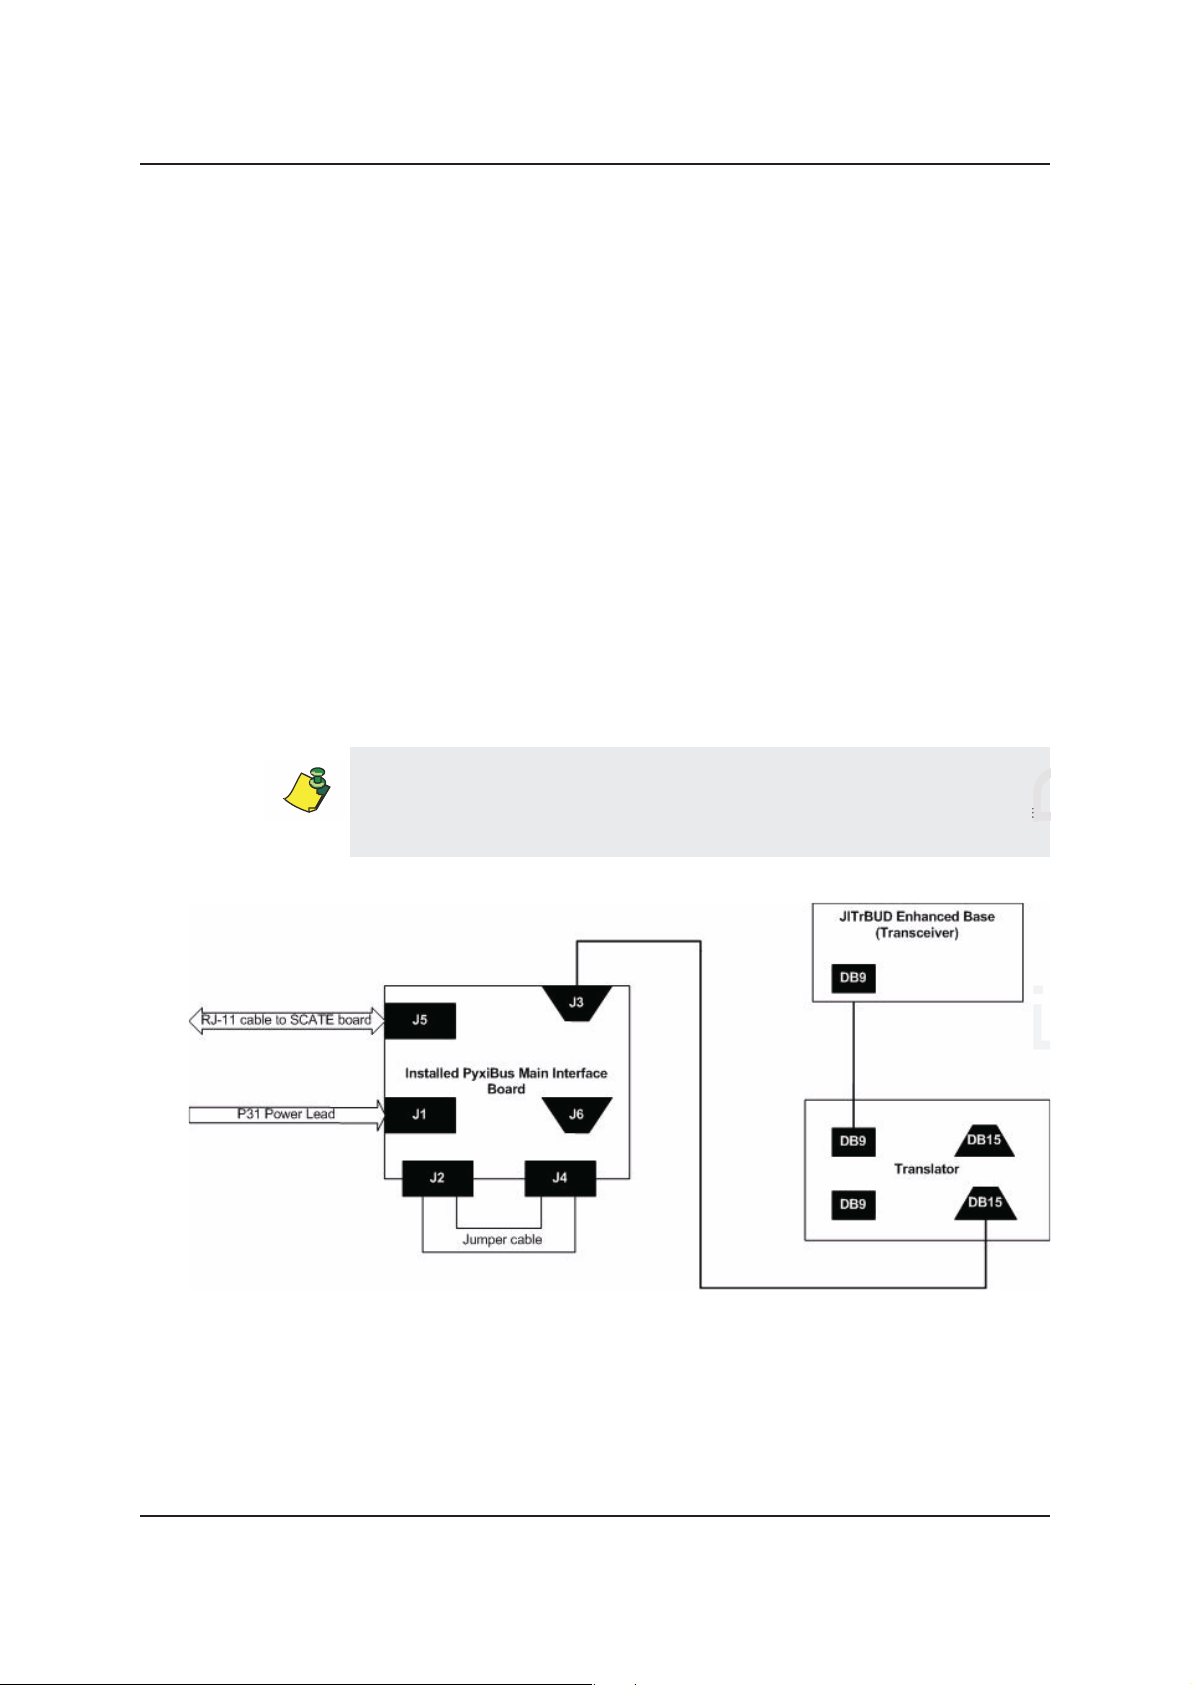
1. Connect the PyxiBus port on the PyxiBus Main Interface Board (MIB) to the
translator (item C) using the 12-ft PyxiBus cable (item A).
2. Connect the enhanced base (item E) to the translator (item C) using the 6-ft
DB-9 cable (item B).
See Figure 1 for a diagram of the MIB-to-JITrBUD peripheral hardware wiring.
Mount the enhanced base as high as possible (on the ceiling if possible).
If you are placing the enhanced base on a flat surface, such as the top of a
cabinet, remove the four rubber feet from the bottom and use double-sided tape
to secure the enhanced base to the surface.
Figure 1 Hardware Wiring Diagram for Connecting a JITrBUD Enhanced
Base to a SupplyStation
Pyxis SupplyStation® System v9.x Pyxis® JITrBUD Enhanced System Installation Guide 15
Page 16

Chapter 2—Installing the JITrBUD Enhanced Hardware
a
t
Setting the Frequency
The JITrBUD enhanced base communicates at the following four frequencies:
909.3 and 918.7 MHz, and 912.6 and 921.4 MHz. Set the switch on the base to
hop between one of the two frequency pairs:
• To the left (A position) for 909.3 and 918.7 MHz
• To the right (B position) for 912.6 and 921.4 MHz
The JITrBUD hardware installation is now complete.
For instructions on installing a JITrBUD Main, see the Pyxis SupplyStation
System v9.x Install and Support Guide (PN 127578-05)
Switch
.
®
f
r
16 Company Confidential—Do Not Reproduce
Page 17

Chapter 3
Installing JITrBUD Enhanced
Transceivers
This chapter provides information on configuring JITrBUD enhanced transceivers
(units) and installing the units on surfaces such as bins, shelves, and walls.
Identifying JITrBUD Enhanced Transceivers ......................................... 18
Configuring and Associating JITrBUD Enhanced Transceivers ............ 18
Adjusting the Size of the JITrBUD Mounting Bracket............................ 21
Installing a JITrBUD Enhanced Transceiver on a Large Bin................. 25
Installing a JITrBUD Enhanced Transceiver on a Small Bin ................. 27
Installing a JITrBUD Enhanced Transceiver on a Wire Rack ................ 28
Attaching a JITrBUD Enhanced Transceiver to a Wall .......................... 34
Uninstalling JITrBUD Enhanced Transceivers ...................................... 37
Upgrading to SupplyStation 9.x .............................................................. 38
Item numbers in this chapter refer to the Parts List on page 9 of this guide.
Pyxis SupplyStation® System v9.x JITrBUD Enhanced System Installation Guide 17
Page 18

Chapter 3—Installing JITrBUD Enhanced Transceivers
Preparing the JITrBUD Enhanced
Transceivers
Before you install or attach the JITrBUD enhanced transceivers, the units must be
configured and associated with a JITrBUD enhanced base.
Identifying JITrBUD Enhanced Transceivers
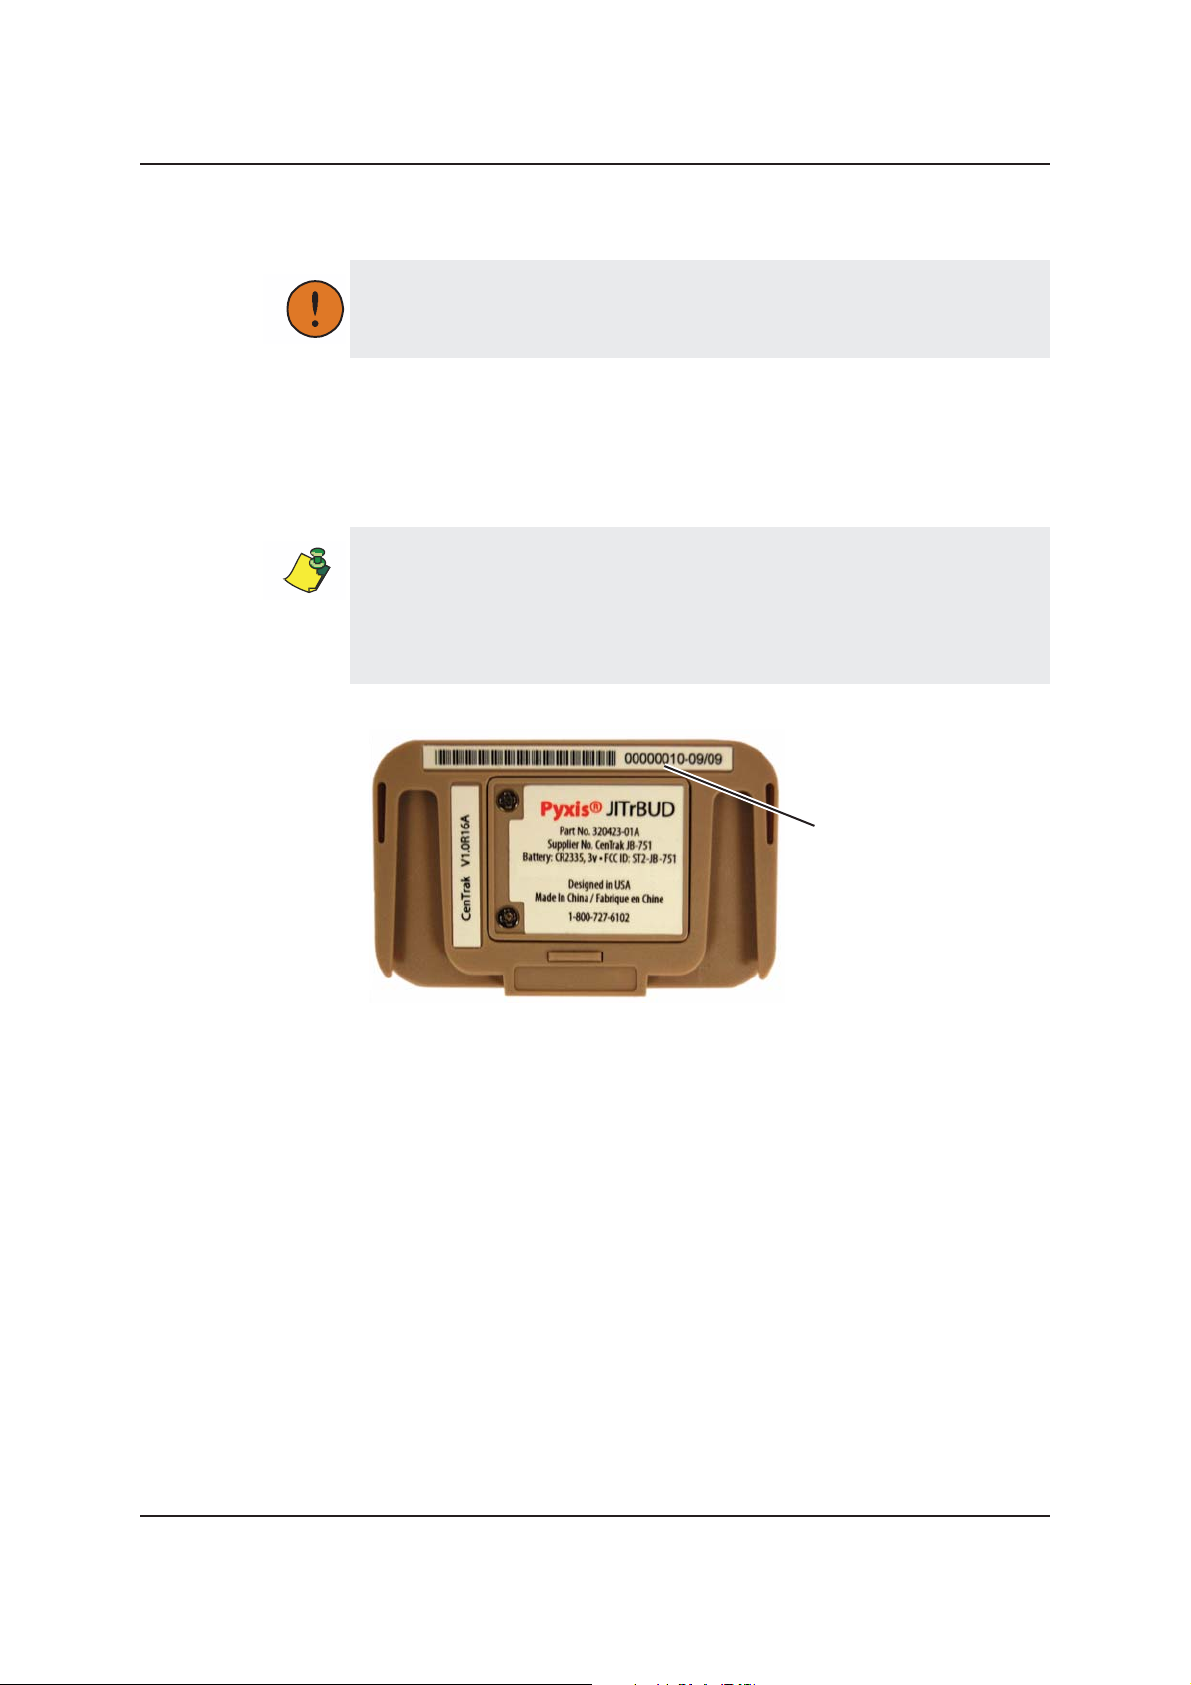
It is strongly recommended that you label the location of the JITrBUD enhanced
transceiver on the front of the unit.
This identifying information helps ensure that a JITrBUD enhanced transceiver is
returned to the proper location if it is removed from the mounting bracket or
clamp, such as when the battery is changed.
Indicate location here.
Configuring and Associating JITrBUD Enhanced
Transceivers
JITrBUD enhanced transceivers must be configured before the system can be
used. This procedure can only be done at the station. You must configure and
associate the transceivers at either a JITrBUD main or at the SupplyStation.
When you configure a JITrBUD enhanced transceiver, you are also associating it
with a JITrBUD enhanced base.
To configure and associate JITrBUD enhanced transceivers to a
JITrBUD main
1. Log in as the Pyxis technical user.
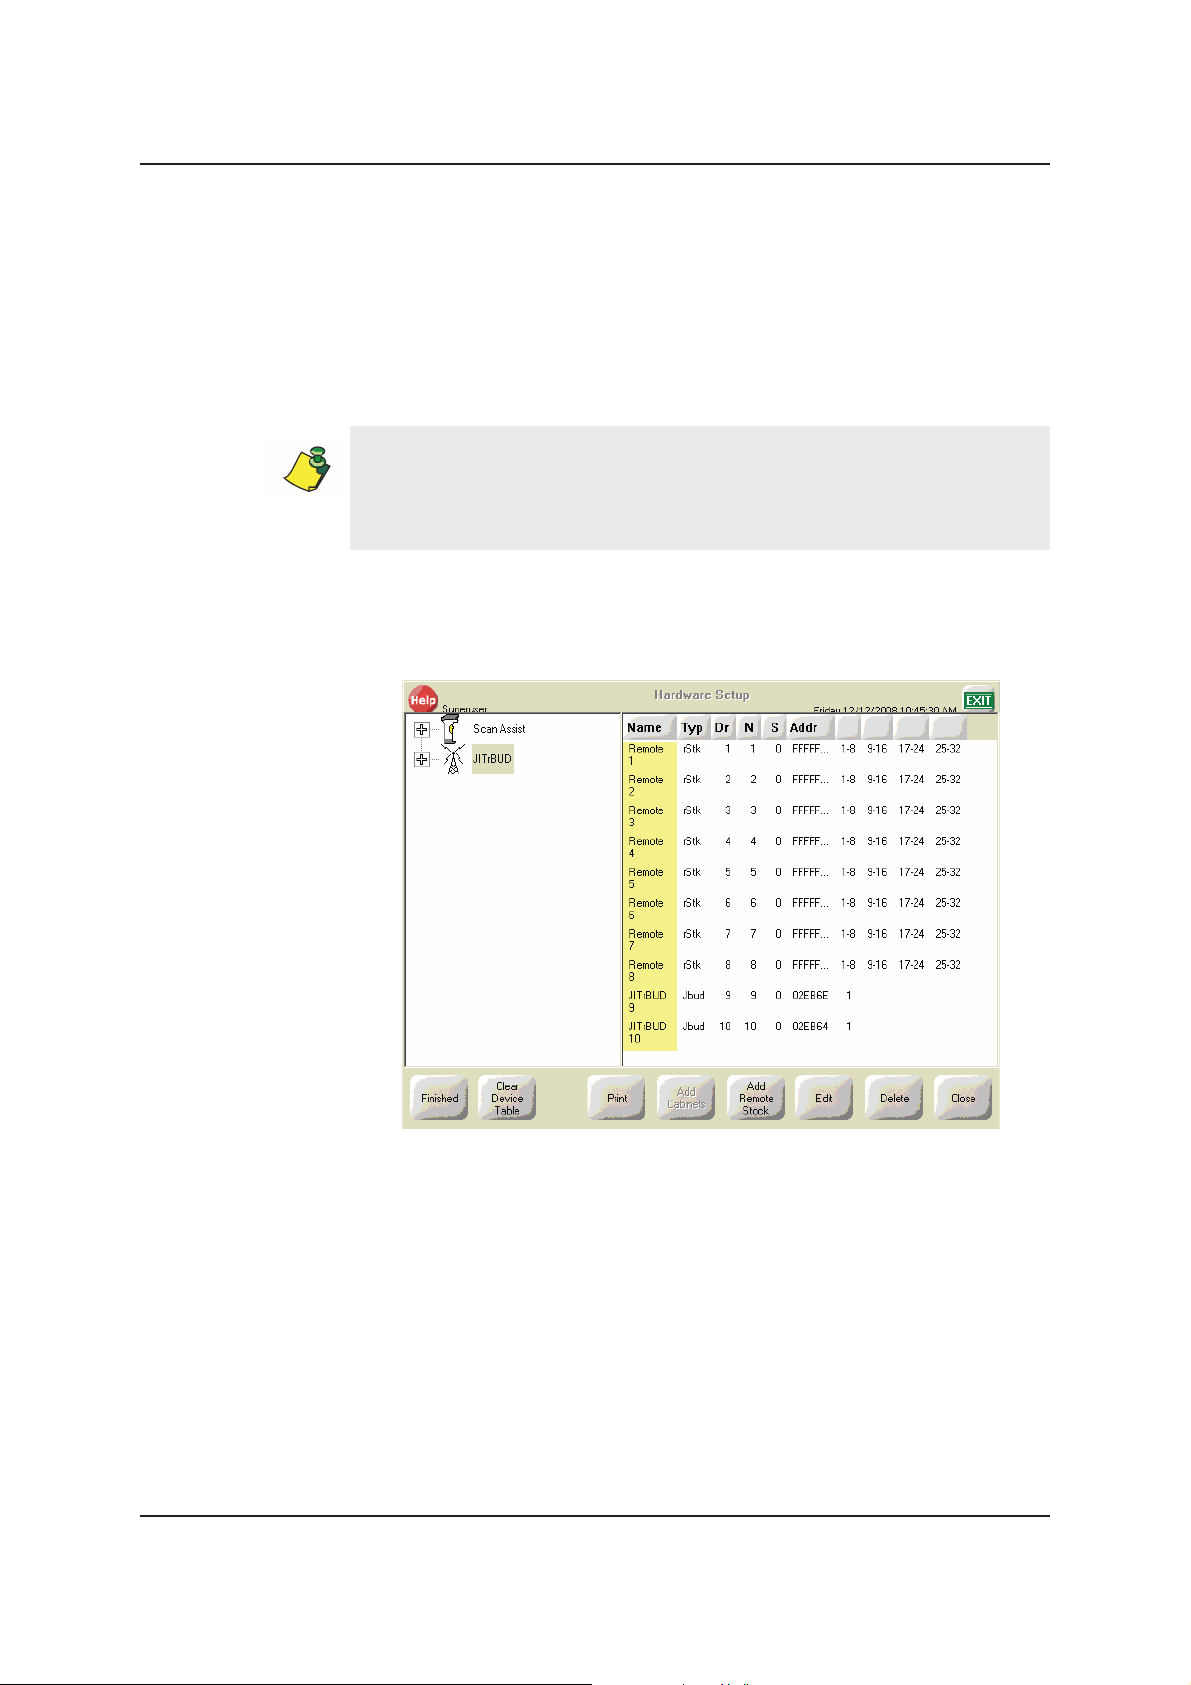
2. In the main menu, touch
3. In the Hardware Setup screen, select the cabinet, and then touch
4. Hold the JITrBUD enhanced transceiver near the JITrBUD base and press
T
AKE.
Hardware Setup.
Configure.
Draft
18 Pyxis SupplyStation® System v9.x JITrBUD Enhanced System Installation Guide
Page 19

Preparing the JITrBUD Enhanced Transceivers
n
If the LED on the JITrBUD enhanced transceiver flashes but the JITrBUD
enhanced base does not respond when you press Take on the transceiver, the
transceiver might already be configured for a different location. Press and hold
both the Take and Return buttons until the LED on the transceiver flashes an
amber color and perform step 3 again.
The LED on the JITrBUD enhanced transceiver flashes a green color and
the JITrBUD enhanced base beeps to confirm configuration.
The JITrBUD enhanced transceiver appears in the list.
5. Repeat the previous step for each JITrBUD enhanced transceiver.
6. Edit the device description as desired to give it a more descriptive name than
the default.
One naming option is to include the device location. To edit the name of a
JITrBUD enhanced transceiver:
a. Select the device, and touch
Edit.
b. In the Edit Device dialog box, enter a name for the JITrBUD enhanced
transceiver in the Description box, and touch
on editing device descriptions, see the Pyxis SupplyStation
OK. For more information
®
v9.x Install
and Support Guide.
7. To return to the main menu, touch
8. In the confirmation screen that appears, touch
Close.
Yes to save the new
configuration.
Pyxis SupplyStation® System v9.x JITrBUD Enhanced System Installation Guide 19
Page 20

Chapter 3—Installing JITrBUD Enhanced Transceivers
ft
You can now load items at the specified location and the items will be available
for Take/Return, Inventory, and Refill transactions at the station.
To configure and associate JITrBUD enhanced transceivers on the
station
1. In the main menu, touch
2. In the Hardware Setup screen, select the cabinet, and then touch
3. Pick up the first JITrBUD enhanced transceiver to be configured.
4. Stand close to the station.
5. Press T
The JITrBUD enhanced transceiver is added to the device configuration list.
6. Edit the device description as desired to give it a more descriptive name than
the default. One naming option is to include the device location. see the Pyxis
SupplyStation
device descriptions.
7. Repeat steps 1 through 6 for each JITrBUD transceiver you are configuring.
If you press Take or Return on a JITrBUD enhanced transceiver that is not
associated with an enhanced base and the unit is out of range of an operating
enhanced base, the transceiver remains in its unassociated state. This applies
whether configuring and associating with a main or with the station.
The JITrBUD enhanced base and enhanced transceiver remain associated
regardless of a power failure.
See the Pyxis SupplyStation
information on configuring JITrBUD enhanced transceivers on the station or on
JITrBUD Main.
AKE or RETURN on the JITrBUD enhanced transceiver.
®
v9.x Install and Support Guide for information on editing
Hardware Setup.
Configure.
®
System v9.x Install and Support Guide for additional
To reset a JITrBUD enhanced transceiver and enhanced base
• Press and hold down both the T
enhanced transceiver simultaneously for two seconds.
The LED on the JITrBUD enhanced transceiver flashes three times in amber
to indicate that the JITrBUD enhanced transceiver is no longer associated
with the JITrBUD enhance base.
20 Pyxis SupplyStation® System v9.x JITrBUD Enhanced System Installation Guide
AKE and RETURN buttons on the JITrBUD
Page 21

Mounting Options
e
Mounting Options
JITrBUD enhanced transceivers can be installed on a number of surfaces, such as:
• Large and small bins
•Wire racks
•Shelves
• Walls
Each surface requires a different method of attaching the JITrBUD enhanced
transceiver. In addition, in some instances you may need to adjust the size of the
mounting bracket.
Adjusting the Size of the JITrBUD Mounting Bracket
The following section provides information about adjusting the size of the
mounting bracket to fit different bins or for mounting on a wall.
Full-size Mounting Bracket
The default JITrBUD enhanced transceiver configuration as delivered has a
mounting bracket with two extender tabs. This configuration works well on large
bins.
e
Extender tabs
Mounting bracket with extender tabs
Pyxis SupplyStation® System v9.x JITrBUD Enhanced System Installation Guide 21
Page 22

Chapter 3—Installing JITrBUD Enhanced Transceivers
Shorter Mounting Bracket
You can shorten the width of the mounting bracket by snapping off the extender
tabs. The shorter configuration works well on smaller bins and walls.
Mounting bracket without extender tabs
To snap the tabs off the mounting bracket
1. Hold the JITrBUD enhanced transceiver in the mounting bracket in one hand.
2. With the other hand, grasp the extender tab.
3. Fold the extender tab down along the breakaway line, the line closest to the
end.
Extender tab
Breakaway line
4. Continue moving the tab down and up until you are able to break the tab away
from the mounting bracket.
5. Repeat steps 1 through 4 for the other tab.
Draft
22 Pyxis SupplyStation® System v9.x JITrBUD Enhanced System Installation Guide
Page 23

Mounting Options
Removing the JITrBUD Enhanced Transceiver From
the Mounting Bracket
Remove the JITrBUD enhanced transceiver from the mounting bracket when
using a clamp (see Installing a JITrBUD Enhanced Transceiver on a Wire Rack on
page 28) and when changing the battery. You must remove the JITrBUD enhanced
transceiver from the mounting bracket before attaching the bracket to a wall.
Use these procedures as well when removing and replacing a JITrBUD
enhanced transceiver on a clamp.
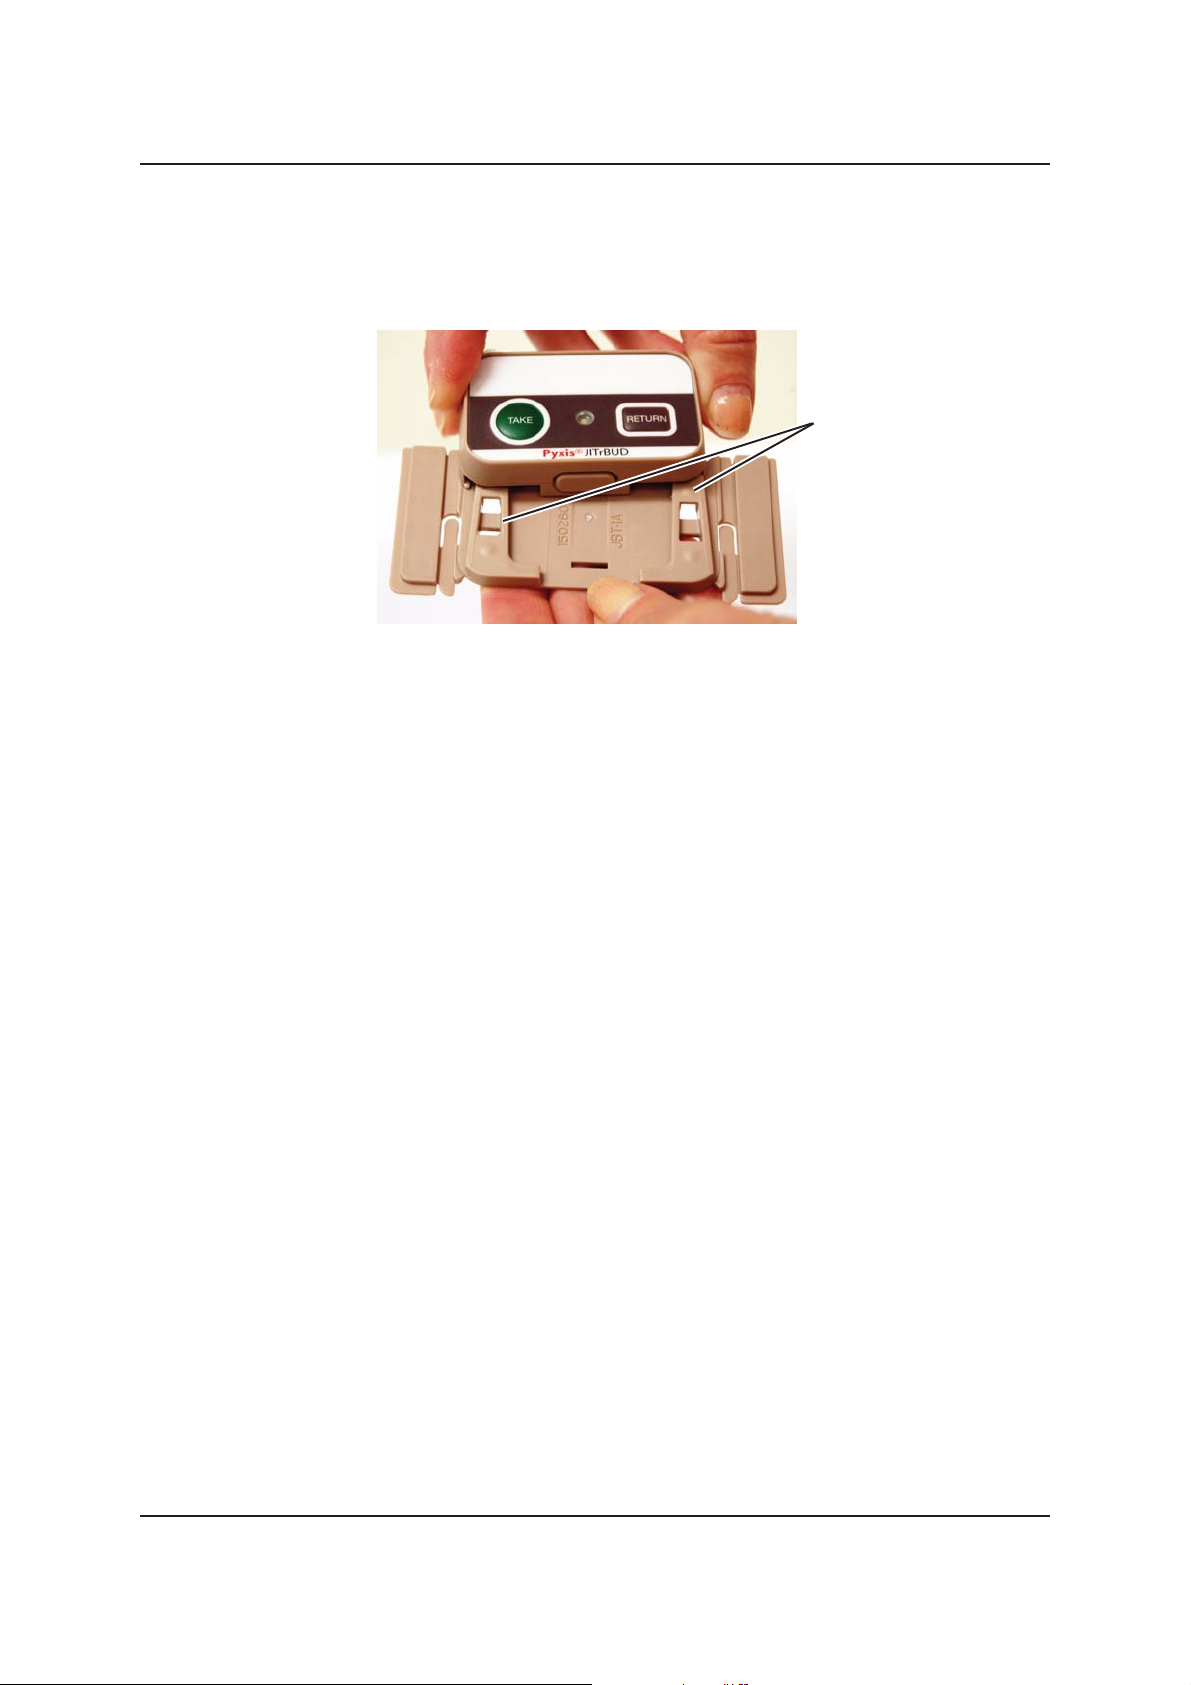
To remove a JITrBUD enhanced transceiver from a mounting bracket
1. While holding the JITrBUD enhanced transceiver in your hand, press in on
the release button at the bottom of the transceiver.
Release button
2. Slide the JITrBUD enhanced transceiver up and out of the mounting bracket.
Slide up and out.
Pyxis SupplyStation® System v9.x JITrBUD Enhanced System Installation Guide 23
Page 24
Chapter 3—Installing JITrBUD Enhanced Transceivers
To replace a JITrBUD enhanced transceiver in a mounting bracket
1. Hold the mounting bracket with the raised ridges facing you.
2. Align the edges of the JITrBUD enhanced transceiver with the ridges.
3. Slide the JITrBUD enhanced transceiver down until you hear a click; the click
signals that the JITrBUD enhanced transceiver is anchored to the mounting
bracket.
Raised ridges on
mounting bracket
Draft
24 Pyxis SupplyStation® System v9.x JITrBUD Enhanced System Installation Guide
Page 25

Attaching or Installing JITrBUD Enhanced Transceivers
Attaching or Installing JITrBUD Enhanced
Transceivers
The procedures below suggest various scenarios for installing or attaching
JITrBUD enhanced transceivers on the following surfaces:
• Large bins
• Small bins
•Wire racks
•Shelves
• Walls
These procedures are intended as guidelines; however, you may find other
installation procedures that work as well in the facility.
Installing a JITrBUD Enhanced Transceiver on a Large
Bin
Use the JITrBUD enhanced transceiver in the full-size mounting bracket.
Required Parts
Part Number Description Quantity
320423-01 ASSY,ROHS,XCVR,JITRBUD II,DOM 1
150260-01 BRACKET,ROHS,MOUNTING,JITRBUD II,UNIV 1
To install a JITrBUD enhanced transceiver on a large bin
1. Remove the JITrBUD enhanced transceiver from its packaging.
The JITrBUD enhanced transceiver should be in the mounting bracket.
2. Hold the JITrBUD enhanced transceiver by placing a finger on each side.
Pyxis SupplyStation® System v9.x JITrBUD Enhanced System Installation Guide 25
Page 26

Chapter 3—Installing JITrBUD Enhanced Transceivers
3. Align the extender tabs of the mounting bracket with the ridges of the bin as
shown in the following photograph.
Extender tabs
Raised ridges on
bin
4. Slide the mounting bracket and JITrBUD enhanced transceiver to the bottom
of the side of the bin.
The tabs on the mounting bracket are behind the ridges of the bin.
26 Pyxis SupplyStation® System v9.x JITrBUD Enhanced System Installation Guide
Page 27

Attaching or Installing JITrBUD Enhanced Transceivers
Installing a JITrBUD Enhanced Transceiver on a Small
Bin
Snap off the extended tabs to use the JITrBUD enhanced transceiver in the shorter
bracket.
Required Parts
Part Number Description Quantity
320423-01 ASSY,ROHS,XCVR,JITRBUD II,DOM 1
150260-01 BRACKET,ROHS,MOUNTING,JITRBUD II,UNIV 1
To install a JITrBUD enhanced transceiver on a small bin
1. Remove the JITrBUD enhanced transceiver from its packaging.
The JITrBUD enhanced transceiver should be in the mounting bracket.
2. Remove the extender tabs from the mounting bracket. See Shorter Mounting
Bracket on page 16.
3. Hold the JITrBUD enhanced transceiver by placing a finger on each side, as
shown in the following photograph.
Draft
Pyxis SupplyStation® System v9.x JITrBUD Enhanced System Installation Guide 27
Page 28

Chapter 3—Installing JITrBUD Enhanced Transceivers
a
4. Align the extender tabs of the mounting bracket with the ridges of the bin, as
shown in the following photograph.
The ends of the mounting bracket are behind the ridges of the bin.
Installing a JITrBUD Enhanced Transceiver on a Wire
Rack
Installing a JITrBUD enhanced transceiver on a wire rack requires that you use a
clamp.
Clamp front
Clamp back
Required Parts
Part Number Description Quantity
320423-01 ASSY,ROHS,XCVR,JITRBUD II,DOM 1
320469-01 CLAMP,ROHS,JITRBUD II 1
28 Pyxis SupplyStation® System v9.x JITrBUD Enhanced System Installation Guide
Page 29

Attaching or Installing JITrBUD Enhanced Transceivers
ft
To install a JITrBUD enhanced transceiver on a wire rack
1. Remove the JITrBUD enhanced transceiver and clamp from their packaging.
The JITrBUD enhanced transceiver should be in the mounting bracket.
2. Make sure the pointer at the top of the lever on the clamp is pointing to O.
Pointing to O
Lever
When you are working with the clamp, take care not to catch your fingers in
the space between the clamp mounting bracket and back of the clamp.
3. Turn the hexagon-shape screw counter-clockwise to separate the back of the
clamp from the clamp mounting bracket.
Turn hexagonal screw
counter-clockwise
4. Slide the clamp up from the bottom of the wire rack.
Pyxis SupplyStation® System v9.x JITrBUD Enhanced System Installation Guide 29
Page 30

Chapter 3—Installing JITrBUD Enhanced Transceivers
5. Turn the hexagon-shaped screw clockwise to tighten the clamp on the wire
rack.
6. Turn the lever to C to lock the screw in place.
Turn hexagonal screw
clockwise
7. Remove the JITrBUD enhanced transceiver from the mounting bracket. See
To remove a JITrBUD enhanced transceiver from a mounting bracket on
page 23.
Draft
30 Pyxis SupplyStation® System v9.x JITrBUD Enhanced System Installation Guide
Page 31

Attaching or Installing JITrBUD Enhanced Transceivers
8. Slide the JITrBUD enhanced transceiver onto the front of the clamp, aligning
the recessed areas on the back of the JITrBUD enhanced transceiver with the
ridges on the front of the clamp.
Raised ridges on front of
clamp
9. Push the JITrBUD enhanced transceiver down until you hear the click,
signalling that it is anchored in the clamp.
To remove the JITrBUD enhanced transceiver and clamp
1. Turn the lever on the clamp to O.
2. Turn the hexagon-shaped screw counter-clockwise to loosen the clamp’s grip
on the rack.
3. Slide the clamp downward to remove it from the rack.
4. Turn the hexagon-shaped screw clockwise to tighten the clamp.
5. Store the JITrBUD enhanced transceiver and clamp in an appropriate place.
Draft
Pyxis SupplyStation® System v9.x JITrBUD Enhanced System Installation Guide 31
Page 32

Chapter 3—Installing JITrBUD Enhanced Transceivers
Installing a JITrBUD Enhanced Transceiver on a Shelf
Required Parts
Part Number Description Quantity
320423-01 ASSY,ROHS,XCVR,JITRBUD II,DOM 1
150260-01 BRACKET,ROHS,MOUNTING,JITRBUD II,UNIV 1
320436-01 VELCRO,ROHS,MOUNTING,JITRBUD II 1
To install a JITrBUD enhanced transceiver on a shelf
This installation method works on both horizontal surfaces, such as shelves, and
vertical surfaces, such as walls or the sides of cabinets.
1. Remove the JITrBUD enhanced transceiver from its packaging.
The JITrBUD enhanced transceiver should be in the mounting bracket.
2. Remove the extender tabs from the mounting bracket. See Shorter Mounting
Bracket on page 16.
3. Remove the JITrBUD enhanced transceiver from the mounting bracket. See
To remove a JITrBUD enhanced transceiver from a mounting bracket on
page 23.
4. Remove the top tab from the mounting bracket.
Removing the tab allows the bracket to lie flush against the shelf.
a. Clip the connectors on either side of the top tab as shown:
Connectors
Back of mounting
bracket
Top tab
The tab is still attached by the bottom connector.
32 Pyxis SupplyStation® System v9.x JITrBUD Enhanced System Installation Guide
Page 33

Attaching or Installing JITrBUD Enhanced Transceivers
b. Move the tab back and forth until you are able to break the tab away from
the mounting bracket.
Top tab
Connector
Back of mounting
bracket
®
5. Affix the VELCRO
a. Remove the sticky backing from one side of the VELCRO
tape to the mounting bracket as follows:
®
tape.
Sticky backing
VELCRO® tape
b. Align the cutouts on the mounting bracket and the tape, and place the
VELCRO
Put the VELCRO® tape on the back of the mounting bracket only; do not put
VELCRO
®
tape directly on the back of the JITrBUD enhanced transceiver.
c. Press the tape in place.
®
tape sticky side down on the mounting bracket.
Draft
Pyxis SupplyStation® System v9.x JITrBUD Enhanced System Installation Guide 33
Page 34

Chapter 3—Installing JITrBUD Enhanced Transceivers
The hook and loop sides are still together.
6. Place the JITrBUD enhanced transceiver in the desired location as follows:
a. Separate the hook and loop sides of the VELCRO
bracket.
b. Remove the backing from the side of the VELCRO
on the shelf.
®
c. Press the VELCRO
d. Place the JITrBUD enhanced transceiver —in the mounting
bracket—over the VELCRO
tape in the desired location.
Aligned cutouts on
VELCRO® tape and
mounting bracket
Tape on back of
mounting bracket
®
tape on the mounting
®
tape you will place
®
tape on the shelf, aligning the cutouts.
Attaching a JITrBUD Enhanced Transceiver to a Wall
Attaching the mounting bracket and JITrBUD enhanced transceiver to a wall
requires screws or nails. You can also attach the mounting bracket using
VELCRO
page 32.
Required Parts
Part Number Description Quantity
320423-01 ASSY,ROHS,XCVR,JITRBUD II,DOM 1
150260-01 BRACKET,ROHS,MOUNTING,JITRBUD II,UNIV 1
You will also need a hammer and nails or screws and a screwdriver, depending on
how you will install the JITrBUD enhanced transceiver.
To attach a JITrBUD enhanced transceiver to a wall
1. Remove the JITrBUD enhanced transceiver and mounting bracket from the
2. Remove the extender tabs from the mounting bracket. See Shorter Mounting
®
tape. See Installing a JITrBUD Enhanced Transceiver on a Shelf on
packaging.
The JITrBUD enhanced transceiver should be in the mounting bracket.
Bracket on page 22.
Draft
34 Pyxis SupplyStation® System v9.x JITrBUD Enhanced System Installation Guide
Page 35

Attaching or Installing JITrBUD Enhanced Transceivers
3. Remove the top tab from the mounting bracket as follows:
a. Clip the connectors on either side of the top tab as shown:
Connectors
Back of mounting
bracket
Top tab
The tab is still attached by the bottom connector.
b. Move the tab back and forth until you are able to break the tab away from
the mounting bracket.
Top tab
Connector
Back of mounting
bracket
Removing this extension allows to bracket to rest flush against the wall.
4. Position the mounting bracket in the desired position on the wall, and mark
that spot.
Consider asking several people of different heights to stop by so that you can
position the mounting bracket at a convenient height for users.
5. Remove the JITrBUD enhanced transceiver from the mounting bracket. See
Removing the JITrBUD Enhanced Transceiver From the Mounting Bracket on
page 23.
Pyxis SupplyStation® System v9.x JITrBUD Enhanced System Installation Guide 35
Page 36

Chapter 3—Installing JITrBUD Enhanced Transceivers
6. Attach the mounting bracket to the wall using screws or nails.
Take care not to damage the bracket when you are attaching it to the wall.
7. Slide the JITrBUD enhanced transceiver into the mounting bracket, aligning
the recessed areas on the back of the JITRBUD enhanced transceiver with the
raised ridges on the mounting bracket.
Insert nails or
screws here.
Raised ridges
Draft
36 Pyxis SupplyStation® System v9.x JITrBUD Enhanced System Installation Guide
Page 37

Uninstalling JITrBUD Enhanced Transceivers
Uninstalling JITrBUD Enhanced
Transceivers
Unload and remove JITrBUD enhanced transceivers through the Hardware
Configuration menu.
To uninstall JITrBUD enhanced transceivers
1. Log in as the Pyxis technical user.
2. Touch
3. Touch
4. Do one of the following:
5. Select the location of the bin.
6. Select the item to unload.
7. Touch
Inventory Management.
Load-Unload.
a. If you are removing JITrBUD units from a station, go to step 5.
b. If you are removing JITrBUD units from a JITrBUD main, touch
.
Items
Unload.
This action unloads items from the bin, but does not delete the bin.
Unload
8. Touch
Yes when you receive a message confirming that you want to delete the
selected item.
9. Touch
10. Touch
The station software is set up so that only the last device in the list can be
deleted.
11. Touch
12. Touch
Close to return to the main menu.
Hardware Setup.
Delete.
Save.
13. Remove the JITrBUD transceiver.
14. Touch T
AKE and RETURN simultaneously for two seconds on the JITrBUD
enhanced transceiver to reset both the transceiver and the base transceiver.
15. Provide the uninstalled enhanced transceivers to the system manager at the
facility, so that he or she may ensure that the units are disposed of properly.
e
Pyxis SupplyStation® System v9.x JITrBUD Enhanced System Installation Guide 37
Page 38
Chapter 3—Installing JITrBUD Enhanced Transceivers
Upgrading to SupplyStation 9.x
If you are upgrading from SupplyStation v8.x to SupplyStation v9.x, you must
replace your existing JITrBUD transmitters and bases with JITrBUD enhanced
transceivers and enhanced bases. See Chapter 2, Installing the JITrBUD
Enhanced Hardware for information on installing a JITrBUD enhanced base.
To replace a JITrBUD transmitterr
For sites that currently have JITrBUD installed and are upgrading to the JITrBUD
uncanceled system, a "replace" can be done, which allows you to retain the
name associated with the location of the old JITrBUD. This can minimize
workflow impact for the customer during the upgrade.
1. Log in as the Pyxis technical user.
2. In the main menu, touch
The Hardware Setup screen appears.
Hardware Setup.
Draft
38 Pyxis SupplyStation® System v9.x JITrBUD Enhanced System Installation Guide
Page 39

Upgrading to SupplyStation 9.x
3. Select the JITrBUD transmitter to be replaced and touch Edit.
The Edit Device dialog box appears.
4. With the Edit Device dialog box open, hold the JITrBUD enhanced
transceiver near the JITrBUD enhanced base, and press T
AKE or RETURN.
The LED lights up on the enhanced transceiver and the base beeps to confirm
configuration.
The Edit Device dialog box displays a message in the bottom left corner
indicating whether the replacement was accepted or rejected. If the
replacement was accepted, the new address for the replacement JITrBUD
enhanced transceiver appears in the address field.
If the LED on the enhanced transceiver flashes but the JITrBUD enhanced base
does not respond when pressing Take on the JITrBUD enhanced transceiver, it
might already be configured for a different location. Press and hold both the Take
and Return buttons until the LED flashes an amber color and perform step 3
again.
5. Touch
OK.
A confirmation message appears, asking if the replacement is correct.
6. If the replacement is correct, touch
Yes.
Pyxis SupplyStation® System v9.x JITrBUD Enhanced System Installation Guide 39
Page 40

Chapter 3—Installing JITrBUD Enhanced Transceivers
7. Perform one of the following:
• If additional transmitters need replacement, repeat steps 2–5.
• If you have finished changing transmitters, touch
Setup screen.
A message appears, asking if you want to save the configuration changes.
Close on the Hardware
8. To save the station configuration changes, touch
Yes .
Draft
40 Pyxis SupplyStation® System v9.x JITrBUD Enhanced System Installation Guide
Page 41

Chapter 4
Troubleshooting
This chapter provides troubleshooting tips and instructions for changing the
battery in an JITrBUD enhanced transceiver.
Troubleshooting Tips............................................................................... 42
Changing the Battery .............................................................................. 43
Pyxis SupplyStation® System v9.x JITrBUD Enhanced System Installation Guide 41
Page 42

Chapter 4—Troubleshooting
Troubleshooting Tips
Transceivers from other stations are
registering themselves when configuring a
new station.
How can I verify the proper location of a
JITrBUD enhanced transceiver?
When associating a JITrBUD enhanced
transceiver and a JITrBUD enhanced base,
the LED on the enhanced transceiver flashes
in amber, but the JITrBUD enhanced base
does not beep.
• JITrBUD enhanced transceivers have an
effective range of approximately 75feet.
Transmissions from one station can carry
through walls and floors and be received
at another station. During the process of
configuring the JITrBUD enhanced
transceivers, it is possible for a JITrBUD
enhanced transceiver from another
nearby station to register itself on the
station you are configuring.
• Pay attention to the Hardware Setup
screen and listen for the beep tones that
indicate received transmissions when
configuring. Delete any JITrBUD
enhanced transceivers that do not belong
on the station in your configuration
before continuing. You can only delete
the last device on the configuration list.
• If possible, plan ahead to minimize the
cross-talk between stations.
• You can confirm the location of a
JITrBUD enhanced transceiver by
checking the serial number of the
JITrBUD enhanced transceiver on the
Hardware Setup screen. See
and Associating JITrBUD Enhanced
Transceivers
• The JITrBUD enhanced transceiver is
already associated with a base.
• Either associate a different JITrBUD
enhanced transceiver or reset the one you
are holding before associating it again
with another base.
on page18.
Configuring
42 Pyxis SupplyStation® System v9.x JITrBUD Enhanced System Installation Guide
Page 43

Changing the Battery
Changing the Battery
The LED on the JITrBUD enhanced transceiver shines red to indicate that the
battery is low.
To change the battery in a JITrBUD
1. If necessary, remove the JITrBUD enhanced transceiver from the mounting
bracket or clamp. See Removing the JITrBUD Enhanced Transceiver From
the Mounting Bracket on page 23.
Slide JITrBUD up and out.
2. Remove the two screws from the battery compartment cover on the back of
the JITrBUD enhanced transceiver.
Use a #1 Phillips screwdriver.
3. Remove the battery compartment cover.
4. Remove the battery.
Screws
Cover
Draft
Pyxis SupplyStation® System v9.x JITrBUD Enhanced System Installation Guide 43
Page 44
Chapter 4—Troubleshooting
5. Insert the new battery.
Be sure to insert the new battery with the positive terminal (+) facing up.
6. Replace the battery compartment cover.
7. Return the JITrBUD enhanced transceiver to the wall, shelf, or mounting
bracket, as necessary. If the JITrBUD enhanced transceiver was in a mounting
bracket, see To replace a JITrBUD enhanced transceiver in a mounting
bracket on page 24.
Be sure to return the JITrBUD enhanced transceiver to the proper location, as
noted on the white strip on the front. See Identifying JITrBUD Enhanced
Transceivers on page 18 for more information.
You can also determine location by checking the JITrBUD enhanced
transceiver’s serial number on the Hardware Setup dialog box. See Configuring
and Associating JITrBUD Enhanced Transceivers on page 18.
Serial number
Draft
44 Pyxis SupplyStation® System v9.x JITrBUD Enhanced System Installation Guide
 Loading...