

Page 1
Instructions for use
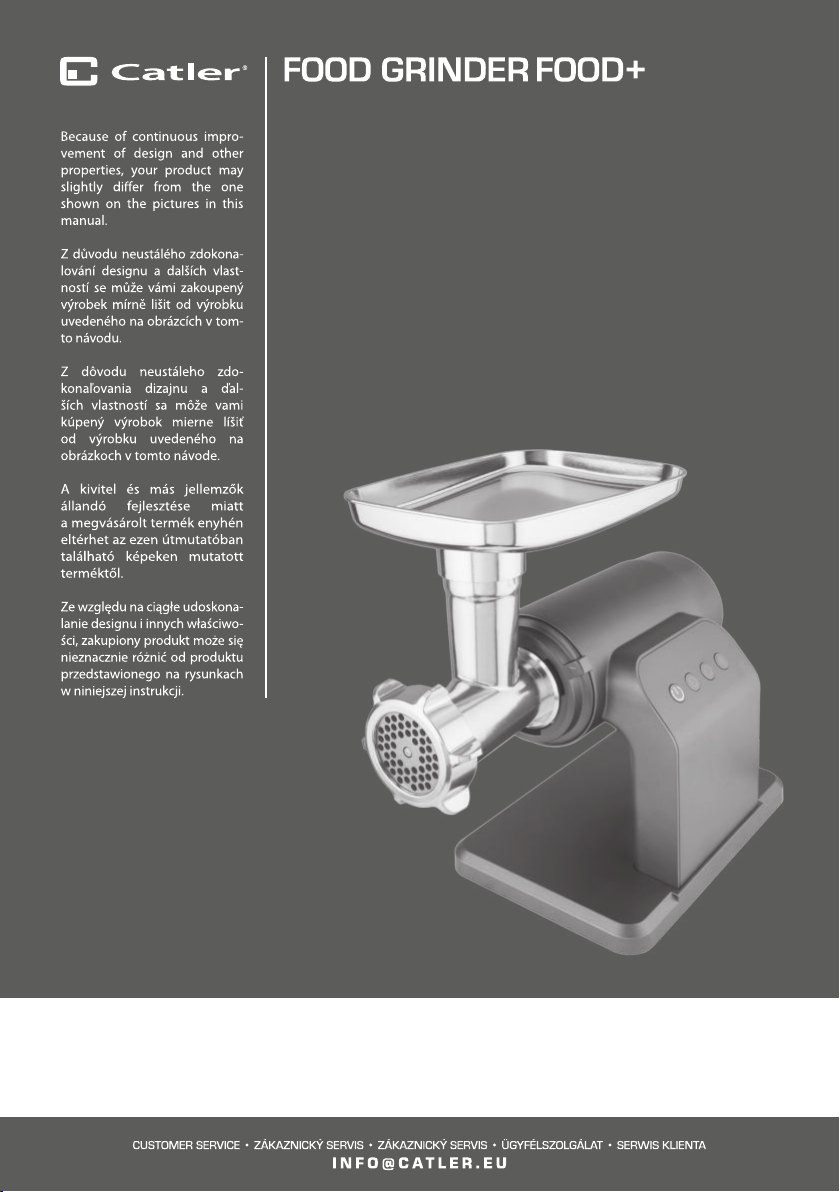
FOOD GRINDER FOOD+
FG 403
Page 2

FOOD
GRINDER
FOOD+
Page 3

TABLE OF CONTENTS
5 Catler recommends safety rst
9 Know Your FG 403 FOOD+
14 Assembling Your FG 403 FOOD+
16 Operating your FG 403 FOOD+
18 Care and Cleaning
19 Troubleshooting
TABLE OF CONTENTS
3
Page 4
Congratulations
on the purchase of your new FG 403 Food Grinder FOOD+.
CONGRATULATIONS
4
Page 5

CATLER RECOMMENDS SAFETY FIRST
We understand the importance of safety and that’swhy we put your safety first from the initial
design concept to the production itself. Nevertheless, we ask you to be careful when using
electrical equipment and to observe the following guidelines:
• This appliance is not to be used by children.
Keep this appliance and its power cord out of
children.
• The appliances may be used by persons with
physical, sensory or mental impairments or by
inexperienced persons only if they are properly
supervised or have been informed about how
to use of the product in asafe manner and
understand the potential dangers.
• Children must not play with the appliance.
• Cleaning and maintenance performed by the
user must not be performed by children.
• If the power cord is damaged, ask the
authorised service for areplacement in order
to prevent hazards. It is forbidden to use the
appliance with the power cord damaged.
WARNING: Improper use can cause injury.
• Be careful when handling the juicing screw,
especially when inserting or removing it, and
during cleaning.
CATLER RECOMMENDS SAFETY FIRST
5
Page 6

• Do not use the appliance if the rotary strainer is
damaged.
• Be careful when handling the grinding blade,
especially when inserting or removing it, and
during cleaning. Grinding blades are sharp and
there is arisk of serious injury.
• Be careful when handling the graters, especially
when inserting or removing them from the
neck, and during cleaning.
• Clean the parts of the appliance and
accessories that come into contact with food
according to the instructions in this manual.
• Always disconnect the appliance from the
power socket if you are leaving it unattended
and before assembly, disassembly or cleaning.
• Before replacing the accessories or accessible
movable parts, please turn the appliance off
and disconnect it from the power supply.
Always wait until the accessories or rotating
parts have come to acomplete stop.
• Use the appliance only with the accessories
supplied with it. The use of other accessories is
prohibited.
• Use the appliance according to the instructions
in this manual. Otherwise, there is arisk of
personal injury.
CATLER RECOMMENDS SAFETY FIRST
6
Page 7

• This appliance is designed for home use only. This appliance is not designed for
commercial use. Do not use this appliance in moving vehicles or on boats, outdoors, or for
any purpose other than it’sintended. Otherwise, there is arisk of personal injury.
• Before connecting this appliance to apower socket, make sure the voltage stated on the
product'srating label corresponds to the voltage in your power socket.
• Place the appliance on astable, heat-resistant, at and dry surface away from the edge of
the worktop.
• Do not place the appliance on or near heat sources such as hotplates, ovens or gas
burners. Vibrations during operation may cause the appliance to move.
• Do not use this appliance with aprogrammable switch, timer switch or any other device
that automatically switches the appliance on.
• Before switching on the appliance, make sure it is correctly assembled.
• Do not attempt to grind bones, nutshells or other hard ingredients.
• Do not leave the appliance running continuously under heavy load for more than 5
minutes. Before turning it on again, allow it to cool down for at least 10 minutes.
• Never use your ngers or other objects to push ingredients through the lling funnel.
Always use the provided plunger.
• If the ingredients inside the grinding chamber become clogged, use the reverse button to
remove the clogged ingredients.
• Never run the appliance without liquid. This may damage the lid.
• Always switch o the appliance and disconnect it from the power supply when you have
nished processing ingredients.
• To prevent electric shock, do not immerse the appliance, the power cord or the power
cord plug in water or other liquid.
• Check the condition of the appliance regularly. Never use adamaged appliance or an
appliance with adamaged accessory, power cord or plug.
• Do not disconnect the appliance from the power socket by pulling on the power cord. This
could damage the power cord or the power socket. Disconnect the cord from the power
socket by gently pulling the plug of the power cord.
IMPORTANT SAFETY INSTRUCTIONS FOR USING ELECTRICAL EQUIPMENT
• Fully unwind the power cord before use.
• Do not leave the power cord hanging over the edge of atable or countertop or allow it
to touch ahot surface or to become tangled up. Do not put heavy objects on the power
cord.
• For safety reasons, we recommend to connect the appliance in an independent electrical
circuit separated from other appliances. Do not use adapter plugs or extension cords to
connect the appliance to apower outlet.
• To prevent electric shock, do not immerse the appliance, its base or the power cord in
water or other liquids.
• We recommend that you check your appliance regularly. Do not use the appliance if it is
damaged in any way or if the power cord or plug is defective. All repairs or adjustments
must be performed at the nearest Catler authorised service centre.
• Any maintenance other than routine cleaning must be entrusted to an authorised Catler
service centre.
CATLER RECOMMENDS SAFETY FIRST
7
Page 8

• We recommend to install aresidual current device (standard safety switches in your power
outlet) to provide ahigher level of protection when using the appliance. We recommend
to install aresidual current device (with anominal residual operating current of no more
than 30mA) in the electric circuit in which your appliance is to be connected. For further
expert advise, please contact your electrician.
Instructions are also available at www.catler.eu.
CATLER RECOMMENDS SAFETY FIRST
8
Page 9
KNOW YOUR FG 403 FOOD+
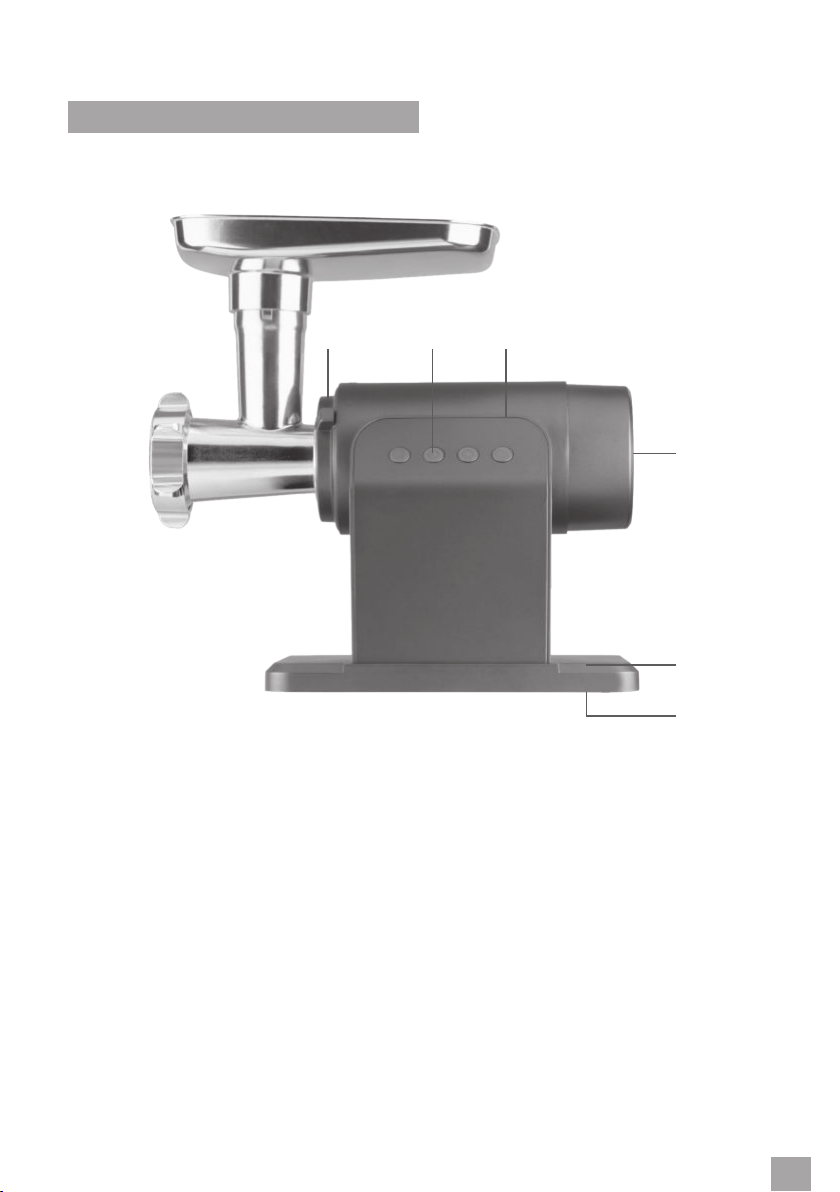
MOTOR UNIT
1 2 3
4
5
1. Safety lock
2. Control panel
3. Motor Unit
4. Ventilation openings
5. Base
6. Suction cups (located at the bottom, provide greater stability of the base)
KNOW YOUR FG 403 FOOD+
6
9
Page 10
CONTROL PANEL
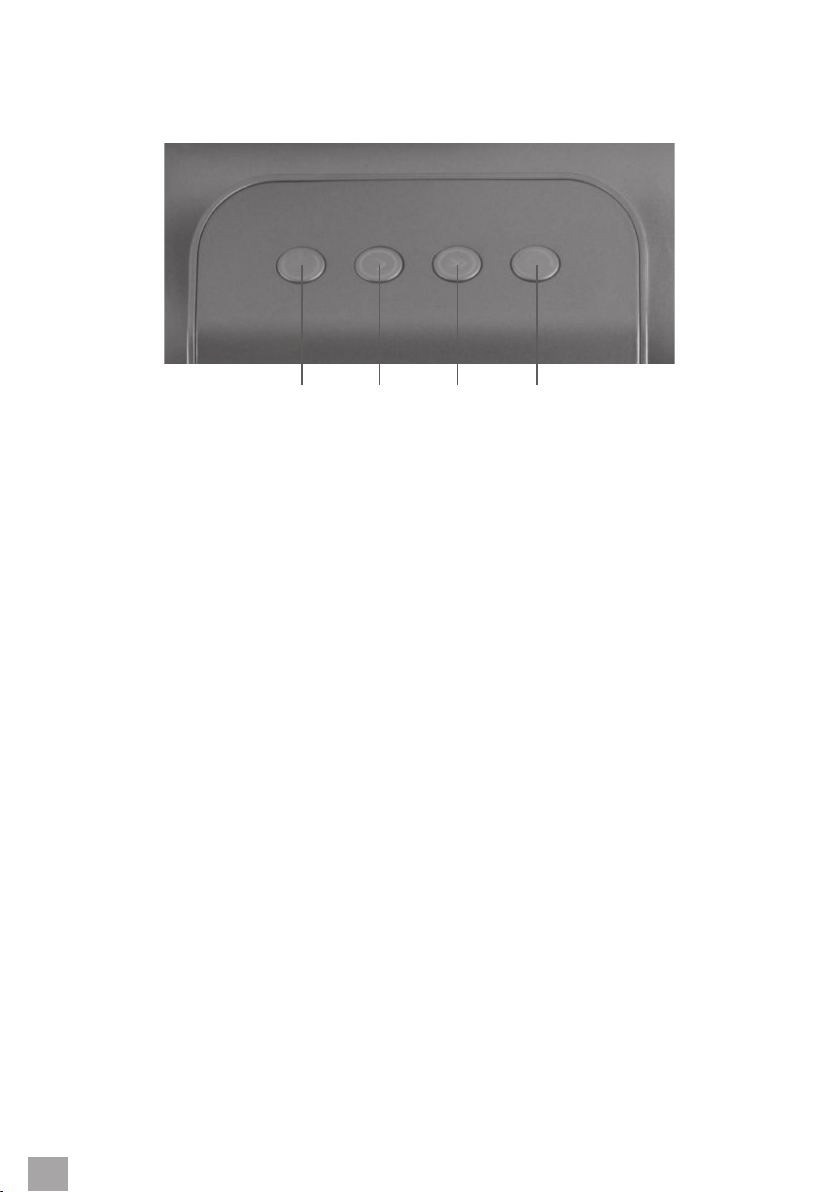
1 2 3 4
1. button: used to switch the appliance on/o
2. Low speed button
3. High speed button
4. Reverse button
KNOW YOUR FG 403 FOOD+
10
Page 11
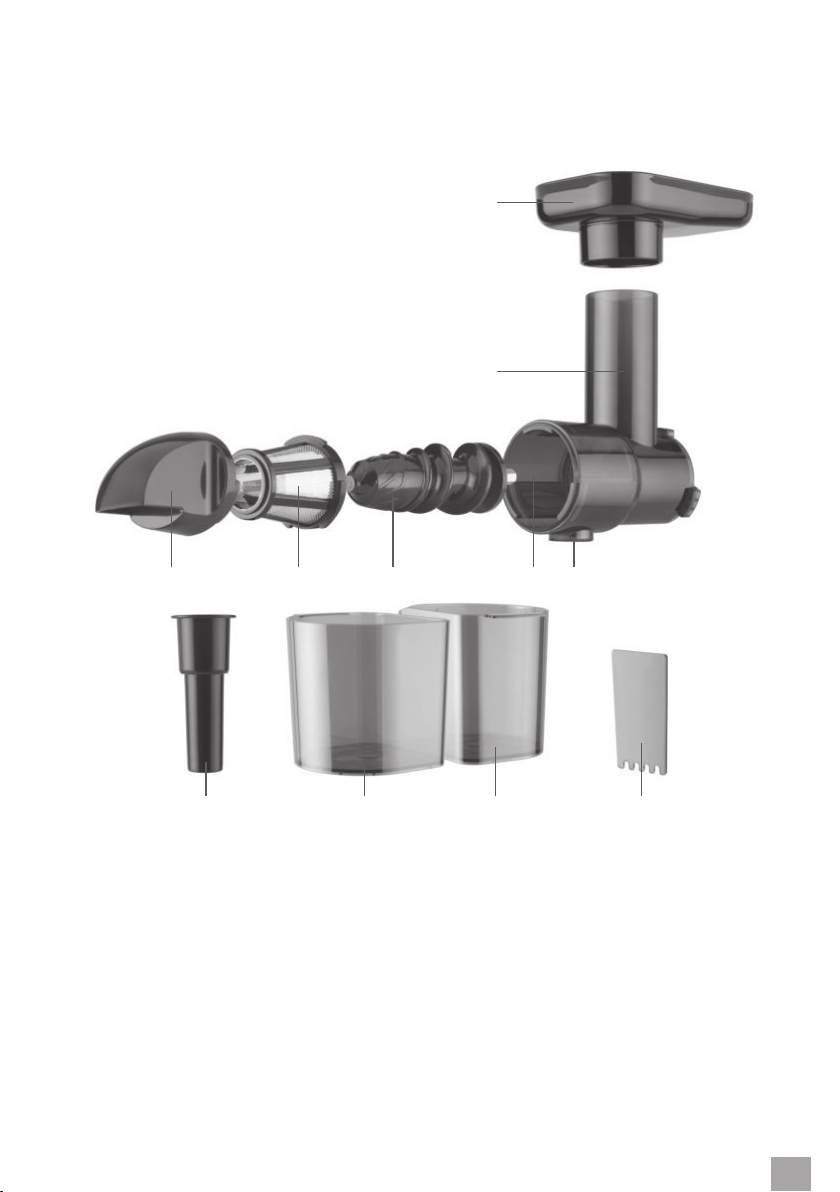
DESCRIPTION OF ACCESSORIES
Juicing Attachment
1 2 3 4 5
7
6
8 9 10 11
1. Front cover with pulp outlet
2. Fine strainer
3. Worm shaft for juicing
4. Grinding chamber
5. Juice outlet
6. Filling funnel
7. Juicing attachment hopper
8. Juicing attachment plunger
9. Pulp container
10. Juice jug
11. Pulp separator
KNOW YOUR FG 403 FOOD+
11
Page 12
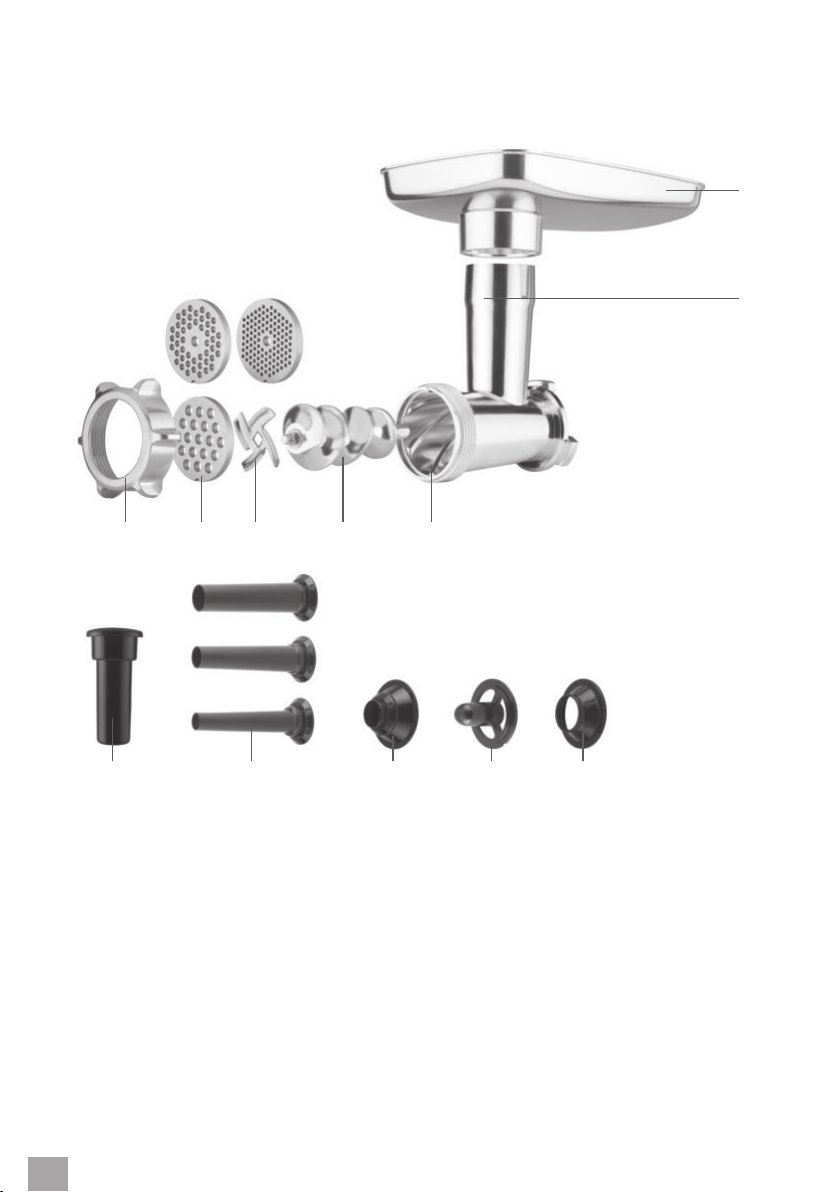
Food Grinder
1 2 3 4 5
7
6
8 9 10 11 12
1. Screw ring
2. Grinding discs
3. Grinding blade
4. Food grinder worm shaft
5. Grinding chamber
6. Filling funnel
7. Food grinder hopper
8. Food grinder plunger
9. Attachments for sausage preparation
10. Cover for sausage preparation attachment
11. Attachment for kubbe preparation
12. Cover for kubbe preparation attachment
KNOW YOUR FG 403 FOOD+
12
Page 13
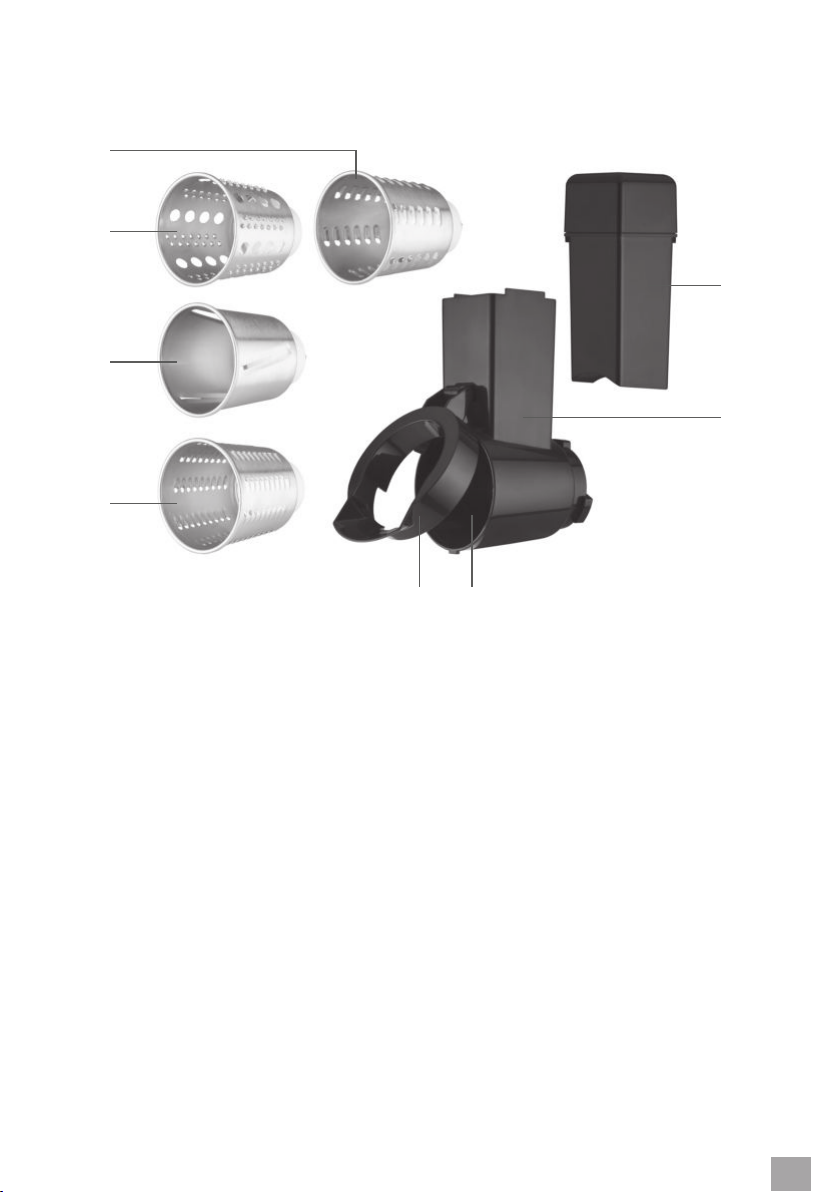
Cutting and grating attachment
8
7
6
5
1. Grater lock
2. Grinding chamber
3. Filling funnel
4. Pusher
5. Fine grater
6. Slicer
7. Puree grater
8. Coarse grater
4
3
1 2
KNOW YOUR FG 403 FOOD+
13
Page 14
ASSEMBLING YOUR FG 403 FOOD+
ASSEMBLING THE JUICING ATTACHMENT
1. Place the motor unit on adry, level and
rm surface.
2. Make sure that the lock is turned so that
the arrow points to the open lock symbol.
3. Insert the juicing attachment into the
motor unit so that the protrusions on
the attachment t into the cut-outs in
the xing thread. Then turn the lock
clockwise until the arrow points to
the closed lock symbol and you feel
resistance.
4. Insert the juicing worm shaft into the
juicing attachment. Rotate the worm
shaft as necessary to engage the bearing
in the motor unit.
5. Insert the ne strainer into the juicing
attachment so that the protrusions on
the strainer t into the cut-outs in the
attachment. Push the strainer slightly to
make sure it is inserted correctly and not
loose.
6. Fit the front cover onto the juicing
attachment so that the protrusions
on the cover t into the cut-outs in
the attachment. Then turn the cover
counterclockwise until you reach the
closed lock symbol and feel resistance.
7. Fit the hopper onto the lling funnel and
insert the plunger into the funnel.
8. Place the pulp container under the front
cover and the juice jug under the juice
outlet.
9. The appliance is now ready for use.
10. To disassemble, perform the procedure in
reverse order.
ASSEMBLING THE FOOD GRINDER
1. Place the motor unit on adry, level and
rm surface.
2. Make sure that the lock is turned so that
the arrow points to the open lock symbol.
3. Insert the food grinder into the motor
unit so that the protrusions on the
grinder t into the cut-outs in the xing
thread. Then turn the lock clockwise
until the arrow points to the closed lock
symbol and you feel resistance.
4. Insert the worm shaft of the grinder into
the grinding chamber. Rotate the worm
shaft as necessary to engage the bearing
in the motor unit.
5. Fit the grinding blade onto the worm
shaft. It is important that the blade is
pointing out of the grinding chamber.
WARNING!
WHEN
ATTACHING THE
GRINDING BLADE,
BE VERY CAREFUL
NOT TO GET
INJURED WITH ITS
EDGE.
6. Attach one of the grinding discs on the
grinding blade. Select agrinding disc
depending on the preferred grinding
roughness and intended meat use. Make
sure that the protrusion in the grinding
chamber is engaged with the notch in
the grinding disc.
7. Now attach the screw cap and screw it
properly by turning clockwise. Make sure
the cap is tightened securely. However,
do not tighten with excessive force to
avoid stripping the thread.
ASSEMBLING YOUR FG 403 FOOD+
14
Page 15

8. Fit the hopper onto the lling funnel and
insert the plunger into the funnel.
9. The appliance is now ready for use.
10. To disassemble, perform the procedure in
reverse order.
ASSEMBLING THE SAUSAGE PREPARATION
GRINDER
1. Assemble the grinder according to steps
1–5 in “Assembling the Food Grinder”.
2. Put on the sausage maker attachment
and the cap. Choose the size of the
attachment depending on how thick you
want your sausages to be.
3. Now attach the screw cap and screw it
properly by turning clockwise. Make sure
the cap is tightened securely. However,
do not tighten with excessive force to
avoid stripping the thread.
4. Fit the hopper onto the lling funnel and
insert the plunger into the funnel.
5. The appliance is now ready for use.
6. To disassemble, perform the procedure in
reverse order.
ASSEMBLING THE GRINDER FOR THE
PREPARATION OF KUBBE
1. Assemble the grinder according to steps
1-3 in “Assembling the Food Grinder”.
2. Fit the kubbe preparation attachment
onto the worm shaft. Make sure that the
protrusion in the grinding chamber ts
into the cut-out in the kubbe attachment.
Then put on the cap.
3. Now attach the screw cap and screw it
properly by turning clockwise. Make sure
the cap is tightened securely. However,
do not tighten with excessive force to
avoid stripping the thread.
4. Fit the hopper onto the lling funnel and
insert the plunger into the funnel.
5. The appliance is now ready for use.
6. To disassemble, perform the procedure in
reverse order.
ASSEMBLING THE CUTTING AND
GRATING ATTACHMENT
1. Place the motor unit on adry, level and
rm surface.
2. Make sure that the lock is turned so that
the arrow points to the open lock symbol.
3. Insert the slicing and grating attachment
into the motor unit so that the
protrusions on the attachment t into the
cut-outs in the xing thread. Then turn
the lock clockwise until the arrow points
to the closed lock symbol and you feel
resistance.
4. Release the grater lock.
5. Insert one of the graters into the grinding
chamber. Select agrater according to the
ingredients processing method. Rotate
the grater as necessary to engage the
bearing in the motor unit.
WARNING!
WHEN
HANDLING THE
GRATERS, BE VERY
CAREFUL NOT TO
GET INJURED WITH
THEIR EDGE.
6. Secure the lock. Correct locking is
indicated by aclick.
7. Insert the plunger into the lling funnel.
8. The appliance is now ready for use.
9. To disassemble, perform the procedure in
reverse order.
ASSEMBLING YOUR FG 403 FOOD+
15
Page 16

OPERATING YOUR FG 403 FOOD+
BEFORE FIRST USE
Before rst use, remove all packaging
and advertising labels / stickers from the
appliance. Make sure you have removed all
accessories from the package.
WARNING!
TO PUSH
INGREDIENTS
Wipe the motor unit with asoft cloth slightly
dampened with warm water. Wipe dry using
aclean wiping cloth.
Wash all parts of the juicing attachment,
meat grinder and slicing and grating
attachments in warm water with alittle
dishwashing liquid. Rinse in clean water and
wipe dry.
Always make sure all parts are thoroughly
dry before folding.
OPERATION
1. Assemble the appliance according to its
intended use.
2. Place the assembled appliance on adry,
level and rm surface well away from the
mains socket.
3. Place acontainer under the dispensing
opening of the appliance.
4. Insert the mains cord plug into apower
socket.
5. Press the button to switch on the
appliance.
6. Press the low or high speed button and
the appliance will start.
7. Insert the ingredients one by one in the
lling funnel using the plunger. Avoid
choking the lling funnel with excessive
amount of ingredients.
THROUGH THE
FILLING FUNNEL,
ALWAYS USE THE
SUPPLIED PLUNGER.
NEVER USE YOUR
FINGERS OR OTHER
ITEMS.
8. When all the ingredients are processed,
press the button to switch o the
appliance. Then, unplug the power cord
from the mains socket.
9. Remove the hopper from the lling
funnel and put the bowl with the
processed ingredients aside.
10. If the raw materials become clogged,
turn o the appliance by pressing the
button and press the reverse button.
Once the ingredients are released
from the grinding chamber, continue
processing.
11. Clean the appliance according to the
instructions in the chapter “Care and
Cleaning”.
OPERATING YOUR FG 403 FOOD+
16
Page 17
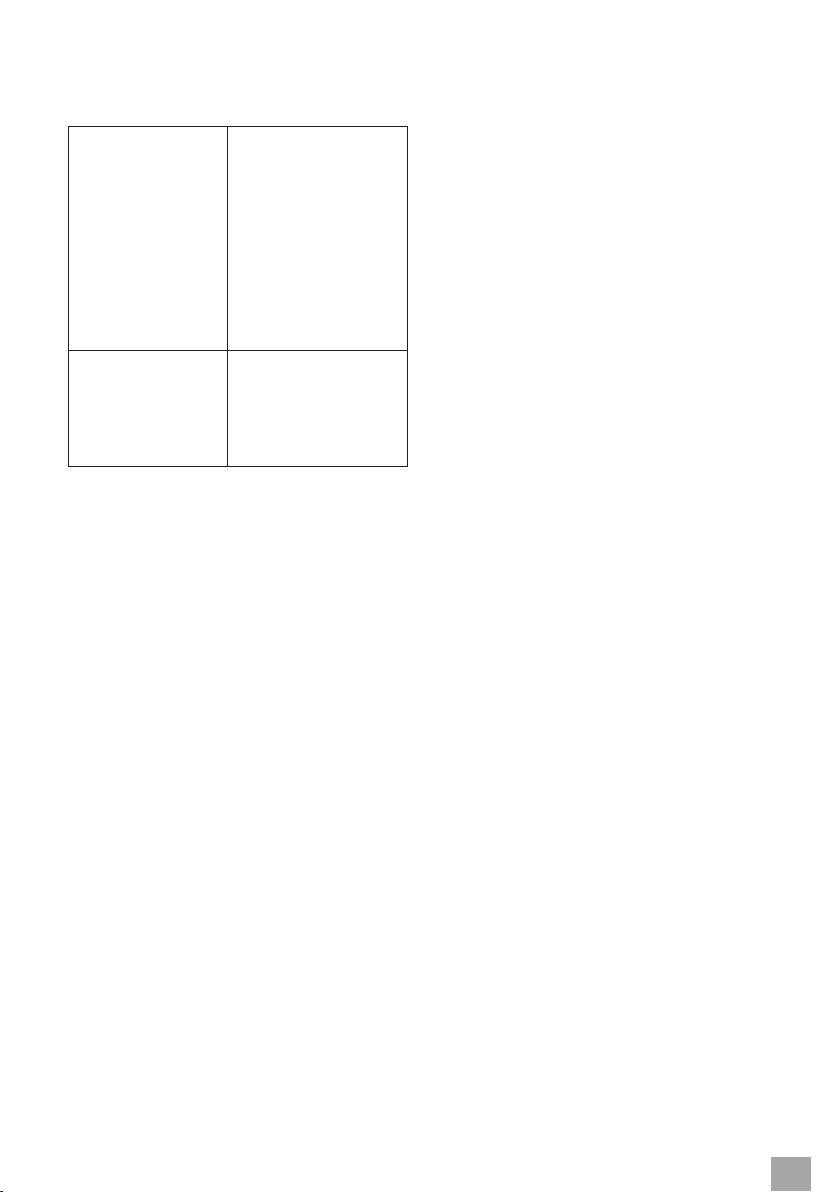
SPEED OVERVIEW TABLE
Low speed Juicing soft fruits
and vegetables (e.g.
berries, tomatoes,
etc.)
Grinding of ne meat
(e.g. sh)
Grating and slicing of
fruit and vegetables
Preparation of kubbe
and sausages
High speed Juicing fruits and
vegetables (e.g.
apples, carrots, etc.)
Grinding meat (beef,
pork, game, etc.)
PREPARATION OF KUBBE
Kubbe (also kubbeh or kibbeh) is agroup of
dishes originating in the Middle East based
on amixture of spiced minced meat, onions
and usually wheat semolina with various
llings. The ingredients are processed to form
balls, which are then baked or fried.
PREPARATION OF SAUSAGES
Prepare the ingredients for the sausages and
place them on the hopper. Soak the casings
in lukewarm water for about 10 minutes and
wait for them to soften. Then place the full
length of the casings on the attachment.
Make aknot at the end of the casing so that
the sausage mixture does not spill out of the
casing.
Select alow speed and while processing,
hold the casing on the attachment with one
hand and use the other hand to slowly push
the ingredients through the lling funnel
using pressure.
When the sausage is the desired length, stop
the operation by pressing the button.
Press the casing right at the attachment
outlet with your ngers and rotate the
sausage several times around its axis. Then
switch the grinder on again and proceed in
the same way until you have processed all
the ingredients.
If the casing gets stuck on the attachment
while being lled, wet it slightly with
lukewarm water.
When lling, it is important that the mixture
is loosely but evenly distributed in the
sausage. If there is too much mixture in the
sausage, it could burst during cooking or
frying.
By choosing the grinding disc you choose
the neness or coarseness of the mixture in
the sausage. If you prefer acoarser sausage
mixture, use the grinding disc with the
largest holes and vice versa.
OPERATING YOUR FG 403 FOOD+
17
Page 18
CARE AND CLEANING
Before cleaning the appliance, always switch
it o and unplug the power cord from the
mains socket and allow it to cool down
suciently. Disassemble the appliance and
clean it according to the instructions below.
WARNING!
DO NOT WASH
THE APPLIANCE,
MAINS CORD AND
PLUG UNDER
RUNNING WATER
AND DO NOT
IMMERSE IT IN
WATER OR ANY
OTHER LIQUID.
CAUTION:
DO NOT USE SHARP OBJECTS,
CHEMICALS, THINNERS, PETROL
OR OTHER SIMILAR SUBSTANCES.
UNDER NO CIRCUMSTANCES
SHOULD THE APPLIANCE BE
CLEANED WITH ASTEAM CLEANER.
MOTOR UNIT
Wipe the motor unit with asoft cloth slightly
dampened with warm water. Wipe dry using
aclean wiping cloth.
ACCESSORIES
Wash all parts of the juicing attachment,
meat grinder and slicing and grating
attachments in warm water with alittle
dishwashing liquid. Rinse in clean water and
wipe dry. We recommend lubricating the
grinding blade, grinding discs and worm
shaft with alittle vegetable oil.
WARNING!
BE CAREFUL
NOT TO INJURE
YOURSELF WHEN
HANDLING THE
GRINDING BLADE,
JUICING WORM
SHAFT, FINE
STRAINER OR
GRATERS.
CARE AND CLEANING
18
STORAGE
Before storing, make sure that the appliance
is clean, dry andcompletely cooled. Store it
in awell-ventilated dry place out of reach of
children and animals.
Page 19
TROUBLESHOOTING
This chapter describes the most common problems you may encounter while using this
appliance. If your problem is either not stated here or persists, stop using the appliance,
unplug the power cord and contact your authorized service centre.
UNDER NO CONDITION SHOULD YOU REPAIR OR DISASSEMBLE THE APPLIANCE
YOURSELVES. THE APPLIANCE CONTAINS NO USER SERVICEABLE PARTS.
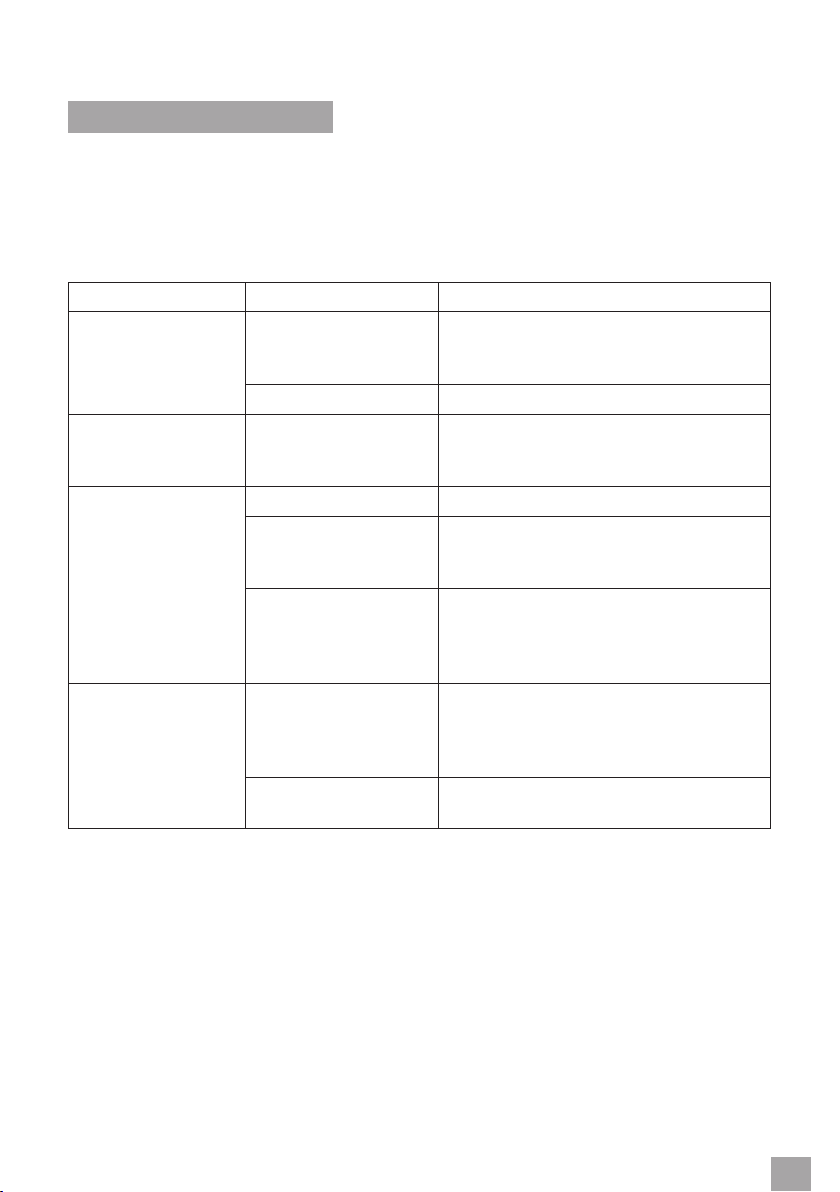
Problem Cause Solution
The appliance will
not start, the plug
is plugged into the
socket.
There is afaint
smell after the rst
switching on.
The appliance has
switched itself o
during use.
An unusual sound
comes from the
appliance during use.
The plug is not
plugged into the
socket correctly.
The socket is not live. Contact aqualied electrician.
This is normal. The unpleasant smell disappears after
The voltage is too low. Check the voltage at your power outlet.
You have processed
too much ingredients
at one time.
The appliance has been
running for too long.
The appliance is not
assembled correctly.
The motor unit is
damaged.
Remove the plug from the socket and
reconnect it.
Plug the plug into another socket.
the rst few uses. However, if it persists,
contact an authorised service centre.
Disconnect the appliance from the power
supply. Disassemble and remove any
stuck food.
Overheating has occurred and the
thermal fuse has activated. Disconnect
the appliance from the power supply and
allow it to cool down.
Switch o the appliance and disconnect it
from the power supply.
Disassemble, inspect and reassemble the
appliance.
Stop using the appliance and contact an
authorised service centre.
TROUBLESHOOTING
19
Page 20
INSTRUCTIONS AND INFORMATION ON DISPOSING OF USED PACKAGING MATERIALS
Dispose of used packaging material at asite designated for waste in your municipality.
DISPOSING OF USED ELECTRICAL AND ELECTRONIC EQUIPMENT
This symbol on products or original documents means that used electric or electronic products must not
be added to ordinary municipal waste. For proper disposal and recycling, take these products to designated
collection points. Or in some European Union states or other European countries the products can be
returned to the local retailer when buying an equivalent new product. Disposing of this product correctly
helps save valuable natural resources and prevents damage to the environment by improper waste disposal.
Ask your local authorities or collection facility for more details. In accordance with national regulations
penalties may be imposed for the incorrect disposal of this type of waste.
For business entities in European Union states
If you want to dispose of electric or electronic devices, ask your retailer or supplier for the necessary
information.
Disposal in other countries outside the European Union
This symbol is valid in the European Union. If you wish to dispose of this product, request the necessary
information about the correct disposal method from the local council or from your retailer.
This product meets all the basic requirements of the applicable EU directives.
The text, design and technical specifications may be changed without prior notice and we reserve the right to make
these changes.
The original version is in the Czech language.
Manufacturer’saddress: FAST ČR, a.s., USanitasu 1621, Říčany CZ-251 01
20
Page 21

NOTES
21
Page 22
WWW.CATLER.EU
 Loading...