

Page 1

DATA PROJECTOR
XJ-L8300HN
User’s Guide
• Be sure to read the “Safety Precautions”, and make sure you use this product correctly.
• Keep this manual in a safe place for future reference.
• Visit the site below for the latest version of this manual.
http://world.casio.com/manual/projector/
Page 2

• DLP is a registered trademark of Texas Instruments of the United States.
• HDMI, the HDMI Logo and High-Definition Multimedia Interface are trademarks or registered
trademarks of HDMI Licensing, LLC.
• HDBaseT™ and the HDBaseT Alliance logo are trademarks of the HDBaseT Alliance.
• Blu-ray™ and the logo are trademarks of the Blu-ray Disc Association.
• PJLink is a pending trademark or a registered trademark in Japan, the United States, and
other countries and areas.
• Crestron, Crestron Connected and Crestron Connected Logo are registered trademarks of
Crestron Electronics, Inc. of the United States.
• AMX is a registered trademark of AMX LLC of the United States.
• XGA is a registered trademark of IBM Corporation of the United States.
• Other company and product names may be registered trademarks or trademarks of their
respective owners.
• The contents of this User’s Guide are subject to change without notice.
• Copying of this manual, either in part or its entirety is forbidden. You are allowed to use this
manual for your own personal use. Any other use is forbidden without the permission of
CASIO COMPUTER CO., LTD.
• CASIO COMPUTER CO., LTD. shall not be held liable for any lost profits or claims from third
parties arising out of the use of this product or this manual.
• CASIO COMPUTER CO., LTD. shall not be held liable for any loss or lost profits due to loss of
data due to malfunction or maintenance of this product, or any other reason.
• The sample screens shown in this manual are for illustrative purposes only, and may not be
exactly the same as the screens actually produced by the product.
2
Page 3

Table of Contents
Important safety instructions ...........................................................................................4
Laser and High Temperature Precautions (See the label on the projector) .............. 11
Other Precautions ...........................................................................................................12
Introduction ...................................................................................................................... 14
Shipping contents ..................................................................................................... 14
Projector exterior view .............................................................................................. 15
Controls and functions ..............................................................................................16
Positioning your projector ..............................................................................................18
Choosing a location .................................................................................................. 18
Obtaining a preferred projected image size .............................................................. 18
Mounting the projector .............................................................................................. 20
Adjusting the projected image ................................................................................... 21
Connection .......................................................................................................................22
Operation ..........................................................................................................................25
Starting up the projector ............................................................................................ 25
Using the menus .......................................................................................................26
Securing the projector............................................................................................... 27
Switching input signal ............................................................................................... 28
Shutting down the projector ...................................................................................... 29
Menu operation ................................................................................................................ 30
PICTURE menu ........................................................................................................30
DISPLAY menu ........................................................................................................ 33
INSTALLATION menu .............................................................................................. 34
SYSTEM SETUP: BASIC menu............................................................................... 35
SYSTEM SETUP: ADVANCED menu ...................................................................... 35
INFORMATION menu ............................................................................................... 37
Controlling the projector remotely ................................................................................ 38
Projector RS-232C Control ............................................................................................. 41
Maintenance .....................................................................................................................46
Care of the projector .................................................................................................46
Light source information............................................................................................ 47
Troubleshooting ..............................................................................................................49
Specifications .................................................................................................................. 50
Projector specifications .............................................................................................50
Dimensions ...............................................................................................................51
Timing chart .............................................................................................................. 52
3 Table of Contents
Page 4
Important safety instructions
Safety Precautions
About safety symbols
Various symbols are used in this User’s Guide and on the product itself to ensure safe use,
and to protect you and others against the risk of injury and against material damage. The
meaning of each of the symbols is explained below.
This symbol indicates information that, if ignored or applied incorrectly,
Danger
Warning
Icon Examples
A triangle indicates a situation against which you need to exercise caution. The
example shown here indicates you should take precaution against electric shock.
A circle with a line through it indicates information about an action that you should not
perform. The specific action is indicated by the figure inside the circle. The example
shown here means disassembly is prohibited.
creates the risk of death or serious personal injury.
This symbol indicates information that, if ignored or applied incorrectly, could
possibly create the risk of death or serious personal injury.
A black circle indicates information about an action that you must perform. The specific
action is indicated by the figure inside the circle. The example shown here indicates you
must unplug the power cord from the power outlet.
Precautions During Use
Warning
• Adult supervision is required whenever there are young children present
and especially when there is the possibility of young children coming into
contact with the projector.
• Smoke, odor, heat, and other abnormalities
Should you ever notice smoke, strange odor, or any other abnormality, immediately
stop using the projector. Continued use creates the risk of fire and electric shock.
Immediately perform the following steps.
1. Unplug the projector.
2. Contact your original dealer or authorized CASIO service center.
• Malfunction
Immediately stop using the projector if the screen appears abnormal, or if any other
abnormal operation occurs even though you are operating the projector correctly.
Continued use creates the risk of fire and electric shock. Immediately perform the
following steps.
4 Important safety instructions
Page 5

1. Turn off the projector.
2. Unplug the projector.
3. Contact your original dealer or authorized CASIO service center.
• Power cord
Misuse of the power cord creates the risk of fire and electric shock.
Make sure that you always observe the following precautions.
• Be sure to use only the accessories that come with the projector.
• Make sure that you use a power source with the same voltage as that specified for the
projector.
• Do not overload a power outlet with too many devices.
• Do not locate the power cord near a stove.
• Do not use the power cord that comes with the projector with any other device.
• Do not share the outlet supplying power to the projector with other devices. If you are using
an extension cord, make sure that the ampere rating of the extension cord is compatible with
the power consumption value of this projector.
• Never use the power cord while it is still bundled together.
• Use a conveniently located power outlet that you can reach easily when you need to unplug
the projector.
A damaged power cord creates the risk of fire and electric shock.
Make sure that you always observe the following precautions.
• Never place heavy objects on the power cord and never expose it to heat.
• Make sure the power cord is not pinched between the wall and the rack or table where the
projector is located, and never cover the power cord with a cushion or other object.
• Never try to modify the power cord, allow it to become damaged, or subject it to excessive
bending.
• Do not twist the power cord or pull on it.
Never touch the power cord or plug while your hands are wet. Doing so creates the risk
of electric shock.
• When using this projector in the country where you purchased it, be sure to use the power
cord that came with it. Whenever using the projector in another country, be sure to purchase
and use a power cord that is rated for the voltage of that country. Also make sure that you are
aware of the Safety Standards that apply in that country.
When going out, make sure the projector is in a location away from pets and other
animals, and unplug the power plug from the power outlet. A power cord damaged by
chewing can cause shorts, and creates the risk of fire.
• Water and foreign matter
Never allow water to get on the projector. Water creates the risk of fire and electric
shock.
Never place a vase or any other container of water on top of the projector. Water
creates the risk of fire and electric shock.
5 Important safety instructions
Page 6

Water or other liquid, or foreign matter (metal, etc.) getting into the projector creates the
risk of fire and electric shock. Should anything get inside the projector, immediately
perform the following steps.
1. Turn off the projector.
2. Unplug the projector.
3. Contact your original dealer or authorized CASIO service center.
• Disassembly and modification
Never try to take the projector apart or modify it in any way. The projector contains a
large number of high-voltage components that create the risk of electric shock and burn
injury. Also, note that problems caused by unauthorized projector disassembly or
modification are not covered by the warranty and are not eligible for repair by CASIO.
Be sure to leave all internal inspection, adjustment, and repair up to your original dealer or
authorized CASIO service center.
• Dropping and impact
Continued use of the projector after it has been damaged by dropping or other
mistreatment creates the risk of fire and electric shock. Immediately perform the
following steps.
1. Turn off the projector.
2. Unplug the projector.
3. Contact your original dealer or authorized CASIO service center.
• Disposal by burning
Never try to dispose of the projector by burning it. Doing so can cause an explosion,
which creates the risk of fire and personal injury.
• Projector light emission
• Never look directly into the lens, intake vents, or exhaust vents while the light is on.
When turning on the projector, check to make sure that no one is looking directly into
its lens, intake vents, or exhaust vents. The strong light emitted by the projector
creates the risk of eye damage.
• Do not attempt to use a magnifying glass, mirror, or other similar object to bend or
reflect the projector’s light, and never hold or place such object in the path of the
projector’s light. Refracted or reflected light can shine into a person’s eyes and create
the risk of eye damage.
• Blocking the vents
Never allow the vents to become blocked. Doing so causes internal heat build up, which
creates the risk of fire and breakdown of the projector. Touching the projector while it is
hot creates the risk of burn injury. Make sure that you always observe the following
precautions.
6 Important safety instructions
Page 7

• Allow at least 30cm (11.8 inches) between the projector and walls. Maintain a distance of at
least 30 cm (11.8 inches) between surfaces and the other sides of the projector.
• Do not insert the projector into any space where air circulation is poor.
• Never cover the projector with a blanket or any similar item.
• Locate the projector on a firm, flat surface during use. Never use the projector while it is on a
carpet, blanket, towel, seat cushion, or other pliable surface.
• Never stand the projector up on either end during use.
• Projector cabinet
Never open the projector’s cabinet. Doing so creates the risk of electric shock.
• Cleaning
Before cleaning the projector, be sure to turn it off and unplug it from the power outlet.
Failure to do so creates the risk of electric shock.
• Exhaust vents
The exhaust vents become very hot while the projector is running. Never touch them. Doing
so creates the risk of burn injury. The areas near the exhaust vents also become quite hot.
Never locate objects made of plastic or other heat-sensitive materials near or under the
projector. Doing so creates the risk of deformation and discoloration of the object.
• Lens cover (If your projector has a lens cover)
Be sure to remove the lens cover before turning on the projector. Never leave the lens cover
attached while the projector is in use.
• Location
Never locate the projector in any of the following types of locations. Doing so creates the risk
of fire and electric shock.
• Near an area subject to strong vibration
• An area subject to large amounts of moisture or dust
• In a kitchen or other area exposed to oil smoke
• Near a heater, on a heated carpet, or in an area exposed to direct sunlight
• An area subject to temperature extremes (Operating temperature range is 5°C to 35°C (41°F
to 95°F)).
• Heavy objects
Never place heavy objects on the projector or climb on top of the projector. Doing so creates
the risk of fire and electric shock.
• Water
Never locate the projector in a bathroom or anywhere else there is the chance that it will be
splashed with water.
• Unstable location
Never place the projector on an unstable surface or on a high shelf. Doing so can cause
it to fall, creating the risk of personal injury.
7 Important safety instructions
Page 8
• Using the projector on a base with casters
Whenever using the projector on a base that has casters, make sure that you lock the casters
when not moving the base.
• Lightening
During a lightening storm, do not touch the plug of the projector’s power cord.
• Remote controller
Never try to take the remote controller apart or modify it in any way. Doing so creates
the risk of electric shock, burn injury, and other personal injury. Be sure to leave all
internal inspection, adjustment, and repair up to your original dealer or authorized
CASIO service center.
Never allow the remote controller to become wet. Water creates the risk of fire and
electric shock.
• Do not use flammable gas sprays nearby
Do not spray flammable gas into or in the vicinity of the projector. The gas may ignite
and create the risk of fire.
Battery Precautions
Danger
Should liquid leaking from an alkaline battery get into the eyes, immediately take the
following steps.
1. Do not rub the eyes! Wash the eyes with clean water.
2. Contact a physician immediately. Failure to take immediate action can lead to loss of
eyesight.
Warning
Misuse of batteries can cause them to leak and stain the area around them, or to explode,
creating the risk of fire and personal injury. Make sure that you always observe the following
precautions.
• Never try to take batteries apart and do not allow them to become shorted.
• Never expose batteries to heat or throw them into fire.
• Never mix old batteries and new ones.
• Never mix batteries of different types.
• Never try to charge batteries.
• Take care that batteries are oriented correctly when you load them.
Caution
Misuse of batteries can cause them to leak and stain the area around them, or to explode,
creating the risk of fire and personal injury. Make sure that you always observe the following
precaution.
8 Important safety instructions
Page 9
• Use only the type of batteries that is specified for the remote controller.
• Dead batteries
Be sure to remove batteries from the remote controller as soon as they go dead.
• Remove batteries from the remote controller if you do not plan to use it for a long time.
• Disposing of batteries
Make sure that you dispose of used batteries in accordance with the rules and regulations in
your local area.
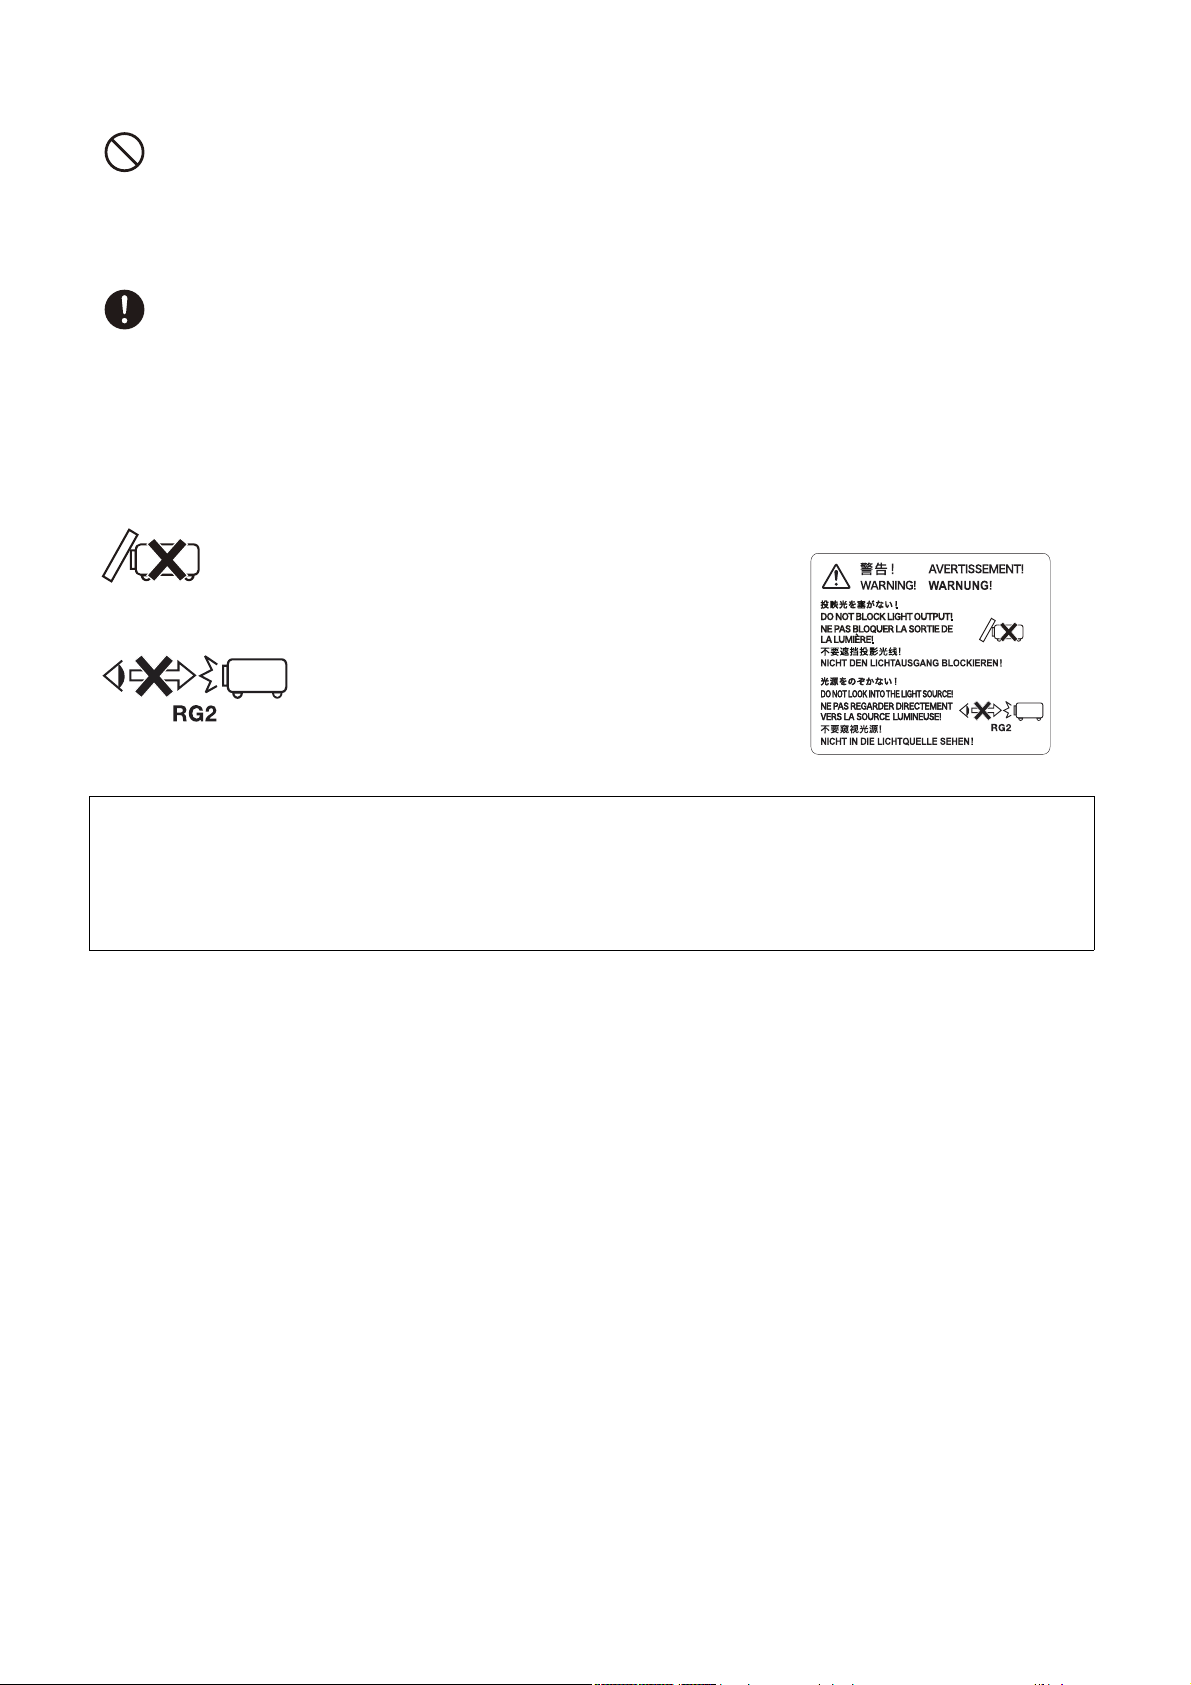
Projector Light Emission
• Never block light output while the light is on.
• Never look directly into the lens while the light is on. Particular
care is required when children are present.
Risk Group 2
1. As with any bright light source, do not stare into the beam, RG2 IEC 62471-5:2015
2. Possibly hazardous optical radiation emitted from this product.
3. Do not stare at operating lamp. May be harmful to the eyes.
About the Light Source Unit
• The projector’s light source unit uses a laser.
• The life of the light source unit is rated at approximately 20,000 hours. The actual life will
depend on use conditions, the settings configured on the setup menu, and differences
between each individual light source unit.
• The light source unit is warranted for the period noted on the warranty certificate or for 6,000
hours, whichever comes first.
• The failure of the light source unit to light or a noticeable drop in light source unit brightness
indicates the end of the light source unit’s life. Contact your original dealer or authorized
CASIO service center for replacement. Note that problems caused by unauthorized projector
disassembly or modification are not covered by the warranty and are not eligible for repair by
CASIO.
9 Important safety instructions
Page 10

Setup Precautions
• Use a conveniently located power outlet that you can reach easily when you need to unplug
the projector.
• Allow at least 30cm (11.8 inches) between the projector and walls. Maintain a distance of at
least 30 cm (11.8 inches) between surfaces and the other sides of the projector. There
should be no other objects within the above distances from the projector. Particular care is
required to keep objects away from projector air intake and exhaust openings.
• Airflow from air conditioning equipment can blow the heat being exhausted from the area
around the projector’s lens in a way that causes heat ripples to appear in the projected
image. If this happens, adjust the airflow of the air conditioning equipment or move the
projector.
10 Important safety instructions
Page 11
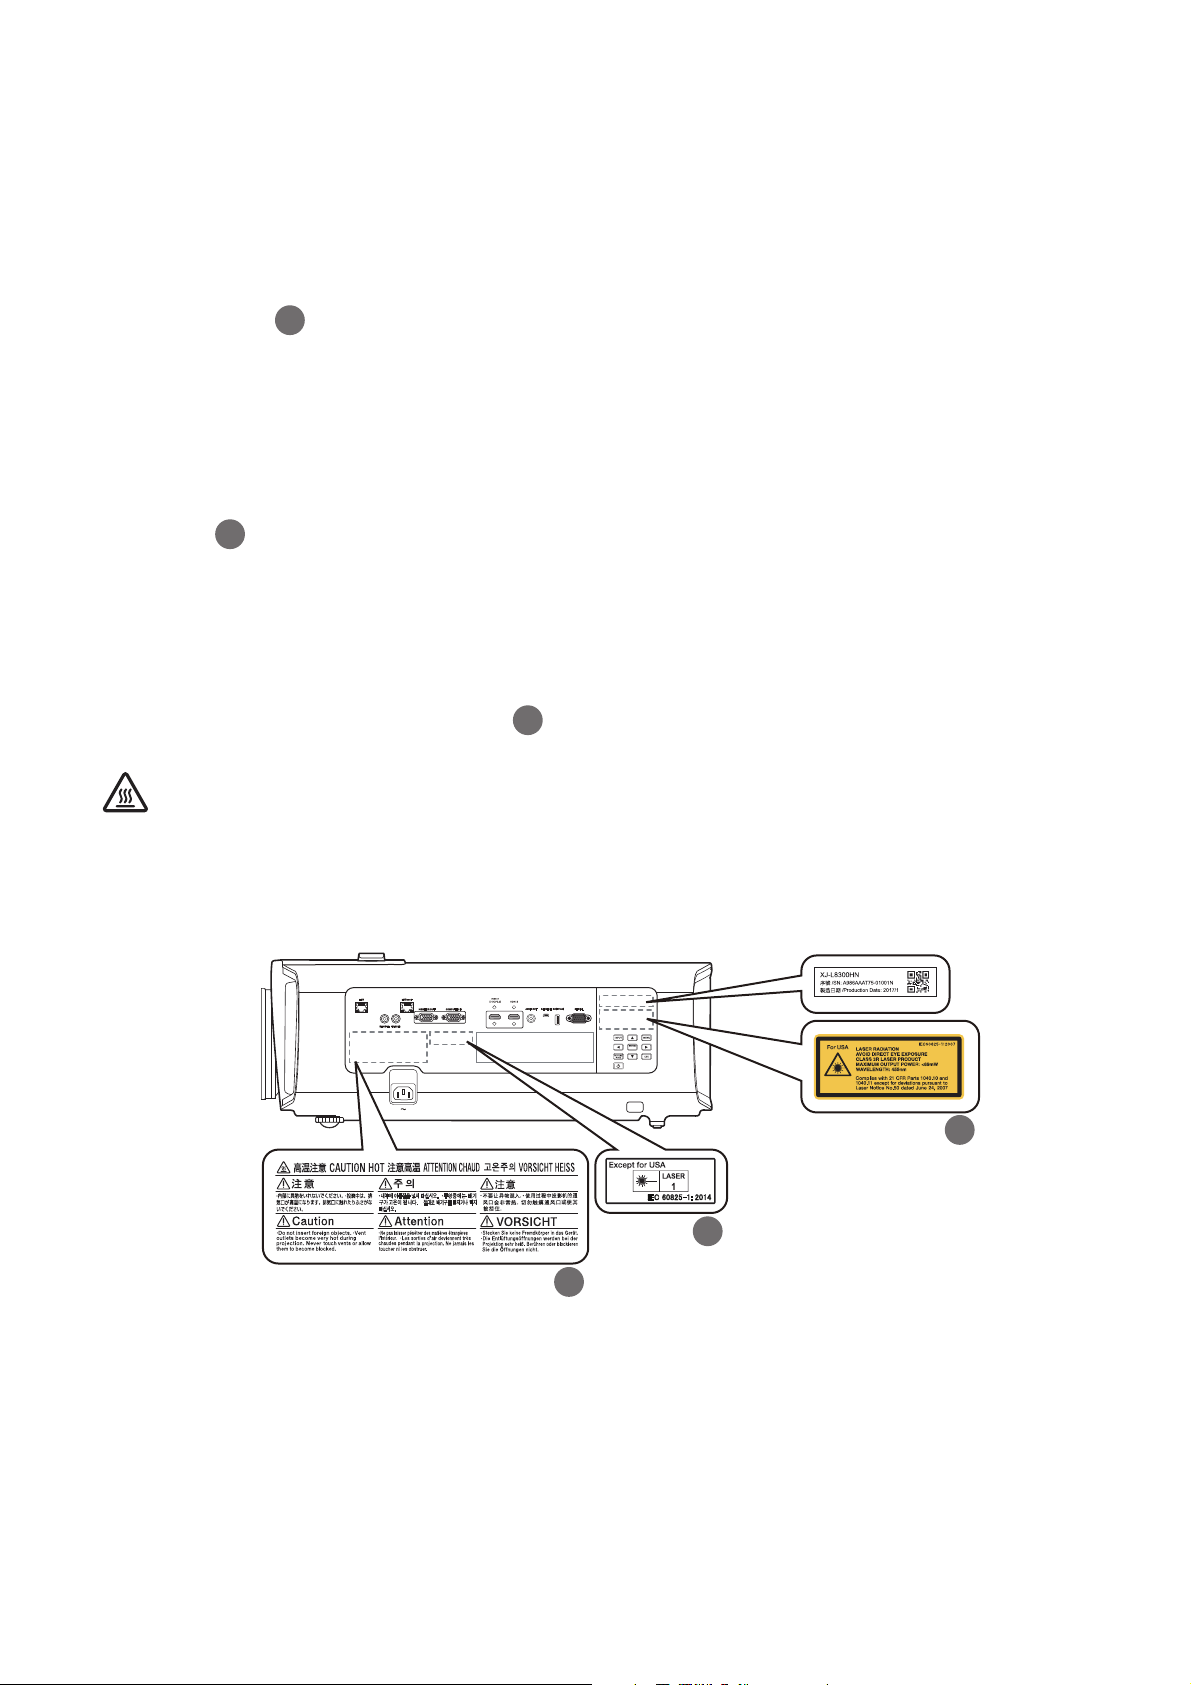
Laser and High Temperature Precautions
1
2
3
1
2
3
Label
Label
Label
Left side of the projector (viewed from the back)
(See the label on the projector)
Laser Precautions
Non- U.S. Label : This projector is a Class 1 laser device that conforms to IEC 60825-1:
2014.
• This projector has a built-in laser module. Disassembly or modification is very dangerous and
should never be attempted.
• Any operation or adjustment not specifically instructed by the user’s guide creates the risk of
hazardous laser radiation exposure.
U.S. Label : This projector is a Class 3R laser device that conforms to IEC 60825-1: 2007.
• This projector has a built-in laser module. Disassembly or modification is very dangerous and
should never be attempted.
• Any operation or adjustment not specifically instructed by the user’s guide creates the risk of
hazardous laser radiation exposure.
Vent Outlet Precautions (Label )
• Vent outlets become very hot during projection. Never touch vents or allow them to
become blocked.
• Do not insert foreign objects.
11 Laser and High Temperature Precautions
Page 12

Other Precautions
This projector is made of precision components. Failure to observe the following precautions
can result in inability to correctly save data and malfunction.
• Never use or store the projector in the following locations. Doing so creates the risk of
malfunction of and damage to the projector.
• Locations subjected to electrostatic charge
• Locations subjected to temperature extremes
• Locations where there is extreme moisture
• Locations subjected to sudden temperature changes
• Locations where there is a lot of dust
• On a shaky, slanted, or otherwise unstable surface
• Locations where there is the danger of getting wet
• Locations where there are large amounts of oil smoke or other smoke
• Locations where there is the risk of salt damage
• Locations where corrosive gas (such as the sulfur gas at hot springs) is generated
• Ensure that the remote control signal receiver is not exposed fluorescent light, sunlight, or
other strong light. Strong light can cause malfunction.
• Avoid using the projector under the following conditions. Such conditions create the risk of
malfunction of and damage to the projector.
• Avoid areas subject to temperature extremes (operating temperature range is 5°C to 35°C
(41°F to 95°F)).
• Never place heavy objects on the projector or climb on top of the projector.
• Never insert or allow foreign objects to drop into the projector.
• Never place a vase or any other container of water on top of the projector.
• Whenever setting the projector down or performing any operation that involves moving or
reorienting it, take care that you do not pinch your fingers under the projector.
• Never leave dead batteries inside the remote controller for a long time.
Dead batteries can leak, which leads to malfunction of and damage to the remote controller.
Be sure to replace the batteries at least once every one year, no matter how much you use the
remote controller during that time.
• Clean with a soft, dry cloth.
When very dirty, use a soft cloth that has been dampened in a weak solution of water and a
mild neutral detergent. Wring all excess water from the cloth before wiping. Never use thinner,
benzine, or any other volatile agent to clean the projector. Doing so can remove its markings
and cause staining of the case.
• Missing Screen Dots
Though this projector is manufactured using the most advanced digital technology available
today, some of the dots on the screen may be missing. This is normal, and does not indicate
malfunction.
12 Other Precautions
Page 13

• Never subject the projector to strong impact while it is projecting.
If the projector is accidentally subjected to strong impact, the projection image will momentarily
go blank. The image will reappear after some time, but it may be the wrong color or it may be
accompanied by an error message.
If the projected image is the wrong color, re-select the current input source. If this does not
return the projected image to its proper color, turn projector power off and then back on again.
• Use a power outlet near the projector. Always use the projector so that the power cord can
be easily unplugged.
• Even if your projector is still within the warranty period, you will be charged for repair if a
problem is due to running the projector non-stop for very long periods (like 24 hours) or if the
projector was set up and used without following the “Setup Precautions”.
• Use under high ambient temperature or in environments subjected to large amounts of dust,
oil smoke, tobacco smoke, or other types of smoke can shorten the replacement cycles and
require more frequent replacement of the optical engine and other components. Note that
you are charged for such replacement. For details about replacement cycles and fees,
contact an authorized CASIO service center.
• Condensation
Moving the projector from a cold room to a heated room, turning on a heater in a cold room,
and other similar conditions can cause condensation (fogging) to form on the projector lens
and/or inside the projector, which will make the projected image appear out of focus and can
lead to malfunction and other trouble. If this happens, turn off the projector and wait for a while
until the condensation clears naturally. When it does, you will be able to project images
normally.
• Power Supply to External Equipment
Turning off projector power also cuts power being supplied to external equipment. Note that
power being supplied is also cut when the projector is turned off due to restarting by its
self-check function or Auto Power Off, due to some error, or for any other reason. Depending
on the external equipment being used, cut off of the power supply may cause data that is
being edited to be lost or corrupted. Make it a habit to frequently save data on external
equipment being powered by the projector. Note that CASIO COMPUTER CO., LTD. shall be
held in no way liable for any loss or corruption of data.
13 Other Precautions
Page 14
Introduction
Shipping contents
Carefully unpack and verify that you have all of the items shown below. If any of these items are
missing, please contact your place of purchase.
Standard accessories
• Projector
• Remote control, YT-310
• Cable tie set x 2
• Test batteries (AA-size x 2)
• AC Power cord
• RGB cable
• "Safety Precautions" sheet
• "Read this first" sheet
• Warranty*
• The supplied accessories will be suitable for your region.
• *The warranty card is only supplied in some specific regions. Please consult your dealer for detailed
information.
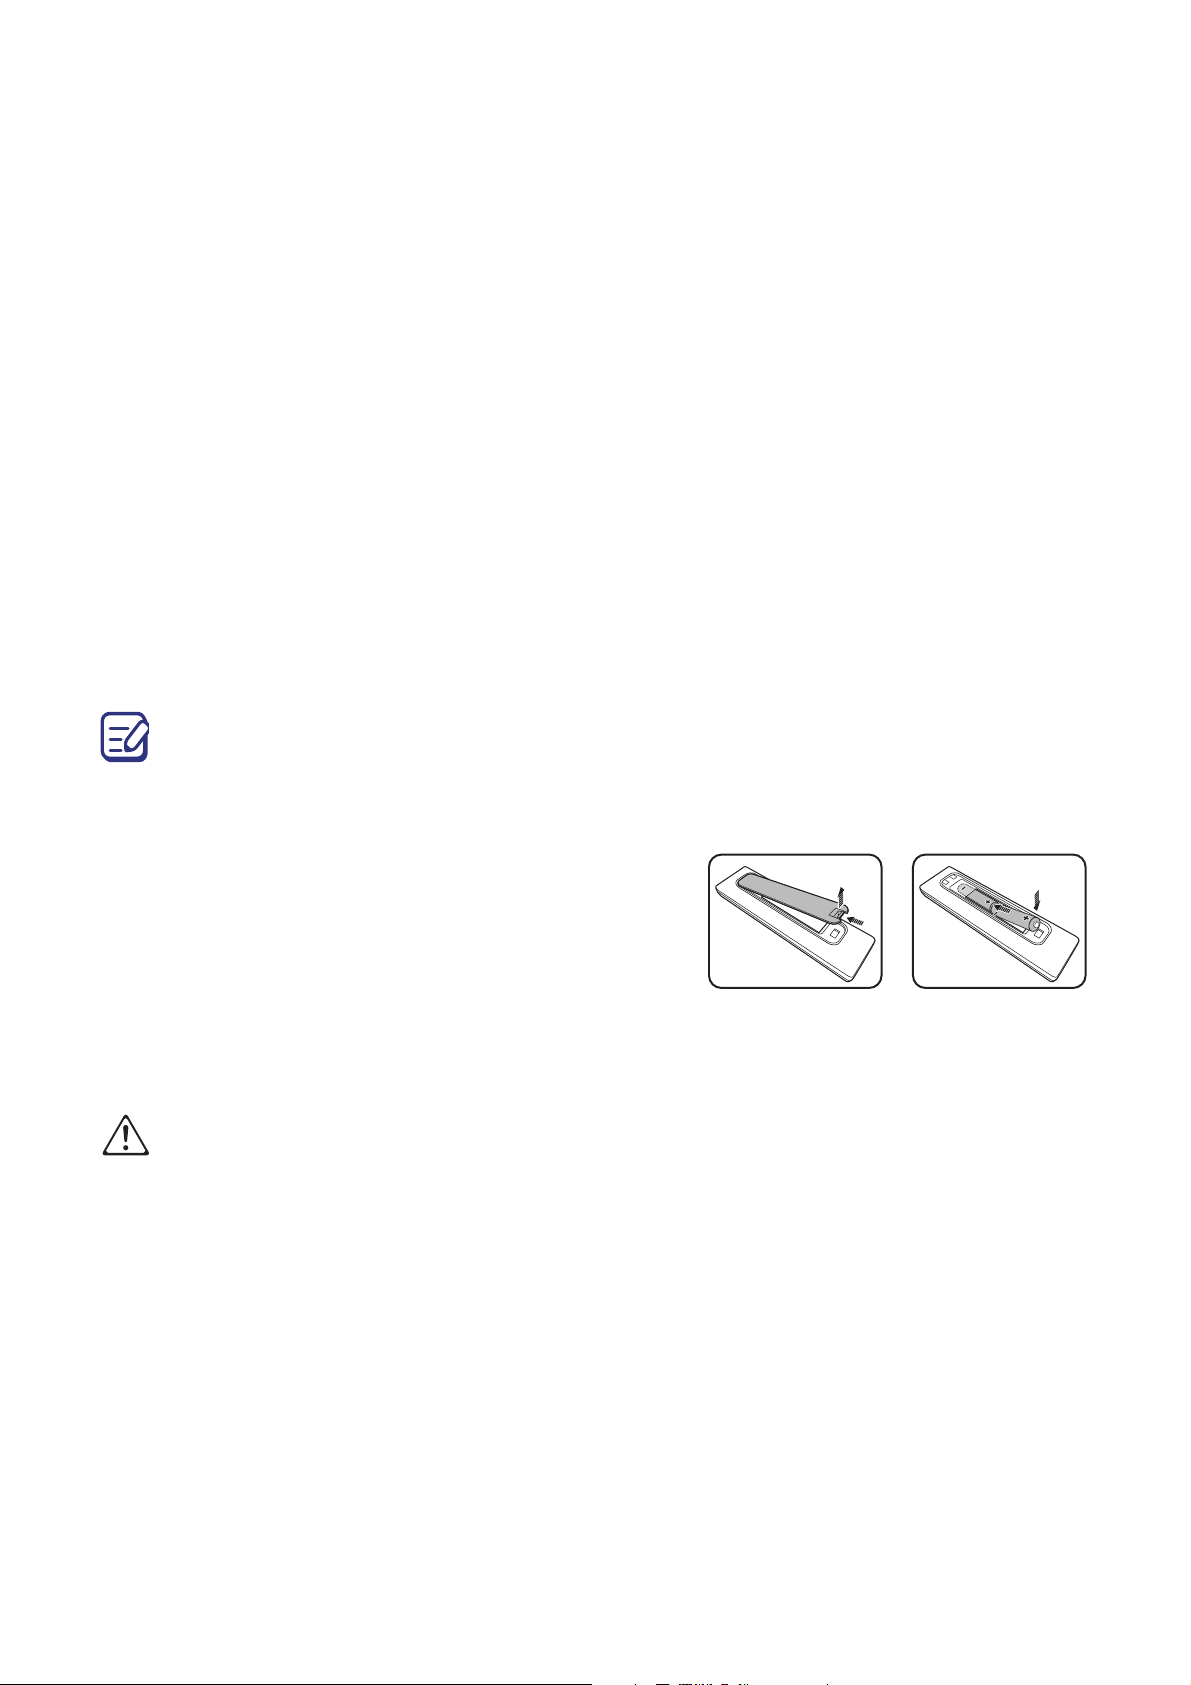
Replacing the remote control batteries
1. Press on the finger grip on the cover and push it up in
the direction of the arrow as illustrated.
2. Remove the old batteries (if applicable) and install
two AA batteries. Make sure that the positive and
negative ends are positioned correctly, as illustrated.
3. Refit the cover by aligning it with the base and
pushing it back down into position. Stop when it
clicks into place.
• Avoid leaving the remote control and batteries in an excessive heat or humid environment like the
kitchen, bathroom, sauna, sunroom or in a closed car.
• Replace only with the same or equivalent type recommended by the battery manufacturer.
• Dispose of the used batteries according to the manufacturer's instructions and local environment
regulations for your region.
• Never throw the batteries into a fire. There may be danger of an explosion.
• If the batteries are dead or if you will not be using the remote control for an extended period of time,
remove the batteries to avoid damage to the remote control from possible battery leakage.
14 Introduction
Page 15
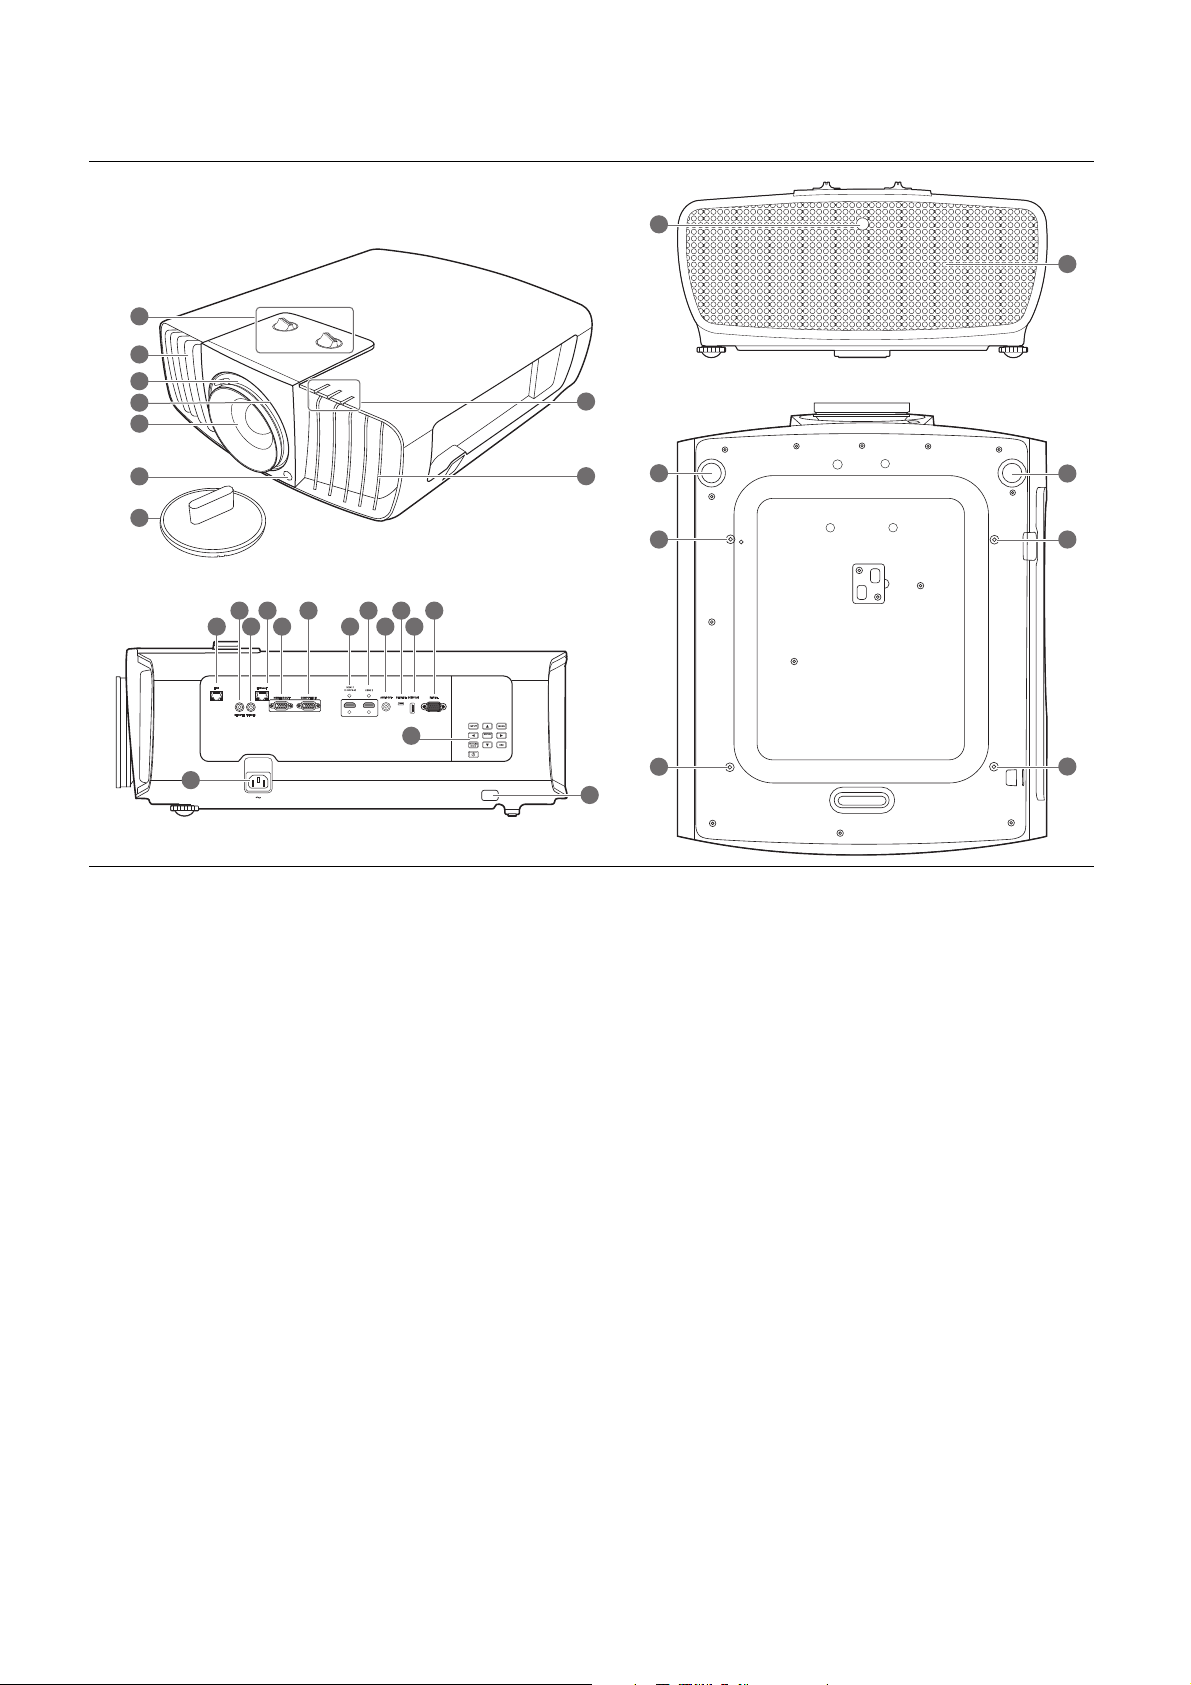
Projector exterior view
6
6
25
26
26
5
3
2
4
7
1
25
26
26
24
2
9
8
1011121314
15
16
171819
20
21
23
22
1. Lens shift adjustment knobs (LEFT/RIGHT,
UP/DOWN)
2. Vent (heated air exhaust)
3. Focus ring
4. Zoom ring
5. Projection lens
6. IR remote sensor
7. Lens cover
8. POWER indicator light/TEMPerature
warning light/LIGHT indicator light
(See "Indicators" on page 48.)
9. Vent (cool air intake)
10. RJ-45 LAN input jack
11. Remote control jack
For use with an wired remote control.
12. 12 VDC output terminal
Trigger external devices such as an
13. HDBaseT input port
14. RGB (PC) signal output jack
15. RGB (PC)/Component Video (YPbPr /
YCbCr) signal input jack
16. HDMI 1 input port (HDCP 2.2)
17. HDMI 2 input port
18. Audio output jack
19. Service port
20. DC (5V 2A) output port
21. Serial port
22. External control panel
(See "Controls and functions" on
page 16.)
23. AC power jack
24. Security bar
25. Adjuster feet
26. Ceiling mount holes
electric screen or light control, etc.
15 Introduction
Page 16
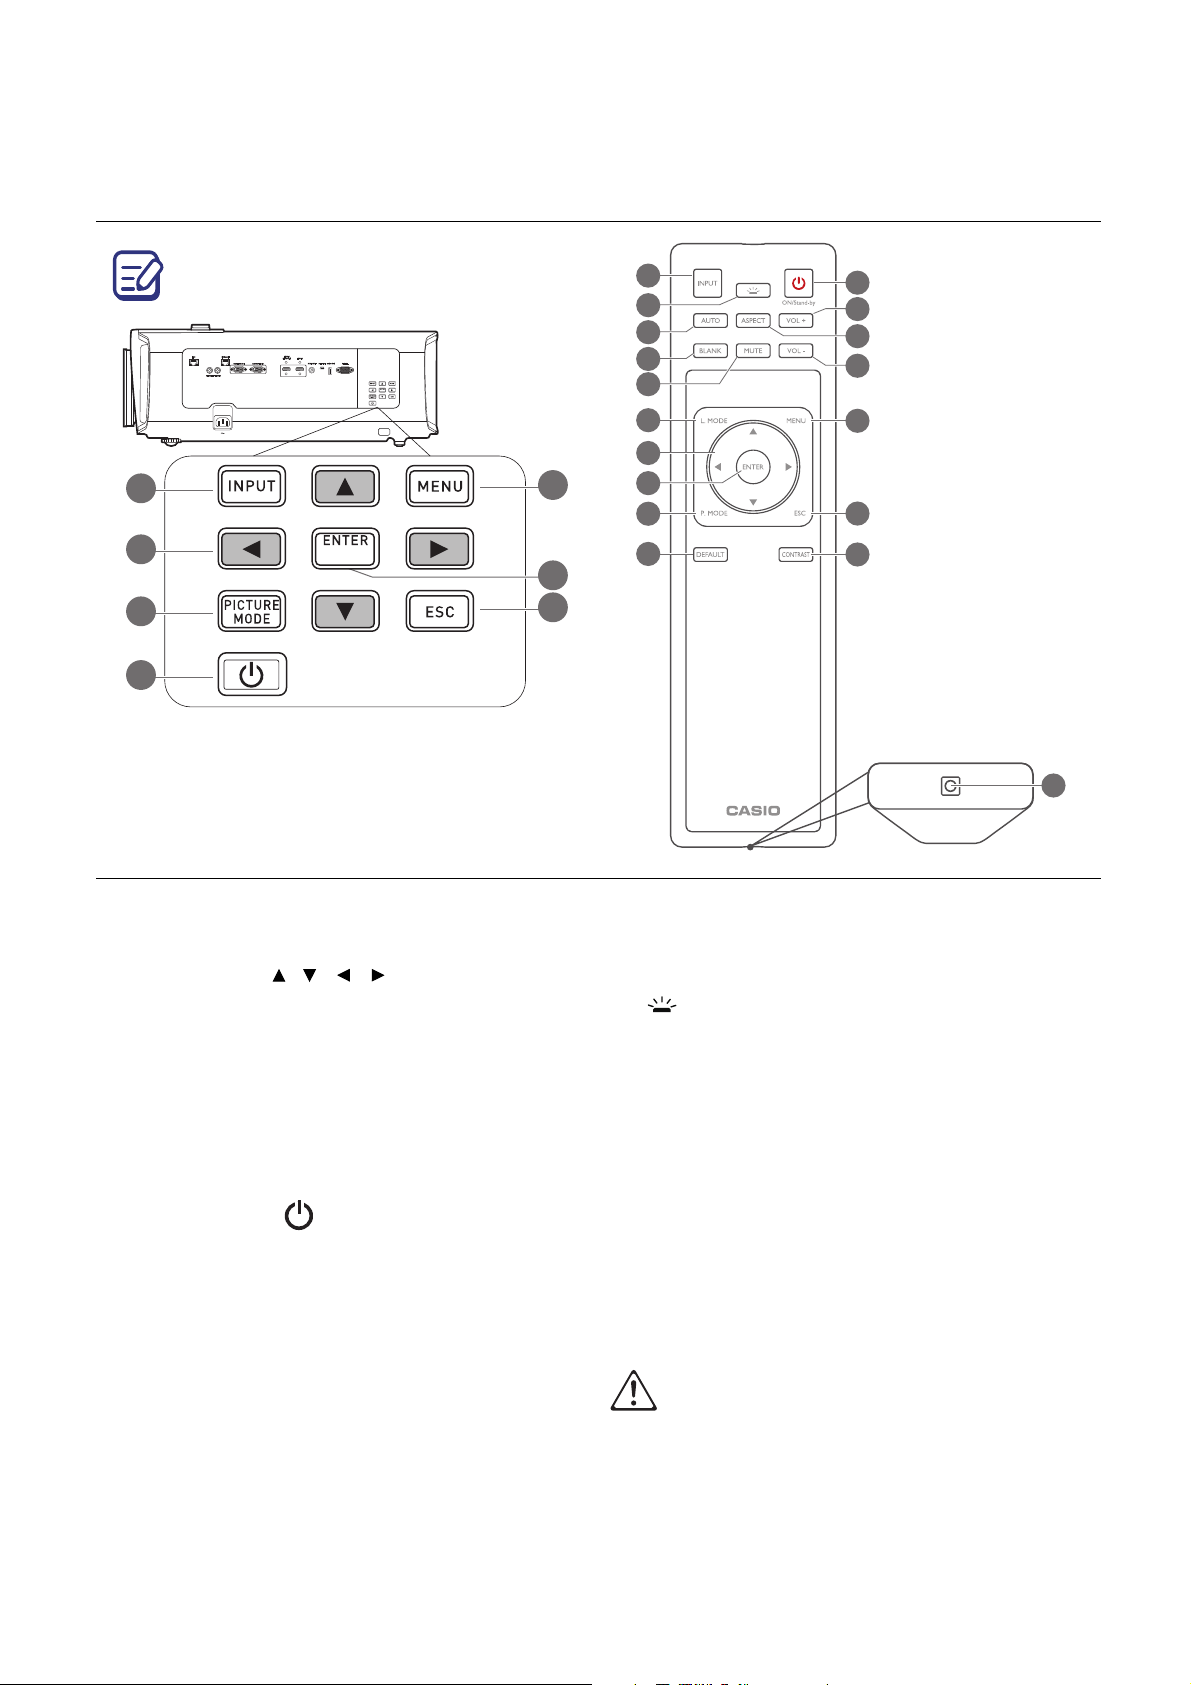
Controls and functions
7
5
3
4
2
1
6
All the key presses described in this
document are available on the remote control
or projector.
Bottom
Projector & Remote control
1
8
9
10
11
12
2
6
3
13
4
14
15
16
5
1212
7
17
18
1. INPUT
Displays the input selection bar.
2. Arrow keys ( , , , )
When the On-Screen Display (OSD) menu
is activated, these keys are used as
directional arrows to select the desired
menu items and to make adjustments.
3. PICTURE MODE
Selects an available picture setup mode.
4. ON/Stand-by
Toggles the projector between standby
mode and on.
5. MENU
Turns on the On-Screen Display (OSD)
menu.
6. ENTER
Confirms the selected On-Screen Display
(OSD) menu item.
7. ESC
Goes back to previous OSD menu, exits
and saves menu settings.
8. KEY LIGHT
Turns on the remote control back light for a
few seconds. To keep the back light on,
press any other key while the back light is
on. Press the key again to turn the back
light off.
9. AUTO
Automatically determines the best picture
timings for the displayed image.
10. BLANK
Used to hide the screen picture.
Do not block the projection lens from projecting
as this could cause the blocking object to
become heated and deformed or even cause a
fire.
16 Introduction
Page 17
11. MUTE
A
p
p
r
o
x
.
+
3
0
º
A
p
p
r
o
x
.
+
3
0
º
15. ASPECT
Toggles the projector audio between on
and off.
12. L. MODE
Selects a suitable light source power from
Selects the display aspect ratio.
16. VOL-
Lowers the projector volume.
17. CONTRAST
among the provided modes.
Displays the contrast setting bar for
13. DEFAULT
Resets the current function to default
adjustment.
18. Port for wired remote control
factory setting.
Connects a cable to the projector for
14. VOL+
remote control operation.
Increases the projector volume.
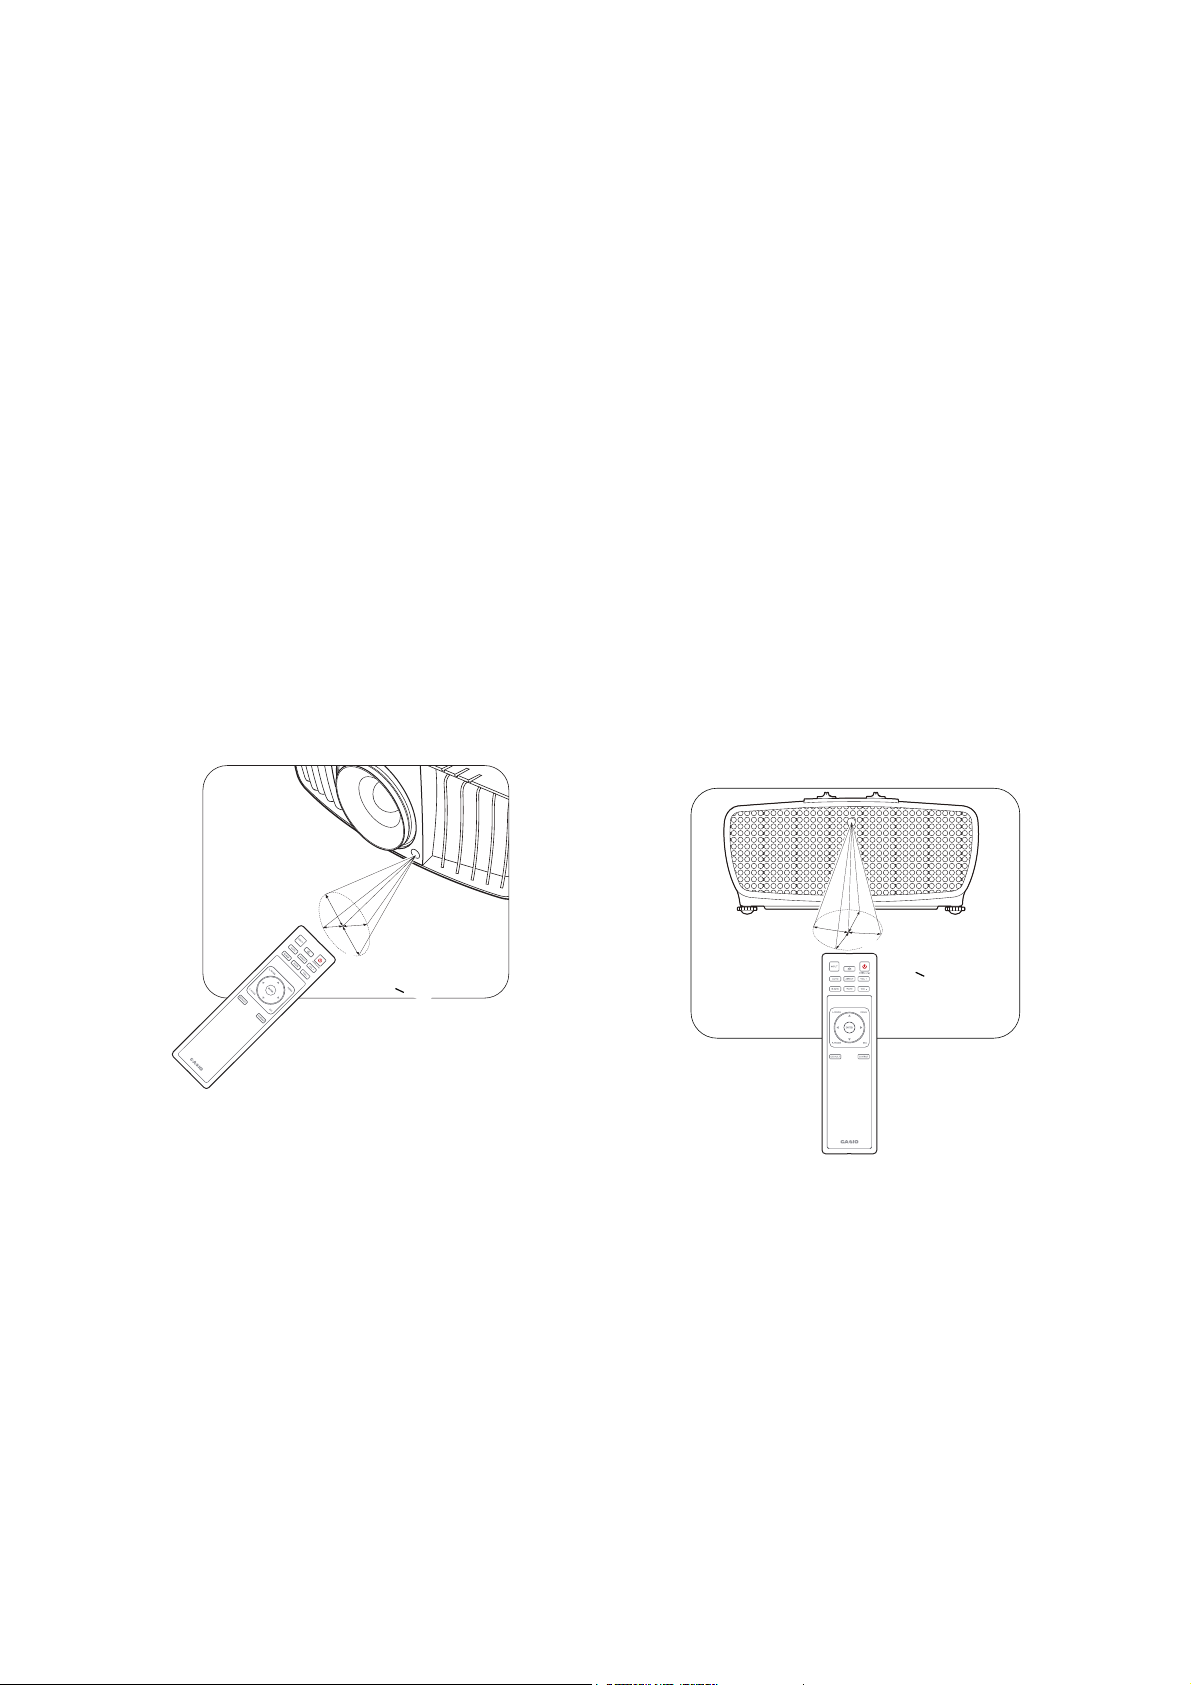
Remote control effective range
The remote control must be held at an angle within 30 degrees perpendicular to the projector's
IR remote control sensor(s) to function correctly. The distance between the remote control and
the sensor(s) should not exceed 8 meters (~ 26 feet).
Make sure that there are no obstacles between the remote control and the IR sensor(s) on the
projector that might obstruct the infra-red beam.
• Operating the projector from the front • Operating the projector from the rear
17 Introduction
Page 18

Positioning your projector
Choosing a location
Before choosing an installation location for your projector, take the following factors into
consideration:
• Size and position of your screen
• Electrical outlet location
• Location and distance between the projector and the rest of your equipment
You can install your projector in the following ways.
1. Front
Select this location with the projector placed
on the table in front of the screen. This is the
most common way to position the projector for
quick setup and portability.
2. Front Ceiling
Select this location with the projector
suspended upside-down from the ceiling in
front of the screen. Purchase a projector
ceiling mount kit from your dealer to mount
your projector on the ceiling.
3. Rear Ceiling
Select this location with the projector
suspended upside-down from the ceiling
behind the screen. Note that a special rear
projection screen and a projector ceiling
mount kit are required for this installation
location.
4. Rear
Select this location with the projector placed
on the table behind the screen. Note that a
special rear projection screen is required.
After turning on the projector, go to INSTALLATION > Projector Mode and press / to select
a setting.
Obtaining a preferred projected image size
The distance from the projector lens to the screen, the zoom setting, and the video format each
factors in the projected image size. To shift the lens, turn the knobs on the projector to shift the
18 Positioning your projector
Page 19

projection lens in any direction within the allowable range depending on your desired image
F
E
A
90°
B
F
E
D
90°
C
F
position
Front projection
• When adjusting the projection position
vertically in lens shift
• When adjusting the projection position
horizontally in lens shift
A: Distance from the center of the lens to the bottom edge of the projected image (when lens shift is raised to its
highest level)
B: Distance from the center of the lens to the bottom edge of the projected image (when lens shift is lowered to
its lowest level)
C: Lens center movement distance (when lens shift is set to maximum left)
D: Lens center movement distance (when lens shift is set to maximum right)
E: Projection distance from the projector to the screen
F: Size of the projected image
• The screen aspect ratio is 16:9 and the projected picture is in a 16:9 aspect ratio
Screen
size
Diagonal Height Width
Inch cm Inch cm Inch cm Inch cm Inch cm Inch cm Inch cm Inch cm
95 241 47 118 83 210 114 289 167 425 4.7 12 51.2 130 20.7 53
100 254 49 125 87 221 120 305 176 448 4.9 12 53.9 137 21.8 55
120 305 59 149 105 266 144 366 212 537 5.9 15 64.7 164 26.1 66
150 381 74 187 131 332 180 457 264 672 7.4 19 80.9 205 32.7 83
180 457 88 224 157 398 216 548 317 806 8.8 22 97.1 247 39.2 100
200 508 98 249 174 443 240 609 353 896 9.8 25 107.9 274 43.6 111
All measurements are approximate and may vary from the actual sizes.
We recommend that if you intend to permanently install the projector, you should physically test the
projection size and distance using the actual projector in situ before you permanently install it, so as to
make allowance for this projector's optical characteristics. This will help you determine the exact mounting
position so that it best suits your installation location.
Size of the projected
image (F)
Projection distance (E)
Shortest
(Wide)
Longest
(Tele)
Offset (A) Offset (B) Offset (C, D)
19 Positioning your projector
Page 20

The projection range for lens shift
a: Maximum horizontal range (H × 25%)
b: Maximum vertical range (V × 60%)
c: 1/2 the vertical height of the image
d: 1/2 the horizontal width of the image
a a
c
b
d
Be sure to stop turning the adjustment knob when you hear a clicking sound indicating that the knob has
reached its limit. Over-turning the knob may cause damage.
You cannot move the image to both the horizontal and vertical maximum values.
b
Mounting the projector
If you intend to mount your projector, we strongly recommend that you use a projector ceiling
mount kit and that you ensure it is securely and safely installed.
Before mounting the projector
• Ask your dealer to install the projector for you. Installing the projector on your own may cause
it to fall and result in injury.
• Take necessary procedures to prevent the projector from falling off such as during an
earthquake.
• The warranty on this projector does not cover any damage caused by installation of the ceiling
mount kit in an improper location.
• Consider the surrounding temperature where the projector is ceiling mounted. If a heater is
used, the temperature around the ceiling may be higher than expected.
• Read the user’s guide for the mounting kit about the range of torque. Tightening with torque
exceeding the recommended range may cause damage to the projector and subsequently
falling off.
• Make sure the power outlet is at an accessible height so that you can easily shut down the
projector.
20 Positioning your projector
Page 21

Adjusting the projected image
Adjusting the projection angle
If the projector is not placed on a flat surface or
the screen and the projector are not
perpendicular to each other, the projected
image becomes trapezoidal. You can screw the
adjuster feet to fine-tune the horizontal angle.
To retract the feet, screw the adjuster feet in a
reverse direction.
• Do not look into the lens while the light source is on. The strong light from the light source may cause
damage to your eyes.
• If you keep on screwing the adjuster feet clockwise, they will come off. This is not a malfunction. When it
happens, turn the adjuster feet counterclockwise to put them back on.
Auto-adjusting the image
In some cases, you may need to optimize the picture quality. To do this, press AUTO. Within 3
seconds, the built-in Intelligent Auto Adjustment function will re-adjust the values of Frequency
and Clock to provide the best picture quality.
The current source information will be displayed in the corner of the screen for 3 seconds.
This function is only available when PC signal (analog RGB) is selected.
Fine-tuning the image size and clarity
1. Adjust the projected image to the size that
you need using the zoom ring.
2. Sharpen the image by rotating the focus
ring.
21 Positioning your projector
Page 22

Connection
Notebook or desktop
computer
A/V device
RJ-45 cable
Wired remote control
Powered screen, etc.
HDBaseT transmitter
VGA cable
HDMI cable
Audio cable
RS-232C cable
1
2
34567
8
Monitor
Speaker
When connecting a signal source to the projector, be sure to:
1. Turn all equipment off before making any connections.
2. Use the correct signal cables for each source.
3. Ensure the cables are firmly inserted.
• In the connections above, some cables may not be included with the projector (see "Shipping contents"
on page 14). They are commercially available from electronics stores.
• The connection illustrations are for reference only. The rear connecting jacks available on the projector
vary with each projector model.
• Many notebooks do not turn on their external video ports when connected to a projector. Usually a key
combo like FN + function key with a monitor symbol turns the external display on/off. Press FN and the
labeled function key simultaneously. Refer to your notebook's documentation to find your notebook's key
combination.
• If the selected video image is not displayed after the projector is turned on and the correct video source
has been selected, check that the video source device is turned on and operating correctly. Also check
that the signal cables have been connected correctly.
• LAN port provides Ethernet functions.
• Be sure to use a High Speed HDMI Cable for HDMI connection.
• Use a Premium High Speed cable to project 4K content through the HDMI 1 port.
• Be sure to use a shielded RS-232C cable for RS-232C connection.
2 3
55 61 74 8
22 Connection
Page 23

Using the cable tie set
Cable tie
Cable tie ratchet
Cable tie head
3
The cable tie set helps prevent a cable plug from falling out of the connecting port. It contains
the following parts.
To use the cable tie set:
1. Firmly plug a cable to a correct port on the projector. Insert
the cable tie head to the cable tie hole right above the
connecting port. Note that the cable tie cannot be removed
from the hole once it is inserted.
2. Take the cable tie ratchet. Slightly open the ratchet to
surround the connecting cable.
1
2
3. Insert the end of the cable tie to the cable tie ratchet as
illustrated.
4. Close the cable tie ratchet by pressing its tab.
5. Move the cable tie ratchet along with the cable tie to the
end of the cable plug.
4
5
23 Connection
Page 24

Connecting multiple sources through HDBaseT
VGA IN YPbPr HDMI RS232 RJ45
HD Connect
IR RX
Notebook computer
Blu-ray player
Control computer
HDBaseT transmitter
Projector
LAN cable
IR extender
Projector
remote
control
HDBaseT of this model combine HD digital video, audio, and a control signal. With the use of
HDBaseT transmitter (commercially available), you may connect multiple sources to your
projector with HDBaseT connection.
The illustration below is for reference only, actual layout may vary.
• Use the following types of LAN cables:
- a shielded LAN cable rated at CAT5e or better
- Twisted pair LAN cable
- Single wire
- Straight cable
• Maximum transmission distance is 100 m.
• However, maximum transmission distance may be shorter in some environments.
• Do not use the LAN cable when it is coiled or bundled.
• Inserting or removing the LAN cable during projection may cause noise.
• Connectivity with all HDBaseT transmitters on the market is not guaranteed.
• Some HDBaseT transmitters may not enable correct projection when used to connect source equipment
to the projector.
• Commands cannot be received through HDBaseT when the projector is in standby mode.
24 Connection
Page 25

Operation
Starting up the projector
1. Plug the power cord. Turn on the power outlet switch
(where fitted). The power indicator on the projector
lights red after power has been applied.
2. Press on the projector or remote control to start
the projector. The power indicator flashes green and
stays green when the projector is on.
(If necessary) Rotate the focus ring to adjust the
image clearness.
3. If this is the first time you turn on the projector, the
setup wizard appears to guide you through setting up the projector. If you have already
done this, skip this step and move on to the next step.
• Use the arrow keys ( / / / ) on the projector or remote control to move through the
menu items.
• Use ENTER to confirm the selected menu item.
Step 1:
Specify Projector Position.
For more information about projector position,
see Choosing a location.
Step 2:
Specify OSD Language.
Step 3:
Specify Auto Source.
Select On if you want the projector to always
search for available signals automatically when
the projector is turned on.
Now you’ve completed the initial setup.
4. If you are prompted for a password, press the arrow keys to enter a 6-digit password. See
"Utilizing the password function" on page 27.
25 Operation
Page 26

5. Switch all of the connected equipment on.
PICTURE
Picture Mode
User Mode Settings
Contrast
Tint
Sharpness
Advanced
Reset Current Picture Mode
Bright
Exit
Color
Brightness
2
3
1
5
6
4
142
5
3
6
6. The projector will search for input signals. The current input signal being scanned appears.
If the projector does not detect a valid signal, the message “No Signal” will continue
displaying until an input signal is found.
You can also press INPUT to select your desired input signal. See "Switching input signal"
on page 28.
• Please use the original accessories (e.g. power cord) to avoid possible dangers such as electric shock
and fire.
• The Setup Wizard screenshots are for reference only and may differ from the actual design.
• If the frequency/resolution of the input signal exceeds the projector's operating range, you will see the
message “Out of Range” displayed on the background screen. Please change to an input signal which is
compatible with the projector's resolution or set the input signal to a lower setting. See "Timing chart" on
page 52.
• If no signal is detected for 3 minutes, the projector automatically enters saving mode.
Using the menus
The projector is equipped with On-Screen Display (OSD) menus for making various
adjustments and settings.
The OSD screenshots below are for reference only, and may differ from the actual design.
Below is the overview of the OSD menu.
Main menu
icon
Current input
signal
Main menu Status
Sub-menu
Button operation
guidance.
To access the OSD menu, press MENU on the projector or remote control.
• Use the arrow keys ( / / / ) on the projector or remote control to move through the menu
items.
• Use ENTER on the projector or remote control to confirm the selected menu item.
26 Operation
Page 27

Securing the projector
INPUT NEW PASSWORD
Back
Password Error
Please try again.
Using a security cable lock
The projector has to be installed in a safe place to prevent theft. Otherwise, purchase a lock to
secure the projector. You can locate a security bar on the projector. See item 24 on page 15.
A Kensington security cable lock is usually a combination of key(s) and the lock. Refer to the
lock’s documentation for finding out how to use it.
Utilizing the password function
Setting a password
1. Go to SYSTEM SETUP: ADVANCED > Password. Press ENTER. The Password page
appears.
2. Highlight Change Password and press ENTER.
3. The four arrow keys ( , , , ) respectively
represent 4 digits (1, 2, 3, 4). According to the
password you desire to set, press the arrow keys to
enter six digits for the password.
4. Confirm the new password by re-entering the new
password.
Once the password is set, the OSD menu returns to
the Password page.
5. To activate the Power On Lock function, press /
to highlight Power On Lock and press / to select On. Input the password again.
• The digits being input will display as asterisks on-screen. Make a note of your selected password and
keep it in a safe place in advance or right after the password is entered so that it is available to you
should you ever forget it.
• Once a password has been set and the power on lock is activated, the projector cannot be used unless
the correct password is entered every time the projector is started.
If you forget the password
If you enter the wrong password, the password error
message will appear, and the Input Current Password
message follows. If you absolutely do not remember the
password, you can use the password recall procedure.
See "Entering the password recall procedure" on
page 28.
If you enter an incorrect password 5 times in
succession, the projector will automatically shut down in a short time.
27 Operation
Page 28

Entering the password recall procedure
Please write down the recall code,
and contact
Customer Center.
Recall Code:
RECALL PASSWORD
Exit
1. Press and hold ENTER for 3 seconds. The projector
will display a coded number on the screen.
2. Write down the number and turn off your projector.
3. Seek help from the local CASIO service center to
decode the number. You may be required to provide
proof of purchase documentation to verify that you
are an authorized user of the projector.
Changing the password
1. Go to SYSTEM SETUP: ADVANCED > Password > Change Password.
2. Press ENTER. The message “Input Current Password” appears.
3. Enter the old password.
• If the password is correct, another message “Input New Password” appears.
• If the password is incorrect, the password error message will appear, and the message
“Input Current Password” appears for your retry. You can press ESC to cancel the
change or try another password.
4. Enter a new password.
5. Confirm the new password by re-entering the new password.
Disabling the password function
To disable password protection, go to SYSTEM SETUP: ADVANCED > Password > Power
On Lock and press / to select Off. The message “Input Current Password” appears.
Enter the current password.
• If the password is correct, the OSD menu returns to the Password page. You will not have
to enter the password next time turning on the projector.
• If the password is incorrect, the password error message will appear, and the message
“Input Current Password” appears for your retry. You can press ESC to cancel the
change or try another password.
Though the password function is disabled, you need to keep the old password in hand should you ever
need to re-activate the password function by entering the old password.
Switching input signal
The projector can be connected to multiple devices at the same
time. However, it can only display one full screen at a time.
When starting up, the projector automatically searches for the
available signals.
Be sure the SYSTEM SETUP: BASIC > Auto Input Search
menu is On if you want the projector to automatically search for
the signals.
To select the source:
1. Press INPUT. A source selection bar appears.
2. Press / until your desired signal is selected and press
ENTER.
28 Operation
Page 29

Once detected, the selected source information will appear at the corner of the screen for
seconds. If there is multiple equipment connected to the projector, repeat steps 1-2 to
search for another signal.
• The brightness level of the projected image will change accordingly when you switch between different
input signals.
• For best display picture results, you should select and use an input signal which outputs at the
projector’s native resolution. Any other resolutions will be scaled by the projector depending upon the
“aspect ratio” setting, which may cause some image distortion or loss of picture clarity. See "Aspect
Ratio" on page 33.
Shutting down the projector
1. Press and a confirmation message will appear
prompting you. If you don't respond in a few
seconds, the message will disappear.
2. Press a second time.
3. The power indicator becomes a steady red and fans
stop. Disconnect the power cord from the power
outlet.
The indicator lights may stay lit even after you unplug the power cord. However, this is not a malfunction.
29 Operation
Page 30

Menu operation
Please note that the on-screen display (OSD) menus vary according to the signal type selected
and the projector model you are using.
The menu items are available when the projector detects at least one valid signal. If there is no
equipment connected to the projector or no signal detected, limited menu items are accessible.
PICTURE menu
The projector is preset with several predefined picture modes so that you
can choose one to suit your operating environment and input signal picture
type.
• Bright: Maximizes the brightness of the projected image. This mode is
suitable for environments where extra-high brightness is required, such as
using the projector in well lit rooms.
Picture Mode
• Vivid: Being slightly brighter than Natural mode, it is suitable for
presentation in rooms where you need more brightness.
• Natural: With well-balanced color saturation and contrast with a low
brightness level, this is most suitable for presentation.
User Mode
Settings
• User 1/User 2: Recalls the settings customized based on the current
available picture modes. See "User Mode Settings" on page 30.
There are 2 user-definable modes if the current available picture modes are
not suitable for your need. You can use one of the picture modes (except the
User 1/User 2) as a starting point and customize the settings.
• Load Settings
1. Go to PICTURE > Picture Mode.
2. Press / to select User 1 or User 2.
3. Press to highlight User Mode Settings, and press ENTER. The User
Mode Settings page is displayed.
4. Select Load Settings and press ENTER.
5. Press / to select a picture mode that is closest to your need.
6. Press ENTER and ESC to return to the PICTURE menu.
7. Press to select the sub-menu items you want to change and adjust the
values with / . The adjustments define the selected user mode.
30 Menu operation
Page 31

User Mode
High Brightness
Low Contrast
Low Brightness
High Contrast
1.6 1.8 2.0 2.1 2.2 2.3 2.4 2.5 2.6 2.8
Settings
(Continued)
Brightness
Contrast
• Rename User Mode
Select to rename the customized picture modes (User 1 or User 2). The new
name can be up to 9 characters including English letters (A-Z, a-z), digits
(0-9), and space (_).
1. Go to PICTURE > Picture Mode.
2. Press / to select User 1 or User 2.
3. Press to highlight User Mode Settings, and press ENTER. The User
Mode Settings page is displayed.
4. Press to highlight Rename User Mode and press ENTER. The
Rename User Mode page is displayed.
5. Use / / / to select desired characters.
6. When done, press ENTER or ESC to exit.
The higher the value, the brighter the image. Adjust this control so the black
areas of the image appear just as black and that detail in the dark areas is
visible.
The higher the value, the greater the contrast. Use this to set the peak white
level after you have previously adjusted the Brightness setting to suit your
selected input and viewing environment.
Color
Tint
Lower setting produces less saturated colors. If the setting is too high, colors
on the image will be overpowering, which makes the image unrealistic.
The higher the value, the more greenish the picture becomes. The lower the
value, the more reddish the picture becomes.
Sharpness The higher the value, the sharper the picture becomes.
• Select Gamma
Gamma refers to the relationship between input source and picture
brightness.
• 1.6/1.8/2.0/2.1: Select these values according to your preference.
• 2.2/2.3: Increases the average brightness of the picture. Best for a lit
environment, meeting room or family room.
Advanced
• 2.4/2.5: Best for viewing movies in a dark environment.
• 2.6/2.8: Best for viewing movies which are mostly composed of dark
scenes.
31 Menu operation
Page 32

Advanced
RED
BLUE
GREEN
Yellow
Cyan
Magenta
(Continued)
• Color Temperature
There are several preset color temperature settings available. The available
settings may vary according to the signal type selected.
• Normal: Maintains normal colorings for white.
• Cool: Makes images appear bluish white.
• Warm: Makes images appear reddish white.
You can also set a preferred color temperature by adjusting the following
options.
• Red Gain/Green Gain/Blue Gain: Adjusts the contrast levels of Red,
Green, and Blue.
• Red Offset/Green Offset/Blue Offset: Adjusts the brightness levels of
Red, Green, and Blue.
• 3D Color Management
The Color Management provides six sets (RGBCMY) of colors to be
adjusted. When you select each color, you can independently adjust its
range and saturation according to your preference.
• Primary Color: Selects a color from among Red, Yellow, Green, Cyan,
Blue, or Magenta.
• Hue: Increase in the range will include colors
consisted of more proportions of its two
adjacent colors. Please refer to the
illustration for how the colors relate to each
other.
For example, if you select Red and set its
range at 0, only pure red in the projected
picture will be selected. Increasing its range
will include red close to yellow and red close
to magenta.
• Gain: Adjusts the values to your preference. The contrast level of the
primary color you select will be affected. Every adjustment made will
reflect to the image immediately.
• Saturation: Adjusts the values to your preference. Every adjustment
made will reflect to the image immediately. For example, if you select
Red and set its value at 0, only the saturation of pure red will be
affected.
32 Menu operation
Saturation is the amount of that color in a video picture. Lower settings produce less
saturated colors; a setting of “0” removes that color from the image entirely. If the saturation
is too high, that color will be overpowering and unrealistic.
Page 33

Advanced
15:9 picture
4:3 picture
16:9 picture
16:10 picture
(Continued)
Reset Current
Picture Mode
• MoviePro
• Color Enhancement: Allows you to fine-tune the saturation of colors
with larger flexibility. It modulates complex color algorithms to flawlessly
render saturated colors, fine gradients, intermediate hues and subtle
pigments.
• Skin Tone: Provides a smart adjustment of hue only for calibrating
people's skin color, not other colors in the image. It prevents
discoloration of skin tones from the light of the projection beam,
portraying every skin tone in its most beautiful shade.
• Super Resolution: It is a super-resolution technology which radically
enhances Full HD content in terms of colors, contrast, and textures. It's
also a detail enhancement technology refines surface details for
true-to-life images that pop off the screen. Users can adjust levels of
sharpness and detail enhancement for optimal viewing.
Returns all of the adjustments you’ve made for the selected Picture Mode
(including preset modes, User 1, and User 2) to the factory preset values.
1. Press ENTER. The confirmation message is displayed.
2. Use / to select Reset and press ENTER. The current picture mode
returns to the factory preset settings.
DISPLAY menu
There are several options to set the image's aspect ratio depending on your
input signal source.
• Auto: Scales an image proportionally to fit the
projector's native resolution in its horizontal or
vertical width.
• 4:3: Scales an image so that it is displayed in the
center of the screen with a 4:3 aspect ratio.
Aspect Ratio
• 16:9: Scales an image so that it is displayed in the
center of the screen with a 16:9 aspect ratio.
• 16:10: Scales an image so that it is displayed in
the center of the screen with a 16:10 aspect ratio.
Note that enlarging or reducing the size of an image using the ASPECT key for commercial
purposes or public presentation may infringe on the legally protected copyright of the
copyright holder of the original material.
Image
Position
Overscan
Adjustment
Displays the position adjustment page. To move the projected image, use
the directional arrow keys. This function is only available when a PC signal
(analog RGB) is selected.
Conceals the poor picture quality in the four edges.
The greater the value, the more portion of the picture is concealed while the
screen remains filled and geometrically accurate. Setting 0 means the
picture is 100% displayed.
33 Menu operation
Page 34

Adjusts the clock phase to reduce image distortion.
Phase
This function is only available when a PC signal (analog RGB)
is selected.
Adjusts the horizontal width of the image.
H. Size
This function is only available when a PC signal (analog RGB) is selected.
INSTALLATION menu
Projector
Mode
Test Pattern
Light Source
Settings
12V Trigger
The projector can be installed on a ceiling or behind a screen. See
"Choosing a location" on page 18.
Is used to adjust the image size and focus and
check that the projected image is free from
distortion. To close the test pattern, press MENU
and select Off.
• Light Source Mode: Selects a suitable light source power from among the
provided modes. See "Saving power" on page 47.
• Light Source Information: See "Getting to know the light source hour" on
page 47.
There is one 12V trigger that works according to your needs for installation
scenarios. Two selections are available:
• Off: If this is selected, the projector will not send electronic signal out
when it is turned on.
• On: The projector will send a low to high electronic signal out when it is
turned on, a high to low signal out when it is turned off.
We recommend you use the High Altitude Mode when your environment is
between 1500 m –3000 m above sea level, and ambient temperature is
between 5°C–30°C.
High Altitude
Mode
34 Menu operation
Operation under "High Altitude Mode" may cause a higher decibel
operating noise level because of increased fan speed necessary to improve
overall system cooling and performance.
If you use this projector under other extreme conditions excluding the above,
it may display auto shut-down symptoms, which is designed to protect your
projector from over-heating. In cases like this, you should switch to High
Altitude mode to solve these symptoms. However, this is not to state that this
projector can operate under any and all harsh or extreme conditions.
Do not use the High Altitude Mode if your altitude is between 0 m and 1500 m and ambient
temperature is between 5°C and 35°C. The projector will be over cooled, if you turn the
mode on under such a condition.
Page 35

SYSTEM SETUP: BASIC menu
Language Sets the language for the On-Screen Display (OSD) menus.
Background
Color
Splash
Screen
Auto Power
Off
Direct Power OnAllows the projector to turn on automatically once the power is fed through
Menu
Settings
Rename Input
Auto Input
Search
Sets the background color for the projector.
Allows you to select which screen will be displayed during projector start-up.
Allows the projector to turn off automatically if no input signal is detected
after a set period of time to prevent unnecessary waste of light source power.
the power cord.
• Menu Position: Sets the On-Screen Display (OSD) menu position.
• Menu Display Time: Sets the length of time the OSD will remain active
after your last key press.
• Reminder Message: Sets the reminder messages on or off.
Renames the current input source to your desired name.
On the Rename Input page, use / / / and ENTER to set the desired
characters for the connected source item.
When done, press ESC to exit and save the changes.
Allows the projector to automatically search for a signal.
SYSTEM SETUP: ADVANCED menu
Audio Out
Volume
Mute Temporarily turns off the sound.
HDMI Range
Password See "Utilizing the password function" on page 27.
Panel Key
Lock
Adjusts the sound level.
Selects a suitable RGB color range to correct the color accuracy.
• Auto: Automatically selects a suitable color range for the incoming
HDMI signal.
• Full Range: Utilizes the Full range RGB 0-255.
• Limited Range: Utilizes the Limited range RGB 16-235.
With the control keys on the projector and remote control locked, you can
prevent your projector settings from being changed accidentally (by children,
for example). When the Panel Key Lock is on, no control keys on the
projector and remote control will operate except ON/Stand-by .
To release panel key lock, press and hold (the right key) on the projector
or remote control for 3 seconds.
If you turn off the projector without disabling panel key lock, the projector will still be in
locked status the next time it is turned on.
35 Menu operation
Page 36

Serial Port
• IP Address
Only available when DHCP is set to Off. Use /
to select a column and use / to adjust the
value.
• Subnet Mask
• Default Gateway
• DNS Server
• Apply Enacts these settings.
Setting
Network
Settings
Allows you to select a preferred control port: through the RS-232C port
(SERIAL port on the projector) or the HDBaseT port (HDBaseT input port on
the projector).
This projector is equipped with network function. You can manage and
control the projector from a remote computer using a web browser when they
are properly connected to the same local area network.
• Wired LAN
• Status: Shows the connection status.
• DHCP: Select On if you are in a DHCP environment and IP Address,
Subnet Mask, Default Gateway, DNS Server settings will be
automatically retrieved. Select Off if you are in a non-DHCP
environment and make adjustments to below settings.
Network
Standby
Reset All
Settings
For details on controlling the projector from a remote computer, see "Controlling the
projector remotely" on page 38
.
• AMX Device Discovery: When this function is On, the projector can be
detected by AMX controller.
• MAC Address: Displays the mac address for this projector.
• Enable Network Standby Mode: Allows the projector to provide the
network function in standby mode.
• Auto Disable Network Standby Mode: Allows the projector to disable the
network function after a set period of time after it enters standby mode. For
instance, if 20 min is selected, the projector is able to provide the network
function for 20 minutes after it enters standby mode. When 20 minutes is
up, the projector enters normal standby mode.
Returns all settings to the factory preset values.
The following settings will still remain: Picture Mode, User Mode Settings, Brightness,
Contrast, Color, Tint, Sharpness, Advanced, Projector Mode, Rename Input, Audio
Out Volume, Mute, Password, Network Settings and Network Standby.
INFORMATION menu
Input Shows the current signal source.
Picture Mode Shows the selected mode in the PICTURE menu.
Resolution Shows the native resolution of the input signal.
Color System Shows input system format.
36 Menu operation
Page 37

Light Source
Usage Time
Shows the number of hours the light source has been used.
Firmware
Version
Shows the firmware version of your projector.
37 Menu operation
Page 38

Controlling the projector remotely
i
i
i
ii
Once you have the correct IP address for the projector and the projector is on or in standby
mode, you can use any computer that is on the same local area network to control the
projector.
The screenshots in this user’s guide are for reference only, and may differ from the actual design.
1. Enter the address of the projector in the address bar of your browser and press Enter.
2. The Crestron (eControl) page displays the Crestron eControl user interface. The eControl
page provides a variety of virtual keys to control the projector or adjust the projected
pictures.
• Main page
i. These buttons function the same as the ones on the OSD menus, projector or remote
control. See "Projector & Remote control" on page 16 and "Menu operation" on page 30
for details. However, if you intend to go back to previous OSD menu, exit and save menu
settings, press MENU.
ii. To switch input source, click your desired signal.
38 Controlling the projector remotely
Page 39

• Tools page
i
ii
iii
iv
v
i
The tools page allows you to manage the projector, configure the LAN control settings and
secure access of remote network operation on this projector.
i. You can name the projector, keep track of its location and the person in charge of it.
ii. You can adjust the Network Settings.
iii. Once set, access to the remote network operation on this projector has been
password-protected.
iv. Once set, access to the tools page has been password-protected.
After making the adjustments, press the Send button and the data will be saved in the projector.
v. Press this button to go back to the remote network operation page.
• Info page
The info page displays the information and status of this projector.
i. Press this button to go back to the remote network operation page.
39 Controlling the projector remotely
Page 40

PJLink Commands
This projector supports standard protocol PJLink for projector control. Supported commands
are as below.
Command Control details Notes
Parameters
POWR Power supply control
POWR ?
INST ?
INPT Input selection
INPT ? Input selection query
AVMT AV MUTE control
AVMT ? AV MUTE status query VIDEO & AUDIO MUTE mode on
ERST ? Error status query
LAMP ? Light source status query
NAME ? Projector name query “C
INF1 ? Manufacturer name query “C
INF2 ? Model name query "XJ-L8300HN" is returned.
INFO ?
Power supply status
query
Input selection index
query
Other information query
0 = Standby
1 = Power ON
Parameters
0 = Standby 1 = Power ON
No.1 11
No.2 31
No.3 32
No.4 51
Parameters
11: RGB 1
31: HDMI 1
32: HDMI 2
51: HDBaseT
Parameters
VIDEO & AUDIO MUTE mode off
Parameters
1st byte: Indicates fan errors, range 0 , 2
2nd byte: Indicates light source errors, range 0 , 2
3rd byte: Indicates temperature errors, range 0 , 2
4th byte: Fixed at 0
Definitions for each value from 0 or 2 are as follows.
0 = No error known 1 = Warning 2 = Error
Parameters
1st digits (1 – 5 digits) : Light source cumulative
operating time
ASIO” is returned.
ASIO” is returned.
"" (null) is returned.
CLSS ? Class information query “1” is returned.
For details, visit the CASIO website at the URL below.
http://world.casio.com/download/projector/
40 Controlling the projector remotely
Page 41

Projector RS-232C Control
To control the projector using RS-232C commands from a computer, you need to connect the
projector and computer using a commercially available serial cable (cross).
Interface settings
RS-232C Protocol
Baud rate Fixed at 9600
Data length 8 bit
Parity check None
Stop bit 1 bit
Flow control None
Commnad table
Function Type Operation ASCII
Write Power On <CR>*pow=on#<CR>
Power
Write Power off <CR>*pow=off#<CR>
Read Power Status <CR>*pow=?#<CR>
Write COMPUTER/YpbPr <CR>*sour=RGB#<CR>
Source Selection
Audio
Picture Mode
Write HDMI <CR>*sour=hdmi#<CR>
Write HDMI 2 <CR>*sour=hdmi2#<CR>
Write HDBaseT <CR>*sour=hdbaset#<CR>
Read Current source <CR>*sour=?#<CR>
Write Mute On <CR>*mute=on#<CR>
Write Mute Off <CR>*mute=off#<CR>
Read Mute Status <CR>*mute=?#<CR>
Write Volume + <CR>*vol=+#<CR>
Write Volume - <CR>*vol=-#<CR>
Write Volume = value <CR>*vol=value#<CR>
Read Volume Status <CR>*vol=?#<CR>
Write Bright <CR>*appmod=bright#<CR>
Write Vivid <CR>*appmod=vivid#<CR>
Write Natural <CR>*appmod=natural#<CR>
Write User1 <CR>*appmod=user1#<CR>
Write User2 <CR>*appmod=user2#<CR>
Read Picture Mode <CR>*appmod=?#<CR>
41 Projector RS-232C Control
Page 42

Write Contrast + <CR>*con=+#<CR>
Write Contrast - <CR>*con=-#<CR>
Read Contrast value <CR>*con=?#<CR>
Write Brightness + <CR>*bri=+#<CR>
Write Brightness - <CR>*bri=-#<CR>
Read Brightness value <CR>*bri=?#<CR>
Write Color + <CR>*color=+#<CR>
Write Color - <CR>*color=-#<CR>
Read Color value <CR>*color=?#<CR>
Write Tint + <CR>*tint=+#<CR>
Write Tint - <CR>*tint=-#<CR>
Read Tint value <CR>*tint=?#<CR>
Write Sharpness + <CR>*sharp=+#<CR>
Write Sharpness - <CR>*sharp=-#<CR>
Read Sharpness value <CR>*sharp=?#<CR>
Write Skin Tone + <CR>*skintone=+#<CR>
Write Skin Tone - <CR>*skintone=-#<CR>
Read Skin Tone value <CR>*skintone=?#<CR>
Write Color Temperature-Warm <CR>*ct=warm#<CR>
Picture Setting
Write Color Temperature-Normal <CR>*ct=normal#<CR>
Write Color Temperature-Cool <CR>*ct=cool#<CR>
Read Color Temperature Status <CR>*ct=?#<CR>
Write Aspect 4:3 <CR>*asp=4:3#<CR>
Write Aspect 16:9 <CR>*asp=16:9#<CR>
Write Aspect 16:10 <CR>*asp=16:10#<CR>
Write Aspect Auto <CR>*asp=AUTO#<CR>
Read Aspect Status <CR>*asp=?#<CR>
Write Overscan Adjustment + <CR>*overscan=+#<CR>
Write Overscan Adjustment - <CR>*overscan=-#<CR>
Read Overscan Adjustment value <CR>*overscan=?#<CR>
Write Auto <CR>*auto#<CR>
Write Red Gain + <CR>*RGain=+#<CR>
Write Red Gain - <CR>*RGain=-#<CR>
Read Red Gain value <CR>*RGain=?#<CR>
Write Green Gain + <CR>*GGain=+#<CR>
Write Green Gain - <CR>*GGain=-#<CR>
Read Green Gain value <CR>*GGain=?#<CR>
Write Blue Gain + <CR>*BGain=+#<CR>
Write Blue Gain - <CR>*BGain=-#<CR>
Read Blue Gain value <CR>*BGain=?#<CR>
42 Projector RS-232C Control
Page 43

Write Red Offset + <CR>*ROffset=+#<CR>
Write Red Offset - <CR>*ROffset=-#<CR>
Read Red Offset value <CR>*ROffset=?#<CR>
Write Green Offset + <CR>*GOffset=+#<CR>
Write Green Offset - <CR>*GOffset=-#<CR>
Read Green Offset value <CR>*GOffset=?#<CR>
Write Blue Offset + <CR>*BOffset=+#<CR>
Write Blue Offset - <CR>*BOffset=-#<CR>
Read Blue Offset value <CR>*BOffset=?#<CR>
Picture Setting
Write Gamma Selection-1.6 <CR>*gamma=1.6#<CR>
Write Gamma Selection-1.8 <CR>*gamma=1.8#<CR>
Write Gamma Selection-2.0 <CR>*gamma=2.0#<CR>
Write Gamma Selection-2.1 <CR>*gamma=2.1#<CR>
Write Gamma Selection-2.2 <CR>*gamma=2.2#<CR>
Write Gamma Selection-2.3 <CR>*gamma=2.3#<CR>
Write Gamma Selection-2.4 <CR>*gamma=2.4#<CR>
Write Gamma Selection-2.5 <CR>*gamma=2.5#<CR>
Write Gamma Selection-2.6 <CR>*gamma=2.6#<CR>
Write Gamma Selection-2.8 <CR>*gamma=2.8#<CR>
Read Gamma Selection Status <CR>*gamma=?#<CR>
43 Projector RS-232C Control
Page 44

Write Splash Screen -Casio <CR>*splash=casio#<CR>
Write Splash Screen -Black <CR>*splash=black#<CR>
Write Splash Screen -Blue <CR>*splash=blue#<CR>
Read Splash Screen Status <CR>*splash=?#<CR>
Write Background Color - Green <CR>*background=green#<CR>
Write Background Color - Black <CR>*background=black#<CR>
Write Background Color - Blue <CR>*background=blue#<CR>
Read Background Color States <CR>*background=?#<CR>
Write Projector Position-Front Table <CR>*pp=FT#<CR>
Write Projector Position-Rear Table <CR>*pp=RE#<CR>
Write Projector Position-Rear Ceiling <CR>*pp=RC#<CR>
Write Projector Position-Front Ceiling <CR>*pp=FC#<CR>
Read Projector Position Status <CR>*pp=?#<CR>
Write
Write
Read
Quick auto search/Auto source
search
Quick auto search/Auto source
search
Quick auto search status/Auto
source search status
<CR>*QAS=on#<CR>
<CR>*QAS=off#<CR>
<CR>*QAS=?#<CR>
Write Menu Display Time -Always On <CR>*menutime=on#<CR>
Write Menu Display Time -5 sec <CR>*menutime=5s#<CR>
Operation Settings
Write Menu Display Time -10 sec <CR>*menutime=10s#<CR>
Write Menu Display Time -15 sec <CR>*menutime=15s#<CR>
Write Menu Display Time -20 sec <CR>*menutime=20s#<CR>
Write Menu Display Time -25 sec <CR>*menutime=25s#<CR>
Write Menu Display Time -30 sec <CR>*menutime=30s#<CR>
Read Menu Display Time Status <CR>*menutime=?#<CR>
Write Menu Position - Center <CR>*menuposition=center#<CR>
Write Menu Position - Top-Left <CR>*menuposition=tl#<CR>
Write Menu Position - Top-Right <CR>*menuposition=tr#<CR>
Write Menu Position - Bottom-Right <CR>*menuposition=br#<CR>
Write Menu Position - Bottom-Left <CR>*menuposition=bl#<CR>
Read Menu Position Status <CR>*menuposition=?#<CR>
Write Reminder Message - On <CR>*reminder=on#<CR>
Write Reminder Message - Off <CR>*reminder=off#<CR>
Read Reminder Message Status <CR>*reminder=?#<CR>
Write Direct Power On-on <CR>*directpower=on#<CR>
Write Direct Power On-off <CR>*directpower=off#<CR>
Read Direct Power On-Status <CR>*directpower=?#<CR>
Write Standby Settings-Network on <CR>*standbynet=on#<CR>
Write Standby Settings-Network off <CR>*standbynet=off#<CR>
Read
44 Projector RS-232C Control
Standby Settings-Network
Status
<CR>*standbynet=?#<CR>
Page 45

Read Light Source Usage Time <CR>*ltim=?#<CR>
Write Normal mode <CR>*lampm=lnor#<CR>
Lamp Control
Write Eco mode <CR>*lampm=eco#<CR>
Write 360 & Portrait <CR>*lampm=portrait360#<CR>
Read Lamp Mode Status <CR>*lampm=?#<CR>
Read Model Name <CR>*modelname=?#<CR>
Write Blank On <CR>*blank=on#<CR>
Write Blank Off <CR>*blank=off#<CR>
Read Blank Status <CR>*blank=?#<CR>
Write Menu On <CR>*menu=on#<CR>
Write Menu Off <CR>*menu=off#<CR>
Write Up <CR>*up#<CR>
Write Down <CR>*down#<CR>
Write Right <CR>*right#<CR>
Write Left <CR>*left#<CR>
Write Enter/OK <CR>*enter#<CR>
Write BACK <CR>*back#<CR>
Write Language + <CR>*lang=+#<CR>
Write Language - <CR>*lang=-#<CR>
Read Language Status <CR>*lang=?#<CR>
Write Auto Power off -disable <CR>*APOFF=DIS#<CR>
Miscellaneous
Write Auto Power off - 5 min <CR>*APOFF=5#<CR>
Write Auto Power off - 10 min <CR>*APOFF=10#<CR>
Write Auto Power off - 15 min <CR>*APOFF=15#<CR>
Write Auto Power off - 20 min <CR>*APOFF=20#<CR>
Write Auto Power off - 25 min <CR>*APOFF=25#<CR>
Write Auto Power off - 30 min <CR>*APOFF=30#<CR>
Read Auto Power off Status <CR>*APOFF=?#<CR>
Write AMX Device Discovery-on <CR>*amxdd=on#<CR>
Write AMX Device Discovery-off <CR>*amxdd=off#<CR>
Read AMX Device Discovery Status <CR>*amxdd=?#<CR>
Read Mac Address <CR>*macaddr=?#<CR>
Write High Altitude mode on <CR>*Highaltitude=on#<CR>
Write High Altitude mode off <CR>*Highaltitude=off#<CR>
Read High Altitude mode status <CR>*Highaltitude=?#<CR>
Write Key Lock on <CR>*keylock=on#<CR>
Write Key Lock off <CR>*keylock=off#<CR>
Read Key Lock status <CR>*keylock=?#<CR>
45 Projector RS-232C Control
Page 46

Maintenance
Care of the projector
Cleaning the lens
Clean the lens whenever you notice dirt or dust on the surface. Please be sure to turn off the
projector and let it cool down completely before cleaning the lens.
• If there is dirt or smears, use lens-cleaning paper or moisten a soft cloth with lens cleaner and
gently wipe the lens surface.
• Never use any type of abrasive pad, alkaline/acid cleaner, scouring powder, or volatile
solvent, such as alcohol, benzene, thinner or insecticide. Using such materials or maintaining
prolonged contact with rubber or vinyl materials may result in damage to the projector surface
and cabinet material.
Cleaning the projector case
Before you clean the case, turn the projector off using the proper shutdown procedure as
described in "Shutting down the projector" on page 29 and unplug the power cord.
• To remove dirt or dust, wipe the case with a soft, lint-free cloth.
• To remove stubborn dirt or stains, moisten a soft cloth with water and a neutral pH detergent.
Then wipe the case.
Never use wax, alcohol, benzene, thinner or other chemical detergents. These can damage the case.
Storing the projector
If you need to store the projector for an extended time, please follow the instructions below:
• Make sure the temperature and humidity of the storage area are within the recommended
range for the projector. Please refer to "Specifications" on page 50 or consult your dealer
about the range.
• Retract the adjuster feet.
• Remove the battery from the remote control.
• Pack the projector in its original packing or equivalent.
Transporting the projector
It is recommended that you ship the projector with its original packing or equivalent.
46 Maintenance
Page 47

Light source information
Getting to know the light source hour
When the projector is in operation, the duration (in hours) of light source usage is automatically
calculated by the built-in timer.
To obtain the light source hour information:
1. Go to INSTALLATION > Light Source Settings and press ENTER. The Light Source
Settings page appears.
2. Press to select Light Source Information and press ENTER. The light source
information is displayed.
You can also get the light source hour information on the INFORMATION menu.
Saving power
• Setting the Light Source Mode
Go to INSTALLATION > Light Source Settings > Light Source Mode and press / or
press L. MODE on the remote control to select a suitable light source mode from among the
provided modes.
Setting the projector in Eco/360 & Portrait mode saves power.
Light source
mode
Normal Provides full light source brightness
Eco Lowers brightness to save power and decreases the fan noise
360 & Portrait
Description
Lowers brightness to save power, most suitable for 360-degree and portrait
projection
• Setting Auto Power Off
This function allows the projector to turn off automatically if no input signal is detected after a
set period of time to save power.
To set Auto Power Off, go to SYSTEM SETUP: BASIC > Auto Power Off and press / .
• The apparent brightness of the projected image will vary depending on the ambient lighting conditions,
selected input signal contrast/brightness settings, and is directly proportional to projection distance.
• The light source brightness will decline over time and may vary within the light source manufacturers
specifications. This is normal and expected behavior.
47 Maintenance
Page 48

Indicators
Light
Status & Description
Power events
Stand-by mode (The indicator lights may stay lit even after you
unplug the power cord. However, this is not a malfunction.)
Powering up
Normal operation
Normal power-down cooling
Phosphor/color wheel start fail
Phosphor/color wheel spin fail
Light source events
Light source error in normal operation
Light source is not lit up
Thermal events
: Off
Fan 1 error (the actual fan speed is outside the desired speed)
Fan 2 error (the actual fan speed is outside the desired speed)
Fan 3 error (the actual fan speed is outside the desired speed)
Fan 4 error (the actual fan speed is outside the desired speed)
Fan 5 error (the actual fan speed is outside the desired speed)
Fan 6 error (the actual fan speed is outside the desired speed)
Fan 7 error (the actual fan speed is outside the desired speed)
Fan 8 error (the actual fan speed is outside the desired speed)
Temperature 1 error (over limited temperature)
Temperature 2 error (over limited temperature)
Water pump error (The water from liquid cooler is insufficient)
: Orange On : Green On : Red On
: Orange Flashing : Green Flashing : Red Flashing
48 Maintenance
Page 49

Troubleshooting
The projector does not turn on.
Cause Remedy
There is no power from the power cord.
Attempting to turn the projector on again
during the cooling process.
No picture
Cause Remedy
Plug the power cord into the AC power jack on the
projector, and plug the power cord into the power
outlet. If the power outlet has a switch, make sure that
it is switched on.
Wait until the cooling down process has completed.
The video source is not turned on or
connected correctly.
The projector is not correctly connected to the
input signal device.
The input signal has not been correctly
selected.
The lens cover is still closed. Open the lens cover.
Turn the video source on and check that the signal
cable is connected correctly.
Check the connection.
Select the correct input signal with the INPUT key.
Blurred image
Cause Remedy
The projection lens is not correctly focused. Adjust the focus of the lens using the focus ring.
The projector and the screen are not aligned
properly.
The lens cover is still closed. Open the lens cover.
Adjust the projection angle and direction as well as the
height of the projector if necessary.
Remote control does not work.
Cause Remedy
The batteries are out of power. Replace both of the batteries with new ones.
There is an obstacle between the remote
control and the projector.
You are too far away from the projector. Stand within 8 meters (26 feet) of the projector.
Remove the obstacle.
The password is incorrect.
Cause Remedy
You do not remember the password.
See
"Entering the password recall procedure" on
page 28.
49 Troubleshooting
Page 50

Specifications
Projector specifications
All specifications are subject to change without notice.
Optical
Resolution
4K UHD 3840 x 2160
Display system
1-CHIP DLP
Clear focus range
2.89–6.09 m @ Wide, 4.25–8.96 m @ Tele
Lens
F = 2.1 to 2.4, f = 20.6 to 30.3 mm
Electrical
Power supply
100 to 240V (AC), 50/60Hz
Power consumption
595 W (Max); < 0.5 W (Standby);
< 3.0 W (Network standby)
Mechanical
Weight
19.8 Kg (43.7 lbs)
Output terminals
RGB output
15-pin mini D-Sub (female) x 1
Audio signal output
3.5 mm stereo mini jack x 1
USB
DC (5V 2A) Output port x 1
12V Trigger (0.5A) x 1
Control
RS-232C serial control
9-pin D-sub male x 1
LAN control
RJ-45 x 1
Service Port x 1
Wired Remote x 1
IR receiver x 2
Input terminals
Computer input
RGB input
15-pin mini D-Sub (female) x 1
Video signal input
Digital
HDMI1 (HDCP2.2) ×1;
HDMI2 ×1
HDBaseT x 1
Environmental Requirements
Operating temperature
5°C–35°C at sea level
Storage temperature
-10°C–65°C at sea level
Operating/Storage relative humidity
10%–90% (without condensation)
Operating altitude
0 up to 1500 m at 5°C–35°C
1500–3000 m at 5°C–30°C (with
High Altitude Mode on)
50 Specifications
Page 51

Dimensions
471
565
223
Unit: mm
471 mm (W) x 223 mm (H) x 565 mm (D)
51 Specifications
Page 52

Timing chart
Supported timing for RGB input
Resolution Mode
VGA_60 59.940 31.469 25.175
640 x 480
800 x 600
1024 x 768
1152 x 864 1152 x 864_75 75.00 67.500 108.000
1280 x 720 1280 x 720_60 60 45.000 74.250
1280 x 768 1280 x 768_60 59.870 47.776 79.5
1280 x 800 WXGA_60 59.810 49.702 83.500
1280 x 1024
1280 x 960 1280 x 960_60 60.000 60.000 108
1366 x 768 1366 x 768_60 59.790 47.712 85.500
1440 x 900 WXGA+_60 59.887 55.935 106.500
1400 x 1050 SXGA+_60 59.978 65.317 121.750
1600 x 1200 UXGA 60.000 75.000 162.000
1680 x 1050 1680 x 1050_60 59.954 65.290 146.250
1920 x 1200@60Hz 1920 x 1200_60 (Reduce Blanking) 59.95 74.038 154
1920 x 1080 (VESA) 1920 x 1080_60 59.963 67.158 173
VGA_72 72.809 37.861 31.500
VGA_75 75.000 37.500 31.500
VGA_85 85.008 43.269 36.000
SVGA_60 60.317 37.879 40.000
SVGA_72 72.188 48.077 50.000
SVGA_75 75.000 46.875 49.500
SVGA_85 85.061 53.674 56.250
XGA_60 60.004 48.363 65.000
XGA_70 70.069 56.476 75.000
XGA_75 75.029 60.023 78.750
XGA_85 84.997 68.667 94.500
SXGA_60 60.020 63.981 108.000
SXGA_75 75.025 79.976 135.000
SXGA_85 85.024 91.146 157.500
Vertical
Frequency (Hz)
Horizontal
Frequency (kHz)
Pixel
Frequency
(MHz)
The timings showing above may not be supported due to EDID file and VGA graphic card limitations. It is
possible that some timings cannot be chosen.
52 Specifications
Page 53

Supported timing for HDMI input
• PC timings
Resolution Mode
640 x 480 VGA_60 59.940 31.469 25.175
800 x 600 SVGA_60 60.317 37.879 40.000
1024 x 768 XGA_60 60.004 48.363 65.000
1280 x 720 1280 x 720_60 60 45.000 74.250
1280 x 768 1280 x 768_60 59.870 47.776 79.5
1280 x 800 WXGA_60 59.810 49.702 83.500
1280 x 1024 SXGA_60 60.020 63.981 108.000
1280 x 960 1280 x 960_60 60.000 60.000 108
1400 x 1050 SXGA+_60 59.978 65.317 121.750
1920 x 1200@60Hz
1920 x 1080 (VESA) 1920 x 1080_60 59.963 67.158 173
1920 x 1200_60 (Reduce
Blanking)
Vertical Frequency
(Hz)
59.95 74.038 154
Horizontal
Frequency (kHz)
Pixel Frequency
(MHz)
The timings showing above may not be supported due to EDID file and VGA graphic card limitations. It is
possible that some timings cannot be chosen.
• Video timings
Timing Resolution
480p 720 x 480 59.94 31.47 27
576p 720 x 576 50 31.25 27
720/50p 1280 x 720 50 37.5 74.25
720/60p 1280 x 720 60 45.00 74.25
1080/50i 1920 x 1080 50 28.13 74.25
1080/60i 1920 x 1080 60 33.75 74.25
1080/50P 1920 x 1080 50 56.25 148.5
1080/60P 1920 x 1080 60 67.5 148.5
2160/24P 3840 x 2160 24 54 297
2160/25P 3840 x 2160 25 56.25 297
2160/30P 3840 x 2160 30 67.5 297
2160/50P* 3840 x 2160 50 112.5 594
2160/60P* 3840 x 2160 60 135 594
Vertical
Frequency (Hz)
Horizontal Frequency
(kHz)
Pixel Frequency
(MHz)
*Supported only when an HDMI 1 (HDCP2.2) port is in use.
Supported timing for Component-YPbPr input
Timing Resolution
480i 720 x 480 59.94 15.73 13.5
480p 720 x 480 59.94 31.47 27
576i 720 x 576 50 15.63 13.5
576p 720 x 576 50 31.25 27
720/50p 1280 x 720 50 37.5 74.25
720/60p 1280 x 720 60 45.00 74.25
1080/50i 1920 x 1080 50 28.13 74.25
1080/60i 1920 x 1080 60 33.75 74.25
1080/50P 1920 x 1080 50 56.25 148.5
1080/60P 1920 x 1080 60 67.5 148.5
Vertical Frequency
(Hz)
Horizontal Frequency
(kHz)
Pixel Frequency
(MHz)
53 Specifications
Page 54

Supported timing for HDBaseT input
• PC timings
Resolution Mode
640 x 480 VGA_60 59.940 31.469 25.175
800 x 600 SVGA_60 60.317 37.879 40.000
1024 x 768 XGA_60 60.004 48.363 65.000
1280 x 720 1280 x 720_60 60 45.000 74.250
1280 x 768 1280 x 768_60 59.870 47.776 79.5
1280 x 800 WXGA_60 59.810 49.702 83.500
1280 x 1024 SXGA_60 60.020 63.981 108.000
1280 x 960 1280 x 960_60 60.000 60.000 108
1400 x 1050 SXGA+_60 59.978 65.317 121.750
1920 x 1200@60Hz
1920 x 1080 (VESA) 1920 x 1080_60 59.963 67.158 173
1920 x 1200_60 (Reduce
Blanking)
Vertical Frequency
(Hz)
59.95 74.038 154
Horizontal
Frequency (kHz)
Pixel Frequency
(MHz)
The timings showing above may not be supported due to EDID file and VGA graphic card limitations. It is
possible that some timings cannot be chosen.
• Video timings
Cable type Cable Range
Pixel
Frequency
Supported HDMI format
720x480p/60Hz 4:3 24bit 30bit 36 bit
1280x720p/60Hz 16:9 24bit 30bit 36 bit
1920x1080i/60Hz 16:9 24bit 30bit 36 bit
CAT 5e/CAT 6a 100m <=225MHz
CAT 5e 70m >225MHz 3840 x 2160 60Hz YUV 4:2:0 24bit
CAT 5e 70m >225MHz 3840 x 2160 30Hz 24bit
CAT 6a 100m >225MHz 3840 x 2160 30Hz 24bit
1920x1080p/60Hz 16:9 24bit 30bit 36 bit
720x576p/50Hz 4:3 24bit 30bit 36 bit
1280x720p/50Hz 16:9 24bit 30bit 36 bit
1920x1080i/50Hz 16:9 24bit 30bit 36 bit
1920x1080p/50Hz 16:9 24bit 30bit 36 bit
54 Specifications
Page 55

XJ-L8300HN
XJ-L8300HN
XJ-L8300HN
This Class B digital apparatus complies with Canadian ICES-003.
Cet appareil numérique de la classe B est conforme à la norme NMB-003 du Canada.
55 Specifications
Page 56

MQ008-01V01
 Loading...