

Page 1

DATA PROJECTOR
EN
XJ-V Series
XJ-V10X/XJ-V100W/XJ-V110W
XJ-F Series
XJ-F10X/XJ-F20XN*/
XJ-F100W/XJ-F200WN*/
XJ-F210WN*
*Network Models
User’s Guide
In this manual, “XJ-V Series” and “XJ-F Series” refer only to the specific models listed above.
Be sure to read the “Safety Precautions” and “Operating Precautions” in the “Setup Guide”
document, and make sure you use this product correctly.
Keep this manual in a safe place for future reference.
Visit the site below for the latest version of this manual.
http://world.casio.com/manual/projector/
1
Page 2

DLP is a registered trademark of Texas Instruments of the United States.
Microsoft, Windows, and Windows Vista are registered trademarks or trademarks of Microsoft
Corporation in the United States and other countries.
HDMI, the HDMI Logo and High-Definition Multimedia Interface are trademarks or registered
trademarks of HDMI Licensing, LLC.
Mac OS is a trademark or registered trademark of Apple, Inc. in the United States and other
countries.
PJLink is a pending trademark or a registered trademark in Japan, the United States, and other
countries and areas.
Crestron is a registered trademark of Crestron Electronics, Inc. of the United States.
AMX is a registered trademark of AMX LLC of the United States.
XGA is a registered trademark of IBM Corporation of the United States.
Other company and product names may be registered trademarks or trademarks of their
respective owners.
Portions of this product are based in part on the work of the Independent JPEG Group.
The contents of this User’s Guide are subject to change without notice.
Copying of this manual, either in part or its entirety is forbidden. You are allowed to use this
manual for your own personal use. Any other use is forbidden without the permission of CASIO
COMPUTER CO., LTD.
CASIO COMPUTER CO., LTD. shall not be held liable for any lost profits or claims from third
parties arising out of the use of this product or this manual.
CASIO COMPUTER CO., LTD. shall not be held liable for any loss or lost profits due to loss of
data due to malfunction or maintenance of this product, or any other reason.
The sample screens shown in this manual are for illustrative purposes only, and may not be
exactly the same as the screens actually produced by the product.
2
Page 3

Contents
Useful Features and Functions ...................................... 7
XJ-V10X/XJ-V100W/XJ-V110W...................................................................................7
XJ-F10X/XJ-F100W .....................................................................................................8
XJ-F20XN/XJ-F200WN/XJ-F210WN (Network Models) .............................................. 9
XJ-V100W/XJ-V110W/XJ-F100W/XJ-F200WN/XJ-F210WN (WXGA Models) ............9
Getting Ready................................................................ 10
Setting Up the Projector.......................................................................10
Setup Precautions ..................................................................................................... 10
Connecting Projector Cables ...............................................................11
Remote Controller ................................................................................12
To load remote controller batteries ..........................................................................13
To replace remote controller batteries...................................................................... 13
Operating the Projector................................................ 14
Selecting the Input Source (INPUT)......................................................14
To select the input source........................................................................................15
Resolution ..................................................................................................................15
Output Image Operations.....................................................................16
To use manual keystone correction (KEYSTONE) .................................................... 16
To zoom an image (D-ZOOM)..................................................................................16
To momentarily blank the image and mute the audio (BLANK).................................17
To freeze an image (FREEZE)................................................................................... 17
To auto adjust an image (AUTO) .............................................................................. 17
To change the aspect ratio of the projected image (ASPECT) .................................. 17
To adjust image brightness (FUNC).......................................................................... 19
To change the color mode (FUNC)........................................................................... 19
Adjusting the Volume Level (VOLUME) ................................................20
To adjust the volume level........................................................................................ 20
To mute the audio ...................................................................................................20
Light Control.........................................................................................21
To turn light control on or off....................................................................................21
To adjust light output...............................................................................................21
To check the power saving level .............................................................................. 22
To turn the light sensor control on or off (XJ-F Series only)....................................... 22
3
Page 4

Using the Presentation Timer (TIMER) .................................................23
To display the timer .................................................................................................23
To display the timer function menu .......................................................................... 23
To configure timer settings.......................................................................................24
To start a countdown timer operation ......................................................................24
To pause the timer countdown ................................................................................ 25
To resume a paused timer countdown..................................................................... 25
To reset the timer to its start time ............................................................................25
Using the Setup Menu (MENU) ............................................................26
Basic Setup Menu Operations...................................................................................26
Setup Menu Settings .................................................................................................27
Password Protection ............................................................................32
Using the Password Feature......................................................................................32
To change the password .........................................................................................33
To change the power on password setting .............................................................. 34
To change the projector internal storage function password
(network models only)..............................................................................................34
Control Panel Lock (XJ-F Series Only) .................................................35
To lock the control panel ......................................................................................... 35
To unlock the control panel...................................................................................... 35
Projecting from Built-in Memory or USB Input
(Network Models Only) ................................................. 36
Projecting with File Viewer ...................................................................36
File Viewer Overview..................................................................................................36
Projecting Files Located in Projector Internal Memory..............................................37
To copy files from a computer to projector internal memory.....................................37
Starting Projection of Files Located in Projector Internal Memory .............................39
To format projector internal memory (Windows users only) ...................................... 40
Projecting Files from a Memory Device Connected by USB..................................... 41
To connect a USB flash drive to the projector..........................................................41
To connect a memory card to the projector.............................................................41
To connect a digital camera to the projector............................................................ 42
To start projection of files that are on a memory device connected via USB............. 42
Projecting Files ..........................................................................................................45
To project a presentation file....................................................................................45
To project a PDF file ................................................................................................46
To project an image file............................................................................................ 47
To project a movie file.............................................................................................. 47
4
Page 5

File Menu Operations................................................................................................. 49
To toggle the file menu between the list view and icon view ..................................... 49
To scroll the file menu..............................................................................................49
To open a folder ......................................................................................................49
To exit the current folder and move up to the next level ........................................... 49
To return to the main screen from the file menu.......................................................49
Configuring File Viewer Settings................................................................................ 50
To configure File Viewer settings..............................................................................50
Autorun ...................................................................................................................... 52
To auto project images files or a movie file from a USB flash drive ...........................52
To auto project images files or a movie file from projector internal memory .............. 53
File Viewer Troubleshooting.......................................................................................54
File Viewer Error Messages ....................................................................................... 55
Using EZ-Converter FA to Convert PowerPoint Files to ECA or PtG Files................56
To convert a PowerPoint file to an ECA file or PtG file ..............................................57
To specify the screen resolution of the ECA file or PtG file........................................ 59
To specify the maximum animation display time.......................................................59
To play back an ECA file or PtG file on your computer.............................................59
Projecting with the USB Display Function ...........................................61
USB Display Function Overview................................................................................ 61
Projecting Computer Screen Contents Over a USB Connection ..............................61
To project Windows computer screen contents over a USB connection
for the first time........................................................................................................62
To project Mac OS computer screen contents over a USB connection
for the first time........................................................................................................63
To project computer screen contents over a USB connection
after the first time..................................................................................................... 65
Projecting the Screen Image of a Graphing Calculator........................66
To project the screen image of a graphing calculator............................................... 66
Cleaning the Projector.................................................. 67
Cleaning the Projector Exterior ............................................................67
Cleaning the Lens.................................................................................67
Cleaning Vents .....................................................................................67
Troubleshooting ............................................................ 68
Indicators..............................................................................................68
Error Indicators and Warning Messages ..............................................69
Projector Troubleshooting....................................................................70
5
Page 6

Appendix ........................................................................ 73
Connecting to a Component Video Output..........................................73
Connecting to a Composite Video Output or S-Video Output
(XJ-F Series Only).................................................................................74
Supplying Power to External Equipment (XJ-F Series Only)................75
Updating Firmware and Transferring a User Logo...............................76
To update firmware and transfer a user logo............................................................76
Hanging the Projector from a Ceiling ...................................................76
Projection Distance and Screen Size ...................................................77
Aspect Ratio Setting and Projection Image .........................................78
Supported Signals................................................................................80
Projector RS-232C Control ..................................................................82
To establish a serial connection between the projector and a computer...................82
6
Page 7

Useful Features and Functions
XJ-V10X/XJ-V100W/XJ-V110W
Mercury-free Hybrid Light Source
A CASIO-original laser and LED hybrid light source enables high luminance, low power
consumption, and low running cost. This projector does not use a mercury lamp, making it
environmentally friendly.
No-wait Projection
A CASIO hybrid light source reaches maximum brightness immediately after power is turned on,
compared with a wait of approximately one minute normally required with a mercury lamp. The light
source will even reach maximum brightness immediately if you turn it back on right after you turn it
off. A mercury lamp requires a longer wait in this case to cool down.
Quick and simple light adjustment (Instant Light Control)
A simple key operation instantly adjusts light output to one of seven levels.
Support for Three Input Sources
Analog RGB, component video (Y·Cb·Cr, Y·Pb·Pr), and HDMI input sources are supported.
Vertical Keystone Correction
Manual adjustment to correct for vertical keystoning (distortion of the projected image shape
caused when projecting from below or above the projection surface) and return the projected image
to a rectangular shape.
AUDIO OUT Terminal for Audio Output
Audio input via the projector’s HDMI terminal or AUDIO IN terminal is output from its AUDIO OUT
terminal. Amped speakers or other equipment can be connected to the AUDIO OUT terminal when
you want to output audio from another device via the projector.
Ceiling Mounted and Rear Projection Support
The projector can be configured to project an image of normal orientation even when installed
upside down (for ceiling projection) or when projecting from behind the screen.
Direct Power On
The projector can be configured to turn on automatically and start projecting as soon as it is
plugged into a power outlet.
Firmware update
Firmware (software in the projector flash ROM) updates can be transferred to the projector from a
computer as required.
7
Page 8

XJ-F10X/XJ-F100W
Mercury-free Hybrid Light Source
A CASIO-original laser and LED hybrid light source enables high luminance, low power
consumption, and low running cost. This projector does not use a mercury lamp, making it
environmentally friendly.
No-wait Projection
A CASIO hybrid light source reaches maximum brightness immediately after power is turned on,
compared with a wait of approximately one minute normally required with a mercury lamp. The light
source will even reach maximum brightness immediately if you turn it back on right after you turn it
off. A mercury lamp requires a longer wait in this case to cool down.
Quick and simple light adjustment (Instant Light Control)
A simple key operation instantly adjusts light output to one of seven levels.
Auto light adjustment using a light sensor (Intelligent Light Control)
The projector senses surrounding light levels and adjusts light output automatically as required for
efficient low-power operation. (Requires “Light Sensor” setting to be set to “On”.)
Support for five input sources
Analog RGB, component video (Y·Cb·Cr, Y·Pb·Pr), HDMI, composite video, and S-video input
sources are supported. Two HDMI inputs are provided.
Vertical Keystone Correction
Manual adjustment to correct for vertical keystoning (distortion of the projected image shape
caused when projecting from below or above the projection surface) and return the projected image
to a rectangular shape.
Power supply to external equipment
A 5V DC terminal enables power supply to external equipment.
Temporary blanking of projection without cutting power
Turning off projector power also cuts power being supplied to external equipment. To prevent this,
a [BLANK] key lets you temporarily stop projection without interrupting the power supply.
16W built-in speaker
Audio from the input source can be output from the projector’s built-in speaker.
Ceiling Mounted and Rear Projection Support
The projector can be configured to project an image of normal orientation even when installed
upside down (for ceiling projection) or when projecting from behind the screen.
Direct Power On
The projector can be configured to turn on automatically and start projecting as soon as it is
plugged into a power outlet.
Firmware update and user logo image data transfer
Firmware (software in the projector flash ROM) updates and user logo images can be transferred to
the projector from a computer as required.
8
Page 9

XJ-F20XN/XJ-F200WN/XJ-F210WN (Network Models)
Network models include all of the features of the XJ-F10X and XJ-F100W (page 8) along with those
described below.
Projection of image, movie, and other types of files (File Viewer)
The projector’s File Viewer can be used to open and project the following types of files located in
projector internal memory or on a USB flash drive connected to the projector: image files (JPG,
PNG, GIF, BMP), movie files (AVI, MOV, MP4), presentation files (ECA, PtG), PDF files.
Projection of computer screen contents over a USB connection (USB Display)
Connecting the projector to a computer with a USB cable enables projection of the computer’s
screen contents. This supports projection of screen contents of even small computers that have
only a USB port, but no RGB, HDMI, or other type of video output terminal.
Graphic Scientific Function Calculator Connection
Certain CASIO graphic scientific calculator models can be connected directly to the projector’s
USB-A port for projection of the calculator screen contents.
Power supply to external equipment
A USB-A/5V DC port (doubles as a USB host port) enables power supply to external equipment.
Projection of images from a computer or smart device over a wireless LAN connection*
The projector is configured as an access point, a computer or smart device can connect directly to
it over a wireless LAN connection. Or a computer or smart device can connect over a wireless LAN
connection via an existing wireless LAN access point. Both screen output and audio output are
supported while a computer is connected.
Projector control using a computer or smart device over a wireless LAN connection*
The projector can be controlled from a computer or smart device connected to it over a wireless
LAN connection.
Projection of screen contents of a computer connected via wired LAN*
A LAN cable can be used for a direct connection between the projector and a computer, or a LAN
connection can be established via an existing network router. Once a connection is established,
both screen output and audio output are supported.
Remote control of the projector from a computer connected via wired LAN*
Projector control operations can be performed remotely using the web browser of a computer
connected via a wired LAN connection.
* For details about LAN connection, see the separate “Network Function Guide”.
XJ-V100W/XJ-V110W/XJ-F100W/XJ-F200WN/XJ-F210WN (WXGA Models)
WXGA Resolution
Supports WXGA (1280
projecting wide-screen notebook computer and HD TV images.
× 800) wide-screen projection resolution. This resolution is ideal for
9
Page 10
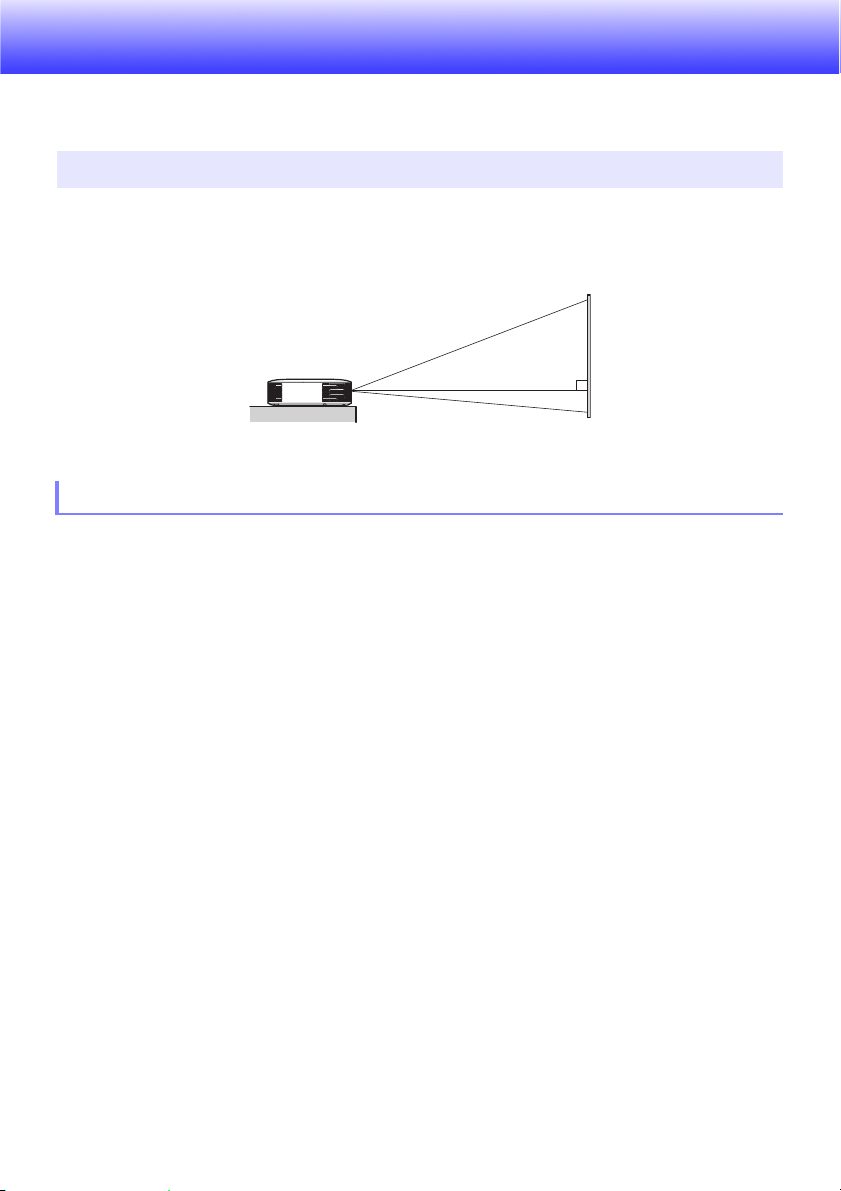
Getting Ready
Screen
Make sure the projector is at a right angle to the screen.
This section explains how to select a location for the projector, how to connect its cables, and how to
perform other operations required before using it.
Setting Up the Projector
Locate the projector on a desk, table, or stand that is firm and level. Make sure that you allow
sufficient space around the sides and back of the projector for proper ventilation. The illustrations
below show how the projector should be oriented relative to the screen for optimum projection.
Setup Precautions
Use a conveniently located power outlet that you can reach easily when you need to unplug the
projector.
Do not located any objected within 30 cm (11.8 inches) around the projector. Particular care is
required to keep objects away from projector air intake and exhaust openings.
Airflow from air conditioning equipment can blow the heat being exhausted from the area around
the projector’s lens in a way that causes heat ripples to appear in the projected image. If this
happens, adjust the airflow of the air conditioning equipment or move the projector.
10
Page 11
Note
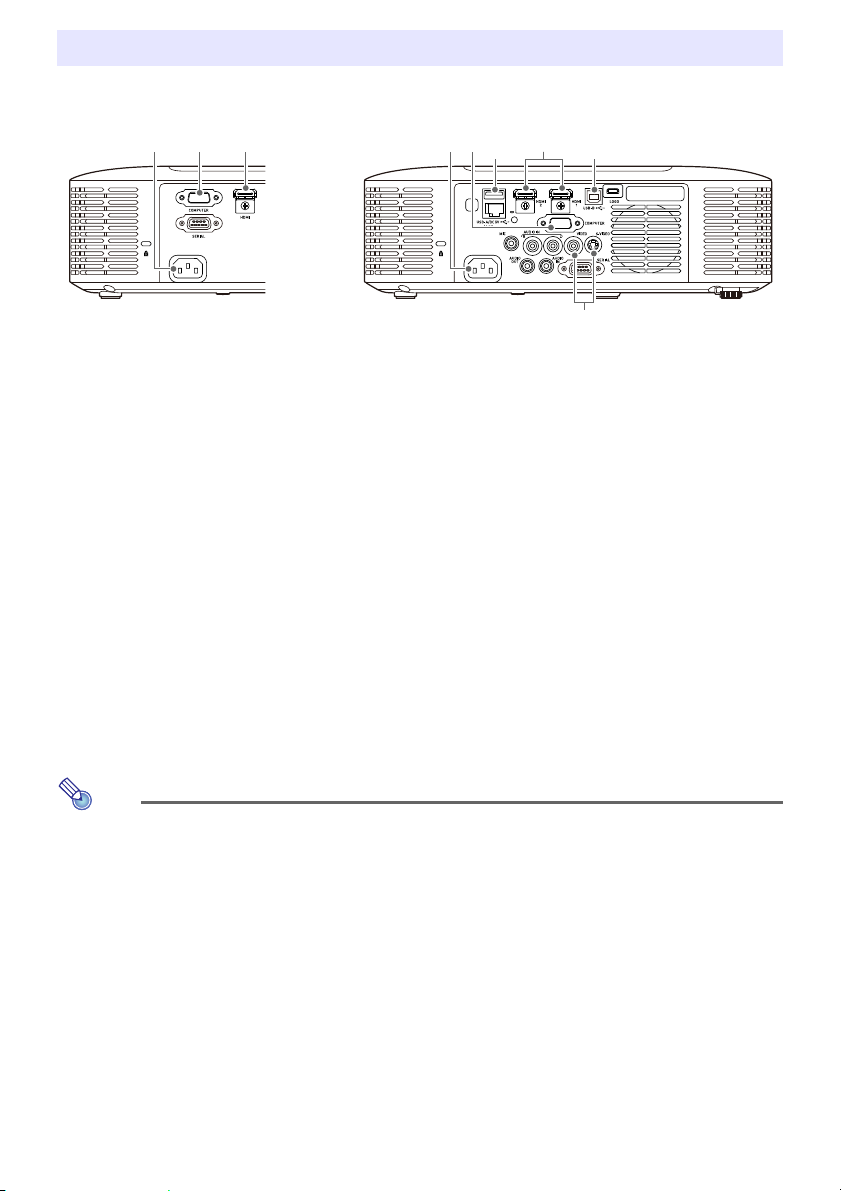
Connecting Projector Cables
Some of the terminals shown in the illustration are not equipped on the XJ-F10X and XJ-F100W.
XJ-V Series XJ-F Series
*1 *2
Connect the projector to a power outlet and to an input source device.
Use the provided power cord to plug the projector into a power outlet.
Use an RGB cable to connect to the RGB output terminal of a computer or other input source.
Use an HDMI cable to connect to the HDMI output terminal of a computer, video equipment, or
other input source. Be sure to use a High Speed HDMI cable for connection.
The XJ-F Series models have two HDMI input terminals, which means you can have two external
HDMI devices connected at the same time.
Connect to the composite output or S-Video output of the video device. For details, see
“Connecting to a Composite Video Output or S-Video Output (XJ-F Series Only)” (page 74).
*1 This port can be used to supply power (up to 5V DC 2A) to external equipment. For details, see
“Supplying Power to External Equipment (XJ-F Series Only)” (page 75).
With the XJ-F20XN, XJ-F200WN, and XJ-F210WN projectors (network models), a USB flash drive
(page 41), a CASIO calculator (page 66), or a separately available wireless adapter (refer to the
separate “Network Function Guide”) can be connected to this port as an input source for
projection.
*2 This port is equipped on the XJ-F20XN, XJ-F200WN, XJ-F210WN (network models) only.
It is used when accessing projector internal memory from a computer and when projecting
computer screen contents from the projector over a USB connection. For details, see “To copy files
from a computer to projector internal memory” (page 37) and “Projecting with the USB Display
Function” (page 61).
For more information about component video connection, see “Connecting to a Component
Video Output” on page 73.
For information about how to connect for RS-232C control of the projector, see “Projector
RS-232C Control” (page 82).
For information about how to connect in order to update the projector firmware or to transfer
user logo data, see “Updating Firmware and Transferring a User Logo” (page 76).
11
Page 12
Important!
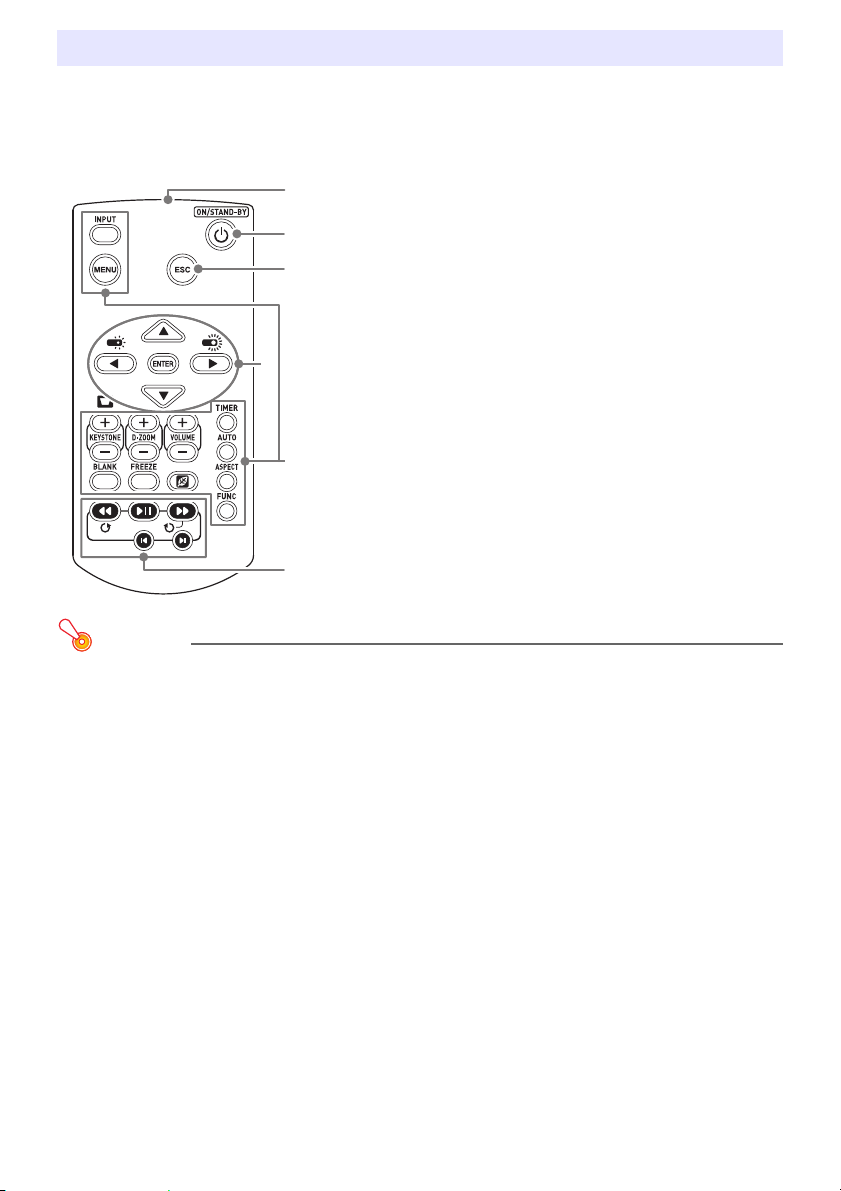
Remote Controller
Projector operations are performed using the remote controller that comes with it. Point the remote
controller signal emitter at one of the signal receivers on the projector as you perform remote
controller key operations. The maximum range of the remote controller signal is approximately
5 meters (16.4 feet) (between signal emitter and receiver).
Remote control signal emitter
[P] key
Turns power on or off.
[ESC] key
Press to exit the currently displayed menu or to cancel an
operation.
Cursor keys (///), [ENTER] key
Use the cursor keys to move between menu items, and to
change setting values. Press the [ENTER] key to select a menu
item or to execute a function.
Each of these keys has a specific fixed function. For details,
see the sections that describe key operations in “Operating
the Projector” (pages 14 through 35). For information about
the [MENU] key, for example, see “Using the Setup Menu
(MENU)” (page 26).
These keys are used with network models only. They are
mainly used for File Viewer (page 36) projection operations.
To avoid running down the batteries, store the remote control unit so its keys are not pressed
inadvertently.
12
Page 13
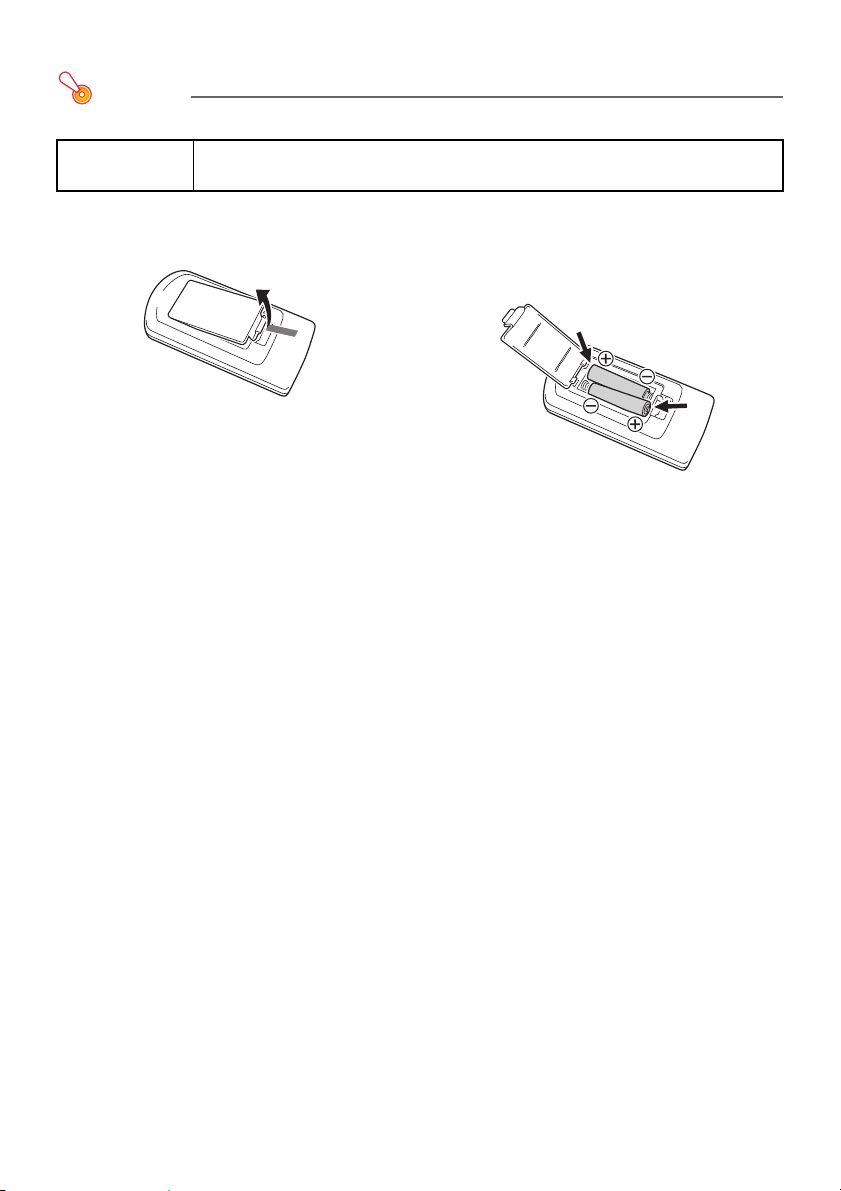
To load remote controller batteries
Important!
Be sure to use alkaline batteries only.
Caution
*
1.
Open the battery cover on the back
of the remote controller.
3.
Close the battery cover on the back of the remote controller.
RISK OF EXPLOSION IF BATTERY IS REPLACED BY AN INCORRECT TYPE.
DISPOSE OF USED BATTERIES ACCORDING TO THE INSTRUCTIONS.
2.
Load two new batteries into the
case, making sure that their positive
(+) and negative (–) ends are facing
correctly.
To replace remote controller batteries
Open the battery cover on the back of the remote controller, replace the old batteries with new ones,
and then close the battery cover.
13
Page 14

Operating the Projector
Unless specifically noted otherwise, the operations in this section are performed using the remote
controller. If both the projector and the remote controller have the same key, either one can be used to
perform the corresponding operation.
Selecting the Input Source (INPUT)
The tables below show the input sources that can be selected for each projector model.
XJ-V Series
Input Source Name Output Projection Image (and Audio)
Computer
(RGB or Component)
HDMI Images and audio from a computer or video device connected to the projector’s
XJ-F Series
Input Source Name Output Projection Image (and Audio)
Computer
(RGB or Component)
S-Video Images and audio from a video device connected to the projector’s S-VIDEO terminal
Video Images and audio from a video device connected to the projector’s VIDEO terminal
HDMI1 Images and audio from a computer or video device connected to the projector’s
HDMI2 Images and audio from a computer or video device connected to the projector’s
File Viewer* Images (and audio in the case of a movie file) contained in the following types of files
CASIO USB Tool* Screen contents of a CASIO calculator or electronic dictionary connected to the
Network* Screen contents and audio of a computer connected to the projector via wireless LAN
USB Display* Screen contents and audio of a computer connected to the projector’s USB-B port.
Images and audio from a computer or video device connected to the projector’s
COMPUTER terminal and AUDIO IN terminal.
HDMI terminal.
Images and audio from a computer or video device connected to the projector’s
COMPUTER terminal and AUDIO IN terminal.
and AUDIO IN R/L terminals.
and AUDIO IN R/L terminals.
HDMI 1 terminal.
HDMI 2 terminal.
located in projector internal memory or on a memory device connected to the
projector’s USB-A port: image files, movie files, presentation files, PDF files.
projector’s USB-A port.
or wired LAN.
* Network models only
14
Page 15

To select the input source
Note
1.
Press the [INPUT] key.
2.
On the “Input” dialog box that appears, use the [INPUT], [] and [] keys to
select the input source you want and then press the [ENTER] key.
If you do not press the [ENTER] key, the projector will automatically apply the currently
selected input source after about three seconds.
The name of the input source you selected will appear in the upper right corner of the
projection screen for a few seconds.
The message “No signal input” will appear if no input signal can be detected.
For more information about the operation required to select “Network”, “USB Display”, “File
Viewer”, or “CASIO USB Tool” as the input source and perform projection, refer to the
following.
Network: Separate Network Function Guide
USB Display: “Projecting with the USB Display Function” (page 61)
File Viewer: “Projecting with File Viewer” (page 36)
CASIO USB Tool: “Projecting the Screen Image of a Graphing Calculator” (page 66)
Resolution
Depending on the projector model, its video resolution will be fixed at XGA (1024 × 768 pixels) or
WXGA (1280 × 800 pixels). Images may appear coarse, text and other figures may be difficult to read
or a moire pattern may appear when the input signal from a computer does not match the projector’s
video resolution. If this happens, try doing the following.
Change the computer’s output resolution setting so it matches the projector’s video resolution.
For information about the video resolution of your projector, see “Specifications” in the Setup
Guide. See the user documentation that comes with your computer for details about changing its
settings.
Change the “Aspect Ratio” setting to “True” (Applies only to models that support WXGA video
resolution). With the “True” setting, the projector projects the input signal at its actual size (1 input
source dot equal to one projector output pixel dot).
For information about configuring the Aspect Ratio setting, see “To change the aspect ratio of the
projected image (ASPECT)” (page 17).
15
Page 16

Note
Output Image Operations
To use manual keystone correction (KEYSTONE)
Use the [KEYSTONE +] and [KEYSTONE –] keys to adjust
keystone correction manually.
The projector has a keystone correction feature that detects
when it is at a vertical angle to the screen and performs
keystone correction automatically. Use the above to make
adjustment manually when auto correction produces results
that are not what you want.
If there is no menu, dialog box, or anything else displayed on the projection screen with an
XJ-F Series projector, you can also use the projector’s [] and [] keys to perform manual
keystone correction.
To zoom an image (D-ZOOM)
1.
Press the [D-ZOOM +] key.
This will enlarge the center of the projected image one step.
2.
To zoom in on the center of the projected image more, press the [D-ZOOM +]
key again. To zoom out, press the [D-ZOOM –] key.
Each press of [D-ZOOM +] zooms in (increases the zoom factor), while [D-ZOOM –] zooms
out. Holding down either key continuously scrolls the zoom factor.
3.
While an image is zoomed, use the [], [], [], and [] keys to scroll the view
to other parts of the image.
4.
To exit the zoom operation, press the [ESC] key.
16
Page 17

To momentarily blank the image and mute the audio (BLANK)
1.
Press the [BLANK] key.
This blanks the screen by displaying the blank screen image specified by the Setup Menu
“Blank Screen” setting (page 28) and mutes the audio.
2.
To resume normal image and sound, press the [BLANK] key (or [ESC] key).
To freeze an image (FREEZE)
Press the [FREEZE] key to freeze the current input source image. To return to the real-time input
source image, press the [FREEZE] key again or press the [ESC] key.
To auto adjust an image (AUTO)
Press the [AUTO] key.
Pressing the [AUTO] key automatically adjusts the frequency and phase in accordance with the
input signal, which can reduce flickering and other projected image problems.
This operation is supported while the input source is Computer (RGB).
To change the aspect ratio of the projected image (ASPECT)
Press the [ASPECT] key to cycle through the aspect ratio settings for the projected image.
Available settings depend on your projector model as shown below.
XJ-V100W/XJ-V110W/XJ-F100W/XJ-F200WN/XJ-F210WN
Pressing the [ASPECT] key will cycle through settings in accordance with the current input source as
shown below.
Input Source Pressing the [ASPECT] key will cycle through these settings:
RGB, HDMI(PC) Normal Full 16:9 4:3 True
Video*, S-Video*, Component, HDMI(DTV) Normal 16:9 16:10 4:3 Letter Box
* XJ-F100W/XJ-F200WN/XJ-F210WN only
XJ-V10X/XJ-F10X/XJ-F20XN
Pressing the [ASPECT] key will cycle through settings in accordance with the current input source as
shown below.
Input Source Pressing the [ASPECT] key will toggle between these settings:
RGB, HDMI(PC) Normal Full 16:9 16:10
Video*, S-Video*, Component, HDMI(DTV) Normal 16:9 16:10 4:3
* XJ-F10X/XJ-F20XN only
17
Page 18

Description of Each Setting
Note
Important!
Normal:Projects at the projector’s maximum possible size while maintaining the input signal aspect
ratio.
Full: Projects at the projector’s maximum possible size by enlarging or reducing the input signal.
16:9: This setting specifies a 16:9 aspect ratio, which is the same as a movie screen, high-definition
TV, etc. Using this setting when the input signal is a 16:9 image that has been squeezed to a
4:3 image causes the image to be displayed with its normal 16:9 aspect ratio.
16:10: This setting specifies a 16:10 aspect ratio. Use this setting to adjust the image for projection
onto a 16:10 aspect ratio screen.
4:3: Regardless of the input signal aspect ratio, the image is always resized to an aspect ratio of
4:3 for projection.
True: Projects the input signal at its actual size (1 input source dot equal to one projector output
pixel dot) in the center of the projector’s projection screen. If the input signal resolution
exceeds the projector’s output resolution, the excess is cut off.
Letter Box:This will resize the image horizontally to 1280 dots and project 800 vertical dots of the
center of the image, maintaining the aspect ratio of the input signal.
For details about how the aspect ratio setting affects the projected image, see “Aspect Ratio
Setting and Projection Image” (page 78).
When projecting while “True” is selected as the aspect ratio setting for an RGB signal with a
resolution that is less than SVGA, the image is enlarged to SVGA and projected.
You can also change the aspect ratio using the Setup Menu “Screen Settings 3 Aspect
Ratio” setting (page 28).
Note that enlarging or reducing the size of an image using the [ASPECT] key for commercial
purposes or public presentation may infringe on the legally protected copyright of the
copyright holder of the original material.
18
Page 19

To adjust image brightness (FUNC)
Note
Important!
1.
Press the [FUNC] key. On the menu that appears, select “Brightness” and then
press the [ENTER] key.
2.
On the brightness adjustment screen that appears, use the [] and [] keys to
adjust brightness.
3.
To hide the window, press the [ESC] key.
The above operation is for fine adjusting image brightness without affecting light brightness.
For information about changing light brightness, see “Light Control” (page 21).
To change the color mode (FUNC)
1.
Press the [FUNC] key. On the menu that appears, select “Color Mode” and then
press the [ENTER] key.
This displays the color mode selection window. The currently selected color mode is the one
whose button is selected (filled in).
2.
Use the [] and [] keys to move the highlighting to the color mode you want to
select, and then press the [ENTER] key.
This will select the button next to the highlighted color mode name.
For details on what each color mode does, see “Image Adjustment 1 3 Color Mode” (page
27).
3.
To hide the window, press the [ESC] key.
The color mode cannot be selected in the following cases.
• When “Off” is selected for the “Light Control” setting (page 21)
19
Page 20

Adjusting the Volume Level (VOLUME)
Use the procedure below to adjust the volume level of the projector’s speaker output, and output from
the AUDIO OUT terminal. If your projector does not have a built-in speaker, only AUDIO OUT terminal
output is affected.
To adjust the volume level
1.
Press the [VOLUME +] or [VOLUME –] key.
This causes the “Volume” screen to appear on the projected image.
2.
Press the [VOLUME +] key to increase the volume, or the [VOLUME –] key to
lower the volume.
3.
After the setting is the way you want, press the [ESC] key.
To mute the audio
1.
Press the [VOLUME +] or [VOLUME –] key to display the “Volume” screen.
2.
Press the [ENTER] key.
This stops output from the speaker.
3.
To restore the audio, press the [VOLUME +] or [VOLUME –] key.
20
Page 21

Note
Note
Light Control
Light Control lets you adjust the light being output (light source brightness) by the projector. When
“On” is selected for “Light Control” on the Setup Menu (initial default setting), light output can be
adjusted to one of seven levels.
With the XJ-F Series, selecting “On” for the Setup Menu “Light Sensor” setting will cause light output
to be adjusted automatically in accordance with currently available light.
To project at maximum light source brightness, select “Off” for the “Light Control” setting on
the Setup Menu. This also disables changes in light output. With the XJ-F Series, this also
disables the light sensor.
To turn light control on or off
1.
Press the [MENU] key to display the Setup Menu.
2.
Use the [] key to select “Option Settings 1”, and then press the [ENTER] key.
3.
Use the [] key to select “Light Control” and then press the [ENTER] key.
This displays a light control dialog box.
4.
Use the [] key to select “Light Control” and then press the [] key to select
“On” or the [] key to select “Off”.
5.
Press the [ESC] key to exit the Setup Menu.
To adjust light output
1.
While there is no menu, dialog box, or anything else displayed on the projection
screen, press the [] or [] key.
Pressing the [] key lower light output by 1, while pressing [] increases it by 1. Pressing
either key also displays a light output dialog box that shows the current light output setting as
a value from 1 to 7.
2.
You can use [] and [] to further adjust light output while the dialog box is
displayed.
3.
When the brightness is the level you want, press the [ESC] key to exit the dialog
box.
The dialog box will disappear automatically if you do not perform any key operation for about
five seconds.
The above operation cannot be performed while “Off” is selected for the “Light Control”
setting on the Setup Menu.
21
Page 22

To check the power saving level
Note
1.
Press the [ ] key.
This displays a light control dialog box. The current power saving level is indicated by leaf ( )
marks at the top of the dialog box. The more leaf marks there are, the higher the power saving
level.
At this time you can adjust the light output level using the [] and [] keys.
2.
To close the dialog box, press the [ESC] key.
The above operation cannot be performed while “Off” is selected for the “Light Control”
setting on the Setup Menu.
To turn the light sensor control on or off (XJ-F Series only)
1.
Press the [MENU] key to display the Setup Menu.
2.
Use the [] key to select “Option Settings 1”, and then press the [ENTER] key.
3.
Use the [] key to select “Light Control” and then press the [ENTER] key.
This displays a light control dialog box.
4.
Use the [] key to select “Light Sensor” and then press the [] key to select
“On” or the [] key to select “Off”.
5.
Press the [ESC] key to exit the Setup Menu.
22
Page 23

Using the Presentation Timer (TIMER)
The presentation timer shows a countdown from a preset time value. You can use it to keep track of
how much time has elapsed during your presentation, and to limit a presentation to a preset amount of
time. You can configure the presentation timer so it is displayed in the projected image.
To display the timer
When the timer is not displayed on the projected image, press the [TIMER] key once.
The timer will appear for about five seconds and then disappear automatically if the “Off” is selected
for the “Continuous Display” setting on the timer function menu.
To display the timer function menu
When the timer is not displayed on the projected image, press the [TIMER] key twice. If the timer is
displayed, press the [TIMER] key once.
Use this menu to start, pause, resume, and reset the timer, and to configure various timer settings.
23
Page 24

To configure timer settings
1.
Use the [TIMER] key to display the timer function menu.
2.
Use the [] and [] keys to select the “Position”, “Continuous Display”, or “Start
Time” setting and then change the settings as described in the table below.
To do this: Perform this operation:
Reposition the timer on the
projected image
Enable or disable
continuous display of the
timer
Specify the timer
countdown start time
3.
To save your settings and close the timer function menu, press [ESC].
To start the timer immediately after changing its settings, use [] and [] to select “Start
Timer” on the timer function menu and then press the [ENTER] key before pressing [ESC] in
the step above.
Select “Position”, and then use the [] and [] keys to select one of the
following settings: “Lower Right”, “Upper Right”, “Upper Left”, “Lower Left”
(Initial default: Lower Right).
Select “Continuous Display”, and then use the [] and [] keys to select either
“On” or “Off” (Initial default: Off).
On: Once the timer is displayed, it remains displayed until you display a
different dialog box or you press the [ESC] key.
Off: The timer automatically disappears about five seconds after it is
displayed.
Select “Start Time”, and then use the [] and [] keys to specify the
countdown start time you want.
You can set a start time from five to 60 minutes, in five-minute steps (Initial
default: 20 minutes).
To start a countdown timer operation
1.
Use the [TIMER] key to display the timer function menu.
2.
Select “Start Timer” and then press the [ENTER] key.
This will close the timer function menu and start the timer countdown.
After the countdown reaches 00:00, it will start a 60-minute count up operation (from –00:01 to
–60:00). The numerals of the timer display are red (indicating that the presentation is over time)
during a count up operation.
24
Page 25

To pause the timer countdown
1.
Use the [TIMER] key to display the timer function menu.
2.
Select “Pause Timer” and then press the [ENTER] key.
To resume a paused timer countdown
1.
Use the [TIMER] key to display the timer function menu.
2.
Select “Restart Timer” and then press the [ENTER] key.
To reset the timer to its start time
1.
Use the [TIMER] key to display the timer function menu.
2.
Select “Reset Timer” and then press the [ENTER] key.
This will reset the time to the “Start Time” setting.
25
Page 26
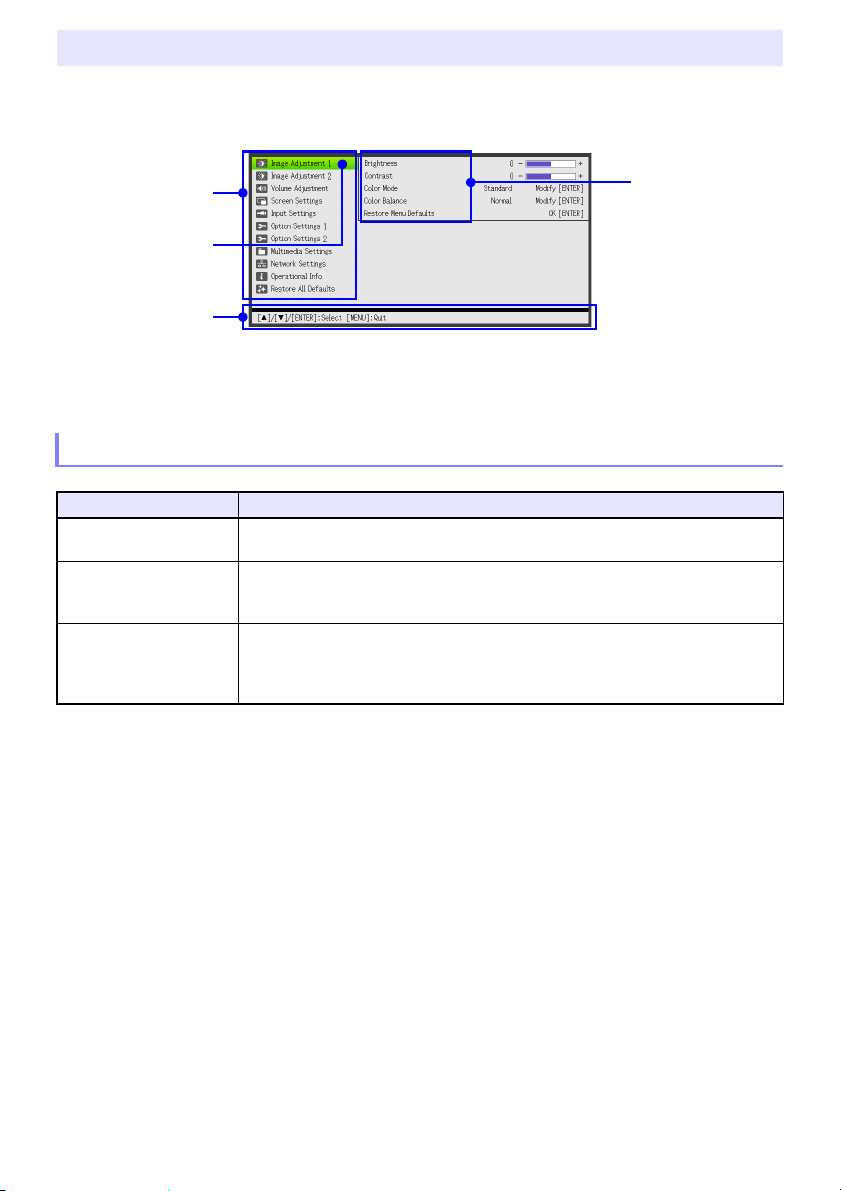
Using the Setup Menu (MENU)
Menu Items
(Main Menu)
Highlighting
Menu Item
(Sub-menu)
Guidance
(Network Model Screen Shot)
Pressing the [MENU] key displays the Setup Menu shown below on the projection screen. You can
use this menu to adjust projected image brightness, contrast, and other settings, and to change
projector settings.
The guidance shows the key operations that can be performed for the currently selected (highlighted)
menu item.
Basic Setup Menu Operations
To do this: Perform this operation:
Display the Setup Menu
Exit the Setup Menu
Select a menu item Use the [] and [] keys to move the highlighting to the menu that contains the menu
Configure the setting of a
menu item
Press the [MENU] key. Pressing the [MENU] key to exit the Setup Menu will save the
settings you configured while it was displayed.
item you want to select and then press the [ENTER] key. Next, use the [] and []
keys to move the highlighting to the menu item you want to select.
If a menu item that has options or setting values to the right, use the [] and []
keys to change the setting.
For a menu item that has “Modify[ENTER]” or “OK[ENTER]” to the right, press the
[ENTER] key to display a dialog box for configuring the setting.
26
Page 27
Setup Menu Settings
Note
One or more letters (such as RCV) after the menu item name indicates an item that is available only
when one or more particular input source is selected. The letters indicate the input source(s) where
the menu item is available.
R: RGB input, C: Component input, V: S-video input*
D: HDMI (DTV) input, F: File Viewer*
2
, T: CASIO USB Tool*2, N: Network*2, U: USB Display*
*1 XJ-F Series projectors only *2 Network model projectors only
A menu item that does not have any letter after it will be available regardless of the input source.
after a menu item indicates the item is available only on XJ-F Series projectors.
after a menu item indicates the item is available only on network model projectors.
The initial default setting is indicated by an asterisk (*).
Use this menu item: To do this:
Image Adjustment 1 3
Brightness
Image Adjustment 1 3
Contrast
Image Adjustment 1 3
Sharpness (V)
Image Adjustment 1 3
Saturation (V)
Image Adjustment 1 3
Tint (V)
Image Adjustment 1 3
Color Mode
Adjust projected image brightness.
Adjust projected image contrast.
Use this sub-menu to adjust the sharpness of the outlines in the projected image. A
larger value makes the image sharper, while a smaller value makes it softer.
Use this sub-menu to adjust the color saturation of the projected image. A larger
value increases color saturation.
Use this sub-menu to adjust the tint of the projected image.
A larger value makes the overall image more bluish, while a smaller value makes the
overall image more reddish. This setting is supported only when the signal is NTSC
or NTSC4.43.
Select one of the following projected image color modes: “Standard*”, “Graphics”,
“Theater*”, “Blackboard”, “Natural”.
1
or Video input*1, H: HDMI (PC) input,
2
Image Adjustment 1 3
Color Balance
Image Adjustment 1 3
Light Control Off Mode
Image Adjustment 1 3
Restore Menu Defaults
Image Adjustment 2 3
Vertical Position (RCV)
Image Adjustment 2 3
Horizontal Position (RCV)
Image Adjustment 2 3
Frequency (R)
Image Adjustment 2 3
Phase (R)
Initial default setting: “Theater” when the input source is S-Video, Video, or
HDMI (DTV). “Standard” any other time.
Select one of the following color balance presets: “Warm”, “Normal*”, “Cold”.
Also can be used to separately adjust red, green, and blue.
When “Off” is selected for the “Option Settings 1 3 Light Control 3 Light Control”
setting, specify either “Bright” (brightness priority) or “Normal*” (hue priority) as the
image quality setting.
Return all of the items in the “Image Adjustment 1” main menu to their initial defaults
for the currently projecting image source.
Adjust the vertical and horizontal positions of the input source image in relation to
the target screen.
When vertical bands appear in the projected image while RGB is selected as the
input source, it means that the frequency setting is not correct. When this happens,
use this setting to adjust the frequency manually. If, for some reason, your manual
frequency settings cause the image input from the computer to disappear from the
projection, you can press the [AUTO] key to perform an auto adjust operation, which
should cause the image to appear.
Adjust the phase of the RGB input signal when the image flickers because the
projector phase and RGB input signal phase do not match.
27
Page 28

Use this menu item: To do this:
Display range at 5%
Display range at 0%
Image Adjustment 2 3
Overscan (CVD)
Adjust the overscan amount for an input video signal within the range of 0% to 5%*.
The size of the border area displayed on the projection screen depends on the
setting value. A smaller value results in a wider border area as shown below.
Image Adjustment 2 3
Restore Menu Defaults
(RCVD)
Volume Adjustment 3
Volume
Volume Adjustment 3
Restore Menu Defaults
Screen Settings 3
Keystone Correction
Screen Settings 3
Aspect Ratio (RCVHD)
Screen Settings 3
Projection Mode
Screen Settings 3
Ceiling Mount
Screen Settings 3
No Signal Screen
Screen Settings 3
Blank Screen
Screen Settings 3
Restore Menu Defaults
Input Settings 3
COMPUTER Terminal (RC)
Input Settings 3
RGB Level Adjust (RC)
Return all of the items in the “Image Adjustment 2” main menu to their initial defaults
for the currently projecting image source.
See “Adjusting the Volume Level (VOLUME)” (page 20) for more information.
Return the Volume setting to its initial default for the currently projecting image
source.
Use this sub-menu to perform vertical keystone correction of the projected image.
Select an aspect ratio setting for the projected image.
See “To change the aspect ratio of the projected image (ASPECT)” (page 17) for
more information.
Specify whether projection will be from the front of the screen or the back of the
screen.
Front*: Select this option to project from the front of the screen.
Rear: Select this option to project from the back of the screen. This setting flips the
front projected image horizontally.
Set up the projector to be positioned upside down for hanging from a ceiling.
On: Select when the projector is positioned upside down for hanging from a ceiling.
Since the bottom of the projector is upwards, the projected image is flipped
both horizontally and vertically.
Off*: Select when the projector is used on a desktop. This projects the image
assuming that the top of the projector is upwards.
Select one of the following as the projection image whenever there is no input signal
being input to the projector: “Blue”* (blue screen), “Black” (black screen), “Logo”
(projector built-in logo, or user logo, page 76).
Select one of the following as the projection image whenever the [BLANK] key is
pressed: “Blue”* (blue screen), “Black” (black screen), “Logo” (projector built-in
logo, or user logo, page 76).
Return all of the items in the “Screen Settings” main menu to their initial defaults for
the currently projecting image source.
Specify the method to be used to identify the COMPUTER terminal input signal.
Auto*: Projector automatically identifies the COMPUTER terminal input signal.
RGB: Always assumes the COMPUTER terminal input signal is an RGB signal.
Component: Always assumes the COMPUTER terminal input signal is a component
Specifies whether level adjustment of the input RGB signal is enabled (On*) or
disabled (Off). Leaving this setting “On” will normally optimize the projected image.
However, depending on the input signal, there may be cases when this setting does
not optimize the image and may even distort it. If this happens, change this setting to
“Off”.
video signal.
28
Page 29
Important!
Use this menu item: To do this:
Input Settings 3
Video Signal (V)
Input Settings 3
S-Video Signal (V)
Input Settings 3
Signal Name Indicator
Input Settings 3
Restore Menu Defaults
Option Settings 1 3
Auto Keystone Correction
Specify the method to be used to identify the VIDEO terminal input signal.
Auto*: Projector automatically identifies the video input signal.
NTSC, NTSC4.43, PAL, PAL-M, PAL-N, PAL60, SECAM:
Always assumes the video input signal is the specified video signal type.
Specify whether the newly selected input signal type should be displayed (On*) or
not displayed (Off) when the [INPUT] key is pressed to change the input signal.
Return all of the items in the “Input Settings” main menu to their initial defaults for the
currently projecting image source.
Turn auto keystone correction on (On*) or off (Off).
Note
This item cannot be selected while “On” is selected for “Screen Settings 3
Option Settings 1 3
Auto Adjust (R)
Specify whether the projector should detect the RGB input signal type (resolution,
frequency) and adjust the projection image accordingly.
On*: Auto Adjust enabled.
Off: Auto Adjust disabled.
Note
If you want to retain the following “Image Adjustment 2” menu settings
Option Settings 1 3
Light Control
Option Settings 1 3
Auto Power Off
Option Settings 1 3
Password
Option Settings 1 3
Direct Power On
Option Settings 1 3
Language
See “Light Control” (page 21).
Specify the amount of time of projector operation and input signal inactivity to be
allowed before Auto Power Off is triggered to turn off projector power automatically.
Auto Power Off can be disabled, if you want.
5 min, 10 min*, 15 min, 20 min, 30 min: Time until Auto Power off is triggered.
Off: Disables Auto Power Off.
See “Password Protection” (page 32).
Enable (On) and disable (Off*) projector auto power on as soon as the projector’s AC
adapter is plugged into a power outlet.
Specify the display language.
English, French, German, Italian, Spanish, Swedish, Portuguese, Dutch, Norwegian,
Polish, Finnish, Czech, Turkish, Russian, Lithuanian, Vietnamese, Thai, Malay,
Indonesian, Arabic, Chinese (Simplified), Chinese (Traditional), Korean, Japanese
Ceiling Mount”, and “Auto Keystone Correction” is disabled regardless of
the setting of this item.
when power is turned off, select “Off” for this setting: “Vertical Position”,
“Horizontal Position”, “Frequency”, “Phase”.
Option Settings 1 3
Restore Menu Defaults
Option Settings 2 3
Plug and Play
Network Model Users
When using certain Network model functions, some menus and messages
may be displayed in English, regardless of the language selected here.
Return all of the items in the “Option Settings 1” main menu to their initial defaults for
the currently projecting image source.
Specify what the projector should do when a supported external USB device is
connected to the projector’s USB-A port or when the projector is turned on while an
external USB device is connected to the USB-A port.
On: Enables automatic input source switching.
Off*: Disables automatic input source switching.
29
Page 30
Important!
Note
Use this menu item: To do this:
Option Settings 2 3
Audio Out
Use this sub-menu to specify whether audio input from the input sources below
should be output to the speaker (Speaker*) or output to an external destination
1
(Line)*
.
HDMI
File Viewer (Movie playback audio)*
Wireless or Network (Video stream projection movie audio)*
USB Display*
*1 When Line is specified, the projector will output audio from its AUDIO OUT
terminal.
*2 Network models only
Option Settings 2 3
High Altitude
Turn the high-altitude fan speed setting on or off in accordance with the altitude of
the area where you are using the projector.
On: Select this setting when using the projector in a high altitude (1,500 to
3,000 meters / 5,000 to 10,000 feet above sea level) area where air is thin. This
setting increases cooling efficiency.
Off*: Select this setting at normal altitudes (up to 1,500 meters / 5,000 feet).
Do not use this projector at altitudes greater than 3,000 meters (10,000 feet)
Option Settings 2 3
Control Panel Lock
Option Settings 2 3
Closed Caption (V)
Disable projector unit key operations.
See “Control Panel Lock (XJ-F Series Only)” (page 35) for more information.
Use this sub-menu to specify whether to display closed captions when projecting a
video signal that includes them.
Off*: Closed captions not displayed.
CC1, CC2, CC3, CC4: Indicates the current closed caption output setting (CC1,
2
2
2
above sea level.
CC2, CC3, and CC4).
Keystone correction does not affect displayed closed caption text.
Option Settings 2 3
Timer Function
Option Settings 2 3
Microphone Input Level
Option Settings 2 3
Restore Menu Defaults
Multimedia Settings 3
Autorun
Multimedia Settings 3
Functions (FN)
Multimedia Settings 3
Internal Storage Function
Display the timer function menu. For details, see “Using the Presentation Timer
(TIMER)” (page 23).
Adjusts the volume level of audio input from the MIC terminal within the range of 0*
(mute) to 3 (maximum).
Return all of the items in the “Option Settings 2” main menu to their initial defaults for
the currently projecting image source.
Specify whether to use (Enable*) or not use (Disable) the autorun function. For
details, see “Autorun” (page 52).
Display the same menu (Function Menu) that appears when the remote controller’s
[FUNC] key is pressed.
Access projector internal memory from a computer. For details, see “To copy files
from a computer to projector internal memory” (page 37).
(RCVHD)
Network Settings Access projector wireless LAN connection setting and network setting items. For
details, see the separate “Network Function Guide”.
Operational Info Display the projector information below.
Input Signal, Signal Name, Resolution, Horizontal Frequency, Vertical Frequency,
Scan System, Light Time, Version (projector ROM version)
Restore All Defaults 3
Unit Operating Time
Display the cumulative operating time of this unit.
This time cannot be initialized.
30
Page 31

Note
Use this menu item: To do this:
Restore All Defaults 3
Restore All Defaults
Initialize all Setup Menu item settings, except for those below.
Option Settings 1 3 Language, Option Settings 1 3 Power On Password,
Operational Info 3 Light Time, Operational Info 3 Version,
Restore All Defaults 3 Unit Operating Time
A user logo image that has been transferred to the projector (page 76) is not
deleted by a “Restore All Defaults” operation.
31
Page 32

Password Protection
The operations described below can be password protected on the projector. You can have only one
password assigned to the projector at any time, and the same password is used for operations.
Projector startup protection
The projector can be configured so a dialog box prompting input of the password is displayed
whenever the projector is turned on. In this case, further operation of the projector is not possible
unless the correct password is input. This protects against unauthorized use of the projector.
Using projector internal storage (network models only)
Attempting to access the projector internal storage function (page 37) from the Setup Menu causes
a password input dialog box to appear. This protects against inadvertent and unauthorized deletion
or replacement of files in projector internal memory.
Use the “Power On Password” and “Internal Storage Password” settings to turn password protection
for the above operations on or off individually.
Using the Password Feature
Note the following precautions whenever you use the password feature.
The password feature protects against unauthorized use of the projector. Note that it is not an
anti-theft measure.
You will need to enter the initial factory default password the first time you use the projector after
turning on the password feature. Change the initial factory default password to a different one of
your choice as soon as possible after turning on the password feature.
Remember that password operations are always performed using the remote controller, so you
should take care not to lose or misplace the remote controller.
Also note that you will not be able to input the password if the remote controller batteries are dead.
Replace the remote control batteries as soon as possible after it starts to go low.
If you forget your password...
If you forget the password, you will need to bring the following two items to your CASIO distributor to
have the password cleared. Note that you will be charged to have the password cleared.
1. Personal identification (original or copy of your driver’s license, employee I.D., etc.)
2. Projector unit
Note that your CASIO distributor will not be able to clear the password of your projector unless you
bring both of the items listed above.
Also, keep the projector’s warranty in a safe place.
Important!
Having your password cleared using the procedure described above will return all of the
settings of your projector, except for the Light Time, to their initial factory defaults.
Keep a written record of your password!
You will not be able to use the projector if you forget its password. We strongly suggest that you keep
a written or other type of record of the password so you can look it up when necessary.
32
Page 33

To change the password
1.
Press the [MENU] key to display the setup menu.
2.
Use the [] key to select “Option Settings 1”, and then press the [ENTER] key.
3.
Use the [] key to select “Password”, and then press the [ENTER] key.
This will display a dialog box prompting you to enter the current password.
4.
Enter the current password.
The password of your projector is not really a “word” made up of letters, but rather a
sequence of remote controller key inputs.
If the projector is still protected by the factory default password, perform the key operation
shown below to enter it.
[] [] [] [] [] [] [] []
5.
After entering the current password, press the [ENTER] key.
This displays the Password screen.
6.
Use the [] key to select “Change Password”, and then press the [ENTER] key.
This will display a dialog box prompting you to enter the new password.
7.
Enter a key sequence up to eight key operations long.
You can use any of the following keys as part of your password key sequence.
[INPUT], [MENU], [BLANK], [FREEZE], [ ], [VOLUME +], [VOLUME –], [D-ZOOM +],
[D-ZOOM –], [KEYSTONE +], [KEYSTONE –], [], [], [], [], [TIMER], [AUTO], [ASPECT],
[FUNC]
8.
After entering the new password, press the [ENTER] key.
This will display a dialog box prompting you to enter the same password again.
9.
Re-enter the same password key sequence you entered in step 7 and then press
the [ENTER] key.
The message “Your new password has been registered.” indicates that the password has
been changed. Press the [ESC] key.
If the password you entered in this step is different from the one you entered in step 7, the
message “The password you input is wrong.” appears. Press the [ESC] key to return to step 7.
33
Page 34

To change the power on password setting
1.
Perform steps 1 through 5 under “To change the password” (page 33) and
display the Password screen.
2.
After confirming that “Power On Password” is selected, use the [] and [] keys
to select either the “On” or “Off” setting.
Changing the setting from “Off” to “On” will cause the “Prompt for password when power is
turned on?” dialog box to appear. Press the [ENTER] key to confirm that you want to turn on
power on password protection, or [ESC] to exit the dialog box without changing the setting.
3.
After you are finished, press the [MENU] key to exit the setup menu.
To change the projector internal storage function password
(network models only)
1.
Perform steps 1 through 5 under “To change the password” (page 33) and
display the Password screen.
2.
Press the [] key to select “Internal Storage Password”.
3.
Use the [] and [] keys to select “On” or “Off”.
Changing the setting from “Off” to “On” will cause the “Prompt for password when an internal
storage operation is performed?” dialog box to appear. Press the [ENTER] key to confirm that
you want to turn on internal storage password protection, or [ESC] to exit the dialog box
without changing the setting.
4.
After you are finished, press the [MENU] key to exit the setup menu.
34
Page 35

Note
Control Panel Lock (XJ-F Series Only)
Control panel lock disables (locks) all of the projectors keys, except for the [P] key. This limits
projector operation to the remote controller, which protects against inadvertent mis-operation.
To lock the control panel
1.
Press the [MENU] key to display the setup menu.
2.
Use the [] key to select “Option Settings 2”, and then press the [ENTER] key.
3.
Use the [] key to select “Control Panel Lock”.
4.
Use the [] key to select “On”.
5.
When the confirmation dialog box appears, press the [ENTER] key.
This disables (locks) all projector keys except for the [P] key.
6.
After you are finished, press the [MENU] key to exit the setup menu.
Even if the control panel is locked, you can clear a warning message (page 69) that appears on
the projection screen by pressing the projector’s [ESC] key.
To unlock the control panel
Perform either of the following operations.
On the projector, hold down the [] key until the message “Control panel was unlocked.” appears.
To use the remote controller to unlock the control panel, perform the procedure under “To lock the
control panel” above. In step 4, press the [] key of the remote controller to select “Off” and then
press the [MENU] key.
35
Page 36

Projecting from Built-in Memory or USB Input
(Network Models Only)
This section explains operations using the projector’s “File Viewer” (to project the contents of files in
built-in memory or on a USB flash drive), “USB Display” (to project data from a computer over a USB
connection), and “CASIO USB Tool” (to project CASIO calculator screen contents).
Projecting with File Viewer
File Viewer Overview
File Viewer is an application you can use for viewing or playing back different types of files located in
projector internal memory or on a memory device connected to the projector’s USB port.
Supported Playback Files
File Type Supported File Conditions
Image File:*
Movie File:*
Presentation File ECA or PtG file created with EZ-Converter FA*
PDF Files PDF Ver 1.4
1
3
JPEG: Up to approximately 15 M pixels (baseline JPEG)
Up to approximately 8 M pixels (progressive JPEG)
PNG: Less than 6 MB and up to approximately 8 M pixels*
GIF: Less than 6 MB and up to approximately 8 M pixels*
BMP: Less than 6 MB and up to approximately 8 M pixels (for 24-bit color)
AVI: 20 Mbps maximum 720/30P (MJPEG video, ADPCM audio)
MOV: 20 Mbps maximum 1080/30P (H.264 video, ADPCM audio or AAC audio)
MP4: 20 Mbps maximum 1080/30P (H.264 video, AAC audio)
4
2
2
*1 Even if you are using a WXGA model projector (page 9), the maximum projection resolution for
image data is 1024 × 768, except for baseline JPEG. In the case of baseline JPEG image data,
maximum projection resolution is 1280 × 800.
*2 Transparent colors in PNG and GIF format image files that have transparent colors enabled will all
be displayed as black. Animation GIFs are displayed as still images, without animation.
*3 Performing fast forward or fast reverse with a movie file with a large bit rate may cause the
operation to be performed at a slower speed than normal or to stop part way through. Though a
movie with one of the maximum bit rates shown above will play back normally, fast forward and
fast reverse not supported.
*4 PowerPoint files can be converted using EZ-Converter FA (available from the CASIO website). See
“Using EZ-Converter FA to Convert PowerPoint Files to ECA or PtG Files” (page 56).
36
Page 37

Note
Projecting Files Located in Projector Internal Memory
File Viewer can be used to project the following types of files when they are located in projector
internal memory: image files, movie files, presentation files, PDF files. To use the procedure in this
section, the file(s) to be projected must first be copied to projector internal memory. You can copy files
using either of the following methods.
Connect the projector to a computer with a USB cable and copy the files to projector internal
memory.
Use a LAN to copy (upload) files from a computer or smart device to projector internal memory.
The procedures in this manual are all based on copying files over a USB connection. For information
about how to copy a file using a LAN, see the separate “Network Function Guide”.
To copy files from a computer to projector internal memory
This procedure is supported on a computer running one of the operating systems below.
Windows: XP, Vista, 7, 8, 8.1, 10 (Logged in with admin privileges)
Mac OS: 10.6, 10.7, 10.8, 10.9, 10.10 (Logged in with a root account or user account)
1.
Press the [MENU] key to display the setup menu.
2.
Use the [] key to select “Multimedia Settings”, and then press the [ENTER] key.
3.
Use the [] key to select “Internal Storage Function”, and then press the
[ENTER] key.
4.
When the “Turns off the projector to use internal storage.” message appears,
press the [ENTER] key.
This will cause projector power to turn off. The POWER/STANDBY indicator will light amber
and the STATUS indicator will light red.
5.
Press the projector’s [P] key to turn on power.
The POWER/STANDBY indicator will light green and the STATUS indicator will light red. This
indicates that the projector’s internal storage function is operational. You will not be able to
project images with the projector at this time.
6.
If the computer has a USB flash drive or any other removable media connected,
disconnect it.
7.
Use a commercially available USB cable to connect the projector’s USB-B port
(Micro USB B type) to your computer’s USB port.
The location of the USB-B port of this projector is indicated by “*2” in the illustration under
“Connecting Projector Cables” (page 11).
When you do, projector internal memory will be recognized by your computer as removable
disk drive named “InternalMem”.
37
Page 38

8.
Note
On the computer, open the “InternalMem” drive.
Windows:
When the “AutoPlay” dialog box appears on your computer screen, click “Open folder to view
files”. If the “AutoPlay” dialog box does not appear, perform the following operation: [Start] 3
[Computer] 3 Double-click “InternalMem”.
Mac OS:
An “InternalMem” drive icon will appear on the Mac desktop. Double-click to open it.
9.
Copy the file(s) you want to project to the “InternalMem” drive.
10.
After you copy all of the files you want, perform one of the operations below to
unmount the “InternalMem” drive.
Windows:
Click the “Safely Remove Hardware” icon in the task tray (in the lower right corner of the screen).
On the menu that appears, select “CASIO USB Display Storage”. Check to make sure that a
“Safe To Remove Hardware” message appears.
Mac OS:
Drag the “InternalMem” drive icon to the trash can icon. Check to make sure that the
“InternalMem” drive icon is no longer on the Mac desktop.
11.
Disconnect the USB cable from the projector and the computer.
12.
Turn the projector back on.
This stops internal storage function operation and returns to normal projection.
For information about how to project a file copied to projector internal memory, see “Starting
Projection of Files Located in Projector Internal Memory” (page 39).
The above is presented only as a typical example of the file copy operation on a computer.
The actual steps you will need to perform may differ slightly in accordance with your
computer’s operating system and setup.
If “On” is selected for “Internal Storage Password” on the setting menu, a password input
dialog box will appear when you press the [ENTER] key in step 3 of the procedure above. If
this happens, enter the appropriate password and then press the [ENTER] key to advance to
step 4 of the procedure. For details, see “Password Protection” (page 32).
38
Page 39

Starting Projection of Files Located in Projector Internal
Memory
1.
If a USB flash drive or some other USB device is connected to the projector’s
USB-A port, disconnect it.
2.
Press the [INPUT] key. This will display the “Input” dialog box.
3.
Use the [] and [] keys to select “Viewer” and then press the [ENTER] key.
4.
On the dialog box that appears, confirm that “File Viewer” is selected and then
press the [ENTER] key.
This will start up File Viewer and display the File Viewer main screen like the one shown below.
5.
Depending on the type of file you want to project, perform one of the operations
below.
To project this type of file: Perform this operation:
Presentation Files “To project a presentation file” (page 45)
PDF Files “To project a PDF file” (page 46)
Image Files “To project an image file” (page 47)
Movie Files “To project a movie file” (page 47)
39
Page 40

To format projector internal memory (Windows users only)
*
Caution
Important!
Performing the procedure below will delete all of the folders and files currently in the projector
internal memory.
1.
Perform steps 1 through 7 under “To copy files from a computer to projector
internal memory” (page 37).
2.
Perform the procedure below to format the “InternalMem” drive on your
computer.
(1) Right click the “InternalMem” drive icon. On the menu that appears, select “Format”.
(2) On the “Format” dialog box that appears, check to make sure that “FAT32 (recommended)” is
selected for “File system” and then click [Start].
(3) On the warning dialog box that appears, click the [OK] button.
(4) When a dialog box telling you that formatting is complete appears, click [OK] to close it.
(5) Click [Close] to close the format dialog box.
Never format projector internal memory from a computer running Mac OS.
Doing so can disable the projector’s USB functions.
40
Page 41

Projecting Files from a Memory Device Connected by USB
Use the procedures in this section when you want to use File Viewer to project image files, movie files,
presentation files, or PDF files from a USB flash drive or other memory device.
Supported Memory Devices
The Data Projector’s USB-A port supports connection of a FAT/FAT32 format memory device
supported by the USB interface. The following are supported memory devices.
USB flash drive
Memory cards
A commercially available USB card reader is required to connect a memory card to the Data
Projector.
USB storage class (USB Mass Storage Class) compatible digital cameras
To connect a USB flash drive to the projector
Connect USB flash drive to the Data Projector’s USB-A port as shown below.
To connect a memory card to the projector
1.
Load the memory card into a USB card reader’s card slot.
For details about how to load a memory card into the USB card reader, see the user
documentation that comes with the reader.
2.
Connect the USB card reader to the Data Projector’s USB-A port.
41
Page 42

To connect a digital camera to the projector
Note
1.
If necessary, configure the digital camera’s USB mass storage class setting.
2.
Turn off the digital camera and connect a USB cable to it.
3.
Connect the other end of the USB cable (Type A connector) to the Data
Projector’s USB-A port.
4.
Turn on the digital camera.
For details about steps 1, 2, and 4, see the user documentation that comes with your digital
camera.
To start projection of files that are on a memory device
connected via USB
1.
Connect the memory device where files you want to project are stored to the
projector’s USB-A port.
If the File Viewer main screen appears automatically, advance to step 4 of this procedure. If it
doesn’t, go to step 2. Note that the File Viewer main screen will appear automatically if “On” is
selected for the “Plug and Play” setting on the projector’s Setup Menu.
2.
Press the [INPUT] key. This will display the “Input” dialog box.
3.
Use the [] and [] keys to select “File Viewer” and then press the [ENTER] key.
This will start up File Viewer and display the File Viewer main screen.
42
Page 43

4.
Function name
Folder path
Depending on the type of file you want to project, perform one of the operations
below.
To project this type of file: Perform this operation:
Presentation File Use the [] and [] keys to select “Presentation” and then press the [ENTER]
PDF File Use the [] and [] keys to select “PDF Viewer” and then press the [ENTER]
Image File Use the [] and [] keys to select “Slide” and then press the [ENTER] key.
Movie File Use the [] and [] keys to select “Movie” and then press the [ENTER] key.
The screen that will appear depends on the function you selected.
5.
Use the file list displayed on the screen to check the contents of the USB flash
key.
key.
drive you connected in step 1 of this procedure or the contents of internal
memory.
If the file list shows the contents of a USB flash drive, go to step 7 of this procedure. If the file
list shows the contents of internal memory, go to step 6.
6.
Press the [FUNC] key. On the menu that appears, select “Drive Switching” and
then press the [ENTER] key.
7.
Depending on the function you selected in step 4 of this procedure, perform one
of the operations below.
If you selected this function: Perform this operation:
Presentation Perform the procedure from step 2 under “To project a presentation file”
PDF Viewer Perform the procedure from step 2 under “To project a PDF file” (page 46).
Slide Perform the procedure from step 2 under “To project an image file” (page
Movie Perform the procedure from step 2 under “To project a movie file” (page 47).
(page 45).
47).
43
Page 44

Drive Menu
Note
Entering the Presentation Mode, PDF Viewer Mode, Slide Mode, or Movie Mode while there are
multiple memory devices connected to the Data Projector’s USB-A port (multiple USB flash drive
devices connected via a USB hub, multiple memory cards loaded in the memory card reader
connected to the Data Projector, etc.) will cause a menu like the one shown below to appear on the
projection screen.
When this happens, use the cursor keys to move the highlighting to the drive you want to use and then
press the [ENTER] key. This will display a menu of files for the mode you are entering.
The Data Projector can recognize up to four drives.
The message “NOUSB” will appear in the Drive Menu if there is no memory device connected
to the projector’s USB-A port when you perform Drive Switching ([FUNC] 3 “Drive
Switching” 3 [ENTER]). If this happens, perform Drive Switching again to restore the
previous screen.
44
Page 45

Note
Projecting Files
This section explains procedures you can project each type of file using File Viewer.
To project a presentation file
1.
On the File Viewer main screen, select “Presentation” and then press the
[ENTER] key.
This displays a menu of presentation (ECA or PtG) files.
2.
Use the [] and [] keys to select the presentation file you want to play and then
press the [ENTER] key (or [R] key).
This will start playback of the currently selected presentation file. Whenever there is an
automatic pause in playback, press [R] to play the next animation or to advance to the next
page.
3.
To return to the file menu, press the [ESC] key.
4.
To return to the main screen, press the [FUNC] key and then the [ENTER] key.
You can perform the operations described in the table below while presentation playback is in
progress.
To do this: Perform this operation:
Go to the previous page Press the [] or [S] key.
Go to the next page Press the [] or [T] key.
Pause playback; Resume
playback from where it was
paused
Skip back to the start of the
currently playing animation
Skip forward to the end of the
currently playing animation
Select a particular page from a
menu of thumbnails and play back
that page
Press the [R] key.
Press the [] or [s] key
Press the [] or [d] key.
1. Press the [FUNC] key.
2. On the menu that appears, select “Page Selection” and then press
the [ENTER] key.
3. Use the cursor keys to select the thumbnail of the page you want
to play back and then press the [ENTER] key.
45
Page 46

To project a PDF file
1.
On the File Viewer main screen, select “PDF Viewer” and then press the [ENTER]
key.
This displays a list of PDF files.
2.
Use the [] and [] keys to select the PDF file you want to open and then press
the [ENTER] key (or [R] key).
This will open the selected PDF file.
3.
Perform page change, zoom, and other operations as required.
The following operations are supported during PDF file projection.
To do this: Perform this operation:
Go to the previous page Press the [] or [S] key.
Go to the next page Press the [] or [T] key.
Adjust the image to the
screen width
Return to a full page view Press the [FUNC] key. On the menu that appears, select “Show Entire
Select a page from a
thumbnail list and display it
4.
To return to the file menu, press the [ESC] key.
Press the [FUNC] key. On the menu that appears, select “Adjust to Screen
Width” and then press the [ENTER] key.
Page” and then press the [ENTER] key.
1. Press the [FUNC] key.
2. On the menu that appears, select “Page Selection” and then press the
[ENTER] key.
3. Use the cursor keys to select the thumbnail of the page you want to
display and then press the [ENTER] key.
5.
To return to the main screen, press the [FUNC] key and then the [ENTER] key.
46
Page 47

To project an image file
1.
On the File Viewer main screen, select “Slide” and then press the [ENTER] key.
This displays a list of image files.
2.
Use the [] and [] keys to select image file you want to open and then press
the [ENTER] key.
This will project the selected image file.
Pressing the [R] key instead of the [ENTER] key will start an image file slideshow starting
from the currently selected file.
3.
Perform the rotate image and image scrolling operations described below as
required.
The following operations are supported during image file projection.
To do this: Perform this operation:
Project the previous image file Press the [] or [S] key.
Project the next image Press the [] or [T] key.
Rotate the image leftwards 90 degrees* Press the [s] key.
Rotate the image rightwards 90 degrees* Press the [d] key.
Start a slideshow Press the [R] key.
Stop an ongoing slideshow Press the [R] key.
* Supported for JPEG files only.
4.
To return to the file menu, press the [ESC] key.
5.
To return to the main screen, press the [FUNC] key and then the [ENTER] key.
To project a movie file
1.
On the File Viewer main screen, select “Movie” and then press the [ENTER] key.
This displays a list of movie files.
2.
Use the [] and [] keys to select the movie file you want to open and then
press the [ENTER] key or [R] key.
This will start playback of the selected movie file.
47
Page 48

3.
Total movie play time
Elapsed movie play time
Perform fast forward, fast reverse, pause, and other operations as required.
The operations described below are supported during movie file playback.
To do this: Perform this operation:
Pause and resume movie playback Press the [ENTER] or [R] key.
Re-play the file from the beginning 1. Press the [FUNC] key.
Toggle display of the movie playback time
between show and hide
A pause icon ( ) is displayed in the upper left
corner of the projection screen while movie
projection is paused.
2. On the menu that appears, select “Play from
Beginning” and then press the [ENTER] key.
Press the [FUNC] key. On the menu that appears,
select “Time Indicator On/Off” and then press the
[ENTER] key.
Fast forward at 2X, 8X, or 32X normal speed Press the [] or [d] key.
Fast reverse at 2X, 8X, or 32X normal speed Press the [] or [s] key.
Return from fast forward or fast reverse to
normal playback
Jump to the final movie frame Press the [FUNC] key. On the menu that appears,
Stop movie file playback and return to the file
menu
4.
To return to the file menu, press the [ESC] key.
5.
To return to the main screen, press the [FUNC] key and then the [ENTER] key.
The first press starts 2X speed fast forward, the
second press increases to 8X, and the third press
increases to 32X.
The indicator appears in the upper left corner
during 2X fast forward, during 8X fast forward,
and during 32X fast forward.
The first press starts 2X speed fast reverse, the
second press increases to 8X, and the third press
increases to 32X.
The indicator appears in the upper left corner
during 2X fast reverse, during 8X fast reverse,
and during 32X fast reverse.
Press the [ENTER] key or [R] key twice. Pressing
either of these keys only once will pause playback.
Press once more to start normal playback.
select “Go to End” and then press the [ENTER] key.
Press the [ESC] key.
48
Page 49

Note
File Menu Operations
There are two different views for the File Viewer file menu: a list view and an icon view.
List View
This view shows a list of names of folders and files in the projector internal memory, or on memory
device connected to the projector’s USB port. Folders and files are displayed in this format
immediately after you go from the File Viewer main screen to the Presentation Mode, PDF Viewer
Mode, Slide Mode, or Movie Mode.
Icon View
This view shows both icons and names for the folders and files. Thumbnails are displayed for all of the
files that can be played back by File Viewer.
To toggle the file menu between the list view and icon view
Press the [FUNC] key. On the menu that appears, select “Screen Format” and then press the [ENTER]
key.
You can specify either the list view or icon view as the default view. For more information, see
“Configuring File Viewer Settings” on page 50.
To scroll the file menu
Press the [T] key to scroll forward, and the [S] key to scroll back.
To open a folder
Use the cursor keys to move the highlighting to the folder you want to open and then press the
[ENTER] key.
To exit the current folder and move up to the next level
Press the [ESC] key.
To return to the main screen from the file menu
Press the [FUNC] key. On the menu that appears, select “Back to top menu” and then press the
[ENTER] key.
49
Page 50

Configuring File Viewer Settings
This section explains how to configure File Viewer settings, including those that control what appears
on the File Viewer file menu.
To configure File Viewer settings
1.
On the File Viewer main screen, select “Viewer Settings” and then press the
[ENTER] key.
This displays the “Viewer Setup” screen.
2.
Use [] and [] to select the item whose setting you want to change.
3.
Use [] and [] to change the currently selected setting.
For information about the settings available for each item, see “File Viewer Setting Items”.
4.
Repeat steps 2 through 3 as many times as necessary to configure all of the
settings you want.
5.
After all the settings are the way you want, press the [ESC] key to return to the
File Viewer main screen.
50
Page 51

File Viewer Setting Items
The initial default setting for each item is indicated by an asterisk (*).
Setting Name Description
Display Sequence
Setup
Startup Mode Specifies whether the default view when a mode is entered from the main File Viewer
Thumbnail View < Show >*:
Image Switching < Manual >*:
Slideshow Display
Interval
Slideshow Repeat < Repeat >:
Movie Audio Output < Output >*:
Initialize Viewer Setup Returns all File Viewer settings to their initial defaults.
Specifies the sequence of images in the file menu.
< File Names (Ascending) >*:
Displays files in file name ascending order.
< File Names (Descending) >:
Displays files in file name descending order.
< File Name Extension (Ascending) >:
Displays file names in file name extension ascending alphabetical order. If multiple files
have the same file name extension, they are displayed in file name ascending order.
< Time (New-to-Old) >:
Displays files by the time they were last modified, from the newest to the oldest.
< Time (Old-to-New) >:
Displays files by the time they were last modified, from the oldest to the newest.
main screen is the list view or icon view.
< List View >*:
Specifies list view as the default view.
< Icon View >:
Specifies icon view as the default view.
Displays file thumbnails in the file menu.
< Hide >:
File thumbnails not displayed.
Specifies manual image scrolling.
< Auto >:
Specifies auto image scrolling.
Specifies how long each image will remain displayed during a slideshow.
< 5 seconds >*, < 10 seconds >, < 30 seconds >, < 1 minute >, < 5 minutes >
Loops playback of a slideshow or movie.
< Repeat Off >*:
Automatically stops playback when the end of a slideshow or movie is reached.
Outputs audio when a movie with an audio track is played back.
< Do not output >:
Audio not output during movie playback.
51
Page 52

Note
Autorun
Autorun lets you configure the projector for automatic projection of image files or a movie file located
in a special folder named “AUTORUNC”. When auto projection is performed depends on where the
“AUTORUNC” folder is located.
When AUTORUNC is located here: Autorun is performed at this time:
Internal memory When the projector is turned on while there is nothing
USB flash drive When a USB flash drive is connected to the projector’s
The settings shown below need to be configured before using Autorun.
“Multimedia Settings 3 Autorun” (page 30): Enabled
“Option Settings 2 3 Plug and Play” (page 29): On
Autorun projection of the still images or a movie file is in accordance with the current settings
configured on the “Viewer Setup” screen (page 50).
connected to its USB-A port.
USB-A port or when the projector is turned on while a
USB flash drive is connected to the USB-A port.
To auto project images files or a movie file from a USB flash
drive
1.
Create a folder named “AUTORUNC” (all single-byte upper-case characters) in
the root directory of the USB flash drive.
2.
Insert all of the image files or movie file you want to auto project into the folder
you created in step 1.
If you want to auto project a movie file, place only one movie file into the “AUTORUNC” folder.
Do not place any other files into the folder. If there is both a movie file and image file in the
“AUTORUNC” folder, the image file will be given priority and the movie file will not be played.
Multiple image files can be placed in the “AUTORUNC” folder without any problem. If there
are, plugging the USB flash drive into the projector in step 3 below will start a slideshow of the
images.
3.
While projector power is turned on, plug the USB flash drive that contains the
“AUTORUNC” folder to which you copied the files in step 2 above into the
projector’s USB-A port.
This will automatically start up File Viewer and project the file(s) you put in the “AUTORUNC”
folder in step 2 above.
52
Page 53

To auto project images files or a movie file from projector
internal memory
1.
Perform steps 1 through 8 under “To copy files from a computer to projector
internal memory” (page 37).
2.
Create a folder named “AUTORUNC” (all single-byte upper-case characters) in
the root directory of the “InternalMem” drive (projector internal memory).
3.
Insert all of the image files or movie file you want to project with Autorun into the
folder you created in step 2.
If you want to auto project a movie file, place only one movie file into the “AUTORUNC” folder.
Do not place any other files into the folder. If there is both a movie file and image file in the
“AUTORUNC” folder, the image file will be given priority and the movie file will not be played.
Multiple image files can be placed in the “AUTORUNC” folder without any problem. If there
are, turning on projector power in step 6 below will start a slideshow of the images.
4.
Turn off the projector.
5.
If a USB flash drive or some other USB device is connected to the projector’s
USB-A port, disconnect it.
6.
Turn on the projector.
This will automatically project the file(s) you put in the “AUTORUNC” folder in step 3 above.
53
Page 54

File Viewer Troubleshooting
Problem Cause and Required Action
File Viewer does not appear when I
connect USB flash drive to the
Data Projector’s USB-A port.
Some folders and/or files are not
displayed in the file menu.
There are multiple devices
connected to the Data Projector via
a USB hub or USB card reader, but
some of the devices are not
recognized.
When I connect my digital camera
to the Data Projector via USB,
digital camera memory contents do
not appear.
On the Slide Mode file menu,
question marks (?) appear in place
of thumbnails.
The USB flash drive you are connecting may have a format that cannot be
recognized by the Data Projector. Connect the USB flash drive to your
computer to check if its file system is FAT or FAT32. If it isn’t, reformat the
USB flash drive to FAT or FAT32. Note that doing so will delete all of the
data currently in USB flash drive.
If “Off” is selected for the “Option Settings 2 3 Plug and Play” setting
(page 29), File Viewer will not startup automatically even if a USB flash
drive is connected to the projector’s USB-A port. If this happens, change
the “Plug and Play” setting to “On”.
All the folders and/or files contained in a folder will not be displayed if there
are more than 999 folder and/or files inside the folder. If this happens, reduce
the number of folders and/or files in the folder.
The Data Projector can recognize up to four drives. If the number of
connected drives is greater than four, the Data Projector will not recognize
the fifth and subsequent drives. Connect memory devices while ensuring that
no more than four drives are connected.
The digital camera’s USB mass storage class setting may not be
configured correctly, or you may need to perform some operation on the
camera. Consult the user documentation for your digital camera for
information about the required settings and operations.
The digital camera may not support USB mass storage class. If it does not,
you will not be able to use Viewer to view digital camera memory contents.
Question marks are displayed in place of thumbnails of images that cannot
be projected by File Viewer.
54
Page 55

File Viewer Error Messages
Problem Cause and Required Action
Folder does not contain any image
files.
This ECA file cannot be played./
This PtG file cannot be played.
Cannot display an image file. You may be trying to play back an image whose format and/or size is not
This movie file cannot be played
back.
This PDF file cannot be displayed. For information about the types of PDF files that can be displayed by File
Internal Memory Access Error An error may have been generated by a particular folder or file in projector
Failure due to insufficient internal
memory capacity.
This file cannot be played back. For information about the types of files that can be displayed by File Viewer,
Could not find an image file. There is nothing in projector internal memory or on the connected USB flash
There is no displayable folder, or file in the folder you are trying to access with
the File Viewer. Use your computer to check the contents of the folder. For
details about file formats supported for Data Projector playback, see
“Supported Playback Files” (page 36).
There may be an error in the ECA file or PtG file itself. Play back the ECA file
or PtG file using the EZ-Converter FA on your computer and check it.
supported by File Viewer. Check the “Supported Playback Files” (page 36).
There may be an error in the image file itself. Open the image file on your
computer and check it.
You may be trying to play back a movie whose format and/or size is not
supported by File Viewer. Check the “Supported Playback Files” (page 36).
There may be an error in the movie file itself. Open the movie file on your
computer and check it.
Viewer, see “Supported Playback Files” (page 36).
internal memory. Perform steps 1 through 8 under “To copy files from a
computer to projector internal memory” (page 37) and then open the
“InternalMem” drive (projector internal memory) on your computer. Check if
all of the folders and files in “InternalMem” open normally. If you experience
trouble with any file or folder, delete it.
If you cannot open any of the files or folders in projector internal memory with
your computer or if you cannot open the “InternalMem” drive itself, it could
mean there is a problem with the projector internal memory file system. In this
case, perform the procedure under “To format projector internal memory
(Windows users only)” (page 40).
Remaining available projector internal memory capacity is insufficient.
Perform steps 1 through 8 under “To copy files from a computer to projector
internal memory” (page 37) and then open the “InternalMem” drive (projector
internal memory) on your computer. Next, delete files you no longer need.
see “Supported Playback Files” (page 36).
drive, or there is some problem with the file system. Use your computer to
check the contents of projector internal memory or the USB flash drive.
55
Page 56

Note
Using EZ-Converter FA to Convert PowerPoint Files to ECA or PtG Files
EZ-Converter FA is computer software for converting PowerPoint files to ECA files or PtG files, which
can be played back using the projector’s File Viewer. EZ-Converter FA supports conversion of files
created with Microsoft Office PowerPoint 2003, 2007 and 2010.
Important!
Before trying to use EZ-Converter FA, be sure to go to the CASIO website
(http://www.casio-intl.com/support/) and check the information there about minimum
computer system requirements, and conditions governing download and use.
The procedure below assumes that you already have EZ-Converter FA installed on your
computer.
Save for certain exceptions (described below), playback and projection of an ECA file or PtG
file normally should be able to reproduce transitions, animations, and other special effects of
the original PowerPoint file.
• Conversion of OLE objects (movies, audio, etc.) and VBA objects in a PowerPoint file is not
supported.
• Conversion of timer and repeat operations in a PowerPoint file animation is not supported.
• An animation in a PowerPoint file is converted up to the time specified by “To specify the
maximum animation display time” (page 59), and everything after that is cut. When the point
up to which the animation was converted is reached during playback of the converted file,
playback will pause, and you will have to press the [R] key to advance to the next step.
• The source PowerPoint file plays when you convert a file with EZ-Converter FA. If there is no
change on the screen for about three consecutive seconds during this playback, say
between Points A and B, for example, the effect at Point B in the original file is ignored and
not converted. When Point B is reached during playback of the converted file, playback will
pause, and you will have to press the [R] key to advance to the next step.
Starting a conversion operation with EZ-Converter FA will temporarily change the screen
settings of your computer as shown below. Screen settings will revert back to what they were
after the conversion operation is complete.
Operating System: Changes:
Windows XP Screen resolution changes to 800 × 600, 1024 × 768, 1280 × 768 or
Windows Vista or
Windows 7
Windows 8 Screen resolution changes to 800 × 600, 1024 × 768, 1280 × 768 or
The screen resolution of the ECA file or PtG file will be the resolution specified by the
EZ-Converter FA setting (800 × 600, 1024 × 768, 1280 × 768 or 1280 × 800) when the file
conversion operation starts. For information about configuring this setting, see “To specify the
screen resolution of the ECA file or PtG file” (page 59).
1280 × 800.
Display card hardware acceleration is disabled.
Screen resolution changes to 800 × 600, 1024 × 768, 1280 × 768 or
1280 × 800.
Windows changes to the Basic mode (Windows Aero
1280 × 800.
TM
disabled).
56
Page 57

To convert a PowerPoint file to an ECA file or PtG file
Close button
Player button
Convert button
Minimize button
Important!
Before performing any of the operations here, you will need to have a file created using
Microsoft Office PowerPoint 2003, 2007 or 2010 on hand.
Conversion of a PowerPoint file to an ECA file or PtG file requires playback of the original file
from beginning to end. Note that the time required for conversion will roughly correspond to
the time required for playback.
1.
Turn on your computer and start up Windows.
2.
Connect the USB flash drive (or memory card) where you want to store the
converted ECA file or PtG file to your computer.
You can skip this step if you want to save the ECA file or PtG file to your computer’s local hard
disk.
3.
On your computer, start up EZ-Converter FA.
If your computer is running Windows Vista or Windows 7, starting up EZ-Converter FA will
cause the “User Account Control” message to appear. When it does, click [Allow] or [Yes].
This will display the EZ-Converter FA window.
4.
Configure the following settings as required.
Specify the ECA file or PtG file screen display resolution. See “To specify the screen resolution
of the ECA file or PtG file” (page 59).
If the original file contains an animation, specify the maximum animation display time. See
“To specify the maximum animation display time” (page 59).
5.
Click the button at the top of the EZ-Converter FA window.
This displays a dialog box for opening files.
6.
Select the PowerPoint file you want to convert from and then click the [Open]
button.
This will display a dialog box like the one shown below for specifying the file settings.
57
Page 58

7.
Configure the settings as required on the dialog box.
The following describes the meanings and settings of each of the items that appear on the
dialog box.
Dialog Box Item Description
Input File Shows the name of the PowerPoint file selected in step 6. The setting of this item
Output Drive Shows the drive name of the removable disk (USB flash drive or memory card)
Output File Name Shows the file name of the converted file, along with the path from the drive name.
ECA/PtG Specifies the format of the converted file (Default: ECA).
8.
After configuring all the settings you want, click [OK].
This will start playback of the PowerPoint file and start converting it to an ECA file or PtG file.
The “Conversion complete.” message will appear when file conversion is complete.
If you have other PowerPoint files you want to convert, repeat steps 4 through 7.
To check the contents of an ECA file or PtG file, perform the procedure under “To play back
an ECA file or PtG file on your computer” (page 59).
9.
After you are finished converting all the files you want, click the close button in
cannot be changed.
connected to the computer in step 2. When you have multiple removable disks
connected to your computer, you can click the [] button and select the name of the
drive where you want to save the converted file. A converted file is stored in the folder
named ECA (in the case of an ECA file) or PtG (in the case of a PtG file) on the drive you
specify here.
Under initial default settings, if there are no removable disks connected to the
computer, the resulting file will be saved in the same location (drive and folder) as the
original PowerPoint file. Click the [Browse] button and change the save destination, if
you want.
Except for the extension, the file name is the same as the PowerPoint file name. The
setting of this item cannot be changed.
the upper right corner of the EZ-Converter FA window.
58
Page 59

To specify the screen resolution of the ECA file or PtG file
1.
Right-click the left side of the EZ-Converter FA window.
2.
On the menu that appears, click “Output Resolution”.
3.
On the sub-menu that appears, select the resolution you want.
Select 1280 × 800 or 1280 × 768. If you cannot select the 1280 × 800 or 1280 × 768
resolution, select 1024 × 768.
For a PtG file, select 1024 × 768 or 800 × 600.
The setting you select here remains in effect until you change it.
To specify the maximum animation display time
1.
Right-click the left side of the EZ-Converter FA window.
2.
On the menu that appears, click “Max Animation Display Time”.
3.
On the sub-menu that appears, select a maximum animation display time value
(in seconds).
Available sub-menu options are 10 seconds, 20 seconds, 30 seconds, and 60 seconds.
The option you select remains in effect until you change it.
To play back an ECA file or PtG file on your computer
1.
On your computer, start up EZ-Converter FA.
This will display the EZ-Converter FA window.
2.
Click the button at the top of the EZ-Converter FA window.
This will display two more buttons as shown below.
3.
Click the button.
This displays a dialog box for opening files.
59
Page 60

4.
Control panel
Select the ECA file or PtG file you want to play back and then click the [Open]
button.
This will display a control panel at the top of the screen.
During file playback, you can use the control panel buttons to perform the operations
described below.
To do this: Perform this operation:
Go to the previous page Click the button.
Go to the next page Click the button.
Jump to a specific page 1.Click the button and then click “Slide Viewer” on the menu that appears.
Display help Click the button and then click “Help” on the menu that appears.
Exit file playback Click the button, or click the button and then click “Exit” on the menu
2. On the page menu that appears, click the thumbnail of the destination page
and then click [OK].
that appears. You could also press the [ESC] button on your computer keyboard
to stop playback.
60
Page 61

Projecting with the USB Display Function
USB Display Function Overview
Connecting the projector to a computer with a USB cable* enables projection of the computer’s
screen contents. This supports projection of screen contents of even small computers that have only a
USB port, but no RGB, HDMI, or other type of video output terminal.
* To use the USB Display function, connect the computer to the projector’s USB-B port.
Minimum Computer System Requirements
Supported Operating Systems
Windows XP SP3, Windows Vista SP1 (32bit), Windows 7 SP1 (32bit, 64bit), Windows 8/8.1 (64bit),
Windows 10, or Mac OS (10.6, 10.7, 10.8, 10.9)
Note, however, that functions may be limited by the operating system being used. For the latest
information about operating environments, visit the CASIO website.
USB Type A port (USB 2.0 or USB 3.0) equipped.
Important!
Log into Windows with admin privileges to use the USB display function. You will not be able
to use USB display if you are logged into Windows with a non-admin account.
Projecting Computer Screen Contents Over a USB Connection
The operation you need to perform the first time you connect to a computer to project its display
contents (described below) depends on whether the computer is running Windows or Mac OS. After
that, use the procedure under “To project computer screen contents over a USB connection after the
first time” (page 65), which is the same for any operating system.
Perform one of the procedures below, depending on your computer’s operating system.
61
Page 62

To project Windows computer screen contents over a USB
Note
connection for the first time
1.
Press the [INPUT] key. This will display the “Input” dialog box.
2.
Use the [] and [] keys to select “USB Display” and then press the [ENTER]
key.
This will cause the “USB Display” standby screen to be projected.
3.
While your computer is running, use a commercially available USB cable to
connect the projector’s USB-B port (Micro USB B type) to your computer’s USB
port.
The location of the USB-B port of this projector is indicated by “*2” in the illustration under
“Connecting Projector Cables” (page 11).
This will mount the projector onto your computer as a virtual CD-ROM drive, which is
represented by a “USB_DISPLAY” drive icon on your computer’s desktop.
Also, CASIO USB Display will start up automatically and display a licensing agreement dialog
box.
4.
On the licensing agreement dialog box, select “I agree” and then click [OK].
This will display a window like the one shown below on your computer. At the same time,
projection of the computer’s screen contents will start.
If CASIO USB Display does not start up automatically, use Explorer to navigate to the
“USB_DISPLAY” drive. Right-click the drive and then click “Auto Play” on the menu that
appears.
For information about the types of operations that can be performed at this point, see
“Supported Operations during Projection over a USB connection” (page 64).
Add-on Driver Software for Windows
With Windows, use of some functions of the CASIO USB Display requires installation of the driver
software shown in the table below. The driver software is the same as that used for Network
Connection. You can download it from the Network Connection download page at the CASIO website
(http://www.casio-intl.com/support/).
To use this function: Install this driver software:
Extended screen output function VDD driver (for Windows XP and Windows Vista)
62
Page 63
To project Mac OS computer screen contents over a USB
connection for the first time
1.
Press the [INPUT] key. This will display the “Input” dialog box.
2.
Use the [] and [] keys to select “USB Display” and then press the [ENTER]
key.
This will cause the “USB Display” standby screen to be projected.
3.
While your computer is running, use a commercially available USB cable to
connect the projector’s USB-B port to your computer’s USB port.
The location of the USB-B port of this projector is indicated by “*2” in the illustration under
“Connecting Projector Cables” (page 11).
This will cause a drive icon named “USB_DISPLAY” to appear on your computer screen.
4.
Double-click the “USB_DISPLAY” drive icon to open it.
5.
Double-click “MAC_USB_Display_V2.pkg” and follow the instructions that
appear on the display to install the application.
A message prompting you to restart your computer will appear after installation is complete.
Restart your computer. After the restart is complete, you will see a CASIO USB Display icon in
the Dock.
6.
In the Dock, click the CASIO USB Display icon.
Also, CASIO USB Display will start up and display a licensing agreement dialog box.
7.
On the licensing agreement dialog box, select “I agree” and then click [OK].
This will display a window like the one shown below on your computer. At the same time,
projection of the computer’s screen contents will start.
For information about the types of operations that can be performed at this point, see
“Supported Operations during Projection over a USB connection” (page 64).
Add-on Driver Software for Mac OS
With Mac OS, use of some parts of the CASIO USB Display requires installation of the driver software
shown in the table below. The driver software is the same as that used for Network Connection. You
can download it from the Network Connection download page at the CASIO website
(http://www.casio-intl.com/support/).
To use this function: Install this driver software:
Audio output function Sound flower
Extended desktop output function Syphon-virtual-screen
63
Page 64

Supported Operations during Projection over a USB connection
The operations described in the table below are supported on the CASIO USB Display window during
projection.
To do this: Perform this operation:
Start (resume) computer screen projection
Freeze computer screen projection
Stop computer screen projection and project the USB
display standby screen
Start audio output from a computer*
Mute audio output from a computer*
Output the computer’s main screen on the projection
screen
Output the computer’s extended screen on the
projection screen*
Minimize the CASIO USB Display window Click .
Exit the CASIO USB Display window (1) Click . Or you could click and then click
Display CASIO USB Display version information Click . On the menu that appears, select “About”.
1*2
1
1
Click .
Click .
Click .
Click . On the menu that appears, select “Audio
Out” so there is a check mark next to it.
Click . On the menu that appears, select “Audio
Out” to remove the check mark next to it.
Click . On the menu that appears, select “Select the
Projection Screen” 3 “Main Screen”.
Click . On the menu that appears, select “Select the
Projection Screen” 3 “Extended Screen”.
“Exit” on the menu that appears.
(2) On the confirmation dialog box that appears, click
the [OK] button.
This stops computer screen projection and
projects the “USB Display” standby screen.
*1 With Mac, installation of driver software is required to enable these functions. See “Add-on Driver
Software for Mac OS” (page 63).
*2 This operation is disabled under Mac OS 10.6. With Windows XP and Windows Vista, installation of
driver software is required to enable these functions. See “Add-on Driver Software for Windows”
(page 62).
64
Page 65

To project computer screen contents over a USB connection
Note
after the first time
1.
Turn on and start up the projector and computer.
2.
Press the [INPUT] key. This will display the “Input” dialog box.
3.
Use the [] and [] keys to select “USB Display” and then press the [ENTER]
key.
This will cause the “USB Display” standby screen to be projected.
4.
Use a USB cable to connect the projector’s USB-B port to your computer’s USB
port.
The CASIO USB Display will startup automatically on the computer and start projection of the
computer screen contents.
If the above operation does not cause CASIO USB Display to start up automatically, perform
either of the operations below on your computer, depending on its operating system.
Windows:
Use Explorer to navigate to the “USB_DISPLAY” drive. Right-click the drive and then click
“Auto Play” on the menu that appears.
Mac OS:
In the Dock, click the CASIO USB Display icon.
65
Page 66

Projecting the Screen Image of a Graphing Calculator
You can connect a CASIO graphing calculator to the Data Projector using a USB cable and project the
calculator’s screen image with the Data Projector. USB connection of the following CASIO graphing
calculators is supported.
ClassPad II (fx-CP400)
ClassPad 330 PLUS
fx-CG series
fx-9860G series
fx-9860GII series
fx-9750GII
GRAPH 95/85/85 SD/75/75+/35+
To project the screen image of a graphing calculator
1.
While the projector is turned on, connect the USB cable that comes with the
graphing calculator to the projector’s USB-A port and the graphing calculator’s
USB port.
2.
On the projector, press the [INPUT] key. This will display the “Input” dialog box.
3.
Use the [] and [] keys to select “CASIO USB Tool” and then press the
[ENTER] key.
4.
On the graphing calculator, perform the operation required for projection.
For details about this operation, refer to the use documentation that comes with your
calculator.
Important!
If the calculator does not operate properly after you connect it to the Data Projector, try
disconnecting the USB cable from the calculator and then reconnecting it. If this does not
correct the problem, disconnect the USB cable from both the Data Projector and the
calculator. Turn the Data Projector off and then back on again, and then re-connect the
calculator.
66
Page 67

Cleaning the Projector
Make it a habit to clean the projector at regular intervals as described in this section. Before cleaning
the projector, be sure to unplug it from the power outlet and make sure it is cooled down completely.
Cleaning the Projector Exterior
Wipe the exterior of the projector with a soft cloth that has been moistened in a weak solution of water
and a mild neutral detergent. Be sure to wring all excess moisture from the cloth before wiping.
Never use benzene, alcohol, thinner, or any other volatile agent for cleaning.
Cleaning the Lens
Carefully wipe the lens with a commercially available lens cloth or optical lens paper, like those for
eyeglasses or camera lenses. When cleaning the lens, do not apply undue force and take care to avoid
damaging the lens.
Cleaning Vents
Dust and dirt tend to collect around the intake vents. Because of this, you should use a vacuum
cleaner to clean away accumulated dust and dirt periodically (about once a month) as shown below.
Important!
Continued use of the projector after dust has accumulated around the intake vents can cause
overheating of internal components and lead to malfunction.
Certain operating conditions also can cause dirt and dust to accumulate around the
projector’s exhaust vents. If this happens, use the same procedure as that described above to
clean the exhaust vents.
67
Page 68

Troubleshooting
Note
Indicators
The POWER/STANDBY indicator and STATUS indicator change to show the current status of the
projector as described in the tables below.
POWER/STANDBY indicator
When the indicator is doing this: It means this about the projector:
Lit red Connected to a power source, but turned off (standby mode)
Flashing green Warming up after being turned on
Lit green Power on, operation normal
Flashing red Internal process in progress immediately after power off
STATUS indicator
When the indicator is doing this: It means this about the projector:
Lit green “On” selected for the “Light Control” setting
Lit (or flashing) red Error
Lit (or flashing) amber Error
The POWER/STANDBY and STATUS indicators both light amber immediately after the
projector is plugged into a power outlet.
68
Page 69

Error Indicators and Warning Messages
Warning messages and indicators let you know what the problem is when a projector error occurs.
When an error occurs, wait until the fan stops before unplugging the AC power cord. If you unplug
the AC power cord while the fan is still operating, an error may occur when you plug the AC power
cord back in.
Press the [ESC] key to clear the warning message.
Indicator/Error Message Description and Required Action
POWER : Green steady The projector’s internal temperature is very high. Perform the following
STATUS : –
(Green steady when “On”
is selected for the “Light
Control” setting.)
Message : Internal temperature is too
high. Check projector air
vents for blockage.
POWER : Green steady 3
Red steady
STATUS : –
Message : Internal temperature is too
high. The projector will
turn off.
POWER : Red steady Power has turned off automatically due to a fan problem. Confirm that the
STATUS : Amber flashing
(0.5-second interval)
POWER : Red steady Power has turned off automatically due to a system problem. After
STATUS : –
POWER : Red steady The projector was turned off automatically due to some problem that was
STATUS : Red steady
Message : –
steps.
Check for any blocking of the projector’s intake vents and exhaust
vents, and make sure that there is sufficient space around the
projector. See
If there is dust accumulated around the intake vents and/or exhaust
vents, turn off the projector and remove it. See
Projector” (page 67).
Power has turned off automatically due to internal overheating. Perform
the following steps.
Check for any blocking of the projector’s intake vents and exhaust
vents, and make sure that there is sufficient space around the
projector. See
If there is dust accumulated around the intake vents and/or exhaust
vents, remove it. See
If there is no problem with the projector’s vents, confirm that the POWER/
STANDBY indicator is lit red (without flashing), and then turn power back
on again. If the error occurs again when you turn power back on, contact
your retailer or nearest authorized CASIO Service Center.
POWER/STANDBY indicator is lit red (without flashing) and that the fan
has stopped. After checking the POWER/STANDBY indicator, disconnect
the power cord from the projector and wait for all of the projector’s
indicators to go out. Next, reconnect the power cord and turn projector
power back on.
If the error occurs again when you turn power back on, contact your
retailer or nearest authorized CASIO Service Center.
confirming that the POWER/STANDBY indicator is lit red (without
flashing), disconnect the power cord from the projector and wait for all of
the projector’s indicators to go out. Next, reconnect the power cord and
turn the projector back on.
If the error occurs again when you turn power back on, contact your
retailer or nearest authorized CASIO Service Center.
probably caused by external digital noise or some other reason. Confirm
that the POWER/STANDBY indicator is lit red (without flashing). After
checking the POWER/STANDBY indicator, disconnect the power cord
from the projector and wait for all of the projector’s indicators to go out.
Next, reconnect the power cord and turn projector power back on.
If the error occurs again when you turn power back on, contact your
retailer or nearest authorized CASIO Service Center.
“Setup Precautions” (page 10).
“Cleaning the
“Setup Precautions” (page 10).
“Cleaning the Projector” (page 67).
69
Page 70

Indicator/Error Message Description and Required Action
POWER : Red steady The projector was turned off automatically because the light source unit
STATUS : Red flashing
(0.5-second interval)
Message : –
POWER : Red steady Power has turned off automatically due to a projector memory error.
STATUS : Red flashing
(2-second or 1-second
interval)
Message : –
turned off or did not turn on. After confirming that the POWER/STANDBY
indicator is lit red (without flashing), unplug the power cord. Wait for a
short while and then plug it back in and turn on the projector again.
If the error occurs again when you turn power back on, contact your
retailer or nearest authorized CASIO Service Center.
Confirm that the POWER/STANDBY indicator is lit red (without flashing).
After checking the POWER/STANDBY indicator, disconnect the power
cord from the projector and wait for all of the projector’s indicators to go
out. Next, reconnect the power cord and turn projector power back on.
If the error occurs again when you turn power back on, contact your
retailer or nearest authorized CASIO Service Center.
Projector Troubleshooting
Check the following items whenever you experience any problem with the projector.
Problem Cause and Recommended Action
Power does not turn on. If the POWER/STANDBY indicator is not lit, the AC power cord is not connected
No image is projected or
the projected image is
abnormal.
Image color or display is
very abnormal.
I can’t understand
messages or menus
because they are the
wrong language.
correctly. Connect the AC power cord correctly.
If the POWER/STANDBY indicator is lit red and the STATUS indicator is lit (or
flashing) red or amber, it means some type of error has occurred. See “Error
Indicators and Warning Messages” (page 69).
The computer or video device connected to the projector is not turned on or it is
not outputting a video signal. Make sure the connected computer or video device
is turned on, and perform the required operation on it to output a video signal.
The correct output source is not selected on the projector. On the projector, select
the correct input source that corresponds to the connected device.
Images may not project correctly when you have the component output terminal of
a video device connected to the COMPUTER terminal of the projector.
The wrong option (“Component” or “RGB”) may be selected for the “Input Settings
COMPUTER Terminal” setting on the setup menu. The image will not be projected
correctly if “Component” is selected while the projector’s COMPUTER terminal is
connected to the RGB output terminal of a computer, or if “RGB” is selected while the
projector’s COMPUTER terminal is connected to the component video output
terminal of a video device. On the setup menu, select “Auto” for the “Input Settings
COMPUTER Terminal” setting. See page 28.
Perform the following operation to select the language you want. See page 29.
1. Press the [MENU] key to display the setup menu.
2. If the input signal is HDMI (PC), press [] four times and then press the [ENTER]
key. If the input signal is not HDMI (PC), press [] five times and then press the
[ENTER] key.
3. Press [] twice and then press the [ENTER] key to display the language selection
menu.
4. Use the [] and [] keys to move the highlighting to the language you want to
select and then press the [ENTER] key.
5. Press the [MENU] key to exit the setup menu.
70
Page 71

Problem Cause and Recommended Action
No sound output from the
AUDIO OUT terminal
No sound output from the
speaker (XJ-F Series)
Strange color The input signal may not match projector settings. Try doing the following.
Text is blurry. The image may be out of focus. Adjust image focus.
The message “Please input
the password.” appears
and further operation is not
possible.
The remote controller does
not work.
The POWER/STANDBY
indicator is lit red and the
STATUS indicator is lit (or
flashing) red or amber.
The light source unit does
not light.
The projector’s volume level setting may be too low or muted. Use the remote
controller [VOLUME +] and [VOLUME –] keys to adjust the volume level. See page
20.
The volume level setting of the device connected to the projector is too low or the
other device is not outputting audio. Adjust the volume level of the connected
device.
The audio output of the connected device may not be connected correctly to the
projector’s AUDIO IN terminal. Check the connection.
When the input source is “HDMI”, “File Viewer”, “Network” or “USB Display”,
“Line” may be selected for the “Option Settings 2 Audio Out” setting on the
setup menu. Change the “Audio Out” setting to “Speaker”. See page 30.
– Press the [FUNC] key and then select “Brightness” to adjust image brightness.
– Press the [FUNC] key and then select “Color Mode” to change the color mode.
– On the setup menu, use “Image Adjustment 1 Color Balance” to adjust the
projection image color balance.
The current frequency and/or phase setting do not match the input signal. (Applies
only when the input source is an RGB signal.) Press the [AUTO] key to execute an
automatic adjustment operation.
On the setup menu, perform the “Image Adjustment 2 Frequency” and “Image
Adjustment 2 Phase” adjustments. (Applies only when the input source is an
RGB signal.) See page 27.
The “Option Settings 1 Power On Password” setting on the setup menu is turned
on, so the projector is password protected. Input the correct password, and then
press the [ENTER] key. See page 32.
The remote controller batteries may be dead. Replace the batteries.
The remote controller may be too far from the projector. Make sure the remote
controller is within about five meters from the projector when performing
operations.
An error occurred. See “Error Indicators and Warning Messages” (page 69).
The light source has been temporarily shut off by pressing the [BLANK] key. Press
the [BLANK] key or [ESC] key to turn it back on. For more information, see “To
momentarily blank the image and mute the audio (BLANK)” (page 17).
The light source unit has reached the end of its service life or it is malfunctioning.
Contact your original dealer or authorized CASIO service center for replacement.
71
Page 72

Problem Cause and Recommended Action
Power suddenly turns off
and the projector restarts.
The projector periodically performs a self-check operation. In rare cases, the result of
a self-check may cause the projector to restart automatically. This normally does not
indicate malfunction, so you can continue using the projector.
However, malfunction may be indicated if successive restarts keep occurring. If this
happens contact your original dealer or authorized CASIO service center.
Important!
Try performing the following steps, which may or may not return the projector to normal
operation.
1. Unplug the AC power cord and wait for at least 10 minutes.
2. Plug the power cord back in and turn the projector back on again.
If normal operation does not resume after you perform the above steps, take the projector to
your retailer or authorized CASIO service center.
72
Page 73

Appendix
Projector
Stereo mini plug Pin plug type audio cable
(commercially available)
To component video
output terminals
Component video cable (commercially available)
To audio output terminals
White
Red
COMPUTER terminal
AUDIO IN terminal
Video device
Connecting to a Component Video Output
This section explains how to establish a component video connection between the projector and a
video device.
Component video output terminals come in 3-terminal sets: Y·Cb·Cr or Y·Pb·Pr. Be sure to match
the colors of the plugs on a component video cable with the colors of the terminals (Green: Y;
Blue: Cb/Pb; Red: Cr/Pr).
Note that connection only to an analog component video output terminal is supported.
Connection to a digital output terminal is not supported.
XJ-V Series
73
Page 74

XJ-F Series
Note
Projector
Video device
Stereo mini plug Pin plug type audio cable
(commercially available)
To component video
output terminals
Component video cable (commercially available)
To audio output terminals
White
Red
COMPUTER terminal
AUDIO IN terminal
To S-video output terminal
To video/audio output terminal
Yellow: To VIDEO terminal
To S-VIDEO terminal
Red: To AUDIO IN R terminal
White: To AUDIO IN L terminal
Projector
Video device
S-video cable (commercially available)
Pin plug type video/audio cable
(commercially available)
Connecting to a Composite Video Output or S-Video Output (XJ-F Series Only)
Note that regardless of whether the image being projected is being input via the projector’s
S-VIDEO terminal or VIDEO terminal, the projector outputs audio that is input via the
projector’s AUDIO IN L/R terminals.
74
Page 75

Important!
Note
Supplying Power to External Equipment (XJ-F Series Only)
Power can be supplied to external equipment via the USB-A/DC 5V port of an XJ-F20XN, XJ-F200WN,
or XJ-F210WN model projector, or via the DC 5V port of an XJ-F10X or XJ-F100W model projector.
Turning off projector power also cuts power being supplied to external equipment. Note that
power being supplied is also cut when the projector is turned off due to restarting by its
self-check function or Auto Power Off, due to some error, or for any other reason. Depending
on the external equipment being used, cut off of the power supply may cause data that is
being edited to be lost or corrupted. Make it a habit to frequently save data on external
equipment being powered by the projector.
Projector power being turned off by Auto Power Off (page 29) also causes power to external
equipment to be cut off. Before starting power supply to external equipment, be sure to select
“Off” for the setting “Option Settings 1 3 Auto Power Off” to disable Auto Power Off.
For a list of external equipment whose operation has been confirmed while being powered by
the projector, visit the CASIO projector website (http://www.casio-intl.com/support/). Proper
operation is not guaranteed for any external device that is not included in the list at the CASIO
projector website.
Though power up to 5V DC 2A can be supplied to other devices not included on the CASIO
website, note that doing so may make some functions unavailable on some devices. Before
using output from this port to power another device, be sure to check the user documentation
of the device and make sure you connect it correctly. Particular care is required when
connecting a chargeable battery to this projector’s USB port power supply. Incorrect
connection creates the risk of explosion, fire, and smoke.
Note that CASIO COMPUTER CO., LTD. shall be held in no way liable for any loss or
corruption of data stored on an external device connected to this projector’s USB port power
supply, or for any damage, smoke generation, or fire occurring on the connected device.
To temporarily blank projection while maintaining power supply from the projector to external
equipment, press the [BLANK] key. For more information, see “To momentarily blank the
image and mute the audio (BLANK)” (page 17).
75
Page 76

Updating Firmware and Transferring a User Logo
SERVICE port
(Micro-USB Type B)
LOGO port
(Micro-USB Type B)
XJ-V Series XJ-F Series
With an XJ-V Series projector, you can update firmware (software in the projector flash ROM) using a
computer. With an XJ-F Series projector, you can update firmware and also transfer images to the
projector to be used as a user logo.
For details about these operations, refer to the “Projector Firmware Update Guide” and “User Logo
Transfer Guide”, which are available for download from the CASIO projector website.
To update firmware and transfer a user logo
Use a commercially available USB cable to connect the projector’s SERVICE port (XJ-V Series
models) or LOGO port (XJ-F Series models) to your computer’s USB port.
Hanging the Projector from a Ceiling
The projector can be hung from a ceiling. When hanging a projector from the ceiling, you can orient it
upside down or with the projection lens facing straight downwards.
For full details, contact the retailer where you purchased the projector.
Important!
When hanging the projector from a ceiling, make sure that it is at least one meter away from
fire detectors, fire alarms, and other fire protection devices. Locating the projector too close to
a fire protection device creates the risk of mis-operation of the device due to warm air
exhausted from the projector. Also, avoid locating the projector close to fluorescent lights or
other strong light sources. Bright light can shorten the operating range of the remote controller
or even make remote control impossible. When selecting a location for the projector, be sure
to test for proper operation of the remote controller.
The vertical and horizontal orientation of the projected image is reversed from normal when
the projector is positioned upside down for hanging from a ceiling. You need to change the
setup of the projector in order to correct for this. For details, see “Screen Settings 3 Ceiling
Mount” (page 28) under “Setup Menu Settings”.
76
Page 77
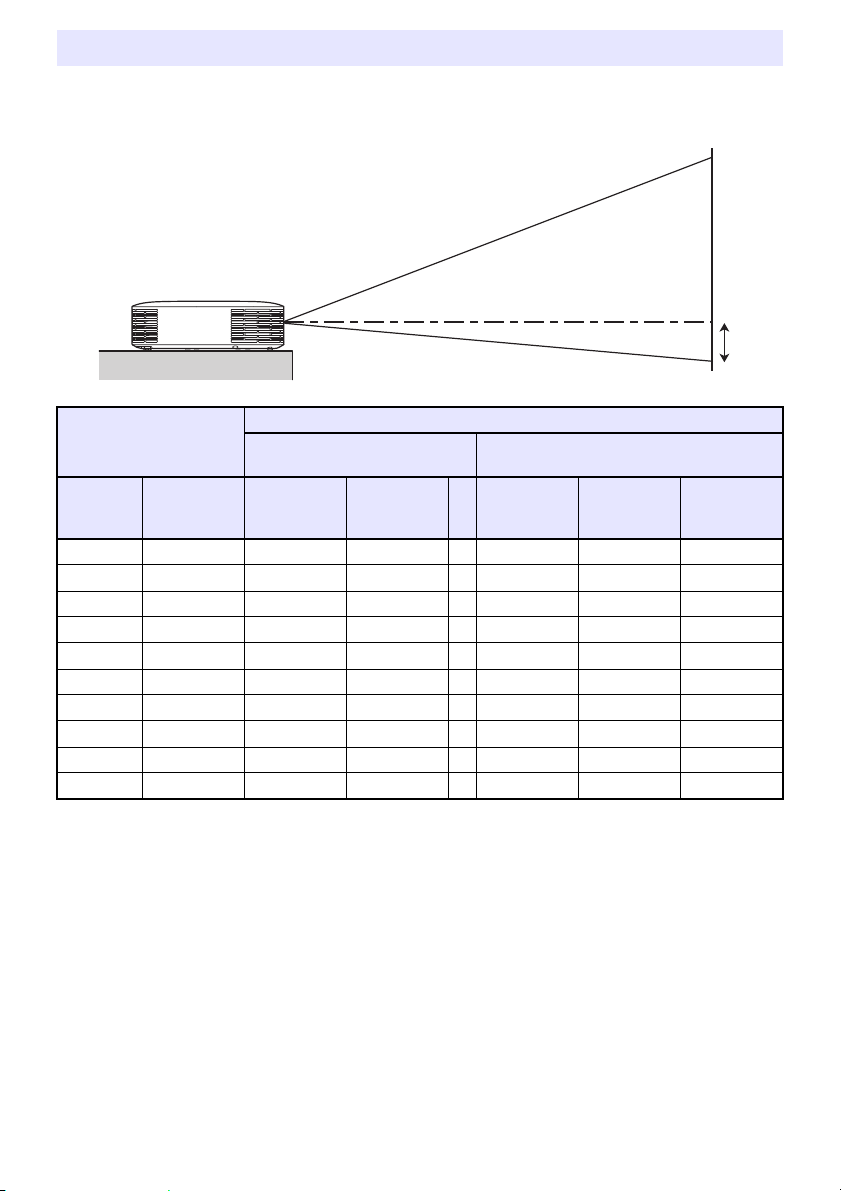
Projection Distance and Screen Size
The projection distance values below are for reference when setting up the projector.
“h” in the illustration and table indicates the distance between the center of the projector lens and
the bottom edge of the projection screen.
h
Approximate Projection Distance
Projection Size
Screen
Size
30 76 0.93 / 3.05 1.38 / 4.53 0 – – –
35 89 – – – 0.92 / 3.02 1.37 / 4.49 8 / 3.15
40 102 1.27 / 4.17 1.88 / 6.17 0 1.06 / 3.48 1.58 / 5.18 9 / 3.54
60 152 1.95 / 6.4 2.87 / 9.42 0 1.64 / 5.38 2.42 / 7.94 13 / 5.12
77 196 2.54 / 8.33 3.72 / 12.2 0 2.14 / 7.02 3.14 / 10.3 17 / 6.69
80 203 2.64 / 8.66 3.86 / 12.66 0 2.22 / 7.28 3.26 / 10.7 18 / 7.09
100 254 3.33 / 10.93 4.85 / 15.91 0 2.81 / 9.22 4.11 / 13.48 22 / 8.66
150 381 5.04 / 16.54 7.33 / 24.05 0 4.26 / 13.98 6.22 / 20.41 34 / 13.39
200 508 6.76 / 22.18 9.82 / 32.22 0 5.72 / 18.77 8.32 / 27.3 45 / 17.72
300 762 10.18 / 33.4 14.78 / 48.49 0 8.63 / 28.31 12.54 / 41.14 67 / 26.38
Diagonal
(cm)
XJ-V10X/XJ-F10X/XJ-F20XN
Minimum
Distance
(m / feet)
Maximum
Distance
(m / feet)
h
XJ-V100W/XJ-V110W/XJ-F100W/
XJ-F200WN/XJ-F210WN
Minimum
Distance
(m / feet)
Maximum
Distance
(m / feet)
h
(cm / inch)
77
Page 78

Aspect Ratio Setting and Projection Image
The following shows how images are projected in accordance with the type of the input signal and the
aspect ratio setting of the projector.
XJ-V100W/XJ-V110W/XJ-F100W/XJ-F200WN/XJ-F210WN
Input source: RGB or HDMI(PC)
Input Signal Normal Full 16:9 4:3 True
SVGA (800 × 600)
XGA (1024 × 768)
WXGA (1280 × 800)
SXGA (1280 × 1024)
Input source: Video*, S-Video*, Component or HDMI(DTV)
Input Signal Normal 16:9 16:10 4:3 Letter Box
4:3 Aspect Image
Squeezed Image
Letter Box Image
16:9 Aspect Image
* XJ-F100W/XJ-F200WN/XJ-F210WN only
78
Page 79

XJ-V10X/XJ-F10X/XJ-F20XN
Input source: RGB or HDMI(PC)
Input Signal Normal Full 16:9 16:10
SVGA (800 × 600)
XGA (1024 × 768)
WXGA (1280 × 800)
SXGA (1280 × 1024)
Input source: Video*, S-Video*, Component or HDMI(DTV)
Input Signal Normal 16:9 16:10 4:3
4:3 Aspect Image
Squeezed Image
Letter Box Image
16:9 Aspect Image
* XJ-F10X/XJ-F20XN only
79
Page 80

Important!
Supported Signals
Even if a signal is listed in the table below, it does not guarantee that you will be able to
display its images correctly.
RGB Signal
Signal Name Resolution
VESA 640 × 480/60 640 × 480 31.5 60
640 × 480/72 640 × 480 37.9 73
640 × 480/75 640 × 480 37.5 75
640 × 480/85 640 × 480 43.3 85
800 × 600/56 800 × 600 35.2 56
800 × 600/60 800 × 600 37.9 60
800 × 600/72 800 × 600 48.1 72
800 × 600/75 800 × 600 46.9 75
800 × 600/85 800 × 600 53.7 85
1024 × 768/60 1024 × 768 48.4 60
1024 × 768/70 1024 × 768 56.5 70
1024 × 768/75 1024 × 768 60.0 75
1024 × 768/85 1024 × 768 68.7 85
1152 × 864/75 1152 × 864 67.5 75
1280 × 720/60 1280 × 720 45.0 60
1280 × 768/60 1280 × 768 47.8 60
1280 × 800/60 1280 × 800 49.7 60
1280 × 960/60 1280 × 960 60.0 60
1280 × 1024/60 1280 × 1024 64.0 60
1280 × 1024/75 1280 × 1024 80.0 75
1280 × 1024/85 1280 × 1024 91.1 85
1366 × 768/60 1366 × 768 47.7 60
1400 × 1050/60 1400 × 1050 65.3 60
1440 × 900/60 1440 × 900 55.9 60
1600 × 1200/60 1600 × 1200 75.0 60
1680 × 1050/60 1680 × 1050 65.3 60
1920 × 1080/60 1920 × 1080 67.5 60
1920 × 1200RB/60 1920 × 1200 74.0 60
Horizontal Frequency
(kHz)
Vertical Frequency
(Hz)
80
Page 81

Component Signal
Signal Name Horizontal Frequency (kHz) Vertical Frequency (Hz)
HDTV 1080p/50 56.3 50
1080p/60 67.5 60
720p/50 37.5 50
720p/60 45.0 60
1080i/50 28.1 50
1080i/60 33.7 60
SDTV 576p/50 31.3 50
576i/50 16.6 50
480p/60 31.5 60
480i/60 15.7 60
Video Signal (XJ-F Series only)
Signal Name Horizontal Frequency (kHz) Vertical Frequency (Hz)
NTSC 15.7 60
NTSC4.43 15.7 60
PAL 15.6 50
PAL-M 15.7 60
PAL-N 15.6 50
PAL60 15.7 60
SECAM 15.6 50
HDMI Signal
Signal Name Horizontal Frequency (kHz) Vertical Frequency (Hz)
640 × 480/60 31.5 60
800 × 600/60 37.9 60
1024 × 768/60 48.4 60
1280 × 720/60 45.0 60
1280 × 768/60 47.8 60
1280 × 800/60 49.7 60
1280 × 960/60 60 60
1280 × 1024/60 64 60
1400 × 1050/60 65.3 60
1920 × 1080/60 67.5 60
1920 × 1200RB/60 74.0 60
SDTV (480p) 31.5 60
SDTV (576p) 31.25 50
HDTV (720p) (50) 37.5 50
HDTV (720p) (60) 45 60
HDTV (1080i) (50) 28.13 50
HDTV (1080i) (60) 33.75 60
HDTV (1080p) (50) 56.25 50
HDTV (1080p) (60) 67.5 60
81
Page 82

Projector RS-232C Control
Projector
Commercially available serial cable (cross)
Computer
SERIAL port (RS-232C)
D-Sub 9-pin (female)
Serial port
D-Sub 9-pin (female)
Projector
Commercially available serial cable (cross)
Computer
SERIAL port (RS-232C)
D-Sub 9-pin (female)
Serial port
D-Sub 9-pin (female)
When there is a serial connection between the projector and a computer, you can control the projector
using RS-232C commands sent from the computer.
To establish a serial connection between the projector and a
computer
Connect the projector and computer as shown in the illustration below.
XJ-V Series
XJ-F Series
82
Page 83

Using Control Commands
(
VOL ?
)
(
0-30,15
)
(
VOL 0
)
This section explains the commands that are used to control the projector from a computer.
Command Send Format
Configure your computer’s serial port with the following settings.
Data Rate 19200 bps
Communication
Protocol
Read Command
Write Command
See the “Command List” for details about command names and settings.
All commands use ASCII characters and decimal format integers.
The projector will return a question mark (?) when it is sent a command it cannot recognize. Also,
any command that attempts to set a value that is outside the applicable allowable range will be
ignored.
If the projector is performing a process initiated by a previously sent command, a projector key
operation, or a remote controller key operation, send of the next command must wait until the
projector completes the previous process.
Data Bit 8 bit
Parity None
Stop Bit 1 bit
Flow Control None
Send this command when you want information about the current setup of the data
projector.
Send Format (<command name>?)
Receive Format (<applicable command setting range>,<current setting>)
Command Send
Example
Send this command to control the data projector (power on/off, etc.) and to write data to it.
Send Format (<command name><setting value>)
Command Send
Example
sent from the computer to the projector.
4
returned from the projector to the computer.
sent from the computer to the projector.
4
Projector volume setting becomes 0.
83
Page 84

Command List
Only the following functions are supported while the projector is turned off. Do not try to send any
other command to the projector.
Power on/off: Read
Power on: Write
Get light time: Read
Input of a valid signal must be in progress in order to use a command to turn on blank screen or
change the aspect ratio.
R: Read enabled W: Write enabled
Function
Power On/Off: PWR RW 0: Off, 1: On
Input Switching:
0: Switches the input source to the COMPUTER terminal
and changes the COMPUTER terminal setting to RGB.
1: Switches the input source to COMPUTER terminal and
changes the COMPUTER terminal setting to component.
2: Switches the input source to Video.
6: Switches the input source to COMPUTER terminal and
changes the COMPUTER terminal setting to Auto.
7: Switches the input source to “HDMI”.
8: Switches the input source to “Network”.
9: Switches the input source to “S-Video”.
11: Switches the input source to “File Viewer”.
12: Switches the input source to “USB Display”.
13: Switches the input source to “CASIO USB Tool”.
14: Switches the input source to “HDMI2”.
Settings 2, 9, and 14 are valid for XJ-F Series projectors
only.
Settings 8, 11, 12, and 13 are valid for network model
projectors only.
Blank Screen: Switches the blank screen on or off. BLK RW 0: Off, 1: On
Volume: Specifies a value to adjust the volume level. This
setting is applied to the input source signal that is
currently being projected by the projector.
Color Mode: Selects the color mode. PST RW 1: Graphics, 2: Theater
Aspect Ratio:
Specifies the aspect ratio.
Setting 0 is the “Normal” setting when the input source is
“RGB” or “HDMI(PC)”, while setting 2 is the “Normal”
setting when the input source is component, “HDMI(DTV)”,
“Video”, or “S-Video”.
Get Light Time: Gets the light time from the projector. LMP R 0- Unit: Hours
Command
Name
SRC RW 0: RGB, 1: Component
VOL RW 0 to 30
ARZ RW 0: Normal, 1: 16:9
RW Settings
2: Video
6: Auto (RGB/Component)
7: HDMI, 8: Network
9: S-Video, 11: File Viewer
12: USB Display
13: CASIO USB Tool
14: HDMI2
3: Standard, 4: Blackboard
5: Natural
2: Normal, 3: Letter Box
4: Full, 5: True, 6: 4:3
7: 16:10
84
Page 85

Note
Function
Light Control:
Configures the Light Control settings and Light Control Off
Mode settings. Setting 2 is valid for XJ-F Series projectors
only.
Command
Name
RW Settings
PMD RW 0: Bright, 1: Normal
2: Light Sensor On
3: Light Output 7
4: Light Output 6
5: Light Output 5
6: Light Output 4
7: Light Output 3
8: Light Output 2
9: Light Output 1
Freeze: Switches freeze on or off. FRZ RW 0: Off, 1: On
Keystone Correction:
KST RW 0 to 120
Specifies the keystone correction setting as a value that
corresponds to the typical Setup Menu “Keystone
Correction” settings below.
0: Keystone Correction –60
60: Keystone Correction 0
120: Keystone Correction +60
Example: 65 here, specifies a setting equivalent to
Keystone Correction +5.
Keystone Correction +/–:
Raises or lowers the current keystone correction setting
+: KSP
–: KSM
W 0 to 120
by 1.
Key: Operation executed when a key is pressed.
Settings 26 through 30 are valid for network model
projectors only.
KEY W 1: , 2: , 3: , 4:
5: ENTER, 6: ESC, 10: FUNC
11: MENU, 12: POWER
13: AUTO, 14: INPUT
15: TIMER, 16: ASPECT
Each KEY command setting corresponds to a
remote controller key. The projector operation that is
performed in response to a KEY command is
identical to the corresponding remote controller key
operation. When sending KEY commands to the
projector from an external device, make sure they
are sent in the same sequence that the
corresponding key operations are performed on the
remote controller.
17: BLANK, 18: FREEZE
19: , 20: KEYSTONE +
21: KEYSTONE –
22: D-ZOOM +
23: D-ZOOM –
24: VOLUME +
25: VOLUME –
26: PLAY(R)
27: REWIND(s)
28: FORWARD(d)
29: PREVIOUS(S)
30: NEXT(T)
Setup Type:
POS RW 0 to 3
Specifies how the projector is set up relative to screen for
projection.
0: Projection to a screen in front of the projector*
1: Ceiling mounted projection from behind the screen*
2: Projection from behind the screen*
3: Ceiling mounted projection to a screen in front of the
projector*
2
1
APO: Used to change the Auto Power Off setting (trigger time
setting or Auto Power Off disable).
1
2
APO RW 0: Off, 1: 5 minutes
2: 10 minutes, 3: 15 minutes
4: 20 minutes, 5: 30 minutes
Error: Reads the projector error status. STS R 0: Normal, 1: Fan error
2: Temperature error
7: Light error, 16: Other error
85
Page 86

Function
Volume +/–: Raises or lowers the current volume setting by 1. +: VLP
Mute: Switches mute on or off. MUT RW 0: Off, 1: On
Microphone Input Level:
Adjusts the volume level of audio input from the MIC
terminal. This command is available only for network model
projectors.
Command
Name
–: VLM
MIC RW 0 to 3
RW Settings
W0 to 30
*1 Top of projector upwards
*2 Top of projector downwards
86
Page 87

GPL and LGPL
(1) This product uses software (This Software) that comes under the GNU General Public License
(GPL) and GNU Lesser General Public License (LGPL). In accordance with the GPL and LGPL, the
source code of This Software is open source code. Anyone who wishes to view the open source
code can do so by downloading it from the CASIO Projector download site. Whenever copying,
modifying, or distributing This Software, be sure to do so in accordance with the terms and
conditions of the GPL and LGPL.
(2) This Software is provided “as is” without expressed or implied warranty of any kind. However, this
disclaimer does not affect the terms and conditions of the warranty of the product itself (including
malfunctions due to This Software).
(3) The following are the GPL and LGPL that This Software comes under.
87
Page 88

GNU GENERAL PUBLIC LICENSE
Version 2, June 1991
Copyright (C) 1989, 1991 Free Software Foundation, Inc.
51 Franklin Street, Fifth Floor, Boston, MA 02110-1301, USA
Everyone is permitted to copy and distribute verbatim copies
of this license document, but changing it is not allowed.
Preamble
The licenses for most software are designed to take away your freedom to share and change it. By
contrast, the GNU General Public License is intended to guarantee your freedom to share and change
free software--to make sure the software is free for all its users. This General Public License applies to
most of the Free Software Foundation’s software and to any other program whose authors commit to
using it. (Some other Free Software Foundation software is covered by the GNU Lesser General Public
License instead.) You can apply it to your programs, too.
When we speak of free software, we are referring to freedom, not price. Our General Public Licenses
are designed to make sure that you have the freedom to distribute copies of free software (and charge
for this service if you wish), that you receive source code or can get it if you want it, that you can
change the software or use pieces of it in new free programs; and that you know you can do these
things.
To protect your rights, we need to make restrictions that forbid anyone to deny you these rights or to
ask you to surrender the rights. These restrictions translate to certain responsibilities for you if you
distribute copies of the software, or if you modify it.
For example, if you distribute copies of such a program, whether gratis or for a fee, you must give the
recipients all the rights that you have. You must make sure that they, too, receive or can get the
source code. And you must show them these terms so they know their rights.
We protect your rights with two steps: (1) copyright the software, and (2) offer you this license which
gives you legal permission to copy, distribute and/or modify the software.
Also, for each author’s protection and ours, we want to make certain that everyone understands that
there is no warranty for this free software. If the software is modified by someone else and passed on,
we want its recipients to know that what they have is not the original, so that any problems introduced
by others will not reflect on the original authors’ reputations.
Finally, any free program is threatened constantly by software patents. We wish to avoid the danger
that redistributors of a free program will individually obtain patent licenses, in effect making the
program proprietary. To prevent this, we have made it clear that any patent must be licensed for
everyone’s free use or not licensed at all.
The precise terms and conditions for copying, distribution and modification follow.
88
Page 89

TERMS AND CONDITIONS FOR COPYING,
DISTRIBUTION AND MODIFICATION
0. This License applies to any program or other work which contains a notice placed by the copyright
holder saying it may be distributed under the terms of this General Public License. The “Program”,
below, refers to any such program or work, and a “work based on the Program” means either the
Program or any derivative work under copyright law: that is to say, a work containing the Program
or a portion of it, either verbatim or with modifications and/or translated into another language.
(Hereinafter, translation is included without limitation in the term “modification”.) Each licensee is
addressed as “you”.
Activities other than copying, distribution and modification are not covered by this License; they
are outside its scope. The act of running the Program is not restricted, and the output from the
Program is covered only if its contents constitute a work based on the Program (independent of
having been made by running the Program). Whether that is true depends on what the Program
does.
1. You may copy and distribute verbatim copies of the Program’s source code as you receive it, in
any medium, provided that you conspicuously and appropriately publish on each copy an
appropriate copyright notice and disclaimer of warranty; keep intact all the notices that refer to this
License and to the absence of any warranty; and give any other recipients of the Program a copy of
this License along with the Program.
You may charge a fee for the physical act of transferring a copy, and you may at your option offer
warranty protection in exchange for a fee.
2. You may modify your copy or copies of the Program or any portion of it, thus forming a work based
on the Program, and copy and distribute such modifications or work under the terms of Section 1
above, provided that you also meet all of these conditions:
a) You must cause the modified files to carry prominent notices stating that you changed the files
and the date of any change.
b) You must cause any work that you distribute or publish, that in whole or in part contains or is
derived from the Program or any part thereof, to be licensed as a whole at no charge to all third
parties under the terms of this License.
c) If the modified program normally reads commands interactively when run, you must cause it,
when started running for such interactive use in the most ordinary way, to print or display an
announcement including an appropriate copyright notice and a notice that there is no warranty
(or else, saying that you provide a warranty) and that users may redistribute the program under
these conditions, and telling the user how to view a copy of this License. (Exception: if the
Program itself is interactive but does not normally print such an announcement, your work
based on the Program is not required to print an announcement.)
89
Page 90

These requirements apply to the modified work as a whole. If identifiable sections of that work are
not derived from the Program, and can be reasonably considered independent and separate works
in themselves, then this License, and its terms, do not apply to those sections when you distribute
them as separate works. But when you distribute the same sections as part of a whole which is a
work based on the Program, the distribution of the whole must be on the terms of this License,
whose permissions for other licensees extend to the entire whole, and thus to each and every part
regardless of who wrote it.
Thus, it is not the intent of this section to claim rights or contest your rights to work written entirely
by you; rather, the intent is to exercise the right to control the distribution of derivative or collective
works based on the Program.
In addition, mere aggregation of another work not based on the Program with the Program (or with
a work based on the Program) on a volume of a storage or distribution medium does not bring the
other work under the scope of this License.
3. You may copy and distribute the Program (or a work based on it, under Section 2) in object code or
executable form under the terms of Sections 1 and 2 above provided that you also do one of the
following:
a) Accompany it with the complete corresponding machine-readable source code, which must be
distributed under the terms of Sections 1 and 2 above on a medium customarily used for
software interchange; or,
b) Accompany it with a written offer, valid for at least three years, to give any third party, for a
charge no more than your cost of physically performing source distribution, a complete
machine-readable copy of the corresponding source code, to be distributed under the terms of
Sections 1 and 2 above on a medium customarily used for software interchange; or,
c) Accompany it with the information you received as to the offer to distribute corresponding
source code. (This alternative is allowed only for noncommercial distribution and only if you
received the program in object code or executable form with such an offer, in accord with
Subsection b above.)
The source code for a work means the preferred form of the work for making modifications to it.
For an executable work, complete source code means all the source code for all modules it
contains, plus any associated interface definition files, plus the scripts used to control compilation
and installation of the executable. However, as a special exception, the source code distributed
need not include anything that is normally distributed (in either source or binary form) with the
major components (compiler, kernel, and so on) of the operating system on which the executable
runs, unless that component itself accompanies the executable.
If distribution of executable or object code is made by offering access to copy from a designated
place, then offering equivalent access to copy the source code from the same place counts as
distribution of the source code, even though third parties are not compelled to copy the source
along with the object code.
4. You may not copy, modify, sublicense, or distribute the Program except as expressly provided
under this License. Any attempt otherwise to copy, modify, sublicense or distribute the Program is
void, and will automatically terminate your rights under this License. However, parties who have
received copies, or rights, from you under this License will not have their licenses terminated so
long as such parties remain in full compliance.
90
Page 91

5. You are not required to accept this License, since you have not signed it. However, nothing else
grants you permission to modify or distribute the Program or its derivative works. These actions are
prohibited by law if you do not accept this License. Therefore, by modifying or distributing the
Program (or any work based on the Program), you indicate your acceptance of this License to do
so, and all its terms and conditions for copying, distributing or modifying the Program or works
based on it.
6. Each time you redistribute the Program (or any work based on the Program), the recipient
automatically receives a license from the original licensor to copy, distribute or modify the Program
subject to these terms and conditions. You may not impose any further restrictions on the
recipients’ exercise of the rights granted herein. You are not responsible for enforcing compliance
by third parties to this License.
7. If, as a consequence of a court judgment or allegation of patent infringement or for any other
reason (not limited to patent issues), conditions are imposed on you (whether by court order,
agreement or otherwise) that contradict the conditions of this License, they do not excuse you from
the conditions of this License. If you cannot distribute so as to satisfy simultaneously your
obligations under this License and any other pertinent obligations, then as a consequence you may
not distribute the Program at all. For example, if a patent license would not permit royalty-free
redistribution of the Program by all those who receive copies directly or indirectly through you, then
the only way you could satisfy both it and this License would be to refrain entirely from distribution
of the Program.
If any portion of this section is held invalid or unenforceable under any particular circumstance, the
balance of the section is intended to apply and the section as a whole is intended to apply in other
circumstances.
It is not the purpose of this section to induce you to infringe any patents or other property right
claims or to contest validity of any such claims; this section has the sole purpose of protecting the
integrity of the free software distribution system, which is implemented by public license practices.
Many people have made generous contributions to the wide range of software distributed through
that system in reliance on consistent application of that system; it is up to the author/donor to
decide if he or she is willing to distribute software through any other system and a licensee cannot
impose that choice.
This section is intended to make thoroughly clear what is believed to be a consequence of the rest
of this License.
8. If the distribution and/or use of the Program is restricted in certain countries either by patents or by
copyrighted interfaces, the original copyright holder who places the Program under this License
may add an explicit geographical distribution limitation excluding those countries, so that
distribution is permitted only in or among countries not thus excluded. In such case, this License
incorporates the limitation as if written in the body of this License.
9. The Free Software Foundation may publish revised and/or new versions of the General Public
License from time to time. Such new versions will be similar in spirit to the present version, but may
differ in detail to address new problems or concerns.
Each version is given a distinguishing version number. If the Program specifies a version number of
this License which applies to it and “any later version”, you have the option of following the terms
and conditions either of that version or of any later version published by the Free Software
Foundation. If the Program does not specify a version number of this License, you may choose any
version ever published by the Free Software Foundation.
91
Page 92

10.If you wish to incorporate parts of the Program into other free programs whose distribution
conditions are different, write to the author to ask for permission. For software which is copyrighted
by the Free Software Foundation, write to the Free Software Foundation; we sometimes make
exceptions for this. Our decision will be guided by the two goals of preserving the free status of all
derivatives of our free software and of promoting the sharing and reuse of software generally.
NO WARRANTY
11.BECAUSE THE PROGRAM IS LICENSED FREE OF CHARGE, THERE IS NO WARRANTY FOR THE
PROGRAM, TO THE EXTENT PERMITTED BY APPLICABLE LAW. EXCEPT WHEN OTHERWISE
STATED IN WRITING THE COPYRIGHT HOLDERS AND/OR OTHER PARTIES PROVIDE THE
PROGRAM “AS IS” WITHOUT WARRANTY OF ANY KIND, EITHER EXPRESSED OR IMPLIED,
INCLUDING, BUT NOT LIMITED TO, THE IMPLIED WARRANTIES OF MERCHANTABILITY AND
FITNESS FOR A PARTICULAR PURPOSE. THE ENTIRE RISK AS TO THE QUALITY AND
PERFORMANCE OF THE PROGRAM IS WITH YOU. SHOULD THE PROGRAM PROVE
DEFECTIVE, YOU ASSUME THE COST OF ALL NECESSARY SERVICING, REPAIR OR
CORRECTION.
12.IN NO EVENT UNLESS REQUIRED BY APPLICABLE LAW OR AGREED TO IN WRITING WILL ANY
COPYRIGHT HOLDER, OR ANY OTHER PARTY WHO MAY MODIFY AND/OR REDISTRIBUTE
THE PROGRAM AS PERMITTED ABOVE, BE LIABLE TO YOU FOR DAMAGES, INCLUDING ANY
GENERAL, SPECIAL, INCIDENTAL OR CONSEQUENTIAL DAMAGES ARISING OUT OF THE USE
OR INABILITY TO USE THE PROGRAM (INCLUDING BUT NOT LIMITED TO LOSS OF DATA OR
DATA BEING RENDERED INACCURATE OR LOSSES SUSTAINED BY YOU OR THIRD PARTIES
OR A FAILURE OF THE PROGRAM TO OPERATE WITH ANY OTHER PROGRAMS), EVEN IF
SUCH HOLDER OR OTHER PARTY HAS BEEN ADVISED OF THE POSSIBILITY OF SUCH
DAMAGES.
92
Page 93

END OF TERMS AND CONDITIONS
How to Apply These Terms to Your New Programs
If you develop a new program, and you want it to be of the greatest possible use to the public, the
best way to achieve this is to make it free software which everyone can redistribute and change under
these terms.
To do so, attach the following notices to the program. It is safest to attach them to the start of each
source file to most effectively convey the exclusion of warranty; and each file should have at least the
“copyright” line and a pointer to where the full notice is found.
one line to give the program’s name and an idea of what it does.
Copyright (C) yyyy name of author
This program is free software; you can redistribute it and/or
modify it under the terms of the GNU General Public License
as published by the Free Software Foundation; either version 2
of the License, or (at your option) any later version.
This program is distributed in the hope that it will be useful,
but WITHOUT ANY WARRANTY; without even the implied warranty of
MERCHANTABILITY or FITNESS FOR A PARTICULAR PURPOSE. See the
GNU General Public License for more details.
You should have received a copy of the GNU General Public License
along with this program; if not, write to the Free Software
Foundation, Inc., 51 Franklin Street, Fifth Floor, Boston, MA 02110-1301, USA.
Also add information on how to contact you by electronic and paper mail.
If the program is interactive, make it output a short notice like this when it starts in an interactive
mode:
Gnomovision version 69, Copyright (C) year name of author
Gnomovision comes with ABSOLUTELY NO WARRANTY; for details
type ‘show w’. This is free software, and you are welcome
to redistribute it under certain conditions; type ‘show c’
for details.
The hypothetical commands ‘show w’ and ‘show c’ should show the appropriate parts of the
General Public License. Of course, the commands you use may be called something other than
‘show w’ and ‘show c’; they could even be mouse-clicks or menu items--whatever suits your
program.
You should also get your employer (if you work as a programmer) or your school, if any, to sign a
“copyright disclaimer” for the program, if necessary. Here is a sample; alter the names:
Yoyodyne, Inc., hereby disclaims all copyright
interest in the program ‘Gnomovision’
(which makes passes at compilers) written
by James Hacker.
signature of Ty Coon, 1 April 1989
Ty Coon, President of Vice
This General Public License does not permit incorporating your program into proprietary programs. If
your program is a subroutine library, you may consider it more useful to permit linking proprietary
applications with the library. If this is what you want to do, use the GNU Lesser General Public License
instead of this License.
93
Page 94

GNU LESSER GENERAL PUBLIC LICENSE
Version 2.1, February 1999
Copyright (C) 1991, 1999 Free Software Foundation, Inc.
51 Franklin Street, Fifth Floor, Boston, MA 02110-1301 USA
Everyone is permitted to copy and distribute verbatim copies
of this license document, but changing it is not allowed.
[This is the first released version of the Lesser GPL. It also counts
as the successor of the GNU Library Public License, version 2, hence
the version number 2.1.]
Preamble
The licenses for most software are designed to take away your freedom to share and change it. By
contrast, the GNU General Public Licenses are intended to guarantee your freedom to share and
change free software--to make sure the software is free for all its users.
This license, the Lesser General Public License, applies to some specially designated software
packages--typically libraries--of the Free Software Foundation and other authors who decide to use it.
You can use it too, but we suggest you first think carefully about whether this license or the ordinary
General Public License is the better strategy to use in any particular case, based on the explanations
below.
When we speak of free software, we are referring to freedom of use, not price. Our General Public
Licenses are designed to make sure that you have the freedom to distribute copies of free software
(and charge for this service if you wish); that you receive source code or can get it if you want it; that
you can change the software and use pieces of it in new free programs; and that you are informed that
you can do these things.
To protect your rights, we need to make restrictions that forbid distributors to deny you these rights or
to ask you to surrender these rights. These restrictions translate to certain responsibilities for you if
you distribute copies of the library or if you modify it.
For example, if you distribute copies of the library, whether gratis or for a fee, you must give the
recipients all the rights that we gave you. You must make sure that they, too, receive or can get the
source code. If you link other code with the library, you must provide complete object files to the
recipients, so that they can relink them with the library after making changes to the library and
recompiling it. And you must show them these terms so they know their rights.
We protect your rights with a two-step method: (1) we copyright the library, and (2) we offer you this
license, which gives you legal permission to copy, distribute and/or modify the library.
To protect each distributor, we want to make it very clear that there is no warranty for the free library.
Also, if the library is modified by someone else and passed on, the recipients should know that what
they have is not the original version, so that the original author’s reputation will not be affected by
problems that might be introduced by others.
Finally, software patents pose a constant threat to the existence of any free program. We wish to
make sure that a company cannot effectively restrict the users of a free program by obtaining a
restrictive license from a patent holder. Therefore, we insist that any patent license obtained for a
version of the library must be consistent with the full freedom of use specified in this license.
94
Page 95

Most GNU software, including some libraries, is covered by the ordinary GNU General Public License.
This license, the GNU Lesser General Public License, applies to certain designated libraries, and is
quite different from the ordinary General Public License. We use this license for certain libraries in
order to permit linking those libraries into non-free programs.
When a program is linked with a library, whether statically or using a shared library, the combination of
the two is legally speaking a combined work, a derivative of the original library. The ordinary General
Public License therefore permits such linking only if the entire combination fits its criteria of freedom.
The Lesser General Public License permits more lax criteria for linking other code with the library.
We call this license the “Lesser” General Public License because it does Less to protect the user’s
freedom than the ordinary General Public License. It also provides other free software developers Less
of an advantage over competing non-free programs. These disadvantages are the reason we use the
ordinary General Public License for many libraries. However, the Lesser license provides advantages
in certain special circumstances.
For example, on rare occasions, there may be a special need to encourage the widest possible use of
a certain library, so that it becomes a de-facto standard. To achieve this, non-free programs must be
allowed to use the library. A more frequent case is that a free library does the same job as widely used
non-free libraries. In this case, there is little to gain by limiting the free library to free software only, so
we use the Lesser General Public License.
In other cases, permission to use a particular library in non-free programs enables a greater number of
people to use a large body of free software. For example, permission to use the GNU C Library in
non-free programs enables many more people to use the whole GNU operating system, as well as its
variant, the GNU/Linux operating system.
Although the Lesser General Public License is Less protective of the users’ freedom, it does ensure
that the user of a program that is linked with the Library has the freedom and the wherewithal to run
that program using a modified version of the Library.
The precise terms and conditions for copying, distribution and modification follow. Pay close attention
to the difference between a “work based on the library” and a “work that uses the library”. The former
contains code derived from the library, whereas the latter must be combined with the library in order to
run.
95
Page 96

TERMS AND CONDITIONS FOR COPYING,
DISTRIBUTION AND MODIFICATION
0. This License Agreement applies to any software library or other program which contains a notice
placed by the copyright holder or other authorized party saying it may be distributed under the
terms of this Lesser General Public License (also called “this License”). Each licensee is addressed
as “you”.
A “library” means a collection of software functions and/or data prepared so as to be conveniently
linked with application programs (which use some of those functions and data) to form
executables.
The “Library”, below, refers to any such software library or work which has been distributed under
these terms. A “work based on the Library” means either the Library or any derivative work under
copyright law: that is to say, a work containing the Library or a portion of it, either verbatim or with
modifications and/or translated straightforwardly into another language. (Hereinafter, translation is
included without limitation in the term “modification”.)
“Source code” for a work means the preferred form of the work for making modifications to it. For
a library, complete source code means all the source code for all modules it contains, plus any
associated interface definition files, plus the scripts used to control compilation and installation of
the library.
Activities other than copying, distribution and modification are not covered by this License; they
are outside its scope. The act of running a program using the Library is not restricted, and output
from such a program is covered only if its contents constitute a work based on the Library
(independent of the use of the Library in a tool for writing it). Whether that is true depends on what
the Library does and what the program that uses the Library does.
1. You may copy and distribute verbatim copies of the Library’s complete source code as you receive
it, in any medium, provided that you conspicuously and appropriately publish on each copy an
appropriate copyright notice and disclaimer of warranty; keep intact all the notices that refer to this
License and to the absence of any warranty; and distribute a copy of this License along with the
Library.
You may charge a fee for the physical act of transferring a copy, and you may at your option offer
warranty protection in exchange for a fee.
2. You may modify your copy or copies of the Library or any portion of it, thus forming a work based
on the Library, and copy and distribute such modifications or work under the terms of Section 1
above, provided that you also meet all of these conditions:
a) The modified work must itself be a software library.
b) You must cause the files modified to carry prominent notices stating that you changed the files
and the date of any change.
c) You must cause the whole of the work to be licensed at no charge to all third parties under the
terms of this License.
96
Page 97

d) If a facility in the modified Library refers to a function or a table of data to be supplied by an
application program that uses the facility, other than as an argument passed when the facility is
invoked, then you must make a good faith effort to ensure that, in the event an application does
not supply such function or table, the facility still operates, and performs whatever part of its
purpose remains meaningful.
(For example, a function in a library to compute square roots has a purpose that is entirely
well-defined independent of the application. Therefore, Subsection 2d requires that any
application-supplied function or table used by this function must be optional: if the application
does not supply it, the square root function must still compute square roots.)
These requirements apply to the modified work as a whole. If identifiable sections of that work are
not derived from the Library, and can be reasonably considered independent and separate works
in themselves, then this License, and its terms, do not apply to those sections when you distribute
them as separate works. But when you distribute the same sections as part of a whole which is a
work based on the Library, the distribution of the whole must be on the terms of this License,
whose permissions for other licensees extend to the entire whole, and thus to each and every part
regardless of who wrote it.
Thus, it is not the intent of this section to claim rights or contest your rights to work written entirely
by you; rather, the intent is to exercise the right to control the distribution of derivative or collective
works based on the Library.
In addition, mere aggregation of another work not based on the Library with the Library (or with a
work based on the Library) on a volume of a storage or distribution medium does not bring the
other work under the scope of this License.
3. You may opt to apply the terms of the ordinary GNU General Public License instead of this License
to a given copy of the Library. To do this, you must alter all the notices that refer to this License, so
that they refer to the ordinary GNU General Public License, version 2, instead of to this License. (If
a newer version than version 2 of the ordinary GNU General Public License has appeared, then you
can specify that version instead if you wish.) Do not make any other change in these notices.
Once this change is made in a given copy, it is irreversible for that copy, so the ordinary GNU
General Public License applies to all subsequent copies and derivative works made from that copy.
This option is useful when you wish to copy part of the code of the Library into a program that is
not a library.
4. You may copy and distribute the Library (or a portion or derivative of it, under Section 2) in object
code or executable form under the terms of Sections 1 and 2 above provided that you accompany
it with the complete corresponding machine-readable source code, which must be distributed
under the terms of Sections 1 and 2 above on a medium customarily used for software
interchange.
If distribution of object code is made by offering access to copy from a designated place, then
offering equivalent access to copy the source code from the same place satisfies the requirement
to distribute the source code, even though third parties are not compelled to copy the source along
with the object code.
5. A program that contains no derivative of any portion of the Library, but is designed to work with the
Library by being compiled or linked with it, is called a “work that uses the Library”. Such a work, in
isolation, is not a derivative work of the Library, and therefore falls outside the scope of this
License.
97
Page 98

However, linking a “work that uses the Library” with the Library creates an executable that is a
derivative of the Library (because it contains portions of the Library), rather than a “work that uses
the library”. The executable is therefore covered by this License. Section 6 states terms for
distribution of such executables.
When a “work that uses the Library” uses material from a header file that is part of the Library, the
object code for the work may be a derivative work of the Library even though the source code is
not. Whether this is true is especially significant if the work can be linked without the Library, or if
the work is itself a library. The threshold for this to be true is not precisely defined by law.
If such an object file uses only numerical parameters, data structure layouts and accessors, and
small macros and small inline functions (ten lines or less in length), then the use of the object file is
unrestricted, regardless of whether it is legally a derivative work. (Executables containing this
object code plus portions of the Library will still fall under Section 6.)
Otherwise, if the work is a derivative of the Library, you may distribute the object code for the work
under the terms of Section 6. Any executables containing that work also fall under Section 6,
whether or not they are linked directly with the Library itself.
6. As an exception to the Sections above, you may also combine or link a “work that uses the Library”
with the Library to produce a work containing portions of the Library, and distribute that work
under terms of your choice, provided that the terms permit modification of the work for the
customer’s own use and reverse engineering for debugging such modifications.
You must give prominent notice with each copy of the work that the Library is used in it and that
the Library and its use are covered by this License. You must supply a copy of this License. If the
work during execution displays copyright notices, you must include the copyright notice for the
Library among them, as well as a reference directing the user to the copy of this License. Also, you
must do one of these things:
a) Accompany the work with the complete corresponding machine-readable source code for the
Library including whatever changes were used in the work (which must be distributed under
Sections 1 and 2 above); and, if the work is an executable linked with the Library, with the
complete machine-readable “work that uses the Library”, as object code and/or source code,
so that the user can modify the Library and then relink to produce a modified executable
containing the modified Library. (It is understood that the user who changes the contents of
definitions files in the Library will not necessarily be able to recompile the application to use the
modified definitions.)
b) Use a suitable shared library mechanism for linking with the Library. A suitable mechanism is
one that (1) uses at run time a copy of the library already present on the user’s computer
system, rather than copying library functions into the executable, and (2) will operate properly
with a modified version of the library, if the user installs one, as long as the modified version is
interface-compatible with the version that the work was made with.
c) Accompany the work with a written offer, valid for at least three years, to give the same user the
materials specified in Subsection 6a, above, for a charge no more than the cost of performing
this distribution.
d) If distribution of the work is made by offering access to copy from a designated place, offer
equivalent access to copy the above specified materials from the same place.
e) Verify that the user has already received a copy of these materials or that you have already sent
this user a copy.
98
Page 99

For an executable, the required form of the “work that uses the Library” must include any data and
utility programs needed for reproducing the executable from it. However, as a special exception,
the materials to be distributed need not include anything that is normally distributed (in either
source or binary form) with the major components (compiler, kernel, and so on) of the operating
system on which the executable runs, unless that component itself accompanies the executable.
It may happen that this requirement contradicts the license restrictions of other proprietary libraries
that do not normally accompany the operating system. Such a contradiction means you cannot
use both them and the Library together in an executable that you distribute.
7. You may place library facilities that are a work based on the Library side-by-side in a single library
together with other library facilities not covered by this License, and distribute such a combined
library, provided that the separate distribution of the work based on the Library and of the other
library facilities is otherwise permitted, and provided that you do these two things:
a) Accompany the combined library with a copy of the same work based on the Library,
uncombined with any other library facilities. This must be distributed under the terms of the
Sections above.
b) Give prominent notice with the combined library of the fact that part of it is a work based on the
Library, and explaining where to find the accompanying uncombined form of the same work.
8. You may not copy, modify, sublicense, link with, or distribute the Library except as expressly
provided under this License. Any attempt otherwise to copy, modify, sublicense, link with, or
distribute the Library is void, and will automatically terminate your rights under this License.
However, parties who have received copies, or rights, from you under this License will not have
their licenses terminated so long as such parties remain in full compliance.
9. You are not required to accept this License, since you have not signed it. However, nothing else
grants you permission to modify or distribute the Library or its derivative works. These actions are
prohibited by law if you do not accept this License. Therefore, by modifying or distributing the
Library (or any work based on the Library), you indicate your acceptance of this License to do so,
and all its terms and conditions for copying, distributing or modifying the Library or works based on
it.
10.Each time you redistribute the Library (or any work based on the Library), the recipient
automatically receives a license from the original licensor to copy, distribute, link with or modify the
Library subject to these terms and conditions. You may not impose any further restrictions on the
recipients’ exercise of the rights granted herein. You are not responsible for enforcing compliance
by third parties with this License.
11.If, as a consequence of a court judgment or allegation of patent infringement or for any other
reason (not limited to patent issues), conditions are imposed on you (whether by court order,
agreement or otherwise) that contradict the conditions of this License, they do not excuse you from
the conditions of this License. If you cannot distribute so as to satisfy simultaneously your
obligations under this License and any other pertinent obligations, then as a consequence you may
not distribute the Library at all. For example, if a patent license would not permit royalty-free
redistribution of the Library by all those who receive copies directly or indirectly through you, then
the only way you could satisfy both it and this License would be to refrain entirely from distribution
of the Library.
If any portion of this section is held invalid or unenforceable under any particular circumstance, the
balance of the section is intended to apply, and the section as a whole is intended to apply in other
circumstances.
99
Page 100

It is not the purpose of this section to induce you to infringe any patents or other property right
claims or to contest validity of any such claims; this section has the sole purpose of protecting the
integrity of the free software distribution system which is implemented by public license practices.
Many people have made generous contributions to the wide range of software distributed through
that system in reliance on consistent application of that system; it is up to the author/donor to
decide if he or she is willing to distribute software through any other system and a licensee cannot
impose that choice.
This section is intended to make thoroughly clear what is believed to be a consequence of the rest
of this License.
12.If the distribution and/or use of the Library is restricted in certain countries either by patents or by
copyrighted interfaces, the original copyright holder who places the Library under this License may
add an explicit geographical distribution limitation excluding those countries, so that distribution is
permitted only in or among countries not thus excluded. In such case, this License incorporates
the limitation as if written in the body of this License.
13.The Free Software Foundation may publish revised and/or new versions of the Lesser General
Public License from time to time. Such new versions will be similar in spirit to the present version,
but may differ in detail to address new problems or concerns.
Each version is given a distinguishing version number. If the Library specifies a version number of
this License which applies to it and “any later version”, you have the option of following the terms
and conditions either of that version or of any later version published by the Free Software
Foundation. If the Library does not specify a license version number, you may choose any version
ever published by the Free Software Foundation.
14.If you wish to incorporate parts of the Library into other free programs whose distribution
conditions are incompatible with these, write to the author to ask for permission. For software
which is copyrighted by the Free Software Foundation, write to the Free Software Foundation; we
sometimes make exceptions for this. Our decision will be guided by the two goals of preserving the
free status of all derivatives of our free software and of promoting the sharing and reuse of software
generally.
NO WARRANTY
15.BECAUSE THE LIBRARY IS LICENSED FREE OF CHARGE, THERE IS NO WARRANTY FOR THE
LIBRARY, TO THE EXTENT PERMITTED BY APPLICABLE LAW. EXCEPT WHEN OTHERWISE
STATED IN WRITING THE COPYRIGHT HOLDERS AND/OR OTHER PARTIES PROVIDE THE
LIBRARY “AS IS” WITHOUT WARRANTY OF ANY KIND, EITHER EXPRESSED OR IMPLIED,
INCLUDING, BUT NOT LIMITED TO, THE IMPLIED WARRANTIES OF MERCHANTABILITY AND
FITNESS FOR A PARTICULAR PURPOSE. THE ENTIRE RISK AS TO THE QUALITY AND
PERFORMANCE OF THE LIBRARY IS WITH YOU. SHOULD THE LIBRARY PROVE DEFECTIVE,
YOU ASSUME THE COST OF ALL NECESSARY SERVICING, REPAIR OR CORRECTION.
16.IN NO EVENT UNLESS REQUIRED BY APPLICABLE LAW OR AGREED TO IN WRITING WILL ANY
COPYRIGHT HOLDER, OR ANY OTHER PARTY WHO MAY MODIFY AND/OR REDISTRIBUTE
THE LIBRARY AS PERMITTED ABOVE, BE LIABLE TO YOU FOR DAMAGES, INCLUDING ANY
GENERAL, SPECIAL, INCIDENTAL OR CONSEQUENTIAL DAMAGES ARISING OUT OF THE USE
OR INABILITY TO USE THE LIBRARY (INCLUDING BUT NOT LIMITED TO LOSS OF DATA OR
DATA BEING RENDERED INACCURATE OR LOSSES SUSTAINED BY YOU OR THIRD PARTIES
OR A FAILURE OF THE LIBRARY TO OPERATE WITH ANY OTHER SOFTWARE), EVEN IF SUCH
HOLDER OR OTHER PARTY HAS BEEN ADVISED OF THE POSSIBILITY OF SUCH DAMAGES.
100
 Loading...