

Page 1
MO1004-EB
c
c
s
s
Operation Guide 3202
Congratulations upon your selection of this CASIO watch.
Applications
The built-in sensors of this watch measure barometric pressure, temperature and
altitude. Measured values are then shown on the display. Such features make this
watch useful when hiking, mountain climbing, or when engaging in other such outdoor
activities.
•
The measurement functions built into this watch are not intended for taking
measurements that require professional or industrial precision. Values produced
by this watch should be considered as reasonable representations only.
• Note that CASIO COMPUTER CO., LTD. assumes no responsibility for any
damage or loss suffered by you or any third party arising through the use of
this product or its malfunction.
Warning !
About This Manual
• Depending on the model of your watch, display text
appears either as dark figures on a light background, or
light figures on a dark background. All sample displays
in this manual are shown using dark figures on a light
background.
• Button operations are indicated using the letters shown
in the illustration.
• Note that the product illustrations in this manual are
intended for reference only, and so the actual product
may appear somewhat different than depicted by an
illustration.
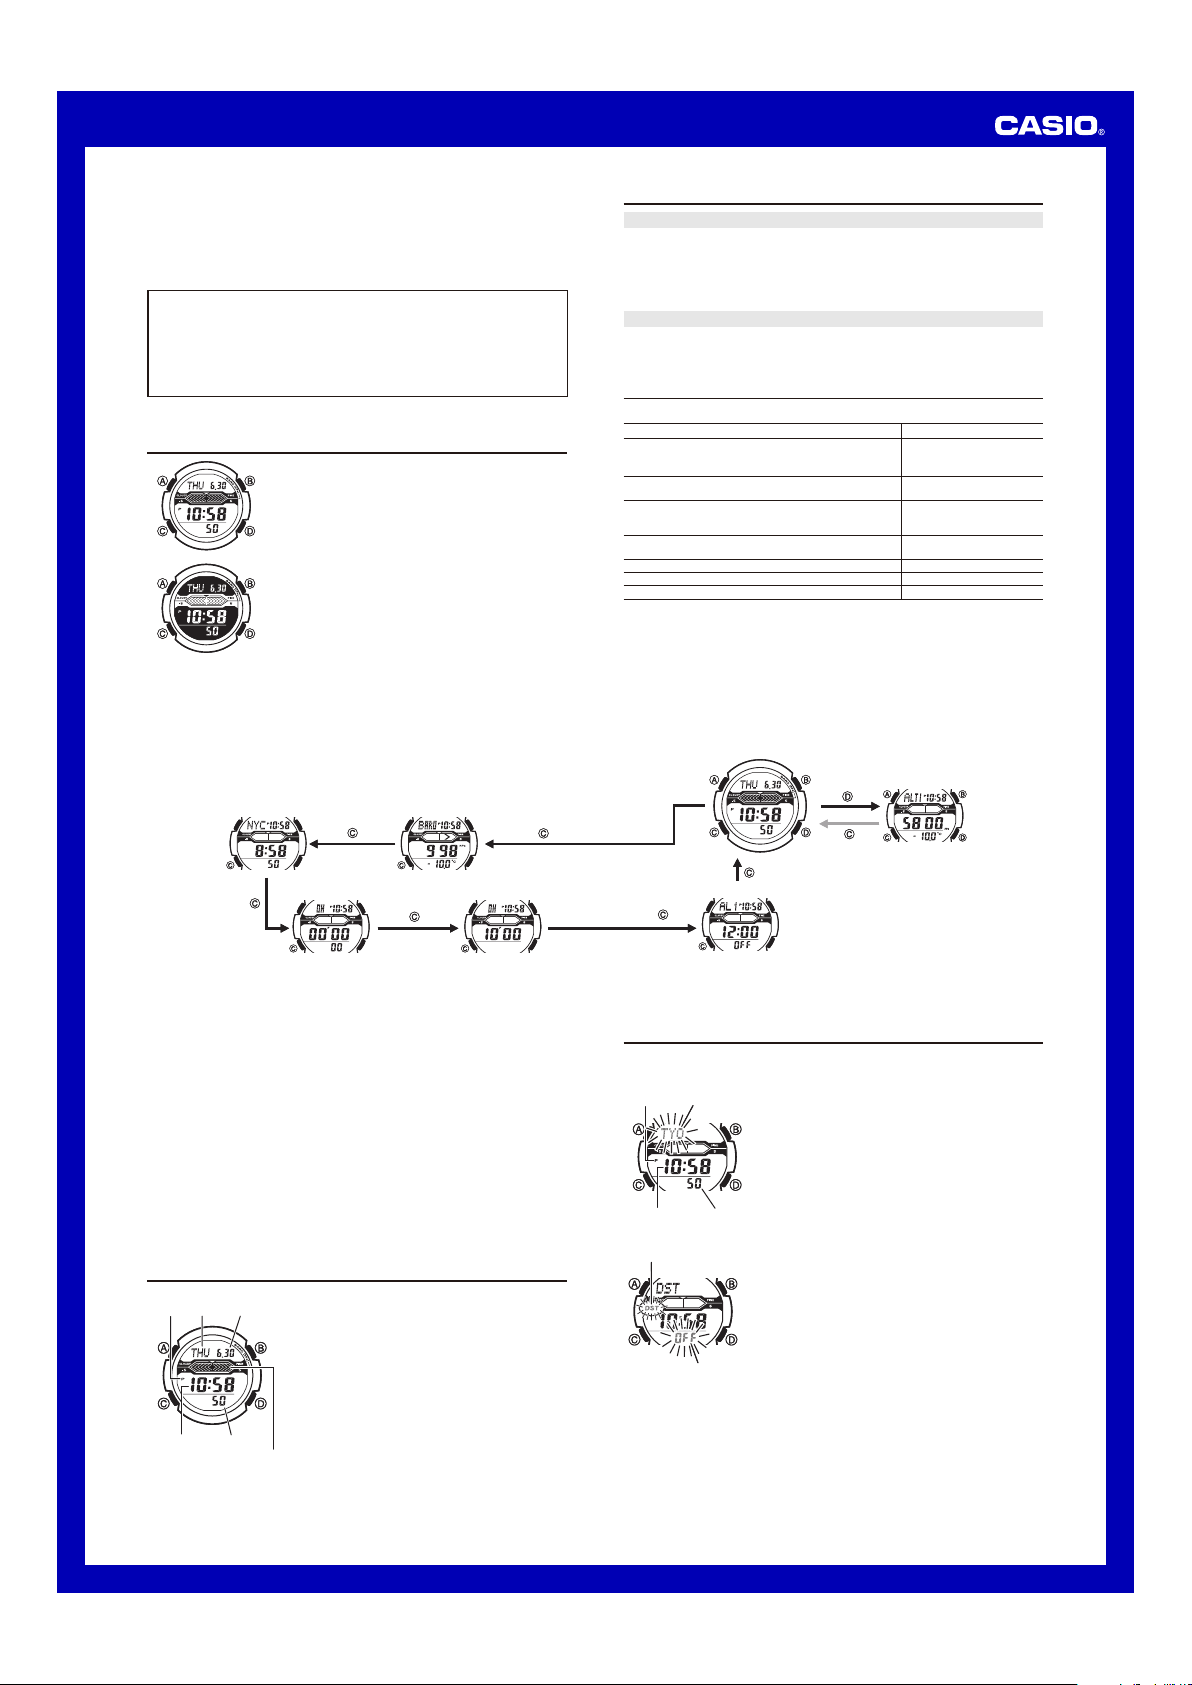
Selecting a Mode
• The illustration below shows which buttons you need to press to navigate between
modes.
• In any mode (except when a setting screen, with flashing digits is on the display),
press B to illuminate the display.
Barometer/
World Time
World Time
Mode
Mode
Barometer/
Thermometer Mode
Thermometer Mode
Things to check before using the watch
1. Check the Home City and the daylight saving time (DST) setting.
Use the procedure under “To configure Home City settings” to configure your Home
City and daylight saving time settings.
Important!
Proper World Time Mode data depend on correct Home City, time, and date settings
in the Timekeeping Mode. Make sure you configure these settings correctly.
2. Set the current time.
See “Configuring Current Time and Date Settings”.
The watch is now ready for use.
Mode Reference Guide
Your watch has 7 “modes”. The mode you should select depends on what you want to do.
To do this: Enter this mode:
• View the current time and date in the Home City
•
Configure Home City and daylight saving time (DST) settings
• Configure time and date settings
View the barometric pressure and temperature at your
current location
• View the altitude at your current location
• Determine the altitude differential between two locations
(reference point and current location)
View the current time in one of 48 cities (31 time zones)
around the globe
Use the stopwatch to measure elapsed time Stopwatch Mode
Use the countdown timer Countdown Timer Mode
Set an alarm time Alarm Mode
Timekeeping Mode
Timekeeping Mode
Timekeeping Mode
Barometer/Thermometer
Mode
Altimeter Mode
World Time Mode
Altimeter Mode
Altimeter Mode
Countdown
Stopwatch Mode
Stopwatch Mode
General Functions (All Modes)
The functions and operations described in this section can be used in all of the modes.
Auto Return Features
• The watch returns to the Timekeeping Mode automatically if you do not perform any
button operation for two or three minutes in the Alarm Mode.
• The watch will return to the Timekeeping Mode automatically if you do not perform
any operation for about one hour after entering the Barometer/Thermometer Mode.
•
If you leave a setting screen with flashing digits on the display for two or three minutes
without performing any operation, the watch exits the setting screen automatically.
Initial Screens
When you enter the World Time Mode or Alarm Mode, the data you were viewing
when you last exited the mode appears first.
Scrolling
The B and D buttons are used on the setting screen to scroll through data on the
display. In most cases, holding down these buttons during a scroll operation scrolls
through the data at high speed.
Countdown
Timer Mode
Timer Mode
Timekeeping
PM
Day of
PM
Day of
indicator
week
indicator
week
Hour : Minutes
Hour : Minutes
Use the Timekeeping Mode to set and view the current
Month
Month
time and date.
Day
Day
• In the Timekeeping Mode, the graphic in the center of
the display indicates the passage of seconds.
Seconds
Seconds
Graphi
Graphi
Alarm Mode
Alarm Mode
Configuring Home City Settings
There are two Home City settings: actually selecting the Home City and selecting
either standard time or daylight saving time (DST).
PM
City
PM
City
indicator
code
indicator
code
Hour : Minutes
Hour : Minutes
DST indicator
DST indicator
Setting
5.
Setting
After all the settings are the way you want, press A to return to the Timekeeping Mode.
• The DST indicator a ppears to indi cate that Daylig ht Saving Ti me is turned o n.
Note
• After you sp ecify a cit y code, the watch w ill use UTC* o ffsets in t he World Time
Mode to calc ulate the curre nt time for oth er time zone s based on the c urrent
time in your H ome City.
* Coordinated Universal Time, the world-wide scientific standard of timekeeping.
The reference point for UTC is Greenwich, England.
To configure Home City settings
1. In the Timekeeping Mode, hold down A until the
currently selected city code (Home City) starts to flash.
This is the city code setting screen.
• Before the cit y code starts to flash, t he message
SET Hold will appear on the di splay. Keep A
depressed until SET Hold disappears and the city
code starts to flash.
• The watch will exi t the setti ng mode auto matically if
you do not per form any op eration for ab out two or
Second
Second
three minutes.
• For detail s about cit y codes, se e the “Cit y Code
Tab le”.
2. Press D (East) and B (West) to select the city code
you want to use as your Home City.
• Keep pressin g D or B until the cit y code you want
to select as yo ur Home Cit y appears o n the display.
3. Press C to display the DST setting screen.
Press
D
to toggle between Daylight Saving Time (On)
4.
and Standard Time (OFF).
• Note that you c annot switc h between st andard
time and dayli ght saving tim e (DST) w hile UTC is
selected as yo ur Home Ci ty.
1
Page 2
Operation Guide 3202
s
s
l
l
l
l
l
l
l
l
l
l
l
l
l
l
l
l
l
l
l
l
l
l
l
l
l
l
l
l
l
l
l
l
l
l
l
l
l
l
l
l
l
l
l
l
l
l
l
l
l
l
l
l
l
l
l
l
l
l
l
l
l
l
l
l
l
l
l
l
l
l
l
l
l
l
To change the Daylight Saving Time (summer time) setting
DST indicator
DST indicator
Setting
Setting
1. In the Timekeeping Mode, hold down A until the
currently selected city code (Home City) starts to flash.
This is the city code setting screen.
• Before the cit y code starts to flash, t he message
SET Hold will appear on the di splay. Keep
depressed until SET Hold disappears and the city
code star ts to flash.
2. Press C to display the DST setting screen.
3. Press D to toggle between Daylight Saving Time (On)
and Standard Time (OFF).
4. After all the settings are the way you want, press A to
return to the Timekeeping Mode.
• The DST indicator ap pears to indic ate that Daylight
Saving Tim e is turned on .
A
Configuring Current Time and Date Settings
You can use the procedure below to adjust the current time and date settings if they
are off.
To change the current time and date settings
PM
PM
indicator
indicator
3.
4. When the timekeeping setting you want to change is flashing, use B and/or D to
City
City
code
code
Hour : Minutes
Hour : Minutes
PressC to move the flashing in the sequence shown below to select the other settings.
City
DST
Code
Barometer
unit
• The follow ing steps expla in how to conf igure timeke eping set tings only.
change it as described below.
Screen To do this: Do this:
50
5. Press A to exit the setting screen.
Note
• For information about selecting a Home City and configuring the DST setting, see
“Configuring Home City Settings”.
• While 12-hour format is selected for timekeeping, a P (PM) indicator will appear for
times from noon to 11:59 p.m. No indicator appears for times from midnight to
11:59 a.m. With 24-hour format, time is displayed from 0:00 to 23:59, without any
(PM) indicator.
• The watch’s built-in full automatic calendar makes allowances for different month
lengths and leap years. Once you set the date, there should be no reason to
change it except after you have the watch’s battery replaced.
1. In the Timekeeping Mode, hold down A until the
currently selected city code (Home City) starts to flash.
This is the city code setting screen.
• Before the cit y code starts to flash, t he message
SET Hold will appear on the di splay. Keep
depressed until SET Hold disappears and the city
code star ts to flash.
2. Use D and B to select the city code you want.
• Select you r Home Cit y code befo re changing any
other setting.
Second
Second
Altitude
unit
• For full info rmation o n city code s, see the “C ity
Code Table”.
12/24-Hour
Format
Change the city code
Toggle between Daylight Saving Time (On)
and Standard Time (
Toggle between 12-hour (
24H
(
Reset the seconds to
Change the hour or minute
Change the year, month, or day
Seconds Hour Minute Year Month
Temperature
unit
) timekeeping.
Illumination
Duration
OFF
).
00
12H
) and 24-hour
Button Operation
Tone On/Off
UseD (East) and
B
(West).
PressD.
PressD.
PressD.
UseD (+) and
(–).
A
Day
B
P
Barometer/Thermometer
This watch uses a pressure sensor to measure air pressure (barometric pressure) and
a temperature sensor to measure temperature.
Current time
Current time
Barometric
Barometric
pressure
pressure
2. Press C five times to return to the Timekeeping Mode.
Barometric Pressure
• Barometric pressure is displayed in units of 1 hPa (or 0.05 inHg).
•
The displayed barometric pressure value changes to
pressure falls outside the range of 260 hPa to 1,100 hPa (7.65 inHg to 32.45 inHg).
The barometric pressure value will reappear as soon as the measured barometric
pressure is within the allowable range.
Pressure
Pressure
differential
differential
pointer
pointer
Temperature
Temperature
•
The watch will ret urn to the Time keeping Mo de automatic ally if you do no t perform
any operatio n for about on e hour afte r entering the B arometer/ Thermo meter Mode .
To enter and exit the Barometer/Thermometer Mode
1. While in the Timekeeping Mode, press C to enter the
Barometer/Thermometer Mode.
• BARO will appea r on the display, indic ating
that baromet ric pressure an d temperature
measurem ents are in progre ss. The me asurement
results will a ppear on the di splay after ab out five
seconds.
• After you press C, the watch will ta ke readings
every five se conds for th e first three mi nutes, and
then every t wo minutes af ter that.
- - -
if a measured barometric
Temperature
• Temperature is displayed in units of 0.1°C (or 0.2°F).
• The displayed temperature value changes to
temperature falls outside the range of –10.0°C to 60.0°C (14.0°F to 140.0°F). The
temperature value will reappear as soon as the measured temperature is within the
allowable range.
Display Units
You can select either hectopascals (hPa) or inchesHg (inHg) as the display unit for the
measured barometric pressure, and Celsius (°C) or Fahrenheit (°F) as the display unit
for the measured temperature value. See “To specify temperature, barometric
pressure, and altitude units”.
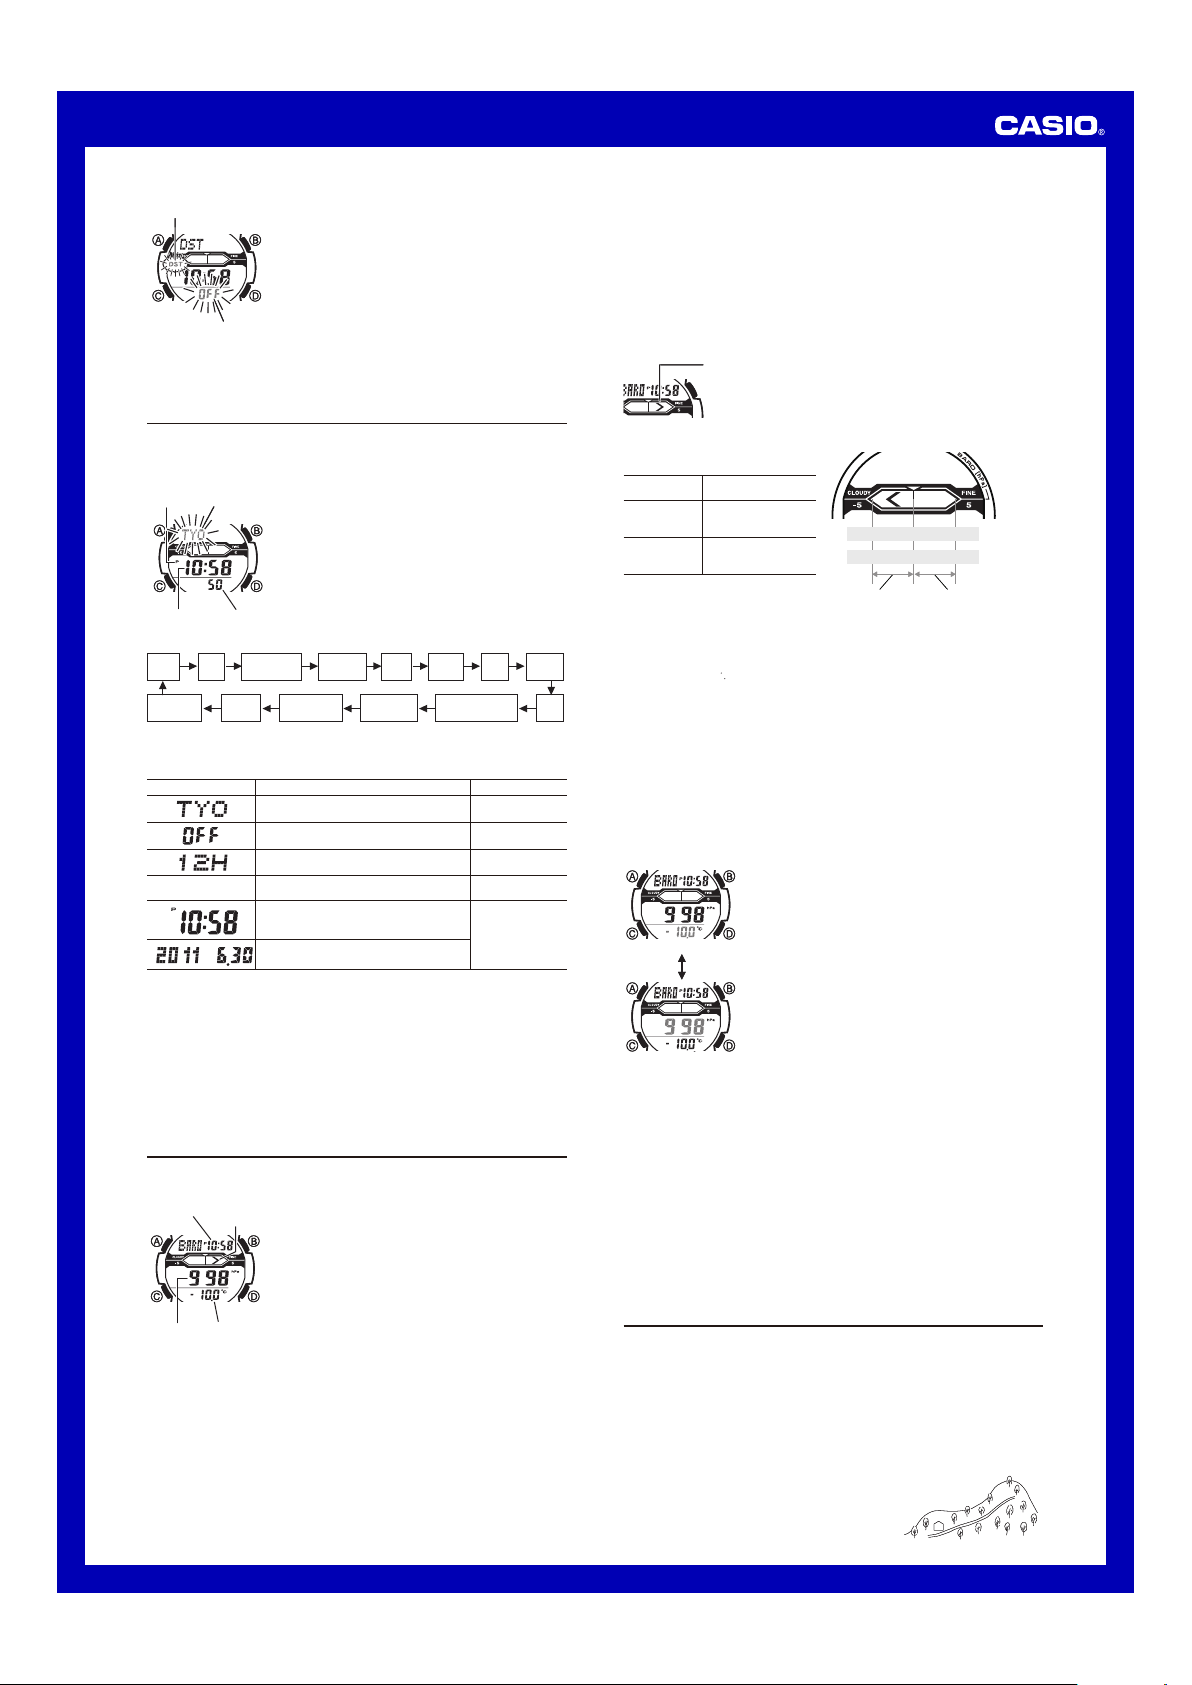
Barometric Pressure Differential Pointer
Reading Barometric Pressure Differential Pointer
Pressure differential is indicated in the
range of ±5 hPa, in 1-hPa units.
If the pointer is
located here:
CLOUDY (–)
FINE (+)
• The nearby screen shot, for example,
shows what the pointer would indicate
when the calculated pressure
differential is approximately – 3 hPa
(approximately – 0.09 inHg).
• Barometric pressure is calculated and displayed using hPa as the standard. The
barometric pressure differential also can be read in inHg units as shown in the
illustration (1 hPa
Pressure Sensor and Temperature Sensor Calibration
The pressure sensor and temperature sensor built into the watch are calibrated at the
factory and normally require no further adjustment. If you notice serious errors in the
pressure readings and temperature readings produced by the watch, you can calibrate
a sensor to the reading of another device to correct the errors.
Important!
• Incorrectly calibrating the temperature sensor can result in incorrect readings.
Carefully read the following before doing anything.
Compare the readings produced by the watch with those of another reliable and
–
accurate thermometer.
– If adjustment is required, remove the watch from your wrist and wait for 20 or 30
minutes to give the temperature of the watch time to stabilize.
To calibrate the pressure sensor and the temperature sensor
5.
UseD (+) and B (–) to adjust the calibration value in the units shown below.
Temperature 0.1°C (0.2°F)
Barometric Pressure 1 hPa (0.05 inHg)
• To return the currentl y flashing val ue to its initia l factory defa ult settin g, press
B
one secon d, followed by th e initial defau lt value.
6. Press A to return to the Barometer/Thermometer Mode screen.
Barometer and Thermometer Precautions
• The pressure sensor built into this watch measures changes in air pressure, which
you can then apply to your own weather predictions. It is not intended for use as a
precision instrument in official weather prediction or reporting applications.
• Sudden temperature changes can affect pressure sensor readings.
• Temperature measurements are affected by your body temperature (while you are
wearing the watch), direct sunlight, and moisture. To achieve a more accurate
temperature measurement, remove the watch from your wrist, place it in a well
ventilated location out of direct sunlight, and wipe all moisture from the case. It
takes approximately 20 to 30 minutes for the case of the watch to reach the actual
surrounding temperature.
Barometric
Barometric
pressure
pressure
differential
differential
pointer
pointer
Pressure is falling and
weather will tend to
deteriorate.
Pressure is rising and
weather will tend to
improve.
=
l
l
l
l
l
l
l
l
l
l
l
l
l
l
l
l
l
l
l
l
l
l
l
l
l
l
l
l
l
l
l
l
l
l
l
l
l
l
l
l
l
l
l
l
l
l
l
l
l
l
l
l
l
l
l
l
l
l
l
l
l
l
l
l
l
l
l
l
l
l
l
l
l
l
and D at the same ti me. OFF will appear a t the flashin g location f or about
This pointer indicates the relative difference between
the most recent barometric pressure reading and the
current barometric pressure value displayed in the
Barometer/Thermometer Mode.
It means this:
0.03 inHg).
1.Take a reading with another measurement device to
determine the exact current barometric pressure or
temperature.
2. With the watch in the Timekeeping Mode, press C to
enter the Barometer/Thermometer Mode.
3. Hold down A until the current temperature value starts
to flash on the display. This is the setting screen.
• Before the tem perature value s tarts to fla sh, the
message SET Hold will appear on the display.
Keep A depressed u ntil SET Hold disappears.
4. Press C to move the flashing between the temperature
value and barometric pressure value, to select the one
you want to calibrate.
--.-
°C (or °F) if a measured
−5 0 5
−5 0 5
−0.15 0 0.15
−0.15 0 0.15
Current pressure
Current pressure
less than most
less than most
recent measured
recent measured
pressure
pressure
hPa values
hPa values
inHg values
inHg values
Current pressure
Current pressure
greater than most
greater than most
recent measured
recent measured
pressure
pressure
Altimeter
The watch displays altitude values based on air pressure readings taken by a built-in
pressure sensor.
How the Altimeter Measures Altitude
The altimeter can measure altitude based on its own preset values (initial default
method) or using a reference altitude specified by you.
When you measure altitude based on preset values
Data produced by the watch’s barometric pressure sensor is converted to approximate
altitude based on ISA (International Standard Atmosphere) conversion values stored
in watch memory.
When you measure altitude using a reference altitude specified by you
After you specify a reference altitude, the watch uses
that value to convert barometric pressure readings to
altitude.
ABA
B
2
Page 3

Operation Guide 3202
l
l
l
l
l
l
l
l
l
l
l
l
l
l
l
l
l
l
l
l
l
l
l
l
l
l
l
l
l
l
l
l
l
l
l
l
l
l
l
l
l
l
l
l
l
l
l
l
l
l
l
l
l
l
l
l
l
l
l
l
l
l
l
l
l
l
• When mountain climbing, you can specify a reference altitude value in accordance
with a marker along the way or altitude information from a map. After that, the
altitude readings produced by the watch will be more accurate than they would
without a reference altitude value.
To take an altimeter reading
Current time
Current time
Current
Current
Temperature
Temperature
altitude
altitude
• If you leave the watc h in the Altim eter Mode, it w ill update the dis played altitud e
value regularl y.
• Temperature is meas ured in the Baro meter/T hermom eter Mode an d in the
Altimeter M ode. For det ails about te mperature read ings, see " Temperature".
3. After you are finished using the Altimeter, press
Mode and stop auto measurement.
• The watch will ret urn to the Time keeping Mo de automatic ally if you do no t
perform a ny operation f or about 10 ho urs after ente ring the Alt imeter Mod e.
Note
• The measurement range for altitude is –700 to 10,000 meters (–2,300 to 32,800
feet).
• The displayed altitude value changes to
measurement range. An altitude value will reappear as soon as the altitude reading
is within the allowable range.
•
Normally, displayed altitude values are based on the watch’s preset conversion
values. You also can specify a reference altitude value, if you want. See “Specifying
a Reference Altitude Value” below.
• You can change the unit for displayed altitude values to either meters (m) or feet (ft).
See “To specify temperature, barometric pressure, and altitude units”.
Specifying a Reference Altitude Value
The altitude readings produced by this watch are subject to error caused by changes
in air pressure. Because of this, we recommend that you update the reference altitude
value whenever accurate altitude information is available during your climb. After you
specify a reference altitude value, the watch adjusts its air-pressure-to-altitude
conversion calculation accordingly.
To specify a reference altitude value
l
l
l
l
l
l
l
l
l
l
l
l
l
l
l
l
l
l
l
l
l
l
l
l
l
l
l
l
l
l
l
l
• You can set the referen ce altitude va lue within th e range of –10,00 0 to 10,00 0
meters (–32,800 to 32,800 feet).
•
Pressing B and D at the same ti me returns to OFF (no referen ce altitude va lue),
so the watch per forms air pre ssure to altitu de conversio ns based on pre set data
only.
3. Press A to exit the setting screen.
How does the altimeter work?
Generally, air pressure and temperature decrease as altitude increases. This watch
bases its altitude measurements on International Standard Atmosphere (ISA) values
stipulated by the International Civil Aviation Organization (ICAO). These values define
relationships between altitude, air pressure, and temperature.
Altitude Air Pressure Temperature
4000 m
3500 m
3000 m
2500 m
2000 m
1500 m
1000 m
0 m
14000 ft.
12000 ft.
10000 ft.
8000 ft.
4000 ft.
0 ft.
Source: International Civil Aviation Organization
• Note that the following conditions will prevent you from obtaining accurate readings:
When air pressure changes because of changes in the weather
Extreme temperature changes
When the watch itself is subjected to strong impact
There are two standard methods of expressing altitude: Absolute altitude and relative
altitude. Absolute altitude expresses an absolute height above sea level. Relative
altitude expresses the difference between the height of two different places.
1. Make sure the watch is in the Timekeeping Mode.
D
to start Altimeter measurement.
2. Press
• ALTI will appear on the disp lay, indicating that
Altimeter m easureme nt is in progress . The first
reading will app ear on the dis play after ab out four
or five seconds.
• The current a ltitude valu e is displayed in uni ts of 5
meters (20 feet).
• After the f irst reading is ob tained, the watc h
continue s to take altim eter readings au tomatical ly
every five se conds for th e first three mi nutes, and
then every t wo minutes af ter that.
C
to return to the Timekeeping
- - - -
if an altitude reading falls outside the
1. In the Altimeter Mode, hold down A until the current
reference altitude value starts to flash. This is the
l
l
l
l
l
l
l
l
l
l
500 m
6000 ft.
2000 ft.
setting screen.
• Before the referen ce altitude va lue start s to flash,
the message SET Hold will appear on the dis play.
Keep A depressed u ntil SET Hold disappears.
2. Press D (+) or B (–) to change the current reference
altitude value by 5 meters (or 20 feet).
• Specif y a reference alti tude value bas ed on
accurate altit ude informat ion about yo ur current
location f rom a map, etc.
616 hPa
About 8 hPa per 100 m
701 hPa
About 9 hPa per 100 m
795 hPa
About 10 hPa per 100 m
About 11 hPa per 100 m
899 hPa
About 12 hPa per 100 m
19.03 inHg
About 0.15 inHg per 200 ft.
22.23 inHg
About 0.17 inHg per 200 ft.
About 0.192 inHg per 200 ft.
25.84 inHg
About 0.21 inHg per 200 ft.
Height of building 130 m
(relative altitude)
Rooftop at an altitude of
230 m above sea level
(absolute altitude)
–11°C
–4.5°C
16.2°F
30.5°F
44.7°F
59.0°F29.92 inHg
8.5°C
15°C1013 hPa
2°C
About 6.5°C
per 1000 m
About 3.6°F
per 1000 ft.
Altimeter Precautions
• This watch estimates altitude based on air pressure. This means that altitude
readings for the same location may vary if air pressure changes.
• The semiconductor pressure sensor used by the watch for altitude measurements
is also affected by temperature. When taking altitude measurements, do not subject
the watch to temperature changes.
• Do not rely upon this watch for altitude measurements or perform button operations
while sky diving, hang gliding, or paragliding, while riding a gyrocopter, glider, or
any other aircraft, or while engaging in any other activity where there is the chance
of sudden altitude changes.
• Do not use this watch for measuring altitude in applications that demand
professional or industrial level precision.
• Remember that the air inside of a commercial aircraft is pressurized. Because of
this, the readings produced by this watch will not match the altitude readings
announced or indicated the flight crew.
Specifying Temperature, Barometric Pressure, and Altitude Units
Use the procedure below to specify the temperature, barometric pressure, and altitude
units to be used in the Barometer/Thermometer Mode and the Altimeter Mode.
Important!
TYO
When
(Tokyo) is selected as the Home City, the
altitude unit is set automatically to meters (m), the
l
l
l
l
l
l
l
l
l
l
l
l
To specify temperature, barometric pressure, and altitude units
1. In the Timekeeping Mode, hold down A until the currently selected city code starts
to flash. This is the city code setting screen.
• Before the cit y code star ts to flash, t he message SET Hold will appear on
the display. Keep A depressed u ntil SET Hold disappears and the city code
starts to flash.
2. Keep pressing C until TEMP (temperature), ALTI (altitude), or BARO (barometric
pressure) appears in the upper left corner of the screen.
• See step 3 unde r “To change the cu rrent time an d date setting s” for inform ation
about how to sc roll through set ting screens.
3. Perform the operations below to specify the units you want.
To specify this unit: Press this key: To toggle between these settings:
Temperature
Altitude
Barometric Pressure
4. After the settings are the way you want, press A to exit the setting screen.
barometric pressure unit to hectopascals (
l
l
l
l
l
l
temperature unit to Celsius (°C). These settings cannot
l
l
l
l
l
l
be changed.
D
°C
(Celsius) and °F (Fahrenheit)
D
m
(meters) and ft (feet)
D
hPa
(hectopascals) and
hPa
inHg
(inches of mercury)
), and the
Precautions Concerning Simultaneous Measurement of Altitude and Temperature
Though you can perform altitude and temperature measurements at the same time,
you should remember that each of these measurements requires different conditions
for best results. With temperature measurement, it is best to remove the watch from
your wrist in order to eliminate the effects of body heat. In the case of altitude
measurement, on the other hand, it is better to leave the watch on your wrist, because
doing so keeps the watch at a constant temperature, which contributes to more
accurate altitude measurements.
• To give altitude measurement priority, leave the watch on your wrist or in any other
location where the temperature of the watch is kept constant.
• To give temperature measurement priority, remove the watch from your wrist and
allow it to hang freely from your bag or in another location where it is not exposed
to direct sunlight. Note that removing the watch from your wrist can affect pressure
sensor readings momentarily.
Checking the Current Time in a Different Time Zone
Currently selected
Currently selected
World Time City
World Time City
Current Timekeeping
Current Timekeeping
Mode time
Mode time
Current time in the currently
Current time in the currently
selected World Time City
selected World Time City
To specify standard time or daylight saving time (DST) for a city
DST indicatorDST indicator
• You cannot use th e World Time M ode to change t he current sta ndard time/
daylight savin g time (DST ) settin g of the Hom e City.
• Note that you can not switch be tween sta ndard time /daylight saving time
(DST) w hile UTC is selected as t he World Time C ity.
• Note that the st andard time /daylight savi ng time (DS T) setti ng affects only the
currently se lected time zo ne. Other t ime zones are n ot affected .
You can use the World Time Mode to view the current
time in one of 31 time zones (48 cities) around the globe.
The city that is currently selected in the World Time Mode
is called the “World Time City”.
To enter the World Time Mode
UseC to select the World Time Mode (WT) as shown in
“Selecting a Mode”.
WT
will appear on the display for about one second.
•
Next, the display will change to show the city code of
the currently selected World Time City.
To view the time in another time zone
In the World Time Mode, use D (East) to scroll through
city codes.
1. In the World Time Mode, use D (East) to display the
city code (time zone) whose Standard Time/Daylight
Saving Time setting you want to change.
2. Hold down A until DST Hold appears on the display
and then disappears. Release A after DST Hold
disappears.
• This toggle s the city co de you selec ted in step
1 between D aylight Savin g Time (DST indica tor
displayed) and standard time (DST indicator not
displayed).
Sea Level
3
Page 4

Operation Guide 3202
s
s
l
l
l
l
l
l
l
l
l
l
l
l
l
l
l
l
l
l
l
l
l
l
l
l
l
l
l
l
l
l
l
l
l
l
l
l
l
l
l
l
l
l
l
l
l
l
l
l
l
l
l
l
l
l
l
l
l
l
Using the Stopwatch
The stopwatch measures elapsed time, split times, and two finishes.
Hours
Hours
Current
Current
time
time
Second
1/100 second
1/100 second
Second
Minutes
Minutes
To measure two finishes
D
Start Split
Note
• The Stopwatch Mode can indicate elapsed time up to 23 hours, 59 minutes, 59.99
seconds.
• Once started, stopwatch timing continues until you press A to stop it, even if you
exit the Stopwatch Mode to another mode and even if timing reaches the stopwatch
limit defined above.
• Exiting the Stopwatch Mode while a split time is frozen on the display clears the
split time and returns to elapsed time measurement.
To enter the Stopwatch Mode
Use C to select the Stopwatch Mode (STW) as shown in
“Selecting a Mode”.
STW
•
will appear on the display for about one second.
Next, the display will change to show the stopwatch
hours.
To perform an elapsed time operation
D
Start Stop (Restart) (Stop) Reset
To pause at a split time
D
Start Split
A
First runner
finishes.
Display time of
first runner
D D D A
A A D A
(
D A
Stop
Second runner
finishes.
SPL
displayed)
Split release
Split release
Display time of
second runner
Stop Reset
A
Reset
Using the Countdown Timer
The countdown timer can be configured to start at a preset time, and sound an alarm
when the end of the countdown is reached.
Current time
Current time
Countdown time
Countdown time
(Hour, minutes,
(Hour, minutes,
seconds)
seconds)
2. Hold down A until the hour setting of the current countdown start time starts to
flash. This is the setting screen.
• Before the ho ur settin g starts to f lash, the mes sage SET Hold will appear
on the display. Keep A depressed u ntil SET Hold disappears and the hour
setting st arts to fla sh.
3. Press C to move the flashing between the hour and minute settings.
4. Use D (+) and B (–) to change the flashing item.
• To set the starti ng value of the c ountdown ti me to 24 hours, se t 0H 00’00.
5. Press A to exit the setting screen.
To perform a countdown timer operation
D
Start Stop (Restart) (Stop) Reset
• Before starting a countdown timer operation, check to make sure that a countdown
operation is not already in progress (indicated by the seconds counting down). If it
is, press D to stop it and then A to reset to the countdown start time.
• An alarm sounds for five seconds when the end of the countdown is reached. This
alarm will sound in all modes. The countdown time is reset to its starting value
automatically when the alarm sounds.
To stop the alarm
Press any button.
To enter the Countdown Timer Mode
Use C to select the Countdown Timer Mode (TMR) as
shown in “Selecting a Mode”.
TMR
•
will appear on the display for about one second.
Next, the display will change to show the countdown
time hours.
To specify the countdown start time
1. Enter the Countdown Timer Mode.
• If a countdow n is in progress (i ndicated by the
seconds counting down), press D to stop it and
then press A to reset to the cur rent countdo wn
start time.
• If a countdow n is paused, pres s A to reset to the
current countdown start time.
D
D D
A
Using the Alarm
Alarm
Alarm
number or
number or
SIG
SIG
Alarm time
Alarm time
(Hour : Minutes)
(Hour : Minutes)
Current time
Current time
You can set five independent daily alarms. When a daily
alarm is turned on, an alarm tone will sound for about 10
seconds each day when the time in the Timekeeping
Mode reaches the preset alarm time. This is true even if
the watch is not in the Timekeeping Mode.
You can also turn on an Hourly Time Signal, which will
cause the watch to beep twice every hour on the hour.
To enter the Alarm Mode
C
to select the Alarm Mode (ALM) as shown in
Use
“Selecting a Mode”.
ALM
•
will appear on the display for about one second.
Next, the display will change to show an alarm number
AL1
(
number indicates an alarm screen.
the Hourly Time Signal screen is on the display.
• When you enter the Alarm Mode, the data you were
viewing when you last exited the mode appears first.
through
AL5
) or the
SIG
indicator. The alarm
SIG
is shown when
To set an alarm time
l
l
l
l
l
l
l
l
l
l
l
l
l
l
l
l
l
l
l
l
l
l
l
l
l
l
l
l
l
l
Alarm ON/OFF
Alarm ON/OFF
indicator
indicator
2. Hold down A until the alarm time starts to flash. This is the setting screen.
• Before the ala rm time star ts to flash, t he message SET Hold will appear on
the display. Keep A depressed u ntil SET Hold disappears an d the alarm ti me
starts to flash.
3. Press C to move the flashing between the hour and minute settings.
4. While a setting is flashing, use D (+) and B (–) to change it.
• When set ting the alar m time using t he 12-hour fo rmat, take c are to set the tim e
correctly a s a.m. (no indica tor) or p.m. (P indicator).
5. Press A to exit the setting screen.
To test the alarm
In the Alarm Mode, hold down D to sound the alarm.
To turn an alarm and the Hourly Time Signal on and off
1. In the Alarm Mode, use D to select an alarm or the Hourly Time Signal.
2. When the alarm or the Hourly Time Signal you want is selected, press A to toggle
it between on and off.
Hourly time signal
Hourly time signal
on indicator
on indicator
Alarm on indicator
Alarm on indicator
To stop the alarm
Press any button.
1. In the Alarm Mode, use D to scroll through the alarm
screens until the one whose time you want to set is
displayed.
AL1 AL2 AL3
SIG AL5 AL4
• The alarm o n indicator (wh en any alarm is o n) and
the Hourl y Time Sign al on indicato r (when the
Hourly Ti me Signal is o n) are shown on th e display
in all modes.
Illumination
The display of the watch is illuminated for easy reading in
the dark.
To turn on illumination
In any mode (except when a setting screen is on the
display), press B to illuminate the display.
• You can use the procedure below to select either one
second or three seconds as the illumination duration.
When you press B, the display will remain illuminated
for about one second or three seconds, depending on
To change the illumination duration
1. In the Timekeeping Mode, hold down A until the currently selected city code starts
to flash. This is the city code setting screen.
• Before the cit y code starts to flash, t he message SET Hold will appe ar on the
display. Keep A depressed u ntil SET Hold disappears an d the city co de
starts to flash.
2. Keep pressing C until LT1 or LT3 is displayed in the upper left corner of the
display.
• See step 3 unde r “To change the cur rent time and d ate setting s” for
informatio n about how to s croll through s etting scre ens.
3. Press D to toggle the illumination duration between three seconds (LT3 displayed)
and one second (LT1 displayed).
4. After the settings are the way you want, press A to exit the setting screen.
Illumination Precautions
• Illumination may be hard to see when viewed under direct sunlight.
• Illumination turns off automatically whenever an alarm sounds.
• Frequent use of illumination runs down the battery.
the current illumination duration setting.
Button Operation Tone
The button operation tone sounds any time you press one of the watch’s buttons. You
can turn the button operation tone on or off as desired.
• Even if you turn off the button operation tone, the alarm, Hourly Time Signal, and
Countdown Timer Mode alarm all operate normally.
To turn the button operation tone on and off
l
l
l
l
l
l
l
l
l
l
l
l
l
l
l
l
l
l
l
l
l
l
l
l
l
l
l
l
2. Keep pressing C until MUTE or KEY
display.
• See step 3 und er “To change the cu rrent time an d date setting s” for inform ation
about how to sc roll through se tting scree ns.
Mute indicatorMute indicator
1. In the Timekeeping Mode, hold down A until the
currently selected city code starts to flash. This is the
city code setting screen.
• Before the cit y code sta rts to flas h, the messag e
SET Hold will appear on the di splay. Keep A
depressed until SET Hold disappears and the city
code star ts to flash.
is displayed in the upper left corner of the
Press D to toggle the button operation tone between on
3.
) and off (MUTE).
(KEY
4. After the settings are the way you want, press A to exit
the setting screen.
Note
• The mute indi cator is displaye d in all modes w hen
the butto n operation to ne is turned of f.
4
Page 5

Operation Guide 3202
Troubleshooting
Time Setting
The current time setting is off by hours.
■
Your Home City setting may be wrong. Check your Home City setting and correct it, if
necessary.
The current time setting is off by one hour.
■
You may need to change your Home City’s standard time/daylight saving time (DST)
setting. Use the procedure under “To change the current time and date settings” to
change the standard time/daylight saving time (DST) setting.
Sensor modes
I can’t change the temperature, barometric pressure, and altitude units.
■
When TYO (Tokyo) is selected as the Home City, the altitude unit is set automatically
to meters (m), the barometric pressure unit to hectopascals (hPa), and the
temperature unit to Celsius (°C). These settings cannot be changed.
The battery indicator (
■
performed.
Battery indicatorBattery indicator
“ERR” appears while a sensor operation is in progress.
■
Subjecting the watch to strong impact can cause sensor malfunction or improper
contact of internal circuitry. When this happens, ERR (error) will appear on the display
and sensor operations will be disabled.
Pressure/Temperature
ERR
If
appears while a measurement operation is being performed in a sensor mode,
•
restart the measurement. If
something wrong with the sensor.
•
Barometer/Thermometer Mode and Altimeter Mode sensor operations are disabled
whenever there is not enough battery power available to perform a sensor operation.
This is true regardless of the current battery level. In this case,
the display. This does not indicate malfunction, and sensor operation should resume
once battery voltage returns to its normal level.
ERR
• If
keeps appearing during measurement, it could mean there is a problem with
the applicable sensor.
Whenever you have a sensor malfunction, take the watch to your original dealer or
nearest authorized CASIO distributor as soon as possible.
The barometric pressure differential pointer does not appear on the display
■
when I enter the Barometer/Thermometer Mode.
• This could indicate sensor error. Try using C to re-enter the Barometer/
Thermometer Mode.
•
The barometric pressure differential pointer is not displayed when the displayed current
barometric value is outside of the allowable measurement range (260 to 1,100 hPa).
) appears while a sensor operation is being
The battery indicator appears in the upper left corner of the digital
display whenever there is not enough battery power available to
perform a sensor operation in the Barometer/Thermometer Mode
or Altimeter Mode. Sensor operation is disabled while the battery
indicator is displayed.
• Normal operation should return after battery power recovers.
Barometric
Measurement
ERR
appears on the display again, it can mean there is
Altitude
Measurement
ERR
will appear on
World Time Mode
The time for my World Time City is off in the World Time Mode.
■
This could be due to incorrect switching between standard time and daylight saving
time. See “To specify standard time or daylight saving time (DST) for a city” for more
information.
Specifications
Accuracy at normal temperature: ±30 seconds a month
Timekeeping: Hour, minutes, seconds, p.m. (P), month, day, day of the week
Time format: 12-hour and 24-hour
Calendar system: Full Auto-calendar pre-programmed from the year 2000 to 2099
Other: Home City code (can be assigned one of 48 city codes); Standard Time /
Daylight Saving Time (summer time)
Altimeter:
Measurement range: –700 to 10,000 m (or –2,300 to 32,800 ft.) without reference
altitude
Display range: –10,000 to 10,000 m (or –32,800 to 32,800 ft.)
Negative values can be caused by readings produced based on a reference
altitude or due to atmospheric conditions.
Display unit: 5 m (or 20 ft.)
Measurement timing: 5-second interval for first 3 minutes followed by 2-minute
interval for next 10 hours
Other: Reference altitude setting
Barometer:
Measurement and display range:
260 to 1,100 hPa (or 7.65 to 32.45 inHg)
Display unit: 1 hPa (or 0.05 inHg)
Measurement timing: 5-second interval for first 3 minutes followed by 2-minute
interval for next 10 hours in the Barometer/Thermometer Mode
Other: Calibration; Barometric pressure differential pointer
Thermometer:
Measurement and display range: –10.0 to 60.0°C (or 14.0 to 140.0°F)
Display unit: 0.1°C (or 0.2°F)
Measurement timing: 5-second interval for first 3 minutes followed by 2-minute
interval for next 10 hours
Other: Calibration
Pressure Sensor Precision:
Conditions
(Altitude)
0 to 6000 m
Fixed
temperature
Effect of
variable
temperature
• Values are guaranteed for a temperature range of –10°C to 40°C (14°F to 104°F).
• Precision is lessened by strong impact to either the watch or the sensor, and by
temperature extremes.
Temperature Sensor Precision:
World Time: 48 cities (31 time zones)
Stopwatch:
Countdown Timer:
Alarms: 5 Daily alarms; Hourly time signal
Illumination: LED (Light-emitting diode); Selectable illumination duration
Other: Low-temperature resistance (–10°C/14°F); Button operation tone on/off
Battery: One lithium battery (Type: CR2016)
0 to 19680 ft.
6000 to 10000 m
19680 to 32800 ft.
0 to 6000 m
0 to 19680 ft.
6000 to 10000 m
19680 to 32800 ft.
±2°C (±3.6°F) in range of –10°C to 60°C (14.0°F to 140.0°F)
Other: Daylight Saving Time/Standard Time
Measuring unit: 1/100 second
Measuring capacity: 23:59' 59.99"
Measuring modes: Elapsed time, split time, two finishes
Measuring unit: 1 second
Countdown start time setting range: 1 minute to 24 hours (1-hour increments and
1-minute increments)
(approximately 1 second or 3 seconds)
Approximate battery operating time: 3 years under the following conditions:
• 1 illumination operation (1.5 seconds) per day
• 10 seconds of alarm operation per day
• 10 hours of altimeter measurement, once per month
Altimeter Barometer
± (altitude differential × 2%
+ 15 m) m
± (altitude differential × 2%
+ 50 ft.) ft.
± (altitude differential × 2%
+ 25 m) m
± (altitude differential × 2%
+ 90 ft.) ft.
± 50 m every 10°C
± 170 ft. every 50°F
± 70 m every 10°C
± 230 ft. every 50°F
± (pressure differential × 2%
+ 2 hPa) hPa
± (pressure differential × 2%
+ 0.059 inHg) inHg
± 5 hPa every 10°C
± 0.148 inHg every 50°F
Frequent use of illumination runs down the battery.
City Code Table
City
City
Code
PPG Pago Pago –11
HNL Honolulu –10
ANC Anchorage –9
YVR Vancouver
LAX Los Angeles
YEA Edmonton
DEN Denver
MEX Mexico City
CHI Chicago
NYC New York –5
SCL Santiago
YHZ Halifax
YYT St. Johns –3.5
RIO Rio De Janeiro –3
Fernando de
FEN
Noronha
RAI Praia –1
UTC
LON London
MAD Madrid
PAR Paris
ROM Rome
BER Berlin
STO Stockholm
ATH Athens
JRS Jerusalem
UTC Offset/
GMT Differential
–8
–7
–6
–4
–2
0LIS Lisbon
+1
+2CAI Cairo
City
City
Code
MOW Moscow
JED Jeddah
THR Tehran +3.5
DXB Dubai +4
KBL Kabul +4.5
KHI Karachi +5
DEL Delhi +5.5
KTM Kathmandu +5.75
DAC Dhaka +6
RGN Yangon +6.5
BKK Bangkok +7
SIN Singapore
HKG Hong Kong
BJS Beijing
TPE Taipei
SEL Seoul
TYO Tokyo
ADL Adelaide +9.5
GUM Guam
SYD Sydney
NOU Noumea +11
WLG Wellington +12
• Based on data as of December 2009.
• The rules governing global times (GMT
differential and UTC offset) and
summer time are determined by each
individual country.
UTC Offset/
GMT Differential
+3
+8
+9
+10
5
 Loading...