


Casio QV-11 Manual
|
|
Liquid Crystal Digital Camera QV-10 |
Liquid Crystal Digital Camera |
B |
■ Before using the QV-10... |
QV-10 |
Note the following precautions before attempting to use the QV-10. |
|
|
|
|
Owner’s Manual |
|
• CASIO COMPUTER CO., LTD. assumes no responsibility for any |
|
damage or loss resulting from the use of this manual. |
|
|
|
• CASIO COMPUTER CO., LTD. assumes no responsibility for any |
|
|
loss or claims by third parties which may arise through the use of |
|
|
the QV-10. |
|
|
• CASIO COMPUTER CO., LTD. assumes no responsibility for any |
|
|
damage or loss caused by deletion of data as a result of malfunc- |
|
|
tion, repairs, or battery replacement. Be sure to back up all impor- |
|
|
tant data on other media to protect against its loss. |
|
|
Windows is a trademark of Microsoft Corporation. |
|
|
Apple and Macintosh are registered trademarks of Apple Computer, Inc. |
Introduction
Congratulations upon your selection of the QV-10 Liquid Crystal Digital Camera. The QV-10 comes with its own built-in liquid crystal color monitor that let’s you instantly view the pictures you take.
To get the most out of the QV10, be sure to carefully read this manual and follow the instructions contained in it.
Please refer to this manual for the QV-10, QV-10A & QV-11 models
1 2
Contents |
|
|
Liquid Crystal Digital Camera QV-10 |
|
|
|
|
|
|
|
|
QV-10 Features ..................................................... |
6 |
|
Operation |
33 |
|
............................................General Precautions |
8 |
|
|
Recording Image ................................................ |
34 |
Other Precautions .............................................. |
10 |
|
|
To record an image ............................................................. |
34 |
FCC Guidelines |
12 |
|
|
How to avoid hand movement... ......................................... |
36 |
|
|
Flourescent Lighting |
36 |
||
|
|
|
|
||
|
|
|
|
Infrared Light ....................................................................... |
37 |
Getting Acquainted |
13 |
|
|
Changing the Lens Orientation ........................................... |
38 |
|
|
|
|
NORMAL/MACRO Switch |
40 |
Unpacking |
14 |
|
|||
|
|
Exposure Adjustment .......................................................... |
41 |
||
General Guide .................................................... |
15 |
|
|
Changing the Aperture Setting ........................................... |
42 |
Opening the Terminal Panel Cover |
16 |
|
|
Record Mode Displays ........................................................ |
43 |
|
|
Image Display |
43 |
||
Connecting the Wrist Strap |
17 |
|
|
||
|
|
Displaying the Image Number |
43 |
||
Using the Lens Cloth |
17 |
|
|
||
|
|
Exposure Warning Indicators |
45 |
||
Using the Soft Case |
17 |
|
|
||
|
|
Low Battery Indicator |
46 |
||
Operation Reference |
18 |
|
|
||
|
|
Memory Full Message |
46 |
||
To record an image |
18 |
|
|
||
|
|
Using the Self-Timer |
47 |
||
To view images stored in memory |
19 |
|
|
||
|
|
Playing Back Images |
49 |
||
To delete images stored in memory |
20 |
|
|
||
|
|
Displaying Images on the Camera's LCD |
49 |
||
Function Referense |
21 |
|
|
||
|
|
Displaying Images on a TV Screen |
51 |
||
Record Functions |
21 |
|
|
||
|
|
Displaying the Memory Page Number |
52 |
||
Playback Functions |
23 |
|
|
||
|
|
Producing a Multi-Page Display |
53 |
||
|
|
|
|
||
Power Supply ..................................................... |
25 |
|
|
Using the Zoom Function .................................................... |
57 |
To load batteries |
25 |
|
|
Using Auto Play .................................................................. |
59 |
|
|
Protecting Memory Pages |
67 |
||
Standard Battery Life |
27 |
|
|
||
|
|
|
|
||
Low Battery Indicator ..................................................... |
28 |
|
|
Deletting Memory Pages ................................... |
70 |
Flash Memory ................................................................ |
28 |
|
|
To delete a single memory page |
70 |
Auto Power Off |
29 |
|
|
||
|
|
To delete all unprotected memory pages |
73 |
||
Using AC Power |
30 |
|
|
||
|
|
|
|
||
|
3 |
4 |
|
|
|
|
Contents |
LiquidQV-10CrystalFeaturesDigital Camera QV-10 |
|
Connecting to Other Devices |
75 |
Lightweight and compact design |
|
Connection Guide |
76 |
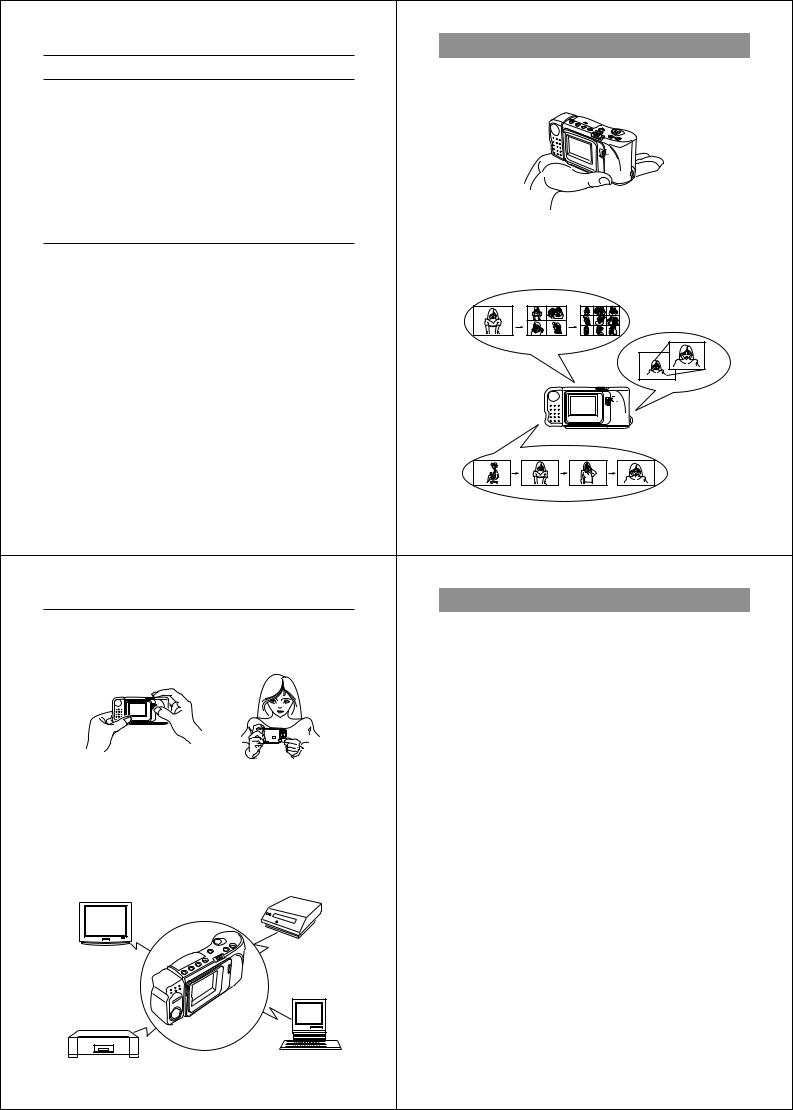
The QV-10 is the first camera to incorporate a built-in monitor into a |
|
compact configuration. |
|||
QV-10 Terminals |
78 |
||
|
|||
Using the QV-10 with a Connected Device ...... |
79 |
|
|
Television ............................................................................ |
79 |
|
|
Video Tape Deck ................................................................ |
79 |
|
|
Video Printer ....................................................................... |
80 |
|
|
Computer (Using special cable and software) .................... |
81 |
|
|
Computer (Video Capture) .................................................. |
82 |
|
|
Reference |
83 |
Versatile features and functions |
|
The versatile features and functions of the QV-10 include: simulta- |
|||
Troubleshooting |
84 |
||
neous display of multiple memory pages, close-up capabilities, au- |
|||
Specifications |
88 |
tomatic sequential display of memory pages, and more. |
|
|
|||
About the camera's backlight ........................... |
89 |
|
Close ups
Multi-Page Display
Auto Playback
5 6
QV-10 Features |
LiquidGeneralC ystalPrecautionsDigit l Camera QV-10 |
||
Picture composition without looking through a |
Be sure to observe the following imporatnt precautions whenever us- |
||
viewfinder |
ing the QV-10. |
||
The QV-10’s high-resolution, low-glare TFT liquid crystal display |
• |
Never try to take pictures or use the built-in display while operating |
|
|
a motor vehicle or while walking. Doing so creates the danger of |
||
provides clear pictures even in bright light. |
|
||
|
|
serious accident. |
|
|
• Never try to open the case of the camera or attempt your own re- |
||
|
|
pairs. High-voltage internal components create the risk of electrical |
|
|
|
shock when exposed. Always leave maintenance and repair work |
|
|
|
up to authorized CASIO service providers. |
|
|
• |
Keep the camera away from water and other liquids, and never let it |
|
|
|
get wet. Moisture creates the danger of fire and electrical shock. |
|
|
|
Never use the camera outdoors in the rain or snow, at the seashore |
|
VIDEO OUT and digital transfer function for un- |
|
or beach, in the bathroom, etc. |
|
• |
Should foreign matter or water ever get into the unit, immediately |
||
limited application of digital images |
|||
|
turn power off, unplug the AC adaptor from the power outlet, and |
||
The VIDEO OUT capabilities of the QV-10 makes it possible to con- |
|
||
|
contact your dealer or nearest CASIO service provider. Using the |
||
nect to a television to use images for presentations and other appli- |
|
unit under these conditions creates the danger of fire and electrical |
|
cations. Digital images can be transferred to a personal computer |
|
||
|
shock. |
||
for storage and editing, or from a computer to the QV-10 for take- |
|
||
• Should you ever notice smoke or a strange odor coming out of the |
|||
along convenience. |
|||
Video Printer |
|
unit, immediately turn power off and unplug the AC adaptor from the |
|
TV |
|
power outlet. Using the unit under these conditions creates the dan- |
|
|
ger of fire and electrical shock. After making sure there is no more |
||
|
|
||
|
|
smoke coming from the unit, take it to your nearest CASIO service |
|
|
|
provider for repair. Never attempt your own maintenance. |
|
|
• |
If the unit’s case should ever become cracked due to dropping it or |
|
Personal |
|
otherwise subjecting it to rough treatment, immediately turn power |
|
|
off, unplug the AC adaptor from the power outlet, and contact your |
||
Computer |
|
||
|
nearest CASIO service provider. |
||
|
|
||
Video Tape Deck |
• |
Never use the unit inside of an air craft or in any other areas where |
|
|
its use is prohibited. Doing so can result in an accident. |
||
|
|
||
7 |
8 |
|
|

General Precautions |
|
LiquidOtherC ystalPrecautionsDigital Camera QV-10 |
|
||
• Physical damage and malfunction of this unit can cause the image |
MEMORY ERROR message |
|
|
||
data stored in its memory to be deleted. Be sure to always keep |
The following error appears on |
the built-in monitor whenever |
the |
||
backup copies of data by recording them on video tape or by trans- |
|||||
camera’s flash memory becomes disabled due to malfunction or im- |
|
||||
ferring them to personal computer memory. |
|
||||
proper operation. |
|
|
|||
|
|
|
|||
• Never open the battery compartment cover, disconnect the AC |
|
|
|
|
|
adaptor from the camera or unplug it from the wall socket while the |
|
|
|
|
|
“WAIT” message is on the LCD. Doing so will not only make storage |
|
|
|
|
|
of the current image impossible, it can also corrupt other image data |
|
|
|
|
|
already stored in camera memory. |
|
|
|
|
|
|
Whenever this happens, all of the digital images stored in the |
||||
|
camera’s memory will be lost. You will not be able to view stored |
||||
|
images or record new ones. Take your camera to your dealer or an |
|
|||
|
authorized CASIO service provider as soon as possible after the |
||||
|
MEMORY ERROR message appears. |
|
|||
|
Operating conditions |
|
|
||
|
• This camera is designed for use in temperatures ranging from 0 |
° C |
|||
|
|
to 40 ° C (32 ° F to 104 |
° F). |
|
|
• Do not use or keep the camera in the following areas.
— In areas subject to direct sunlight
— In areas subject to high humidity or dust
— Near air conditioners, heaters, or other areas subject to temperature extremes
— Inside of a closed vehicle, especially one parked in the sun
— In areas subject to strong vibration
9 10
Other Precautions |
Liquid Crystal Digital Camera QV-10 |
|
|
|
|
Condensation |
GUIDELINES LAID DOWN BY FCC RULES FOR USE OF |
|||
• |
When you bring the camera indoors on a cold day or otherwise ex- |
THIS UNIT IN THE U.S.A. (not applicable to other areas). |
||
|
|
|
||
|
pose it to a sudden change of temperature, there is the possibility |
|
|
|
|
|
NOTICE |
|
|
|
that condensation can form on the exterior or on interior compo- |
|
|
|
|
nents. Condensation can cause malfunction of the camera, so you |
|
This equipment has been tested and found to comply with the lim- |
|
|
should avoid exposing it to conditions that might cause condensa- |
|
its for a Class B digital device, pursuant to Part 15 of the FCC |
|
|
tion. |
|
Rules. These limits are designed to provide reasonable protection |
|
• |
To keep condensation from forming, place the camera into a plastic |
|
against |
harmful interference in a residential installation. This |
|
equipment generates, uses and can radiate radio frequency en- |
|||
|
bag before moving it into a location that is much warmer or colder |
|
||
|
|
ergy and, if not installed and used in accordance with the instruc- |
||
|
than your current location. Leave it in the plastic bag until the air |
|
||
|
|
tions, may cause harmful interference to radio communications. |
||
|
inside the bag has a chance to reach the same temperature as the |
|
||
|
|
However, there is no guarantee that interference will not occur in a |
||
|
new location. If condensation does form, remove the batteries from |
|
||
|
|
particular installation. If this equipment does cause harmful inter- |
||
|
the camera and leave the battery compartment cover open for a few |
|
||
|
|
ference to radio or television reception, which can be determined |
||
|
hours. |
|
||
|
|
by turning the equipment off and on, the user is encouraged to try |
||
|
|
|
||
|
|
|
to correct the interference by one or more of the following mea- |
|
|
|
|
sures: |
|
|
|
|
|
|
|
|
This device complies with Part 15 of the FCC Rules. Operation is |
||
|
|
subject to the following two conditions: (1) this device may not cause |
||
|
|
harmful interference, and (2) this device must accept any interference |
||
|
|
received, including interference that may cause undesired operation. |
||
|
|
• Reorient or relocate the receiving antenna. |
||
|
|
• Increase the separation between the equipment and receiver. |
||
|
|
• Connect the equipment into an outlet on a circuit different from that |
||
|
|
|
to which the receiver is connected. |
|
|
|
• Consult the dealer or an experienced radio/TV technician for help. |
||
|
|
Caution : |
Changes or modification to the product not expressly ap- |
|
|
|
proved by CASIO could void the user's authority to operate the prod- |
||
|
|
uct. |
|
|
|
|
Properly shielded cables with ferrite core must be used for connec- |
||
|
|
tion to computer in order to meet FCC emission limits. |
||
|
11 |
12 |
|
|
Unpacking
Getting Acquainted
Check to make sure that all of the items shown below are included Getting Acquainted with your QV-10. If something is missing, contact your dealer as soon
as possible.
This part of the manual contains information on unpacking, the names of controls and components, and power supply information. It
also has sections that cover basic operations to let you begin enjoying the QV-10 as quickly as possible.
|
|
Soft case |
|
Unpacking ........................................................... |
14 |
|
|
General Guide .................................................... |
15 |
|
|
Operation Reference .......................................... |
18 |
Alkaline batteries (AA-size |
× 4) |
|
|
||
To record an image |
18 |
QV-10 |
|
|
|
||
To view images stored in memory ...................................... |
19 |
|
|
To delete images stored in memory ................................... |
20 |
|
|
Function Reference ........................................... |
21 |
|
|
Record Functions ................................................................ |
21 |
Special video cable |
|
Playback Functions ............................................................. |
23 |
|
|
Power Supply |
25 |
Cleaning Cloth |
|
|
|
||
To load batteries ................................................................. |
25 |
|
|
Using AC Power ................................................................. |
30 |
|
|
|
|
Manual and warranty |
|
|
|
Wrist Strap |
|
|
|
• See page 17 for instal- |
|
|
|
lation instructions. |
|
|
|
AC adaptor AD-C60 |
|
|
13 |
14 |
|
General Guide |
|
|
Getting Acquainted |
|
|
The following illustrations show the names of each component, but- |
Bottom |
|
Tripod hole |
||
ton and switch on the camera. |
|
|
|
|
|
Top and Display |
|
|
|
|
Battery |
|
|
|
|
compartment |
|
|
|
|
|
|
|
/PROTECT |
DISP (Display) button |
MODE button |
|
Battery compartment cover |
lock |
|
|
||||
|
|
|
|
|
|
(Timer/Protect) |
|
DEL (Delete) button |
BRIGHT (brightness) control |
|
|
button |
|
|
|
||
|
Shutter button |
• BRIGHT control adjusts the brightness of the image on the LCD. |
|||
|
|
The brightness is set at the factory to the optimum setting, and nor- |
|||
|
|
|
mally does not need adjustment. Use BRIGHT control to make ad- |
||
|
|
|
justments after replacing batteries, or any other time you feel the |
||
|
|
[+] (Forward) |
LCD image brightness is too dark or too light. |
|
|
ZOOM button |
|
button |
Terminals |
|
Terminal panel cover |
|
|
|
|||
|
|
|
|
|
VIDEO OUT terminal |
LCD |
|
[–] (Reverse) |
|
|
DIGITAL terminal |
|
button |
|
|
||
|
|
|
|
|
|
|
POWER switch |
Function switch |
|
|
|
|
|
|
|
|
|
Lens |
|
|
AC Power terminal |
|
|
|
|
|
|
|
|
|
|
NORMAL/MACRO switch |
Opening the Terminal Panel Cover |
|
|
|
|
|
|
||
|
|
|
1 |
2 |
3 |
Lens
Important!
Make sure that the terminal panel cover is slid fully away as shown in Aperture switch step 2 above before trying to raise it. Forcing the cover up can seri-
ously damage it.
15 16
|
General Guide |
GettingOperationAcquaintReferenced |
|
Connecting the Wrist Strap |
|
To record an image |
|
Pass the wrist strap through the hole on |
|
• Be sure to load batteries (page 25) before operation. |
|
the side of the camera a shown in the |
2 |
|
|
illustration. |
|
|
|
|
|
|
|
|
1 |
|
5 |
|
|
|
2 |
Using the Cleaning Cloth |
|
|
|
Use the cleaning cloth to wipe finger- |
|
3 |
1 |
prints and smudges from the LCD and |
|
||
lens. |
|
4 |
|
• Be sure to avoid applying too much |
|
|
|
pressure when wiping the LCD. Too |
|
|
|
much pressure can cause permanent |
|
|
|
discoloration, abnormal images, and |
|
1. Set to REC. |
|
cracks. |
|
|
|
|
2. Slide to the right to turn on power. |
|
|
|
|
|
|
Using the Soft Case |
|
3. Set to NORMAL. |
|
|
• Set to MACRO for close-ups. See page 40 for information on |
|
|
Keep the camera in its soft case to pro- |
|
|
|
|
the difference between NORMAL and MACRO. |
|
|
tect it when not in use. |
|
|
|
|
4. While viewing the image on the LCD, slowly move the cam- |
|
|
|
|
|
|
|
|
era so the image appears as you want it. |
|
|
|
5. Press the shutter button. |
|
|
|
• The message “WAIT” appears on the LCD for about four |
|
|
|
seconds along with the image that was recorded when you |
|
|
|
pressed the shutter button. You can use the camera to take |
|
|
|
the next picture after the “WAIT” message disappears. |
|
|
|
• The camera can hold up to 96 images in memory |
|
|
17 |
18 |
|
Operation Reference |
Getting Acquainted |
|
|
|
|
To view images stored in memory |
|
To delete images stored in memory |
|
|
You can recall images and view them on the LCD. |
|
After you delete an image you can store a new one it its place. |
|
|
|
3 |
|
2, 6 |
5 |
|
|
|
||
|
|
|
|
|
|
2 |
|
|
|
|
|
|
|
3 |
(2) |
1 |
|
4 |
|
1. Set to PLAY. |
|
1. |
Display the image you want to delete (page 19). |
|
2. Slide to the right to turn on power. |
|
2. |
Press DEL. |
|
• An image appears on the LCD when power comes on. |
|
|
• The following steps are performed in accordance with |
|
3. Press [+] to display the next memory page or [–] to display |
|
prompts that appear on the LCD. |
|
|
the previous page. |
|
3. Press [+]. |
|
|
|
|
4. |
A message appears to confirm that you really want to de- |
|
|
|
|
lete the image. |
|
|
|
|
• To abort the delete operation without deleting anything, |
|
|
|
|
press DEL here. |
|
|
|
5. |
Press the shutter button to delete the image shown on the |
|
|
|
|
LCD. |
|
|
|
6. |
After you finish deleting all the images you want, press |
|
|
|
|
DEL to quit the delete procedure. |
|
|
19 |
20 |
|
|

Function Reference |
|
|
|
|
Getting Acquainted |
|
Record Functions |
|
|
|
|
|
Exposure Adjustment (page 41) |
The following describes features and functions that you can use |
|
|
|
|||
|
|
|
The camera normally adjusts exposure automatically, using aper- |
|||
when recording images. |
|
|
|
|
|
|
|
|
|
|
|
|
ture priority AE. You can also perform manual exposure adjust- |
NORMAL/MACRO Switch (Page 40) |
|
|
|
ments, while viewing the image on the LCD. |
||
|
|
|
|
|||
Select the setting that suits the distance between the camera and |
|
|
|
|
||
object whose image is being recorded. |
|
|
|
|
||
|
• |
NORMAL |
|
|
|
|
|
|
For normal shots |
|
|
|
|
|
|
of scenery, |
|
|
|
|
|
|
people, etc. |
|
|
|
Image Number (Page 43) |
|
• |
MACRO |
|
|
|
|
|
|
|
|
This value indicates the number of the next image that will be re- |
||
|
|
|
|
|
|
|
|
|
For close-up |
|
|
|
corded. |
|
|
shots. |
|
|
|
|
Aperture Switch (Page 42) |
|
|
|
|
Image |
|
Use this switch to select from one of two aperture settings and con- |
|
|
|
number |
||
|
|
|
|
|||
trol the brightness of the image. |
|
|
|
|
|
|
|
|
• |
on the LCD in- |
|
||
|
|
|
dicates lighting |
is |
Self-Timer (Page 47) |
|
|
|
|
too dim. Change |
|
||
|
|
|
the aperture switch |
|
Press a button and the shutter releases automatically 10 seconds |
|
|
|
|
setting to [ |
○]. |
||
|
|
|
later. |
|||
|
|
|
|
|
|
|
Low |
High |
• |
on the LCD in- |
|
||
|
dicates lighting |
is |
|
|||
brightness |
brightness |
|
|
|||
|
too bright. Change |
|
|
|||
|
|
|
the aperture switch |
|
|
|
|
|
|
setting to [ |
●]. |
|
|
|
|
|
|
|
21 |
22 |
Function Reference |
Getting Acquainted |
|
|
|
|
Playback Functions |
Zoom (Page 57) |
|
The following functions help you view the images stored in memory |
||
This function lets you enlarge a specific part of an image to twice its |
||
quickly and easily. |
||
|
original size. |
|
Memory Page Number (Page 52) |
|
|
This value indicates the number of the memory page whose con- |
|
|
tents are currently shown on the LCD. |
|
|
|
Memory |
|
|
page number |
|
|
Auto Play (Page 59) |
|
|
This function automatically scrolls through the camera’s memory |
|
|
pages. |
|
Multi-Page Display (Page 53) |
Press both these buttons |
|
This function lets you view four or nine memory pages at the same |
||
at the same time to start |
||
time. |
Auto Play. |
• • •
Protect Function (Page 67)
Use this function to protect specific memory pages against being deleted.
Protect
indicator
23 24
Power Supply |
|
|
|
Getting Acquainted |
|
|
|
|||
The QV-10 features a two-way power supply that lets you use either |
|
|
|
3. Close the battery compartment cover. |
|
|||||
batteries (AA-size Alkaline) or household AC current. |
|
|
|
|
|
|
|
|
||
To load batteries |
|
|
|
|
|
|
|
|
A |
|
|
|
|
|
|
|
|
|
|
||
Be sure that camera power is turned off whenever loading or replac- |
|
|
|
|
|
|
|
|
||
ing batteries. |
|
|
|
|
|
|
|
|
|
|
1. Slide the battery compartment lock on the bottom of the |
|
|
|
|
|
|
|
|||
camera in the direction indicated by arrow (1), and swing |
|
|
|
|
|
|
|
|||
open the battery compartment cover as indicated by arrow |
|
|
|
• |
Press down on the battery compartment cover at the point |
|||||
(2). |
|
|
|
|
||||||
|
|
|
|
|
marked |
A in the nearby illustration until the cover locks into |
||||
|
|
|
|
|
|
|
||||
|
|
|
|
|
|
|
place with a click. |
|
|
|
|
|
|
|
|
Battery Handling Precautions |
|
|
|||
|
|
|
|
|
Incorrect use or handling of batteries can cause them to leak or burst |
|
||||
|
|
|
|
|
and seriously damage your camera. Be sure to note the following |
|
||||
|
|
|
|
|
important precautions to avoid problems with batteries. |
|
||||
2. Insert four batteries. |
|
|
|
|
|
|
|
Never load manganese batteries into |
||
|
|
|
|
|
Caution |
|
the camera! Doing so not only results |
|||
|
|
|
|
|
|
|
|
in shortened battery life, it also causes |
||
|
|
|
|
|
|
|
|
|
batteries to generate heat that can |
|
|
|
|
|
|
|
|
|
|
cause serious damage to the camera. |
|
|
|
|
|
|
|
|
|
|
Always use Alkaline batteries only. |
|
|
|
|
|
|
• |
Make sure that the positive |
+ and negative |
- ends of the batteries |
||
|
|
|
|
|
|
are facing properly when you load them in the camera. |
|
|||
|
|
|
|
|
• Remove batteries from the camera if you do not plan to use it for |
|||||
|
|
|
|
|
|
more than two weeks. |
|
|
|
|
Be sure to use only AA-size |
Alkaline |
batteries. Never use |
• |
Never mix old batteries with new ones. |
|
|||||
• |
Never recharge batteries, never allow direct connection between |
|
||||||||
manganese batteries (see precautions on the next page). |
|
|
|
|||||||
|
|
|
two ends of a battery, and never try to take batteries apart. |
|
||||||
• |
Make sure that the positive |
+ and negative |
- ends of the |
|
|
|||||
• |
Do not expose batteries to direct heat or dispose of them by burn- |
|
||||||||
|
batteries are facing correctly. |
|
|
|
|
|||||
|
|
|
|
|
ing. Doing so can create the danger of explosion. |
|
||||
|
|
|
|
|
|
|
||||
|
|
|
|
25 |
26 |
|
|
|
|
|
Power Supply |
Getting Acquainted |
|
|
|
• Never mix batteries of different types. |
Low Battery Indicator |
|
|
|
• Dead batteries are susceptible to leakage, which can cause serious |
A low battery indicator ( |
|
) appears on the LCD whenever remain- |
|
|
||||
damage to your camera. Remove batteries from the camera as |
ing battery power drops below a certain level. |
|||
soon as you notice they are dead. |
||||
|
|
|
||
Standard Battery Life |
|
|
|
|
You can generally expect to get about 120 minutes of operation from |
|
|
|
|
a fresh set of LR6 (AM3) Alkaline batteries at normal temperature. |
|
|
|
|
Note that battery life is shortened by extreme cold. |
|
|
|
|
|
When this indicator appears, replace all four batteries with a fresh set |
|||
|
of new ones. Once the low battery indicator appears, you can expect |
|||
|
only about 10 more minutes of operation before total power failure. |
|||
|
Flash Memory |
|
|
|
|
The QV-10 features flash memory for storage of images. Flash |
|||
|
memory does not require electrical power to store data, so image |
|||
|
data is retained in memory even when you turn camera power off. If |
|||
|
batteries go dead, simply load a set of new batteries or connect the |
|||
|
AC adaptor and you will be able to view images in camera memory. |
|||
27 28
 Loading...