

Casio PF-8000 Operation Manual
OPERATION MANUAL
MANUAL
DE
OPERACION
CASIO
PF-8000
103A M @S")(pj)
Printed
in
Japan

'
Doar
rustomiit,
Thank
you
vory
mm h lot
IHIM
hosing
the
Casio
PF-800U
This
is a
highly
pui
uMu
Id
<li<ni
Hectronic
calculator
nni>nl>ln
n*
ilmni!"/""
M
in the two
s<!|>iii!ii« i ni<t(i"i
H"..
n.unely,
telephone
nunil"'i'.
iiml
iniimniiiMilimi
Please
read
this
insimcllun
m.jnual
carefully
so
that
yim < iin
lully
unilri
-.i.iiid
each
of the
calcul.itoi's
liuu
timis
and
handle
it
properly
*Special
care
should
bo
tiikon
not to
damage
the
unit
l>y
ln>inlini/
<>i
drop-
ping.
For
example,
do not
curry
it in
your
hip
pocket
CONTENTS
Prior
to Use
.
4
Use
precautions
4
Power
Supply
and
Battery Replacement
5
Auto Power
Off 8
Contrast
Adjustment
8
RAM
Pack
for
Expansion (option)
9
Each
Section's Nomenclature
and
Operation
11
Nomenclature
13
Finger
Writing Function
18
Data Bank Functions
22
Data
storage format
23
How
to
count
the
number
of
stored characters
23
TEL
function
25
MEMO
function
36
SECRET
function
43
COMMAND
function
46
Data
input
errors
51
2
Calculation Function
Specifications
CALCULATION
EXAMPLES
52
54
111
Prior
to Use
This
calculator
has
been manufactured using
Casio's
advanced electronics technology
under strict quality control conditions.
•
Use
precautions
•
This calculator
is
composed
of
precision electronic components. Never
attempt
to
take
it
apart. Avoid
shock
such
as
throwing
or
dropping.
Do not
subject
it to
sudden tem-
perature
changes.
Do not
leave
or
store
it in
hot,
humid
or
dusty places.
At low
tempe-
ratures
the
display
may
have a slower
response
or
fail
to
light
up. It
will
return
to
normal
when
the
temperature
becomes
normal.
•
Replace
the
batteries
at
least
every 2 years
even
when
the
calculator
is not
used.
Do
not
leave
old
batteries
in
place
since
the
electrolyte
may
leak
out and
cause
damage.
•
Avoid
using
thinner, benzine
or
other volatile,
liquid
to
clean
the
calculator. Wipe
it
with
a dry
cloth
or a
cloth
dipped
in a
neutral detergent
and
wrung dry.
•
When
strong static
electricity
is
applied
to
this
calculator,
the
display contrast
may
weaken
or
functions
may not
work properly.
In
such
cases,
remove
and
reinstall
the
main batteries then resume normal operation.
CAUTION:
USE
FINGER ONLY
Characters
should only
be
drawn
on the
screen
by
finger.
Avoid using a pointed
object
as it
could
damage
the
screen
or
internal
circuit.
I
Power
Supply
and
The
calculator
uses
two
CR2032
lithium
batteries
for
calculation/dlnpliiy
ll
nhu
uses
one
CR1220
lithium
battery
for
memory backup.
If
display
contrast
Is
low
nvnn
when
the
contrast control
(p. 8)
adjusted
to the
maximum,
it
indicates that
thct
hniim
inn
luive
become weak.
Replace
the
batteries
as
soon
as
possible
using
the
procedurti
<lm<.iilmcl
below.
If the old
batteries
are not
replaced, memory
may be
lost.
Even
whun
tint
ml
culator functions normally, replace batteries
every 2 years.
•
How
to
replace
the
batteries:
1.
Calculation/display
batteries
(DTurn
off the
power switch,
remove
the two
screws
on the
back
of the
unit
and
take
off the
back
cover.
Please
refer
the
figure
shown below.
(2)
Remove
screw
(§)
and
remove
the
battery-retaining plate.
(3)
Take
out the
both
old
batteries.
(4)
Wipe
the
surfaces
of the two new
batteries well
with
a dry
cloth
and
insert them
with
their
(+)
sides
(flat
sides)
on
top.
(5)
Hold
down
the new
batteries
with
the
battery-retaining plate
and
replace
screw
® .
(6)
Hook
the
back
cover
claw
to the
main
body
and
replace
the two
screws.
"Be
sure
to
rep/ace
both
batteries.
2.
Memory backup battery
Turn
off the
power switch
and
follow
the
same
procedure
as in
trm
(MM
nt
main
hnltRry
replacement, beginning
by
removing
screw
(g).
Replace this
auxiliary
Imtlmy
eivnty
2
years
irrespective
Of
main
battery
replacement.
Note:
If the
main batteries
for
calculation/display
and the
auxiliary battery
for
memory
beck
up
are
removed
at the
same
time,
the
memory contents
will
be
lost.
Be
sure
to
keep
either
in
place.
*
Never
throw
the old
batteries
into a fire.
This
is
very
dangerous
because
they
are
likely
to
explode.
*
Never confuse
the (+) and
(-)
sides
of the
batteries.
Store
the
batteries
out of
reach
of
infants.
If an
infant
swallows a battery,
consult
a
physician
at
once.
This
is an
automatic power saving
function
for
preventing wasteful power consumption
that
will
result should
you
forget
to
turn
off the
power switch.
The
power supply
is
automatically
cut off
about 6 minutes after
completion
of
operation.
In
this
case,
power
can be
resumed
by
pressing
the
c*jjokey
or
turning
the
power switch
off and
then
on
again.
*
Even when
the
power
is
off,
independent
memory
and
data memory contents
are
retained. However, mode designations ( ua , H , Hmo*,
etc.)
are
canceled except
that
of the
finger
input
mode
( D ).
Adjustment
of
display contrast
can be
performed using
the
adjustment
control
located
on
the
right
side
of the
unit.
Turn
in the
direction
of the
arrow
to
increase contrast.
Turn
in the
opposite
direction
to
reduce contrast. This
is
used
to
compensate contrast
of
the
display
in
accordance
with
battery capacity
or to
adjust
to
compensate
for the
viewing angle.
The
RAM
area
of
this
calculator's
data
memory
is
929
charactun
(•|I|IMIM|MIM|H|V 1 kilo-
byte),
but the
addition
of the
optional
RAM
Pack
(OR-20)
Incrnnwi*
Urn
ninn
to
2977
characters
(approximately 3 kilobytes).
•
How
to
install
the RAM
pack
(OR-20)
<Preparation>
If the RAM
pack
is-
handled carelessly,
its
internal
circuit
may bo
diMtrnyiNl
by
Mntlr
electricity.
Therefore, before handling
the
pack, touch a door knob
or
nihm
motiillic
object
to
discharge
the
electrostatic
charge
contained
in
your body.
<Procedure>
1)
Turn
off the
power supply.
(Power
switch
-»
OFF)
2)
Remove
the two
screws
on the
back
and
take
off the
back
cover.
(See
page
5)
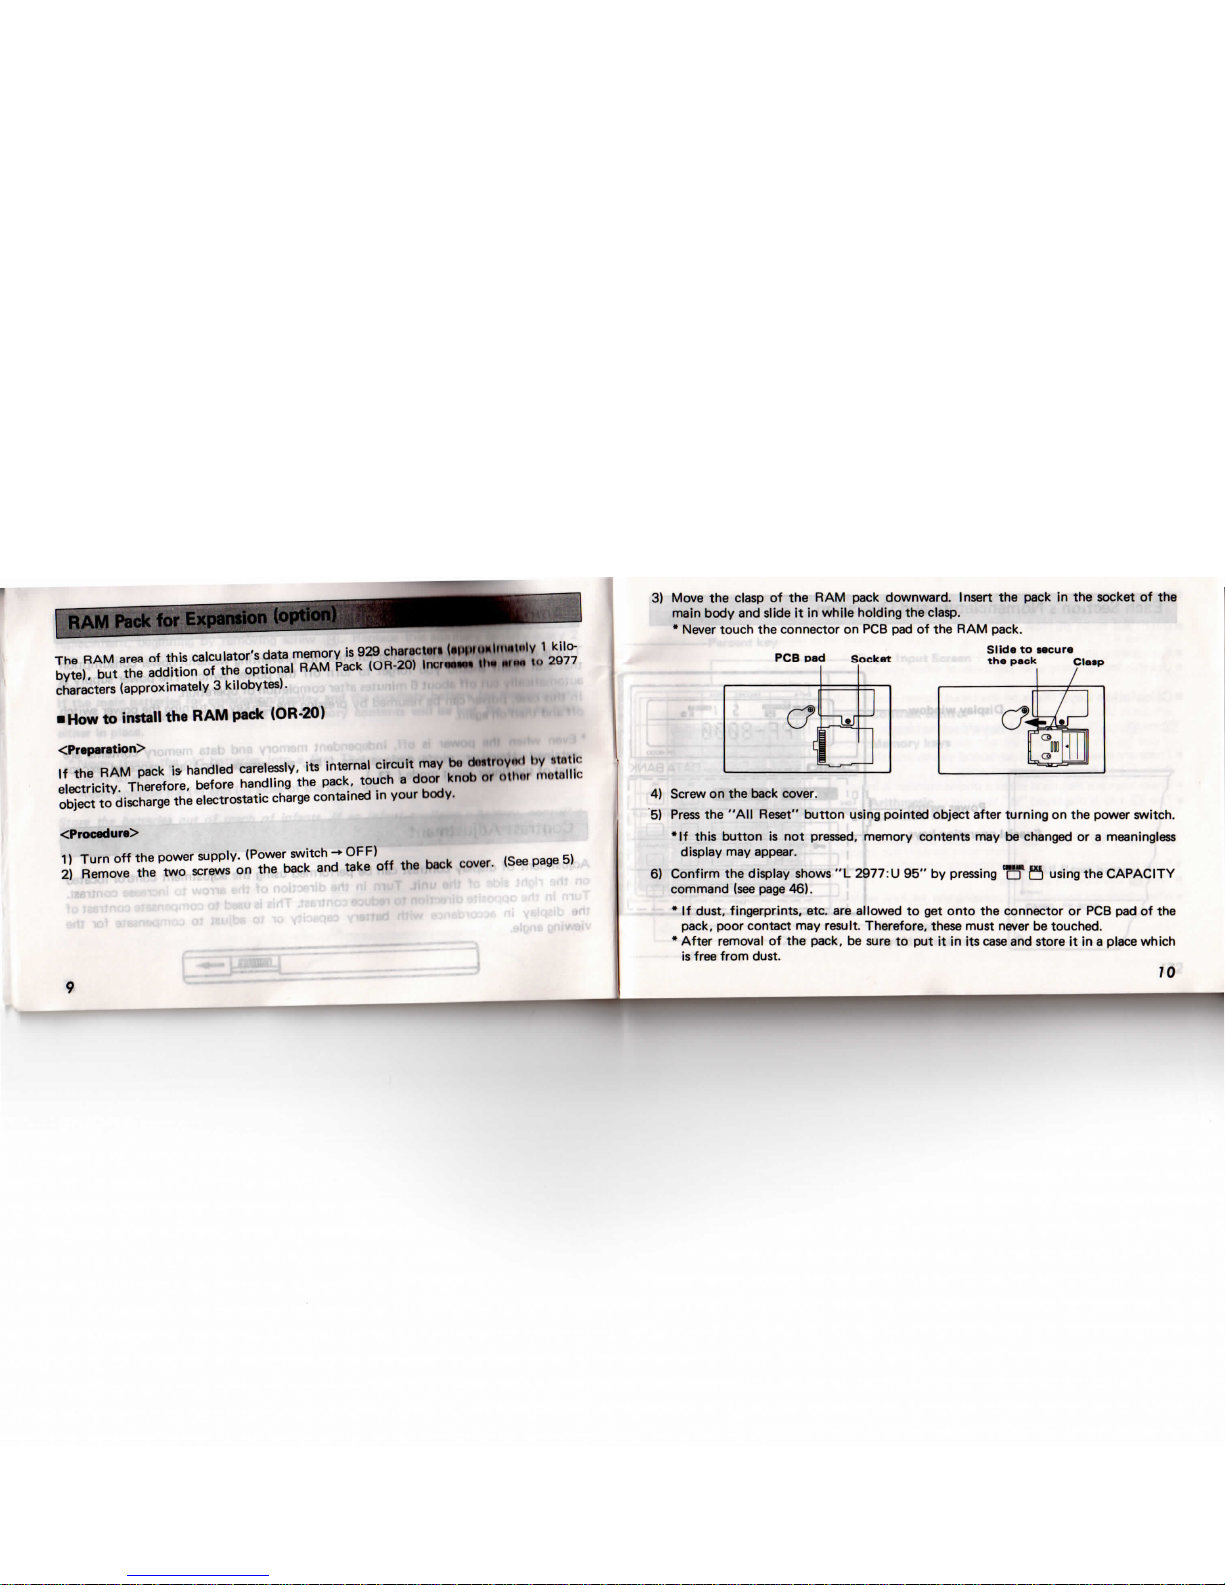
3)
Move
the
clasp
of the RAM
pack
downward. Insert
the
pack
in the
socket
of the
main body
and
slide
it in
while
holding
the
clasp.
*
Never
touch
the
connector
on PCB pad of the RAM
pack.
PCB
pad
Socket
Slide
to
secure
the
pack
Clasp
4)
Screw
on the
back cover.
5)
Press
the
"All Reset"
button
using
pointed
object after
turning
on the
power switch.
•If
this
button
is not
pressed, memory contents
may be
changed
or a
meaningless
display
may
appear.
6)
Confirm
the
display shows
"L
2977:11
95" by
pressing
"cf H using
the
CAPACITY
command
(see
page
46).
* If
dust, fingerprints, etc.
are
allowed
to get
onto
the
connector
or PCB pad of the
pack,
poor contact
may
result.
Therefore, these must
never
be
touched.
*
After removal
of the
pack,
be
sure
to put it in its
case
and
store
it in a
place
which
is
free from dust.
70
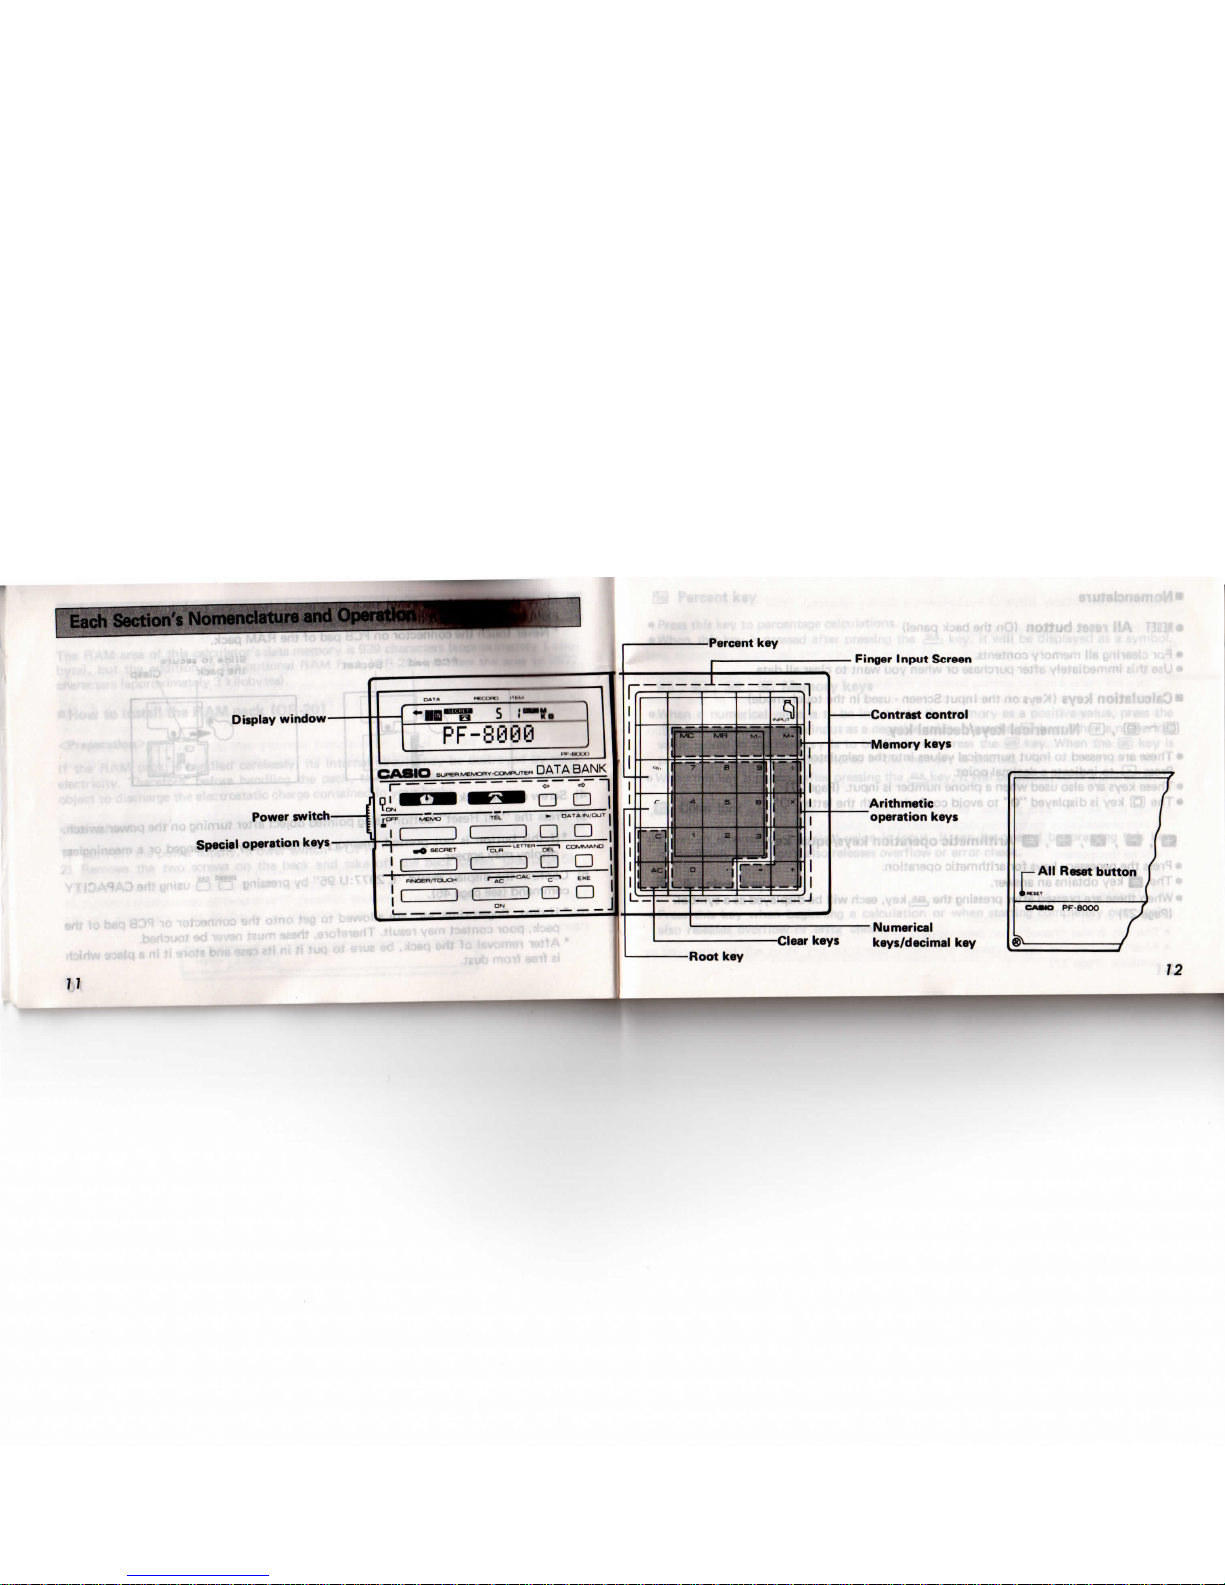
ismok
Display
window
Power
switch
Special
operation
keys
-^s^"-^— L __j
|
-•in-f? s i—
ir.
n
PF-8000
J
*
CASIO
SUP.PK-~.~~~~™
DATA BANK
r-^~^~
^_—
^— ° "
~l
[OFF
MEMO
TEL
*°
OATAIIM/LJLJ
.«
secner
rS^-^«"«"-SP
COMMAND
FINGER/TOUCH
1
Ac
C
C
e"c
1
1
1
1
1
1
1
1
!
i
L
•"
X
r
cl
1
>C|
_
J
!«-
1
1
1
1
1
1
—
1
1
—
~~
~~~
~
1
3
•o!,'
~3Bd
'>!
int
key
r^_.__.
i
t^/m
,s
a
j
r
•1
—
i
"-.
s|
1
B:
;
^B
«
q
'—
MT
5
is
;:;
-
-•
—
— — ^ — — —
Cle:
'
Root
key
-.1
1
1
1
1
-J
r
kei
o
Contrast
control
Memory
keys
Arithmetic
operation keys
Numerical
f*
keys/decimal
key
no»uri
311
O3
y'0^"
^
isttf
-*-
U
-
3VA
0
rc|
p-
All
Reset
button
j
•
KSET
(
CAKO
PF80OO
r
Sv. . .-J
i
•
Nomenclature
•
RESET
All
reset
button
(On the
back panel)
• For
clearing
all
memory
contents.
•
Use
this immediately after purchase
or
when
you
want
to
claar
.ill
data.
•Calculation
keys
(Keys
on the
Input
Screen-
used
in the
touch
modi.)
EO ~ (D , Q
Numerical keys/decimal
key
•
These
are
pressed
to
input
numerical
values
into
the
calculator.
Press
(Zl
to
indicate a decimal
point.
•
These keys
are
also
used
when a phone number
is
input.
(Puu<>
27)
•
The O key is
displayed
"0" to
avoid confusion
with
the
lottot
"O".
Q f B
, a , B , B Arithmetic operation
keys/equal
key
•
Press
the
necessary
keys
for
arithmetic operation.
•
The B key
obtains
an
answer.
•
When these
are
pressed after pressing
the
^key,
each
will
be
displayed
as a symbol.
(Page
27)
(%)
Percent
key
•
Press
this
key
to
percentage
calculations.
•
When
this
key is
pressed after pressing
the
,
("») , ®
Memory
keys
>
key,
it
will
be
displayed
as a
symbol.
•
When a numerical value
is to be
input
into
the
memory
as a
positive
value, press
the
(M+|
key. When
it is to be
input
as a
negative value, press
the B
key. When a numerical
value
stored
in the
memory
is to be
displayed,
press
the
|«5)
key. When
the
(Sc|
key is
pressed,
the
numerical value stored
in the
memory
is
deleted.
•
When
this
key is
pressed
after
pressing
the
^key,
it
will
be
displayed
as a character.
B
Clear
key
•
When
an
erroneous numerical value
is
input,
it can be
cleared
by
pressing
this
key
immediately after
input;
also
releases
overflow
or
error check.
BD
All
clear
key
•
Press
this
key
when beginning a calculation
or
when starting
completely
over again;
also
releases
overflow
or
error check.
14

•Special
operation
keys
(Keys
below
the
display
window)
T=3
Finger/Touch mode
key
•
Finger mode
( a
mark
appears)
— 48
types
of
characters
(alphabot,
iiiiiniiniK
;md
symbols)
can be
input
by
finger
writing
using
the
Input
Screen.
There
are
many kinds
of
writing
forms
in the
world.
This
unit
recognizes
only
standard alpha-numeric characters
written
in
tho
(onns
shown
on
page
21.
•
Touch
mode
( a
mark disappears) — Numerical
and
arithemetic
operation
keys
on
the
Input
Screen
can be
input.
(Symbolized here
as ED ).
"a"
Data
input/output
mode
key
•
Press
this
key for
data
storage,
no
will
be
displayed
and
data
can be
input . This
key
is
also
pressed
with
performing data correction
or
deletion.
(Page
35, 36)
• If
this
key is
pressed
while
ra is
displayed,
na
will
disappear
and the
output
mode
will
be
designated.
(Symbolized here
as
S ).
e=i
Display clear
key
•
Press
this
key to
clear
the
display.
•
This
key is
also
pressed when
deleting
data.
(Page-36,
42)
•
After
this
key has
been pressed,
arithmetic
operation
key
input
will
be
displayed
as
, c symbols.
(Page
27)
a , a Cursor keys
•
Press
these
keys
when
the
cursor
position
is to be
shifted.
When
one of
these keys
is
pressed
once, a shift
of one
display
location
results.
If it
remains depressed,
the
shift
is
automatically repeated.
a
Delete
key
•
Press
to
delete
one
character
to the
left
of the
blinking cursor.
(Page
28)
'•"-'"
Command
key
•
Each
time
this
key is
pressed, five commands
are
displayed.
•
When
the
desired
command
is
displayed,
press
the o key and the
command
will
be
executed.
(Page
46)
• In the
input mode, after "BUZZER
ON(OFF)"
is
displayed
"AUTO
INPUT^"and
"AUTO
INPUTV
are
displayed
but
these commands can't
be
executed.
(Symbolized
here
as H .)
B
Execute
key
•
This
key is
used
to
execute
the
command specified using
the &
key.
(Page
46)
crbTEL
input/output
key
•
Press
this
key to
input/output
telephone numbers, etc.
(Page
26)
16
 Loading...