

Page 1

PA-2400W
C Library Manual
(V ersion 1.00)
CASIO Computer Co., Ltd.
Copyright ©1999. All rights reserved.
July 1999
Page 2

Table of Contents
Preface 4
Chapter 1 Supported Files 5
1.1 Dedicated Library and Utility 7
1.1.1 System Library 7
1.1.2 SIPanel Library 7
1.1.3 I/O Bootup Library 7
1.1.4 File Tra ns fer Utility 8
1.1.5 File Ch eck U tility 8
Chapter 2 Development Environment 9
Chapter 3 System Library 10
3.1 Overview 10
3.2 Details of Function 11
CA_BacklightOn 11
CA_BacklightOff 12
CA_BacklightCheck 13
SyncPowerOff 14
DisablePowerOff 15
EnablePowerOff 16
StatusPowerOff 17
ApoCountReset 18
SoftReset 19
SetPowerOnAlarm 20
GetPowerOnA larm 21
SetPowerEventStat 22
GetPowerEventStat 24
Chapter 4 SIPanel Library 25
4.1 Overview 25
4.2 Use of SIPanel Library 26
4.3 Restrictions 26
4.4 Details of Function 27
SIP_ExecutePanel 27
SIP_ShowPanel 28
4.5 SIPANEL .EXE 34
4.5.1 Overview 34
4.5.2 Options of Command Line 34
Chapter 5 I/O Bo otup L ibrary 35
5.1 Overview 35
5.2 Function 35
5.3 Details of Function 36
iobox_chk 36
5.4 Use of iobox_chk 37
5.5 Sample Program 38
Chapter 6 Registry of Libraries 42
6.1 System Library 42
6.2 SIPanel Library 42
Chapter 7 File T ran sfer U tility 43
7.1 Overview 43
7.2 List of Supported Commands 44
7.3 Use of FLCE 45
7.4 Termination of FLCE 45
7.5 Restrictions 46
7.6 Communication Commands 47
2
Page 3

Chapter
7.7 Method of Describing Pathname 48
7.8 Conditions at Communication Partner 50
7.8.1 Rules of Naming File and Directory Pathname 50
7.9 Setting Up Registry 51
7.9.1 Setting Up Items 51
7.9.2 Setting Up Registry with User Application 52
7.10 Termination Codes 54
7.11 Log File 56
7.12 Precautions 57
7.13 Details of Command and Option 58
FLCE /Y 58
FLCE /S 59
FLCE /R 60
FLCE /A 61
FLCE /D 62
FLCE /N 63
FLCE /T 64
FLCE (Idle Start) 65
7.14 Command and Status 66
7.15 Retry Process When Downloading File 67
7.15.1 Overview 67
7.15.2 Retry Method 67
7.15.3 Restriction 68
8 File Check U tility 69
8.1 Overview 69
8.2 List of Commands 69
8.3 Operation Method 70
8.4 Describing Method 72
8.4.1 Pathname 72
8.4.2 Rules of Naming File and Directory Pathname 72
8.5 Details about Command and Option 73
8.6 Command of FCHKCE 74
8.6.1 Generation of List File 74
8.6.2 Comparison by List File 75
8.7 Format of List File 76
8.8 Syntax Analysis of Script File 77
8.9 Error Messages/Codes 79
8.10 Restriction 80
8.11 Details of Command and Option 81
FCHKCE /G 81
FCHKCE /C 83
Microsoft, MS-DOS, and Windows are registered trademarks of Microsoft Corporation in the USA.
Other company, product and service names used in this manual may also be trademarks or service marks of
respective companies.
3
Page 4

Preface
This manual describes the C language-dedicated library functions and utilities that run on the CASIO
PA-2400W (hereinafter referred to as "H/PC", which stands for Handheld PC).
The PA-2400W uses the Windows CE operating system (Ver. 2.11), and uses the Win32 API functions to
generate user application programs. However, more functions may be required if generating a business
application, etc.
The C language-dedicated library functions and utilities described in this manual are used to support
functions that are not supported by the API functions.
Information about the Win32 API functions can be retrieved using the Help function in the Windows
95 system .
Win32 API Function
C language dedicated library, utility
(I/O bootup, FLCE, FCHKCE)
Available from
Microsoft
Available from
CASIO
4
Page 5

1. Supported Files
The following files will be supported by the C-library functions and utilities described in this manual.
Table 1.1
File Function Description
System Library
CasioSys.lib
CasioSys.h
CA_BacklightOn
CA_BacklightOff
CA_BacklightCheck
SyncPowerOff
DisablePowerOff
EnablePowerOff
StatusPowerOff
ApoCountRese t
SoftReset
SetPowerOnAlarm
GetPowerOnAlarm
SetPowerEventStat
GetPowerEventStat
Turns on the backlight.
Turns off the backlight.
Acquires the status of the backlight.
Turns off the power after completion of access to card.
Disables power off with the power button.
Enables power off with the power button.
Acquires the status of enable/disable power off with the
power button.
Resets the APO’s counter.
Performs soft-reset (warm-bootup).
Enables or disables power on with the alarm.
Acquires the status of enable/disable power on with the
alarm.
Enables or disables power-on notification.
Acquires the status of enable/disable power-on notification.
SIPanel Library
SIPanel.lib
SIPanel.h
SIPanel.dll (note 1)
SIPanel.ex e
(for individual
executi on)
SIP_ExecutePan el
SIP_ShowPanel
Starts up the SIPanel.
Displays the SIPanel on the LCD screen or erases it from
the screen.
I/O Bootup Library
Iobox1.lib
Iobox1.h
iobox_chk Checks the condition of connection between PA-2400W
and I/O Box, and acquires a result of the status.
Iobox1.dll
File Transfer Utility
FLCE.EXE Execution file
SND.LNK Shortcut for PA-2400W-to-PA-2400W communication
RCV.LNK Shortcut for PA-2400W-to-PA-2400W communication
IDLE.LNK Shortcut for idle
File Check Utility
FCHKCE.EXE Execution file
MAKE.LNK Shortcut for PA-2400W-to-PA-2400W communication
CHECK.LNK Shortcut for downloading AP
5
Page 6
Notes:
py
1. Since the “SIPanel.dll” and “SIPanel.exe” in English version are pre-installed in the ROM, you do not
need to install it every time you use the software input panel. However, if you use other language
versions of the SIPanel, you need to replace them.
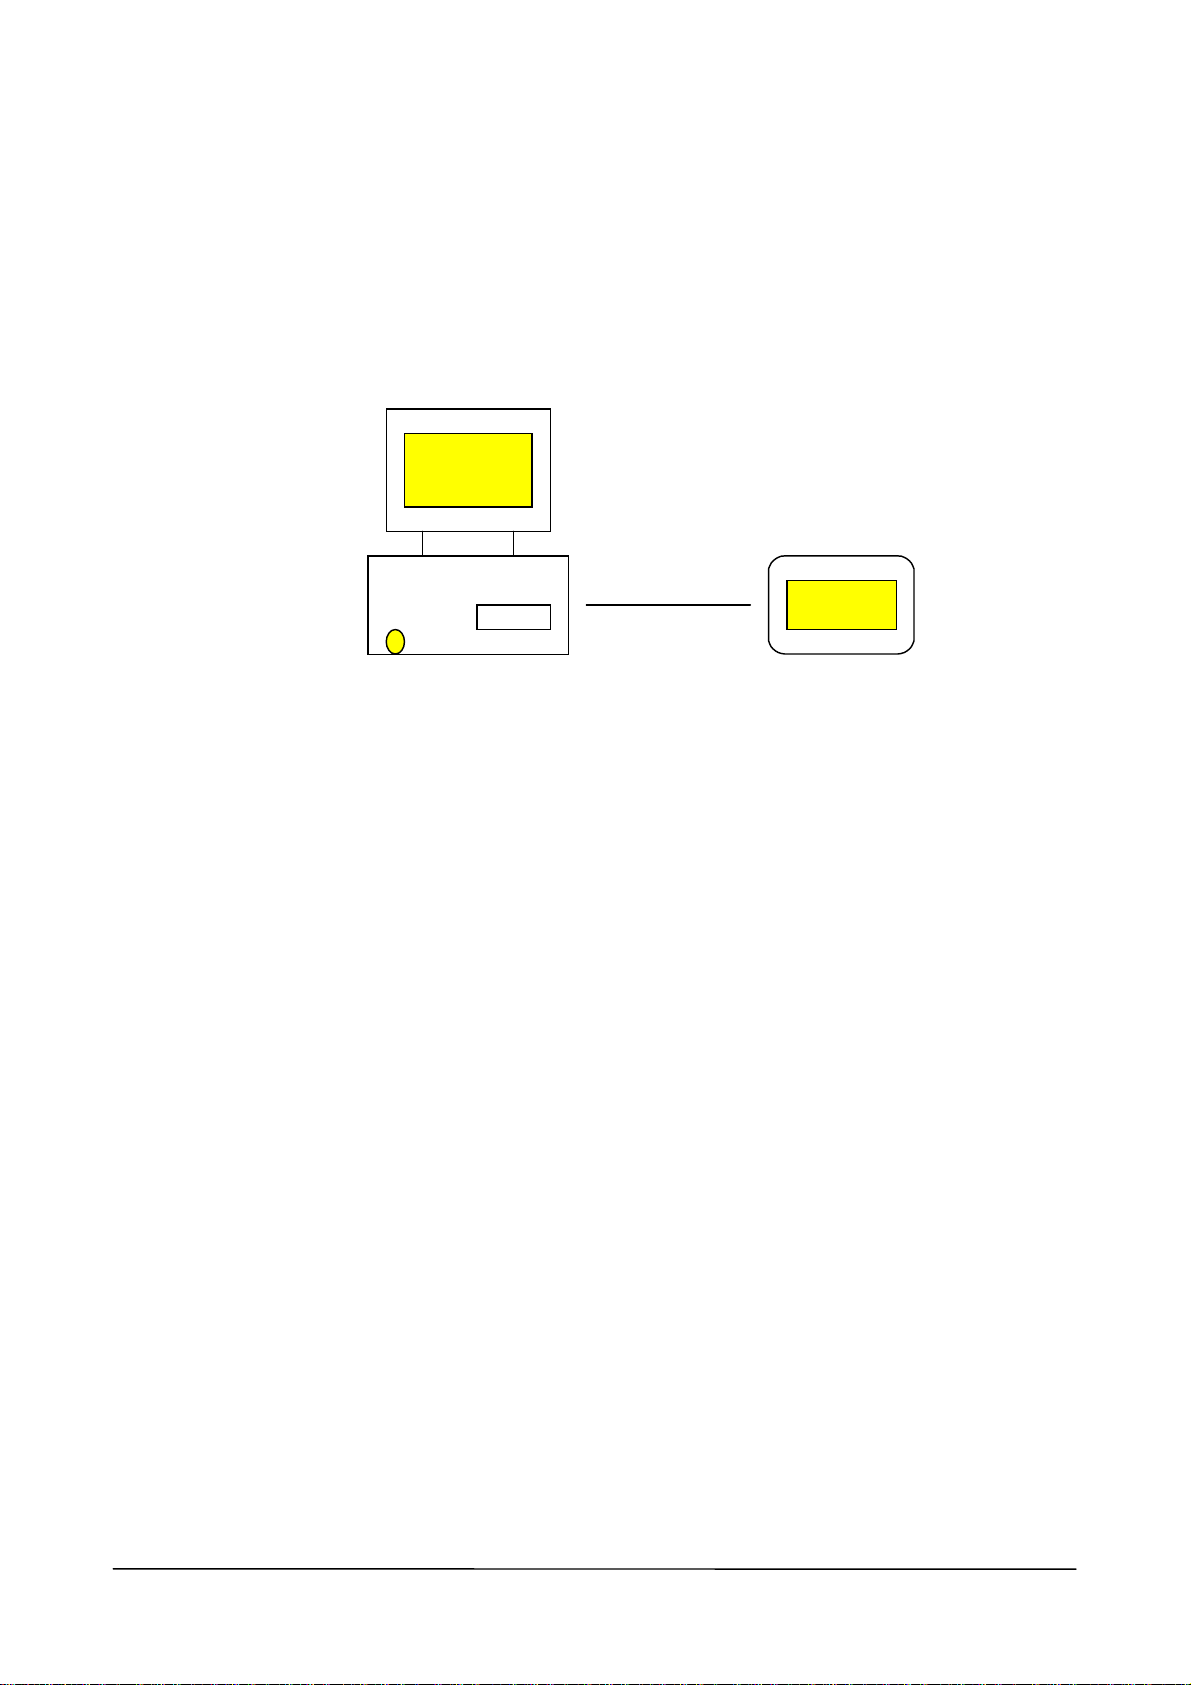
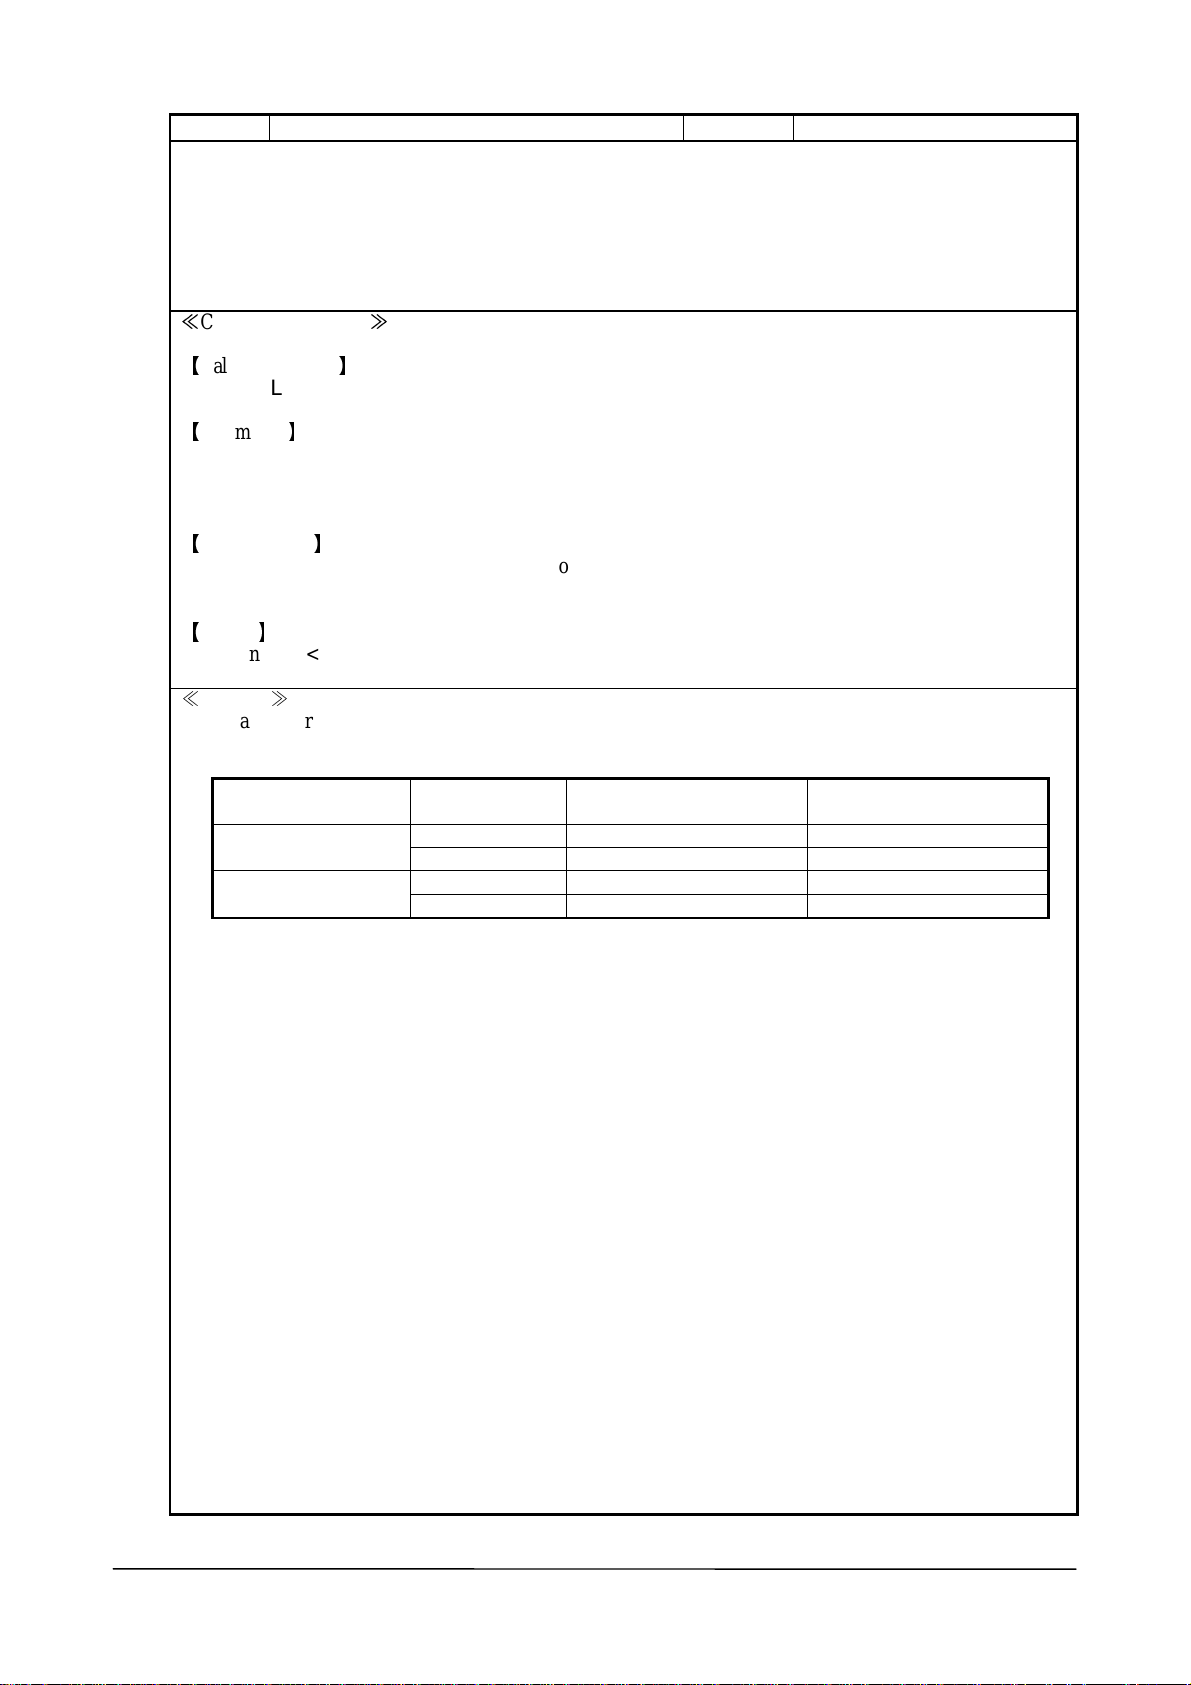
2. Each library function or utility command can be made available to the user when the DLL/EXE file is
copied into the Windows directory on the PA-2400W (see the figure below).
Host PC
PA-2400W
Co
Fig. 1.1 System configuration
6
Page 7

1.1 Dedicated Library and Utility
1.1.1 System Library
Table 1.2
No. Function Description Page
CA_BacklightOn
1
CA_BacklightOff
2
CA_BacklightCheck
3
SyncPow e r O f f
4
DisablePowerOff
5
EnablePowerOff
6
StatusPowerOff
7
ApoCountReset
8
SoftReset
9
SetPowerOnAlarm
10
GetPowerOnAlarm
11
SetPowerEventStat
12
GetPowerEventStat
13
Turns on the backlight. 11
Turns off the backlight. 12
Acquires the status of backlight. 13
Turns off after completion of access to a card. 14
Disables power off with the power button. 15
Enables power on with the power button. 16
Acquires the status of enable/disable power off with the
power button.
Resets the APO’s counter. 18
Resets the system and then starts up warm bootup. 19
Enables or disables automatic power on with the alarm. 20
Acquires the status of automatic power on with the alarm. 21
Enables or disables power on event notification. 22
Acquires the status of enable/disable power on event
notification.
17
24
1.1.2 SIPanel Library
Table 1.3
No. Function Description Page
SIP_ExecutePanel
1
2
SIP_Sh ow Pa n e l
Starts up the SIPanel. 27
Displays the SIP or erases it from the LCD screen. 28
1.1.3 I/O Bootup Library
Table 1.4 I/O Bootup library function
No. Function Description Page
iobox_chk
1
Monitoring the connection status of PA-2400W with I/O Box 36
7
Page 8

1.1.4 File Transfer Utility
Table 1.5 File transfer utility
No. Command Description Page
1 FLCE /Y Communication environment setup/Idle start 58
2 FLCE /S File transmission 59
3 FLCE /R File reception 60
4 FLCE /A File transmission (append) 61
5 FLCE /D File deletion 62
6 FLCE /N File move/F il e name m odifi ca tion 63
7 FLCE /T Time transmission 64
8 FLCE Idle start 65
1.1.5 File Check Utility
Table 1.6 File check utility
No. Command Description Page
1 FCHKCE /G Generation of a list file 81
2 FCHKCE /C Comparison of list files 83
8
Page 9

2. Development Environment
Your own application program can be developed by implementing the CASIO’s dedicated library functions
and utility commands listed in the previous pages under the following software development environment.
Microsoft Visual C/C++ version 6.0
Microsoft Windows CE Toolkit for Visual C/C++ 6.0
Windows CE version 2.11 SDK (US version)
9
Page 10

3. System Libr ary
3.1 Overview
This System Library functions can provide you with various dedicated functions such as backlight control,
power OFF supplement control, power-ON control with alarm, etc.
These functions to be described in the next pages are developed only for the PA-2400W and therefore not
guaranteed for use with other hardware platforms. Also, please note that it is not a Windows CE generalpurpose library.
10
Page 11
3.2 Details of Function
g
Title Function
Turns on the backlight. If this function is called while the backlight is already on, nothing will happen.
C Language Interface
Calling Sequence
BOOL CA_BacklightOn ()
Parameters
Return Values
Header
Remarks
The automatic backlight off will be remained active after this function is called. Duration of the automatic
backli
at the control panel, the function cannot be activated.
During an event of low battery, the backlight still can be turned on. However, because of inrush current at
a time of turning on the backlight, the power of PA-2400W may be turned off. Always observe the battery
condition before activation of the backlight.
None
TRUE : Normal end
#include <CasioSys.h>
ht off can be set at the control panel. For example, if the automatic backlight off is se t to “disa bl e mo de”
CA_BacklightOn
11
Page 12
Title Function
Turns off the backlight.
C Language Interface
Calling Sequence
BOOL CA_BacklightOff()
Parameters
None
Return Values
TRUE : Normal end
Header
#include <CasioSys.h>
Remarks
This function can turn off the backlight which is turned on by a keyboard operation.
CA_BacklightOff
12
Page 13
Title Function
Acquires the status of the backlight if it is set to on or off.
C Language Interface
Calling Sequence
BOOL CA_BacklightCheck()
Parameters
None
Return Values
TRUE : Backlight is on.
FALSE : Backlight is off.
Header
#include <CasioSys.h>
Remarks
CA_BacklightCheck
13
Page 14

Title Function
Turns off the power after access to an installed card is complete.
C Language Interface
Calling Sequence
BOOL SyncPowerOff()
Parameters
None
Return Values
TRUE : Normal end.
Header
#include <CasioSys. h>
Remarks
SyncPow e r Of f
14
Page 15
Title Function
DisablePowerOff
Disables power-off with the power button. This setting is cleared when the power is turned on.
C Language Interface
Calling Sequence
BOOL DisablePowerOff()
Parameters
None
Return Values
TRUE : Normal end.
Header
#include <CasioSys. h>
Remarks
15
Page 16

Title Function
Enables the power to be turned off with the power button.
C Language Interface
Calling Sequence
BOOL EnablePowerOff()
Parameters
None
Return Values
TRUE : Normal end.
Header
#include <CasioSys. h>
Remarks
EnablePowerOff
16
Page 17
Title Function
StatusPowerOff
Acquires the status of “enable/disable the power to be turned off with the power button”.
C Language Interface
Calling Sequence
BOOL StatusPowerOff()
Parameters
None
Return Values
FALSE : Disable “the power to be turned off with the power button.”
TRUE : Enable “the power to be turned off with the power button.”
Header
#include <CasioSys. h>
Remarks
17
Page 18
Title Function
ApoCountReset
Resets the counter of APO time.
By calling this function before elapse of the APO time set at the control panel, APO can be disabled.
C Language Interface
Calling Sequence
BOOL ApoCountReset()
Parameters
None
Return Values
TRUE : Normal end.
Header
#include <CasioSys. h>
Remarks
18
Page 19
Title Function
SoftReset
Resets the system. After this function is called, a worm-bootup is performed.
C Language Interface
Calling Sequence
void SoftReset()
Parameters
None
Return Values
None
Header
#include <CasioSys. h>
Remarks
When this function is called, a warm-bootup is immediately performed. This will cause file and data being
accessed to be erased. All files and devices being currently opened must be closed before this function is
activated.
19
Page 20
Title Function
SetPowerOnAlarm
Enables or disables “the automatic power-on to be activated with the alarm”.
C Language Interface
Calling Sequence
BOOL SetPowerOnAlarm ( BOOL bMode);
Parameters
BOOL bMode
FALSE : Disables “automatic power-on with the alarm”.
TRUE : Enables “automatic power-on with the alarm”. (default)
Return Values
TRUE : Normal end
FALSE : Internal error
Header
#include <CasioSys. h>
Remarks
Related operations to the “automatic power-on” after this function is implemented are as follows.
Table 3.1
Setup of
“SetPowerOnAlarm”
disable d
enabled
Setup at Control
panel
When the power of PA-
2400W is turned on
When the power of PA-
2400W is off
Alarm off Alarm cannot be activated. No “automatic power-on”“automatic power-on”
Alarm on Alarm can be activated. No “automatic power-on”
Alarm off Alarm cannot be activated. No “automatic power-on”“automatic power-on”
Alarm on Alarm can be activated. Yes “automatic power-on”
20
Page 21
Title Function
GetPowerOnAlarm
Acquires the status of “automatic power-on with the alarm” if it is disabled or enabled.
C Language Interface
Calling Sequence
BOOL GetPowerOnAlarm()
Parameters
None
Return Values
TRUE : Enable “automatic power-on with the alarm”.
FALSE : Disable “automatic power-on with the alarm”.
Header
#include <CasioSys. h>
Remarks
21
Page 22
Title Function
Sets “power-on event notification” enabled or disabled.
C Language Interface
Calling Sequence
BOOL SetPowerEventStat( BOOL bMode)
Parameters
BOOL bMode
TRUE : Enable “power-on event notification”.
FALSE : Disable “power-on event notification”. (default)
Return Values
TRUE : Normal end
FALSE : Failure in opening registry
Header
#include <CasioSys. h>
SetPowerEventStat
Remarks
Settings by using this function remain active even after a RESET is performed.
22
Page 23

Sample program to acquire power-on event notification
#include <windows.h>
static HANDLE hEv en tOn = NULL;
static HANDLE h Threa dOn = NUL L ;
DWORD WINA PI On Th r ea d()
{
LONG WaitReturn;
While (1 ) {
WaitRetu rn = W aitF orS ingl eOb ject(h Ev en ton, INF INITE );
If (WaitReturn == WAIT_OBJECT_0) {
MessageBox(NULL, TEXT(“PowerONEvent”), TEXT(“Event”), MB_OK);
}
ResetEvent(hEventOn);
}
return 0;
}
BOOL Initialize()
{
DWORD ThreadIDOn;
hEventOn = CreateEvent(NULL, TRUE, FALSE, TEXT(“PA_OnEvent”));
if( !hEventOn )
{
return(FALSE);
}
hThreadOn = CreateThread(NULL, 0, OnThread, 0, 0, &ThreadIDOn);
if(!hThreadOn)
{
return(FALSE);
}
return(TRUE);
}
int WINAPI WinMain(HINSTANCE hInstance, HINSTANCE hPrevInstance, LPSTR lpCmdLine, int nCmdShow)
{
if(Initialize() ) {
MessageBox(NULL, TEXT(“Initialize Success”), TEXT(“Initialize”), MB_OK);
While (1 ) {
Sleep(1000);
}
return(TRUE);
}
else {
MessageBox(NULL, TEXT(“Initialize Error”), TEXT(“Initialize”), MB_OK);
return(FALSE);
}
}
23
Page 24

Title Function
Acquires the status of “power-on event notification” if it is enabled or disabled.
C Language Interface
Calling Sequence
BOOL GetPowerEventStat()
Parameters
None
Return Values
TRUE : Enable notification.
FALSE : Disable notification.
Header
#include <CasioSys. h>
Remarks
GetPowerEventStat
24
Page 25
4. SIPanel Library
4.1 Overview
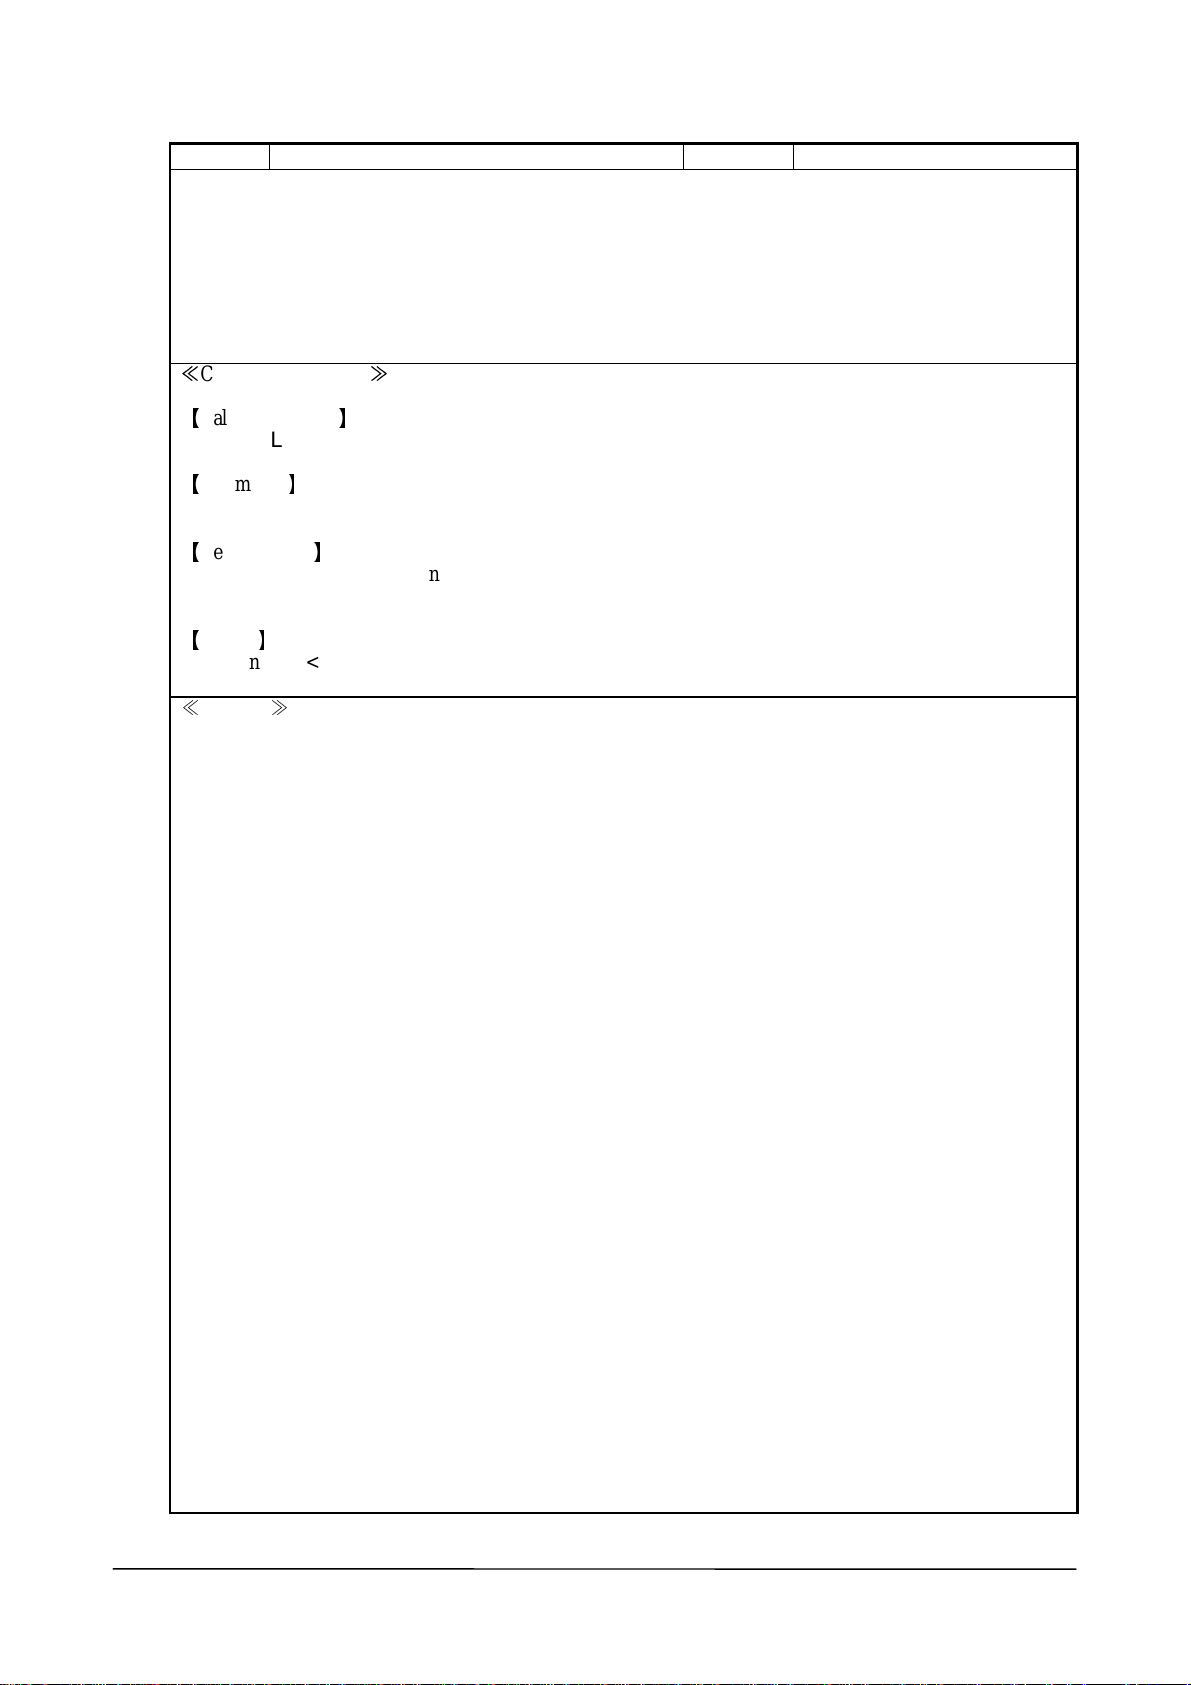
In this chapter, the SIPanel which is executed on the Windows CE Ver.2.11 (on PA-2400W), and the DLL
(Dynamic Link Library) which is called from a user application are described.
Fig. 4.1 System configuration (Windows CE Ver. 2.11)
User
application
SIPANEL.DLL
SIPANEL.EXE
Operation of this library requires the following files:
Table 4.1
File Name Operation environment Description
sipanel.dll Windows CE ver. 2.11 (SH3) Execution management library for starting up SIPanel
sipanel.exe Windows CE ver. 2.11 (SH3) Execution program for starting up SIPanel
Use the following files if developing a user application that controls the SIPanel with the execution
management library of this system.
Output to windows
with forcus
SIPanel
keyboard screen
Input by tapping
Table 4.2
File Name Operation environment Description
sipanel.lib
sipanel.h
Windows CE ver. 2.11 (SH3) Import library and header file for calling sipanel.dll
25
Page 26

4.2 Use of SIPanel Library
Program for starting up the library
Before use of the SIPanel library, a dedicated program must be created to start up the library. The
following is the method to call.
Create a dedicated program to call the library, separate from application program for business use. This
dedicated program must be programmed so that the SIPanel library is called when a message is released
by the application program to the dedicated program. It should be stored in the root directory of “My
Handheld PC”.
Avoid having the application program to call directly the SIPanel library. Instead, always use such the
method that a message released by the application program can make the dedicated program start up the
library.
A sample program for the dedicated program mentioned above is on page xxx. You may refer to it to
create your own dedicated program of calling the library.
Registry
After a dedicated program is created, the registry of the SIPanel must be rewritten to the following values.
The values can be changed with “RegSetValueEx” function of Win32API.
Key name : LocalMachine\Software\Apps\SIPManager
SIPExeName = sipanel.exe -> SIPExeName = a name of the dedicated program
By having the registry values to be re-written, a user created p rogram to start up the SIPanel can be also
possible when the SIP button at upper-left corner of the PA-2400W is pushed. Or, if you wish to disable the
startup, delete the values of Key name above.
Once user’s own SIPanel startup program is created, the registry must be re-written (or the registry must be
deleted). Otherwise, it may crash to the original SIPanel star tup progra m of the built-in ROM when the S IP
button is pushed.
4.3 Restrictions
The SIPanel function is subject to the following restrictions.
The SIPanel screen may be hidden behind a display that is associated with an application, such as
PowerPoint, if one is used.
If the SIPanel library is called directly by application software, you may not be able to input characters
into an object input area. Always follow the method described in Chapter 4.2 “Use of SIPanel
Library” when it is called.
26
Page 27

4.4 Details of Function
Title Function
Initiation of the SIPanel
Initiates the SIPanel in the non-display mode. If it has already been initiated, it will be displayed as specified
by the parameters.
C Language Interface
Calling Sequence
int SIP_ Exe cut ePan el (LPC TST R lp Par am)
Parameters
/T1 Adds a text area. If keyboard character is touched once it will be temporarily displayed in the
/T0 Does not add a text area. (Initial condition default.)
/D1
/D3 Does not establish a drag area. Dragging is not possible.
/D0 or /D2 Establishes a drag area on the left side of the screen. (Initial condition default.)
/N2 Displays a panel that only contains numeric keys.
/N1 Adds numeric keys to the standard keyboard.
/N0 Does not add numeric keys to the standard keyboard. (Initial condition default.)
/L1 Activates the Caps Lock key.
/L0 Deactivates the Caps Lock key. (Initial condition default.)
/Px, y
/Sw, h
LPCTSTR lpParam:
Pointer to the parameters string. One specification unit consists of a '/' and an alphabet
(not case-sensitive) plus a numeral. To specify multiple units delimit them with a space
(order of specification unit does not matter). All parameters other than those listed below will
be ignored (invalid).
text area, and, if the Return key is touched, it will be transferred to a currently active window.
If the Return key is touched, it will be transferred to a currently active window.
Establishes a drag area in the upper section of the screen. This drag area is a range in which a
mouse event is detected if the display position of the SIPanel is modified.
Note:
If the drag area extends beyond the display range, dragging is no longer possible.
Specifies the coordinates of the top left corner of the SIPanel. "x" should be between 0 and
479 of the X-axis coordinate, and "y" should be between 0 and 239 of the Y-axis coordinate
"x" and "y" should be separated by a comma (","). The default values are x=0 and y=0.
Specifies the width and height of the SIPanel to be displayed. "w", the width, should be
between 1 and 480, and "h", the height, should be between 1 and 240. "w" and "h" should be
separated by a comma (","). The default values are w=288 and h=100.
Note:
If values that are too small are specified, tapping the panel has no effect and, consequently,
a key input is not possible.
SIP_ExecutePanel
Unless otherwise specified, the parameters will retain their previous values.
If SIPanel is initiated without a parameter being specified, the following condition is employed for the defaults.
SIP_ExecutePanel (L"/T0 /D0 /N0 /L0 /P0,0 /S288, 100");
Return Values
SIP_NO_ERROR
SIP_SHOW
SIP_HIDE
Header
#include <SIPanel. h>
Remarks
The SIPanel screen may be hidden (HIDE state) if the function is called while the SIPanel is displayed.
During the HIDE state, if the function is called without specifying parameters, the SIPanel will be
displayed in the same mode specified by previous setting parameters.
: Normal termination
: Normal initiation, the SIPanel is in the display mode.
: Normal initiation, the SIPanel is in the non-display mode.
27
Page 28

Title Function
SIP_Sh ow Pa n e l
Display/Non-display of the SIPanel
Sets the SIPanel to display mode or non-display mode.
C Language Interface
Calling Sequence
int SIP_ShowPanel (int iCmdShow)
Parameters
int iCmdShow SIP_SHOW : Displays the SIPanel if it is in the non-display mode.
SIP_HIDE : Hides the SIPanel if it is in the display mode.
Return Values
SIP_NOT_FOUND : SIPanel is not initiated.
SIP_SHOW : SIPanel is being displayed.
SIP_HIDE : SIPanel is hidden (not displayed).
Header
#include <SIPanel. h>
28
Page 29

Sample program to start up the SIPanel
This is a source program of SipTsr.exe which must be used together with “CallSip.exe”.
// SipTsr.cpp : Defines the entry point for the application. //
#include “stdafx. h”
#include “SIPanel. h”
TCHAR ClassName[] = TEXT(“SipTsr”);
// ***************************************************************************************//
// WndProc //
// ***************************************************************************************//
LRESULT CALLBACK WndProc(HWND hwnd, UNI T message, WPARAM wParam, L PARAM IParam)
{
switch (message) {
case (WM_USER + 1): //ten-key SIPanel
SIP_ExecutePanel( TEXT(“/N2 /T0 /P200.0 /S180, 120”));
break;
case (WM_USER + 2); //SIPanel with text area
SIP_ExecutePanel( TEXT(“/T1 /N0 /P0, 0 /S320, 120”));
break;
case WM_DESTROY:
PostQuitMessage(0);
return 0;
}
return defWindowProc(hwnd, message, wParam, lParam);
}
// ***************************************************************************************//
// InitApplication //
// ***************************************************************************************//
BOOL InitApplication (HINSTANCE hInstance)
{
WINDCLASSW wc;
BOOL f;
wc.style = CS_HREDRAW | CS_VR EDRAW;
wc. lpfnWndProc = WndProc;
wc.cbClsExtra = 0;
wc. cbWndExtra = DLGWINDOWEXTRA;
wc. hInstance = hInstance;
wc. hIcon = NULL;
wc. hCursor = NULL;
wc. hbrBackground = (HBRUSH) GetStockObject(LTGRAY_BRUSH);
wc. lpszMenuName = NULL;
wc. lpszClassName = ClassName;
f= (RegisterClass(&wc));
return f;
}
// ***************************************************************************************//
// InitInstance //
// ***************************************************************************************//
BOOL InitInstance(HINSTANCE hIntance, int nCmdShow)
{
HWND hWnd;
hWnd = CreateWindow( ClassName, NULL, WS_OVERLAPPED, 0, 0, 0, 0, NULL, NULL, hInstance,
NULL);
29
Page 30

if (hWnd == 0) // Check whether values returned by CreateWindow() are valid.
return (FALSE);
if (lsWindow(hWnd) != TRUE)
return (FALSE);
return(TRUE); // Window handle hWnd is valid.
}
// ****************************************************************************************//
// WinMain //
// ****************************************************************************************//
int WINAPI WinMain( HINTANCE hInstance.
HINSTANCE hPrevInstance,
LPTSTR lpCmdLine,
int ncmdShow)
{
MSG msg;
HWND hWnd;
long lResult;
HKEY hKeyResult;
TCHAR TsrName[] = TEXT(“SipTsr .exe”);
if ( hWnd = FindWindow( ClassName, NULL)) {
SIP_Exe cut ePa nel ( TE XT( “”) );
return FLASE;
}
if (hPrevInstance == 0) {
if (InitApplication(hInstance) == FALSE)
return(FALSE);
}
if (InitInstance(hInstance, nCmdShow) == FALSE)
return(FALSE);
lResult = RegOpenKeyEx( HKEY_LOCAL_MACHINE, // Open Registry
TEXT( “Software\\Apps\\SIPManager”),
0, KEY_WRITE, &hKeyResult);
if ( lResult != ERROR_SUCCE SS)
return(FALSE);
lResult = RegSetValueEx( hKeyResult, // Write Registry
TEXT( “SIPExeName”), 0, REG_SZ,
( unsigned char *)TsrName , sizeof( TsrName));
if ( lResult !=ERROR_SUCCESS)
return(FALSE);
RegCloseKey( hKeyResult); // Close Registry
While (GetMessage(&msg, NULL, 0, 0) == TRUE) {
DispatchMessage (&msg);
}
return TRUE;
}
30
Page 31

Sample program of application software for business use
Install “SipTsr.exe”, and execute the following program.
// CallSip.cpp : Defines the entry point for the application.//
#include <Winuser.h>
#include "stdafx.h"
#define IDC_BTN_TEN 1
#define IDC_BTN_TEXT 2
#define IDC_EDIT 3
HINSTANCE hInst; // The current instance
TCHAR ClassName[] = TEXT( "CallSip"); // Class name of this program
TCHAR ClassName_TSR[] = TEXT("SipTsr"); // Class name of "SipTsr"
HWND hbCallTen;
HWND hbCallText;
HWND heT ext;
BOOL CallSip( HWND, WP ARAM);
// ***************************************************************************************//
// WndProc //
// ***************************************************************************************//
LRESULT CALLBACK WndProc(HWND hWnd, UINT message, WPARAM wParam, L PARAM lParam)
{
switch (message) {
case WM_COMMAND:
if ( HIWORD(wParam ) == BN_ CLICKED) {
CallSip( hWnd, LOWORD(wParam));
SetFocus( heText);
}
break;
case WM_CREATE:
hbCallTen = CreateWindow( TEXT("button"), TEXT("Ten-key"),
( WS_CHILD | WS_VISIBLE | BS_PUSHBUTTON), 20, 80, 90, 30,
hWnd, (HMENU)IDC_BTN_TEN, (HANDL E)hInst, NULL);
hbCallText = CreateWindow( TEXT("button"), TEXT("Text Area"),
( WS_CHILD | WS_VISIBLE | BS_PUSHBUTTON), 120, 80, 90, 30,
hWnd, (HMENU)IDC_BTN_TEXT, (HANDLE)hInst, NULL);
heText = CreateWindow( TEXT("edit"), TE XT("\0"),
( WS_CHILD | WS_VISIBLE | WS_BORDER | ES_NOHI DESEL),
20, 40, 200, 20, hWnd, (HMENU)IDC_EDIT, hInst, NULL);
break;
case WM_DESTROY:
PostQuitMessage(0);
return 0;
}
return DefWindowProc(hWnd, message, wParam, lParam);
}
// ***************************************************************************************//
// InitApplication //
// ***************************************************************************************//
BOOL InitApplication (HINSTANCE hInstance)
{
WNDCLASSW wc;
31
Page 32

wc.style = CS_HREDRAW | CS_VREDRAW;
wc.lpfnWndProc = WndProc;
wc.cbClsExtra = 0;
wc.cbWndExtra = DLGWINDOWEXTRA;
wc.hInstance = hInstance;
wc.hIcon = NULL;
wc.hCursor = NULL;
wc.hbrBackground = (HBRUSH) GetStockObject(LTGRAY_BRUSH);
wc.lpszMenuName = NULL;
wc.lpszClassName = ClassName;
return (RegisterClass(&wc));
}
// ****************************************************************************************//
// InitInstance //
// ****************************************************************************************//
BOOL InitInstance(HINST ANCE hInstance, int nCmdShow)
{
HWND hWnd;
hInst = hInstance; // Store instance handle in our global variable
hWnd = CreateWindow(ClassName, ClassName,
( WS_VISIBLE | WS_OVERLAPPED | WS_SYSMENU),
0, 0, CW_USEDEF AULT, CW_USEDEFAULT, NULL, NUL L, hInstance, NULL);
if (hWnd == 0) // Check whether values returned by CreateWindow() are valid.
return (F ALSE);
if (IsWindow(hWnd) != TRUE)
return (F ALSE);
ShowWindow(hWnd, SW_SHOW);
UpdateWindow(hWnd);
return(TRUE); // Window handle hWnd is valid.
}
int WINAPI WinMain( HINSTANCE hInstance,
HINST ANCE h PrevInstance,
LPTSTR lpCmdLine,
int nCmdShow)
{
MSG msg;
if (hPrevInstance == 0) {
if (InitApplication(hInstance) == FALSE) {
NKDbgPrintfW( TEXT("CallSip : InitApp failed!\n"));
return(FALSE);
}
}
if (InitInstance(hInstance, nCmdShow) == FALSE) {
NKDbgPrintfW( TEXT("CallSip : InitInst failed!\n"));
return(FALSE);
}
while (GetMessage(&msg, NULL, 0, 0) == TRUE) {
TranslateMessage(&msg);
DispatchMessage(&msg);
}
return(msg.wParam);
}
32
Page 33

BOOL CallSip( HWND hWnd, WPARAM wId)
{
HWND hSip;
UINT CmdMessage = WM_USER;
hSip = FindWindow( ClassName_TSR, NULL); // Find "SipTsr"
if ( hSip == NULL) {
MessageBox( hWnd, TEXT("Error: FindWindow failed!"),
TEXT("SIPanel Sample"), MB_OK);
return F ALSE;
}
switch( wId) {
case IDC_BTN_TEXT:
CmdMessage++;
case IDC_BTN_TEN:
CmdMessage++;
break;
default:
return F ALSE;
}
SendMessage( hSip, CmdMessage, 0, 0); // Send message to SipTsr
return TRUE;
}
33
Page 34

4.5 SIPANEL.EXE
4.5.1 Overview
Initiate SIPANEL.EXE and call SIPANEL.DLL to control the SIPanel. The SIPanel will be initiated in the
non-display mode. If it has already been initiated, it will be displayed as specified by the command line
options. If it has already been displayed, it will be set to non-display and all parameters other than /Q will be
ignored.
4.5.2 Options of Command L ine
Format: sipanel.exe [/Q] [/T|0|1|] [/D|0|1|] [/N|0|1|] [/L|0|1|] [/Px,y] [/Sw,h]
One specification unit consists of a ' / ' and an alphabet (not case-sensitive) plus a number. To specify
multiple units delimit them by inserting a space after each unit (order of unit specification does not matter).
All parameters other than those listed below will be ignored (invalid).
/T1 ......... Adds a text area. If keyboard character is touched once it will be temporarily displayed in
the text area, and, if the Return key is touched, it will be transferred to a currently active
window.
/T0 ........ Does not add a text area. (Initial condition default.)
/D1 ....... Establishes a drag area in the upper section of the screen. This drag area is a range in which
a mouse event is detected if the display position of SIPanel is modified.
Note:
If the drag area extends beyond the display range, dragging is no longer possible.
/D3 ......... Does not establish a drag area. Dragging is not possible.
/D0 or /D2
/N2 ........ Displays a panel that only contains numeric keys.
/N1 ........ Adds numeric keys to the standard keyboard.
/N0 ........ Does not add numeric keys to the standard keyboard. (Initial condition default.)
/L1 ........ Activates the Caps Lock key.
/L0 ........ Deactivates the Caps Lock key. (Initial condition default.)
/Px,y ..... Specifies the coordinates of the top left corner of the SIPanel.
/Sw,h ...... Specifies the width and height of SIPanel to be displayed.
Establishes a drag area on the left side of the screen. (Initial condition default.)
"x" should be between 0 and 479 of the X-axis coordinate, and "y" should be between 0 and
239 of the Y-axis coordinate. "x" and "y" should be separated by comma (",").
The default values are x=0 and y=0.
"w", the width, should be between 1 and 480, and "h", the height, should be between 1 and
240. "w" and "h" should be separated by a comma (",").
The default values are w=320 and h=120.
Note:
If values that are to small are specified, tapping the panel has no effect and, consequently, a
key input is not possible. Unless otherwise specified, the parameters will retain their previous
values.
If SIPanel is initiated without a parameter being specified, the following condition is employed for the
defaults:
sipanel.exe /T0 /D0 /N0 /L0 /P0, 0 /S288, 100
34
Page 35

5. I/O Bootup Library
5.1 Overview
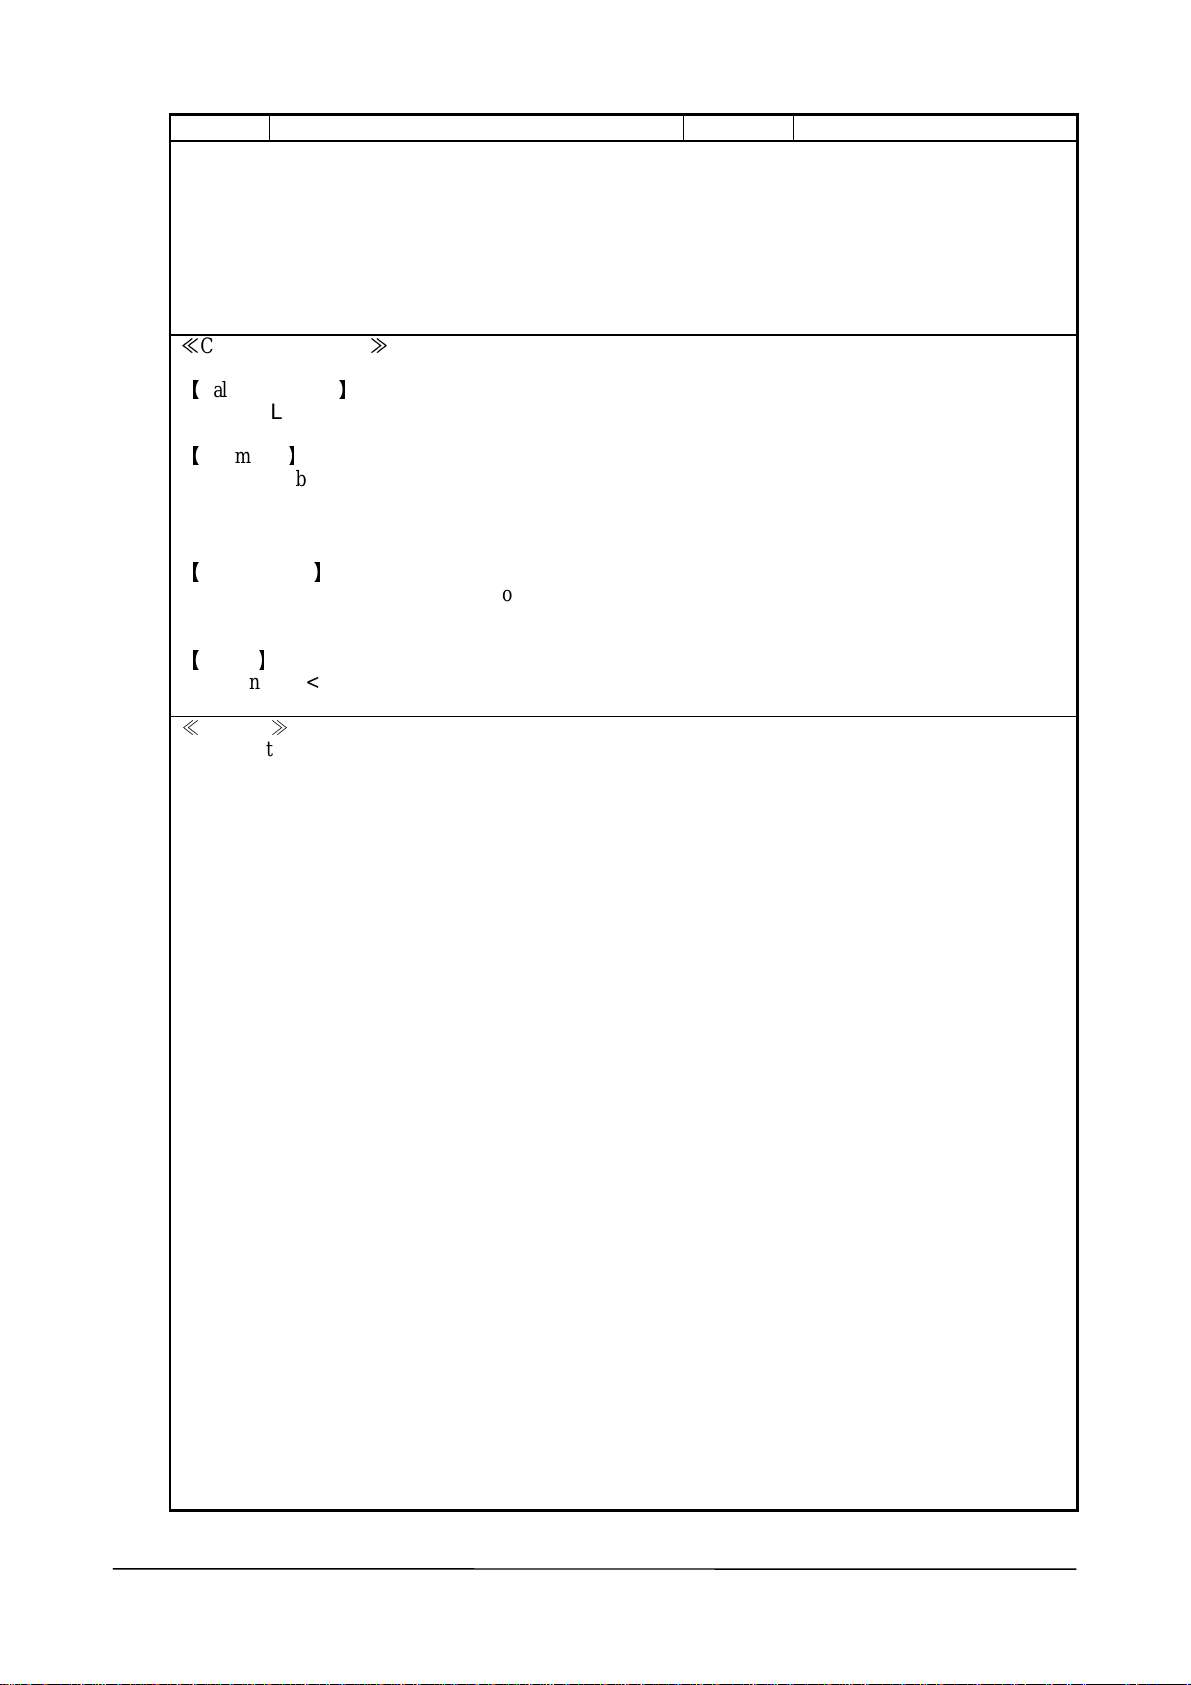
The I/O bootup library monitors the connection status of dedicated I/O Box and notifies user of the status.
5.2 Function
This library supports only one function, iobox_chk(). The iobox_chk() function monitors and detects, for a
specified period, whether PA-2400W is mounted on I/O Box, and returns the result (mounting detected,
timeout error, or error). Each time this function is used, it is necessary to also execute "Permit interrupt, Wait
for interrupt and time-out, and Prohibit interrupt". The following diagram shows the range covered by this
library.
Fig. 5.1
PA-2400W
User Application
(1) iobox_chk ( TIME_OUT_SEC ) ;
IOBOX1.DLL
Karnel
(4) Interrupt Signal
(5) Return
Detection, Timeout
Error
(4) Timeout
I/O PORT: 0
(2) Mounting
I/O Box
Because the interrupt signals are detected by their signal levels, they can be detected even if the order of (1)
and (2) is changed. (The connection status can be detected whether this function is called before or after the
PA-2400W is mounted on I/O Box is mounted, unless a timeout occurs.)
35
(3) I/O Box ON Signal
Page 36

5.3 Details of Function
Title Function
This function monitors the connection and mounting status of PA-2400W terminal on I/O Box for a
specified period of time and returns a result of it. When the power of I/O Box is turned off, the status is considered
as improper connection of PA-2400W with I/O Box.
It returns also an error if other program uses this function at the same time. If the power switch of I/O Box
is turned off during wait specified period, the monitoring can be continued from the state before the power is off.
C Language Interface
Calling Sequence
int iobox_chk ( DWORD time_out );
Parameters
Return Values
Header
DWORD time_out : Maximum time to monitor the session (0 to 4,294,967,295 msec.)
#include <IoBox1. H>
INFINITE = No timeout
(4,294,967,295 msec. equals to INFINITE.)
0 : Session establishment detected
1 : Timeout
-1 : Used exclusively by other program
Others : Fail to call the function.
iobox_chk
Remarks
36
Page 37

5.4 Use of iobox_chk
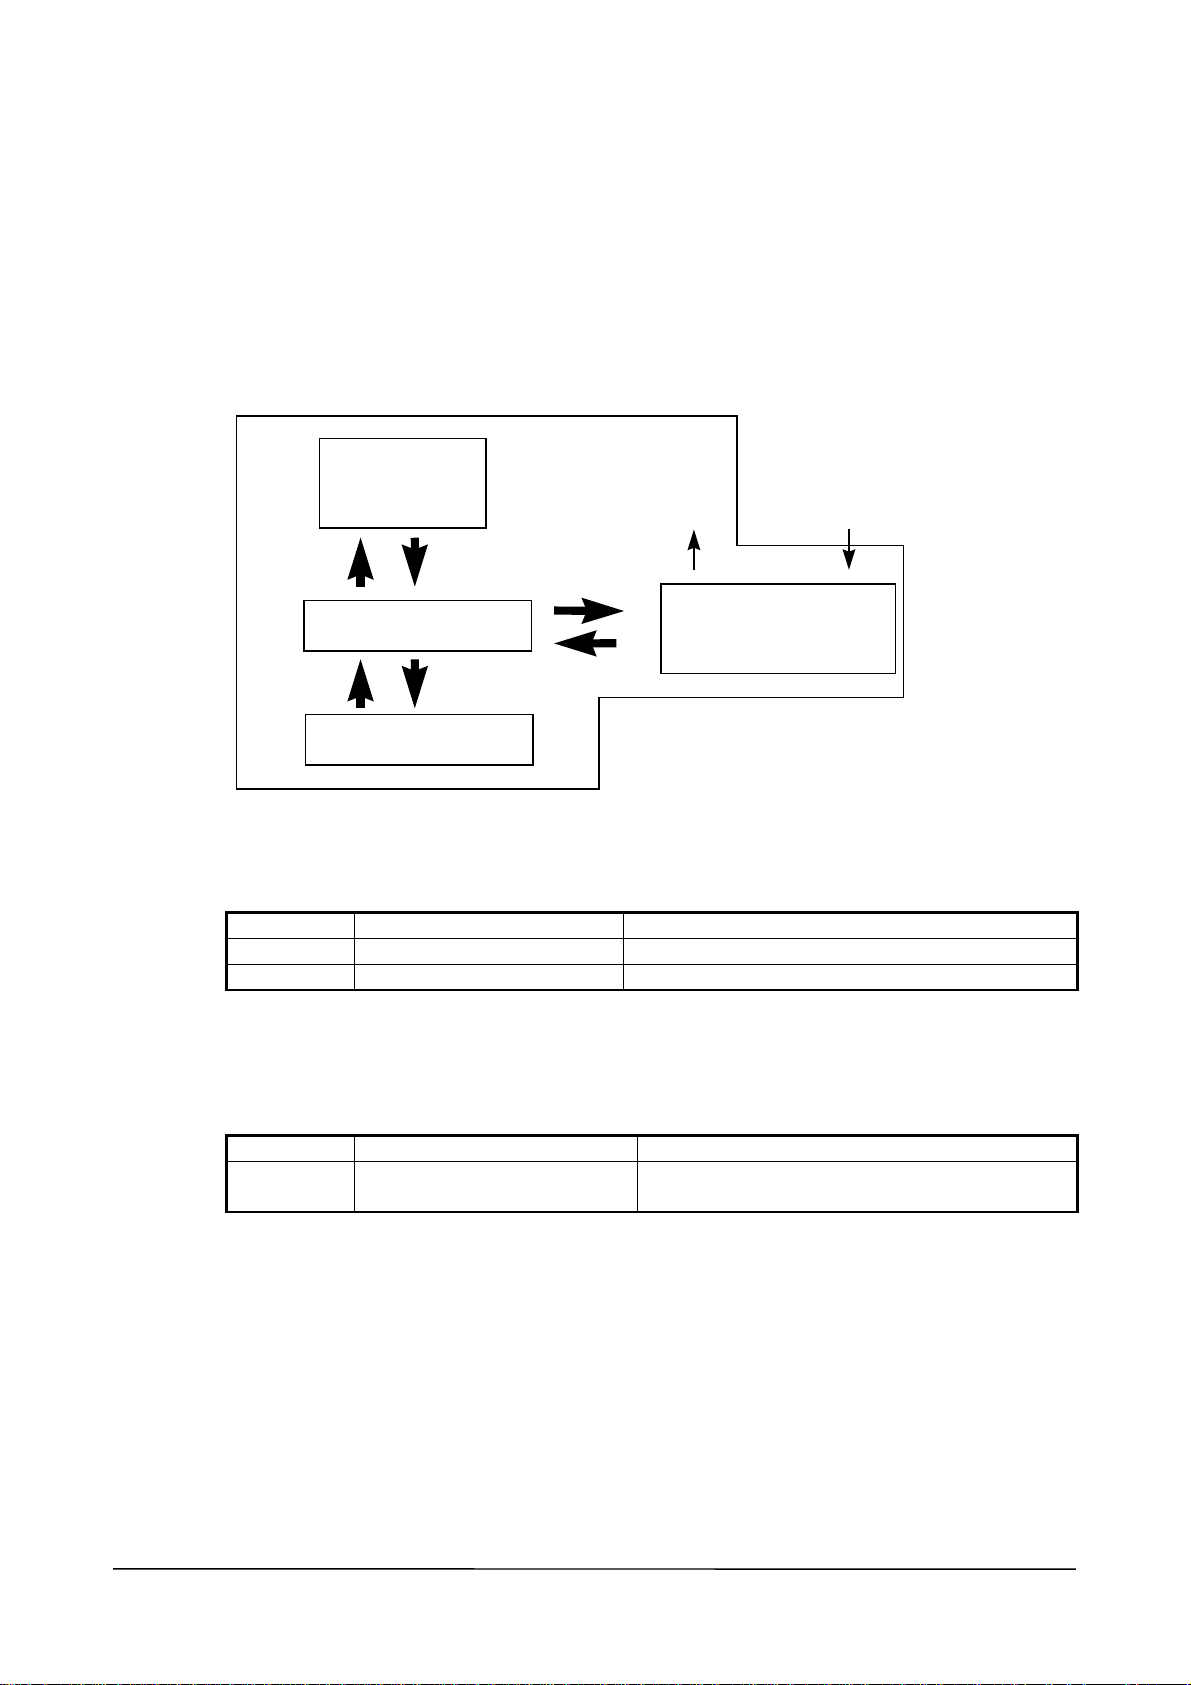
Internally, this function creates an event object of I/O Box and waits for the object for a specified time.
During the wait time, it is possible to dispatch another task. Therefore, there are two ways of usage as stated
below.
Sequential Mode
This mode is to call the function and check if the PA-2400W is connected to I/O Box. After a confirmation
on the session establishment, the process continue to a next job.
Place PA-2400W on I/O Box.
iobox_chk (30)
Yes
Next Job
Connected ?
Error Process
Fig. 5.2
No
Multiple-Thread Mode
Main program creates a thread (CreateThread( ) ) for session with I/O Box and calls the function within
this thread to wait for the establishment of session with the I/O Box. While the main program waits in the
loop, it makes necessary processes of each message.
After the created thread confirms the session, the sub-thread throws a message to the main program which
makes the main program confirms the session. Refer to Chapter 5.5 “Sample Program” on page 38 for a
sample program to use the function in “Multiple-Thread Mode”.
37
Page 38

5.5 Sample Program
This sample program is created with the method of “Multiple-Thread Mode” under development
environment of Visual C++ 5.0 plus and Windows CE SDK/DDK.
It introduces the IOBOX1.C program and its reference sources, and shows a list of environment variables.
// windows ce iobox sample file
#include <windows.h>
#include <commctrl.h>
#include "iobox1.h"
VOID ioProc( void);
TCHAR szAppName[ ] = TEXT("Hello Windows CE");
TCHAR szTitle[ ] = TEXT("PA-2400 I/O BOX TEST");
LRESULT CALLBACK WndProc(HW ND, UINT, WP ARAM, LPARAM) ;
HINSTANCE hInst = NULL;
HWND hWndCB = NULL;
HANDLE hWnd;
HANDLE h;
const int WINDOW_WIDTH = 480;
const int WINDOW_HEIGHT = 214;
int WINAPI WinMain(HINSTANCE hInstance, HINSTANCE hPrevI nstance, LPWSTR
lpCmdLine, int nCmdShow )
{
// HWND hWnd;
MSG msg;
WNDCLASS wc;
wc.style = 0L;
wc.lpfnWndProc = (WNDPROC) WndProc;
wc.cbClsExtra = 0;
wc.cbWndExtra = 0;
wc.hInstance = hInstance;
wc.hIcon = NULL;
wc.hCursor = NULL;
wc.hbrBackground = (HBRUSH) GetStockObject(WHITE_BRUSH);
wc.lpszMenuName = NULL;
wc.lpszClassName = szAppName;
RegisterClass(&wc);
38
Page 39

InitCommonControls(); // Initialize common controls - command bar
hInst = hInstance; // Save handle to create command bar
hWnd = CreateWindow(szAppName, // Class
szTitle, // Title
WS_OVERLAPPED, // Style
100, // x-position
50, // y-position
WINDOW_WIDTH/2, // x-size
WINDOW_HEIGHT/2, // y-size
NULL, // Parent handle
NULL, // Menu handle
hInstance, // Instance handle
NULL); // Creation
ShowWindow(hWnd, SW_SHOW);
UpdateWindow(hWnd);
while ( GetMessage(&msg, NULL, 0, 0))
{
TranslateMessage(&msg);
DispatchMessage(&msg);
}
return(msg.wParam);
}
LRESULT CALLBACK WndProc(HWND hWnd, UINT message, WPARAM uParam,
LPARAM lParam )
{
HDC hdc;
PAINTSTRUCT ps;
RECT rect;
DWORD ThreadID;
switch (message)
{
case WM_CREATE:
sndPlaySound(TEXT("OpenProg"), SND_NODEFAULT | SND_ASY NC);
hWndCB = CommandBar_Create(hInst, hWnd, 1);
CommandBar_AddAdornments( hWndCB, 0L, 0L);
return 0;
39
Page 40

case WM_PAINT:
hdc = BeginPaint(hWnd, &ps);
GetClientRect(hWnd, &rect);
rect.top += CommandBar_Height(hWndCB);
DrawText(hdc, TEXT("Hello Windows CE!"), -1, &rect,
DT_SINGLELINE | DT_ CE NTER | DT_V CENTER) ;
EndPaint(hWnd, &ps);
return 0;
case WM_LBUTTONDOWN:
h = CreateThread(NULL, 0, ( LPTHREAD_START_ROUTINE)ioProc, NULL, 0,
( LPDWORD)&ThreadID); return 0;
case WM_USER:
switch( ( int)uParam) {
case 0:
MessageBox( hWnd, TEXT( "Connected!") , TEXT( "MessageBox"), MB_OK);
break;
case 1:
MessageBox( hWnd, TEXT( "Time Out!") , TEXT( "MessageBox"),
MB_OK); break;
case -1:
MessageBox( hWnd, TEXT( "Other program is using!") ,
TEXT( "MessageBox"), MB_OK); break;
default:
MessageBox( hWnd, TEXT( "Function call Failed!") , TEXT( "MessageBox"),
MB_OK); break;
}
// TerminateThread( h,0); // Close because thread is no longer required.
// ExitThread( 0L);
CloseHandle( h);
return 0;
case WM_CLOSE:
sndPlaySound(TEXT("Close"), SND_NODEFAULT | SND_ASYNC);
DestroyWindow(hWnd);
return 0;
case WM_DESTROY:
PostQuitMessage(0);
return 0;
40
Page 41

default:
return (DefWindowProc(hWnd, message, uParam, lParam));
}
return (0);
}
VOID ioProc()
{
int ret;
// ret=iobox_chk( INFINITE); // Wait for infinite
ret=iobox_chk( 5*1000); // Wait for 5 seconds
PostMessage( hWnd, WM_USER, ret, 0L);
}
// End of Hello Windows CE program.
41
Page 42

6. Registry of Libraries
In this chapter, registries which are used by the libraries of System and SIPanel are described. The I/O
Startup Library does not use any registry.
6.1 System Library
The System Library uses the following registries. The values of each registry are automatically updated by
dedicated API functions. User is required not to edit the values.
Localmachine\HARDWARE\DEVICEMAP\AlarmWakeUp
Set up “enable” or “disable” of the power ON by alram.
Table 6.1
Key name Form Value Description
0 Disable the power ON by alarm.Satus DWORD
1 Enable the power ON by alarm. (default)
LocalMachine\HARDWARE\DEVICEM AP\powerONEvent
Set up “enable” or “disable” of the power ON event notification”.
Table 6.2
Key name Form Value Description
0 Disable the power ON event notification.Status DWORD
1 Enable the power ON event notification.
6.2 SIPanel Library
The SIPanel Library uses the following registries. User is required to edit the values of each registry.
LocalMachine\Software\Apps\SIPmanager
Specify a program to start up the SIPanel when the SIP button is pushed by operator.
Table 6.3
Key name Form Value Description
SIPExeName SZ (file name) Specify a file name of program which is started up
when the SIP butt on is pu shed.
Default is “SIPanel.exe”.
SIPQuitOpt SZ (character string of
option)
SIPNormOpt SZ (character string of
option)
Note:
If you wish to disable the SIP button, delete “SipExeName”. If you create your own startup program for the
SIPanel usi ng t his libr ary , do n ot for get to d elet e or ch ang e “SIP Exe Nam e”. R ef er to Ch apt er 4.2 “Use o f
SIPane l L i br ary ” .
Specify a character string of quit option which is
attached to th e pro gr am sp ecif ied by “S IPEx eNam e”.
Default is “ / Q” .
Specify startup option of the program specified by
“SIPExeName”.
Default is not available.
42
Page 43

7. File Transfer Utility
7.1 Overview
This file utility performs file transfer either between a host PC and PA-2400W or between two PA-2400W
terminals. The dedicated upload/download utility (LMWIN) must run on the host PC.
As a result, fun ctions that can be i mp leme nte d by th is uti lity dep end o n the uploa d/dow nlo ad util ity d edi cated
for the host PC, as well as the file transfer protocol used between two FLCEs.
For this operation the following I/O interfaces of PA-2400W can be used:
(For more information about the hardware configuration of the I/O Box system, refer to the PA-2400W
Hardware Manual.)
RS-232C Interface
Interface (COM1 port) via the 16-pin cable (using the communication cable supplied with PA-2400W)
Direct interface to the host PC
IrDA 1.0 Interface
Interface (IrDA port) to the host PC via the Master or Satellite I/O Box
Interface between two PA-2400W terminals
43
Page 44

7.2 List of Supported Commands
Among file transmission protocol, this file tr ansfer utility (FL CE) can support the foll owing specific
commands.
Table 7.1 List of supported commands
Specify on
FLCE’s
command line
SupportedNo. Command
Request by
comm. partner
1 File transmission
2 File reception
3 File append
4 File/directory delete
5 File mode/update
6 Directory creation
7 Time setup
8Time request
9 Message display
10 Buzzer ON
11 File information acquisition
12 File informat ion se tup
13 Disk information acquisition
14 Acquisition of session ID and system inform ation (see note 1)
15 IDLE notification (see note 1)
16 Order of termination (see note 1)
--
--
--
--
--
--
--
--
--
--
Notes:
1. Functions 14, 15 and 16 are used internally by the protocol. You do not need to specify these commands
on the command line.
2. All files are transferred in binary mode with date/time of file creation and attribute.
3. If file transmission fails, a part of the file at reception side is disregarded and none of data in the file will
be saved.
44
Page 45

7.3 Use of FLCE
The FLCE is an execution program, and there are two methods for the use.
FLCE individually
FLCE as child-process in user application
In the individual use mode, it can be started up by a shortcut in which necessary parameters are set as
argument. Or in case it is started up in IDLE startup mode, FLCE.EXE icon can be accessed for direct access.
In user application, the FLCE can be started up as child-process with argument for file transmission and etc.
After completion of the transmission, termination code can be acquired as a return value of the process.
Before transmission via COM1 port, there is operation you must follow. If you do not follow the operation,
PC LINNK automatically starts up as RS-232C cable is connected, which will cause the transmission to fail.
The operation continues to be active until the setup is changed or cold-bootup takes place.
Operation
1. Select “Set up” in the start menu.
2. Tap “Communication” to open.
3. Select “Connection with PC”.
4. Deselect “Connect with PC if communication is possible”
5. Tap the OK button.
If you wish to have a communication by using with H/PC Explore and PC LINK, select the menu stated in
operation step 4 above.
Input Parameter
Command line argument : communication command, communication option, transmission pathname,
I/O interface to be used, baud rate, mode
Registry : Set up registry only if the following default values must be changed.
I/O interface to be used (RS-232C, IrDA), baud rate, drive letter
(refer to Chapter7.9 “Setting Up Registry”.)
Output Parameter
Return value of Winmain : termination code (refer to Chapter 7.10 “Termination Codes”.)
7.4 Termination of FLCE
This FLCE utility will terminate if;
All specified commands are implemented normally, or notification of normal end is received from
partner station.
Specified command results abnormal state, or notification of abnormal end is received from partner
station.
Timeout for session establishment is 1 minute. If the session cannot be established within the period,
timeout will cause an error. “INFINITE” of timeout (= no timeout) can be set for continuous session.
The cancel button in the status window which appears after the FLCE startup is tapped.
45
Page 46

7.5 Restrictions
The file trans fer u tility (FL CE) is su bject to th e follo wing r estrict ion s:
The FLCE does not support communication with a 3-pin interface or PCMCIA card.
The COM1 port and IrDA port cannot be used concurrently because they must use the same hardware.
Before initiating the FLCE, terminate the other program that is using the COM1 or IrDA port.
As the return value from the FLCE the termination codes which request formatting of a drive or
resetting of the machine are defined. However, Windows CE Ver 2.11 doe s n ot s upport this function.
If this function is required, incorporate it into the user application.
46
Page 47

7.6 Communication Commands
Operational specifications for the FLCE should be made by initiating an appropriate command together with
the following arguments. A maximum of twenty commands can be described at one time, and they will be
processed sequentially in the order in which they are described. If a command encounters an error,
communication is immediately terminated from the error and subsequent commands will no longer be
processed. When the communication environment setup command is not specified, the default value is used.
Table 7.2 Types of Arguments
Type Function Command Applicable Option Example of Input
Setup
command
Operation
command
Communication
environm ent s etu p
File transm issi on / S O, R / SOR
File reception / R O, R / ROR
File transmiss ion
(append)
File deletion / D O, R / D
File move / N None / N
Time transmission / T None / T
Idle startu p None Scri pt f i le n ame
/Y={device, baud
rate, mode}
/ A None / A
None /Y={COM1, 115200, }
Options
O (Overwrite) :
Specification of forced overwrite of a read-only file
If this option is specified, even a read-only file will be overwritten.
If an overwrite of read-only file is attempted and this option is not specified, this command will be
abnormally terminated. The attribute of source file will be duplicated onto a target file which has been
overwritten.
R (Recursive call):
All files that exist under a specified directory are used as the objective of processing. If the specified
directory has any sub-directories, the files in these sub-directories are also included as the objective of
processing. The hierarchical directory system has a maximum depth of sixteen levels. If this option is not
specified, only a file that is designated by its pathname will be the objective of processing.
47
Page 48

7.7 Method of Describing Pathname
Enclose every pathname in a pair of parentheses. A pathname must have a length of 255 characters or
less including the two parentheses. A 2-byte code character is counted as one character.
Example: FLCE /S "\asio data\*.dat" "d:\data\"
Pathnames must be described in accordance with the path naming rules supported by OS of the
machine on which the specified path is to be placed.
Observe the following rules on drive letters when describing pathnames:
1. Describe a pathname on the PA-2400W so it begins with root directory, without including a
drive letter. (This rule should also be applied when the pathname of file or directory on the PA2400W is specified from the upload/down utility (LMWIN) for host PC.)
2. If a pathname with a drive letter is specified from the communication partner, the drive letter will
be ignored by the FLCE on host PC. (In other words, this pathname specification is treated as
being equal to a specification that begins with root directory without a drive letter.)
3. If the communication partner (PC, etc.) runs under an OS that requires drive letter specification,
and if the PA-2400W needs to describe the pathname of file or directory on the partner side,
always attach an appropriate drive letter.
However, as an exception to 2. above, if the communication partner side designates a device on the Windows
CE machine for retrieving the format or other disk information, define a drive letter as follows. These setups
can be modified as required by making the appropriate description in the registry.
Default setting : Internal RAM
PC card
C: (Define the boot drive as C: to meet with
specifications of PC/AT machine.)
D:
Table 7.3 Summary of drive letter handling
Pathname specification on Windows CE Pathname specification on other
machines
Specify file or directory Not required (ignored if described) Depends on the OS.
Specify device Follows the above mentioned rules. Depends on the OS.
Drive letters D and E are used for external storage devices if concurrent use of multiple PC cards (compact
flash card, ATA flash card) is allowed..
Note:
Identification between multiple PC cards depends on the Windows CE’s specifications. Directory names of
multiple PC cards are determined according to the order in which they were inserted into each slot, for
example, "\Storage Card" and "\Storage Card2", thus no differentiation is made between these two cards
in terms of device type. This is why neither of the cards can be assigned a fixed drive letter.
48
Page 49

Reference:
Windows CE has no concept of a drive letter. Accordingly, an additional drive is assigned a directory directly
under the root directory.
Example
Internal RAM
“My Documents” Internal RAM
“General directory Internal RAM
Internal RAM
“Storage Card” PC card
"My Documents" Internal RAM
49
Page 50

7.8 Conditions at Communication Partner
7.8.1 Rules of Naming File and Directory Pathnam e
Specify the pathname of file or directory at the communication partner according to the naming rules of
communication partner-side OS.
Table 7.4
Communication
partner
Windows95 /Windows NT
DOS
Windows CE
: Specification permitted
X : Results in invalid pathname and termination from error if specified.
8.3 format Long file name Drive letter
X Required (Error if omitted)
Required (Error if omitted)
Not required (Ignored if specified)
7.8.2 Specifying Non-existing File
If the pathname of file or directory which does not exist at the communication partner side, the following
processing is performed;
Table 7.5
Communication partner Reception Delete Move Transmission,
Transmission (append)
Windows 95/Windows NT
DOS A C B D
Windows CE A C B D
Meaning of the alphabets:
A: Abnormally terminated if any of the multiple pathnames specified does not exist (even a file that
actually exi sts wi ll not b e tran sferr ed).
B: Abnormally terminated if the specified pathname does not exist (transfer is not achieved).
C: If the specified pathname includes a pathname that does not exist, that pathname will be ignored
(existing pathnames will be processed).
D: A new file will be created.
50
Page 51

7.9 Setting Up Reg ist ry
By rewriting values in the registry it is possible to modify the default values of commands’ parameters for
communication environment, etc. However, use the command line argument (/Y) to specify the
communication line or baud rate during normal use. Use this registry setup only if the default values require
modification.
In other cases, where the drive letter definition requires modification, create the key (item) of a drive letter
and describe on the key the pathname of a device which will be defined according to the specification.
If the registry has been set up, it will be remained valid until it is modified again or the system is cold-booted
up. For a key (item) that is not set in the registry or a key (item) that has an incorrect setup the original default
value will be used.
7.9.1 Setting Up Items
Default value if the RS-232C baud rate registry has no setup :
19,200 bps
Default value if the IrDA baud rate registry has no setup :
115.2 Kbps
Default value if the communication line specification (232C= COM1 or IrDA) registry has no setup:
IrDA
Default value if the drive letter definition registry has no setup value:
C \(Object Store of internal RAM)
D \Storage Card\ (storage card)
Default value if the command-to-response interval timeout registry has no setup :
30 seconds
Registry position
\HKEY_CURRENT_USER\F LCE\
Contents
Key name Type Value
BAUD DWORD Baud rate
DEVNM STRING Communication line (I/O device)
DRIVE\A STRING Path of a device defined as drive a:
DRIVE\B STRING Path of a device defined as drive b:
DRIVE\C STRING Path of a device defined as drive c:
: :
DRIVE\Z STRING Path of a device defined as drive z:
Values for communication line and baud rate setups
Communication line : COM1, IrDA
Baud rate : For RS-232C; 9600, 14400, 19200, 38400, 57600, 115200
: For IrDA; Setting of baud rate cannot be allowed.
Only the above permitted baud rates can be set. Setting with other baud rate can cause the default
value to be set.
Path to device
A path to a device should be specified by the directory name to which the device is assigned.
Example: Object Store of the internal RAM \
PC card or compact flash \Storage Card\
51
Page 52

7.9.2 Setting Up Registry with User Application
Modify the registry as required from your application while referencing the following sample program.
/***********************************************/
/* Registry Registration Program */
/***********************************************/
#include <windows.h>
#include <string.h>
#include <commctrl.h>
int WINAPI WinMain(HINSTANCE hInstance, HINSTANCE hPrevI nstance,
LPWSTR lpCmdLine, int nCmdShow )
{
HKEY hKey1; // Open Handle
LONG lReg1; // Result code
DWORD Disp1; // Create or Open disposition
int err;
const wchar_t SubKey1[] = TEXT( "FLCE"); // Key for FLCE
const wchar_t Name[] = TEXT( "RECVWAIT");
// Name for the command-to-response interval timeout
const DWORD Value = 1800L;
// Time-out value to be set (seconds)
err=TRUE;
// Open the registry key
lReg1=RegCreateKeyEx( HKEY_CURRENT_USER, SubKey1, 0, NULL, 0, 0, 0,
if( lReg1 == ERROR_SUCCESS) {
// Set the value
lReg1=RegSetValueEx( hKey1, Name, 0, REG_DWORD, ( const BYTE
// Close the registry key.
lReg1=RegCloseKey( hKey1);
if( lReg1 != ERROR_SUCCESS)
*)&Value, sizeof( Value)); if( lReg1 != ERROR_SUCCESS)
err=FALSE;
&hKey1, &Disp1);
52
Page 53

}
else {
}
if( err==TRUE)
else
return( err);
}
err=FALSE;
err=FALSE;
MessageBox( NULL, TEXT( "Success setting registry!") , TEXT( "This is MessageBox"),
MB_OK);
MessageBox( NULL, TEXT( "Fail setting registry!") , TEXT( "This is MessageBox"),
MB_OK);
53
Page 54

7.10 Termination Codes
The FLCE returns one of the codes listed in Table 7.6 as the termination code when communication is
complete. Upper-level programs should perform an appropriate action to reference these values.
The communication function may return a code other than that described in the termination codes list. Such a
code is received from the communication partner and specific (i.e. outside the standard protocol) to the
software used on the communication partner side.
For information about these codes refer to the Upload/Download Manual of PA-2400W.
Passing of termination code
A termination code will be returned as a return value from Winmain. Upper-level programs should
reference this return value using the “GetExitCodeProcess()” function.
List of termination codes
A category code (upper byte) indicates the error category, and an error detail code (lower byte) indicates
the detail of the error. Category codes are defined as follows:
00h Normal termination
DCh to F8h Normal termination and notification of termination. Upper-level programs
should take an action that is appropriate to each definition.
01h Protocol error
02h File-related error
0Fh Argum ent- rel ated erro r
A0h Communication line-related error
54
Page 55

Table 7.6 List of termination codes
Error Code
Category
code
00h 00h Normally terminated Normal. -
DCh to
F5h
F6h 00h Norma lly term in ate d Power- off is s pec ifie d f rom th e
F7h 00h Normally terminated. Resetting the power is specified
F8h 00h Terminated due to interruption. Communication is terminated
01h 00h Protocol error Data anomaly (data error
02h 80h File not found Non-existent file is specified. Check the specified file or
02h 81h Current directory delete error An attempt has been made to
02h 82h File write error Write to the file is not possible. Check if the file is ready to
02h 83h File read error Read from the file is not possible. Check if the file is ready to
02h 84h Read only access error A n attempt has been made to
0Fh 01h Argument parameter error Incorrect argument desc ription Check the argument
0Fh 02h Argument too long Argument portion of the
A0h 10h Communication port open error One of the other programs is
A0h 20h Line break error or IrDA
A0h 30h Session-wait timeout error Session was not es tablished
Detail
code
00h Normally terminated Formatting of drive a:between 'A'
duplicate open error
Meaning Possible Cause Remedy
Refer to Chapter 7.5
and 'Z' is specified from the
partner station. (For drive letter
definitions, refer to Chapter
7.7 “Method of Describing
Pathname”.)
partner station.
from the partner station.
because the break key is pressed
on the PA-2400W (local station)
or partner station.
occurred on the communication
line).
delete the current directory.
overwrite or delete the read-only
file.
command line is too long
using COM1 or IrDA,or FLCE is
already initiated.
Either the cable was unplug ged
during communication or the
IrDA connection is broken
(where the PA-2400W is
dismounted from I/O Box).
IrDA port is already open. Terminate the other
within 1 minute of startup.
“Restrictions”.
Turn off the power.
Refer to Chapter 7.5
“Restrictions”.
Resume communication as
required.
Check the communication
line connection.
directory.
Check the objective
directory of deletion.
be written.
be read from.
Specify another file name or
cancel the read-only
attribute.
parameter.
Reduce the length of the
argument including FLCE to
255 characters or less .
Terminate the program that
is using COM1 or IrDA.
Check the cable connection
and mounting condition of
the PA-2400W on I/O Box.
program that is using IrDA .
Check the cable connection
or check if the IrDA is ready
for communication.
55
Page 56

7.11 Log File
The FLCE will create a log file to record communication logs.
Log File Name
The current log file name is fixed to "FLCE.LOG".
This specification cannot be modified. Therefore, if the current log file needs to be stored, use another file
name.
Location of Log File
A log file is created under the "\Windows\" directory.
Method of Creation
Even if a log file already exists, a new log file is created (i.e. overwrites the old one).
Append to the existing log file is not attempted.
If a new file cannot be created, log file creation is aborted.
If an argument of command parameter includes error, a log file will not be created.
A log file starts to be created at the point in time when communication with the partner begins.
Format
1st line Version information of FLCE.EXE will be outputted.
2nd line Version information (1 byte) of the protocol will be outputted. The first version is "1".
3rd line Communicati on par tner m achine code (m ax imum 3 byte s) will be outp utted .
AT .... IBM-PC compatible machine
4th line Session ID information will be outputted.
This will be outputted in a hexadecimal number (Example: 0x0000).
5th line Last event information will be outputted.
6th line Last phase information will be outputted.
7th line Last status information will be outputted.
Outputted as a hexadecimal number (Example: 0x0000).
8th line Last transmission file name will be outputted.
9th line Last reception file name will be outputted. Output will consist of the above eight lines
Output will consist of the above nine lines.
Since with lines 2 through 4 the information acquired from the communication partner is outputted, this
line will be outputted as a blank line for a log file on one of the PA-2400Ws that operates in the PC
emulation mode for communication between two PA-2400Ws.
One line must be less than 80 bytes in length. Therefore, if a file name inserted in the 8th or 9
requires 65 bytes or more (15 bytes are used for the item name), characters on and after the 65th byte will
not be outputted.
56
th
line
Page 57

7.12 Precautions
Under the state where the file transfer utility is operating, if a file is transmitted out or received in a
folder that is opened by the Explorer, the transfer speed is reduced considerably.
To avoid this close the folder that was opened by the Explorer and that contains the file to be
transmitted before initiating the file transfer utility. Otherwise create a folder, other than the one opened
by the Explorer, for file reception.
If attempting PA-2400W-to-PA-2400W communication always use the CASIO AC adaptor to power.
57
Page 58

7.13 Details of Command and Option
p
p
Title Command
FLCE /Y
This command sets up the device, baud rate, and communication mode used for communication.
If this command is omitted, the default value {IrDA, , } is used.
Any of the parameters can be omitted. If this is done, the default values for each parameter will be used.
Always insert this command directly after the word “FLCE”. Placing it in another place will result in a parameter
error.
C Language Interface
Calling Sequence
FLCE /Y={ [<device>], [<baud rate>], [<mode>] }
(Comma must be written and no space allowed. Parameters in [ ] can be omitted.)
Parameters
Device Select either "IrDA" or "COM1".
Baud rate If "IrDA" is selected – the baud rate setting can not be allowed.
If "COM1" is selected - The following baud rates can be selected for RS-232C communication.
9600, 19200, 38400, 57600, 115200
Combinati ons ot her than t hose descr ibe d abov e are not p ermitte d and will caus e a para met er
error.
Mode "H" - PA-2400W-to-PA-2400W command specification mode (Session-wait timeout is
1 minute.)
This option is used by one side which specifies the operation command when performing
communication between two PA-2400Ws.
(The FLCE on the communication partner should operate in the idle start mode.)
"I" - Normal mode (Session-wait timeout is infinite.)
Only "H" or "I" can be specified.
If mode specification is omitted, the normal mode with the session-wait timeout set to 1
minute is automatically specified.
Table 7.7
Session Wait TimeoutStartup Communication Partner
1 minute Inf inite
Idle (including script) PC (I/O Box)/PA-2400W
Designation of
Operation command
PC (I/O Box)
PA-2400W Mode
No mode
specification
s
ecification, “H” -
Mode
S
ecification, “I”
Startup Examples
FLCE /Y={COM1, 115200, } /S "\casio\*.dat" "d:\casiodat\"
Communication is performed using the RS-232C port at a baud rate of 115.2 Kbps. (Session-wait timeout
is 1 minute.)
FLCE /Y={, , I} /S "\casio\*.dat" "d:\casiodat\"
Communication is performed through command specification with the device name and the baud rate
are default-set. (Session-wait timeout is infinite.)
FLCE /Y={, , H} /S "\casio\*.dat" "d:\casiodat\"
Communication is performed between two PA-2400Ws through command specification with the device
name and the baud rate are default-set. (Session-wait timeout is 1 minute.)
FLCE /Y={, , I}
Communication is performed in the idle mode with the device name and the baud rate are default-set.
(Session-wait timeout is 1 minute.)
FLCE /Y={, , } /S "\casio\*.dat" "d:\casiodat\"
Communication is performed under the same conditions (with default values) of which "/Y" is omitted.
58
Page 59

Title Command
FLCE /S
This command transfers a file on the PA-2400W to the communication partner side of PA-2400W.
If an identical file name exists in the destination directory of the partner side, it will be overwritten.
If the directory that is specified as the destination directory does not exist, it will be automatically created.
The progress of file transfer will be displayed.
File pathnames will be processed in order from the left of the command line. If any of the file pathnames to
be transmitted do not exist on the PA-2400W side, the FLCE is immediately terminated by an error, and file
pathnames placed at the right of that pathname will no longer be transmitted.
C Language Interface
Calling Sequence
FLCE /S[<Option>] <Transmission file pathname> [<Transmission file pathname>] [...]
<Pathname of destination directory>
(Parameters in [ ] can be omitted.)
Parameters
Option O: Specification of forced overwrite of read-only file
If this option is specified, even read-only file will be overwritten.
If an overwrite is attempted for read-only file and this option is not specified, this command
will be abnormally terminated
R: Recursive call
All the files that exist under the directory specified by the transmission file pathname are
used as the objective of file transfer.
If the specified directory has any sub-directories, they will be also included in the destination
directories for the file transmission.
The hierarchical directory system has a maximum depth of sixteen levels.
Even if this option is specified, the transmission file pathname should be specified by the full
pathname.
If this option is not specified, only a file that is designated by the transmission file pathname
can be the objective of processing.
Transmission file pathname
Specify a file that exists on the PA-2400W side by its full pathname.
To specify all files enter "*.*" as file name.
A wild card can be used for file name.
Directory names or file names can be described using 2-byte code characters
Destination directory pathname
As the last input parameter of this command describe the destination directory name
of the communication partner side. If the specified directory does not exist, it will be
automatically created by specified name.
Enter a "\" as the delimiter of directory name. If not, it will result a parameter error.
A wild card can be used for the file name.
Directory names can be described using 2-byte code characters.
Name the destination side directory pathname in accordance with the naming rules of the
communication partner-side OS.
Example: “d:\” Root directory specification
“d:\casio\12\” Sub-directory specification
“d:\casio” Incorrect specification.
Startup Examples
FLCE /S "\casio\*.dat" "d:\casiodat\"
FLCE /SR "\casio\*.dat" "d:\casiodat\"
This transfers file that is located in the "casio" directory of the PA-2400W which has a "dat"
extension to the "d:\casiodat\" directory of the communication partner side of PA-2400W.
This transfers all files under the "casio" directory (including the sub-directories) of the PA-2400W
which have a "dat" extension to the "d:\casiodat\" directory of the communication partner side.
59
Page 60

Title Command
FLCE /R
This command uses a pathname request to specify file that exists on the communication partner side, then receive
the file.
If an identical file name exists in the reception directory of the PA-2400W, it will be overwritten.
If the directory that is specified as the reception directory does not exist, it will be automatically created.
The progress of file transfer will be displayed.
All other ope rat ions whi ch m ust f ollow co nditi ons at t he com m unic atio n par tner , r efer to Ch apt er 7.8 “Con d i ti ons
at Communication Partner”.
C Language Interface
Calling Sequence
FLCE /R[<Option>] <Request file pathname> [<Request file pathname >] [...] <Reception directory
pathname>
(Parameters in [ ] can be omitted.)
Parameters
Option O: Specification of forced overwrite of a read-only file
If this option is specified, even read-only file will be overwritten.
If an overwrite is attempted on read-only file and this option is not specified, this command
will be abnormally terminated.
R: Recursive call
All files that exist under the directory specified by the transmission file pathname are used as
the objective of file transfer. If the specified directory has any sub-directories, they will also
be included in the destination directories for file transmission.
Even if this option is specified, the transmission file pathname should be specified by full
pathname.
Pathname of requested file
Specify an objective file of reception that exists on the communication partner side by its full
pathname.
To specify all files enter "*.*" as file name.
A wild card can be used for file name.
Directory names or file names can be described using 2-byte code characters.
Specify a pathname of requested file according to the naming rules of the communication
partner-side OS. Refer to Chapter 7.8 “Conditions at Communication Partner”.
Destination directory pathname
As the last input parameter of this command describe the destination directory name of the
communication partner side.
If specified directory does not exist, it will be automatically created by the specified name.
Enter a "\" as the delimiter of the directory name. If not, it will result a parameter error.
Directory names can be described by using 2-byte code characters.
Example “\” Root directory specification
“\casio\12\” Sub-directory specification
“\casio” Incorrect specification
Startup Examples
FLCE /R "a:\12\*.dat" "d:\casio\*.*" "\casio data\"
FLCE /RR "a:\12\*.dat" "d:\casio\*.*" "\casio data\"
This transfers all files under the "12" directory of drive A: of the communication partner side which
have a "dat" extension and all files under the "casio" of drive D: to the "casio data" directory of the
PA-2400W.
This transfers all files under the "12" directory (including the sub-directories) of drive A: of the
communication side which have a "dat" extension and all files under the "casio" directory (including
the sub-directories) of drive D: to the "casio data" directory of the PA-2400W.
60
Page 61

Title Command
FLCE /A
This command transfers the contents of file that exists on the PA-2400W and specified by the append file pathname to
the communication partner side of PA-2400W, and append the contents to file that exists on the communication
partner side.
If file specified by the target file pathname does not exist on the communication partner side, it will be
automatically created.
The date and time of the target file will be set to current system date and time of a machine where the target
file is processed for the append operation.
If the file transfer fails in mid-course, the target file restores the condition that existed before communication
started.
File data will be app ended a s bina ry d ata. (If th e targ et fil e is termi nate d by EOF cod e, th e data w ill be appe nded
after the EOF code.)
The progress of file transfer will be displayed.
If a transmission file pathname that does not exist on the PA-2400W is specified, the FLCE is immediately
terminated by error. If this occurs, even files that exist will not be transmitted.
C Language Interface
Calling Sequence
FLCE /A <Appended file pathname> <Target file pathname>
Parameters
Appended file pathname
Specify an objective file of transmission that exists on the PA-2400W by its full pathname.
A wild card cannot be used for the file name
Directory names or file names can be described by using 2-byte code characters.
Target file pathname
Specify file that is the target of append and that exists on the communication partner side by its full
pathname. If the specified file does not exist, it will be automatically created by specified file name.
A wild card cannot be used for file name.
Directory names can be described by using 2-byte code characters.
Create the target file pathname in accordance with the naming rules of the communication partner-side OS.
Startup Example
FLCE /A "\MY\casio.dat " "b:\your\master.dat"
This appends the contents of the "casio.dat" file to the "master.dat" file on the communication
partner side.
61
Page 62
Title Command
FLCE /D
This command deletes a specified file or directory that exists on the communication partner side.
For all other operations which must follow the conditions at the communication partner side, refer to Chapter 7.8
“Conditions at Communication Partner”.
The progress of file transfer will not be displayed.
C Language Interface
Calling Sequence
FLCE /D[<Option>] <Deleted pathname> [<Deleted pathname>] [...]
(Parameters in [ ] can be omitted.)
Parameters
Option O: Specification of forced overwrite of a read-only file
If this option is specified, even read-only file will be deleted.
If a deletion is attempted for read-only file and this option is not specified, this command will
be abnormally terminated.
R: Recursive call.
All files that exist under the directory specified by deleted file pathname are used as the
objective of file deletion.
If specified directory has any sub-directory, it will also be included in the objective of deletion.
The hierarchical directory system has a maximum depth of sixteen levels.
If this option is specified, the deleted file pathname should be specified by full pathname.
If this option is not specified, only file that is designated by the deleted file pathname can be the
objective of deletion.
Startup Examples
FLCE /D "a:\12\*.dat" "b:\casio\970613.dat"
FLCE /DR "a:\casio\"
Pathname of file to be deleted
Without the R option
Specify an objective file of deletion that exists on the communication partner side by its full
pathname.
A wild card can be used for file name.
To specify all files enter "*.*" as file name.
With the R option
Specify an objective file of deletion that exists on the communication partner side by its full
Pathname. Enter a "\" as the delimiter of the directory name.
Directory names or file names can be described by using 2-byte code characters.
Specify pathname of requested file according to the naming rules of the communication partner
side OS.
This deletes files under "a:\12\*.dat" and "b:\casio\970613.dat" of the communication partner side.
This deletes all files and directories under the "a:\casio\" directory of the communication partner side.
62
Page 63
Title Command
FLCE /N
This command moves a file that is specified by the move source pathname and that exists on the communication
partner side to the move destination-side path.
Specify a file name for the move destination-side pathname. The move source file will be saved by specified
file name on the move destination side.
For all operations which must follow the conditions at communication partner side, refer to Chapter 7.8 “
Conditions at Communication Partner”.
The progress of file transfer will not be displayed.
C Language Interface
Calling Sequence
FLCE /N <Source pathname> <Destination pathname>
Parameters
Source pathname
Specify a file that is the objective of the move and that exists on the communication partner side
by its full pathname.
A wild card cannot be used for file name.
Directory names or file names can be described by using 2-byte code characters.
Name the move source path in accordance with the naming rules of the communication partner-
side OS.
Startup Examples
FLCE /N "a:\ 12\kk.dat" "a:\casio\"
FLCE /N "a:\12\kk.dat" "a:\casio\sj.dat"
Destination pathname
Specify the destination path on the communication partner side by its full pathname.
If the specified source file name differs from the destination file name, the source file name will
be changed to the destination file name after transfer.
If the directory that is specified by the destination pathname does not exist, it will be automatically
created.
A wild card cannot be used for file name.
Directory names or file names can be described by using 2-byte code characters.
Name the destination path in accordance with the naming rules of the communication partner-side
OS.
This moves the "a:\12\kk.dat" file on the communication partner side to the "a:\casio\" directory.
This modifies the "a:\12\kk.dat" file on the communication partner side to the "a:\casio\sj.dat"
file.
63
Page 64

Title Command
FLCE /T
This command transfers the system date and time of the PA-2400W to the communication partner side for setting.
Transmitted date and time is a local time.
Depending on the line condition, a few seconds of error may result.
C Language Interface
Calling Sequence
FLCE /T
Parameters
None
Setup Example
FLCE /SR "\casio ap\*.*" "\casio ap\" /T
Transfers all files under the "casio ap" directory (including sub-directories) of the PA-2400W to the
"\casio ap\" directory of the communication partner side for setting up.
64
Page 65

Title Command
FLCE (Idle Start)
This command passes the request right to the communication partner side and operates according to a command that
is requested by the communication partner.
If starting up the PA-2400W with this mode, only the /Y command can be specified.
(If this is done, the normal mode instead of the idle start mode is entered. In other cases, if script file name is
specified, a parameter error results and the function is terminated.)
Do not designate "H" as mode parameter when specifying the "/Y" command.
(If "H" is specified a parameter error results and the function is terminated.)
This command will be normally terminated by the reception of termination command except termination due to
error condition.
If a script file name is specified, communication will be performed according to the contents of the script file that
exists on the communication partner side.
If a script file name that does not exist on the communication partner side is specified, an error code will be
returned. However, in PA-2400W-to-PA-2400W communication mode, a script file will not be processed.
Therefore, it will be ignored if specified.
C Language Interface
Calling Sequence
FLCE [/Y= { [Device], [Baud rate], [Mode] } ] [Script file name]
Parameters
Script file name
Specify a script file name that exists on the communication partner side. Always enclose a script file name
with quotation marks, “ “.
Startup Examples
Descriptions of parameters, such as those for file specification, are eliminated in these examples.
In addition, assume the local machine is PA-2400W.
Session with PC
Session between PA-2400W-and-PA-2400W
FLCE
Communic ati on par tner : Upl oad/d own loa d uti lity at host PC ( comm an d spec ifi cati on mo de)
FLCE "casio.scr"
Communic ation part ner: Upload/ dow nlo ad uti lity at host PC (ser ve r mod e)
FLCE /Y={COM1, , } "casio.scr"
Communication partner: Connected via cable to the Upload/Download utility at host PC
FLCE
Communication partner: FLCE /Y= { , ,H } /S
FLCE
Communication partner: FLCE /Y= { , ,H } /R
65
Page 66

7.14 Command and Status
Table 7.8
1 File transmission C C
2 File reception C C
3 File append C C
4 File/directory delete A B
5 File move/update A B
6 Directory creation - B
7Time setup A A
8 Time request - A
9 Message display - D
10 Buzzer ON - A
11 Acquisition of file information - A
12 Setup of file information - A
13 Acquisition of disk information - A
14 Acquisition of session ID/system information
15 IDLE notification
16 Termination command
Specification
by FLCE
StatusNo. Commands of the protocol
Remarks
Request by
partner
These commands are
for internal operations.
Meaning of the status
A : A command currently running or requested is displayed.
B : In addition to the displayed content in A above, file or directory that is being processed in the PA-2400W
is displayed.
C : In addition to the displayed content in A above, the progress of file being transmitted is displayed.
D : Text message transmitted by the communication partner is displayed.
When the FLCE is called, status display window appears. In this display window, there is a status display
which is described in Table 7.8 and the cancel button. The statuses A to D are displayed in the same status
display window.
66
Page 67

7.15 Retry Process When Downloading File
In this chapter, retry process for downloading files by the FLCE at time of a communication error is
explained.
7.15.1 Overview
The retry process for file transmission can be implemented by the file transmission command with update
option of the LMWIN. The update option enables file transmission only if a file to be transmitted by the
PA-2400W is not existed at the communication partner side of PA-2400W. The verification of files can be
done by verifying date/time of both the fi les. If the file to be transmit ted has a newer date/tim e than that of the
file at the communication partner side, or the same file is not existed in the communication partner side, the
file transmission can be possible.
At a time of retry to transfer files by using the file transmission command with update option, files that are
already transferred successfully can be skipped and only files that are not transferred can be transferred.
7.15.2 Retry Method
Preparation at PC
First, create script files for normal file transmission and retry file transmission (not using the script file for
normal file transmission, the retry process can be possible by using normal file transmission mode with
update option. However it takes a longer time.).
Example: Script file for normal file transmission
/S “c:\la\hpcall\*.*” “\”
/S “c:\la\hpcall\card\*.*” “\storage card\“
/S “c:\la\hpcall\soft\*.*” “\soft\“
For the script file of retry file transmission, append “U” to the /S option for the update option.
Example: Script file for retry file transmission
/SU “c:\la\hpcall\*.*” “\”
/SU “c:\la\hpcall\card\*.*” “\storage card\“
/SU “c:\la\hpcall\soft\*.*” “\soft\“
Using the LMWIN’s script editor, the U option can be appended by checking the checkbox of “Update” in
the Send menu.
67
Page 68

Preparation at PA-2400W
The flow of retry operation is as follows. The operation is recommended only if such error as 0x0100
protocol error (data error on line) or 0xA020 line broken error occurs.
FLCE “normal transmission.scr”
Return value = 0x0100 or 0xA020 ?
Retry counter +=1
Return value = 0x0100 or 0xA020 ? Yes
and retry counter < limited value ? Yes
According to the flow chart above, another retry after the initial retry operation can be possible. However, if
there is fatal error exists, recovery routine of the error may run into a trap and never be able to escape from it.
One time retry operation can recover from most of error states.
Fig. 6.xx
Yes
FLCE “retry.scr”
Fig. 7.1
No
7.15.3 Restriction
When you download a file to the PA-2400W where the same file exists, set up newer date time/date into
the file before downloading it. This will avoid unnecessary retry operation which is started up by the
time/date verification function.
68
Page 69

8. File Check Utility
8.1 Overview
The file check utility is used to check if an objective file has been successfully installed on the
communication partner-side of PA-2400W. This utility has the capability t o detect an installation error
irrespective of file transfer method used.
The transfer method involves a file transferred either between a host PC and PA-2400W or between two
PA-2400Ws. It also includes copy operations from the card. The term, "host PC", includes a personal
computer (PC) and PA-2400W which emulate the operation of PC.
8.2 List of Commands
The file check utility includes the following commands.
Table 8.1 List of commands
Command Description
List file generation Generates a list file required for file checks (at file transmission side).
List file comparison Compares list files (at file reception side).
Note:
Widows CE can check if the FCHKCE.EXE has been transferred to PA-2400W or not. However, if there is
any broken part of the file in the header, the program may run without showing error indication.
69
Page 70

8.3 Operation Method
This File Check Utility is to check if a file has been correctly copied to other PA-2400W or not.
In this chapter, operating method to copy a file from PC to PA-2400W via RS-232C interface is described.
Downloading file from PC to PA-2400W
Transmission side (PC)
Reception side (PA-2400W)
RS-232C Interface
Fig. 8.1
Operation:
1) Set a file correctly at the PC side which is to be downloaded to PA-2400W.
2) Specify the file at command line and creation of list file (FCHK.LOG).
3) Create list fil e on tra nsmi ssion side o f PC by using the Fil e Check utility .
FCHK /G [/Option] <file name list or Script file name>
<Destination directory name> [FCHK.LOG File output Directory name]
FCHK.LOG file is generated [FCHK.LOG file = list file]
4) As file is copied to PA-2400W (use H/PC’s Explorer, etc. to copy), FCHK.LOG file should be
copied as well to the <Destination directory name> directory file that is specified by parameter.
(FCHK.LOG file must be copied along with the file.)
5) By having the File Check utility run on the PA-2400W, make sure that the file and list file
(FCHK.LOG) are correctly copied (transferred from PC to PA-2400W).
70
Page 71

Copying file with PC card (from PA-2400W to PA-2400W)
py
py
Transmission side (PA-2400W)
Co
PC card PC card
Fig. 8.2
Operation:
1) Set a file correctly at the transmission side of PA-2400W.
2) Specify a file (to be copied) in script file and creation of list file (FCHK.LOG) in the same
script file.
3) Create list file on the transmission side of PA-2400W by using the File Check utility.
FCHK /G /SC <Script file name> <Destination directory name>
FCHK.LOG file is generated [FCHK.LOG file = list file]
4) As file is copied to an installed PC card (use the icon “My Handheld PC” to copy),
FCHK.LOG file should be copied to the card as well.
5) Copy the file to specified directory (use the icon “My Handheld PC” to copy) on the
reception side from the card. After copying the file, have the File Check utility run on the
reception side to check if both the files, file to be copied and list file (FCHK.LOG), are
copied correctly.
Reception side (PA-2400W)
Co
71
Page 72

8.4 Describing Method
8.4.1 Pathname
Always enclose a pathname in a pair of quotation marks. One pathname must be 255 characters or less
including the two quotation marks. A 2-byte code character is counted as one character.
Example: FCHKCE /G "\casio data\*.dat" "d:\data\" "\casio data\"
Pathnames should be described in accordance with the path naming rules supported by OS of machine
on which the specified path is to be placed.
Observe the following rules for drive letters if describing pathnames:
Specify a pathname on the PA-2400W so it begins with the root directory (of My Handheld PC) and do
not include a drive letter.
If a pathname with a drive letter is specified, the drive letter will be ignored by the FCHKCE on the
PA-2400W side (This pathname specification is treated equal to a specification from the root directory
without a drive letter.)
If the communication partner (PC, etc.) runs on an OS that requires drive letter specification, and if the
PA-2400W requires the pathname of a file or directory on the partner side to be specified, always attach
the appropriate drive letter.
8.4.2 Rules of Naming File and Directory Pathnam e
Table 8.2
8.3 Format Long File Name Drive letter
Windows 95/Windows NT O O Required (Error if omitted)
DOS O X Required (Error if omitted)
Windows CE O O Not required (ignored if written)
O : Specification permitted
X : If specified, results in invalid pathname and termination by error.
72
Page 73

8.5 Details about Command and Option
The total number of characters must be 255 characters or less including "FCHKCE".
If at least one incorrect parameter, such as an incorrect description, an incorrect command, or an option
that is not permitted to make a specification to the command, exists, the file check utility is not initiated
but is terminated by the error.
Separate the parameters by inserting a space (1-byte) between two parameters.
The /G option or /C option should be placed immediately after "FCHKCE".
To specify multiple transmission source file names, separate the pathnames with a space (1-byte).
Examples of Correct Startup :
FCHKCE^/G^"\casio data\data1.dat"^"\casio data\data2.dat"^"d:\data\"^"\casio data\"
^ : Space code
FCHKCE^/G^/SC^"\casio data\fchkce.scr"^"\casio data\"
FCHKCE^/C^"\casio data\"
Example of Incorrect Startup (no /G or /C option):
FCHKCE "\casio data\data1.dat" "\casio data\data2.dat" "d:\data\" "\casio data\"
Uppercase and lowercase characters can be used for commands and options.
The order in which options other than /G or /C is specified does not matter.
Examples of specification for command and option:
FCHKCE /g /r /AO
FCHKCE /G /ao /R
73
Page 74

8.6 Command of FCHKCE
8.6.1 Generation of List File
If the names of files to be transferred (copied) from PA-2400W are specified, this command will create
a list of files to be transferred (copied) and a list file that contains the checksum data calculated from all
the files to be transferred. Furthermore, the checksum data of this list file is also generated. The name of
a list file created with this command is set to "FCHK.LOG".
If the list file is successfully created, a return value “0” will be passed to this command as the program
termination code. If list file creation fails, this command receives a return value that is not "0" and is
abnormally terminated. In either case a history file is generated.
(FCHKG.HIS is created in [FCHK.LOG File output Directory name]).
The history file is generated to track the process of creating a list file. The user must transmit (copy) the
list file generated by this command to the partner station (child machine side) when performing any file
transfer (file copy).
Information to be set in the list file includes:
1) File size
2) Date and time of update
3) Transfer (copy) destination pathname (file name)
4) Number of transferred (copied) files
5) Checksum data of all the transferred (copied) files
6) Checksum data of list file
The checksum data of all the transferred (copied) files consists of the result in which each piece of
double-word data in all the objective files is XORed sequentially from beginning to end.
However, the checksum data of a list file is generated to obtain the sum of each double-word
contained in the list file, then a value is calculated that offsets the sum to zero. Use this offset value as
the checksum data.
The checksum data will be outputted as a list file as follows:
FILE_CHECKSUM=HHHHLLLL ( HHHH: HIGH-WORD / LLLL: LOW-WORD )
LIST_CHECKSUM=HHHHLLLL ( HHHH: HIGH-WORD / LLLL: LOW-WORD )
If an error occurs while generating the checksum of the list file (FCHK.LOG) which has already been
generated, the list file will be aborted. However, a generated list file will not be deleted even if an error
occurs during the analysis of command parameters.
74
Page 75

8.6.2 Comparison by List Fi le
With this command the following comparison will be made:
Comparison between the file information transferred (copied) by the PA-2400W (parent machine) and
the contents of the list file (FCHK.LOG).
Comparison between the checksum data of the list file and the result of checksum calculation
performed again for the list file.
Comparison between the checksum data included in the list file and the result of checksum calculation
performed again for all the entire files that were transmitted (copied).
If list file comparison is successfully completed, a return value “0” will be passed to this command as
the program termination code. If list file comparison fails, this command receives a return value that is
not "0" and is abnormally terminated. In either case a history file is generated (FCHKC.HIS is created
in [FCHK.LOG file pathname]). The history file is generated as track the process of comparing the
transmitted (copied) file and the list file.
The objective information to be compared in the files includes:
1) File size
2) Date and time of update
3) Transfer (copy) destination pathname (file name)
4) Number of transferred (copied) files
5) Checksum data of all the transferred (copied) files
6) Checksum data of list file
The checksum data of all the transferred (copied) files consists of the result in which each piece of
double-word data in all the objective files is XORed sequentially from beginning to end.
However, the checksum data of a list file is generated to obtain the sum of each double-word contained
in the list file, then a value is calculated that offsets the sum to zero. Use this offset value as the
checksum data.
75
Page 76

8.7 Format of List File
The format of list file to be generated with the file check utility is shown below.
<
FCHKLOG> :: = <FILENO> <FILEINFO> <FILECHECKSUM> <LISTCHECKSUM> null
<FILENO> :: = FILE_NO= <dec_num> <LS>
<FILEINF O> :: = <INF O> <LS>
<INFO> :: = <PATH> SP <SIZE> SP <DATE>
<LS> :: = CR
<FILECH ECK SUM > : : = F IL E_C H ECK SU M= <h ex _ch a r> <LS >
<LISTCH ECK SUM > : : = LI S T_C H ECK SU M= <h ex _ch a r> <LS >
<dec_num> :: = decimal number
<hex_char> ::= hexadecimal number represented by characters.
Example:
FILE_NO=3
“A:\AP\MENU.EXE” 12345 19960728-0630
“A:\CONFIG.SYS” 1000 19960308-2058
“A:\AUTOEXEC.BAT” 512 19960206-2340
FILE_CHECKSUM=XXXXXXXX
LIST_CHECKSUM=XXXXXXXX
76
Page 77

8.8 Syntax Analysis of Scr ipt File
If a script file name is specified when generating a list file, the syntax of the script file is analyzed as follows
before generating the list file. The specifications of the script file syntax is given below.
<SCRIPT FILE> :: = <COMMANDS>
<COMMANDS> :: = <COMMANDS> <COMMAND> | null
<COMMAND> :: = ?/? <CMDBODY> <LS>
<CMDBODY> :: = <APPEND>
| <CHILD_PROC>
| <DELETE>
| <FORMAT>
| <BEEP>
| <RENAME>
| <RECEIVE>
| <SEND>
| <PRINT>
| <TIME_ADJUST>
| <END_SESSION>
<APPEND> :: = <APPEND_CMD> <APPEND_OPTION> <SP> <PATHNAME_PAIR>
<CHILD_PROC> :: = <CHILD_PROC_CMD> <SP> <CMD_PARAMETER>
<FORMAT> :: = <FORMAT_CMD> <SP> <DRIVE>
<BEEP> :: = <BEEP_CMD>
<RENAME> :: = <RENAME_CMD> <SP> <PATHNAME_PAIR>
<RECEIVE> :: = <RECEIVE_CMD> <OPTIONS> <SP> <PATHNAME_LIST>
<SEND> :: = <SEND_CMD> <OPTION> <SP> <PATHNAME_LIST>
<PRINT> :: = <PRINT_CMD> <SP> <STRING>
<TIME_ADJUST> :: = <TIME_CMD> <SP> <TIME_VALUE>
<END_SESSION> :: = <END_CMD> <PARAM>
<APPEND_CMD> :: = 'A'
<CHILD_PROC_CMD> :: = 'C'
<FORMAT_CMD> :: = 'F'
<BEEP_CMD> :: = 'B'
<RENAME_CMD> :: = 'N'
<RECEIVE_CMD> :: = 'R'
<SEND_CMD> :: = 'S'
<PRINT_CMD> :: = 'P'
<TIME_CMD> :: = 'T'
<END_CMD> :: = '/'
77
Page 78

<PATHNAME_PAIR> :: = <PATHNAME> <DELM> <PATHNAME>
<CMD_PARAMETER> :: = <CMD_NAME> <STRING>
<CMD_NAME> :: = <PATHNAME>
<PATHNAME_LIST> :: = <PATHNAME> <DELM> <PATHNAME_LIST> | <PATHNAME>
<DRIVE> :: = <DRIVE_LETTER> ':'
<TIME_VALUE> :: = <DATE> <TIME>
<OPTIONS> :: = <OPTIONS> <OPTION> | null
<OPTION> :: = <RECURSIVE_OPTION> | <UPDATE_OPTION>
<RECURSIVE_OPTION> :: = 'R'
<UPDATE_OPTION> :: = 'U'
<APPEND_OPTION>::='S' | 'R'
<STRING> :: = ""<CHARS>""
<DELM> :: = <SP>
<LS> :: = CR | <SP>
<SP> :: = <SP> SP | SP
<PARAM> :: = <SP> <NUMBER>
With this file check utility <CMD_BODY> is searched in the objective script file. If <SEND> (='S' :
See Note is found in the <CMD_BODY>, <PATHNAME_LIST> line that follows, <SEND> is
determined to be the destination pathname and a list file (FCHK.LOG) is generated.
Other <CMD_BODY> lines not accompanying <SEND> will be ignored in the list file generation.
Note :
The commands and options that can be the objective of generating a list file are given below.
1) "/S"
2) "/SO"
3) "/SR"
4) "/SOR"
5) "/SRO"
78
Page 79

8.9 Error Messages/Codes
Table 8.3
Code Message Meaning Remedy
The making of list file completed.
00
The contents of list file agreed.
Specified pathname not found.
01
The list file making error.
02
FCHK.LOG not found.
03
The contents of list file didn’t agree.
04
(The pathname discords)
The contents of list file didn’t agree.
05
(The size discords)
The contents of list file didn’t agree.
06
(The date/the time discord)
The contents of list file didn’t agree.
07
(All the file check-sum data discord) .
The contents of list file didn’t agree.
08
(The list file check-sum data discord)
Script file not found
09
Script file syntax error
0A
List file read-in error
0B
Illegal option
0C
Parameter error
0D
Script file read-in error
10
File size excess over the size of script
11
file.
Number of files excess ov er the
12
number of log-in f iles .
13 Output pathname of specified list file
wasn’t found.
Normal termination Not necessary.
File name specified by list file does
not exist.
Physical error occurs during list
file creation.
List file (FCHK.LOG) could not
be found by list f ile chec k.
Verification result of list file check is
not matched. (No pathname
matched)
Verification result of list file check is
not matched. (No size matched)
Verification result of list file check is
not matched. (No date/time matched)
Verification result of list file check is
not matched.
(No all file check-sum matched)
Verification result of list file check is
not matched. (No check-sum data of
the list files matched)
Script file with specified file name
was not found.
Specified script file includes sy ntax
error.
Physical error occurs during list file
check while the list file
(FCHK.LOG) was being read.
Startup option is illegal. Review the start-up option.
Specified parameter has error. Review the specified parameter.
Error occurs in the process of reading
in script file.
The size of s pec if ied sc ri pt fi le i s
32,001 bytes or greater.
There are 65,001 files or m ore that
are to be logged in.
Output destination pathname of the
specified FCHK.LOG file was not
found.
Specify an existing pathname or
file name.
Execute the same program agai n.
Specify directory where the list
file is located.
Start up the file check utility
again from the beginning.
Start up the file check utility
again from the beginning.
Start up the file check utility
again from the beginning.
Start up the file check utility
again from the beginning.
Start up the file check utility
again from the beginning.
Specify directory where the
script file is located.
Re-write the script file correctly.
Execute the same program agai n.
Execute the same program agai n.
Reduce the script file size to
32,000 bytes or less.
Reduce the number of objective
files to 65,000 or less
Specify directory that actually
exists.
79
Page 80

8.10 Restriction
Because of the limitation from Windows CE some of the files contained in the “\Windows\” folder cannot
be duplicated. As a result, they will not be listed in the list file.
80
Page 81

8.11 Details of Command and Option
Title Command
If the names of files to be transferred (copied) from the PA-2400W are specified, this command will create a list of
files to be transferred (copied) and a list file that contains the checksum data calculated from all the files to be
transferred. It also calculates the checksum data of this list file.
The maximum number of objective files that can be logged is 65,000.
The maximum size of a script file is 3,200 bytes.
C Language Interface
Calling Sequence
FCHKCE /G [</Option>] <file name list or script file name > <Destination directory name >
[<FCHK.LOG file output directory name>]
Return Value
Return code (refer to Chapter 8.9 “Error Messages/Codes”.)
Parameters
Option /SC: Specification of a script file name
/R: Specification of recursive call
All the files that exist under the directory specified by the parameter of the file pathname are used
The hierarchical directory system has a maximum depth of sixteen levels.
If this option is not specified, only files that are designated by the file names list can be the
If the FCHK.LOG file exists in the directory specified by [FCHK.LOG file output directory
If the FCHK.LOG file does not exist in the directory specified by [FCHK.LOG file output
This append output is achieved in such a simple way that a new list file is appended to the end of
Describe the list of files to be transmitted (copied). These files should be located on the
A wild card can be used for file name.
If the “/SC” option is specified, also specify the pathname of the script file.
(Parameters in [ ] can be omitted.)
The objective script file is specified by this parameter to indicate the file name.
FCHKCE.EXE will analyze the file names to be transmitted against the contents of this script file
and then create a list file.
as the objective of creating a list file. If the specified directory has sub-directories, files located in
them are also used as the objective of creating a list file.
objective of list file creation.
/AO: Append output
name], log file will be created and appended to the FCHK.LOG file.
directory name], a new log file will be created. (However, if the specified directory itself does
not exist, this command will be abnormally terminated.)
existing list file. If part of the existing list file needs to be modified, create a list file again
instead of performing this append output.
File name list or Script file name
transmission (copy) source side. As the last input parameter of this command describe the
destination directory name of the communication partner side. If the specified directory does not
exist, it will be automatically created under the specified name. If specifying multiple
transmission (copy) source file names, separate the pathnames with a space (1-byte).
FCHKCE /G
81
Page 82

Destination directory name
Specify the destination directory name of the file transmission (copy).
Specify the directory name in accordance with the naming rules of OS used on the transmission
(copy) destination side.
If “/SC” option is specified, this parameter can be disabled.
Add a "\" to the end of the directory name as the delimiter.
Example: “b:\” Root directory specification
“b:\PA\12\” Sub-directory specification
“b:\PA” Incorrect specification
FCHK.LOG file output directory name
Specify the output destination directory name of the FCHK.LOG file.
Specify the directory name in accordance with the naming rules of OS on the local machine
side.
Add a "\" to the end of the directory name as the delimiter.
If this parameter is omitted, the FCHK.LOG file will be created in the current directory.
Example: “b:\” Root directory specification
“b:\PA\12\” Sub-directory specification
“b:\PA” Incorrect specification
Startup Examples
FCHKCE /G “\casio\
.dat” “\casio data\“ “\casio\“
This transfers all files under the "\casio\" directory of the transmission side of PA-2400W which
have a "dat" extension to the "\casio data\" directory of the communication partner side.
And, create list file in the “\casio\
directory of the transmission side.
”
FCHKCE /G /R “\casio\
.dat ” “\casio dat a\“ “\casio\“
This transfers all files under the "\casio\" directory (including sub-directories) of the transmission
side of PA-2400W which have a "dat" extension to the "\casio data\" directory of the communication
partner side. And, create list file in the “\casio\
FCHKCE /G /SC “\casio\fchkce.scr” “\casio\“
directory of the transmission side.
”
This creates list file in the "\casio\" directory of the transmission side of PA-2400W by following content
of script file “fchkce.scr” in the "\casio\" directory of the transmission side.
82
Page 83

Title Command
FCHKCE /C
This command will perform the following comparisons; a comparison between the file information transferred
(copied) from the partner station (parent machine) and the contents of the list file (FCHK.LOG), a comparison
between the checksum data of the list file and the result of checksum calculation performed again for the list file,
and a comparison between the checksum data included in the list file and the result of checksum calculation
performed again for all the files that were transmitted (copied).
There can be a maximum of 65,000 objective files for comparison.
C Language Interface
Calling Sequence
FCHKCE /C [</Option>] <FCHK.LOG file pathname >
(Parameters in [ ] can be omitted.)
Return Value
Return code (refer to Chapter 8.9 “Error Messages/Codes”.)
Parameters
Option /D: Does not compare the update data.
Generally, the update date/time will be automatically changed to the current time of
PA-2400W if file transfer is performed through Explorer of PA-2400W.
Set this option to omit the update date/time from the objective of comparison.
(A copy operation performed between the FLCE and PC card will not update the date/time.)
FCHK.LOG file pathname
Specify the pathname of the FCHK.LOG list file in accordance with the naming rules of OS.
Total number of files which can be verified is 65,000 or less. Value of “FILE_NO=” is
65,001 or greater will cause error and force the utility to be terminated.
Startup Example
FCHKCE /C “\casio data\“
This checks all transferred files by following content of list file in the “\casio data\“ directory of the
transmission side of PA-2400W.
83
 Loading...