

Page 1
MA1309-EA
© 2013 CASIO COMPUTER CO., LTD.
Operation Guide ITM-461
Features
••• Temperature•sensor•for•tempera ture•reading•display.
••• Humidity•sensor•for•humidity•reading•display.
Specifications
Quartz Oscillation Frequency:•32,768Hz
Display Contents:••Analog:•Hour,•minute,•second•(3hands)
Digital:•Humidity ,•temperature
Accuracy:•±30•seconds•per•mont h
Temperature:••Measurement•Range:•–19.9°C•to•49.9° C
Display•Unit:•0.1°C•
Measuring•Accurac y:•±2°C•(0°C•to•40°C)
Humidity:••Measurement•Range:•
• 20%•to•90%•(Result•reading•at•5°C•to•45°C)•
Display•Unit:•1%•
Measuring•Accurac y:•±10%•(5°C•to•40°C)•
(Example:•Reading•of•40%•to•60%•will•be•dis played•when•
humidity•is•50%.)
••• A•temperature•reading•and•humi dity•reading•are•taken•
each•minute.
Main Element:••Tuning•fork•type•high-performance•quartz•oscillator,•
CMOS-LSI
Operating Temperature:••–10•to•50°C
••• The•LCD•may•become•difficult•to•read•at•temp eratures•outside•of•
the•range•(0•to•40°C).
Battery:••Two•AA-size•alkaline•batte ries•(Type:•LR6)
Battery Life:••Approximately•1•year
Dimensions:•343(H)×343(W)×49(D)•mm
Weight:••Approximately•1200g•(including•batteries)
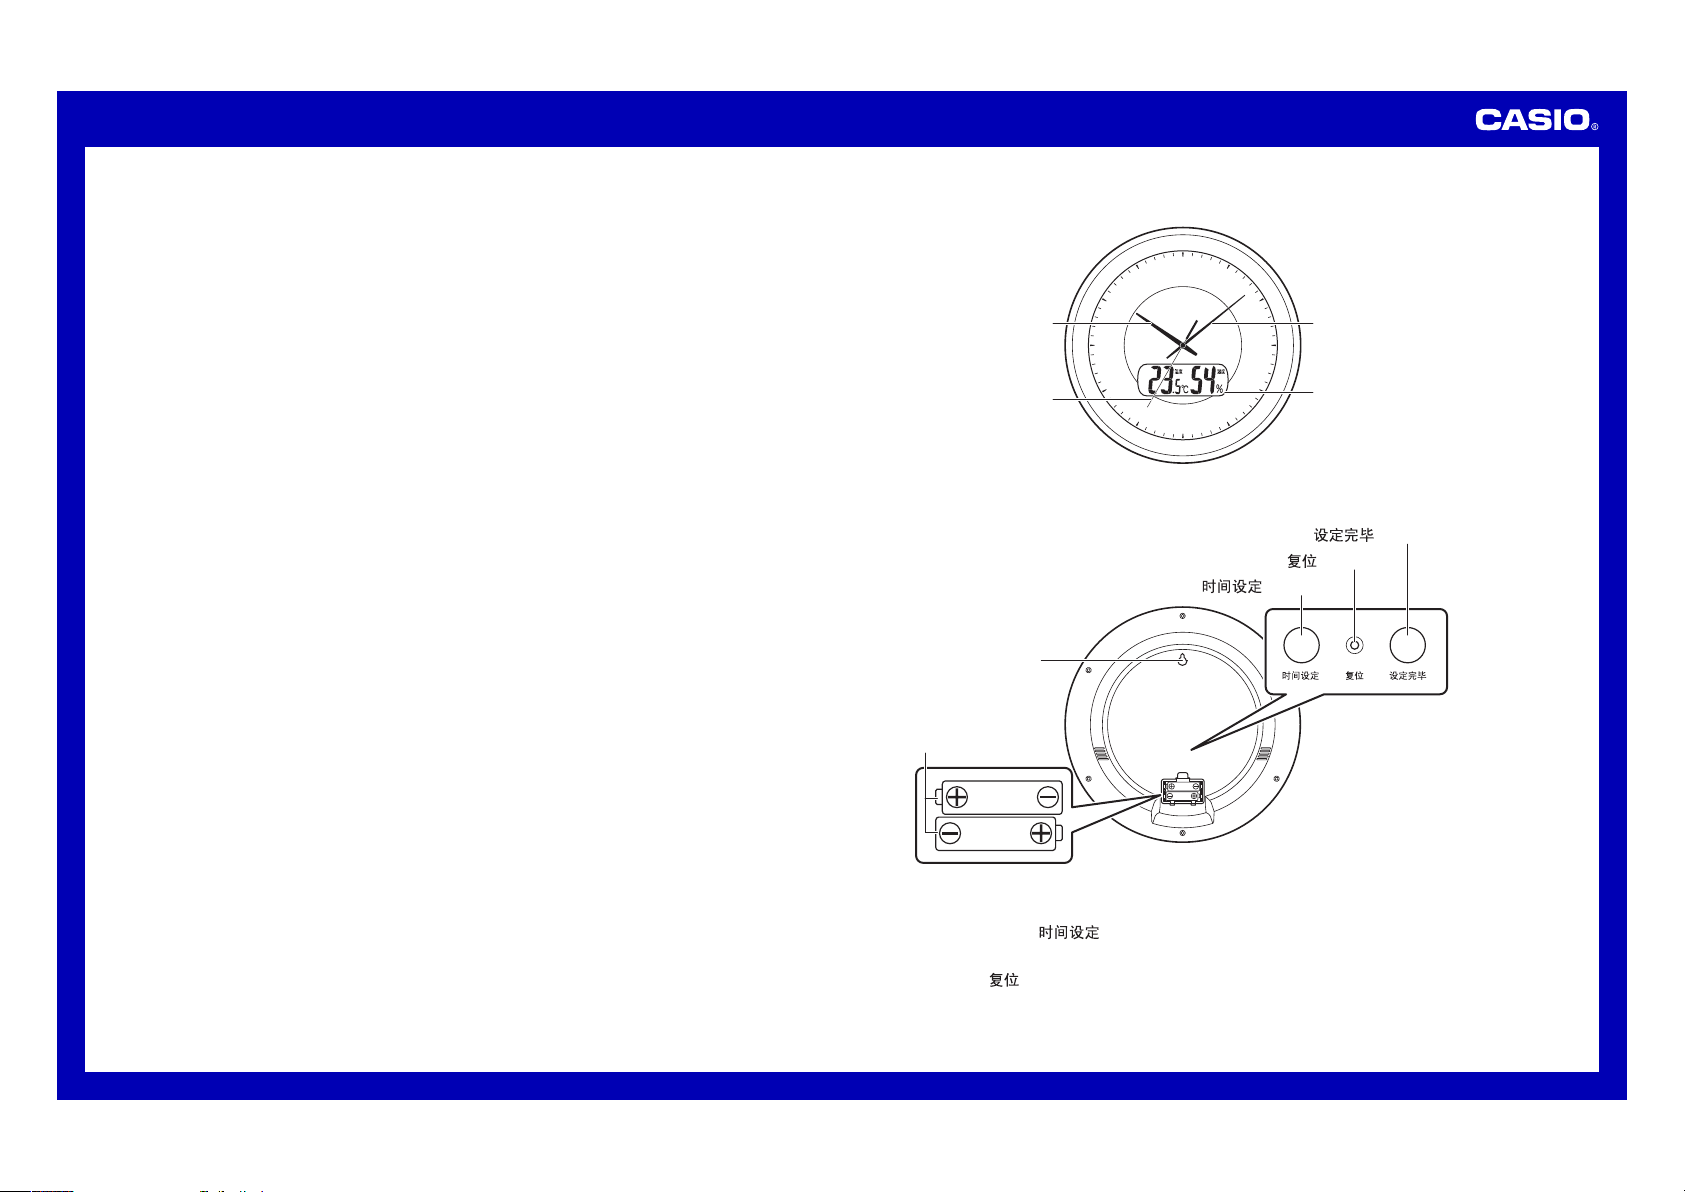
General Guide
(Front)
Hour•Hand
9
Second•Hand
(Back - Battery cover open)
Time adjustment end ( ) button
3
Adjust time ( ) button
1
Wall•hang•hole
Two•AA-s ize•
alkaline•batteries•
(LR6)
12
111
210
3
48
57
6
Reset ( ) button
2
Minute•Hand
Digital•display
••• The•actual•appear ance•of•the•clock•depends•on•the•model.
• Adjust time (
1
Use•this•button•to•adjust•the•current•time•setting.
• Reset (
2
Be•sure•to•press•this•button•after•replacing•the•batteries.
••• If•you•have•troub le•pressing•this•button,•use•a•thin,•pointed•
object•to•press•it.•Take•care•to•avoid•dama ging•the•clock.
) button
) button
1
Page 2
Operation Guide ITM-461
••Time adjustment end (
3
Press•this•button•to•exit•the•time•adjustment•operation.
QQ
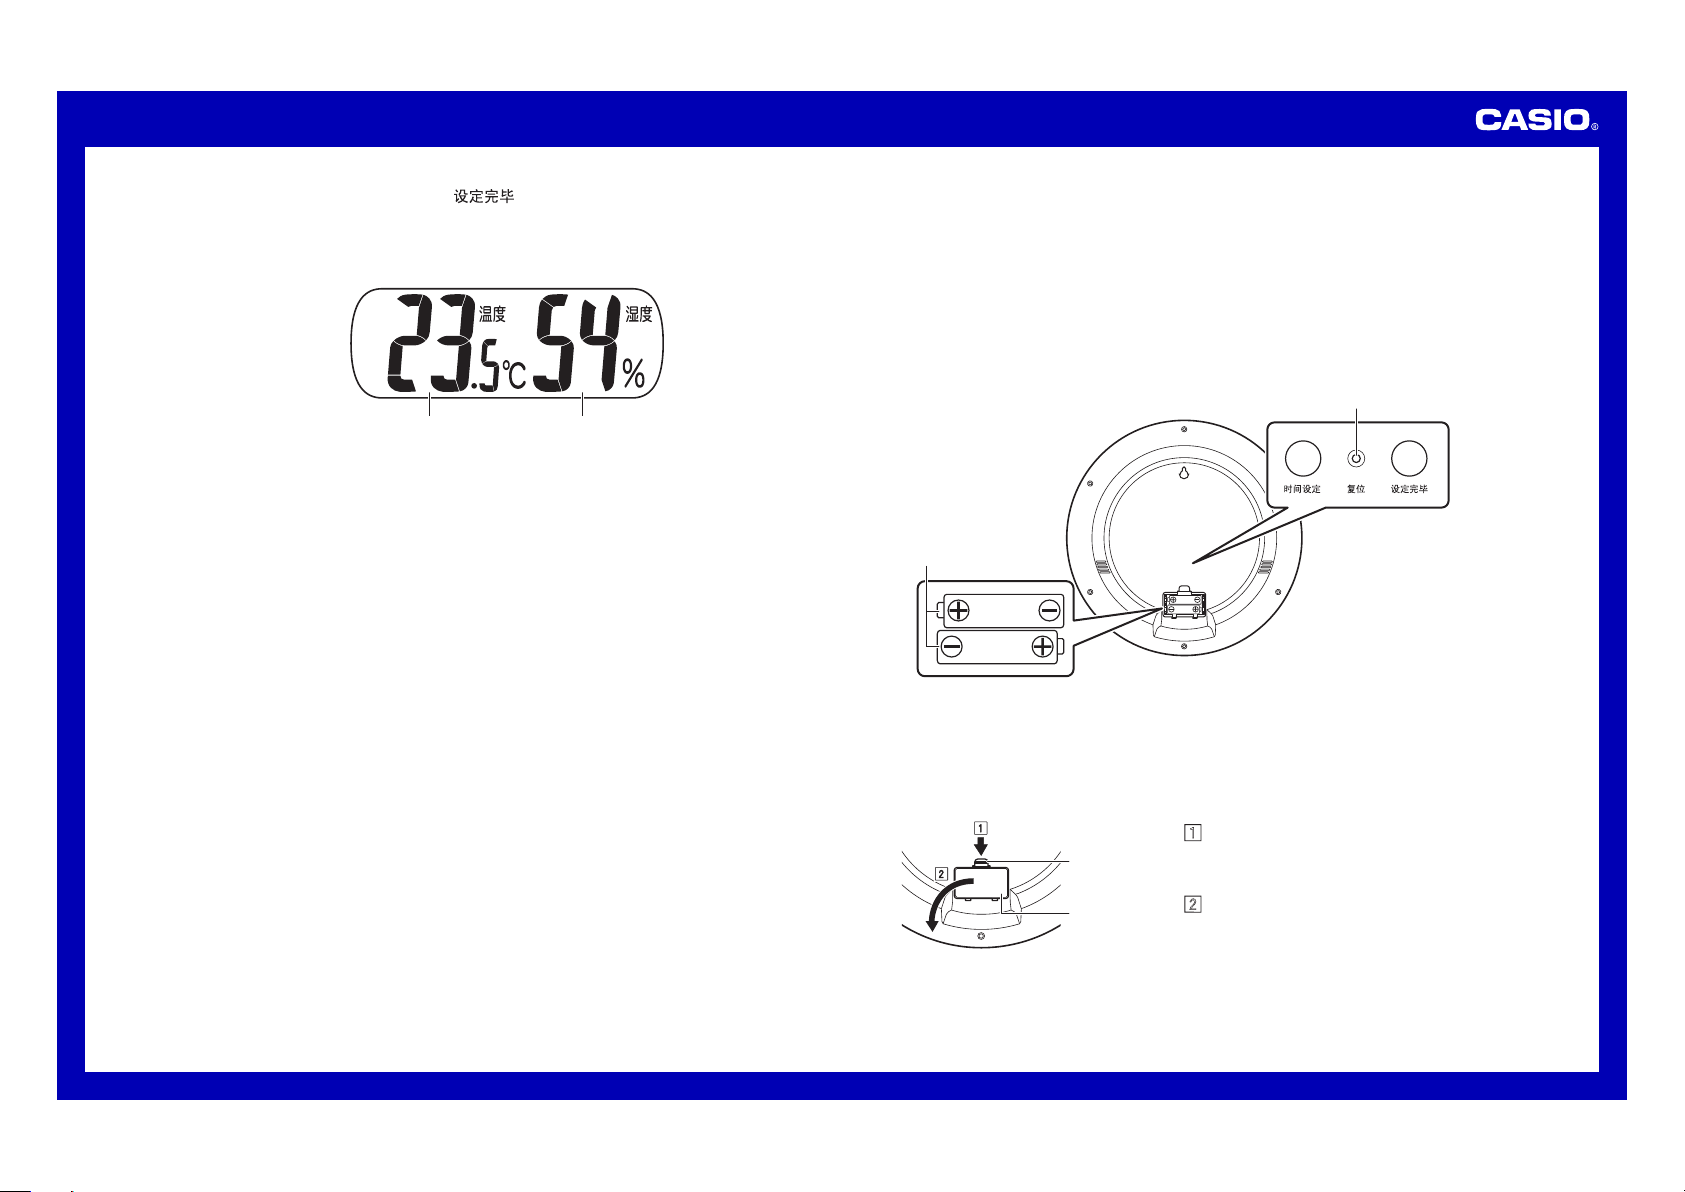
Digital Display Contents
Temperature Humidity
QQ
Temperature and Humidity Readings
The•temperature•and•humidity•reading•displa yed•by•the•cl ock•are•
based•on•measurements•taken•by•the•clock’s•built-in•temp erature•
and•humidity•sensors.•Even•if•there•is•a•sudden•change•in•
temperature•and/or•humidity,•it•can•take•up•to•about•30•minutes•until•
the•reading•is•reflected•on•the•clock•display.•This•is•because•it•take s•
time•for•conditions•inside•the•clock•match•conditions•outside.•Also,•
do•not•leave•the•clock•near•an•air•conditioner•air•outlet•when•using•
sensors.
••• The•clock•takes•temperature•and•humidity•readings•once•every•
minute•(except•while•a•time•setting•operation•is•in•prog ress).
••• Temperature•readings•continue•to•be•taken•at•temperatures•lower•
than•0°C•and•from•40.1°C•and•higher,•but•su ch•readings•a re•
outside•the•guara nteed•range.
••• The•displayed•temperature•reading•will•show•“LO”•when•the•
temperature•is•lower•than•–19.9°C•and•“HI”•when•it•is•higher•than•
49.9°C.
••• The•displayed•humidity•reading•will•show•“LO”•when•the•humidity•
is•lower•than•20%•and•“HI”•whe n•it•is•higher•than•90%.
••• The•displayed•humidity•reading•will•show•“-•-”•when•the•
temperature•is•outside•the•range•of•5°C•to•45°C.
Power Supply
••• Your•clock•runs•on•two•AA-size•alkaline•batteries.
••• Whenever•possible•use•CASIO•specified•batteries•or•equivalents.
••• Be•sure•to•remove•the•batteries•from•the•clock•when•you•do•not•
plan•to•use•it•for•a•long•time.
) button
QQ
Replacing Batteries (Replace both batteries!)
1.••Open•the•battery•cover•then•remove•the•old•batteries.•(Refer•to•
“To•open•the•batt ery•cover”•be low.)
2.••Taking•care•to•ensure•that•their•plus•(+)•and•minus•(–)•ends•are•
facing•correctly,•load•two•new•batteries.•Press•them•into•place•as•
far•as•they•will•go.
3.••After•replacing•the•batteries ,•press•the•reset•button.
4.••Close•the•battery•cover.
(Back - Battery cover open)
Two•AA-s ize•
alkaline•batteries•
(LR6)
••• If•you•have•troub le•pressing•this•button,•use•a•thin,•pointed•object•
to•press•it.•Take•care•to•avoi d•damaging•th e•clock.
••• The•actual•appear ance•of•the•clock•depends•on•the•model.
QQ
To open the battery cover
1• Press•downwards•on•the•hook•
Hook
Battery•
Cover
of•the•battery•cover•with•your•
fingertip.
2• While•pressing•down•on•the•
hook,•swing•the•battery•cover•
outwards•to•open•it.
Reset button
2
Page 3

Operation Guide ITM-461
Important!
QQO
Ensure that the plus (+) and minus (–) ends of the batteries
are facing correctly when you load them.
QQO
The symptoms listed below indicate that battery power
is getting low. Replace batteries as soon as possible
after any one of these symptoms occurs. Regular battery
replacement is recommended.
••• Incorrect•operati on•(resetting•of•time,•incorrect•timeke eping,•
etc.)
••• Dim•display•figure s•or•blank•di splay
••• Slow•or•stopped•timekeeping•(analog•model)
••• Even•if•the•clock•is•operating•normally,•be•sure•to•repl ace•
the•batteries•at•least•once•a•year.
QQO
The batteries are not chargeable. Never try to charge them.
••• Store•batteries•out•of•the•rea ch•of•small•children.•Should•
anyone•ever•accidentally•swallow•a•battery,•contact•a•
physician•immedia tely.
••• Should•a•battery•ever•leak,•immediately•wipe•up•the•fluid ,•
without•allowing•it•to•come•into•contact•with•your•skin.
Using the Clock for the First Time
1.••Load•batteries.•(Refer•to•“Replacing•Batteries”.)
Open•the•battery•cover•on•the•back•of•the•c lock•and•correctly•
load•batteries•ensuring•that•their•plus•(+)•and•minus•(–)•ends•of•the•
batteries•are•facing•correctly.
••• Loading•batteries•will•cause•the•hands•of•the•clock•to•
start•changing•automatically•until•they•reach•12:0000•
(hour:minute:second).
••• The•hands•always•move•clockwise.•They•do•not•move•
counterclockwise.•
2.••Press•the•reset•button•on•the•back•of•the•clock.•(Reset•Operation)
••• After•the•reset•operation•is•complete,•clos e•the•battery •cover.
••• When•the•hands•stop•at•12:0000•press•the•time•adjustment•
end•button.•This•will•cause•the•hands•to•st art•normal•
timekeeping•movement.
12
111
210
9
Reset button
Press
3
48
57
6
3
Page 4

Operation Guide ITM-461
Configuring Time Settings
1.••Press•the•adjust•time•button•to•enter•the•time•adjustme nt•mode.
Time•the•pressing•of•the•adjus t•time•button•so•the•second•hand•of•
the•clock•stops•at•around•12o ’clock.
This•will•cause•the•hour•hand,•minute•hand,•and•second•hand•to•
stop•and•enter•the•time•adjustment•mode.
12
111
210
9
Adjust time button
Press
2.••Press•the•adjust•time•button•again.
This•will•cause•the•minute•hand•to•start•moving.•The•hou r•hand•will•
also•move•in•accordance•with•minute•hand•movement.
Press•once:•Time•setting•advan ces•one•minute.
Hold•down•for•two•seconds:••Hour•han d•and•minute• hand•move•at•
••• To•keep•from•going•past•your•desired•settin g•with•high-speed•
hand•movement,•move•the•hands•until•the•set ting•is•about•
10minutes•before•your•desired•setting.•Then•move•the•minute•
hand•in•one-minute•increments•until•your•setting•is•reached.
••• The•clock•does•not•distinguish•between•a.m.•and•p.m.
Hour hand, minute hand,
and second hand stopped.
high•speed.
3
48
57
6
3.••Press•the•time•adjustment•end•button.
Time•the•pressing•of•the•time•adjustment•end•button•with•the•
sounding•of•a•time•signal•on•the•TV,•on•a•t elephone•time •service,•
etc.•This•will•exit•time•adjustment•and•start•normal•second•hand•
movement.
••• Note•that•the•clock•will•exit•time•adjustment•automatically•if•you•
do•not•perform•any•operation•for•about•three•minutes.
12
111
210
3
48
57
6
Time adjustment end button
Press
9
Second hand movement
restarts.
Adjust time button
Press
12
111
210
9
Hour hand and minute hand
move at high speed.
3
48
57
6
4
Page 5

Operation Guide ITM-461
Wall mounting example
Put•the•clock•in•the•location•where•you•want•to•use•it.
Important!
QQO
After hanging the clock onto a hook, screw, etc., move the
clock upwards, downwards, left, and right, and pull lightly
towards you to make sure it is secure. A clock that is hung
in a way that is not secure can fall and cause accidents.
QQO
Make sure that the clock is straight while hanging, and is
not at an angle.
OK NG
12
111
210
9
3
48
57
6
111
12
210
9
3
48
57
6
Screw•diameter:•4•to•5•mm
Wall
10mm
Screw
Screw•head•diameter:•6•to•8•mm
Important!
QQO
Be sure to use a screw that is strong enough to support
the weight of the clock.
••
5
 Loading...