

Page 1

User Guide
Page 2

Important Customer Information
Data Plans and Features:
Content and Internet Access
Many ser vices and applications offered through your device may
be provided by third parties. Before you use, link to or download
a service provided by a third par ty, or an application such as a
non-Verizon Wireless location-based GPS type ser vice, chat room,
marketplace or social network from your device, you should review
the terms of such service or application and applicable privacy policy.
Personal information you submit may be read, collected or used
by the service or application provider and/or other users of those
forums.
Verizon Wireless is not responsible for any information, content or
services you access, download or use from the Internet.
You are responsible for maintaining virus and other Internet security
protections when accessing service. For additional information, visit
the Verizon Content Policy at
http://responsibility.verizon.com/contentpolicy
Your Verizon Wireless Customer Agreement terms and conditions
and cer tain other specially identified terms govern your use of any
Verizon Wireless product or service.
Page 3

Contents
Gett ing St arted with Your Phone ............................... 6
Phone overview ............................................................................6
Feature overview .........................................................................11
Inserting and removing the battery ..............................................13
Removing and inserting a microSD card .....................................17
Inserting the SIM Card ................................................................19
Charging the phone ....................................................................20
Touchscreen operations ..............................................................21
Turning the phone on and off ...................................................... 24
Setup Wizard .............................................................................. 25
Basic s ...................................................................... 27
Turning the screen on and off ......................................................27
Getting to know the Home screen...............................................28
Monitoring your phone’s status ...................................................30
Managing notifications ................................................................32
Opening and switching applications ............................................35
Customizing the Home screen ....................................................36
Working with widgets ..................................................................39
Working with menus ...................................................................45
Quickly connecting to your contacts ...........................................46
Silent mode ................................................................................47
Airplane mode ............................................................................48
Selecting an application to be opened by the Tactile Key ............48
Locking your screen ....................................................................49
Optimizing battery life ..................................................................50
Entering and Editing Text ........................................ 52
Entering text ...............................................................................52
Editing text ..................................................................................57
Phone ....................................................................... 59
Placing a call ...............................................................................59
Answering a call ..........................................................................61
Operation during a call ................................................................ 63
Managing multiple calls ...............................................................64
Working with the Call log.............................................................65
Dialing by voice ...........................................................................66
1
Page 4

Contents
Voicemail ....................................................................................67
Visual Voice Mail .........................................................................68
Contacts .................................................................. 74
Opening your contacts ................................................................74
Adding a new contact .................................................................76
Editing contact details .................................................................78
Deleting a contact .......................................................................80
Communicating with your contacts ............................................. 81
Changing which contacts are displayed ......................................82
Linking or Unlinking contacts information ....................................83
Importing, exporting, and sharing contacts .................................84
Working with Groups ..................................................................86
Working with Favorites ................................................................88
Configuring Backup Assistant Plus
Connecting t o Networks .......................................... 91
Connecting to mobile networks...................................................91
Connecting to Wi-Fi networks ..................................................... 93
Connecting to virtual private networks ........................................96
VPN Client ..................................................................................97
Working with secure certificates ..................................................98
Connecting to Devices ............................................. 99
Connecting to a Headset ............................................................99
Connecting to a PC via USB ..................................................... 100
Connecting to Bluetooth
Sharing your phone’s mobile data connection ........................... 106
NFC ..........................................................................................108
DLNA ........................................................................................108
Accounts and Sync .................................................110
Adding and removing accounts.................................................110
Configuring account sync settings ............................................112
Emai l .......................................................................115
Opening Email ..........................................................................115
Opening your Inbox ..................................................................115
®
SM
.........................................89
devices .............................................102
2
Page 5

Reading your messages............................................................117
Responding to messages .........................................................118
Searching your messages .........................................................119
Working with messages in batches ........................................... 119
Composing and sending email ..................................................119
Working with account folders ....................................................120
Adding and editing email accounts ...........................................121
Messaging .............................................................. 123
Checking sent and received messages .....................................123
Sending a message ..................................................................125
Changing Messaging settings ...................................................128
Browser .................................................................. 131
Opening Browser ......................................................................131
Viewing a web page ..................................................................132
Navigating between web pages ................................................135
Working with bookmarks ..........................................................137
Downloading files ......................................................................138
Working with multiple Browser windows ...................................139
Changing Browser settings .......................................................140
Camer a................................................................... 144
Opening Camera ......................................................................144
Taking pictures and shooting videos..........................................145
Changing Camera settings ........................................................147
Galle ry ................................................................... 152
Gallery and albums ...................................................................152
Working with albums.................................................................153
Working with pictures................................................................156
Working with videos ..................................................................159
Music ..................................................................... 161
Copying music files to the phone’s Memory ..............................161
Opening Music and working with your library ............................162
Playing music ............................................................................164
Working with playlists ................................................................167
3
Page 6

Contents
Calendar ................................................................ 170
Viewing your calendar and events ............................................. 170
Creating an event ......................................................................177
Editing or deleting an event .......................................................178
Setting an event reminder .........................................................179
Responding to an event reminder .............................................179
Displaying and synchronizing calendars ....................................180
Changing Calendar settings ......................................................182
Verizon Tones......................................................... 183
Opening Verizon Tones .............................................................183
VZ Navigator® ......................................................... 184
Opening VZ Navigator ...............................................................184
My Verizon Mobile .................................................. 185
Opening My Verizon Mobile .......................................................185
G’zGEAR® ............................................................... 186
Opening G’zGEAR .................................................................... 186
Earth Compass .........................................................................187
Thermometer ............................................................................190
Tides ........................................................................................191
Sun/Moon .................................................................................192
Star Gazer ................................................................................193
Walking Counter .......................................................................195
Barometer .................................................................................196
Configuring G’zGEAR ...............................................................197
Widgets in G’zGEAR .................................................................198
G’zWOR LD .............................................................. 200
Opening G’zWORLD .................................................................200
More Applications .................................................. 201
Play Store™..............................................................................201
YouTube™ ................................................................................ 205
Gmail™ ....................................................................................208
Google Talk™ ...........................................................................210
FM Radio ..................................................................................211
4
Page 7

Quickoffice® ..............................................................................211
Clock ........................................................................................212
Calculator .................................................................................214
Sound Recorder .......................................................................215
Voice Command ....................................................................... 216
Desk Cradle ..............................................................................218
Glove mode ..............................................................................219
Task ..........................................................................................220
Sett ings.................................................................. 221
Opening Settings ......................................................................221
Wireless & networks .................................................................221
DEVICE .....................................................................................224
PERSONAL ..............................................................................227
SYSTEM ...................................................................................233
Safety ..................................................................... 235
TIA Safety Information ...............................................................235
Safety Information for FCC RF Exposure ...................................238
FDA Information ........................................................................242
Emergency Calls ....................................................................... 249
Compliance with Other FCC Regulations ..................................251
General Safety ..........................................................................252
CE Safety Information ...............................................................258
Games ......................................................................................259
Camera .....................................................................................260
Accessibility ..............................................................................260
RECYCLE YOUR CELL PHONE! ...............................................264
Warranty ................................................................ 266
Index ...................................................................... 270
Declaration of Conformity ..........................................................275
5
Page 8
Getting Started with Your Phone
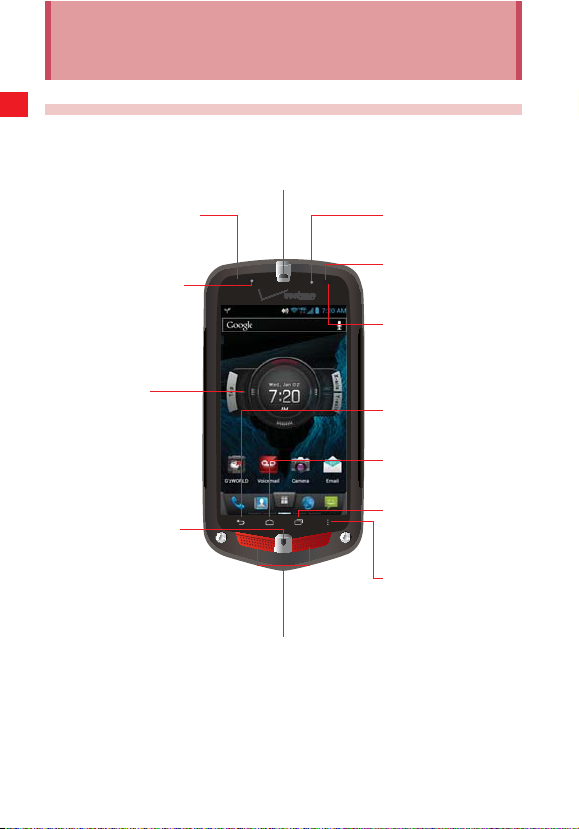
Phone overview
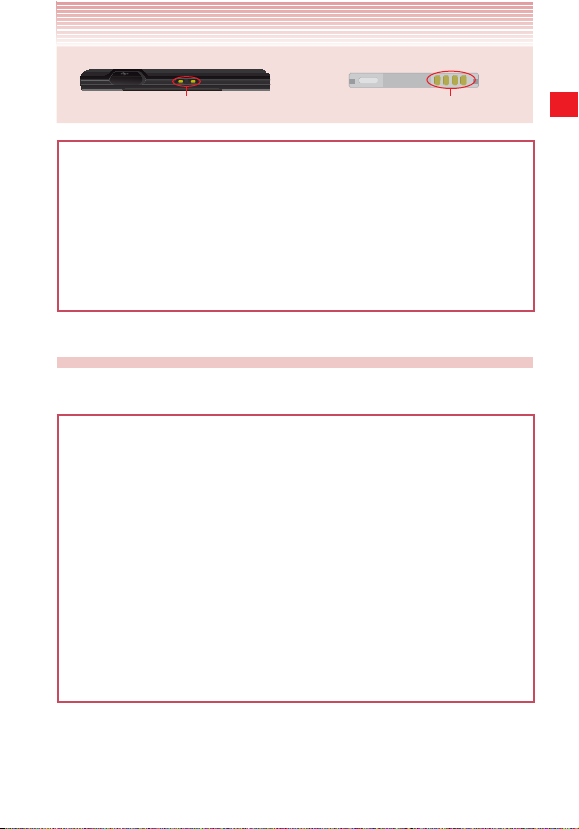
1. E arp iec e
2. Notification Indicator 13.
Getting Started with Your Phone
3. Front Camera Lens
4. Touchscreen
5. Main Microphone
6. Speaker
Third Microphone
12. Light Sensor
11. Proximity Sensor
10. Back Key
9. Home Key
8. Recent Apps Key
7. Menu Key
6
Page 9
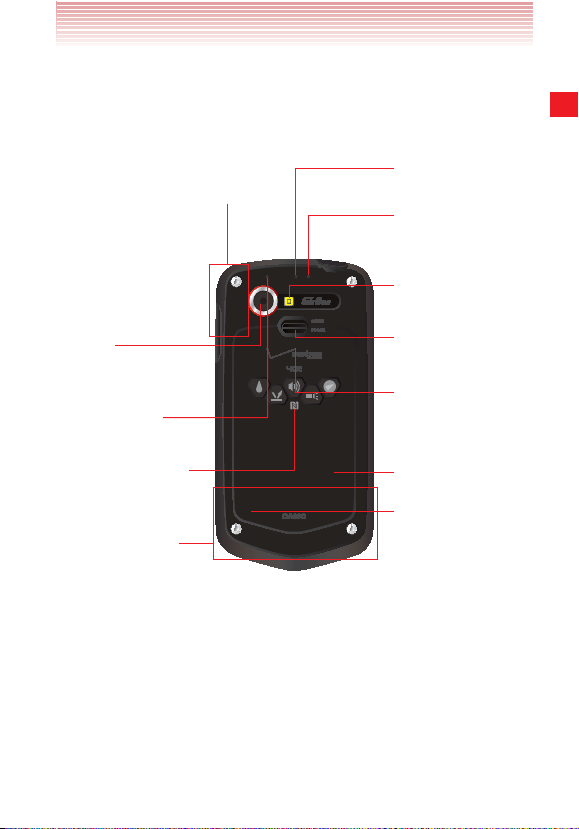
14. Top Internal Antenna Area*
Getting Started with Your Phone
25. Pressure Sensor
24. Temperature
Sensor
23. LED Flash
15. Rear Camera
Lens
16. Secondary
Microphone
17. NFC Touchpoint
18. Bottom Internal
Antenna Area*
Battery Cover
22.
Lock
21. microSD Card
Slot (under the
battery)
20. Back Cover
19. SIM Card Slot
(under the
battery)
* For best signal, do not touch or cover these areas while using your phone.
7
Page 10
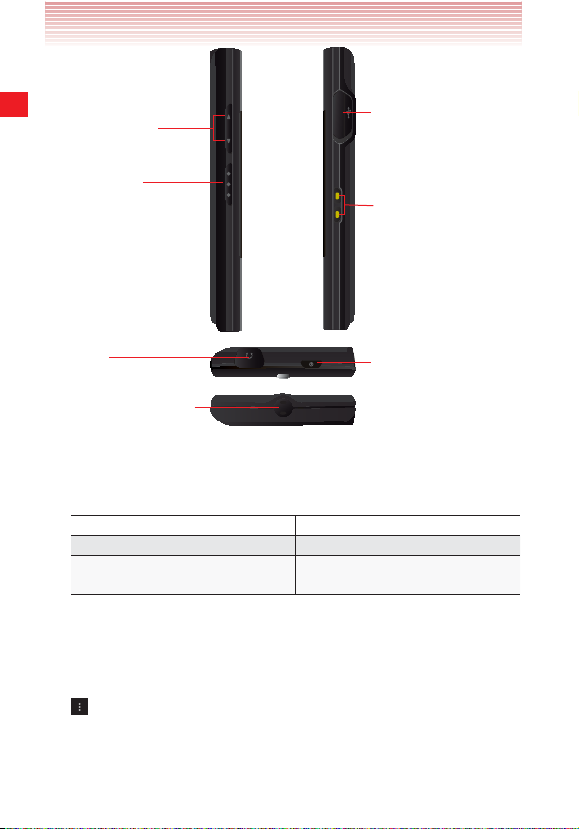
26. Volume Keys
27. Tactile Key
Getting Started with Your Phone
30. 3.5mm Headset
Jack
31. Wrist-Strap Eyelet
1. Earpiece
2. Notification Indicator
State Indicator
Charging Lights up in red
New message, email, voicemail
Blinks in green
or missed call
3. Front Camera Lens
4. Touchscreen
5. Main Microphone
6. Speaker
7.
Menu Key
Opens the menu for the current screen or application.
28. Charging/Data
Port
29. Charging
Ter mi nal s
32. Power/Lock Key
8
Page 11

8. Recent Apps Key
Opens a list of recently used applications.
9.
Home Key
Returns to the Home screen.
10.
Back Key
Returns to the previous screen. Use to close pop up or menu screens.
11. Proximity Sensor
If the proximity sensor is covered, you may not be able to operate the
phone as a result.
12. Light Sensor
Senses the ambient light and automatically adjusts display brightness
accordingly (applicable when Automatic brightness is enabled).
13. Third Microphone
Used when the speakerphone is turned on.
14. Top Internal Antenna Area
For best signal, do not touch these areas while using your phone.
15. Rear Camera Lens
16. Secondary Microphone
17. NFC Touchpoint
18. Bottom Internal Antenna Area
For best signal, do not touch these areas while using your phone.
19. SIM Card Slot (under the battery)
20. Back Cover
21. microSD Card Slot (under the battery)
22. Battery Cover Lock
23. LED Flash
24. Temperature Sensor
25. Pressure Sensor
26.
Volume Keys
Press to adjust the volume of the ringtone, the speaker’s voice during
a call, or the playback volume of music or video.
Getting Started with Your Phone
9
Page 12
27. Tactile Key
Press and hold to open the application assigned to the actile key.
By default, Glove Mode opens.
28. Charging/Data Port
Plug in the SB Cable here included in the bo .
29. Charging Terminals
he terminals used to charge the phone when it is placed in the
cradle sold separately .
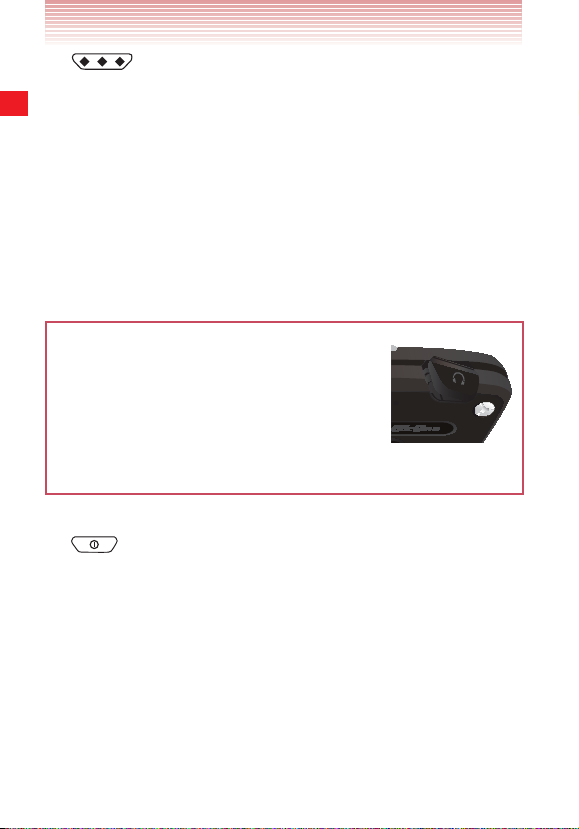
30. 3.5mm Headset Jack
Some headset plugs may be unusable depending on its e ternal
Getting Started with Your Phone
dimensions. Compatible size: Ma Ø .
Warning!
Be sure to completely tuck in the connecting
rubber for the eadset ack and Charging /
ata port before closing the cover. eaving the
connecting rubber e posed, as shown in this
figure, may result in dust or water entering the
casing, which could damage the phone.
31. Wrist-Strap Eyelet
32.
Power/Lock Key
Press and hold to open the pop-up menu with options to turn off the
phone, restart or to switch the Silent and Airplane modes n/ ff.
Press to turn off the screen display and lock the ouchscreen.
Press again to turn on the screen display and unlock the
ouchscreen.
10
Page 13

NOTES
• Descriptions and instructions in this manual are based on
the software version and default settings of the phone when
purchased. Operations may dif fer when any settings are changed
or the software version is updated.
• Screen images in this manual are shown for reference only and may
differ from what appears on your phone.
Feature overview
Water resistance
The CASIO G’zOne COMMANDO™ 4G LTE is water resistant. It
provides reliable performance for outdoor activities, and in wet
conditions such as driving rain or high humidity.
The tested device meets the requirements of the MIL-STD-810G (Rain &
immersion 1m, 30min) standard.
Warning!
The Water Resistance feature does not guarantee protection
against the usage of this device underwater. Do not use the phone
underwater.
NOTES
To maintain water resistance:
• Securely close the Charging/Data Por t cover and the Headset Jack
cover.
• Do not use earphones underwater. Defects or damage resulting
from underwater usage are not covered by warranty.
• Completely close the back cover and slide the battery cover lock to
the LOCK position.
Getting Started with Your Phone
11
Page 14
• If the CASIO G’zOne COMMANDO™ 4G LTE body is wet, shake to
drain excess water.
• When the CASIO G’zOne COMMANDO™ 4G LTE body is wet,
water can seep into the gaps of the microphones, sensors and
other locations. If the product was exposed to water, your clothes
or bag may get wet, and sounds may become difficult to hear.
Shock resistance
The rugged construction of the CASIO G’zOne COMMANDO™ 4G LTE
provides outstanding shock and vibration resistance. The tested device
Getting Started with Your Phone
meets the requirements of the MIL-STD-810G (Drop 1.5m) standard.
Warning!
The shock and vibration resistance features do not guarantee
protection against every type of shock and vibration. Your phone may
be damaged or malfunction depending on the severity of the shock
or vibration.
Dust resistance
For additional peace of mind, the CASIO G’zOne COMMANDO™ 4G
LTE is also dust resistant. The device was tested using silica flour at a
temperature of 95°F and meets the MIL-STD-810G (dust) standard.
NOTES
• Your phone can be rinsed with clean water when dirt y. To ensure
water resistance, make sure that all covers are securely closed
before rinsing.
• Periodically clean the Charging Terminals and the Battery Terminals
with a dry cloth or cotton swab. Dust can cause electrical
connection problems. Avoid wiping with excessive force, which can
damage the terminals.
12
Page 15
Battery
Charging Terminals
Warning!
• Do not clean terminals inside the phone, as they may be damaged.
• If mud or sand adhere to the phone, do not use the phone until it is
completely wiped of f.
• Do not place the phone directly on sand. If sand gets into the
Earpiece or Speaker, sound may become difficult to hear.
• Completely close the earphone cover to ensure dust resistance.
Batter y Terminals
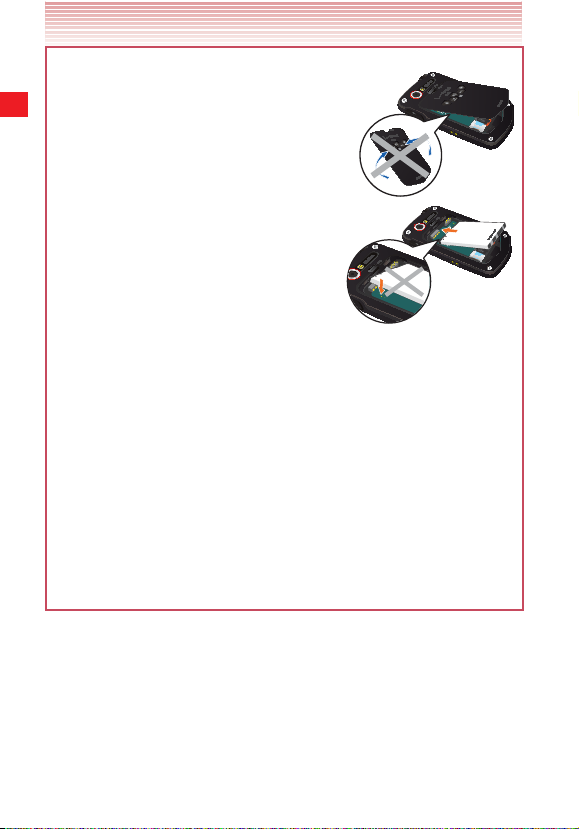
Inserting and removing the battery
The phone comes with a rechargeable bat tery.
Warning!
• Use only approved batteries for the CASIO G’zOne COMMANDO™
4G LTE.
• Wipe your phone before opening the back cover to prevent
moisture or dust from entering.
• Failure to follow the directions for inserting and removing the battery
could cause the phone to stop working.
• Fully charge the battery before using the phone for the first time.
• Do not inser t the battery in humid places, such as a bathroom or
other places where water or liquid can come into contact with the
phone or battery. Doing this may cause electrical circuits to short or
erode and cause the phone to malfunction.
Getting Started with Your Phone
13
Page 16
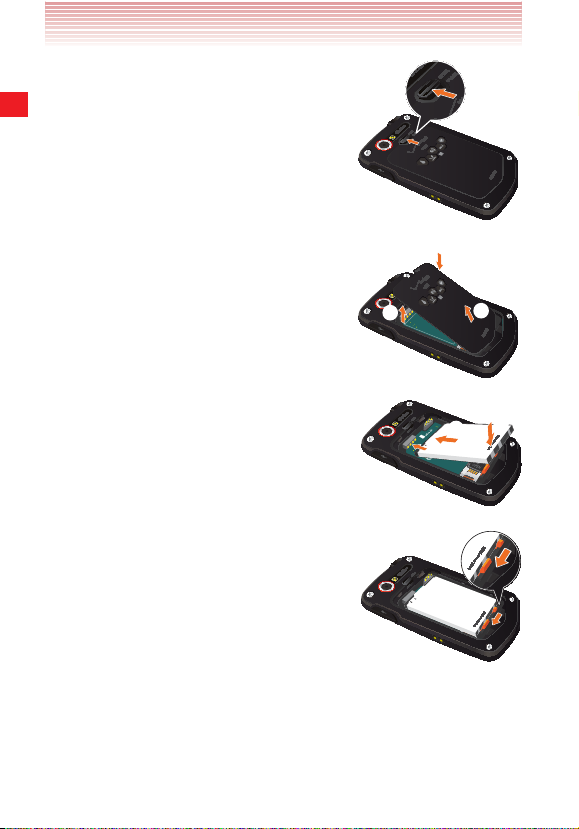
1. Slide the Batter y Cover Lock upward to the
FREE position, as shown in the figure.
2. Insert your fingertip in the groove 1 and pull
up on the back cover in the direction of
Getting Started with Your Phone
the arrow 2. When the back cover is
disengaged, pull it in the direction of the
arrow 3.
3. To insert the batter y, slide the battery into the
slot by aligning the battery contacts with
the terminals in the battery compartment
1 and press down 2 until it fits into place.
4. Slide the Batter y Lock to the left to
the LOCK position, as shown in the figure.
14
1
2
3
2
1
Page 17
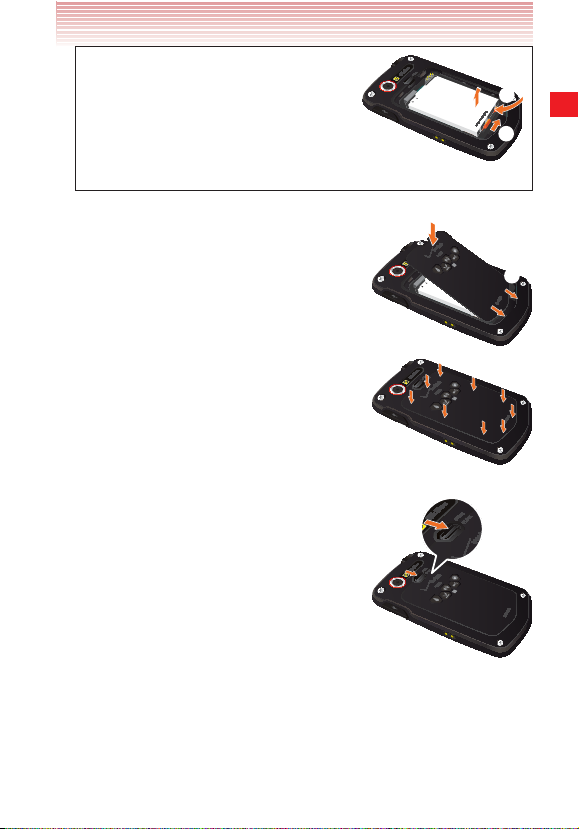
To remove the batter y, slide the Battery
Lock to the right to the FREE position 1.
Insert your fingertip in the groove 2 and
pull up on the battery in the direction of the
arrow 3.
2
3
Getting Started with Your Phone
1
5. Insert the battery cover tabs into the slots
1 and press the back cover in the
direction of the arrow 2.
6. Press down firmly on all sides of the back
cover as shown by the arrows in the right
figure.
7. Slide the Battery Cover Lock downward to
the LOCK position, as shown in the figure.
2
1
15
Page 18
Warning!
• Do not twist the back cover as shown in the
right figure. Doing so can damage the
phone and the back cover.
• When inserting the battery, please inser t
the battery parallel to the slot surface.
Incorrectly inserting the battery can
Getting Started with Your Phone
damage the terminal contacts.
• Do not press hard on the back cover if the tabs are not properly
inserted into the slots of the phone. Doing so may damage the
battery cover tabs.
• When using a wrist strap (sold separately), ensure it doesn’t get
caught between the back cover and the phone. Incorrect battery
insertion will result in the loss of water resistance.
• Do not leave the battery in direct sunlight, or near heat sources
such as an open flame or stove. Doing so may cause the phone to
malfunction or cause a fire from the batter y bursting or igniting. Do
not hit or exert excessive impact on the battery, as it may ignite or
break.
16
Page 19
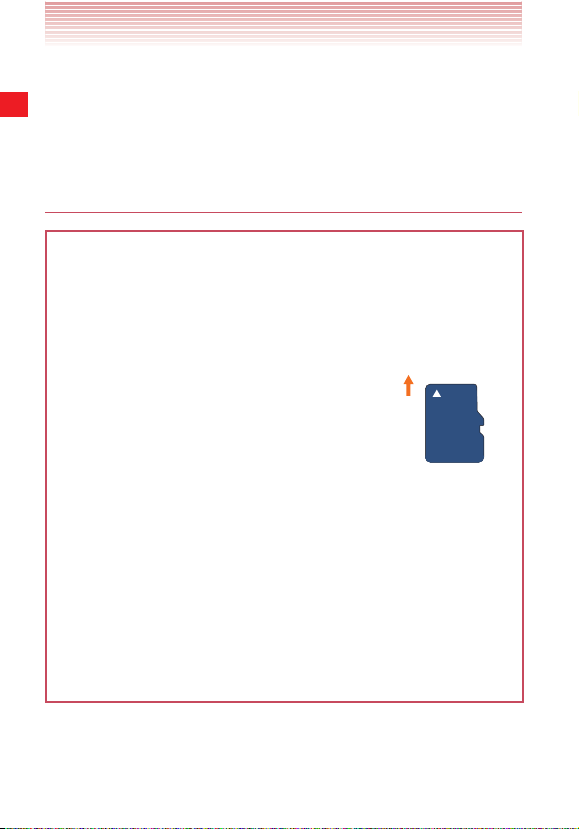
Removing and inserting a microSD card
To expand the memory of your device, you can insert a microSD card in
the phone.
Removing a microSD card
Warning!
• The microSD card is ver y small. Make sure you do not drop it.
• Failure to completely reseal the back cover after removal may result
in damage if the phone is exposed to water.
• Do not touch the microSD card terminal with your finger or hand. It
can contaminate the terminal and cause contact failure.
1. Remove the back cover and the battery.
(For instructions on how to remove the back cover and the battery,
refer to steps 1 through 4 of “Inserting and removing the batter y”
beginning on page 13.)
2. Insert the microSD card with the logo facing
up and slide it into place until fully inserted.
3. Remove the microSD card from the
microSD card slot by gently pressing in to
release the lock, then carefully pull the card
out.
Getting Started with Your Phone
17
Page 20
4. Insert the battery and replace the back cover making sure to slide the
Batter y Lock and Battery Cover Lock to the LOCK position.
(For instructions on how to insert the battery and the back cover,
refer to steps 3 through 7 of “Inserting and removing the batter y”
beginning on page 13.)
Inser ting a microSD card
Warning!
• Ensure the phone is turned off and the Wall/USB Charger is not
Getting Started with Your Phone
connected.
• Avoid touching the microSD card terminal to avoid damaging the
card, causing malfunction or loss of data.
• The front and the back of the microSD card
are different. When inserting the memory
card, make sure the terminals of the phone
and the microSD card are facing each other.
Other wise, the microSD card will not fit in the
card slot, or the microSD card and/or card
cover may be damaged.
• Do not forcibly insert the microSD card into the microSD card slot.
Hold the card so the terminals of the phone and the microSD card
are facing each other, and carefully insert.
• Do not use your nails when inserting the microSD card, as this may
result in injury or damage to the microSD card and/or phone.
• Failure to completely reseal the back cover after inserting the
memor y card may result in damage if the phone is exposed to
water.
Insert this way
18
Page 21
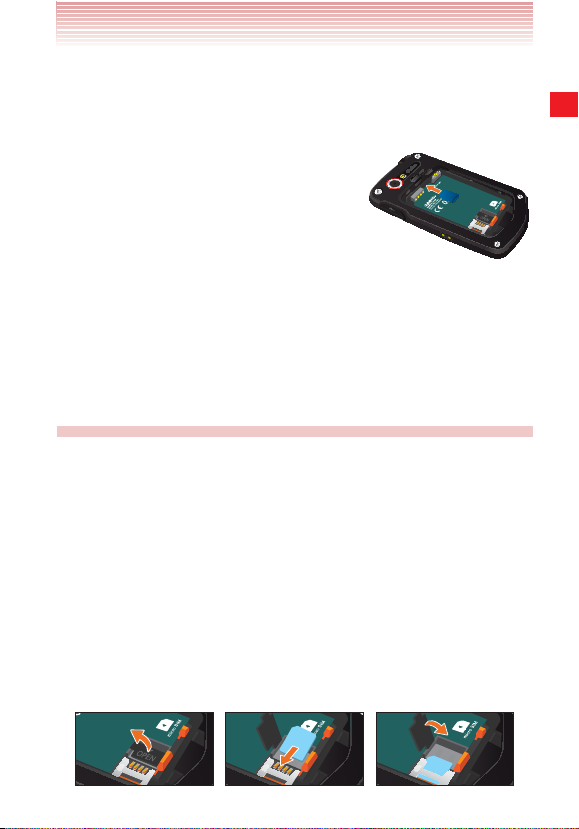
1. Remove the back cover and the battery.
(For instructions on how to remove the back cover and the battery,
refer to steps 1 through 4 of “Inserting and removing the batter y”
beginning on page 13.)
2. Hold the microSD card so the terminals of
the phone and the card are facing each
other, and carefully insert the microSD
card into the slot, as shown in the right
figure.
3. Insert the battery and replace the back cover making sure to slide the
Batter y Lock and Battery Cover Lock to the LOCK position.
(For instructions on how to insert the battery and the back cover,
refer to steps 3 through 7 of “Inserting and removing the batter y”
beginning on page 13.)
Inserting the SIM Card
Your wireless device accepts a SIM Card, which along with a Global
Feature on your account, enables you to make calls and access Data
Networks while traveling overseas.
Please follow these instructions to insert a new SIM:
1. Remove the back cover and the battery.
(For instructions on how to remove the back cover and the battery,
refer to steps 1 through 4 of “Inserting and removing the batter y”
beginning on page 13.)
2. Lif t the SIM Card Cover marked “Open” and slide the SIM Card into
the SIM Card Slot. Close SIM Card Cover by pressing down until it
clicks in place.
Getting Started with Your Phone
19
Page 22
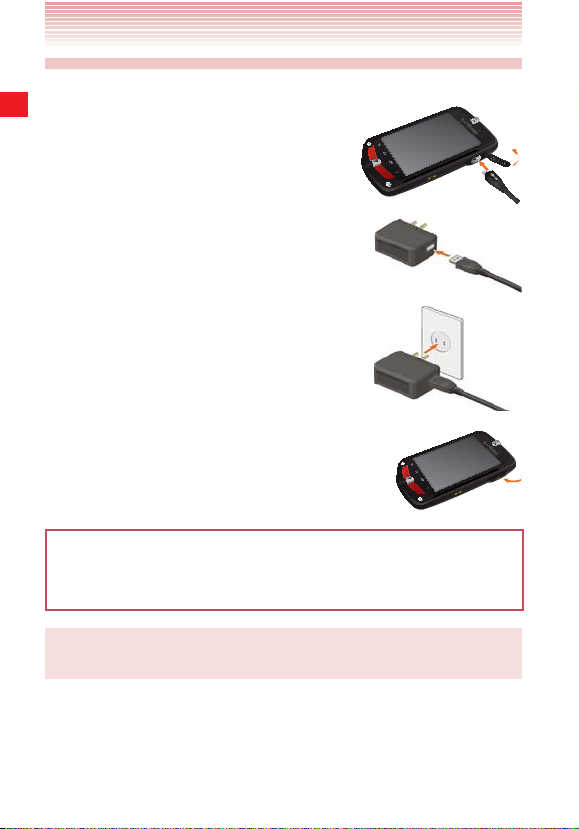
Charging the phone
To charge the battery:
1. Open the Charging/Data Port cover with your
fingertip.
Plug the USB Cable (included in box) into
the Charging/Data Port.
2. Connect the other end of the USB Cable
to the USB por t on the Wall Charger
(included in box).
Getting Started with Your Phone
3. Plug the Wall Charger power plug into an
electrical outlet.
4. After the phone is completely charged, unplug
the USB Cable from the Charging/Data Port,
then close the port cover.
Warning!
• After charging, firmly close and seal the Charging /Data Port to
prevent damage to phone if exposed to water.
NOTE
Charging time varies depending upon the battery level.
20
Page 23

Touchscreen operations
Most of the phone operations are performed on the Touchscreen by
touching or dragging.
Warning!
• When working in glove mode, there are some gloves that cannot be
used to operate the phone, such as thick gloves, etc.
• Touch the Touchscreen lightly with your finger. Do not press hard or
use a plastic pen, etc.
• Any of the following operations could potentially cause the
Touchscreen to malfunction:
- Operating the phone while wearing gloves when glove mode is off
- Operating the screen with your fingernails
- Using foreign objects to operate the Touchscreen
- Operating the phone when Touchscreen covered by a protective
sheet, stickers, etc.
- Operating the phone in a high-humidity environment or when the
Touchscreen is wet.
In this manual, the following terms are used for Touchscreen operations.
Tap
Tap the screen with your finger when you want to select or press
onscreen items such as application icons, or buttons.
Touch and hold
To open the pop-up menu, touch and hold the Touchscreen with your
finger.
For example, if you touch and hold the empty area of the Home screen,
the pop-up menu to customize the Home screen will open.
Getting Started with Your Phone
21
Page 24

Drag
Touch and hold an item on the screen and then, without lifting your
finger, move the item to the target position.
Swipe or slide
To swipe or slide, move your finger quickly in a horizontal or vertical
direction on the Touchscreen.
For example, you can swipe the Home screen to view the left/right
Home screen extension panels, or slide the screen up or down to scroll
through an email list.
Getting Started with Your Phone
Double tap
A double tap is a quick succession of two taps to the Touchscreen.
For example, you can zoom into a section of a web page by double
tapping it.
Pinch
In some applications (such as Browser, Maps, and Gallery), you can
zoom in or out by placing two fingers on the screen at once and
spreading them apart (to zoom in) or pinching them together (to zoom
out).
22
Page 25
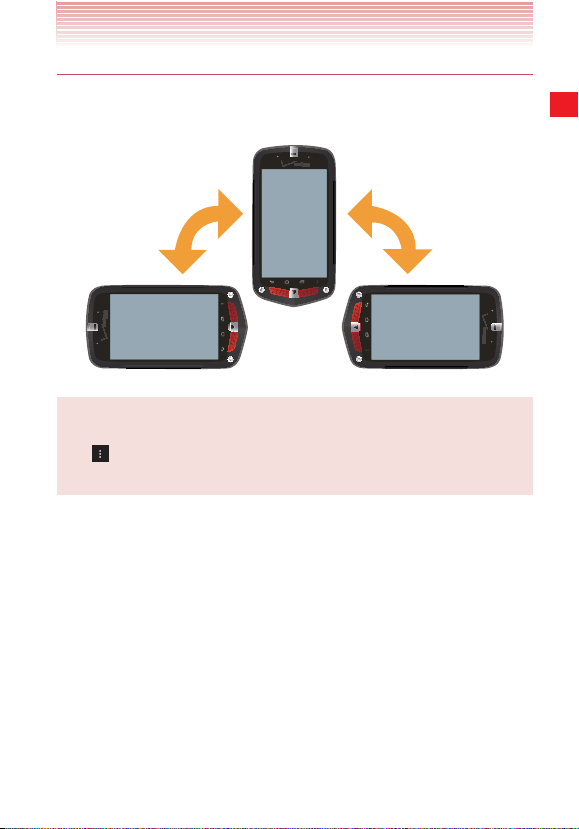
Rotate the screen
In many applications, rotating the phone also rotates the orientation of
the screen display.
NOTE
The screen rotation is enabled by default. To disable it, tap the Menu
key
on the Home screen, then tap Settings > Display and
uncheck Auto-rotate screen.
Getting Started with Your Phone
23
Page 26
Turning the phone on and off
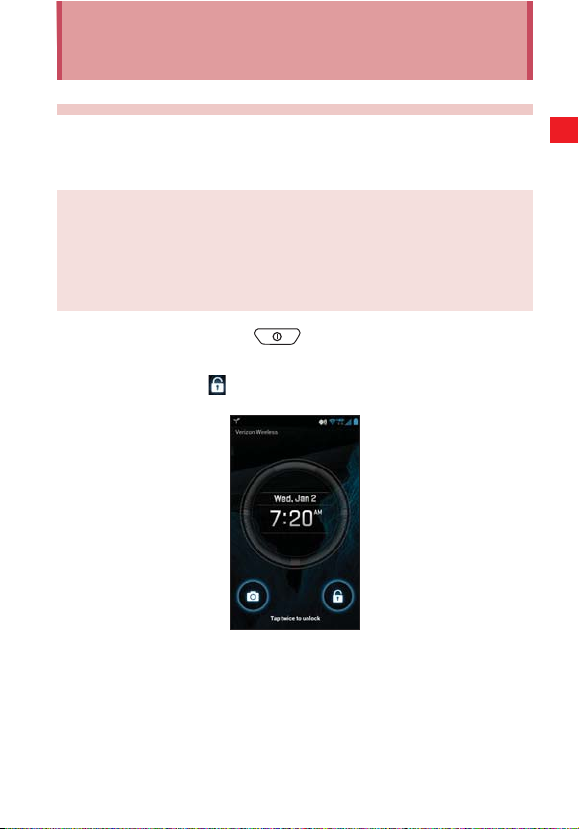
Turning the phone on
1. Press and hold the Power/Lock Key until the display lights up.
NOTES
• When you first turn on the phone, you are prompted to perform
Initial setup. See “Setup Wizard” on page 25.
• If your phone is left for a certain period of time without operation,
the screen display will turn off and the Touchscreen will be locked.
To resume phone operation, press the Power/Lock Key
Getting Started with Your Phone
to turn on the screen display and unlock the Touchscreen. See
“Turning the screen on and of f” on page 27.
• Avoid any unnecessary contact with the internal antenna area while
your phone is on.
Turning the phone off
1. Press and hold the Power/Lock Key until the pop-up menu
appears.
2. Tap Power off > OK.
Restarting the phone
1. Press and hold the Power/Lock Key until the pop-up menu
appears.
2. Tap Restart > OK.
24
Page 27

Setup Wizard
The Setup Wizard will start when you turn on the phone for the first
time.
1. Press and hold the Power/Lock Key until the display lights up.
2. Select the language to be used on the phone and tap Next.
3. Your phone will connect to the network. If you’ve already inser ted
the SIM Card, the device will automatically be activated. Then your
phone will display your new Verizon Wireless Mobile phone number.
Tap Next > Next. If SIM Card is not inserted, tap the Home key
and tap Leave Wizard.
4. If Sync contacts is checked, you can restore or backup your
contacts from your previous phone if you had Backup Assistant Plus
on the previous Verizon device. Tap Next.
5. Set up email account.
You can also select an email account to setup or skip for later.
6. Review terms for Location Sharing and Data Use to use your phone’s
location. Check I agree to enable location and tap Next.
7. Ta p Go To My Verizon to check account balance, usage and make
payments. To skip account setup, tap Go to Google Setup.
8. Set up Google account.
Tap one of the following options:
Sign in: If you already have your own Google account, you can sign
in to your account by entering your username and password.
Get an account: Enables you to create a new Google account.
Follow the onscreen instructions to enter information such as a user
name. Once the Google account is created, you can sign in to your
account by entering your username and password.
Tap Not now to skip the Google account setup and do it later.
Getting Started with Your Phone
25
Page 28
9. Tap one of the following options:
Setup Summary: Review setup configuration.
How-to Videos: Watch Video tutorials to learn how to use
functions on your phone.
Done: Finishes the initial setup to use your phone.
10. When your phone setup is completed, your phone screen will say
“Congratulations!”. Tap Done with setup.
NOTES
• If Emergency is tapped, you can place an emergency call without
Getting Started with Your Phone
unlocking the phone.
• You can also perform the same settings using the Setup Wizard
later on, by tapping the Apps icon
Setup Wizard icon
.
on the Home screen, then the
About Google account
To use Google services such as Gmail, Play Store, Google Calendar™,
and other Google applications, or for backing up settings to the Google
server, you need to sign in to your Google account.
When signed in, the phone will synchronize with your Google contacts,
e-mail, and calendar events.
NOTES
• If you have another account through a company or other
organization, a special procedure may be required to sign in to that
account. Contact your IT department.
• If you have not signed in to the Google account in the initial setup
steps, you may be prompted to sign in or create a new account
when you tr y to use any application that requires you to sign in,
such as Gmail or Google Talk.
26
Page 29
Basics
Turning the screen on and off
You can turn off the screen to conserve the battery. The Touchscreen is
locked while the screen is off to prevent accidental operation.
NOTE
The screen also turns off when the phone is not used for a certain
period of time.
You can set the time until the screen goes off with Sleep under
Display settings. See “Display” on page 225.
1. Press the Power/Lock Key to turn on your screen. Your Lock
Screen will appear.
2. Double tap the icon to unlock it.
Basics
3. Screen will open to previous state.
27
Page 30
NOTES
• The display can be awakened by tapping Tactile key and Volume
key in addition to the Power key.
• If you lock your screen, you must draw the unlock pattern, use facial
recognition or enter a PIN/password to unlock it. See “Locking your
Basics
screen” on page 49.
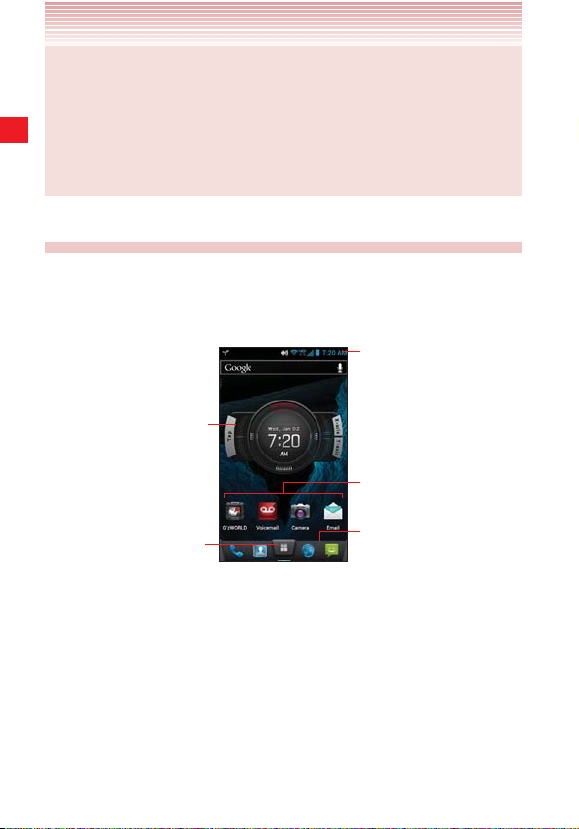
Getting to know the Home screen
The Home screen is your starting point to access all the features on
your phone. It displays application icons, widgets, shortcuts, and other
features.
The Stat us bar shows the time,
signal s trength, bat tery status, an d
other in formation. It al so displays
notification icons.
Widgets are application s that
you can us e directly on th e Home
screen.
Tap items on th e Home screen to
open them.
Tap the Apps icon to open t he
Apps sc reen and view all yo ur
applications.
The app icons you as sign in the
favorite s tray remain visi ble on
every Ho me screen.
• At the top of the screen, the Status bar displays the time, information
about the status of your phone, and icons for notifications you
received. To learn more, see “Monitoring your phone’s status” on page
30 and “Managing notifications” on page 32.
• You can customize the Home screen with different wallpapers and
items. See “Customizing the Home screen” on page 36.
28
Page 31

• Tap the Apps icon at the bottom of the screen to view all installed
applications. See “Opening and switching applications” on page
35.
Viewing other parts of the Home screen
Slide your finger left or right across the Home screen.
These additional screens provide more space for widgets, shortcuts,
and other items.
Returning to the Home screen
1. Tap the Home key at any time, in any application.
To return to the Home screen while in glove mode, see “Glove mode”
on page 219.
Edit the Home screen panels
Pinching the Home screen allows you to view thumbnails of the Home
screen and its extensions, which you can then tap to open.
• Tap the icon to add another Home screen panel. Up to 7 total
screens are available.
• Touch and hold the page you want to move or remove until it vibrates.
Do not lift your finger. Drag the item to desired location on the screen,
or drag the item to the icon
finger.
to remove the panel, then lift your
Basics
29
Page 32

• The default Home screen will blink when Set default home screen
is tapped.
Tap one of the Home screen thumbnails to set it as default.
Monitoring your phone’s status
Basics
The Status bar is at the top of every screen. It displays icons indicating
you have received notifications (on the left) and icons indicating the
phone’s status (on the right), along with the current time.
Notification icons Status icons
If you have more notifications than can fit in the status bar, a plus
icon
prompts you to open the Notifications panel to view them all.
“Managing notifications” on page 32.
Status icons
The following icons indicate the status of your phone.
Connected to 4G LTE
network
4G in use
Connected to 3G mobile
network
3G in use
Connected to 1X mobile
network
1X in use Roaming
Mobile network signal
strength
Connected to a Wi-Fi
network
An open Wi-Fi network is
available
Bluetooth is on
Connected to a Bluetooth
device
Airplane mode
No signal
30
Page 33

Silent mode-Vibrate Batter y is charging
Silent mode-Mute Speakerphone is on
Phone microphone is mute
Batter y is very low No SIM Card
Batter y is low E911 Only
Batter y is partially drained Alarm is set
Batter y is full Unrecognized SIM Card
Location information is
available
Notification icons
The following icons indicate that you have received a notification. See
“Responding to a notification” on page 33 for more information. In
addition to these icons, applications you install on your phone may use
their own notification icons.
New email Upcoming event
New Gmail message Data is syncing
New text or multimedia
message
Problem with text or
multimedia message delivery
New Google Talk message
Call in progress
Missed call
New voicemail
Problem with sign-in or sync
Batter y is charging and full
SD card is full
Phone is connected via USB
cable
Number of devices
connected using Mobile
Hotspot
More notifications not
displayed
Basics
31
Page 34

Carrier data use threshold
approaching or exceeded
Application update available Music
System update available Player Music
FM Radio
Basics
Uploading data GPS is on
Downloading data BUA+
Connected to VPN Screenshot captured
Receiving location data
from GPS
Select input method
Wi-Fi Direct
Managing notifications
Notification icons report the arrival of new messages, calendar events,
and alarms, as well as ongoing events, such as current call status.
When you receive a notification, an icon appears in the Status bar, along
with a temporary summary that will disappear.
Depending on your settings, when you receive a new notification you
may hear a notification sound, or the phone may vibrate. These settings,
such as the alert volume and other general notification settings, are
described in “Sound” on page 224.
You can open the Notifications panel to view a list of all your notifications
(see “Opening the Notifications panel” on page 33.)
32
Page 35

NOTE
Applications whose activities produce notifications, such as Email
and Gmail, have their own settings to configure whether or not
notifications are displayed, and how they are handled, such as
whether they sound a ringtone, vibrate, and so on. See the sections
on those applications for details.
Opening the Notifications panel
1. Drag the Status bar down from the top of the screen.
The Notifications panel displays your wireless provider and a list of
your current notifications. Notifications about ongoing activities are
listed first, followed by Notifications about events, such as new mail
notifications or Calendar reminders.
Tap to activat e or deactivate
Tap to config ure Wi-Fi.
Tap to open Set tings.
device functions.
Tap to clear all notific ations.
Tap a notific ation to open it in its
application.
Drag thi s bar up to close the
Notifications panel.
Responding to a notification
1. Open the Notifications panel.
Your current notifications are listed in the panel, each with a brief
description.
2. Tap a notification to respond.
The Notifications panel will close, and the next step depends on the
notification.
Basics
33
Page 36

For example, new email notifications will open your inbox, and
network disconnection notifications will open a list of configured
networks to reconnect.
NOTE
Basics
Swipe a notification left or right to remove it from the Notifications
panel.
Clearing all notifications
1. Open the Notifications panel.
2. Tap Clear at the right of the panel.
All event-based notifications are cleared; ongoing notifications remain
in the list.
Accessing additional functions
1. Open the Notifications panel.
2. In addition to notifications, this panel also provides quick setting
functions.
Toggle these icons to activate (bright) or deactivate (dark) functions.
Silent mode
GPS Data enabled
Airplane mode
Bluetooth
3. Tap the icon to open Settings.
Closing the Notifications panel
1. Drag the tab at the bottom of the Notifications panel to the top of the
screen.
Alternatively, just tap the Back key .
The panel also closes when you tap a notification to respond to it.
34
Page 37

Opening and switching applications
The Apps screen, which you open from the Home screen, holds icons
for all of the applications on your phone, including any applications
downloaded and installed from the Play Store or other sources.
When you open an application, the other applications being used do not
exit. You can quickly switch between running applications to use several
at once.
NOTE
To learn how to discover and install additional applications and
games, see “Play Store™” on page 201.
Opening and closing the Apps screen
1. Tap the Apps icon on the Home screen to open.
If you have more applications or widgets than can fit on the Apps
screen in one view, you can slide left or right to view more.
Basics
Tap to view app lications.
Tap to view wid gets.
Tap to open Play Store.
Tap an applic ation to open it .
Slide left or righ t to bring more
icons i nto view.
35
Page 38

• You can add an application icon or a widget to the Home screen
by touching and holding it on the Apps screen until it vibrates, and
then dragging it to another location on the Home screen.
• You can rearrange the order of the icons. Tap the App icon
Menu key
Basics
Apps Date.
• Tap the Back key
• The Apps screen closes when you tap an icon to open an
application or if you move an icon or a widget from the Apps
screen to the Home screen.
> Sort and tap Apps A to Z, Apps Frequent or
or the Home key to close the Apps screen.
Opening an application
1. Tap an application icon on the Apps screen or Home screen.
Switching to a recently used application
1. Tap the Recent Apps Key .
A list will display icons and thumbnail images of applications that you
have recently used.
2. Tap an icon to open its application.
Swipe a thumbnail left or right to remove it from the list.
Or, tap the Back key
to return to the current application.
Customizing the Home screen
You can add application icons, widgets, and other items to any part of
the Home screen or change the wallpaper.
>
Adding an item to the Home screen
1. Tap the Apps icon on the Home screen.
2. Tap the Apps A to Z to add an application or Widgets to add a
widget at the top of the screen.
You can add an application icon or a widget to the Home screen by
36
Page 39

touching and holding it on the Apps screen until it vibrates, and then
dragging it to a desired location on the Home screen.
Widgets: Add any of a variet y of miniature applications (widgets) to
your Home screen, including a clock, music player, picture frame,
power manager, calendar showing upcoming appointments, and
news. You can also download other widgets from Play Store.
Moving an item on the Home screen
1. Touch and hold the item you want to move until it vibrates.
2. Drag the item to a new location on the screen.
Pause at the edge of the screen to drag the item onto another Home
screen panel.
3. When the item is placed where you want it, lift your finger.
Removing an item from the Home screen
1. Touch and hold the item you want to remove until it vibrates.
The Remove icon
will appear on top of the screen.
2. Drag the item to the Remove icon .
3. When the icon turns red, lif t finger.
Organizing applications with a folder
1. Touch and hold the application icon you want to organize until it
vibrates.
2. Drag the item to another application or folder icon.
Pause at the edge of the screen to drag the item onto another Home
screen panel.
3. When the item is where you want it, release finger.
Basics
37
Page 40

Renaming a folder
1. Tap the folder to open it.
2. Tap the folder’s name.
3. Enter a new name.
4. Tap the Enter key on keyboard.
Basics
Changing the Home screen wallpaper
1. From the Home screen, tap the Menu key > Wallpaper.
2. Tap one of the following wallpaper types:
Gallery: Choose a picture taken using the camera or saved to your
phone as a wallpaper. You can crop the picture before setting it as
the wallpaper.
Live wallpapers: Opens a scrolling list of animated wallpapers
installed on your phone. Some live wallpapers have a Settings
option.
Wallpapers: Displays a selection of wallpaper images that come
with the phone. Slide the thumbnail images left and right to view the
samples.
3. Tap CROP or Set wallpaper.
NOTE
You can also change the Home screen wallpaper by touching and
holding an empty area of the Home screen.
38
Page 41

Working with widgets
This phone comes pre-installed with various widgets. You can also
download widgets from the Play Store.
Amazon
You can access Amazon’s Kindle Store, Shop, and Music applications.
Clock
You can select the clock to display on the Home screen from three
types of Analog Clocks, a Compass Clock, three types of Digital
Clocks, and a World Clock.
Audible
You can listen to digital audio books.
Book
You can access over 3 million eBooks on the go.
Bookmark(s)
You can access webpages from your bookmarks.
Calendar
The Calendar widget displays upcoming Calendar events. Tap the
widget to open the Calendar application.
Call Log & Map
You can see your call record from Call Log.
If an address is on the contact list, the address’s map is displayed as
the background. Tap the PIN’s icon to view the map.
Basics
39
Page 42

Contact
You can set your frequently accessed contacts as a widget.
Direct dial
You can create a shortcut for calling a registered telephone number with
Basics
one tap.
Direct message
You can create a shortcut for creating a message to a registered
contact.
Directions & Navigation
You can create a shor tcut for quick navigation to a registered address.
Email
The Email widget displays the number of unread Emails. Tap the widget
to open the Email application.
Facebook
You can update your Facebook status and read your friend’s updates.
Flashlight
Tap the Flashlight widget to turn the Flashlight on or of f.
FM Radio
You can listen to FM radio and change stations.
40
Page 43

G’zGEAR
G’zGEAR comes with various widgets: G’zGEAR BAROMETER,
G’zGEAR EARTH COMPASS, G’zGEAR MOONRISE MOONSET,
G’zGEAR PEDOMETER, G’zGEAR SUNRISE SUNSET, G’zGEAR
TIDES, G’zGEAR VIRTUAL TREK. See “Widgets in G’zGEAR” on page
198 for details.
®
G’zWORLD
You can use G’zWORLD widget to share your location with other people
by using the map. You can find the direction of the way you want to
go. It’s possible to pin your current location. You can also share the
information with your friends.
Gmail
Gmail widget displays the inbox.
Google Play™ Books
You can use the Play Books widget to read eBooks from the Home
screen.
Google Play Music
You can use the Play Music widget to control the playback of music
from the Home screen.
Google Search™
Tap the text field of the Google Search widget to enter search terms.
Search results from your phone, search histor y, and web search
suggestions will appear as you type.
You can also tap the microphone icon
to search using your voice.
Basics
41
Page 44

Google+™ posts
You can update or read Google+ posts from your friends.
Memo
You can use the Memo widget to keep a memo displayed on the Home
Basics
screen.
Music
You can use the Music widget to control the playback of music from the
Home screen.
Music playlist
You can play your favorite playlist easily by adding this widget.
My Verizon Data
You can use the My Verizon Data widget to access My Verizon Mobile to
display an overview of your data usage.
News & Weather
The News & Weather widget displays the latest news and today’s
weather forecast for the current location.
Photo Gallery
You can use the Photo Gallery widget to display pictures taken with the
camera or images saved to the phone.
Play
You can listen to voice mail. The Play widget displays the number
of unread messages. Tap the widget to star t reading out unread
messages. When the phone starts reading out a message, the details of
the message will appear on the screen.
42
Page 45

Play Store™
The Play Store widget displays recommended applications, tap to view
details and install it.
Power control
You can use the Power control widget to turn Wi-Fi, Bluetooth, GPS, or
Auto-sync on or off. You can also adjust the brightness of the screen
from the Home screen.
Power saving mode
You can use the Power saving mode widget to turn Power saving mode
on or off.
Quick Communication
You can call, send messages or send voicemails directly to a contact.
Once an email address is registered, you can quickly compose an email
to the address.
Read out
You can use the Read out widget to have the phone read out unread
messages with a computerized voice.
The Read out widget displays the number of unread messages. Tap the
widget to start reading out unread messages.
During read out, message details will appear on the screen. Tap
Previous message or Next message to navigate.
Basics
Settings shortcut
Select frequently used settings from the menu and set it as a shor tcut
on the Home screen.
43
Page 46

Slacker Radio
You can listen to free personalized radio or create your own custom
radio stations from millions of songs.
Task
Basics
You can add, view and manage tasks.
Traf fic
You can set up a variety of locations for real-time updates to show your
journey time to a destination depending on your current location.
Voice Memo
You can use the Voice Memo widget to record and save voice
recordings to Internal Storage Memory.
Recorded voice data is available from My Recordings in Music.
VZ Navigator
You can use VZ Navigator® to get traffic directions via GPS.
®
WEATHER
The WEATHER widget displays today and tomorrow’s weather forecasts
for the current location.
YouTu be™
The YouTube widget lists video thumbnails and titles by playback
frequency for easy access.
44
Page 47

Working with menus
There are two kinds of Android menus: option menus and context
menus.
Option menus
Option menus contain action items based on the current screen or
application, not to any specific item on the screen. You can open option
menus by tapping the Menu key
If you tap the Menu key
will happen.
Some screens have more option menu items than can fit in the main
menu. Tap More to open a menu of additional items.
Optio n menus contain i tems that
apply to t he current scre en or to
the applicatio n as a whole.
Context menus
Context menus contain tools that apply to a specific item on the screen.
You open a context menu by touching and holding an item on the
screen. Not all items have context menus. If you touch and hold an item
with no context menu, nothing will happen.
. Not all screens have option menus.
on a screen with no option menu, nothing
Basics
45
Page 48

Basics
When you touch and ho ld some
items on a s creen, a contex t menu
appears.
Quickly connecting to your contacts
As you build up your list of contacts on your phone, you can use Quick
Contact for Android in many applications to quickly start a chat, email,
or text message; to place a call; or to locate your contacts. Quick
Contact for Android is a special icon to open a popup with options for
quickly communicating with a contact.
1. Identify a Quick Contact icon by its frame.
Contacts that you can access with Quick Contact are displayed
differently in different applications, but usually with a picture frame
that looks like this:
Tap to open a popup with ic ons.
2. Tap a Quick Contact icon to open a popup with icons for options to
communicate with the contact.
If there are more icons than can fit in the popup, scroll vertically to
view them all.
Tap an icon to st art communi cating with the contact i n that
application.
46
Page 49

3. Tap an icon to open its application and start communicating with
your contact right away.
You can also tap an icon to edit the contact’s information in
Contacts, to view the contact’s address in VZ Navigator
depending on which applications and accounts are configured on
your phone.
NOTE
You can add a shor tcut for a contact to your Home screen, which
you can then tap to open Quick Contact for Android. For more
information about adding shortcuts to the Home screen, see “Adding
an item to the Home screen” on page 36.
®
, and so on,
Silent mode
You can silence all sounds including call and notification ringtones by
putting your phone in Silent mode.
1. Press and hold the Power/Lock Key until the pop-up menu
appears.
2. Tap the icon (Mute) or (Vibrate) to initiate Silent mode.
In Silent mode, the Mute mode icon
appears in the Status bar.
NOTES
• Press and hold the Power/Lock Key
appears in Silent mode and tap the icon
• The audio from music, videos, and other media and any alarms you
have set still sound in Silent mode. You must silence media and
alarms in their own applications.
or the Vibrate mode icon
until the pop-up menu
to exit Silent mode.
Basics
47
Page 50

Airplane mode
Some locations may require you to turn of f your phone’s wireless
connections. You can turn of f all these wireless connections at once by
placing your phone in Airplane mode.
1. Press and hold the Power/Lock Key until the pop-up menu
Basics
appears.
2. Tap Airplane mode.
3. Tap OK to confirm.
The Airplane mode icon
NOTE
You can switch Airplane mode ON/OFF by tapping the icon
Notifications panel.
will appear in the Status bar.
in the
Selecting an application to be opened by
the Tactile Key
You can change the application that opens when you press and hold
the Tactile Key
1. From the Home screen, tap the Menu key > Settings > Ta ct ile
key > Assign app to Tactile key.
2. Tap a shortcut type from the displayed shortcut type list.
3. Tap the item you want to open when the Tactile Key is
pressed from the displayed list.
4. Press and hold to open the application assigned to the Tactile key
setting. (Glove Mode can be launched while using Home screen, lock
screens or while the screen is off. Other shortcut of applications can be
launched in any screen. It cannot be launched during a call.)
. Glove mode is assigned by default.
48
Page 51

Locking your screen
You can lock your screen so that only you can unlock it to place calls,
access your data, buy applications, and so on.
1. From the Home screen, tap the Menu key > Settings > Security.
2. Tap Screen lock
3. Tap Tap, Face Unlock, Pattern, PIN, or Password.
If you tap Face Unlock, you will be guided to look at your phone.
Read the on-screen notification and tap Set it up. Then follow the
on-screen instructions.
If you tap Pattern, you will be guided to create a pattern you must
draw to unlock the screen. The first time you do this, a short tutorial
about creating an unlock pattern appears. You can tap the Retry
at any time for a refresher. Then you will be prompted to draw and
redraw your own pattern.
If you tap PIN or Password, you will be prompted to set a numeric
PIN or a password you must enter to unlock your screen.
The next time you turn on your phone or wake up the screen, you
must draw your unlock pattern or enter your PIN or password to
unlock the screen.
To release screen lock, tap None.
NOTE
Even when the screen is locked, you can still place an emergency call
by tapping Emergency call on the screen to draw an unlock pattern
or enter your PIN or password.
Basics
49
Page 52

Optimizing battery life
You can extend your battery’s life by turning off unwanted features
and applications. You can also monitor how applications and system
resources consume battery power.
Basics
Extending the life of your battery
You can extend the life of your battery by performing the following
operations:
• Turn off wireless communications you are not using.
If you are not using Wi-Fi, Bluetooth, or GPS, use the Settings
application to turn them off. (The GPS receiver is only turned on when
using an application that uses it.)
You can also switch Wi-Fi, Bluetooth or GPS easily by opening the
Notification panel and tapping their icons.
• Turn down screen brightness and set a shorter screen timeout.
• If you do not need automatic syncing for Contacts, Calendar, Gmail,
and other applications, turn them off.
• Use the Power Control widget to check and control the status of
radios, the display brightness, and syncing.
Adding widgets is described in “Adding an item to the Home screen”
on page 36.
Checking the battery charge level
1. From the Home screen, tap the Menu key > Settings > Battery.
The battery status (charging, discharging) and level (as a percentage
of full charge) are displayed at the top of the screen.
50
Page 53

Monitoring and controlling what uses the battery
The Battery Use screen shows which applications consume the most
battery power.
You can also use it to turn off installed applications that you have
downloaded if they are consuming too much power.
1. From the Home screen, tap the Menu key > Settings > Battery.
The Battery Use screen lists the applications consuming the battery,
from greatest to least battery use.
The top of the screen displays the time when the phone was last
connected to a charger. If connected, the amount of time the phone
ran on battery power before connected is displayed.
Each application or service that used battery power is displayed, in
order of the amount of power used.
2. Tap an application to learn details about its power consumption.
Different applications offer different kinds of information. Some
applications include options or settings to adjust power use.
Using Power saving mode
The feature allows you to automatically set the phone to use a power
saving mode to conser ve batter y power.
1. From the Home screen, tap the Menu key > Settings > Power
saving mode.
2. Tap Power saving mode to activate.
3. Tap Power saving settings to configure additional power saving
options manually.
Basics
NOTE
You can also switch Power saving mode ON/OFF easily by using the
Power saving mode widget.
51
Page 54
Entering and Editing Text
Entering text
You can enter text using the onscreen keyboard. Some applications
open the keyboard automatically. In others, you tap a text field where
you want to enter tex t to open the keyboard.
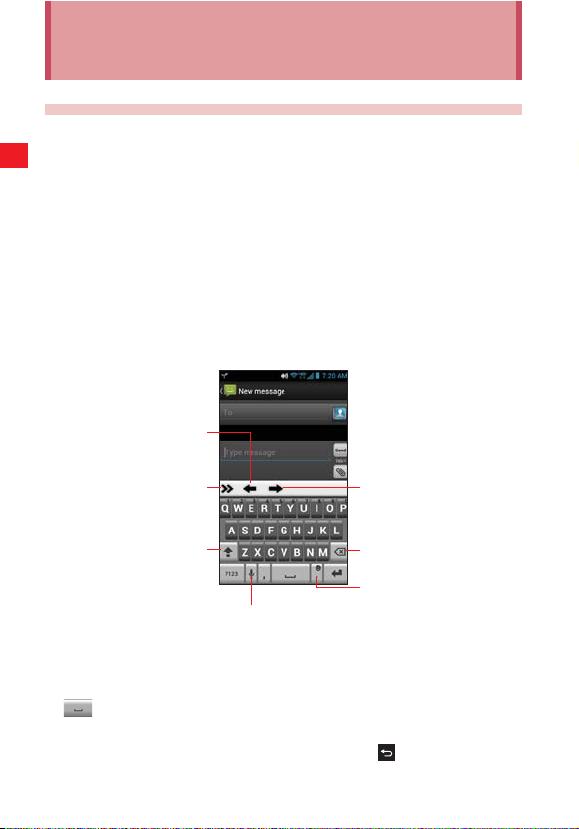
1. Tap a text field for keyboard.
2. Typ e tex t.
The characters you have entered appear in a selection list above
the keyboard, with suggestions for the word you are typing to the
right. Tap the left or right arrow in the selection list to view more
Entering and Editing Text
suggestions. You can also view more suggestions by sliding the
selection list lef t or right.
Tap to move the cu rsor to the left .
Tap for more options.
Tap for one cap ital letter.
Tap Twice for all ca pital letters.
Tap to launch vo ice input.
Tap to move the cu rsor to the right .
Tap to delete the preced ing
character.
Touch and ho ld to display the
selec tion candida te list.
3. To enter the word as typed, tap the first word displayed in the
selection list.
To enter the blue bold word from the selection list, tap the Space key
or that word.
To enter another suggested word, tap the word you want to enter.
4. When you are finished typing, tap the Back key to close the
keyboard.
52
Page 55

NOTES
• If you tap a suggested word that is not in the predictive text
dictionary, it is automatically added to the dictionary.
• Depending on the key, the list of relevant characters or symbols
pops up when you touch and hold the key. You can enter a
character or symbol by tapping it in the list.
• To hide the onscreen keyboard, tap the Back key
To show the keyboard, tap a text field.
.
Entering numbers, punctuations, and symbols
1. Tap the ?123 key on the onscreen keyboard.
The onscreen keyboard will switch to the keyboard with numbers,
punctuations and symbols. Tap the keys on the keyboard to type.
2. Tap the ALT key.
The onscreen keyboard will switch to the keyboard with other
symbols such as currencies and operators for expressions. Tap the
keys on the keyboard to type.
Tap the ALT key again to return to the previous keyboard with
numbers, punctuations and symbols.
3. Tap the ABC key to return to the keyboard to type alphabetical
characters.
Changing the keyboard type
1. Tap the right arrow icon on the keyboard.
The icon menu will be displayed on the keyboard.
2. Type of keyboard will be switched every time you tap the keyboard
switch icon
You can switch between the following types of keyboards:
in the icon menu.
Entering and Editing Text
53
Page 56

Keyboard: Full QWERTY keyboard same as that of PC. This
keyboard is displayed by default.
Reduced keyboard: The keyboard with two alphabetical characters
assigned to one key.
Phone keypad: Keypad similar to those of found on basic cell
phones.
Entering and Editing Text
Keyboard Reduced Keyboard Phone Keypad
3. Tap the left arrow icon to hide the options.
NOTES
• You can enter words by tracing from key to key on the XT9
onscreen keyboard.
• You can display the X T9 Text Input settings screen by tapping the
settings icon
• You can turn off the Trace Input feature by tapping the T9 Trace
icon
again. For the Trace Input feature, see “Entering words using Trace
Input feature” on page 56.
in the icon menu.
in the icon menu. To turn it on, tap the T9 Trace icon
Keys with special functions
The following table describes the keys with special assigned functions.
Some keys are not displayed depending on types of keyboards or
applications.
54
Page 57

Shift Case key
Tap once to capitalize the next character
you type.
Touch and hold for all caps.
?123 key
Delete key
See “Entering numbers, punctuations,
and symbols” on page 53.
Deletes the preceding character.
If Word Reselection of XT9 Text
Input settings is checked, by placing
the cursor at the end of the word and
tapping the Delete key once, the word is
highlighted and the original selection list
is displayed.
Enter key
Punctuation key
Accepts an entry or inserts a carriage
return.
Enters a common punctuation mark with
a single key tap.
Touch and hold to open the popup menu
of common punctuations and smiley.
(message area of Messaging)
XT9/ABC key
Switches between XT9 mode and ABC
(Multi-tap) mode.
XT9 mode uses a built-in-dictionary to
determine a word based on the entered
characters. A word is entered more
quickly because you only need to tap
each key once per character.
In ABC (Multi-tap) mode, you need to
tap each key repeatedly until the desired
character appears.
Search key Tap to start a search.
Entering and Editing Text
55
Page 58

Entering words using Trace Input feature
On the Full QWERTY keyboard, you can enter a word by tracing from
key to key with your finger held on it. If, for example, you want to enter
“Word”, trace from W to D key on the keyboard as shown in the figure
below.
Entering and Editing Text
NOTE
XT9 mode automatically adds punctuation, capitalization and accents
to words as you type. For example, typing c-a-n-t will result in
“can’t” with the apostrophe added automatically.
Changing the keyboard orientation
When entering text, you can change the keyboard orientation to
horizontal by turning the phone sideways.
56
Page 59

NOTES
• To rotate the screen to horizontal automatically as you turn the
phone sideways, Auto-rotate screen of Display settings must
be checked. See “Display” on page 225.
• The horizontal keyboard may not be available in some applications.
Editing text
You can edit the text entered in tex t fields. Use the menu commands to
cut, copy, and paste tex t, within or across applications.
NOTE
Some applications do not support editing of some or all of the text
displayed. Others may offer their own editing function to work with
text.
Selecting text
You can select tex t and cut, copy, delete, or replace it.
1. Touch and hold the text or word you want to select.
The nearest word will be highlighted, with a tab at each end of the
selection. Drag the tabs to change the selection.
2. Drag either selection tab to expand or reduce the range of selected
text.
3. Per form one of the following actions:
- Cut or copy your selection by tapping icons
if you have previously cut or copied text, replace the selected text
by tapping the icon
- Simply enter text by typing or speaking, to replace the selection
with what you type.
- Tap the Delete key
field.
.
, the selected text is removed from the text
, , respectively, or
Entering and Editing Text
57
Page 60

NOTES
• You can select all the text in the tex t field by touching and holding
the text field, then tapping the icon
appears.
• You can unselect the text by tapping unselected text in the same or
in another text field, or tapping the Back key
from the icon menu that
.
Cutting or copying text
1. Select the text to cut or copy.
2. Tap the icon
The text is temporarily stored in the phone’s memory, so that you can
Entering and Editing Text
paste it into another text field.
to cut or tap the icon
to copy in the icon menu.
Pasting text
You can paste text that you cut or copied from one application into the
text field of another application.
1. Cut or copy the text to paste.
2. Tap the text field where you want to paste the text.
3. Tap in the text field to move the cursor to the location where you want
to paste the text.
4. Touch and hold the text field.
5. Tap the icon from the icon menu.
The text is inserted at the cursor. The text that you pasted still
remains in a temporary area on the phone, so you can paste the
same text in another location.
58
Page 61

Phone
You can use the Phone application to make calls. You can dial an
incoming, outgoing, or missed call number recorded in the call log.
Placing a call
1. Tap the phone icon on the Home screen.
Tap a tab to switch to Call log or
Favorites.
Tap to erase di gits one by one.
Touch and ho ld to erase the ent ire
phone nu mber.
Touch and ho ld to open the Visu al
Tap to pick a dia ling number fro m
2. Enter a phone number by tapping the dialpad on the screen (include
the area code if needed).
• If you enter a wrong number, tap the delete icon to erase digits
one by one.
To erase the entire number, touch and hold the delete icon
• To place an international call, touch and hold the 0 key to enter the
plus symbol (+). Then enter the international prefix for the country,
followed by the full phone number.
Voice Mai l.
contacts.
Tap to open Voic e command.
Tap to place a ca ll.
.
Phone
59
Page 62

3. Tap the call icon to place a call.
The call in progress screen appears.
Name in C ontacts or c aller’s phon e
Phone
Tap to call another pers on.
Tap to mute the micropho ne.
number.
ERI (Enhanc ed Roaming Indicator)
Call duration
Tap to end a call .
Tap to display t he dialpad for
sendin g a DTMF tone.
Tap to switch Speaker, Hand set
earpie ce or Bluetooth mode.
• Press the Volume Keys to adjust the call volume.
4. Tap the end call icon to end a call.
NOTES
• When the Proximity Sensor senses proximity to other objects such
as your head, the icons on the call in progress screen will be hidden
temporarily.
• You can also tap the Home key
Home screen and open another application. Even when another
application is opened, the call in progress icon appears on the
Status Bar.
• To end a call in progress when another application is opened, tap
the Recent Apps Key
and tap the call icon . Tap Return to
call in progress, and then tap the end call icon
• You can end a call by displaying the Notification panel and tapping
the end call icon .
during a call to return to the
.
60
Page 63

Answering a call
When there is an incoming call, the screen will show information such
as the caller’s phone number or name depending on the information
stored in Contacts.
Locked Screen
Name in Co ntacts or phon e
number.
Phone
Double tap to answer.
Double tap to reject call and s end
messag e to caller.
Double tap to reject call.
Unlocked Screen
Name in Co ntacts or phon e
Tap to reject c all and send
number.
Tap to answer ca ll.
messag e to caller.
Tap to reject c all.
• If the screen is unlocked, tap the icon to answer a call.
• If the screen is locked, double tap the icon
.
61
Page 64

NOTES
• All incoming calls are recorded in the Call log.
• If there is an incoming call while another call is in progress, the first
caller will be put on hold if you choose to answer the new call.
Rejecting an incoming call
When there is an incoming call, it will appear on the screen.
• If the screen is unlocked, tap the icon
Phone
• If the screen is locked, double tap the icon
NOTE
When you reject a call, the caller is sent directly to voicemail.
to reject a call.
.
Rejecting an incoming call and send a message to
caller
1. When there is an incoming call, it will appear on the screen.
• If the screen is unlocked, tap the icon
reject a call.
• If the screen is locked, double tap the icon
to send a message and
.
2. The Message dialog appears.
Tap the message you would like to send after the incoming call is
rejected.
Tap Custom message.. to compose a message.
Selecting a ringtone to sound when receiving a call
1. From the Home screen, tap the Menu key > Settings > Sound >
Phone ringtone.
2. From the list of ringtones shown, tap the one to play when you
receive a phone call.
You can also tap MUSIC tab to set an audio file as your ringtone.
The ringtone plays a sample.
3. Tap OK.
62
Page 65

NOTE
You can select a ringtone that comes with the phone, or one that
you saved as a ringtone by using the Music application. See “Using a
song as a phone ringtone” on page 166.
Operation during a call
Switching to the speakerphone
1. To turn on the speakerphone, tap the speaker icon on the call in
progress screen.
2. To turn off the speakerphone, tap the speaker icon again on the
call in progress screen.
NOTES
• When the speakerphone is turned on, the third microphone picks
up the sounds.
• The speakerphone turns off automatically when you end a call.
Warning!
In order to prevent hearing damage, keep the phone away from your
ear while the speakerphone is on.
Muting the microphone
1. To mute the microphone, tap the microphone icon on the call in
progress screen.
2. To un-mute the microphone, tap the microphone icon again on
the call in progress screen.
NOTE
The microphone is un-muted automatically when you end a call.
Phone
63
Page 66

Switching between a Bluetooth headset and the
phone
When a Bluetooth headset is connected to your phone, you can switch
between using your Bluetooth headset or just your phone.
1. While placing a call using a Bluetooth headset, tap the Bluetooth icon
on the call in progress screen and tap Speaker or Handset
earpiece to switch to using just your phone.
2. Tap the Bluetooth icon on the call in progress screen and tap
Phone
Bluetooth to switch to using the Bluetooth headset.
NOTE
For instructions on how to pair a Bluetooth headset with your phone,
see “Connecting to Bluetooth
®
devices” on page 102.
Managing multiple calls
Setting up a conference call
You can set up a conference call with multiple callers.
1. Tap the add call icon on the call in progress screen to call another
person.
Then, you can also tap Recent, Favorites tab to place a call from
each list.
The first participant is put on hold while placing a call to the other
person.
2. Tap the merge calls icon on the call in progress screen to merge
the calls into a single conference call.
3. Tap the end call icon to disconnect both calls at once.
64
Page 67

Switching between multiple calls
If you accept a new call when you are already on a call, you can switch
between the two calls.
1. When there is another incoming call while you are already on a call,
the Incoming call screen opens.
2. Tap the icon to answer a new call.
When you answer the new call, the current call is placed on hold.
3. Tap the swap icon to put the current call on hold and connect to
another call.
4. Tap the end call icon to disconnect both calls at once.
Working with the Call log
The Call log is a list of all the calls you have placed, received, or missed.
Placing a call from the Call log
1. Tap the phone icon on the Home screen.
2. Tap the Recent tab.
Calls are listed with the most recent call at the top. Scroll to view
earlier entries in the log.
Phone
: Missed call
: Received call
: Dialed c all
Phone number or name in
Contacts.
Tap to place a ca ll.
65
Page 68
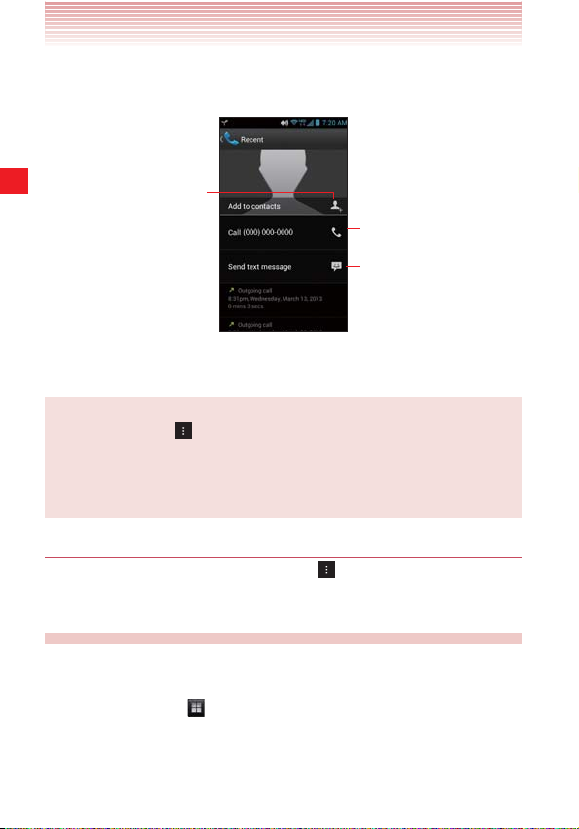
3. Tap a phone number or name.
The details of the Call log appear.
If the pho ne number is not in
Contacts, Add to co ntacts is
displayed and you ca n tap to add
Phone
the phone number to C ontacts.
If the pho ne number is alre ady in
Contac ts, picture ID is displayed
and you ca n tap to open the details
of the Contact.
Tap to place a ca ll.
Tap to send a tex t message.
4. Tap Call XXX-XXX-XXXX(phone number) to place a call.
NOTE
Tap the Menu key
to access the following options:
Remove from call log: Deletes an entr y from the Call log.
Edit number before call: Opens the Dialer tab containing the
phone number. You can edit the number and then place a call.
Clearing the entire Call log
On the Call log screen, tap the Menu key > Clear recent calls.
Dialing by voice
You can use the Voice Command application to place a phone call by
speaking the name of a contact or a phone number.
1. Tap the Apps icon on the Home screen.
66
Page 69

2. Tap the Voice Command icon .
The Voice Command opens, listens for your spoken instructions, and
displays some hints for how to use it.
3. Say “Call” followed by the name of the contact to call.
Or, follow one of the suggestions for dialing a number or controlling
your phone in other ways.
NOTE
If you have a Bluetooth headset that suppor ts “voice-recognition”
or “voice dialing,” you may be able to open the Voice Command by
pressing your headset’s main button or in some other way, and dial
by voice using your headset. For details, see the documentation that
came with your headset.
Voicemail
Setting up voicemail
You should set up your voicemail according to the tutorial you hear the
first time you call the voicemail.
1. Tap the Voicemail icon on the Home screen or in the Apps
screen.
The Voicemail menu screen opens.
2. Tap Call Voicemail to dial *86.
3. The dialpad will automatically appear on the call in progress
screen. Follow the instructions and enter a number or the # sign as
requested.
4. Follow the tutorial to set the password of your voice mailbox and
record a voice signature and greeting.
Phone
67
Page 70

Listening to your voicemail
1. Tap the Voicemail icon on the Home screen or in the Apps
screen.
The Voicemail menu screen opens.
2. Tap Call Voicemail to dial *86.
3. The dialpad will automatically appear on the call in progress
screen. Follow the instructions and enter a number or the # sign as
requested.
Phone
4. Follow the prompts to enter your password and retrieve your
messages.
NOTE
When you have a new voicemail message, the new voicemail icon
appears on the Status bar. Drag the status bar down to open the
Notification panel and tap New voicemail to open the Voicemail
menu screen.
If you have already subscribed to Visual Voice Mail, tap New
voicemails displayed in the Notification panel to open a Visual Voice
Mail.
Visual Voice Mail
Visual Voice Mail is a feature that allows you to review your voicemails
on your device, including the option to listen to your voicemail in any
order.
There is a monthly charge for Visual Voice Mail, and airtime charges
may apply.
68
Page 71

Subscribing to Visual Voice Mail
1. Tap the Voicemail icon on the Home screen or in the Apps
screen.
The Voicemail menu screen opens.
2. Tap Subscribe to Visual Voice Mail > Accept.
3. Tap OK > Subscribe > Accept > Accept > Exit.
Typical steps when you access the Visual Voice Mail for the first time
are described above. To subscribe, follow the on-screen instructions.
4. Wait 5 minutes before starting to use Visual Voice Mail.
NOTE
If you have already subscribed to Visual Voice Mail, a screen for
entering password will be displayed after step 3.
Logging in to Visual Voice Mail
1. Tap the Voicemail icon on the Home screen or in the Apps
screen.
2. Tap the “Password” field and enter your password. Visual Voice Mail
uses the same password as your standard Voicemail system.
3. Tap Login.
The Visual Voice Mail screen is displayed when login is completed.
NOTE
Once you logged in, you need not login for subsequent operation to
open the Visual Voice Mail. You do need to login if you change your
password or perform Factory data reset.
Phone
69
Page 72

Listening to your voicemail
1. Tap the Voicemail icon on the Home screen or in the Apps
screen.
The Visual Voice Mail screen opens.
Touch and ho ld the check box to
Selec ting voicemai l changes the
Phone
menu on the bar. From the me nu,
you can se lect Delete, Check OFF,
select voicemail.
Lock, and Star.
Tap to compose and send a
voicemail.
Tap to search fo r a voicemail. Tap to cha nge the order of t he voicemail li st.
2. Tap the voicemail you want to listen to.
The Voicemail player screen is displayed.
Tap to display t he previous
Tap to play a voicemail.
Tap to return a call to the sen der
Tap to reply by vo icemail, text m essage, or Email . Tap to add note.
voicemail.
of voicemail.
3. Tap the play icon to listen to your voicemail.
• Press the Volume Keys
to adjust the volume.
70
A heard voicemail
An unheard voicemail
Tap to update t he voicemail li st.
Caller ’s phone number, or bo th
name in Co ntacts and cal ler’s
phone number
Date and time when th e Voicem ail
system re ceived a voicem ail
Tap to display t he next voicem ail.
Tap to turn on th e speakerphon e.
Tap to delete a vo icemail.
Page 73

NOTE
When you have a new voicemail message, a new voicemail icon
appears in the Status bar. If you have already subscribed to Visual
Voice Mail, drag the Status bar down to open the Notification panel
and tap New voicemails to open Visual Voice Mail.
Using the menu on the Visual Voice Mail screen
The following menu is available on the Visual Voice Mail screen.
• Tap the Menu key
Select All: Selects all voicemails.
Deselect All: Deselects all voicemails.
Call Voicemail: Places a call to the voicemail.
Logout: Logs out of Visual Voice Mail.
Preferences: Allows you to change the Visual Voice Mail settings.
Clear Data: Deletes the login information and message data of Visual
Voice Mail.
About: Displays the version of Visual Voice Mail.
Unsubscription: Cancels the Visual Voice Mail subscription.
to access the following options:
Using the menu on the Voicemail player screen
The following menu is available on the Voicemail player screen :
• Tap the Menu key
Add Contact: Adds the phone number to Contacts. ( Only applicable
when the phone number is not already in your Contacts)
View contact: Shows details in Contacts, with the phone number of
the voicemail sender when the phone number is in your Contacts.
Forward: Forwards the voicemail by voicemail, multimedia message,
or Email.
Save a copy: Saves the voicemail on a microSD card or the internal
storage.
to access the following options:
Phone
71
Page 74

Deleting multiple voicemails
1. From the Visual Voice Mail screen, tap the Menu key > Select All.
All voicemails will be check-marked. Tap a check-marked voicemail
to un-check it.
2. Tap the icon .
Composing and sending a voicemail
1. From the Visual Voice Mail screen, tap the Compose icon .
Phone
The Compose Voice Message screen is displayed.
Send the voicemai l.
Tap and enter a phone number or
a contac t’s name.
Tap to start recordin g.
Open contact lists.
Tap to stop rec ording or playba ck.
Tap to turn on th e speakerphon e.
2. Tap the “To” field.
3. Enter a phone number or a contact’s name. As you enter the
phone number or the contact’s name, the search function displays
suggestions.
4. Tap a suggestion or continue entering the phone number.
5. Tap the record icon to start recording a voicemail.
6. Tap the stop icon to stop recording a voicemail. Even if you don’t
tap the stop icon
, recording stops after 3 minutes.
7. Ta p Send to send a voicemail.
72
Page 75

NOTE
Tap the Menu key
the following options:
Mark Urgent: Sets the status of the voicemail to urgent.
Mark Private: Sets the status of the voicemail to private.
on the Voicemail composing screen to access
Changing Visual Voice Mail settings
1. From the Visual Voice Mail screen, tap the Menu key >
Preferences.
2. Change the following settings as necessary.
Save voicemail message to: Allows you to set the location where
the voicemails will be saved; either the phone (Internal storage) or
microSD card (External storage).
Select ringtone: Allows you to set the default notification ringtone
when there is a new voicemail.
Vibrate: Check to have the phone vibrate when you receive a new
voicemail.
Phone
73
Page 76

Contacts
The Contacts application gives you quick and easy access to the
people you want to reach. The Contacts application allows you to store
names, phone numbers, and other information in your phone’s memor y.
Opening your contacts
Open Contacts to add, view, and communicate with your friends and
acquaintances.
Contacts
Opening your contacts
1. Tap the Contact icon on the Home screen.
All of your contacts are displayed alphabetically in a scrolling list.
Tap to view Grou ps.
Tap a contact to view its de tails.
Tap to view only your favorit e
contacts.
Tap and enter a phone number or
a contac t’s name.
Tap an icon to open Quick
Contact.
• You can drag the list up or down to scroll it, or slide your finger up
or down to scroll quickly.
74
Page 77

Viewing details about a contact
1. Open your contacts.
2. Tap the contact whose details you want to view.
Entries for communicating with the contact are followed by details.
Slide down to view ma p.
Tap a contact method to start
communicatin g with the contac t.
Tap an icon to call, email , text,
map, and so o n.
Tap an icon to vi ew communication
log.
• Tap a communication method to start dialing, texting, or emailing
the contact by using the listed number, address, and so on.
• You can edit the contact’s information by tapping the Menu key
> Edit.
Searching for a contact
You can search for a contact by name.
1. Open your contacts.
2. Tap the Find contacts field.
3. Start entering the name, phone number, email address, address or
note of the contact you are searching for.
As you type, contacts with matching names appear below the search
box.
4. Tap the matching contact in the list to open the Details screen, or tap
the enter key
to open a screen with a list of matching contacts.
Contacts
75
Page 78

Adding a new contact
You can add contacts on your phone and synchronize them with the
contacts in your Google, Backup Assistant Plus, Microsoft Exchange
ActiveSync, or other accounts that support syncing contacts.
1. Open your contacts.
2. Tap the icon .
3. If you have more than one account for contacts, tap the account you
want to add the contact to.
The Edit contact screen opens.
Contacts
Enter the c ontact’s name .
Tap to add more t han one entry for
the cate gory.
Tap to select a p icture.
Tap to open a men u with preset
labels.
Tap to delete this entry.
4. Enter the contact’s name.
5. Tap to add other contact information, such as phone numbers and
email addresses.
Scroll the page to view all categories.
76
Page 79

6. Tap Add new to add more than one entry for that category—for
example, to add both work and home numbers.
Tap the label to the right of the contact information to open a menu
with preset labels, such as Mobile, Work, Home, Work Fax, Home
Fax, CUSTOM for a phone number.
7. To add a category, tap Add another field and tap on the category
you would like to add from the list that is displayed.
8. Tap the picture frame icon to take a photo or choose a photo from
your Gallery to represent the contact.
9. Tap Save to finish.
NOTE
Contacts will try to link new addresses with existing contacts, to
create a single entry. You can also manage that process manually.
See “Linking or Unlinking contacts information” on page 83.
Contacts
77
Page 80

Editing contact details
You can change or add contact details.
NOTE
Some contact entries contain information from multiple sources:
information that you added manually or Contacts linked from
multiple accounts to consolidate duplicates and so on. If you find
duplicate entries in Contacts, you can link them into a single entry,
as described in “Linking contacts” on page 83. If information from
Contacts
unrelated contacts was consolidated in error, you can separate them
as described in “Unlinking contacts” on page 83.
Editing contact details
1. Open your contacts.
2. Tap the name of a contact whose details you want to edit.
3. Tap the Menu key > Edit while viewing a contact’s details.
4. Edit the contact information, using the same controls as creating a
contact. See “Adding a new contact” on page 76.
5. Tap Save.
Changing a contact’s default phone number
The default phone number is used when you initiate a call or send a text
message from the list by touching and holding a contact.
1. Open your contacts.
2. Tap the name of a contact in the list to view its details.
3. Touch and hold the phone number to use as the contact’s default
phone number.
4. Tap Set default.
78
Page 81

Diverting all of a contact’s calls to your voicemail
1. Open your contacts.
2. Tap the name of a contact in the list to view its details.
3. Tap the Menu key > All calls to voicemail.
When this contact calls, your phone will not ring and the caller is sent
directly to your voicemail.
Setting a ringtone for a contact
1. Open your contacts.
2. Tap the name of a contact in the list to view its details.
3. Tap the Menu key > Set ringtone.
4. In the scrolling list of ringtones, tap the one to play when the contact
calls.
The phone will play a sample.
5. Tap OK.
Setting a ringback tone for a contact
1. Open your contacts.
2. Tap the name of a contact in the list to view its details.
3. Tap the Menu key > Set ringbacktone.
4. The Verizon Tones screen opens.
Set a ringback tone in Verizon Tones.
Contacts
79
Page 82

Deleting a contact
1. Open your contacts.
2. Tap the name of a contact in the list to view its details.
3. Tap the Menu key > Delete > OK.
NOTES
• If you delete a contact from Google Contacts (or another account
with editable contacts), the contact is also deleted from Contacts
on the web the next time you sync your phone.
Contacts
• You cannot delete contacts from a read-only account. Instead, a
dialog informs you that the contact will be hidden. To restore hidden
contacts from a read-only account, you must delete that account
from your phone and sync it again.
• If the contact contains information from both editable accounts
(such as Contacts ) and from a read-only account, a dialog informs
you that the information from the read-only account will be hidden,
not deleted.
80
Page 83

Communicating with your contacts
From the Contacts or Favorites tab, you can quickly call or send a
text (SMS) or multimedia message ( MMS) to a contact’s default phone
number. You can also open details to view a list of all the ways you can
communicate with that contact.
Connecting by using Quick Contact for Android
1. Tap a contact’s picture to open Quick Contact for Android.
Tap the icon fo r the way you want
to connect.
Tap to open Quick Conta ct.
Tap to start t he correspon ding
application.
2. Tap the icon for the way you want to communicate.
The icons availabilit depends on the information you have for the
contact and the applications and accounts on your phone.
3. Tap a phone number or address to start the corresponding
application.
Contacts
81
Page 84

Changing which contacts are displayed
You can hide contacts that don’t have phone numbers. You can also
configure which account’s groups of contacts you want to display in the
Contacts list.
Changing what account’s groups are displayed
1. Open your contacts.
2. Tap the Menu key > Contacts to display > Customize.
3. Tap an account to open its list of groups.
Contacts
The account’s groups depend on the type of account.
4. Check or uncheck the groups whose contacts you want to view in
Contacts.
5. Tap OK.
A message appears while your changes are made. If your changes
affect many contacts, this will take a short while.
NOTE
This setting affects only the display of groups of contacts. Your sync
settings are not affected.
82
Page 85

Linking or Unlinking contacts information
Linking contacts
When you add an account or add contacts in other ways, such as by
exchanging emails, Contacts attempts to avoid duplication by linking
any new contact information with existing contacts under a single entry.
You can also link contacts manually.
1. Open your contacts.
2. Tap the contact entry to which you want to add information.
This is the contact you will see in Contacts after the link.
3. Tap the Menu key > Edit.
4. Tap the Menu key > Link.
Matching contacts are displayed at the top of the screen. You can
add another contact from your full list of contacts.
5. Tap the contact you want to link with the first contact.
The information from the second contact is added to the first contact,
and the second contact is no longer displayed in the Contacts list.
Unlinking contacts
If contact information from different sources was linked in error, you can
unlink the information into individual contacts again.
1. Open your contacts.
2. Tap the contact entry whose information you want to separate.
3. Tap the Menu key > Edit.
4. Tap the Menu key > Unlink.
The contact information will be separated into individual contacts.
Contacts
83
Page 86

Importing, exporting, and sharing
contacts
If you have contacts stored in vCard format on a microSD card, you
can import them into Contacts on your phone. You can export contacts
in vCard format to a microSD card, to back them up to a PC or other
device. You can also send a contact in vCard format via email.
Importing contacts from your microSD card
You can copy individual or group contacts in vCard format onto your
Contacts
microSD card and then import them into one of your accounts on the
phone.
NOTES
• For details about copying files to a microSD card from your PC, see
“Connecting to a PC via USB” on page 100.
• You may also have contacts stored on a microSD card from another
device. Refer to the device’s owner’s guide for details about
working with microSD cards.
1. Open your contacts.
2. Tap the Menu key > Import/export > Import from SD card.
3. If you have more than one account on your phone, tap the account
you want to import the contacts in to.
4. If you have more than one vCard file on the microSD card, tap the
option to import a single contact file, multiple contact files, or all of
the contact files on the microSD card.
84
Page 87

Exporting contacts to your microSD card
You can export all of the contacts on your phone to your microSD card,
as a group vCard file.
You can then copy this file to a PC or another device that can work with
files in this format, such as an address book application.
1. Open your contacts.
2. Tap the Menu key > Import/export > Export to SD card > OK.
Contacts creates a vcf file on your microSD card with all of your
contacts.
Sharing a contact
You can share the contact in vCard format via Gmail, Email, Messaging,
Bluetooth connection or any download app.
1. Open your Contacts.
2. Open the contact you want to share.
3. Tap the Menu key > Import/export > Share visible contacts.
4. Tap the application to use for sharing the contact.
For the application you selected, see the section about that
application.
Contacts
85
Page 88

Working with Groups
Once you add contacts to a group, you can broadcast messages or
emails to all members of the group.
Adding a new group
1. Tap the Contact icon on the Home screen.
2. Tap the Groups tab.
3. Tap the icon .
4. If you have more than one account with contacts, tap the account to
Contacts
which you want to add the group.
5. Enter the group name and person’s name who you want to add the
group.
6. When you are finished, tap Save.
Adding contacts to a group
1. Open the Groups tab.
2. Tap the group to which you want to add contacts.
3. Tap the Menu key > Edit.
4. Enter a person’s name who you want to add the group.
5. When you are finished, tap Save.
Sending messages or emails to group members
1. Open the Groups tab.
2. Tap the group for which you want to send a message.
3. Tap the Menu key > Send group sms or Send group email.
The Messaging or Email application is automatically activated. For
more information about sending a message, see “Messaging” on
page 123 and “Email” on page 115.
86
Page 89

Editing a group name
1. Open the Groups tab.
2. Tap the group you want to edit.
3. Tap the Menu key > Edit.
4. Edit the group name.
5. Tap Save to finish.
Removing a contact from a group
1. Open the Groups tab.
2. Tap the group whose contact you want to remove.
3. Tap the Menu key > Edit.
4. Tap at the right of the contact you want to remove.
5. Tap Save to finish.
Deleting a group
1. Open the Groups tab.
2. Tap the group you want to delete.
3. Tap the Menu key > Delete > OK.
Contacts
87
Page 90

Working with Favorites
The Favorites tab contains the contacts starred as favorites followed
by a list of the contacts you communicate with most frequently.
Adding a contact to your favorites
1. Tap the Contact icon on the Home screen.
2. Tap the Contacts tab.
3. Tap a contact to view its details.
4. Tap the star to the right of the contact’s name.
Contacts
The star turns gold
Opening a list of your favorite contacts
1. Tap the Contact icon on the Home screen.
2. Tap the Favorites tab.
The Favorites tab lists contacts to the favorites list, followed by a list
of frequently called contacts.
Removing a contact from your favorites list
1. Tap the Contact icon on the Home screen.
2. Tap the Favorites tab.
3. Tap a contact to view its details.
4. Tap the gold star to the right of the contact’s name.
The star turns gray
favorites.
NOTE
You can also remove the contact from your favorites by tapping the
gold star to the right of the contact’s name on the details displayed
on the Contacts tab.
and the contact is added to your favorites.
and the contact is removed from your
88
Page 91

Configuring Backup Assistant Plus
Backup Assistant Plus safeguards your phone’s contacts and
automatically saves a copy of the names, phone numbers, email
addresses, etc., stored in your phone. You can view, print, add, delete,
or edit your contacts online.
SM
NOTE
Subject to specific terms of use. Results may vary based on
backup schedule and other factors. See verizonwireless.com/
backupassistant for more details.
Configuring Backup Assistant Plus
If Backup Assistant Plus settings were not configured during the
initialization of your phone, configure the settings using the following
procedure:
1. Tap the Contact icon on the Home screen.
2. Tap the Contacts tab.
3. Tap the Menu key > Backup Assistant Plus.
4. Tap Start Backup Assistant Plus.
5. Tap OK.
Contacts
89
Page 92

Syncing Contacts manually
You need to sync your Contacts manually, if you unchecked Auto-
sync.
1. Tap the Contact icon on the Home screen.
2. Tap the Contacts tab.
3. Tap the Menu key > Backup Assistant Plus.
4. Tap Backup now.
Changing schedule for auto-syncing
Contacts
You can change the scheduled time to per form auto-syncing.
1. Tap the Contact icon on the Home screen.
2. Tap the Contacts tab.
3. Tap the Menu key > Backup Assistant Plus.
4. Tap Set Schedule.
5. Tap to select the time to perform syncing.
6. Tap OK.
90
Page 93

Connecting to Networks
Connecting to mobile networks
When you buy your phone and sign up for service, your phone is
configured to use your provider’s mobile networks for voice and data
communication.
The icons in the Status bar indicate which type of data network you are
connected to and the net work signal strength.
Connected to 4G LTE network
Connected to 3G network
Connected to the 1X data network
The more bars the stronger the wireless signal
Connected to another wireless service provider’s network
(roaming)
NOTE
When connected to slower networks, you may want to postpone
using your phone for data-intensive tasks until you are connected to a
faster net work, or find a Wi-Fi network on which to connect.
Disabling data when roaming
You can prevent your phone from transmitting data over another
carrier’s mobile network when you leave an area covered by your
carrier’s network.
This is useful for controlling expenses if your phone’s service plan
doesn’t include data roaming.
1. From the Home screen, tap the Menu key > Settings > More... >
Mobile networks > Global Data Roaming Access.
2. Tap Deny data roaming access.
Connecting to Networks
91
Page 94

Configuring system select
You can set your phone to search or roam for another network when
you are not in your carrier’s range.
Leave this setting as default unless you want to alter the system
selection as instructed by your service provider.
1. From the Home screen, tap the Menu key > Settings > More... >
Mobile networks > System select.
2. Tap one of the following:
Home only: Only within your home area or affiliated area.
Automatic: Scan for signal automatically.
Configuring network mode
You can set the network mode manually.
1. From the Home screen, tap the Menu key > Settings > More... >
Connecting to Networks
Mobile networks > Network Mode.
2. Tap Global, GSM/WCDMA or LTE/ CDM A.
92
Page 95

Connecting to Wi-Fi networks
Connecting to a Wi-Fi network “hotspot” or wireless access point
enables faster data transmission.
Some access points are open and free to connect while others are
hidden or protected by passwords and other security measures
requiring additional configuration.
The following Status bar icons indicate Wi-Fi status.
Connected to a Wi-Fi network (Waves indicate
connection strength)
Failed to connect to a Wi-Fi network
Notification that an open Wi-Fi network is in range
NOTE
You can extend your battery life by turning off the Wi-Fi when not in
use.
Turning Wi-Fi on and connecting to a Wi-Fi network
1. From the Home screen, tap the Menu key > Settings > Wi-Fi.
The Wi-Fi settings screen appears.
2. Slide the Wi-Fi switch from the OFF position to the ON position.
Wi-Fi turns on and your phone scans for available Wi-Fi network.
3. A list of available Wi-Fi networks will be displayed. Secured networks
are indicated by a lock icon
If the phone finds a network that you have connected to previously, it
automatically connects to that network.
.
4. Tap the network you want to join.
5. If the network is open, you will be prompted to confirm that you want
to connect to that network. Tap Connect to confirm.
If the network is secured, you will be prompted to enter a password.
(Ask your network administrator for details.)
Connecting to Networks
93
Page 96

NOTES
• Tap a network name on the Wi-Fi settings screen while connected
to a network to display detailed information such as speed, security,
address, etc.
• Touch and hold a network name on the Wi-Fi settings screen while
connected to the network for the following options:
Forget network: Erases saved information for the added Wi-Fi
network. Use this for a Wi-Fi network if you do not want to connect
automatically to that network or no longer use that network.
Modify network: Allows you to change your password.
• Tap SCAN on the bottom of Wi-Fi settings screen to manually scan
for networks.
• When connecting to a Wi-Fi network, your phone obtains network
address and other information via the DHCP protocol.
Connecting to Networks
• Tap the ADVANCED to use static IP address, check MAC address,
or setup of Network notification and Wi-Fi sleep policy.
Adding a Wi-Fi network
You can add a Wi-Fi network manually if it does not broadcast its name
(SSID ) or if you want to add a Wi-Fi network when you are out of its
range.
To add a secured net work, you need to contact the network
administrator to obtain the password or other required security
credentials.
1. From the Home screen, tap the Menu key > Settings > Wi-Fi.
2. Slide the Wi-Fi switch from the OFF position to the ON position.
3. Tap MORE > Add network.
4. Enter the network’s SSID. If the network is secured, tap the Security
box, and select appropriate security option for that net work.
5. Enter any required passwords and security credentials.
6. Tap Save.
94
Page 97

NOTE
The phone will connect automatically to added Wi-Fi networks when
you enter its access range.
Receiving notifications when open networks are in
range
Set to receive notifications in the Status bar when your phone detects
an open Wi-Fi network when Wi-Fi is on.
1. From the Home screen, tap the Menu key > Settings > Wi-Fi.
2. Slide the Wi-Fi switch from the OFF position to the ON position.
3. Tap ADVANCED > Network notification to check it.
NOTE
An open Wi-Fi network icon
an open network is detected. Drag the status bar down to open
the Notification panel and tap the network name to open the Wi-Fi
settings screen.
is displayed in the Status bar when
Connecting to Networks
95
Page 98

Connecting to virtual private networks
Virtual Private Networks (VPNs) allow you to connect to resources
inside a secured local network from outside that network.
To connect to VPN, configure VPN settings in Settings. A VPN Client
can be used to connect more easily.
NOTE
There are numerous systems for securing VPN connections,
including some that rely on secure certificates or other methods to
ensure that only authorized users can connect. For instructions on
how to install secure certificates, see “Installing a secure certificate
from the microSD card” on page 98.
Adding a VPN
Connecting to Networks
To configure VPN access from your phone, you must obtain the details
from your network administrator.
1. From the Home screen, tap the Menu key > Settings > More... >
VPN.
If you did not set any screen lock, you must set a PIN or password
before using VPN.
2. Tap Add VPN Network.
3. Follow the instructions obtained from your network administrator to
configure settings.
4. Tap Save.
The VPN will be added to the list on the VPN settings screen.
NOTE
Touch and hold the added VPN name on the VPN settings screen to
access the following options:
Edit network: Allows you to edit the VPN settings.
Delete network: Deletes the VPN settings.
96
Page 99

Connecting to a VPN
1. From the Home screen, tap the Menu key > Settings > More... >
VPN for a list of configured VPNs.
2. Tap the VPN to connect.
3. Enter any required credentials then tap Connect.
NOTE
When you are connected to VPN, a VPN icon
Status bar.
Drag the status bar down to open the Notification panel, then tap the
ongoing notification for the VPN connection to disconnect.
is displayed in the
VPN Client
You can configure VPN connections easily with the VPN Client.
1. Tap the Apps icon on the Home screen.
2. Tap the VPN Client icon to open.
3. Tap the Menu key > New.
4. Follow the instructions obtained from your network administrator to
configure the settings.
Connecting to Networks
97
Page 100

Working with secure certificates
If your VPN or Wi-Fi network relies on secure certificates, you must
obtain the certificates and save them to your phone’s secure credential
storage before you can configure access to the VPN or Wi-Fi network.
For specific instructions, contact your network administrator.
Installing a secure certificate from the microSD card
The installed certificate can be used to connect to a secured network.
1. Copy the certificate from your PC to the top level (not folder) of the
microSD card.
(For instructions on how to connect your phone to a PC and copy
files to the microSD card, see “Connecting your phone to a PC via
USB” on page 100.)
2. From the Home screen, tap the Menu key > Settings > Security.
Connecting to Networks
3. Scroll the screen up, then tap Install from SD card.
Only the names of cer tificates not already installed on your phone are
displayed.
4. Tap the file name of the cer tificate to install.
5. If prompted, enter the certificate’s password then tap OK.
6. Enter a name for the certificate then tap OK.
If you have not already set a password for your phone’s credential
storage, you will be prompted to enter and confirm a password.
For security purposes, the original certificate will be deleted from the
microSD card.
98
 Loading...