

Page 1
MO1510-EA
© 2015 CASIO COMPUTER CO., LTD.
Operation Guide 5475
ENGLISH
Congratulations upon your selection of this CASIO watch.
E-1
About This Manual
• Depending on the model of your watch, display text
appears either as dark fi gures on a light background, or
light fi gures on a dark background. All examples in this
manual are shown using dark fi gures on a light
background.
• Button operations are indicated using the letters shown
in the illustration.
• Note that the product illustrations in this manual are
intended for reference only, and so the actual product
may appear somewhat different than depicted by an
illustration.
E-2
Contents
About This Manual …………………………………………………………………… E-2
Things to check before using the watch ………………………………………… E-3
Mode Reference Guide ……………………………………………………………… E-7
Timekeeping ……………………………………………………………………………E-12
Confi guring Home City Settings ……………………………………………………E-14
To confi gure Home City settings ……………………………………………… E-14
To change the daylight saving time (summer time) setting…………………E-16
Confi guring Current Time and Date Settings ……………………………………E-17
To change the current time and date settings ………………………………E-17
Hand Home Position Adjustment …………………………………………………E-21
To adjust home positions ………………………………………………………E-21
Checking the Current Time in a Different Time Zone ……………………………E-24
To enter the World Time Mode ………………………………………………E-25
E-4
To turn an alarm and the Hourly Time Signal on and off……………………E-38
To stop the alarm ………………………………………………………………E-38
Illumination ……………………………………………………………………………E-39
To illuminate the display manually …………………………………………… E-39
To change the illumination duration …………………………………………E-40
To enable or disable auto light…………………………………………………E-42
Button Operation Tone ………………………………………………………………E-44
To enable or disable the button operation tone ……………………………E-44
Low Battery Indication ………………………………………………………………E-46
Troubleshooting ………………………………………………………………………E-48
Specifi cations …………………………………………………………………………E-50
Things to check before using the watch
1. Check the Home City and the daylight saving time (DST) setting.
Use the procedure under “To confi gure Home City settings” (page E-14) to confi gure
your Home City and daylight saving time settings.
Important!
Proper World Time Mode data depends on correct Home City, time, and date settings
in the Timekeeping Mode. Make sure you confi gure these settings correctly.
2. Set the current time.
See “Confi guring Current Time and Date Settings” (page E-17).
The watch is now ready for use.
E-3
To confi gure World Time City and summer time settings …………………E-26
To swap your Home Time and World Time Cities …………………………E-28
Using the Stopwatch …………………………………………………………………E-29
To enter the Stopwatch Mode …………………………………………………E-29
To perform an elapsed time operation ………………………………………E-29
To pause at a split time …………………………………………………………E-30
To measure two fi nishes ………………………………………………………E-30
Using the Countdown Timer ………………………………………………………… E-32
To enter the Countdown Timer Mode …………………………………………E-32
To specify the countdown start time ………………………………………… E-32
To perform a countdown timer operation ……………………………………E-33
To stop the alarm ………………………………………………………………E-34
Using the Alarm ……………………………………………………………………… E-35
To enter the Alarm Mode ………………………………………………………E-35
To set an alarm time ……………………………………………………………E-36
To test the alarm ………………………………………………………………E-37
E-5
Mode Reference Guide
The mode you should select depends on what you want to do.
To do this: Enter this mode: See:
• View the current date in the Home City
• Confi gure Home City and daylight saving time (DST)
settings
• Confi gure time and date settings
View the current time in one of 48 cities (31 time zones)
around the globe
Use the stopwatch to measure elapsed time Stopwatch Mode E-29
Use the countdown timer Countdown Timer Mode E-32
• Set an alarm time
• Turn the hourly time signal on or off
Timekeeping Mode E-12
World Time Mode E-24
Alarm Mode E-35
E-6
Selecting a Mode
• The illustration below shows which buttons you need to press to navigate between
modes.
Countdown Timer Mode
Countdown Timer Mode
E-8
World Time ModeStopwatch Mode
World Time ModeStopwatch Mode
Alarm Mode
Alarm Mode
• To return to the Timekeeping Mode from any other mode, hold down C for about
two seconds.
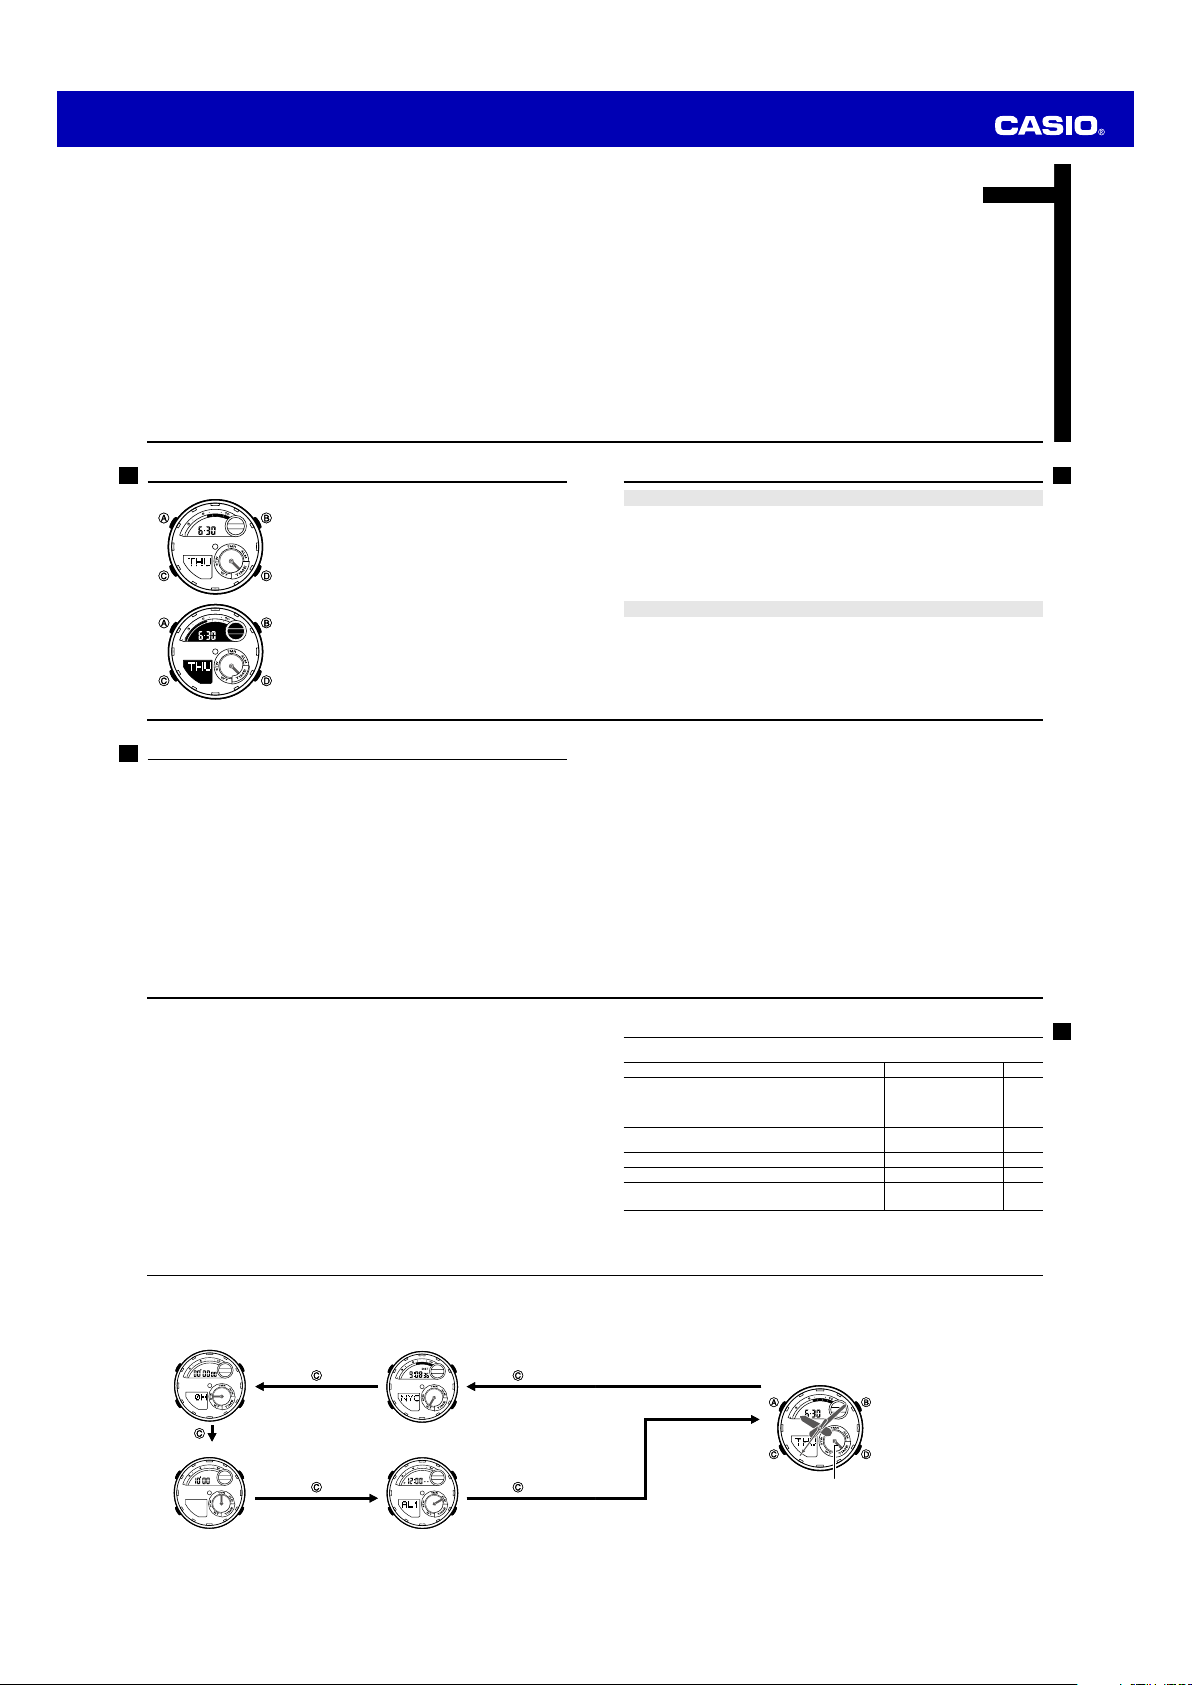
• The mode dial hand indicates the watch’s current mode.
Timekeeping Mode
Timekeeping Mode
Mode dial hand
Mode dial hand
E-7
E-9
Page 2
Operation Guide 5475
General Functions (All Modes)
The functions and operations described in this section can be used in all of the modes.
Direct Timekeeping Mode Access
• To enter the Timekeeping Mode from any other mode, hold down C for about two
seconds.
Auto Return Features
• The watch will automatically return to the Timekeeping Mode if you do not perform
any button operation for a particular amount of time in each mode.
Mode Name Approximate Elapsed Time
Alarm 3 minutes
Setting screen (digital setting fl ashing) 3 minutes
Initial Screens
When you enter the Alarm or World Time Mode, the data you were viewing when you
last exited the mode appears fi rst.
E-10
Timekeeping
Use the Timekeeping Mode to set and view the current time and date.
Digital meter Minute hand
Hour hand
Day of week
E-12
Month Day
Mode dial hand
Second hand
Confi guring Home City Settings
There are two Home City settings: actually selecting the Home City and selecting
either standard time or daylight saving time (DST).
E-14
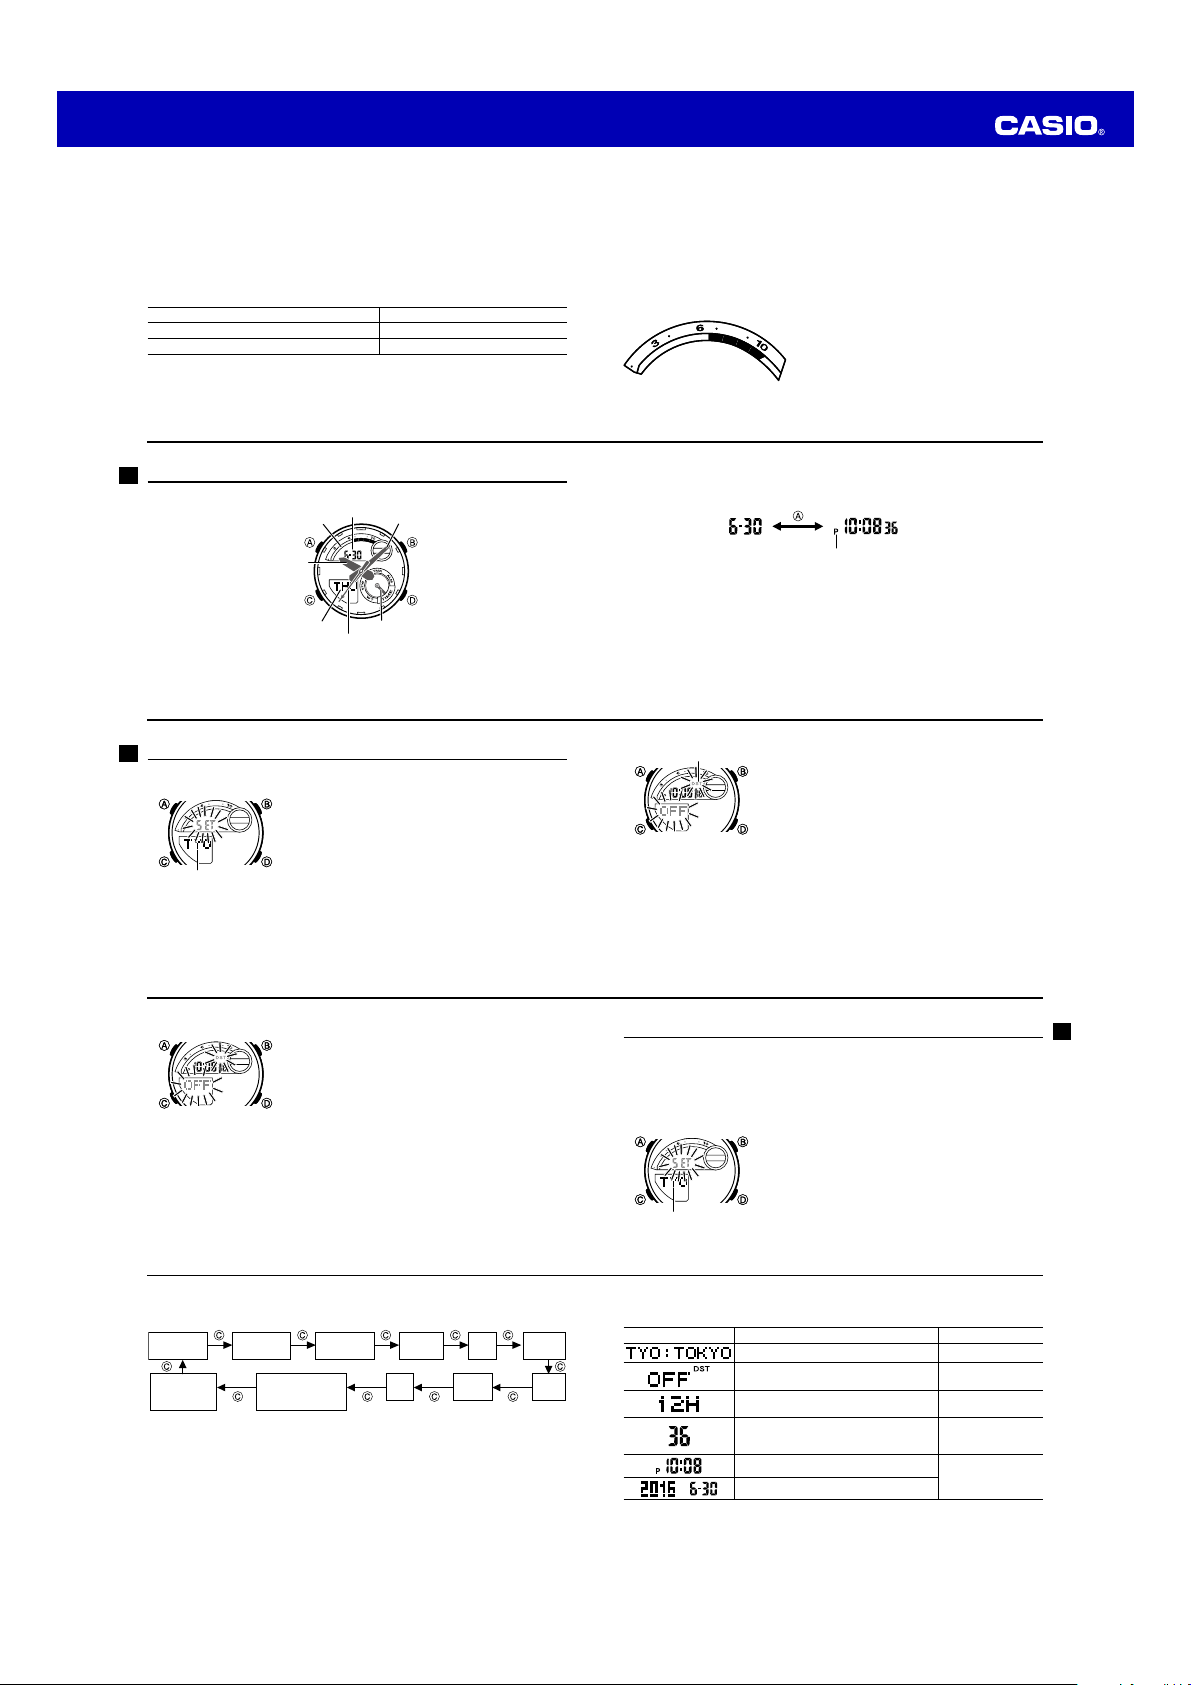
City codeCity code
To confi gure Home City settings
1. In the Timekeeping Mode, hold down A until
appears in the lower display.
• When you rel ease A (aft er ADJ appears), SET will
be fl ashing in the upper display. This is the setting
mode.
• The watch will exi t the settin g mode automat ically if
you do not per form any ope ration for ab out two or
three minutes.
2. Use D (East) and B (West) to scroll through the
available city codes.
• For detail s about cit y codes, see t he “City C ode
Table” at the back of thi s manual.
ADJ
Scrolling
TheD and B buttons are used on the setting screen to scroll through data on the
display. In most cases, holding down these buttons during a scroll operation scrolls
through the data at high speed.
Digital Meter
• The digital meter indicates the seconds count in the Timekeeping Mode (page
E-12), World Time Mode (page E-24), and Timer Mode (page E-32). In the
Stopwatch Mode (page E-29) it indicates the 1/10-second count.
Digital MeterDigital Meter
• Each press of A in the Timekeeping Mode will change screen contents as shown
below.
Month-Day
DST indicatorDST indicator
3. Press C.
4. Press D to toggle the DST setting between daylight
5. After all of the settings are the way you want, press A to exit the setting screen.
• The DST indicator a ppears to indi cate that dayligh t saving time is tu rned on.
Note
• After you sp ecify a cit y code, the watch w ill use UTC* of fsets in the Wo rld Time
Mode to calcu late the current t ime for other t ime zones bas ed on the curren t
time in your H ome City.
* Coordinated Universal Time, the world-wide scientifi c standard of timekeeping.
The reference point for UTC is Greenwich, England.
Hour : Minutes Seconds
PM indicator
• This will cause DST to appear in the upper dis play
and the DST s etting of th e currently sel ected Home
City to appe ar in the lower d isplay.
saving time (ON) and standard time (
• Note that you c annot switch b etween sta ndard
time and dayli ght saving tim e (DST) whi le UTC is
selected as your Home City.
OFF
).
E-11
E-13
E-15
To change the daylight saving time (summer time) setting
3. Press D to toggle the DST setting between daylight saving time (ON) and standard
OFF
time (
4. After all of the settings are the way you want, press A to exit the setting screen.
E-16
2. Press C to move the fl ashing in the sequence shown below to select the other
E-18
).
• The DST indicator a ppears to indi cate that dayligh t saving time is tu rned on.
settings.
City Code
(page E-14)
Illumination
Duration
(page E-40)
1. In the Timekeeping Mode, hold down A until
appears in the lower display.
• When you rel ease A (aft er ADJ appears), SET will
be fl ashing in the upper display.
2. Press C.
• This will cause DST to appear in the upper dis play
and the DST s etting of th e currently sel ected Home
City to appe ar in the lower d isplay.
DST
(page E-16)
12/24-Hour
Format
Button Operation
Tone On/Off
(page E-44)
Seconds Hour
Day Month
ADJ
Minutes
Year
Confi guring Current Time and Date Settings
You can use the procedure below to adjust the Timekeeping Mode time and date
settings if they are off.
Changing the digital Home City data should cause the analog time setting to change
accordingly. If the analog time does not indicate the digital time, check the home
positions of the hands and make adjustments if necessary (page E-21).
To change the current time and date settings
City CodeCity Code
3. When the timekeeping setting you want to change is fl ashing, use D and/or B to
change it as described below.
Screen To do this: Do this:
1. In the Timekeeping Mode, hold down A until
appears in the lower display.
• When you release A (after
be fl ashing in the upper display.
Change the city code See page E-14.
Toggle between daylight saving time (ON)
and standard time (
Toggle between 12-hour (
24H
(
) timekeeping.
Reset the seconds to
(If the current seconds count is between 30
and 59, one is added to the minute count).
Change the hour or minutes
Change the year, month, or day
OFF
).
12H
00
ADJ
) and 24-hour
ADJ
SET
appears),
See page E-14.
PressD.
PressD.
UseD (+) and B (–).
will
E-17
E-19
Page 3

Operation Guide 5475
4. After all of the settings are the way you want, press A to exit the setting screen.
Note
• For inform ation abou t selecting a H ome City a nd confi gurin g the DST set ting,
see “Con fi guring Hom e City Set tings” (page E-14).
• While the 12- hour forma t is selected fo r timekeepi ng, a P (PM) indicator will
appear for ti mes from no on to 11:59 p.m. No indicato r appears for ti mes from
midnight to 11:59 a.m. Wit h 24-hour f ormat, time i s displayed from 0: 00 to
23:59, without any P (PM) indicator.
• The watch’s built- in full automat ic calendar ma kes allowance s for differen t
month leng ths and leap yea rs. Once you s et the date, there sh ould be no
reason to chan ge it except after yo u have the watch’s batter y replaced.
• The day of the we ek changes au tomaticall y when the date ch anges.
• Refer to the page s shown belo w for more infor mation on T imekeepin g Mode
settings.
- Button operation tone on/off: “To enable or disable the button operation tone”
(page E-44)
- Illumination duration setting: “To change the illumination duration” (page E-40)
E-20
• Use the C button to se lect a hand for a djustment . Each press of C cycles
in sequences from the second hand, to the hour and minute hands, and then
the mode dia l hand. Selec ting a hand caus es it to move to 12 o’clock and th e
content of th e upper display ch anges as sho wn in the table b elow.
Upper display Selected hand
00
Flashing
Flashing
Flashing
• If the selec ted hand does n ot move exactly to 12 o’cloc k, perfor m step 2 below
to adjust it.
• The watch will ret urn to regular tim ekeeping auto matically if y ou do not per form
any operatio n for about t wo or three min utes. Any chan ges you have made to
settings up to that point will be saved.
E-22
0:00
Sub
Second hand
Hour and minute hands
Mode dial hand
Checking the Current Time in a Different Time Zone
You can use the World Time Mode to view the current time in one of 31 time zones (48
cities) around the globe. The city that is currently selected in the World Time Mode is
called the “World Time City”.
• You also can swap the current World Time City and Home Time City in the World
Time Mode (page E-27).
Hand Home Position Adjustment
Strong magnetism or impact can cause the hands of the watch to go out of alignment.
• Home position adjustment is not necessary when the analog time and digital time
are the same time in the Timekeeping Mode.
To adjust home positions
2. Use D (+) and B (–) to adjust the position of the currently selected hand.
• Holding down either button will cause the hand to move at high speed. O nce
started, hi gh-spe ed hand moveme nt will contin ue even if you relea se the
button. To stop high-speed hand movement, press any button.
• The seco nd hand and mod e dial hand will au tomatical ly stop high- speed
movement af ter they comp lete one revoluti on. The minu te hand will stop
automatica lly after 12 revoluti ons.
3. Press A to exit home position correction and return to regular timekeeping.
Note
After performing home position adjustment, enter the Timekeeping Mode and check to
make sure that the analog hands and the upper display indicate the same time. If they
do not, perform home position adjustment again.
Current time in the currently
Current time in the currently
selected World Time City
selected World Time City
Currently selected
Currently selected
World Time City
World Time City
1. In the Timekeeping Mode, hold down A and keep it
depressed for about fi ve seconds until
on the lower display.
• When you rel ease A after H.SET appears, the
second han d will move to 12 o’clock. T his indicates
the second hand home position adjustment mode.
• Though ADJ will appear in the lowe r display about
two seco nds after you h old down A, do not releas e
the butto n yet. Keep it depre ssed until H.SET
appears.
To enter the World Time Mode
UseC to select the World Time Mode as shown on page
E-8.
• The mode dial hand will point to WT, and the current
city code and city name will scroll across the lower
display. After that, the city code will remain shown in
the lower display. You can scroll the city code and city
name again by pressing A.
• The hour, minute, and second hands will indicate the
current Timekeeping Mode time.
H.SET
appears
E-21
E-23
E-24
To confi gure World Time City and summer time settings
Hold down A
Hold down A
DST indicator
DST indicator
E-26
To swap your Home Time and World Time Cities
PressA and B at the same time.
•
This causes the Home City time (indicated by the main hour and minute hands) and
the World Time City time (shown on the display) to be swapped with each other.
Home City [TYO] Time
Current World Time
City and Time
E-28
1. In the World Time Mode, use D (East) to scroll through
city codes.
• For detail s about cit y codes, see t he “City C ode
Table” at the back of thi s manual.
• Pressing do wn B and D at the same ti me will
jump to the U TC city code.
2. To toggle between summer time (
display) and standard time (
downA.
• Using the World Time Mode to change the DST
setting of t he city cod e that is selecte d as your
Home Cit y also will ch ange the Tim ekeeping Mo de
time DST se tting.
• Note that you c annot switch b etween st andard time/
daylight savin g time (DST ) while UTC is selected as
the World Time City.
$ and %
DST
in the upper
DST
not displayed), hold
Home City [NYC] Time
New World Time
City and Time
E-25
• Note that the s tandard tim e/daylight savi ng time (DST ) setting a ffects onl y the
currently se lected time zo ne. Other ti me zones are not af fected.
Swapping the Home City and World Time City
You can use the procedure below to swap your Home Time City with your World Time
City. This function comes in handy for those who often travel between two different
time zones.
•
You need to confi gure starting Home City and World Time City settings before
performing the procedure below.
To confi gure Home City settings (page E-14)
To confi gure World Time City and summer time settings (page E-26)
E-27
Using the Stopwatch
The stopwatch measures elapsed time, split times, and two fi nishes.
Seconds
Seconds
Minutes
Minutes
Hours
Hours
1/100
1/100
second
second
To enter the Stopwatch Mode
UseC to select the Stopwatch Mode as shown on page
E-8.
The mode dial hand will move to
STW
.
To perform an elapsed time operation
D
Start Stop (Resume) (Stop) Reset
D
D D
A
E-29
Page 4

Operation Guide 5475
To pause at a split time
D
Start Split
A
SPL
(
lower display.)
appears in the
A D
Split release Stop Reset
A
To measure two fi nishes
D
Start Split
E-30
A
First runner
fi nishes.
SPL
(
the lower display.)
Display time of
fi rst runner
appears in
D A
Stop
Second runner
fi nishes.
Split release
Display time of
second runner
A
Reset
Using the Countdown Timer
The countdown timer can be confi gured to start at a preset time and sound an alarm
when the end of the countdown is reached.
Countdown time
Countdown time
(Minutes, seconds)
(Minutes, seconds)
E-32
• An alarm sounds for 10 seconds when the end of the countdown is reached. This
alarm will sound in all modes. The countdown time is reset to its starting value
automatically after the alarm sounds.
To stop the alarm
Press any button.
E-34
To enter the Countdown Timer Mode
UseC to select the Countdown Timer Mode as shown on
page E-8.
• The mode dial hand will move to
display will show the current countdown time.
To specify the countdown start time
1. Enter the Countdown Timer Mode.
• If a countdow n is in progress (i ndicated by the
seconds counting down), press D to stop it and
then press A to reset to the cur rent countdow n
start time.
TMR
and the upper
Note
• The Stopwatch Mode can indicate elapsed time up to 23 hours, 59 minutes, 59.99
seconds.
• Elapsed time returns to zero automatically and timing continues from there when
the above elapsed time limit is reached.
• An ongoing elapsed time measurement operation will continue internally even if you
change to another mode. However, if you exit the Stopwatch Mode while a split
time is displayed, the split time will not be displayed when you return to the
Stopwatch Mode.
E-31
• If a countdow n is paused, pres s A to reset to the cur rent countdow n start
time.
2. Hold down A until the minute setting of the current countdown start time starts to
fl ash. This is the setting screen.
3. Use D (+) and B (–) to change the minute.
• You can set a countdo wn start ti me from 1 to 60 mi nutes, in one -minute
increments.
4. Press A to exit the setting screen.
To perform a countdown timer operation
D
Start Stop (Resume) (Stop) Reset
• Before starting a countdown timer operation, check to make sure that a countdown
operation is not already in progress (indicated by the seconds counting down). If it
is, press D to stop it and then A to reset to the countdown start time.
D
D D
A
E-33
Using the Alarm
Alarm time
Alarm time
(Hour : Minutes)
(Hour : Minutes)
Alarm number or SIG
Alarm number or SIG
You can set fi ve independent daily alarms. When an alarm
is turned on, an alarm will sound for about 10 seconds
each day when the time in the Timekeeping Mode reaches
the preset alarm time. This is true even if the watch is not
in the Timekeeping Mode. One of the daily alarms is a
snooze alarm. The snooze alarm will sound every fi ve
minutes up to seven times or until it is turned off.
You can also turn on an Hourly Time Signal, which will
cause the watch to beep twice every hour on the hour.
To enter the Alarm Mode
UseC to select the Alarm Mode as shown on page E-8.
• The mode dial hand will move to
will show the currently selected alarm number (
AL4
SNZ
, or
), or the hourly time signal indicator (
ALM
, the lower display
AL1
SIG
to
E-35
).
• When you enter the Alarm Mode, the data you were viewing when you last exited
the mode appears fi rst.
To set an alarm time
1. In the Alarm Mode, use D to scroll through the alarm screens in the lower display
until the one you want to change is shown.
AL1 AL2 AL3
SIG SNZ AL4
E-36
To turn an alarm and the Hourly Time Signal on and off
1. In the Alarm Mode, use D to select an alarm or the Hourly Time Signal.
2. When the alarm or the Hourly Time Signal you want is selected, press A to turn it
on (on) and off (
Snooze alarm indicator
Snooze alarm indicator
Alarm on indicator
Alarm on indicator
E-38
- -
).
Hourly time signal
Hourly time signal
on indicator
on indicator
• The alarm o n indicator (wh en any alarm is o n),
snooze alar m indicator (whe n the snooze al arm is
on), and the Hou rly Time Sig nal on indicat or (when
the Hourl y Time Signa l is on) are shown on th e
upper display i n all modes.
To stop the alarm
Press any button.
Alarm ON/OFF
Alarm ON/OFF
indicator
indicator
2. Hold down A until the hour digits of the alarm setting
start to fl ash in the upper display.
• This is the setting screen.
3. Press C to move the fl ashing between the hour and
minute settings.
4. While a setting is fl ashing, use D (+) and B (–) to
change it.
• When set ting the alar m time using th e 12-hour
format, ta ke care to set the tim e correctly as a .m. (no
indicator) or p. m. (P indicator).
5. Press A to exit the setting screen.
To test the alarm
In the Alarm Mode, hold down D to sound the alarm.
Illumination
The display of the watch is illuminated for easy reading in
the dark. The auto light turns on illumination automatically
when you angle the watch towards your face.
• Auto light must be enabled (page E-42) for it to operate.
To illuminate the display manually
PressB in any mode (except when a fl ashing setting
screen is displayed) to illuminate the display.
• You can use the procedure below to select either 1.5
seconds or three seconds as the illumination duration.
When you press B, the display will remain illuminated
for about 1.5 seconds or three seconds, depending on
the current illumination duration setting.
• The above operation illuminates the display regardless
of whether auto light is enabled or disabled.
E-37
E-39
Page 5

Operation Guide 5475
To change the illumination duration
1. In the Timekeeping Mode, hold down A until
• When you rel ease A (aft er ADJ appears), SET will be fl ashing in th e upper
display.
2. Use C to cycle through the settings on the lower display until the current
illumination duration (
• See the seq uence in step 2 of t he procedure u nder “To change th e current
time and date set tings” (page E-17) for information abo ut how to scroll th rough
setting screens.
3. Press D to toggle the illumination duration between three seconds (
and 1.5 seconds (
4. After all of the settings are the way you want, press A to exit the setting screen.
E-40
To enable or disable auto light
Auto light enabled
Auto light enabled
indicator
indicator
E-42
LT1
LT3
or
) is shown.
LT1
displayed).
In the Timekeeping Mode, hold down B for about three
seconds to toggle auto light between enabled (LT shown
on the lower display) and disabled (LT not displayed).
• The auto light enabled indicator (LT) is on the lower
display in all modes while auto light is enabled.
• Auto light remains enabled for about six hours. After
that it becomes disabled automatically.
Illumination Precautions
• Illumination may be hard to see when viewed under
direct sunlight.
• Illumination turns off automatically whenever an alarm
sounds.
• Frequent use of illumination runs down the battery.
ADJ
appears in the lower display.
LT3
displayed)
Button Operation Tone
When enabled, the button operation tone sounds any time you press one of the
watch’s buttons. You can enable or disable the button operation tone as desired.
• Even if you disable the button operation tone, the alarm, Hourly Time Signal, and
Countdown Timer Mode alarm all operate normally.
To enable or disable the button operation tone
Mute indicatorMute indicator
1. In the Timekeeping Mode, hold down A until
appears in the lower display.
• When you rel ease A (aft er ADJ appears), SET will
be fl ashing in the upper display.
2. Use C to cycle through settings on the lower display
until the current button operation tone setting (
KEY
) is shown.
ADJ
MUTE
About auto light
While auto light is enabled, illumination will turn on
whenever you position your wrist as described
below in any mode.
Moving the watch to a position that is parallel
to the ground and then tilting it towards you
more than 40 degrees causes illumination to
turn on.
Warning!
Always make sure you are in a safe place whenever you are reading the
•
display of the watch using auto light. Be especially careful when running or
engaged in any other activity that can result in accident or injury. Also take
care that sudden illumination by auto light does not startle or distract others
around you.
When you are wearing the watch, make sure that auto light is disabled before
•
riding on a bicycle or operating a motorcycle or any other motor vehicle.
Sudden and unintended operation of auto light can create a distraction, which
can result in a traffi c accident and serious personal injury.
Auto light precautions
• See the seq uence in step 2 of t he procedure u nder “To change th e current
time and date set tings” (page E-17) for information abo ut how to scroll th rough
setting screens.
3. Press D to toggle the button operation tone setting between enabled (
disabled (
4. After the setting is the way you want, press A to exit the setting screen.
Note
• The mute indi cator is displayed i n all modes whe n the button o peration ton e is
disabled.
or
• Illumination may not turn on if the face of the watch is more than
15 degrees above or below parallel. Make sure that the back of
your hand is parallel to the ground.
• Illumination turns off after the preset illumination duration (page
E-40), even if you keep the watch pointed towards your face.
• Static electricity or magnetic force can interfere with proper
operation of auto light. If illumination does not turn on, try
moving the watch back to the starting position (parallel with the
ground) and then tilt it back towards your face again. If this
does not work, drop your arm all the way down so it hangs at
your side, and then bring it back up again.
• You may notice a very faint clicking sound coming from the
watch when it is shaken back and forth. This sound is caused
by mechanical operation of auto light, and does not indicate a
problem with the watch.
MUTE
).
More than
More than
40°
40°
Wear the watch on the
Wear the watch on the
outside of your wrist
outside of your wrist
E-41
E-43
KEY
) and
E-44
Low Battery Indication
A low battery indicator appears on the display when the power of the batteries is low.
Have the batteries replaced as soon as possible.
Note
• For guideli nes covering th e life of the bat teries and supp orted bat tery type s,
see “Spe cifi cations” ( page E-5 0).
The conditions below are in effect while the low battery indicator is fl ashing.
Low battery indicatorLow battery indicator
E-46
• All hands are stopped.
• Except for the low battery indicator, all other display
functions are disabled.
• Watch tones are disabled.
• Display illumination is disabled.
• Watch operations are disabled.
Troubleshooting
Time Setting
The current time setting is off by a couple of hours.
■
Your Home City setting may be wrong (page E-14). Check your Home City setting and
correct it, if necessary.
The current time setting is off by one hour.
■
You may need to change your Home City’s standard time/daylight saving time (DST)
setting. Use the procedure under “To change the current time and date settings” (page
E-17).
World Time Mode
The time for my World Time City is off in the World Time Mode.
■
This could be due to incorrect switching between standard time and daylight saving
time.
See “To confi gure World Time City and summer time settings” (page E-26) for more
information.
E-48
Note
• Sequenti ally or repeated ly perfor ming light, ala rm, and other p ower intensive
operation s over a short p eriod can cau se a sudden dro p in battery p ower,
which will make the low battery indicator fl ash. Even though the low battery
indicator may di sappear and watc h functions m ay become re -enabled , battery
replaceme nt is recomme nded.
Batteries
The low battery indicator is fl ashing on the digital display.
■
Low battery indicatorLow battery indicator
The watch’s battery power is low. Have the batteries
replaced as soon as possible.
See “Low Battery Indication” (page E-46).
E-45
E-47
E-49
Page 6

Operation Guide 5475
Specifi cations
Accuracy at normal temperature:
Digital Timekeeping:
Time format: 12-hour and 24-hour
Calendar system: Full Auto-calendar pre-programmed from the year 2000 to 2099
Other: Home City code (can be assigned one of 48 city codes); standard time /
daylight saving time (summer time)
Analog Timekeeping:
World Time:
Other: daylight saving time/standard time
Stopwatch:
Measuring unit: 1/100 second
Measuring capacity: 23:59' 59.99"
Measuring modes: Elapsed time, split time, two fi nishes
E-50
Hour, minutes, seconds, p.m. (P), month, day, day of the week
48 cities (31 time zones)
±15 seconds a month
Hour, minutes (hand moves every 10 seconds), seconds
City Code Table
City
City name
Code
PPG PAGO PAGO –11
HNL HONOLULU –10
ANC ANCHORAGE –9
YVR VANCOUVER
LAX LOS ANGELES
YEA EDMONTON
DEN DENVER
MEX MEXICO CITY
CHI CHICAGO
NYC NEW YORK –5
L-2
UTC Offset/
GMT Differential
City
City name
Code
SCL SANTIAGO
YHZ HALIFAX
YYT ST. JOHN’S –3.5
RIO DE
–8
–7
–6
RIO
JANEIRO
F. DE
FEN
NORONHA
RAI PRAIA –1
UTC
LON LONDON
UTC Offset/
GMT Differential
Countdown Timer:
Countdown unit: 1 second
Countdown range: 60 minutes
Setting ranges: Countdown start time (1 to 60 minutes, 1-minute increments)
Alarms:
5 daily alarms (with one snooze alarm); Hourly Time Signal
Illumination:
Other:
Battery:
LED (light-emitting diode); Selectable illumination duration
(approximately 1.5 seconds or 3 seconds); Auto light
Button operation tone on/off, Low battery alert
Two silver oxide batteries (Type: SR927W)
Approximate battery operating time: 2 years under the following conditions:
• 1 illumination operation (1.5 seconds) per day
• Alarm: 10 seconds/day
Frequent use of illumination runs down the battery. Particular care is required
when using auto light (page E-43).
Specifi cations are subject to change without notice.
E-51
L-1
City
City name
Code
MAD MADRID
PAR PARIS
–4
–3
–2
0LIS LISBON
ROM ROME
BER BERLIN
STO STOCKHOLM
ATH ATHENS
JRS JERUSALEM
MOW MOSCOW
JED JEDDAH
THR TEHRAN +3.5
DXB DUBAI +4
UTC Offset/
GMT Differential
+1
+2CAI CAIRO
+3
City
City name
Code
KBL KABUL +4.5
KHI KARACHI +5
DEL DELHI +5.5
KTM KATHMANDU +5.75
DAC DHAKA +6
RGN YANGON +6.5
BKK BANGKOK +7
SIN SINGAPORE
HKG HONG KONG
BJS BEIJING
TPE TAIPEI
UTC Offset/
GMT Differential
+8
L-3
City
City name
Code
SEL SEOUL
TYO TOKYO
ADL ADELAIDE +9.5
GUM GUAM
SYD SYDNEY
NOU NOUMEA +11
WLG WELLINGTON +12
L-4
UTC Offset/
GMT Differential
+10
• This table shows the city codes of this
watch. (As of December 2014)
+9
• The rules governing global times (GMT
differential and UTC offset) and
summer time are determined by each
individual country.
 Loading...