

Page 1
EN
fx-Manager PLUS
Subscription
for fx-9860GII
fx-9750GII
GRAPH75+ E
GRAPH35+ E
User’s Guide
CASIO Worldwide Education Website
http://edu.casio.com
Manuals are available in multi languages at
http://world.casio.com/manual/calc
Page 2
Getting Started
k Software Covered by This Manual
• This manual covers the following software.
fx-9860G
fx-9750G
GRAPH75+ E Manager PLUS
GRAPH35+ E Manager PLUS
• Emulator Graphic
The following shows the emulator graphics displayed by each type of software.
fx-9860G
Manager PLUS
II Manager PLUS
II Manager PLUS
II
fx-9750GII
Manager PLUS
GRAPH75+ E
Manager PLUS
GRAPH35+ E
Manager PLUS
• Though the calculator operations you perform with the emulator graphic are different for each
type of software, operation of the software itself is the same in all cases.
• The operations in this manual are based on the fx-9860G
perform the same operations for other software.
II Manager PLUS software. You can
EN-1
Page 3
k About fx-9860GII Manager PLUS
• fx-9860GII Manager PLUS is an emulator that lets you perform fx-9860GII operations on your
computer.
• You can record key operations you perform on the emulator as “Key-Log records”, and edit Key-
Log records as required.
• The keys on the Key-Log editor screen as well as the emulator LCD screen contents can be
pasted into other applications. This means that emulator data can be used to create assignments,
tests, and other materials.
• A presentation feature lets you play back saved Key-Log records.
• You can connect your fx-9860G
screen.
II unit to your computer and display its contents on your computer
Important!
• Be sure to install the software before you connect fx-9860GII to your computer. Connecting
before you install the software can result in improper operation.
k Using This Manual
• For details about operation of the fx-9860GII Graphic Scientific Calculator, see the user
documentation that comes with the calculator.
• The procedures in this manual assume that you are already familiar with the following standard
computer operations.
- Menu operations using the mouse, including: clicking, double-clicking, dragging, etc.
- Text input using the keyboard
- Icon operations, general window operations, etc.
- If you are not familiar with these types of operations, refer to the user documentation for your
computer.
• The screen shots shown in this manual are all from the English version of Windows
®
8.1.
• Note that the actual appearance of the screen that appears when using this software depends on
your computer system setup and on the operating system you are using.
• Screen shots shown in this User’s Guide are intended for illustrative purposes only. The actual
text and values that appear on display may differ from the examples shown in this User’s Guide.
EN-2
Page 4
k System Requirements
Operating Systems: Windows 7 (32-bit/64-bit), Windows 8.1 (32-bit/64-bit), Windows 10 (32-bit/
64-bit)
Your hardware configuration needs higher than functionalities that operating
system recommends.
Computer: Computer with one of the Windows operating systems pre-installed
(Excluding computers with an upgraded operating system and self-built
computers.)
Disk Space: 100MB for installation and uninstall
Note: Actual requirements and product functionality may vary based on your
system configuration and operating system.
Other:
Video adapter and display must support resolution of XGA (1024×768) or
higher, 16 bit or higher system color.
®
Internet Explorer
®
Adobe
Reader® 8.0 or later.
7 or later.
Microsoft® Excel® 2007 or Microsoft Excel 2010
Note
• For the latest information about system requirements, visit the website at the URL below:
http://world.casio.com/support/os_support/
• Microsoft, Windows and Excel are registered trademarks or trademarks of Microsoft Corporation
in the United States and/or other countries.
• Adobe and Reader are either registered trademarks or trademarks of Adobe Systems
Incorporated in the United States and/or other countries.
• Company and product names used herein are trademarks of their respective owners.
• Note that trademark ™ and registered trademark
guide.
®
are not used within the text of this user’s
EN-3
Page 5
Contents
1. Installing and Uninstalling the Software ............................................EN-5
2. Screen Configuration ...........................................................................EN-6
Menu Bar ...................................................................................................................... EN-7
Toolbar ....................................................................................................................... EN-10
Status Bar .................................................................................................................. EN-11
3. Emulator Mode and Key-Log Editor Mode .......................................EN-12
4. Emulating fx-9860G
II Calculator Operation ...................................EN-13
5. Using the Emulator Key-Log ............................................................EN-17
6. Configuring Options Dialog Box Setting .........................................EN-21
Other Functions ..................................................................................EN-23
7.
Printing ....................................................................................................................... EN-23
Shortcut Menu ............................................................................................................ EN-25
8. File Types Supported by fx-9860GII Manager PLUS ......................EN-26
9. Differences between fx-9860GII Calculator and fx-9860GII
Manager PLUS Functions ..................................................................EN-27
10. Using Screen Receiver to Display the Calculator Screen Image
on Your Computer .............................................................................EN-38
11. Error Message Table ..........................................................................EN-41
EN-4
Page 6

1. Installing and Uninstalling the Software
To install the software
1. On your computer, double-click the fx-Manager PLUS application EXE file.
2. Perform operations as instructed by the text that appears on the screen.
To uninstall the software
Use Windows Control Panel to uninstall the software.
To start up the software
1. On your computer’s desktop, click the “fx-Manager PLUS Subscription” icon.
• Starting up this application for the first time will display a dialog box for selecting a calculator
model. Select a calculator model and then click [OK].
EN-5
Page 7

2. Screen Configuration
The following shows the fx-9860GII Manager PLUS screen.
Menu Bar
Toolbar
Emulator
Status Bar
Key Log window
File Display Area
* When you have both the emulator window and Key-Log (or bitmap file) window open on the
display, the emulator window always will be displayed on top.
Bitmap File window (a capture
of the emulator LCD screen)
EN-6
Page 8
Menu Bar
• If a menu command can also be executed by clicking a toolbar button, the applicable toolbar
button is also provided.
k File Menu
Menu
New
Open...
Close Closes the currently open file.
Capture Screen
Save
Save As... Saves the current work file under a new name.
Print...
Toolbar
Button
Description
Creates a new Key-Log file.
Opens an existing file.
Captures the emulator screen.
Saves the current work file, overwriting the previous
(unedited) version.
Prints the currently displayed bitmap file.
Print Preview
Print Setup... Displays the print setup dialog box.
(File History) Shows up to four of the last files you worked on.
Change
Calculator Model
and Exit...
Exit Exits this application.
Displays a preview of the print image.
Displays a dialog box for selecting a calculator model
to be emulated. Clicking [Save and Exit] will exit this
application. The next time you start up this application,
the emulator that was selected when you clicked [Save
and Exit] will appear on the display.
EN-7
Page 9
k Edit Menu
Menu
Undo
Redo
Cut
Copy
Paste
Clear Deletes the selected data.
Select All Selects all Key-Log records.
Toolbar
Button
Description
Undoes the last operation.
Redoes the last undone operation.
Moves the selected data to the clipboard.
Copies selected data to the clipboard.
Pastes the clipboard contents.
* The Edit menu is disabled during emulator operation.
k View Menu
Menu Submenu Description
Calc Key Normal Selects normal-size calculator keys.
Large Selects large-size calculator keys.
Calc Screen
Tool Bar Standard Toggles display of the standard toolbar on and off.
×1
×2
×3
×4
×5
Log Toggles display of the log toolbar on and off.
Edit Toggles display of the edit toolbar on and off.
Specifies an actual size display.
Specifies a 2X size display.
Specifies a 3X size display.
Specifies a 4X size display.
Specifies a 5X size display.
Bitmap Toggles display of the bitmap toolbar on and off.
EN-8
Page 10
k Key-Log Menu
Menu
Add
Delete
Emulator
Editor
Auto Play
Step Play
Stop
Toolbar
Button
Description
Adds a new Key-Log record (Key-Log editor mode
only).
Deletes the currently displayed Key-Log record (KeyLog editor mode only).
Enters the emulator mode.
Enters the Key-Log editor mode.
Starts Key-Log auto playback.
Starts Key-Log manual playback.
Stops Key-Log playback or recording.
Pause
Record
Insert Pause
Pauses Key-Log playback.
Starts Key-Log recording.
During Key-Log editing, inserts a pause character into
Key-Log playback (Key-Log editor mode only).
k Window Menu
Menu Description
Tiled Displays all windows in a tiled configuration.
Horizontal Displays all windows in a horizontal line.
• The Window menu also shows the names of files that you have open. When you have multiple
files open, the file name at the top of the list is the one you are currently working with the active
file.
EN-9
Page 11
k Tools Menu
Menu
Screen Receiver
Options... Displays a dialog box for configuring optional settings.
Toolbar
Button
Description
Starts up Screen Receiver.
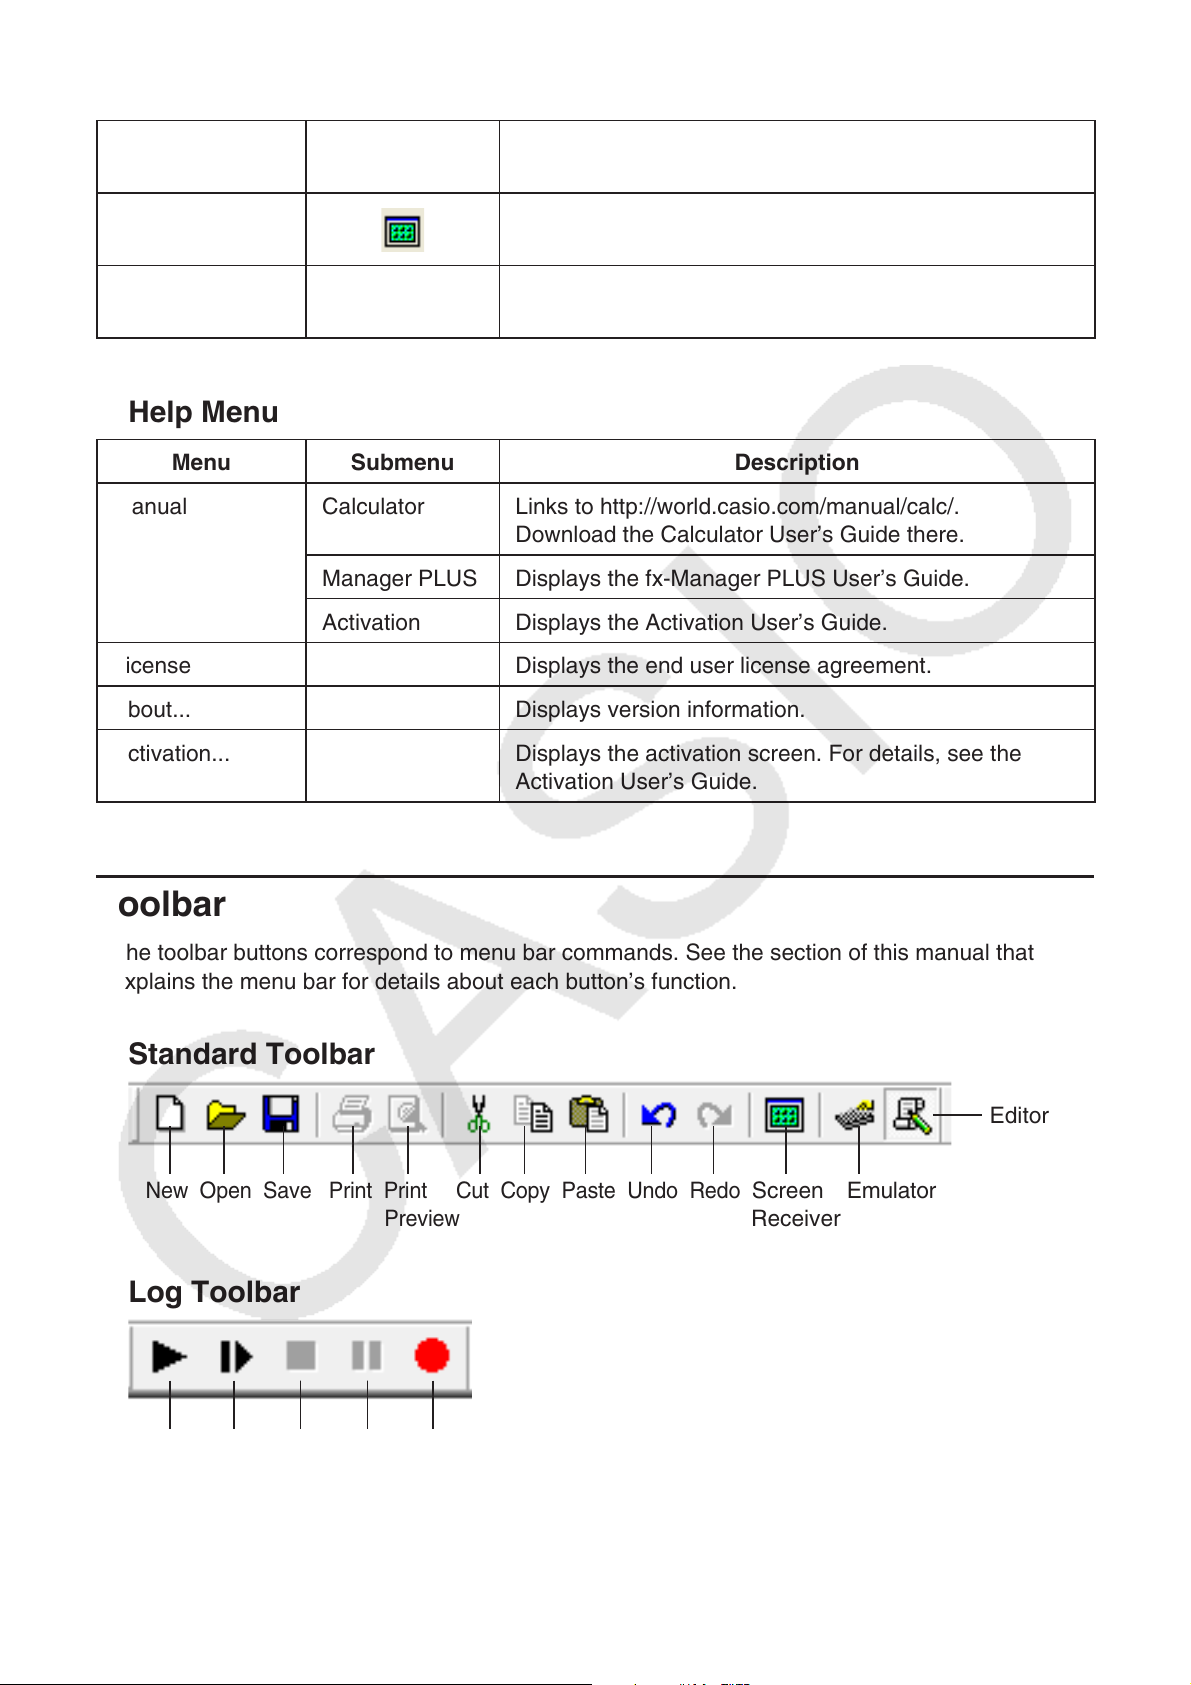
k Help Menu
Menu Submenu Description
Manual Calculator Links to http://world.casio.com/manual/calc/.
Download the Calculator User’s Guide there.
Manager PLUS Displays the fx-Manager PLUS User’s Guide.
Activation Displays the Activation User’s Guide.
License Displays the end user license agreement.
About... Displays version information.
Activation... Displays the activation screen. For details, see the
Activation User’s Guide.
Toolbar
• The toolbar buttons correspond to menu bar commands. See the section of this manual that
explains the menu bar for details about each button’s function.
k Standard Toolbar
Editor
New Open Save Print Print Cut Copy Paste Undo Redo
Preview
k Log Toolbar
Screen
Receiver
Emulator
Play Step Stop Pause Record
EN-10
Page 12
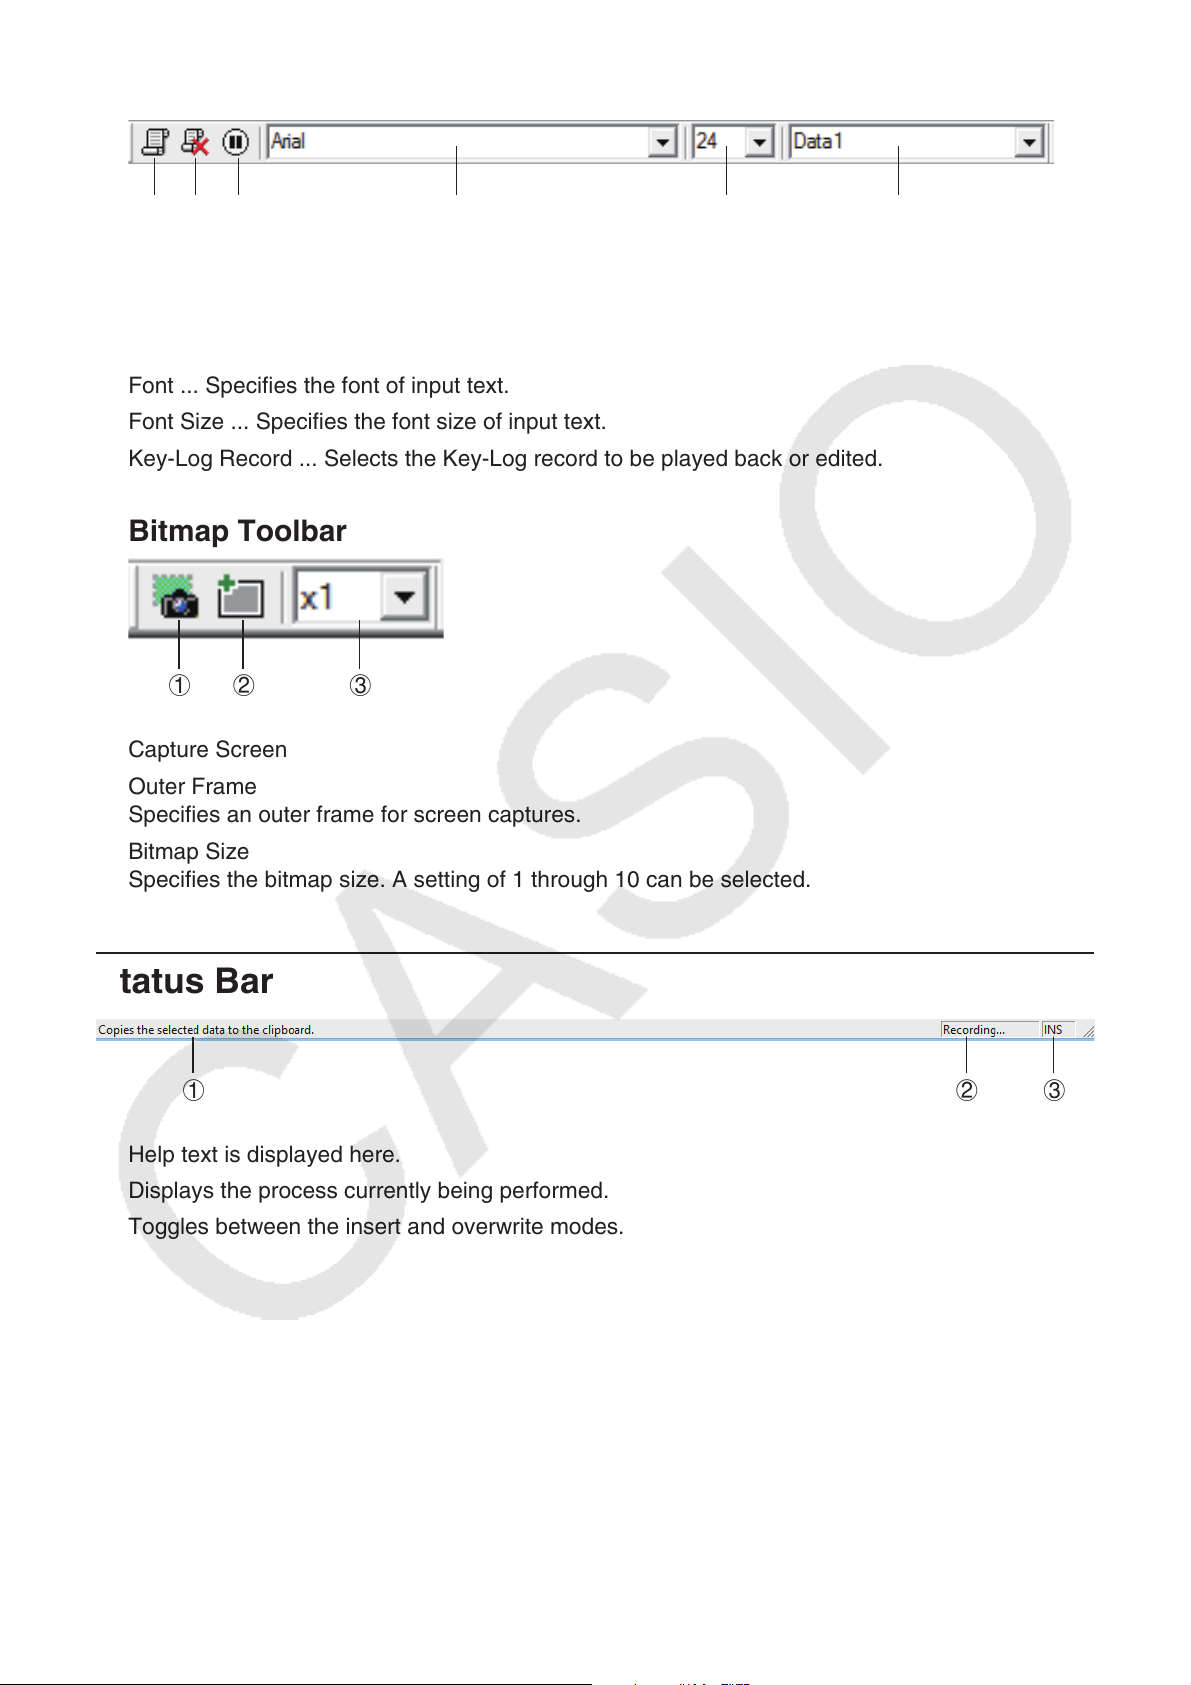
k Edit Toolbar
1 2 3 4 5 6
1 Add
2 Delete
3 Insert Pause
4 Font ... Specifies the font of input text.
5 Font Size ... Specifies the font size of input text.
6 Key-Log Record ... Selects the Key-Log record to be played back or edited.
k Bitmap Toolbar
1 2 3
1 Capture Screen
2 Outer Frame
Specifies an outer frame for screen captures.
3 Bitmap Size
Specifies the bitmap size. A setting of 1 through 10 can be selected.
Status Bar
1 2 3
1 Help text is displayed here.
2 Displays the process currently being performed.
3 Toggles between the insert and overwrite modes.
EN-11
Page 13

3. Emulator Mode and Key-Log Editor Mode
fx-9860GII Manager PLUS has two modes.
You can use either of the following to operations to select the mode you want.
• On the [KeyLog] menu, select either [Emulator] or [Editor].
• On the standard toolbar, click
Emulator Mode
Use this mode when you want to perform mainly emulator operations.
Key-Log Editor Mode
Use this mode when you want to perform mainly Key-Log data operations.
or .
EN-12
Page 14
4. Emulating fx-9860GII Calculator Operation
• The emulator makes it possible to mimic fx-9860GII calculator operation using your computers
mouse and keyboard.
• For details about emulator operations, see the fx-9860G
• Note that some emulator functions are different from the functions of the fx-9860G
For details, see “9. Differences between fx-9860G
Functions” (page EN-27).
II Calculator and fx-9860GII Manager PLUS
II User’s Guide.
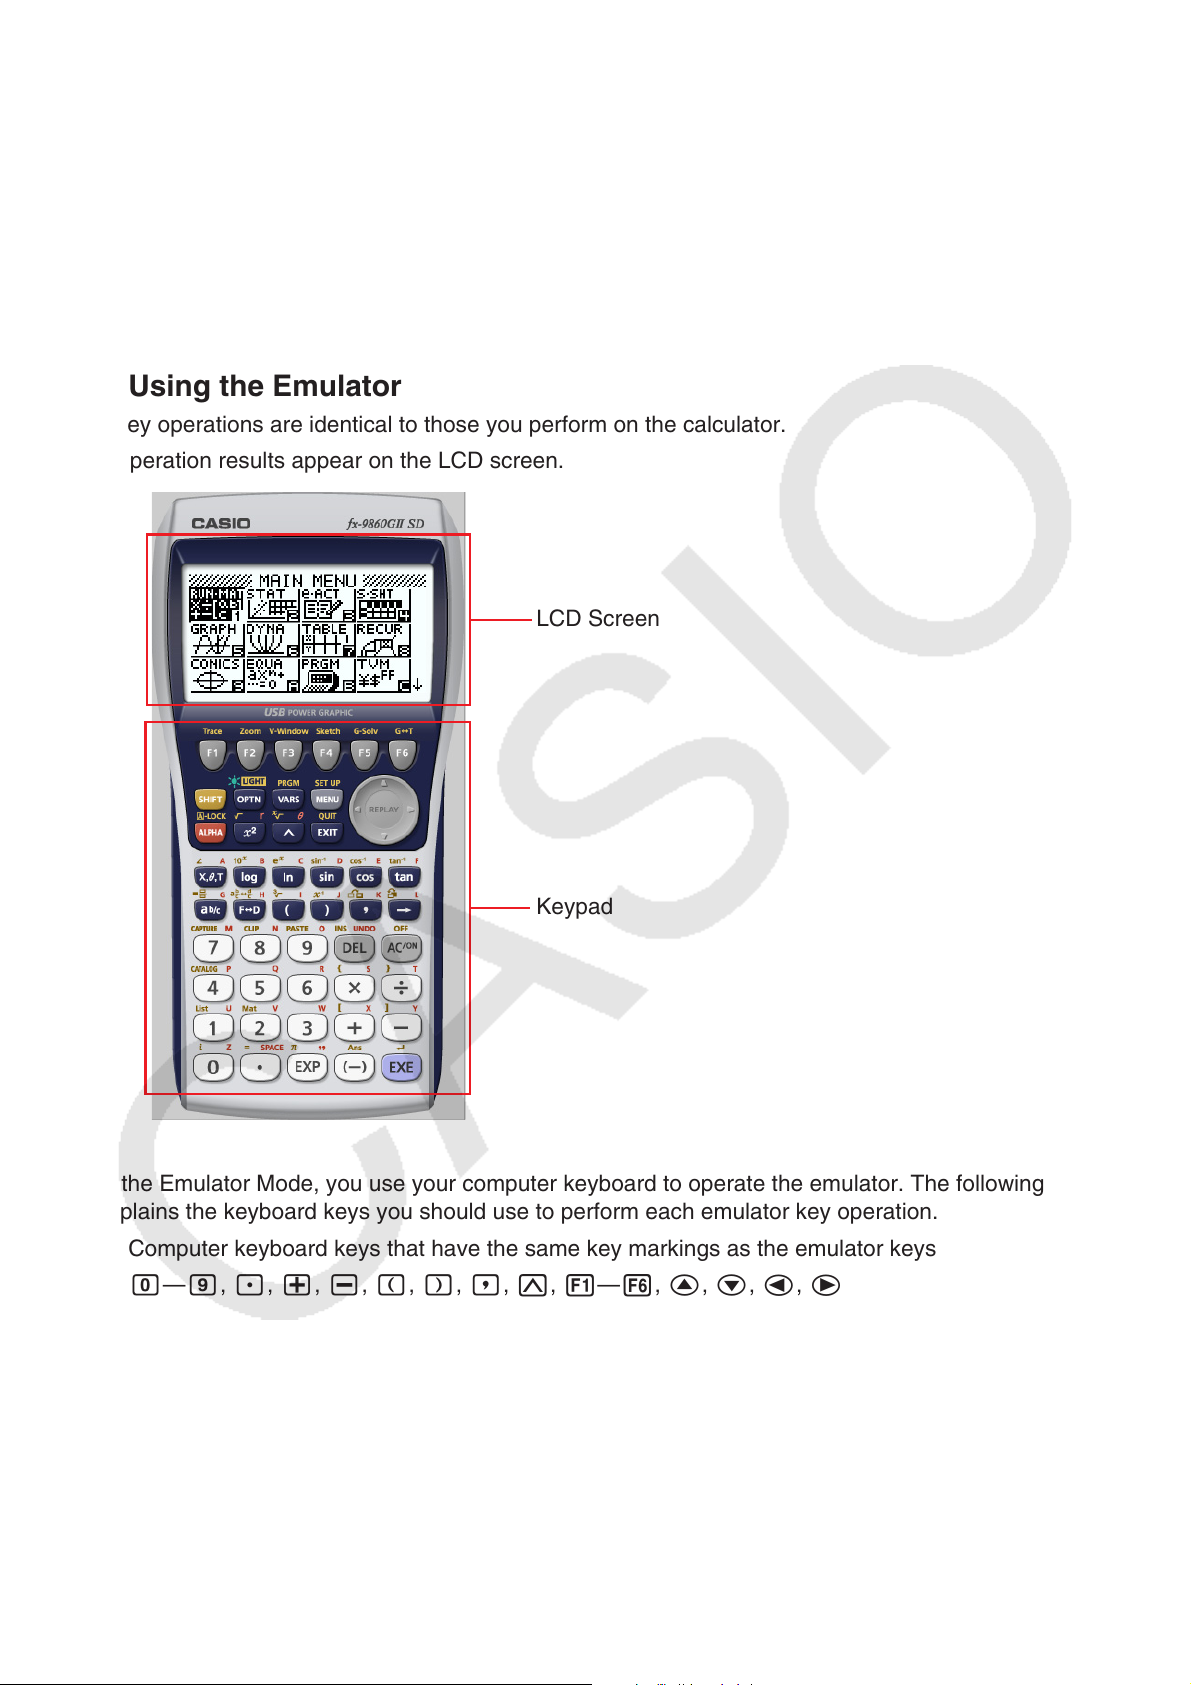
k Using the Emulator
• Key operations are identical to those you perform on the calculator.
• Operation results appear on the LCD screen.
LCD Screen
II calculator.
Keypad
In the Emulator Mode, you use your computer keyboard to operate the emulator. The following
explains the keyboard keys you should use to perform each emulator key operation.
(1) Computer keyboard keys that have the same key markings as the emulator keys
a—j, ., +, -, (, ), ,, M, 1—6, f, c, d, e
EN-13
Page 15
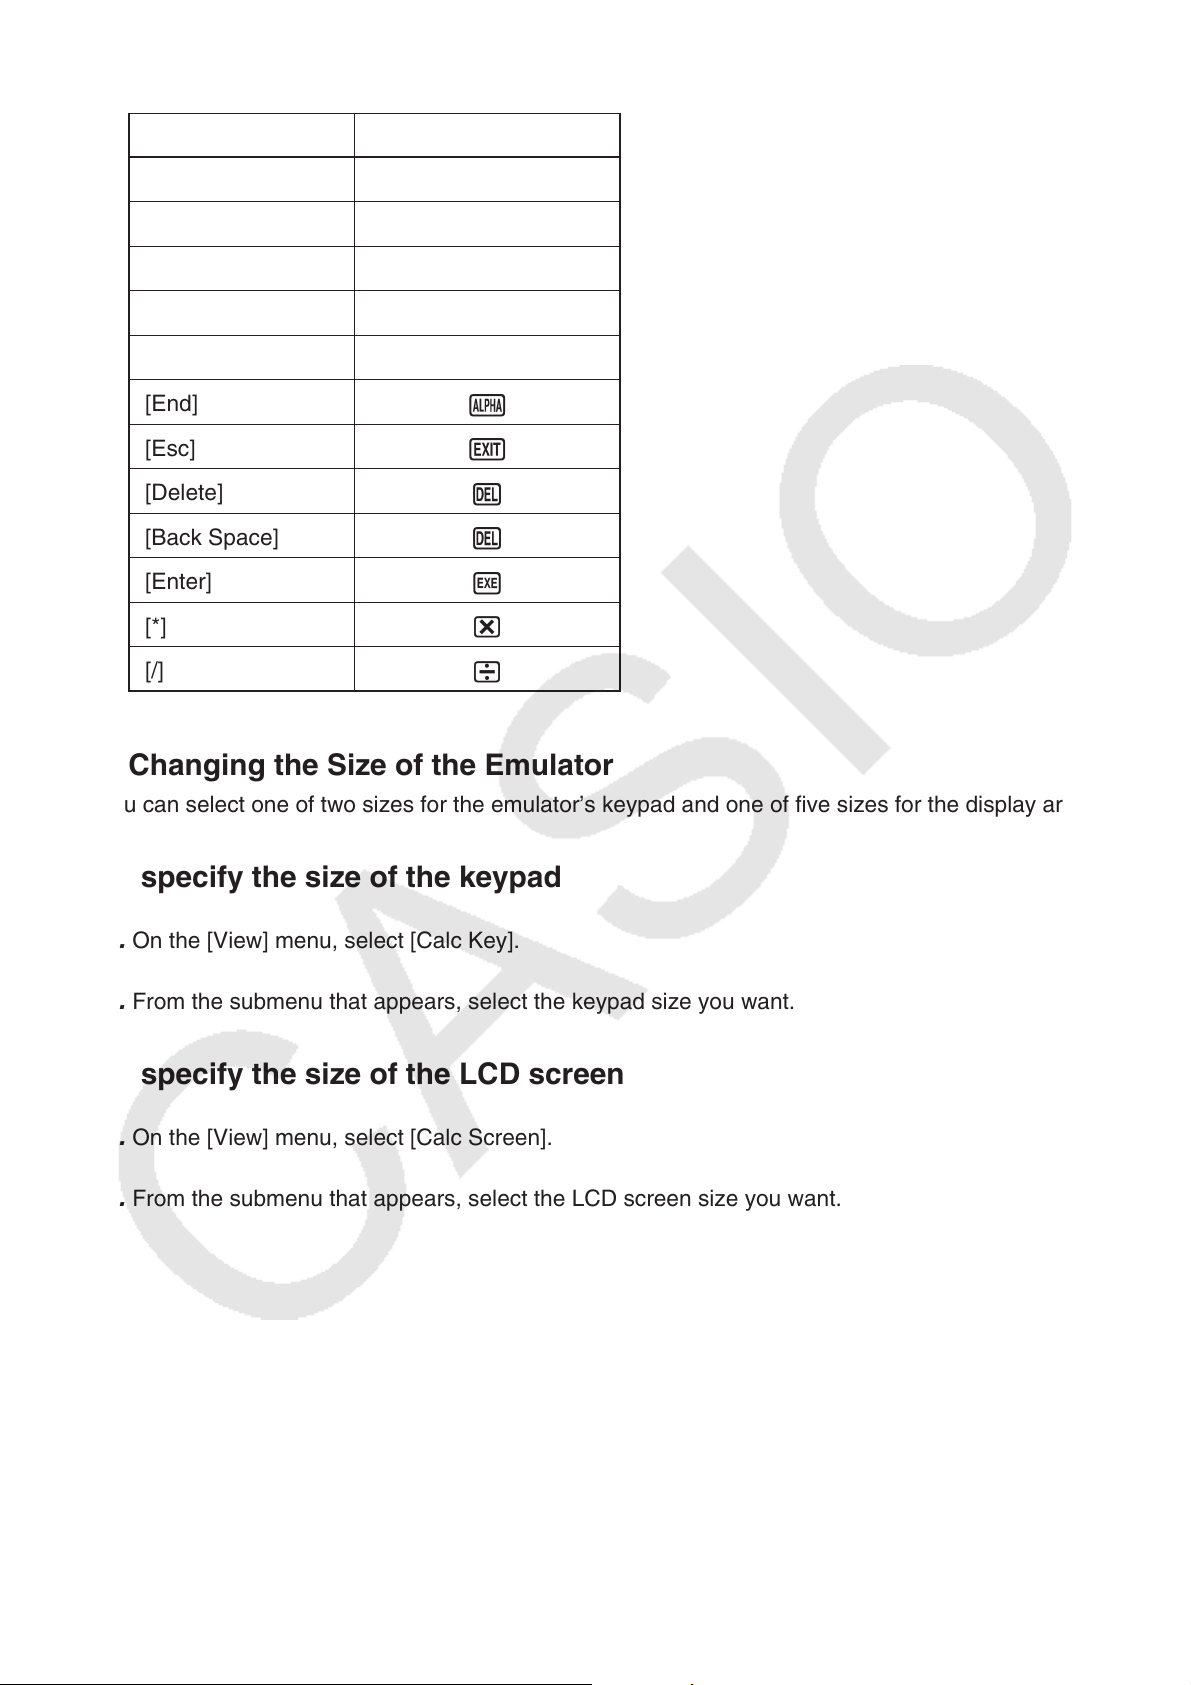
(2) Computer keyboard keys that have different key markings as the emulator keys
Computer Key Emulator Key
[Tab]
[Insert]
[Home]
[Page Up]
[Page Down]
[End]
[Esc]
[Delete]
[Back Space]
[Enter]
[*]
[/]
A
!
K
J
m
a
J
D
D
w
*
/
k Changing the Size of the Emulator
You can select one of two sizes for the emulator’s keypad and one of five sizes for the display area.
To specify the size of the keypad
1. On the [View] menu, select [Calc Key].
2. From the submenu that appears, select the keypad size you want.
To specify the size of the LCD screen
1. On the [View] menu, select [Calc Screen].
2. From the submenu that appears, select the LCD screen size you want.
EN-14
Page 16

k Using the Floating Emulator Feature
• You can drag the LCD screen and the keypad to any location you want on your computer screen.
• You can display the emulator LCD screen and its keypad in their own windows that are separate
from the main window.
To make the LCD screen and/or keypad a floating window
1. Double-click the LCD screen and/or keypad.
2. Drag the LCD screen and/or keypad to the left so it is outside of the main window, and drop it
there.
k Moving the LCD Screen and Keypad Back into the Main Window
• Perform the following steps to move the LCD screen and/or keypad back into the main window
from independent floating windows.
- Double-click the floating LCD screen and/or keypad.
- Drag the LCD screen and/or keypad back to the left side of the main window.
Important!
• You can return an independent floating window to the main window by dragging the floating
window to the left side of the main window only. Dragging top, bottom, or right side of the main
window will not work.
EN-15
Page 17

k Capturing the Emulator LCD Screen Image
• You can use the following procedure to capture an image of the emulator LCD screen.
To capture the emulator LCD screen image
1. On the [File] menu, select [Capture Screen] to display a capture of the emulator LCD screen
(page EN-6).
• You could also click
• You can also add a frame to the captured image or change the image zoom factor, if you
want. For details, see “Bitmap Toolbar” (page EN-11) and “LCD Screen Capture Settings”
(page EN-21).
• If either a window containing of a captured image or the Key-Log screen is currently
maximized (using the Windows maximize command) on your computer display, any window
produced by the capture operation will also be maximized. This is true regardless of the size
setting specified for screen capture on the Options dialog box (page EN-21).
on the bitmap toolbar.
2. Select the captured screen image window and then click to save it to a file.
* You can save a screen capture as either of the two following file formats.
• Monochrome bitmap format
• JPEG format
This application uses libraries by the Independent JPEG Group.
k Opening a Saved LCD Screen Image
• You can open a saved LCD screen image and display it on your computer. You can have multiple
screen images open at the same time.
• LCD screen images can be copied and pasted into other applications in order to create operation
example handouts, assignments, etc.
* Only bitmap files can be opened using this procedure. Opening of JPEG files is not supported.
To copy an LCD screen image and paste it into another application
1. Click and then open the file that contains the LCD screen image you want to copy.
2. Select the LCD screen image window and then click to copy it to the clipboard.
3. Open the other application and then paste the contents of the clipboard.
EN-16
Page 18

5. Using the Emulator Key-Log
This section explains how to use the Key-Log, which is a log of the emulator’s key operations. It
also covers playback of recorded key operations and editing of Key-Log records.
All of the operations in this section are performed using toolbar buttons.
k Key-Log File Structure
A Key-Log file can contain multiple Key-Log records.
Key-Log records contain recorded key operations and text.
The following shows the Key-Log file structure.
Key-Log File
Key-Log Records
Key
b
• You can assign names (up to 20 single-byte characters) to Key-Log records.
Important!
• Key-Log data processing can take a long time when there is a lot of data. This is normal and does
not indicate malfunction.
• Only key operation procedures are stored in a Key-Log file. Because of this, replaying Key-Log
contents starting from an initial screen that is different from the one that was displayed when the
data was originally stored may produce different results.
• A key operation may not be stored to a Key-Log if you click it while an emulator calculation
operation is in progress.
w
Mathematics
Text Data
EN-17
Page 19

To record emulator key operations using Key-Log
1. Click to start Key-Log recording.
2. Perform operations on the emulator.
Keys appear in the sequence you press them.
3. Click to stop Key-Log recording.
4. Click to save the Key-Log file.
To perform Key-Log auto play of a recorded key operation
1. Click and then open the Key-Log file you want to play.
2. Click to start playback.
The next key to be
played back is orange.
Played key operations
are blue.
The last played
key is blue. The next key to be played is framed in orange.
• Click to pause playback.
Click
to restart playback after pausing it.
EN-18
Page 20

3. To stop playback, click . Stopping playback causes all keys to return to their original colors.
Note
• You can use the optional settings dialog box (page EN-21) to configure playback settings like the
key playback interval following a pause, the color of playback keys, etc.
• Simultaneous playback of multiple Key-Log files is not supported. If you try to open a Key-Log file
while another Key-Log file is already open, the currently open file will close automatically. If the
currently open file has been edited, a message “At least one file has unsaved edits. Save edits?”
will appear asking if you want to save it before closing.
To playback a Key-Log record manually (STEP playback)
1. Click and then open the Key-Log file you want to play.
2. Click to play the first key operation in the Key-Log.
3. Keep pressing to play Key-Log contents one step at a time.
4. To stop playback, click .
To edit a Key-Log record
1. Click and then open the Key-Log file you want to edit.
2. Select the Key-Log record you want to edit.
Select the Key-Log record from this menu.
3. Edit the key operations and text of the Key-Log record.
• You can use normal text input and editing operations to edit the keys in a Key-Log record.
• When inputting text, you can specify the font and font size you want to use.
Font Font Size
4. Click to save the Key-Log file.
EN-19
Page 21

To add a Key-Log record to the currently open Key-Log file
After opening the Key-Log file to which you want to add the record, click .
This automatically assigns the Key-Log record a name (Example: “Data1”) and displays it in the
menu.
To rename a Key-Log record
1. Select the Key-Log record you want to rename from the menu.
2. Click the name of the Key-Log record and then change it.
3. Press the [Enter] key.
To delete a Key-Log record
1. Select the Key-Log record you want to delete from the menu.
2. Click to delete the selected Key-Log record and display the next one.
Note
• There must be at least one Key-Log record in memory. You will not be able to delete a Key-Log
record if it is the only one left in memory.
k Inputting a Pause Character
A pause character causes Key-Log playback to pause automatically when it reaches the character.
To input a pause character, click
.
k Copying Keys or Text and Pasting It into Another Application
Keys and text can be copied and pasted into other applications in order to create operation
example handouts, assignments, etc.
To copy keys or text and paste it into another application
1. Drag the cursor across the keys or text you want to copy.
2. Click to copy the selected keys or text to the clipboard.
3. Open the other application and then paste the contents of the clipboard.
EN-20
Page 22

6. Configuring Options Dialog Box Setting
k LCD Screen Capture Settings
1
2
1 Select this option to add a frame to an LCD screen capture.
2 Specifies the screen size during LCD screen capture. You can select a setting in the range of 1
through 10.
k Key-Log Playback
1
2
3
4
1 Select this option to highlight the current key in blue.
2 Select this option to frame the next key in orange.
3 Specifies how much time should be allowed to elapse to resume paused playback. You can set
an interval in the range of 10 seconds to 10 minutes in 10-second steps.
4 Specifies the key playback interval during auto play. You can set an interval of 0.1 second, or
any interval in the range of 0.5 to 5 seconds, in 0.5-second steps.
EN-21
Page 23

k Spreadsheet Setting
1
2
1 You can configure Copy & Paste so either values or Excel formulas are pasted into a
spreadsheet.
Paste Formulas ... Pastes formulas.
Paste Values ... Pastes values only.
2 You also can specify the language to be used when pasting to Microsoft Excel.
Whenever you copy from Spreadsheet and paste to an Excel formula, the formula will be
converted to the selected language.
Example: CellIf( IF( : English
SI( : Spanish
SI( : French
WENN( : German
When using the following language versions of Excel, configure the Excel Language setting as
shown below.
Arabic: English2
Slovenian: English3
Portuguese (European): PortugueseEu
Portuguese (Brazilian): PortugueseBr
• For details about copying and pasting Excel formulas, see page EN-32.
EN-22
Page 24

7. Other Functions
Printing
• You can use the following procedure to print LCD screen captures.
1. Click the window of the LCD screen capture that you want to print to select it.
2. Click . This will display the Print dialog box.
3. Click [OK] to start printing.
Important!
• Each screen image is printed on a separate page.
• Images are printed in accordance with width setting of the paper size selected on the Print dialog
box.
• If you are printing a bitmap image that was created using another application and does not fit
within the preview area, only the part within the preview area will be visible. Also, only that part
will be printed.
EN-23
Page 25

k Print Preview
• Selecting [Print Preview] on the [File] menu displays the print preview image.
1 2 3 4
1 Displays the Print dialog box.
2 Enlarges the preview image.
3 Reduces the size of the preview image.
4 Closes the print preview window image.
k Print Setup Dialog Box
• Selecting [Print Setup] on the [File] menu displays the Print Setup dialog box.
EN-24
Page 26

Shortcut Menu
• Right-clicking the mouse displays one of the shortcut menus shown below.
• During Key-Log Editing
• During Bitmap Display of the Calculator
Screen
• When Using the Emulator
• On the Emulator Keypad
A screen zoom operation affects only the screen where
you display the shortcut menu. If you have multiple
screens on the display, the other screens are not affected
by the zoom operation.
EN-25
Page 27

8. File Types Supported by fx-9860GII
Manager PLUS
• fx-9860GII Manager PLUS supports files with the file name extensions described below.
Extension Description Supported Software
g1m Emulator or calculator user memory
data file (variables, programs, etc.)
g2m Emulator or calculator user memory
data file (variables, programs, etc.)
g1e eActivity file All fx-Manager PLUS software (not
g2e eActivity file Software after fx-Manager PLUS Ver. 2.0
g1a Add-In application All fx-Manager PLUS software (not
g1l Add-In message
g1n Add-In menu
g1k
bmp Bitmap file All fx-Manager PLUS software
fx-9860G
file
II Manager PLUS Key-Log
All fx-Manager PLUS software
Software after fx-Manager PLUS Ver. 2.0
including fx-9750G
GRAPH35+ E Manager PLUS)
(not including fx-9750G
and GRAPH35+ E Manager PLUS)
including fx-9750G
GRAPH35+ E Manager PLUS)
All fx-Manager PLUS software
II Manager PLUS and
II Manager PLUS
II Manager PLUS and
Note
• You can use the MEMORY application to import all file types (except g1k) into the emulator.
• Files with the extension g1k can be used in Key-Log files.
EN-26
Page 28

9. Differences between fx-9860GII Calculator
and fx-9860GII Manager PLUS Functions
k eActivity Applications (SD Card Access) (Not included on the fx-
9750G
Calculator: SD card access supported.
Emulator: Performing an operation that accesses an SD card displays a dialog box, which can
Example: To use the emulator to create a new eActivity file (ABC.g2e) on an SD card (actually
II/GRAPH35+ E)
be used to open an eActivity saved on your computer or save an eActivity on your
computer. Trying to perform an optimize operation while accessing an SD card will
cause an error.
your computer’s hard disk)
1. From the Main Menu, enter the e·ACT mode.
2. Click 6(SD).
• This displays the SD access screen.
3. Click 2(NEW).
• This displays a file name input dialog box.
EN-27
Page 29

4. Select the location on your computer where you want to save the file, input the file name
(ABC.g2e), and then click [Save].
• This displays the eActivity file editing screen.
* Subsequent operations are identical to those you would perform on the calculator.
* After you are finished, perform the required operation to save the file.
Example: To use the emulator to open an eActivity file (ABC.g2e) that is stored on an SD card
(actually your computer’s hard disk)
1. From the Main Menu, enter the e·ACT mode.
2. Click 6(SD).
• This displays the SD access screen.
3. Click 1(OPEN).
• This displays a file selection dialog box.
4. Type in the file name (ABC.g2e), and then click [Open].
• This displays the eActivity file editing screen.
EN-28
Page 30

k LINK Application
Calculator: Data transfer execution supported.
Emulator: Data send/receive, and configuring cable, wakeup, and capture settings are not
supported.
k MEMORY Applications (SD Card Access)
Calculator: Data save to and data read from an SD card supported. (fx-9860GII SD only)
Emulator: Performing an operation that accesses an SD card displays a dialog box, which can be
used to store data to a computer file and to import a file.
Trying to perform the SD card optimize operation on the emulator will cause an error.
SD card (actually your computer’s hard disk) access can be performed by selecting
either a folder or a file. What you select depends on the type of operation you want to
perform.
When to select a folder on your computer’s hard disk
Select a folder on your computer’s hard disk when you want to perform any one of the following
operations.
• Copying main memory or storage memory contents to an SD card (actually your computer’s hard
disk)
• Loading backup data from an SD card (actually your computer’s hard disk)
• Saving backup data to an SD card (actually your computer’s hard disk)
Example: To use the emulator to save backup data to your computer
1. From the Main Menu, enter the MEMORY mode.
2. Click 4(BKUP)1(SAVE).
• This displays the save location selection screen.
EN-29
Page 31

3. Click 2.
• This displays the folder selection screen.
4. Select the folder you want and then click [OK].
• The backup data is saved to the folder you select.
When to select a file on your computer’s hard disk
Select a file on your computer’s hard disk when you want to perform the following operation.
• Copying a file on an SD card (actually your computer’s hard disk) to main memory or storage
memory
1. From the Main Menu, enter the MEMORY mode.
2. Click 3(SD).
• This displays the file selection screen.
3. Select the file you want and then click [Open].
• This displays the main memory/storage memory selection screen.
• Selecting a destination (main memory or storage memory) will start the copy operation.
EN-30
Page 32

k SYSTEM Applications (Contrast, Auto Power Off, Reset)
Calculator: Contrast adjustment, auto power off setting configuration, and SD card formatting
supported.
Emulator: Contrast adjustment, auto power off setting configuration, and SD card formatting not
supported.
k Installing an Add-In (Not included on the fx-9750GII Manager PLUS/
GRAPH35+ E Manager PLUS)
You can perform the following procedure on the emulator to install an Add-In application, Add-In
language, or an eActivity.
Example: To install an Add-In application
1. From the Main Menu, enter the MEMORY mode.
2. Click 3(SD).
• This displays a dialog box for opening a file.
3. Select the Add-In file you want and then click [Open].
4. Click 2.
5. Click E.
EN-31
Page 33

6. Click J.
7. Click m.
• The icon of the application you just installed should be
visible on the Main Menu.
• Some Add-In applications may act differently on the fx-9860G
emulator.
II calculator than they do on the
k LIGHT Key (fx-9860GII/GRAPH75+ E only)
Calculator: Turns on the display backlight.
Emulator: No operation
k OFF (! + A)
Calculator: Turns off power.
Emulator: Does not turn off the emulator. (! + A does not perform any operation.)
k COPY & PASTE
Calculator: COPY & PASTE supported on the calculator.
Emulator: COPY & PASTE supported on the calculator, and between the calculator and other
applications running on the computer.
Copy and paste of fx-9860G
and other applications is not supported in some cases.
II calculator-specific input codes between fx-9860GII Manager PLUS
Supports copy and paste between an emulator spreadsheet and an Excel spreadsheet running on
your computer. (Not included on the fx-9750G
• Copy and paste of the following formulas is supported between an emulator spreadsheet and an
Excel spreadsheet running on your computer.
+, –, `, /, ^, =, <>, >, <, >=, <=, $, :
IF, MIN, MAX, AVERAGE, MEDIAN, SUM, PRODUCT
LOG, FACT, POWER, SQRT, LOG10, LN, PI
SIN, COS, TAN, ASIN, ACOS, ATAN, SINH, COSH, TANH, ASINH, ACOSH, ATANH
ABS, GCD, LCM, MOD, TRUNC, INT, ROUND, PERMUT, COMBIN, RAND, NOT, AND, OR
II Manager PLUS)
EN-32
Page 34

The table below shows how some formulas may be modified automatically when a paste operation
is performed.
Modified Formulas
Spreadsheet Paste Operation* Excel
⫻ ⇔
⫼ ⇔
≠⇔
>
<
Omitted multiplication sign
CellIf(
CellMin(
CellMax(
CellMean(
CellMedian(
CellSum(
CellProd(
logab(#1,#2
2
#1
–1
#1
⇔
⇔
→
⇔
⇔
⇔
⇔
⇔
⇔
⇔
⇔
→
→
`
/
<>
>=
<=
`
IF(
MIN(
MAX(
AVERAGE(
MEDIAN(
SUM(
PRODUCT(
LOG(#2,#1
#1^2
#1^–1
#1!
X
#1
'#2
#1{#2
'#1
3
'#1
log #1
ln #1
e^#1
10
#1
⇔
→
→
⇔
→
⇔
⇔
⇔
→
π⇔
E#n1
#n1E#n2
#1^#2
sin #1
cos #1
→
→
←
⇔
⇔
FACT(#1)
#2^(1/#1)
#1/#2
SQRT(#1)
#1^(1/3)
LOG10(#1)
LN(#1)
EXP(#1)
10^#1
PI()
10^#n1
#n1`10^#n2
POWER(#1, #2)
SIN(#1)
COS(#1)
tan #1
–1
sin
#1
–1
cos
–1
tan
#1
#1
⇔
⇔
⇔
⇔
EN-33
TAN(#1)
ASIN(#1)
ACOS(#1)
ATAN(#1)
Page 35

Spreadsheet Paste Operation* Excel
sinh #1
cosh #1
tanh #1
–1
sinh
#1
–1
cosh
tanh
–1
#1
#1
Abs #1
GCD(
LCM(
MOD(
Int #1
Intg #1
RndFix(
#1P#2
#1C#2
⇔
⇔
⇔
⇔
⇔
⇔
⇔
⇔
⇔
⇔
⇔
⇔
⇔
⇔
⇔
SINH(#1)
COSH(#1)
TANH(#1)
ASINH(#1)
ACOSH(#1)
ATANH(#1)
ABS(#1)
GCD(
LCM(
MOD(
TRUNC(#1)
INT(#1)
ROUND(
PERMUT(#1,#2)
COMBIN(#1,#2)
P(
Ran#
Not #1
#1 And #2
#1 Or #2
⇔
⇔
⇔
⇔
⇔
NORMSDIST(
RAND()
NOT(#1)
AND(#1,#2)
OR(#1,#2)
* The following are the meanings of the symbols in the “Paste Operation” column of the above
table.
⇔: Either way
→: From emulator spreadsheet to Excel
←: From Excel to emulator spreadsheet
• For information about how formulas are modified when using a non-English version of Excel, see
the Formula List (page EN-35).
• If a paste operation includes an unsupported formula or an operation whose value causes an
error, only the final value will pasted without the formula.
• If a formula being pasted into an emulator spreadsheet exceeds 255 bytes after being modified
as described in the table above, only the final value will be pasted without the formula.
• An error will occur if the argument of a formula is outside the argument range of the location
where it is being pasted.
• When pasting a formula with a relative cell reference (such as: =A1+1) from Spreadsheet to
Excel, make sure you paste it into the cell with the same name as the cell you copied it from.
Copying it into a different cell will cause an incorrect cell reference.
EN-34
Page 36

㺕
Czech Danish Dutch Finnish Calculator
(European)
Portuguese
Calculator English French German Spanish
Formula List
CellIF IF SI WENN SI SE KDYŽ HVIS ALS JOS CellIF
CellMin MIN MIN MIN MIN MÍNIMO MIN MIN MIN MIN CellMin
CellMax MAX MAX MAX MAX MÁXIMO MAX MAKS MAX MAKS CellMax
CellMean AVERAGE MOYENNE MITTELWERT PROMEDIO MÉDIA PRMR MIDDEL GEMIDDELDE KESKIARVO CellMean
CellMedian MEDIAN MEDIANE MEDIAN MEDIANA MED MEDIAN MEDIAN MEDIAAN MEDIAANI CellMedian
CellProd PRODUCT PRODUIT PRODUKT PRODUCTO PRODUTO SOUIN PRODUKT PRODUCT TULO CellProd
CellSum SUM SOMME SUMME SUMA SOMA SUMA SUM SOM SUMMA CellSum
RndFix ROUND ARRONDI RUNDEN REDONDEAR ARRED ZAOKROUHLIT AFRUND AFRONDEN PYÖRISTÄ RndFix
GCD GCD PGCD GGT M.C.D MDC GCD STØRSTE.FÆLLES.DIVISOR GGD SUURIN.YHT.TEKIJÄ GCD
LCM LCM PPCM KGV M.C.M MMC LCM MINDSTE.FÆLLES.MULTIPLUM KGV PIENIN.YHT.JAETTAVA LCM
MOD MOD MOD REST RESIDUO RESTO MOD REST REST JAKOJ MOD
P NORMSDIST LOI.NORMALE.STANDARD STANDNORMVERT DISTR.NORM.ESTAND DIST.NORMP NORMSDIST STANDARDNORMFORDELING STAND.NORM.VERD NORM.JAKAUMA.NORMIT P
PIPI PI PI PIPIPI PI PII
Ran# RAND ALEA ZUFALLSZAHL ALEATORIO ALEATÓRIO NÁHÍSLO SLUMP ASELECT SATUNNAISLUKU Ran#
SQRT RACINE WURZEL RAIZ RAIZQ ODMOCNINA KVROD WORTEL NELIÖJUURI
10^ EXP EXP EXP EXP EXP EXP EKSP EXP EKSPONENTTI 10^
^ POWER PUISSANCE POTENZ POTENCIA POTÊNCIA POWER POTENS MACHT POTENSSI ^
log LOG LOG LOG LOG LOG LOGZ LOG LOG LOG log
! FACT FACT FAKULTÄT FACT FACTORIAL FAKTORIÁL FAKULTET FACULTEIT KERTOMA !
log10 LOG10 LOG10 LOG10 LOG10 LOG10 LOG LOG10 LOG10 LOG10 log10
㺕
sin SIN SIN SIN SENO SEN SIN SIN SIN SIN sin
ln LN LN LN LN LN LN LN LN LUONNLOG ln
cos COS COS COS COS COS COS COS COS COS cos
tan TAN TAN TAN TAN TAN TG TAN TAN TAN tan
sin-1 ASIN ASIN ARCSIN ASENO ASEN ARCSIN ARCSIN BOOGSIN ASIN sin-1
cos-1 ACOS ACOS ARCCOS ACOS ACOS ARCCOS ARCCOS BOOGCOS ACOS cos-1
tan-1 ATAN ATAN ARCTAN ATAN ATAN ARCTG ARCTAN BOOGTAN ATAN tan-1
sinh SINH SINH SINHYP SENOH SENH SINH SINH SINH SINH sinh
cosh COSH COSH COSHYP COSH COSH COSH COSH COSH COSH cosh
tanh TANH TANH TANHYP TANH TANH TGH TANH TANH TANH tanh
sinh-1 ASINH ASINH ARCSINHYP ASENOH ASENH ARCSINH ARCSINH BOOGSINH ASINH sinh-1
cosh-1 ACOSH ACOSH ARCCOSHYP ACOSH ACOSH ARCCOSH ARCCOSH BOOGCOSH ACOSH cosh-1
tanh-1 ATANH ATANH ARCTANHYP ATANH ATANH ARCTGH ARCTANH BOOGTANH ATANH tanh-1
Not NOT NON NICHT NO NÃO NE IKKE NIET EI Not
Abs ABS ABS ABS ABS ABS ABS ABS ABS ITSEISARVO Abs
Int TRUNC TRONQUE KÜRZEN TRUNCAR TRUNCAR USEKNOUT AFKORT GEHEEL KATKAISE Int
Intg INT ENT GANZZAHL ENTERO INT CELÁ.ÁST HELTAL INTEGER KOKONAISLUKU Intg
nPr PERMUT PERMUTATION VARIATIONEN PERMUTACIONES PERMUTAR PERMUTACE PERMUT PERMUTATIES PERMUTAATIO nPr
nCr COMBIN COMBIN KOMBINATIONEN COMBINAT COMBIN KOMBINACE KOMBIN COMBINATIES KOMBINAATIO nCr
And AND ET UND Y E A OG EN JA And
Or OR OU ODER O OU NEBO ELLER OF TAI Or
EN-35
Page 37

Calculator
*1) Portuguese
(Brazilian)
Swedish
Russian Turkish *2) Arabic
*2) Slovenian
Calculator
CellIF
HA SE HVIS JEELI SE OM
EER
IF IF
CellIF
CellMin
MIN MIN MIN MIN MÍNIMO MIN
MN MIN MIN
CellMin
CellMax
MAX MAX STØRST MAX MÁXIMO MAX
MAK
MAX MAX
CellMax
CellMean
ÁTLAG MEDIA GJENNOMSNITT REDNIA MÉDIA MEDEL
ORTALAMA
AVERAGE AVERAGE
CellMean
CellMedian
MEDIÁN MEDIANA MEDIAN MEDIANA MED MEDIAN
ORTANCA
MEDIAN MEDIAN
CellMedian
CellSum
SZUM SOMMA SUMMER SUMA SOMA SUMMA
TOPLA
SUM SUM
CellSum
CellProd
SZORZAT PRODOTTO PRODUKT ILOCZYN MULT PRODUKT
ÇARPIM
PRODUCT PRODUCT
CellProd
RndFix
KEREKÍTÉS ARROTONDA AVRUND ZAOKR ARRED AVRUNDA
YUVARLA
ROUND ROUND
RndFix
GCD
GCD MCD SFF GCD MDC SGD
OBEB
GCD GCD
GCD
LCM
LCM MCM MFM LCM MMC MGM
OKEK
LCM LCM
LCM
MOD
MARADÉK RESTO REST MOD MOD REST
MOD
MOD MOD
MOD
P
STNORMELOSZL DISTRIB.NORM.ST NORMSFORDELING ROZKAD.NORMALNY.S DIST.NORMP NORMSFÖRD
NORMSDA
NORMSDIST NORMSDIST
P
PI PI.GRECO PI PI PI PI
P
PI PI
Ran#
VÉL CASUALE TILFELDIG LOS ALEATÓRIO SLUMP
S_SAYI_ÜRET
RAND RAND
Ran#
^
HATVÁNY POTENZA OPPHØYD.I POTGA POTÊNCIA UPPHÖJT.TILL
KUVVET
POWER POWER
^
log
LOG LOG LOG LOG LOG LOG
LOG
LOG
LOG LOG
log
!
FAKT FATTORIALE FAKULTET SILNIA FATORIAL FAKULTET
ÇARPINIM
FACT FACT
!
䌮
GYÖK RADQ ROT PIERWIASTEK RAIZ ROT
KAREKÖK
SQRT SQRT 䌮
log10
LOG10 LOG10 LOG10 LOG10 LOG10 LOG10
LOG10
LOG10
LOG10 LOG10
log10
ln
LN LN LN LN LN LN
LN
LN
LN LN
ln
10^
KITEV EXP EKSP EXP EXP EXP
EXP
ÜS
EXP EXP
10^
sin
SIN SEN SIN SIN SEN SIN
SIN
SN
SIN SIN
sin
cos
COS COS COS COS COS COS
COS
COS
COS COS
cos
tan
TAN TAN TAN TAN TAN TAN
TAN
TAN
TAN TAN
tan
sin-1
ARCSIN ARCSEN ARCSIN ASIN ASEN ARCSIN
ASIN
ASN
ASIN ASIN
sin-1
cos-1
ARCCOS ARCCOS ARCCOS ACOS ACOS ARCCOS
ACOS
ACOS
ACOS ACOS
cos-1
tan-1
ARCTAN ARCTAN ARCTAN ATAN ATAN ARCTAN
ATAN
ATAN
ATAN ATAN
tan-1
sinh
SINH SENH SINH SINH SENH SINH
SINH
SNH
SINH SINH
sinh
cosh
COSH COSH COSH COSH COSH COSH
COSH
COSH
COSH COSH
cosh
tanh
TANH TANH TANH TANH TANH TANH
TANH
TANH
TANH TANH
tanh
sinh-1
ASINH ARCSENH ARCSINH ASINH ASENH ARCSINH
ASINH
ASNH
ASINH ASINH
sinh-1
cosh-1
ACOSH ARCCOSH ARCCOSH ACOSH ACOSH ARCCOSH
ACOSH
ACOSH
ACOSH ACOSH
cosh-1
tanh-1
ATANH ARCTANH ARCTANH ATANH ATANH ARCTANH
ATANH
ATANH
ATANH ATANH
tanh-1
Not
NEM NON IKKE NIE NÃO ICKE
DEL
NOT NOT
Not
Abs
ABS ASS ABS MODU.LICZBY ABS ABS
ABS
MUTLAK
ABS ABS
Abs
Int
CSONK TRONCA AVKORT LICZBA.CAK TRUNCAR AVKORTA
NSAT
TRUNC TRUNC
Int
Intg
INT INT HELTALL ZAOKR.DO.CAK INT HELTAL
TAMSAYI
INT INT
Intg
nPr
VARIÁCIÓK PERMUTAZIONE PERMUTER PERMUTACJE PERMUT PERMUT
PERMÜTASYON
PERMUT PERMUT
nPr
nCr
KOMBINÁCIÓK COMBINAZIONE KOMBINASJON KOMBINACJE COMBIN KOMBIN
KOMBNASYON
COMBIN COMBIN
nCr
And
ÉS E OG ORAZ E OCH
VE
AND AND
And
Or
VAGY O ELLER LUB OU ELLER
YADA
OR OR
Or
*2) Pretvori samo decimalni simbol in lo!ilo.
*1) Atualiza o conversor em português incorporado.
*2( "#$ %&'+,-/ 01/34-/3 536'-/ 0&378 .
Hungarian Italian Norwegian Polish
EN-36
Page 38

Note
Some mathematical functions do not copy and paste correctly between Microsoft Excel 2010 and
the Emulator Spreadsheet. Change the functions below in Excel to the proper function names.
Pasted Function Name
Czech NE NENÍ
Danish MIDDEL GENNEMSNIT
STØRSTE.FÆLLES.DIVISOR FÆLLES.DIVISOR
HELTAL HEL
Hungarian GCD LKO
LCM LKT
Dutch AFRONDEN AFRONDING
WORTEL VWORTEL
Norwegian STØRST MAKS
Polish LCM NAJW.WSP.DZIEL
MOD NAJMN.WSP.WIEL
Portuguese
(Brazilian)
MÍNIMO MÍN
MULT PRODUTO
DIST.NORMP DISTNORMP
FATORIAL FATO
Correct Function Name
(Rename as shown below.)
TRUNCAR TRUNC
Turkish TOPLA TOPLAM
k Examination Mode
Calculator: Examination Mode supported.
Emulator: Examination Mode not supported.
EN-37
Page 39

10. Using Screen Receiver to Display the Calculator Screen Image on Your Computer
Important!
• A USB driver install dialog box will appear the first time you connect the fx-9860GII calculator to
your computer with the USB cable. Follow the instructions that appear on the dialog box. Screen
Receiver will not operate properly if you cancel the install operation.
k To display the calculator screen image on your computer
1. Use the USB cable that comes with the calculator to connect the calculator to your computer.
• For the fx-9750G
FA-124USB.
• This will display a dialog box on the calculator screen.
II and GRAPH 35+, you will need to purchase the separately available
2. On the calculator, press 4(ScreenRecv).
3. On the [Tools] menu, select [Screen Receiver], or click on the toolbar.
4. A short while after Screen Receiver starts up, an image of the calculator screen will appear on
your computer.
5. Operate the calculator. When you do, the calculator screen image will change in real time on
your computer.
6. You can enlarge the calculator screen image by clicking and reduce its size by clicking .
7. To close the calculator screen image, click .
8. Disconnect the USB cable.
EN-38
Page 40

Important!
• If the calculator screen does not appear, try disconnecting the USB cable and then restart the
above procedure from the beginning. If the calculator screen still does not appear, check the
points described below.
If this is the problem: Do this:
The USB cable is disconnected. Reconnect the USB cable.
There are multiple calculators connected. Disconnect the other calculators so there is
only one left connected.
There is another CASIO product connected
with a USB cable.
Disconnect the other CASIO product.
k Screen Receiver Menus
Screen Receive Menu
Menu Toolbar Button Description
Start
Stop
Exit Exits Screen Receiver.
Displays the calculator screen image.
Closes the calculator screen image.
EN-39
Page 41

View Menu
Menu Submenu
Expand
Reduce
Zoom*
×1
×2 Shows the calculator screen image is ×2 size.
×3 Shows the calculator screen image is ×3 size.
×4 Shows the calculator screen image is ×4 size.
×5 Shows the calculator screen image is ×5 size.
×6 Shows the calculator screen image is ×6 size.
×7 Shows the calculator screen image is ×7 size.
×8 Shows the calculator screen image is ×8 size.
×9 Shows the calculator screen image is ×9 size.
Toolbar
Button
Description
Enlarges the calculator screen image.
Reduces the size of the calculator screen image.
Shows the calculator screen image in actual size.
×10 Shows the calculator screen image is ×10 size.
Toolbar Toggles display of the toolbar on and off.
Status Bar Toggles display of the status bar on and off.
* The allowable zoom size is limited by the resolution of the computer.
Help Menu
Menu Submenu Description
Manual Calculator Links to http://world.casio.com/manual/calc/.
Download the Calculator User’s Guide there.
Manager PLUS Display the fx-Manager PLUS User’s Guide.
License Displays the end user license agreement.
About Displays version information.
EN-40
Page 42

11. Error Message Table
k fx-Manager PLUS
Message Description Required Action
An error occurred while
reading the file <file name>.
The file may be corrupted.
There is no more playable
data.
You cannot delete all Key-Log
records at once.
Before deleting the selected
record, first add new record.
<file name>
This file is read-only.
Use a different file name.
A problem occurred while
adding a Key-Log record.
After confirming there is
enough memory capacity to
store the record, try again.
Wrong file format. Check the file to see if it is
corrupted.
There are no playable keys to
the right of the input cursor.
You are trying to delete all
Key-Log records, which is not
allowed.
You are trying to save a read-
only Key-Log file after editing
or recording to it.
Some problem occurred while
adding a Key-Log record.
Move the input cursor to the
left of the keys you want to
play back, and perform the
play operation.
To delete all of the current
records, first add a different
record. At least one Key-Log
record must be remaining in
memory.
Save the Key-Log file under a
different file name.
Make sure there is enough
free memory remaining to
complete the operation and try
again.
A problem occurred while
writing to the file <file name>
because not enough disk
space is available.
Check the remaining capacity
of your disk and try again.
This application cannot be
started up because the DLL
version is wrong.
This may be due to a problem
during installation.
Re-install the application.
A problem occurred while
reading file <file name>.
The disk being read from may
be damaged or may not exist.
Check the disk and try again.
A problem occurred while
writing file <file name>.
The disk being written to may
be damaged or may not exist.
Check the disk and try again.
There is not enough disk space
available to save the file.
Your computer has the wrong
DLL version.
A problem occurred while
reading from a disk.
A problem occurred while
writing to a disk.
Make sure there is enough
free memory available and try
again.
Installation may have failed, so
re-install the application.
Check the disk for data
corruption and confirm that the
disk exists. Then try again.
Check the disk for data
corruption and confirm that the
disk exists. Then try again.
EN-41
Page 43

Message Description Required Action
A problem occurred while
reading file <file name>.
The file may have been moved
or deleted.
There is not enough memory.
Increase memory capacity and
try again.
A problem occurred while
launching the emulator.
Try re-starting the application.
If you still cannot launch, it
could mean that the emulator
is damaged. Update
the emulator or reinstall it.
A problem occurred while
launching the manual (***.pdf)
viewer.
Download the viewer from the
site below and reinstall it.
http://get.adobe.com/reader/
otherversions/
A problem occurred when you
tried opening a file from the list
of previously opened files on
the File menu.
There is not enough memory to
perform the operation.
A problem occurred during
emulator startup.
A problem occurred during
manual viewer startup.
Check to see if the file has
been moved or deleted.
Increase memory capacity and
try again.
Try restarting the application.
If this does not work, it could
mean that the emulator is
damaged. Update the emulator
or reinstall it.
Download and install a new
viewer from
http://get.adobe.com/reader/
otherversions/.
The following characters
cannot be used in a Key-Log
record name.
:\ /?*[ ]
A system error has occurred.
(1) Shut down all other
applications that you are
not currently using.
(2) Check how much free
space is available on your
computer’s hard disk.
(3) Exit the emulator and
restart it.
If this does not correct the
problem, it could be the
emulator files have been
corrupted.
Please reinstall the emulator.
The path and/or filename
exceeds the maximum length
allowed by your Windows
operating system.
The Key-Log record name you
are trying to use contains an
illegal character.
—
The number of letters in the
path or file name you specified
exceeds the allowable limit.
The following characters are
not allowed in Key-Log record
names.
:\ /?*[ ]
Follow the steps that are
shown on the display and try
again.
Shorten the specified path or
file name.
EN-42
Page 44

Message Description Required Action
A problem occurred while
importing <file name>.
Some problem occurred while
importing the file.
Note that import of a file
created on another model is
not supported.
A Key-Log file cannot be
created or opened while KeyLog data is being played back
or recorded.
Stop playback or recording
You are trying to create a
new Key-Log file or open an
existing Key-Log file while Key-
Log data is being played back
or recorded on the calculator.
and try again.
File Extension Error The file you selected has an
invalid file name extension.
<path> Invalid Extension The file path you selected has
an invalid file name extension.
A problem occurred while
accessing the registry.
Some problem occurred during
registry access.
Check to make sure that the
emulator is installed correctly.
Make sure that the file was
created using a calculator with
the same model name as this
calculator.
Stop playback or recording and
try again.
Make sure that the extension
of the file you are selecting is
bmp or jpg.
Make sure that the extension
of the file path you are
selecting is bmp or jpg.
Re-installation of the emulator
is recommended.
A system error has occurred.
A system error occurred. Re-installation of the emulator
Exit the emulator and restart
it. If this does not correct the
problem, it could mean that
the emulator file is damaged.
Reinstall the emulator.
Invalid File Name You specified an invalid file
name.
Invalid Folder Name You specified an invalid folder
name.
Too Many Files Selected The number of files you
selected exceeds the allowable
limit.
This data was created by a
different model or different
version. Because of this, some
key names may be wrong.
Though the Key-Log will play
back, some operations may
not be performed correctly.
You are attempting to open
a Key-Log file (g1k) whose
version is older than that of
the software you are currently
running. Note that operations
may not match the operations
in the Key-Log file.
is recommended.
Make sure that you are
specifying the file name
correctly.
Make sure that you are
specifying the folder name
correctly.
Reduce the number of selected
files.
—
EN-43
Page 45

k Screen Receiver
Message Description Required Action
A connection could not be
established.
Either the calculator is not
connected or the connected
calculator is not in the Screen
Receiver Mode.
Correct the problem and try
again.
For details, select the following
on the menu bar: Help -
Manual - Manager PLUS, or
refer to the Manager PLUS
user’s guide.
A problem occurred during
communication.
Disconnect the USB cable,
check the setup of the
calculator, and try again.
For details, select the following
on the menu bar: Help -
Manual - Manager PLUS, or
refer to the Manager PLUS
user’s guide.
You started a data
communication operation
while the USB cable was not
connected.
Some problem occurred during
data communication.
Check for proper connection of
the calculator to the computer
and confirm that the calculator
is in the Screen Receiver
mode. Then try again.
See “10. Using Screen
Receiver to Display the
Calculator Screen Image on
Your Computer” for details.
Disconnect the USB cable
and check the setup of the
calculation. Then try again.
See “10. Using Screen
Receiver to Display the
Calculator Screen Image on
Your Computer” for details.
Multiple calculators have been
detected.
To start communication, make
sure only one calculator is
connected by USB.
The image could not be sent
from the calculator.
(1) Try pressing a key on the
calculator.
(2) Check to make sure that the
calculator is in the Screen
Receiver Mode.
If the screen is not sent after
you perform the above steps,
disconnect the USB cable and
check the calculator setup.
Next, reconnect and try again.
For details, select the following
on the menu bar: Help Manual - Manager PLUS, or
refer to the Manager PLUS
user’s guide.
Multiple calculators are
connected to the computer.
The calculator screen image
cannot be sent for some
reason.
Make sure that there is only
one USB connection to a
single calculator before starting
communication.
See “10. Using Screen
Receiver to Display the
Calculator Screen Image on
Your Computer” for details.
Follow the steps that are
shown on the display and try
again.
See “10. Using Screen
Receiver to Display the
Calculator Screen Image on
Your Computer” for details.
EN-44
Page 46

Message Description Required Action
The connection has been
broken for some reason and is
being restored.
If data communication does
not resume after some
time, perform the operation
described below.
Try pressing a key on the
calculator. If the screen is
not sent after you perform
the above steps, disconnect
the USB cable and check
the calculator setup. Next,
reconnect and try again.
For details, select the following
on the menu bar:
Help - Manual - Manager
PLUS, or refer to the Manager
PLUS user’s guide.
Follow the steps that are
shown on the display and try
again.
—
EN-45
Page 47

Expat, Release 1.95.8 (MIT/X license)
Copyright © 1998, 1999, 2000 Thai Open Source Software Center Ltd and Clark Cooper
Copyright © 2001, 2002, 2003 Expat maintainers.
Permission is hereby granted, free of charge, to any person obtaining a copy of this software and
associated documentation files (the “Software”), to deal in the Software without restriction, including
without limitation the rights to use, copy, modify, merge, publish, distribute, sublicense, and/or sell
copies of the Software, and to permit persons to whom the Software is furnished to do so, subject
to the following conditions:
The above copyright notice and this permission notice shall be included in all copies or substantial
portions of the Software.
THE SOFTWARE IS PROVIDED “AS IS”, WITHOUT WARRANTY OF ANY KIND, EXPRESS OR
IMPLIED, INCLUDING BUT NOT LIMITED TO THE WARRANTIES OF MERCHANTABILITY,
FITNESS FOR A PARTICULAR PURPOSE AND NONINFRINGEMENT.
IN NO EVENT SHALL THE AUTHORS OR COPYRIGHT HOLDERS BE LIABLE FOR ANY
CLAIM, DAMAGES OR OTHER LIABILITY, WHETHER IN AN ACTION OF CONTRACT, TORT
OR OTHERWISE, ARISING FROM, OUT OF OR IN CONNECTION WITH THE SOFTWARE OR
THE USE OR OTHER DEALINGS IN THE SOFTWARE.
EN-46
Page 48

CASIO COMPUTER CO., LTD.
6-2, Hon-machi 1-chome
Shibuya-ku, Tokyo 151-8543, Japan
SA1702-F
© 2014 CASIO COMPUTER CO., LTD.
 Loading...