

Page 1

SERVICE MANUAL
& PARTS LIST
REF. NO. S/M-738
MAY. 2001
MODULE NO.
QW-2269
GL-130
R
(WITHOUT PRICE)
Page 2

CONTENTS
Page
1. SPECIFICATIONS: QW-2269..................................................................... 1
2. OPERATION CHART: QW-2269................................................................ 2
3. DRAWINGS: QW-2269
3-1. LCD DIAGRAM ...................................................................................6
3-2. CIRCUIT DIAGRAM ............................................................................ 7
3-3. CHECKING TERMINALS AND COMPONENT .................................. 8
4. EXPLODED VIEW: QW-2269..................................................................... 9
5. PARTS LIST: QW-2269............................................................................. 10
6. PRECAUTIONS FOR REPAIR: QW-2269
6-1. AC (ALL CLEAR) AND REMOVING OF MODULE ........................... 11
6-2. ACCURACY CHECKING ................................................................... 11
Page 3

1. SPECIFICATIONS: QW-2269
Item Detail
Battery CR1616
Battery life Approx. 2 years
Current consumption 1.58 µA maximum
Alarm system Piezo plate on Back cover
Accuracy ±15 sec./month
Accuracy setting system Trimmer capacitor
Accuracy checking See page 9
Functions • Shock resistant (G-SHOCK)
• Electro-luminescent backlight
Auto light switch, afterglow
• World Time: 10 sites (preset with information about 10 surfing tournament
sites around the world; preset data can be replaced with user data), 8character site name, daylight saving on/off
• Tide graph
• Moon data function
(moon up & moon down time and moon age of the input data)
Moon phase graph
• Sunrise/Sunset (Sunrise time/Sunset time)
• 1/100-sec. stopwatch
Measuring capacity: 23:59'59.99"
Measuring modes: Elapsed time, split time, 1st-2nd place times
• Countdown timer
Input range: 1 min. to 24 hr.
Unit: 1 sec.
Others: Auto-repeat, progress beeper on/off
• Multi-function alarms
3 independent multi-function alarms
• Hourly time signal
• Auto-calendar (to year 2039)
• 12/24-hour formats
• Regular timekeeping: Hr, min, sec, pm, month, date, day
— 1 —
Page 4
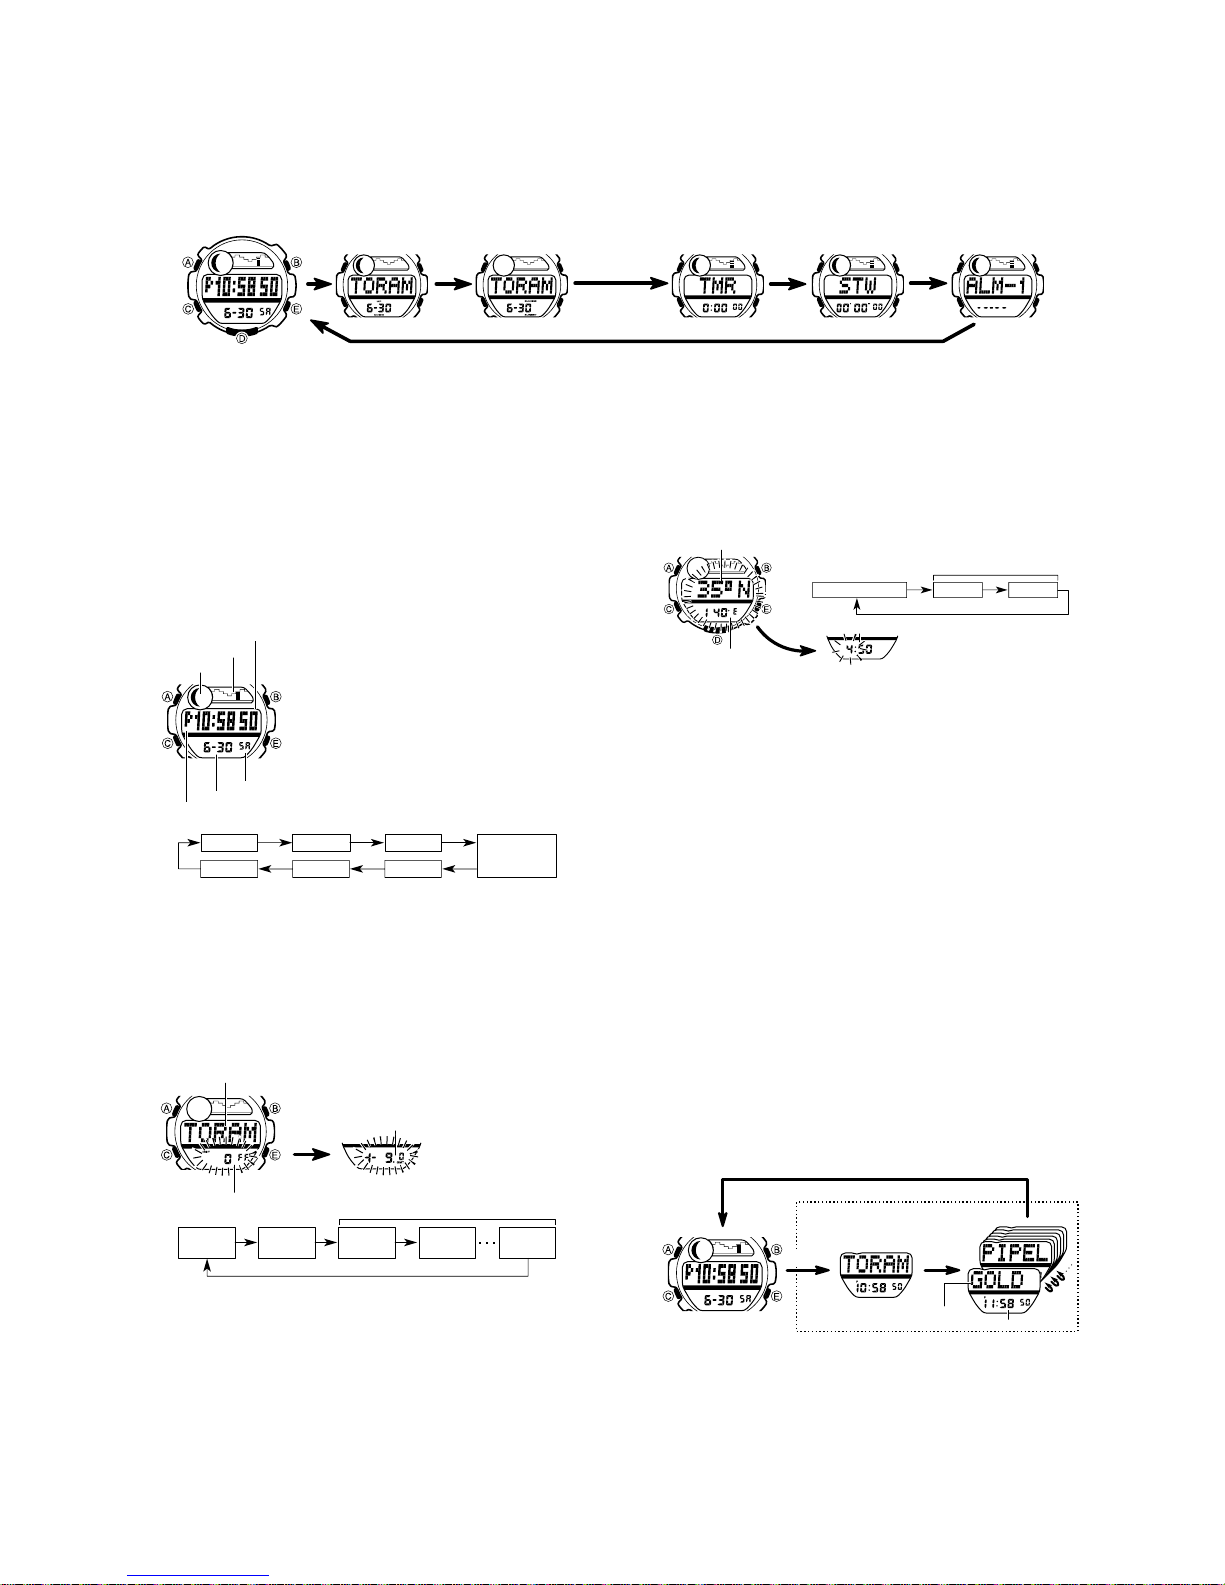
2. OPERATION CHART: QW-2269
• Press C to change from mode to mode. After you perform an operation in Countdown Timer Mode or Stopwatch Mode, pressing C returns to the Timekeeping Mode.
• In the Timekeeping Mode, Moon Data Mode, Sunrise/Sunset Mode or Alarm Mode, press D to illuminate the display for about two seconds. In the Countdown Timer Mode or Stopwatch
Mode, press E to illuminate the display for about two seconds.
Timekeeping Mode
Moon Data Mode
Sunrise/Sunset Mode
GENERAL GUIDE
Countdown Timer Mode
Stopwatch Mode
Alarm Mode
The settings you make in the Timekeeping Mode are very important, because they
TIMEKEEPING MODE
affect the Moon Data, Tide Graph, and Sunrise/Sunset functions.
There are three setting screens in the Timekeeping Mode: the Time and Date Setting
Screen, DST, GMT Differential, Point Name Setting Screen, and Longitude/Latitude,
Lunar Tide Interval Setting Screen.
• For normal timekeeping, you need to set the time, and date, and turn daylight
saving time (summer time) on or off.
• To use the Moon Data, Tide Graph, and Sunrise/Sunset functions, you must set the
GMT differential, your current longitude and latitude, and the lunar tide interval on
your point.
• If you do not operate any button for a few minutes while a selection is flashing, the
flashing stops and the watch goes back to the Timekeeping Mode automatically.
• Any time you change a setting on one of the three setting screens, exiting the
setting screens causes the graphics at the top of the display to perform an animated
pattern for a few minutes while the watch calculates data.
To set the time and date
Hour : Minutes Seconds
Tide graph
Moon graph
Month - Day
PM indicator
3. Press C to move the selection around the display in the following sequence.
Seconds Hour Minutes
Day YearMonth
4. While the second’s digits are selected (flashing), press E to reset the seconds to
00. If you press E while the second’s count is in the range of 30 to 59, the
seconds are reset to 00 and 1 is added to the minutes. If the second’s count is in
the range of 00 to 29, the minute’s count is unchanged.
5. While any other digits (besides seconds), are selected (flashing), press E to
increase the number or B to decrease it. Holding down either button changes the
current number at high speed.
• While the 12/24-hour setting is selected, press E to switch between the two
formats.
• The day of the week is automatically set in accordance with the date.
• The date can be set with the range of January 1,1995 to December 31, 2039.
6. After you are finished making the settings you want, press A to advance to the
DST, GMT Differential, Point Name Setting Screen. To return to the normal
Timekeeping Mode screen, press A three times.
DST, GMT Differential, Point Name Setting Screen
Point name
DST ON/OFF
DST
ON/OFF
To turn DST on and off
While ON or OFF and the small DST mark is flashing on the display, press E to
toggle DST on and off.
• Use C to move the flashing to the GMT differential value.
Important!
• Be sure to use this procedure to turn daylight saving time (summer time) on and off.
Never manually change the timekeeping setting to adjust for daylight saving time.
Doing so will produce incorrect Moon Data, Tide Graph, and Sunrise/Sunset data.
To set the GMT differential
• The GMT differential is the difference in time between the time zone where you are
currently located and Greenwich Mean Time (GMT).
• See “TIME ZONE CHART” for information about determining the GMT differential in
your area.
1. Press E to increase the value or B to decrease it. Holding down either button
changes the setting at high speed.
2. Use C to move the flashing to the first character of the point name.
• Use this screen to set the current time and date, to
reset the seconds to 00, and to toggle between 12-hour
and 24-hour timekeeping.
1.In the Timekeeping Mode, check if the DST indicator is
displayed, and change the DST setting in accordance
with the timekeeping in your area.
• Turn on DST if daylight saving time (summer time) is
currently in effect in your area. If daylight saving time is
not currently in effect in your area, be sure to turn DST
off.
• See “DST, GMT Differential, Point Name Setting
Screen” for details about turning DST on and off.
2.In the Timekeeping Mode, hold down A until the
Day of week
second’s digits start to flash. This is the Time and Date
Setting Screen.
Use this screen to switch DST (daylight saving time or
summer time) on and off, to specify the GMT differential
from your current location and to input new point names.
Press C.
GMT
differential
GMT differential
Point name
1st
character
Press C.
2nd
character
12/24-Hour
Format
8th
character
— 2 —
To change a point name
1. Press E to scroll forward through the characters at the current flashing location, or
B to scroll backwards. Holding down either button changes the current characters
at high speed.
2. When the character you want is displayed, press C to advance to the next
character.
3. Repeat steps 1 and 2 for all eight characters of the point name.
• After you are finished making the settings you want, press A to advance to the
Longitude/Latitude, Lunar Tide Interval Setting Screen.
Longitude/Latitude, Lunar Tide Interval Setting Screen
Latitude
Longitude
To set the longitude and latitude of your current location
While the Longitude/Latitude is flashing on the display, use E to change the longitude
value and B to change the latitude value. To reverse the direction of the change
(from increase to decrease, or from decrease to increase), press D.
• After you are finished making the settings you want, press C to advance to the
Lunar Tide Interval Setting Screen.
To set the lunar tide interval at your current location
1. Press E to increase the hours value or B to decrease it. Holding down either
button changes the setting at high speed.
2. Press C to move to the minute’s digits.
3. Press E to increase the minutes value or B to decrease it.
4. After you are finished making the settings you want, press A to return to the
normal Timekeeping Mode Screen.
About the lunar tide interval
The lunar tide interval is the period from the moon’s upper transit (moon up) to high
tide. If you know the lunar tide interval, tide changes can be determined using the
moon age. This watch calculates tide changes according to the current time and the
location setting, and displays them graphically.
To calculate the lunar tide interval
1. Look up the high tide time for the flood tide of the location whose tide changes you
want to know.
2. Use this watch to look up the moon up time that occurs immediately before this
time.
Subtracting the moon up time from the high tide time produces the lunar tide interval.
3.
Use this screen to specify the longitude, latitude, and
lunar tide interval of your current location.
Longitude/Latitude
Press C.
Lunar tide interval
Luner tide interval
Press C.
MinutesHours
MULTI-TIME MODE
To view point data
1. In the Timekeeping Mode, press B to enter the Multi-time Mode. The first point
that appears is the one you selected as your home (Timekeeping Mode) point.
2. Press B to scroll through the data for the 10 points. The watch beeps and returns
to the Timekeeping Mode after the tenth point.
• Pressing C at any time in the Multi-time Mode immediately returns to the
Timekeeping Mode.
• You can use the procedure under “DST, GMT Differential, Point Name Setting
Screen” and “Longitude/Latitude, Lunar Tide Interval Setting Screen” to
change the name and other data of a point.
Multi-time Mode
Press B.
Point name
This watch comes pre-programmed with data for 10 surfing points around the world.
The data for each point includes an 8-character point name, GMT differential,
longitude and latitude, and lunar tide interval. Setting the current time and date for any
of the points causes the time and date settings for all other points to be adjusted
accordingly. In the case of DST, however, you must make a separate setting for each
point. You can use the following procedure to select any one of the ten points as your
home time point.
• See the “PRESET LOCATION CHART” for details on the locations whose data is
preset in watch memory when you purchase it.
To select a point for your home time
While the point you want to use for your home time is displayed in the Multi-time
Mode, hold down E for about two seconds.
Local time
Page 5
ABOUT THE BACKLIGHT
About the Auto Light Switch
When the auto light switch is turned on, the backlight automatically turns on for two
seconds under the conditions described below. Avoid wearing the watch on the inside
of your wrist. Doing so causes the auto light switch to operate when not needed,
which shortens battery life.
Moving the watch to a position that is parallel to the ground and then tilting it
towards you more than 40 degrees causes the backlight to illuminate.
Parallel to ground
More than
40
°
To display the moon up and moon down time for a specific date
Month
Moon age
Point name
• The moon data for your home (T imekeeping Mode)
Day
point appears first when you enter the Moon Data Mode.
• Press E (forward) or B (back) within about two
seconds after entering the Moon Data Mode to scroll to
another point. It takes a few minutes before moon data
appears after you display the name of a point.
• If you do not perform any button operation, about two
seconds after you enter the Moon Data Mode the
display changes automatically to show the moon data
for today’s date. Pressing E advances to the next date,
while B goes back to the previous date. Holding down
either button scrolls the date at high speed. It takes a
few minutes before moon data appears after you display
a date.
• The backlight may not illuminate if the face of the watch is more than 15 degrees off
parallel to the left or right. Make sure that the back of your hand is parallel to the
ground.
Parallel to ground
• Static electricity or magnetic force can interfere with proper operation of the auto
light switch function. If the backlight does not illuminate, try moving the watch back
to the starting position (parallel with the ground) and then tilt it back toward you
again. If this does not work, drop your arm all the way down so it hangs at your side,
and then bring it back up again.
• Under certain conditions the backlight may not light until about one second after you
turn the face of the watch towards you. This does not necessarily indicate
malfunction of the backlight.
To turn the auto light switch on and off
In the Timekeeping Mode, hold down E for one or two seconds to turn the auto light
switch function on and off.
ON OFF
• The auto light switch indicator is shown on the display in all modes while the auto
light switch is on.
• In order to protect against running down the battery, the auto light switch is
automatically turned off approximately six hours after you turn it on. Repeat the
above procedure to turn the auto light switch back on if you want.
• Pressing D (Timekeeping Mode, Moon Data Mode, Tide Graph Mode, Sunrise/
Sunset Mode, Alarm Mode) or E (Countdown Timer Mode, Stopwatch Mode)
illuminates the display, regardless of the auto light switch’s on/off setting.
Caution
• The backlight of this watch employs an electro-luminescent (EL) light, which loses
its illuminating power after very long term use.
• Frequent use of the backlight shortens the battery life.
• The watch may emit an audible sound whenever the display is illuminated. This is
due to vibration of the EL panel used for illumination, and does not indicate
malfunction.
Warning!
• Never try to read your watch when mountain climbing or hiking in areas that
are dark or in areas with poor footing. Doing so is dangerous and can result in
serious personal injury.
• Never try to read your watch when running where there is the danger of
accidents, especially in locations where there might be vehicular or
pedestrian traffic. Doing so is dangerous and can result in serious personal
injury.
• Never try to read your watch when riding on a bicycle or when operating a
motorcycle or any other motor vehicle. Doing so is dangerous and can result
in a traffic accident and serious personal injury.
• When you are wearing the watch, make sure that its auto backlight function is
turned off before riding on a bicycle or operating a motorcycle or any other
motor vehicle.
Sudden and unintended operation of the auto backlight can create a
distraction, which can result in a traffic accident and serious personal injury.
More than 15 degrees too high More than 15 degrees too low
Hold down E
Auto light
switch on indicator
.
Moon up time
Year
Day
Month
• Note that once the moon data display appears, you
cannot change to another point. To change to another
point, press A twice to return to the point name display
and make the changes you want.
• Moon data is displayed in 5-minute units.
• For days around the full moon (moon age 15) or new
moon (moon age 29.5), there are days where there is
no moon up or moon down. In such cases, the xx:xx
is shown for the moon up or moon down time.
Moon down time
TIDE GRAPH MODE
Time
Tide graph
Month - Day
Ebb Flood High
Low
High
The black bar on the tide graph indicates
the current tide.
Month
Point name
Sunset time Sunrise time
• Note that once the sunrise/sunset data display appears, you cannot change to
another point. T o change to another point, press A to return to the point name
display and make the changes you want.
• Sunrise/sunset data is displayed in 5-minute units.
1.Press A while in the Moon Data Mode to enter the
Tide Graph Mode. The display shows the tide graph for
6:00 am on the date that was selected in the Moon
Data Mode.
2.Use E (forward) and B (back) to scroll the time in
1-hour increments. Holding down either button changes
the time at high speed.
• Note that once you enter the Tide Graph Mode, you
cannot change to another point or date. To change to
another point or date, press A to return to the Moon
Data Mode, make the changes you want, and then
reenter the Tide Graph Mode.
SUNRISE/SUNSET MODE
• The today’s sunrise and sunset data for the point
currently selected in the Moon Data Mode appears first
when you enter the Sunrise/Sunset Mode.
• Press E (forward) or B (back) within about two
seconds after entering the Sunrise/Sunset Mode to
scroll to another point. It takes a few minutes before
Day
sunrise/sunset data appears after you display the name
of a point.
• If you do not perform any button operation, about two
seconds after you enter the Sunrise/Sunset Mode the
display changes automatically to show the sunrise/
sunset data for today’s date. Pressing E advances to
the next date, while B goes back to the previous date.
Holding down either button scrolls the date at high
speed. It takes a few minutes before sunrise/sunset
data appears after you display a date.
Be sure to set the current time and your current location before trying to use the Moon
Data Mode.
The Moon Data Mode display shows the current moon age, as well as moon up and
moon down times. Moon age is indicated both by a value and one of the following
graphics.
New Moon Crescent
• The light part of the moon graph shows the part of the Moon that is visible in the sky
during each particular phase.
• The moon graph shows the Moon as viewed at noon from a position in the Northern
Hemisphere looking south. Note that at times the image shown by the moon graph
may differ from that of the actual Moon in your area.
• The left-right orientation of the Moon phase is reversed when viewing from the
Southern Hemisphere or from a point near the equator.
Moon
Location
Earth
Moon Moon-Down
Moon
First Quarter
Moon-Up
Half Moon
• The moon up time indicates when the moon will
Full Moon Half Moon
reach its highest point relative to your current
location (upper transit), while the moon down time
indicates when it will reach its lowest point (lower
transit). Note that moon up and moon down times
are accurate up to ±30 minutes.
MOON DATA MODE
Last Quarter
— 3 —
The countdown start time can be set within a range of 1 second to 24 hours. When
COUNTDOWN TIMER MODE
the countdown reaches zero, an alarm sounds.
To set the countdown start time and to switch auto repeat timing on and off
Hours : Minutes
3. While the hour, minutes, or second’s digits are flashing, press E to increase the
value or B to decrease it. Holding down either button changes the value at high
speed.
• To set the starting value of the countdown time to 24 hours, set 0:00 00.
4. While the auto repeat indicator is flashing, press E toggle auto repeat on and off.
The auto repeat indicator is on the display only while you are setting the countdown
start time.
Seconds
Auto repeat OFF Auto repeat ON
5. After you set the countdown start time and auto repeat timing on and off, press A
to return to the Countdown Timer Mode.
1.Hold down A while in the Countdown Timer Mode.
The minute’s digits flash on the display because they
are
selected
sequence.
Minutes
.
Seconds Hours
Auto repeat on/off
Press E.
2.Press C to change the selection in the following
Page 6

To use the countdown alarm
1. Press D while in the Countdown Timer Mode to start the countdown alarm.
2. Press D again to stop the countdown alarm.
• You can resume countdown alarm operation by pressing D.
3. Press D to stop the countdown alarm, and then press B to reset the countdown
time to its starting value.
• When the end of the countdown is reached and auto repeat timing is off, the alarm
sounds for 10 seconds or until you stop the alarm by pressing any button.
Countdown timing stops and the countdown time is automatically reset to its starting
value after the alarm stops.
• When the end of the countdown is reached while auto repeat is on, the alarm
sounds, but the countdown restarts from the beginning without stopping. You can
stop the countdown by pressing D and manually reset to the start time by pressing
B.
• If you set a starting time of 10 seconds or less and have Auto Repeat turned on, the
countdown alarm tone (which normally sounds for 10 seconds) sounds for only one
second.
To turn the progress beeper on and off
While the Countdown Timer Mode screen shows its starting value or while a
countdown operation is in progress, press B to toggle the progress beeper on and
off.
OFF ON
• When the progress beeper is turned on, the watch beeps as the countdown time
passes the 10, 5, 4, 3, 2, and 1-minute marks, and the 50, 40, 30, 20, 10, 5, 4, 3, 2,
and 1-second marks.
STOPWATCH MODE
The Stopwatch Mode lets you measure elapsed time, split
times, and two finishes. The range of the stopwatch is 23
hours, 59 minutes 59 seconds. You can use the EL
backlight at any time while the stopwatch is operating by
pressing E.
• For the first 60 minutes, the screen shows minutes,
seconds, and 1/100 second. After 60 minutes, the
Minutes
1/100
screen format changes to show hours, minutes, and
second
seconds.
• The stopwatch continues to run, restarting from zero
after it reaches its limit, until you stop it.
Seconds
Minutes
Seconds
Hours
Elapsed time measurement
Start
Stop Re-start Stop Clear
Split time measurement
Start
Split Split release Stop Clear
Split time and 1st-2nd place times
Start
Auto-Start
Split Stop Split release Clear
First runner
finishes.
Display time of
first runner.
In addition to the normal instant start at the press of a
button, the stopwatch can also be set up to start timing
automatically after five seconds have elapsed.
• While the stopwatch is stopped and cleared to all zeros,
Second runner
finishes.
press A to toggle auto-start on and off. Turning on
auto-start displays 5 in the lower part of the display. 00'
00" 00 is displayed when auto-start is turned off.
Display time of
second runner.
ALARM MODE
Alarm number
Day
Month
Alarm on indicator
Hour : Minutes
• To set a date alarm
Set the month, day, hour and minutes for the alarm time. This type of setting causes
the alarm to sound at the specific time, on the specific date you set.
• To set a 1-month alarm
Set the month, hour and minutes for the alarm time. Set “xx” for the day. This type
setting causes the alarm to sound every day at the time you set, only during the
month you set.
• To set a month alarm
Set the day, hour and minutes for the alarm time. Set “xx” for the month. This type of
the setting causes the alarm to sound every month at the time you set, on the day you
set.
You can set three independent alarms with the hour,
minutes, month and day. Use the Alarm Mode to turn the
alarm and the Hourly Time Signal on and off.
• When an alarm is turned on, an alarm tone sounds for
20 seconds when the preset time reached.
• When the Hourly Time Signal is turned on, the watch
beeps every hour on the hour.
Alarm types
The types of alarm you get depends on the information
you set.
• To set a daily alarm
Set the hour and minutes for the alarm time. Set “xx” for the
month and day. This type of setting causes the
alarm to sound everyday at the time you set.
To set the alarm time
1. Press E while in the Alarm Mode to select Alarm 1 through Alarm 3 and Hourly
Time Signal.
Alarm 1 Alarm 3Alarm 2
2. After you select an alarm, hold down A until the hour digits start to flash on the
display. The hour digits flash because they are
automatically switched on.
3. Press C to change the selection in the following sequence.
Hourly Time Signal
selected
. At this time the Alarm is
Hour Minutes Month Day
4. Press E to increase the number or B to decrease it. Holding down either button
changes the current number at high speed.
• The format (12-hour and 24-hour) of the alarm time matches the format you select
for normal timekeeping.
• When setting the alarm time using the 12-hour format, take care to set the time
correctly as morning or afternoon.
5. After you set the alarm time, press A to return to the Alarm Mode.
• If you do not operate any button for a few minutes while a selection is flashing, the
flashing stops and the watch goes back to the Alarm Mode automatically.
To stop the alarm
• Press any button to stop the alarm after it starts to sound.
To switch an alarm on and off
Alarm on indicator
To switch the Hourly Time Signal on and off
Hourly time signal on
indicator
1.In the Alarm Mode, press E to select an alarm.
2.When an alarm you want to is selected, press B to
switch it on and off.
• If any alarm is on, the alarm on indicator is shown on
the display when you change to another mode.
1.In the Alarm Mode, press E to select the Hourly Time
Signal.
2.When Hourly Time Signal is selected, press B to
switch it on and off.
• If Hourly Time Signal is on, the Hourly Time Signal On
indicator is shown on the display when you change to
another mode.
To test the alarm
Hold down E while in the Alarm Mode to sound the
alarm.
PRESET LOCATION CHART
HOSSEGOR
HUNTNGTN
■
■ PIPELINE
Point name Longitude Latitude
TORAMI 140° E35° N 9 4:50
GOLD CST 154° E28° S 10 8:30
PIPELINE 158° W22° N –10 3:00
HUNTNGTN 118° W34° N –8 9:20
RIO 43° W23° S –3 3:00
FIGUEIRA 9° W40° N 0 2:10
HOSSEGOR 1° W44° N 1 3:10
JEFFREY 25° E34° S 2 3:10
REUNION 55° E21° S 4 1:40
EAST JAVA 114° E9° S 7 10:40
FIGUEIRA ■
■
RIO
■
■
JEFFREY
EAST JAVA
■
REUNION
differential
GMT
■
■ TORAMI
■
GOLD CST
Lunar Tide
Interval
— 4 —
Page 7

TIME ZONE CHART
North America
180° 165° 150°
4
.
3
.
165°
180°
0°
.
2
.
1
15°
Central and South America
105° 90°
Europe
15° 0° 15° 30°
60°
3
.
45°
.
.
5
1
.
4
135° 120° 105° 90°
.
12
.
17
8
.
.
9
.
10
.
6
7
.
.
5
.
15
.
11
.
14
18
.
.
.
4
.
3
.
2
.
5
1
.
6
75° 60° 45°
14
.
10
11
.
.
2
.
12
.
6
13
.
7
.
8
9
7
10
.
8
.
9
.
.
12
.
11
16
.
.
.
17
.
.
15
.
1
.
THE DIFFERENCE
CITY
FROM GMT FOR
NO.
75°
60° 45°
60°
20
.
.
23
.
.
13
.
19
21
16
.
.
22
0°
15°
30°
45°
45°
45°
30°
15°
STANDARD TIME
1. PAGO PAGO –11 171°W14°N
2. HONOLULU –10 158°W21°N
3. ANCHORAGE –9 150°W61°N
4. NOME –9 165°W65°N
5. LOS ANGELES –8 118°W34°N
6. SAN FRANCISCO –8 122°W38°N
7. LAS VEGAS –8 115°W36°N
8. V ANCOUVER –8 123°W49°N
9. SEATTLE –8 122°W48°N
10. DENVER –7 105°W40°N
11. EL PASO –7 106°W32°N
12. EDMONTON –7 114°W54°N
13. CHICAGO –688°W42°N
14. HOUSTON –695°W30°N
THE DIFFERENCE
CITY
NO.
FROM GMT FOR
STANDARD TIME
1. PANAMA CITY –580°W9°N
2. LIMA –577°W12°S
3. BOGOTA –574°W5°N
4. CARACAS –467°W10°N
5. LA PAZ –468°W17°S
6. SANTIAGO –471°W33°S
7. PORT OF SPAIN –461°W11°N
8. RIO DE JANEIRO –343°W23°S
9. SAO PAULO –347°W24°S
10. BRASILIA –348°W16°S
11. BUENOS AIRES –358°W35°S
12. MONTEVIDEO –356°W35°S
THE DIFFERENCE
CITY
FROM GMT FOR
NO.
STANDARD TIME
1. AZORES –125°W38°N
2. LONDON +0 0°E51°N
3. DUBLIN +0 6°W53°N
4. CASABLANCA +0 8°W34°N
5. LISBON +0 9°W39°N
6. P ARIS +1 2°E49°N
7. MILAN +1 9°E45°N
8. ROME +1 12°E42°N
9. MADRID +1 4°W40°N
10. AMSTERDAM +1 5°E52°N
11. HAMBURG +1 10°E54°N
12. FRANKFURT +1 9°E50°N
13. VIENNA +1 16°E48°N
14. STOCKHOLM +1 18°E59°N
LONGITUDE
LONGITUDE
LONGITUDE
LATITUDE
LATITUDE
LATITUDE
THE DIFFERENCE
CITY
FROM GMT FOR
NO.
STANDARD TIME
15. DALLAS/
FORT WORTH –697°W33°N
16. NEW ORLEANS –690°W30°N
17. WINNIPEG –697°W50°N
18. MEXICO CITY –699°W19°N
19. NEW Y ORK –574°W41°N
20. MONTREAL –574°W45°N
21. DETROIT –583°W42°N
22. MIAMI –580°W26°N
23. BOSTON –571°W42°N
Add 1 hour to the difference time if DST
(Daylight Saving Time) is used. (EX. if difference
of standard time is +2, that of DST is +3.)
THE DIFFERENCE
CITY
FROM GMT FOR
NO.
STANDARD TIME
Add 1 hour to the difference time if DST
(Daylight Saving Time) is used. (EX. if difference
of standard time is +2, that of DST is +3.)
THE DIFFERENCE
CITY
FROM GMT FOR
NO.
STANDARD TIME
15. A THENS +2 24°E38°N
16. HELSINKI +2 25°E60°N
17. IST ANBUL +2 29°E41°N
Add 1 hour to the difference time if DST
(Daylight Saving Time) is used. (EX. if difference
of standard time is +2, that of DST is +3.)
LONGITUDE
LONGITUDE
LONGITUDE
LATITUDE
LATITUDE
LATITUDE
Africa and Middle East
30°
15
14
.
.
15°
0°
15°
30°
Asia and South Pacific
75°
60°
THE DIFFERENCE
CITY
FROM GMT FOR
NO.
1
2
.
.
4
.
10
13
5
.
.
.
.
6
.
.
12
11
7
.
8
16
.
.
14
17
.
10
.
6
7
5
1
11
.
.
.
12
2
.
.
.
49
.
.
8
.
3
13
.
.
1
.
9
1
3
.
.
16
.
.
15
.
20
.
26
.
22 252127
.
18
.
19
.
.
.
24
75°60°45°30°15°0°15°
45°
30°
15°
0°
15°
..
30°
23
45°
150°165°180°165°150°135°120°105°90°
STANDARD TIME
1. BEIRUT +2 35°E34°N
2. DAMASCUS +2 36°E33°N
3. CAPE TO WN +2 18°E34°S
4. KUWAIT +3 48°E29°N
5. RIYADH +3 47°E25°N
6. JEDDAH +3 39°E21°N
7. ADEN +3 45°E13°N
8. ADDIS ABABA +3 39°E9°N
9. NAIROBI +3 37°E1°S
10. DUBAI +4 55°E25°N
11. ABU DHABI +4 54°E24°N
12. MUSCAT +4 58°E23°N
13. KARACHI +5 67°E25°N
14. PRAIA –123°W15°N
THE DIFFERENCE
CITY
FROM GMT FOR
NO.
STANDARD TIME
1. DHAKA +6 90°E24°N
2. BANGKOK +7 100°E14°N
3. JAKARTA +7 107°E6°S
4. PHNOM PENH +7 105°E12°N
5. HANOI +7 106°E21°N
6. VIENTIANE +7 103°E18°N
7. HONG KONG +8 114°E22°N
8. SINGAPORE +8 104°E1°N
9. KUALA LUMPUR +8 102°E3°N
10. BEIJING +8 116°E40°N
11. TAIPEI +8 122°E25°N
12. MANILA +8 121°E15°N
13. PERTH +8 116°E32°N
14. ULAANBAATAR +8 107°E48°N
15. TOKYO +9 140°E36°N
LONGITUDE
LONGITUDE
LATITUDE
LATITUDE
THE DIFFERENCE
CITY
FROM GMT FOR
NO.
STANDARD TIME
15. DAKAR +0 17°W15°N
16. ABIDJAN +0 4°W5°N
Add 1 hour to the difference time if DST
(Daylight Saving Time) is used. (EX. if difference
of standard time is +2, that of DST is +3.)
THE DIFFERENCE
CITY
FROM GMT FOR
NO.
STANDARD TIME
16. SEOUL +9 127°E38°N
17. PY ONGY ANG +9 126°E39°N
18. SYDNEY +10 151°E34°S
19. MELBOURNE +10 145°E38°S
20. GUAM +10 145°E13°N
21. NOUMEA +11 166°E22°S
22. PORT VILA +11 168°E18°S
23. WELLINGTON +12 175°E41°S
24. CHRISTCHURCH +12 173°E43°S
25. NADI +12 178°E18°S
26. NAURU ISLAND +12 166°E1°S
27. PAPEETE –10 150°W18°S
Add 1 hour to the difference time if DST
(Daylight Saving Time) is used. (EX. if difference
of standard time is +2, that of DST is +3.)
LONGITUDE
LONGITUDE
LATITUDE
LATITUDE
— 5 —
Page 8

3. DRAWINGS: QW-2269
3-1. LCD DIAGRAM
L8
L22
L14
L15
L16
L13
L12
L11
L10
L17
L21
L18
L19
L20
L23
L26
L27L9L28
L29
L30
L25
L24
L31
L32
TIDE4
b2
c2
POINT
DEG
TIDE5
h1
j1
i1
GMT
TIDE6
a1
f1
g1
e1
d1
h0
a0
f0
b1
g0
e0
c1
d0
TIDE1
TIDE3
MOON3
MOON2
MOON1
MOON0
TIDE0
Y4
Y0
X0 X28
A
P DST
24
AL
SIG
a5
f5
g5
e5
d5
a4
f4
b5
c5
b4
g4
HYP
e4
c4
COL
d4
TIDE DOWN SUNSET
TIDE2
UP
MINSEC
a3
f3
g3
e3
d3
SUNRISE AUTO EL
a2
f2
b3
g2
e2
c3
d2
b0
c0
SEG.
L 8
L 9
L10
L11
L12
L13
L14
L15
L16
L17
L18
L19
L20
L21
L22
L23
L24
L25
L26
L27
L28
L29
L30
COM.
LC1
x0y4
x1y4
x2y4
x3y4
x4y4
x5y4
x6y4
x7y4
x8y4
x9y4
x10y4
x11y4
x12y4
x13y4
x14y4
x15y4
x16y4
x17y4
x18y4
x19y4
x20y4
x21y4
x22y4
LC2
x0y3
x1y3
x2y3
x3y3
x4y3
x5y3
x6y3
x7y3
x8y3
x9y3
x10y3
x11y3
x12y3
x13y3
x14y3
x15y3
x16y3
x17y3
x18y3
x19y3
x20y3
x21y3
x22y3
LC5
LC4
LC3
x0y2
x1y2
x2y2
x3y2
x4y2
x5y2
x6y2
x7y2
x8y2
x9y2
x10y2
x11y2
x12y2
x13y2
x14y2
x15y2
x16y2
x17y2
x18y2
x19y2
x20y2
x21y2
x22y2
L36
LC1
c0
d0
e0
GMT
d1
i1
d2
e2
d3
TIDE
d4
e4
d5
L33
LC3
L34
LC2
LC2
x23y3
x24y3
b0
g0
f0
c1
g1
e1
j1
c2
g2
f2
c3
e3
c4
g4
c5
e5
x28y3
x27y3
x26y3
x25y3
LC1
AUTO EL
LC3
x23y2
x24y2
a0
h0
b1
a1
f1
h1
DEG
b2
a2
b3
g3
COL
b4
f4
g5
x28y2
x27y2
x26y2
x25y2
LC4
x23y0
x24y0
MOON3
MOON2
MOON1
MOON0
SIG
AL
24
DST
P
a5
A
x28y0
x27y0
x26y0
x25y0
LC5
x23y1
x24y1
TIDE6
TIDE5
TIDE4
TIDE3
TIDE2
TIDE1
TIDE0
SUNRISE
UP
MINSEC
a3
f3
HYP
a4
b5
f5
x28y1
x27y1
x26y1
x25y1
L35
L52
L51
L50
L49
LC4
x0y0
x1y0
x2y0
x3y0
x4y0
x5y0
x6y0
x7y0
x8y0
x9y0
x10y0
x11y0
x12y0
x13y0
x14y0
x15y0
x16y0
x17y0
x18y0
x19y0
x20y0
x21y0
x22y0
L45
L48
L47
L46
LC5
x0y1
x1y1
x2y1
x3y1
x4y1
x5y1
x6y1
x7y1
x8y1
x9y1
x10y1
x11y1
x12y1
x13y1
x14y1
x15y1
x16y1
x17y1
x18y1
x19y1
x20y1
x21y1
SEG.
L31
L32
L33
L34
L35
L36
L37
L38
L39
L40
L41
L42
L43
L44
L45
L46
L47
L48
L49
L50
L51
L52
COM.
x23y4
x24y4
POINT
SUNSET
DOWN
x28y4
x27y4
x26y4
x25y4
x22y1
L37
L38
L39
L40
L41
L42
L43
L44
— 6 —
Page 9

— 7 —
3-2. CIRCUIT DIAGRAM
L8AC
T1
T2
T3
KI1
KI2
KI3
KI4
KI5
KI6
KI7
KI8
KI9
KC2
KC1
KC3
KC4
KC6
LD1
EMP
XTB
XT
KC5
VDD2A
✽1
✽1
✽1
✽1
✽1
PX1
PY1
Vref
PW1
PY3
PX3
PU1
PZ1
PH
LE
ADIN
A2OUT
P0
✽1
✽1
✽1
✽1
✽1
✽1
✽1
✽1
✽1
✽1
✽1
✽1
✽1
S1
S2
S3
S4
SA
SK
✽2
✽2
L1-L7, L53-L60 ✽1
L52
LC1 LC5
LCD
TOTAL
BONDING
(LSI TEST AC, T1-3, KI1-9, L8-L39)
129 Pins
83 Pins
LSI
BD1
Tr1
PZZ
LL1
VHFGND VDD2GNDA
BAT
GND
L–
VOUT
L+
FRONT
EL LL2
Cel
BACK
C6
C
+
✽ 1.No bonding
✽ 2.GND-KI7: Short (Soldering)
GND-KI8: Short (Soldering)
INV
VC2VC1
C1
VC4VC3
C5
VAN
✽1
E'
CLF2
CLF1
V+
VCH
C8+
VOSC
C7
VDSP
C4
VDD1
C2
VDD3
C3
CT
Xtal
✽1
LC6
✽1
SDI
✽1
CSB
✽1
SDO
✽1
SCK
✽1
SCUT
✽1
T4
✽1
PT
✽1
PTIN
✽1
CRM
✽1
CRS
✽1
CRI
Page 10

3-3. CHECKING TERMINALS AND COMPONENT
Capacitor/Tantalum
C8
Capacitor/Chip
C7
Capacitor/Chip
C6
C
KI2
KI3
GND KI7
GND KI8
GND
VOUT
3. PCB ASS'Y
(7640 4422)
KI9 KC2
VOUT
GND
KI5 KI5
KI4
GND
KI1
5. Oscillator/Crystal
Xtal
(7110 6316)
Cushion
10
(7211 0064)
CT
Capacitor/Tantalum
GND
KI4
KC1
KI4
GND
L
KI1
KI1
GND
GND
L
L
K19
KC2
VDD2
KI9KC2
VDD2
GND
BD1
GND
4. Capacitor/Trimmer
(1001 0950)
Capacitor/Chip
C2
Capacitor/Chip
C3
C4
VDD2
GND
VOSC
CLF1
CLF2
VDD2
CLF1
CLF2
KC5
GND
XT
AC
VOSC
VCH
VCH
VC2
L- L+
L+
VOUT
L-
GND
VDD2
GND
GND
L
Capacitor/
Chip
KI2
XT
XTB
KI2
VDD1
VDD3
GND
GND
GND
GND
GND
VHF
VC3
VC1
VC1
KI3
VDD3
VDSP
GND
VC4
Tilt/Sensor
16
(7105 5275)
Tr1
LL1
Transistor
8
Coil
Cel
Cushion
(7211 9631)
Capacitor/
Chip
LL2
INV
Coil
8
Inverter
C5
Capacitor/
C1
Chip
Cushion
(7211 9631)
Top view of P.C.B. ass'y Bottom view of P.C.B. ass'y
— 8 —
Capacitor/
Chip
Page 11

4. EXPLODED VIEW: QW-2269
1a (1004 6065)
1b (1004 6068)
1c (1004 6067)
2 (1003 4039)
18 (1004 6069)
17 (1003 0899)
20 (1003 0898)
13 (1003 0896)
3 (7640 4422)
PCB Ass'y
19 (7230 0511)
7 (1004 6066)
13 (1003 0896)
6 (7236 0283)
11 (1004 6062)
Battery Lithium
(CR1616)
15 (1004 6063)
12 (7231 1960)
14(7229 0790)
— 9 —
Page 12

5. PARTS LIST: QW-2269
-
-
-
yp
p
Note: 1. Prices and specifications are subject to change without prior notice.
2. Spare parts are classified as follows according to their importance in after-sales service.
A Rank ----------------------------------------B Rank ----------------------------------------C Rank -----------------------------------------
3. Batteries in Bulk pack on the tray will be supplied from our Overseas Spare Parts Section under charge basis.
Batteries in Blister pack will be supplied from our Sales Department.
4. As for order/supply of spare parts, refer to the separate publication "GUIDE BOOK for spare parts supply".
Item Code No. Parts Name Specification Applicable Q R
Very Important
Important
Less important
MODULE/WITHOUT MOVEMENT QW-2269CM-01
MODULE/WITHOUT MOVEMENT QW-2269CM-03
MODULE/WITHOUT MOVEMENT QW-2269CM-02
MODULE/WITHOUT MOVEMENT QW-2269CM-04
< The module QW-2269 is "built-in t
therefore the module as the s
1a 1004 6065 LCD C2269-01P
1b 1004 6068 LCD C2269-03P
1c 1004 6067 LCD C2269-02P
2 1003 4039 EL EL-2258-A-01
3 7640 4422 PCB ASS'Y Q254994*1TK
4 1001 0950 CAPACITOR/TRIMMER CTZ2E-30C-W2-P
5 7110 6316 OSCILLATOR/CRYSTAL DT-26S12
6 7236 0283 CONTACT/BATTERY(-) 1828 Q359948B-1
7 1004 6066 CUSHION/2269-1 Q467897-1
8 7211 9631 CUSHION/506 Q49364-1
9 7218 0438 CUSHION/524 Q411459-1
10 7211 0064 CUSHION/6 Q4914-1
1004 6062 HOUSING/2269-2 Q152033-1
11
12 7231 1960 HOLDER/BATTERY Q254197-1
13 1003 0896 INTERCONNECTOR/2258 Q467174-1
14 7229 0790 LABEL/1856 Q461569-1
15 1004 6063 PLATE/MAIN 2269 Q152034-1
16 7105 5275 SENSOR/TILT TS-2418-P
17 1003 0899 SPACER/2258-1 Q254755A-1
18 1004 6069 SPACER/2269-1 Q467974-1
19 7230 0511 SPRING/COIL 1253-2 Q439219-1
20 1003 0898 SPRING/COIL 2258 Q467279B-1
BATTERY/LITHIUM CR1616
e" which is assembled directly to the case,
are parts is not available.>
GL-130-1M
GL-130-2M
GL-130-8M
GL-130TC-7M
QW-2269CM-01
QW-2269CM-03
QW-2269CM-02/04
QW-2269CM Common
QW-2269CM Common
QW-2269CM Common
QW-2269CM Common
QW-2269CM Common
QW-2269CM Common
QW-2269CM Common
QW-2269CM Common
QW-2269CM Common
QW-2269CM Common
QW-2269CM Common
QW-2269CM Common
QW-2269CM Common
QW-2269CM Common
QW-2269CM Common
QW-2269CM Common
QW-2269CM Common
QW-2269CM Common
QW-2269CM Common
QW-2269CM Common
1
1
1
1
1A
1A
1A
1A
1A
1B
1B
1C
1C
2C
1C
1C
1C
1C
2C
1C
1C
1B
1C
1C
1B
2B
1
For the prices and minimum order/supply quantities of the above parts, refer to the Parts Price List P.P.L.-570.
Notes: Q - Used quantity
R - Rank
— 10 —
Page 13

6. PRECAUTIONS FOR REPAIR: QW-2269
6-1. AC (ALL CLEAR) AND REMOVING OF MODULE
1. Perform AC (ALL CLEAR) when inserting a new battery, or else the memories and/ or counters may give
erratic displays.
Touch the AC contact and the positive (+) side of the battery or main plate with the metallic tweezers.
The contact should be made for about two seconds.
2. On removing of the module from the case, please insert the precision screw driver between the module
and the case pointed by arrows.
Metallic tweezers
6-2. ACCURACY CHECKING
Check the accuracy of the module with the quartz timer after switching the module to “ACCURACY
CHECKING MODE”.
The operations are shown below:
A) SWITCHING TO “ACCURACY CHECKING MODE”
While pressing the D button, press A and C buttons at the normal timekeeping mode.
Then all the segments are displayed and the LCD drive signals are changed to the static drive signal
of “32 Hz” so that you can check the accuracy with the quartz timer.
B) CANCELLATION OF THE “ACCURACY CHECKING MODE”
Press any button except for D buttom.
Then the display is returned to its original state.
NOTE: The “ACCURACY CHECKING MODE” will automatically return to the regular mode in
1 ~ 2 hour(s) without any operation.
A
C
D
B
E
(QW-2269)
— 11 —
Page 14

CASIO TECHNO CO.,LTD.
Overseas Service Division
Nishi-Shinjuku Kimuraya Bldg. 1F
5-25, Nishi-Shinjuku 7-Chome
Shinjuku-ku, Tokyo 160-0023, Japan
 Loading...