

Page 1

Contents/Ready
Contents/Ready
Phone Call
Inputting
Characters
Address Book/
Pair Function
Mail
Camera
EZweb
BasicManual
EZ Navi
au Media Tuner
Other Functions
Troubleshooting/
Remote Ctrl Lock
Index
Page 2
Introduction
Thank you for purchasing the W62CA.
Before using it for the first time, be sure to read the Basic Manual (this PDF manual) so as
to know how to use it correctly. After you finish reading this manual, store it and the printed
materials that come with the phone in a safe place for future reference.
Printed Manuals for the W62CA (Japanese)
The W62CA comes with a Basic Manual and an Instruction Manual.
For information about basic
operation
Basic Manual
Refer to this English
PDF manual.
The following information is also available on the au website.
• To download the Basic Manual or Instruction Manual
(http://www.au.kddi.com/torisetsu/index.html)
• To access a keyword searchable au On-Line Manual
(http://www.au.kddi.com/manual/index.html)
You can also access the au On-Line Manual using EZweb.
EZweb Access
au one Top
→auお客さまサポート (au Customer Support)
→調べる (Information)
→オンラインマニュアル (On-Line Manual)
For detailed information
about each function
Instruction Manual
English version not
available.
All mentions of “the W62CA” in this manual refer to “the G’zOne W62CA.”
◎
The typeface, fonts, and colors of the texts on the screens shown in this
◎
manual may differ from the actual contents. Also, certain icons and the
scroll bars may be omitted.
The typeface, screens, icons shown in this manual and explanations are
◎
made on the initial settings of main unit color “Sparkling Green.”
Page 3

Cellphone Etiquette
Mind your manners!
A cellphone always emits weak radio waves while it is turned on.
Enjoy operation of your cellphone without forgetting to be considerate
of those around you.
Some locations do not allow the use of
cellphones.
Using a cellphone while driving is dangerous and
■
prohibited by the Traffic Control Law.
Using a cellphone inside of an aircraft is prohibited
■
by the law. Be sure to turn off your cellphone before
takeoff.
Watch out where you use your cellphone,
and keep your voice down.
Do not make calls at cinemas, theaters, museums,
■
libraries, or other similar locations. Turn off the
cellphone or use Manner Mode to ensure that the
ringtone does not disturb others.
When in public, move to a location where you will
■
not be blocking traffic.
On the Shinkansen, in a hotel lobby, or in other similar locations, move
■
to a location where you will not disturb others.
Take care to avoid talking on the phone in a loud voice.
■
Before taking the picture of others, be sure to obtain permissions first.
■
Cellphone radio waves may interfere with
electrical medical equipment.
On a train or in other crowded locations, there is
■
always the possibility that someone nearby may be
wearing a pacemaker. Turn off your cellphone when
you are in a crowded area.
Follow the rules of hospitals and other medical
■
facilities prohibiting the use or possession of cellphones.
1
Page 4
Cellphone Basics
Features
Camera
Shoot photos and
record movies, and
send them by e-mail.
Page
59
au Media Tuner
Enjoy using
Television (1Seg)
and EZ Channel-Plus.
Page
75
EZ Navi
EZ Navi Walk,
Passenger Seat Navi,
Evacuate Navi and
Security Navi allow you
to get various kinds of
location information.
They are all built-in
functions.
Page
72
Security Setup
Select either “Safety
Buzzer” or “HOT DIAL”
as reliable setting
function.
Page
82
EZ FeliCa
Use the cellphone for
shopping by using
electronic money, or
use it as member’s
cards, point cards,
and so on.
Mail
Send mail messages
to other cellphones or
to PCs.
Page
48
EZweb
Download “ChakuUta®”/other data or
access sites.
Page
64
For other useful functions, see page 82.
Water & Shock Resistance
W62CA provides
water and shock
resistance against the
rain and strenuous
motions/shocks
arisen in your daily
life.
2
G’zGEAR
Six tools with GPS
and direction/
temperature/
acceleration sensor
functionalities that
assist your outdoor
activities are available.
Page 5
Manner Mode and Answer Memo
Manner Mode
Use Manner Mode to turn off the
ringtone so as not to bother
others around you.
While the standby
screen is displayed,
hold down ( for
at least one second.
Page
35
Answer Memo
If you cannot answer a call,
Answer Memo plays an
answering message and records
the caller’s message.
While the standby
screen is displayed,
hold down
at least one second.
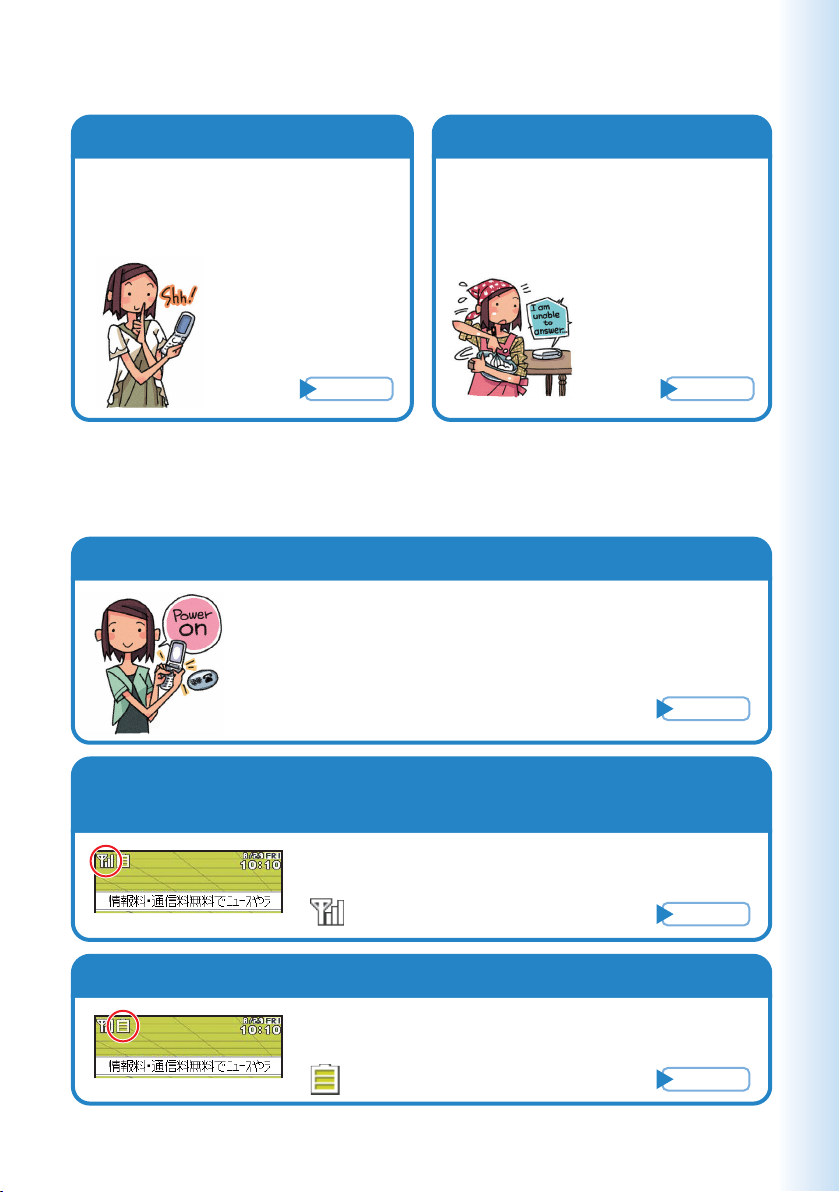
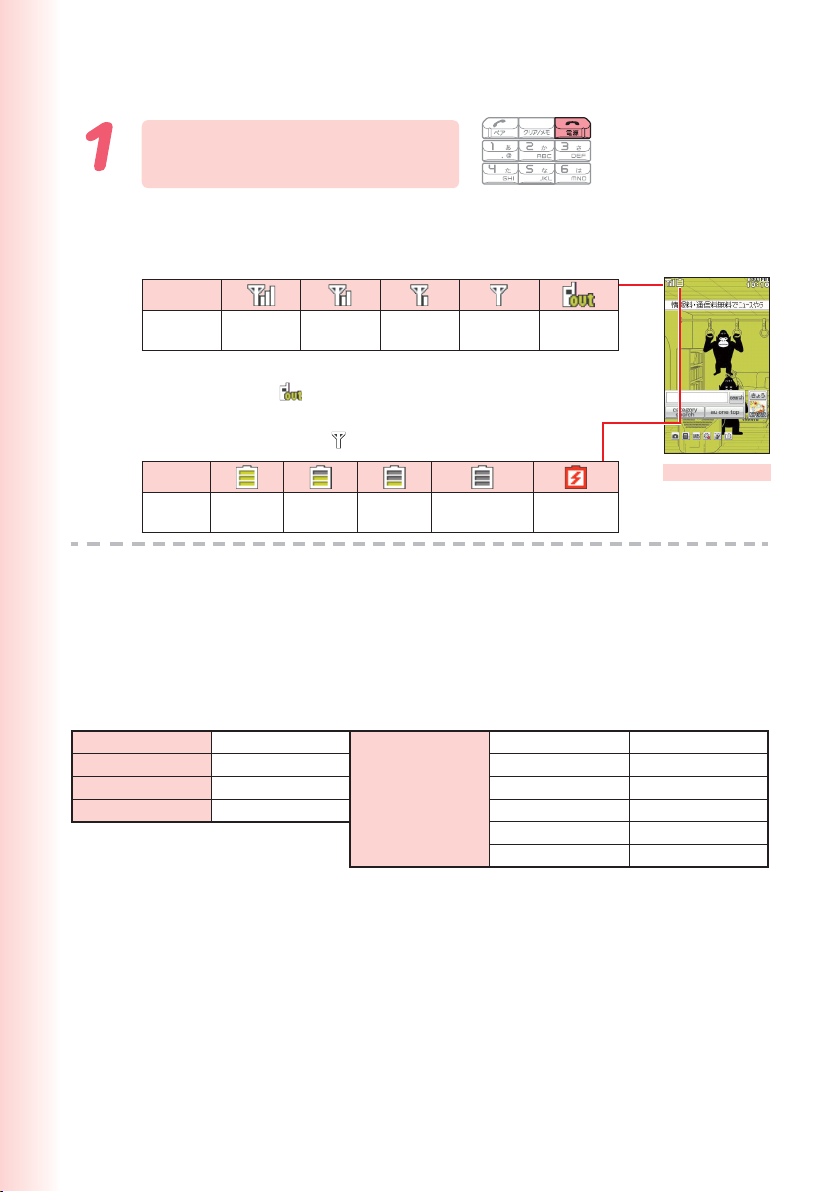
Checking Power, Signal Strength, and Battery Level
Normally leave the phone turned on.
The phone needs to be turned on to make and receive
calls.
Hold down F for at least 2.5 seconds to turn on W62CA.
After a while, W62CA turns on with tone and the standby
screen appears.
C for
Page
36
Page
14
You cannot talk on the phone
if it is unable to receive a signal.
Signal strength is low in some areas, even if
they are within the service area.
indicates the current signal strength.
Keep an eye on the battery level.
The phone may not function properly if battery
power is low.
indicates the current battery level.
Page
Page
14
14
3
Page 6
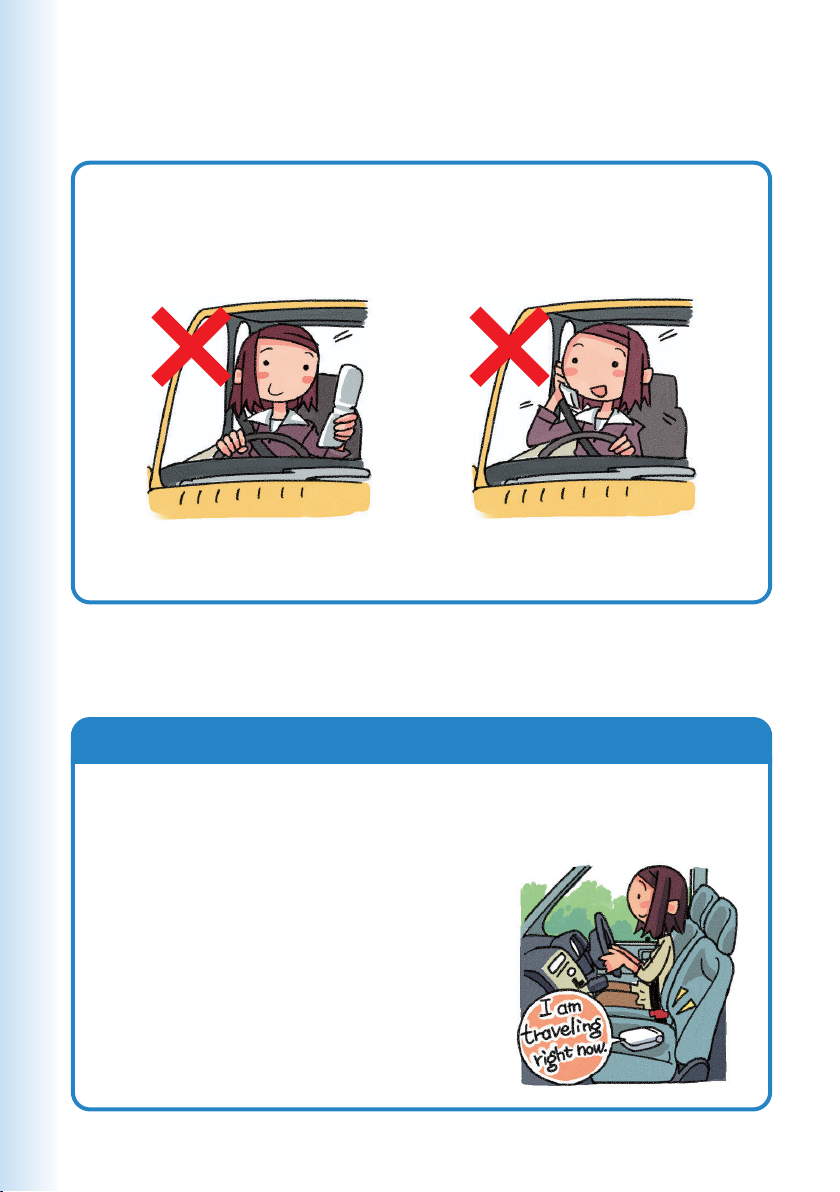
Never use your cellphone while driving!
Do not use the cellphone while driving a car/motorcycle/bicycle.
It may cause a traffic accident. Use of the cellphone while driving
a car/motorcycle is forbidden by the law. Use of the cellphone
while driving a bicycle may be punished by the law too.
× Reading mail or looking
at the display.
× Holding a cellphone in
your hand to talk.
Turn off your cellphone or use Drive Mode while
driving.
Drive Mode
In Drive Mode, the phone will play the message “ただいま移動中で
すので電話に出ることができません。・・・” (I am traveling and unable to
answer the phone right now…), and then ask the caller to leave a
message using Answer Memo.
While the standby screen is displayed, press
(
, and press 2 (Drive) to turn on Drive
Mode.
4
Page 7

Beware of spam and One-ring Calls!
You can set up mail filters to block
specific mail or spoof mail.
The following are the main features your
cellphone uses to block spam.
・Blocking of “未承諾広告※”
(unsolicited advertisement) mail
・Blocking of specific mail
・Blocking of spoof mail
Beware of One-ring Calls!
A “One-ring Call” (wan-giri in Japanese) rings your phone only
once, in an attempt to make you call back to a service that
automatically bills you very high charges.
If W62CA received a “One-ring Call,” the
icon appears at the head of an incoming
history.
If you get spam
Page
55
Page
31
5
Page 8

Disaster Message Board Service
Disaster Message Board
The Disaster Message Board lets you use EZweb to register
information about your well-being in case of a major disaster. The
information you register can be accessed from anywhere in Japan
over EZweb or the Internet.
◆When a major disaster strikes, you can use your au
Registering
the safety
information
Checking
the safety
information
Access
method
cellphone to access the “
Board) on EZweb and register your current condition,
comments, and other information about your well-being.
◆After you register information, it can be sent by mail to
family, friends, and other individuals you have registered as
a recipient of your Disaster Message Board information.
◆Disaster Message Board information can be accessed by
inputting the phone number of an individual over EZweb or
the Internet.
※ Disaster Message Board information can be accessed
from cellphone of other manufacturer’s, PHS, or PC at
http://dengon.ezweb.ne.jp/.
R
※
au one Top
http://dengon.ezweb.ne.jp/
災害用伝言板” (Disaster Message
災害用伝言板
(Disaster Message Board)
m
’
I
.
K
O
6
Page 9
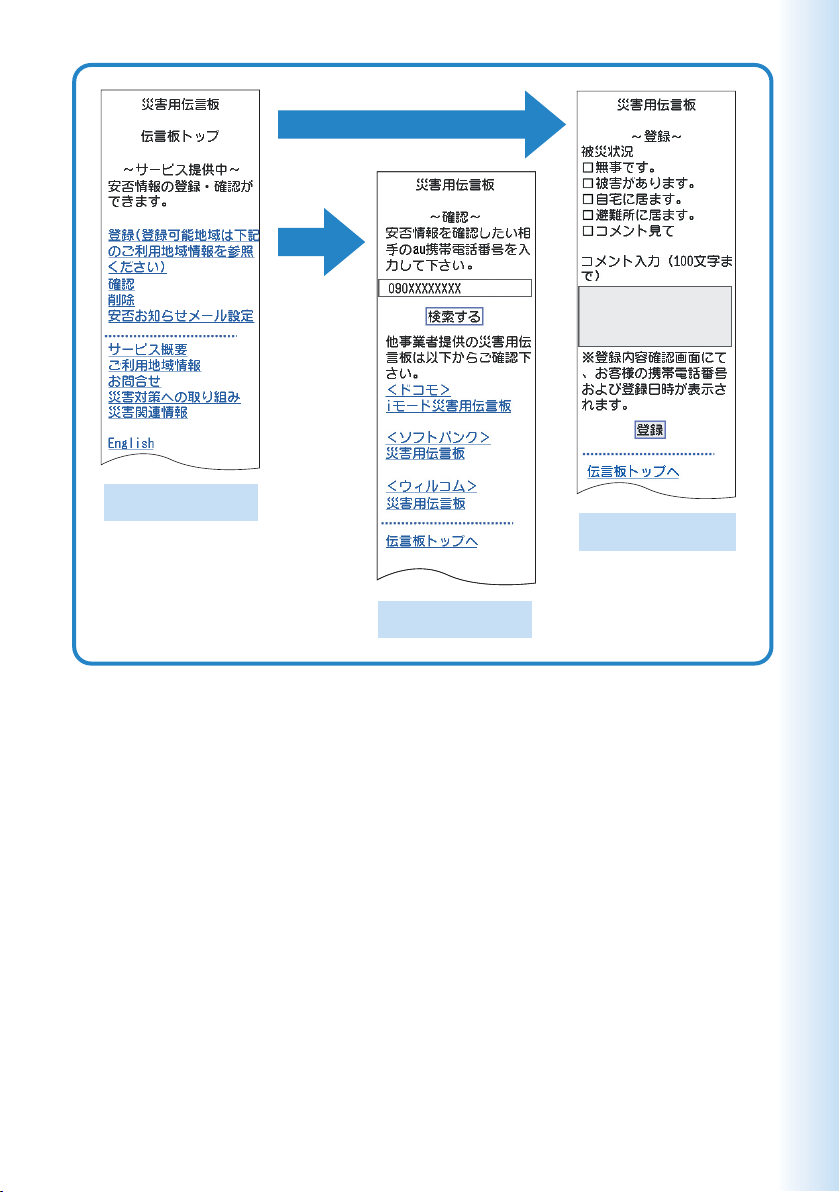
Registration
Access
Disaster Message
Board top screen
Information screen
※ Registration contents are retained for up to 72 hours.
※ You can register up to 10 entries per phone number. Registering a new entry while there are already 10
registered entries, automatically overwrites the oldest entry.
※You can view a Disaster Message Board demonstration at:
R→ auoneTop→auお客さまサポート →災害用伝言板(デモ版)
(au Customer Support) (Disaster Message Board (Demo))
※ To view the Disaster Message Board in English, select the “English” option on the Disaster Message Board
top screen.
Information registration
screen
7
Page 10

Contents
Cellphone Etiquette 1
Mind your manners! ......................................1
Cellphone Basics 2
Features ........................................................2
Manner Mode and Answer Memo ................. 3
Checking Power, Signal Strength, and
Battery Level ...............................................3
Never use your cellphone while driving! ........4
Beware of spam and One-ring Calls! ............5
Disaster Message Board Service..................6
Contents 8
Phone Call 28
Making a Call ..............................................28
Making an International Call .......................29
Answering a Call .........................................30
Redialing (Outgoing Histories/Incoming
Histories) ..................................................31
One-ring Calls .............................................31
Changing the Ringtone ................................32
Adjusting the Ringtone Volume ...................34
Adjusting the Earpiece Volume during a
Call ...........................................................35
Turning On Manner Mode ............................35
Turning On Answer Memo...........................36
Playing an Answer Memo ...........................37
Inputting Characters 38
Inputting an E-mail Address ........................ 39
Inputting Pictograms ...................................40
Ready 10
Checking the Contents of the Package .......10
Names of Parts ...........................................11
Charging the Battery Pack ..........................12
Turning On Power .......................................14
Initial Values ................................................14
Security Code and Passwords .................... 15
Selecting English as the Display Language
.................................................................16
Operation Basics .........................................18
Display Indicators ........................................19
Main Menu ..................................................20
Initializing E-mail and EZweb ...................... 24
Looking Up Your Current Phone Number
and E-mail Address ..................................25
Changing Your E-mail Address ...................26
Address Book 41
Registering an Address Book .....................41
Editing an Address Book Record ................43
Adding Outgoing or Incoming History
Data to the Address Book .........................44
Dialing from the Address Book ...................45
Pair Function 46
Registering a Pair Partner ...........................46
Making a Phone Call or Sending Mail to a
Pair Partner ...............................................47
Mail 48
Using E-mail ................................................48
Using C-mail ...............................................49
Creating and Sending E-mail Messages .....50
Reading Received E-mail Messages ..........52
Reading an E-mail Message with an
Attached Photo .........................................53
Replying to a Received E-mail Message ....54
Avoiding Spam ............................................ 55
Creating and Sending C-mail Messages ....56
Reading Received C-mail Messages .......... 58
8
Page 11

Camera 59
Using the Camera .......................................59
Shooting a Photo ........................................61
Viewing Photos ...........................................62
Attaching a Photo to an E-mail Message .... 63
EZweb 64
Using EZweb ...............................................64
Displaying the au one Top ...........................65
Bookmarking Sites You Frequently Access
.................................................................66
Viewing a Bookmarked Site ........................67
Checking Charges ......................................67
Downloading Chaku-Uta
.................................................................68
®
/Chaku-Uta-Full
®
Contents
EZ News Flash/au one Gadget
EZ News Flash/au one Gadget Features ....70
Setting EZ News Flash service ...................71
70
EZ Navi 72
EZ Navi Features ........................................72
au Media Tuner 75
au Media Tuner Features ............................75
Configuring au Media Tuner Initial Settings
.................................................................77
Using Television (1Seg)............................... 79
Exiting au Media Tuner ................................81
Other Functions 82
Security Setup Features .............................82
Troubleshooting 84
If you lose your W62CA ..............................85
Index 88
9
Page 12
Ready
All
Before using the W62CA, check the contents
of the package coming with your W62CA.
You should also familiarize yourself with
basic operations, like how to charge the
battery, how to turn the power on, etc.
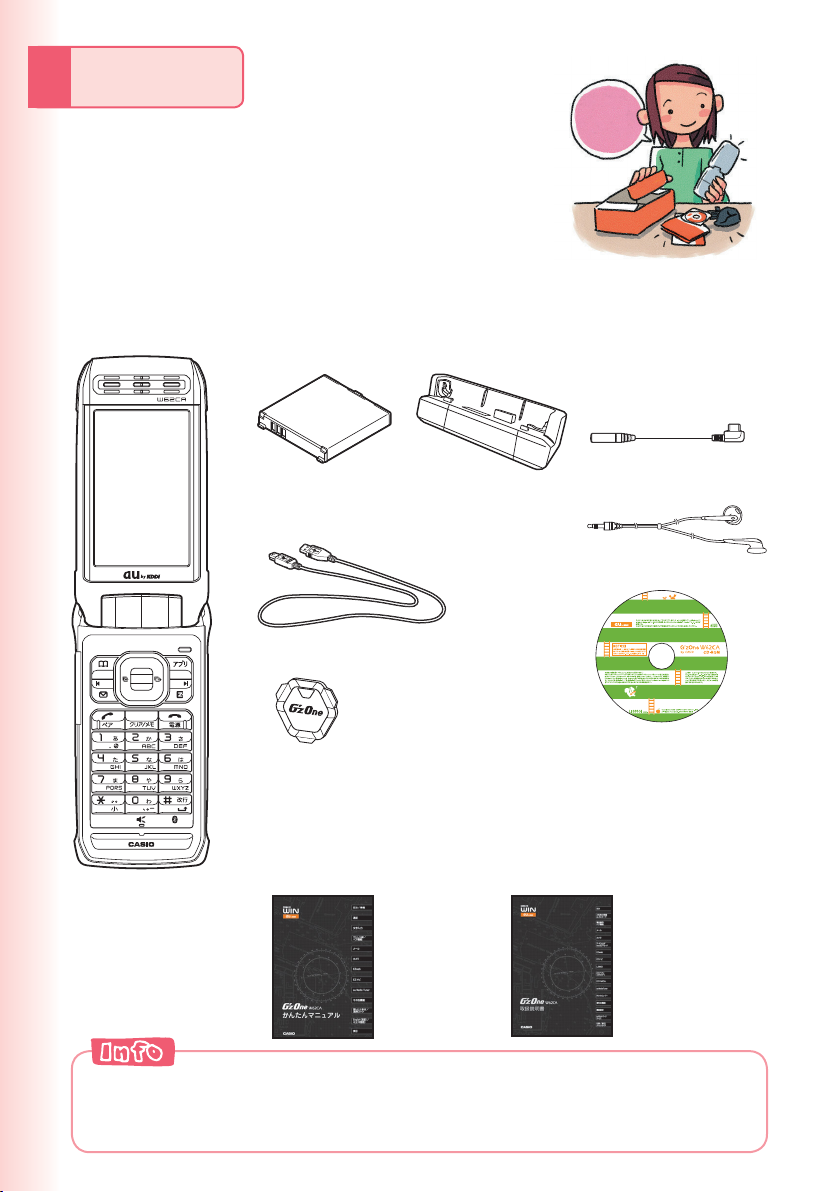
Checking the Contents of the Package
set?
W62CA
●
Battery pack
●
(62CAUAA)
Casio USB cable 03 (MiniB)
●
(03CAHUA)
Lock driver (sample)
●
Warranty (Japanese)
●
Osaifu-Keitai® Basic
●
Manual (Japanese)
LISMO Installation
●
Guide (Japanese)
Basic Manual (Japanese)
●
Desktop holder
●
(62CAPUA)
Casio round-type
●
earphone jack
conversion adaptor
03 (03CAQNA)
SONY MDR-E0921
●
(sample)
CD-ROM
●
Operating Precautions
●
(Japanese)
Global Passport mobile
●
rental service Owner’s Guide
(Japanese)
Promotional Fliers (Japanese)
●
Instruction Manual (Japanese)
●
◎ The microSD
◎ An AC adaptor is not included. It is up to you to purchase a common AC
adaptor 01/02 (option).
TM
memory card is not included.
10
Page 13

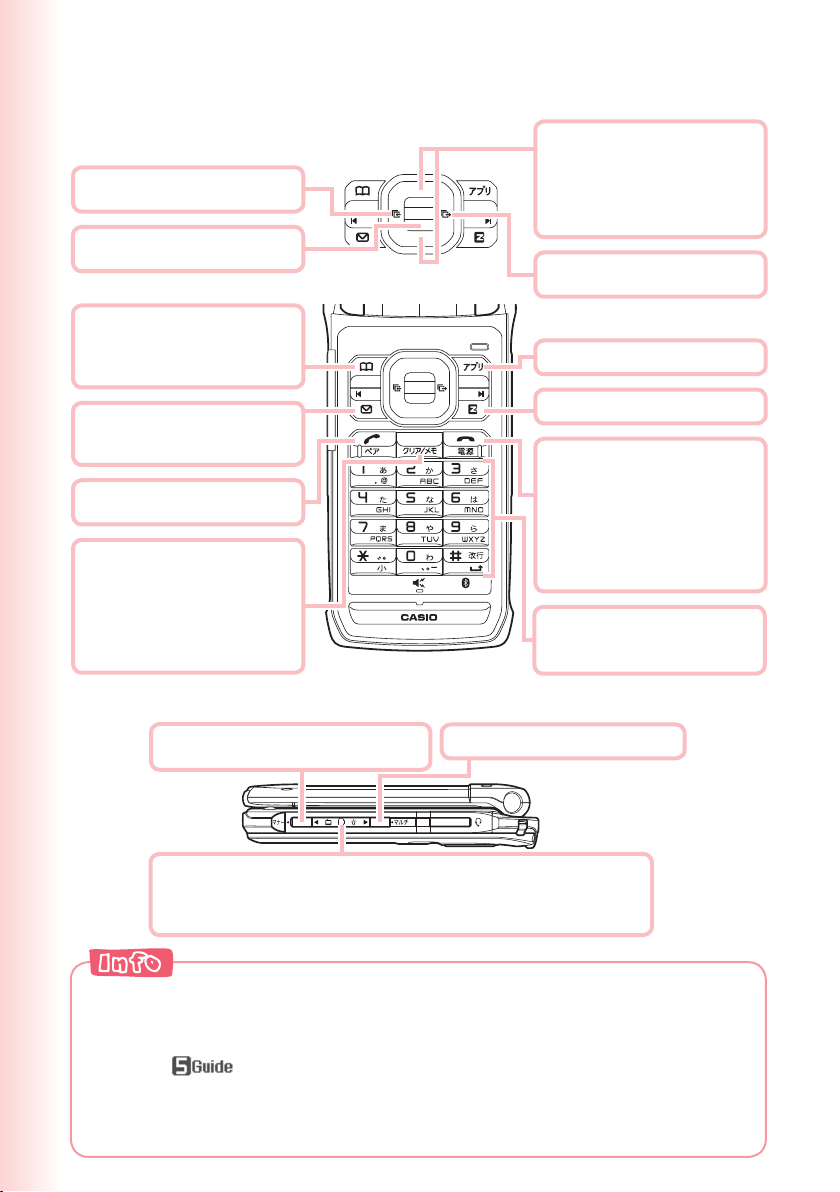
Names of Parts
Front
■
Earpiece
Speaker
Main display
Center key
Cursor key
Address book key
Mail key
Answer/Pair key
Number keys
※
Microphone
※1During a call, do not cover the
microphone with your hands or your
chin.
※2Take care to avoid covering the
built-in antenna with your hand when
making a call, using EZweb, using PC
Site Viewer and when accessing GPS
information.
※3Take care to avoid covering the
built-in TV antenna with your hand
when viewing with Television (1Seg).
1
Built-in antenna
Back
■
Temperature
sensor
FeliCa mark
Sub display
Optical sensor
Application key
EZ key
Clear/Memo key
End/Power key
※
2
Attach/remove au IC-Card or microSD™ memory card
after turning the phone off and uninstalling the battery
pack.
microSD™ memory
card slot
au IC-Card
※Do not take out this card if not necessary as your
number is recorded on it.
Photo light/
Pocket light
LED indicator
Bumper A
Built-in TV antenna
Camera lens
Infrared port
Camera start indicator
Screw type battery
lock
Battery pack/cover
Bumper B
※
Ready
※
3
Side
■
Manner key
Up/Down key (side)
Flat-type earphone-microphone jack cover
Multi key
Flat-type earphone-microphone jack
Strap eyelet Charging terminals
External connection jack cover
External connection jack
11
Page 14
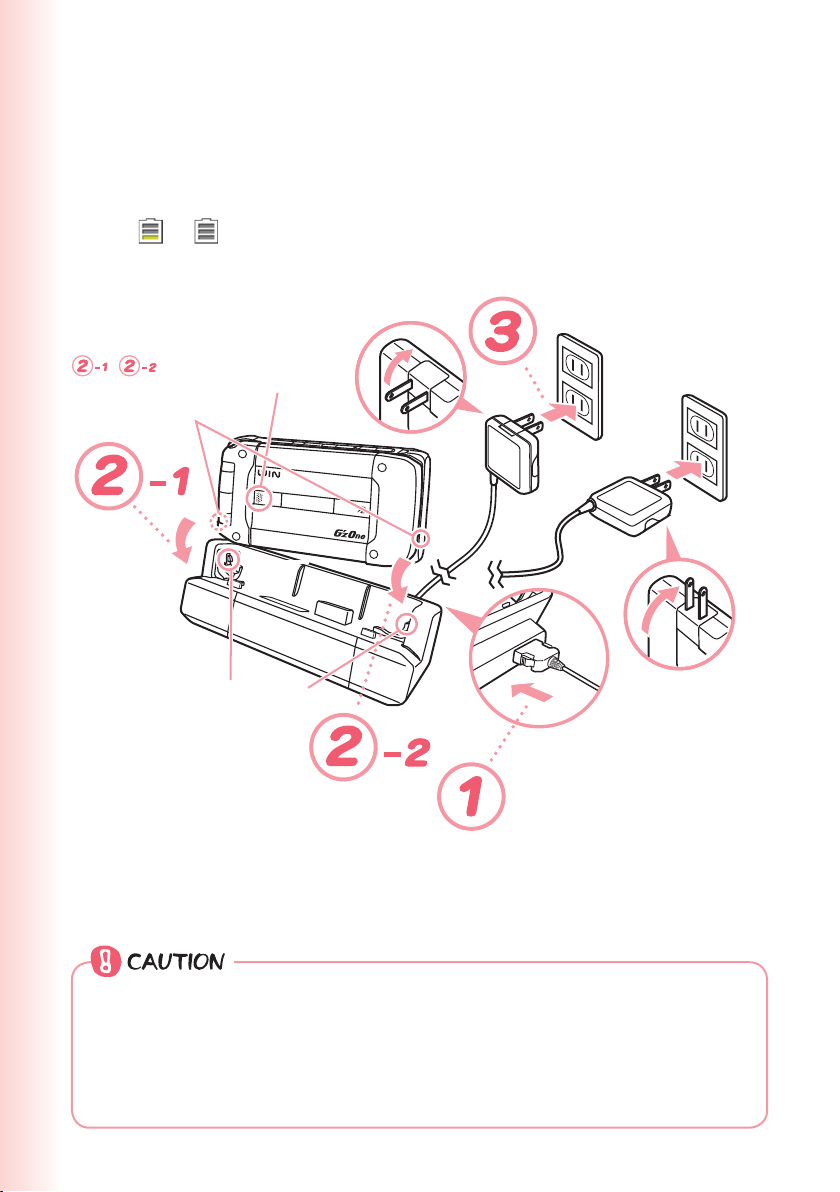
Charging the Battery Pack
The battery pack that comes with the phone is not fully charged when
you purchase it. Be sure to charge the battery pack before using the
W62CA for the first time. Charging takes about 140 minutes.
You should recharge the battery pack whenever the battery level icon
shows
Aligning the locking tabs of the
desktop holder with the slots on the
sides of the phone, attach the phone
to the holder in the sequence
, .
or .
LED indicator
Slot
12
Locking tab
Check the shape of connectors before
connecting, and ensure that you plug
them in as far as they will go.
You must purchase a common AC adaptor 01/02 (option) for charging.
◎
Note that the configuration of the AC adaptor may be different from that
shown in the illustration above.
Whenever connecting or disconnecting the common AC adaptor 01/02
◎
(option) to the desktop holder, make sure the connector on the back of
the desktop holder is positioned horizontally.
You can also
use the plug by
extending the
prongs like this.
Page 15
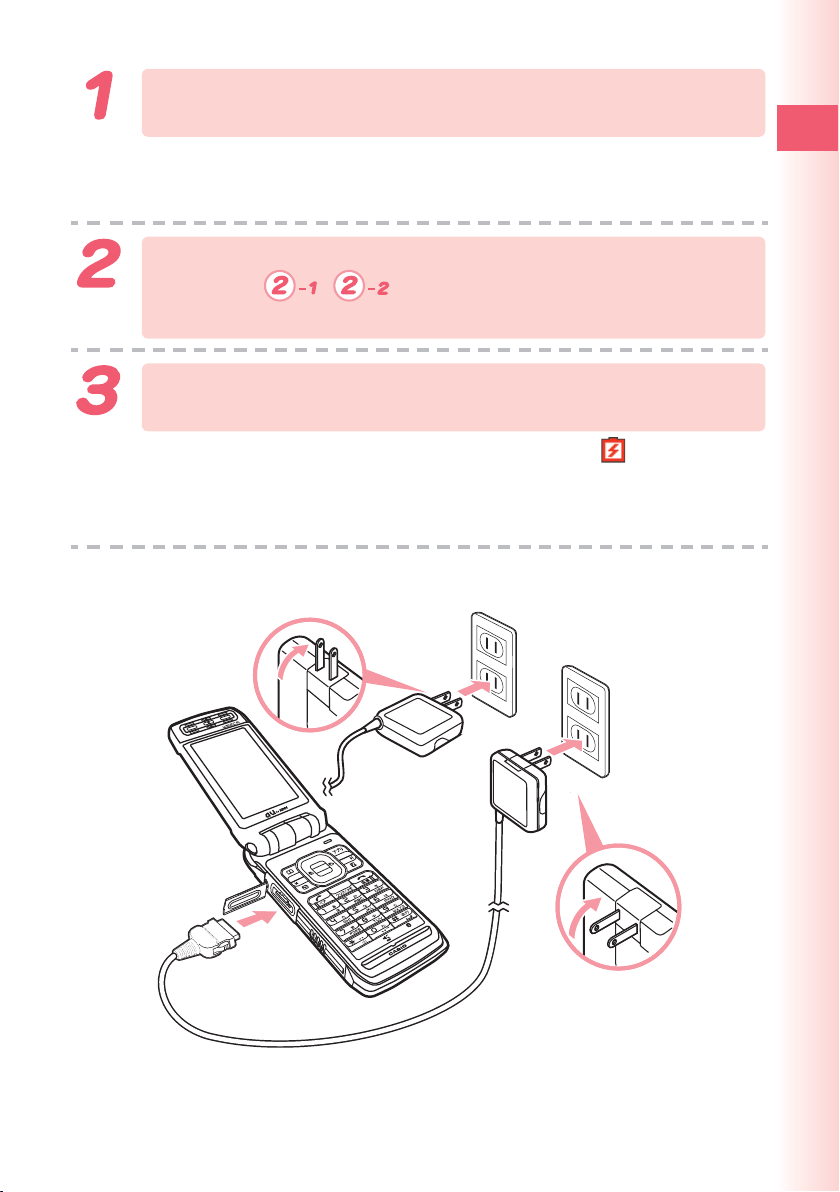
Connect the common AC adaptor 01/02 (option) to
the desktop holder.
Check the shape of the connectors to ensure they are aligned correctly before
you connect.
Trying to force a connection may damage the connectors.
Attach the closed phone to the desktop holder in the
sequence , , aligning the locking tabs of the
holder with the slots on the sides of the phone.
Fold out the power plug of the common AC adaptor 01/02
(option), and then plug it into a 100V AC power outlet.
This will cause the W62CA LED indicator to light red, and (charging
icon) to display. When charging is completed, the LED indicator will go out.
To remove the W62CA from the desktop holder, hold the holder by hand and
remove W62CA.
You can connect the common AC adaptor 01/02 (option) to the W62CA directly to
※
charge the battery pack.
Ready
battery
Fully open the external connection jack cover, check
the shape of connectors and insert it horizontally.
13
Page 16
Turning On Power
Hold down
for at least
F
2.5 seconds.
The message “Now Loading...” will appear
on the display for a short while, followed
by the standby screen.
Icon
Signal
Strength
• Communication is not possible while the signal
strength icon is
• Communication may not be possible while the
signal strength icon is
Icon
Battery
Level
Turning off power
■
Hold down
Strong Medium Weak
High
F
(Out of Range).
(Very Weak).
Medium
Low
for at least 1.5 seconds.
Ver y
Weak
Fully
Discharged
Out of
Range
Standby screen
Charging
Initial Values
The following are the initial settings of the phone.
Lock No. 1234 Font Size Input Size Slightly Large
Caller ID ON Mail Display Medium
Incm Caller Disp Display EZweb Display Medium
Profile Blank Address Book Slightly Large
History Slightly Large
Phone No. Slightly Large
14
Page 17
Security Code and Passwords
The W62CA lets you use the numbers and passwords described
below. Be sure to take steps so you do not to forget your numbers and
passwords. You will need them to perform various operations and to
access subscription services.
Security Code
For remote operation of the Answering Service (Voice Mail) and Call
a
Transfer from a standard phone
For inquiries, applications, and service modifications using au
Usage Examples
b
Customer Service Center voice guidance, au website, and EZweb
For changing e-mail settings
c
Ready
Initial Value
4-digit number you entered on your subscription contract
Lock No.
Usage Examples
Initial Value
For modifying various phone settings
1234
EZ Password
Usage Examples
Initial Value
For entering and canceling subscriptions for EZweb fee-based content
4-digit number you entered on your subscription contract
Premium EZ Password
For entering and canceling subscriptions for EZweb fee-based content
a
Usage Examples
Initial Value
paid for using “
For purchasing products from EZweb sites that use “
b
(
au Collective Payment Service
4-digit number you entered on your subscription contract
まとめてau支払い
” (au Collective Payment Service)
まとめてau支払い
)
”
15
Page 18
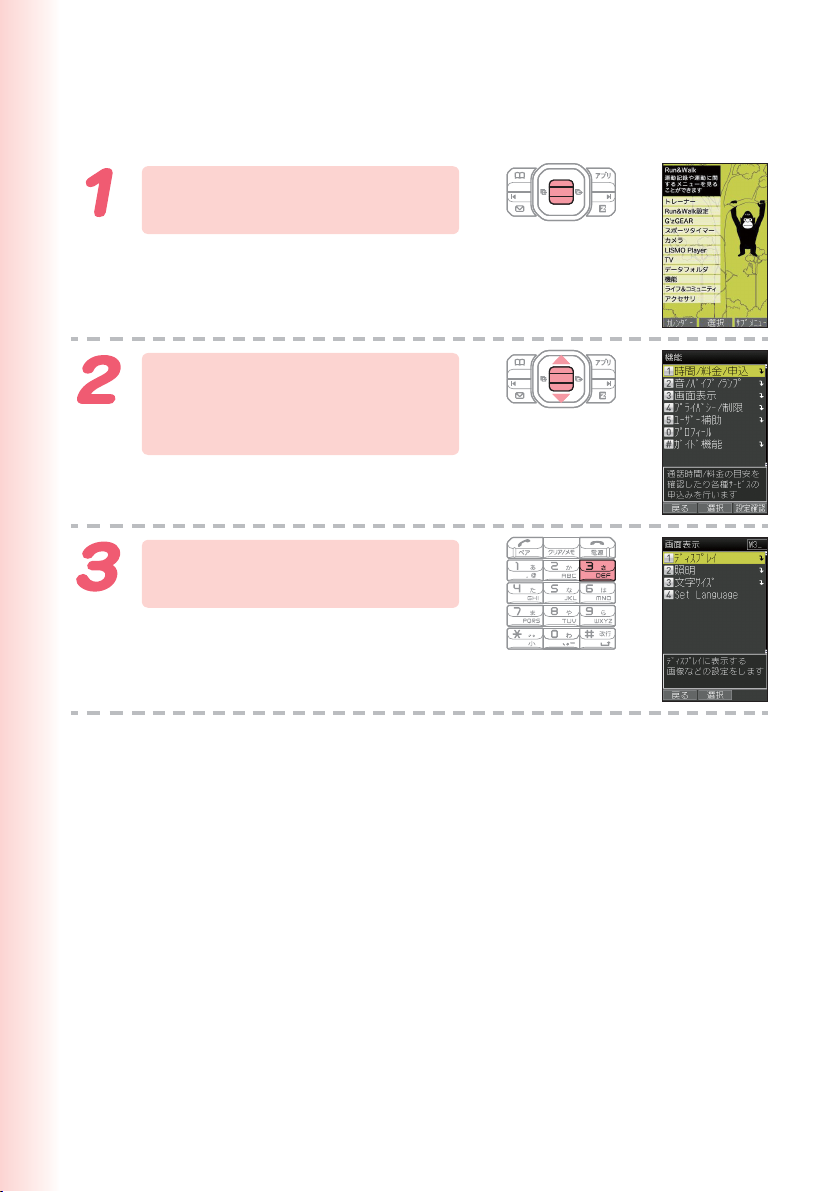
Selecting English as the Display Language
While the standby screen
is displayed, press c.
Use j to select “
(Function), and then press
c (選択
Press
(Screen Display).
) (Select).
3 (画面表示
機能
)
”
16
Page 19
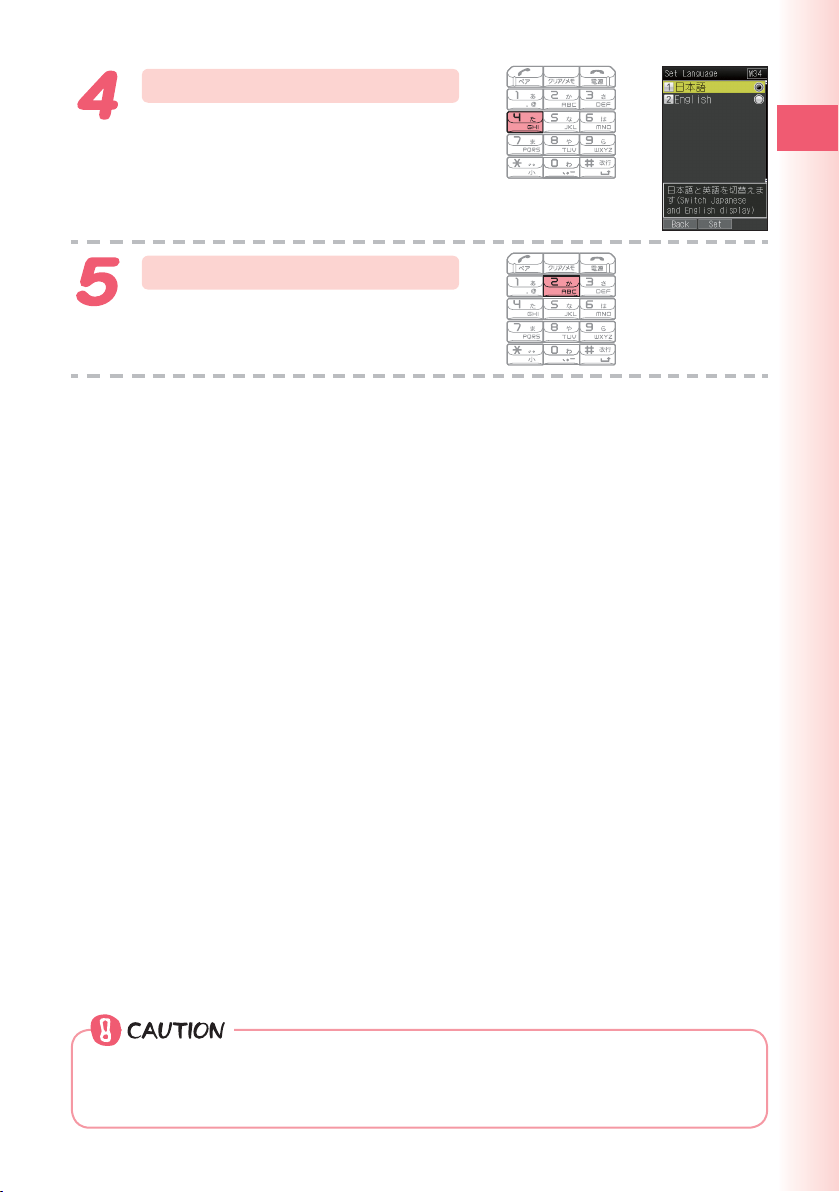
Press
(Set Language).
4
Ready
Press
This selects English as the display
language.
(English).
2
Even if English is selected as the display language, schedule and other
dates are displayed in the format year/month/day. Folder names inside of
the Data Folder are also displayed in year/month/day format.
17
Page 20
Operation Basics
■ Key functions
•
Displays incoming histories.
l
•
Selects an item.
•
Displays the main menu.
c
•
Applies an item.
•
Displays the address book.
&
•
Creates a new address
book (hold down for at least
one second).
•
E-mail
L
•
C-mail (hold down for at
least one second)
•
Dials/answers a phone call.
N
•
Displays the Pair Function.
•
Memo
C
•
Toggles Answer Memo on
and off (hold down for at
least one second).
•
Deletes a character.
•
Returns to the previous
menu screen.
Side key functions
■
•
Toggles Manner Mode on and off
(
(hold down for at least one second).
j
r
%
R
F
0〜9*#
•
Displays Multi Play Window.
v
•
Selects EZ News Flash
telop/window or au one
Gadget.
•
Displays the standby
shortcut icon.
•
Selects an item.
•
Displays outgoing histories.
•
Selects an item.
•
Displays the EZ apps menu.
•
Displays the EZweb menu.
•
Power on (hold down for at
least 2.5 seconds).
•
Power off (hold down for at
least 1.5 seconds).
•
Hangs up.
•
Terminates a function.
•
Returns to the standby
screen (hold down).
•
Inputs phone number.
•
Inputs text character.
•
gf
If you lose track of where you are or if you make a mistake:
◎
While the standby screen is displayed, hold down f for at least
one second to light the pocket light and hold down g for at least
one second to start au Media Tuner.
•
Page scroll at browser display.
Press C to scroll back to the previous screen.
Hold down F to return to the standby screen.
◎
When
is displayed in the lower right corner of the photo screen
etc., pressing 5 will display key help.
Holding down c for at least one second toggles side key’s disabling
◎
18
feature on and off while W62CA is folded.
Page 21
a
Display Indicators
The following explains the main icons that appear on the standby
screen.
abcd h
i
j
ab
(When phone is folded)
efg
Maindisplay
k
h
Sub display
a
b
c
o
//
d
e
f
g
h
p
i
mlk
n
j
k
l
m
n
o
p
※ A hyphen (-) may appear in place of the current date.
Signal strength
Battery level
The microSD
is inserted into the cellphone.
During phone call or LISMO Player/au Media
Tuner on
EZ apps (BREW
/
EZweb browsing in progress/PC Site Viewer on
Unread mail
Current time
The date and time are set automatically.
Selects the user defined icons such as Photo
(DSC Mode), calculator, Emission OFF Mode,
G’zGEAR, Sports Timer, and “01
ご案内
etc. by pressing d and a.
FeliCa Lock on
Manner Mode on
Ringtone off
Vibrator on
Answer Memo on
-
EZ News Flash telop
-
EZ News Flash window
TM
memory card (commercial item)
®
) on
※
”(information from CASIO)(Notepad 01),
カシオからの
Ready
Key symbols used in this manual
■
The cursor key is described in this manual using
the key symbols shown below.
or d key:
u
or r key:
l
u, d, l
j
s
or r key:
a
19
Page 22

Main Menu
There are four initial main menus (“Carbon pattern,” “G-gallery,” “Eco &
Ego G,” and “Simple”) for W62CA.
Pressing c while the standby screen is displayed displays the main
menu.
The menu structure depends on the type of the main menu.
Using the “Carbon pattern” menu
■
If your cellphone color is “Burned Black,” the initial main menu is
“Carbon pattern.”
Use a to select the icon, and then press c (Select) to access the
function associated with the icon.
Camera
microSD
Data Folder
PC Site Viewer
Function
G’zGEAR
TV
EZ FeliCa
LISMO Player
Infrared Comm
Accessories
Watch/Calendar
20
Page 23
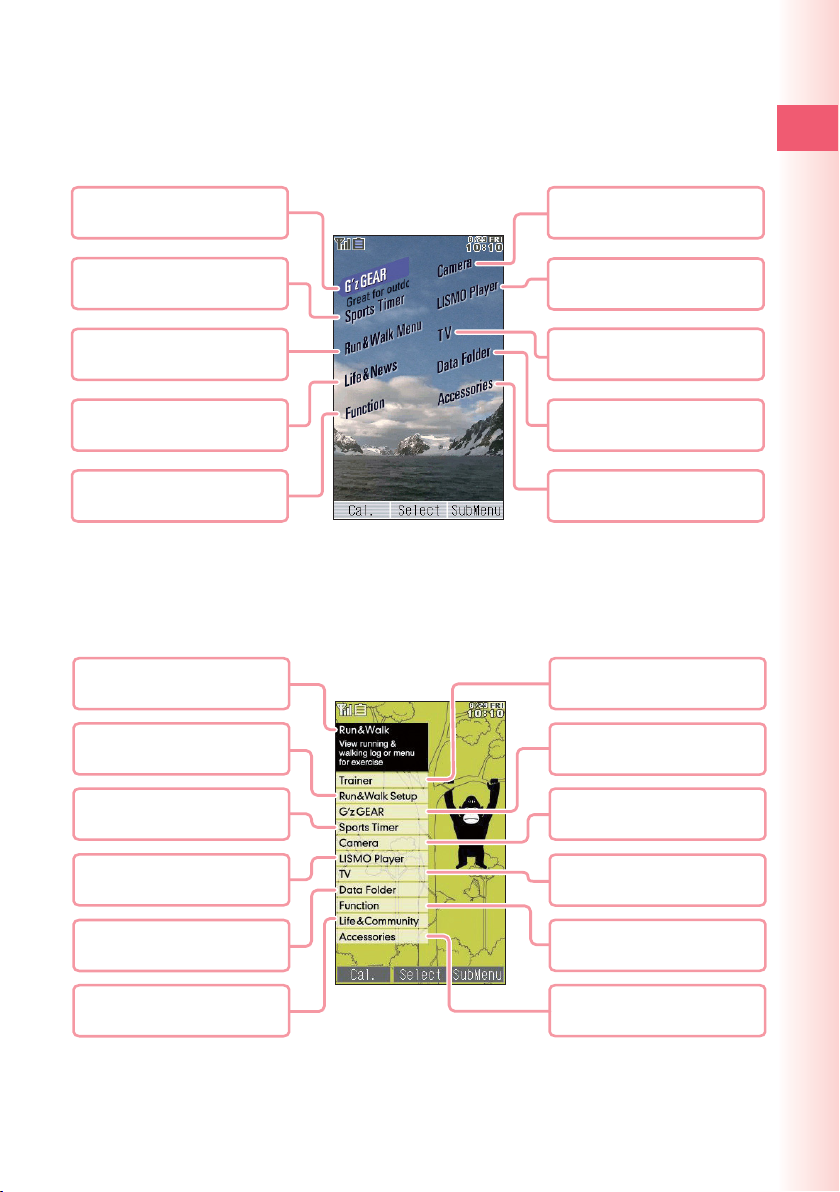
Using the “G-gallery” menu
■
If your cellphone color is “Frozen White,” the initial main menu is
“G-gallery.” Use a to select the icon, and then press c (Select) to
access the function associated with the icon.
Ready
G’zGEAR
Sports Timer
Run&Walk Menu
Life&News
Function
Using the “Eco & Ego G” menu
■
Camera
LISMO Player
TV
Data Folder
Accessories
If your cellphone color is “Sparkling Green,” the initial main menu is
“Eco & Ego G.” Use j to select the icon, and then press c (Select)
to access the function associated with the icon.
Run&Walk
Run&Walk Setup
Trainer
G’zGEAR
Sports Timer
LISMO Player
Data Folder
Life&Community
Camera
TV
Function
Accessories
21
Page 24
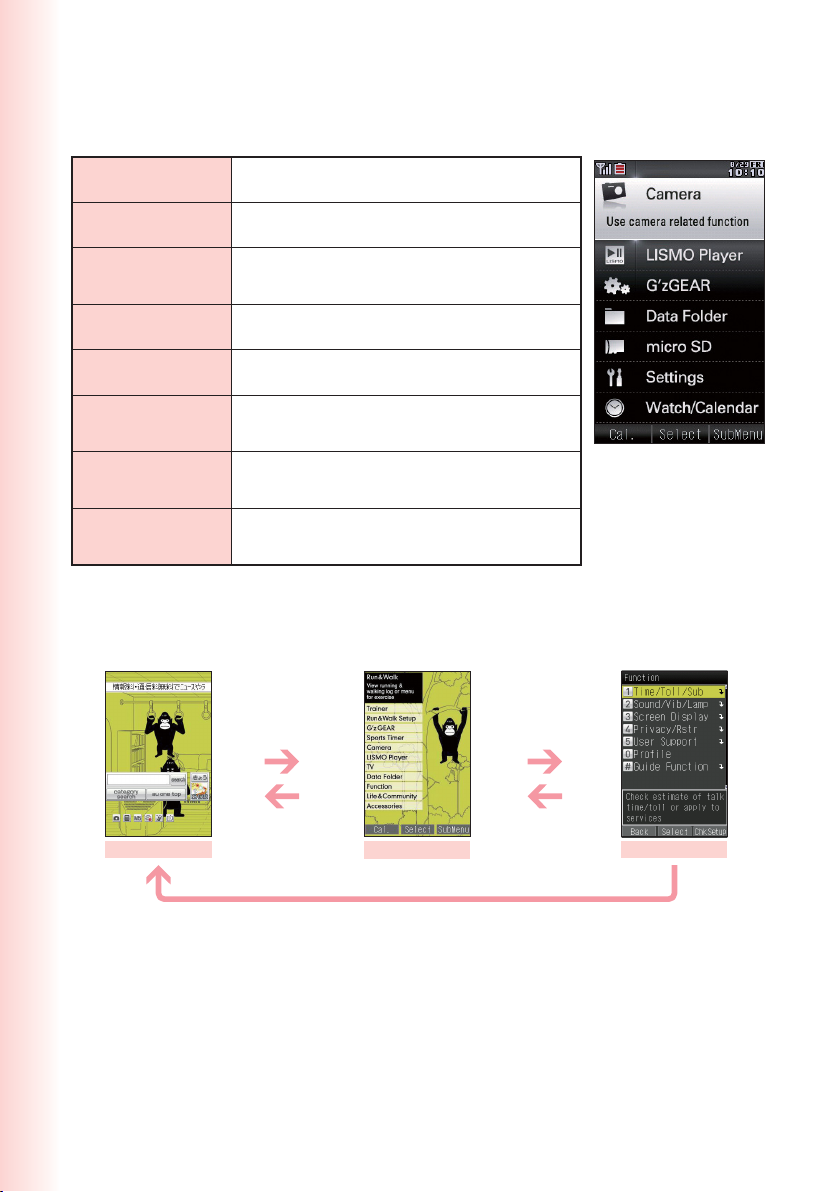
Using the “Simple” menu
■
Use j to select the icon, and then press c (Select) to access the
function associated with the icon.
Camera
LISMO Player
G’zGEAR
Data Folder
micro SD
Settings
Watch/Calendar
Accessories
Using the Main Menu
■
Photo/Movie/Bar Code Reader
Play music/video clips
EARTH COMPASS, EARTH LOCATOR,
HEAT GAUGE, SEA TIDE, etc.
Check and play stored data
Check and play stored data
Incoming settings, display settings and other
frequently used setting functions
Alarm, Sports Timer, Calendar/Schedule,
Task List, and other functions
Mobile Dictionary, PC Site Viewer, Infrared
Communication, and other functions
Example: To display the function screen from the main menu.
Press a to select
“Function,” and
c
then press
c
(Select).
22
Standby screen
returns to the
C
previous screen.
Holding down F returns to the standby screen.
Main menu
C returns to the
previous screen.
Function screen
Page 25
■ Using Soft Keys
Left
Center
Right
Soft keys are the keys you use to execute the functions along with
the bottom of the screen. The table below explains how to assign
the soft keys to the on-screen functions. Note that the function of
each soft key depends on the currently displayed screen.
Left
Center
Left Center Right
Right
Left soft key
Center soft key cExecutes the function on the center.
Right soft key
Executes the function on the left.
&
Executes the function on the right.
%
■ Using Submenus
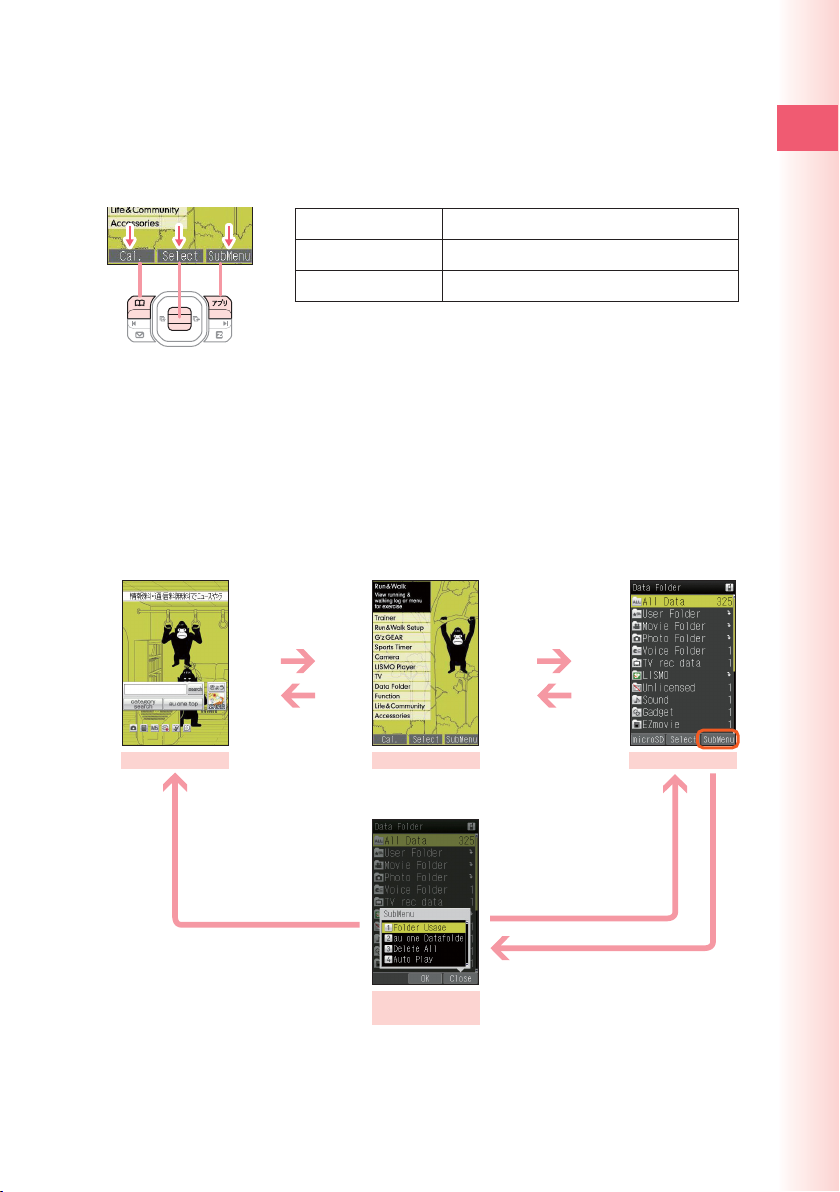
Pressing the soft key that corresponds to the “SubMenu” at the
bottom of the display will display a submenu of various operations
related to the function you are currently using.
Example: To open the folder list submenu screen from the folder list
screen.
Press
a to select
“Data Folder,”
c
and then press
c (Select).
Ready
Standby screen
Holding down F returns
to the standby screen.
returns to the
C
previous screen.
Main menu
Folder list
submenu screen
returns to the
C
previous screen.
Folder list screen
C returns to the previous
screen. Or,
closes the submenu.
%
% (Close)
(SubMenu)
23
Page 26
Initializing E-mail and EZweb
An EZweb subscription is required to use e-mail, EZweb or other EZ
services. If you did not subscribe when you purchased your phone,
contact your nearest au shop or the au Customer Service Center.
You will be assigned an e-mail address automatically when you perform the
※
EZweb initialization procedure.
While the standby screen
is displayed, press L.
Press c (OK).
Wait until the phone connects to the
server for initialization.
After your automatically
assigned e-mail address
appears, press c (OK).
Pressing R/% also allows you to make initial settings.
24
Page 27
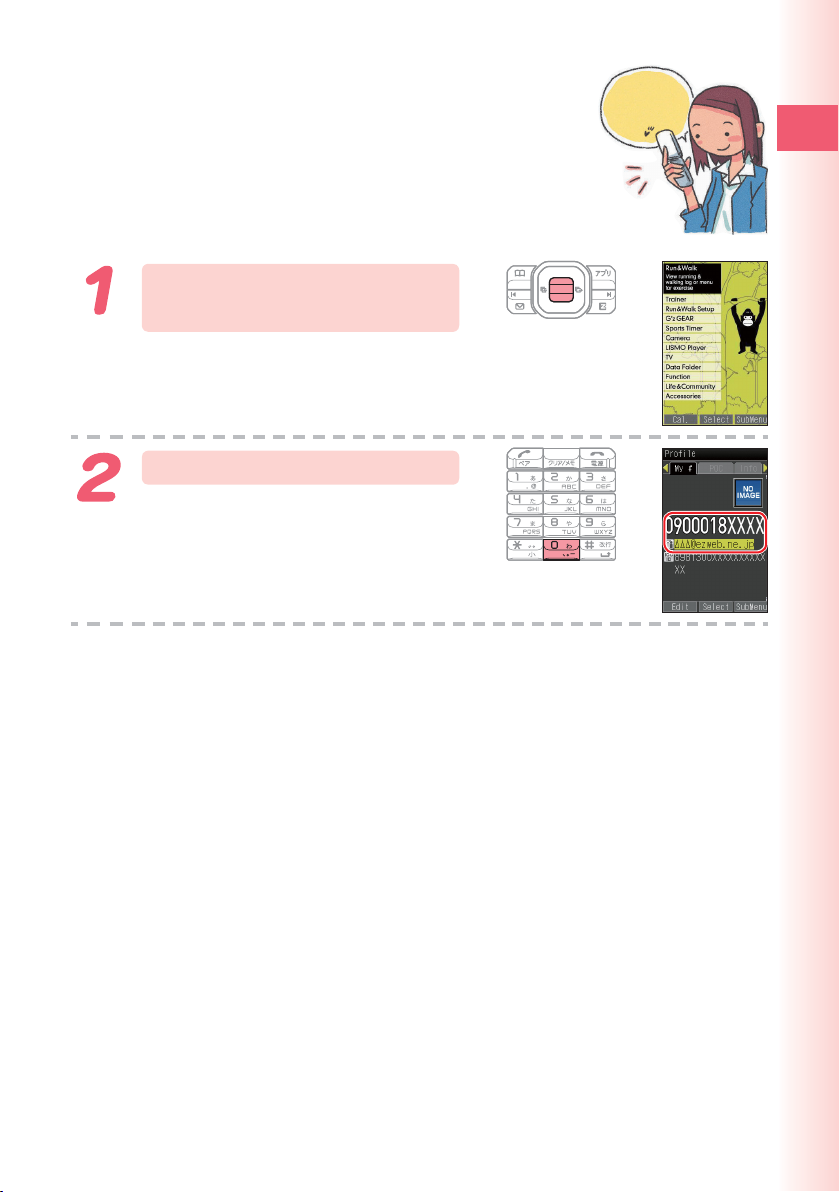
Looking Up Your Current Phone Number and E-mail Address
While the standby screen
is displayed, press c.
My phone
number and
mail address
Ready
Press
Your current phone number and e-mail
address appear.
0
.
25
Page 28
Changing Your E-mail Address
E-mail address
@ezweb.ne.jp
△△△
Part you can change Domain name
While the standby screen
is displayed, press L.
Press
Press
Press
スの変更
Address).
0
4
1
(E-mail Setup).
(Other).
(E
メールアドレ
) (Change E-mail
26
Page 29

Enter your Security Code,
press c (OK), use j to
select “
” (Send), and
送信
then press c (Select).
Use j to select “
” (Accept), and then
る
承諾す
press c (Select).
Use j to select the text
box, and then press c
(Input). Enter the e-mail
address you want, and
then press c (OK).
To input an e-mail address
“Inputting an E-mail Address” (page 39)
→
Ready
Use j to select “
送信
”
(Send), and then press
(Select).
c
The e-mail address confirmation screen
appears.
Press j to select “OK,”
and then press c (Select).
The message “Update is complete.”
appears to indicate that your e-mail
address has been changed.
Your Security Code is the 4-digit number you entered on your
◎
subscription contract. If the wrong Security Code is entered three times a
day, the setting operation will be disabled until the following day.
If your e-mail address won’t change in step 7:
◎
The new e-mail address you entered may be registered by someone else
already. Try entering a different address.
27
Page 30

Phone Call
Making a Call
While the standby screen is displayed,
use the number keys (
keypad to enter the phone number you
want to call.
When calling a standard phone, you need to enter the area
code.
0
to
9
) of the
Press
After you finish a call, press F to hang up.
The caller always hears your voice even when you cover
※
the microphone with your hands.
Outgoing Methods
You can select whether to notify/not to notify your cellphone
number to the other party by pressing c (Call) and displaying
Outgoing Menu in step 2.
To not notify: Select “Add Special No.” in Outgoing Menu
To notify: Select “Add Special No.” in Outgoing Menu
To call without any settings: Select “Voice Call” in Outgoing
・When calling without any settings, your cellphone number is
either notified or not notified according to “Caller ID” settings
of your phone.
.
N
(OK) →Select “184”
Select “186”
→
→c
(Add)
Menu
→c
→N
→c
(Add)
(OK).
→N
→c
→c
(OK)
28
Page 31

Making an International Call
au International Call Service
■
Available without any additional application.
Ex: To call 212-123-
005345
International access code Country code (USA) Phone number
△△△△
1
in the USA
212
Area code
123
△△△△
Press N.
• Calling charges for this service are added to monthly mobile phone
calling charges and billed together.
• Please check the Country code at the au Customer Service Center.
• For charges, please refer to the au MOBILE PHONE SERVICE GUIDE
or the au Customer Service Center.
001 KOKUSAI MOBILE TALK
■
Application required.
For inquiries, please contact the KDDI Customer Service Center.
0077-7160
Ex: To call 212-123-
001
KDDI international access code
• Charges for 001 KOKUSAI MOBILE TALK are charged separately from
monthly au telephone charges.
• Please check the Country code at the au Customer Service Center.
• For charges, please refer to the au MOBILE PHONE SERVICE GUIDE
or the au Customer Service Center.
(toll-free; open 9:00 to 20:00 on everyday including weekends and national holiday)
in the USA
212
Area code
123
△△△△
Phone number
Press N.
010
△△△△
1
Country code (USA)
Phone Call
29
Page 32

Answering a Call
Press
After you finish a call, press F to hang up.
Display for Incoming Calls
to answer an incoming call.
N
Missed Call Notification
30
If the caller’s name is in your address book, it appears
on the display. If not, only the caller’s phone number is
displayed.
A message appears when the phone number of the
caller is not provided for some reason.
ID Unsent: The caller’s phone refused to send its
Payphone: The call is from a payphone.
Not Support: The call is from a phone that does not
The message “Missed Call X” appears on the display if
you did not answer one or more calls. Press c (Select)
to check incoming histories (caller phone number, etc.).
To redial a number
“Redialing (Outgoing Histories/Incoming Histories)”
→
(page 31)
phone number.
support caller ID.
Page 33

Redialing (Outgoing Histories/ Incoming Histories)
While the standby screen
is displayed, press s.
: Displays outgoing histories.
r
: Displays incoming histories.
l
Use j to select the
number you want to dial,
and then press
The phone stores up to 50 histories each for the outgoing histories and
incoming histories. When a history is created while there are already 50
histories in memory, the oldest current history is deleted automatically to
make room for the new one.
N
.
Phone Call
One-ring Calls
What is a “One-ring Call”?
■
A “One-ring Call” is an incoming call that rings your phone only once, which
aims it to be stored in your incoming histories. If you redial the number
shown in your incoming histories, often you are connected to a dating
service or some other service that may bill you very high charges. Always
keep in mind that it is a good idea to avoid calling back unfamiliar numbers.
One-ring Call indicator
■
The icon indicates an incoming call you did not
answer. The icon indicates an incoming call that rang
for three seconds or less. These calls may be One-ring
Calls with high possibility.
31
Page 34

Changing the Ringtone
While the standby screen
is displayed, press c,
use a to select “Function,”
and then press c (Select).
Press
Lamp).
Press
Setup).
Press
Call).
(Sound/Vib/
2
(Incoming
1
(Incoming
1
32
Page 35

Use j to select and
press c (Select).
Phone Call
Press
To hear the currently selected ringtone,
press & (Play).
(Original).
1
Use j to select the
ringtone you want, and
then press c (Set).
Press % (OK).
The ringtone is set.
You can also download a “Chaku-Uta®” from the Internet and use it for your
ringtone.
“Downloading Chaku-Uta
→
®
/Chaku-Uta-Full®” (page 68)
33
Page 36

Adjusting the
Beep,
beep
...
Ringtone Volume
To adjust the ringtone volume, perform steps 1
through 4 under “Changing the Ringtone” (page
32), and then continue with the following steps.
Use j to select and
press c (Select).
Use j to adjust the
ringtone volume, and then
press c (Set).
u
: Increases volume.
: Decreases volume.
d
Beep,
Beep,
bee
beep
..
...
Press % (OK).
앖
STEP
STEP
OFF: Ringtone does not sound.
: Ringtone volume gradually increases.
앗
: Ringtone volume gradually decreases.
34
Page 37

Adjusting the Earpiece
Hello
?
Volume during a Call
During a call, use j to
adjust the volume.
: Increases volume.
u
: Decreases volume.
d
You can adjust the earpiece volume (level 1-5 and Max).
Turning On Manner Mode
While Manner Mode is set to on, the phone alerts
incoming calls to you by vibrating.
Hello
Hello
?
Phone Call
While the standby screen
is displayed, hold down
for at least one
(
second.
This turns on Manner Mode. The icon
appears on the display while Manner
Mode is turned on.
Turning on Manner Mode also turns on Answer Memo, which is indicated by
on the display. While Manner Mode is set to on, the phone vibrates without
sounding its ringtone.
To turn off Manner Mode, hold down ( for at least one second.
While the standby screen is displayed, you can press ( to select the
Manner Mode type. Holding down
standby screen is displayed will enable the Manner Mode type you selected.
for at least one second while the
(
35
Page 38

Turning On Answer Memo
While the standby screen
is displayed, hold down
for at least one
C
second.
This turns on Answer Memo. The icon appears on the display while Answer
Memo is turned on.
You can use Answer Memos (up to 6 memos), and each memo can contain
up to 30 seconds recording time.
To turn off Answer Memo, hold down C for at least one second.
Using the Answering Service (Voice Mail)
◎
The Answering Service (Voice Mail) can be used to answer the phone
and take messages when the phone is turned off, or when you are in a
location where signal reception is not possible.
◎ You can record Answer Memo and Voice Memo up to 6 messages within
30 seconds.
36
Page 39

Playing an Answer Memo
When there is a recorded Answer
Memo
The message “
the standby screen.
Select “Answer Memo,”
and press c (Select).
“Answer Memo List” appears.
Use j to select the
Answer Memo you want to
hear, and then press c
(Play).
The Answer Memo plays back.
Answer
Memo” appear on
Phone Call
To delete an Answer Memo, press
is displayed. Select the Answer Memo you want to delete, press %
(SubMenu), and then 1 (Delete). Next press 1 (Delete One), and then
press 1 (YES).
C11
while the standby screen
37
Page 40

Inputting Characters
Input characters using keypad keys 0
through 9, and
The table below shows the characters each
key cycles through when you press it.
*
.
d
e
f
Key
1 .@-/ :
2 abcABC2
3 de fDEF3
4 ghiGHI4
5 jklJKL5
6 mn oMNO6
7 pqrsPQRS7
8 tuvTUV8
9 w x y zWXYZ9
0 0
*
#
•
In order to input consecutive characters that are assigned to the same key, press r to
move the cursor (highlighted), and then press the same key to input next character.
123456789
Space
!#$%&′()
Switch between upper case and lower case of the entered alphabet character.
Inputs (
Returns to the previous character (Back function) when entering characters.
Inputs a line break after the entered character has been settled.
) when no character is entered.
.,-!?
Number of Presses
˜
+,-./:;<=>?@[¥]^{|}˜
*
1
Allowable Characters in Your E-mail Address
Your e-mail address (the part at the left of “@”) can contain up to 30
characters, including single-byte English lower case letters, hyphens (-),
periods (.) and underbars (_).
A period (.) or a zero (0) cannot be used as the first character.
Characters and symbols that are shaded in the above table cannot be
used at the left of “@” in the address format “
△△△
@ezweb.ne.jp.”
38
Page 41

Inputting an E-mail
mark@
mark@
Address
Inputting “mark@ezweb.ne.jp”
■
In this example, we will input “mark@ezweb.ne.jp” for
[E-mail Address1]. To input [E-mail Address1], perform
steps 1 through 6 under “Registering an Address
Book” (page 41), and then perform the following steps.
mark@
mark@
mark@
Input “mark.”
To input “m”: Press 6 once.
To input “a”: Press 2 once.
To input “r”: Press 7 three times.
To input “k”: Press 5 twice.
Press % (SubMenu), and
then
Use *, # and % to scroll through
the categories of phrases.
(Phrase).
3
Use j to select
“@ezweb.ne.jp,” and then
press c (Select).
Inputting Characters
39
Page 42

Inputting Pictograms
The following procedure shows how to input
pictograms into the body text when creating a
new e-mail message.
Press R.
You can switch between Pictogram
Symbol (Full-Size/Half-Size)→Face Mark
Pictogram by pressing R.
→
Use a to select the
pictogram you want, and
then press c (Select).
Use % (Category) or */# to
scroll through the various categories
of pictograms. To input pictograms
consecutively, press & (Repeat) instead
of c (Select).
→
40
Page 43

Address Book
Registering an Address Book
While the standby screen
is displayed, hold down
for at least one second.
&
Select “ [Name],” and
then press c (Select).
Address Book
Enter the name, and then
press c (OK).
The [Reading] is generated
automatically when you enter a name.
To input text
“Inputting Characters” (page 38)
→
Use j to select
[Phone No.1],” and
“
then press c (Select).
Continued on the next page
41
Page 44

Enter the phone number,
and then press c (OK).
Use j to select the No.
Type, and then press
(Select).
c
When entering the number of a standard
phone, be sure to include the area code.
Use j to select
“ [E-mail Address1],” and
then press c (Select).
If you do not want to enter an e-mail
address, jump to step 8.
Enter the e-mail address,
and then press c (OK).
Use j to select the
E-mail Type, and then
press c (Select).
To input an e-mail address
“Inputting an E-mail Address” (page 39)
→
Press % (Reg).
The Address Book can contain up to 1,000 records.
◎
Address book records are numbered from 000 through 999. A new
◎
record is automatically assigned to the lowest available unused record
number.
An address book record can also contain a group, image, street address,
◎
birthday, and other personal information.
◎ To delete an address book record, press & while the standby screen is
displayed. Use a to select the address book you want to delete, press
(SubMenu), and then 2 (Delete). Next press 1 (Delete One),
%
and then press 1 (YES).
42
Page 45

Editing an Address Book Record
Example: To edit the phone number of “Tom Carter”
While the standby screen
is displayed, press &,
use a to select the
record you want to edit.
Press c (Detail), and
then & (Edit).
Use j to select
“ 0900006XXXX,” and
then press c (Select).
Address
Birthday
Group
...
...
...
Address Book
Make the changes you
want, press c (OK).
Use j to select the No.
Type, and then press
(Select).
c
To delete characters, press C.
Press % (Reg). Use j
to select “Overwrite,” and
then press c (OK).
43
Page 46

Adding Outgoing or Incoming History Data to the Address Book
While the standby screen
is displayed, press s,
use j to select the
phone number you want to
register, and then press
(SubMenu).
%
: Displays outgoing histories.
r
: Displays incoming histories.
l
Incoming history
submenu screen
44
Press
(Reg to Adrs
2
Book).
Press
(Register New).
1
Use j to select the No.
Type, and then press
(Select).
c
The phone number is entered
automatically. To enter the name and other
items, refer to step 2 under “Registering
an Address Book” (page 41).
Page 47

Dialing from the Address Book
While the standby screen
is displayed, press &,
and then use a to select
the record whose phone
number you want to dial.
Press c (Detail).
The detail screen of the record appears.
Hello
?
Address Book
Use j to select the
phone number, and then
press
N
.
45
Page 48

Pair Function
You can register up to five phone numbers
(like frequently used ones from the address
book).
You can make calls or send mails to these
registered numbers (called Pair Partners)
more easily.
Registering a Pair Partner
While the standby screen
is displayed, press
Use s to select the 1 through 5 tab
where you want to register the Pair
Partner.
Use j to select “Reg./
Can.,” and then press c
(Select). Press
1
.
N
(YES).
46
Use a to select the
address book record for
the person you want to
register as a Pair Partner,
and then press c (Detail).
Press c (Select).
When there is more than one phone
number/e-mail address registered in the
address book, the Pair Function phone
number/e-mail address selection screen
will appear.
Page 49

Making a Phone Call or Sending Mail to a Pair Partner
While the standby screen
is displayed, press
Use s to select the Pair
Partner.
N
.
Pair Function
Use j to select “Call,”
and then press c (Select).
Sending E-mail: Selecting “E-mail” and then pressing c (Select) will display
a screen for composing and sending an e-mail message.
Sending C-mail: Selecting “C-mail” and then pressing c (Select) will display
a screen for composing and sending a C-mail message.
For the subsequent procedure, see “Creating and Sending E-mail Messages”
(page 50)/“Creating and Sending C-mail Messages” (page 56).
In order to register a person as a Pair Partner, the person’s name, phone
number, and other information need to be registered in the address book
beforehand. Use the procedure under “Registering an Address Book” (page
41) to create the required record before trying to register a person as a Pair
Partner.
47
Page 50

Internet
△△△
EZweb subscription required
Your W62CA supports two types of mail:
e-mail and C-mail.
Using E-mail
To use e-mail, you need to subscribe to an EZweb service. If you did
not subscribe when you purchased your phone, contact your nearest
au shop or the au Customer Service Center.
In addition to an EZweb subscription, you also need to perform an
initialization procedure before you can use e-mail. If you have not performed
initialization yet, refer to “Initializing E-mail and EZweb” (page 24).
E-mail lets you exchange mails with a PC and with another cellphone
that supports e-mail function.
You can send mail messages that contain up to 5,000 double-byte
characters (10,000 single-byte characters), and you can attach photos
to e-mail messages.
You can send e-mail up to 30 recipients (includes To/Cc/Bcc, within 640 single-
※
byte characters) at a time. When Adrs. Count Limit is set to “Restrict,” you can
send up to 5 recipients at a time (includes To/Cc/Bcc, within 640 single-byte
characters).
You can send up to 1,000 e-mail messages (each addressee counts as a
※
separate message) per day.
The sending and receiving operations may take longer when a mail message
※
has data attached.
Packet communication fee (varied by the sent/received data amount, regardless
※
of the connection time) is charged to send/receive an e-mail.
Page
50
48
Internet
Internet
Sent using an e-mail address.
Example:
@ezweb.ne.jp
E-mail can be sent to
another au cellphone or
cellphone of other
manufacturer’s.
E-mail can be sent to a PC.
Page 51

Using C-mail
C-mail Center
C-mail Center
C-mail lets you exchange text messages
that contain up to 50 double-byte characters
(100 single-byte characters) with another au
cellphone that supports C-mails.
C-mail transmission fee is charged when sending C-mail.
※
C-mail Center
C-mail Center
C-mail CenterC-mail Center
Page
56
Sent using a phone number.
Example: 090-0001-XXXX
Received using a phone number.
Example: 090-0002-XXXX
About C-mail Safety Block
C-mail Safety Block blocks C-mails that contain accessing URLs
(http://
△△△
, https://
C-mail Safety Block is set to on at the time of purchase. If you
want to receive C-mails that contain accessing URLs or phone
numbers in their body texts, you can disable this function to
receive such C-mails.
△△△
) or phone numbers in its body text.
C-mail can be sent to
another au cellphone.
Mail
49
Page 52

Creating and Sending E-mail Messages
While the standby screen
is displayed, press L.
Press
(Create New).
1
Select “ Address,” and
then press
(Select).
c
Press c (Select).
: Address to which the e-mail will be
sent.
You can send e-mail up to 30 recipients
(includes To/Cc/Bcc, within 640 singlebyte characters) at a time. When Adrs.
Count Limit is set to “Restrict,” you can
send up to 5 recipients at a time (includes
To/Cc/Bcc, within 640 single-byte
characters).
Press
(Address
1
Book), use a to select an
addressee, and then press
(Detail).
c
You can select an addressee from sent
histories, received histories, address
book group, profile, or you can enter an
address.
50
Page 53

Use j to select the
e-mail address you want
to enter, and then press
(Select). Press & (OK).
c
Use j to select “
Subject,” and then press
(Select).
c
: Subject of the e-mail message.
Enter the subject, and
then press c (OK).
Use j to select “
Text,”
and then press
(Select).
c
: Body of the e-mail message.
Mail
Enter the body text, and
then press c (OK).
Press & (Send) or
The message “E-mail Sending
completed.” appears on the display after
the e-mail message is sent.
N
.
51
Page 54

Reading Received E-mail Messages
When you receive an e-mail
The message “E-mail” and appear on
the standby screen.
Select “E-mail,” and then
press c (Select).
E-mail icon
52
Press c (Select).
: Indicates an unread message.
: Indicates an already read message.
Use j to select the
unread e-mail you want to
view, and then press
(Select).
c
The received e-mail message appears.
If all of the message cannot be displayed, press d to scroll.
Use L and R to scroll between messages.
Press C to return to the e-mail message list.
Page 55

Reading an E-mail Message with an Attached Photo
Use j to select the
e-mail message, and then
press c (Select).
Use j to select the
attached data, and then
press c (Select).
Use j to select a file
name, and then press
(Play).
c
Depending on the type of the attached data, the contents may be
◎
displayed at the last of the body text.
Depending on the size of the attached data, it may not come in at the
◎
same time as the mail message. If this happens, use j in step 3 to
select the file name, press c (Receive), and then press c (Play).
The sending and receiving operations may take longer when a mail
◎
message has data attached.
Certain signal conditions may also cause e-mail sending and receiving
◎
to take longer than normal.
Mail
53
Page 56

Replying to a Received
Reply
E-mail Message
To reply to an e-mail message, perform steps
1 through 3 under “Reading Received E-mail
Messages” (page 52), and then perform the
following steps.
Press & (Reply).
(Subject) is prefixed with “Re:,” and
the body text of the e-mail is quoted.
Use j to select “
Text,” and then press
(Select).
c
For the remainder of this procedure
Perform the procedure starting from
→
step 7 under “Creating and Sending
E-mail Messages” (page 50).
Reply
Reply
54
Page 57

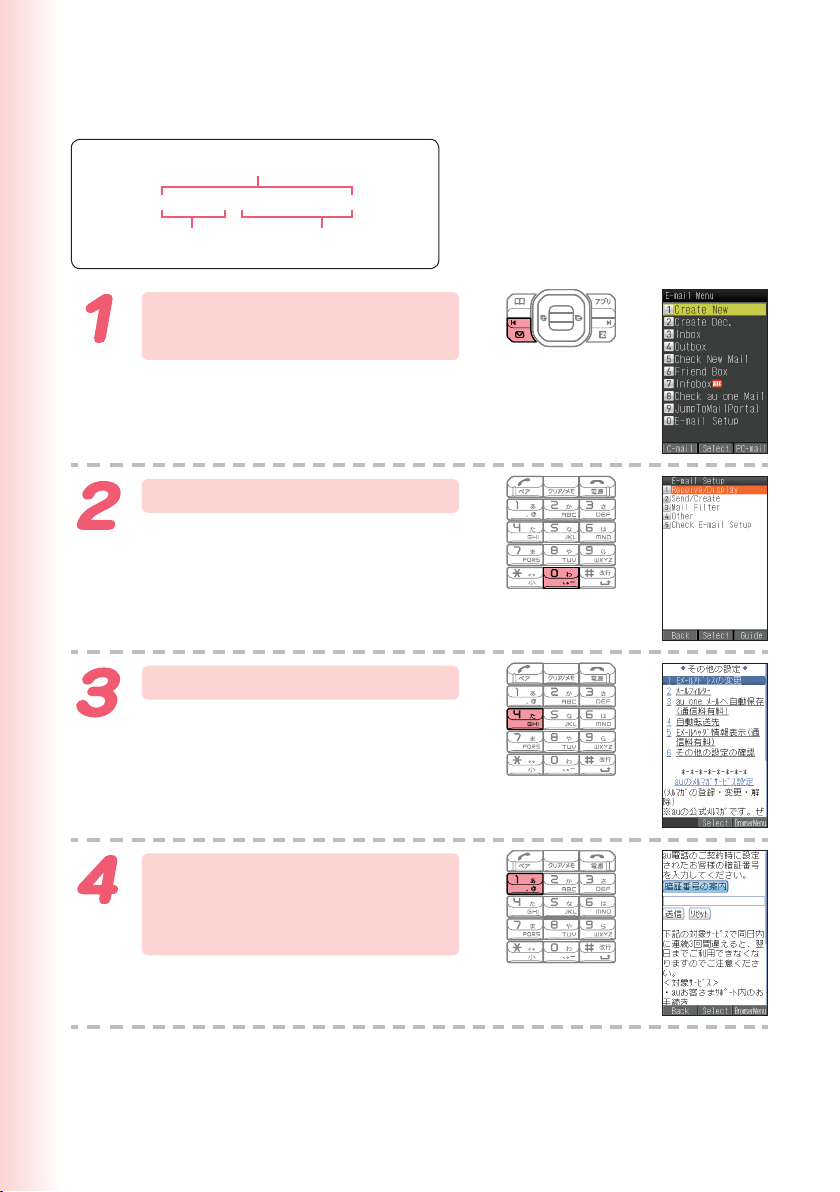
Avoiding Spam
It is recommended that you use our mail filter
function to block spam.
You can use the “Supportive settings” to easily
configure mail filter settings by answering
questions that appear on the display.
■ Configuring Mail Filter Settings
Example: To access the “
While the standby screen is displayed, press L.
a
Press 0 (E-mail Setup)
b
Use j to select “次へ” (Next) and then press c(Select).
c
Enter your Security Code, press c(OK).
d
Use j to select “送信” (Send) and then press c(Select).
➔
Use j to select the item and then press c(Select).
e
Next, follow the instructions that appear on the display.
サポート設定
3 (Mail Filter).
➔
” (Supportive settings)
Mail
■ “カンタン設定
“
サポート設定
(Supportive settings)
“
フィルターレベル(高)
(Filter level (Strict))
“
フィルターレベル(中)
(Filter level (Medium))
“
フィルターレベル(低)
(Filter level (Normal))
”
” (Simple Settings)
You can choose filtering options by answering
our questions.
It is recommendable for those who want to check
the filtering conditions one by one.
You can block all the mails from PC.
”
It is recommendable for those who use only
cellphones to send e-mails.
You can block the e-mails from specified
addresses in addition to the e-mails containing “
”
承諾広告※
titles and “
It is recommendable for those who are bothered
by specified spam senders.
You can block the e-mails containing “
”
” (unsolicited advertisement) in their titles, and
※
“
なりすましメール
It is recommendable for all e-mail users.
” (unsolicited advertisement) in their
なりすましメール
” (spoof e-mail).
” (spoof e-mail).
未承諾広告
未
You can prevent spam by changing your e-mail address. See “Changing
Your E-mail Address” (page 26) for information about how to change your
e-mail address.
➔
55
Page 58

Creating and Sending C-mail Messages
While the standby screen
is displayed, hold down
for at least one second.
L
Hold down
...
Press
Enter the body text, and
then press c (OK).
Select “ [Address],” and
then press c (Edit).
(Create New).
1
56
Page 59

Press
(Quote Adrs
1
Book), use a to select an
addressee, and then press
(Detail).
c
You can also select a phone number from
sent histories or received histories, or you
can enter an address.
Use j to select the
phone number you want to
enter, and then press
(Select).
c
Press & (Send) or
When the C-mail reaches the other party,
the message “Mail delivered” appears,
and the message is stored in the Outbox.
N
.
Mail
57
Page 60

Reading Received C-mail Messages
When you receive a C-mail
The message “C-mail” and appear on
the standby screen.
Select “C-mail,” and then
press c (Select).
Press c (Select).
: Indicates an unread message.
: Indicates an already read message.
C-mail icon
58
Use j to select the
unread C-mail you want to
view, and then press
(View).
c
The received C-mail message appears.
Use L and R to scroll between
messages.
Press C to return to the C-mail
message list.
Page 61

Camera
The W62CA has a CMOS camera with approximately 1.97 million
effective pixels and powerful functions to support various types of
digital imaging. You can attach the photos that you shot to e-mail
messages.
Using the Camera
Shooting a Photo (page 61)
1
You can use photos you shot for
the standby screen, for the
image that appears when
receiving a call, and in your
address book.
2
Within 500KB, you can send a photo as
an e-mail attachment.
※ Certain signal conditions may cause
Use your images for W62CA functions!
Send images by e-mail!
e-mail sending and receiving to take
longer than normal.
Camera
59
Page 62

Tips for Better Photos
Shooting with W62CA open
Do not cover the lens or optical sensor with your hands. Hold the camera
securely with both hands.
Use your thumb to press c (Shoot) to release the shutter.
Tips for Avoiding Hand Movement
Tips for Avoiding Hand Movement
●Remain steady by keeping your arms lightly against your sides and standing
with your feet about shoulder width apart. Having your arms away from your side or
extended in front of you can cause blurred images.
●When you press the shutter button, remain still until your shutter tone finishes sounding.
This is especially important when shooting where lighting is dim.
●A self-timer is also provided for shooting photos. With the self-timer, you do not need to
press the shutter button to shoot a photo, so there is less chance of a blurred image
caused by accidental movement of the phone.
Auto Focus
W62CA
has built-in auto focus function. You can shoot photos with
the subject properly focused simply by pressing the shutter key.
Photo Sizes
The following shows the sizes of the photos that can be recorded
with your W62CA.
Photo Sizes
W.paper (Normal)
240×320
W.paper (Wide)
240×400
0.3M
640×480
1M
1280×960
1.5M (Wide)
1600×960
2M
1600×1200
60
Where to Store
Photo Folderin
W62CA’s Data Folder
DSC Folderin
microSD
TM
memory card
※At the time of purchase, Photo (W.paper Mode) is
set to “W.paper (Wide)” and Photo (DSC Mode) is
set to “2M.”
※Photos are stored in Data Folder when a microSD
memory card is not inserted irrespective of the
photo size.
TM
Page 63

Shooting a Photo
While the standby screen
is displayed, press c,
use a to select “Camera,”
and press c (Select).
Press
Mode)).
Point the lens at the
subject, and press
(Shoot).
c
The phone emits a shutter sound.
Note that the phone emits the shutter
sound even if it is in Manner Mode.
Check the subject through the monitor
screen (within the area indicated as
and release the shutter.
(Photo (W.paper
1
Camera
),
Press c (Save).
The photo you shot is stored in the “Photo
Folder” in the Data Folder, and then
returns to the photo monitor screen.
When shot mistakenly
If the photo is not what you want to take, press C in step 3.
Next, repeat step 2 to redo.
61
Page 64

Viewing Photos
While the standby screen
is displayed, press c,
use a to select “Data
Folder,” and then press
(Select).
c
Use j to select “Photo
Folder,” and then press
(Select).
c
Selecting “All Data” displays a list of all
photos in the “Photo Folder.”
62
Use j to select the
folder, and then press
(Select).
c
A list of all photos that were shot on that
day are displayed.
Use a to select the
photo you want to view,
and then press
c
(Select).
The photo is displayed.
Page 65

Attaching a Photo to an E-mail Message
Perform the procedure from step 1 to 2 under “Shooting a Photo” (page
61), and then perform the following steps.
Press & (E-mail), and
then press
The photo you shot is stored in the “Photo
Folder” in the Data Folder.
Perform the procedure starting from step 2 under
“Creating and Sending E-mail Messages” (page 50) to
create an e-mail message.
1
(E-mail).
Camera
You can attach any photo you have shot to an E-mail, but data over 500KB
cannot be sent.
63
Page 66

Internet
EZweb
EZweb subscription required
Using EZweb
To use EZweb, you need to subscribe to an
EZweb beforehand. If you did not subscribe
when you purchased your phone, contact your
nearest au shop or the au Customer Service
Center.
In addition to an EZweb subscription, you also need to perform an
initialization procedure before you can use EZweb. If you have not
performed initialization yet, refer to “Initializing E-mail and EZweb” (page
24).
EZweb is an information service for simple Internet access from your
phone. EZweb lets you search for information on the Web, and provides
you with access to Chaku-Uta
contents (information sites).
Packet communication fee (varied by the sent/received data amount, regardless
※
of the connection time) is charged when connecting EZweb.
®
, the latest news, and other web-based
64
While the standby
screen is displayed
R
➔
c(Select)
Weather reports
Chaku-Uta
®
Internet
Internet
Wallpaper
Games
Latest news
Traffic reports
Chaku-Uta-Full
®
Page 67

Displaying the au one Top
While the standby screen is displayed, press
, use s to select “EZweb,” and then
R
press
(au one Top).
1
The layout and contents of
◎
the EZweb screens shown
here are for example
purposes only.
Some sites may charge you
◎
for the content in addition
to transmission charges.
a
b
c
d
e
f
g
h
i
j
k
l
m
n
o
p
q
r
s
t
キーワード検索機能
a
Provides information search function by keywords
メール
b
c
d
e
f
g
h
i
j
k
l
m
n
o
p
q
r
s
t
(Mail)
Provides another e-mail address for both cellphone and PC use
マイページ
Provides various information, useful tools or mass storage
capabilities to suit your needs
リモコン形式での直接アクセス
a
Weather bFortune-telling cTransfer dMusic eTV programs
f
Games gBooks & Comics hShopping iAuction
トップ ニュ ー ス
Provides the automatically-updated latest top news
最新オススメ情 報
Introduces various EZweb features and content information
ニュース&ビジ ネス
Provides the latest information such as news, weather,
and other information beneficial for business
マップ&エリア ガ イド
Provides regional information such as transit and map search
ショッピング&オ ー ク ション
Provides information about where you can purchase
goods with your cellphone, and information about how to
use net auctions to buy and sell goods
ライフ
(Daily life) Provides useful information for daily life
エンターテインメント
Provides the latest information about games, music, e-books,
and information about hobby and entertainment trends
コミュニティ
Provides the useful, amusing information that make you
feel like using such as SNS, blog
パーソナル&ラボ
Provides another e-mail address, information and tools to
suit your needs, ID registration for convenient use of au
one services
austyle
Introduces au-recommended information and sites
とくする情 報
Provides gifts and useful information exclusively for
EZweb service subscribers for free
auお客さまサポート
Provides phone bills, procedures, au information, and au
on-line manuals
auワンちゃんの部屋
Introduces you to the au ワンちゃん mascot
カンタンアクセス・オープンサイト
Introduces Simple Access and Open Site
災害用伝言板
Registers/checks the safety information in disasters
ENGLISH
(Search by keyword)
(My Page)
(Provides direct access via remote control)
(Top News)
(What’s Hot)
(News & Business)
(Map & Regional information)
(Shopping & Auctions)
(Entertainment)
(Community)
(Personal & Laboratory)
(Valuable Information)
(
au Customer Support
(
au ワンちゃん
(Simple Access & Open Site)
(Disaster Message Board)
Introduces English sites
)
’s room)
EZweb
65
Page 68

Bookmarking Sites You Frequently Access
Display a site you want to
bookmark, and press
(BrowserMenu).
%
Bookmark
!
it
Press
You may not be able to bookmark
※
some sites.
(New bookmark).
1
Press % (Reg).
The message “Registered to Bookmark”
appears when registration is completed.
You can store up to 100 sites in the Bookmark(s).
66
Page 69

Viewing a Bookmarked Site
While the standby screen
is displayed, press R.
Use s to select “EZweb,”
and then press
(Bookmark(s)).
2
Use j to select a site or
folder, and then press
(Connect/Select).
c
g
o
s
’
t
e
L
!
e
r
e
h
If you selected a folder, use j to select
a site, and then press c (Connect).
Checking Charges
You can check call and transmission charges.
While the standby screen
is displayed, press
c11
When the EZweb connection confirmation
screen appears, press 1 (YES).
Use j to select the item
you want to check, and
then press c (Select).
.
EZweb
67
Page 70

Downloading Chaku-Uta®/
Chaku-Uta-Full
®
To download a Chaku-Uta®/Chaku-Uta-Full®,
perform step 1 under “Displaying the au one Top”
(page 65), and then perform the following steps.
Use j to select “
リ検索
” (Search by
カテゴ
Category), and then press
(OK).
c
Use j to select “
フル・ビデオクリップ
(Chaku-Uta-Full
Video Clip) or “
着うた
®
and
着うた
”
”
(Chaku-Uta®), and then
press c (Select).
Select the content (desired information site), and
download it.
In order to use fee-based contents, you need to enter your EZ Password or
Premium EZ Password.
Initial Value: Any 4-digit number you entered on your subscription contract.
Input the required password according to the instructions that appear on the
display. To download information, follow the instructions that appear on the
display. Downloaded data is stored in the Data Folder.
68
Page 71

EZweb
In addition to transmission charges, you will be charged according to the
pricing policy of each site to download Chaku-Uta
®
/Chaku-Uta-Full® and
other contents from a fee-based site.
Perform the same procedure to download wallpaper and use it for the
◎
standby screen background.
You also can access an information site where you can download Chaku-
◎
Uta-Full
s
®
by pressing R while the standby screen is displayed, using
to select “LISMO,” and then pressing 2 (Jump to au one Music).
69
Page 72

EZ News Flash/au one Gadget
EZweb subscription required
EZ News Flash displays a scrolling ticker showing the latest news on
the standby screen, and you can view information by selecting it.
au one Gadget displays an application called gadget on the standby screen.
EZ News Flash/au one Gadget is available just after making initial
settings for EZweb (page 24). All EZ News Flash information is
distributed for no charge.
When updating EZ News Flash by manual operation or connecting to EZweb
※
site, packet communication fee may be required. If packet communication fee is
required, confirmation screen appears.
When the gadget you are using needs update via network connection, packet
※
communication fee is required when updating.
Gadgets for C-mail and Photo slide show are available without EZweb
※
subscription.
EZ News Flash/au one Gadget Features
Select and operate
from the standby screen
Select the ticker.
70
Browse news
Select the
gadget
setting icon.
Make settings for au one Gadget
The information is updated in regular time intervals. appears while
◎
receiving information.
If you are using au one My Page, you can confirm the updated contents
◎
by selecting “My Page” from the top page of EZ News Flash.
Standby screen
Select the window.
Browse weather
report
Page 73

Setting EZ News Flash service
You can use EZ News Flash with simple settings for no charge. Refer to
“Initializing E-mail and EZweb” (page 24), complete initializing, and then
make settings for EZ News Flash.
Press u in the standby
screen, select the ticker
and press c (OK).
Press j to select
“
c (選択
j
press c (Select).
Setup is complete.
When you complete setup and return to
the standby screen, the message “
信までしばらくお待ち下さい。
wait a while for the next distribution), will
be displayed on the ticker.
” (Yes), press
はい
)(Select), Press
to select “OK,” and
次回配
” (Please
EZ News Flash/au one Gadget
Turning EZ News Flash off
■
To turn off EZ News Flash, operate the following directions:
While the standby screen is displayed, press u, select the ticker and
a
press c (News).
Press % (
b
termination), and press c (選択)(Select).
Follow the instructions on the screen and turn off the setting.
c
The setting is turned off, and news distribution will stop.
Changing settings of receiving notifications
■
You can change the settings of the tone, vibrator, and LED indicator which
notifies EZ News Flash distribution.
While the standby screen is displayed, press
a
Set each item.
b
If you do not need notifications when receiving EZ News Flash, set the
item to “OFF.”
メニュー
)(Menu), use j to select “
c216
サービス設定解除
.
” (Service
71
Page 74

EZ Navi
EZweb subscription required
EZ Navi Features
EZ Navi uses global positioning system (GPS) information to provide
you with useful information.
Use s to select
“ EZnavi.”
EZ Navi menu
Standby screen
Press R.
EZweb menu
Checking your route: Passenger Seat Navi
Passenger Seat Navi makes it possible for the passenger (non-driver) in a motor vehicle to
check route information to a destination using both voice and map guides.
When you check where your child is: Security Navi
“Security Navi” application is composed of following three functions:
“いつでも位置確認” (Auto Position Search) (paid), “エリア通知” (Area Message) (free), and
位置確認メール” (Position Search Mail)(free).
“
These functions enable you to check the location of an au cellphone
supporting “Security Navi” and receive an alert mail which is sent to a
particular au phone whenever another phone enters (or is inside of) or
exits (or is outside of) a preset area by operating W62CA.
72
Page 75

EZ Navi Walk
A menu of useful options you can use while you are out.
ナビをする
(Navigation)
地図を見る (free)
(View Map)
乗換検索する(free
(Search Connection)
道路情報を見る
(View Traffic Info)
もっとナビウォーク
(EZ Navi Walk)
インフォメーション
(Information)
The star symbol shows that you can use your voice to enter search terms.
This is called
※1You are charged a fee for some services.
★
Searchable source of a route guidance (voice navigation)
to your destination, shops, and facilities
★
You can view a map of your current location or any other
location.
※1)★
Searchable source of train transfer and timetable
information
Check real-time traffic information on the major roads all
over Japan.
Provides information on settings and PC cooperative
service.
You can register for memberships or make inquiries.
“
voice input” function.
Positioning Present Location 3D Navi
Your initial location is
indicated by .
Changes in your location
are indicated in real time
.
by
The display is switched to
the 3D image at the
guidance point or a point
near the destination.
Navigation engine by NAVITIME
JAPAN
Map: Shobunsha Publications, Inc./
Sumitomo Electric Industries, Ltd.
3D data: ZENRIN CO., LTD./GEO
Technical Laboratory Co., Ltd.
Z06A-No.2137
Evacuate Navi
Evacuate Area
Map
Map: Shobunsha Publications, Inc.
Preparation: Asia Air Survey Co., Ltd.
Route Home
Map
You can use the map data stored in the Data Folder of the
W62CA to locate the nearest refuge shelter or to determine the
direction to your home (避難所マップ (Evacuate Area Map)).
You also can access the Evacuate Navi EZweb site to
download contents, including the recommended route between
two points, such as from your place of work to your home
(Office to Home),
※ In order to have it indicate your direction home, you will have to
pre-register the GPS information of your home in the au phone
address book.
※ Some contents may require payment.
“ 帰宅支援マップ” (
Route Home Map), etc.
EZ Navi
73
Page 76

◎ All display information is intended for reference purposes only. Be sure
to follow all instructions issued by police, fire department personnel,
government officials, etc.
◎ Due to GPS satellite conditions and other factors, it may take some time
for Evacuate Navi to indicate your current location.
◎
The display layout and contents shown here are for example purposes only.
◎ Depending on the number of records stored in your address book, it may
take some time for map viewer to start up.
◎
To use EZ Navi services, packet communication fee is charged. Also, to
use some of the services, information fee is charged in addition to the
packet communication fee.
74
Page 77

au Media Tuner
EZweb subscription required
au Media Tuner makes it possible to enjoy using Television (1Seg)
and EZ Channel-Plus.
au Media Tuner Features
With au Media Tuner, you can switch between television operation screen/data operation
screen and enjoy Television (1Seg) of terrestrial digital audio broadcasts.
(Vol/Ch)
&
&(戻る
Data operation
screen
By switching the channel using L and R, registered EZ Channel-Plus programs will
※
be displayed.
)(Back)
Television
operation screen
■ Television (1Seg)
There are two types of digital TV broadcasting: the terrestrial digital television
programs you view on your home television and the 1Seg, which is the name
of a broadcasting service for cellphones. Television (1Seg) lets you view 1Seg
broadcasts.
Terrestrial digital television is broadcast using the same UHF band radio waves as
terrestrial analog broadcasts.
■ EZ Channel-Plus
You can use au Media Tuner to play back programs registered with EZ ChannelPlus/EZ Channel.
au Media Tuner
75
Page 78

Using the built-in TV antenna
■
When viewing with Television (1Seg), take care to avoid covering the built-in TV
antenna with your hand in order to ensure proper reception.
Built-in TV antenna
You need to perform an initialization procedure before you can use au
◎
Media Tuner. If you have not performed initialization yet, refer to “Initializing
E-mail and EZweb” (page 24).
No call charge or packet communication fees are charged for using au
◎
Media Tuner.
No call charge or packet communication fees are charged for watching
◎
data broadcasting programs. However, you will be charged for packet
communication if you use the interactive service provided by data
broadcasting programs or access to the information site on EZweb.
You will not be able to view au Media Tuner broadcasts after changing
◎
models or on a W62CA whose contract has been cancelled. You can use
au Media Tuner to play back programs stored in your Data Folder even
after changing models or canceling your contract.
When remaining battery level shows
◎
during au Media Tuner is active,
a message (indicating the battery will soon be discharged) appears, and
au Media Tuner automatically stops.
The following shows the approximate Television (1Seg) continuous
◎
viewing time
Earphone
Speaker
1 Time measured under the conditions below. Actual continuous viewing
※
time may varydepending on data broadcast operations, etc.
Display: Full-screen; Earphone Volume: 10; Caption: Off; Brightness: 3.
The W62CA may fail to receive radio signals properly depending on the
◎
1
※
with the W62CA.
Time with DBEX On: 5 hours, 10 minutes
Time with DBEX Off: 5 hours, 20 minutes
Time with DBEX On: 5 hours, 00 minutes
Time with DBEX Off: 5 hours, 00 minutes
location or radio wave receiving conditions. In this case, the quality of the
picture or the sound may be lower than usual or not available.
The display layout and contents shown here are for example purposes
◎
only.
For details on “1Seg” service, visit the website below.
◎
The Association for Promotion of Digital Broadcasting (DPA):
http://www.dpa.or.jp/ (For PC)
http://www.dpa.or.jp/1seg/k/ (For Cellphones)
76
Page 79

Configuring au Media Tuner Initial Settings
Perform the following procedure before using au Media Tuner for the
first time.
While the standby screen
is displayed, hold down
for at least one
g
second.
Escape clause is displayed.
If you select “OK (
(Do not display again.)), the display will
not appear in the future.
以後表示しない
Use j to scroll the
screen to read its contents.
After you do, use
j
select “OK” and then press
c(選択
A screen for configuring au Media Tuner
initial settings will appear. Follow the
instructions on the screen to configure
the settings. After you finish the channel
setting screen will appear.
) (Select).
)” (OK
to
Use j to select “
定(放送波)
” (Auto Setting)
and then press c (
オート設
)
選択
(Select).
This automatically configures reception
area and channel settings, and displays
the television screen.
If you want to configure area settings
manually, select “
Manually).
マニュアル設定
” (Set
au Media Tuner
77
Page 80

78
You may run into problems when configuring channel settings in step 3
◎
in areas where 1Seg terrestrial digital television broadcast for cellphone/
mobile service has just started.
Whenever you start up au Media Tuner, the channel you were viewing the
◎
last time you used it will appear first. If you move to a different viewing
area and are unable to receive the currently configured channels,
reconfigure channel settings.
Page 81

Using Television (1Seg)
While the standby screen is
displayed, hold down
for at least one second.
You need to perform an initialization
procedure before you can use au
Media Tuner. If you have not performed
initialization yet, refer to “Configuring au
Media Tuner Initial Settings” (page 77).
When you start up au Media Tuner after
configuring initial settings, the channel of
the mode you were viewing the last time
you used will appear.
Use L and R to change
the channel.
g
Use j in television operation screen
and
gf
adjust the volume.
With EZ Channel-Plus, you can select a
program with s and then press c
(再生) (Play) to start playback.
When you start up au Media Tuner, it may take some time to acquire
◎
images and, especially in the case of a data broadcast, data. This is due
to the characteristics of digital broadcasts.
In any mode, pressing R while the final channel is displayed or L
◎
while the first channel is displayed will switch mode.
in data operation screen to
au Media Tuner
79
Page 82

To switch between the earphone and speaker
■
On the television operation screen/data operation screen while au Media Tuner
a
is running, press % (機能) (Function).
Use j to select “
b
Use j to select “
c
(Select).
Use j to select “
d
(Earphone), and then press c (設定) (Set).
音声設定
出力先
オート
” (Sound Settings) and then press c (選択) (Select).
” (Sound Output Settings) and then press c (選択)
” (Auto), “
スピーカー
” (Speaker), or “
イヤホン
”
The initial setting is “
80
オート
” (Auto).
Page 83

Exiting au Media Tuner
Press
select “
then press c (OK).
, use j to
F
” (Yes), and
はい
81
au Media Tuner
Page 84

Other Functions
Security Setup Features
With Security Setup, you can make a phone call to preregistered
numbers or use high-volume buzzer just by holding down
least one second.
Safety Buzzer
0
for at
You can use W62CA as high-volume emergency
buzzer by holding down 0 for at least one
second while the standby screen is displayed.
To turn on Safety Buzzer
■
While the standby screen is displayed, press
c591
To stop Safety Buzzer
■
To stop Safety Buzzer, input the lock No., and then press c (OK).
You cannot turn off W62CA or perform any other operation while the
※
Safety Buzzer is sounding. The Safety Buzzer will continue to sound until
you input the lock No. or the battery fully discharges.
, input the lock No., and then press c (OK).
Hot Dial
With HOT DIAL, holding down 0 for at least one second will dial a
preset phone number.
To turn on HOT DIAL
■
While the standby screen is displayed, press
the lock No., and then press
Next, input the phone number you want to preset, and then press
(OK).
c
c
(OK).
c592
, input
82
The Safety Buzzer will sound through the W62CA’s speaker even when
◎
the Casio round-type earphone jack conversion adapter 03 and the
SONY MDR-E0921, flat-type switched earphone microphone (option), or
flat-type stereo earphones microphone (option) is connected.
Even when Manner Mode is on, Safety Buzzer sounds.
◎
Page 85

In addition to the functions covered in this Basic Manual, your W62CA
also has the following features.
Global Passport GSM
W62CA supports Global Passport GSM
based on au IC-Card.
Global Passport GSM is an
international roaming service for the
customers to use the phone replacing
its au IC-Card with GSM cellphone for
overseas use. No special application
procedure or daily/monthly fee are
needed, and the call charge is added
up to domestic call, so the pay
procedure is simple.
LISMO
You can use LISMO Player to enjoy
a Chaku-Uta-Full
CD tracks. Also, you can download a
Chaku-Uta-Full
by accessing “au one Music.”
®
or your favorite
®
or purchase CD tracks
PC Site Viewer
You can view WEB sites created for
PCs.
Bar Code Reader & Maker
Infrared Communication
You can exchange the data stored
in your Address Book, Schedule,
Bookmarks, or Data Folder between
devices supporting infrared
communication.
EZ Apps (BREW®)
Enjoy downloaded games and other
software.
Earthquake Early Warning
Provides Earthquake Early Warning
to au phones at once which are in the
surrounding area of the seismic center.
The information is distributed by the
Japan Meteorological Agency.
Electronic Compass
A built-in digital compass automatically
rotates the EZ Navi Walk map to make
the direction you face always becomes
upwards. In G’zGEAR, you can display
the direction and azimuth angle.
You can use the camera to read QR
codes and bar codes. Also, you can
create your own bar codes directly from
your address book entries.
Touch Message
Send and receive message, address
book, Data Folder data between devices
which supports EZ FeliCa function.
Sports Timer
You can measure the length of a game,
interval time, LAP/SPLIT time.
Other Functions
83
Page 86

Troubleshooting
Symptom What to check What to do Page
Is the battery pack
The phone
does not turn
on.
I can’t make
calls.
I can’t receive
calls.
Nothing happens
when I press the
keys.
The phone emits
a warning tone,
and then turns
off.
The phone
answers calls
automatically.
I can’t hear
the caller.
If the battery level is very low, “Now Loading...” is shown on the display, and after a while display disappears.
※
installed correctly?
Is the battery pack
charged?
Are you holding down F
for at least 2.5 seconds?
(Out of Range) on
Is
the display?
Are you including the area
code?
Is the phone turned on?
Did you press N?
Is Emission OFF Mode
turned on?
Is (Out of Range) on
the display?
Is the phone turned on?
Is Emission OFF Mode
turned on?
Is the phone turned on?
Is battery pack power low? Charge the battery pack.
Is Answer Memo turned
on?
Is Drive Mode turned on?
Is the earpiece volume
level too low?
Is the earpiece covered
with your ear?
Correctly install the battery pack.
Charge the battery pack.
Hold down F for at least 2.5 seconds
to turn on the phone.
Wait until you are in a location where
is not displayed before trying to
make a call.
When making a call to a standard
phone, you need to input the area
code, and then the phone number.
Hold down F for at least 2.5 seconds
to turn on the phone.
After inputting the phone number,
press N to dial it.
Turn off Emission OFF Mode.
Move to a location where is not on
the display.
Hold down F for at least 2.5 seconds
to turn on the phone.
Turn off Emission OFF Mode.
Hold down F for at least 2.5 seconds
to turn on the phone.
Hold down C for at least one second
to turn off Answer Memo.
Hold down ( for at least one second
to turn off Drive Mode.
During a call, press u to increase
earpiece volume.
Make sure to place the earpiece to the
center of your ear.
※
P. 1 2
P. 1 4
P. 1 4
P. 2 8
P. 1 4
P. 2 8
P. 1 4
P. 1 4
P. 1 4
P. 1 2
P. 3 6
P. 3 5
−
−
−
P. 4
−
84
Page 87

If you lose your W62CA
Setting Remote Ctrl Lock makes it possible to perform a remote
operation that activates Auto Lock, FeliCa Lock and Address Book Lock
to lock the W62CA. This helps to avoid unauthorized use of your phone
and its features.
Configuring operating environment settings for Remote
■
Ctrl Lock
Repeatedly calling the W62CA from a pre-registered telephone number a specified
number of times within a specified amount of time will activate Auto Lock, FeliCa Lock
and Address Book Lock.
While the standby screen is displayed,
press
c414
and then press c (OK).
, input the lock No.,
Press
(Valid No.), use j to select
1
“Register New,” and press c (Select). Enter
the phone number and press % (Comp).
You can enter the phone number by selecting from the address
book, outgoing histories, incoming histories, sent histories,
received histories, memo, profile, payphone. Otherwise, you can
enter the number directly.
You can register up to 3 phone numbers.
Press
(Duration (min)), input the
2
period you want to specify, and then
press c (Set).
You can set the time period (the time intervals from the first call
to the last call you should make to activate Remote Ctrl Lock).
You can set the time period between 1 to 10 minutes.
Continued on the next page
Troubleshooting/Remote Ctrl Lock
85
Page 88

Press
(No. of Incm), input the
3
number of calls you want to specify, and
then press c (Set).
You can set how many times you should repeat making a call to
activate Remote Ctrl Lock. You can set it from 3 to 10 times.
Press % (Save).
Using remote operation to lock the W62CA with Auto
■
Lock, FeliCa Lock, and Address Book Lock
After using the procedure under “Configuring
operating environment settings for Remote Ctrl Lock”
(page 85) to register the calling phone number, place
the specified number of consecutive calls from the
registered phone number to the W62CA within the
specified amount of time.
86
You will hear the announcement “
Lock activated), and the W62CA will be locked using Auto Lock, FeliCa Lock
and Address Book Lock.
Remote Ctrl Lock cannot be activated if the W62CA is not turned on or if
◎
it is outside its service area, or when “ON” is selected for “Emission OFF
(M52).” Also, you may not be able to activate Remote Ctrl Lock while the
W62CA is in an area where the signal is weak.
The initial setting for the “Unlock by Phone” of “Rem. Ctrl Lock (M414)” is
◎
“Invalid.” When “Invalid” is selected, the unlock screen is not displayed
while Remote Ctrl Lock is activated, and Remote Ctrl Lock cannot be
unlocked by W62CA operation. When “Valid” is selected, pressing any
key while Remote Ctrl Lock is activated displays an unlock screen.
Entering the proper lock No. will deactivate Remote Ctrl Lock and unlock
the phone.
The initial setting for the “Erase Data” of “Rem. Ctrl Lock (M414)” is
◎
“Not Erase.” When “Erase” is selected, activating Remote Ctrl Lock
will perform “Memory Reset (M453)” and delete all data in the phone
memory.
遠隔ロックに設定しました
” (Remote Ctrl
Page 89

ル
Using the Security Lock Service to activate Remote Ctrl Lock
■
With the Security Lock Service, you can activate Auto Lock, FeliCa Lock and
Address Book Lock remotely by placing a call to an au Customer Service Center
or with your computer even if Remote Ctrl Lock is not set beforehand. The Security
Lock Service is free.
Using the Security Lock Service
Calling an au Customer Service Center to activate or deactivate Remote
●
Ctrl Lock
On an au phone, dial 113 (free).
From cellphone of other manufacturer’s or a standard phone, dial the following
toll-free number:
This service is available 24 hours per day.
・
Follow the procedure in accordance with the voice guidance that is played.
・
Using a computer to activate or deactivate Remote Ctrl Lock
●
On the Internet, go to “au
com/) and log in, and then follow the instructions that appear on the screen.
Registration is required the first time you use this service. You can register even
※
after you lose your phone.
MyKDDI has changed its name to “au
※
spring 2008. The procedures for using this service remain unchanged.
0077-7-113 (free).
フリーコー
お客さまサポート
” (au Customer Support) (http://cs.kddi.
お客さまサポート
” (au Customer Support) in
Remote Ctrl Lock
87
Page 90

Index
A
Address Book ..................................... 41
Adding outgoing or incoming history
data to the address book ..............44
Deleting ............................................42
Dialing from the address book .......... 45
Editing ............................................... 43
Registering .......................................41
Adjusting the earpiece volume .........35
Adjusting the ringtone volume ......... 34
Answering a call ................................. 30
Answer Memo ..................................... 36
Deleting ............................................37
Playback ...........................................37
Turning on .........................................36
au IC-Card ...........................................11
au Media Tuner ...................................75
Configuring initial settings.................77
Exiting ............................................... 81
Using Television (1Seg) ....................79
au one Gadget .................................... 70
B
Battery level ........................................ 14
Battery pack .................................. 10, 11
C
C-mail Safety Block ............................ 49
Caller ID ............................................... 28
Camera ................................................ 59
Shooting a photo ..............................61
Viewing photos ................................. 62
Casio round-type earphone jack
conversion adaptor 03 ................... 10
Casio USB cable 03 (MiniB) ..............10
Cellphone Etiquette .............................1
Chaku-Uta
Downloading ................................... 68
Changing the ringtone ....................... 32
Charging the battery pack ................. 12
Checking Charges .............................. 67
C-mail .................................................. 49
Creating and sending .......................56
Reading ............................................ 58
®
/Chaku-Uta-Full®,
D
Desktop holder ............................. 10, 12
Disaster Message Board Service ........ 6
Display indicators .............................. 19
Display language ................................ 16
Drive Mode ............................................ 4
E
Earpiece volume ................................. 35
E-mail ..................................................48
Avoiding spam ..................................55
Changing your e-mail address .......... 26
Creating and sending .......................50
Initializing e-mail ...............................24
Looking up your e-mail address .......25
Reading ............................................ 52
Reading an e-mail message with an
attached photo .............................. 53
Replying ............................................ 54
EZ Channel-Plus ................................. 75
EZ Navi ................................................72
EZ Navi Walk ....................................... 73
EZ News Flash .................................... 70
Settings ............................................. 71
EZweb .................................................. 64
au one Top ........................................65
Bookmarking sites ............................ 66
Downloading Chaku-Uta
Chaku-Uta-Full
EZ Password ..............................15, 68
Initial settings .................................... 24
Viewing a bookmarked site ............... 67
®
/
®
...........................68
H
Hot Dial ................................................ 82
I
Incoming histories ............................. 31
Initial settings (e-mail and EZweb) ... 24
Initial values ........................................ 14
Inputting characters ........................... 38
Inputting an e-mail address .............. 39
Inputting pictograms ......................... 40
International call ................................. 29
K
Key functions .....................................18
88
Page 91

L
Looking up your phone number .......25
M
Mail ...................................................... 48
C-mail ............................................... 49
E-mail ...............................................48
Mail filter .........................................5, 55
Main menu ..........................................20
Making a call ....................................... 28
Making an international call ..............29
Manner Mode ......................................35
microSD
Missed call notification ...................... 30
TM
memory card .............. 11, 19
N
Names of parts ................................... 11
O
One-ring Calls ................................. 5, 31
Operation basics ................................18
Outgoing histories ............................. 31
P
Pair Function ...................................... 46
Making a phone call .......................... 47
Registering a pair partner .................46
Sending mail ..................................... 47
Phone call ........................................... 28
Photo
Sending a photo by e-mail ................ 63
Shooting a photo ..............................61
Viewing photos ................................. 62
Soft keys ............................................. 23
SONY MDR-E0921 .............................. 10
Spam ............................................... 5, 55
Standby screen ............................14, 19
Submenus ........................................... 23
T
Television (1Seg) ................................ 75
Troubleshooting .................................84
Turning on power ............................... 14
U
Unsolicited advertisement ............5, 55
V
Vibrating .............................................. 35
R
Redialing (outgoing/incoming
histories) .........................................31
Remote Ctrl Lock ...............................85
S
Safety Buzzer ...................................... 82
Security Code .....................................15
Security Lock Service ........................ 87
Security Setup ....................................82
Hot Dial ............................................. 82
Safety Buzzer ................................... 82
Signal strength ...................................14
Index
89
Page 92

For inquiries, call:
au Customer Service Center
From EZweb site:
How to access
EZ→auoneTop→auお客さまサポート
(auCustomerSupport)
→お問い合わせ(Inquiries)
※
Menustructureissubjecttochangewithoutnotice.
General Information,
Rate Information
From regular phones:
(toll free)
From au cellphones:
areacodenotrequired
(toll free)
In case of loss, theft, or
malfunction...
From regular phones:
(toll free)
From au cellphones:
areacodenotrequired
Cellphone and PHS operators collect and recycle unused telephones, batteries and
battery chargers at stores bearing theࠈࠈlogo regardless of brand and manufacturer to
protect the environment and reuse valuable resources.
(toll free)
Sales: KDDI Corporation
Okinawa Cellular Telephone Company
Manufactured by CASIO COMPUTER CO., LTD.
Readthistoaccesstothe
auOn-LineManual
June 2008, 1st Edition
 Loading...