

Page 1

FC-200V
FC-100V
User's Guide
E
CASIO Worldwide Education Website
http://edu.casio.com
CASIO EDUCATIONAL FORUM
http://edu.casio.com/forum/
Page 2

Important!
CASIO COMPUTER CO., LTD. makes no guarantees
concerning accuracy of the contents of this manual or
their suitability for any commercial purpose or other
particular purpose, or concerning the accuracy of
calculation results (such as financial calculation
simulation results) produced by this calculator.
• Financial calculation rules and practices can differ
according to country, geographic area, or financial
institution. It is up to you to determine whether the
calculation results produced by this calculator are
compatible with the financial calculation rules that
apply to you.
Manufacturer:
CASIO COMPUTER CO., LTD.
6-2, Hon-machi 1-chome
Shibuya-ku, Tokyo 151-8543, Japan
Responsible within the European Union:
CASIO EUROPE GmbH
Casio-Platz 1
22848 Norderstedt, Germany
Page 3

About this Manual
• This User’s Guide covers use and operation of the CASIO
FC-200V and FC-100V. Operations apply to both models,
except in cases indicated by the text “FC-200V only”.
• Keycap markings indicate what a key inputs or what
function it performs.
Example: 1, 2, +, -, A, etc.
SHIFT
• Pressing the
or
ALPHA
key followed by a second key
performs the alternate function of the second key. The
alternate function is indicated by the text printed above
the key.
Alternate function
Y}VARS
Keycap function
t
• The following shows what the different colors of the
alternate function key text mean.
If key marking
It means this:
text is this color:
SHIFT
Yellow
Red
Press
access the applicable function.
Press
input the applicable variable or
and then the key to
ALPHA
and then the key to
constant.
SHIFT
• In this manual, a
ALPHA
while an
key operation is shown as S.
key operation is shown as 1,
• The following shows an example of how an alternate
function operation is represented in this User’s Guide.
Example: 17(S-MENU)
Indicates the function that is accessed by the
key operation (17) before it. Note that
this is not part of the actual key operation you
perform.
E-1
Page 4

• The following shows an example of how a key operation
to select an on-screen menu item is represented in this
User’s Guide.
Example: 1(1-VAR)
Indicates the menu item that is selected by the
number key operation (1) before it. Note that
this is not part of the actual key operation you
perform.
• The cursor key is marked with four
arrows, indicating direction, as shown
in the illustration nearby. In this User’s
Guide, cursor key operation is
indicated as f, c, d, and e.
Some examples in this manual start out assuming that the
calculator is set to a particular angle unit. This is indicated
by the following marks.
REPLAY
z : Degrees
Z : Radians
• The displays and illustrations (such as key markings)
shown in this User’s Guide are for illustrative purposes
only, and may differ somewhat from the actual items they
represent.
• The contents of this manual are subject to change without
notice.
• In no event shall CASIO Computer Co., Ltd. be liable to
anyone for special, collateral, incidental, or consequential
damages in connection with or arising out of the purchase
or use of this product and items that come with it.
Moreover, CASIO Computer Co., Ltd. shall not be liable
for any claim of any kind whatsoever by any other party
arising out of the use of this product and the items that
come with it.
E-2
Page 5

Initializing the Calculator
Perform the following procedure when you want to initialize
the calculator and return the calculation mode and setup
to their initial default settings. Note that this operation also
clears all data currently in calculator memory.
1. O19(CLR)
2. “All:EXE” (cf), then E.
3. E(Yes)
4. A
•To cancel initialization without doing anything, press
E(Cancel) instead of E(Yes).
This setting: Is initialized to this:
Calculation Mode COMP
This setting: Is initialized to this:
Payment End
Date Mode 365
dn CI
Periods/Y Annual (FC-200V only)
Bond Date Date (FC-200V only)
Date Input MDY
PRF/Ratio PRF (FC-200V only)
B-Even Quantity (FC-200V only)
Digit Sep. Off
Angle Deg
Display Digits Norm1
STAT Off
• For information about memory, see “Using Calculator
Memory” on page E-35.
• For information about shortcut keys settings, see
“Shortcuts” on page E-94.
E-3
Page 6

Safety Precautions
Be sure to read the following safety precautions before
using this calculator. Keep this manual handy for later
reference.
Caution
This symbol is used to indicate information that can
result in personal injury or material damage if ignored.
Battery
• After removing the battery from the calculator, put it
in a safe place where it will not get into the hands of
small children and accidentally swallowed.
• Keep batteries out of the reach of small children. If
accidentally swallowed, consult with a physician
immediately.
• Never charge the battery, try to take the battery apart,
or allow the battery to become shorted. Never expose
the battery to direct heat or dispose of it by
incineration.
• Improperly using a battery can cause it to leak and
damage nearby items, and can create the risk of fire
and personal injury.
• Always make sure that the battery’s positive
negative
it into the calculator.
• Remove the battery if you do not plan to use the
calculator for a long time.
• Use only the type of battery specified for this
calculator in this manual.
ends are facing correctly when you load
l
k
and
Disposing of the Calculator
• Never dispose of the calculator by burning it. Doing
so can cause certain components to suddenly burst,
creating the risk of fire and personal injury.
E-4
Page 7

Handling Precautions
• Be sure to press the O key before using the
calculator for the first time.
• Even if the calculator is operating normally, replace
the battery at least once every three years (FC-200V)
or two years (FC-100V).
A dead battery can leak, causing damage to and
malfunction of the calculator. Never leave a dead battery
in the calculator.
• The battery that comes with this unit discharges
slightly during shipment and storage. Because of
this, it may require replacement sooner than the
normal expected battery life.
• Low battery power can cause memory contents to
become corrupted or lost completely. Always keep
written records of all important data.
•Avoid use and storage of the calculator in areas
subjected to temperature extremes.
Very low temperatures can cause slow display response,
total failure of the display, and shortening of battery life.
Also avoid leaving the calculator in direct sunlight, near
a window, near a heater or anywhere else it might be
exposed to very high temperatures. Heat can cause
discoloration or deformation of the calculator’s case, and
damage to internal circuitry.
•Avoid use and storage of the calculator in areas
subjected to large amounts of humidity and dust.
Take care never to leave the calculator where it might be
splashed by water or exposed to large amounts of
humidity or dust. Such conditions can damage internal
circuitry.
• Never drop the calculator or otherwise subject it to
strong impact.
• Never twist or bend the calculator.
Avoid carrying the calculator in the pocket of your trousers
or other tight-fitting clothing where it might be subjected
to twisting or bending.
• Never try to take the calculator apart.
E-5
Page 8

• Never press the keys of the calculator with a ballpoint
pen or other pointed object.
• Use a soft, dry cloth to clean the exterior of the
calculator.
If the calculator becomes very dirty, wipe it off with a cloth
moistened in a weak solution of water and a mild neutral
household detergent. Wring out all excess liquid before
wiping the calculator. Never use thinner, benzene or other
volatile agents to clean the calculator. Doing so can
remove printed markings and can damage the case.
E-6
Page 9

Contents
About this Manual ............................................ 1
Initializing the Calculator ................................ 3
Safety Precautions ........................................... 4
Handling Precautions ...................................... 5
Before Using the Calculator .......................... 10
kRemoving the Hard Case .................................... 10
kTurning Power On and Off ................................... 10
kAdjusting Display Contrast ................................... 10
kAbout the Display .................................................. 11
kDisplay Indicators ................................................. 11
Calculation Modes and Calculator Setup .... 13
kCalculation Modes ............................................... 13
kUsing the Setup Screen ....................................... 13
Inputting Expressions and Values ............... 23
kInputting a Calculation Expression Using
Standard Format .................................................. 23
kCorrecting an Expression .................................... 25
kDisplaying the Location of an Error ...................... 27
Basic Calculations ......................................... 28
kArithmetic Calculations ........................................ 28
kPercent Calculations ............................................ 29
Using Multi-statements in Calculations ....... 32
Using Calculation History Memory and
Replay ............................................................. 33
Using Calculator Memory .............................. 35
kAnswer Memory (Ans) ......................................... 35
kIndependent Memory (M) .................................... 37
kVariables (A, B, C, D, X, Y) .................................. 38
kFinancial Calculation Variables (VARS) ............... 40
kClearing Memory Contents .................................. 41
E-7
Page 10

Financial Calculation ..................................... 42
kSimple Interest Mode ........................................... 42
kCompound Interest Mode .................................... 44
kCash Flow Mode .................................................. 50
kAmortization Mode ............................................... 55
kConversion Mode ................................................. 59
kCost/Sell/Margin Mode ........................................ 61
kDay Calculation Mode .......................................... 64
kDepreciation Mode (FC-200V only) ..................... 66
kBond Mode (FC-200V only) ................................. 71
kBreak-Even Mode (FC-200V only) ....................... 78
kBEV Sub-mode (Break-Even Mode 1) ................. 78
kMargin of Safety Sub-mode
(Break-Even Mode 2) ........................................... 82
kDegree of Operating Leverage Sub-mode
(Break-Even Mode 3) ........................................... 84
kDegree of Financial Leverage Sub-mode
(Break-Even Mode 4) ........................................... 86
kDegree of Combined Leverage Sub-mode
(Break-Even Mode 5) ........................................... 88
kQuantity Conversion Sub-mode
(Break-Even Mode 6) ........................................... 90
Shortcuts ........................................................ 94
kCustom Shortcut Keys ......................................... 94
kFunction Shortcut Keys ........................................ 96
Function Calculations ................................... 98
kPi (π) and Natural Logarithm Base e ................... 98
kTrigonometric and Inverse Trigonometric
Functions ............................................................. 98
kHyperbolic and Inverse Hyperbolic Functions ..... 99
kConverting an Input Value to the Calculator’s
Default Angle Unit ................................................ 99
kExponential Functions and Logarithmic
Functions ........................................................... 100
kPower Functions and Power Root Functions .... 101
kRectangular-Polar Coordinate Conversion ........ 103
kOther Functions ................................................. 104
E-8
Page 11

Statistical Calculation .................................. 108
kStatistical Calculation Types .............................. 108
kInputting Sample Data ....................................... 108
kSTAT Calculation Screen .................................... 111
kUsing the STAT Menu ......................................... 112
Technical Information .................................. 134
kCalculation Priority Sequence ............................ 134
kStack Limitations ................................................ 136
kCalculation Ranges, Number of Digits, and
Precision ............................................................ 137
kSpecial Financial Calculation Error Messages .. 139
kError Messages ................................................. 140
kBefore assuming malfunction of the calculator... 142
Reference ...................................................... 143
kPower Requirements and Battery
Replacement ..................................................... 143
Specifications ............................................... 146
E-9
Page 12

Before Using the Calculator
k Removing the Hard Case
Before using the calculator, slide its hard case downwards
to remove it, and then affix the hard case to the back of
the calculator as shown in the illustration below.
k Turning Power On and Off
• Press O to turn on the calculator.
• Press 1A(OFF) to turn off the calculator.
k Adjusting Display Contrast
1. Press s.
2. Use c to select “CONTRAST:EXE”, and then press
E.
This displays the contrast adjustment screen. Use d and
e to adjust display contrast. After the setting is the way
you want, press E.
Important!
• If adjusting display contrast does not improve display
readability, it probably means that battery power is low.
Replace the battery.
E-10
Page 13

k About the Display
Your calculator has a 31-dot × 96-dot LCD screen.
Example:
Input expression
Calculation result
Financial Calculation Mode
k Display Indicators
Sample Display:
This
Means this: Page:
indicator:
The keypad has been shifted by
pressing the 1 key. The keypad
7
will unshift and this indicator will
disappear when you press a key.
{
STAT
The alpha input mode has been
entered by pressing the S key.
3 The alpha input mode will be exited
and this indicator will disappear
when you press a key.
There is a value stored in independ-
M
ent memory.
The calculator is standing by for input
of a variable name to assign a value
STO
to the variable. This indicator appears after you press 1t(STO).
The calculator is standing by for input
of a variable name to recall the vari-
RCL
able’s value. This indicator appears
after you press t.
E-1
E-37
E-37
E-38
E-94
E-11
Page 14

This
indicator:
Means this: Page:
STAT The calculator is in the STAT Mode.
360 360 days in a year.
Simple interest for interest calcula-
SI
tions of odd (partial) months.
Day, month, year (DMY) as the date
DMY
format.
7 The default angle unit is degrees.
8 The default angle unit is radians.
9 The default angle unit is grads.
A fixed number of decimal places is
FIX
in effect.
A fixed number of significant digits
SCI
is in effect.
E-108
E-15
Calculation history memory data is
$`
available and can be replayed, or
there is more data above/below the
current screen.
The display currently shows an in-
Disp termediate result of a multi-state-
ment calculation.
E-33
E-32
Important!
• For a very complex calculation or some other type of
calculation that takes a long time to execute, the display
may show only the above indicators (without any value)
while it performs the calculation internally.
E-12
Page 15

Calculation Modes and
Calculator Setup
k Calculation Modes
When you want to perform Press this
this type of operation: key:
Simple interest calculations S E-42
Compound interest calculations c E-44
Cash flow calculations C E-50
Amortization calculations A E-55
Page:
General and function calculations m
Statistical and regression
calculations
Interest rate conversion calculations
Cost, selling price, or margin
calculations
Day or date calculations D E-64
Depreciation calculations
(FC-200V only)
Purchase price and annual yield
calculations (FC-200V only)
Break-even point calculations
(FC-200V only)
a E-108
n E-59
o E-61
d E-66
b E-71
B E-78
E-28
E-98
k Using the Setup Screen
The setup screen lets you configure various conditions and
screen settings used for calculations. You can also use
the setup screen to adjust display contrast.
E-13
Page 16

A Displaying the Setup Screen
There are two different ways to display the setup screen.
• Pressing the s key
• Selecting the “Set:” item on
the menu screen that
appears when you enter
some modes.
The following are the
procedures you need to
perform to access and use the
setup screen using the above
operations.
FC-200V
Important!
All of the example procedures presented in this manual
use the s key procedure to display the setup screen.
To display the setup screen with the s key
1. Press the s key.
This displays a menu of setup items.
• See “Setup Screen Settings” on page E-15 for a
complete list of menu items.
2. Use fc to select the setup item whose setting you
want to change, and then press E.
This displays a screen for configuring the setting of the
setup item you selected.
3. Configure the setting you want.
•You can select a setting by with the cursor and then
press E , or you can input the number that
corresponds to the setting you want to select.
• See “Configuring Settings” on page E-16 for
information about configuring each setting.
To display the setup screen by selecting “Set:” on a
mode menu
Important!
The following procedure is possible only when there is a
“Set:” item on the menu that initially appears when you
enter a mode. It is not available in all modes.
E-14
Page 17

1. On the menu that appears when you initially enter a
mode, use fc to select “Set:”, and then press E.
• This displays a setup screen of settings that apply to
the current mode only. The content of the setup screen
depends on what mode you are currently in.
2. Use fc to select the setup item whose setting you
want to change. You can also select a setup item by
inputting the applicable number.
• See “Setup Screen Settings” below for information
about configuring each setting.
A Setup Screen Settings
No.
1 Payment
2 Date Mode Number of days in a year E-16
3 dn Odd period interest calculation E-16
4 Periods/Y
5 Bond Date
6 Date Input Date format E-18
7 PRF/Ratio Profit or profit ratio specification E-18
8 B-Even
Setup
Screen Item
Description Page
Payment date (beginning of
term/end of term)
Number of payment periods
per year
Date or number of coupon
payments specification
Sales quantity or sales amount
specification
E-16
E-17
E-17
E-18
9 Digit Sep. 3-digit separator symbol E-19
0 Angle Angle unit E-19
! Fix Number of decimal places E-20
@ Sci Number of significant digits E-20
# Norm
$ STAT Statistical display E-21
%
CONTRAST
Value range for exponential
format
Contrast adjustment E-22
E-15
E-21
Page 18
A Configuring Settings
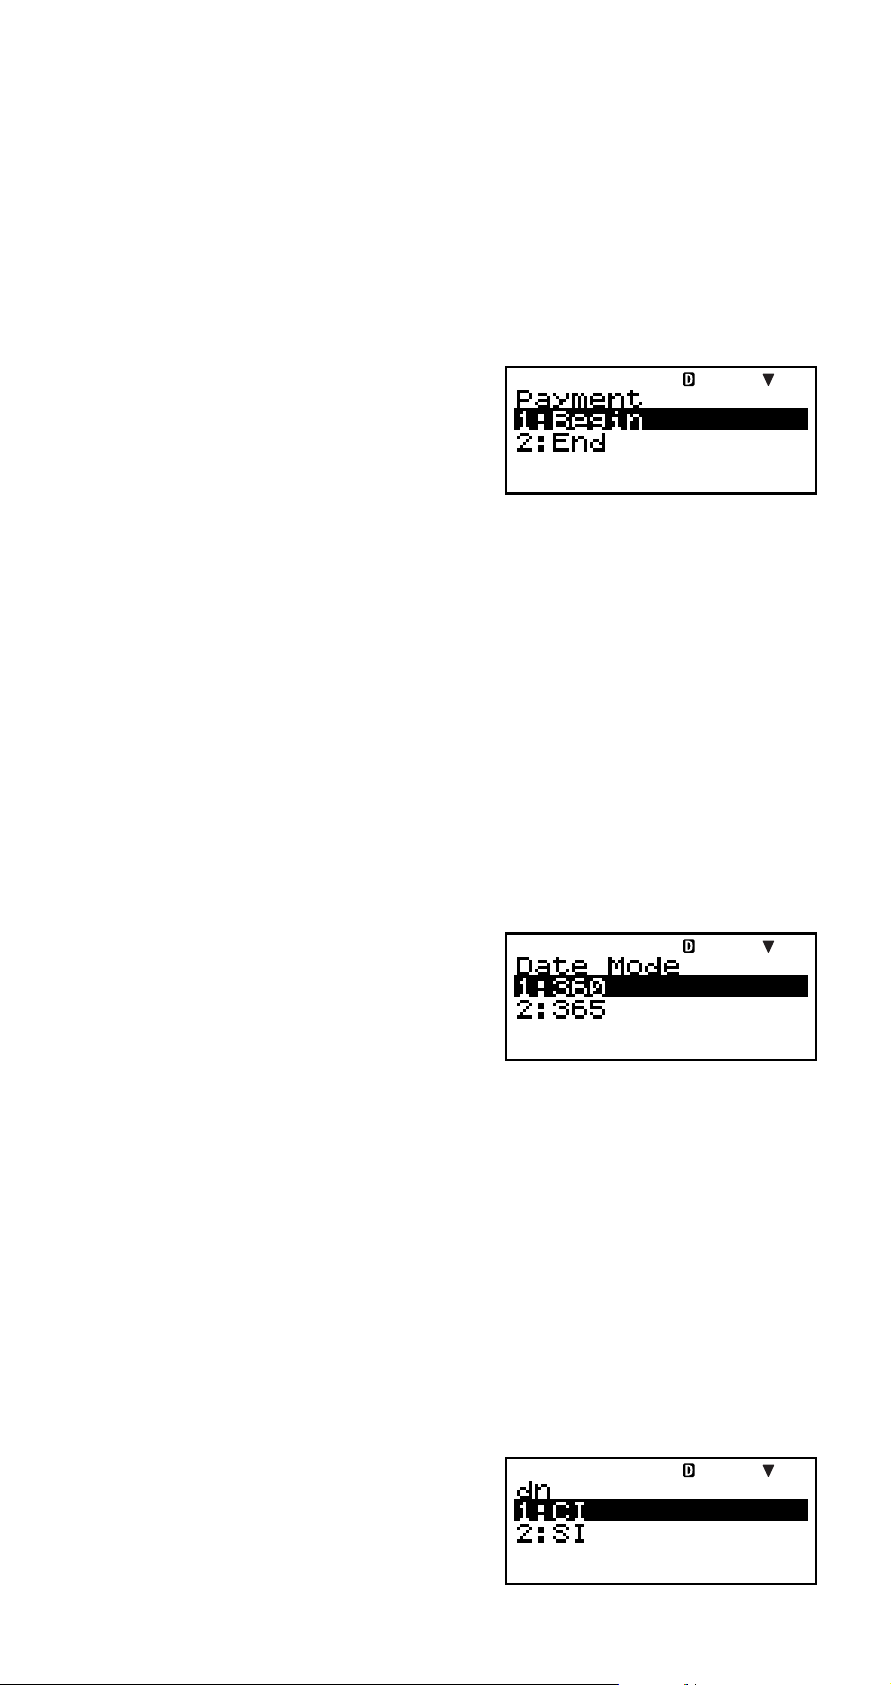
1 Payment: Compound Interest (CMPD) Mode,
Amortization (AMRT) Mode
This setting specifies the payment date.
1:Begin Beginning of period
2:End End of period
1. Use fc to select
“Payment”, and then press
E.
2. Press 1(1:Begin) or 2(2:End) to select the setting
you want.
•You can also use fc to select a setting and then
press E.
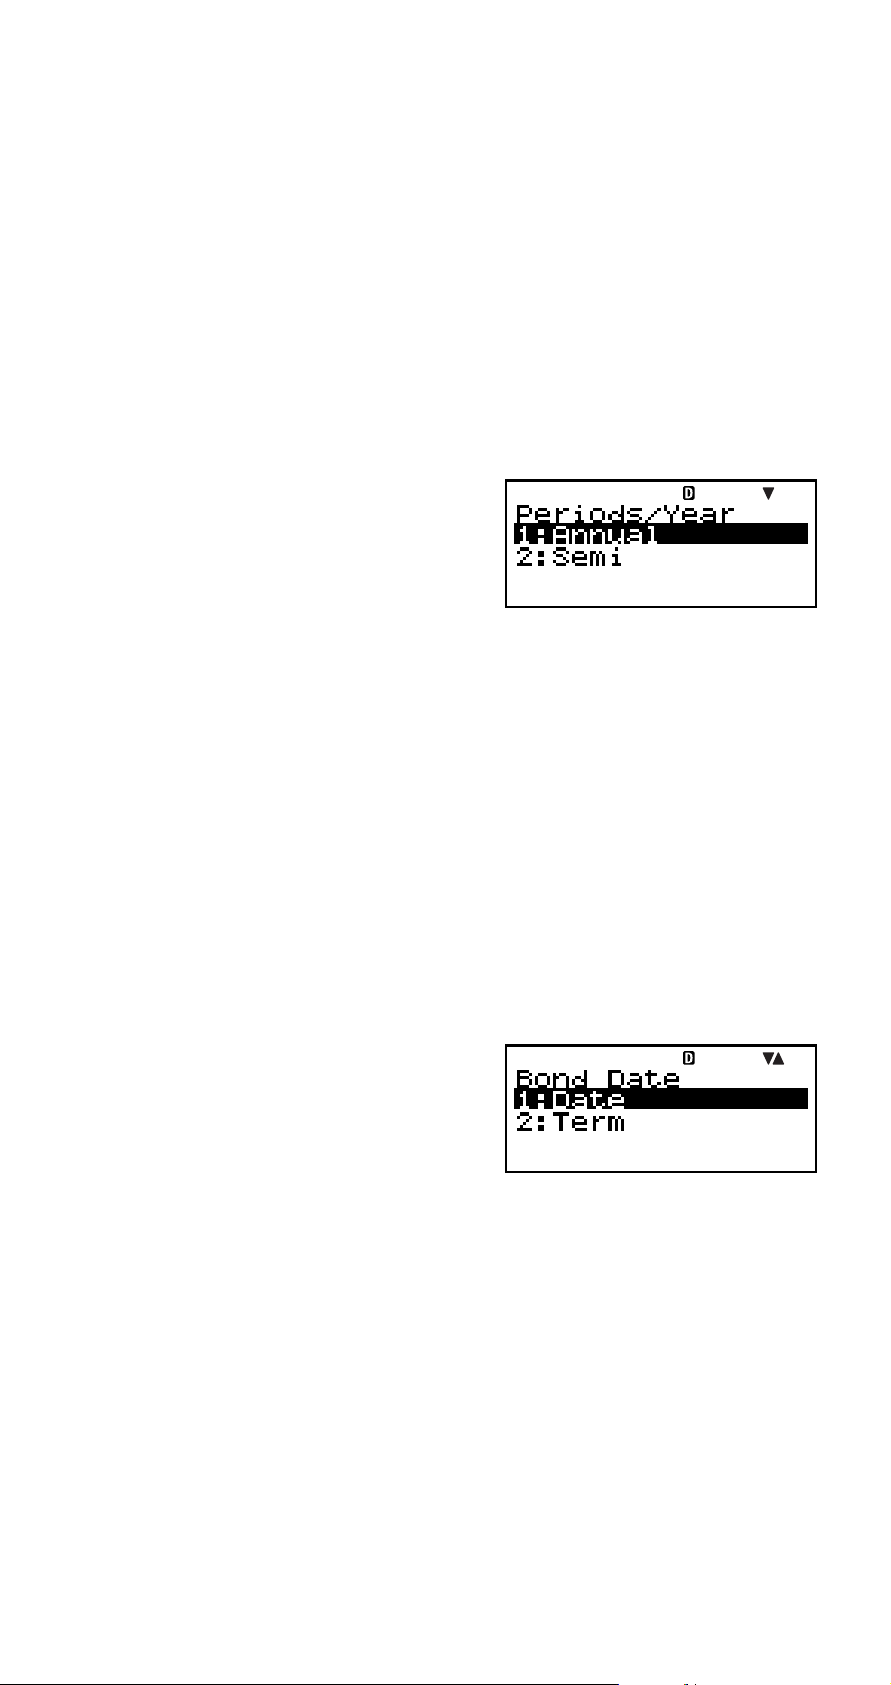
2 Date Mode: Simple Interest (SMPL) Mode, Day
Calculation (DAYS) Mode, Bond (BOND)
Mode (FC-200V only)
This setting specifies the number of days in a year.
1:360 360 days
2:365 365 days
1. Use fc to select “Date
Mode”, and then press E.
2. Press 1(1:360) or 2(2:365) to select the setting you
want.
•You can also use fc to select a setting and then
press E.
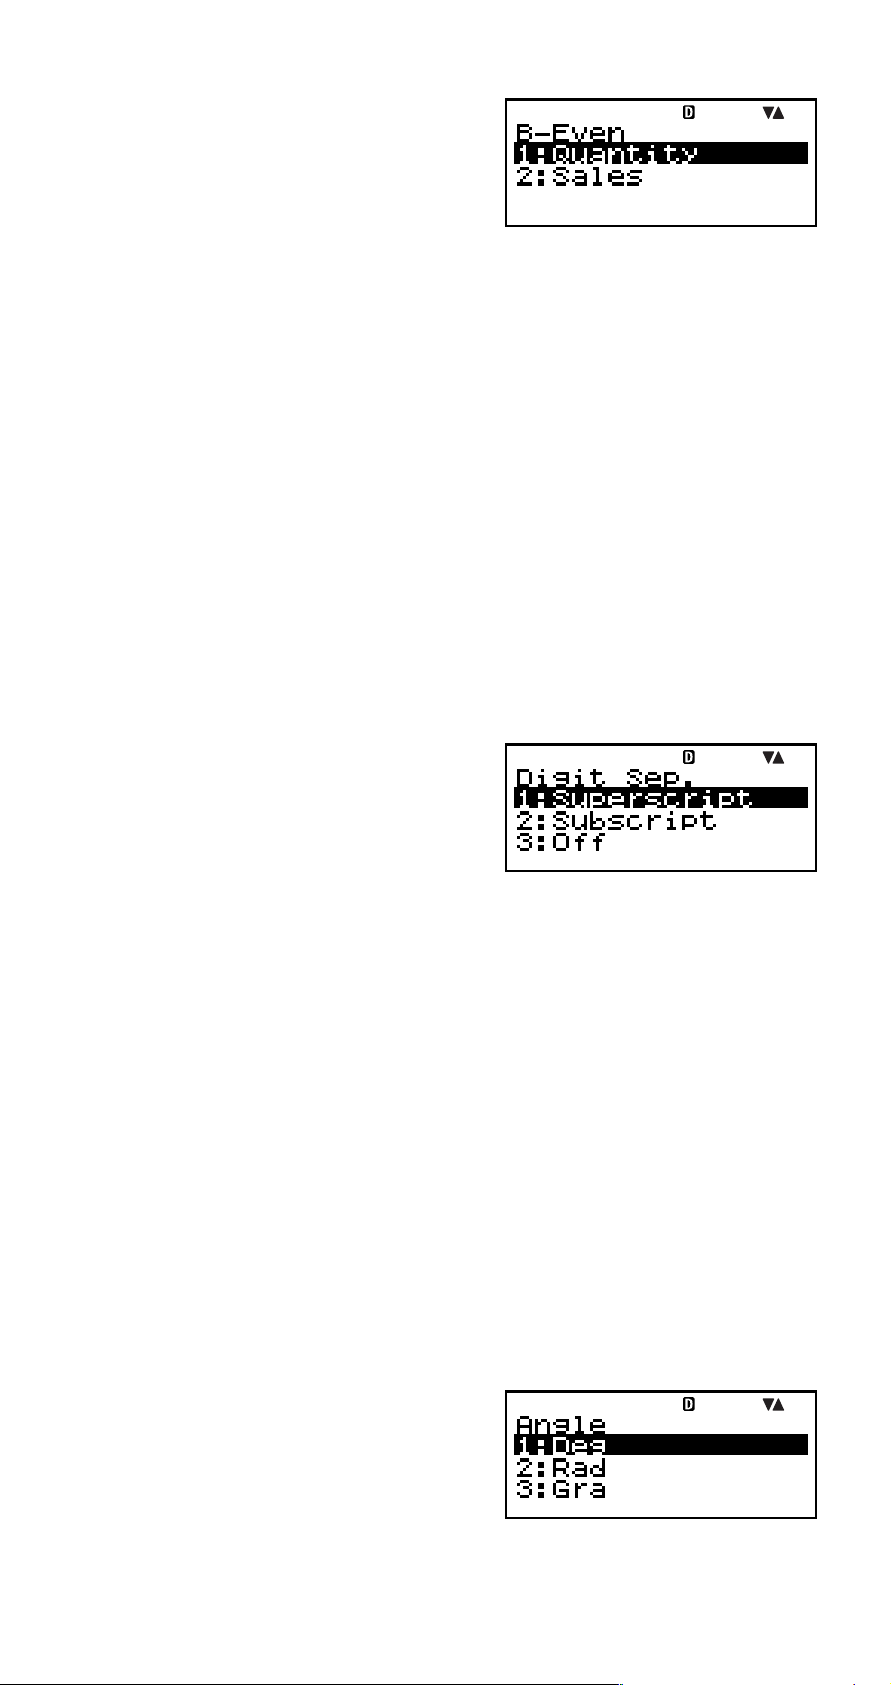
3 dn: Compound Interest (CMPD) Mode
This setting specifies whether simple interest or compound
interest for interest calculations of odd (partial) months.
1:CI Compound interest
2:SI Simple interest
1. Use fc to select “dn”,
and then press E.
E-16
Page 19
2. Press 1(1:CI) or 2(2:SI) to select the setting you
want.
•You can also use fc to select a setting and then
press E.
4 Periods/Y: Bond (BOND) Mode (FC-200V only)
This setting specifies once a year (Annual) or twice a year
(Semi-Annual) coupon payments.
1:Annual One coupon payment per year
2:Semi One coupon payment every six months
1. Use fc to select
“Periods/Y”, and then press
E.
2. Press 1(1:Annual) or 2(2:Semi) to select the setting
you want.
•You can also use fc to select a setting and then
press E.
5 Bond Date: Bond (BOND) Mode (FC-200V only)
This setting specifies use of either a date (Date) or a
number of payments (Term) as the term for bond
calculations.
1:Date Date
2:Term Number of payments
1. Use fc to select “Bond
Date”, and then press E.
2. Press 1(1:Date) or 2(2:Term) to select the setting
you want.
•You can also use fc to select a setting and then
press E.
E-17
Page 20

6 Date Input: Day Calculation (DAYS) Mode, Bond
(BOND) Mode (FC-200V only)
This setting specifies either month, day, year (MDY) or
day, month, year (DMY) as the date format.
1:MDY Month, day, year 06012006 (June 1, 2006)
2:DMY Day, month, year 01062006 (June 1, 2006)
1. Use fc to select “Date
Input”, and then press E.
2. Press 1(1:MDY) or 2(2:DMY) to select the setting
you want.
•You can also use fc to select a setting and then
press E.
7 PRF/Ratio: Break-Even Point Calculation (BEV) Sub-
mode of Break-Even (BEVN) Mode (FC200V only)
This setting specifies use of either profit (PRF) or profit
ratio (
1. Use fc to select “PRF/
2. Press 1(1:PRF) or 2(2:
8 B-Even: Break-Even Point Calculation (BEV) Sub-
r%) for break-even point calculations.
1:PRF Profit
2:
r% Profit ratio
Ratio”, and then press E.
r%) to select the setting you
want.
•You can also use fc to select a setting and then
press E.
mode of Break-Even (BEVN) Mode (FC-200V
only)
This setting specifies use of either sales quantity (Quantity)
or sales amount (Sales) for break-even point calculations.
1: Quantity Sales quantity
2: Sales Sales amount
E-18
Page 21
1. Use fc to select
“B-Even”, and then press
E.
2. Press 1(1:Quantity) or 2(2:Sales) to select the
setting you want.
•You can also use fc to select a setting and then
press E.
9 Digit Sep.: All modes except for the STAT Mode and
COMP Mode
This setting specifies what type of 3-digit separator should
be used. Note that the 3-digit separator is not displayed
after you specify a number of significant digits with @ Sci.
1:Superscript Superscript comma 123´456
2:Subscript Subscript comma 123,456
3:Off Separator off 123456
1. Use fc to select “Digit
Sep.”, and then press E.
2. Press 1(1:Superscript), 2(2:Subscript), or 3(3:Off)
to select the setting you want.
•You can also use fc to select a setting and then
press E.
0 Angle: All modes
This setting specifies the angle unit used for trigonometric
functions.
π
90° = — radians = 100 grads
2
1:Deg Degrees
2:Rad Radians
3:Gra Grads
1. Use fc to select “Angle”,
and then press E.
E-19
Page 22

2. Press 1(1:Deg), 2(2:Rad), or 3(3:Gra) to select
the setting you want.
•You can also use fc to select a setting and then
press E.
! Fix: All modes
This setting specifies a fixed number of digits to the right
of the decimal place. Calculation results are rounded off
to the specified number of digits before being displayed.
• Changing this setting automatically cancels any previous
settings made for @ Sci and # Norm.
• Specify the number of decimal places by inputting a value
in the range of 0 (round off and then cut fraction part) to
9 (nine decimal places).
1. Use fc to select “Fix”,
and then press E.
2. Input a value from 0 to 9 to specify the number of decimal
places.
Example: 100 ÷ 7 = 14.286 (Fix 3)
= 14.29 (Fix 2)
@ Sci: All modes
This setting specifies the number of significant digits.
Calculation results are rounded off to the specified number
of digits before being displayed.
• Changing this setting automatically cancels any previous
settings made for ! Fix and # Norm.
•You can specify anywhere from 1 significant digit (by
inputting 1) to 10 significant digits (by inputting 0).
1. Use fc to select “Sci”,
and then press E.
2. Input a value from 0 to 9 to specify the number of
significant digits.
Example: 10 ÷ 7 = 1.4286 × 10
= 1.429 × 10
0
0
(Sci 5)
(Sci 4)
E-20
Page 23

# Norm: All modes
This setting specifies the range that determines when
display of values switches to exponential format.
• Changing this setting automatically cancels any previous
settings made for ! Fix and @ Sci.
Norm1: 10
–2
> x, x > 10
Norm2: 10–9 > x, x > 10
10
10
Example: 1 ÷ 200 = 5 × 10⁻³(Norm1)
= 0.005 (Norm2)
1. Use fc to select “Norm”,
and then press E.
2. Press 1(Norm1) or 2(Norm2).
$ STAT: Statistics (STAT) Mode, Cash Flow (CASH)
Mode
This setting controls whether a frequency (FREQ) column
is included in the STAT Mode DataEditor.
• The Cash Flow (CASH) Mode uses the same DataEditor
as the STAT Mode. Turning on display of the frequency
column reduces the maximum number of data items that
can be input for investment appraisal.
1:On Frequency (FREQ) column display on
2:Off Frequency (FREQ) column display off
1. Use fc to select
“STAT”, and then press E.
2. Press 1(1:On) or 2(2:Off) to select the setting you
want.
•You can also use fc to select a setting and then
press E.
Important!
• This operation clears DataEditor data. Note that data is
cleared even if you select the setting that corresponds to
the current FREQ column display status. Selecting “On”
while FREQ column display is currently turned on, for
example, will clear DataEditor data.
E-21
Page 24

% CONTRAST: All modes
Select this setting when you want to adjust screen contrast
and make display figures lighter or darker.
1. Use fc to select
“CONTRAST”, and then
press E.
2. Use d and e to adjust display contrast.
3. Press E.
Note
• On a setting screen, the cursor mark displayed on the
upper right of a screen cannot be used.
A Initializing the Setup Screen Settings
1. O19(CLR)
2. “Setup:EXE” (fc), then E.
3. E(Yes)
4. A
•To cancel initialization without doing anything, press
E(Cancel) instead of E(Yes).
• The calculator will automatically enter the COMP Mode
after you initialize the setup screen settings.
E-22
Page 25
Inputting Expressions and
Values
k Inputting a Calculation Expression
Using Standard Format
Your calculator lets you input calculation expressions just
as they are written. Then simply press the E key to
execute it. The calculator automatically judges the
calculation priority sequence for addition, subtraction,
multiplication, and division, functions, and parentheses.
Example: 2 (5 + 4) – 2 × (–3) =
2(5+4)-
2*y3E
A Inputting a Function with Parenthesis
When you input any of the functions shown below, it is
automatically input with the open parenthesis (
Next, you need to input the argument and the closing
parenthesis (
sin(, cos(, tan(, sin–1(, cos–1( , tan–1(, sinh(, cosh(, tanh(,
–1
sinh
x
Example: sin 30 =
(, cosh–1(, tanh–1(, log(, ln(, e^(, 10^(, ^(, '(, 3'(,
'(, Abs(, Pol(, Rec(, Rnd(
)
).
(
) character.
z
1. t
2. “sin(” (fc), then E.
3. 30)E
• Some commonly used functions can also be input using
a direct key operation.
Example: sin 30 =
1. 11(sin)
2. 30)E
E-23
Page 26

A Omitting the Multiplication Sign
You can omit the multiplication sign (×) in any of the
following cases.
• Before an open parentheses (
• Before a function with parenthesis: 2
etc.
• Before a variable name, constant, or random number:
20
× A, 2 × π, etc.
( ): 2 × (5 + 4), etc.
× sin(30), 2 × '(3),
A Final Closed Parenthesis
You can omit one or more closed parentheses that come
at the end of a calculation, immediately before the E key
is pressed. For details, see “Omitting a Final Closed
Parenthesis” on page E-29.
A Displaying a Long Expression
The display can show up to 14 characters at a time.
Inputting the 15th character causes the expression to shift
to the left. At this time, the ] indicator appears to the left
of the expression, indicating that it runs off the left side of
the screen.
Input expression: 1111 + 2222 + 3333 + 444
Displayed portion:
Cursor
• When the ] indicator is displayed, you can scroll left
and view the hidden part by pressing the d key. This
will cause the ' indicator to appear to the right of the
expression. At this time, you can use the e key to scroll
back.
A Number of Input Characters (Bytes)
•You can input up to 99 bytes of data for a single
expression. Basically, each key operation uses up one
byte. A function that requires two key operations to input
(like 11(sin)) also uses only one byte.
E-24
Page 27

• Normally the input cursor appears as a straight vertical
(
) or horizontal ( ) flashing line on the display screen.
I
When there are 10 or fewer bytes of input remaining in
the current expression, the cursor changes shape to
to let you know. If the I cursor appears, terminate the
expression at a convenient point and calculate the result.
• Each expression in calculation history memory (page
E-33) can contain up to 76 bytes of data. Up to 89 bytes
of data can be assigned to each custom shortcut key
(page E-94).
I
k Correcting an Expression
This section explains how to correct an expression as you
are inputting it. The procedure you should use depends
on whether you have insert or overwrite selected as the
input mode.
A About the Insert and Overwrite Input Modes
With the insert mode, the displayed characters shift to the
left to make room when you input a new character. With
the overwrite mode, any new character you input replaces
the character at the current cursor position.
• The cursor is a vertical flashing line (
mode is selected. The cursor is a horizontal flashing line
(
) when the overwrite mode is selected.
• The initial default is the insert mode. You can switch
between the insert mode and the overwrite mode by
pressing 1Y(INS).
) when the insert
I
A Changing the Character or Function You
Just Input
Example: To correct the expression 369 × 13 so it
becomes 369 × 12
369*13
Y
2
E-25
E
Page 28
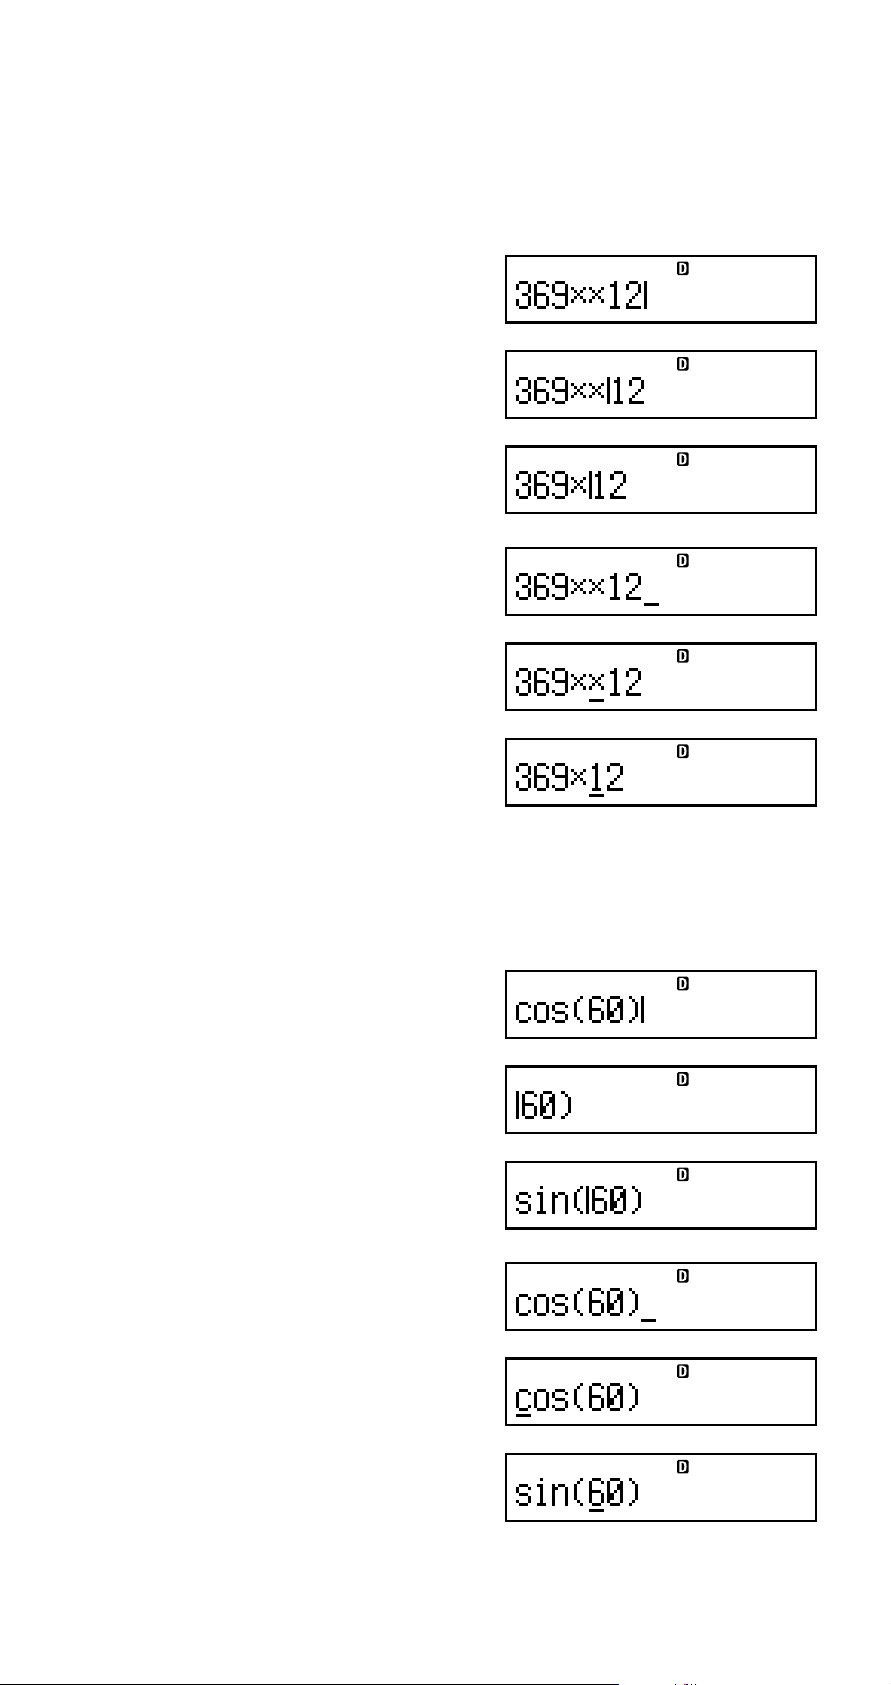
A Deleting a Character or Function
Example: To correct the expression 369 × × 12 so it
becomes 369 × 12
Insert Mode:
369**12
dd
Y
Overwrite Mode:
369**12
ddd
Y
A Correcting a Calculation
Example: To correct cos(60) so it becomes sin(60)
Insert Mode:
12(cos)60)
dddY
11(sin)
Overwrite Mode:
12(cos)60)
dddd
11(sin)
E-26
Page 29
A Inserting input into a Calculation
Always use the insert mode for this operation. Use d or
e to move the cursor to the location where you want to
insert new input, and then input what you want.
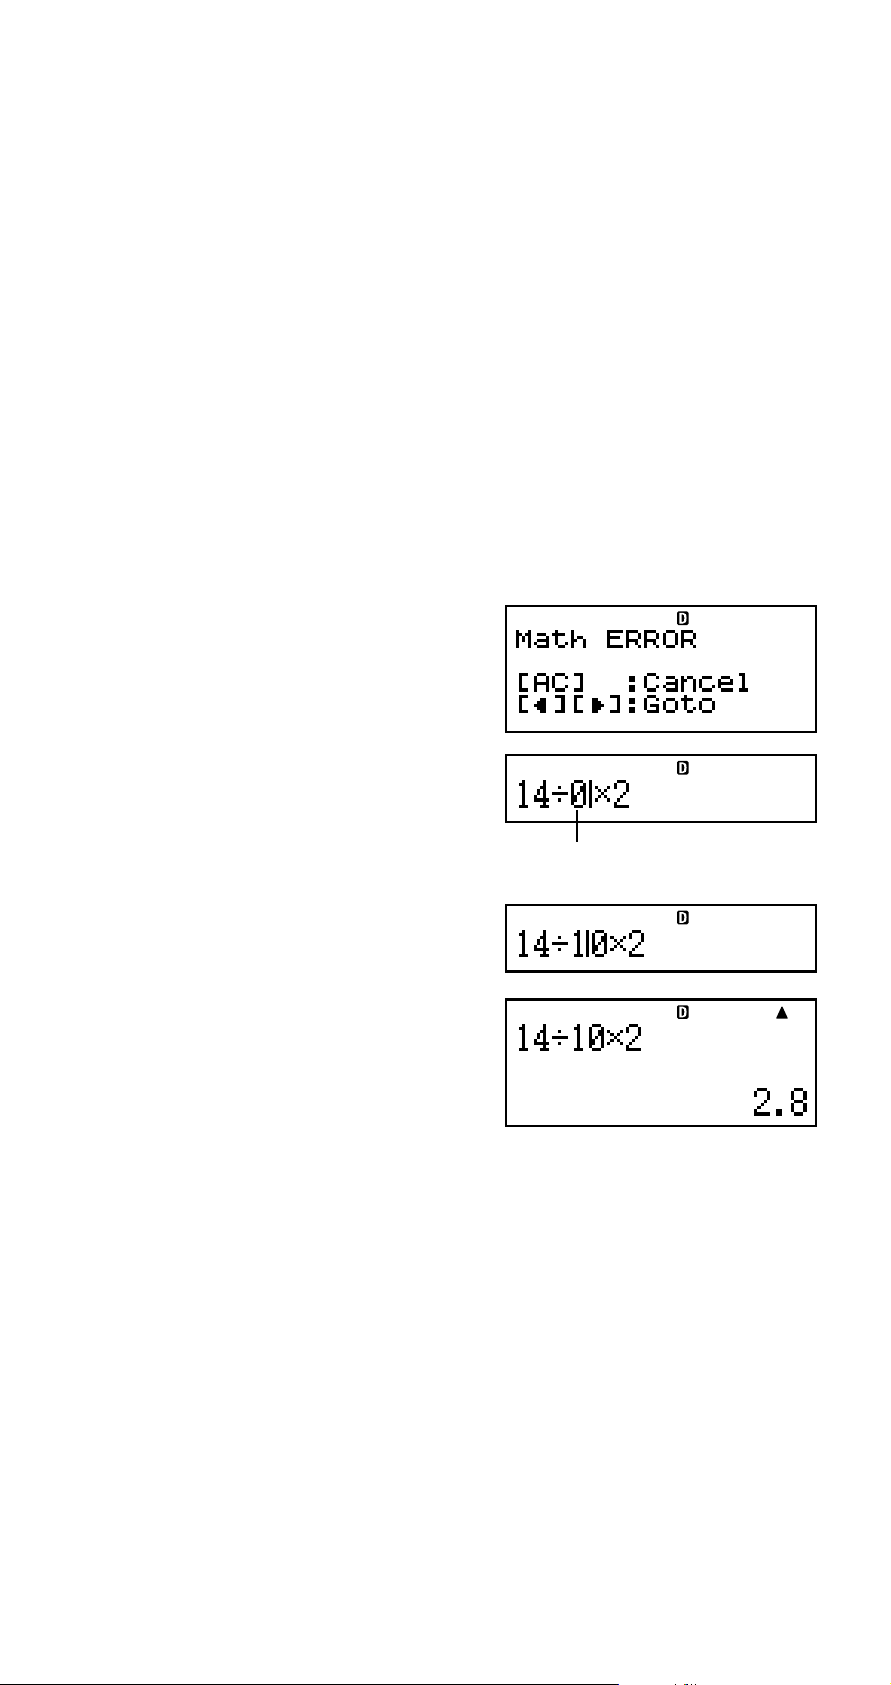
k Displaying the Location of an Error
If an error message (like “Math ERROR” or “Syntax
ERROR”) appears when you press E, press d or e.
This will display the part of the calculation where the error
occurred, with the cursor positioned at the error location.
You can then make necessary corrections.
Example: When you input 14 ÷ 0 × 2 = by mistake instead
of 14 ÷ 10 × 2 =
Insert Mode:
14/0*2E
Press e or d.
This is causing the error.
d1
E
You can also exit the error screen by pressing A, which
clears the calculation.
E-27
Page 30
Basic Calculations
This section explains how to perform arithmetic and percent
calculations.
All calculations in this section are performed in the
COMP Mode (g).
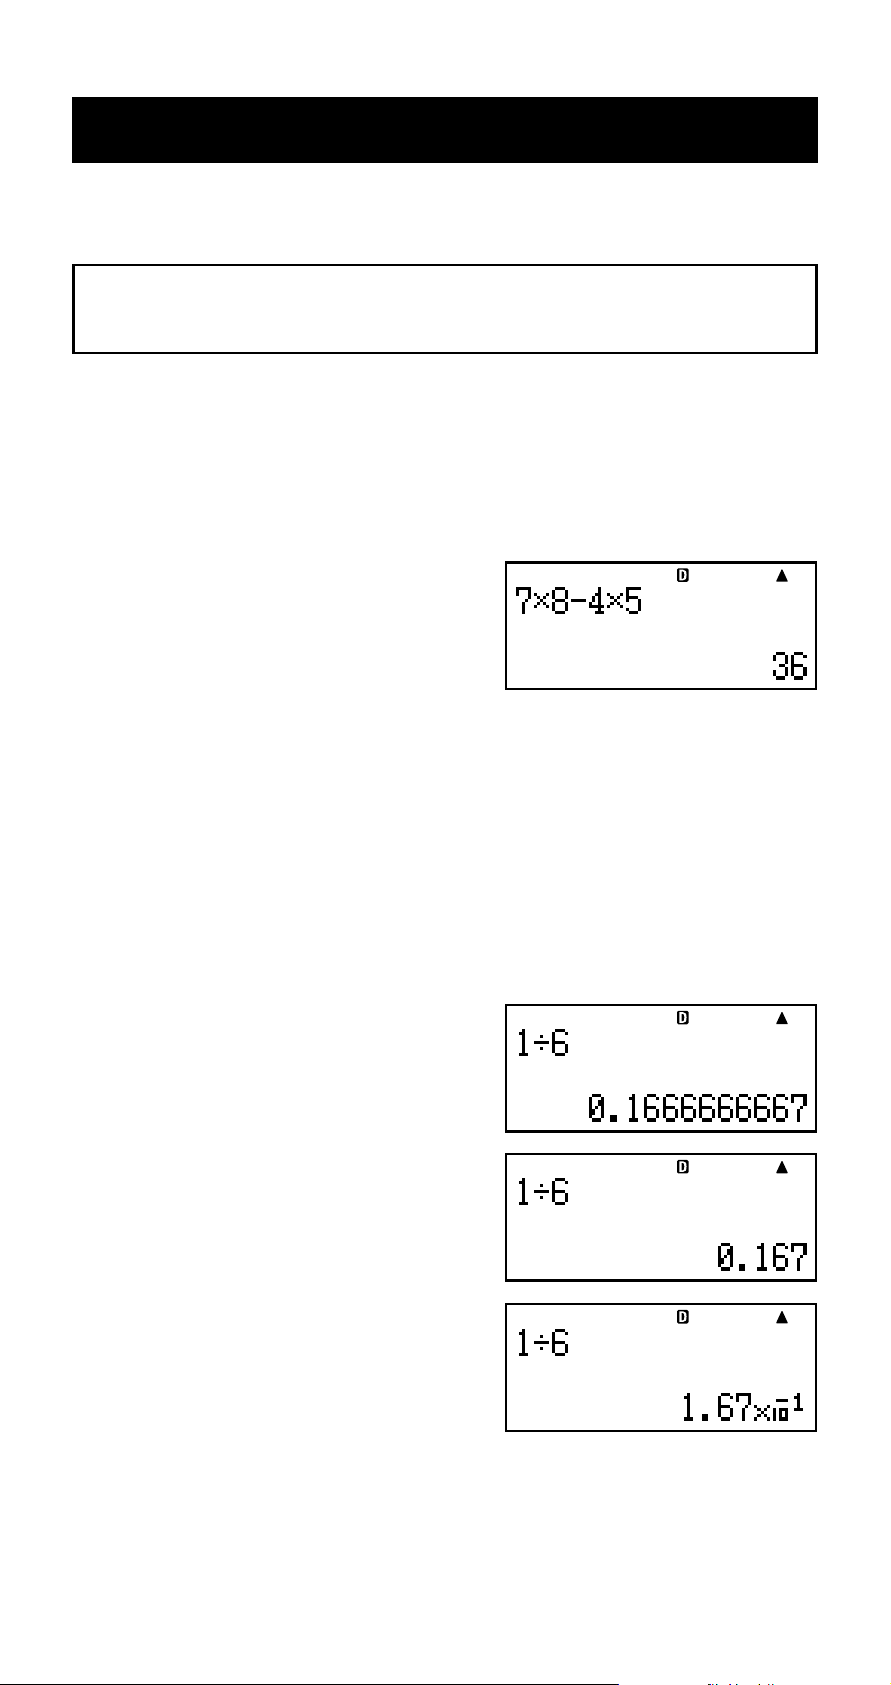
k Arithmetic Calculations
Use the +, -, *, and / keys to perform arithmetic
calculations.
Example: 7 × 8 – 4 × 5 = 36
7*8-4*5E
• The calculator automatically judges the calculation priority
sequence. For more information, see “Calculation Priority
Sequence” on page E-134.
A Number of Decimal Places and Number of
Significant Digits
You can specify a fixed number of decimal places and
significant digits for the calculation result.
Example: 1 ÷ 6 =
Initial default setting (Norm1)
FIX
3 decimal places (Fix3)
SCI
3 significant digits (Sci3)
• For more information, see “Configuring Settings” on page
E-16.
E-28
Page 31

A Omitting a Final Closed Parenthesis
You can omit any closed parenthesis ( ) ) immediately
preceding operation of the E key at the end of a
calculation.
Example: (2 + 3) × (4 – 1) = 15
(2+3)*
(4-1E
k Percent Calculations
Example 1: 2% = 0.02
21((%)E
Example 2: 150 × 20% = 30
150*20
1((%)E
Example 3: To calculate what percentage of 880 is 660.
660/880
1((%)E
Example 4: To increase 2500 by 15%.
2500+
2500*
151((%)E
E-29
Page 32

Example 5: To discount 3500 by 25%.
35003500*
251((%)E
Example 6: To discount the sum of 168, 98, and 734 by
20%.
168+98+
734E
-G*201((%)E
Example 7: If 300 grams are added to a test sample
originally weighing 500 grams, what is the
percentage increase in weight?
300+500
1.(A%)
Example 8: What is the percentage change when a value
is increased from 40 to 46? How about to 48?
Insert Mode:
46-40
1.(A%)
eeeY8E
E-30
Page 33

Example 9: To calculate the selling price and profit when
the purchase price is $480 and the profit rate
to the selling price is 25%.
480*25
1.(A%)
480/25
1.(A%)
Example 10: To calculate the bargain price and loss when
the purchase price is $130 and the loss rate
is 4%.
130*y4
1.(A%)
130/y4
1.(A%)
E-31
Page 34

Using Multi-statements in
Calculations
You can use the colon character (:) to connect two or more
expressions and execute them in sequence from left to
right when you press E.
Example: To create a multi-statement that performs the
following two calculations: 3 + 3 and 3 × 3
Insert Mode:
1. 3+3
2. t
3. “ : ” (fc), then E.
4. 3*3
Disp
E
“Disp” indicates this is an intermediate result of a multi-statement.
E
E-32
Page 35

Using Calculation History
Memory and Replay
Calculation history memory maintains a record of each
calculation expression you input and execute, and its result.
You can use calculation history memory in the COMP
Mode (g) only.
A Recalling Calculation History Memory
Contents
Press f to back-step through calculation history memory
contents. Calculation history memory shows both
calculation expressions and results.
Example:
1+1E
2+2E
3+3E
f
f
•Note that calculation history memory contents are cleared
whenever you turn off the calculator, press the O key,
change to another mode, or perform the operation under
“Initializing the Calculator” (page E-3) or “Initializing the
Setup Screen Settings” (page E-22).
• Calculation history memory is limited. When the
calculation you are performing causes calculation history
memory to become full, the oldest calculation is deleted
automatically to make room for the new calculation.
E-33
Page 36

A Replay Function
While a calculation result is on the display, you can press
d or e to edit the expression you used for the previous
calculation.
Example: 4 × 3 + 2.5 = 14.5
4 × 3 – 7.1 = 4.9
4*3+2.5E
A
d
YYYY
-7.1E
E-34
Page 37

Using Calculator Memory
Memory Name Description
Answer Memory Stores the last calculation result
obtained.
Independent Calculation results can be added to
Memory or subtracted from independent
memory. The “M” display indicator
indicates data in independent
memory.
Variables Six variables named A, B, C, D, X,
and Y can be used for storage of
individual values.
VARS The following are the names of the
financial calculation variables:
PV, PMT, FV, P/Y, C/Y, PM1, PM2,
Dys.
This section uses the COMP Mode (g) to demonstrate
how you can use memory.
n, I,
k Answer Memory (Ans)
A Answer Memory Overview
• Answer Memory contents are updated whenever you
execute a calculation using any one of the following keys:
E, 9, m, 1m(M–), t, or 1t(STO). Answer
Memory can hold up to 15 digits.
• Answer Memory contents do not change if an error occurs
during the current calculation.
• Answer Memory contents are maintained even if you
press the A key, change the calculation mode, or turn
off the calculator.
• When multiple results are obtained (in polar coordinate
calculations, when “ALL:Solve” is selected in the Simple
Interest Mode, etc.), the result that is displayed at the top
of the screen is the one stored in Answer Memory.
E-35
Page 38

A Using Answer Memory to Perform a Series
of Calculations
Example: To divide the result of 3 × 4 by 30
3*4E
(Continuing)/30E
Pressing / automatically inputs
“Ans” command.
• With the above procedure, you need to perform the
second calculation immediately after the first one. If you
need to recall Answer Memory contents after pressing
A, press the G key.
A Inputting Answer Memory Contents into an
Expression
Example: To perform the calculations shown below:
123 + 456 = 579 789 – 579 = 210
123+456E
789-GE
E-36
Page 39

k Independent Memory (M)
You can add calculation results to or subtract results from
independent memory. The “M” appears on the display when
independent memory contains a value.
A Independent Memory Overview
• The following is a summary of the different operations
you can perform using independent memory.
To do this:
Add the displayed value or
result of the expression to m
independent memory
Subtract the displayed value
or result of the expression 1m(M–)
from independent memory
Recall current independent
memory contents
Assign a specific value or 1. 3+5
result of the expression to 2. 1t(STO)
independent memory 3. “M:”(fc), then E.
•You can also store financial calculation value in
Perform this key
operation:
Sm(M)
(for example)
4. E(Yes)
independent memory.
Example: In the SMPL Mode, store the value of SI in
independent memory (M)
1. Enter the SMPL Mode for calculation of simple interest
(SI). See pages E-42 and E-43 for more information.
2. 1t(STO)
3. “SI”(fc), then E.
4. “M:”(fc), then E.
5. E(Yes)
•A number sign (#) next to the independent memory
variable name indicates that it already contains data.
Performing the following steps will replace any existing
data with the new data.
E-37
Page 40

• The “M” indicator appears in the upper left of the display
when there is any value other than zero stored in
independent memory.
• Independent memory contents are maintained even if you
press the A key, change the calculation mode, or turn
off the calculator.
A Calculation Examples Using Independent
Memory
• If the “M” indicator is on the display, perform the procedure
under “Clearing Independent Memory” before performing
this example.
Example: 23 + 9 = 32 23+9m
53 – 6 = 47 53-6m
–) 45 × 2 = 90 45*21m(M–)
99 ÷ 3 = 33 99/3m
(Total) 22 Sm(M)E
A Clearing Independent Memory
1. 0
2. 1t(STO)
3. “M:”(fc), then E.
4. E(Yes)
• This clears independent memory and causes the “M”
indicator to disappear from the display.
k Variables (A, B, C, D, X, Y)
A Variable Overview
•You can assign a specific value or a calculation result to
a variable.
Example: To assign the result of 3 + 5 to variable A.
1. 3+5
2. 1t(STO)
3. “A:”(fc), then E.
4. E(Yes)
E-38
Page 41

• Use the following procedure when you want to check the
contents of a variable.
Example: To recall the contents of variable A
Sn(A)
• The following shows how you can include variables inside
of an expression.
Example: To multiply the contents of variable A by the
contents of variable B
Sn(A)*So(B)E
•You can also assign a financial calculation value to a
variable.
Example: In the CMPD Mode, assign the value of PMT to
variable “A”.
1. CMPD mode: “PMT”
(fc).
2. 1t(STO)
3. “A:”(fc), then E.
4. E(Yes)
•A number sign (#) next to a variable name indicates that
there is already data assigned to the variable. Performing
the following steps will replace any existing data with the
new data.
•Variable contents are maintained even if you press the
A key, change the calculation mode, or turn off the
calculator.
9 × 6 + 3
Example:
= 1.425
5 × 8
1. 9*6+3
2. 1t(STO)
3. “B:” (fc), then E.
4. E(Yes)
5. 5*8
6. 1t(STO)
7. “C:” (fc), then E.
8. E(Yes)
E-39
Page 42

9. So(B)/SD(C)
E
k Financial Calculation Variables (VARS)
• The following are the names of the financial calculation
variables (VARS):
n, I, PV, PMT, FV, P/Y, C/Y, PM1, PM2, Dys.
• Financial calculation variables are used in financial
calculations to store values. See the sections that
describe the various modes for information about which
variables are used in each mode.
• In the COMP Mode, the above variables are used as
arithmetic variables, and are referred to as such in the
section explaining the COMP Mode.
A To select an financial calculation variable
in the COMP mode
1. Press 1t(VARS).
2. On the menu screen that appears, use fc to move
the highlighting to the variable you want to select, and
then press E.
A Clearing the Contents of VARS Memories
Only
1. O19(CLR)
2. “VARS:EXE” (fc), then E.
3. E(Yes)
4. A
•To cancel the clear operation without doing anything,
press E(Cancel) instead of E(Yes).
•VARS Memory Initial Default Values
P/Y, C/Y ....................................................................... 1
n, I, PV, PMT, FV, PM1, PM2, Dys .......................... 0
E-40
Page 43

k Clearing Memory Contents
Use the following procedure to clear the contents of Answer
Memory, independent memory, and all of the variables.
This procedure does not clear VARS memory contents.
See “Clearing the Contents of VARS Memories Only” for
more information.
1. O19(CLR)
2. “Memory:EXE” (fc), then E.
3. E(Yes)
4. A
•To cancel the clear operation without doing anything,
press E(Cancel) instead of E(Yes).
E-41
Page 44

Financial Calculation
k Simple Interest Mode
• The Simple Interest (SMPL) Mode lets you calculate the
interest amount and/or simple future value (principal and
interest amount).
A Entering the SMPL Mode
• Press S to enter the SMPL Mode.
Value Input Screen
A Setting Values
No. Display Name
1 Set* Days in Year (Date Mode) 365
Number of Interest Periods
2 Dys
(Number of Days)
3 I Interest Rate (Annual) 5%
4 PV Principal (Present Value) $10,000
* For information about specifying the Date Mode, see the
“Date Mode” item under “Configuring Settings” on page
E-16.
Values Used
in Examples
120
A Basic SMPL Mode Procedure
Example 1: To calculate the interest amount (SI), and the
simple future value (SFV)
1. Input the values for 1, 2, 3, and 4 from the Setting
Values table above.
• For this example, use
fc to select 1 “Set:”,
and then press E.
E-42
Page 45

• Press 2 to select “365”.
• Use fc to select 2
“Dys”, input 120, and then
press E.
• Use fc to select 3 “
E.
• Use fc to select 4 “PV”, input 10000, and then
press E.
2. Select the value you want to calculate.
• For this example, use
fc to select “ALL:
Solve”.
3. Press 9 to perform the
calculation.
• Pressing the E key returns to the value input screen.
•To solve for the items that have “Solve” specified (such
as “ALL:Solve”), you can press E instead of 9.
I”, input 5, and then press
A Other SMPL Mode Calculations
Example 2: To calculate the simple interest (SI) amount
only
• In step 2 of the basic procedure (Example 1), select
“SI:Solve”.
Example 3: To calculate the simple future value (SFV)
only
• In step 2 of the basic procedure (Example 1), select
“SFV:Solve”.
E-43
Page 46

A SMPL Mode Financial Calculation Variables
SI' =
Dys
365
× PV × i
I%
100
i =
SI' =
Dys
360
× PV × i
I%
100
i =
SI = –SI'
SFV = –(PV + SI')
(VARS)
•Variables Dys, I, and PV are used in the SMPL Mode.
• The values of SMPL Mode variables are retained even if
you change to another mode. Note, however, that SMPL
Mode variables are also used by other modes, so
performing an input or calculation operation may change
the values assigned to them.
• Though SMPL Mode variables are financial calculation
variables, they are also used by arithmetic and function
operations in the COMP Mode.
A Calculation Formulas
365-day Mode
360-day Mode
SI : simple interest
Dys : number of interest periods
PV : principal
I
%:interest rate (annual)
SFV : principal plus interest
k Compound Interest Mode
• The Compound Interest (CMPD) Mode lets you calculate
any one of the following values, by inputting values for
the other four: number of payments, interest rate,
principal, payment amount, and future value (principal
and interest, or final payment amount).
A Entering the CMPD Mode
• Press c to enter the CMPD Mode.
Value Input Screen
E-44
E
Page 47

A Setting Values
No. Display Name
Values Used
in Examples
1 Set*
1
Payment Period (Payment) End
2 n Number of Payments 48
3 I Interest Rate 4%
4 PV Present Value (Principal) –$1,000
5 PMT Payment Amount –$300
Future Value (Principal and
6 FV Interest, or Final Payment $16,760
Amount)
Number of Annual Payments
7 P/Y
12
(PMT)
Number of Annual
8 C/Y*
2
12
Compoundings
1
*
• For information about specifying the payment period,
see the “Payment” item under “Configuring Settings”
on page E-16.
• In the case of compound interest calculations, you can
also use the compound interest mode (dn) setting on
the setup screen for interest calculations of odd (partial)
months. See the explanation of the compound interest
mode (dn) setting (page E-16) for more information.
2
*
Specify 2 for semiannual compound interest, or 12 for
monthly compound interest.
Note
• After specifying the 1 Payment Period (Payment) and
inputting values for 7 Number of Annual Payments
(P/Y) and 8 Number of Annual Compoundings, you can
calculate any one of the following by inputting values for
the other four: Number of Payments, Interest Rate,
Principal, Payment Amount, Future Value (principal and
interest, or final payment amount).
• Input money paid out as a negative value, using the y
key to input the minus sign.
E-45
E
Page 48

A Basic CMPD Mode Procedure
Example 1: To calculate the future value (FV) of an
investment vehicle that pays an annual interest rate of
4%, when the initial deposit is $1,000 and additional
deposits of $300 are made each month
1. Input the required values from the Setting Values table
(page E-45).
• For this example, use
fc to select 1 “Set:”,
and then press E.
• Press 2 to select “End”.
• Use fc to select 2
“
n”, input 48, and then
press E.
• Use fc to select 3 “
E.
• Use fc to select 4 “PV”, input –1000, and then
press E.
• Use fc to select 5 “PMT”, input –300, and then
press E.
• Use fc to select 7 “P/Y”, input 12, and then press
E.
• Use fc to select 8 “C/Y”, input 12, and then press
E.
Input Precautions
• Before specifying the number of months when there
is a partial month, see “Calculating the Number of
Months when a Partial Month is Included” (page
E-47).
• Input money paid out as a negative value, using the
I”, input 4, and then press
y key to input the minus sign.
2. Select the value you want to calculate.
• For this example, use
fc to select “FV”.
E-46
Page 49

3. Press l to perform the
calculation.
A Calculating the Number of Payments (n),
Interest Rate (I%), Present Value (Principal:
PV), and Payment Amount (PMT)
• Use the same procedure as shown under “Example 1”
(page E-46), substituting the required values.
A Calculating the Number of Months when a
Partial Month is Included
The following example shows how to calculate the number
of months (number of days/total days in the month) for the
number of payments (
Example 1: When the payment period is 16 months and
20 days
• When P/Y=12,
period (number of months).
1. Use fc to select “
2. Input the division operation that divides the number of
days in the partial month (20 in this example) by the
total number of days in the month.
• This example assumes
that there are 30 days in
the month.
3. Add the number of full
months (16 in this example).
n can be thought of as being the payment
n) when a partial month is include.
n”.
4. Press E.
Note
• When n includes a fractional part (odd period), the
calculator always assumes the odd period occurs before
the first full payment period.
E-47
E
Page 50

A Selecting Interest Calculation for a Period
V
with a Partial Month
•You can select compound interest or simple interest to
calculate interest for a period with a partial month. Before
performing each type of calculation, first use Configuring
Settings (page E-16) to select either compound interest
or simple interest for the dn setting.
A CMPD Mode Financial Calculation
Variables (VARS)
•Variables n, I, PV, PMT, FV, P/Y, and C/Y are used in
the CMPD Mode.
• The values of CMPD Mode variables are retained even if
you change to another mode. Note, however, that CMPD
Mode variables are also used by other modes, so
performing an input or calculation operation may change
the values assigned to them.
• Though CMPD Mode variables are financial calculation
variables, they are also used by arithmetic and function
operations in the COMP Mode.
A Calculation Formulas
uu
u PV, PMT, FV, n
uu
I % G 0
PV =
–α × PMT – × FV
PMT =
– × PV – × PMT
FV =
log
n =
γ
– × PV – × F
γ
(1+ iS) × PMT – FV × i
{}
(1+ iS) × PMT + PV × i
log (1+ i)
β
γ
β
α
α
β
E-48
D
Page 51

I % = 0
PV = – (PMT × n + FV )
PMT = –
FV
= – (PMT × n + PV)
n =
–
= (1+ i × S) ×
α
(1+ i )
γ
=
{
1+ i × Frac (n) ....... dn : SI (Setup Screen)
0 ............................ Payment : End
S =
1 ............................ Payment : Begin
{
PV + FV
n
PV + FV
PMT
Frac
1 –
β
, =
i
(n)
........... dn : CI (Setup Screen)
(1 + i)
β
(Setup Screen)
(Setup Screen)
(–Intg(n))
I %
100
i =
{
(1+ ) –1
uu
u I
%
uu
i (effective interest rate)
i (effective interest rate) is calculated using Newton's
Method.
γ
× PV + α × PMT + β × FV = 0
To I % from i (effective interest rate)
I% =
............................... (P/Y = C/Y = 1)
C/Y
I %
100 × [C/Y ]
i × 100 ................................. (P/Y = C/Y = 1)
P/Y
C/Y
(1+ i )–1
{
{ }
P/Y
.....
C/Y × 100 ...
×
(Other than
those above)
(Other than
those above)
E-49
Page 52

n : Number of Payments
I
%:Interest Rate
PV : Present Value (Principal)
PMT : Payment Amount
FV : Future Value (Principal and Interest, or Final
Payment Amount)
P/Y : Number of Annual Payments (PMT)
C/Y : Number of Annual Compoundings
Note
• This calculator performs interest (I) calculations using
Newton’s Method, which produces approximate values
whose precision can be affected by various calculation
conditions. Because of this, interest calculation results
produced by this calculator should be used keeping the
above limitation in mind, or the results should be verified.
• When you use f and c to select an item that can be
calculated, the “=” changes to “7”. You can perform a
calculation by inputting the required values for the other
items, and then pressing the l key. Performing the
calculation causes the “7” to change back to “=”.
k Cash Flow Mode
• The Cash Flow (CASH) mode calculates the total of
income and expenses over a fixed period, and then uses
the discounted cash flow (DCF) method to perform
investment appraisal. The following four items are
appraised.
NPV : Net Present Value
IRR : Internal Rate of Return
PBP : Payback Period*
NFV : Net Future Value
* The payback period (PBP) can also be called the
“discounted payback period” (DPP). When the annual
interest rate (
payback period” (SPP).
I) is zero, the PBP is called the “simple
E-50
E
Page 53

A Entering the CASH Mode
• Press C to enter the CASH Mode.
Value Input Screen
A cash flow diagram like the one shown below helps to
visualize the movement of funds.
CF7
CF2
CF3
CF5
CF6
CF4
CF1
CF0
With this graph, the initial investment amount is represented
by CF
years later by CF
0. The cash flow one year later is shown by CF1, two
2, and so on.
A Setting Values
No. Display Name
1 I Annual Interest 3%
Values Used
in Examples
A Receipt and Payment Summary
Period Receipt/Payment
CF0 Payment –$10,000
CF1 Payment –$1,000
CF2 Receipt $4,500
CF3 Receipt $5,000
CF4 Receipt $4,000
• Input money paid out as a negative value, using the y
key to input the minus sign.
E-51
Values Used
in Examples
Page 54

A Basic CASH Mode Procedure
Example 1: To calculate net present value (NPV)
1. Input the annual interest (
I), and then receipt and
payment values provided on page E-51.
• Use fc to select 1
“
I”, input 3, and then
press E.
• Use fc to select “Csh
=D.Editor
x”, and then
press E.
This displays the DataEditor. Only the
for calculation. Any values in the
y-column and FREQ-
x-column is used
column are not used.
Note
• The STAT editor and the D.Editor x of the CASH Mode
use the same memory area to store data.
• –10000 E(CF
0)
Input money paid out as a
negative value, using the
y key to input the minus
sign.
• –1000 E(CF
• 4500 E(CF
• 5000 E(CF
• 4000 E(CF
1)
2)
3)
4)
2. Press E to return to the value input screen.
3. Select the value you want to calculate.
• For this example, use
fc to select “NPV:
Solve”.
4. Press l to perform the
calculation.
• Pressing the E key returns to the value input screen.
E-52
Page 55

A Other CASH Mode Calculations
Example 2: To calculate the internal rate of return (IRR)
• In step 3 of the basic procedure (Example 1), select
“IRR:Solve”.
• The IRR calculation result is assigned to financial variable
(VARS)
Example 3: To calculate the payback period (PBP)
• In step 3 of the basic procedure (Example 1), select
“PBP:Solve”.
Example 4: To calculate net future value (NFV)
• In step 3 of the basic procedure (Example 1), select “NFV:
Solve”.
I.
A Maximum Number of DataEditor Items
Maximum Number of
Data Items
• Only the
80 X
40 X, Y or X, FREQ
26 X, Y, FREQ
x-column is used for calculation. Any values in
DataEditor Screen
the
y-column and FREQ-column are not used.
• Normally, you will be able to input up to 80 data items in
the DataEditor.
•To maximize the number of data items you can input,
enter the STAT Mode, select “1-VAR”, and then use the
setup screen to select “Off” for the “STAT” setting (page
E-21).
•Values you input while “1-VAR” is selected are cleared
when “2-VAR” is selected in the STAT Mode. Conversely,
values you input while “2-VAR” is selected are cleared
when “1-VAR” is selected in the STAT Mode.
A CASH Mode Financial Calculation Variables
(VARS)
•Variable I is used in the CASH Mode.
• The value of the CASH Mode variable is retained even if
you change to another mode. Note, however, that
I is
also used by other modes, so performing an input or
calculation operation may change the value assigned to
it.
E-53
Page 56

• Though
N
N
I is a financial calculation variable, it is also
used by arithmetic and function operations in the COMP
Mode.
A Calculation Formulas
u NPV
1
CF
PV = CF0 + + + +
(1+ i)
CF
2
(1+ i)
2
CF
3
(1+ i)
3
CF
… +
: natural number up to 79
n
n
(1+ i)
n
I %
i =
100
u NFV
NFV = NPV × (1 + i )
n
u IRR
is calculated using Newton’s Method.
IRR
1
CF
0 = CF0 + + + + … +
(1+ i)
In this formula,
to
i × 100. It should be noted, however, that minute
NPV = 0, and the value of IRR is equivalent
CF
2
(1+ i)
2
CF
3
(1+ i)
CF
n
3
(1+ i)
n
fractional values tend to accumulate during the subsequent
calculations performed automatically by the calculator, so
NPV never actually reaches exactly zero. IRR becomes
more accurate the closer that
NPV approaches to zero.
u PBP
0 .................................. (CF0 > 0)
PBP =
n –
{
NPV
n
= 0
CF
(1 + i)
PVn =
: Smallest positive integer that satisfies the conditions
n
Σ
k
NPV
n
k
k
n
+1
– NPV
(Other than
...
those above)
n
NPVn < 0, NPVn+1 > 0, or 0.
E-54
Page 57

k Amortization Mode
• The Amortization (AMRT) Mode lets you calculate the
principal balance, and the interest portion and principal
portion of monthly payments, as well as interest and
principal amounts paid to date.
BAL : Principal balance upon completion of payment
PM2
INT : Interest portion of payment PM1
PRN : Principal portion of payment PM1
Σ
INT :Total interest paid from payment PM1 to
payment PM2
ΣPRN :Total principal paid from payment PM1 to
payment PM2
A Entering the AMRT Mode
• Press A to enter the AMRT Mode.
Value Input Screen
a
1 payment
b
1 PM1 PM2 Last.............. ..................... ............
Number of Payments
a : Interest portion of payment PM1 (INT)
c
b : Principal portion of payment PM1 (PRN)
c : Principal balance upon completion of payment PM2
(BAL)
E-55
Page 58

e
1 payment
d
PM2
1 PM1
Number of Payments
...............
Last............... ..................
d :Total principal paid from payment PM1 to payment
PM2 (ΣPRN)
e :Total interest paid from payment PM1 to payment PM2
(ΣINT)
A Setting Values
No. Display Name
Values Used
in Examples
1 Set*
1
Payment Period (Payment) End
Payment PM1
2 PM1
3 PM2
n*
3
4
(Number of Payments)
Payment PM2
2
*
(Number of Payments)
Number of Payments
(Number of Months)
15
28
—
5 I Interest Rate (Annual) 2%
6 PV Principal $100,000
7 PMT Payment Amount –$920
Ending Balance after Last
3
8 FV
*
Payment (Future Value)
—
9 P/Y
0 C/Y*
Number of Annual Payments
(PMT)
Number of Annual
4
Compoundings
E-56
12
12
E
Page 59

1
*
For information about specifying the payment period,
see the “Payment” item under “Configuring Settings”
on page E-16.
2
*
Make sure the payment you specify for PM2 comes after
the payment you specify for PM1.
3
*
This variable is used by other modes. The value that
initially appears may be a value that was input or
calculated in another mode.
4
*
Specify 2 for semiannual compound interest, or 12 for
monthly compound interest.
• Input money paid out as a negative value, using the y
key to input the minus sign.
A Basic AMRT Mode Procedure
Example 1: To calculate the principal balance (BAL) after
payment 28
1. Input the values for 1, 2, 3, 5, 6, 7, 9, and 0
from the Setting Values table (page E-56).
• For this example, use
fc to select 1 “Set:”,
and then press E.
• Press 2 to select “End”.
• Use fc to select 2
“PM1”, input 15, and then
press E.
• Use fc to select 3 “PM2”, input 28, and then press
E.
• Use fc to select 5 “
I”, input 2, and then press
E.
• Use fc to select 6 “PV”, input 100000, and then
press E.
• Use fc to select 7 “PMT”, input –920, and then
press E.
• Use fc to select 9 “P/Y”, input 12, and then press
E.
• Use fc to select 0 “C/Y”, input 12, and then press
E.
E-57
Page 60

2. Select the value you want to calculate.
• For this example, use
fc to select “BAL:
Solve”.
3. Press l to perform the
calculation.
• Pressing the E key returns to the value input screen.
A Other AMRT Mode Calculations
Example 2: To calculate the interest amount (INT)
included in payment 15 (PM1)
• In step 2 of the basic procedure (Example 1), select
“INT:Solve”.
Example 3: To calculate the principal amount (PRN)
included in payment 15 (PM1)
• In step 2 of the basic procedure (Example 1), select
“PRN:Solve”.
Example 4: To calculate total interest paid (ΣINT) from
payment 15 (PM1) to payment 28 (PM2)
• In step 2 of the basic procedure (Example 1), select
“ΣINT:Solve”.
Example 5: To calculate total principal paid (ΣPRN) from
payment 15 (PM1) to payment 28 (PM2)
• In step 2 of the basic procedure (Example 1), select
“ΣPRN:Solve”.
A AMRT Mode Financial Calculation Variables
(VARS)
•Variables PM1, PM2, n, I, PV, PMT, FV, P/Y, and C/Y
are used in the AMRT Mode.
• The values of AMRT Mode variables are retained even if
you change to another mode. Note, however, that AMRT
Mode variables are also used by other modes, so
performing an input or calculation operation may change
the values assigned to them.
• Though AMRT Mode variables are financial calculation
variables, they are also used by arithmetic and function
operations in the COMP Mode.
E-58
Page 61

A Calculation Formulas
: Interest portion of payment PM1 (INT)
a
INT
PM1
= I BAL
PM1–1
× i I × (PMT sign)
b: Principal portion of payment PM1 (PRN)
PRN
PM1
= PMT + BAL
PM1–1
× i
c: Principal balance upon completion of payment PM2
(BAL)
BALPM2 = BALPM2–1 + PRNPM2
d:Total principal paid from payment PM1 to payment PM2
(ΣPRN)
PM2
PRN = PRN
Σ
PM1
PM1
+ PRN
PM1+1
+ … + PRN
PM2
e:Total interest paid from payment PM1 to payment PM2
(ΣINT)
•
a + b = one repayment (PMT)
PM2
INT = INTPM1 + INTPM1+1 + … + INTPM2
Σ
PM1
BAL0 = PV ....................... Payment: End
(Setup Screen)
INT1 = 0, PRN1 = PMT ... Payment: Begin
(Setup Screen)
Converting between the Nominal Interest Rate and
Effective Interest Rate
The nominal interest rate (
converted to an effective interest rate (
loans where the number of annual payments is different
from the number of annual compoundings calculation
periods.
I%' =
The following calculation is performed after conversion from
the nominal interest rate to the effective interest rate, and
the result is used for all subsequent calculations.
(1+ ) –1
{}
100 × [C / Y ]
I%
I
% value input by user) is
I
%´) for installment
[C / Y ]
[P / Y ]
×100
i = I%'÷100
k Conversion Mode
• The Conversion (CNVR) Mode lets you convert between
the nominal interest rate (APR) and effective interest rate
(EFF).
E-59
Page 62

A Entering the CNVR Mode
• Press n to enter the CNVR Mode.
Value Input Screen
A Setting Values
No. Display Name
Number of Annual
1 n
Compoundings
2 I Interest Rate (Annual) 3%
Values Used
in Examples
6
A Basic CNVR Mode Procedure
Example 1: To convert a nominal interest rate (APR) to
an effective interest rate (EFF)
1. Input the number of annual compoundings (
interest rate (
above.
• For this example, use
fc to select 1 “
input 6, and then press
I) values from the Setting Values table
n”,
n) and
E.
• Use fc to select 2 “
E.
2. Select the value you want to calculate.
• For this example, use
fc to select “EFF:
Solve”.
3. Press l to perform the calculation.
• Pressing the E key returns to the value input screen.
I”, input 3, and then press
E-60
Page 63

A Other CNVR Mode Calculations
A
Example 2: To convert an effective interest rate (EFF) to
a nominal interest rate (APR)
• In step 2 of the basic procedure (Example 1), select “APR:
Solve”.
A CNVR Mode Financial Calculation Variables
(VARS)
•Variables n and I are used in the CNVR Mode.
•A value is assigned to
or APR calculation in the CNVR Mode.
• The values of CNVR Mode variables are retained even if
you change to another mode. Note, however, that CNVR
Mode variables are also used by other modes, so
performing an input or calculation operation may change
the values assigned to them.
• Though CNVR Mode variables are financial calculation
variables, they are also used by arithmetic and function
operations in the COMP Mode.
I whenever you perform an EFF
A Calculation Formulas
n
–1 × 100
1
n
–1 × n ×100
EFF =
PR =
APR/100
1+
n
EFF
1+
100
APR
: nominal interest rate (%)
EFF :effective interest rate (%)
n : number of annual compoundings
k Cost/Sell/Margin Mode
• The Cost/Sell/Margin (COST) Mode lets you calculate
cost, selling price, or margin after inputting the other two
values. You can input the cost and selling price, for
example, and calculate the margin.
E-61
Page 64

A Entering the COST Mode
• Press o to enter the COST Mode.
Value Input Screen
A Setting Values
No. Display Name
1 CST Cost $40
2 SEL Selling Price $100
3 MRG Margin 60%
Values Used
in Examples
A Basic COST Mode Procedure
Example 1: To calculate the margin (MRG)
1. Input the cost (CST) and selling price (SEL) values from
the Setting Values table above.
• For this example, use
fc to select 1 “CST”,
input 40, and then press
E.
• Use fc to select 2 “SEL”, input 100, and then
press E.
2. Select the value you want to calculate.
• For this example, use
fc to select 3 “MRG”.
3. Press l to perform the
calculation.
E-62
Page 65

A Other COST Mode Calculations
M
Example 2: To calculate the cost based on margin and
selling price
1. Input the margin (MRG) and selling price (SEL) values
in step 1 of the basic procedure (Example 1).
2. Select 1 “CST” in step 2.
Example 3: To calculate the selling price (SEL) based on
margin and cost
1. Input the margin (MRG) and cost (CST) values in step
1 of the basic procedure (Example 1).
2. Select 2 “SEL” in step 2.
A COST Mode Financial Calculation Variables
(VARS)
•Variables CST, SEL, and MRG are used in the COST
Mode.
• These variables are used in the COST Mode only, and
their values are retained even when you change to
another mode.
A Calculation Formulas
CST = SEL
SEL =
CST
1–
RG(%) =
CST
:cost
MRG
1–
100
1–
MRG
100
CST
× 100
SEL
SEL : selling price
MRG : margin
E-63
Page 66

k Day Calculation Mode
• The Day Calculation (DAYS) Mode lets you calculate the
number of dates from one date to another, the date that
falls on a specific number of days after a starting date,
and the date that falls on a specific number of data prior
to an ending date.
• Starting date (d1) and ending date (d2) calculations are
possible within the range of January 1, 1901 through
December 31, 2099.
A Entering the DAYS Mode
• Press D to enter the DAYS Mode.
Value Input Screen
A Setting Values
No. Display Name
Days in Year
1 Set*
2 d1*
3 d2*
1
(Date Mode)
2
Starting Date 11052004
(Month, Day, Year) (November 5, 2004)
2
Ending Date 04272005
(Month, Day, Year) (April 27, 2005)
Number of Days
4 Dys
1
• For information about specifying the Date Mode, see
*
(Duration)
the “Date Mode” item under “Configuring Settings” on
page E-16.
Values Used
in Examples
365
173
• The following rules apply when a 360-day year is
specified.
When the starting date (d1) is the 31st of a month,
the calculation is performed using the 30th of the same
month.
When the ending date (d2) is the 31st of a month, the
calculation is performed using the 1st of the following
month.
E-64
Page 67

2
*
•You must input two digits for the month and day. This
means you should include a leading zero for values
from 1 through 9 (01, 02, 03... etc.).
•You can specify either month, day, year (MDY) or day,
month, year (DMY) as the date input format. See the
“Date Input” setting under “Configuring Settings” (page
E-16).
Note
• After specifying the 1 Days in Year (Date Mode) in the
Day Calculation Mode, you can calculate any one of the
following three values by inputting values for the other
two: 2 Starting Date (d1), 3 Ending Date (d2), and 4
Number of Days (Dys).
A Basic DAYS Mode Procedure
Example 1: To calculate the number of days between two
dates
1. Input the required values from the Setting Values table
(page E-64).
• For this example, use
fc to select 1 “Set:”,
and then press E.
• Press 2 to select “365”.
• Use fc to select 2
“d1”, input 11052004, and
then press E.
• Use fc to select 3 “d2”, input 04272005, and then
press E.
2. Select the value you want to calculate.
• For this example, use
fc to select “Dys”.
3. Press l to perform the
calculation.
E-65
Page 68

A Other DAYS Mode Calculations
Note
• For Example 2 and Example 3, use the setup screen to
change the “Date Mode” setting to “365”.
• Calculation results “d1” and “d2” are not stored in Answer
Memory.
Example 2: To calculate date that falls a specific number
of days (Dys) from a starting date (d1)
1. In step 1 of the basic procedure (Example 1), input 173
for Dys and do not input anything for d2.
2. In step 2, select “d2”.
Example 3: To calculate the date that falls a specific
number of days (Dys) before an ending date
(d2)
1. In step 1 of the basic procedure (Example 1), input 173
for Dys and do not input anything for d1.
2. In step 2, select “d1”.
A DAYS Mode Financial Calculation Variables
(VARS)
•Variables d1, d2, and Dys are used in the DAYS Mode.
• The values of DAYS Mode variables are retained even if
you change to another mode. Note, however, that DAYS
Mode variables are also used by other modes, so
performing an input or calculation operation may change
the values assigned to them.
• Though DAYS Mode variables are financial calculation
variables, variable “Dys” can be recalled in the COMP
Mode.
k Depreciation Mode (FC-200V only)
• The Depreciation (DEPR) Mode lets you use any of the
four methods for depreciation.
SL : Straight-Line Method
FP : Fixed Percentage Method
SYD : Sum-of-the-Year’s Digits Method
DB : Declining Balance Method
E-66
Page 69

A Entering the DEPR Mode
• Press d to enter the DEPR Mode.
Value Input Screen
A Setting Values
No. Display Name
1 n Useful Life 6
Depreciation Ratio 25%
2 I*
3 PV Original Cost (Basis) $150,000
4 FV Residual Book Value $0
5
6 YR1
1
Depreciation ratio in the case of the fixed percent (FP)
*
method, depreciation factor in the case of the declining
1
Factor 200
Year for Calculation of
j
Depreciation Cost
Number of Months in the
First Year of Depreciation
Values Used
in Examples
Year 3
2
balance (DB) method. Specifying 200 for the
depreciation factor while declining balance (DB)
depreciation is being calculated causes depreciation to
be calculated using the double declining balance (DDB)
method.
A Basic DEPR Mode Procedure
Example 1: To calculate depreciation using Straight-Line
depreciation
1. Input the values for 1, 2, 3, 4, 5, and 6 from the
Setting Values table above.
• For this example, use
fc to select 1 “
input 6, and then press
E.
n”,
E-67
Page 70

• Use fc to select 2 “
E.
I”, input 25, and then press
Note that you need to input 2 “
using the fixed percent (FP) or declining balance (DB)
method.
• Use fc to select 3 “PV”, input 150000, and then
press E.
• Use fc to select 4 “FV”, input 0, and then press
E.
• Use fc to select 5 “
E.
• Use fc to select 6 “YR1”, input 2, and then press
E.
2. Select the value you want to calculate.
• For this example, use
fc to select
“SL:Solve”.
I” only when you are
j ”, input 3, and then press
3. Press l to perform the
calculation.
• Pressing the E key returns to the value input screen.
A Other DEPR Mode Calculations
Example 2: To use the fixed percent method with a
depreciation ratio is 25%
• In step 2 of the basic procedure (Example 1), select “FP:
Solve”.
Example 3: To use the sum-of-the-year’s digits method
• In step 2 of basic procedure (Example 1), select
“SYD:Solve”.
Example 4: To use the double declining balance method
1. In step 1 of the basic procedure (Example 1), input 200
for “
I”.
2. In step 2, select “DB:Solve”.
E-68
Page 71

A DEPR Mode Financial Calculation Variables
(VARS)
•Variables n, I, PV, and FV are used in the DEPR Mode.
• The values of DEPR Mode variables are retained even if
you change to another mode. Note, however, that DEPR
Mode variables are also used by other modes, so
performing an input or calculation operation may change
the values assigned to them.
• Though DEPR Mode variables are financial calculation
variables, they are also used by arithmetic and function
operations in the COMP Mode.
A Calculation Formulas
Depreciation for an item acquired part way through a year
can be calculated by month.
u Straight-Line Method
The straight-line method calculates depreciation for a given
period.
SL
(PV–FV )
1
=
n
YR1
u
12
(PV–FV )
SL
j
=
n
12– YR1
u
SL
n+1
(PV–FV )
=
n 12
(YR1G12)
SL
j : depreciation charge for the jth year
n : useful life
PV : original cost (basis)
FV : residual book value
j : year for calculation of depreciation cost
YR1: number of months in the first year of depreciation
E-69
Page 72

u Fixed Percentage Method
Fixed percentage method can be used to calculate
depreciation for a given period, or to calculate the
depreciation rate.
YR1I%
FP
1
= PV ×
100
×
12
I%
FP
j
= (RDV
j–1
+ FV ) ×
100
n+1
FP
= RDVn (YR1G12)
RDV
RDVj = RDV
RDV
FP
1
= PV – FV – FP
j–1
– FP
n+1
= 0 (YR1G12)
j : depreciation charge for the
1
j
jth year
RDVj : remaining depreciable value at the end of jth
year
I
%:depreciation ratio
u Sum-of-the-Year’s Digits Method
The sum-of-the-year’s-digits method calculates depreciation for a given period.
n (n +1)
Z =
n' = n –
Z' =
2
YR1
12
(Intg (n' ) +1) (Intg (n' )+2 × Frac(n' ))
2
n
SYD1 =
Z
YR1
× (PV
12
– FV )
n'– j+2
)(PV
– FV – SYD1)( jG1)SYDj = (
Z'
n'– (n +1)+2
SYD
n+1
= (
)(PV
– FV – SYD1) ×
Z'
12–YR1
(YR1G12)
12
1
RDV
= PV – FV – SYD
RDVj = RDV
SYD
j : depreciation charge for the
j –1
– SYD
1
j
jth year
RDVj : remaining depreciable value at the end of jth
year
E-70
Page 73

u Declining Balance Method
R
D
D
R
D
R
The declining balance method calculates depreciation for
a given period.
YR1I%
B1 = PV ×
100n
×
12
DV1 = PV – FV – DB1
I%
Bj = (RDVj–1 + FV )
×
100n
DVj = RDVj–1 – DBj
Bn +1 = RDVn
DVn+1 = 0
DB
j : depreciation charge for the j th year
(YR1G12)
(YR1G12)
RDVj : remaining depreciable value at the end of jth
year
I
%:factor
k Bond Mode (FC-200V only)
• The Bond (BOND) Mode lets you calculate purchase price
and annual yield.
A Entering the BOND Mode
• Press b to enter the BOND Mode.
Value Input Screen
A Setting Values
No. Display Name
Periods/Y Annual
1 Set*
2 d1*
3 d2*
1
2
2*3
Bond Date Date
Purchase Date 06012004
(Month, Day, Year)
Redemption Date
(Month, Day, Year)
E-71
Values Used
in Examples
(June 1, 2004)
12152006
(December
15, 2006)
Page 74

No. Display Name
Values Used
in Examples
4 n
3
Payments Until Maturity
Number of Coupon
Redemption Price per $100
5 RDV*
4
$100
of face value
6 CPN*5Coupon Rate 3%
7 PRC*6Price per $100 of face value
–97.61645734
8 YLD Annual Yield 4%
1
*
•You can specify a date (Date) or a number of coupon
payments (Term) as the term for bond calculations.
See the “Bond Date” setting under “Configuring
Settings” (page E-16).
•You can specify once a year (Annual) or once every
six months (Semi-Annual) as the number of coupon
payments per year. See the “Periods/Y” setting under
“Configuring Settings” (page E-16).
2
*
•You must input two digits for the month and day. This
means you should include a leading zero for values
from 1 through 9 (01, 02, 03... etc.)
•You can specify either month, day, year (MDY) or day,
month, year (DMY) as the date input format. See the
“Date Input” setting under “Configuring Settings” (page
E-16).
3
*
When calculating the yield on call, input the call date
for d2.
4
*
When calculating the yield of maturity, input 100 for RDV.
5
*
In the case of a zero coupon, input 0 for CPN.
6
*
• When calculating the redemption price per $100 of
face value (PRC), you can also calculate accrued
interest (INT) and purchase price including accrued
interest (CST).
• Input money paid out as a negative value, using the
y key to input the minus sign.
E-72
Page 75

Note
•You can specify a starting date (d1) in the range of
January 1,1902 through December 30, 2097.
•You can specify an ending date (d2) in the range of
January 2,1902 through December 31, 2097.
• Input money paid out as a negative value, using the y
key to input the minus sign.
A Other Setup Items
• The initial setting of Date Mode is 365 (365-day year).
See the “Date Mode” setting under “Configuring Settings”
(page E-16).
•To display the Setup screen, press s.
A Basic BOND Mode Procedure
Example 1: To calculate the bond purchase price (PRC)
based on a specific date (Date)
1. Input the values required for the calculation from the
Setting Values table (pages E-71, E-72). Input 1, 2,
3, 5, 6, and 8 if “Date” is selected for “Bond Date”,
or 1, 4, 5, 6, and 8 if “Term” is selected for “Bond
Date”. On the setup screen, specify “365” for the “Date
Mode” setting.
• For this example, use
fc to select 1 “Set:”,
and then press E.
• Use fc to select
“Periods/Y”, and then
press E.
• Press 1 to select “Annual”.
• Use fc to select 1 “Set:”, and then press E.
• Use fc to select
“Bond Date”, and then
press E.
E-73
Page 76

• Press 1 to select “Date”.
• Use fc to select 2 “d1”,
input 06012004, and then
press E.
• Use fc to select 3 “d2”, input 12152006, and then
press E.
• Use fc to select 5 “RDV”, input 100, and then
press E.
• Use fc to select 6 “CPN”, input 3, and then press
E.
• Use fc to select 8 “YLD”, input 4, and then press
E.
2. Select the value you want to calculate.
• For this example, use
fc to select “PRC”.
3. Press l to perform the
calculation.
• Pressing the E key returns to the value input screen.
A Other BOND Mode Calculations
• Before performing a calculation based on a specific
number of payments (Term), be sure to specify “360” for
“Date Mode”, and “Annual” for “Periods/Y” (number of
coupon payments per year).
Example 2: To calculate the annual yield (YLD) based on
a specific date (Date)
1. In step 1 of the basic procedure (Example 1), input
–97.61645734 for PRC and do not input anything for
YLD.
2. In step 2, select “YLD”.
• Input money paid out as a negative value, using the
y key to input the minus sign.
E-74
Page 77

Example 3: To calculate a bond purchase price (PRC)
based on a specific number of payments
(Term)
1. In step 1 of the basic procedure (Example 1), select
2(Term) for “Bond Date”.
• This replaces input items d1 and d2 with input item
2. Input 3 for item
Example 4: To calculate the annual yield (YLD) based on
a specific number of payments (Term)
1. In step 1 of the basic procedure (Example 1), select
2(Term) for “Bond Date”.
• This replaces input items d1 and d2 with input item
2. Use fc to select 4 “
E.
3. Input –97.61645734 for PRC, without inputting anything
for YLD.
4. In step 2, select “YLD”.
n.
n”, input 3, and then press
n.
n.
A BOND Mode Financial Calculation
Variables (VARS)
• The values of the following BOND Mode variables are
retained even if you change to another mode:
• Note, however, that
modes, so performing an input or calculation operation
may change the values assigned to them.
• Though
can also be recalled in the COMP Mode.
• The following variables are used in the BOND Mode. Their
values are not retained if you change to another mode:
RDV, CPN, PRC, YLD.
n is a financial calculation variable, its contents
n, d1, and d2 are also used by other
n, d1, d2.
E-75
Page 78

A Calculation Formulas
D
Issue date
Purchase date (d1) Coupon Payment dates
PRC
: price per $100 of face value
A B
Redemption date (d2)
CPN : coupon rate (%)
YLD : annual yield (%)
A : accrued days
M : number of coupon payments per year
(1 = Annual, 2 = Semi-Annual)
N : number of coupon payments until maturity
(
n is used when “Term” is specified for “Bond
Date” on the setup screen.)
RDV : redemption price per $100 of face value
D : number of days in coupon period where
settlement occurs
B : number of days from purchase date until next
coupon payment date = D – A
INT : accrued interest
CST : price including interest
u Price per $100 of face value (PRC)
Date (Using the Setup Screen: Bond Date)
• For one or fewer coupon period to redemption
CPN
RDV +
M
PRC = – + ( )
B
YLD/100
1+ ( × )
D
M
AMCPN
×
D
E-76
Page 79

• For more than one coupon period to redemption
RDV
PRC = –
YLD/100
(N–1+B/D )
–
(1+ )
M
CPN
N
Σ
k
=1
M
YLD/100
+
(k–1+B/D )
(1+ )
M
A CPN
D
×
M
INT = –
CST = PRC + INT
Term (Using the Setup Screen: Bond Date)
CPN
RDV
n
PRC = – –
YLD/100
n
(1+ )
Σ
=1
k
YLD/100
(1+ )
M
AMCPN
×
D
M
k
M
INT = 0
CST
= PRC
u Annual Yield (YLD)
YLD is calculated using Newton’s Method.
Note
• This calculator performs annual yield (YLD) calculations
using Newton’s Method, which produces approximate
values whose precision can be affected by various
calculation conditions. Because of this, annual yield
calculation results produced by this calculator should be
used keeping the above limitation in mind, or the results
should be verified.
E-77
Page 80

k Break-Even Mode (FC-200V only)
• The Break-Even (BEVN) Mode has six sub-modes that
you can use to perform various break-even point
calculations.
A Entering the BEVN Mode
• Press B to enter the BEVN Mode.
A BEVN Mode Sub-modes
BEV:Break-even point sales quantity and sales
amount, sales quantity and sales amount that
attains a profit target, sales quantity and sales
amount that attains a profit ratio
MOS: Margin of Safety
DOL: Degree of Operating Leverage
DFL: Degree of Financial Leverage
DCL: Degree of Combined Leverage
QTY CONV. (Quantity Conversion):
Sales quantity and related values
• Use fc to select the sub-mode you want, and then
press E to enter it.
k BEV Sub-mode (Break-Even Mode 1)
• Use the BEV sub-mode to calculate the break-even point
sales quantity and sales amount, sales quantity and sales
amount that attains a profit target, and sales quantity and
sales amount that attains a profit ratio.
• The “break-even point” is the point where profit is 0 or
the profit ratio is 0%.
E-78
Page 81

A Entering the BEV Sub-mode
1. Press B to enter the Break-Even Mode.
2. Use fc to select
“BEV:EXE”.
3. Press E.
Value Input Screen
A Setting Values
No. Display Name
Values Used
in Examples
Profit or Profit Ratio
PRF (Profit)
(PRF/Ratio)
1 Set*
1
Sales Quantity or Sales Quantity
Amount (B-Even)
(Sales Quantity)
2 PRC Sales Price $100/unit
3 VCU Unit Variable Cost $50/unit
4 FC Fixed Cost $100,000
PRF*
2
Profit $400,000
5
2
r%*
QBE*
Profit Ratio 40%
3
Sales Quantity 10,000 units
6
SBE*
3
Sales Amount $1,000,000
1
*
•You can configure break-even point calculations to use
profit (PRF) or profit ratio (
r%). See the “PRF/Ratio”
setting under “Configuring Settings” (page E-16).
•You can configure break-even point calculations to use
sales quantity (Quantity) or sales amount (Sales). See
the “B-Even” setting under “Configuring Settings” (page
E-16).
2
*
This item becomes profit ratio (r%) when “Ratio” is
selected for “PRF/Ratio”.
3
*
This item becomes break-even sales amount (SBE)
when “Sales” is selected for “B-Even”.
E-79
Page 82

A Basic BEV Sub-mode Procedure
Example 1: To calculate the break-even point sales
quantity (QBE)
1. Input the values for 1, 2, 3, 4, and 5 from the Setting
Values table (page E-79).
• For this example, use
fc to select 1 “Set:”,
and then press E.
• Use fc to select
“PRF/Ratio”, and then
press E.
• Press 1 to select “PRF”.
• Use fc to select 1 “Set:”, and then press E.
• Use fc to select
“B-Even”, and then press
E.
• Press 1 to select “Quantity”.
• Use fc to select 2
“PRC”, input 100, and then
press E.
• Use fc to select 3 “VCU”, input 50, and then press
E.
• Use fc to select 4 “FC”, input 100000, and then
press E.
• Use fc to select 5 “PRF” or “
then press E.
r%”, input 0, and
2. Select the value you want to calculate.
• For this example, use
fc to select 6 “QBE”.
E-80
Page 83

3. Press l to perform the
calculation.
A Other BEV Sub-mode Calculations
Example 2: To calculate the break-even point sales
amount (SBE)
1. Select 2(Sales) for “B-Even” in step 1 of the basic
procedure (Example 1).
2. In step 2, select “SBE”.
Example 3: To calculate the sales quantity (QBE) required
to attain a profit target ($400,000)
• Input 400000 for PRF in step 1 of the basic procedure
(Example 1).
Example 4: To calculate the sales amount (SBE) required
to attain a profit target ($400,000)
1. Select 2(Sales) for “B-Even” and input 400000 for PRF
in step 1 of the basic procedure (Example 1).
2. In step 2, select “SBE”.
Example 5: To calculate the sales quantity (QBE) required
to attain a profit ratio target (40%)
• Select 2(
step 1 of the basic procedure (Example 1).
Example 6: To calculate the sales amount (SBE) required
1. Select 2(
“B-Even”, and input 40 for
procedure (Example 1).
2. In step 2, select “SBE”.
r%) for “PRF/Ratio” and input 40 for r% in
to attain a profit ratio target (40%)
r%) for “PRF/Ratio” and 2(Sales) for
r% in step 1 of the basic
Example 7: To calculate other values besides sales
quantity and sales amount
•You can calculate any one of the following five values by
inputting values the other four: 2 Sales Price, 3 Unit
Variable Cost, 4 Fixed Cost, 5 Profit or Profit Ratio, 6
Sales Quantity or Sales Amount.
E-81
Page 84

A BEV Sub-mode Financial Calculation
Variables (VARS)
•Variables PRC, VCU, FC, PRF, r%, QBE, and SBE are
used in the BEV sub-mode.
• BEV sub-mode variable contents are cleared whenever
you change to another mode other than the BEVN Mode
sub-modes (BEV, MOS, DOL, DFL, DCL, QTY CONV.).
A Calculation Formulas
u Profit (Setup Screen PRF/Ratio Setting: PRF)
+
–
+
–
PRF
VCU
PRF
PRC
VCU
FC
QBE
=
PRC
FC
SBE
= ×
PRC
u Profit Ratio (Setup Screen PRF/Ratio Setting: r%)
QBE
=
PRC
×
1–
r
%
100
–
VCU
FC
FC
×
SBE
=
PRC
×
1–
r
%
100
–
VCU
PRC
QBE : Sales Quantity
FC : Fixed Cost
PRF : Profit
PRC : Sales Price
VCU : Unit Variable Cost
SBE : Sales Amount
r%:Profit Ratio
k Margin of Safety Sub-mode
(Break-Even Mode 2)
• The Margin of Safety (MOS) sub-mode lets you calculate
how much sales can be reduced before losses start to
be sustained, in the case that the expected sales amount
is not attained.
E-82
Page 85

A Entering the MOS Sub-mode
1. Press B to enter the Break-Even Mode.
2. Use fc to select
“MOS:EXE”.
3. Press E.
Value Input Screen
A Setting Values
No. Display Name
1 SAL Sales Amount $1,200,000
2 SBE Break-even Sales Amount $1,000,000
3 MOS Margin of Safety
Values Used
in Examples
0.1667(16.67%)
A Basic MOS Sub-mode Procedure
Example 1: To calculate the margin of safety (MOS)
1. Input the required values from the Setting Values table
above.
• For this example, use
fc to select 1 “SAL”,
input 1200000, and then
press E.
• Use fc to select 2 “SBE”, input 1000000, and
then press E.
2. Select the value you want to calculate.
• For this example, use
fc to select 3 “MOS”.
3. Press l to perform the
calculation.
E-83
Page 86

A Other MOS Sub-mode Calculations
Example 2: To calculate a sales amount (SAL) or break-
even sales amount (SBE)
• Use the basic procedure (Example 1), substituting the
required values.
A MOS Sub-mode Financial Calculation
Variables (VARS)
•Variables SAL, SBE, and MOS are used in the MOS submode.
• MOS sub-mode variable contents are cleared whenever
you change to another mode other than the BEVN Mode
sub-modes (BEV, MOS, DOL, DFL, DCL, QTY CONV.).
A Calculation Formula
SAL – SBE
MOS
=
SAL
SAL
: Sales Amount
SBE : Break-even Sales Amount
MOS: Margin of Safety
k Degree of Operating Leverage Sub-
mode (Break-Even Mode 3)
• The Degree of Operating Leverage (DOL) sub-mode lets
you calculate how profit changes relative to a change in
the sales amount.
A Entering the DOL Sub-mode
1. Press B to enter the Break-Even Mode.
2. Use fc to select
“DOL:EXE”.
3. Press E.
Value Input Screen
E-84
Page 87

A Setting Values
No. Display Name
1 SAL Sales Amount $1,200,000
2 VC Variable Cost $600,000
3 FC Fixed Cost $200,000
4 DOL
Degree of Operating Leverage
Values Used
in Examples
1.5
A Basic DOL Sub-mode Procedure
Example 1: To calculate the degree of operating leverage
(DOL)
1. Input the required values from the Setting Values table
above.
• For this example, use
fc to select 1 “SAL”,
input 1200000, and then
press E.
• Use fc to select 2 “VC”, input 600000, and then
press E.
• Use fc to select 3 “FC”, input 200000, and then
press E.
2. Select the value you want to calculate.
• For this example, use
fc to select 4 “DOL”.
3. Press l to perform the
calculation.
A Other DOL Sub-mode Calculations
Example 2: To calculate the sales amount (SAL), variable
cost (VC), and fixed cost (FC)
• Use the basic procedure (Example 1), substituting the
required values.
E-85
Page 88

A DOL Sub-mode Financial Calculation
Variables (VARS)
•Variables SAL, VC, FC, and DOL are used in the DOL
sub-mode.
• DOL sub-mode variable contents are cleared whenever
you change to another mode other than the BEVN Mode
sub-modes (BEV, MOS, DOL, DFL, DCL, QTY CONV.).
A Calculation Formula
SAL
–
VC
DOL
=
SAL
–
VC
–
FC
SAL
: Sales Amount
VC :Variable Cost
FC : Fixed Cost
DOL : Degree of Operating Leverage
k Degree of Financial Leverage Sub-
mode (Break-Even Mode 4)
• The Degree of Financial Leverage (DFL) sub-mode lets
you calculate the influence of interest on earnings before
interest and taxes (EBIT).
A Entering the DFL Sub-mode
1. Press B to enter the Break-Even Mode.
2. Use fc to select
“DFL:EXE”.
3. Press E.
Value Input Screen
A Setting Values
No. Display Name
Earnings Before Interest and
1 EIT
2 ITR Interest $80,000
3 DFL
Taxes (EBIT)
Degree of Financial Leverage
E-86
Values Used
in Examples
$400,000
1.25
Page 89

A Basic DFL Sub-mode Procedure
Example 1: To calculate the degree of financial leverage
(DFL)
1. Input the required values from the Setting Values table
(page E-86).
• For this example, use
fc to select 1 “EIT”,
input 400000, and then
press E.
• Use fc to select 2 “ITR”, input 80000, and then
press E.
2. Select the value you want to calculate.
• For this example, use
fc to select 3 “DFL”.
3. Press l to perform the
calculation.
A Other DFL Sub-mode Calculations
Example 2: To calculate earnings before interest and
taxes (EBIT), and interest (ITR)
• Use the basic procedure (Example 1), substituting the
required values.
A DFL Sub-mode Financial Calculation
Variables (VARS)
•Variables EIT, ITR, and DFL are used in the DFL submode.
• DFL sub-mode variable contents are cleared whenever
you change to another mode other than the BEVN Mode
sub-modes (BEV, MOS, DOL, DFL, DCL, QTY CONV.).
E-87
Page 90

A Calculation Formula
EIT
DFL
=
EIT – ITR
EIT
: Earnings Before Interest and Taxes (EBIT)
ITR : Interest
DFL : Degree of Financial Leverage
k Degree of Combined Leverage Sub-
mode (Break-Even Mode 5)
• The Degree of Combined Leverage (DCL) sub-mode lets
you calculate the degree of operating leverage (percent
change in profit due to a change in sales amount), with
interest taken into consideration.
A Entering the DCL Sub-mode
1. Press B to enter the Break-Even Mode.
2. Use fc to select
“DCL:EXE”.
3. Press E.
Value Input Screen
A Setting Values
No. Display Name
1 SAL Sales Amount $1,200,000
2 VC Variable Cost $600,000
3 FC Fixed Cost $200,000
4 ITR Interest $100,000
5 DCL
Degree of Combined Leverage
Values Used
in Examples
2
E-88
Page 91

A Basic DCL Sub-mode Procedure
Example 1: To calculate the degree of combined leverage
(DCL)
1. Input the required values from the Setting Values table
(page E-88).
• For this example, use
fc to select 1 “SAL”,
input 1200000, and then
press E.
• Use fc to select 2 “VC”, input 600000, and then
press E.
• Use fc to select 3 “FC”, input 200000, and then
press E.
• Use fc to select 4 “ITR”, input 100000, and then
press E.
2. Select the value you want to calculate.
• For this example, use
fc to select 5 “DCL”.
3. Press l to perform the
calculation.
A Other DCL Sub-mode Calculations
Example 2: To calculate the sales amount (SAL), variable
cost (VC), fixed cost (FC), and interest (ITR)
• Use the basic procedure (Example 1), substituting the
required values.
A DCL Sub-mode Financial Calculation
Variables (VARS)
•Variables SAL, VC, FC, ITR, and DCL are used in the
DCL sub-mode.
• DCL sub-mode variable contents are cleared whenever
you change to another mode other than the BEVN Mode
sub-modes (BEV, MOS, DOL, DFL, DCL, QTY CONV.).
E-89
Page 92

A Calculation Formula
SAL – VC
DCL
=
SAL – VC – FC – ITR
SAL
: Sales Amount
VC :Variable Cost
FC : Fixed Cost
ITR : Interest
DCL : Degree of Combined Leverage
k Quantity Conversion Sub-mode
(Break-Even Mode 6)
• The Quantity Conversion (QTY CONV.) sub-mode lets
you calculate the sales amount, sales price, or sales
quantity after inputting the other two values.
•You can also calculate the variable cost, unit variable
cost, or sales quantity after inputting the other two values.
A Entering the QTY CONV. Sub-mode
1. Press B to enter the Break-Even Mode.
2. Use fc to select “QTY
CONV.:EXE”.
3. Press E.
Value Input Screen
E-90
Page 93

A Setting Values
No. Display Name
1 SAL Sales Amount $100,000
2 PRC Sales Price $200/unit
3 QTY Sales Quantity 500 units
4 VC Variable Cost $15,000
5 VCU Unit Variable Cost $30/unit
6 QTY Sales Quantity 500 units
Values Used
in Examples
A Basic QTY CONV. Sub-mode Procedure
Example 1: To calculate the sales quantity (QTY) from the
sales amount and sales price
1. Input the required values from among 1, 2, and 3 in
the Setting Values table above.
• In this example, use
fc to select 1 “SAL”,
input 100000, and then
press E.
• Use fc to select 2 “PRC”, input 200, and then
press E.
2. Select the value you want to calculate.
• In this example, use
fc to select 3 “QTY”.
3. Press l to perform the
calculation.
• The result of a 3 “QTY” (sales quantity) calculation is
also assigned to variable 6 “QTY”.
Example 2: To calculate the sales amount (SAL) and sales
price (PRC)
• Use the same procedure as Example 1, substituting the
required values.
E-91
Page 94

Example 3: To calculate the sales quantity (QTY) from
variable cost and unit variable cost
1. Input the required values from among 4, 5, and 6 in
the Setting Values table (page E-91).
• In this example, use
fc to select 4 “VC”,
input 15000, and then
press E.
• Use fc to select 5 “VCU”, input 30, and then press
E.
2. Select the value you want to calculate.
• In this example, use
fc to select 6 “QTY”.
3. Press l to perform the
calculation.
• The result of a 6 “QTY” (sales quantity) calculation is
also assigned to variable 3 “QTY”.
Example 4: To calculate the variable cost (VC) and unit
variable cost (VCU)
• Use the same procedure as Example 3, substituting the
required values.
A QTY CONV. Sub-mode Financial
Calculation Variables (VARS)
•Variables SAL, PRC, QTY, VC, and VCU are used in the
QTY CONV. sub-mode.
• QTY CONV. sub-mode variable contents are cleared
whenever you change to another mode other than the
BEVN Mode sub-modes (BEV, MOS, DOL, DFL, DCL,
QTY CONV.).
E-92
Page 95

A Calculation Formulas
SAL
=
VC
=
PRC
VCU
×
×
QTY
QTY
SAL
: Sales Amount
PRC : Sales Price
QTY : Sales Quantity
VC :Variable Cost
VCU : Unit Variable Cost
E-93
Page 96

Shortcuts
k Custom Shortcut Keys
You can assign a mode, setup information, a value, or a
calculation expression to a shortcut key for instant access
whenever you need it. This feature comes in handy when
you need to often perform the same calculation or input
the same data.
A Using Shortcut Keys
Example: To configure the shortcut keys to simplify
calculation of the value of the following
installment savings plan
Compound annual interest rate (
Payment period (Payment): End
Initial deposit (PV): –$1,000
Monthly deposit (PMT): –$50
Number of annual payments (P/Y): 12
Number of annual compoundings (C/Y): 12
Tax on interest (10%)
u To configure the SHORTCUT1 key
1. Press c to enter the Compound Interest Mode.
2. Input the applicable values for Payment,
P/Y, and C/Y.
• See “Compound Interest Mode” (page E-44) for more
information.
3. Use fc to select “
n”.
I): 3%
I, PV, PMT,
4. Press 1t(STO).
•A number sign (#) next to “Shortcut1” or “Shortcut2”
indicates that there is already data assigned to the
key. Performing the following steps will replace any
existing data with the new data.
STO
E-94
Page 97

5. Use fc to select
“Shortcut1”, and then press
E.
6. In response to the confirmation screen that appears,
press E(Yes).
• If you want to cancel this operation without assigning
anything to 1(Shortcut1) key, press E instead of
E in step 6.
u To configure the SHORTCUT2 key
1. Press m to enter the COMP Mode.
2. Input the formula shown below.
STO
(FV – ((–PV) + (–PMT) ×
0.9 + ((–PV) + (–PMT) ×
• “FV”, “PV” and “
(VARS).
3. Perform the same operation as steps 4, 5, and 6 under
“To configure the SHORTCUT1 key” to assign the above
formula to “Shortcut2”.
u To use the configured shortcut keys in a calculation
Example: To calculate the value of the savings plan after
five years (
1. Press 1(Shortcut1).
• This enters the mode
n” are financial calculation variables
n)) ×
n)
n = 60 months)
(CMPD) and configures
the settings assigned to
the 1(Shortcut1) key,
and selects “
2. Input 60, and then press E.
• Since all other input is performed by the data assigned
to the 1(Shortcut1) key, this is the only input
required. To calculate the value for a different length
of time, simply input the applicable number of months.
n” for input.
E-95
Page 98

3. Use fc to select “FV”, and then press l to
perform the calculation.
• This calculates the future value of the investment after
five years. The result appears on the display and is
stored in Answer Memory (Ans).
4. Press 2(Shortcut2).
• This recalls the formula
(for calculating tax)
assigned to the
2(Shortcut2) key.
5. Press E.
• Pressing the E key
calculates the net amount
received after application
of a 10% tax to the interest
amount.
A Initializing the Custom Shortcut Settings
1. O19(CLR)
2. “Shortcut:EXE” (fc), then E.
3. 1(Shortcut1) or 2(Shortcut2)
4. A
Note
•STAT Mode data and operations cannot be assigned to
the custom shortcut keys in the STAT Mode.
• In the CASH Mode, you cannot assign receipt and
payment amounts (for input on the value input screen) to
custom shortcut keys.
• Calculation history memory contents (page E-33) cannot
be assigned to a shortcut key.
• Contrast data and operations cannot be assigned to the
custom shortcut keys.
k Function Shortcut Keys
In the COMP Mode, the 1 (Shortcut1) and
2(Shortcut2) keys become “function shortcut” keys
named “FMEM1” and “FMEM2”.
E-96
Page 99

u To configure an FMEM key
–1
Example: To assign the function “sin
” to the FMEM1 key
1. Press m to enter the COMP Mode.
2. (1) t
–1
(2) “sin
” (fc), then E.
3. Press 1t(STO).
STO
•A number sign (#) next to “FMEM1” or “FMEM2”
indicates that there is already data assigned to the
key. Performing the following steps will replace any
existing data with the new data.
4. Use fc to select “FMEM1”, and then press E.
5. In response to the confirmation screen that appears,
press E(Yes).
• If you want to cancel this operation without assigning
anything to the FMEM1 key, press E instead of E
in step 5.
u To use the configured function memory key in a
calculation
Example: To recall the inverse sin function assigned to
the FMEM1 key
• Press 11(FMEM1).
A Initializing the Function Shortcut Settings
1. O19(CLR)
2. “FMEM:EXE” (fc), then E.
3. 1(FMEM1) or 2(FMEM2)
4. A
E-97
Page 100

Function Calculations
This section explains how to use the calculator’s built-in
functions.
• Certain function calculations may take some time to
display calculation results. Before performing an
operation, be sure to wait until execution of the current
operation is complete. You can interrupt an ongoing
operation by pressing A.
• Pressing t will display a menu of functions that you
can use to select the one you want to input. You can also
use a direct key operation to input the following functions.
FC-200V
Rnd(, sin(, cos(, tan(,
FC-100V
Rnd(, sin(, cos(, tan(,
2
x
, '(, ^(, e^(, ln(
e^(, 10^(, ^(, ln(, log(,
x
'(
All calculations in this section are performed in the
COMP Mode (g).
k Pi (π) and Natural Logarithm Base e
You can input pi (π) or natural logarithm base e into a
calculation. The following shows the required key
operations and the values this calculator uses for pi (
and
e.
π)
π = 3.14159265358980 (15(π))
e = 2.71828182845904 (S5(e))
k Trigonometric and Inverse
Trigonometric Functions
The angle unit required by trigonometric and inverse
trigonometric functions is one specified as the calculator’s
default angle unit. Before performing a calculation, be
sure to specify the default angle unit you want to use.
See “Configuring Settings” (page E-16) for more
information.
E-98
 Loading...