

Page 1

ClassPad 330
ClassPad OS Version 3.04
User’s Guide
E
CASIO Education website URL
http://edu.casio.com
ClassPad website URL
http://edu.casio.com/products/classpad/
ClassPad register URL
http://edu.casio.com/dl/
Page 2

GUIDELINES LAID DOWN BY FCC RULES FOR USE OF THE UNIT IN THE U.S.A. (not
applicable to other areas).
NOTICE
This equipment has been tested and found to comply with the limits for a Class B digital
device, pursuant to Part 15 of the FCC Rules. These limits are designed to provide reasonable
protection against harmful interference in a residential installation. This equipment generates,
uses and can radiate radio frequency energy and, if not installed and used in accordance with
the instructions, may cause harmful interference to radio communications. However, there is
no guarantee that interference will not occur in a particular installation. If this equipment does
cause harmful interference to radio or television reception, which can be determined by turning
the equipment off and on, the user is encouraged to try to correct the interference by one or
more of the following measures:
• Reorient or relocate the receiving antenna.
• Increase the separation between the equipment and receiver.
• Connect the equipment into an outlet on a circuit different from that to which the receiver is
connected.
• Consult the dealer or an experienced radio/TV technician for help.
FCC WARNING
Changes or modifications not expressly approved by the party responsible for compliance
could void the user’s authority to operate the equipment.
Proper connectors must be used for connection to host computer and/or peripherals in order to
meet FCC emission limits.
Connector SB-62 ClassPad to ClassPad
USB connector for the ClassPad ClassPad to Windows® compatible PC
Declaration of Conformity
Model Number: ClassPad 330
Trade Name: CASIO COMPUTER CO., LTD.
Responsible party: CASIO AMERICA, INC.
Address: 570 MT. PLEASANT AVENUE, DOVER, NEW JERSEY 07801
Telephone number: 973-361-5400
This device complies with Part 15 of the FCC Rules. Operation is subject to the
following two conditions: (1) This device may not cause harmful interference, and
(2) this device must accept any interference received, including interference that
may cause undesired operation.
Fugue ©1999 – 2002 Kyoto Software Research, Inc. All rights reserved.
Company and product names used in this manual may be registered trademarks or trademarks
of their respective owners.
Page 3

Quick Start Guide
ClassPad
Stylus (Inserted in ClassPad.)
CD-ROM
3-pin Cable (SB-62)
Front Cover
(Attached to
ClassPad.)
USB Cable
.
7
4
102
3
5
6
8
9
=
(
)
,
(–)
xz
^
y
÷
−
+
EXE
EXP
Keyboard
ON/OFF
Clear
Touch Screen Protector Four AAA-size Batteries LR03
(AM4)
(The protector is already installed
on the touch screen when you
purchase the ClassPad.)
ClassPad website URL
http://edu.casio.com/products/classpad/
EEE Yönetmeli¤ine Uygundur
Quick Start Guide
ClassPad 330
ClassPad OS Version 3.04
CASIO Education website URL
http://edu.casio.com
E
RJA521203-001V01
ClassPad register URL
http://edu.casio.com/dl/
1
Getting Ready
Getting Ready
This section contains important information you need to know before using the ClassPad for the
first time.
1. Unpacking
When unpacking your ClassPad, check to make sure that all of the items shown here are
included. If anything is missing, contact your original retailer immediately.
20090601
Page 4
2
Getting Ready
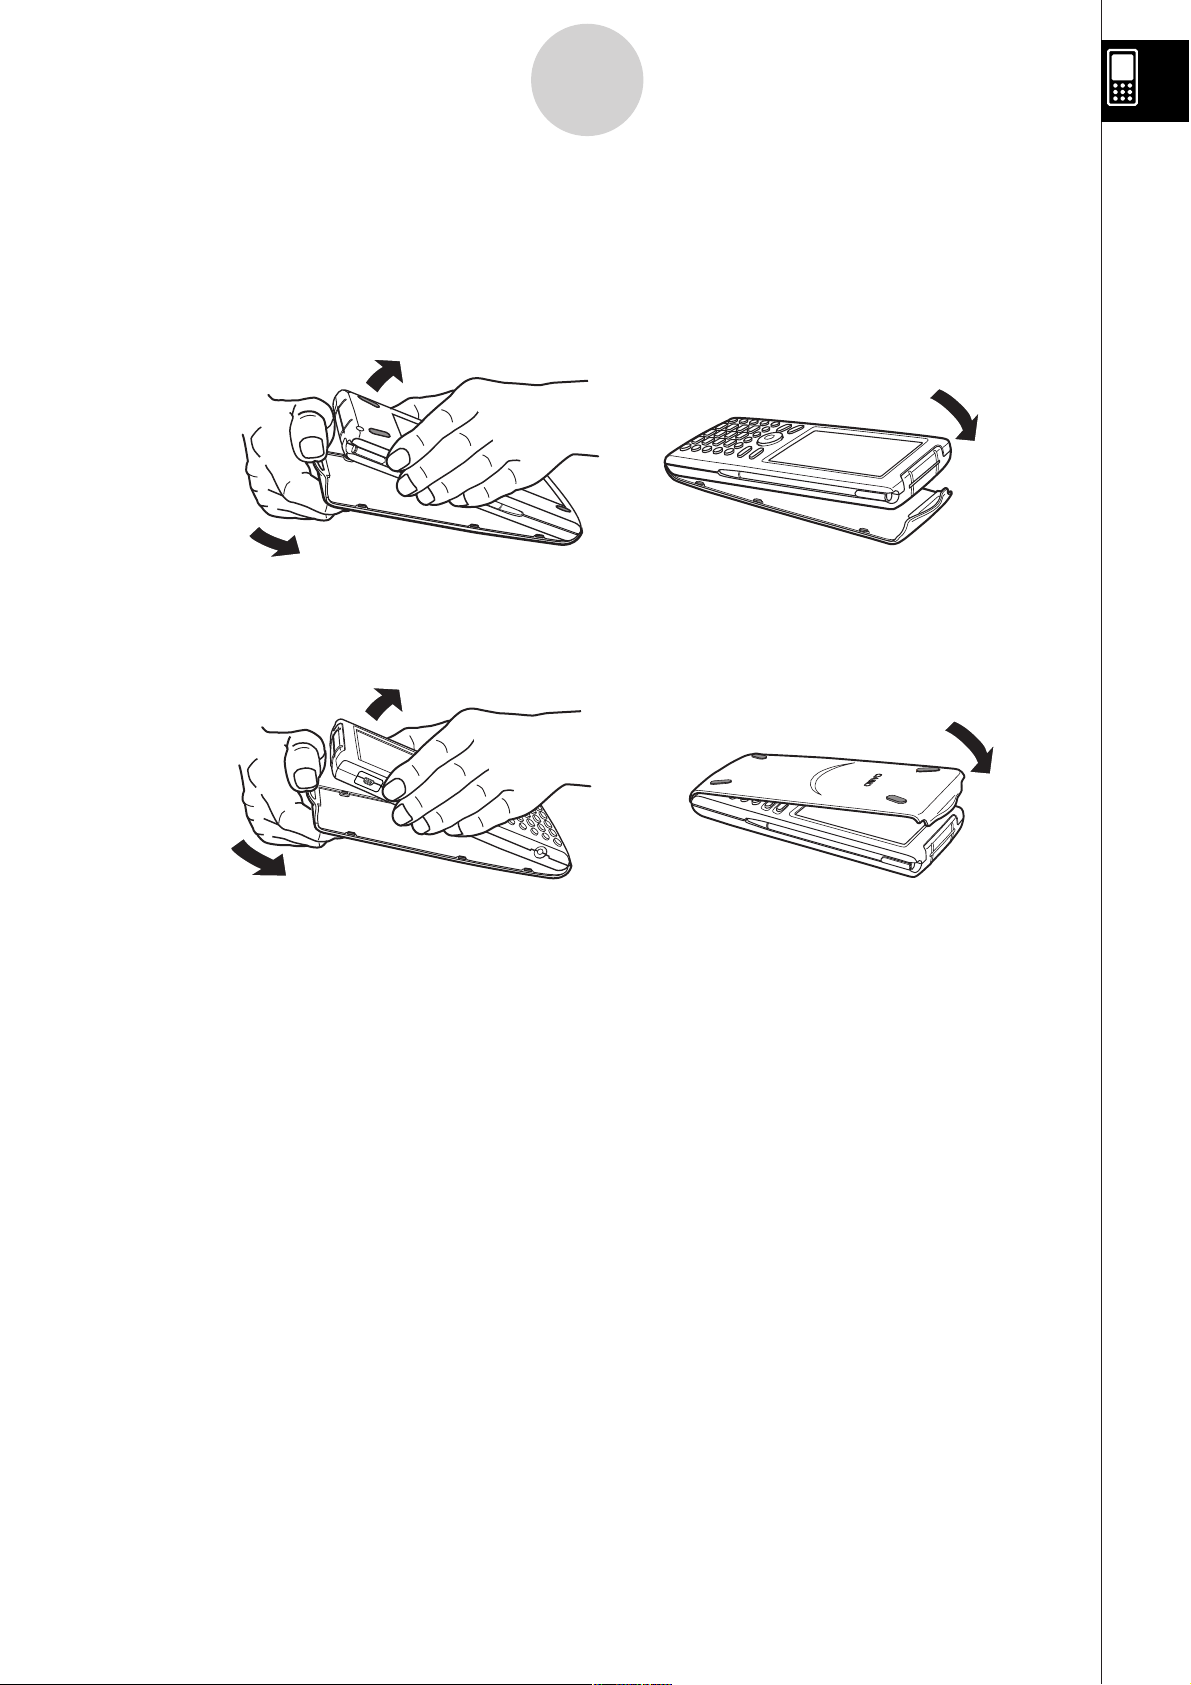
2. Attaching and Removing the Front Cover
S To remove the front cover
Before using the ClassPad, remove the front cover and attach it to the back.
S To attach the front cover
When you are not using the ClassPad, attach the front cover to the front.
Important!
• Always attach the front cover to the ClassPad whenever you are not using it. Otherwise,
accidental operation of the touch screen or the 0 key can cause the power to turn on and
run down the batteries.
20060301
Page 5
P
1
3
Getting Ready
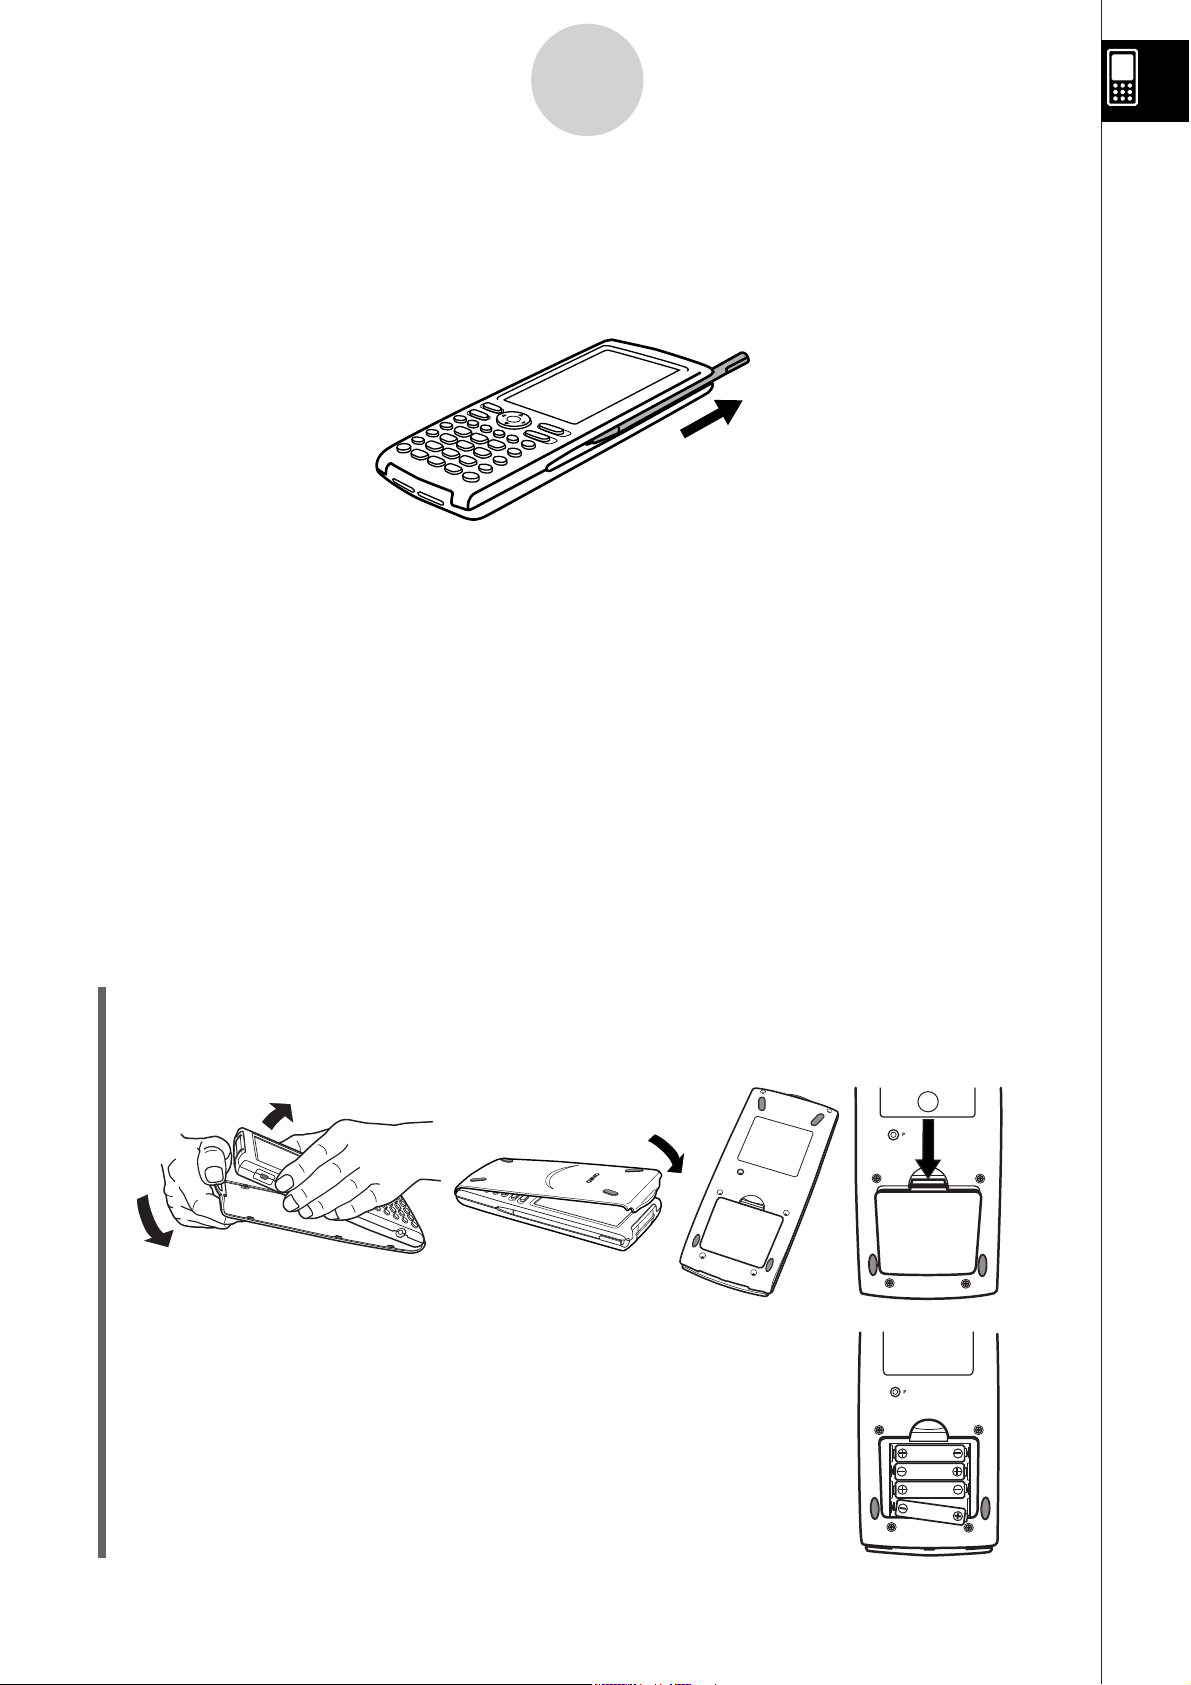
3. Using the Stylus
Slide the stylus from the slot provided for it on the ClassPad, and then use it to perform touch
panel operations.
Important!
• Be careful so that you do not misplace or lose the stylus. When you are not using it, always
keep the stylus in the slot provided for it on the ClassPad.
• Be careful so that you do not damage the tip of the stylus. A damaged tip can scratch or
otherwise damage the ClassPad touch panel.
• Use only the supplied stylus or a similar instrument to perform touch panel operations. Never
use a pen, pencil, or other writing instrument.
4. Replacing Batteries and Setting Up the
ClassPad
S ClassPad Operation
(1) Making sure that you do not accidentally press the 0 key, attach the front cover to the
ClassPad and then turn the ClassPad over. Remove the battery cover from the ClassPad by
pulling with your finger at the point marked .
(2) Load the four batteries that come with ClassPad.
• Make sure that the positive (+) and negative (–) ends of
the batteries are facing correctly.
20060301
Page 6
P
4
2
Getting Ready
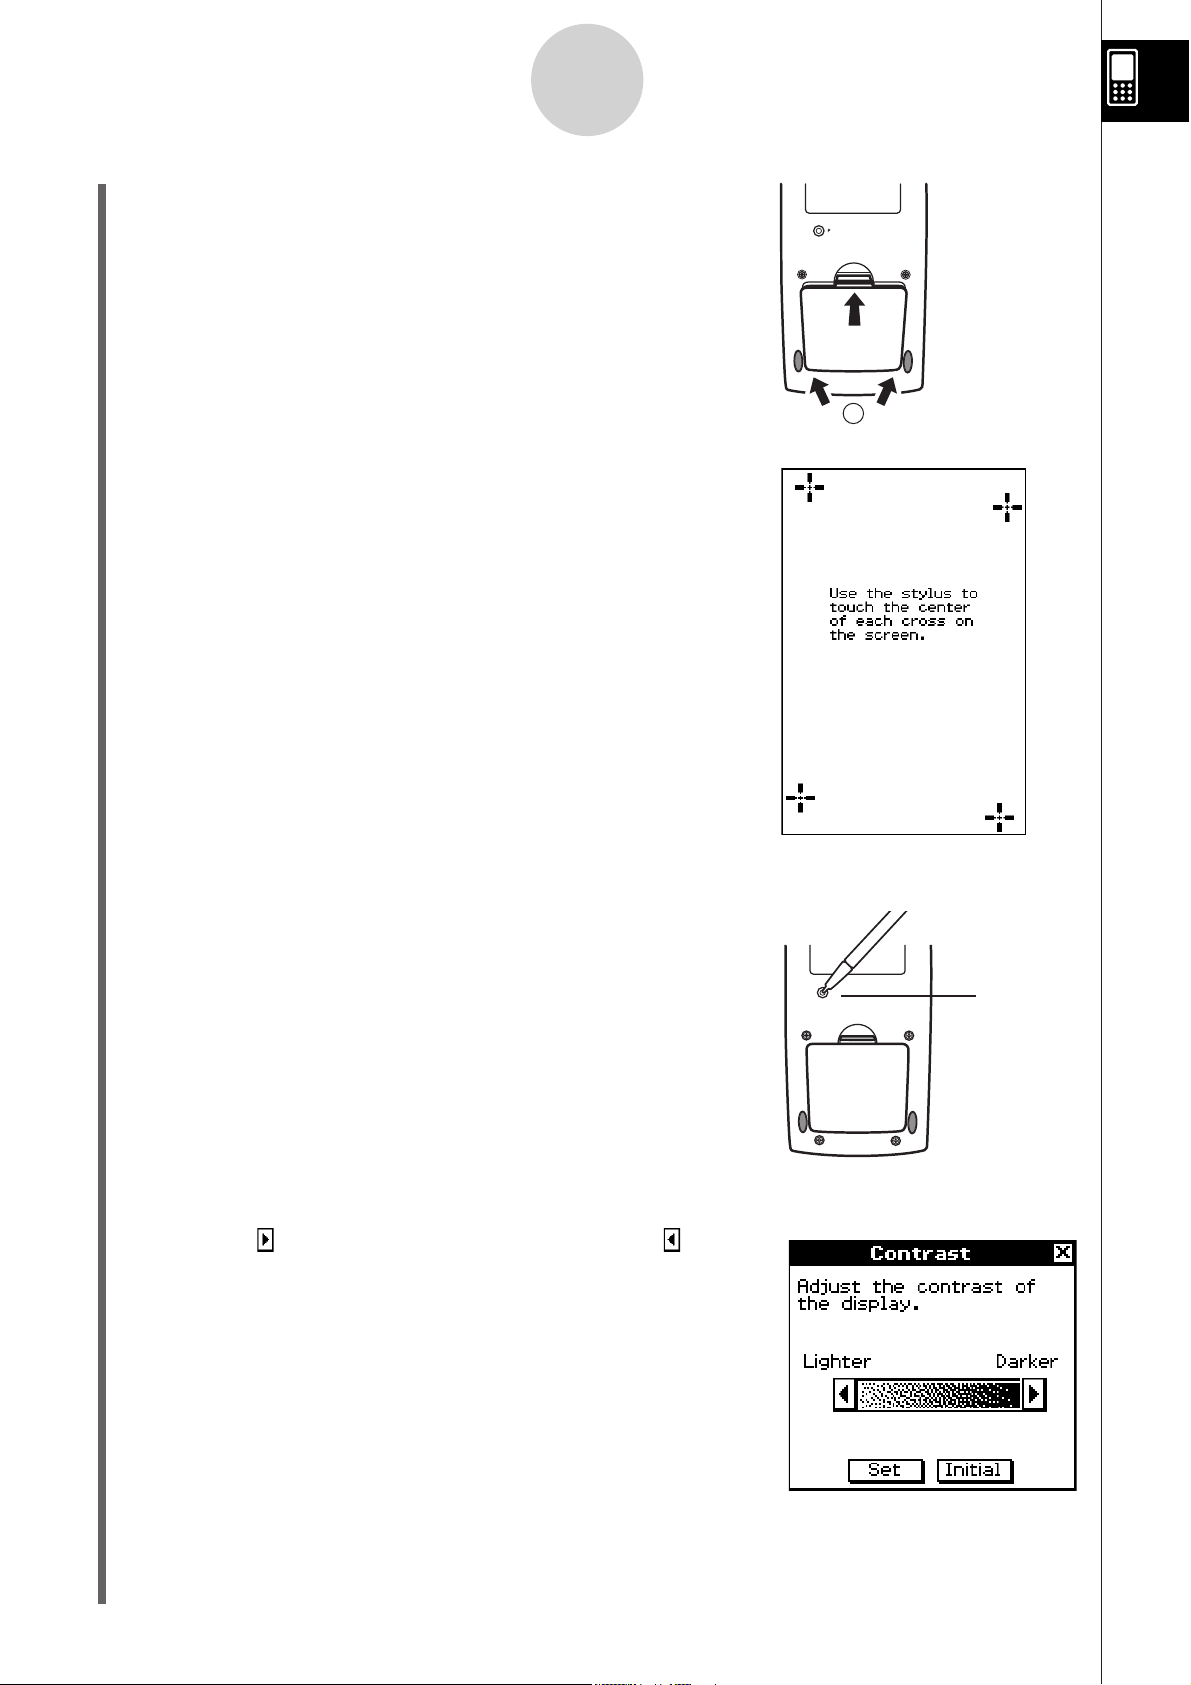
(3) Replace the battery cover, making sure that its tabs enter
the holes marked
and turn the ClassPad front side up.
(4) Remove the front cover from the ClassPad.
(5) Align the touch panel.
a. Your ClassPad should turn on automatically and
display the Touch Panel Alignment screen.
b. Tap the center of each of the four cross marks as they
appear on the display.
• If the Touch Panel Alignment screen does not appear, use
the stylus to press the P button on the back of the
ClassPad.
Important!
• It may take a little time for your ClassPad to start up after
you press the P button.
(6) Adjust the display contrast.
a. Tap the
button to make it lighter.
button to make contrast darker, or the
P button
b. After the contrast setting is the way you want, tap [Set].
• Tapping [Initial] on the Contrast dialog box returns contrast to its initial factory default
setting.
20060301
Page 7
5
Getting Ready
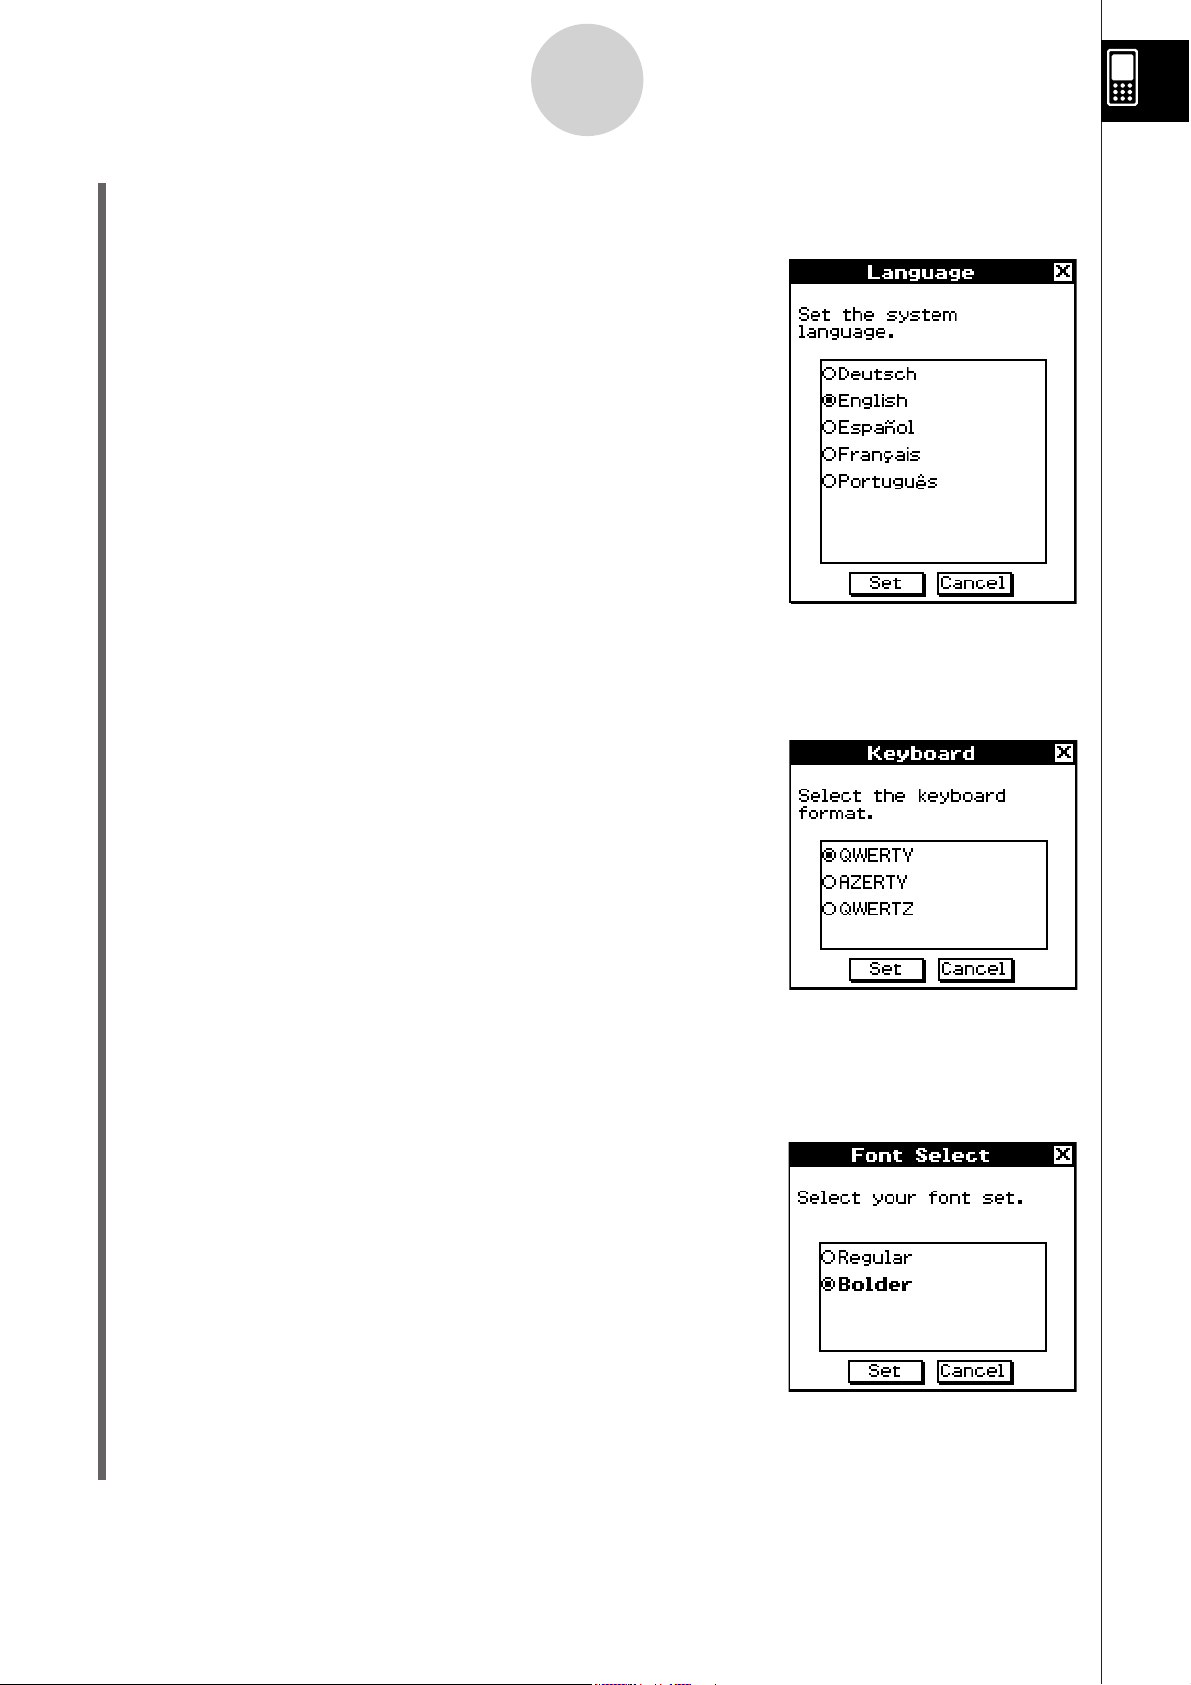
(7) Specify the display language.
a. On the list that appears, tap the language you want to use.
• You can select German, English, Spanish, French, or
Portuguese.
b. When the language you want is selected, tap [Set].
• Tapping [Cancel] selects English and advances to the next dialog box.
(8) Specify the soft keyboard key arrangement.
a. On the list that appears, tap the key arrangement
you want to use.
b. When the key arrangement you want is selected, tap [Set].
• Tapping [Cancel] selects QWERTY arrangement and advances to the next dialog box.
(9) Specify the font set.
a. On the list that appears, tap the font set you want to use.
• You can select Regular or Bolder.
b. When the font set you want is selected, tap [Set].
• Tapping [Cancel] selects Bolder and advances to the next dialog box.
20060301
20070301
Page 8
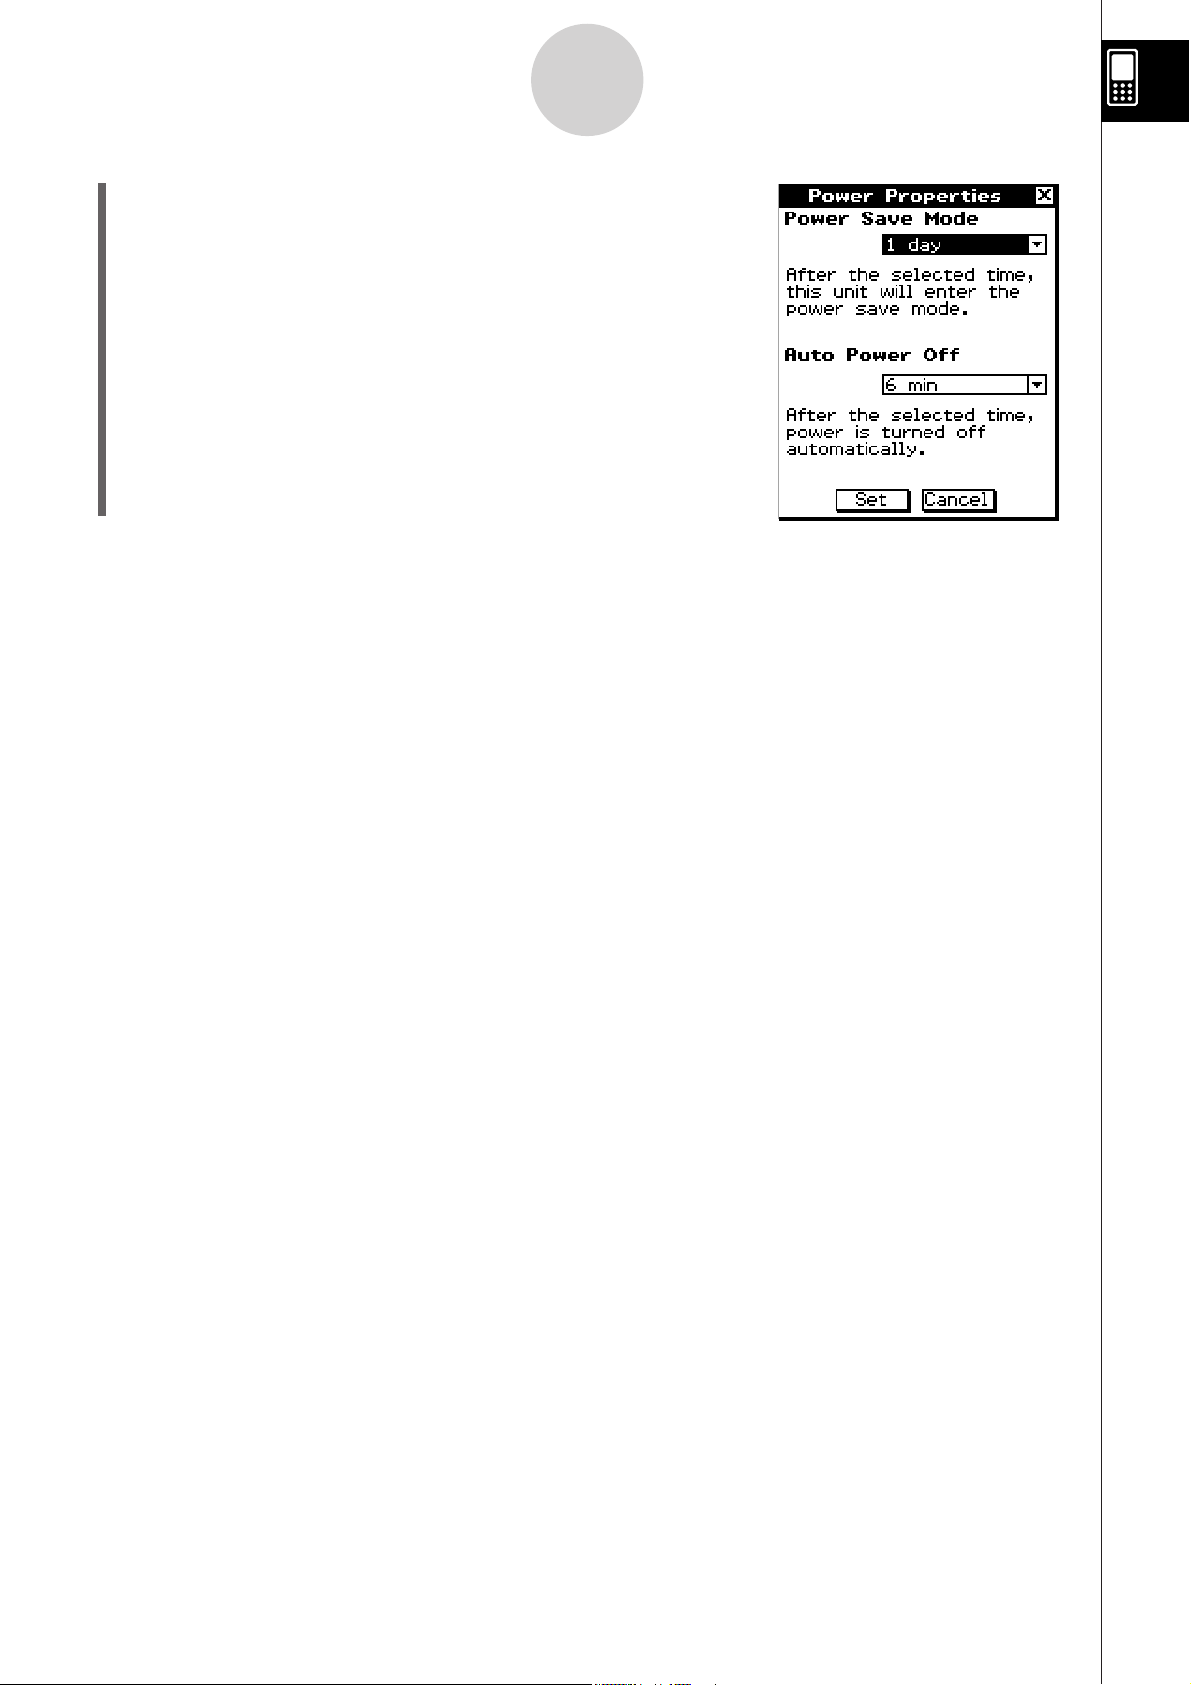
(10) Configure power properties.
6
Getting Ready
a. Configure the Power Save Mode and Auto Power Off
settings.
• See “Power Saving Mode” and “Auto Power Off” on page
16-6-1 for details about these settings.
b. When the configurations are the way you want, tap [Set].
• Tapping [Cancel] selects “1 day” for [Power Save Mode]
and “6 min” for [Auto Power Off], and finalizes the setup
operation.
5. User Registration
Before using your ClassPad or OH-ClassPad, be sure to read the contents of the file named
Readme.html, which is on the bundled CD-ROM. There you will find the URL for a Website
where you can register as an official user.
http://edu.casio.com/dl/
2006030120070301
Page 9

7
Getting Ready
Handling Precautions
• Your ClassPad is made of precision components. Never try to take it apart.
• Avoid dropping your ClassPad and subjecting it to strong impact.
• Do not store the ClassPad or leave it in areas exposed to high temperatures or humidity, or
large amounts of dust. When exposed to low temperatures, the ClassPad may require more
time to display results and may even fail to operate. Correct operation will resume once the
ClassPad is brought back to normal temperature.
• Replace the batteries once every one year regardless of how much the ClassPad is used during
that period. Never leave dead batteries in the battery compartment. They can leak and damage
the ClassPad.
• Do not use an oxyride battery or any other type of nickel-based primary battery with this
product. Incompatibility between such batteries and product specifications can result in shorter
battery life and product malfunction.
• Keep batteries out of the reach of small children. If swallowed, consult a physician immediately.
• Avoid using volatile liquids such as thinners or benzine to clean the ClassPad. Wipe it with a
soft, dry cloth, or with a cloth that has been moistened with a solution of water and a neutral
detergent and wrung out.
• Always be gentle when wiping dust off the display to avoid scratching it.
• In no event will the manufacturer and its suppliers be liable to you or any other person for any
damages, expenses, lost profits, lost savings or any other damages caused by loss of data
and/or formulas arising out of malfunction, repairs, or battery replacement. It is up to you to
prepare physical records of data to protect against such data loss.
• Never dispose of batteries, the liquid crystal panel, or other components by burning them.
• When the “Batteries are extremely low!” message appears on the display, replace the batteries
as soon as possible.
• Be sure to turn off the ClassPad before replacing the batteries.
• If the ClassPad is exposed to a strong electrostatic charge, its memory contents may be
damaged or the keys may stop working. In such a case, perform the reset operation to clear the
memory and restore normal key operation.
• If the ClassPad stops operating correctly for some reason, use the stylus to press the P button
on the back of the ClassPad. Note, however, that this clears all the data in ClassPad memory.
• Note that strong vibration or impact during program execution can cause execution to stop or
can damage the ClassPad’s memory contents.
• Using the ClassPad near a television or radio can cause interference with TV or radio reception.
• Before assuming malfunction of the ClassPad, be sure to carefully reread this user’s guide to
ensure that the problem is not due to insufficient battery power, programming, or operational
errors.
• Make sure nothing gets between the front cover and the touch screen. Besides creating the
risk of scratching the touch screen, an object coming into contact with the screen can cause the
power to turn on and run down the batteries.
• Always attach the front cover to the ClassPad whenever you are not using it. Otherwise,
accidental operation of the touch screen or the 0 key can cause the power to turn on and
run down the batteries.
2006030120070301
Page 10

8
Getting Ready
Be sure to keep physical records of all important data!
Low battery power or incorrect replacement of the batteries that power the ClassPad can cause
the data stored in memory to be corrupted or even lost entirely. Stored data can also be affected
by strong electrostatic charge or strong impact. It is up to you to keep back up copies of data to
protect against its loss.
Backing Up Data
Your ClassPad comes bundled with a special USB cable and FA-CP1 software, which you can
use to backup data to a computer running Windows® 98 SE, Windows® Me, Windows® XP,
Windows® 2000, or Windows Vista®.
• The FA-CP1 software is on the CD-ROM.
In no event shall CASIO Computer Co., Ltd. be liable to anyone for special, collateral, incidental,
or consequential damages in connection with or arising out of the purchase or use of these
materials. Moreover, CASIO Computer Co., Ltd. shall not be liable for any claim of any kind
whatsoever against the use of these materials by any other party.
• Be sure to keep all user documentation handy for future reference.
• The contents of this user’s guide are subject to change without notice.
• No part of this user’s guide may be reproduced in any form without the express written
consent of the manufacturer.
• The options described in Chapter 17 of this user’s guide may not be available in certain
geographic areas. For full details on availability in your area, contact your nearest CASIO
dealer or distributor.
2006030120080201
Page 11

• • • • • • • • • • • • • • • • • • •
• • • • • • • • • • • • • • • • • • •
• • • • • • • • • • • • • • • • • • •
• • • • • • • • • • • • • • • • • • •
• • • • • • • • • • • • • • • • • • •
• • • • • • • • • • • • • • • • • • •
ClassPad 330
ClassPad OS Version 3.04
• • • • • • • • • • • • • • • • • • •
• • • • • • • • • • • • • • • • • • •
• • • • • • • • • • • • • • • • • • •
• • • • • • • • • • • • • • • • • • •
• • • • • • • • • • • • • • • • • • •
• • • • • • • • • • • • • • • • • • •
• • • • • • • • • • • • • • • • • • •
• • • • • • • • • • • • • • • • • • •
• • • • • • • • • • • • • • • • • • •
• • • • • • • • • • • • • • • • • • •
• • • • • • • • • • • • • • • • • • •
• • • • • • • • • • • • • • • • • • •
2006030120090601
Page 12

1
Contents
Contents
Getting Ready
1. Unpacking .....................................................................................................1
2. Attaching and Removing the Front Cover .................................................
3. Using the Stylus ...........................................................................................
4. Replacing Batteries and Setting Up the ClassPad ....................................
5.
About This User’s Guide
User Registration .........................................................................................6
Handling Precautions ........................................................................................
ClassPad Keypad and Icon Panel .....................................................................0-1-1
On-screen Keys, Menus, and Other Controllers ................................................0-1-2
Page Contents ....................................................................................................0-1-3
2
3
3
7
Chapter 1 Getting Acquainted
1-1 General Guide ....................................................................................... 1-1-1
General Guide ....................................................................................................1-1-2
Using the Stylus .................................................................................................1-1-4
1-2 Turning Power On and Off ................................................................... 1-2-1
Turning Power On .............................................................................................1-2-1
Turning Power Off .............................................................................................1-2-1
Resume Function ..............................................................................................1-2-1
Limiting the Duration of the Sleep State .............................................................1-2-2
1-3 Using the Icon Panel ............................................................................. 1-3-1
1-4 Built-in Applications ............................................................................
Starting a Built-in Application ..............................................................................1-4-2
Application Menu Operations .............................................................................1-4-2
1-5 Built-in Application Basic Operations ................................................. 1-5-1
Application Window ...........................................................................................1-5-1
Using a Dual Window Display ............................................................................1-5-1
Using the Menu Bar ............................................................................................1-5-3
Using the Menu ..........................................................................................1-5-4
Using Check Boxes ............................................................................................1-5-6
Using Option Buttons ..........................................................................................1-5-7
Using the Toolbar ...............................................................................................1-5-8
Interpreting Status Bar Information ....................................................................1-5-9
Pausing and Terminating an Operation .............................................................1-5-9
1-6 Input ....................................................................................................... 1-6-1
Using the Soft Keyboard ....................................................................................1-6-1
Input Basics .......................................................................................................1-6-3
Advanced Soft Keyboard Operations ................................................................1-6-8
1-4-1
20060301
Page 13

2
Contents
1-7 Variables and Folders .......................................................................... 1-7-1
Folder Types .......................................................................................................1-7-1
Variable Types ...................................................................................................1-7-2
Creating a Folder ...............................................................................................1-7-4
Creating and Using Variables .............................................................................1-7-5
Assigning Values and Other Data to a System Variable ..................................1-7-10
Locking a Variable or Folder .............................................................................1-7-10
Rules Governing Variable Access ....................................................................1-7-11
1-8 Using the Variable Manager ................................................................. 1-8-1
Variable Manager Overview ...............................................................................1-8-1
Starting Up the Variable Manager ......................................................................1-8-1
Variable Manager Views .....................................................................................1-8-2
Exiting the Variable Manager ............................................................................1-8-2
Variable Manager Folder Operations .................................................................1-8-3
Variable Operations ............................................................................................1-8-7
1-9 Configuring Application Format Settings ........................................... 1-9-1
Specifying a Variable ..........................................................................................1-9-2
Initializing All Application Format Settings ..........................................................1-9-3
Application Format Settings ................................................................................1-9-4
Chapter 2 Using the Main Application
2-1 Main Application Overview .................................................................. 2-1-1
Starting Up the Main Application ........................................................................2-1-1
Main Application Window ...................................................................................2-1-1
Main Application Menus and Buttons .................................................................2-1-3
Using Main Application Modes ...........................................................................2-1-4
Accessing ClassPad Application Windows from the Main Application ...............2-1-5
Accessing the Main Application Window from Another ClassPad
Application ..........................................................................................................2-1-6
2-2 Basic Calculations ................................................................................ 2-2-1
Arithmetic Calculations and Parentheses Calculations ......................................2-2-1
Using the , Key ..............................................................................................2-2-2
Omitting the Multiplication Sign ..........................................................................2-2-2
Using the Answer Variable (ans) ........................................................................2-2-2
Assigning a Value to a Variable ..........................................................................2-2-4
Calculation Error .................................................................................................2-2-4
Calculation Priority Sequence ............................................................................2-2-5
Calculation Modes ..............................................................................................2-2-6
2-3 Using the Calculation History .............................................................. 2-3-1
Viewing Calculation History Contents .................................................................2-3-1
Re-calculating an Expression .............................................................................2-3-2
Deleting Part of the Calculation History Contents ..............................................2-3-4
Clearing All Calculation History Contents ...........................................................2-3-4
2-4 Function Calculations........................................................................... 2-4-1
2-5 List Calculations ...................................................................................
Inputting List Data ...............................................................................................2-5-1
Using a List in a Calculation ...............................................................................2-5-3
Using a List to Assign Different Values to Multiple Variables .............................2-5-4
2-5-1
20060301
Page 14

3
Contents
2-6 Matrix and Vector Calculations ............................................................ 2-6-1
Inputting Matrix Data ..........................................................................................2-6-1
Performing Matrix Calculations ...........................................................................2-6-4
Using a Matrix to Assign Different Values to Multiple Variables .........................2-6-6
2-7 Specifying a Number Base ................................................................... 2-7-1
Number Base Precautions ..................................................................................2-7-1
Binary, Octal, Decimal, and Hexadecimal Calculation Ranges ..........................2-7-1
Selecting a Number Base ...................................................................................2-7-3
Arithmetic Operations .........................................................................................2-7-4
Bitwise Operations ..............................................................................................2-7-5
Using the baseConvert Function (Number System Transform) ..........................2-7-5
2-8 Using the Action Menu ......................................................................... 2-8-1
Abbreviations and Punctuation Used in This Section .........................................2-8-1
Example Screenshots .........................................................................................2-8-2
Displaying the Action Menu ................................................................................2-8-3
Using the Transformation Submenu ...................................................................2-8-3
Using the Advanced Submenu ...........................................................................2-8-8
Using the Calculation Submenu .......................................................................2-8-12
Using the Complex Submenu ...........................................................................2-8-19
Using the List-Create Submenu .......................................................................2-8-21
Using the List-Calculation Submenu ................................................................2-8-24
Using the Matrix-Create Submenu ...................................................................2-8-31
Using the Matrix-Calculation Submenu ............................................................2-8-33
Using the Vector Submenu ...............................................................................2-8-38
Using the Equation/Inequality Submenu .........................................................2-8-42
Using the Assistant Submenu ..........................................................................2-8-47
Using the Distribution and Inv. Distribution Submenus ....................................2-8-48
Using the Command Submenu ........................................................................2-8-57
2-9 Using the Interactive Menu ................................................................. 2-9-1
Interactive Menu and Action Menu .....................................................................2-9-1
Interactive Menu Example ..................................................................................2-9-1
Using the “apply” Command ...............................................................................2-9-4
2-10 Using the Main Application in Combination with Other
Applications
Opening Another Application’s Window ...........................................................2-10-1
Closing Another Application’s Window .............................................................2-10-2
Using the Graph Window and 3D Graph Window ..............................2-10-2
Using a Graph Editor Window (Graph & Table: , Conics: ,
3D Graph: , Numeric Solver: ) ...............................................................2-10-4
Using the Stat Editor Window ...................................................................2-10-5
Using the Geometry Window ....................................................................2-10-9
Using the Sequence Editor Window ........................................................2-10-11
........................................................................................ 2-10-1
2-11 Using Verify ......................................................................................... 2-11-1
Starting Up Verify .............................................................................................2-11-1
Verify Menus and Buttons ................................................................................2-11-2
Using Verify ......................................................................................................2-11-3
20090601
Page 15

4
Contents
2-12 Using Probability ................................................................................ 2-12-1
Starting Up Probability ......................................................................................2-12-2
Probability Menus and Buttons .........................................................................2-12-2
Using Probability ...............................................................................................2-12-4
2-13 Running a Program in the Main Application .................................... 2-13-1
Chapter 3 Using the Graph & Table Application
3-1 Graph & Table Application Overview ................................................... 3-1-1
Starting Up the Graph & Table Application .........................................................3-1-1
Graph & Table Application Window ....................................................................3-1-1
Graph & Table Application Menus and Buttons ..................................................3-1-2
Graph & Table Application Status Bar ................................................................3-1-7
Graph & Table Application Basic Operations .....................................................3-1-7
3-2 Using the Graph Window ...................................................................... 3-2-1
Configuring View Window Parameters for the Graph Window ...........................3-2-1
Viewing Graph Window Coordinates ..................................................................3-2-5
Scrolling the Graph Window ...............................................................................3-2-6
Panning the Graph Window ................................................................................3-2-6
Zooming the Graph Window ...............................................................................3-2-7
Other Graph Window Operations .....................................................................3-2-10
3-3 Storing Functions ................................................................................. 3-3-1
Using Graph Editor Sheets .................................................................................3-3-1
Specifying the Function Type .............................................................................3-3-2
Storing a Function ..............................................................................................3-3-3
Using Built-in Functions ......................................................................................3-3-5
Saving the Message Box Expression to the Graph Editor Window ....................3-3-5
Editing Stored Functions ....................................................................................3-3-6
Deleting All Graph Editor Expressions ...............................................................3-3-7
Graphing a Stored Function ...............................................................................3-3-7
Saving Graph Editor Data to Graph Memory ....................................................3-3-14
3-4 Using Table & Graph ............................................................................. 3-4-1
Generating a Number Table ...............................................................................3-4-1
Editing Number Table Values .............................................................................3-4-4
Deleting, Inserting, and Adding Number Table Lines .........................................3-4-5
Regenerating a Number Table ...........................................................................3-4-6
Generating a Number Table and Using It to Draw a Graph ...............................3-4-7
Saving a Number Table to a List ........................................................................3-4-8
Generating a Summary Table ............................................................................3-4-9
Making the Graph Editor Window the Active Window ......................................3-4-15
3-5 Modifying a Graph................................................................................. 3-5-1
Modifying a Single Graph by Changing the Value of a Coefficient
(Direct Modify) ....................................................................................................3-5-1
Simultaneously Modifying Multiple Graphs by Changing Common Variables
(Dynamic Modify) ................................................................................................3-5-4
3-6 Using the Sketch Menu ......................................................................... 3-6-1
Sketch Menu Overview .......................................................................................3-6-1
Using Sketch Menu Commands .........................................................................3-6-1
20060301
Page 16

5
Contents
3-7 Using Trace ............................................................................................ 3-7-1
Using Trace to Read Graph Coordinates ...........................................................3-7-1
Linking Trace to a Number Table .......................................................................3-7-3
Generating Number Table Values from a Graph ................................................3-7-4
3-8 Analyzing a Function Used to Draw a Graph ..................................... 3-8-1
G-Solve Menu Overview .....................................................................................3-8-1
Using G-Solve Menu Commands .......................................................................3-8-2
Chapter 4 Using the Conics Application
4-1 Conics Application Overview ............................................................... 4-1-1
Starting Up the Conics Application .....................................................................4-1-1
Conics Application Window ................................................................................4-1-1
Conics Application Menus and Buttons ..............................................................4-1-2
Conics Application Status Bar ............................................................................4-1-4
4-2 Inputting Equations ............................................................................. 4-2-1
Using a Conics Form to Input an Equation .........................................................4-2-1
Inputting an Equation Manually ..........................................................................4-2-3
Transforming a Manually Input Equation to a Conics Form ...............................4-2-3
4-3 Drawing a Conics Graph ...................................................................... 4-3-1
Drawing a Parabola ............................................................................................4-3-1
Drawing a Circle .................................................................................................4-3-4
Drawing an Ellipse ..............................................................................................4-3-5
Drawing a Hyperbola ..........................................................................................4-3-6
Drawing a General Conics ..................................................................................4-3-8
4-4 Using Trace to Read Graph Coordinates ............................................ 4-4-1
Using Trace ........................................................................................................4-4-1
4-5 Using G-Solve to Analyze a Conics Graph ......................................... 4-5-1
Displaying the G-Solve Menu .............................................................................4-5-1
Using G-Solve Menu Commands .......................................................................4-5-2
Chapter 5 Using the 3D Graph Application
5-1 3D Graph Application Overview .......................................................... 5-1-1
Starting Up the 3D Graph Application ................................................................5-1-1
3D Graph Application Window ............................................................................5-1-1
3D Graph Application Menus and Buttons .........................................................5-1-2
3D Graph Application Status Bar ........................................................................5-1-4
5-2 Inputting an Expression ....................................................................... 5-2-1
Using 3D Graph Editor Sheets ...........................................................................5-2-1
Storing a Function ..............................................................................................5-2-2
5-3 Drawing a 3D Graph .............................................................................. 5-3-1
Configuring 3D Graph View Window Parameters ..............................................5-3-1
3D Graph Example .............................................................................................5-3-3
5-4 Manipulating a Graph on the 3D Graph Window ................................ 5-4-1
Enlarging and Reducing the Size of a Graph .....................................................5-4-1
Switching the Eye Position .................................................................................5-4-1
Rotating the Graph Manually ..............................................................................5-4-2
Rotating a Graph Automatically ..........................................................................5-4-3
Initializing the Graph Window .............................................................................5-4-3
20060301
Page 17

6
Contents
5-5 Other 3D Graph Application Functions ............................................... 5-5-1
Using Trace to Read Graph Coordinates ...........................................................5-5-1
Inserting Text into a 3D Graph Window ..............................................................5-5-1
Calculating a
Using Drag and Drop to Down a 3D Graph ........................................................5-5-3
z-value for Particular x- and y-values, or s- and t-values ..............5-5-2
Chapter 6 Using the Sequence Application
6-1 Sequence Application Overview .......................................................... 6-1-1
Starting up the Sequence Application ................................................................6-1-1
Sequence Application Window ...........................................................................6-1-1
Sequence Application Menus and Buttons .........................................................6-1-2
Sequence Application Status Bar .......................................................................6-1-6
6-2 Inputting an Expression in the Sequence Application ...................... 6-2-1
Inputting Data on the Sequence Editor Window .................................................6-2-1
Inputting Data on the Sequence RUN Window ..................................................6-2-1
6-3 Recursive and Explicit Form of a Sequence ...................................... 6-3-1
Generating a Number Table ...............................................................................6-3-1
Graphing a Recursion .........................................................................................6-3-3
Determining the General Term of a Recursion Expression ................................6-3-5
Calculating the Sum of a Sequence ...................................................................6-3-6
6-4 Using LinkTrace .................................................................................... 6-4-1
6-5 Drawing a Cobweb Diagram .................................................................
6-5-1
Chapter 7 Using the Statistics Application
7-1 Statistics Application Overview ........................................................... 7-1-1
Starting Up the Statistics Application ..................................................................7-1-2
Stat Editor Window Menus and Buttons .............................................................7-1-3
Stat Editor Window Status Bar ...........................................................................7-1-4
7-2 Using Stat Editor ................................................................................... 7-2-1
Basic List Operations ..........................................................................................7-2-1
Inputting Data into a List .....................................................................................7-2-4
Editing List Contents ...........................................................................................7-2-7
Sorting List Data .................................................................................................7-2-8
Controlling the Number of Displayed List Columns ............................................7-2-9
Clearing All Stat Editor Data ...............................................................................7-2-9
7-3 Before Trying to Draw a Statistical Graph ........................................... 7-3-1
Using the SetGraph Menu ..................................................................................7-3-1
Configuring StatGraph Setups ............................................................................7-3-2
7-4 Graphing Single-Variable Statistical Data ........................................... 7-4-1
Normal Probability Plot (NPPlot) ........................................................................7-4-1
Histogram Bar Graph (Histogram) ......................................................................7-4-2
Med-Box Plot (MedBox) .....................................................................................7-4-2
Normal Distribution Curve (NDist) ......................................................................7-4-3
Broken Line Graph (Broken) ...............................................................................7-4-4
20060301
Page 18

y
=
c
1 +
a·
e
–b·x
7
Contents
7-5 Graphing Paired-Variable Statistical Data........................................... 7-5-1
Drawing a Scatter Plot and xy Line Graph .........................................................7-5-1
Drawing a Regression Graph .............................................................................7-5-2
Graphing Previously Calculated Regression Results .........................................7-5-4
Drawing a Linear Regression Graph ..................................................................7-5-5
Drawing a Med-Med Graph ................................................................................7-5-6
Drawing Quadratic, Cubic, and Quartic Regression Graphs ..............................7-5-7
Drawing a Logarithmic Regression Graph ..........................................................7-5-9
Drawing an Exponential Regression Graph (
Drawing an Exponential Regression Graph (
Drawing a Power Regression Graph (
Drawing a Sinusoidal Regression Graph (
y = a·x
y = a·e
y = a·b
b
y = a·sin(b·x + c) + d) .....................7-5-13
b · x
) ...................................7-5-10
x
)......................................7-5-11
) ................................................7-5-12
Drawing a Logistic Regression Graph (
Overlaying a Function Graph on a Statistical Graph ........................................7-5-15
) ........................................7-5-14
7-6 Using the Statistical Graph Window Toolbar ...................................... 7-6-1
7-7 Performing Statistical Calculations .....................................................
Viewing Single-variable Statistical Calculation Results ......................................7-7-1
Viewing Paired-variable Statistical Calculation Results ......................................7-7-2
Viewing Regression Calculation Results ............................................................7-7-3
Residual Calculation ...........................................................................................7-7-3
Copying a Regression Formula to the Graph & Table Application .....................7-7-4
7-7-1
7-8 Test, Confidence Interval, and Distribution Calculations .................. 7-8-1
Statistics Application Calculations ......................................................................7-8-1
Program Application Calculations .......................................................................7-8-1
7-9 Tests ....................................................................................................... 7-9-1
Test Command List ............................................................................................7-9-2
7-10 Confidence Intervals ........................................................................... 7-10-1
Confidence Interval Command List ..................................................................7-10-2
7-11 Distributions ........................................................................................ 7-11-1
Distribution Command List ...............................................................................7-11-3
7-12 Statistical System Variables ............................................................... 7-12-1
Chapter 8 Using the Geometry Application
8-1 Geometry Application Overview .......................................................... 8-1-1
Starting Up the Geometry Application ................................................................8-1-3
Geometry Application Menus and Buttons .........................................................8-1-3
8-2 Drawing Figures .................................................................................... 8-2-1
Using the Draw Menu .........................................................................................8-2-1
Inserting Text Strings into the Screen ..............................................................8-2-18
Attaching an Angle Measurement to a Figure ..................................................8-2-19
Displaying the Measurements of a Figure ........................................................8-2-22
Displaying the Result of a Calculation that Uses On-screen Measurement
Values ...............................................................................................................8-2-25
Using the Special Shape Submenu ..................................................................8-2-27
Using the Construct Submenu ..........................................................................8-2-30
Transformation Using a Matrix or Vector (General Transform) ........................8-2-37
20060301
Page 19

8
Contents
8-3 Editing Figures ...................................................................................... 8-3-1
Selecting and Deselecting Figures .....................................................................8-3-1
Moving and Copying Figures ..............................................................................8-3-3
Pinning an Annotation on the Geometry Window ...............................................8-3-4
Specifying the Number Format of a Measurement .............................................8-3-5
Using the Measurement Box ..............................................................................8-3-6
8-4 Controlling Geometry Window Appearance ....................................... 8-4-1
Configuring View Window Settings .....................................................................8-4-1
Selecting the Axis Setting ...................................................................................8-4-2
Toggling Integer Grid Display On and Off ..........................................................8-4-3
Zooming ..............................................................................................................8-4-3
Using Pan to Shift the Display Image .................................................................8-4-6
8-5 Working with Animations ..................................................................... 8-5-1
Using Animation Commands ..............................................................................8-5-1
8-6 Using the Geometry Application with Other Applications ................ 8-6-1
Drag and Drop ....................................................................................................8-6-1
Copy and Paste ..................................................................................................8-6-5
Dynamically Linked Data ....................................................................................8-6-5
8-7 Managing Geometry Application Files ................................................ 8-7-1
File Operations ...................................................................................................8-7-1
Folder Operations ...............................................................................................8-7-4
Chapter 9 Using the Numeric Solver Application
9-1 Numeric Solver Application Overview ................................................ 9-1-1
Starting Up the Numeric Solver Application .......................................................9-1-1
Numeric Solver Application Window ...................................................................9-1-1
Numeric Solver Menus and Buttons ...................................................................9-1-1
9-2 Using Numeric Solver ........................................................................... 9-2-1
Chapter 10 Using the eActivity Application
10-1 eActivity Application Overview .......................................................... 10-1-1
Starting Up the eActivity Application .................................................................10-1-1
eActivity Application Window ...........................................................................10-1-1
eActivity Application Menus and Buttons ..........................................................10-1-2
eActivity Application Status Bar ........................................................................10-1-4
eActivity Key Operations ..................................................................................10-1-4
10-2 Creating an eActivity .......................................................................... 10-2-1
Basic Steps for Creating an eActivity ...............................................................10-2-1
Managing eActivity Files ...................................................................................10-2-3
10-3 Inserting Data into an eActivity ......................................................... 10-3-1
Inserting a Text Row .........................................................................................10-3-1
Inserting a Calculation Row ..............................................................................10-3-3
Inserting an Application Data Strip ...................................................................10-3-5
Strip Help Text ................................................................................................10-3-14
Moving Information Between eActivity and Applications ................................10-3-15
Inserting a Geometry Link Row ......................................................................10-3-17
20060301
Page 20

9
Contents
10-4 Working with eActivity Files ............................................................... 10-4-1
Opening an Existing eActivity ...........................................................................10-4-1
Browsing the Contents of an eActivity ..............................................................10-4-2
Editing the Contents of an eActivity ..................................................................10-4-2
Expanding an Application Data Strip ................................................................10-4-2
Modifying the Data in an Application Data Strip ...............................................10-4-3
Saving an Edited eActivity ................................................................................10-4-3
10-5 Transferring eActivity Files ................................................................ 10-5-1
Transferring eActivity Files between Two ClassPad Units ...............................10-5-1
Transferring eActivity Files between a ClassPad Unit and a Computer ...........10-5-2
Chapter 11 Using the Presentation Application
11-1 Presentation Application Overview ................................................... 11-1-1
Starting Up the Presentation Application ..........................................................11-1-2
Presentation Application Window .....................................................................11-1-2
Presentation Application Menus and Buttons ...................................................11-1-3
Screen Capture Precautions ............................................................................11-1-4
11-2 Building a Presentation ...................................................................... 11-2-1
Adding a Blank Page to a Presentation ............................................................11-2-2
11-3 Managing Presentation Files ............................................................. 11-3-1
11-4 Playing a Presentation ........................................................................
Using Auto Play ................................................................................................11-4-1
Using Manual Play ............................................................................................11-4-2
Using Repeat Play ............................................................................................11-4-3
11-5 Editing Presentation Pages ................................................................ 11-5-1
About the Editing Tool Palette ..........................................................................11-5-1
Entering the Editing Mode ................................................................................11-5-1
Editing Operations ............................................................................................11-5-3
Using the Eraser ...............................................................................................11-5-7
11-6 Configuring Presentation Preferences ............................................. 11-6-1
11-7 Presentation File Transfer ..................................................................
11-4-1
11-7-1
Chapter 12 Using the Program Application
12-1 Program Application Overview .......................................................... 12-1-1
Starting Up the Program Application ................................................................12-1-1
Program Loader Window ..................................................................................12-1-1
Program Editor Window ....................................................................................12-1-3
12-2 Creating a New Program .................................................................... 12-2-1
General Programming Steps ............................................................................12-2-1
Creating and Saving a Program .......................................................................12-2-1
Running a Program ..........................................................................................12-2-5
Pausing Program Execution .............................................................................12-2-6
Terminating Program Execution .......................................................................12-2-6
Configuring Parameter Variables and Inputting Their Values ..........................12-2-7
Using Subroutines ............................................................................................12-2-8
20060301
Page 21

10
Contents
12-3 Debugging a Program ......................................................................... 12-3-1
Debugging After an Error Message Appears ....................................................12-3-1
Debugging a Program Following Unexpected Results .....................................12-3-1
Modifying an Existing Program to Create a New One ......................................12-3-2
Searching for Data Inside a Program ...............................................................12-3-5
12-4 Managing Files .................................................................................... 12-4-1
Renaming a File ...............................................................................................12-4-1
Deleting a Program ...........................................................................................12-4-1
Changing the File Type ....................................................................................12-4-2
12-5 User-defined Functions ...................................................................... 12-5-1
Creating a New User-defined Function ............................................................12-5-1
Executing a User-defined Function ..................................................................12-5-3
Editing a User-defined Function .......................................................................12-5-4
Deleting a User-defined Function .....................................................................12-5-4
12-6 Program Command Reference .......................................................... 12-6-1
Using This Reference .......................................................................................12-6-1
Program Application Commands ......................................................................12-6-2
Application Command List ..............................................................................12-6-15
12-7 Including ClassPad Functions in Programs ..................................... 12-7-1
Including Graphing Functions in a Program ....................................................12-7-1
Using Conics Functions in a Program ..............................................................12-7-1
Including 3D Graphing Functions in a Program ................................................12-7-2
Including Table & Graph Functions in a Program .............................................12-7-2
Including Recursion Table and Recursion Graph Functions in a Program .......12-7-3
Including List Sort Functions in a Program .......................................................12-7-3
Including Statistical Graphing and Calculation Functions in a Program ...........12-7-4
Chapter 13 Using the Spreadsheet Application
13-1 Spreadsheet Application Overview ................................................... 13-1-1
Starting Up the Spreadsheet Application ..........................................................13-1-1
Spreadsheet Window .......................................................................................13-1-1
13-2 Spreadsheet Application Menus and Buttons .................................. 13-2-1
13-3 Basic Spreadsheet Window Operations ...........................................
About the Cell Cursor .......................................................................................13-3-1
Controlling Cell Cursor Movement ....................................................................13-3-1
Navigating Around the Spreadsheet Window ...................................................13-3-2
Hiding or Displaying the Scrollbars ...................................................................13-3-4
Selecting Cells ..................................................................................................13-3-5
Using the Cell Viewer Window .........................................................................13-3-6
13-4 Editing Cell Contents .......................................................................... 13-4-1
Edit Mode Screen .............................................................................................13-4-1
Entering the Edit Mode .....................................................................................13-4-2
Basic Data Input Steps .....................................................................................13-4-3
Inputting a Formula ...........................................................................................13-4-4
Inputting a Cell Reference ................................................................................13-4-6
Inputting a Constant .........................................................................................13-4-8
Using the Fill Sequence Command ..................................................................13-4-9
Cut and Copy ..................................................................................................13-4-11
13-3-1
20090601
Page 22

11
Contents
Paste ..............................................................................................................13-4-11
Specifying Text or Calculation as the Data Type for a Particular Cell ............13-4-13
Using Drag and Drop to Copy Cell Data within a Spreadsheet ......................13-4-14
Using Drag and Drop to Obtain Spreadsheet Graph Data .............................13-4-16
Recalculating Spreadsheet Expressions ........................................................13-4-17
Importing and Exporting Variable Values .......................................................13-4-21
Searching for Data in a Spreadsheet .............................................................13-4-26
Sorting Spreadsheet Data ..............................................................................13-4-29
13-5 Using the Spreadsheet Application with the eActivity
Application........................................................................................... 13-5-1
Drag and Drop ..................................................................................................13-5-1
13-6 Statistical Calculations ....................................................................... 13-6-1
13-7
Cell and List Calculations .................................................................. 13-7-1
Spreadsheet [List-Calculation] Submenu Basics ..............................................13-7-1
Cell Calculation and List Calculation Functions ................................................13-7-4
13-8 Formatting Cells and Data .................................................................. 13-8-1
Standard (Fractional) and Decimal (Approximate) Modes ...............................13-8-1
Plain Text and Bold Text ..................................................................................13-8-1
Text and Calculation Data Types .....................................................................13-8-1
Text Alignment ..................................................................................................13-8-2
Number Format ................................................................................................13-8-2
Changing the Width of a Column ......................................................................13-8-3
13-9 Graphing .............................................................................................. 13-9-1
Graph Menu ......................................................................................................13-9-1
Graph Window Menus and Toolbar ................................................................13-9-11
Basic Graphing Steps .....................................................................................13-9-13
Regression Graph Operations ........................................................................13-9-15
Other Graph Window Operations ...................................................................13-9-16
Chapter 14 Using the Differential Equation Graph Application
14-1 Differential Equation Graph Application Overview .......................... 14-1-1
Differential Equation Graph Application Features ............................................14-1-1
Starting Up the Differential Equation Graph Application ...................................14-1-2
Differential Equation Graph Application Window ..............................................14-1-2
Differential Equation Editor Window Menus and Buttons .................................14-1-4
Differential Equation Graph Window Menus and Buttons ................................14-1-6
Differential Equation Graph Application Status Bar ..........................................14-1-8
14-2 Graphing a First Order Differential Equation.................................... 14-2-1
Inputting a First Order Differential Equation and Drawing a Slope Field ..........14-2-1
Inputting Initial Conditions and Graphing the Solution Curves of a
First Order Differential Equation .......................................................................14-2-3
Configuring Solution Curve Graph Settings ......................................................14-2-4
14-3 Graphing a Second Order Differential Equation .............................. 14-3-1
Drawing the Phase Plane of a Second Order Differential Equation .................14-3-1
Inputting Initial Conditions and Graphing the Solution Curve of a
Second Order Differential Equation ..................................................................14-3-2
14-4 Graphing an Nth-order Differential Equation ................................... 14-4-1
Inputting an Nth-order Differential Equation and Initial Conditions, and then
Graphing the Solutions .....................................................................................14-4-1
20090601
Page 23

12
Contents
14-5 Drawing f(x) Type Function Graphs and Parametric Function
Graphs.................................................................................................. 14-5-1
Drawing an f (x) Type Function Graph ..............................................................14-5-1
Drawing a Parametric Function Graph .............................................................14-5-2
14-6 Configuring Differential Equation Graph View Window
Parameters ........................................................................................... 14-6-1
Configuring Differential Equation Graph View Window Settings ......................14-6-1
Differential Equation Graph View Window Parameters ....................................14-6-2
14-7 Differential Equation Graph Window Operations ............................. 14-7-1
Graph Zooming and Scrolling ...........................................................................14-7-1
Configuring and Modifying Initial Conditions ....................................................14-7-1
Using Trace to Read Graph Coordinates .........................................................14-7-5
Graphing an Expression or Value by Dropping it into the Differential
Equation Graph Window ...................................................................................14-7-6
Chapter 15 Using the Financial Application
15-1 Financial Application Overview ......................................................... 15-1-1
Starting Up the Financial Application ................................................................15-1-1
Financial Application Menus and Buttons .........................................................15-1-2
Configuring Default Financial Application Settings ...........................................15-1-4
Financial Application Pages .............................................................................15-1-5
Financial Calculation Screen Basics ................................................................15-1-6
Variables ...........................................................................................................15-1-7
15-2 Simple Interest .................................................................................... 15-2-1
Simple Interest Fields .......................................................................................15-2-1
Financial Application Default Setup for Examples ............................................15-2-1
Calculation Formulas ........................................................................................15-2-2
15-3 Compound Interest ............................................................................. 15-3-1
Compound Interest Fields ................................................................................15-3-1
Financial Application Default Setup for Examples ............................................15-3-1
Calculation Formulas ........................................................................................15-3-3
15-4 Cash Flow ............................................................................................ 15-4-1
Cash Flow Fields ..............................................................................................15-4-1
Inputting Cash Flow Values ..............................................................................15-4-1
Calculation Formulas ........................................................................................15-4-4
15-5 Amortization ........................................................................................ 15-5-1
Amortization Fields ...........................................................................................15-5-1
Financial Application Default Setup for Examples ............................................15-5-1
Calculation Formulas ........................................................................................15-5-4
15-6 Interest Conversion............................................................................. 15-6-1
Interest Conversion Fields ................................................................................15-6-1
Calculation Formulas ........................................................................................15-6-2
15-7 Cost/Sell/Margin .................................................................................. 15-7-1
Cost/Sell/Margin Fields ....................................................................................15-7-1
Calculation Formulas ........................................................................................15-7-1
20060301
Page 24

13
Contents
15-8 Day Count ............................................................................................ 15-8-1
Day Count Fields ..............................................................................................15-8-1
Financial Application Default Setup for Examples ............................................15-8-1
15-9 Depreciation ........................................................................................ 15-9-1
Depreciation Fields ...........................................................................................15-9-1
Calculation Formulas ........................................................................................15-9-3
15-10 Bond Calculation............................................................................... 15-10-1
Bond Calculation Fields ..................................................................................15-10-1
Financial Application Default Setup for Examples ..........................................15-10-1
Calculation Formulas ......................................................................................15-10-4
15-11 Break-Even Point .............................................................................. 15-11-1
Break-Even Point Fields .................................................................................15-11-1
Financial Application Default Setup for Examples ..........................................15-11-1
Calculation Formulas ......................................................................................15-11-3
15-12 Margin of Safety ................................................................................ 15-12-1
Margin of Safety Fields ...................................................................................15-12-1
Calculation Formulas ......................................................................................15-12-1
15-13 Operating Leverage .......................................................................... 15-13-1
Operating Leverage Fields .............................................................................15-13-1
Calculation Formulas ......................................................................................15-13-1
15-14 Financial Leverage ............................................................................ 15-14-1
Financial Leverage Fields ...............................................................................15-14-1
Calculation Formulas ......................................................................................15-14-1
15-15 Combined Leverage .......................................................................... 15-15-1
Combined Leverage Fields .............................................................................15-15-1
Calculation Formulas ......................................................................................15-15-1
15-16 Quantity Conversion ......................................................................... 15-16-1
Quantity Conversion Fields ............................................................................15-16-1
Calculation Formulas ......................................................................................15-16-2
Chapter 16 Configuring System Settings
16-1 System Setting Overview ................................................................... 16-1-1
Starting Up the System Application ..................................................................16-1-1
System Application Window .............................................................................16-1-1
System Application Menus and Buttons ...........................................................16-1-2
16-2 Managing Memory Usage ................................................................... 16-2-1
Memory Usage Sheets .....................................................................................16-2-1
Deleting Memory Usage Data ..........................................................................16-2-3
16-3 Using the Reset Dialog Box ............................................................... 16-3-1
16-4 Initializing Your ClassPad ...................................................................
16-5 Adjusting Display Contrast ................................................................
16-6 Configuring Power Properties ...........................................................
Power Saving Mode .........................................................................................16-6-1
Auto Power Off .................................................................................................16-6-1
Configuring Power Properties ...........................................................................16-6-2
16-7 Specifying the Display Language ...................................................... 16-7-1
20060301
16-4-1
16-5-1
16-6-1
Page 25

14
Contents
16-8 Specifying the Font Set ...................................................................... 16-8-1
16-9 Specifying the Alphabetic Keyboard Arrangement .........................
16-10 Optimizing “Flash ROM” ...................................................................
16-11 Specifying the Ending Screen Image ..............................................
16-12 Adjusting Touch Panel Alignment ...................................................
16-13 Viewing Version Information ............................................................
16-14 Registering a User Name on a ClassPad ........................................
16-15 Specifying the Complex Number Imaginary Unit ...........................
16-16 Assigning Shift Mode Key Operations to Hard Keys .....................
16-9-1
16-10-1
16-11-1
16-12-1
16-13-1
16-14-1
16-15-1
16-16-1
Chapter 17 Performing Data Communication
17-1 Data Communication Overview ......................................................... 17-1-1
Connectable Devices and Transferable Data ...................................................17-1-1
Using the ClassPad Communication Application .............................................17-1-3
17-2 Connecting the ClassPad to Another Device ................................... 17-2-1
Connecting to Another ClassPad Unit ..............................................................17-2-1
Connecting to an EA-200 Data Analyzer ..........................................................17-2-2
Connecting to a Computer (USB) .....................................................................17-2-3
17-3 Configuring Communication Parameters ......................................... 17-3-1
Wakeup ............................................................................................................17-3-2
17-4 Transferring Data to Another ClassPad Unit .................................... 17-4-1
Selecting Data for Transfer ...............................................................................17-4-3
Sending a Screenshot of the Current Display Contents ...................................17-4-5
Communication Standby ..................................................................................17-4-6
Interrupting an Ongoing Data Communication Operation ................................17-4-6
Appendix
1 Resetting and Initializing the ClassPad ..............................................A-1-1
2 Deleting an Application ........................................................................
3 Power Supply .........................................................................................
4 Number of Digits and Precision ...........................................................
5 Specifications ........................................................................................
6 Character Code Table ............................................................................
7 System Variable Table ...........................................................................
8 Command and Function Index .............................................................
9 Graph Types and Executable Functions .............................................
10 Error Message Table ...........................................................................
A-2-1
A-3-1
A-4-1
A-5-1
A-6-1
A-7-1
A-8-1
A-9-1
A-10-1
2006030120070301
Page 26
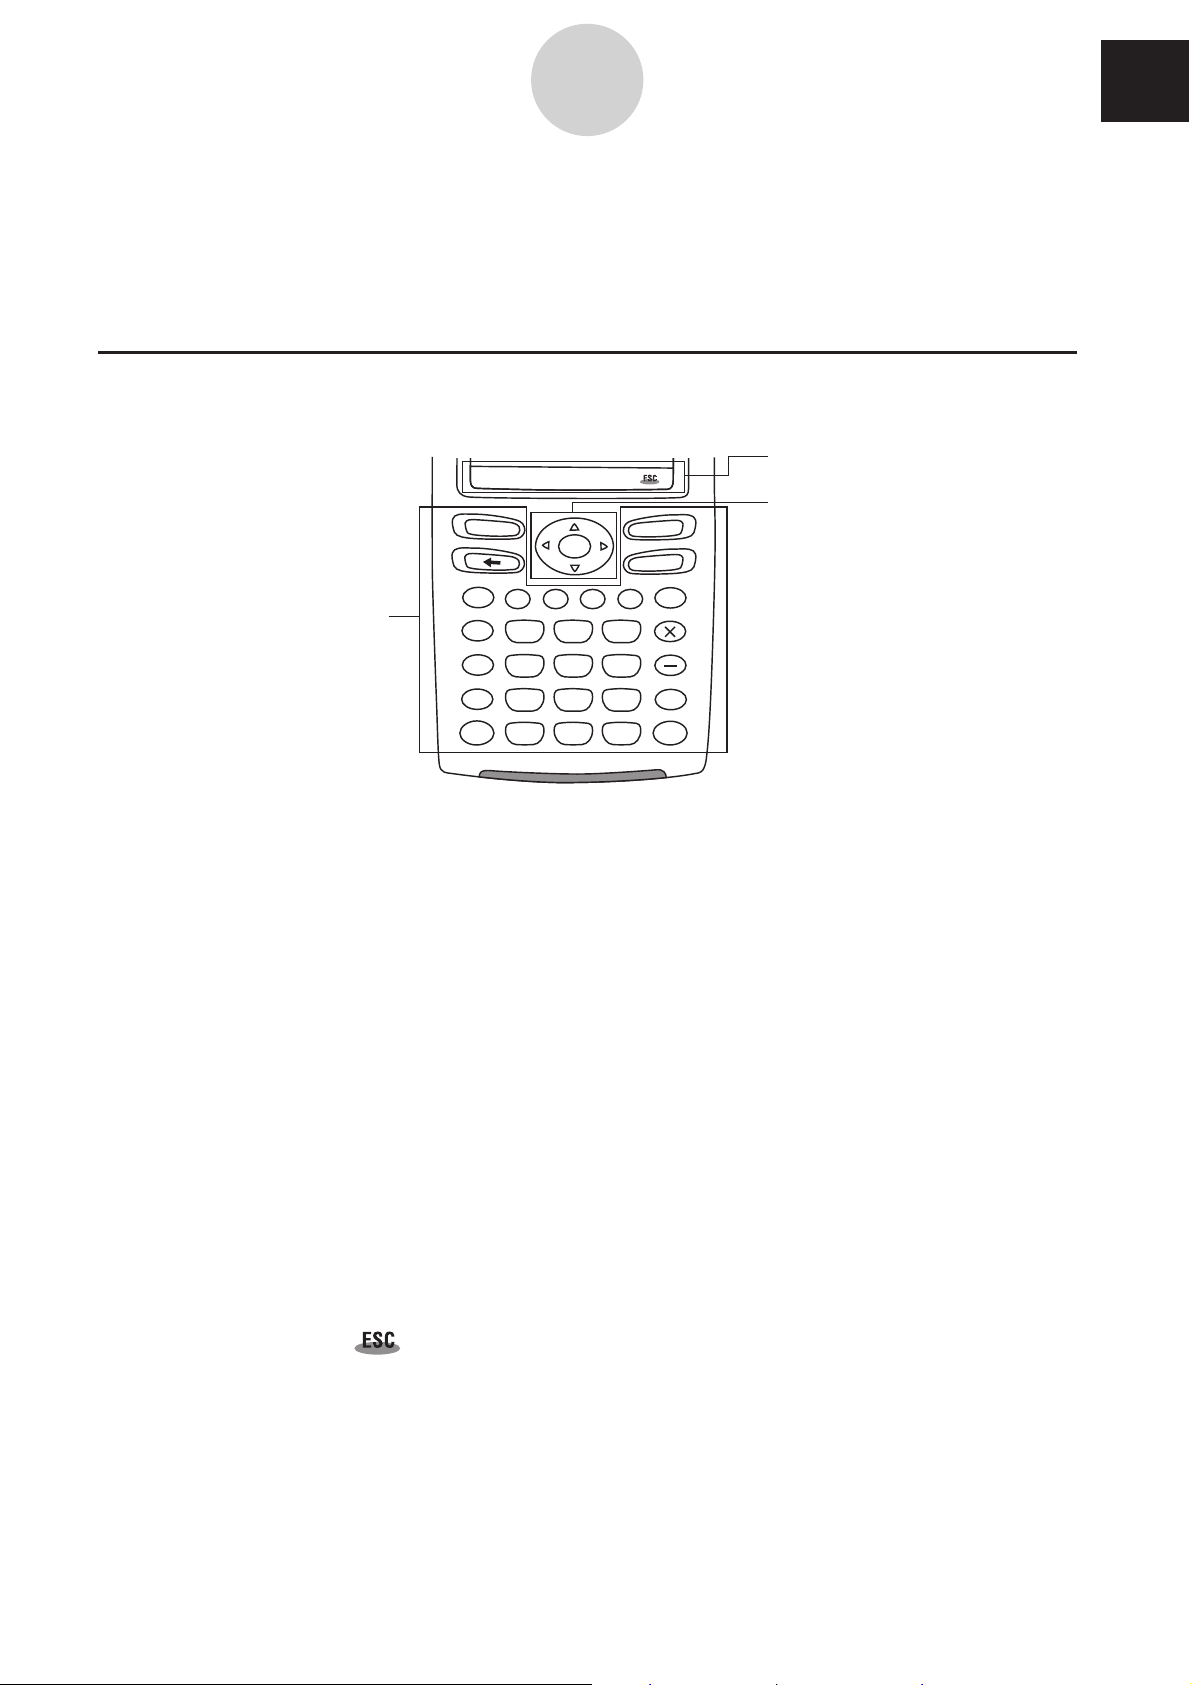
smMrSh
=
(
)
,
(–)
xz
^
y
÷
+
EXE
Key
b
oard
ON/OFF
Clear
0
1
4
7
2
5
8
EXP
3
6
9
.
0-1-1
About This User’s Guide
About This User’s Guide
This section explains the symbols that are used in this user’s guide to represent keys, stylus
operations, display elements, and other items you encounter while operating your ClassPad.
ClassPad Keypad and Icon Panel
Icon panel
Cursor key
Keypad
0
Keypad
ClassPad keypad keys are represented by illustrations that look like the keys you need to
press.
Example 1:
Press the
Example 2:
*
When you see something like the above, simply press the keys in the indicated sequence,
from left to right.
Icon panel
An operation that requires tapping an icon on the icon panel is indicated by an illustration of
the icon.
Example 1:
Example 2:
Key within text
. to show the soft keyboard.
A series of key operations
Tap / to display the application menu.
Tap
to cancel an ongoing operation.
Cursor key
Operation of the cursor key is represented by arrow buttons that indicate which part of the
cursor key you need to press: D, A, B, C.
Example 1:
Example 2:
The above example means that you should press
Use B or C to move the cursor around the display.
BBBB
20060301
B four times.
Page 27

0-1-2
About This User’s Guide
On-screen Keys, Menus, and Other Controllers
Menu bar
Soft keyboard
Toolbar
Tabs
Menu bar
Menu names and commands are indicated in text by enclosing them inside of brackets.
The following examples show typical menu operations.
Example 1:
Tap the menu and then tap [Keyboard].
Example 2: Tap [Analysis], [Sketch], and then [Line].
20060301
Page 28
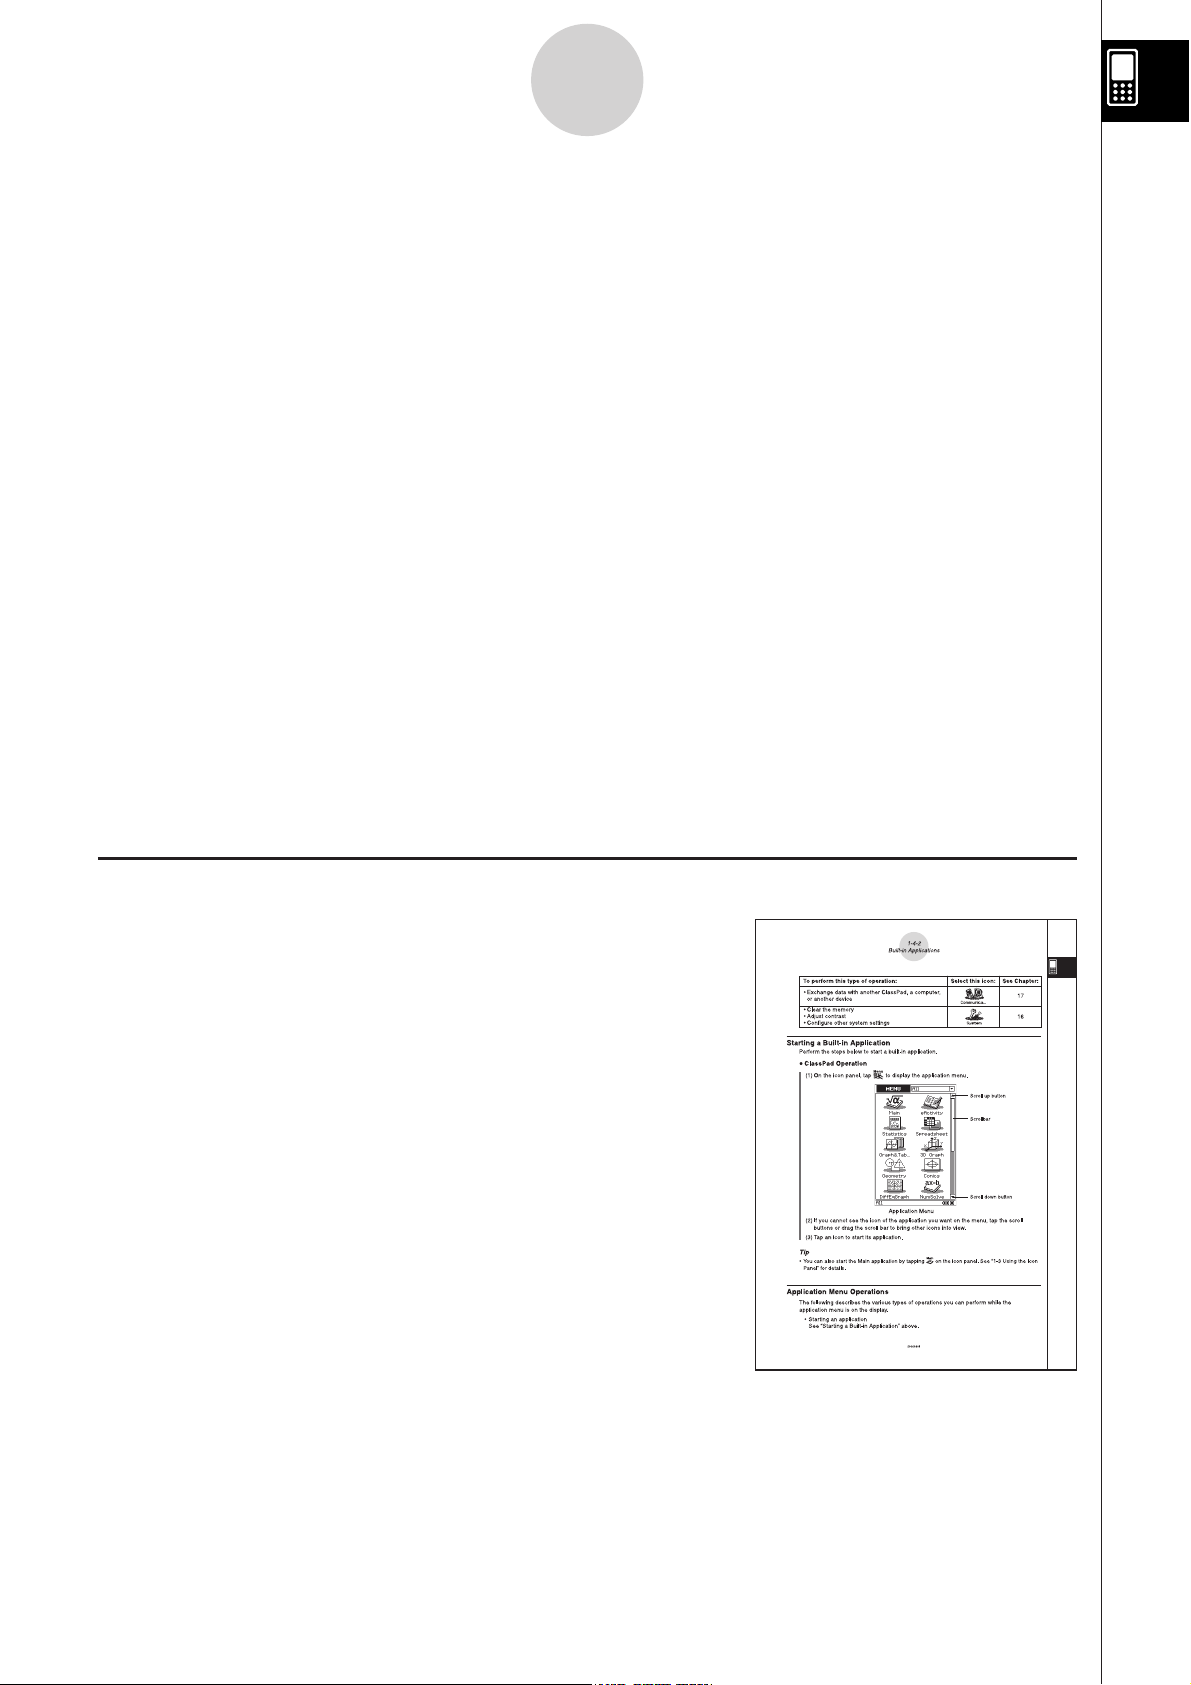
0-1-3
About This User’s Guide
Toolbar
Toolbar button operations are indicated by illustrations that look like the button you need to
tap.
Example 1:
Example 2:
Soft keyboard
Key operations on the soft keyboards that appear when you press the . key are
indicated by illustrations that look like the keyboard keys.
You can change from one keyboard type to another by tapping one of the tabs along the top
of the soft keyboard.
Example 1:
Example 2:
Tap to graph the functions.
Tap to open the Stat Editor window.
@??EU
-EACDU
Important!
• If a procedure in this User’s Guide requires use of a soft keyboard, press the . key to
display the soft keyboard. The . key operation is not included as one of the procedure
steps. For more details about how to input data on the ClassPad, see “1-6 Input”.
Page Contents
Three-part page numbers are centered at the top of each
page. The page number “1-4-2”, for example, indicates
Chapter 1, Section 4, page 2.
Note
Display examples shown in this User’s Guide are intended for illustrative purposes only.
The text, values, menus and buttons shown in the screen shots, and other details shown
in this User’s Guide may be slightly different from what actually appears on your ClassPad
screen.
20060301
Page 29

Chapter
Getting Acquainted
1
1-1 General Guide
1-2 Turning Power On and Off
1-3 Using the Icon Panel
1-4 Built-in Applications
1-5 Built-in Application Basic Operations
1-6 Input
1-7 Variables and Folders
1-8 Using the Variable Manager
1-9 Configuring Application Format Settings
20060301
Page 30
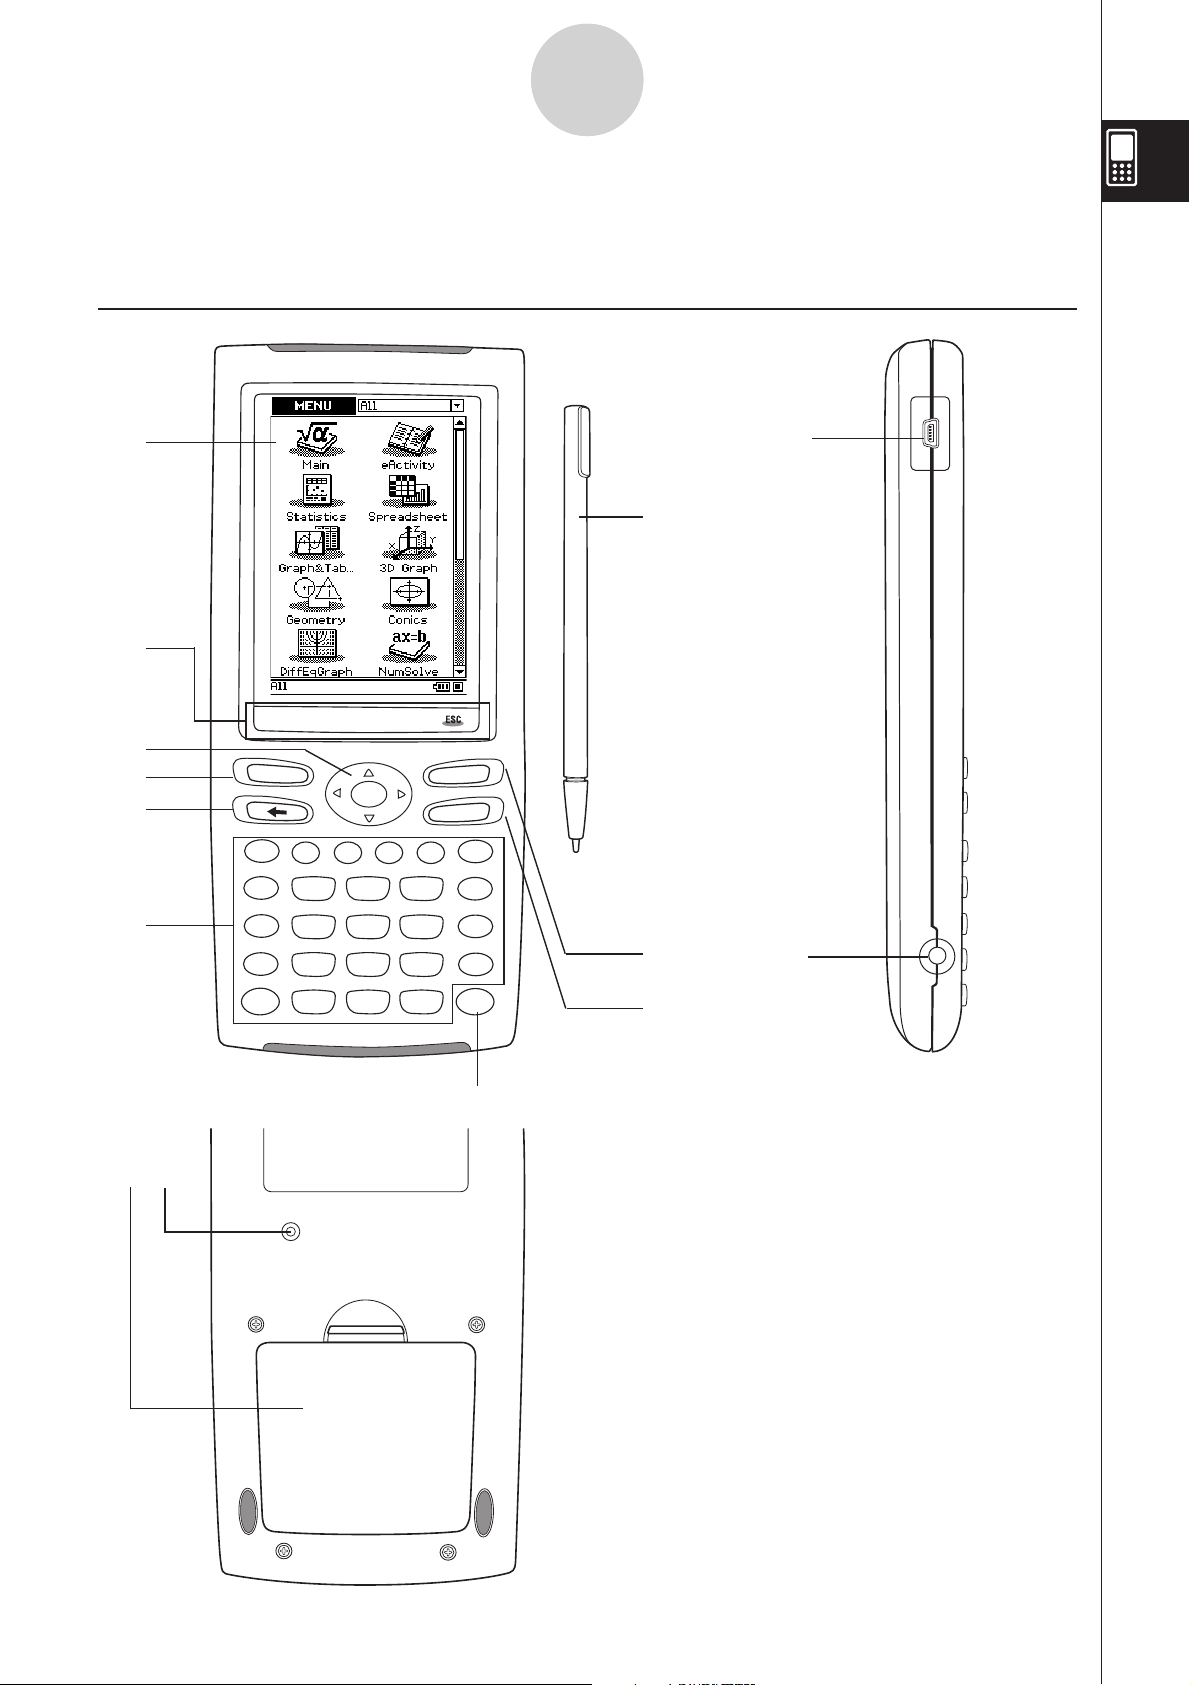
1-1 General Guide
1-1-1
General Guide
Front
smMrSh
K
ey
board
=
(
)
,
(–)
y
xz
7
8
4
5
1
2
.
0
9
6
3
EXP
^
ON/OF
Clea
r
÷
−
+
EXE
Side
F
Back
P
20060301
Page 31

1-1-2
General Guide
General Guide
The numbers next to each of the items below correspond to the numbers in the illustration on
page 1-1-1.
Front
Touch screen
The touch screen shows calculation formulas, calculation results, graphs and other
information. The stylus that comes with the ClassPad can be used to input data and perform
other operations by tapping directly on the touch screen.
Stylus
This stylus is specially designed for performing touch screen operations. The stylus slips
into a holder on the right side of the ClassPad for storage when it is not in use. For more
information, see “Using the Stylus” on page 1-1-4.
Icon panel
Tapping an icon executes the function assigned to it. See “1-3 Using the Icon Panel” for
details.
0
Press this key to toggle ClassPad power on and off. See “1-2 Turning Power On and Off” for
details.
*
• Pressing this key while inputting data clears all of the data you have input up to that point.
For details, see “Input Basics” on page 1-6-3.
• Pressing the
calculation. For details, see “Pausing and Terminating an Operation” on page 1-5-9.
Cursor key (
Use the cursor key to move the text cursor, selection highlighting, and other selection tools
around the display.
.
Press this key to toggle display of the soft keyboard on and off. For details, see “Using the
Soft Keyboard” on page 1-6-1.
key
key
key
*
key while a calculation operation is in progress interrupts the
DABC
)
• Pressing this key while inputting numeric, expression, or text data deletes one character to
the left of the current cursor position. For details, see “Input Basics” on page 1-6-3.
• Pressing the
For details, see “Pausing and Terminating an Operation” on page 1-5-9.
key
key while a calculation operation is in progress pauses the calculation.
20060301
Page 32

1-1-3
General Guide
Keypad
Use these keys to input the values and operators marked on them. See “1-6 Input” for details.
key
Press this key to execute a calculation operation or enter a return.
Side
3-pin data communication port
Connect the data communication cable here to communicate with another ClassPad unit or a
CASIO Data Analyzer. See “Chapter 17 – Performing Data Communication” for details.
4-pin mini USB port
Connect the data communication cable here to exchange data with a computer. See “Chapter
17 – Performing Data Communication” for details.
Back
Battery compartment
Holds the four AAA-size batteries that power the ClassPad. For details, see “Power Supply”
on page
P button
Press this button to reset the ClassPad. For details, see “Performing the RAM Reset
Operation” on page
-3-1.
A
-1-2.
A
20060301
Page 33

1-1-4
General Guide
Using the Stylus
Most value and formula input, command executions, and other operations can be performed
using the stylus.
Things you can do with the stylus
I
• This is equivalent to clicking with a mouse.
• To perform a tap operation, tap lightly with the
stylus on the ClassPad’s touch screen.
Tap
• Tapping is used to display a menu, execute an
on-screen button operation, make a window
active, etc.
• This is equivalent to dragging with a mouse.
• To perform a drag operation, hold the tip of the
stylus on the touch screen as you move the
Drag
stylus to another location.
• Dragging is used to change the setting of a
slider or some other on-screen controller, to
move a formula, etc.
Important!
• Be sure that you do not misplace or lose the stylus. Keep the stylus in the holder on the
right side of the ClassPad whenever you are not using it.
• Do not allow the tip of the stylus to become damaged. Using a stylus with a damaged tip to
perform touch screen operations can damage the touch screen.
• Use only the stylus that comes with your ClassPad or some other similar instrument to
perform touch screen operations. Never use a pen, pencil or other writing instrument, which
can damage the touch screen.
20060301
Page 34

1-2-1
Turning Power On and Off
1-2 Turning Power On and Off
Turning Power On
You can turn on the ClassPad either by pressing the
screen with the stylus.
• Turning on the ClassPad (while it is in the sleep state) displays the window that was on the
display when you last turned it off. See “Resume Function” below.
• Note that you need to perform a few initial setup operations when you turn on the ClassPad
the first time after purchasing it. For details, see “Getting Ready” at the beginning of this
user’s guide (page 1).
0
key or by tapping the touch
Turning Power Off
To turn off the ClassPad, hold down the
screen appears. For details about the ending screen, see “16-11 Specifying the Ending
Screen Image”.
Important!
The ClassPad also has an Auto Power Off feature. This feature automatically turns the
ClassPad off when it is idle for a specified amount of time. For details, see “Auto Power Off”
on page 16-6-1.
Though the screen of your ClassPad goes blank when you turn it off, it continues to perform
certain internal processes for a short while. Because of this, you should always wait for a
minute or so after turning off the ClassPad before turning it back on again.
0
key for about two seconds, or until the ending
Resume Function
Any time the ClassPad powers down (because you turn off power or because of Auto Power
Off), the Resume function automatically backs up its current operational status and any data
in RAM, and the ClassPad enters a “sleep state”. If you turn ClassPad power back on while
it is in the sleep state, the Resume function restores the backed up operational status and
RAM data.
20060301
Page 35

1-2-2
Turning Power On and Off
Limiting the Duration of the Sleep State
You can use the [Power Save Mode] setting (page 16-6-1) to limit the duration of the sleep
state that is entered by the Resume function. If you have “1 day” specified for [Power Save
Mode], for example, the ClassPad remains in the sleep state for one day after power is turned
off. After that, the ClassPad powers down completely, which deletes all data that was backed
up by the Resume function.
The following describes the difference between powering up from the sleep state and
powering up after the ClassPad powers down completely.
Powering Up from the Sleep State
I
Power comes on immediately, with all data backed up by the Resume function restored.
Powering Up after Complete Power Down
I
1. Press the
• This causes the ClassPad to perform it startup routine, which takes a little time to
complete.
2. The application menu will appear after you finish the touch panel alignment procedure.
0
key or tap the ClassPad screen.
Tip
•
See “16-6 Configuring Power Properties” for information about changing the [Power Save Mode]
setting.
20060301
Page 36

1-3-1
Using the Icon Panel
1-3 Using the Icon Panel
The icon panel of seven permanent icons is located below the touch screen.
Tapping an icon executes the function assigned to it.
The table below explains what you can do with the icon panel icons.
Function
When you want to do this: Tap this icon:
Display the menu to configure settings, switch to the application
menu, etc.
See “Using the
Menu” on page 1-5-4.
3
Display the application menu
See “1-4 Built-in Applications” for details.
Start the Main application
See “Chapter 2 – Using the Main Application” for details.
Resize the currently active window (when there are two windows
displayed) so it fills the entire display, or return to the dual window
display again
See “Using a Dual Window Display” on page 1-5-1.
Swap the upper window and lower window (when there are two
windows displayed)
See “Using a Dual Window Display” on page 1-5-1.
Capture the currently displayed screen for transfer to a computer or for
use with the ClassPad’s presentation application
See “Chapter 11 – Using the Presentation Application” and
“Chapter 17 – Performing Data Communication”.
Perform the same operation as a computer’s ESC key
The actual operation performed when this icon is tapped depends on
the application you are currently using.
/
2
#
-
Tip
Tapping the
use to perform the following operations.
• Move an icon (page 1-4-3)
• Swap two icons (page 1-4-4)
• Adjust touch panel alignment (page 1-4-4)
3
icon while the application menu is on the screen will display a menu that you can
20060301
Page 37

To perform this type of operation: Select this icon: See Chapter:
2
10
7
13
3
6
4
5
8
9
11
12
•
Access the eActivity function
• General calculations, including function calculations
• Matrix calculations
• Computer Algebra System
• Create a list
• Perform statistical calculations
• Draw a statistical graph
• Input data into a spreadsheet
• Manipulate spreadsheet data
• Graph spreadsheet data
• Register a function and create a table of solutions by
substituting different values for the function’s variables
• Draw a graph
• Perform sequence calculations
• Solve recursion expressions
• Draw the graph of a conics section
• Graph the 3D function
z = f(x,y)
• Draw geometric figures
• Build animated figures
• Obtain the value of any variable in an equation,
without transforming or simplifying the equation
14
• Draw vector fields and solution curves to explore
differential equations
15
• Perform simple interest, compound interest,
and other financial calculations
• Create and run a presentation using ClassPad
application window
• Register a file name in the programming area
• Input a program or run a program
"
$
!
1
1-4-1
Built-in Applications
1-4 Built-in Applications
Tapping
The table below shows the icon menu names of the built-in applications, and explains what
you can do with each application.
on the icon panel displays the application menu.
/
20060301
Page 38

1-4-2
Built-in Applications
To perform this type of operation: Select this icon: See Chapter:
• Exchange data with another ClassPad, a computer,
or another device
• Clear the memory
• Adjust contrast
• Configure other system settings
Starting a Built-in Application
Perform the steps below to start a built-in application.
ClassPad Operation
S
(1) On the icon panel, tap
to display the application menu.
/
&
Scroll up button
Scrollbar
17
16
Scroll down button
Application Menu
(2) If you cannot see the icon of the application you want on the menu, tap the scroll
buttons or drag the scroll bar to bring other icons into view.
(3) Tap an icon to start its application.
Tip
• You can also start the Main application by tapping on the icon panel. See “1-3 Using the Icon
Panel” for details.
Application Menu Operations
The following describes the various types of operations you can perform while the
application menu is on the display.
• Starting an application
See “Starting a Built-in Application” above.
20060301
Page 39

1-4-3
Built-in Applications
• Displaying applications according to group (Additional Applications, All Applications)
See “Using Application Groups” below.
• Moving or swapping icons
See “Moving an Icon” below, and “Swapping Two Icons” on page 1-4-4.
• Deleting an application
See “Deleting an Application” on page
Using Application Groups
I
You can use application groups to specify the type of applications that appear on the
application menu.
To select an application group, tap the box in the upper right of the application menu, and
then select the group you want from the list that appears.
To display these icons: Select this application group:
-2-1.
A
Add-in applications only Additional
All applications All
Add-in applications above built-in applications Add-ins First
Tip
• Nothing appears on the application menu if you select the “Additional” group while there are no
add-in applications installed on the ClassPad.
Moving an Icon
I
You can use the procedure below to move an icon to a different location on the application
menu.
20090601
Page 40

1-4-4
Built-in Applications
ClassPad Operation
S
(1) On the icon panel, tap / to display the application menu.
(2) Tap
• This opens a menu of setting options.
(3) Tap [Move Icon].
(4) Tap the icon you want to move (
• This selects the icon.
(5) Tap the icon that you want the first icon to follow (
• This moves the icon.
Swapping Two Icons
I
Perform the following steps to swap two icons on the application menu.
ClassPad Operation
S
(1) On the icon panel, tap / to display the application menu.
(2) Tap
• This opens a menu of setting options.
(3) Tap [Swap Icon].
at the top left of the application menu.
in this example).
at the top left of the application menu.
in this example).
(4) Tap one of the icons.
• This selects the icon.
(5) Tap the other icon (the one you want to swap with).
• This swaps the icons.
Adjusting Touch Panel Alignment
I
Perform the following steps to align the touch panel.
ClassPad Operation
S
(1) On the icon panel, tap / to display the application menu.
(2) Tap
• This opens a menu of setting options.
(3) Tap [Touch Panel Alignment].
• This displays the Touch Panel Alignment screen.
(4) Use the stylus to tap the center of each of the four crosses as they appear on the
screen.
• Tapping the center of the fourth cross completes touch panel alignment and returns
you to the application menu.
at the top left of the application menu.
• When aligning your ClassPad try to tap the exact center of each cross.
20060301
Page 41

1-5-1
Built-in Application Basic Operations
1-5 Built-in Application Basic Operations
This section explains basic information and operations that are common to all of the built-in
applications.
Application Window
The following shows the basic configuration of a built-in application window.
Menu bar
}
Toolbar
}
Application window
Soft keyboard (page 1-6-1)
Status bar
}
Using a Dual Window Display
Many applications split the display between an upper window and a lower window, each
of which shows different information. The sample screenshot below is from the Conics
application, which uses the upper window for input of expressions, and the lower window for
graphing.
Upper window
20060301
Lower window
Page 42

1-5-2
Built-in Application Basic Operations
When using two windows, the currently selected window (the one where you can perform
operations) is called the “active window”. The menu bar, toolbar, and status bar contents are
all applicable to the active window. The active window is indicated by a thick boundary around
it.
To switch the active window
S
While a dual window is on the display, tap anywhere inside the window that does not have a
thick boundary around it to make it the active window.
• Note that you cannot switch the active window while an operation is being performed in the
current active window.
To resize the active window so it fills the display
S
While a dual window is on the display, tap 2. This causes the active window to fill the
display. To return to the dual window display, tap 2 again.
To swap the upper and lower windows
S
While a dual window is on the display, tap #. This causes the upper window to become the
lower window, and vice versa. Swapping windows does not have any affect on their active
status. If the upper window is active when you tap # for example, the window will remain
active after it becomes the lower window.
Tip
• When you tap 2 button while a dual window is on the display, the currently active window will
fill the display, but the other (inactive) window does not close. It remains open, hidden behind the
active window. This means you can tap
active window, and send the current active window to the background.
To close the active windows
S
While a dual window is on the display, tap at to top right corner of the window to close the
active window, which causes the other (inactive) window to fill the display.
to bring the hidden window forward and make it the
#
Tip
• When the close ( ) button is dimmed, it means that the active window cannot be closed for some
reason.
20060301
Page 43

1-5-3
Built-in Application Basic Operations
Using the Menu Bar
The menu bar appears along the top of the window of each application. It shows the menus
that you can access for the currently active window.
Menu bar
}
Tapping the menu bar menu displays its commands, options, and settings from which you
can choose the one you want. Some menu items have a single selection as shown in
Example 1, below, while other menu items display a submenu of selections from which you
can choose as shown in Example 2.
Example 1: Choosing the [Edit] menu’s [Copy] item
ClassPad Operation
S
(1) Tap [Edit]. (2) Tap [Copy].
• This displays the contents of the • This performs a copy operation.
[Edit] menu.
Example 2: Choosing [lim], which is on the [Calculation] submenu of the [Action] menu.
ClassPad Operation
S
(1) Tap [Action]. (2) Tap [Calculation].
• This displays the contents of the
[Action] menu.
(3) Tap [lim].
• This displays the contents of the
[Calculation] submenu.
• This inputs “lim(”.
2006030120080201
Page 44

1-5-4
Built-in Application Basic Operations
Using the
The menu appears at the top left of the window of each application, except for the
System application.
You can access the menu by tapping
bar’s menu.
I
The following describes all of the items that appear on the menu.
Menu Items
Menu
3
on the icon panel, or by tapping the menu
Tapping [Variable Manager] starts up the Variable Manager. See “1-8 Using the Variable
Manager” for details.
Tapping [View Window] displays a dialog box for configuring the display range and other
graph settings. For details, see the explanations for the various applications with graphing
capabilities (Graph & Table, Conics, 3D Graph, Statistics, etc.)
Tapping a menu selection displays a dialog box for configuring the corresponding setup
settings. See “1-9 Configuring Application Format Settings” for details.
Tapping [Default Setup] returns all settings to their initial defaults (except for the current
folder setting). See “1-9 Configuring Application Format Settings” for details.
This area shows a list of all of the windows that can be accessed from the current
application (Graph & Table application in this example). Tapping a menu selection displays
the corresponding window and makes it active. For details, see “Using the Menu to
Access Windows” on page 1-5-5.
Tap [Keyboard] to toggle display of the soft keyboard on and off.
Tapping [Close] closes the currently active window, except in the following cases.
• When only one window is on the display
• When the currently active window cannot be closed by the application being used
You cannot, for example, close the Graph Editor window from the Graph & Table
application.
20060301
Page 45

1-5-5
Built-in Application Basic Operations
Using the
I
Most ClassPad applications support simultaneous display of two windows. When two
windows are on the display, the one with a thick selection boundary around it is the active
window. The displayed menu and toolbar are the ones for the currently active window.
You can use the menu to change the active window and to display the window you want.
Window Selection Example (Graph & Table)
S
Menu to Access Windows
E
E
(1) Graph window is active.
E
(4) Tap
and then
[Stat Editor].
(2) Tap
[Graph Editor].
E
(5) Stat Editor window
and then
appears and becomes
active.
(3) Graph Editor window
becomes active.
20060301
Page 46

1-5-6
Built-in Application Basic Operations
Using Check Boxes
A check box shows the current status of a dialog box option that can be turned on or off. An
option is turned on (selected) when its check box has a check mark inside it. An option is
turned off when a check box is cleared.
Tapping a check box toggles the option on (checked) and off (cleared).
Option turned offOption turned on
Check boxes also appear on menus. Menu check boxes operate the same way as dialog box
check boxes.
Option turned on
Option turned off
20060301
Page 47

1-5-7
Built-in Application Basic Operations
Using Option Buttons
Option buttons are used on dialog boxes that present you with a list of options from which
you can select only one. A black option button indicates the currently selected option, while
the buttons of the options that are not selected are white.
Tap “Français”. This selects “Français” and
deselects “English”.
Option buttons also appear on menus. Menu option buttons operate the same way as dialog
box option buttons.
20060301
Page 48

1-5-8
Built-in Application Basic Operations
Using the Toolbar
The toolbar is located directly underneath the menu bar of an application window. It contains
the buttons for the currently active window.
Toolbar
}
Toolbar Buttons
I
Normally, you tap a button to execute the command assigned to it. Some buttons, however,
have a down arrow 6 next to them. Tapping the arrow displays a list of options from which
you can select.
List of options
Toggling between Multiple Toolbars
I
With some applications, not all of the buttons can fit on a single toolbar. When this happens,
the buttons that cannot fit are placed onto a second toolbar. When there are two toolbars,
each of them has an arrow button on the far right. Toolbar 1 has a 5 button while toolbar 2
has a 4 button. Tapping an arrow button toggles between the two toolbars.
Tap here to toggle
Tip
• The explanations in this manual make no distinction between toolbar 1 and toolbar 2.
Even if a button is located on toolbar 2 (like the
instructed simply to “tap
”.
button in the above example) you will be
20060301
Page 49

1-5-9
Built-in Application Basic Operations
Interpreting Status Bar Information
The status bar appears along the bottom of the window of each application.
Status bar
Information about current application
Tip
• You can change the configuration of a setting indicated in the status bar by tapping it. Tapping
“Cplx” (indicating complex number calculations) while the Main application is running will toggle
the setting to “Real” (indicating real number calculations). Tapping again will toggle back to “Cplx”.
For information about application-specific information that appears in the status bar, see the
sections in this manual that describes each application.
Battery level indicator
....................... full
....................... medium
....................... low
This indicator flashes between
appears here to indicate when an operation is paused.
and while an operation is being performed.
Important!
• Be sure to replace batteries as soon as possible whenever the battery level indicator shows
(medium).
• Replace batteries immediately whenever the battery level indicator shows
level, you will not be able to perform data communication or other functions.
• The following message indicates that batteries are about to die. Replace batteries
immediately whenever this message appears.
(low). At this
Batteries are extremely low!
Replace batteries immediately!
• See page
-3-2 for details about replacing batteries.
A
Pausing and Terminating an Operation
Many of the built-in applications provide operations to pause and terminate (break)
expression processing, graphing, and other operations.
Pausing an Operation
I
Pressing the
performed pauses the operation. Pressing
key while an expression processing, graphing, or other operation is being
20060301
again resumes the operation.
Page 50

1-5-10
Built-in Application Basic Operations
Example: To pause a graphing operation and then resume it
ClassPad Operation
S\
(1) Use the Graph & Table application to draw a graph.
• For details about graphing, see “Chapter 3 – Using the Graph & Table Application”.
(2) While the graph is being drawn, press the
• This pauses the draw operation and displays
the right side of the status bar.
(3) To resume the operation, press the
• This resumes the draw operation, which continues
until the graph is complete.
Terminating an Operation (Break)
I
Pressing the
*
key while an expression processing, graphing, or other operation is being
performed terminates the operation.
key.
on
key again.
Draw is paused at the point
where
is pressed.
Example: To terminate a graphing operation
ClassPad Operation
S
(1) Use the Graph & Table application to draw a graph.
• For details about graphing, see “Chapter 3 – Using the Graph & Table Application”.
(2) While the graph is being drawn, press the
*
key.
• This terminates the draw operation and displays the Break dialog box, indicating the
Break state.
Break dialog box
(3) To exit the Break state, tap the [OK] button.
• This returns the ClassPad to its status before you started the graphing operation.
20060301
Page 51

1-6-1
Input
1-6 Input
You can input data on the ClassPad using its keypad or by using the on-screen soft
keyboard.
Virtually all data input required by your ClassPad can be performed using the soft keyboard.
The keypad keys are used for input of frequently used data like numbers, arithmetic
operators, etc.
Using the Soft Keyboard
The soft keyboard is displayed in the lower part of the touch screen. A variety of different
special-purpose soft keyboard styles help to take much of the work out of data input.
To display the soft keyboard
S
When the soft keyboard is not on the touch screen, press the
menu and then tap [Keyboard]. This causes the soft keyboard to appear.
.
Press
.
.
key, or tap the
The soft
keyboard
appears.
• Pressing the
• The icon panel’s 2 icon is disabled while the soft keyboard is on the display.
For details about 2, see “Using a Dual Window Display” on page 1-5-1.
.
key again hides the soft keyboard.
20060301
Page 52

1-6-2
Input
Soft Keyboard Styles
I
There are four different soft keyboard styles as described below.
• Math (mth) Keyboard
Pressing
.
will display the keyboard that you last
displayed while working in that application. If you quit the
application and go into another application, then the
(default) soft keyboard appears.
You can use the math (mth) keyboard to input values,
variables, and expressions. Tap each lower button to see
additional characters, for example tap
. For more
information, see “Using the Math (mth) Keyboard” on page
1-6-8.
• Alphabet (abc) Keyboard
Use this keyboard to input alphabetic characters, Greek
characters, and other characters, as well as logical symbols
and other numeric symbols. Tap one of the buttons along
the bottom of the keyboard to see additional characters, for
example, tap
. For more information, see “Using the
L
Alphabet (abc) Keyboard” on page 1-6-10.
• Catalog (cat) Keyboard
This keyboard provides a scrollable list that can be used
to input built-in functions, built-in commands, system
variables, and user-defined functions. Tap a command to
select it and then tap it again to insert it. Selecting an item
from the Form list changes the available commands. For
more information, see “Using the Catalog (cat) Keyboard”
on page 1-6-13.
• 2D Keyboard
This keyboard displays various templates for natural input
of fractions, exponential values, matrices, differential and
integral calculus expressions, etc. Note that natural input
is available in most ClassPad applications. Natural input
cannot be used in the geometry measurement box or when
entering data into a list. For more information, see “Using
the 2D Keyboard” on page 1-6-15.
Tip
• 2D math symbols are easy to use. Just tap the image of the symbol you would like to use and it
will appear in your application.
• 2D math symbols can be used in most applications.
20090601
Page 53

1-6-3
Input
Selecting a Soft Keyboard Style
I
Tap one of the tabs along the top of the soft keyboard (
the keyboard style you want.
Tap here.
To display the 2D
keyboard
Input Basics
, ,
, or
) to select
This section includes a number of examples that illustrate how to perform basic input
procedures. All of the procedures assume the following.
• The Main application is running.
For details, see “Starting a Built-in Application” on page 1-4-2.
• The soft keyboard is displayed.
For details, see “Using the Soft Keyboard” on page 1-6-1.
Inputting a Calculation Expression
I
You can input a calculation expression just as it is written, and press the key to execute
it. The ClassPad automatically determines the priority sequence of addition, subtraction,
multiplication, division, and parenthetical expressions.
• Before starting any calculation, be sure to clear the ClassPad by pressing
See Chapter 2 for more information about inputting expressions.
• Use the 9 or key to input the minus sign before a negative value.
Example 1: To simplify –2 + 3 – 4 + 10
ClassPad Operation
S
Using the keypad keys
*
.
*9
Using the soft keyboard
Tap the keys of the math (mth) keyboard or the 2D keyboard to input the calculation
expression.
*
When the soft keyboard is not on the touch screen, press the
menu and then tap [Keyboard]. This causes the soft keyboard to appear on the display.
ABC@?
20090601
U
.
key, or tap the
Page 54

1-6-4
Input
Example 2: To simplify 2 (5 + 4) w (23 s 5)
ClassPad Operation
S
Using the keypad keys
;;*
Using the soft keyboard
Tap the keys of the math (mth) keyboard or the 2D keyboard to input the calculation
expression.
;*
(or
)
ADCABD
U
Tip
• As shown in Example 1 and Example 2, you can input simple arithmetic calculations using either
the keypad keys or the soft keyboard. Input using the soft keyboard is required to input higher
level calculation expressions, functions, variables, etc.
Editing Input
I
The following are the different techniques you can use to edit your input.
To change something right after you input it
S
When the cursor is located at the end of your input, press
operator you want to edit.
Example: To change the expression 369 s 3 to 369 s 2
*
(1)
to delete the character or
;
(2)
(3)
Tip
• Or, drag your stylus across 3 to select it and input 2.
20060301
Page 55

1-6-5
Input
To delete an unneeded key operation
S
Use B and C to move the cursor to the location immediately to the right of the key
operation you want to delete, and then press
. Each press of
deletes one
command to the left of the cursor.
Example: To change the expression 369 s s 2 to 369 s 2
*
(1)
B
(2)
Tip
• You can move the cursor without using the cursor key by tapping at the destination with the
stylus. This causes the cursor to jump to the location where you tap.
To correct a calculation expression
S
Use B and C to move the cursor to the location immediately to the right of the location
you want to correct, and then press
Example: To correct cos(60) so it becomes sin(60)
(1) Use the mathematics (mth) keyboard to input “cos(60)”.
*
3
Tapping the 3 key causes it to
change to ( and displays a key set
for inputting trigonometric functions.
E?
A
(2) Move the cursor to the location immediately to the right of “cos(”.
BBB
.
(3) Delete “cos(”.
(4) Input “sin(”.
Q
(5) Tap
to return to the initial math (mth) key set. See “Using the Math (mth)
(
Keyboard” on page 1-6-8 for details.
Tip
• Or, drag your stylus across “cos(” to select it and input “sin(”.
After you make all of the changes you want, press to calculate the result. To continue
inputting the calculation, press C to move the cursor to the end of the calculation, and input
what you want.
20060301
Page 56

1-6-6
Input
To insert new input into the middle of an existing calculation expression
S
Use B or C to move the cursor to the location where you want to insert new input, and
then input what you want.
Example: To change 2.36
*
(1)
(2)
BBBBBB
(3)
3
Q
ABE
2
to sin(2.362)
V
Tip
• You can move the cursor without using the cursor key by tapping at the destination with the
stylus. This causes the cursor to jump to the location where you tap.
To replace a range of input with new input
S
After you drag the stylus across the range of input that you want to replace, enter the new
input.
Example: To replace the “234” of “1234567” with “0”.
(1) Input “1234567”.
*
(2) Drag the stylus across “234” to select it.
(3) Input “0”.
Tip
• You can perform B and
key.
key operations by pressing the corresponding keypad key or soft
20060301
Page 57

1-6-7
Input
Using the Clipboard for Copy and Paste
I
You can copy (or cut) a function, command, or other input to the ClassPad’s clipboard, and
then paste the clipboard contents at another location.
To copy characters
S
(1) Drag the stylus across the characters you
want to copy to select them.
(2) On the soft keyboard, tap
&
.
• This puts a copy of the selected characters onto
the clipboard.
The selected characters are not
changed when you copy them.
Tip
• You can also copy characters by tapping the [Edit] menu and then tap [Copy].
To cut characters
S
(1) Drag the stylus across the characters you want to
cut to select them.
(2) On the soft keyboard, tap
.
• This moves the selected characters onto
the clipboard.
Cutting causes the original
characters to be deleted.
Tip
• Performing a copy or cut operation causes the clipboard contents to be replaced by the newly
copied or cut characters.
• You can also cut characters by tapping the [Edit] menu and then tap [Cut].
To paste the clipboard contents
S
(1) Move the cursor to the location where you want to
paste the clipboard contents.
(2) On the soft keyboard, tap
'
.
• This pastes the clipboard contents at the current
cursor location.
Tip
• The clipboard contents remain on the clipboard after you paste them. This means you can paste
the current contents as many times as you like.
• You can also paste the clipboard contents by tapping the [Edit] menu and then tap [Paste].
20060301
Page 58

1-6-8
Input
Copying and pasting in the message box
S\
The “message box” is a 1-line input and display area under the Graph window (see Chapter 3).
Message box
You can use the two buttons to the right of the message box to copy the message box
contents (& button), or to paste the clipboard contents to the message box (' button).
Copy and paste are performed the same way as the copy and paste operations using the
soft keyboard.
Advanced Soft Keyboard Operations
As explained in “Using the Soft Keyboard” on page 1-6-1, there are four soft keyboard types:
the math (mth) keyboard, the alphabet (abc) keyboard, the catalog (cat) keyboard, and the
2D math (2D) keyboard. This section provides more detailed information about soft keyboard
operations and the various key sets available with each soft keyboard.
• All of the explanations in this section start from the initial key set of each keyboard.
Using the Math (mth) Keyboard
I
The math (mth) keyboard is for inputting calculation expressions and numeric expressions. In
addition to the initial math (mth) key set, you can also select from among four other key sets
named
Initial math (mth) keyboard key set
S
If you stay in the same application, the keyboard that you used last will appear when you
press the
(trigonometry),
3
.
key.
(calculus),
(option), and 5 (variable).
*
20060301
Page 59

S
3
1-6-9
Input
key set
Tapping the
softkey to
3
key displays keys for inputting trigonometric functions, and changes the
3
. You can tap this key to toggle between
(
and the default
3
keyboard. Tapping the (hyperbolic) key switches to a key set for inputting hyperbolic
functions. Tap the key again to return to the regular
S
Tapping the
key set
key displays keys for inputting differential and integral calculus expressions,
permutations, etc., and changes the
between
and the default
keyboard.
softkey to
k
m
(
key set.
3
. You can tap this key to toggle
Tip
• Tapping the key inputs the “solve” function, while tapping the key inputs the “dSolve”
function. See pages 2-8-43 and 2-8-44 for information about these functions.
• For information about each of functions or symbols, see “2-4 Function Calculations”.
S *
Tapping the
changes the
key set
*
*
keyboard.
key displays keys for inputting “<”, “x”, and other special operators, and
softkey to
. You can tap this key to toggle between
(
and the default
*
Tip
• Tapping the key inputs the “rSolve” function. See page 6-3-5 for information about this
function.
• For information about each of the functions and symbols, see “2-4 Function Calculations”.
20060301
Page 60

1-6-10
Input
key set
S 5
Tapping the 5 key displays keys for inputting single-character variables, and changes
the 5 softkey to
. You can tap this key to toggle between 5 and the default
(
keyboard. Tapping the $ key switches to a key set for inputting upper-case singlecharacter variables.
$
k
m
Tip
• As its name suggests, a single-character variable is a variable name that consists of a single
character like “
character variable. To input multiple-character variable names like “ab” or multiple-character
strings, you must use the alphabet (abc) keyboard. For more information, see “Using Singlecharacter Variables” on page 1-6-12.
• For information about the
key sets, see “Using the Answer Variable (ans)” on page 2-2-2.
” or “x”. Each character you input on the 5 keyboard is treated as a single-
a
key that appears in the lower right of all of the math (mth) keyboard
#
Using the Alphabet (abc) Keyboard
I
In addition of the initial alphabet (abc) key set, you can also select from among three
other key sets, within alphabet (abc), named
symbols), and
Initial alphabet (abc) keyboard key set
S
(extra symbols).
2
(character symbols),
,
(mathematics
L
This keyboard is for inputting lower-case alphabetic characters. Tap + to shift the keyboard
or $ to caps lock the keyboard when you want to input upper-case characters.
• Note that the initial alphabet (abc) keyboard uses the qwerty key arrangement, which is
similar to a computer keyboard. You can also change to an azerty or qwertz arrangement.
See “16-9 Specifying the Alphabetic Keyboard Arrangement”.
20090601
Page 61

S
,
1-6-11
Input
key set
Use the
Tap the ) and * buttons to scroll to additional keys. Tapping
key set to input Greek characters, Cyrillic characters, and accented characters.
,
caps locks the keyboard
$
for input of upper-case characters.
• Tap
S L
to return to the initial alphabet (abc) key set.
(
key set
This key set contains some of the mathematical expression symbols that are also available
on the math (mth) keyboard. Tap the ) and * buttons to scroll to additional keys.
• Tap
S
2
to return to the initial alphabet (abc) key set.
(
key set
Use this key set to input punctuation and symbols. Tap the ) and * buttons to scroll to
additional keys.
• Tap
to return to the initial alphabet (abc) key set.
(
20060301
Page 62

1-6-12
Input
Using Single-character Variables
I
As its name suggests, a single-character variable is a variable name that consists of a single
character like “
than input of a series of multiple characters (like “abc”).
To input a single-character variable name
S
Any character you input using any one of the following techniques is always treated as a
single-character variable.
” or “x”. Input of single-character variable names is subject to different rules
a
• Tapping any key in the math (mth) keyboard’s
• Tapping any key in the 2D keyboard’s 5 key set (page 1-6-17)
• Tapping the 7, 8, 9 or : key to the left of the key of the math (mth) keyboard or
2D keyboard
• Pressing the 7, 8, or ' keypad key
If you use the above key operations to input a series of characters, each one is treated as a
single-character variable. Inputting , !, ", for example, is treated as the mathematical
expression a s b s c, and not as the characters “abc”.
key set (page 1-6-10)
5
Tip
• The single-character variables described above make it possible for you to perform calculations
as they appear in your textbook.
Example 1:
Example 2:
5 !"
78
U
Tip
• When you input a single-character variable, its name appears on the display as an italicized bold
character. This is simply to let you know that the letter is a single-character variable name.
20060301
Page 63

1-6-13
Input
To input a series of multiple characters
S
A series of multiple characters (like “list1”) can be used for variable names, program
commands, comment text, etc. Always use the alphabet (abc) keyboard when you want to
input a series of characters.
Example:
?@A
U
You can also use the alphabet (abc) keyboard to input single-character variable names.
To do so, simply input a single character, or follow a single character with a mathematical
operator.
Example:
?@A
U
Tip
• A single-character variable you input using the alphabet (abc) keyboard is identical to a single-
character variable you input using the math (mth) keyboard.
Using the Catalog (cat) Keyboard
I
The “Form” menu of the catalog keyboard lets you select one of the following five categories:
[Func] (built-in functions on pages 2-4-2 and 2-8-1), [Cmd] (built-in commands and operators
on pages 1-7-4 and 12-6-1), [Sys] (system variables on page A-7-1), [User] (user-defined
functions on page 12-5-1), and [All] (all commands, functions, etc.). After selecting a
category, you can choose the item you want from the alphabetized list that appears on the
catalog (cat) keyboard.
Tip
• Note that user-defined variables and user-defined programs cannot be input using the catalog (cat)
keyboard. Use the Variable Manager (page 1-8-1) instead.
• A user-defined function must be stored in the “library” folder to appear in the catalog (cat)
keyboard list when the [User] category is selected.
20060301
Page 64

Catalog (cat) keyboard configuration
S
1-6-14
Input
This is an alphabetized list of commands,
functions, and other items available in the
category currently selected with “Form”.
Tapping a letter button displays the
commands, functions, or other items that
begin with that letter.
To use the catalog (cat) keyboard
S
Example: To input the built-in “Plot” command
Tap the down button and then select the
category you want ([Func], [Cmd], [Sys],
[User], or [All]) from the list that appears.
Tap this key to input the item that is
currently selected in the alphabetized list.
(1) Tap
to display the catalog (cat) keyboard.
(2) Tap the “Form” down arrow button
that appears.
(3) Tap the
(4) Tap
5
button in the lower right corner until the / key is visible.
.
/
(5) In the alphabetized list, tap “Plot”.
(6) Tap [INPUT] to input the command.
6
and then select [Cmd] from the list of categories
Tip
• Instead of tapping [INPUT] in step (6), you could also tap the command you selected in step (5) a
second time to input the command.
20060301
Page 65

1-6-15
Input
Using the 2D Keyboard
I
The 2D keyboard provides you with a number of templates that let you input fractions,
exponential values,
th roots, matrices, differentials, integrals, and other complex
n
expressions as they appear in your textbook.
It also includes a 5 key set that you can use to input single-character variables like the
ones you can input with the math (mth) keyboard.
Initial 2D keyboard key set
S
This key set lets you input fractions, exponential values, nth roots, etc. as they appear in your
textbook.
Tip
• For information about each function or symbol, see “2-4 Function Calculations”.
Use the
•
Use the
•
information.
S
key set
Tapping the
place of the
The following are the mathematical expressions you can input with this 2D keyboard.
To input this: Use these keys: For more information, see:
key to input the piecewise function template. See page 2-4-12 for more information.
key to input the simultaneous equations template. See page 2-8-43 for more
key displays a keyboard like the one shown below, which has a
key. Tapping
returns to the initial 2D keyboard.
(
(
key in
Matrix templates
Limit template
Sum template
,
20090601
,
“Matrix and Vector Calculations” on
page 2-6-1.
“lim” under “Using the Calculation
Submenu” on page 2-8-15.
“3” under “Using the Calculation
Submenu” on page 2-8-15.
Page 66

1-6-16
Input
To input this: Use these keys: For more information, see:
Sum of product template
Differential coefficient template
Integration template
ADV
key set
S
Tapping the
place of the
ADV
key displays a keyboard like the one shown below, which has a
ADV
key. Tapping
,
/
returns to the initial 2D keyboard.
(
“0” under “Using the Calculation
Submenu” on page 2-8-15.
“diff” under “Using the Calculation
Submenu” on page 2-8-13.
“
” under “Using the Calculation
°
Submenu” on page 2-8-14.
(
The following are the mathematical expressions you can input with this 2D keyboard.
key in
To input this: Use these keys: For more information, see:
Fourier transform template
Inverse Fourier transform
template
Laplace transform template
Inverse Laplace transform
template
Gamma function
Delta function
th
n
-delta function
Heaviside function
“fourier” under “Using the Advanced
Submenu” on page 2-8-9.
“invFourier” under “Using the
Advanced Submenu” on page 2-8-9.
“laplace” under “Using the Advanced
Submenu” on page 2-8-8.
“invLaplace” under “Using the
Advanced Submenu” on page 2-8-8.
“Gamma Function” on page 2-4-18.
“Dirac Delta Function” on page 2-4-16.
th
n
Delta Function” on page 2-4-16.
“
“Heaviside Unit Step Function” on
page 2-4-17.
20090601
Page 67

1-6-17
Input
key set
S 5
Tapping the 5 key displays keys for inputting single-character variables, and changes the
softkey to
5
. You can tap this key to toggle between 5 and the initial 2D keyboard.
(
Tapping the $ key switches to a key set for inputting upper-case single-character
variables.
k
m
$
Tip
• As its name suggests, a single-character variable is a variable name that consists of a single
character like “
character variable. You cannot use the 5 keyboard to input multiple-character variable names
like “ab” or multiple-character strings. You must use the alphabet (abc) keyboard when you want
to input a multiple-character string. For more information, see “Using Single-character Variables”
on page 1-6-12.
• For information about the
sets, see “Using the Answer Variable (ans)” on page 2-2-2.
• Note that natural input is available in most applications of the ClassPad. Natural input cannot be
used in the geometry measurement box or when entering data into a list.
” or “x”. Each character you input on the 5 keyboard is treated as a single-
a
key that appears in the lower right of all of the 2D keyboard key
#
To use the 2D keyboard for natural input
S
1
Example 1: To input +
(1) On the application menu, tap
(2) Press the
(3) Press the
(4) Tap
*
.
and then tap @ to input the numerator.
-
3
5
7
key.
key, and then tap
to start the Main application.
to display the 2D keyboard.
(5) Tap the input box of the denominator to move the
cursor there, or press A and then tap D.
(6) Press
to move the cursor to the right side of 1/5.
C
• Instead of using C to move the cursor, you could
also tap with the stylus at the cursor destination.
(7) Tap .
(8) Tap
, and then repeat steps (4) through (6) to
-
input 3/7.
(9) After everything is the way you want, press
20060301
.
Page 68

1-6-18
k
= 1
n
k
2
°
1
0
(1–
x
2
)
ex dx
Input
Tip
• If you want your ClassPad to evaluate a calculation expression and display a result in the eActivity
application, you must input the calculation in a calculation row. See “Inserting a Calculation Row”
on page 10-3-3.
Example 2: To input
(1) Tap
(2) Tap
to display the 2D keyboard and then tap
.
(3) In the input box below
5IC
@
, input “k=1”.
3
Initially, the cursor
appears here.
_
.
(4) Tap with the stylus to move the cursor to the other
input locations and input the required information.
In the input box above
, tap +.
3
(5) Input the part of the expression that comes to the right of 3.
I()
A
(6) After everything is the way you want, press
.
Example 3: To input
(1) Tap
(2) Tap
/
to display the 2D keyboard and then tap
.
.
(3) Input the part of the expression that comes to the right of
@
07
CC
7)
7
AC\
• Or you can use 2D math symbols to enter the
expression.
Initially, the cursor appears in the
input box to the right of
.
°
.
°
20060301
Page 69

1-6-19
Input
(4) Tap with the stylus to move the cursor to the other input locations to enter the
limits of integration.
In the input box above °, tap @.
In the input box below
, tap ?.
°
(5) After everything is the way you want, press
.
20060301
Page 70

1-7-1
Folder Type
Description
“system” Folder
“library” Folder
“main” Folder
User Folder
This is one of the ClassPad’s reserved folders, which is provided by
default. It is used for storage of system variables, which are predefined variables used by ClassPad applications and other system
operations.
Some examples of system variables are “list1” through “list6”, View
Window parameters “xmin” and “xmax”, etc. A system variable can be
accessed by any application simply by specifying the applicable
variable name.
Also a ClassPad reserved folder, the “library” folder can be used for
storing user-created variables. Variables stored in the “library” folder
can be accessed without specifying a path, regardless of the current
folder setting (see next page).
The “main” folder is also a ClassPad reserved folder, and acts as the
default current folder. While the “main” folder is the current folder, all
variables created by ClassPad application operations are stored here
when you do not specify a path for variable storage.
This is a folder created and named by you. You can make a user
folder the current folder, move variables to a user folder, etc. You can
also delete and rename a user folder as required. You can have up to
87 user folders in ClassPad memory at one time.
Variables and Folders
1-7 Variables and Folders
Your ClassPad lets you register text strings as variables. You can then use a variable to
store a value, expression, string, list, matrix, etc. A variable can be recalled by a calculation
to access its contents.
Variables are stored in folders. In addition to the default folders that are provided
automatically, you can also create your own user folders. You can create user folders as
required to group variables by type or any other criteria.
Folder Types
Your ClassPad stores variables in one of four types of folders described below.
Tip
• You cannot put a folder inside of another folder.
• You can view the contents of a folder using the Variable Manager (page 1-8-1). Note, however,
that you cannot open the “system” folder for viewing.
• The “system” folder contents are listed within the
selected for “Form”.
20060301
page of the keyboard when “Sys” is
Page 71

1-7-2
Variable Type
Description
General Variables
System Variables
Local Variables
A general variable is one you create using any name you want.
Unless you specify otherwise when you are creating it, a general
variable is stored in the current folder. You can use the same name
for multiple variables, as long as each of them is stored in a different
folder. General variables can be deleted, renamed, etc.
System variables are pre-defined reserved variables used by
ClassPad applications and other system operations. They are stored
in the “system” folder. System variables can be accessed without
specifying the folder name, and can even be accessed from another
folder. Since system variable names are reserved words, they cannot
be renamed. Whether you are allowed to delete or change the
contents of a system variable depends on each variable.
• For the names of and detailed information about system variables,
see the “System Variable Table” on page -7-1.
A local variable is a variable that is temporarily created by a defining
function, program, or other operation for a particular purpose. A local
variable is deleted automatically when execution of the program or
user-defined function that created it is complete. You can create a
local variable by including the “Local” command in a program. Any
variable specified as the argument of a program or a user-defined
function is automatically treated as a local variable.
Variables and Folders
Current Folder
I
The current folder is the folder where the variables created by applications (excluding
eActivity) are stored and from which such variables can be accessed. The initial default
current folder is the “main” folder.
You can also select a user folder you created as the current folder. For more information
about how to do this, see “Specifying the Current Folder” on page 1-8-3.
Variable Types
ClassPad variables can be broadly grouped into three types: general variables, system
variables, and local variables.
20060301
Page 72

1-7-3
Data Type Name
Data Type
Real number, complex number or expression data
String data
List data created using the Statistics application, Main application, etc.
Matrix data created using the Main application, etc.
General program
User-defined function
Text data
Geometry application data
General-purpose data
Data other than that described above
Image data
• ClassPad image data includes graph image data saved using the
Store function, image data captured using the Presentation
application, and picture data transferred from the FA-CP1.
Graph memory data saved using the Graph & Table application
• For more information, see “Saving Graph Editor Data to Graph
Memory” on page 3-3-14.
Edit prohibited program
EXPR
STR
LIST
MAT
PRGM*
EXE*
FUNC*
GEO*
MEM*
OTHR
PICT*
GMEM*
TEXT*
Variables and Folders
Variable Data Types
I
ClassPad variables support a number of data types. The type of data assigned to a variable
is indicated by a data type name. Data type names are shown on the Variable Manager
variable list, and on the Select Data dialog box that appears when you are specifying a
variable in any ClassPad application. The following table lists all of the variable data type
names and explains the meaning of each.
* Protected variable types
Some data types are protected. A variable whose data type is protected cannot be
overwritten with another variable, which protects variable contents from being inadvertently
altered. Data types whose names are marked with an asterisk in the above table are
protected.
Tip
• Note that whether or not a data type is protected is determined by the system. You cannot
change the protection status of a data type.
• Even when a variable is a protected data type, you can rename, delete, or move it. To disable
these operations, you need to lock the variable. For more information, see “Locking a Variable or
Folder” on page 1-7-10.
• The elements of the LIST data type can contain EXPR or STR type data only. The elements of
the MAT data type can contain EXPR type data only.
20060301
20070301
Page 73

1-7-4
Variables and Folders
Creating a Folder
You can have up to 87 user folders in memory at the same time. This section explains how
to create a user folder and explains the rules that cover folder names.
You can create a folder using either the Variable Manager or the “NewFolder” command.
Creating a folder using the Variable Manager
I
On the Variable Manager window, tap [Edit] and then [Create Folder]. For more information,
see “1-8 Using the Variable Manager”.
Creating a folder using the “NewFolder” command
I
In the Main application or in a program, execute the “NewFolder” command.
Example: To create a new folder named “Test”
ClassPad Operation
S
(1) Tap / to display the application menu, and then tap
application.
(2) Display the catalog (cat) keyboard, and then input the “NewFolder” command.
a. In the [Form] menu, select [Cmd].
b. Tap
c. In the command list, tap “NewFolder” to select it.
d. Tap [INPUT].
5
and the [N] to display the first command that starts with the letter “N”.
“NewFolder”
command
to start the Main
(3) Following the “NewFolder” command you just input, enter “Test”.
3
+
C Q R
20060301
Page 74

1-7-5
Variables and Folders
(4) Tap U to execute the command.
• The message “done” appears on the display to let you know that command execution
is complete.
Tip
• You can use the Variable Manager to view the contents of a folder you create. For more
information, see “1-8 Using the Variable Manager”.
• For information about commands you can use to perform folder operations, see “12-6 Program
Command Reference”.
Folder Name Rules
I
The following are the rules that apply to folder names.
• Folder names can be up to 8 bytes long.
• The following characters are allowed in a folder name.
Upper-case and lower-case unaccented characters (character codes 65 to 90, 97 to 122)
Upper-case and lower-case accented characters (character codes 257 to 416, 513 to 672)
Subscript characters (character codes 480 to 491, 496 to 512, 737 to 746, 752 to 766)
Numbers (character codes 48 to 57)
Underscore (character code 95)
• Folder names are case-sensitive.
For example, each of the following is treated as a different folder name: abc, Abc, aBc,
ABC.
• A reserved word (system variable names, built-in function names, command names, etc.)
cannot be used as a folder name.
• A number, subscript characters or the underscore (_) cannot be used as the first character
of a folder name.
Creating and Using Variables
This section explains how to create a new variable (general variable), and provides a simple
sample calculation that illustrates how to use a variable.
Variable Name Rules
I
The rules for naming variables are identical to those that cover folder names. For more
information, see “Folder Name Rules” above.
20060301
Page 75

1-7-6
Variables and Folders
Single-character Variable Precautions
I
Your ClassPad supports the use of single-character variables, which are variables whose
names consist of a single character like “
keypad keys, math (mth) soft keyboard 7, 8, 9, : keys, 5 key set keys, etc.) are
dedicated single-character variable name input keys. You cannot use such a key to input a
variable name that has more than one character.
For example, pressing the keypad keys 7 and 8 in succession is interpreted by the
ClassPad as the multiplication expression “x s y”, and not as the characters “xy”. In order to
input a variable name made up of two or more characters, use the alphabet (abc) keyboard.
For more information, see “Using Single-character Variables” on page 1-6-12.
Creating a New Variable
I
The most common way to create a new variable is assigning a value or expression to the
applicable variable name. Use the variable assignment key (6) to assign data to a variable.
” or “x”. Some ClassPad keys (7, 8, '
a
Assign key
This key is included on the math
(mth) and 2D soft keyboards.
The following is an example of assignment to a variable while “main” is specified as the
current folder.
Example: To create a new variable named “eq1” and assign the expression 2
The following assumes that there are no variables named “eq1” or “x” currently in
the “main” folder.
ClassPad Operation
S
(1) On the application menu, tap
(2) Press
A7
• This creates a variable named “eq1” in the current folder (the “main” folder in this
.
example), and assigns the expression 2
to display the soft keyboard, and then perform the following key operation.
@
6
CO
to start the Main application.
@
U
+ 1 to it.
x
+ 1 to it
x
20060301
Page 76

1-7-7
Variables and Folders
Tip
• As shown in the above example, assigning something to a variable with a name that does not
yet exist in the current folder causes a new variable with that name to be created. If a variable
with the specified name already exists in the current folder, the contents of the existing variable
are replaced with the newly assigned data, unless the existing variable is protected. For more
information about protected variables, see “Protected variable types” on page 1-7-3.
• To store the newly created variable in a folder other than the current folder, specify the variable
name as follows: <folder name>\<variable name>.
• You can use the Variable Manager to view the contents of a variable you create. For more
information, see “1-8 Using the Variable Manager”.
Variable Usage Example
I
The following example uses the variable we created in the example under “Creating a New
Variable” on page 1-7-6.
Example: To copy the variable “eq1” and then paste it into the following two equations:
eq1 +
ClassPad Operation
S
– 2 and eq1
x
2
s
(1) First, check the current contents of variable “eq1”.
@
CO
(2) Copy the variable by dragging the stylus across “eq1” and then tapping
U
, or tap [Edit]
&
[Copy].
• Copy and paste comes in handy when you need to input the same variable into
multiple expressions. You can also drag “eq1” to another line.
(3) Perform the key operation below to input and execute the first expression:
eq1 +
'
– 2.
x
(or [Edit] [Paste])
7
A
U
(4) Perform the key operation below to replace the current contents of “eq1” with the list
{1, 2, 3}.
W
Y
@AB
(5) Perform the key operation below to input and execute the second expression:
6
'
U
eq1 s 2
'
A
U
20060301
Page 77

1-7-8
Variables and Folders
“library” Folder Variables
I
Variables in the “library” folder can be accessed without specifying a path name, regardless
of the current folder.
Example:
To create and access two variables, one located in the “library” folder and one
located in another folder
ClassPad Operation
S
(1) With “main” specified as the current folder (the default), perform the following operation
to create a variable named “eq1” and assign the indicated list data to it.
{1, 2, 3} 2 eq1
U
(2) Keeping “main” specified as the current folder, perform the following operation to create
a variable named “eq2” in the “library” folder, and assign the indicated list data to it.
{4, 5, 6} 2 library \ eq2
Specifies the “library” folder.
U
(3) Check the contents of the two variables.
eq1
U
eq2
U
Since variable “eq2” is stored in the
“library” folder, you do not need to
indicate a path to access it.
(4) Change the current folder specification to “Test”.
• Use the Basic Format dialog box (page 1-9-4) or the Variable Manager (page 1-8-1)
to change the current folder specification.
(5) Perform the following operations to view the contents of variables “eq1” and “eq2”.
eq1
U
Since this key operation does not access the
“main” folder, the variable name (“eq1”) is
displayed without showing the variable contents.
main\eq1
U
Specifying the path to the “main” folder
where “eq1” is located displays the
contents of the variable.
20060301
Page 78

1-7-9
Variables and Folders
eq2
U
Since variable “eq2” is stored in the
“library” folder, you do not need to
indicate a path to access it.
Tip
• Specifying a variable name that exists in both the current folder and the “library” folder causes
the variable in the current folder to be accessed. For details about the variable access priority
sequence and how to access variables in particular folders, see “Rules Governing Variable
Access” on page 1-7-11.
• You can use the Variable Manager (page 1-8-1) to move existing variables from the “main” folder
or a user folder to the “library” folder, or from the “library” folder to other folders.
Using Stat Editor to Create a LIST Variable
I
Stat Editor makes creation of LIST variables (variables that contain list data) quick and easy.
This capability really comes in handy when you need to perform a calculation (statistical
calculations, etc.) that involves a large number of LIST variables.
Stat Editor appears as the initial screen when you start up the Statistics application. You can
also access the Stat Editor window from the Main, Graph & Table, and eActivity applications.
Input a variable name like “list_t” into the title cell at the top of the list on the Stat Editor
window (
), and then input values into the list (). This creates a LIST variable with the
name list_t that is assigned the contents of the list of data (). The above example creates a
LIST variable named “list_t” and assigns it the list data “{12, 24, 36}”.
Tip
• For details about using Stat Editor, see “7-2 Using Stat Editor”.
20060301
Page 79

1-7-10
Variables and Folders
Assigning Values and Other Data to a System Variable
As its name suggests, a system variable is a variable that is created and used by the system
(page 1-7-5). Some system variables allow you to assign values and other data to them,
while some system variables do not. For more information about which variables allow you to
control their contents, see the “System Variable Table” on page A-7-1.
Locking a Variable or Folder
Locking a variable or folder protects against inadvertently deleting it or changing its contents.
You can unlock a locked variable or folder to re-enable deletion and data assignment.
• Locking a variable disables the following operations on it: delete, overwrite, rename, and
move (to another folder).
• Locking a folder makes it impossible to delete or rename the folder.
Tip
• In terms of ClassPad variables, “lock” is completely different from “protect”. For more information
about “protect”, see “Variable Data Types” on page 1-7-3.
You can lock and unlock a variable or folder using either the Variable Manager or commands.
To lock or unlock a variable or folder using the Variable Manager
S
In the Variable Manager, select the folder or variable you want to lock or unlock and then
tap [Edit] - [Lock] or [Edit] - [Unlock]. For more information, see “1-8 Using the Variable
Manager”.
To lock or unlock a variable or folder using commands
S
In the Main application or in a program, execute one of the commands described below.
To do this:
Lock a variable
Unlock a variable
Lock a folder
Unlock a folder
For information about commands, see “12-6 Program Command Reference”.
Use this command syntax:
Lock <variable name>
Unlock <variable name>
LockFolder <folder name>
UnlockFolder <folder name>
20060301
Page 80

1-7-11
Variables and Folders
Rules Governing Variable Access
Normally, you access a variable by specifying its variable name. The rules in this section
apply when you need to reference a variable that is not located in the current folder or to
access a variable that has the same name as one or more variables located in other folders.
Variable Search Priority Sequence
I
Specifying a variable name to access a variable, searches variables in the following
sequence.
(1) Local Variables
(2) Current Folder Variables
(3) “library” Folder Variables
• Multiple variables with the same name can exist simultaneously as a local variable, as
a variable in the current folder, and as a variable in the “library” folder. In this case, the
ClassPad searches folders according to the sequence shown above and accesses the first
instance of the variable that it finds. If you want to access such a variable when it occurs
lower in the above priority sequence, you need to specify the folder name along with the
variable name as shown in “Specifying a Variable in a Particular Folder” below.
• If a variable you specify cannot be found, it is treated as an “undefined variable”.
• Note that the “system” folder is not included in the above variable search. When accessing
a variable in the system folder, you need to specify the variable name only, without
specifying the folder name.
Tip
• Local variables exist only as long as the program or user-defined function for which it was created
in being executed.
• When a variable search is required during a subroutine called by a program or user-defined
function, the local variable search range includes only the local variables of the subroutine
currently being executed.
• For information about programs and user-defined functions, see Chapter 12.
• Only local variables and current folder variables are searched in the case of an operation that
stores variable data or a command that performs an operation on a variable (like “DelVar”).
Normally, “library” folder variables are not searched. If you want to include “library” folders in the
search, you need to specify the “library” folder as the variable location as explained below.
Specifying a Variable in a Particular Folder
I
You can access a variable located inside the “main” folder, “library” folder, or a particular
user folder by specifying the folder name along with the variable name. Use the following
syntax when specifying a folder name:
<folder name>\<variable name>
Example: To specify variable “abc” located in the “main” folder
main\abc
20060301
Page 81

1-8-1
Using the Variable Manager
1-8 Using the Variable Manager
The Variable Manager is a tool for managing user variables, programs, user functions, and
other types of data. Though this section uses only the term “variables”, the explanations
provided here also refer to the other types of data that can be managed by the Variable
Manager.
Variable Manager Overview
This section explains how to start up and exit the Variable Manager. It also provides
information about the configuration of the Variable Manager.
With the Variable Manager you can:
• Create, delete, rename, lock, and unlock folders for storing variables, and configure current
folder settings.
• Delete, copy, rename, move, lock, unlock, search for variables, and view the contents of
variables.
Starting Up the Variable Manager
To start up the Variable Manager, tap , and then tap [Variable Manager].
• Starting up the Variable Manager initially displays the folder list, which is described on the
next page.
20060301
Page 82

1-8-2
Using the Variable Manager
Variable Manager Views
The Variable Manager uses two views, a folder list and a variable list.
• The folder list always appears first whenever you start up the Variable Manager.
Current folder
Folder names
Number of variables contained
in the folder
Folder List
• Tapping a folder name on the folder list selects it. Tapping the folder name again displays
the folder’s contents; a variable list.
Folder name
Variable names Variable data types (page 1-7-3)
Number of variables contained
in the folder
and sizes (bytes)
Variable List
• To close the variable list and return to the folder list, tap [Close].
Exiting the Variable Manager
To exit the Variable Manager, tap the [Close] button.
20060301
Page 83

1-8-3
Using the Variable Manager
Variable Manager Folder Operations
This section describes the various folder operations you can perform using the Variable
Manager.
Specifying the Current Folder
I
The “current folder” is the folder where the variables created by applications (excluding
eActivity) are stored and from which such variables can be accessed. The initial default
current folder is the “main” folder.
You can also select a folder you created yourself as the current folder.
ClassPad Operation
S\
(1) Start up the Variable Manager and display the folder list.
Current folder
(2) Tap the [Current] down arrow button. On the list that appears, select the folder that
you want to specify as the current folder.
(3) Tap [Close] to close the folder list.
Creating a New Folder
I
You can use the following procedure to create up to 87 folders, as you need them.
ClassPad Operation
S\
(1) Start up the Variable Manager, which causes the folder list to appear.
(2) On the folder list, tap [Edit] and then [Create Folder].
• This displays a dialog box for inputting a folder name.
(3) Enter the folder name, and then tap [OK].
• This creates the new folder and returns to the folder list.
Normally, a folder name can contain up to eight bytes. If your folder name includes 2-byte
•
characters, you may not be able to input eight characters for the folder name. For details
about folder names, see page 1-7-5.
Tip
• An error message appears and your folder is not created if there is already a folder with the same
name you input. Tap [OK] to close the error message dialog box, and then specify a different
name for the folder you are creating.
20060301
Page 84

1-8-4
Using the Variable Manager
Selecting and Deselecting Folders
I
The folder operations you perform are performed on the currently selected folders. The
folders that are currently selected on the folder list are those whose check boxes are selected
(checked). You can use the following operations to select and deselect folders as required.
To do this: Do this:
Select a single folder Select the check box next to the folder name.
Deselect a single folder Clear the check box next to the folder name.
Select all the folders in the list Tap [All] and then [Select All].
Deselect all the folders in the list Tap [All] and then [Deselect All].
Tip
• If no check box is currently selected on the folder list, any folder operation that is performed
affects the folder whose name is currently highlighted on the list. If any folder check box is
currently selected, only that folder is affected by a folder operation, and the folder whose name is
highlighted on the list is not affected.
• Selecting the check box of a folder causes the check boxes of all of the variables inside of it also
to become selected.
• When renaming a folder, only the folder whose name is highlighted on the folder list is renamed.
Other folders whose check boxes are selected are not affected.
Deleting a Folder
I
Warning!
Before deleting a folder, make sure you no longer need any of the variables contained
inside it. It is probably a good idea to first delete the variables you don’t need and move the
variables you do need to another folder, and then delete the empty folder.
ClassPad Operation
S\
(1) Start up the Variable Manager and display the folder list.
(2) Open the folder you want to delete and check its contents.
• Make sure you no longer need any of the variables in the folder. If any of the
variables are locked, unlock them.
• After checking the contents of the folder, close it to return to the folder list.
(3) Select the check box next to the folder you want to delete.
• You can select and delete multiple folders, if you want.
(4) On the folder list, tap [Edit] and then [Delete].
(5) In response to the confirmation dialog box that appears, tap [OK] to delete the folder
or [Cancel] to exit the dialog box without deleting the folder.
20060301
Page 85

1-8-5
Using the Variable Manager
Tip
• You cannot delete the “library” folder or the “main” folder.
• If no check box is currently selected on the folder list, the folder whose name is currently
highlighted on the list is deleted when you tap [Edit] and then [Delete].
• An error message appears and the folder is not deleted if any one of the following conditions
exists.
• The folder is locked.
• Any variable inside the folder is locked.
• There are still variables inside the folder.
Renaming a Folder
I
You can use the following procedure to change the name of an existing folder.
ClassPad Operation
S\
(1) Start up the Variable Manager and display the folder list.
(2) Tap the name of the folder you want to rename so it is highlighted.
(3) Tap [Edit] and then [Rename].
• This displays a dialog box for inputting a new folder name.
(4) Input the new folder name.
(5) When the name is the way you want, tap [OK] to save it, or tap [Cancel] to cancel the
rename procedure.
Tip
• When renaming a folder, only the folder whose name is highlighted on the folder list is renamed.
Other folders whose check boxes are selected are not affected.
• A folder that is locked cannot be renamed.
Locking and Unlocking a Folder
I
A folder cannot be deleted or renamed while it is locked. Lock any folder that you want to
protect against accidental deletion.
To lock a folder
S
(1) Start up the Variable Manager and display the folder list.
(2) Select the check box next to the folder you want to lock.
• If you want to lock multiple folders, select all of their check boxes.
(3) Tap [Edit] and then [Lock].
• This locks the currently selected folder, and adds a
indicate that it is locked.
To unlock a folder
S
(1) Start up the Variable Manager and display the folder list.
(2) Select the check box next to the folder you want to unlock.
(3) Tap [Edit] and then [Unlock].
20060301
)
icon to the left of its name to
Page 86

1-8-6
Using the Variable Manager
Inputting a Folder Name into an Application
I
Perform the procedure below when you want to input the name of a folder displayed on
the Variable Manager window into the application from which you started up the Variable
Manager.
ClassPad Operation
S\
(1) In the Main application, Graph & Table application,
or some other application, move the cursor to the
location where you want to input the folder name.
(2) Start up the Variable Manager to display the list of
folders.
(3) Tap the folder whose name you want to input, so the name is highlighted.
(4) Tap [INPUT].
• This exits the Variable Manager and inputs the
name of the folder you selected in step (3) into the
application at the current cursor position.
20060301
Page 87

1-8-7
Using the Variable Manager
Variable Operations
This section explains the various operations you can perform on the Variable Manager
variables.
Opening a Folder
I
Perform the steps below to open a folder and display the variables contained inside it.
ClassPad Operation
S
(1) Start up the Variable Manager and display the folder list.
(2) Tap the name of the folder you want to open so it is highlighted, and then tap it again.
• This opens the folder and displays a variable list showing its contents.
(3) To return to the folder list, tap [Close].
Opening the “library” Folder
I
Note that the procedure you need to use to open the “library” folder is different from the
procedure for opening other folders.
ClassPad Operation
S
(1) Start up the Variable Manager and display the folder list.
(2) Tap [View] and then [“library” Folder].
• This opens the “library” folder and displays a variable list showing its contents.
(3) To return to the folder list, tap [Close].
Tip
• You can also open the “library” folder (by tapping [View] and then [“library” Folder]) while the
variable list is on the display.
Displaying a List of a Particular Type of Variable
I
You can use the variable list to produce a list of a particular type of variable only.
ClassPad Operation
S
(1) In the Variable Manager, open any folder to display a variable list of its contents.
(2) Tap [View] and then [Variable Type].
• This displays the Variable Type dialog box for
specifying the variable data type.
20060301
Page 88

1-8-8
Using the Variable Manager
(3) On the dialog box, tap the down arrow button and then select the data type from the
list that appears.
• To display variables for all data types, select [All].
• For details about data type names and variables, see “Variable Data Types” on page
1-7-3.
(4) After selecting the data type you want, tap [OK] to apply it or [Cancel] to exit the
selection dialog box without changing the current setting.
Tip
• Returning to the folder list or exiting the Variable Manager causes the data type to change to the
initial default setting, which is [All].
• Performing this operation clears the check boxes for all of the variables inside the applicable
folder.
Selecting a Variable
I
Before you can copy, delete, or perform any other operation on a variable, you must first
select it.
To select or deselect a variable
S
(1) In the Variable Manager, open any folder to display a variable list of its contents.
(2) Perform one of the operations described below to select or deselect a variable.
To do this: Do this:
Select a single variable Select the check box next to the variable name.
Deselect a single variable Clear the check box next to the variable name.
Select all the variables in the list Tap [All] and then [Select All].
Deselect all the variables in the list Tap [All] and then [Deselect All].
Tip
• If no check box is currently selected on the variable list, any variable operation that is performed
affects the variable whose name is currently highlighted on the list. If any variable check box is
currently selected, only that variable is affected by a variable operation, and the variable whose
name is highlighted on the list is not affected.
• The selected/deselected status of a variable is retained, even when you return from the variable
list to the folder list. Exiting the Variable Manager or changing the data type selection, however,
causes all variables to be deselected.
• When renaming a variable, only the variable whose name is highlighted on the variable list is
renamed. If other variables are selected (checked), they will not be affected.
20060301
Page 89

1-8-9
Using the Variable Manager
Deleting a Variable
I
Perform the following steps when you want to delete a variable.
ClassPad Operation
S
(1) Open the folder that contains the variable you want to delete and display the variable
list.
(2) Select the check box next to the variable you want to delete.
• To delete multiple variables, select all of their check boxes.
(3) Tap [Edit] and then [Delete].
(4) In response to the confirmation dialog box that appears, tap [OK] to delete the
selected variable or [Cancel] to cancel the delete operation.
Tip
• If no check box is selected on the variable list, the variable whose name is currently highlighted
on the list is deleted when you tap [Edit] and then [Delete].
• If the currently selected variable is locked, an error message appears and the variable is not
deleted.
Copying and Moving a Variable
I
You can use the procedure below to copy or move a variable to another folder.
ClassPad Operation
S
(1) Open the folder that contains the variable you want to copy or move, and display the
variable list.
(2) Select the check box next to the variable you want to copy or move.
• To copy or move multiple variables, select all of their check boxes.
(3) Perform the copy operation or the move operation.
To do this: Perform this operation:
Copy the variable Tap [Edit] and then [Copy].
Move the variable Tap [Edit] and then [Move].
• This causes a dialog box for selecting the destination
folder to appear.
(4) On the dialog box, tap the down arrow button and then select the destination folder
from the list that appears.
(5) When the destination folder you want is selected, tap [OK] to perform the copy or
move operation, or tap [Cancel] to cancel the procedure.
20060301
Page 90

1-8-10
Using the Variable Manager
Tip
• If no check box is currently selected on the variable list, the variable whose name is currently
highlighted on the list is copied or moved.
• If a variable with the same name already exists in the destination folder, the variable in the
destination folder is replaced with the one that you are copying or moving.
• An error message appears and the variable is not copied or moved if a variable with the same
name already exists in the destination folder and that variable is locked or protected.
• A variable that is locked cannot be moved.
Renaming a Variable
I
Perform the following steps when you want to rename a variable.
ClassPad Operation
S
(1) Open the folder that contains the variable you want to rename and display the variable
list.
(2) Tap the name of the variable you want to rename so it is highlighted.
(3) Tap [Edit] and then [Rename].
• This displays a dialog box for inputting a new variable name.
(4) Input the new variable name.
(5) When the name is the way you want, tap [OK] to save it, or tap [Cancel] to cancel the
rename procedure.
Tip
• When renaming a variable, only the variable whose name is highlighted on the variable list is
renamed. Other variables whose check boxes are selected are not affected.
• A variable that is locked cannot be renamed.
Locking and Unlocking a Variable
I
A locked variable cannot be deleted, moved, or renamed. A locked variable also cannot be
overwritten by a variable with the same name being moved or copied into its folder. Lock any
variable that you want to protect against accidental deletion.
To lock a variable
S
(1) Open the folder that contains the variable you want to lock and display the variable
list.
(2) Select the check box next to the variable you want to lock.
• If you want to lock multiple variables, select all of their check boxes.
(3) Tap [Edit] and then [Lock].
• This locks the currently selected variable, and adds a
indicate that it is locked.
20060301
)
icon to the left of its name to
Page 91

1-8-11
Using the Variable Manager
To unlock a variable
S
(1) Open the folder that contains the variable you want to unlock and display the variable
list.
(2) Select the check box next to the variable you want to unlock.
(3) Tap [Edit] and then [Unlock].
Searching for a Variable
I
You can use the following procedure to search the “main” folder or a user defined folder for a
particular variable name. Note that you cannot search the “library” folder.
ClassPad Operation
S\
(1) Start up the Variable Manager and display the folder list.
(2) On the folder list, tap [Search] and then [Search].
• This displays a dialog box for inputting a search string.
(3) Enter the variable name you want to find and then tap
[OK].
• An exclamation point (
folders containing a variable name that matches
the name in your search.
) appears in front of all
Tip
• The message “Not Found” appears on the display if a match cannot be found.
• The exclamation point ( ) remains on the folder list until you exit the Variable Manager or
perform another search operation. Also note that the exclamation point (
folder name, even if you delete or rename the found variable.
) remains in front of the
20060301
Page 92

1-8-12
Using the Variable Manager
Viewing the Contents of a Variable
I
You can use the Variable Manager to view the contents of a particular variable.
ClassPad Operation
S\
(1) Open the folder that contains the variable whose contents you want to view and
display on the variable list.
(2) Tap the name of the variable whose contents you want to view so it is highlighted, and
then tap it again.
• This displays a dialog box that shows the contents of the variable.
Example of EXPR variable contents
(3) To close the dialog box, tap [OK].
Tip
• You can use this procedure to display the contents of the following variable types only: EXPR,
STR, LIST, MAT, FUNC, PRGM, TEXT, PICT.
20060301
Page 93

1-8-13
Using the Variable Manager
Inputting a Variable Name into an Application
I
Perform the procedure below when you want to input the name of a variable from the
Variable Manager window into the application from which you started up the Variable
Manager.
ClassPad Operation
S\
(1) In the Main application, Graph & Table application, or
some other application, move the cursor to the location
where you want to input the variable name.
(2) Start up the Variable Manager to display the folder list.
(3) Find the name of the folder that contains the variable whose name you want to input,
and tap it twice.
(4) Tap the variable whose name you want to input, so its name is highlighted.
(5) Tap [INPUT].
• This exits the Variable Manager and inputs the
name of the variable you selected in step (4) into the
application at the current cursor position.
• In this example, the variable is located in a folder
(bio) that is not the current folder, so the folder name
needs to be specified (bio\ list02). If the variable
is located in the current folder, you do not need to
specify the folder name (list02).
20060301
Page 94

1-9-1
Configuring Application Format Settings
1-9 Configuring Application Format Settings
The menu includes format settings for configuring the number of calculation result
display digits and the angle unit, as well as application-specific commands. The following
describes each of the settings and commands that are available on the menu.
To do this:
Specify folder for variables, and to configure number format, angle,
and other basic settings for all built-in applications
Configure Graph window and graph drawing settings for Graph &
Table, Conics, and other graphing applications
Configure 3D Graph window and graph drawing settings for the 3D
Graph application
Configure number format and angle settings for Geometry
application
Configure Fourier transform and FFT settings Advanced Format
Configure Financial application settings Financial Format
Configure Presentation application settings Presentation
Configure Communication application settings Communication
Return all [Setup] menu settings to their initial default values (except
for the current folder setting specified on Basic Format dialog box)
Select this
menu command:
Basic Format
Graph Format
3D Format
Geometry Format
Default Setup
Tip
• For more details about the structure and content of the menu, see “Using the Menu” on
page 1-5-4.
ClassPad Operation
S
(1) Open any application (except the System application).
(2) Tap
(3) Tap the menu command you want: Basic Format, Graph Format, 3D Format, Geometry
(4) Use the dialog box to configure the settings you want.
(5) To close a dialog box and apply its settings, tap [Set]. To close a dialog box without
.
Format, Advanced Format, Financial Format, Presentation, or Communication.
• To configure Graph Format settings, for example, tap
This displays the Graph Format dialog box.
• Some setup dialog boxes contain multiple tabbed sheets like the Graph Format
dialog box. Tap the tab for the sheet that contains the settings you want to configure.
• For details about the settings you can configure on each of the dialog boxes, see
“Application Format Settings” on page 1-9-4.
• Some settings require specification of a variable. For more information, see
“Specifying a Variable” on the next page.
applying its settings, tap [Cancel] or the button in the upper right corner of the dialog
box.
20060301
and then [Graph Format].
Page 95

1-9-2
Configuring Application Format Settings
Specifying a Variable
Certain settings require that you specify variables. If you specify a user-stored variable when
configuring the setting of such an item, you must specify the folder where the variable is
stored and the variable name.
Example: To use [Table Variable] on the [Special] tab of the Graph Format dialog box for
configuring a user variable
ClassPad Operation
S\
(1) Tap , or tap
• This displays the Graph Format dialog box.
(2) Tap the [Special] tab.
(3) Tap the [Table Variable] down arrow button.
• This displays a list of variables.
3
on the icon panel, and then tap [Graph Format].
(4) On the list, tap “Select List Name…”.
• This displays the Select Data dialog box for selecting a variable.
Variable type
Select the folder where
the variable is stored.
Specify the variable name.
20060301
Page 96

1-9-3
Configuring Application Format Settings
(5) Use the Select Data dialog box to specify the folder where the variable is saved, and
then specify the variable name.
• The sample dialog box in step (4) shows selection of the list variable named “ab”,
which is located in the folder named “main”.
(6) Tap [OK].
• This closes the Select Data dialog box.
This line shows the <folder
name>\<variable name>
specified in step (5) (“main\ab”
in this case).
This box indicates that “main\ab”
is selected for Table Variable.
(7) Tap [Set] to save your settings.
Initializing All Application Format Settings
Perform the following procedure when you want to return all application format settings to
their initial defaults.
ClassPad Operation
S\
(1) Tap , or tap
(2) In response to the “Reset Setup Data?” message that appears, tap [OK] to initialize all
settings or [Cancel] to cancel the reset operation.
• If you tap [OK], the settings are initialized and then a dialog box appears on the
display.
• For details about the initial default setting for each item, see “Application Format
Settings” on page 1-9-4.
Tip
• Initializing the application format settings does not affect the current folder setting on the Basic
Format dialog box. For details about the current folder, see “Specifying the Current Folder” on
page 1-8-3.
3
on the icon panel, and then tap [Default Setup].
20060301
Page 97

1-9-4
Configuring Application Format Settings
Application Format Settings
This section provides details about all of the settings you can configure using the application
format settings.
The following two points apply to all of the dialog boxes.
• Some settings involve turning options on or off. Selecting a check box next to an option (so
it has a check mark) turns it on, while clearing the check box turns it off.
• Other settings consist of a text box with a down arrow button on the right. Tap the down
arrow button to display a list of available settings, and then tap the setting you want.
Important!
• Settings that are marked with an asterisk (*) in the following tables are the initial defaults.
Basic Format Dialog Box
I
Use the Basic Format dialog box to configure basic settings for calculations, cells, and other
parameters.
Current Folder
S
To specify this folder as the current folder: Select this setting:
main main*
A user-defined folder Any other setting
• [Current Folder] settings can also be configured using the Variable Manager. For more
information, see “Specifying the Current Folder” on page 1-8-3.
20060301
Page 98

1-9-5
Configuring Application Format Settings
Number Format
S
To specify this type of numeric value display format: Select this setting:
–2
Auto exponential display for values less than 10
or greater (when you are in the Decimal mode)
Auto exponential display for values less than 10
or greater (when you are in the Decimal mode)
and from 1010
–9
and from 1010
Normal 1*
Normal 2
Fixed number of decimal places Fix 0 – 9
Fixed number of significant digits Sci 0 – 9
Angle
S
To specify this angle unit: Select this setting:
Radians Radian*
Degrees Degree
Grad Grad
Advanced
S
To do this: Do this:
Perform complex number calculations
(Complex mode)
Select the [Complex Format] check
box.
Perform real number calculations (Real mode) Clear the [Complex Format] check box.*
Select the [Decimal Calculation]
) for
*1
check box.
Clear the [Decimal Calculation]
check box.*
Select the [Assistant] check box.
Clear the [Assistant] check box.*
Select the [Descending Order]
check box.*
Clear the [Descending Order] check box.
Display results as a decimal (Decimal mode)
Leave calculation results as expressions
(Standard mode)
*1
Turn off auto simplification of expressions
*2
(Assistant mode)
Turn on auto simplification of expressions
(Algebra mode)
Specify descending order (e.g.
*2
2
x
+ x + 1) for
the calculation result expression
2
Specify ascending order (e.g. 1 + x +
x
the calculation result expression
Specify that variables in Complex Mode
calculation should be treated as real numbers
Select the [Variable is Real] check box.
• With this setting, re(a+bi)=a and im(a+bi)=b.
Specify that variables in Complex Mode
calculation should be treated as complex
Clear the [Variable is Real] check box.*
numbers
*1 Executing 1
produces a result of
*2 Executing
while the Algebra mode produces a result of
2 in the Decimal mode produces a result of 0.5, while the Standard mode
w
1
.
2
x
+ 2x + 3x + 6 in the Assistant mode produces a result of
2
2
x
+ 2
• x + 3
2
x
+ 5
• x + 6.
Important!
The Assistant mode is available in the Main application and eActivity application only.
20060301
• x + 6,
Page 99

1-9-6
Configuring Application Format Settings
Graph Format Dialog Box
I
Use the Graph Format dialog box to configure settings for the Graph window and for drawing
graphs.
Basic Tab
Axes
S
To do this: Select this setting:
Turn on display of Graph window axes On*
Turn on display of Graph window axes along with maximum
and minimum value of each axis
Turn off display of Graph window axes Off
Other settings
S
To do this: Do this:
Turn on display of Graph window grid Select the [Grid Points] check box.
Turn off display of Graph window grid Clear the [Grid Points] check box.*
Turn on display of Graph window axis labels Select the [Labels] check box.
Turn off display of Graph window axis labels Clear the [Labels] check box.*
Turn on display of graph controller arrows during
graphing
Turn off display of graph controller arrows during
graphing
Select the [G-Controller] check box.
Clear the [G-Controller] check box.*
Number
Draw graphs with plotted points Select the [Draw Plot] check box.
Draw graphs with solid lines Clear the [Draw Plot] check box.*
Turn on display of function name and function Select the [Graph Function] check box.*
Turn off display of function name and function Clear the [Graph Function] check box.
20060301
Page 100

1-9-7
Configuring Application Format Settings
To do this: Do this:
Turn on display of Graph window pointer
coordinates
Turn off display of Graph window pointer
coordinates
Turn on display of leading cursor during graphing Select the [Leading Cursor] check box.
Turn off display of leading cursor during graphing Clear the [Leading Cursor] check box.*
Draw multiple graphs simultaneously Select the [Simul Graph] check box.
Draw multiple graphs one-by-one Clear the [Simul Graph] check box.*
Turn on display of coordinates of Graph window
pointer and its derivative on number table display
Turn off display of coordinates of Graph window
pointer and its derivative on number table display
Select the [Coordinates] check box.*
Clear the [Coordinates] check box.
Select the [Derivative/Slope] check box.
Clear the [Derivative/Slope] check box.*
Special Tab
Background
S
To do this: Select this setting:
Turn off Graph window background display Off*
Select an image to be used as Graph window background <pict name>
Cell Width Pattern
S
To specify this row width for stat editor and data table
displays:
2 cells 2 Cells
3 cells 3 Cells*
4 cells 4 Cells
Table Variable
S
To specify this source for table data: Select this setting:
Table input Table input*
List data list1 through list6
Select list data to be used as source for table data <list name>
Summary Table
S
To specify this source for summary table data: Select this setting:
View Window View Window*
List data list1 through list6
Select list data to be used as source for summary table data <list name>
Select this setting:
Summary Table f ’’(x)
S
To do this: Select this setting:
Turn on display of second derivative for summary tables On*
Turn off display of second derivative for summary tables Off
20060301
 Loading...