

Page 1
MA0611-EC
Operation Guide 2886
Introduction
Thank you for purchasing this CASIO product. To ensure that it can
provide you with the years of service for which it is designed, be sure to
read this manual carefully and follow the instructions contained herein.
Make sure you read the Safety Precautions before using this product for
the first time.
Note that the measurement functions of this product are not
intended for use in applications where special instruments are
required. The readings produced by this product are reasonably
accurate approximations only.
Safety Precautions
Symbols
This manual and the product itself use various symbols that are intended
to ensure safe operation of the product, to prevent injury to you and
others, and to protect against material damage and loss. The following
explains the meanings the symbols.
Example Symbols
The symbol indicates a caution. The symbol to the left
indicates an electric shock caution.
The symbol indicates something you must not do. The
symbol to the left indicates that you should not try to
disassemble something.
The symbol indicates something you must do. The
symbol to the left indicates that you must unplug the
power cord from the power outlet.
Danger!
Warning!
Caution!
Do not use this product while scuba diving (aqualung).
• This product is not a diving watch. Improper use of this
product can lead to serious accident.
Never try to remove the watch’s rechargeable (secondary)
battery. Leave all built-in battery replacement operations up
to your original retailer or authorized CASIO service center.
Whenever the watch’s built-in battery is removed from the
watch, take care to ensure that it is not swallowed
accidentally. Special care is required where young children
are present.
Keep batteries out of the reach of small children. Should a
battery ever be swallowed accidentally, contact a physician
immediately.
Should you ever notice any abnormality such as smoke,
strange odor, or excessive heat being emitted by the AC
adaptor or charger unit, immediately unplug the AC adaptor
from the power outlet and contact your original retailer or
authorized CASIO service center.
Do not allow long-term contact between your skin and the
AC adaptor or charger unit while it is conducting electricity,
or with the watch while it is being charged. Long term
contact creates the risk of low-temperature burn injury.
Disregarding information with this label creates
the risk of death or serious personal injury.
Disregarding information with this label could
possibly create the risk of death or serious
personal injury.
Disregarding information with this label could
possibly create the risk of personal injury or
material loss.
Warning!
Built-in battery
AC Adaptor and Charger Unit
Warning!
AC Adaptor and Charger Unit
Never allow water or foreign matter to get inside the AC
adaptor or charger unit, and do not allow them to become
wet. Should water or foreign matter get into the AC adaptor
or charger unit, immediately turn off power, unplug the AC
adaptor from the power outlet, and contact your original
retailer or authorized CASIO service center.
Failure to observe the following points concerning the AC
adaptor and charger unit creates the risk of fire and
personal injury.
• Do not use or leave the AC adaptor or charger unit near
a heater or any other source of heat.
• Do not use or leave the AC adaptor or charger unit in a
bathroom, near a humidifier, or in any other location
where it is exposed to splashing water or moisture.
• Never touch the AC adaptor or charger unit while your
hands are wet.
• Never expose the AC adaptor or charger unit to flame or
heat.
• Never try to take the AC adaptor or charger unit apart or
modify it in any way.
• Never short AC adaptor or charger unit terminals through
contact with needles, pins, or other metal objects.
• Take care not to drop the AC adaptor or charger unit or
otherwise subject it to strong impact.
• To ensure safety during lightning storms, unplug the AC
adaptor from the power outlet.
• Be sure to grasp the plug when unplugging the AC
adaptor.
• Never use the watch, AC adaptor, or charger unit while it
is covered by a blanket, etc.
• Keep the AC adaptor and charger unit out of the reach of
small children.
• Be sure to unplug the AC adaptor from the power outlet
before leaving on a trip or otherwise leaving it
unattended for long periods.
Caution!
Caring for Your Watch
A dirty or rusty case or band can soil the sleeve of your
clothing. Be sure to keep the case and band clean at all
times. Rust tends to form easily after the watch is exposed
to seawater and then left without cleaning.
Skin Irritation
Since the watch and the band come into direct contact with
the skin, the following conditions may cause irritation of the
skin.
• When a wearer is allergic to metal or leather
• When the watch or band is rusty dirty, sweaty, etc.
• When the wearer is in poor physical condition
• Tightening the band too tightly can cause you to sweat,
and can make it hard for air to pass under the band,
which can lead to skin irritation. Do not over-tighten the
band.
• The bacterial and odor resistant band suppresses the
formation of organisms and bacteria due to sweat, and
related odors. It does not protect against skin rash.
• Should you ever notice any abnormality, immediately
stop using the product and consult a physician.
Using the Auto Light
It is recommended that you turn off the Auto Light while
driving or riding in a motor vehicle. Unintended illumination
can distract the operator and create the risk of traffic
accident.
Never try to take the watch apart!
Never try to take the watch apart. Doing so creates the risk
of personal injury and malfunction of the watch.
1
Page 2
Operation Guide 2886
Caution!
Use of the Product
To avoid unexpected accidents, always check around you
to ensure you are in a safe place before looking at the
display of the watch. Looking at the watch while
marathoning or jogging on the open road, while riding a
bicycle, or while operating a motor vehicle can lead to
accidents. Take care to avoid running into others.
Take care to avoid breaking your fingernails when fastening
and unfastening the band. Particular care is required by
people with long fingernails.
To avoid skin irritation due to unexpected injury or allergy,
do not wear the watch while sleeping.
When picking up or otherwise coming into contact with a
child, remove the watch from your wrist to avoid injury to
the child or causing irritation of the child’s skin.
Keep backup copies of data!
Make sure you always keep separate written copies of
important data to protect against its loss. Memory contents
can be deleted by malfunction repair, etc.
Data Reliability Precaution
• The Global Positioning System (GPS) is maintained by
the United States government. Its operation, precision
and other variables are subject to change.
• GPS precision is affected by the relative positions of the
satellites being tracked and of the watch.
AC Adaptor and Charger Unit
Use only the AC adaptor and charger unit that are designed
specifically for use with this product. Use of another type of
AC adaptor or charger unit can cause the built-in battery to
overheat and ignite, creating the risk of explosion.
Use only an AC adaptor whose markings show it is rated
for the power supply in the area where you are using it.
Basics
■ General Guide
The font used in the screen shots shown in this manual was selected for
ease of reading. Because of this, the appearance of the screen shots
may be slightly different from the actual display of the watch.
● Watch
Button
Button
Button
GPS Positioning
To use GPS for auto time calibration or for stopwatch measurements,
you need to start a GPS measurement operation before entering the
Timekeeping Mode or Stopwatch Mode.
1. In the Timekeeping Mode, hold down the E button for about one
second to start GPS measurement.
2. Perform the Timekeeping Mode or Stopwatch Mode operation you
want.
3. To stop GPS measurement, return to the Timekeeping Mode and
press the E button again.
• For details about GPS, see “GPS”.
• GPS measurement has two modes: NORMAL and LOW POWER.
LOW POWER uses less power than when NORMAL is selected. For
more information, see “Selecting the GPS Measurement Mode”.
Button
Charger Terminal
Button
Current Time and Date Screen (Timekeeping Mode)
Month
Year
Day
Day of the Week
PM Indicator
(A for AM)
Hour
Second
If your watch has a protective sticker on its glass, remove the sticker.
Minute
● Charger Unit
Release Button
Battery Compartment
Tray
Lock
Charge Switch
AC Adaptor Terminal
Battery Cover
Charge Lamp
(LED)
■ Auto Display Off
Auto Display Off conserves built-in battery power by turning off the
display automatically when you are not using the watch.
Auto Display Off Triggers
• No watch button operation for 60 minutes
• No movement of the watch for 60 minutes
Movement of the watch is detected by the angle sensor of the EL
backlight.
To recover from Auto Display Off
• Press any button.
• Moving the watch does not recover from Auto Display Off.
■ Turning the Operation Tone On and Off
You can turn off the operation tone that
sounds when you change from one mode to
another or when you perform other
operations. When any screen besides a
setting screen (one with a flashing setting) is
on the display, hold down the C button for
about one second.
• This will cause the operation tone to
sound, and toggle the operation tone on
or off.
• The M indicator is on the display while the operation tone is off.
• Holding down the C button also changes the watch’s current mode.
• The alarm, hourly time signal, and timer time up beeper continue to
sound, even when the operation tone is turned off.
M Indicator
2
Page 3
Operation Guide 2886
GPS
The letters “GPS” stand for “Global
Positioning System”, which was developed
and is operated by the United States
Department of Defense.
A GPS device picks up radio signals from three or more of the system’s
satellites orbiting about 21,000 kilometers above the Earth, and then
applies the principles of triangulation to calculate a current position
based on the distance between each satellite and the GPS device, and
based on each satellite’s orbit.
Each satellite constantly transmits time information required for GPS
measurement, a one-second pulse (Universal Coordinated Time), the
satellite’s orbit information (ephemeris data), information about the orbits
of all the other satellites (almanac data), and other information.
Your watch analyzes the data it receives from the GPS satellites to
determine your current location, and calculates the distance you have
covered and your bearing.
● Important!
• The signals of the GPS system are controlled by the Tracking and
Control Center (TACC) of the United States, and are subject to
intentional precision degradation and signal termination at its
discretion.
• This watch depends on the reception of radio waves from artificial
satellites, so certain conditions can interfere with its operation.
• The following conditions can cause radio interference and make
reception impossible.
● Among buildings or
underground
Under
ground
● Surrounded by
skyscrapers
● Inside a
motor vehicle
Modes
Press the C button to cycle between modes.
• The watch will return to the Timekeeping Mode automatically if you do
not perform any button operation in the Guide Mode, Recall Mode, or
Alarm Mode.
Timekeeping Mode
Use the mode to view the current time and date.
Day of the Week
Button
PM Indicator
(A for AM)
Button
Hour : Minute Second
Alarm Mode
Use this mode to set the
alarm time, and to turn the
alarm and hourly time signal
on or off.
Mode Name
Month
Year
Day
Button
Stopwatch Mode
This mode measures
distance, speed, and elapsed
time.
Mode Name
Button
Button
● In wooded areas ● Near
If the date is greater than ± 512 weeks off when performing a
GPS measurement, following auto time correction the date will
become ± 1024 weeks from the actual date. In this case, refer to
“Configuring the Watch’s Basic Settings” and adjust the date.
high-voltage lines
● When the watch is
under your sleeve
■ GPS Auto Time Calibration by GPS
When the watch performs a GPS measurement, it also receives time
data and adjusts its time and date setting automatically.
• If you cannot receive a GPS signal for some reason, periodically
adjust the time and date setting manually using the procedure.
To perform GPS auto time calibration
1. In the Timekeeping Mode, hold down the
E button for about one second.
• This will start GPS measurement,
which is indicated by a flashing GPS
indicator (
• To stop GPS measurement, press the
E button again.
• A GPS measurement operation
normally takes one or two minutes, but
can take as long as five minutes. The
message “TIME OUT” will appear and
measurement will stop if measurement
is not possible.
• Summer time (DST) settings are not
configured automatically. See “To
configure basic settings” for more
information.
).
SEARCH Screen
During Measurement
GPS Indicator
Level
No Measurement
Number of Satellites
World Time Mode
This mode shows the current
time in 141 cities in 38 time
zones.
Mode Name
Timer Mode
This mode provides a
countdown timer.
Mode Name
Guide Mode
This mode tells you the
distance and direction from
your current location (BASE
POINT) to your destination
(GOAL POINT).
Mode Name
Recall Mode
Use this mode to recall
stopwatch records.
Mode Name
In order to facilitate GPS reception, set the current date manually
after you first purchase the watch.
• You also can speed up GPS reception by setting the month,
day, and approximate current time manually. See “To configure
basic settings” for information about manual time and date
settings.
3
Page 4
Operation Guide 2886
y
■ Illumination
An EL (electro-luminescent) panel is used for display illumination.
To turn on illumination manually
1. In any mode, press the D button.
• This will turn on illumination for about 1.5
seconds.
• Pressing the D button turns on
illumination regardless of whether Auto
Light is on or off.
To turn Auto Light on or off
• Auto Light turns on illumination for about 1.5 seconds in all modes
when you angle the watch towards your face.
1. In the Timekeeping Mode, hold down the
D button for about one second to toggle
Auto Light on (
displayed).
Positioning Your Arm Correctly
• You should be wearing the watch on the outside of your wrist when
using the auto light switch.
• Make sure that a line running from the left side (9 o’clock) to the right
side (3 o’clock) of the watch is within 15 degrees parallel with the
ground. The auto light switch may not operate properly if this angle is
greater than 15 degrees.
● Illumination Precautions
• Illumination may be difficult to see under bright sunlight.
• Illumination will turn off automatically if you press any button while it is
turned on.
• You may notice a slight sound from the watch while illumination is
turned on. This is the sound of EL panel vibration and does not
indicate malfunction.
● Auto Light Precautions
• Auto Light will remain enabled for about 60 minutes after it last turned
on illumination. After that, it will turn off automatically in order to
conserve built-in battery power.
• If you want to continue using auto light, hold down the D button for
about one second again until the Auto Light on indicator reappears.
Note, however, that frequent use of Auto Light can run down the builtin battery.
• Illumination may not turn on immediately when you angle the watch
towards your face. This does not indicate malfunction.
• Illumination remains on for about 1.5 seconds only, even if you leave
the watch angled towards your face.
• Illumination may turn on unintentionally when you wear the watch on
the inside of your wrist, when you shake your arm, or when you raise
your arm. Be sure to turn off Auto Light whenever you do not need
illumination.
• Keep Auto Light turned off whenever you are wearing the watch on
the inside of your wrist.
• Electro-static charge and magnetism can interfere with Auto Light
operation and even make operation impossible. If this happens, lower
your arm to the starting position and then raise it again. If you still
have trouble with illumination, try lowering your arm down to your side
and then raise it to your face for reading.
You may hear a faint rattling sound when you move the watch
around. This sound is caused by the movement of a metal bulb
that controls Auto Light operation, and does not indicate
malfunction.
displayed) or off ( not
With the watch on your
wrist, position it parallel
with the ground.
Auto Light
On Indicator
Rotate your arm until the
watch is angled at about
40 degrees, so you can
read its face.
At least 40
degrees
Charging the Built-in battery
Use one of the following procedures to charge the built-in battery before
using the watch for the first time or whenever the “LOW BATTERY”
message appears.
To use the AC adaptor for charging
Connect the plug of the AC adaptor to the
charger unit’s AC adaptor terminal.
• Keep charger unit contacts clean by
wiping them with a clean cloth.
Plug
Open the cover,
and then insert the plug.
To use a battery for charging
• Note that charging from a battery is not possible while the AC adaptor
is connected to the charger unit’s AC adaptor terminal.
Use a 006P Type (9V) alkaline battery (6LR61) for charging.
1. Release the lock and then open
the battery cover.
Slide.
Release lock (down).
3. Insert the battery into the
battery compartment.
Insert.
Batter
Compartment
2. Attach the battery.
Attach.
Take care so the
and terminals are
connected correctly.
4. Close the battery cover and lock
it.
To charge the watch
1. Place the watch onto the tray of
the charger unit.
• Make sure the watch is
inserted securely into the
tray.
3. Turn on the charge switch. 4. When the LED goes out, turn off
LED on
ON
5. Remove the watch from the
charger unit.
• Pressing the release button
will cause the tray to return
to its original position with
considerable force. Take
care that you do not injure
your finger on the tray.
Remove.
Press the
release
button.
2. Secure the watch in the charger
unit.
Snap
Slide.
the charge switch.
LED off
Important!
• Note that the charger unit
becomes rather unstable
(because it is top-heavy) when
the watch is mounted on it.
• If the LED starts to flash while
the watch is on the charger unit,
turn off the charge switch and
then turn it back on again.
AC Adaptor
Pull out.
Lock (up).
Slide.
OFF
4
Page 5
Operation Guide 2886
● Time Required for Charging
The watch takes about three hours to achieve a full charge from full
discharge.
● Number of Alkaline Battery (6LR61) Charges
You can charge the watch fully about five times with each alkaline
battery.
• Do not use a manganese battery for charging.
• If the LED flashes while the charger unit switch is turned on after you
remove the watch from the charger unit, it means that there is still
enough alkaline battery power left for charging.
• If the LED does not flash even though the charger unit switch is on, it
could mean that the alkaline battery is dead. Charge again using a
new alkaline battery.
● Approximate Continuous Built-in battery Operating Time
• Timekeeping Only: 7 to 11 days
• Continuous GPS Measurement: NORMAL: 2.0 hours
• Actual built-in battery operating time depends on operating conditions.
• Repeated charging and discharging shortens built-in battery operating
time.
LOW POWER: 4.3 hours
● Built-in battery Level
A low battery indicator appears on the
display to warn you that built-in battery
power is low. When built-in battery power
becomes very low, the low battery indicator
will start to flash and the message “LOW
BATTERY” will appear on the display.
• Low Battery Indicator On: Measurement
data (GPS, stopwatch) is saved as it is
measured.
• Low Battery Indicator Flashing: Stopwatch is forced to reset to all
zeroes. All measurement data (GPS, stopwatch) up to that point is
saved.
• Depending on conditions, the following functions may not operate
correctly or may become disabled while the low battery indicator is
displayed or flashing: GPS reception, stopwatch operations, Recall
Mode data delete, Guide Mode destination editing and delete, contrast
adjustment.
Low Battery
Indicator
● Built-in battery Life
Built-in battery capacity becomes 70% of normal after 300 charge/
discharge cycles. Actual built-in battery life depends on operating
conditions.
● Handling
• Be sure to keep the charger contacts of the watch clean at all times.
Dirt can cause poor contact. Before charging, wipe the contacts with a
dry cloth, tissue paper, etc. Never allow needles, pins, or other metal
objects to touch the contacts.
• Built-in battery performance deteriorates under low temperatures,
which can cause the “LOW BATTERY” message to appear more
quickly than normal.
• The allowable temperature range of the charger unit during charging is
5°C to 35°C (41°F to 95°F).
• Use only the AC adaptor that comes with the charger unit. Never try to
use any other type of AC adaptor.
• Never plug the AC adaptor into any power supply that is outside the
power supply voltage range marked on the adaptor. Doing so creates
the risk of fire, malfunction, and electric shock.
• The LED will flash if an error occurs during charging. If this happens,
turn the charger unit’s charge switch off and then back on again. If this
does not correct the problem, contact your original retailer or
authorized CASIO service center.
• Take care to avoid cutting or damaging of the AC adaptor’s power
cord. Do not place any heavy object on the cord or expose it to heat. A
damaged power cord creates the risk of fire, accident, and electric
shock.
• Never plug in or unplug the AC adaptor while your hands are wet.
Doing so creates the risk of electric shock.
• Do not plug the AC power cord into an extension cord shared by other
devices. Doing so creates the risk of fire, malfunction, and electric
shock.
• Should the AC adaptor’s power cord become damaged (internal wires
exposed, shorted, etc.), request repair from your original retailer or
authorized CASIO service center. Using a damaged power cord
creates the risk of fire, malfunction, and electric shock.
• The AC adaptor will become warm to the touch during charging. This
is normal and does not indicate malfunction.
• Always unplug the AC adaptor from the power outlet when you are not
using it.
• Never cover the AC adaptor with a tablecloth, rug, blanket, cushion, or
similar item while charging. Internal heat build-up creates the risk of
fire.
Using the Stopwatch Mode
To enter the Stopwatch Mode, press the C button once in the
Timekeeping Mode.
About
2 seconds
In order to perform a stopwatch measurement that includes GPS
measurement, you need to start the GPS measurement (by
holding down the E button for about one second) before entering
the Stopwatch Mode.
• The watch will beep and “FIX” will appear on the display to
indicate that GPS measurement has started.
• The GPS indicator ( ) flashes on the display while GPS
measurement is in progress.
● Main Functions
Measurement
Time Measurement Unit: 1/100 second
Time Measurement Range: 23:59'59.99" (24 hours)
• Elapsed time returns to zero automatically and timing continues from
there when the maximum limit is reached.
Distance Measurement Unit: kilometers or miles
• See “To configure basic settings” for information about selecting the
distance unit.
Distance Measurement Range: 999.99 km (621.36 miles)
Speed Measurement Range: 0.0 km/h to 40.0 km/h
Measurement Data: Lap time, split time, target time differential, target
• GPS measurement is used to measure target time differential, target
distance differential, distance covered, speed, and pace.
Memory Data
Number of Records: 50 (up to 100 laps per record)
• Laps are counted from 0 to 999.
Record Items: Lap time, split time, running time, distance covered,
• GPS measurement is used to measure distance covered, average
pace, distance within a lap, and pace within a lap.
average pace, distance within a lap, pace within a lap
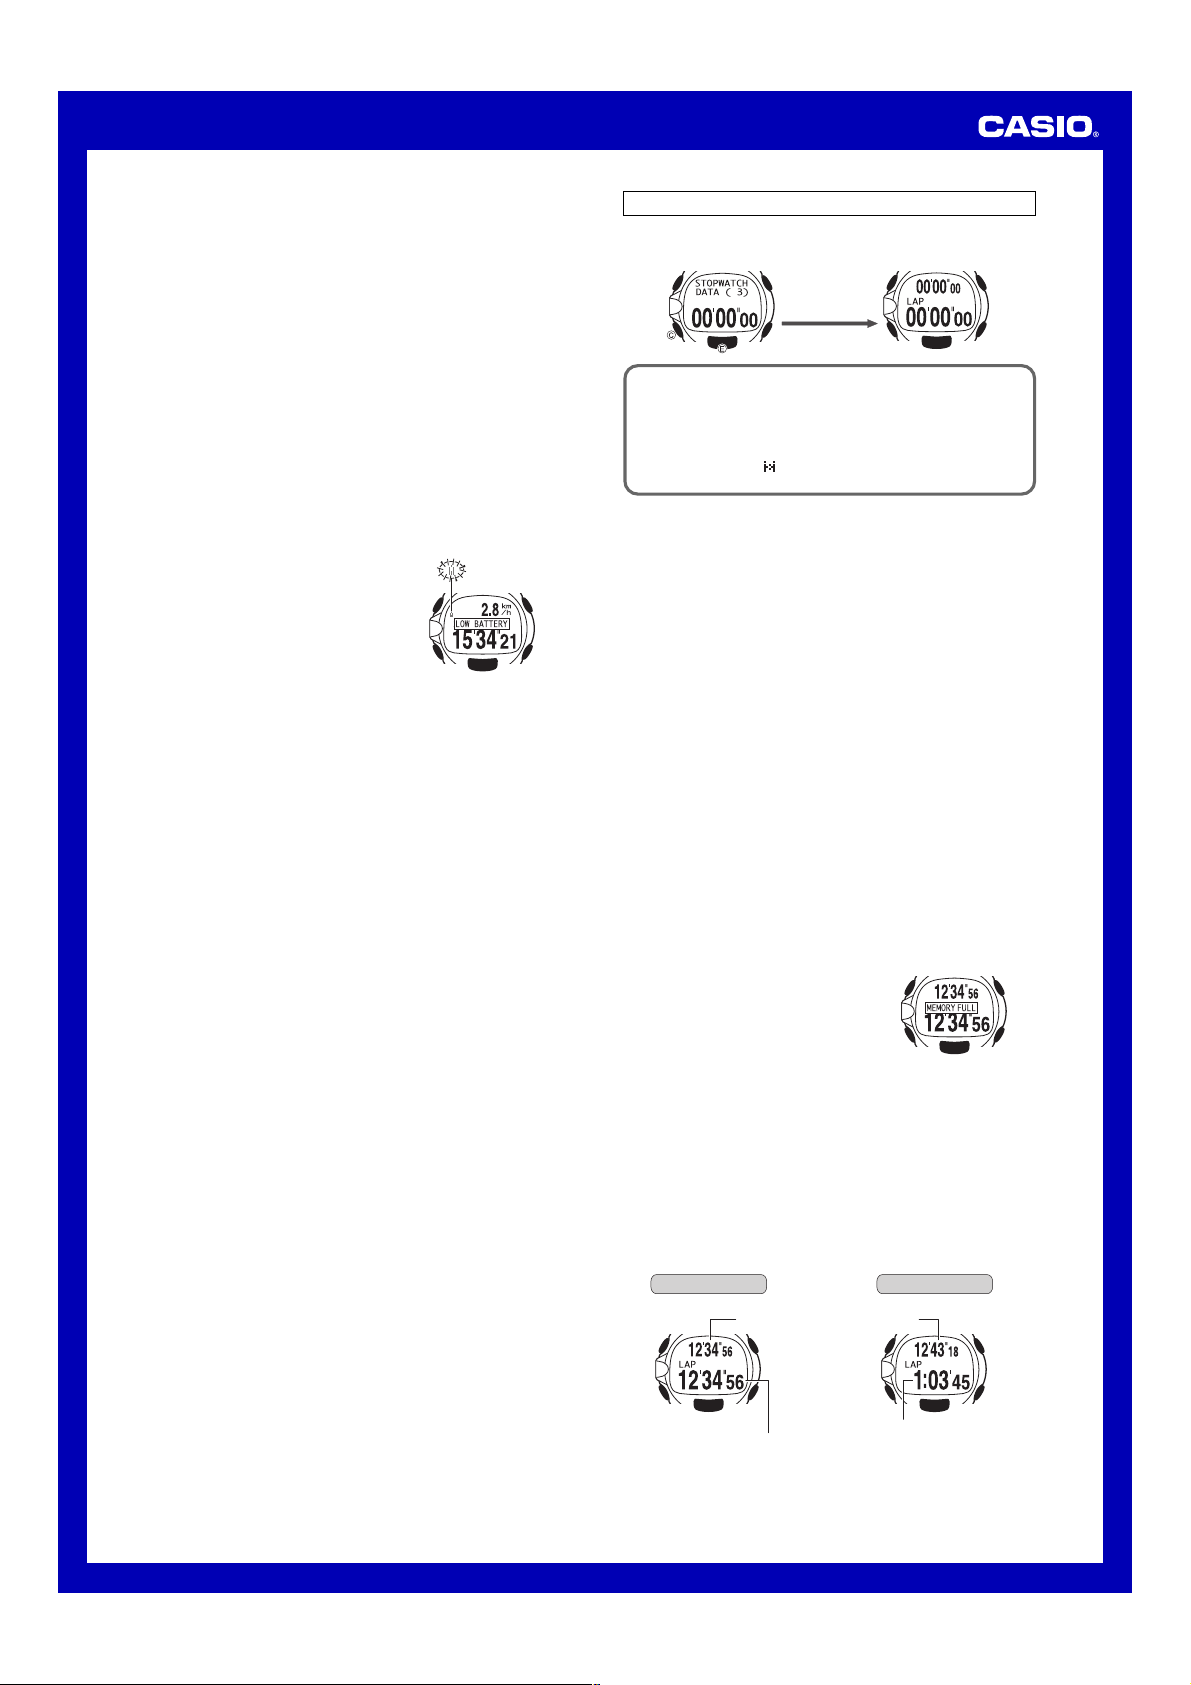
● Memory
Stopwatch measurement data is saved
temporarily in watch memory, and then
moved to flash memory when you reset the
watch to all zeroes. The message
“MEMORY FULL” will appear on the display
if you try to save data when there are
already 50 records stored in flash memory.
In this case, you will need to delete data you
no longer need in order to store more data.
• See “Deleting Records” for information
about deleting data from memory.
● Stopwatch Time Displays
During the first hour of a stopwatch time measurement, the display
shows minute, second, and 1/100-second values. After the end of the
first hour is reached, the display switches to hour, minute, and second
values.
Example: Lap time display
First hour Subsequent Hours
Elapsed Time
(minutes, seconds, 1/100 second)
(0.0 mph to 24.9 mph)
distance differential, distance covered, speed, pace
(minutes, seconds, 1/100 second)
Lap Time
Elapsed Time
(hours, minutes, seconds)
5
Page 6

Operation Guide 2886
y
■ Elapsed Time Measurements
The procedures for stopwatch elapsed time measurement are the same
regardless of whether or not GPS measurement is used.
The only differences are display contents and the data stored in memory.
• It is recommended that you charge the watch fully before using GPS.
• Switches
display screen
(GPS measurement)
• Start
• Lap
• Stop
• Reset (Data to memory)
• (Light)
To measure elapsed time
Start
Cumulative Time Measurement
Pressing the E button to restart the stopwatch without resetting it to all
zeros will resume elapsed time measurement from where it was last
stopped.
Stop Reset
(Data to memory)
To measure lap times
Lap Lap Reset
When you reset the stopwatch to all
zeroes, a message appears on the
display asking if you want to store the
current measurement data in flash
memory. Use the A button to move the
arrow ( ) to “YES” (to store the data) or
“NO” (to discard the data) and then press
the E button.
• It can take as long as three seconds to
store data.
Memory Confirmation Message
StopStart
(Data to memor
Memory Confirmation
Message
■ Using GPS Measurement during a Stopwatch
Operation
● Cycling Through Measurement Screens
You can display any of the measurement screens shown below when
using GPS measurement during a stopwatch operation.
• The same data is measured and maintained in memory regardless of
which screen is currently on the display.
• The target arrival time screen and the distance/time differential screen
are displayed only when the target pace feature is turned on.
• You can select km (kilometers) or mile (miles) as the distance unit.
See “To configure basic settings” for more information.
Distance Screen Speed Screen
SpeedDistance Covered
● Specifying the Target Pace
You can specify the target distance and time, and have the watch emit a
pace beeper when the distance you specified is reached during a
stopwatch elapsed time measurement operation.
• Note that you must reset the stopwatch to all zeroes in order to
configure target pace settings.
1. Enter the Stopwatch Mode.
2. Hold down the A button for about one
second until the setup menu appears.
3. Use the E and B buttons to move the
arrow (
) to “TARGET PACE”.
4. Press the C button.
• This will display the target pace setting
screen.
)
5. Use the C button to select the setting
you want to configure.
• Each press of the C button cycles
through the settings shown below. The
currently selected setting is the one
that is flashing.
TARGET PACE
ON/OFF
TIME
(Second)
6. Use the E (+) and B (–) buttons to
change the currently selected setting.
• TARGET PACE: Select ON or OFF.
• DISTANCE: Change this setting in 0.1 km (0.1 mile) increments
• TIME: Set the hour, minute, and second settings within the
(Minute)
within the range of 0.10 to 99.90 km (0.10 to 62.00
miles). MARATHON will appear when the distance
setting is 42.195 km and HALF (half marathon) will
appear for 21.0975 km.
range of 0:00'01 to 23:59'59.
TIME
DISTANCE
TIME
(Hour)
Settings
(–)
(+)
Distance/Time
Differential Screen
Time Differential
Arrival Time
Distance Differential
Screen
Arrival Time
Pace Screen
Pace
(minutes per kilometer)
Lap Screen
Lap Time
Elapsed Time
7. To exit the setting screen and return to the
menu, press the A button.
The watch calculates the speed in
accordance with the distance and time
you specify here. If the speed is outside
the range of 4.0 km/h to 40.0 km/h (2.5
mph to 24.9 mph), an error message will
appear and then the display will return to
the DISTANCE setting.
8. To return to the Stopwatch Mode screen,
press the A button again.
6
Page 7

Operation Guide 2886
● Performing Stopwatch Operations Using GPS
Measurement
• The watch will not be able to receive GPS data if a stopwatch elapsed
time measurement operation is started before GPS measurement is
started. Because of this, only lap times will be displayed by the
stopwatch.
• The watch will do the following if GPS reception becomes bad during
a stopwatch measurement operation or if there is some problem with
the GPS.
• Elapsed time continues to be measured.
• Distance covered calculation stops.
• “– – –” is displayed for speed and pace.
• If GPS measurement becomes possible again, the watch will add
on to the last distance traveled value that was measured
successfully before GPS measurement stopped.
● Time Required for GPS Measurement
The watch normally starts measuring new GPS data within about two
minutes, because it remembers data from the last GPS measurement.
It can take longer if the data from the last measurement has been
corrupted for some reason or if there has been a major change in the
orbits of the satellites since the last measurement. The message “TIME
OUT” will appear on the display and measurement will stop if GPS
measurement cannot be completed within about five minutes. If that
happens, perform GPS measurement again.
● GPS Measurement Auto Cancel
• The “TIME OUT” message will appear and
GPS acquisition will be canceled if a
signal cannot be received within about two
minutes after GPS acquisition has started.
• If a weak signal can be received and the
stopwatch measurement operation is
complete, acquisition will continue for five
minutes. If the received contents cannot
be recognized, “TIME OUT” will appear on
the display and GPS acquisition will be
terminated.
• If the GPS signal is interrupted during
measurement, the message “SIGNAL
WEAK” will appear on the display.
• If a weak signal can be received and the
stopwatch measurement is in progress,
GPS acquisition will continue.
• The message “GPS OFF? YES/NO” will
appear after about two minutes if you
leave GPS measurement on after you
stop a stopwatch elapsed time
measurement operation. When this
happens, use the A button to move the
arrow ( ) to “YES” (initial default
selection) or “NO”. Next, press the E
button.
• If you do not perform any operation for about one minute while the
above message is on the display, the currently selected option (“YES”
or “NO”) will be executed automatically.
Recalling Memory Contents
The Recall Mode lets you recall the data you store in memory during a
stopwatch measurement operation.
• To enter the Recall Mode, press the C button three times in the
Timekeeping Mode.
● Selecting a Record
A mode title screen appears first when you enter the Recall Mode.
Use the E button for scroll back (new-to-old) through data title screens
and the B button to forward (old-to-new).
Mode Title Screen Record Title Screen
Date Record Number
Start Time
• To change to another mode while the
mode title screen or a record title screen is
on the display, press the C button.
● Viewing the Details of a Record
While a record title screen is on the display,
press the A button to display the details of the
record.
Record Detail Screens
Running Time
• indicates a record before the current one,
while indicates a record after the current
one.
Average Pace
Distance
Covered
Lap 1 Time
Lap 1 Split Time
• “– – –” will be displayed for the
average pace if the measurement
was performed without GPS.
Lap 1 Distance
Lap 1 Pace
• The timer shows “– – –” when the target pace is
turned on and the distance covered is still less
than the target distance.
Returns to the Running Time/Distance Covered screen.
■ Deleting Records
You can delete individual records or all records currently stored in
memory.
• You can delete records only when the stopwatch is reset to all zeroes.
To delete all records
1. While the Recall Mode mode title screen
is on the display, hold down the A button
for about one second until the
confirmation message appears.
2. Use the A button to move the arrow (
to “YES” (to delete all records) or “NO” (to
cancel the delete operation).
)
7
Page 8

Operation Guide 2886
3. Press the E button to execute the
operation you selected in step 2.
• If you selected “YES”, all records in
memory will be deleted.
• The watch will return to the mode title
screen if you leave the confirmation
screen on the display for about two or
three minutes without doing anything.
To delete a specific record
Deleting a record deletes all of its data.
1. In the Recall Mode, use the E and B
buttons to display the record title screen of
the record you want to delete.
2. Hold down the A button for about one
second until the confirmation message
appears.
3. Use the A button to move the arrow (
to “YES” (to delete the record) or “NO” (to
cancel the delete operation).
4. Press the E button to execute the
operation you selected in step 3.
• If you selected “YES”, the selected
record will be deleted.
• The watch will return to the mode title
screen if you leave the confirmation
screen on the display for about two or
three minutes without doing anything.
2. After GPS measurement is complete, use
the E and B buttons to move the arrow
) to the memory where you want to
(
register the location.
• Move the arrow (
if you want to register the location as
your current location, or to “GOAL
POINT” to register the location as your
destination. Move it to “CANCEL” if
you want to cancel without registering
the location.
3. Press the C button to execute the
operation you selected in step 2.
• This will display a default name
(POINT1, POINT2, etc.).
4. Input a location name by using the E (+)
and B (–) buttons to scroll through
characters at the position where the
) is currently located, and the
pointer (
C button to shift the pointer to the right.
• If you want to clear the default name
and input a new one, press the E or
)
B button while the pointer is located
at the first (leftmost) character.
• If you want to edit the default name, press the C button to move
the pointer to the right and then make the changes you want.
• You can input up to eight alpha-numeric characters (see below) for
a location name.
Supported Characters
Letters: A to Z
Numbers: 0, 1 to 9
Symbols: ’, +, –, :, ., /, ?, space
5. When everything is the way you want,
press the A button to exit.
) to “BASE POINT”
(Right)
(–)
(+)
Using the Guide Mode
The Guide Mode calculates the distance and
direction between your destination (goal
point), which is pre-registered in memory,
and a newly measured base point (current
location).
• The locations of both points are measured
using GPS measurement and stored in
memory to perform this operation.
• The distance displayed in the Guide Mode
does not include elevation differentials.
To enter the Guide Mode, press the C button twice in the Timekeeping
Mode. This will display the currently stored base point data record.
(Twice)
Timekeeping Mode Screen Base Point Record Screen
The message “NO DATA” will appear if there is no base point data
currently in memory.
To pre-register a goal in memory
1. While the base point record screen is
displayed, press the E button to start
GPS measurement of your current
location.
• This will cause the search screen to
appear.
Destination
Current Location
● Location Memory Capacity
You can have up to 100 destinations in
memory. Trying to store a destination when
100 are already stored will cause the
message “MEMORY FULL” to appear. If this
happens, use the procedure “To delete a
destination” to delete locations you no longer
need.
To find out the distance and direction between two points
1. While the base point record screen is
displayed, press the E button to start
GPS measurement of your current
location.
• This will cause the search screen to
appear.
2. After GPS measurement is complete,
confirm that the arrow ( ) is next to
“BASE POINT” and then press the C
button. This stores the current location as
the new base point.
3. Press the A button to display the
destination search screen.
4. Use the E (newer) and B (older)
buttons to scroll through the available
destinations until the one you want is on
the display.
• Destinations are listed in measurement
date order.
(Older)
(Newer)
8
Page 9

Operation Guide 2886
5. Press the A button to display the
distance and direction between the two
points.
Direction Indications
• The direction reading indicates the
direction to the destination from your
current location.
DirectionDistance
• “– –” will be indicated for the direction (COMPASS) and “0.00” for the
distance (DISTANCE) when the distance between the current location
and your destination is less than 50 meters.
• To return to the base point record screen, press the A button.
• To change to the Timekeeping Mode or another mode, use the C
button.
To rename a destination
1. While the base point record screen is
displayed, press the A button to display
the destination (GOAL POINT) list.
2. Use the E (newer) and B (older)
buttons to scroll through the destinations
until the one you want is on the display.
• Destinations are listed in measurement
date order.
(Older)
To delete a destination
1. While the base point record screen is
displayed, press the A button to display
the destination (GOAL POINT) list.
2. Use the E (newer) and B (older)
buttons to scroll through the available
destinations until the one you want is on
the display.
• Destinations are listed in measurement
date order.
3. Hold down the A button for about one
second to display the setting menu.
4. Use the E and B buttons to move the
arrow ( ) to “CLEAR”.
5. Press the C button.
(Older)
(Newer)
(Newer)
3. Hold down the A button for about one
second until the setting menu appears.
• Keep the A button depressed after
the distance and direction screen
appears.
4. After confirming that the arrow ( ) is next
to “EDIT”, press the C button to display
the destination name editing screen.
• The current destination name will be
flashing on the display.
• To exit this screen without renaming a
destination, move the arrow ( ) to
“CANCEL” and then press the C
button.
5. Input a location name by using the E (+)
and B (–) buttons to scroll through
characters at the position where the
pointer (
) is currently located, and the
C button to shift the pointer to the right.
• You can input up to eight alphanumeric characters (see below) for a
location name.
• If you want to input more characters, press the E or B button
while the pointer is located at the first (leftmost) character.
• If you want to edit the default name, press the C button to move
the pointer to the right and then make the changes you want.
Supported Characters
Letters: A to Z
Numbers: 0, 1 to 9
Symbols: ’, +, –, :, ., /, ?, space
(Right)
(+)
6. Use the A button to move the arrow (
to “YES” (to delete the destination) or
“NO” (to cancel the delete operation).
7. Press the E button to delete the
destination and display the one before it.
)
Using the Timer
The Timer Mode lets you set a start time of up to 60 minutes in 10second steps, and then countdown from there in one-second units. The
watch beeps for 5 seconds when the end of the countdown is reached.
(–)
Turning on the watch’s auto repeat timer causes the countdown to
restart from the start time whenever the end of the countdown is
reached.
To enter the Timer Mode, press the C button four times in the
Timekeeping Mode.
Start Time
(Minutes, Seconds)
(4 times)
Current Time
6. When the name is the way you want,
press the A button to exit.
9
Page 10

Operation Guide 2886
■ Timer Types
There are two different settings that you can use in order to configure the
timer as describe below.
Repeat Timer
With the Repeat Timer, the countdown stops, the original start time
appears, and the watch beeps for five seconds when the end of the
countdown is reached.
Auto Repeat Timer
With the auto repeat timer, the timer automatically resets the start time
and continues timing from there when the end of the current countdown
is reached.
• “AUTOREPEAT” is on the display while the auto repeat timer is
selected.
To switch between the Repeat Timer and Auto Repeat Timer
While the Timer Mode timer is reset to its
start time, press the B button to toggle
between the repeat timer and auto repeat
timer.
• The auto repeat timer screen shows a
repeat count. (Repeat Count: 01 to 30)
To set the timer start time
1. While the current starting time is displayed
in the Timer Mode, hold down the A
button for about one second until the
minutes start to flash.
2. Use the C button to move the flashing
between the minute and the seconds
setting.
• Set 0:00 for a 60-minute countdown.
3. Use the E (+) and B (–) buttons to
change the currently selected setting.
• Holding down the E or B button
changes the current setting at high
speed.
Repeat steps 2 and 3 as many times as necessary configure the
start time setting you want.
• The start time can be set in 10-second increments up to 60
minutes.
4. When the setting is the way you want,
press the A button to exit the setting
screen.
• The setting screen also will be exited
automatically if you do not perform any
operation for about two or three
minutes.
To use the countdown timer
Repeat Count
Auto Repeat
Timer Indicator
Minutes
Seconds
• Stop
• Reset
(–)
(+)
Using World Time
World Time lets you display the current time in any one of 141 cities (38
time zones) around the world.
• When you enter the World Time Mode, the screen for the city that was
displayed when you last exited the mode appears first.
• The World Time seconds count is linked with the Timekeeping Mode
seconds count.
• The same 12-hour/24-hour format you select for the Home Time in the
Timekeeping Mode is also applied in the World Time Mode.
To enter the World Time Mode, press the C button five times in the
Timekeeping Mode.
Time Differential (UTC)
(5 times)
World Time
City Name
● Important!
If the World Time Mode time is incorrect, correct the Home Time setting
in the Timekeeping Mode.
• For information about setting the time, see “Configuring the Watch’s
Basic Settings”.
To search for a city
In the World Time Mode, use the E
(westward) and B (eastward) buttons to
scroll through the cities.
• Holding down the E or B button scrolls
at high speed.
• For more information about city names,
see “City Name List”.
To turn summer time on and off
While the city whose summer time setting
you want to change is displayed, hold down
the A button for about one second to toggle
summer time on and off.
• The “DST” indicator appears on the
display and timekeeping is advanced by
one hour when summer time is turned on.
• You can turn summer time on or off
individually for each city.
Using Summer Time (DST)
Summer time, or Daylight Saving Time (DST) as is it is called in
some countries, calls for setting clocks ahead one hour during the
summer season. Note that the use of summer time depends on
the country and even the local area.
About 1 second
(Eastward)
(Westward)
• Start
Start: Press the E button.
Stop: Press the B button.
Reset: While the countdown is stopped, press the B button.
• Pressing the E button while the timer countdown is stopped restarts
the countdown.
● Time Up Alarm
The watch beeps for 5 seconds when the end of the countdown is
reached.
To stop the alarm
Pressing any button while the alarm is sounding will stop it.
10
Page 11

Operation Guide 2886
Using the Alarm and Hourly Time Signal
The watch beeps for 10 seconds when the Timekeeping Mode time
reaches the currently set alarm time. The Hourly Time signal causes the
watch to beep every hour on the hour.
Alarm and hourly time signal settings are configured in the Alarm Mode,
which you enter by pressing the C button six times while in the
Timekeeping Mode.
(6 times)
To set the alarm time
1. In the Alarm Mode, hold down the A
button for about one second until the hour
digits of the alarm time start to flash.
• This also turns on the displayed alarm
automatically.
ON
2. Use the C button to move the flashing
between the hour and the minute settings.
3. Use the E (+) and B (–) buttons to
change the currently selected setting.
• Holding down the E or B button
changes the current setting at high
speed.
Repeat steps 2 and 3 as many times as necessary to configure
the alarm time setting you want.
• When setting the hour, make sure you specify AM (A) or PM (P)
correctly when using 12-hour timekeeping, or that you specify
the correct 24-hour time.
• If you selected 24-hour timekeeping in the Timekeeping Mode,
the time will also be displayed in 24-hour timekeeping in the
Alarm Mode.
4. When the setting is the way you want,
press the A button to exit the setting
screen.
• The setting screen also will be exited
automatically if you do not perform any
operation for about two or three
minutes.
To stop the alarm
Pressing any button while the alarm is sounding will stop it.
To test the alarm
In the Alarm Mode, hold down the B button to sound the alarm.
• Pressing the B button also toggles the alarm on or off.
To turn an alarm or the hourly time signal on or off
In the Alarm Mode, each press of the E button will toggle between the
alarm screen and hourly time signal screen. Pressing the B button will
toggle the function whose screen is currently displayed on or off.
Hourly Time SignalAlarm
(–)
(+)
The alarm on indicator is displayed when the alarm is turned on, and the
hourly time signal on indicator is displayed while the hourly time signal is
turned on.
Hourly Time Signal On Indicator
Alarm On Indicator
Configuring the Watch’s Basic Settings
The following describes each of the watch’s basic settings that you need
to configure before using the watch.
Location
Home City: The city (location) where you will use the watch.
• This setting affects all of the World Time Mode times.
Current Time and Date
• If you are in a location where time adjustment using GPS is not
possible, you will need to configure time and date (seconds, hour,
minute, year, month, day) settings manually.
DST: Use this setting to turn summer time on and off.
12/24-hourTimekeeping: Use this setting to select either 12-hour
Time: Set the seconds, hour, and minute of the current time.
Date: Set the year, month, and day of the current date.
Other Settings
Distance Unit: Use this setting to select km (kilometers) or mile
GPS Time Calibration: Use this setting to turn GPS auto time
Contrast: Use this setting to adjust display contrast.
Timekeeping Mode
(2 seconds)
City Code
Contrast
GPS Time Adjustment
Distance Unit
The basic setting screens will not appear if a GPS measurement,
stopwatch measurement, or timer countdown operation is in
progress. Stop the ongoing operation to configure settings.
Summer Time (DST)
Summer time, or Daylight Saving Time (DST) as is it is called in
some countries, calls for setting clocks ahead one hour during the
summer season. Note that the use of summer time depends on
the country and even the local area.
To configure basic settings
1. In the Timekeeping Mode, hold down the
A button for about one second to display
the city name and UTC differential screen.
(AM/PM) or 24 hour timekeeping.
(miles).
calibration on or off.
Basic Setting Screens
DST
12/24-hour Timekeeping
Seconds
Hour
MinuteYearMonthDay
City Name
ON
OFF
UTC Differential
11
Page 12

Operation Guide 2886
2. Use the E (westward) and B (eastward)
buttons to scroll through city names until
the one you want to use as your Home
City is displayed.
• Holding down the E or B button
changes the current setting at high
speed.
• For more information about city
names, see “City Name List”.
3. After selecting your Home City, press the
C button to advance to the summer time
(DST) setting screen.
4. Use the E and B buttons to turn
summer time (DST) on or off.
5. Use the C button to advance through subsequent setting screens to
perform the settings described in the following sections.
• The setting screens appear in the sequence shown in the
flowchart.
After you use the C button to display a setting screen, use the
E and B buttons to configure the settings on the screen.
• Holding down the E or B button changes the current setting
at high speed.
(Eastward)
(Westward)
To select 12-hour or 24-hour timekeeping
• Use the E and B buttons to move the
flashing to either 12 (12-hour timekeeping)
or 24 (24-hour timekeeping).
12-hour timekeeping
24-hour
timekeeping
To adjust display contrast
• Use the E and B buttons to adjust
display contrast as a value from 0
(lightest) to 9 (darkest).
6. When the settings are the way you want,
press the A button to exit the setting
screen and return to the Timekeeping
Mode.
• The watch also will exit the setting
screen and revert to the Timekeeping
Mode automatically if you do not
perform any operation for about two or
three minutes.
Contrast (0 to 9)
■ Selecting the GPS Measurement Mode
You can select either NORMAL or LOW POWER as the GPS
measurement mode. LOW POWER uses less power than the NORMAL
mode. The factory default measurement mode is NORMAL.
1. In the Timekeeping Mode, press the C
button once to enter the Stopwatch Mode.
2. Hold down the A button for about one
second until the setup menu appears.
3. Use the E and B buttons to move the
arrow (
) to “GPS MODE”.
To reset the seconds to 00
• While the seconds are selected, press the
E or B button to reset them to 00.
• Resetting while the seconds count is in
the range of 30 to 59 resets it to 00 and
adds 1 to the minutes. In the range of 00
to 29, the seconds are reset without
changing the minutes.
To set the hour, minute, year, month, and day
• Use the E (+) or B (–) button to change
the flashing setting.
• When setting the hour, make sure you
specify AM (A) or PM (P) correctly, or that
you specify the correct 24-hour time.
• You can set a date in the range of
January 1, 2005 to December 31, 2039.
• The day of the week is set automatically in
accordance with the date you set.
Year
Hour Minute
To specify the distance unit
• Use the E and B buttons to move the
) to the unit you want to select.
arrow (
To turn GPS time adjustment on or off
• Use the E and B buttons to move the
arrow (
• When OFF is selected, the time setting is
) to the setting you want.
not adjusted automatically when a GPS
measurement is performed. Select OFF
when you want the watch to show a time
that is different from the actual time.
Seconds
Month
Day
Kilometers
Miles
4. Press the C button to display the GPS
MODE menu.
5. Use the E and B buttons to move the
arrow ( ) to the GPS MODE setting you
want to use.
• NORMAL: This is the setting you
• LOW POWER: This mode requires less
• Abnormal speed and distance readings can result if the radio wave
path between the satellites and the watch is obstructed while the
LOW POWER mode is being used. Use the LOW POWER mode
only when there are no obstructions between you and the
satellites.
6. Press the A button to exit the setting
screen and return to the menu.
7. Press the A button again to return to the
Stopwatch Mode screen.
normally should use.
power than the NORMAL
mode. This mode extends
the built-in battery
operating time, but it also
decreases GPS precision.
12
Page 13

Operation Guide 2886
Display Messages
Message
DATA ERROR
DELETING
PLEASE WAIT
GPS OFF?
YES
NO
GPS OPERATES
LOW BATTERY
MEMORY FULL
NO DATA
PLEASE WAIT
SAVE DATA?
YES
NO
SIGNAL WEAK
STOP
STOPWATCH
OPERATES
TIME OUT
TIMER OPERATES
When Displayed
When configuring
target pace settings
When deleting
Recall Mode data
When GPS
measurement is
being performed
When setting the
time, deleting
memory contents,
or changing the
destination name
Any time
When storing
stopwatch data
When recording a
Guide Mode
destination
When searching for
a Guide Mode point
When distance and
direction are
displayed
When resetting the
stopwatch to all
zeroes
When performing a
GPS measurement
When performing a
GPS measurement
When setting the
time, writing to
memory, deleting
memory contents,
or changing the
destination name
When performing a
GPS measurement
When setting the
time, writing to
memory, deleting
memory contents,
or changing the
destination name
Meaning
The speed calculated using
the specified distance and
time is too fast.
Data is being deleted.
GPS measurement is being
performed, but no
stopwatch operation is
being performed.
GPS measurement is in
progress.
Built-in battery power is
low.
Flash memory already
contains 50 records.
There are already 100
destinations stored in
memory.
There is no data.
Distance and direction
measurements are in
progress.
The watch is asking if you
want to save data
measured by the stopwatch
to flash memory.
The GPS signal went low or
dropped during GPS
measurement.
GPS measurement was
interrupted.
Stopwatch measurement is
in progress.
GPS measurement could
not be performed for some
reason.
Timer measurement is in
progress.
City Name List
City
PPG
PPT
HNL
ANC
YVR
LAS
LAX
SFO
SAN
SEA
YEA
DEN
PHX
SJO
GUA
MEX
CHI
MSY
RBR
YTO
HAV
PTY
LIM
ATL
BOS
DTT
IND
MIA
NYC
PHL
LPB
YHZ
SCL
CCS
YYT
BUE
RIO
SAO
RAI
LPA
DUB
CAS
LIS
DKR
LON
EDI
UTC
VIE
BRU
PRG
CPH
PAR
BER
FRA
UTC
Differential
–12.00
–11.00
–10.00
–09.50
–09.00
–08.00
–07.00
–06.00
–05.00
–04.00
–03.50
–03.00
–02.00
–01.00
+00.00
+00.00
+01.00
Code
YWG
DFW
HOU
YMQ
BOG
WAS
MAO
MVD
HAM
MUC
ROM
City Name Country Name
Eniwetok Atoll
Pago Pago American Samoa
Papeete
Honolulu United States
Marquises
Anchorage United States
Vancouver Canada
Las Vegas United States
Los Angeles United States
San Francisco United States
San Diego United States
Seattle-Tacoma United States
Edmonton Canada
Denver United States
Phoenix United States
Winnipeg Canada
San Jose Costa Rica
Guatemala City Guatemala
Mexico City Mexico
Chicago United States
Dallas United States
Houston United States
New Orleans United States
Rio Blanco Brazil
Montreal Canada
Toronto Canada
Bogota Columbia
Havana Cuba
Panama Panama
Lima Peru
Washington United States
Atlanta United States
Boston United States
Detroit United States
Indianapolis United States
Miami United States
New York United States
Philadelphia United States
La Paz Bolivia
Manaus Brazil
Halifax Canada
San Diego Chile
Caracas Venezuela
St. John’s Canada
Buenos Aires Argentina
Rio de Janeiro Brazil
Sao Paulo Brazil
Montevideo Uruguay
South Georgia Islands
Praia Cape Verde
Las Palmas Canary Islands
Dublin Ireland
Casablanca Morocco
Lisbon Portugal
Dakar Senegal
London England
Edinburgh U.K. Scotland
Vienna Austria
Brussels Belgium
Prague Czech Republic
Copenhagen Denmark
Paris France
Berlin Germany
Frankfurt Germany
Hamburg Germany
Munich Germany
Rome Italy
Tahiti (French Territory)
(Spanish Territory)
DST
1
1
1
1
1
1
1
1
1
1
1
1
1
1
1
1
1
1
1
1
1
1
1
1
1
1
1
1
1
1
1
1
1
1
1
1
1
1
1
1
1
1
1
1
1
1
1
13
Page 14

City
Code
MIL
AMS
LOS
OSL
WAW
MAD
BCN
STO
ZRH
CAI
HEL
ATH
AMM
BEY
TIP
CPT
JNB
DAM
IST
JRS
BAH
ADD
BGW
NBO
KWI
DOH
MOW
JED
THR
MCT
KUF
AUH
DXB
KBL
KHI
SVX
DEL
MAA
CCU
BOM
CMB
KTM
DAC
ALA
OVB
RGN
JKT
KJA
BBK
SGN
PER
BJS
HKG
SHA
TPE
KUL
ULN
MNL
IKT
SIN
TYO
FUK
OSA
SPK
SEL
YKS
ADL
UTC
Differential
+01.00
+02.00
+03.00
+03.50
+04.00
+04.50
+05.00
+05.50
+05.75
+06.00
+06.50
+07.00
+08.00
+09.00
+09.50
Operation Guide 2886
City Name Country Name
Milan Italy
Amsterdam Holland
Lagos Nigeria
Oslo Norway
Warsaw Poland
Madrid Spain
Barcelona Spain
Stockholm Sweden
Zurich Switzerland
Cairo Egypt
Helsinki Finland
Athens Greece
Amman Jordan
Beirut Lebanon
Tripoli Libya
Cape Town South Africa
Johannesburg South Africa
Damascus Syria
Istanbul Turkey
Jerusalem
Bahrain Bahrain
Addis Ababa Ethiopia
Baghdad Iraq
Nairobi Kenya
Kuwait Kuwait
Doha Qatar
Moscow Russian Federation
Jeddah Saudi Arabia
Teheran Iran
Muscat Oman
Samara Russian Federation
Abu Dhabi Arab Emirates
Dubai Arab Emirates
Kabul Afghanistan
Karachi Pakistan
Yekaterinburg Russian Federation
Delhi India
Chennai India
Calcutta India
Mumbai India
Colombo Sri Lanka
Katmandu Nepal
Dhaka Bangladesh
Alamaty Kazakhstan
Novosibirsk Russian Federation
Yangon Myanmar
Jakarta Indonesia
Krasnoyarsk Russian Federation
Bangkok Thailand
Ho Chi Minh Vietnam
Perth Australia
Beijing
Hong Kong
Shanghai
Taipei Taiwan
Kuala Lumpur Malaysia
Ulaanbaatar Mongolia
Manila Philippines
Irukutsk Russian Federation
Singapore Singapore
Tokyo Japan
Fukuoka Japan
Osaka Japan
Sapporo Japan
Seoul Republic of Korea
Yakutsk Russian Federation
Adelaide Australia
People’s Republic of China
People’s Republic of China
People’s Republic of China
DST
1
1
1
1
1
1
1
1
1
1
1
1
1
1
1
1
1
1
1
1
1
1
1
1
1
1
1
City
Code
MEL
SYD
GUM
VVO
NOU
GDX
WLG
AKL
DYR
TBU
UTC
Differential
+10.00
+10.50
+11.00
+11.50
+12.00
+12.75
+13.00
+14.00
City Name Country Name
Melbourne Australia
Sydney Australia
Guam Guam (U.S. Territory)
Vladivostok Russian Federation
Lord Howe Island (Australia)
Noumea
Magadan Russian Federation
Norfolk Island
Wellington New Zealand
Auckland New Zealand
Anadyr Russian Federation
Chatham Island
(New Zealand)
Nuku’alofa Tonga
Republic of Kiribati
*1
Caledonia (French Territory)
DST
30
minutes
*1 Summer time in Lord Howe Island advances the time by 30 minutes.
•
Based on data as of June 2006.
•
Time differentials in the above table are in accordance with Universal
Coordinated Time (UTC).
1
1
1
1
1
1
1
1
14
 Loading...