

Page 1
1917-1
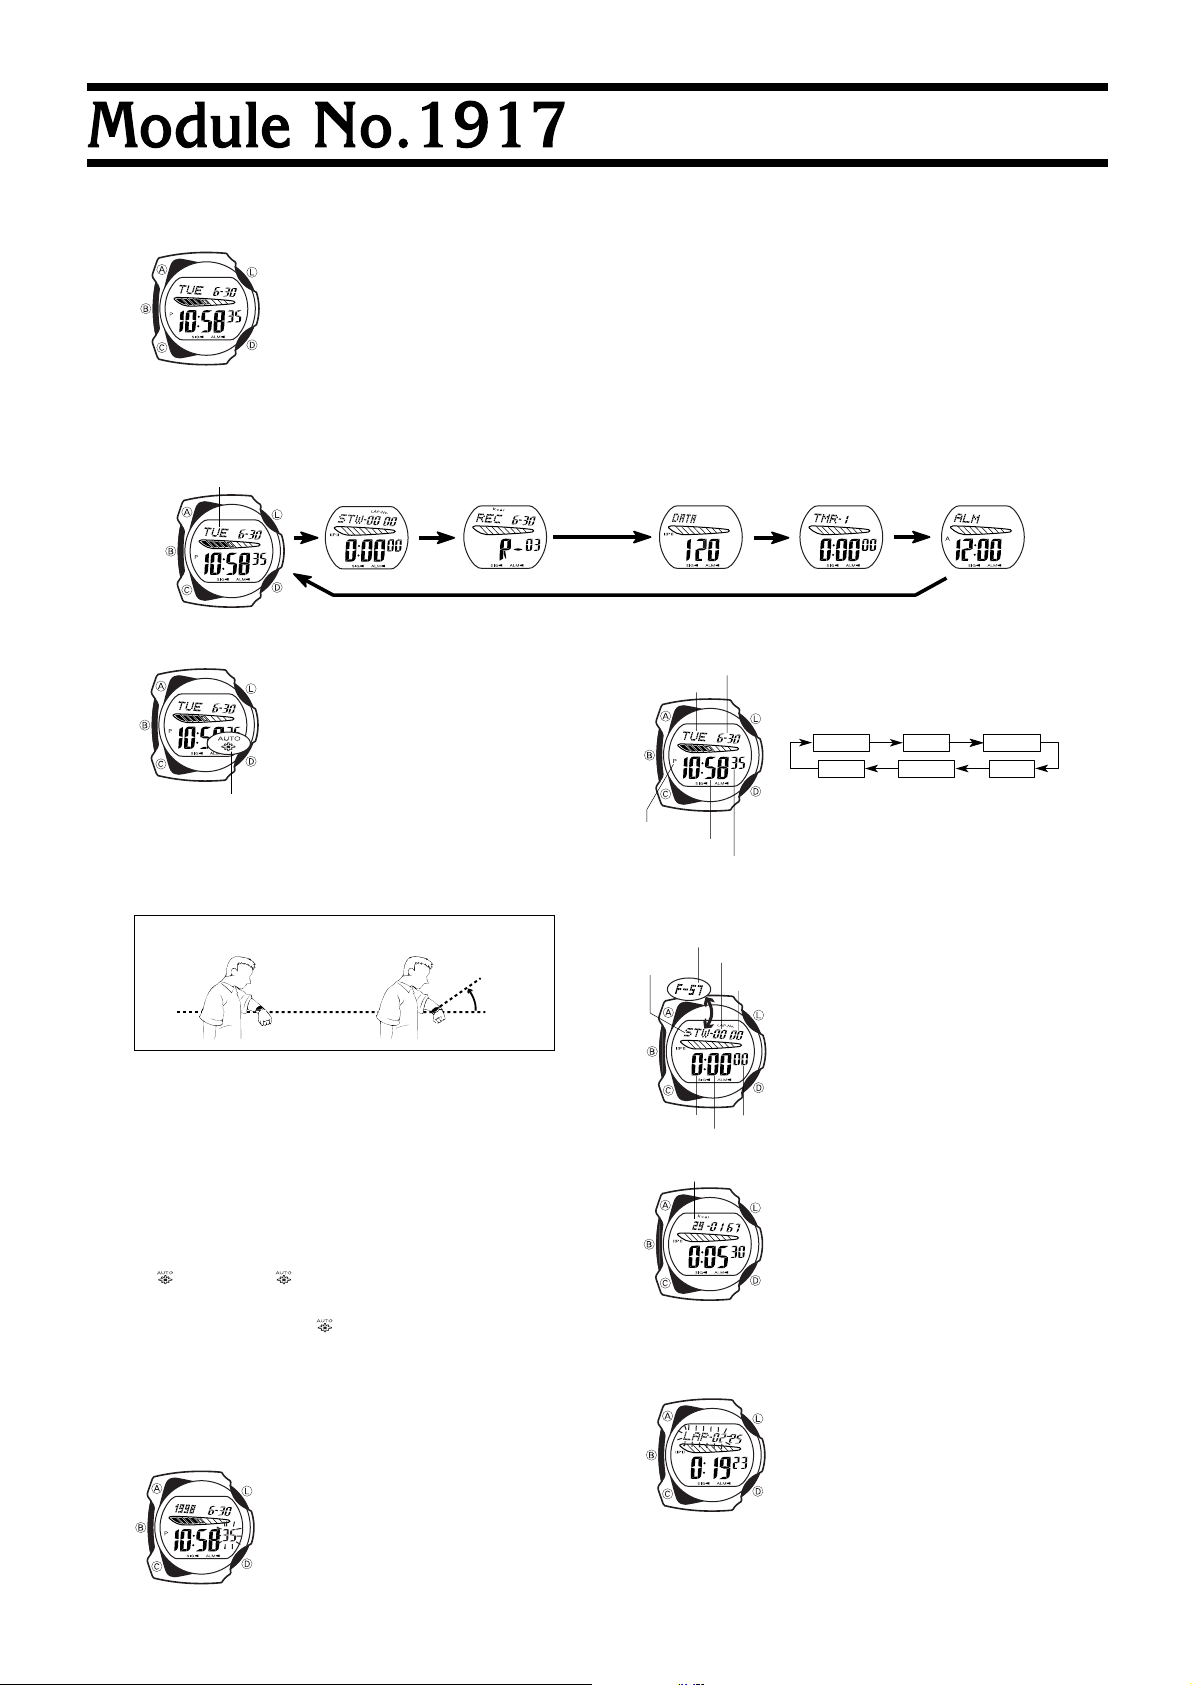
• Button operations are indicated using the letters shown in the illustration.
• Each section of this User’s Guide provides you with the information you need to perform operations in each mode. Further details and technical information
can be found in the “REFERENCE” section.
GENERAL GUIDE
BB
• Press
B to change from mode to mode.
BB
• The animation area shows different animated characters and figures, depending on the mode and the operation being performed.
Timekeeping Mode Exercise Stopwatch Mode Recall Mode Basic Data Input Mode Countdown Alarm Mode Alarm Mode
Animation area
(Light)
ABOUT THIS USER’S GUIDE
BACKLIGHT
The backlight uses an EL (electro-luminescent) panel that
causes the entire display to glow for easy reading in the
dark. The watch’s auto light switch automatically turns on
the backlight when you angle the watch towards your face.
• The auto light switch must be turned on (indicated by
the auto light switch on indicator) for it to operate.
• See “Backlight Precautions” for other important information about using the backlight.
Turning on the Backlight manually
Auto light switch on
indicator
About the Auto Light Switch
Turning on the auto light switch causes the backlight to turn on for about one second,
whenever you position your wrist as described below in any mode.
Moving the watch to a position that is parallel to the ground and then tilting it
towards you more than 40 degrees causes the backlight to light.
Warning!
• Never try to read your watch when mountain climbing or hiking in areas that
are dark or in areas with poor footing. Doing so is dangerous and can result
in serious personal injury.
• Never try to read your watch when running where there is danger of acci-
dents, especially in locations where there might be vehicular or pedestrian
traffic. Doing so is dangerous and can result in serious personal injury.
• Never try to read your watch when riding on a bicycle or when operating a
motorcycle or any other motor vehicle. Doing so is dangerous and can result
in a traffic accident and serious personal injury.
• When you are wearing the watch, make sure that its auto light switch is turned
off before riding on a bicycle or operating a motorcycle or any other motor
vehicle. Sudden and unintended operation of the auto light switch can create a
distraction, which can result in a traffic accident and serious personal injury.
To turn the auto light switch on and off
In the Timekeeping Mode, hold down
displayed) and off ( not displayed).
on (
• In order to protect against running down the battery, the auto light switch is automatically turned off approximately six hours after you turn it on. Repeat the above
procedure to turn the auto light switch back on if you want.
• The auto light switch on indicator (
light switch is turned on.
In any mode, press
one second.
• In the Timekeeping Mode, pressing
light and causes a animation to play.
• The above operation turns on the backlight regardless
of the current auto light switch setting.
Parallel to
ground
LL
L to illuminate the display for about
LL
L L
L lights the back-
L L
More than
40
°
AA
A for one second to turn the auto light switch
AA
) is on the display in all modes while the auto
TIMEKEEPING MODE
In addition to normal timekeeping, use the Timekeeping Mode to set the current time
and date.
Calibrating the Seconds Count
Use the following procedure to calibrate the seconds count
on a time signal from a radio, TV, or other source.
1. In the Timekeeping Mode, hold down
onds digits start to flash on the display.
CC
2.Press
C to set the seconds count to 00 when the time
CC
signal you are calibrating to sounds.
CC
• Pressing
C while the seconds count is in the range of
CC
30 to 59 resets the seconds to 00 and adds 1 to the
minutes. If the seconds count is in the range of 00 to 29,
the minutes count is unchanged.
DD
3.Press
D to return to the current time display.
DD
DD
D until the sec-
DD
Setting the Current Time and Date
Month – Day
Day of week
PM indicator
Hour : Minutes
Seconds
1. In the Timekeeping Mode, hold down
onds digits start to flash on the display.
• The seconds digits are flashing because they are
lected
.
BB
2. Press
B to move the flashing in the sequence shown
BB
below to select other digits and settings.
Seconds
Day
3. While hour, minutes, year, month, or day is selected
(flashing), press
crease it.
4.After the time and date are set the way you want them,
DD
press
D to return to the current time screen.
DD
• The day of the week is automatically displayed in accor-
dance with the month and day setting.
Hour Minutes
CC
C to increase the setting or
CC
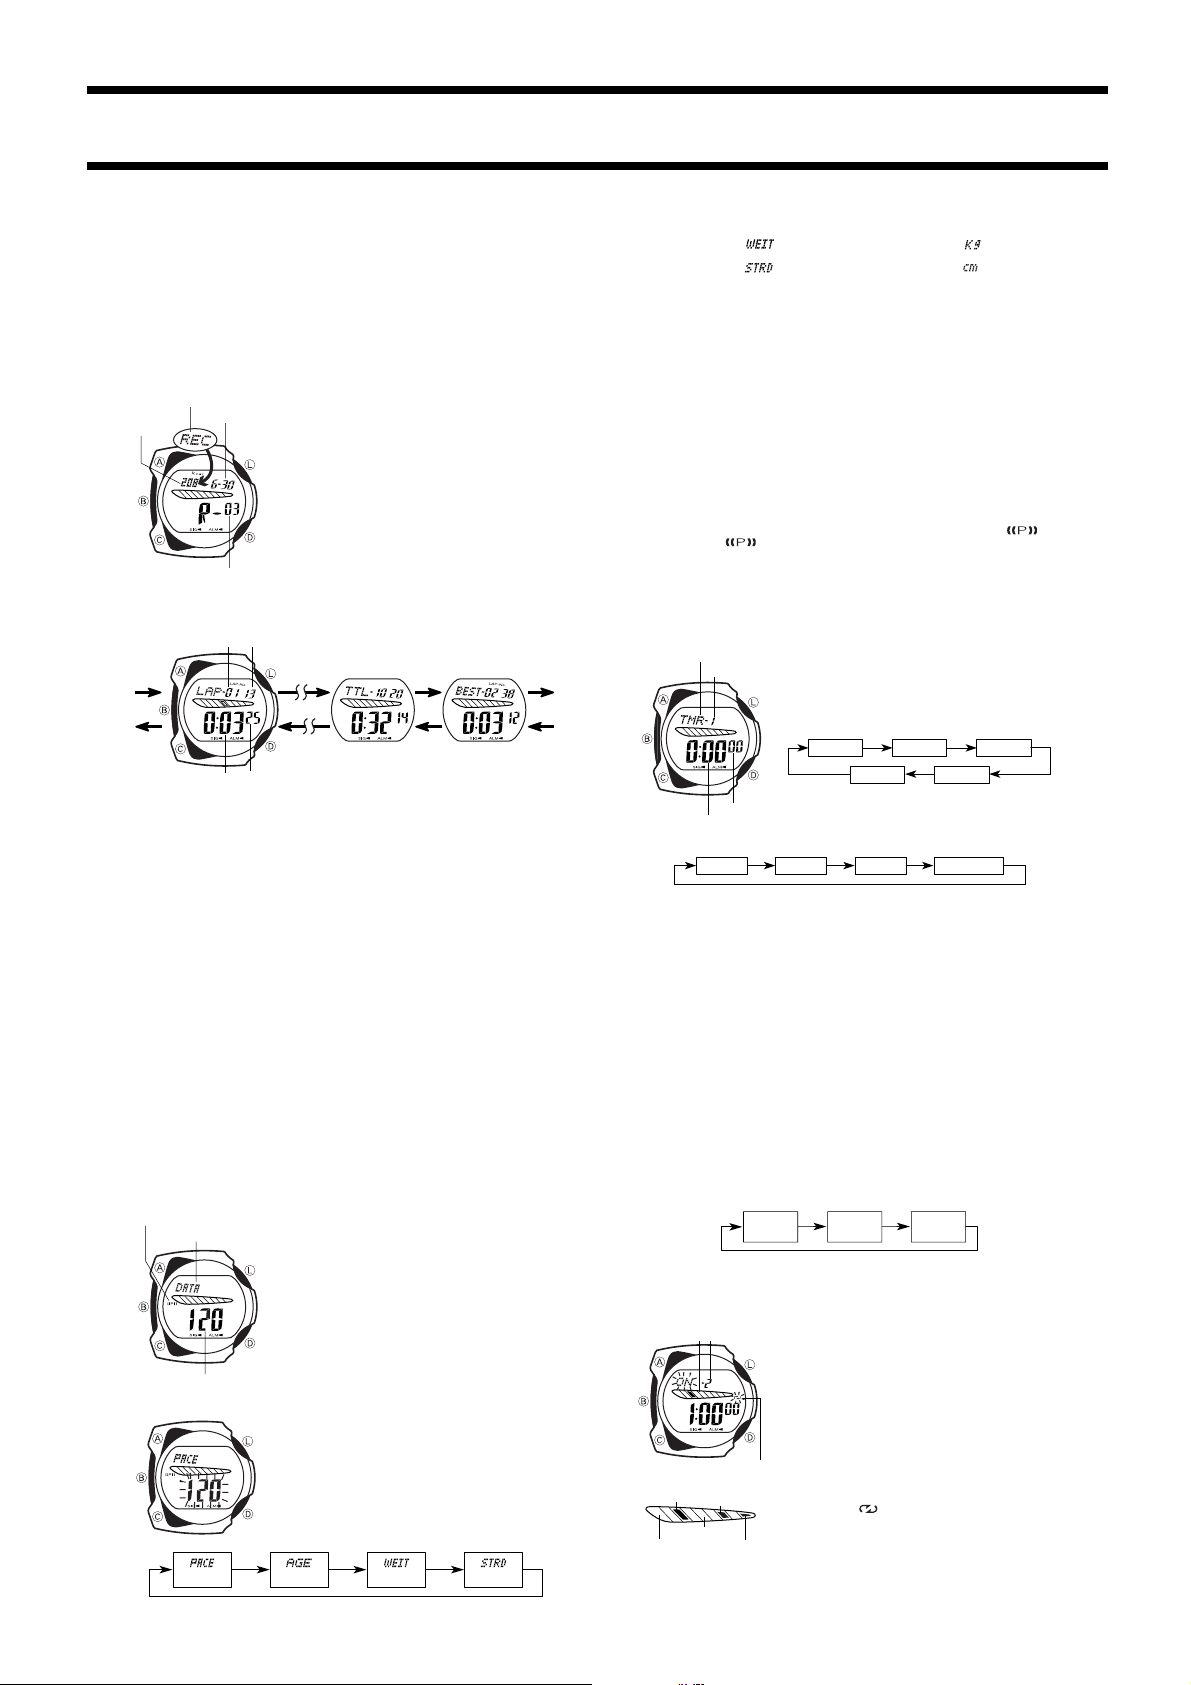
EXERCISE STOPWATCH MODE
Remaining memory
Hours
Lap/Split No.
Minutes
Mode
indicator
Measuring Elapsed Time
Calories burned
CC
• Pressing
C while the stopwatch is stopped and a time is on the display clears the
CC
stopwatch to all zeros. Note that you must press
zeros before you can perform certain stopwatch operations.
• When the stopwatch is cleared, the upper part of the display periodically changes
between the mode indicator and remaining memory value.
Recording Lap or Split Times
AA
4.Press
A to stop the time measurement.
AA
• About seven seconds after you press
showing the number of calories burned appears on the display.
5.After the number of calories burned value appears, press
to all zeros.
• The data is stored as lap or split times depending on the last operation you perform.
If you measure a lap time and then a split time, all the lap/split times stored in
memory are shown as split times in the Recall Mode.
The Exercise Stopwatch Mode provides you with a 1/100second stopwatch for measuring elapsed time and lap/
split times. Elapsed time measured in the Exercise Stopwatch Mode is used in combination with data you input in
1/100
the Basic Data Input Mode to calculate the number of cal-
second
ories you burn while jogging or running.
• Whenever you perform a stopwatch time measurement
operation, the date, elapsed time, and calories burned
are automatically stored in memory. Data in memory can
be viewed using the Recall Mode.
Seconds
1. In the Exercise Stopwatch Mode, press
stopwatch.
AA
2. Press
A to stop the stopwatch.
AA
• You can resume the measurement operation by press-
AA
ing
A again.
AA
CC
3.Press
C to clear the stopwatch to all zeros.
CC
Stopping and Clearing the Stopwatch
AA
• Pressing
A while the stopwatch is running stops it and
AA
leaves the measured time on the display. Pressing
this time resumes the stopwatch operation, starting from
the displayed time.
CC
C to clear the stopwatch to all
CC
AA
1.Press
A to start the stopwatch.
AA
CC
2.Press
C to display the timing up to that point. Stop-
CC
watch timing continues internally.
• When you press
display for about seven seconds. Then the screen automatically changes back to the stopwatch (elapsed time)
screen.
• Holding down
play to change between the lap time (
and split time (
3.You can repeat step 2 as many times as you want.
CC
C, the lap (or split) time remain on the
CC
DD
D for about one second causes the dis-
DD
displayed).
SPL
AA
A to stop the time measurement, a value
AA
DD
D until the sec-
DD
YearMonth
AA
A to de-
AA
AA
A to start the
AA
AA
A at
AA
displayed)
LAP
CC
C to clear the stopwatch
CC
se-
Page 2
1917-2
How the Watch Counts Calories
• The watch calculates the number of calories you consume using the elapsed time
measured in the Exercise Stopwatch Mode and the age, weight and other data you
input in the Basic Data Input Mode. The calorie calculations made by this watch will
not be correct unless you input your own personal basic data.
• The watch also sounds a pacer signal to that you should use as a reference to
control the intensity of your workouts. See “About the Pacer Signal” for details.
• The calorie value on the display is updated every 30 seconds while a stopwatch
operation is in progress.
RECALL MODE
Mode indicator
Carories
burned
[Run Number Screen]
• Note that there can be multiple lap/split time screens.
• If you did not measure any lap/split times, only the run number screen and total
• The run number screen appears between the best lap screen and the screen for
• The total time screen shows the total amount of elapsed time.
• Best lap time screen shows the fastest lap among those recorded under the current
• Pressing
Deleting Stopwatch Data
You can delete the data stored under a specific run number, or all data stored under
all run numbers. Note the following important rules about deleting data.
Important!
• Performing a lap or split time operation in the Exercise Stopwatch Mode stores the
• You cannot delete all stopwatch data while the stopwatch is running in the Exercise
• If the stopwatch is running, enter the Exercise Stopwatch Mode and then press
To delete data under a specific run number
1.In the Recall Mode, display the run number whose data you want to delete.
2.Hold down
To delete all data under all run numbers
1.In the Recall Mode, display any run number.
2.Hold down
Month – Day
Run number
[Lap/Split Time]
Lap/Split No.
time screen appear when you press
lap screen do not appear.
lap/split time 1.
run number.
DD
D while viewing the data under a run number jumps to the next lower run
DD
number.
data in memory immediately, even if the stopwatch is still running. Note that you
cannot delete a run number for which a stopwatch operation is still being performed.
Stopwatch Mode. Also, the screen in the Exercise Stopwatch Mode must show all
zeros.
to stop it. Press
AA
A and
AA
AA
A and
AA
The Recall Mode is used to recall and delete data that is
stored by Exercise Stopwatch Mode operations.
• Data is assigned a run number when it is stored in memory. The oldest data is run number 01 data.
• Whenever you enter the Recall Mode, the newest (highest run number) data appears first.
Recalling Stopwatch Data
1.In the Recall Mode, press
bers until the one whose data you want to view is on
the display.
AA
2.Use
1/100 second
SecondsHours : Minutes
CC
C to clear the Exercise Stopwatch Mode display to all zeros.
CC
CC
C until the message
CC
CC
C until the message
CC
CC
A or
C to scroll through the different time data
AA
CC
available for the run number you selected.
[Total Time]
CC
Press
C.
CC
AA
Press
A.
AA
AA
A or
AA
CLR
CLR
DD
D to scroll through run num-
DD
[Best Lap Time]
CC
C. The lap/split time screens and best
CC
appears and the watch beeps.
ALL appears and the watch beeps.
BASIC DATA INPUT MODE
Pacer signal on indicator
Mode indicator
Pacer value
Inputting Basic Data
Pacer value
The Basic Data Input Mode is for inputting your weight,
age, and stride length that the Exercise Stopwatch Mode
uses for calculating the number of calories you burn while
jogging or running. You can also turn the pacer that controls the intensity of your workouts on and off.
• See “Basic Data” for full explanation of basic data contents.
• You cannot input basic data while the stopwatch is running in the Exercise Stopwatch Mode.
• If the stopwatch is running, enter the Exercise Stopwatch
Mode and then press
1. In the Basic Data Input Mode, hold down
pacer value starts to flash on the display.
• The pacer value is flashing because it is
• This operation automatically turns on the pacer signal.
BB
2.Press
B to move the flashing in the sequence shown
BB
below to select other settings.
• The top lines in the sequence show the on-screen indicator for each setting.
AA
A to stop it.
AA
WeightAge
DD
D until the
DD
selected
Stride
.
• While the weight setting is selected, the upper part of the display periodically alternates between the
• While the stride setting is selected, the upper part of the display periodically alternates between the
3.While the pacer value, age, weight, or stride setting is selected (flashing), press
to increase the setting or
• Changing the pacer value (see “About the Pacer Signal”) causes the pacer signal
to sound at the speed set by the pacer value for 15 seconds.
4. After the basic data is the way you want it, press
Data Input Mode screen.
About the Pacer Signal
The pacer signal is a beeper that helps you to maintain a specific level of intensity
during your workouts. You can control the speed of the pacer signal by setting the
pacer value.
• The pacer signal sounds in the Exercise Stopwatch Mode and Basic Data Input
Mode only.
• Starting the stopwatch in the Exercise Stopwatch Mode while the pacer signal is on
causes the pacer signal to sound for the first 15 seconds of each minute for the first
30 minutes.
• If you stop the stopwatch (by pressing
tion (by pressing
sumed stopwatch operation.
To turn pacer signal on and off
In the Basic Data Input Mode, press
played) and off (
To test the pacer signal
In the Basic Data Input Mode, press
can stop the pacer signal by pressing any button.
indicator and the unit of the setting ( ).
indicator and the unit of the setting ( ).
AA
A to decrease it.
AA
DD
D to return to the initial Basic
DD
AA
A) and then resume the stopwatch opera-
AA
A), the pacer signal sounds for the first 15 seconds of the re-
AA
not displayed).
AA
AA
A to toggle the pacer signal on (
AA
CC
C to sound the pacer signal for 15 seconds. You
CC
dis-
CC
C
CC
COUNTDOWN ALARM MODE
Mode indicator
• See “About Auto-Repeat” for details on setting up the Auto-Repeat function.
4. While hours, minutes, or seconds digits are selected (flashing), press
• The seconds setting change in 10-second increments.
• To set the starting value of the countdown time to 24 hours, set 0:00 00.
5. After the countdown time is the way you want it, press
Using a Countdown Timer
1.
2.Press
• When the end of the countdown is reached and Auto-Repeat is turned off, an alarm
AA
A
AA
sounds for 10 seconds or until you stop the alarm by pressing any button. The
countdown time is automatically reset to its starting value after the alarm stops.
• Press
resume the countdown.
• To completely stop a countdown operation, first pause it (by pressing
press
About Auto-Repeat
All of the timers for which Auto-Repeat is turned on operate in succession when a
timer operation is started. This means you can set up an interval routine that is tailored to your own specific training needs.
• The following example shows how timing would be performed when Auto-Repeat is
turned on for Timers 2, 4, and 5. This loop would be repeated endlessly until you
stop it.
• If Auto-Repeat is turned on for only one timer, that timer’s operation is repeated
until you stop it.
• The watch beeps for two seconds when the end of a countdown is reached while
Auto-Repeat is turned on.
To turn Auto-Repeat on and off
Graphic area
Timer 2 (on)
Timer 1 (off)
Timer No.
Hours : Minutes
Hours
crease the setting or
Countdown Alarm Mode screen.
In the Countdown Alarm Mode, press
AA
A to start the countdown timer.
AA
AA
A while a countdown operation is in progress to pause it. Press
AA
CC
C. This returns the countdown time to its starting value.
CC
Timer No.
Auto-repeat on indicator
[Graphic Area]
Timer 4 (on)
Timer 3 (off)
You can set up to five countdown times in the Countdown
Alarm Mode. Times can be used individually, or in series.
An alarm sounds when the countdown reaches zero.
Setting a Countdown Time
1.
In the Countdown Alarm Mode, use
whose time you want to set
Timer 1
Timer 5
2. Hold down
Seconds
•
The hours digits are flashing because they are
3.Press
Minutes
AA
A to decrease them.
AA
Timer 2
(1 hr.)
1. In the Countdown Alarm Mode, press
2. Hold down
3.Press
• Auto-Repeat on/off setting is selected when the ON or
OFF
4.Press
5. After the Auto-Repeat function is the way you want it,
• The Auto-Repeat on/off status of each timer is indicated
in the graphic area of the Countdown Alarm Mode.
• The indicator (
Repeat is turned on.
Timer 5 (on)
DD
D until the hours digits of the countdown
DD
time start to flash on the display.
BB
B to move the flashing in the sequence shown
BB
below to select other settings.
CC
C
to select the timer whose time you want to use.
CC
Timer 4
(10 min.)
timer whose time you want to use.
DD
D until the hours digits of the countdown
DD
time start to flash on the display.
BB
B three times to select Auto-Repeat on/off set-
BB
ting.
setting is flashing.
AA
CC
A or
C to turn Auto-Repeat on (ON) and off
AA
(
press
screen.
CC
).
OFF
DD
D to return to the initial Countdown Alarm Mode
DD
.
Timer 2
Seconds
Timer 5
(15 min.)
) on the display indicates that Auto-
CC
C
to select the timer
CC
Timer 3
Timer 4
selected
Auto-Repeat
CC
C to in-
CC
DD
D to return to the initial
DD
AA
A again to
AA
AA
A), and then
AA
CC
C to select the
CC
.
Page 3

1917-3
ALARM MODE
AM indicator
Mode indicator
Hourly time signal on
indicator
Alarm on indicator
3.While hour or minutes is selected (flashing), press
to decrease it.
• When setting the alarm time using the 12-hour format, take care to set the time
correctly as a.m. (A indicator) or p.m. (P indicator).
4. After the alarm time is the way you want it, press
Mode screen.
Daily Alarm Operation
The alarm sounds at the preset time each day for about 20 seconds, or until you stop
it by pressing any button.
To test the alarm
CC
Hold down
C to sound the alarm.
CC
Turning the Daily Alarm and Hourly Time Signal on and off
In the Alarm Mode, press
[Hourly Time Signal On Indicator/Alarm On Indicator]
Signal On
Alarm On
You can set a Daily Alarm that sounds at the same time
each day, while it is turned on. You can also turn on an
Hour :
Minutes
Hourly Time Signal that causes the watch to beep twice
every hour on the hour.
Setting the Daily Alarm
1.In the Alarm Mode, hold down
the alarm time start to flash on the display.
• The hour digits are flashing because they are
• This operation automatically turns on the Daily Alarm.
BB
2.Press
B to move the flashing in the sequence shown
BB
below to select other digits.
Hour Minutes
AA
A to cycle through the on and off settings as shown below.
AA
Signal Off
Alarm Off
Signal Off
Alarm On
DD
D until the hour digits of
DD
CC
C to increase the setting or
CC
DD
D to return to the initial Alarm
DD
Signal On
Alarm Off
selected
REFERENCE
This section contains more detailed and technical information about watch operation.
It also contains important precautions and notes about the various features and functions of this watch.
Animated Figures
Animation area
Auto Return Operations
• If you leave a screen with flashing digits on the display for two or three minutes
without performing any operation, the watch automatically saves anything you have
input up to that point and exits the setting screen.
• After you perform an operation in any mode (except for the Exercise Stopwatch
Mode), pressing
Data and Setting Scrolling
AA
CC
The
A and
C buttons are used in various modes and screens to scroll through data
AA
CC
on the display. In most cases, holding down these buttons during a scroll operation
scrolls through the data at high speed.
12-hour/24-hour Timekeeping Formats
The 12-hour/24-hour timekeeping format you select in the Timekeeping Mode is also
applied in the Alarm Mode.
Timekeeping Mode Notes
• In the Timekeeping Mode (except when making setting), press
tween the 12-hour and 24-hour formats.
• With the 12-hour format, the P (PM) indicator appears to the left of the hour digits
for times in the range of noon to 11:59 pm and the A (AM) indicator appears to the
left of the hour digits for times in the range of midnight to 11:59 am.
• With the 24-hour format, times are indicated in the range of 00:00 to 23:59, without
any indicator.
• The year can be set in the range of 1995 to 2039.
• The watch’s built-in full automatic calendar automatically make allowances for dif-
ferent month lengths and leap years. Once you set the date, there should be no
reason to change it except after the replacement of the watch’s battery.
Backlight Precautions
• The electro-luminescent (EL) panel loses illuminating power after very long use.
• The illumination provided by the backlight may be hard to see when viewed under
direct sunlight.
• The watch will emit an audible sound whenever the display is illuminated. It does
not indicate malfunction of the watch.
• The backlight automatically turns off whenever an alarm sounds.
• Normally the backlight lights when you press the
watch Mode, pressing
second.
The animation area of the display shows animated figures when you preform certain button operations.
• In the Timekeeping Mode, the animation area normally
shows the day of the week. Different animated figures
appear at 00, 20, and 40 seconds.
BB
B returns to the Timekeeping Mode.
BB
LL
L button. In the Exercise Stop-
AA
CC
A or
C also causes the backlight to light for about one
AA
CC
LL
CC
C to switch be-
CC
Auto light switch precautions
• Avoid wearing the watch on the inside of your wrist. Doing so causes the auto light
switch to operate when it is not needed, which shortens battery life.
• The backlight turns off in about one second, even if you keep the watch pointed
towards your face.
• The backlight may not light if the face of the watch is more than 15 degrees off the
parallel as shown below. Make sure that the back of your hand is parallel to the
ground.
Parallel to ground
.
• Static electricity or magnetic force can interfere with proper operation of the auto
AA
A
AA
light switch. If the backlight does not light, try moving the watch back to the starting
position (parallel with the ground) and then tilt it back toward you again. If this does
not work, drop your arm all the way down so it hangs at your side, and then bring it
back up again.
• Under certain conditions the backlight may not light until about one second or less
after turn the face of the watch towards you. This does not necessarily indicate
malfunction of the backlight.
Exercise Stopwatch Mode Precautions
• The values for the number of calories burned produced by this watch include both
calories normally burned through normal metabolism and rest and extra calories
burned by jogging or running.
• This watch is set up to calculate calories burned by women while jogging. Men
should increase the values produced by this watch by 5%.
• You can use the lap time measurement to time how long it takes to complete a
specific portion (such as a single lap) of a race.
• You can use split time measurement to time how long it takes to get from the start
to a specific point in a race.
• Whenever a lap time or split time is on the display in the Exercise Stopwatch Mode,
the graphic area shows the difference between the current and last lap.
Animation area
• While the stopwatch is running, the animation are shows either a pig ( ), a
leopard (
Exercise Stopwatch Mode memory management
• Measuring time with the stopwatch causes the date, elapsed time, and calories
burned to be stored under a run number. If you measured lap and split times, they
are also stored, along with a best lap time.
• This watch has enough memory to store up to 60 records. Date, run number, and
calories burned take up one record. Each time (elapsed time, lap time, split time,
best lap) takes up one record. The following shows some examples of how memory
can be used, but other combinations are also possible.
(plus date, run number, calories, best time)
• When memory becomes full, the next stopwatch measurement operation automatically deletes the oldest record number to make room for the new data. Note that
data is deleted in record number units, so all split/lap times under the run number
are deleted.
• The lap/split number flashes on the display when an ongoing stopwatch operation
causes memory to become full.
Basic Data
The term
age, and stride length.
• Be sure to update basic data values whenever the person using the watch changes.
Pacer Value
The speed of the pacer signal is determined by the pacer value, which is the number
of beats per minute. You can set the pacer value in increments of 5, in the range of
100 to 200.
Age
You can set the age value in 1-year increments in the range from 13 to 19 years. In
the range from 20 to 70, you can set the age value in 10-year increments.
Weight
You can set your current weight value in increments of 1 kg, in the range of 30 to 150
kg. Those lighter than 30 kg should use the minimum setting, while those heavier
than 150 kg should use the maximum setting.
Stride Length
You can set stride length values in increment of 5 cm, in the range of 40 to 190 cm.
The following examples illustrate how you can calculate values for these setting.
• 239 steps required to jog around a 300-meter track.
300 (meters)
• 25 steps required to run the length of a tennis court (23.77 meters).
23.77 (meters)
), or a person ( ), depending on the number of calories burned.
Data Configuration
Elapsed time only
(plus date, run number, calories)
58 lap or split times
basic data
÷
239 (steps) = 1.255 (approximately 126 cm)
÷
25 (steps) = 0.9508 (approximately 95 cm)
More than 15 degrees
too high
Graphic area
More than 60 seconds
refers to information about pacer value, your current weight,
More than 15 degrees
too low
Plus Minus
30 to 59
1 to 9 1 to 9
10 to 29 10 to 29
Maximum Number of
Measurements
(seconds)
30 to 59
More than 60 seconds
30
1
 Loading...