

Page 1
Module No. 1887
1887-1
TOUCH SCREEN PRECAUTIONS
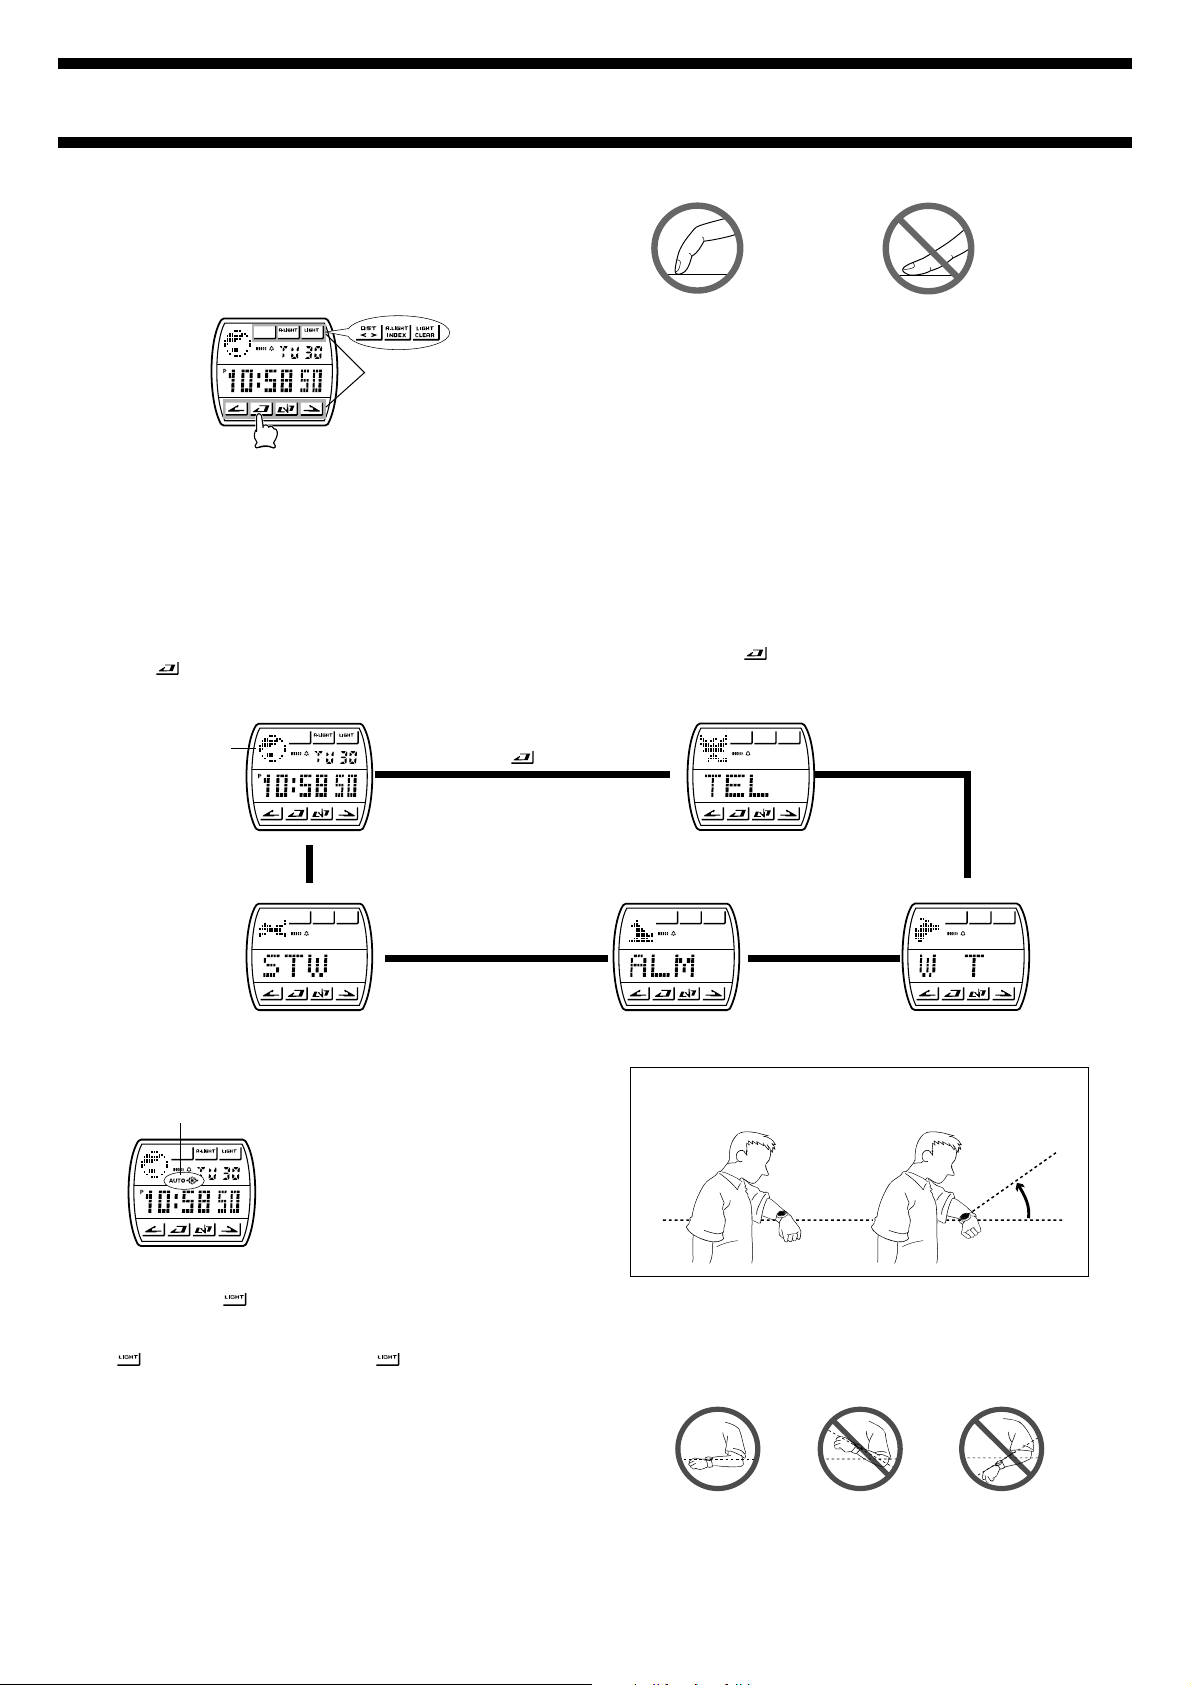
The touch screen of this watch shows a button menu that lets you select the
function you want by simply pressing the correct on-screen button with your
finger.
• The button menu shows only the functions that are currently available in
the mode you are in. Buttons for unavailable functions are not displayed.
Buttons
• Take care that you touch the part of the touch screen that contains the
button whose function you want to perform.
• The following illustrations show the correct way to press an on-screen
button.
GENERAL GUIDE
• If the digital display of your watch is continually changing, see
“AUTO DISPLAY FUNCTION” for information on how to stop it.
• Press
to change from mode to mode.
Timekeeping Mode Telememo Mode
Animation area
Press
Correct
Press straight down
on the screen with
your fingertip.
Incorrect
Finger at an
angle pressing
too strongly.
Important!
• Never press the touch screen with a sharp object, which can damage the
screen. Use your finger only.
• The touch screen is installed on top of the glass. This type of construction
may produce a rainbow effect on the display. The appearance of such
phenomenon does not indicate any problem and there is no need for
concern.
• You may experience problems with touch screen operation if the watch is
left for a long time in an area subjected to temperatures above 60°C
(140°F).
• This watch is not water resistant, so avoid high humidity and direct contact
with water. Also, do not wear the watch during activities that may cause
you to sweat a lot.
• The touch screen becomes convex at high temperatures and high altitudes.
This watch can still be used normally, and the screen will become flat again
when the temperature or altitude return to normal.
• After you perform an operation (except for backlight operation) in any
mode, pressing
• The animation area shows different animated characters and graphics,
depending on the mode and the operation being performed.
returns to the Timekeeping Mode.
▼
▼
Stopwatch Mode Alarm Mode World Time Mode
▼
BACKLIGHT
Auto light switch on
indicator
Turning on the backlight manually
In any mode, press to illuminate the display for about two seconds.
• The above operation turns on the backlight regardless of the current auto
light switch setting.
• The backlight remains lit for about two seconds from the point you press
, even if it is already lit when you press . If you keep depressed for
five seconds, the backlight will automatically turn off.
About the Auto Light Switch
Turning on the auto light switch causes the backlight to turn on whenever you
position your wrist as described below.
• Avoid wearing the watch on the inside of your wrist. Doing so causes the
auto light switch to operate when it is not needed, which shortens battery
life.
The backlight uses an EL (electro-luminescent)
panel that causes the entire display to glow for
easy reading in the dark. The watch’s auto
light switch automatically turns on the backlight
when you angle the watch towards your face.
• The auto light switch must be turned on
(indicated by the auto light switch on
indicator) for it to operate.
▼
▼
Moving the watch to a position that is parallel to the ground and then tilting
it towards you more than 40 degrees causes the backlight to light.
Parallel to
ground
• The backlight turns off in about two seconds, even if you keep the watch
pointed towards your face.
• The backlight may not light if the face of the watch is more than 15 degrees
off the parallel as shown below. Make sure that the back of your hand is
parallel to the ground.
Parallel to ground
• Static electricity or magnetic force can interfere with proper operation of
the auto light switch. If the backlight does not light, try moving the watch
back to the starting position (parallel with the ground) and then tilt it back
toward you again. If this does not work, drop your arm all the way down so
it hangs at your side, and then bring it back up again.
• Under certain conditions the backlight may not light until about one second
or less after turn the face of the watch towards you. This does not
necessarily indicate malfunction of the backlight.
More than 15 degrees
too high
More than 15 degrees
too low
More
than 40
°
Page 2
1887-2
Warning!
• Never try to read your watch when mountain climbing or hiking in
areas that are dark or in areas with poor footing. Doing so is dangerous
and can result in serious personal injury.
• Never try to read your watch when running where there is danger of
accidents, especially in locations where there might be vehicular or
pedestrian traffic. Doing so is dangerous and can result in serious
personal injury.
• Never try to read your watch when riding on a bicycle or when
operating a motorcycle or any other motor vehicle. Doing so is
dangerous and can result in a traffic accident and serious personal
injury.
• When you are wearing the watch, make sure that its auto light switch
is turned off before riding on a bicycle or operating a motorcycle or
any other motor vehicle. Sudden and unintended operation of the
auto light switch can create a distraction, which can result in a traffic
accident and serious personal injury.
To turn the auto light switch on and off
In the Timekeeping Mode, hold down for two seconds to turn the auto
light switch on (
• In order to protect against running down the battery, the auto light switch is
automatically turned off approximately three hours after you turn it on.
Repeat the above procedure to turn the auto light switch back on if you
want.
• The
is turned on.
displayed) and off ( not displayed).
indictor is on the display in all modes while the auto light switch
Backlight Precautions
• The electro-luminescent panel loses illuminating power after very long
use.
• The illumination provided by the backlight may be hard to see when viewed
under direct sunlight.
• The watch will emit an audible sound whenever the display is illuminated.
This is caused by a transformer that vibrates when the EL panel lights up.
It does not indicate malfunction of the watch.
• The backlight automatically turns off whenever an alarm sounds.
• Turning on the backlight in the Timekeeping Mode causes animated
figures to appear on the display.
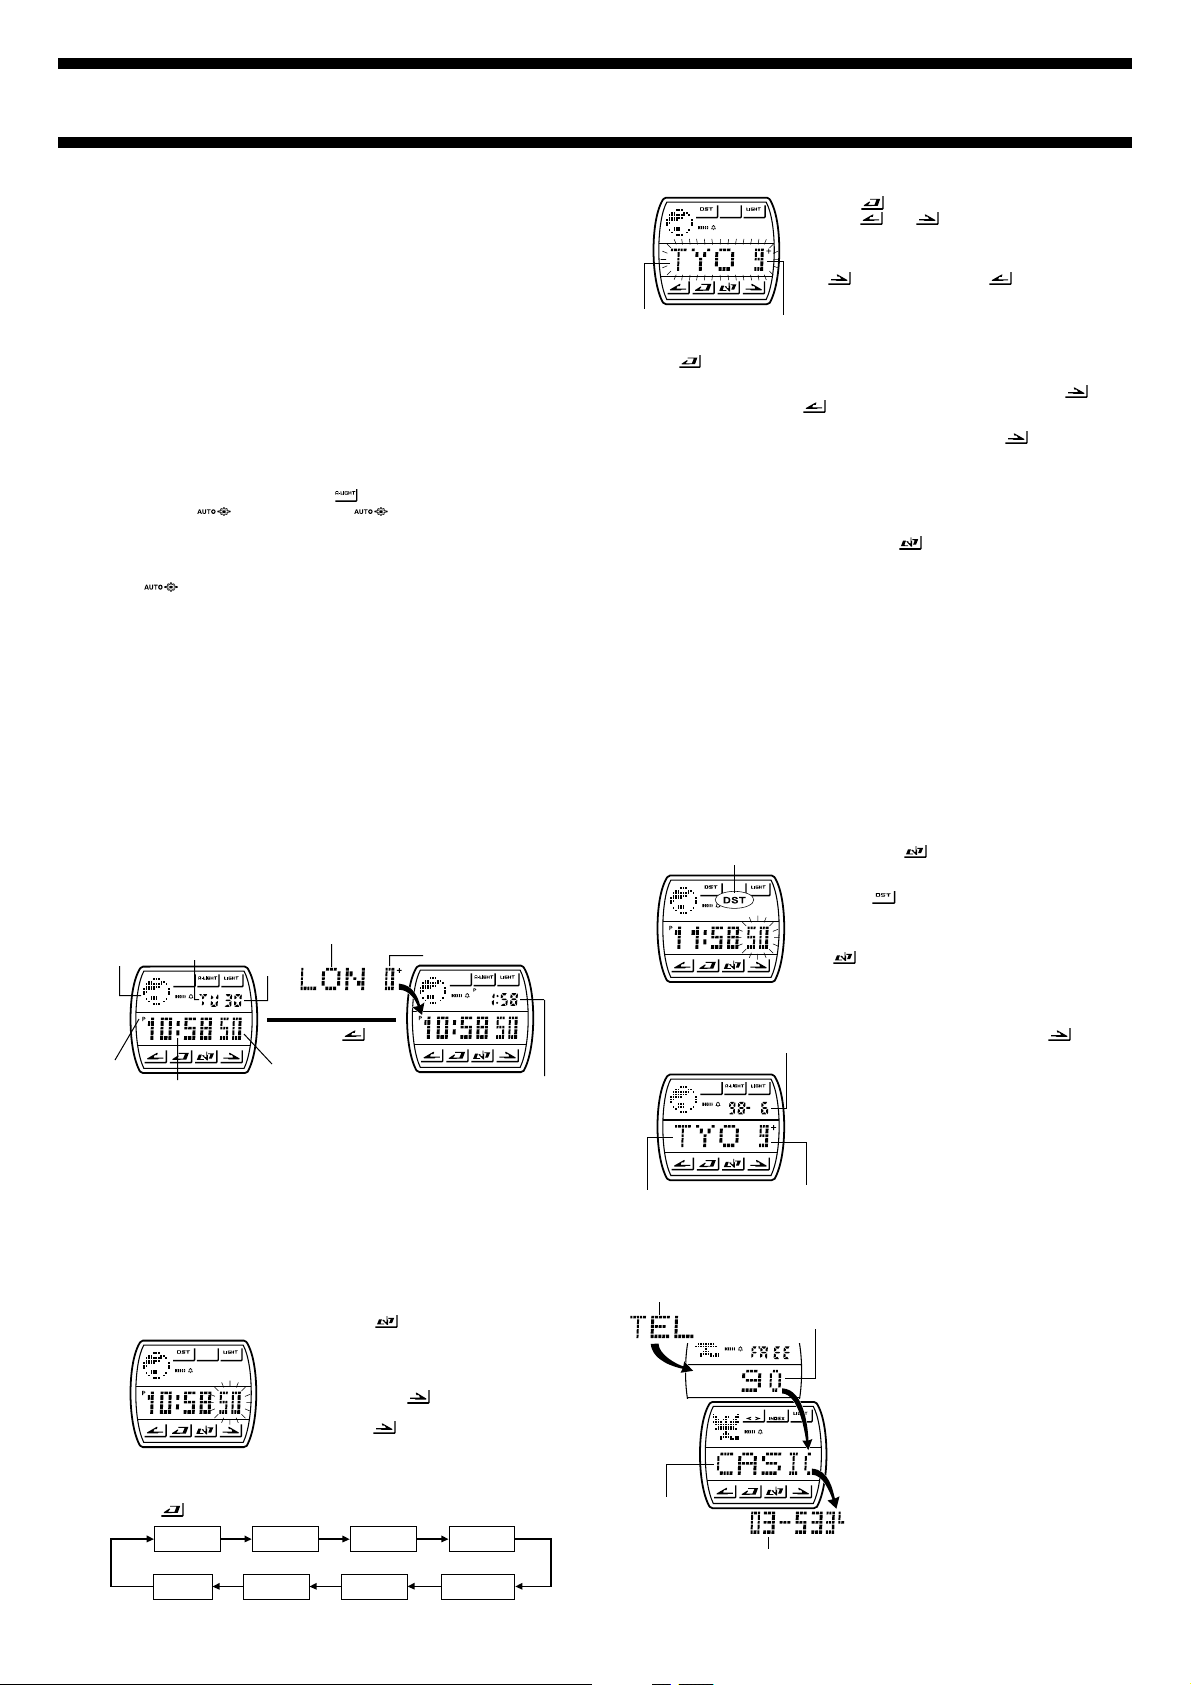
TIMEKEEPING MODE
Use the Timekeeping Mode to set the current time and date. You can also
view the current time in the zone (city) you select in the World Time Mode.
Home Time Screen World Time Screen
Animation
area
Day of week
City Code you select in the World Time Mode
Day
GMT differential
4. Use to select the city code setting.
5. Use
•
City code
• See the “CITY CODE TABLE” for a complete list of available codes.
6. Use
• While hour, minutes, year, month, or day is selected (flashing), press
• While the 12/24-hour setting is selected (flashing), press
• With the 12-hour format, the P (PM) indicator appears to the left of the hour
• With the 24-hour format, times are indicated in the range of 00:00 to 23:59,
7. After you make the setting you want, press
• The day of the week is automatically set in accordance with the date.
• The date can be set within the range of January 1, 1995 to December 31,
• If you do not operate any button for a few minutes while a selection is
GMT differential
to select the hour, minutes, 12/24-hour format, year, month, and
day, and make the settings you want for each.
to increase the setting or to decrease it. Holding down either button
changes the setting at high speed.
between the 12-hour (
digits for times in the range of noon to 11:59 pm. Times from midnight to
11:59 am are shown without any indicator.
with a 24 indicator to the left of the hour digits.
Mode.
2039.
flashing, the flashing stops and the watch goes back to the Timekeeping
Mode automatically.
12H) and 24-hour (24H) formats.
and to scroll through the city
codes until you find the one you want to set
as your home city (the city where you
normally use the watch).
scrolls forward, while scrolls back
through city codes. Holding down either
button scrolls through the city codes at high
speed.
to switch
to return to the Timekeeping
Switching the Home Time between Standard Time and
Daylight Saving Time
Daylight saving time (DST), which is also sometimes called “summer time,”
advances the time for one hour, as is the custom in some areas during the
summer. Remember that not all countries or even local areas use Daylight
Saving Time.
GMT city code’s time cannot be switched to DST. However, the times
• The
of other cities located in the same time zone as GMT (Greenwich Mean
Time) can be switched to DST.
DST indicator
1. Hold down
Mode until the seconds digits start to flash
on the display.
2. Press
on (DST displayed) and off (DST not
displayed).
3. After you make the setting you want, press
to return to the Timekeeping Mode.
while in the Timekeeping
to toggle Daylight Saving Time
▼
Press
PM
indicator
• The current time where you are normally located appears on a Home Time
• Home Time and World Time are linked. Changing the time or date setting
• See “WORLD TIME MODE” for details on using the World Time Mode.
• The GMT differential is the time difference of the time zone where the city
• The animation area in the Timekeeping Mode normally shows a rotating
Hour : Minutes
screen, while the time in the zone (city) you select in the World Time Mode
appears on a World Time screen.
of the Home time also changes the corresponding World Time setting
accordingly.
code is located from Greenwich Mean Time.
globe. This changes to a different animation at the top of each minute.
Seconds
▼
Time in selected city
Setting the Time and Date
1. Hold down while in the Timekeeping
Mode until the seconds digits start to flash
on the display. The seconds flash because
selected
.
to reset the seconds
while the seconds count is
Hour Minutes
12/24-Hour
Format
3. Press
they are
2. While the seconds digits are selected
(flashing), press
00.
to
• If you press
in the range of 30 to 59, the seconds are
00 and 1 is added to the minutes. If
reset to
the seconds count is in the range of 00 to
29, the minutes count is unchanged.
to change the selection in the following sequence.
Seconds City Code
Day
Month Year
Viewing the Home Time City Settings
Year – Month
City code
In the Timekeeping Mode, hold down to
display the currently set Home Time city.
• The upper part of the Home Time city screen
shows the year and month.
GMT differential
TELEMEMO MODE
Mode indicator
Remaining memory
Name
Telephone number
The Telememo Mode lets you store
up to 100 pairs of name and telephone
number data. Data is automatically
sorted based on the characters of the
name. You can recall data by scrolling
through it on the display or by inputting
the first character of the name you
want to look up.
• See the “CHARACTER LIST” for
details on how the watch sorts data.
• The data item on the display when
you exit the Telememo Mode
appears first the next time you enter
the Telememo Mode.
• If you do not operate any button for 2
or 3 minutes while in the Telememo
Mode, the watch automatically goes
back to the Timekeeping Mode.
Page 3
1887-3
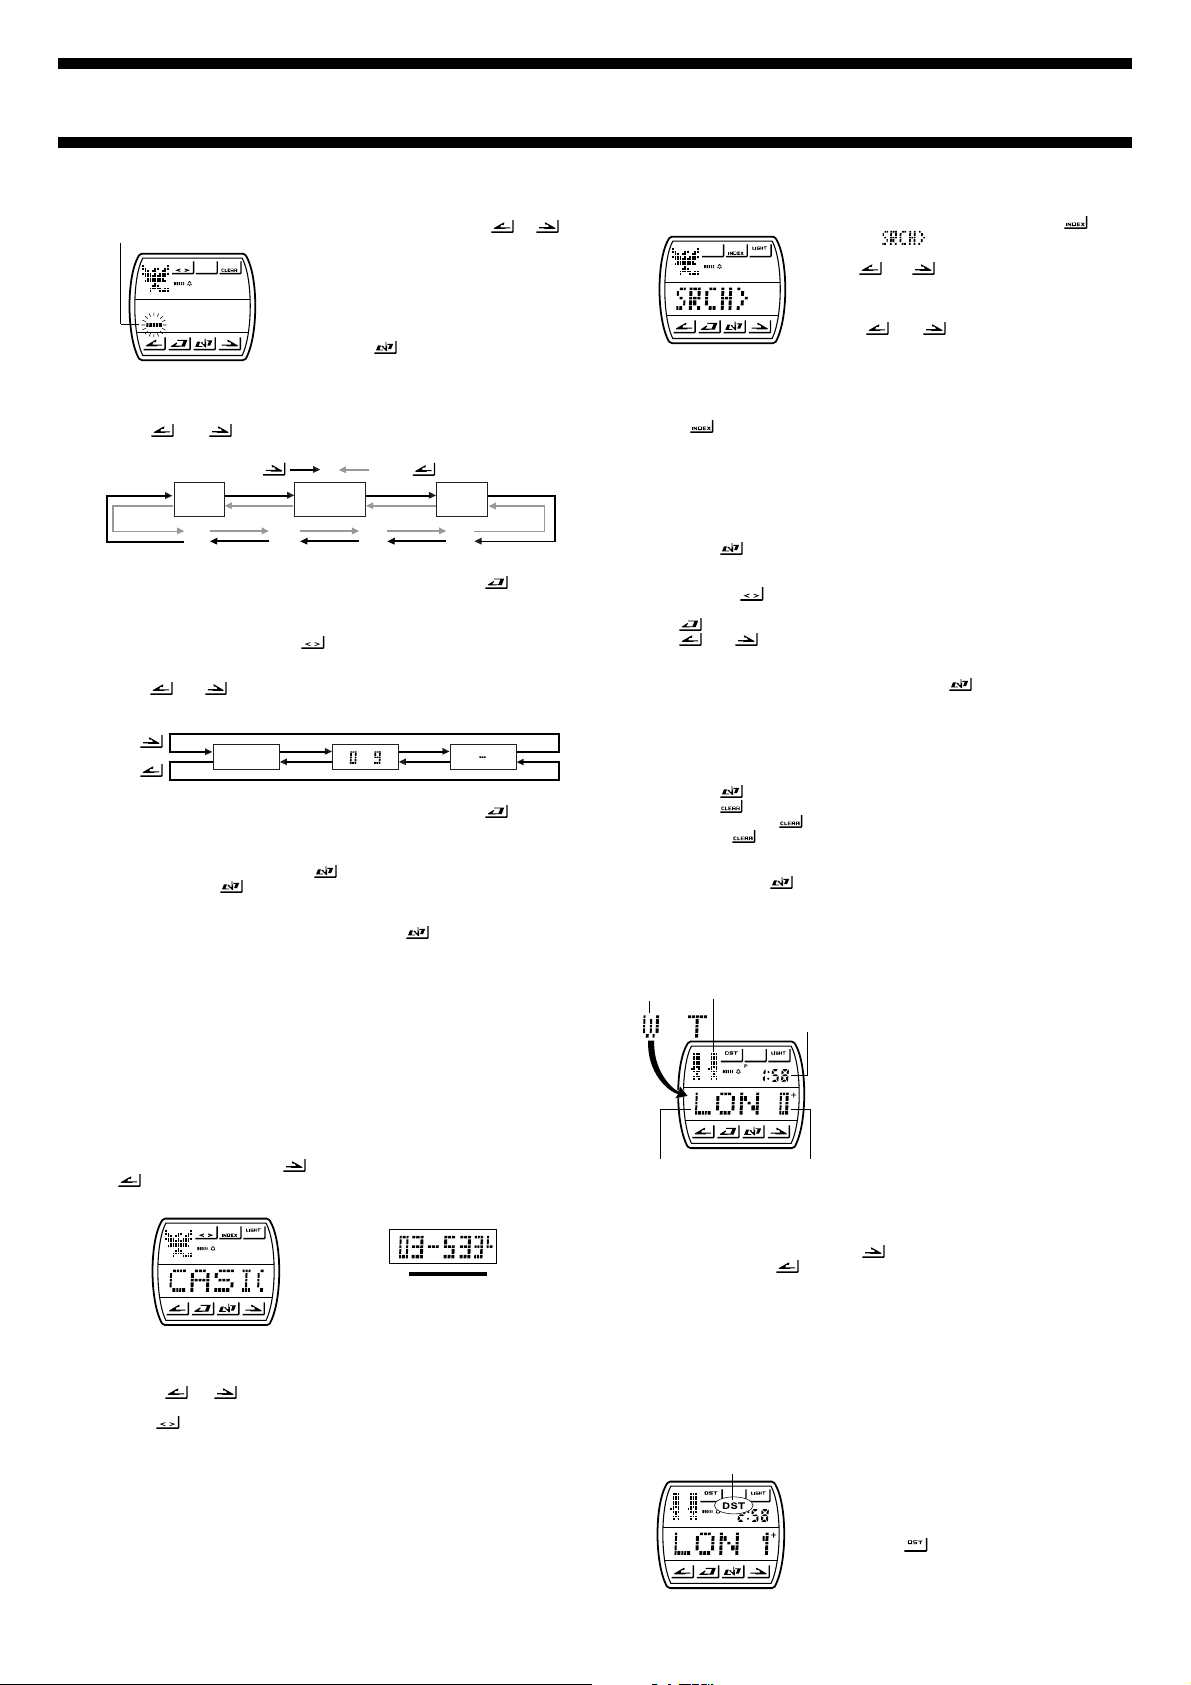
Inputting new Telememo data
Cursor
[New Data Screen]
3. Use
• Holding down either button changes the character at high speed.
4. When the character you want is at the cursor position, press
5. Repeat the steps 3 and 4 until your text is complete.
• You can input up to eight characters for the name.
6. After you input a name, press
• The indicator
•
7. Use
Press
Press
• Holding down either button changes the character at high speed.
8. When the character you want is at the cursor position, press
9. Repeat steps 7 and 8 until you complete number input.
• You can input up to 12 digits for the number.
10.After inputting your data, press
• When you press
11.Input more data (starting from step 3) or press
• If you do not perform any button operation for few minutes while the cursor
• The name field can show up to four characters and the number field can
and to change the character at the cursor position in the
name field. The character changes in the following sequence.
(space)
:
the cursor to the right.
NO. indicates the number input field.
the cursor position in the number field. The character changes in the
following sequence.
the cursor to the right.
display for a few seconds. After the sort operation is complete, the cursor
appears in the name field, ready for input a new Telememo data item.
Telememo Mode data screen (without the cursor).
is on the display, the watch automatically returns to the Telememo Mode
data screen.
show up to six characters, so longer text scrolls continually from right to
left.
NO. appears for a few moments, followed by a cursor.
and to change the character (space, number, or hyphen) at
1. In the Telememo Mode, press or
until the new data screen appears.
• The new data screen is the one that is blank
(contains no name and telephone number).
• If the message
display, it means that memory is full. To
store more data, you will first have to delete
some of the data stored in memory.
2. Hold down
on the display.
• After a few moments,
by a cursor.
NAME indicates the name input field.
•
Press
A to Z
to move the cursor to the number field.
(space)
to store data, the message SORT appears on the
to store it.
FULL appears on the
until the NAME appears
NAME is replaced
Press
0 to 9
. -/
to
again to return to the
to move
to move
Recalling Telememo data
There are two methods you can use to search for Telememo data:
search and index search
.
To use scroll search to recall data
In the Telememo Mode, press to scroll forward through stored data items
to scroll in reverse.
or
[Number Field Screen][Name Field Screen]
▼
Continuously scrolls
• Holding down either button scrolls through the data at high speed.
• During scroll search only name field data appears on the display.
• When the name you are looking for is on the display, release the scroll
button (
switches to the number field for the name.
• Press
name field remains on the display for only about one second, after which it
switches back to the number field.
or ). About one second later, the display automatically
to switch between display of the name and number fields. The
scroll
To use index search to recall data
1. In the Telememo Mode, hold down
until the (search) message appears
on the display.
2. Use
• The only characters that appear when you
• Performing the next step to start the search operation without inputting a
character here causes the new data screen to appear.
3. Press
the character you input in step 2.
• Use scroll reach to recall other data items.
to jump to the first data item whose name field data start with
and to input the first character
of the name field of the data you want to
recall.
press
characters of name data that is already
stored in memory. Unused characters do
not appear.
and are those that are first
Editing Telememo data items
1. In the Telememo Mode, scroll through the data items and display the one
you want to edit.
2. Hold down
• The contents of the data item’s name field appear with the flashing cursor
located at the first character.
• Each press of
number fields.
3. Use
4. Use
• For details on inputting characters, see “Inputting new Telememo data”
(steps 3 for name input and 7 for number).
5. After making the changes that you want, press
return to the Telememo Mode data screen.
until the flashing cursor appears on the display.
causes the cursor to jump between the name and
to move the cursor to the character you want to change.
and to change the character.
to store them and
Deleting Telememo data
1. In the Telememo Mode, scroll through the data items and display the one
you want to delete.
2. Hold down
3. Hold down
• When you hold down
display. Keep
• After the data is deleted, the cursor is located in the name field ready for
more input.
4. Input data or press
until the flashing cursor appears on the display.
about two seconds to delete the data item.
the message CLR (clear) first appear on the
pressed until the message stops flashing.
to return to the Telememo Mode data screen.
WORLD TIME MODE
Mode
indicator
Animation area
Time in
indicated city
City code GMT differential
Viewing the Time in Another Zone
While in the World Time Mode, press to scroll forward through the city
codes (time zones) and
• Holding down either button scrolls through the city codes at high speed.
• Normally, a rotating globe appears in the animation area in the World Time
Mode. When the
HKG, TYO, and SYD city codes are displayed, however, the animation
area changes to an animated figure that is characteristic of the city
represented by the city code.
wrestler, etc. for about 15 seconds.
NYC, SCL, LON, BCN, ZRH, CAI, MOW,
Switching a Zone between Standard Time and
Daylight Saving Time
DST indicator
The World Time Mode shows the current
time in 40 cities (29 time zones) around the
world.
• For full information on city codes, see the
“CITY CODE TABLE”.
• The GMT differential is the time difference
of the time zone where the city code is
located from Greenwich Mean Time.
• The GMT differentials used by this watch
are based on Universal Time Coordinated
(UTC) data.
• The time zone that is displayed when you
leave the World Time Mode will still be
displayed when you enter the World Time
Mode again.
to scroll back.
TYO (Tokyo), for example, shows a sumo
1. In the World Time Mode, display the time
zone (city code) whose standard time/
daylight saving time setting you want to
change.
• You can make separate settings for each
zone.
2. Hold down
toggle daylight saving time on (DST
displayed) and off (DST not displayed).
• The DST indicator appears whenever
daylight saving time is turned on for the
zone (city) whose time is currently on the
display.
for about one second to
Page 4
1887-4
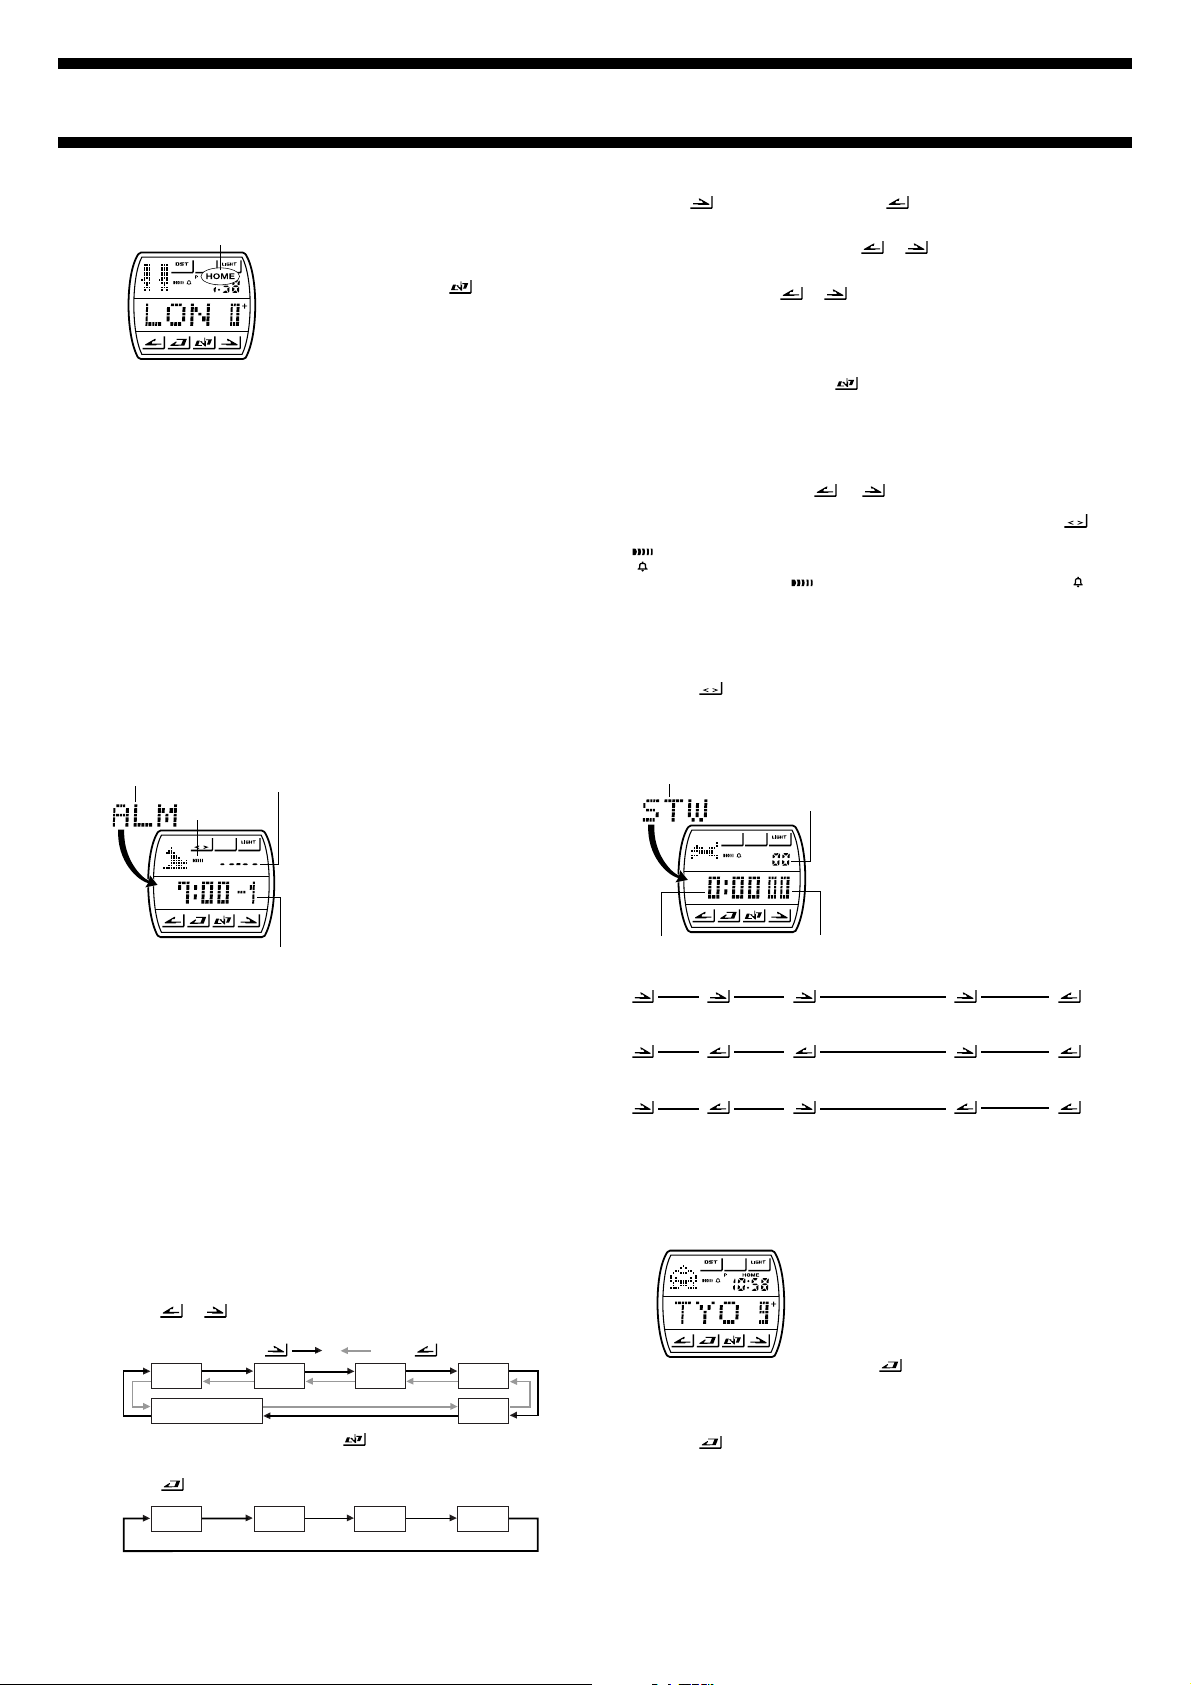
Making a Zone Your Home Zone
HOME indicator
1. In the World Time Mode, display the zone
(city code) that you want to make your
home zone.
2. To make the displayed zone (city) your
home zone, hold down
second.
• The zone with the HOME indicator is the
home zone.
• The time displayed in the Timekeeping Mode
changes in accordance with the zone you
select with the above procedure.
for about one
Timekeeping in the World Time Mode
The current time in all the World Time zones is calculated in accordance with
the Greenwich Mean Time (GMT) differential for each zone, based on the
current Home Time setting in the Timekeeping Mode.
You can also turn Daylight Saving Time (DST) on or off separately for each
time zone. Turning on daylight saving time automatically advances the
corresponding time setting by one hour.
A simple operation switches between the Home Time and the World Time, so
you can quickly and easily change times when travelling from one time zone
to another.
• The seconds count of the World Time is synchronized with the seconds
count in the Timekeeping Mode.
• The 12-hour/24-hour format of the World Time matches the format you
select in the Timekeeping Mode.
• With daylight saving time, clocks are advanced one hour from standard
time in order to better take advantage of daylight hours during the summer,
when days are longer. Whether or not daylight saving time is used depends
on the country you are in.
ALARM MODE
Mode indicator
Hour : Minutes – Alarm No.
Month – Day
Alarm on
indicator
Alarm Types
The alarm type is determined by the settings you make, as described below.
• Daily alarm
Set the hour and minutes for the alarm time. Set
(see step 4 under “Setting Alarms”). This type of setting causes the alarm to
sound every day at the time you set.
• Date alarm
Set the month, day, hour and minutes for the alarm time. This type of setting
causes the alarm to sound at the specific time, on the specific date you set.
• 1-Month alarm
Set the month, hour and minutes for the alarm time. Set
step 4 under “Setting Alarms”). This type of setting causes the alarm to sound
every day at the time you set, only during the month you set.
• Monthly alarm
Set the day, hour and minutes for the alarm time. Set
step 4 under “Setting Alarms”). This type of setting causes the alarm to sound
every month at the time you set, on the day you set.
Setting Alarms
1. Press or while in the Alarm Mode to select the alarm whose time
you want to set.
Press
Alarm 1 Alarm 2
Hourly Time Signal
2. After you select an alarm, hold down until the hour digits start to flash
on the display. The hour digits flash because they are
• This operation automatically turns on the alarm.
3. Press
to change the selection in the following sequence.
Hour
You can set five independent alarms with
hour, minutes, month, and day. When the
alarm is turned on, the alarm sounds for 20
seconds at the preset time. Press any button
to stop the alarm after it starts to sound.
When the Hourly Time Signal is turned on,
the watch beeps every hour on the hour.
• The alarms and Hourly Time Signal sound
in accordance with the Timekeeping
Mode’s Home Time.
• If you do not operate any button for 2 or 3
minutes while in the Alarm Mode, the
watch automatically goes back to the
Timekeeping Mode.
xx for the month and day
xx for the day (see
xx for the month (see
Press
Alarm 3
Alarm 4
Alarm 5
selected
Minutes Month
.
Day
4. Press to increase the setting and to decrease it. Holding down
either button changes the setting at high speed.
• To set an alarm that does not include a month (Daily alarm, Monthly
alarm), set
(between 12 and 1) while the month digits are flashing.
• To set an alarm that does not include day (Daily alarm, 1-Month alarm), set
xx for the day. Press or until the xx mark appears (between 31
and 1) while the day digits are flashing.
• The format (12-hour and 24-hour) of the alarm time matches the format
you select for normal timekeeping.
• When setting the alarm time using the 12-hour format, take care to set the
time correctly as morning (no indicator) or afternoon (P).
5. After you set the alarm, press
• If you do not operate any button for a few minutes while a selection is
flashing, the flashing stops and the watch goes back to the Alarm Mode
automatically.
xx for the month. Press or until the xx mark appears
to return to the Alarm Mode.
Switching an Alarm and Hourly Time Signal on and off
1. In the Alarm Mode, press or to select an alarm or the Hourly
Time Signal.
2. When the alarm or Hourly Time Signal you want to is selected, press
to turn it on and off.
Indicates alarm is ON.
Indicates Hourly Time Signal is ON.
• The alarm on indicator (
are shown on the display in all modes while these functions are turned on.
• If any alarm is on, the Alarm On Indicator is shown on the display when you
change to another mode.
) and the Hourly Time Signal on indicator ( )
Testing the alarm
Hold down while in the Alarm Mode to sound the alarm.
STOPWATCH MODE
Mode indicator
1/100 second
Hours : Minutes
(a) Elapsed time measurement
▼
(b) Split time measurement
▼
Start
Split Split release Stop Clear
(c) Split time and 1st-2nd place times
Start Split releaseStopSplit Clear
▼
First runner
finishes.
The Stopwatch Mode lets you measure
elapsed time, split times, and two finishes.
The range of the stopwatch is 23 hours, 59
minutes, 59.99 seconds.
Seconds
▼
▼
▼
Second runner finishes.
Record time of first runner.
▼
StopRe-start ClearStart Stop
▼
▼
Record time of
second runner.
▼
▼
▼
AUTO DISPLAY FUNCTION
The Auto Display function of this watch
continually changes the contents of the digital
display. Note that you cannot use any of the
watch’s other functions while the Auto Display
function is operating.
Turning the Auto Display On
Hold down for about three seconds in any
mode until the watch beeps.
Turning the Auto Display Off
Hold down for about three seconds until the watch beeps.
Note
The Auto Display function cannot be performed while you are making settings.
Page 5
1887-5
ABOUT THE BATTERY
Should battery power drop below a certain level, display characters will
appear dim, the backlight may fail to light, and the alarm may fail to sound.
Also, the
when you try to input or recall data in the Telememo Mode or when you try to
scroll the World Time city codes. Should any or all of this happen, have the
battery replaced as soon as possible. Using the watch while the battery is low
can result in abnormal operation.
ALWAYS LEAVE BATTERY REPLACEMENT UP TO THE DEALER
WHERE YOU BOUGHT THE WATCH OR TO AN AUTHORIZED CASIO
DISTRIBUTOR. BE SURE TO SHOW THE FOLLOWING INFORMATION
TO THE PERSON REPLACING THE BATTERY.
indicator will appear, and further operation will be impossible
Attention dealer or CASIO distributor
Be sure to use the following procedure when replacing the battery.
1. Open and remove the back cover.
CLOSE appears on the display when you open the back cover,
• If
replace the back cover. Wait for a few minutes and try again.
2. Remove the battery holder.
3. Remove the old battery and load a new one.
4. Replace the battery holder.
5. Touch the AC contact and the battery (+) side with metallic tweezers.
• The AC (all clear) operation
6. Close the back cover.
• The message
perform the AC (all clear) operation in step 5 of the above procedure,
indicating that the watch is performing an internal self-check for data
errors.
• The
watch performs an internal check of data in memory. Though you can
change the time setting of the watch while the
display, other operations are disabled.
WAIT appears on the display about 20 seconds after you
WAIT indicator remains on the display up to 6 minutes while the
DOES NOT
delete data stored in memory.
WAIT indicator is on the
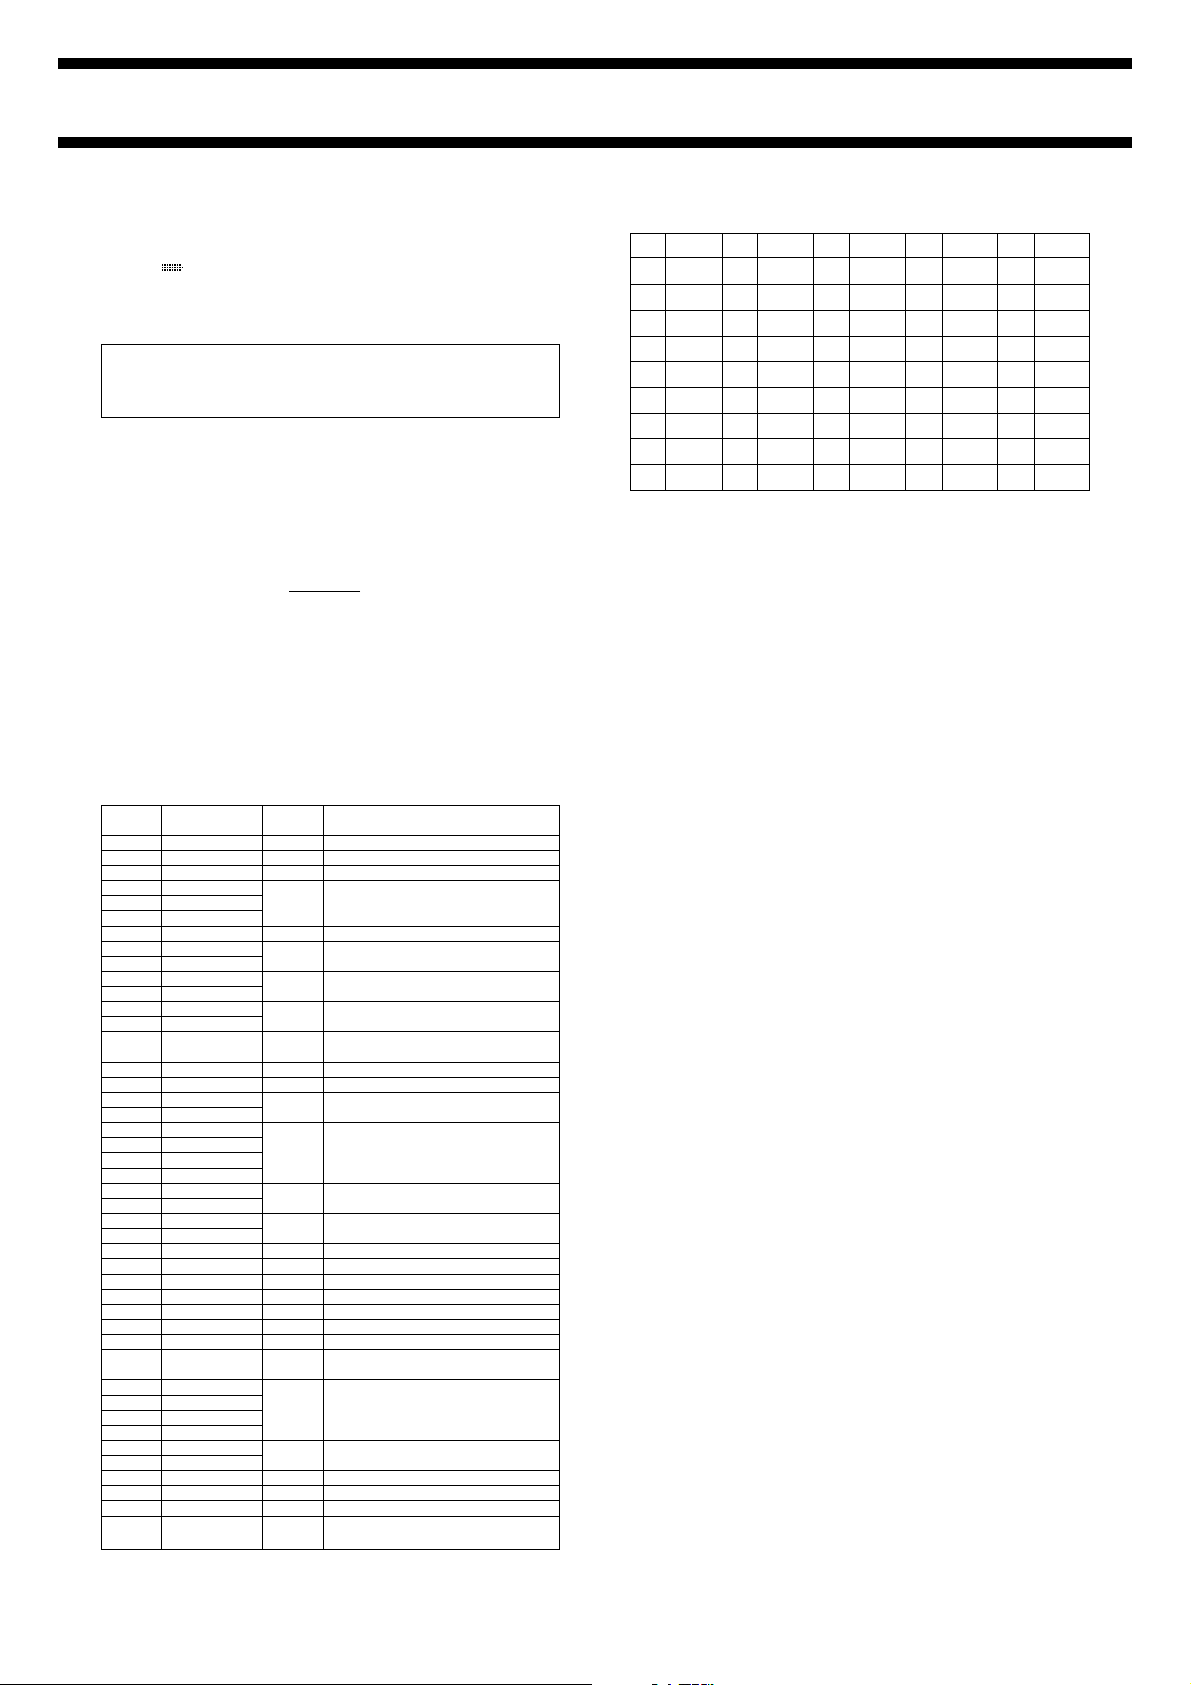
CITY CODE TABLE
City Code
– – –
HNL
ANC
YVR
SFO
LAX
DEN
MEX
CHI
MIA
NYC
SCL
CCS
RIO
– – –
– – –
GMT
LON
BCN
PAR
ZRH
ROM
CAI
JRS
MOW
JED
THR
DXB
KBL
KHI
DEL
DAC
RGN
BKK
SIN
HKG
BJS
TPE
SEL
TYO
ADL
SYD
NOU
WLG
Based on data as of December 1997.
*
City
HONOLULU
ANCHORAGE
VANCOUVER
SAN FRANCISCO
LOS ANGELES
DENVER
MEXICO CITY
CHICAGO
MIAMI
NEW YORK
SANTIAGO
CARACAS
RIO DE JANEIRO
LONDON
BARCELONA
PARIS
ZURICH
ROME
CAIRO
JERUSALEM
MOSCOW
JEDDAH
TEHRAN
DUBAI
KABUL
KARACHI
DELHI
DHAKA
YANGON
BANGKOK
SINGAPORE
HONG KONG
BEIJING
TAIPEI
SEOUL
TOKYO
ADELAIDE
SYDNEY
NOUMEA
WELLINGTON
GMT
Differential
–11
–10
–09
–08
–07
–06
–05
–04
–03
–02
–01
+00
+01
+02
+03
+3.5
+04
+4.5
+05
+5.5
+06
+6.5
+07
+08
+09
+9.5
+10
+11
+12
Other major cities in same time zone
PAGO PAGO
PAPEETE
NOME
LAS VEGAS, SEATTLE, DAWSON
CITY
EL PASO, EDMONTON
HOUSTON, DALLAS/FORT WORTH,
NEW ORLEANS, WINNIPEG
MONTREAL, DETROIT, BOSTON,
PANAMA CITY, HAVANA, LIMA, BOGOTA
LA PAZ, PORT OF SPAIN
SAO PAULO, BUENOS AIRES,
BRASILIA, MONTEVIDEO
PRAIA
DUBLIN, LISBON, CASABLANCA,
DAKAR, ABIDJAN
MILAN, MADRID, AMSTERDAM,
ALGIERS, HAMBURG, FRANKFURT,
VIENNA, STOCKHOLM, BERLIN
ATHENS, HELSINKI, ISTANBUL,
BEIRUT, DAMASCUS, CAPE TOWN
KUWAIT, RIYADH, ADEN, ADDIS
ABABA, NAIROBI
SHIRAZ
ABU DHABI, MUSCAT
MUMBAI, CALCUTTA
COLOMBO
JAKARTA, PHNOM PENH, HANOI,
VIENTIANE
KUALA LUMPUR, MANILA, PERTH,
ULAANBAATAR
PYONGYANG
DARWIN
MELBOURNE, GUAM, RABAUL
PORT VILA
CHRISTCHURCH, NADI, NAURU
ISLAND
1 (space)
2 A
3 B
4 C
5 D
6 E
7 F
8 G
9 H
10 I
CHARACTER LIST
11 J
12 K
13 L
14 M
15 N
16 O
17 P
18 Q
19 R
20 S
21 T
22 U
23 V
24 W
25 X
26 Y
27 Z
28 0
29 1
30 2
31 3
32 4
33 5
34 6
35 7
36 8
37 9
38 39 .
40 /
41 :
 Loading...