

Page 1
INSTALLATION, OPERATION & MAIN TE NANCE MANUAL (IOM)
MODEL 521
TOTAL TFE, GLOBE-PATTERN CON TROL VALVE
I. DESCRIPTION AND SCOPE
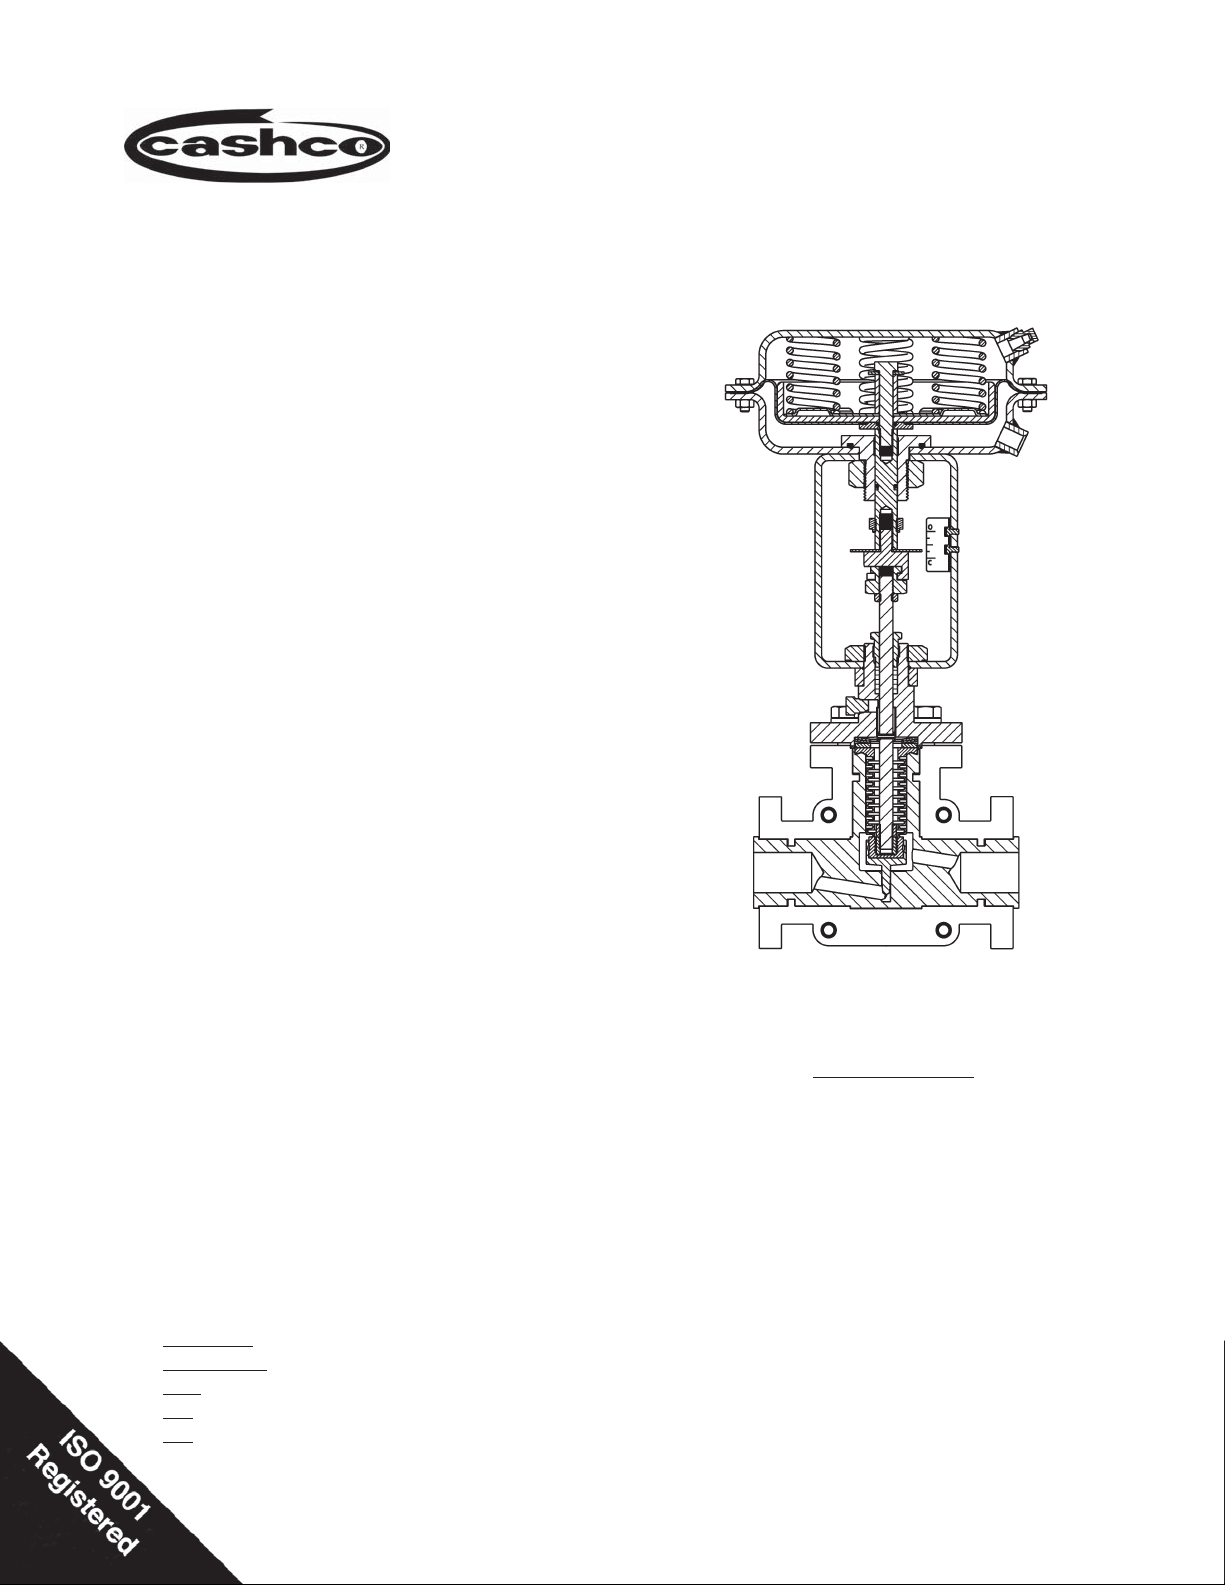
The Model 521 is a bellows sealed, globe-style control valve fabricated from a tee-block of isostatically
com pact ed virgin TFE. Sizes are 1/2", 1", 1-1/2" and
2". The split body jacket is CF8 (304 SST) material.
All wetted internal parts are of isostatically compacted
TFE material. The standard stem material is of 316
SST; two optional Hastelloy C-276 stem material
con struc tions are avail able.
End connections are available to mate with 150#,
300# or DIN PN16, 25 or 40 fl anges. Each fl ange
is drilled and tapped to receive stud bolting only.
IOM-521
12-13
BODY IOM
SECTION I
The valve is designed for chemical service with fl uids
that are normally corrosive to metallic materials.
For application pressure vs. temperature zone refer
to Model 521-TB, Graph No. 1 (pg. 3).
Actuators that may be mounted to a Model 521
body are Cashco Model C27 or Model C53, both
fi eld reversible.
II. REFERENCES
Refer to Technical Bulletin 521-TB for complete
tech ni cal specifi cations of a Model 521 coupled with
either Cashco Actuator C27 or C53.
www.cashco.com/techbulletins/521.pdf
Refer to following Installation, Operation & Main te nance Manuals (IOM’s) for either actuator and/or
devices that maybe mounted to a Model 521:
Actuators: www.cashco.com/IOM/C27-C53.pdf
Positioners:
P/P: www.cashco.com/techbulletins/9540l.pdf
I/P: www.cashco.com/techbulletins/srd991.pdf
I/P: www.cashco.com/iom/PS2iom.pdf
SECTION II
SST.......... Cast or Wrought Stainless Steel
HC ........... Wrought Hastelloy C-276
ATO-FC ... Air-to-Open, Fail Close
ATC-FO ... Air-to-Close, Fail Open
CCW ........ Counter Clockwise
CW ........... Clockwise
D or DIR ... Direct Acting
R or REV.. Reverse Acting
IAS ........... Instrument Air Supply
IOM .......... Installation, Operation and Maintenance
SIG .......... Output Signal from Instrument
LOAD ....... Positioner Output Air Pressure
V .............. Vent
Model 521
with ATO - FC Actuator
ABBREVIATIONS
Man u al
Page 2
SECTION III
III. INSTALLATION
A. Orientation
1. Recommended orientation when installed is
in a hor i zon tal pipeline with the stem vertical. Valves may be installed in a vertical or
hor i zon tal pipeline with the stem between
vertical and horizontal.
2. Outdoors, all installations may be oriented
at any angle from horizontal-to-vertical, as
per A.1. above.
3. Model 521 valves should not be installed
with the stem oriented below horizontal/
down wards.
4. In no case is additional weight to be applied
to the actuator assembly when installed in
an ori en ta tion other than vertical.
WARNING
The valve/actuator unit should not be used as a
“step” to sup port per son nel. Failure to comply
may cause leak age at the bonnet/body joint, al low ing pos si ble con tact with harm ful fl uids.
2. If pipe reducers are located before and/or
after the valve body, keep the reducers as
close as practical to the valve body; this is
especially important where the reducers are
more than one line size larger than the valve
body size, which is common in gaseous
ser vice.
3. Clean the piping of all foreign debris, including chips, weld scale, weld splatter,
oil, grease, sand or dirt prior to installing
the control valve; THIS IS AN ABSOLUTE
REQUIREMENT.
4. Field hydrostatic testing the completed
piping system, including the Model 521,
to 1-1/2 x CWP in di cat ed on Model 521
name plate is ac cept able. If hydro test pres sure ex ceeds the 1-1/2 x CWP limit, the 521
must be re moved for such testing. Before
pres sur iza tion, the valve plug should be
lifted from the seat if of re verse, ATO-FC
action.
5. Flow Direction: Install so the fl ow direc-
tion match es the arrow cast on the valve
body.
6. Valves are not to be direct buried un der ground.
B. Piping System
1. It is recommended that the control valve unit
be installed with a double-block and bypass
as indicated in Figure 1. This arrangement
is recommended especially where main te nance will be done on the valve body while
still installed in the pipeline.
Figure 1: Typical Control Valve Station
7. Insulation may be applied as indicated in
Fig ure 2. Drainage from the packing area
must be ensured when fully installed, sealed
and lagged for outdoors installation. Vented
pipe plug (12) should not be covered.
Figure 2: Body Insulation
8. Undue piping stress/strain or bending
torques may not be transmitted thru the
control valve body. One pipe (inlet or outlet)
should be anchored rigidly for piping that
is “hot” or “cold” with respect to ambient
IOM-5212
Page 3
tem per a ture; the re main ing pipe (inlet or
outlet) should be sup port ed and guided to
ensure uni di rec tion al ex pan sion/con trac tion. Properly align prior to installing valve
with required fl ange bolting.
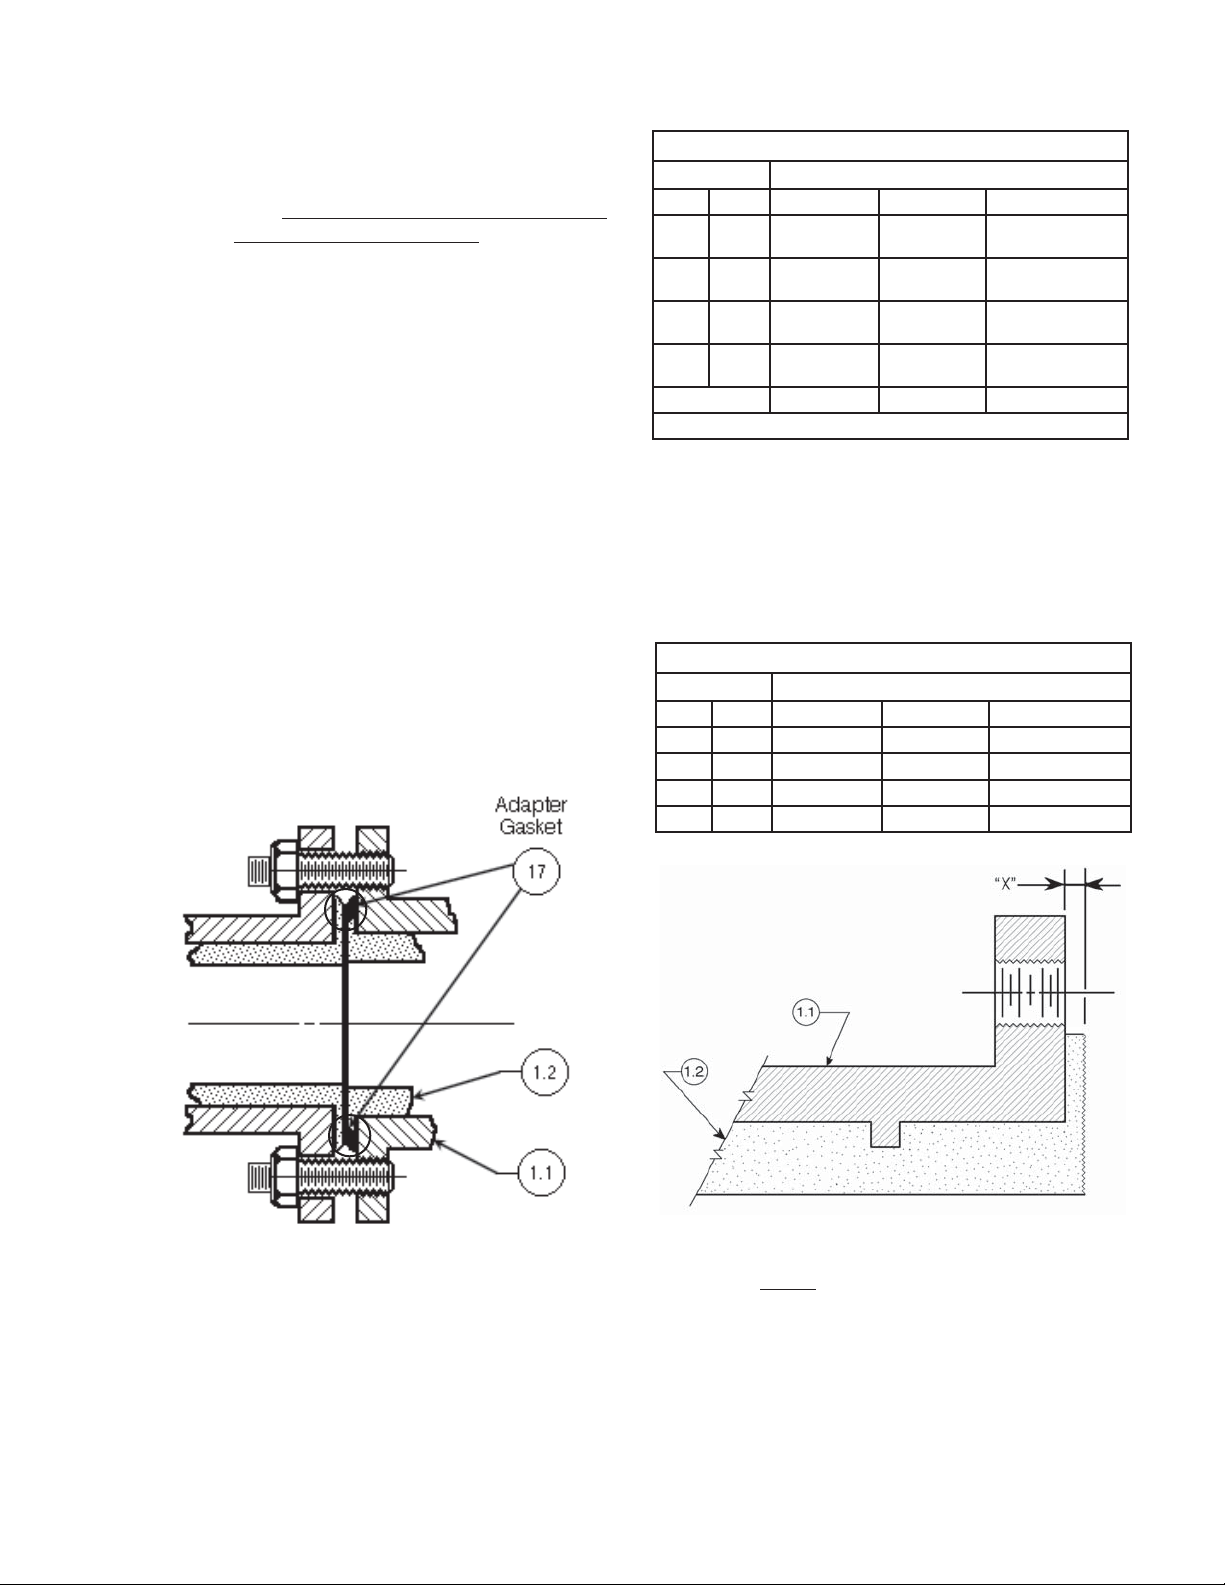
9. The Model 521 is designed for a fl anged
con nec tion that is gasketless. The raised
face portion of end con nec tion fl ange serves
as the gasket.
10. An ANSI/DIN adapter gasket (17) is supplied with all Model 521 valves provided
with DIN 16/25/40 end con nec tions. See
Figure 3. The purpose of this adapter gasket
(17) is to en sure prop er compression of the
body’s TFE core (1.2) when used with DIN
piping.
To assist during installation, place pipe
thread sealant on one side of adapter gasket
(17), and press the sealant covered side of
the adapter gasket over the exposed TFE
of the body core (1.2) end connection. The
sealant will hold the adapter gasket (17)
to its proper location prior to joining with a
piping fl ange.
TABLE 1
Body Size End Connection Flange Bolting
In. (DN) 150# 300# DIN 16/25/40
1/2" DN15
1" DN25
1-1/2" DN40
2" DN50
No. Bolt Holes 4 4 or 8 * 4
1/2" Ø - 1-3/4"
13 UNC-2B
1/2" Ø - 2"
13 UNC-2B
1/2" Ø - 2-1/2"
13 UNC-2B
5/8" Ø - 2-1/2"
11 UNC-2B
* 2" - 300 # requires 8 bolt holes; all others 4.
1/2" Ø - 1-3/4"
13 UNC-2B
5/8 Ø - 2"
11 UNC-2B
3/4" Ø - 2-3/4"
10 UNC-2B
5/8" Ø - 2-3/4"
11 UNC-2B
14 mm Ø - 45 mm
M12x1.75-6H
14 mm Ø - 52 mm
M12x1.75-6H
18 mm Ø - 70 mm
M16x2.0-6H
18 mm Ø - 70 mm
M16x2.0-6H
12. Tighten fl ange stud nuts uniformly in a cross-
ing pattern. Ensure fl ange facing align ment.
Do not use fl ange bolting to “pull” fl ang es
into alignment. Tighten fl ange bolting to
torque levels of Table 2 in increments of
1/2 rev o lu tion to ensure uniform loading of
valve’s raised facing.
TABLE 2
Body Size End Connection Flange Bolting
In. (DN) ANSI-150 ANSI-300 DIN 16/25/40
1/2" DN15 10 - 12 ft-# 10 - 12 ft-# 15 - 18 N-m
1" DN25 10 - 12 ft-# 12 - 14 ft-# 21 - 25 N-m
1-1/2" DN40 10 - 12 ft-# 14 - 17 ft-# 18 - 22 N-m
2" DN50 35 - 40 ft-# 17 - 20 ft-# 50 - 60 N-m
Figure 3: ANSI/DIN Adapter Gasket
11. Flange bolting must be of the stud-type.
Each fl ange is drilled and tapped to accept
studs. The studs should be of a length to
penetrate the full depth of the bolt hole thru
the fl ange; DO NOT USE STUDS/BOLTS
OF TOO SHORT LENGTH. See Table 1
for stud size/thread/length requirements.
IOM-521
Figure 4: End Connection - Partial Section
NOTE: If the installed Model 521 has had
the fl ange bolting over-torqued, distortion
of TFE core (1.2) will occur. If dimension
“X” in Figure 4 is 0.040" (1 mm) or less, a
gasket is rec om mend ed upon reinstallation.
If dimension “X” is less than 0.020" (0.5 mm),
body re place ment is recommended.
3
Page 4

C. Auxiliary Detection:
1. When a fl uid is known to permeate TFE over
a fi nite time period and the fl uid is lethal or
is subject to stringent limits of fugitive emis sions, the vented pipe plug (12) should be
removed and one of, or a com bi na tion of, the
following methods should be considered to
monitor the integrity of the internal primary
stem (9) seal – the bellows sub-assembly
(8):
a. gas detector with alarm
b. pressure indicating gauge
c. pressure switch with alarm
d. inert gas, constant fl ow purge.
SECTION IV
IV. STARTUP
A. General:
1. Ensure that the Model 521 unit has been
properly adjusted and calibrated, including
the po si tion er, if in stalled.
2. Recommend startup to be in “manual”
mode. This procedure assumes double
block (iso la tion) and bypass valves for the
“control valve station" per Figure 1.
3. Start with either of the two block valves
closed, with the other open. The bypass
valve should be closed. Pres sur ize system
if possible/prac ti cal.
4. Back out the airset’s adjusting screw until
loose.
5. Turn on air supply pressure.
6. Adjust the air supply airset (fi lter-regulator) to
the proper level as indicated in the technical
bulletin 521-TB. DO NOT STROKE THE
CON TROL VALVE WITH AN AIR SUPPLY
PRESSURE SET TING GREATER THAN
REC OM MEND ED MAX I MUM PRESSURE!
7. Place loop controller into “manual” mode.
Vary setting from minimum – mid-range—
maximum SIG out put. Ob serve response of
control valve unit to these changes of input
SIG. The valve should fully stroke at the
variation from minimum SIG to maximum
SIG; the mid-range SIG should have the
valve stem travel at/near 1/2 open.
8. Confi rm that action of controller and po si-
tion er – direct or reverse – are producing
the desired response in the control unit.
Confi rm that the control valve “fail” position
is as re quired.
9. Hereafter, the procedure assumes that
actual fl uid fl ow may be established. This
may not be practical/pos si ble in all cases;
if so, vary pro ce dure as required.
Always “heat” or “cool” down the system
pip ing SLOW LY by opening the control valve
station bypass valve in small increments.
10. With one of the control valve station block
valves still closed, and the loop controller
still in “man u al” mode, open bypass valve
and vary fl ow rate manually to observe the
re sponse of the controller and control valve
unit to geth er.
11. Attempt to develop manual control of the
loop by opening/closing the manual bypass
as required, or by manually controlling
main stream fl ow as required.
12. When the control valve is partially open,
crack open, slowly, the closed block valve
while si mul ta neous ly clos ing the bypass
valve; it may be necessary/desirable to vary
the man u al output SIG from the controller
si mul ta neous ly also. Continue this procedure until the by pass is closed and the block
valves are both fully open. The system is still
under “manual” mode control, but all fl ow is
passing thru the control valve.
CAUTION
DO NOT WALK AWAY AND LEAVE A MANUALLY
CONTROLLED CONTROL VALVE UNATTENDED!
13. Vary controller “manual” SIG output until
match ing the “automatic” SIG output, then
change the mode of the controller over to
“automatic”, and the loop will ex pe ri ence a
minimum of upset conditions, and will be in
automatic control.
IOM-5214
Page 5
SECTION V
V. MAINTENANCE
WARNING
Model 521 control valves fre quent ly are installed
in haz ard ous/le thal fl uid ser vic es. Be fore re mov al
from pipe line or any level of dis as sem bly, con sult
the Own er’s safety pro ce dures for proper fl ushing,
clean ing and han dling of a valve ex posed to po ten tial ly haz ard ous fl uids dur ing de-pres sur iza tion
and re mov al. Owner's safe ty procedures pre empt
any state ments or rec om men da tions con tained in
this IOM.
A. General:
1. Once fl uid pressure has been iso lat ed by
block valves, and piping fl ange bolting has
been only loos ened, care ful ly re move vented
pipe plug (12) from the bonnet (2), applying
the detection procedures of C. 1. above, as
a small quantity of fl uid may be “trapped” in
the void space of the bellows (8) interior due
to permeation. The plug (12) has a “groove”
notched in its threads to assure venting prior
to the threads fully disengaging. Once fully
vented and/or purged as required by safety
procedures, reinstall the plug (12) using a
fl uid compatible lubricant . DO NOT USE
THREAD SEAL ANT FOR VENT ED PIPE
PLUG (12) ON RE IN STAL LA TION.
6. The stem sub-assembly (9) is designed
for non-rotation when installed. DO NOT
AT TEMPT TO RO TATE WITH THE STEM
SUB-ASSEMBLY IN STALLED; FAILURE
TO HEED MAY CAUSE DAMAGE TO THE
STEM SUB-ASSEMBLY (9), THE BELLOWS SUB-AS SEM BLY (8), THE PLUG
(3) AND/OR THE BODY ASSEMBLY(1).
Exhibit special care when handling the stem
(9) sur face where it contacts the packing
(6).
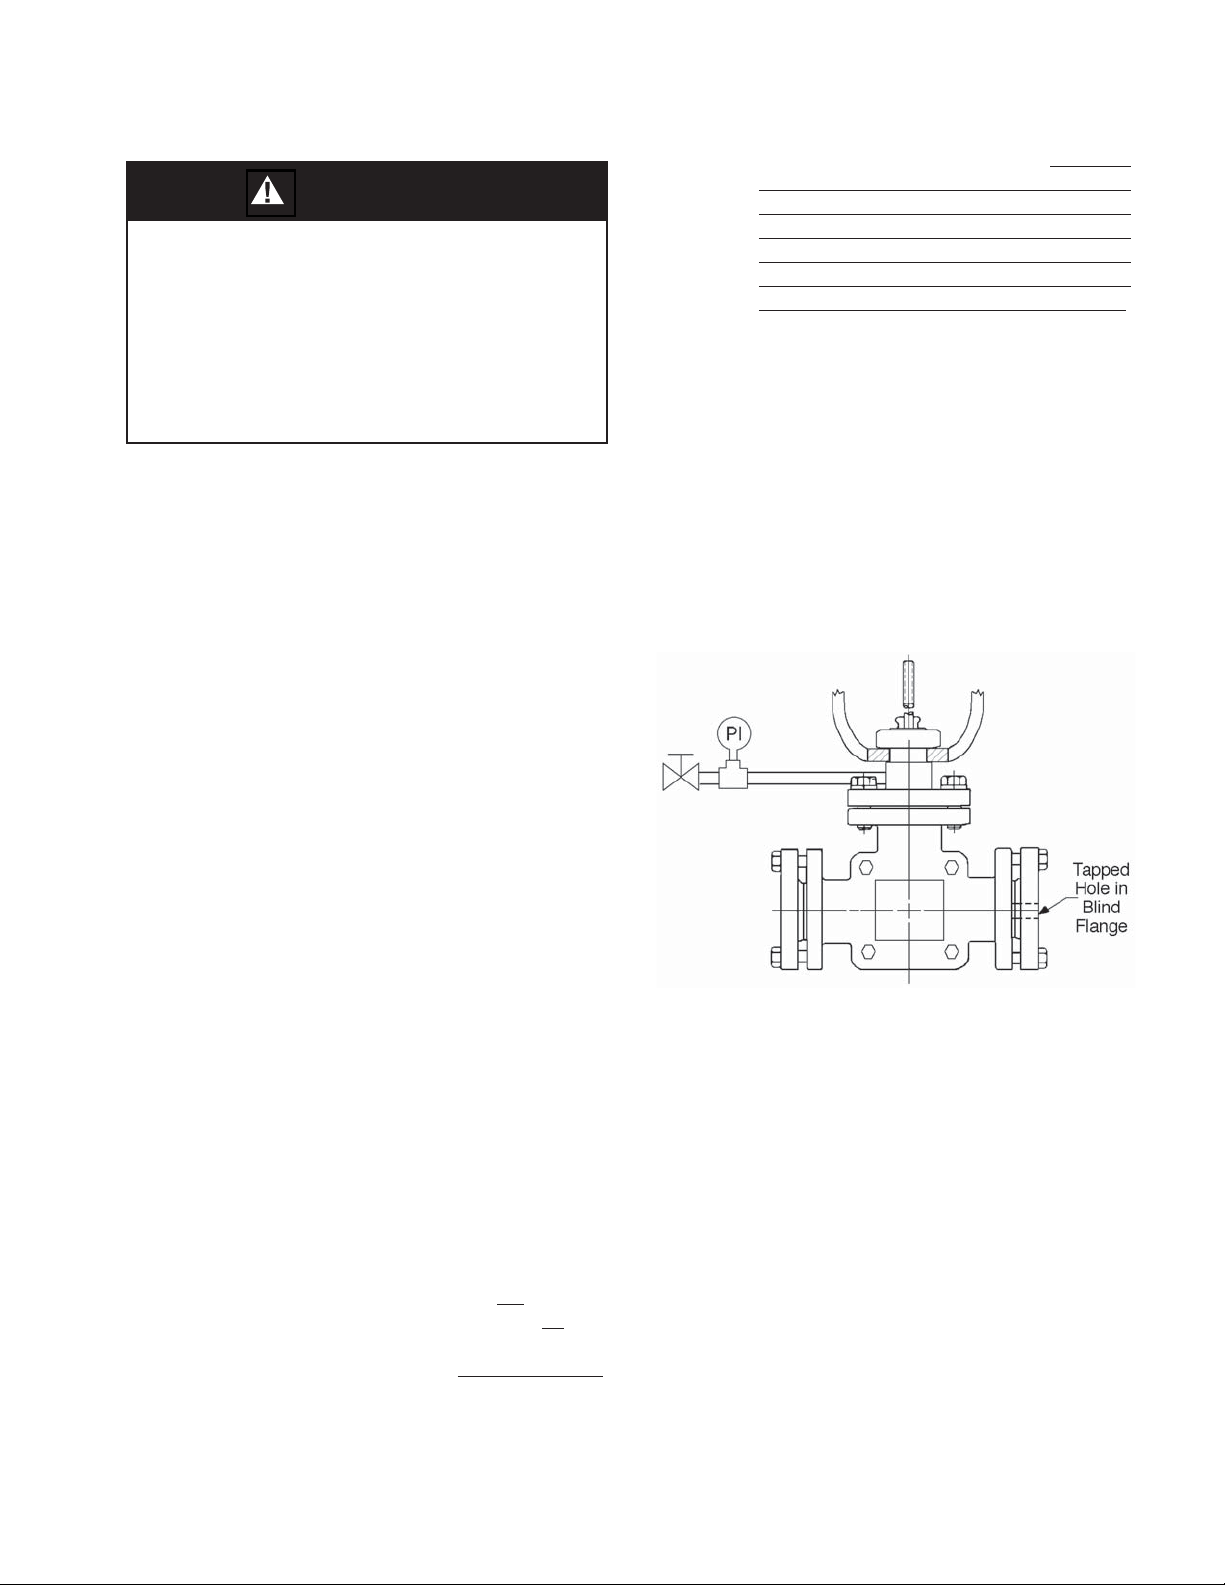
B. Pressure Boundary Leakage Shop Test:
1. Secure the body assembly (BA) in a vise
with the valve stem (9) oriented vertically.
2. Remove vented pipe plug (12).
3. Install a pipe nipple, test pressure gauge and
isolation valve into the 1/8"-NPT (female)
open ing. (See Figure 5.)
2. Maintenance procedures hereinafter are
based upon removal of the valve/actuator
unit from the pipeline where installed.
3. Owner should refer to Owner’s procedures
for re mov al, handling and cleaning of nonreuseable parts and suitable sol vents, etc.
4. Valves supplied from the factory do not use
any sealing aids for the gasket such as oil,
sealant, or pipe dope in the wetted portions
of the valve body as sem bly. Sealing aids
should not be required and are not rec om mend ed.
5. All indicated Item Numbers that are with
re spect to actuator assembly (AA) will be in
pa ren the sis and un der scored; i.e. (20). All
Item Num bers that are with respect to the
body assembly (BA) are not underscored;
i.e. (32). Reference with respect to the
positioner is in double parentheses; i.e.
((AP)).
Figure 5: Pressure Boundry Testing Confi guration
4. Place a suitable adhesive tape (“duct tape”)
around the perimeter of the bonnet/body
fl ange. Place tape on the “joint lines” of the
shell halves (1.1) (see Figure 10). Place blind
fl ang es over the fl anged end connections
and bolt down; one of the blind fl anges must
have a hole thru the face; place tape over
the opening of the blind fl ange.
5. Using a source of acceptable fl uid such as
ni tro gen gas, pressurize the bellows “void
zone” to 30 psig (2.1 Barg). Tightly close off
the isolation valve of 3. above. Disconnect
the pressure source.
6. Poke small holes in the tape at the bonnet/
body fl ange and at the opening in the blind
fl ange.
IOM-521
5
Page 6
7. For units with Reverse Action (ATO-FC)
ac tu a tors pressurize to a level suffi cient to
initiate travel to approximately mid-stroke
to hold the plug (3) away from the body (1)
seat.
6. Loosen stem nut (20) by rotating nut CW
(viewed from above) to base of threads.
7. Loosen packing (6) by turning packing gland
nut (5) CCW 2-3 revolutions.
8. Apply leak detection fl uid to all the potential
leak paths:
a. Packing gland nut (5). (Tighten as nec es-
sary.)
b. Body (1)-to-bonnet (2) fl ange tape hole.
c. Body (1) and bonnet (2) bolting (13, 14,
1.3, 1.4, 1.5).
d. End connection blind fl ange tape hole.
e. Test pressure piping con nec tions.
9. If leakage occurs at:
a. a. above, there is a packing (6) or a pack-
ing (6) /stem sub-assembly (9) failure.
b. b. above, there is a bonnet gasket (11)
failure.
c. c. above, there is a bonnet gasket (11),
or TFE core (1.2) failure.
d. d. above, there is a bellows sub-as sem bly
(8) failure.
10. Following this test procedure may help
to solve main te nance problems when
combined with visual ex am i na tion of disassembled body assembly (BA).
8. Rotate yoke nut (15) CCW to fully loosen
nut.
9A. For ATO-FC Reverse Action Actuators:
a. Connect a temporary air source
to the actuator and pressurize the
actuator to upper limit of the bench
range specifi ed on the valve name
plate. (Pressure will lift the plug head
(3) away from the body's (1) integral
seat until the plug (3) is 100% open.)
b. Place a wrench on the hex surface of
the swivel lower knuckle (44) and rotate
knuckle CCW (viewed from above ac tu a tor) until lower knuckle dis-engages from
stem (9). Keep track of the number of
full rev o lu tions to dis-engage and record
here. _______________
c. Maintain lift support from above the
C. Separation of Body/Actuator:
1. Reference the Actuator IOM-C27-C53 for
item number call outs and drawings for
actuator.
2. Secure the body in a vise with the actuator
assembly (AA) oriented vertically. Place
matchmarks between the body (1) bon net
fl ange, the bonnet (2) fl ange, and the yoke
(3) to assist in fi nal ori en ta tion when the
body is dis as sem bled and/or the ac tu a tor
removed. If actuator has handwheel - see
Actuator IOM for removal instructions.
3. Secure and rig the actuator assembly (AA)
for a ver ti cal lift using an overhead hoist.
Remove slack from rigging.
4. This procedure assumes that the body as sem bly (BA) has been fully assembled thru
the bonnet (2), including the packing gland
nut (5) and packing (6).
5. Remove vented pipe plug (12) from body.
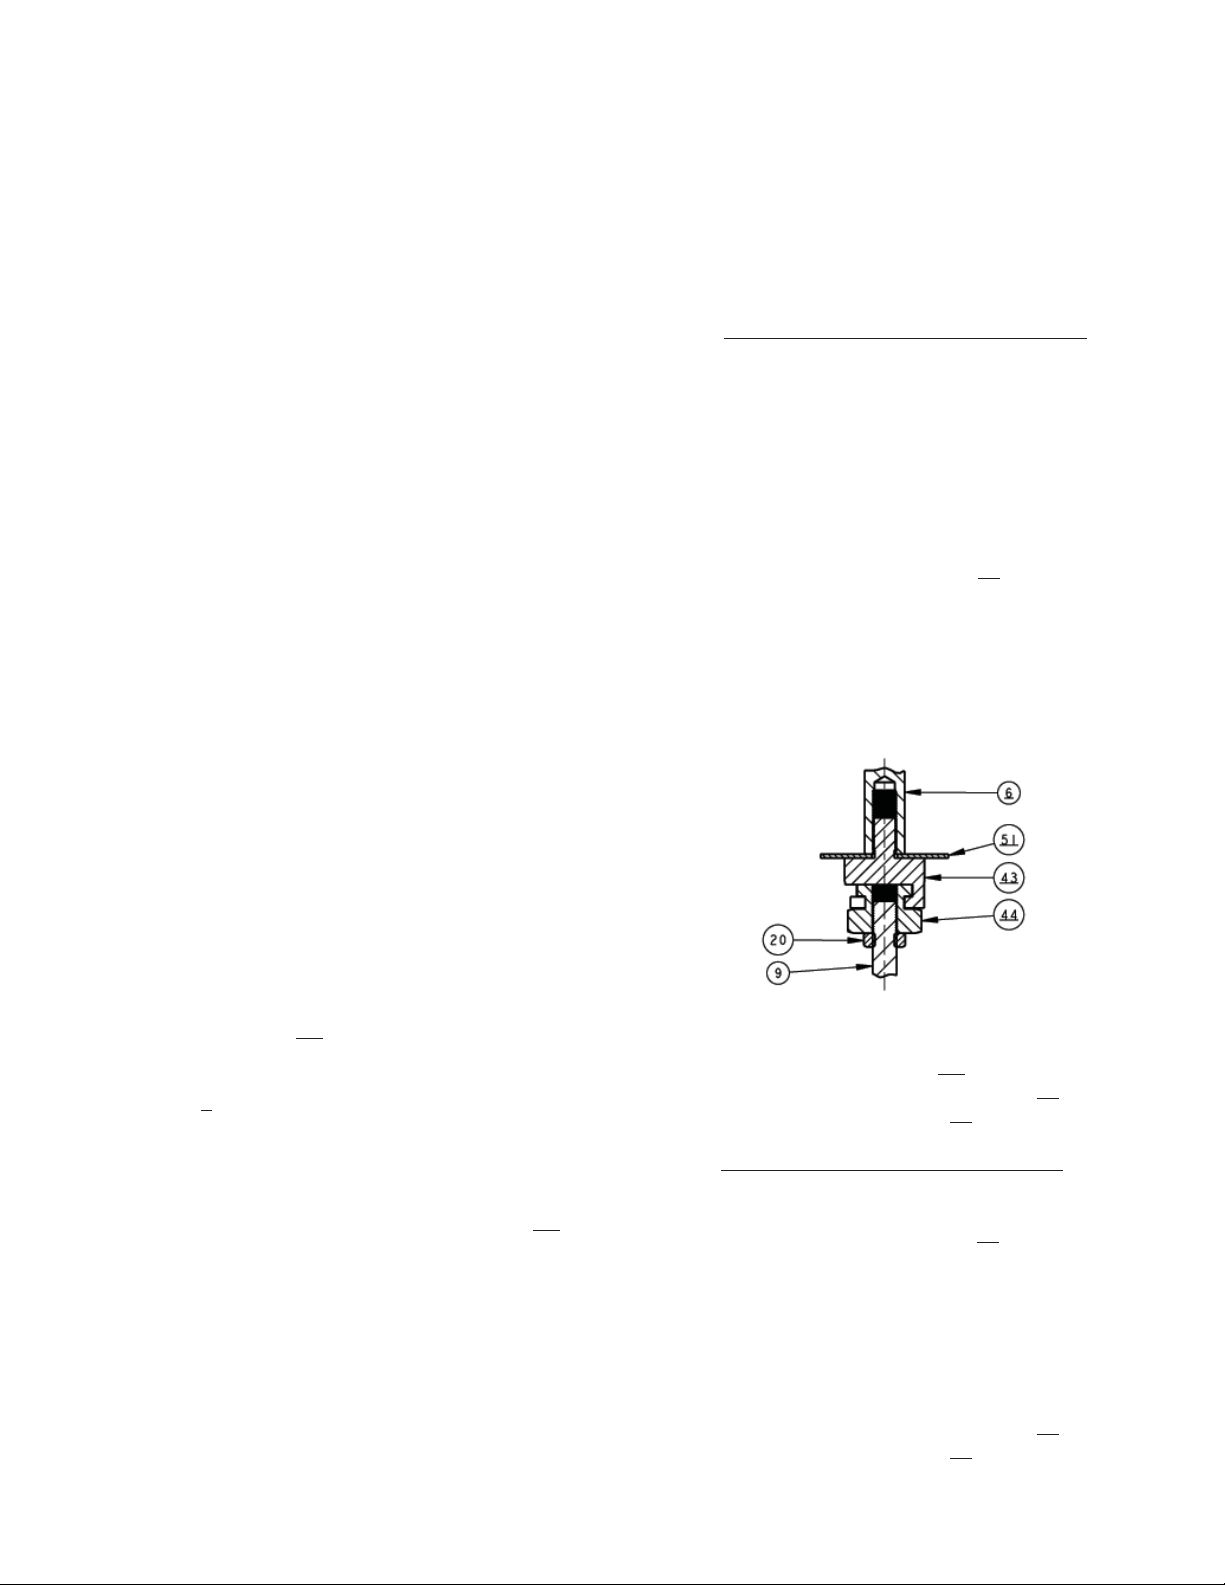
Figure 6: Swivel-Type Connector
actuator assembly (AA). Dis-engage
(slide) the swivel lower knuckle (44) out
of the upper knuckle (43) slot.
9B. For ATC-FO Direct Action Actuators:
a. Place a wrench on the hex surface of
the swivel lower knuckle (44) and rotate
knuckle CCW (viewed from above ac tu a tor) until lower knuckle dis-engages from
stem (9). Keep track of the number of
full rev o lu tions to dis-engage and record
here. ________________
b. Maintain lift support from above the
actuator assembly (AA). Dis-engage
(slide) the swivel lower knuckle (44) out
of the upper knuckle (43) slot.
IOM-5216
Page 7

10. Raise the actuator assembly (AA) over stem
(9). Release any ac tu a tor air pressure. Lay
actuator assemby aside on work surface.
D. Body Disassembly:
1. Access to body assembly (BA) internals
may be accomplished with the actuator assembly (AA) intact with the bonnet (2) (i.e.
locknut (15) is still fully tight ened), or with
the body assembly (BA) separated as per
above para graph V.C. Steps 1-10.
2. Maintenance procedures hereinafter are
based upon the actuator assembly (AA) fully
in ter con nect ed with the valve stem assembly
(9) during disassembly.
3. Secure the body in a vise with the actuator
assembly (AA) oriented vertically upwards.
Place matchmarks between the body (1)
bon net fl ange and the bonnet (2) fl ange to
assist in fi nal ori en ta tion when the body is
dis as sem bled and/or the ac tu a tor removed.
The valve body (1) is ma chined after the shell
halves (1.1) have been bolted (1.3, 1.4, 1.5)
around the TFE core (1.2). Dis as sem bly of
the body sub-assembly (1) will cre ate align ment problems during reassembly. The
TFE core (1.2) is not replaceable, except
as a body sub-as sem bly (1).
10. Make a visual inspection of the trim portions
still in ter con nect ed to the actuator assembly
(AA) for ob vi ous problems.
11. Hand-grasp the bellows sub-assembly
(8) and rotate CCW (viewed from plug (3)
end) to removal. Do not use any wrench,
vise, etc., for grasping the bellows subassembly (8)! The bellows (8) should only
be hand-tight.
12. Loosen packing gland nut (5) 2-3 revolutions out of the bonnet (2) by rotating CCW
(viewed from stem (9) end).
13. Loosen jam nut (20) 1-2 revolutions.
4. Secure and rig the actuator assembly (AA)
for a ver ti cal lift using an overhead hoist.
Remove slack from rigging.
5. Loosen all bon net cap screws (14) ap prox i mate ly 1/4" (6 mm) by rotating CCW (viewed
from above).
6. Raise actuator assembly (AA) with overhead
hoist approximately 1/8" (3 mm).
7. Continue to loosen and remove bonnet cap
screws (14 and lockwashers (13).
8. Using overhead hoist, lift the actuator as sem bly (AA) with the interconnected valve stem
sub-as sem bly (9), bellows sub-assembly
(8), bonnet (2), bonnet spacer (19), locknut
(15), packing gland nut (5), packing rings
(6), Belleville spring washers (7), bonnet
gas ket (11), plug (3) and plug retainer (4).
Lay this as sem bly down on a horizontal work
surface carefully, so as to not damage the
valve’s internals.
9. Make a visual inspection of the body subassembly (1) exterior, which includes two
shell halves (1.1), TFE core (1.2), and four
body cap screws (1.3) with body nuts (1.4)
and lock wash ers (1.5).
NOTE:
OF THE BODY SUB-ASSEMBLY (1)!
DO NOT DISASSEMBLE THE PARTS
14. Grasp the valve’s stem sub-assembly (9)
in the lower area (normally surrounded by
the bellows (8.1)) using soft jawed pliers
to pre vent marring stem surface. Place
a wrench on the hex surface of the swivel
lower knuckle (44) and rotate knuckle CW
(viewed from plug (3) end) until lower knuckle
dis-engages from stem (9). Keep track of
the number of full rev o lu tions to dis-engage
and record here. _______________
15. Retract the stem sub-assembly (9) down wards thru the bonnet (2) until stopped by
locknut (20). Rotate lock nut (20), CCW until
it is removed.
16. Fully withdraw stem sub-assembly (9).
17. Visually inspect parts for wear, general
cor ro sion, localized corrosion, dirty service
fl uid, uneven alignment, seat leakage wire
draw ing, excess plug-to-seat loading, fl ange
fac ings, looseness of plug-to-bellows con nec tion, primary seal at TFE Core (1.2)
-to-bel lows (8.1) joint, secondary seat at
bonnet gasket (11) (See Figure 9), blisters
on TFE sur fac es, etc.
18. Attempt to determine the reason for a failure.
Evaluate if process conditions need cor rec tion, if alternate materials are required for
the stem sub-assembly (9), or if effects of
IOM-521
7
Page 8

pos si ble permeation need considerations
similar to those outlined in Section III.C.1.
E. Plug, Bellows, or Both Replacement:
1. Disassemble the body assembly (BA) per
V.D.1.-11. previous.
2. Hand-grasp the bellows sub-assembly (8)
and hand-rotate the plug head (3) until the
plug retainer strip (4) ends come into view
thru the slot located on the side of the plug
head (3).
3. Using a pointed end pick tool, get under one
end of the plug retainer strip (4) and extract
thru the plug’s (3) slot. Manually rotate the
plug head (3) end to allow more of the plug
retainer strip (4) to be extracted. When able
to grasp with needle nose pliers, lightly pull
the plug retainer strip (4) and rotate the plug
head (3) as necessary until the strip (4) is
fully re moved.
4. Slide plug head (3) off the stub-end of the
bellows sub-assembly (8).
5. Discard the plug head (3), if worn. Always
discard the plug retainer strip (4); only use
a new plug retainer strip (4) at reassembly.
6. Do not attempt to fi eld remove embedded
nut (8.2) from inside the bellows (8.1); these
parts are only available as a sub-assembly
(8). If embedded nut (8.2) is badly corroded,
re place the entire bellows sub-as sem bly (8)
and give strong consideration to alternate
ma te ri als for stem sub-assembly (9) and
bellows nut (8.2). If em bed ded nut (8.2)
is “loose”, consider po ten tial causes and
re place bellows sub-as sem bly (8).
F. Packing Ring Replacement:
1. Disassemble the body assembly (BA) per
V.C. previous, including separation of body
as sem bly (BA) from actuator assembly (AA).
2. Loosen packing gland nut (5) until fully disengaged from bonnet (2) by rotating CCW
(viewed from stem (9) end). Remove packing rings (6) from packing box (re cess) in
bon net (2).
3. Examine wall surface inside the bonnet (2)
for any sign of cor ro sion.
4. Hone the bonnet’s (2) packing box to a #16
RMS fi nish. Burnish the stem sub-assembly
(9) to a #4 RMS fi nish in the packing (6)
contact area.
G. Reassembly of Body Assembly:
1. Place body assembly (BA) (1) in a vise with
the bonnet (2) end directed upwards.
2. Join the stem sub-assembly (9) to the bellows sub-assembly (8) (with new plug head
(3) already installed) by ro tat ing the stem's
(9) lower end into em bed ded nut (8.2) CW
(viewed from bellows (8.1) open end). Rotate the stem sub-assembly (9) as far as
possible while hand-grasping the bellows
(8.1) DO NOT USE A WRENCH IN THIS
OP ER A TION. A light coat of Fluorolube
(™ of Occidental Chem i cal Co.) lubricant
may be applied to the en gaged (threaded)
end of the stem sub-assembly (9) if fl uid
com pat i ble.
3. Place spacer washer (10) over the threaded
upper end of stem sub-assembly (9).
7. If bellows sub-assembly (8) is to be reused,
thor ough ly clean the valleys of the bellows
(8.1) con vo lu tions (inside and outside) for
the smallest of debris. Clean the grooves
of the bellows (8.1) and the plug head (3)
where the plug retainer strip (4) locates.
8. Place the plug head (3) over the bellows
sub-as sem bly (8) end. Insert a new TFE
plug re tain er strip (4) into the slot/groove.
Rotate the plug head (3) as necessary while
feeding the strip (4) until the strip (4) is fully
located into the groove. (No cutting of the
strip (4) should be required.)
4. Referring to Figure 7 for proper orientation
and quantity of Belleville spring washers (7),
place the spring washers (7) over the upper
end of stem sub-assembly (9).
5. Position a new bonnet gasket (11) into recess
of body sub-assembly (1).
6. Observe the underneath side of bonnet (2)
where square recess is located. Position
com bined bellows sub-assembly (8) and
stem sub-assembly (9) so that the antiro ta tion "stop" (square part of stem)is aligned
to slip into the bonnet’s (2) square recess.
IOM-5218
Page 9

1/2" (DN 15) & 1-1/2" (DN 40) Body Sizes
1" (DN 25) Body Size
and align ment of parts (10) (8) (11) (7),
re move temporary spacer while continuing downward force on the stem (9) while
si mul ta neous ly holding the bonnet (2) from
drop ping down wards.
13. Lower bonnet (2) carefully downwards into
the recess of the body sub-assembly (1)
while con tin u al ly applying downward force
on the stem (9).
14. At this point, downward force on stem (9)
may be exchanged for down ward force on
the bon net (2). Hand-tighten all bonnet cap
screws (14); relax down ward force on bonnet
once cap screws have taken up all slack.
15. Using a torque wrench, tight en bonnet cap
screws (14) in alternating cross-pat tern in
1/4 rev o lu tion in cre ments to 40 ft-# (55 N-M).
CAUTION
2" (DN 50) Body Size
Figure 7: Belleville Spring Washer Orientation
7. Center the loose parts (10) (7) surrounding
the stem (9) as close as possible.
8. Position the bonnet (2) over the exposed
upper stem sub-assembly (9), ensuring
that the anti-rotation "stop" (square or fl at
surface of the stem) is properly en gaged
into the bonnet (2) square recess.
9. Place a temporary spacer device (screw driv er blade, nuts, plain washers, etc.)
equallyspaced on the body (1) fl ange to hold
the bonnet (2) up, as bonnet is lowered into
the body, maximizing the gap between the
bonnet fl ang es (1) (2).
10. Place anti-seize thread lubricant on bonnet
cap screws (14). Engage all bonnet cap
screws (14) with lockwashers (13) ap prox i mate ly 1-1/2 revolutions.
11. Visually observing the gap between the
bon net (2) lower fl ange surface and the
body sub-assembly (1) bon net fl ange, ap-
ply downward force tend ing to seat the plug
end (3). This will pull the bellows (8.1) into
proper position for the primary bon net seal.
12. When visually satisfi ed of concentricity
Improper bonnet bolting torques may lead to
premature failure of the primary and secondary
bonnet seals.
16. Engage threaded, vented pipe plug (12) into
the 1/8" NPT tap on the bon net (2) if it was
removed. If a lubricating oil is compatible with
the fl uid, a light coat ing will aid in pre vent ing
galling of the plug (12). En sure that the tip
of the notch on the threads is in the bonnet
(2) at least 1-1⁄2 revolutions. Do not overtighten to min i mize chanc es of galling.
Do not use thread sealing com pound that
might “fi ll in” the notch and negate the pur-
pose of the notch.
17. The packing ring set (6) de sign is identical
for all unit body sizes. It consists of seven
V-rings (6.1) and one each male (6.2) and
female (6.3) adapter. (See Figure 8.)
The
purpose of the packing rings (6) is to minimize moisture ingress, and to serve as a
sec ond ary stem seal in the event of bellows
sub-as sem bly (8) failure.
Carefully install rings (6) as indicated in
Fig ure 8, one at a time, using a hollow tool
to press the rings (6) to their fi nal position.
Take care in slipping the rings (6) over the
threaded end of the stem (9) so as to not
mar the ring’s (6) internal surfaces. Do not
reverse ori en ta tion for vacuum service. Do
not “split” rings (6) for ease in replacement.
Do not reuse re moved packing rings (6).
IOM-521
9
Page 10

Figure 8: Packing Ring Set
18. Place anti-seize thread lubricant on threads
of packing gland nut (5). Place gland nut
(5) over the stem (9) end and engage with
the bonnet (2) by rotating CW (viewed from
ex posed stem (9) end); continue fi nger-
tight en ing to the point of resistance. Wrench
tighten gland nut (5) 1/8 revolution past the
manual tightening re sis tance point.
19. Place bonnet spacer (19) down over
threaded portion of the bonnet (2).
4. This procedure assumes that bonnet (2) has
been bolted to the body sub-assembly (1).
5. Engage stem jam nut (20) to body as sem bly’s stem (9) by rotating CW (viewed from
valve stem (9) end). Rotate jam nut (20) all
the way to root of the stem (9) threads.
6. Lower actuator assembly (AA) until the
open ing of the actuator yoke (1) is at the
level of jam nut (20).
7. Place yoke nut (15) over valve stem (9) and
lower the nut to rest upon the yoke (3).
8. Push valve stem (9) downward towards
seat ing po si tion. NOTE: The valve bellows
(8) may give “spring action” to keep the plug
(3) par tial ly away from the seat.
9. For Direct Action ATO-FC Only: Connect
a temporary air supply hose that has an
adjustable airset with gauge connected at
the lower actuator inlet. Pressurize actuator
to a suffi cient level to the upper pressure
level of the bench setting; i.e. for 5–15 psig
(.34–1.03 Barg) range, set pres sure at 15
psig (1.03 Barg).
20. Valve body assembly (BA) is completed, and
may be pressure tested up to 275 psig x 1.5
= 413 psig (19.0 Barg x 1.5 = 28.5 Barg) at
ambient tem per a ture. Before pressurizing
for hydro, ensure that plug (3) is away from
body (1) seat. NOTE: Use soft gas kets on
body as sem bly (BA) end fl anges to prevent
dis tor tion of TFE fl ange fac ings.
H. Mounting Actuator Assembly to Body
Assembly:
1. Reference Actuator IOM-C27-C53 for item
number call outs and drawings for actuator.
This procedure assumes that accessory
plate ((AP)) or indicating washer (51) was
not removed or has been secured to the
actuator stem(6) by the swivel upper knuckle
(43) - tighten with 20-30 ft.lbs. (27-40 N M).
DO NOT allow actuator stem (6) to rotate.
Secure fl ats on bottom of stem (6) when
rotating knuckle (43).
2. Secure the body as sem bly (BA) in a vise
with the valve stem (9) oriented vertically.
3. Rig actuator assembly (AA) to be supported
from above.
10. Apply Loctite Nickel Anti-Seize to grove and
top surface of swivel lower knuckle. Engage
(slide) the lower knuckle (44) into the upper
knuckle (43) saddle.
11. Continue lowering the actuator assembly
(AA) until the swivel lower knuckle (44)
connector and the valve's stem (9) just
touch. NOTE: For ATO-FC may need to
slowly reduce air pressure in the actuator
to connect the stem and knucle.
12. Thread yoke nut (15) onto bonnet (2) threads
by hand as far as possible to help stabilize
topworks. Wrench-tight en one-half (1/2)
extra revolution.
13. Engage valve stem (9) threads to swiv el
lower knuckle (44). Rotate swivel knuckle
(44) CW (viewed from actuator end) to
engage with valve stem (9), refer to V.C.
Steps 9A or 9B for the number of rev o lutions
recorded to dis-engage the lower knuckle.
14. Remove overhead rigging to allow ac tu a tor
assembly (AA) to fully rest on the bonnet (2).
Refer back to V.C. Step 2 for alignment of
match marks. Hand-tighten yoke nut (15).
IOM-52110
Page 11

15. For Direct Action ATC-FO Only: Release
all air pressure from actuator assembly (AA),
see step 9 previous and remove temporary
air supply.
16. Re-tighten packing gland nut (5).
VI. CALIBRATION
17. Tighten yoke nut (15) to 85 ft--# (115 N-M)
18. Calibrate actuator to valve per Section VI.
SECTION VI
A. General:
1. This section only covers calibration of this
control valve with Actuator Models C27-C53.
2. Positioner, if installed, requires reference to
the spe cifi c positioner model IOM for proper
cal i bra tion pro ce dure.
3. All indicated Item Num bers that are with
re spect to IOM-C27-C53 will be in pa ren the sis and un der scored; i.e. (20). All Item
Num bers that are with respect to this IOM521 are not un der scored; i.e. (32).
B. Procedure – Reverse Ac tion, ATO-FC:
1. Reference the name plate (40) at tached to
the actuator yoke (3). De ter mine the bench
set ting of the installed range springs (10)
from the name plate (40).
2. Connect a temporary air supply with an inline ad just able airset reg u la tor and gauge
to the lower actuator con nec tion. DO NOT
LOAD with any air pressure at this point.
3. To determine when stem/plug (9) begins to
lift out of the seat, touch the stem below the
jam nut with one fi nger. (Stem will begin to
move when actuator pressure exceeds the
spring load.)
4. Slowly pressurize the ac tu a tor to a pres sure
equal to the lower pres sure level of the bench
setting; i.e. for 5-15 psig (.34–1.03 Barg)
range, set pressure at 5 psig (.34 Barg).
Take note of pressure reading when the
stem fi rst begins to move.
5. If the loading pressure for the start of stem
movement is below the lower end of the
desired bench setting, then the com bined
stem (9, 6) length is too short.
a. Rotate jam nut (20) down to base of
threads on stem (9).
b. Increase pressure in the actuator to
approximately mid range of the bench
setting.
c. Rotate lower knuckle (44) CCW to in-
crease the combined stem length. DO
NOT allow actuator stem (6) to rotate
in the actuator.
d. Release all pressure from the actuator
and repeat Step 4 previous.
6. If the loading pressure for the start of stem
movement is above the lower end of the
desired bench setting, then the com bined
stem (9, 6) length is too long.
a. Rotate jam nut (20) down to base of
threads on stem (9).
b. Increase pressure in the actuator to
approximately mid range of the bench
setting.
c. Rotate lower knuckle (44) CW to shorten
the combined stem length. DO NOT
allow actuator stem (6) to rotate in the
actuator.
d. Release all pressure from the actuator
and repeat Step 4 previous.
7. Observe the location of the in di ca ting washer
(51) to the "C" mark on the in di ca tor plate
(23), mak ing sure to use the “top edge” of
the in di ca ting washer (51) as the ref er ence
point. Adjust indicator plate as needed.
8. Remove vented pipe plug (12) from the neck
of the bonnet (2).
9. Slowly increase the pressure in the actuator
until the indicating washer (51) is in alignment with the "O" mark on the indicator plate.
As pressure increases, thru the hole where
the vent ed pipe plug (12) was re moved,
watch for the anti-ro ta tion al "stop" (square
or fl at surface of the stem) to appear.
IOM-521
11
Page 12

NOTE: This "stop" should not function as
an up travel stop and push up against the
bonnet (2) (metal to metal). A gap of approximately 1/16" (1-1/2 mm) should exist
between these two surfaces.
NOTE: The purpose of a correct calibration
of the stem stroke is to cause the up travel
to be limited by the actuator travel stop nut.
10. To limit the up travel, rotate the travel stop
nut (52) CW and secure to bottom of attachment hub (4).
NOTE: Secure the actuator stem (6) by the
fl ats when rotating the travel stop nut.
NOTE: "Stroke" length is indicated on the
nameplate (40), and is the distance between
the "C" and "O" marks of the indicator plate
(23).
NOTE: The proper calibration of the actua-
tor / valve unit will occur when at the lower
pressure level of bench setting the valve
plug (3) will just begin to travel from the "C"
position. At the upper level of the bench
setting, the actuator pressure should be
within ±8% of the upper bench range for
the desired stroke length.
11. Engage threaded, vented pipe plug (12)
into the 1/8" NPT tap on the bon net (2). If
a lubricating oil is compatible with the fl uid,
a light coat ing will aid in pre vent ing galling
of the plug (12). En sure that the tip of the
notch on the threads is in the bonnet (2) at
least 1-1⁄2 revolutions.
Do not over-tighten to min i mize chanc es of
galling.
Do not use thread sealing com pound that
might “fi ll in” the notch and negate the pur-
pose of the notch.
12. Release all pressure from actuator.
(Stem movement will stop when the plug
engages the seat.)
4. Slowly pressurize the ac tu a tor to a pres sure
equal to the upper pres sure lev el of the
bench setting; i.e. for a 5-15 psig (.34 -1.0
Barg) range, set pressure at 15 psig (1.0
Barg). Take note of the pressure reading
when stem travel actually stops.
5. If the loading pressure, when stem movement stops, is below the upper end of the
desired bench setting, then the com bined
stem (9, 6) length is too long.
a. Rotate jam nut (20) down to base of
threads on stem (9).
b. Decrease pressure in the actuator to
approximately mid range of the bench
setting.
c. Rotate lower knuckle (44) CCW to
shorten the combined stem length. DO
NOT allow actuator stem (6) to rotate
in the actuator.
d. Release all pressure from the actuator
and repeat Step 4 previous.
6. If the loading pressure, when stem movement stops, is above the upper end of the
desired bench setting, then the com bined
stem (9, 6) length is too short.
a. Rotate jam nut (20) down to base of
threads on stem (9).
b. Decrease pressure in the actuator to
approximately mid range of the bench
setting.
c. Rotate lower knuckle (44) CW to in-
crease the combined stem length. DO
NOT allow actuator stem (6) to rotate
in the actuator.
d. Release all pressure from the actuator
and repeat Step 4 previous.
C. Procedure – Direct Action, ATC-FO:
1. Reference the nameplate (40) attached to
the actuator yoke (3). Determine the bench
set ting of the installed range springs (10)
from the nameplate (40).
2. Connect a temporary air supply with an inline ad just able airset regulator and gauge
to the upper actuator con nec tion. DO NOT
LOAD with any air pressure at this point.
3. To determine when stem/plug (3) makes
contact with the seat and travel stops, touch
the stem below the jam nut with one fi nger.
7. Increase pressure in the actuator to the upper pressure level of the bench setting.
8. Observe the location of the in di ca ting washer
(51) to the "C" mark on the in di ca tor plate
(23), mak ing sure to use the “top edge” of
the in di ca ting washer (51) as the ref er ence
point. Adjust indicator plate as needed.
8. Remove vented pipe plug (12) from the neck
of the bonnet (2).
9. Slowly release air pressure in actuator until
indicating washer (51) is in alignment with
the “O” mark on the indicator plate (23).
IOM-52112
Page 13

As pressure decreases, thru the hole in
the bonnet where the vented plug (12) was
removed, watch for the anti-rotational "stop"
(square or fl at surface of the stem) to appear.
NOTE: This "stop" should not function as
an up travel stop and push up against the
bonnet (2) (metal to metal). A gap of approximately 1/16" (1-1/2 mm) should exist
between these two surfaces.
NOTE: The purpose of a correct calibration
of the stem stroke is to cause the up travel
to be limited by the actuator travel stop nut.
10. To limit the up travel, rotate the travel stop
nut (52) CW and secure to bottom of attachment hub (4).
NOTE: Secure the actuator stem (6) by the
fl ats when rotating the travel stop nut.
NOTE: "Stroke" length is indicated on the
nameplate (40), and is the distance between
the "C" and "O" marks of the indicator plate
(23).
NOTE: The proper calibration of the actua-
tor / valve unit will occur when at the upper
pressure level of bench setting, the valve
plug (3) will be in the "C" position. At the
lower level of the bench setting, the actuator pressure should be within ±8% of the
lower bench range for the designed stroke
length.
11. Reinstall vented pipe plug (12) using “Fluorolube” grease on threads.
12. Release all pressure from actuator.
NOTES
IOM-521
13
Page 14

SECTION VII
VII. TROUBLE-SHOOTING GUIDE:
1. Valve is "jumpy" in stroking.
Possible Causes Remedies
A. Excess packing friction. A1. Re-align body--stem--actuator.
B. Installed backwards. B. Install per fl ow arrow. Direction is only FTO.
2. Valve/actuator makes "screeching" noise.
Possible Causes Remedies
A. Excess pressure drop. A. Bring pressure drop within design limits.
3. Valve exhibits "excess" vibration.
Possible Causes Remedies
A. Excess pressure drop. A. Bring pressure drop within design limits.
B. Excessive cavitation in liquid service. B. Change operation parameters to relieve causes of cavitation.
C. High outlet velocity. C1. Reduce fl ow rate and/or pressure drop.
A2. Packing follower too tight; back packing gland nut out.
A3. Install positioner.
A4. Increase bench set by changing to stiffer actuator range spring. May require
positioner if not installed. May require different airset.
C2. Use multiple valves in series or parallel.
C3. Increase outlet pipe size.
C4. Use larger valve body with reduced trim.
4. Valve exhibits "excess" seat leakage.
Possible Causes Remedies
A. Excess pressure drop. A1. Reduce pressure drop conditions.
B. Excess body and/or plug wear. B1. Oversized valve operating too close to seat; go to reduced trim.
5. Bonnet gasket leakage.
Possible Causes Remedies
A. Improper bonnet bolting drawdown. A1. Remove bonnet taking necessary safety precautions. Inspect bellows to
B. Cantilevered actuator. B1. Do not allow use of the actuator as a "step" upon which personnel may climb.
6. Body fl ange leakage.
Possible Causes Remedies
A. Over-tightening fl ange bolting. A. Loosen bolting, replace/install new gasket, retighten fl ange bolting in s
B. Improper pipe supports and anchors. B. Provide piping anchors and guides at control valve station.
C. Corroded fl ange bolting. C. Replace with corrosion resistant fl ange bolting.
D. Used outside pressure/temperature limits. D. Bring process variables within range of application; see Graph 1 in 521-TB.
A2. Convert to reduced trim.
A3. Increase actuator thrust by changing actuator range spring.
B2. Remove abrasive particulate.
B3. Possible excess cavitation in liquid service. Change operation parameters.
B4. Replace body assembly if seat is badly worn. Replace plug if badly worn.
determine if primary seal at body/bellows is damaged. If bellows is damaged,
replace bellows.
A2. Inspect secondary seal bonnet gasket for uneven thickness.
Replace bonnet gasket.
A3. Draw down bonnet bolting evenly and in a cross pattern; use bonnet bolting
torque levels indicated herein.
B2. Do not "set" any added weight on the actuator.
B3. Install vertically.
cross-pattern evenly.
Restrain bending movements.
IOM-52114
Page 15

7. Bellows failure.
Possible Causes Remedies
A. Overstroke of actuator. A. Recalibrate valve/actuator unit.
B. Abrasive particulate in fl uid. B. Remove all fl uid particulate.
C. Pressure, temperature, or pressure drop
outside limits.
D. Fluid absorption. D1. Reduce pressure/temperature if possible.
E. Frequent stroking causing fatigue failure of
TFE material.
F. Corrosion of embedded nut. F1. Consult factory.
8. Corrosion of stem sub-assembly at packing area.
Possible Causes Remedies
A. Loose packing. A. Disassemble valve and replace stem. Reassemble and tighten packing.
B. Fluid permeation of bellows.
C. Bellows failure. C. See No. 7 of this section.
C. Bring process variables within range of application; see Graph 1 in 521-TB..
D2. Reduce number of startups/shutdowns, or rapid depressurizations.
E1. Stabilize input SIG.
E2. Stabilize positioner output LOAD.
E3. Stabilize process variations to steady state, steady fl ow.
E4. Excess "play" in actuator swivel adapter; replace adapter.
E5. Cycle life reached; replace bellows.
F2. Use alternate stem material.
B1. Bring process variables within range of application; see Graph 1 in 521-TB.
B2. Use alternate stem materials construction.
B3. Locate, or position valve to be out of ambient moisture.
B4. Modify insulation if "trapping" moisture around packing gland nut.
B5. Purge "void zone".
9. Corrosion of silver soldered joint in sub-assembly (1-1/2" or 2" sizes only).
Possible Causes Remedies
A. Fluid permeation with chemical attack of
silver solder.
10. Corrosion surrounding vented pipe plug on bonnet.
Possible Causes Remedies
A. Fluid permeation and loose vented pipe plug. A1. Tighten plug.
B. Bellows Failure. B. Replace bellows.
11. External corrosion of jacket halves, bonnet, and body and bonnet bolting.
Possible Causes Remedies
A. Corrosive ambient environment. A1. Determine location of corrosive fl uid and maintain cause of leakage.
12. Blisters on TFE internals.
Possible Causes Remedies
A. Effects of absorption. A1. Reduce pressure/temperature levels.
A1. Use alternate stem materials construction.
A2. Purge "void zone".
A2. Replace corroded plug.
A3. Purge "void zone".
A2. Coat exposed portions with suitable corrosive resistant epoxy to degree able,
A2. Reduce startups/shutdowns and rapid depressurizations.
A3. Replace body assembly.
13. General corrosion of internals in "void zone", including Belleville washers ,embedded nut, bonnet, anti-rotation stop, and stem.
Possible Causes Remedies
A. Permeation together with ingress of
moisture in "void zone".
A1. Remove moisture source to greatest degree possible.
A2. Purge "void zone".
IOM-521
15
Page 16

Figure 9: Primary & Secondary Body/Bonnet
IOM-52116
Page 17

NOTE: No. varies
by body size
Figure 10: Control Valve Internals
ITEM NO. DESCRIPTION
1 Body Sub-Assembly
1.1 * Half Shell
1.2 * TFE Core
1.3 * Cap Screw
1.4 * Nut
1.5 * Lockwasher
2 Bonnet
3 Plug Head
4 Plug Retainer Strip
5 Packing Gland Nut
6 Packing Set
* Sub-level parts that make up the body sub-assembly; NOTE: DO NOT DISASSEMBLE THE PARTS OF THE
BODY SUB-ASSEMBLY (1)! The valve body (1) is ma chined after the shell halves (1.1) have been bolted (1.3,
1.4, 1.5) around the TFE core (1.2). Dis as sem bly of the body sub-assembly (1) will cre ate align ment problems
upon com plet ed reassembly. The TFE core (1.2) is not replaceable, except as a body sub-as sem bly (1).
IOM-521
ITEM NO. DESCRIPTION
7 Belleville Spring Washer
8 Bellows Sub-Assembly
9 Stem Sub-Assembly
10 Spacer
11 Bonnet Gasket
12 Vented Pipe Plug
13 Lockwasher
14 Bonnet Cap Screw
15 Yoke nut
Not Shown
18 Rating Tag
19 Bonnet Spacer
20 Jam Nut
17
Page 18

SECTION VIII
VIII. ORDERING INFORMATION:
NEW REPLACEMENT UNIT vs PARTS "KIT" FOR FIELD REPAIR
To obtain a quotation or place an order, please retrieve the Serial Number and Product Code that was stamped
on the metal name plate and attached to the unit. This information can also be found on the Bill of Material
("BOM"), a parts list that was provided when unit was originally shipped. (Serial Number typically 6 digits).
Product Code typical format as follows: (last digit is alpha character that refl ects revision level for the product).
–
NEW REPLACEMENT UNIT:
Contact your local Cashco, Inc., Sales Rep re sen ta tive with the Serial Number and Product code.
With this information they can provide a quotation
for a new unit including a complete description,
price and availability.
CAUTION
Do not attempt to alter the original construction of any
unit without assistance and approval from the factory. All
purposed changes will require a new name plate with appropriate ratings and new product code to accommodate
the recommended part(s) changes.
PARTS "KIT" for FIELD REPAIR:
Contact your local Cashco, Inc., Sales Rep re sen ta tive with the Serial Number and Product code.
Identify the parts and the quantity required to repair
the unit from the "BOM" sheet that was provided
when unit was originally shipped.
–
7
TO RETURN A VALVE FOR REPAIR: (RGA)
Before returning this Model - Contact Cashco Inc.
for permission to return the unit (as a whole or any
part of) and to obtain an "RGA" identifi cation num-
ber. This number must be marked clearly on the
outside of the returned container. In addition, affi x
to the outside of the container a signed statement
attesting to the fact that the valve and/or parts has
been fl ushed out for a specifi c period of time using
an "OSHA"acceptable neutralizing agent. The name
of the agent, the manufacturer's company name
and the total concentration level must be included
for both the valve service medium, as well as the
neutralizing agent.
NO returns wil be accepted at Cashco Inc. without
an M.S.D.S. (Material Safety Data Sheet) affi xed to
the outside of the returned container.
NOTE: Those part numbers that have a quantity indicated
under "Spare Parts" in column "A” refl ect minimum
parts required for inspection and rebuild, - "Soft
Goods Kit". Those in column “B” include minimum
trim replacement parts needed plus those "Soft
Goods" parts from column "A".
If the "BOM" is not available, refer to the crosssectional drawings included in this manual for part
identifi cation and selection.
A Local Sales Representative will provide quotation
for appropriate Kit Number, Price and Availability.
The contents of this publication are presented for informational purposes only, and while every effort has been made to ensure their accuracy, they are not to be
construed as warranties or guarantees, express or implied, regarding the products or services described herein or their use or applicability. We reserve the right to
modify or improve the designs or specifi cations of such product at any time without notice.
Cashco, Inc. does not assume responsibility for the selection, use or maintenance of any product. Responsibility for proper selection, use and maintenance of any
Cashco, Inc. product remains solely with the purchaser.
IOM-52118
Page 19

Figure 11: Body Assembly (BA)
Note: End fl ange
tapped bolt holes
straddle horizontal and
vertical centerlines.
ITEM NO. DESCRIPTION
1 Body Sub-Assembly
2 Bonnet
3 Plug Head
4 Plug Retainer Strip
5 Packing Gland Nut
6 Packing
7 Belleville Spring Washer
8 Bellows Sub-Assembly
IOM-521
ITEM NO. DESCRIPTION
9 Stem Sub-Assembly
10 Spacer
11 Bonnet Gasket
12 Vented Pipe Plug
13 Lockwasher
14 Bonnet Cap Screw
15 Yoke nut
18 Rating Tag
19 Bonnet Spacer
20 Jam Nut
Not Shown
17 ANSI/DIN Adapter Gasket
43 Upper knuckle See Fig. 6
44 Lower knuckle See Fig. 6
51 Indicating Washer See Fig. 6
19
Page 20

Cashco, Inc.
P.O. Box 6
Ellsworth, KS 67439-0006
PH (785) 472-4461
Fax. # (785) 472-3539
www.cashco.com
email: sales@cashco.com
Printed in U.S.A. 521-IOM
Cashco GmbH
Handwerkerstrasse 15
15366 Hoppegarten, Germany
PH +49 3342 4243135
Fax. No. +49 3342 4243136
www.cashco.com
Email: germany@cashco.com
Cashco do Brasil, Ltda.
Al.Venus, 340
Indaiatuba - Sao Paulo, Brazil
PH +55 11 99677 7177
Fax. No.
www.cashco.com
Email: brazil@cashco.com
 Loading...