

Casella CEL Apex personal sampling pump User Manual

Preparation
Please refer to warnings and operation section of
HB3294-02 before using I.S versions of Apex pumps.
The default settings used by the pump (such as menu language
and temperature units) can be specified from within the pump’s
Configuration Mode.
Control Keys
Switches the instrument ON/OFF. Press to switch ON,
press and hold a moment to cancel a command, press
and hold down to switch OFF.
Scrolls up through options or increases a value, has a
hold-down to repeat function.
Scrolls down through options or decreases a value, has
a hold-down to repeat function.
Press to accept a value or option (for example start the
pump). Hold down to stop the pump.
Display Symbols
Halt - shows when pump is in Hold Mode, or blinks
when halt option available.
Run - shows when pump motor is running.
Flow - indicates real flow monitoring.
& together indicate that the pump is paused, but will
start again automatically, for example during TWA or
user prepared programs.
Warning - indicates flow outside permitted limits or other
error conditions.
Battery condition. The symbol empties as the power is
drained.
oC/o
F Instrument temperature (user selectable units).
Indicators & Display Messages
Green LED Flashes when the motor is running.
Red LED Flashes when unable to maintain the required
PROGEnd Displayed when the pump has successfully
flow due to restriction.
completed a programmed sample.
BATTFAIL Warning that the voltage from the battery pack is
SERV dUE Warning after 2500 hours of operation that the
Buzzer When activated sounds warnings and indicates
below minimum operating level.
instrument should be serviced.
keystrokes.
Switch Instrument On / Off
To switch the instrument ON, press and hold until the
instrument display is activated. The display starts to test its
segments, shows the pump ID and finally the firmware version
number before entering Hold Mode.
On Apex Pro versions only, the-day-of-the-week and the timeof-day are also displayed during the start up cycle.
If the display is too bright or dim, shows messages in an
unexpected language or unexpected measurement units, make
changes as described in the Configuration Mode section.
To switch OFF, press and hold . The display will show a
count down in seconds until the instrument switches off and
the screen becomes blank.
If is released before the countdown has finished, the
instrument returns to its previous mode.
Hold Mode
When the instrument is switched ON but the pump is not
operating, nor a program being executed, it is in Hold Mode
where the display cycles between:
TIME Accumulated sample time since the instrument was last
reset.
VOL Accumulated volume sampled since it was last reset.
TEMP Current air temperature.
Manual Reset (Clear Current Sample)
To clear any accumulated sample duration and volume, the
instrument must be in Hold Mode.
Press or sufficient times to make blink on the
display.
Press and hold until CLR and the countdown disappear, to
clear the accumulated values.
Set Flow (Single Point Calibration)
Attach a sampling head and flow tube or other flow-measuring
device to the pump’s inlet nozzle to measure the actual flow.
In Hold Mode, press or several times until FLOW SEt
blinks on the display. Press to select.
Use and to set the flow required at this calibration
point, then press to accept the setting. The pump will start.
A soon as CAL SEt is displayed, use and to adjust the
actual flow measured by the flow tube to match the set point,
then press to accept the value.
This calibration point will be saved and used by the pump in all
future samples made at this flow.
To return to Hold Mode without setting a new flow, press
and hold for a moment.
If the calibration is not completed within 30 seconds, the pump
will revert to Hold Mode automatically.
When basic settings are acceptable, proceed directly to the
Manual Sampling section, if not acceptable, go to Configuration
Mode.
Configuration Mode
This mode allows basic settings to be changed. It can be
activated only while switching the instrument on.
Press to switch on, then immediately hold both and
down. After a brief display test, the first configuration option is
displayed.
LANG Sets the display language (the currently set language
blinks).
Use or to change then press to accept.
TEMP Sets temperature display (current units blink).
Use or to change between Centigrade and
Fahrenheit, then press to accept.
VOL Sets volume display mode (current mode blinks).
Use or to change between Auto or m
3
.
Auto displays volumes below 1000 litres in litres, above
this the display changes to m
3
always displays volumes in m3.
m
BUZZEr Allows an audible alarm to be set.
Use or to change between:
OFF, no buzzer,
Err, any error sounds an alarm,
On, any error or key press sounds an alarm.
PROG Mode Determines whether the program features of an
Apex Pro are to be made available.
Use or to change between:
ON with the program features available,
OFF with the program features hidden.
Press to accept.
LIFE Is read-only and shows total run time for the pump.
This can be used to determine suitable maintenance
schedules for the instrument.
Press to move on.
LCD Sets LCD contrast (current level blinks).
Use to increase the value (make darker) and to
decrease it (make lighter).
Press to accept.
CAL SET Activates Calibration Mode, allowing the pump’s
calibrated range to be reset.
Use or to change between:
NO - do not recalibrate the pump, then press to
revert to Hold Mode,
Or,
YES - recalibrate the pump, press to enter
calibration Mode and proceed to Calibrating The Pump.
3
.
Manual Sampling
While in Hold Mode, press to start sampling and enter Run
Mode.
In Run Mode the display cycles between, current duration of
the sample, volume sampled, and air temperature.
To stop sampling while the pump is in Run Mode, press and
hold until the symbol stops blinking and disappears.
The instrument will save the accumulated duration and volume
sampled until manually reset.
Flow Restriction
If the input flow is restricted, both and the Red LED will
flash (and when activated the buzzer sound) to indicate a
problem. If the problem lasts for eight or more seconds, the
pump motor will switch itself off.
After one minute, the pump will switch on again in an attempt
to determine whether the problem has gone. If the problem
remains for another eight seconds, the pump will switch off
and remain off.
If the output flow is restricted, both and the Red LED will
flash (and when activated the buzzer sound) to indicate a
problem. If the problem lasts for three or more seconds, the
pump motor will switch itself off and remain off.
Normal operation cannot be resumed until the flow restriction
has been removed. When the restriction is removed, the pump
may start again automatically; if it does not, switch the Apex
unit OFF then ON again.
Use With Low Flow Adaptor
This enables the instrument to be used with sorbent tubes at
flows down to 5 millilitres/min.
Connect the inlet of an Apex unit to a flowmeter such as the
Dry Cal and calibrate the flow rate to 1.5 litre/min.
Stop the pump and disconnect the flowmeter.
Starting from the Apex inlet, connect the following: constant
pressure regulator, low flow adaptor, sorbent tube holder and a
low flow flowmeter such as the Dry Flow or Dry Cal.
Break both ends off a sorbent tube and put it in the holder with
the arrow pointing towards the pump.
Start the pump and adjust the flow to the required rate using
the screw on the side of the low flow adaptor.
Perform the measurements using a fresh sorbent tube.
Bag Mode
This allows the pump to fill a gas bag and stop automatically
when the bag is full. Connect the gas bag to the pump outlet.
Select Set Flow then set the flow to less than 0.8 litre/min to
11
Infra red port
Red LED
02036
Infra red port
Red LED
02036
11
activate the mode.
In Bag Mode, the display shows BAG. The speed of the pump
motor is fixed and the display shows only percentage flow,
with no volume or time information.
Once the pump has started, or may be used to change
the flow rate to a different percentage.
Fixed Duration Sampling (DUR)
The duration of a sample can be selected from the instrument
keypad. On the Apex Pro it can also be selected via Pump
Manager software.
This mode allows the pump to sample for a fixed period and
switch off automatically when the period has ended. This is
useful when a stated volume of air must be sampled over a
long period.
In Hold Mode press or several times until DUR blinks
on the display. Press to select.
The programmed duration blinks to indicate it can be changed
by and . Run durations between 3 minutes and 1 hour
can be set in 1-minute steps, and durations between 1 and 25
hours in 10-minute steps.
Press to accept a duration and start sampling.
In addition to the symbol, the display shows PROG. to
indicate that a program is active. While the program is running,
the display cycles through current sample time, volume
sampled, air temperature, and programmed duration.
Once completed, the pump will switch off and the display
show and a PROGEnd message.
Press any key to return the pump to Hold Mode.
Locking The Keypad
The keypad may be partially or fully locked to prevent
unauthorised tampering with instrument settings.
Press three times within 2 seconds to activate Partial Lock
Mode at any time. The symbol is displayed, the counters
and flow cannot be changed but the following options remain
available: start/stop sampling, switch the pump off, unlock
Partial Lock, and select Full Lock. (Press three times within
2 seconds to unlock.)
Only when the PUMP IS RUNNING, press three times
again within 2 seconds while in Partial Lock Mode to activate
Full Lock Mode. The symbol is displayed, the pump cannot
be switched off and the only option available is to release Full
Lock Mode by pressing three times within 2 seconds.
TWA Sampling (Apex Pro only)
This feature is available only when the Apex Pro Program
Mode has been enabled from within Configuration Mode.
This allows the pump to operate for a fixed percentage of a
specified sample time. The instrument calculates the required
on/off cycle automatically to spread the total exposure time
over the entire sample time (as shown).
In Hold Mode press or several times until TWA blinks
on the display. Press to select.
RUN is displayed and the sample time blinks to indicate that it
can be changed by and . Run times between 3 minutes
and 1 hour can be set in 1-minute steps, and times between 1
and 25 hours in 10-minute steps.
Press to accept a sample time.
EXP is displayed, and the exposure time blinks to show it can
be changed by and .
The available range is 2 minutes to 1-minute-less-than-the-run-
time, in 1-minute steps.
Press to accept an exposure time and start sampling. In
addition to the usual and symbols the display shows
PROG. to indicate that a program is active.
The pump exposure (on) times are fixed at 1 minute, and the
instrument calculates the necessary off-times to spread these 1
minute intervals throughout the sample time. While the
program is running, the display cycles through current
accumulated sample time, volume sampled, air temperature
and calculated TWA (as percentage of run time).
During off-times (pump not running) the and symbols
are displayed to show the instrument is paused.
On
1minOn1minOn1minOn1minOn1minOn1minOn1minOn1minOn1minOn1min
Run: 480 min
Exp: 10 min
TWA: 2%
Off
47 min
Off
47 min
Off
47 min
Off
47 min
Off
47 min
Off
47 min
Off
47 min
Off
47 min
Off
47 min
Off
47 min
020
Once the sample is completed, the pump will switch off and
the display show the symbol and a PROGEnd message.
Press any key to return to Hold Mode.
User Program Modes (Apex Pro only)
This feature is available only when the Apex Pro Program Mode
has been enabled from within Configuration Mode. For more
comprehensive information, please refer to the User Handbook.
This allows complex sampling schedules (created by the user in
Pump Manager PC software and downloaded via the infrared
link) to be run by the pump. The programs are stored in two
user program areas Pr1 and Pr2.
In Hold Mode, repeatedly press or until Pr1 or Pr2
blink. Press to select the program.
The various steps in the program can be viewed using and
. Press to accept the program and start it running.
In addition to the usual and symbols the display shows
PROG. to indicate that a program is active.
During off-times (when the motor is not operating) and
are displayed to show the unit is paused.
Once the run is completed, the display will show the
symbol and a PROGEnd message.
Press any key to return the pump to Hold Mode.
To terminate the program early, press and hold to show the
STOP option, keep pressed until the pump reverts to Hold
Mode.
Calibrating The Pump
This procedure changes the basic calibration for the
entire flow range of the pump.
As the pump will have been accurately calibrated at the factory,
DO NOT undertake this procedure without first referring to the
Users Handbook.
Casella Instrumentation and Software is designed,
manufactured and serviced by:
Casella CEL
Regent House
Wolseley Road
Kempston
Bedford
MK42 7JY U.K.
Phone: +44 (0)1234 844 100
Fax: +44 (0)1234 841 490
E-Mail: info@casellacel.com
Web: www.casellacel.com
Casella USA
17 Old Nashua Road #15
Amherst
NH 03031 U.S.A.
Toll Free:+1 800 366 2966
Phone: +1 603 672 0031
Fax: +1 603 672 8053
E-mail: info@casellaUSA.com
Web: www.casellaUSA.com
www.casellagroup.com
Think environment Think Casella
Apex & Apex Pro
Sampling Pumps
HB3295 -02/Jan 05
FIELD GUIDEfor Apex & Apex Pro Personal
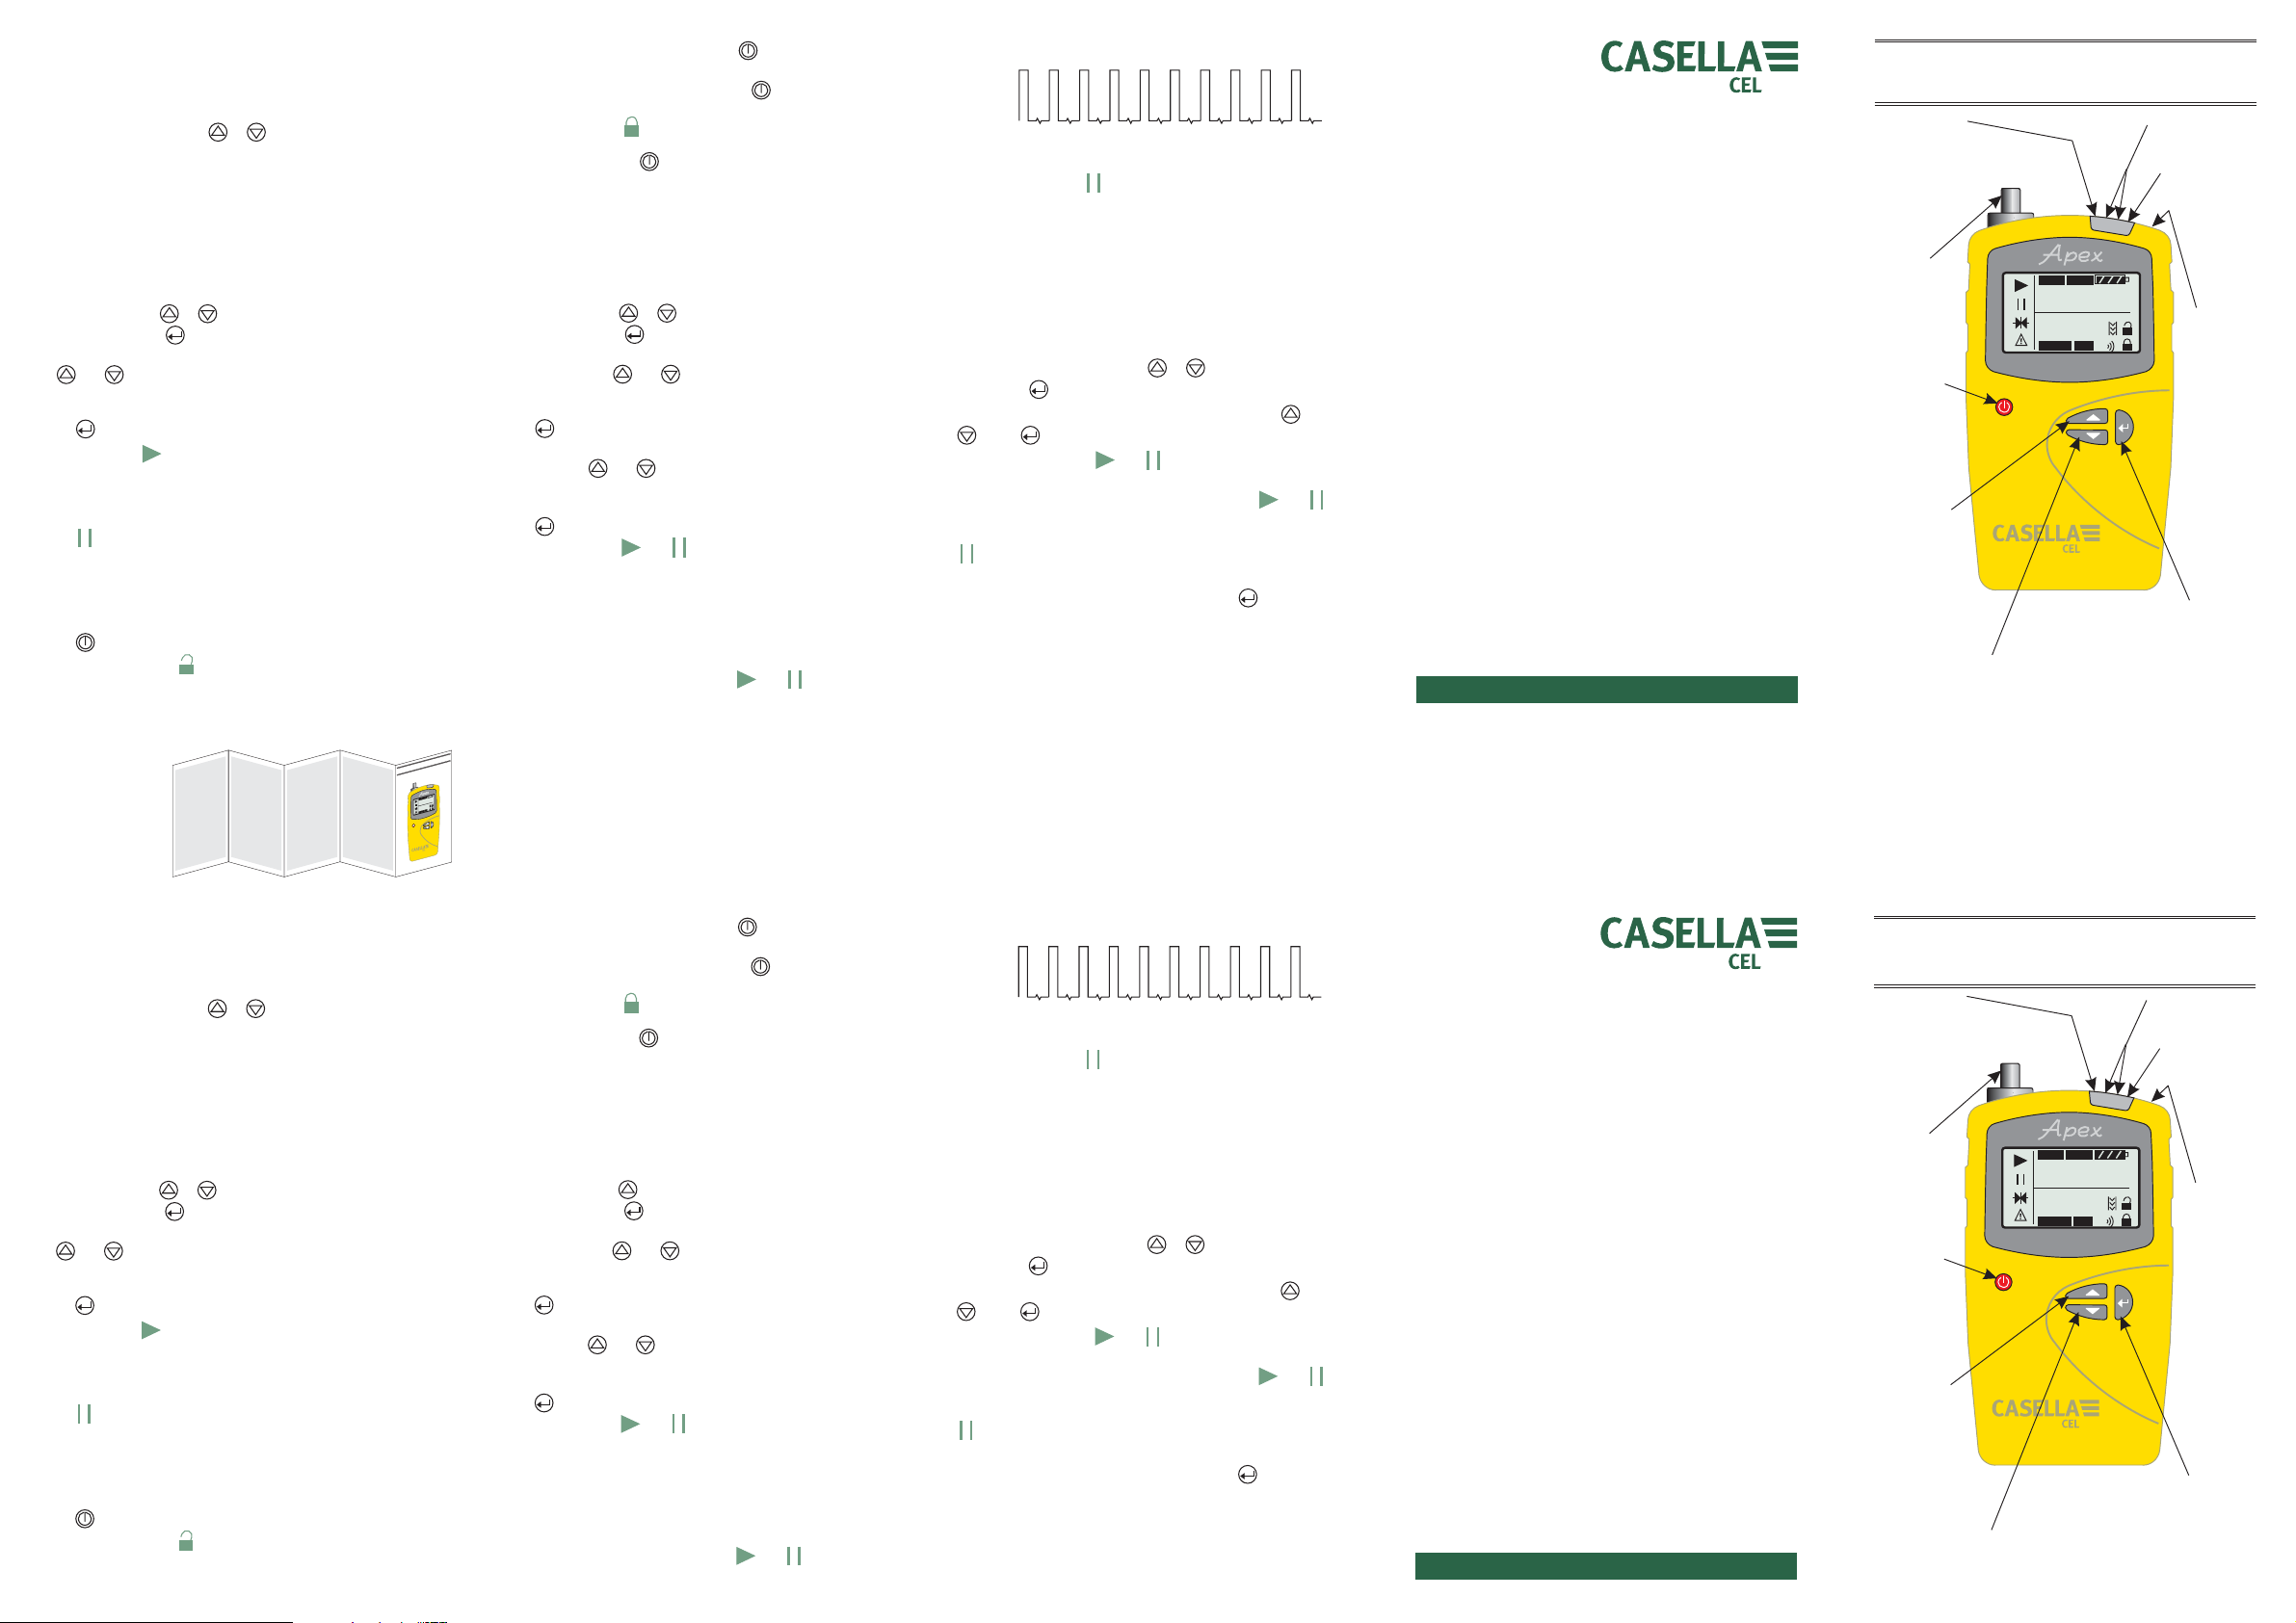
Air Sampling Pumps
blocked flow/
fault indicator
Inlet
nozzle
On/Off
also acts
as cancel
key
Scroll up
through
available
options,
or increase
displayed value
Scroll down
through
available options,
or decrease
displayed value
(I.S & non I.S Versions)
Green LED
running
indicator
RESET
PROG.
L/min
CAL
I.R.
o
C
Covered
Start/Stop
pump, also acts
as Enter key
nozzle
TEMP 19.48
2.5
SET FLO
pump
outlet
Select Set Flow then set the flow to less than 0.8 litre/min to
activate the mode.
In Bag Mode, the display shows BAG. The speed of the pump
motor is fixed and the display shows only percentage flow,
with no volume or time information.
Once the pump has started, or may be used to change
the flow rate to a different percentage.
Fixed Duration Sampling (DUR)
The duration of a sample can be selected from the instrument
keypad. On the Apex Pro it can also be selected via Pump
Manager software.
This mode allows the pump to sample for a fixed period and
switch off automatically when the period has ended. This is
useful when a stated volume of air must be sampled over a
long period.
In Hold Mode press or several times until DUR blinks
on the display. Press to select.
The programmed duration blinks to indicate it can be changed
by and . Run durations between 3 minutes and 1 hour
can be set in 1-minute steps, and durations between 1 and 25
hours in 10-minute steps.
Press to accept a duration and start sampling.
In addition to the symbol, the display shows PROG. to
indicate that a program is active. While the program is running,
the display cycles through current sample time, volume
sampled, air temperature, and programmed duration.
Once completed, the pump will switch off and the display
show and a PROGEnd message.
Press any key to return the pump to Hold Mode.
Locking The Keypad
The keypad may be partially or fully locked to prevent
unauthorised tampering with instrument settings.
Press three times within 2 seconds to activate Partial Lock
Mode at any time. The symbol is displayed, the counters
and flow cannot be changed but the following options remain
available: start/stop sampling, switch the pump off, unlock
Field Guide
RESET
PROG.
o
C
TEMP19.48
L/min
2.5
I.R.
CAL
SETFLO
Partial Lock, and select Full Lock. (Press three times within
2 seconds to unlock.)
Only when the PUMP IS RUNNING, press three times
again within 2 seconds while in Partial Lock Mode to activate
Full Lock Mode. The symbol is displayed, the pump cannot
be switched off and the only option available is to release Full
Lock Mode by pressing three times within 2 seconds.
TWA Sampling (Apex Pro only)
This feature is available only when the Apex Pro Program
Mode has been enabled from within Configuration Mode.
This allows the pump to operate for a fixed percentage of a
specified sample time. The instrument calculates the required
on/off cycle automatically to spread the total exposure time
over the entire sample time (as shown).
In Hold Mode press or several times until TWA blinks
on the display. Press to select.
RUN is displayed and the sample time blinks to indicate that it
can be changed by and . Run times between 3 minutes
and 1 hour can be set in 1-minute steps, and times between 1
and 25 hours in 10-minute steps.
Press to accept a sample time.
EXP is displayed, and the exposure time blinks to show it can
be changed by and .
The available range is 2 minutes to 1-minute-less-than-the-run-
time, in 1-minute steps.
Press to accept an exposure time and start sampling. In
addition to the usual and symbols the display shows
PROG. to indicate that a program is active.
The pump exposure (on) times are fixed at 1 minute, and the
instrument calculates the necessary off-times to spread these 1
minute intervals throughout the sample time. While the
program is running, the display cycles through current
accumulated sample time, volume sampled, air temperature
and calculated TWA (as percentage of run time).
During off-times (pump not running) the and symbols
are displayed to show the instrument is paused.
Run: 480 min
Once the sample is completed, the pump will switch off and
the display show the symbol and a PROGEnd message.
Press any key to return to Hold Mode.
User Program Modes (Apex Pro only)
This feature is available only when the Apex Pro Program Mode
has been enabled from within Configuration Mode. For more
comprehensive information, please refer to the User Handbook.
This allows complex sampling schedules (created by the user in
Pump Manager PC software and downloaded via the infrared
link) to be run by the pump. The programs are stored in two
user program areas Pr1 and Pr2.
In Hold Mode, repeatedly press or until Pr1 or Pr2
blink. Press to select the program.
The various steps in the program can be viewed using and
In addition to the usual and symbols the display shows
PROG. to indicate that a program is active.
During off-times (when the motor is not operating) and
are displayed to show the unit is paused.
Once the run is completed, the display will show the
Press any key to return the pump to Hold Mode.
To terminate the program early, press and hold to show the
STOP option, keep pressed until the pump reverts to Hold
Mode.
Calibrating The Pump
This procedure changes the basic calibration for the
entire flow range of the pump.
On
1minOn1minOn1minOn1minOn1minOn1minOn1minOn1minOn1minOn1min
Exp: 10 min
TWA: 2%
Off
47 min
Off
47 min
Off
47 min
Off
47 min
Off
47 min
Off
47 min
Off
47 min
Off
47 min
. Press to accept the program and start it running.
symbol and a PROGEnd message.
Off
47 min
Off
47 min
FIELD GUIDE for Apex & Apex Pro Personal
Air Sampling Pumps (
020
As the pump will have been accurately calibrated at the factory,
DO NOT undertake this procedure without first referring to the
Users Handbook.
Casella Instrumentation and Software is designed,
manufactured and serviced by:
Casella CEL
Regent House
Wolseley Road
Kempston
Bedford
MK42 7JY U.K.
Phone: +44 (0)1234 844 100
Fax: +44 (0)1234 841 490
E-Mail: info@casellacel.com
Web: www.casellacel.com
Casella USA
17 Old Nashua Road #15
Amherst
NH 03031 U.S.A.
Toll Free:+1 800 366 2966
Phone: +1 603 672 0031
Fax: +1 603 672 8053
E-mail: info@casellaUSA.com
Web: www.casellaUSA.com
www.casellagroup.com
Think environment Think Casella
Apex & Apex Pro
Sampling Pumps
HB3295-02/Jan 05
blocked flow/
fault indicator
Inlet
nozzle
On/Off
also acts
as cancel
key
Scroll up
through
available
options,
or increase
displayed value
Scroll down
through
available options,
or decrease
displayed value
I.S & non I.S versions)
Green LED
indicator
RESET
PROG.
L/min
CAL
I.R.
o
C
Covered
Start/Stop
pump, also acts
as Enter key
TEMP 19.48
2.5
SET FLO
pump
running
outlet
nozzle
 Loading...