

Page 1
Page 2

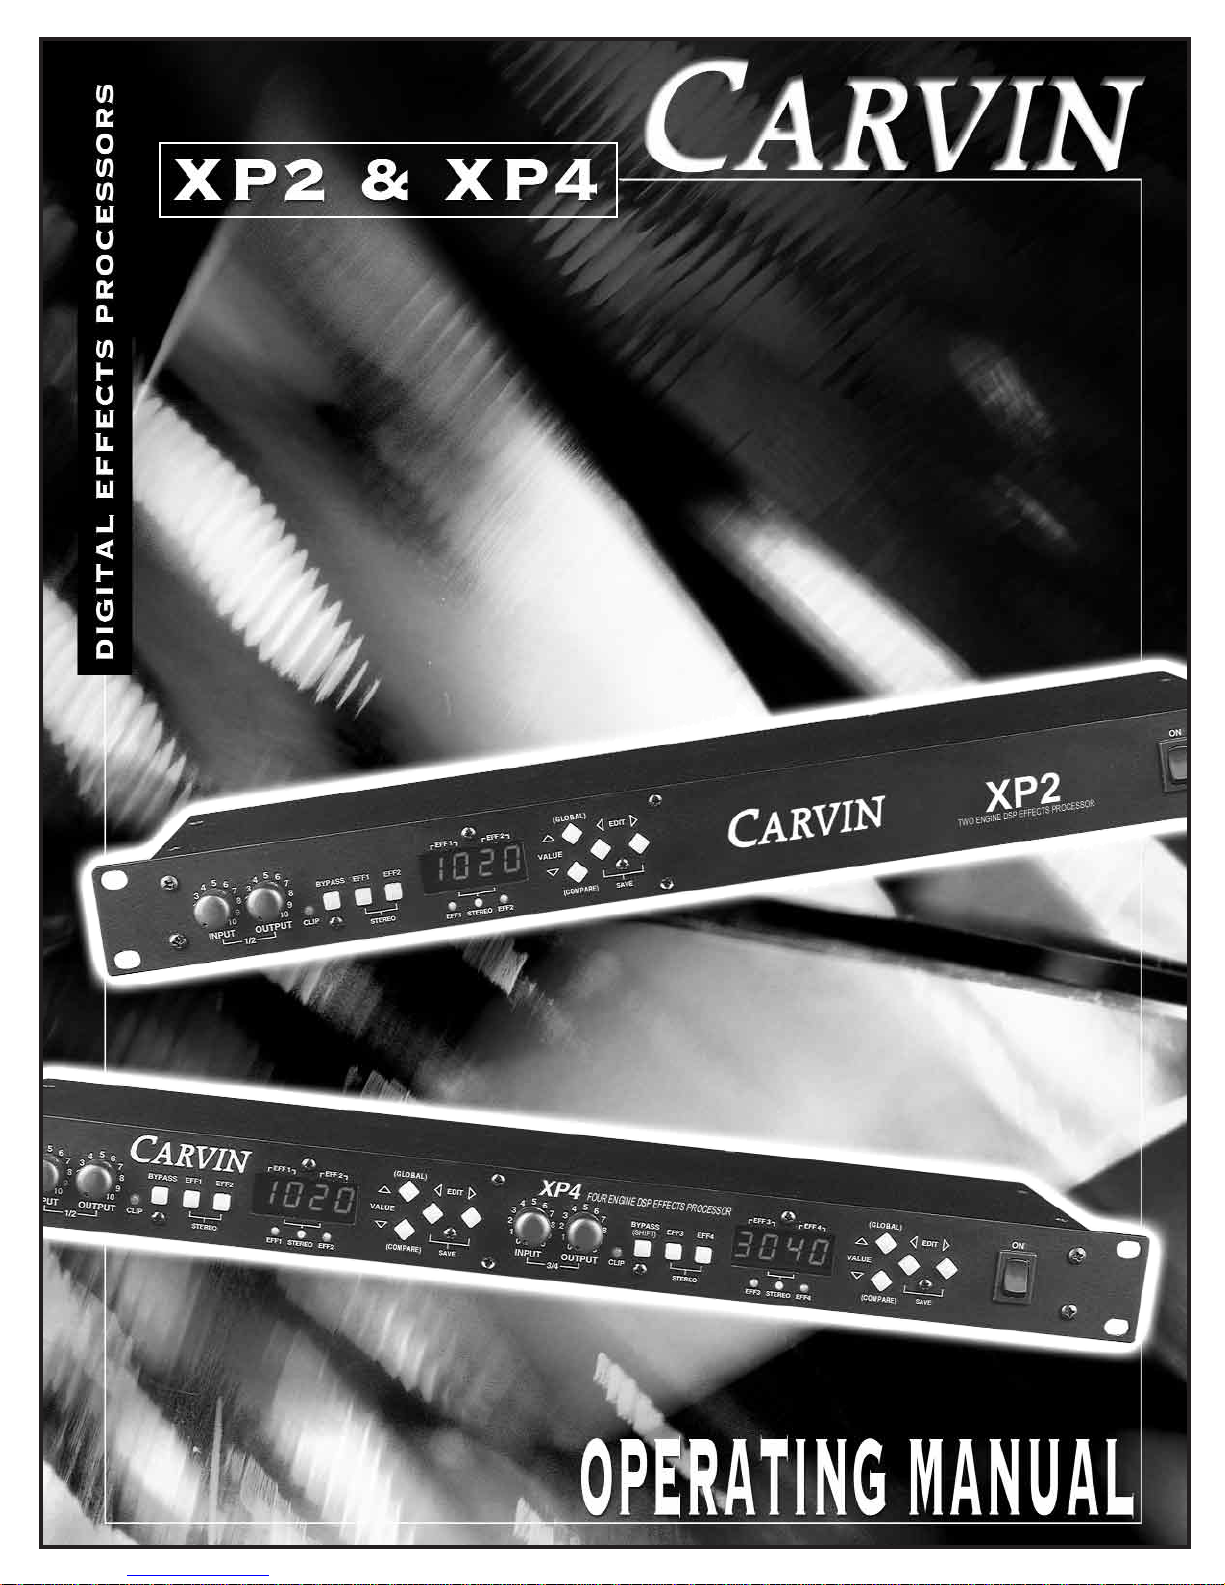
The Carvin XP series is a line of quality digital effect processors
designed for professional use in studio and live sound reinforcement applications. The XP2 and the XP4 are identical except that
the XP4 has 4 processors instead of 2. Thus, the XP4 is capable
of processing 4 independent mono channels, 2 stereo pairs or 2
independent mono channels and 1 stereo pair in a single rack
space. The XP series processors deliver this performance
through the use of easy to configure effect engines that may be
placed in either stereo or mono mode. This allows the XP2 and
XP4 to work with stereo audio sources while still maintaining the
flexibility to provide independent mono processing when it is
needed.
In independent mono engine processing, the engines may be
digitally linked in a serial fashion thus allowing each side of the
XP4 to function as a multi-effects processor.
ULTRA-FLEXIBLE FOOTSWITCHING
The footswitching capabilities of the XP processors are unparalleled in their flexibility. The unit can be easily operated in a live situation without requiring the
use of MIDI. Our flexible footswitching setup allows you to bypass either effect
engine independently, both at once, or alternately (channel switching) using
either our own FS22 footswitch or other footswitches that have a 1/4" plug and
suitable switch circuits!
COMPREHENSIVE MIDI SUPPORT
Both the XP4 and XP2 have a comprehensive MIDI implementation that allows
you to select effect programs and change any parameter or effect program that
has been selected on either side of the XP4 (this includes the effect wet/dry setting which is included in the effect program setup for each effect engine). MIDI
channels may be selected for each effect engine and/or optionally disabled without having to disconnect cables.
RECEIVING INSPECTION—read before getting started
INSPECT YOUR PRODUCT FOR ANY DAMAGE which may have occurred during shipping. If any damage is found, please notify the shipping company and
CARVIN immediately.
SAVE THE CARTON & ALL PACKING MATERIALS. In the event you have to reship your unit, always use the original carton and packing material. This will provide the best possible protection during shipment. CARVIN and the shipping
company are not liable for any damage caused by improper packing.
SAVE YOUR INVOICE. It will be required for warranty service if needed in the
future.
SHIPMENT SHORTAGE. If you find items missing, they may have been shipped
separately. Please allow several days for the rest of your order to arrive before
inquiring.
RECORD THE SERIAL NUMBER on the enclosed warranty card or below on this
manual for your records. Keep your portion of the card and return the portion
with your name and comments to us.
For your records, you may wish to record the following information.
Serial No.________________________________ Invoice Date_______________
EFFECTS LIST
• Reverb: Plate, Hall & Room. The reverbs carefully designed for smooth realistic
sound!
• Chorus: Rich 4-voice chorus with the ability to use triangle or sine LFO.
• Flanger: High quality flanging algorithms with + or - feedback selection.
• Phaser: Thick phasing effects with + or - feedback selections.
• EQ: Low, Mid, and High +6db, to -12db
• Delay/Echo: Precise delay time selection for up to 1 second of delay per effect
engine, and selectable loop filter.
• Rotary Speaker: Features ability to change drum and/or rotor slew rate for vintage
rotary speaker effects.
For a more in depth explanation of the effects and parameters, refer to page 13.
XP2/XP4 SUGGESTED USES
• Live Applications: Use with small and large concert sound systems for vocal effects
or to add effects to other instrument such as drums / percussion, guitars, bass keyboards etc.
• Live Recording: Use the XP processors to enhance 2 track stereo live recordings and
get a professional sounding recording direct-to-tape with the right combination of
effects.
• Studio Recording: Mixing down a multi-track master will sound awesome even in the
smallest home studio with the XP2 or XP4.
• Time Delay: Use with a live sound system to correct time/distance delays between
front of house speakers and rear or fill speakers.
XP2/XP4 SPECIFICATIONS:
THD+N: Less than .01%
Dynamic Range: >93dB (typically 95dB A-wt)
Frequency Response: 10 - 10kHz
Audio Interface: Unbalanced 1/4” Jack
Maximum Signal Output: 15dBu (5.8 Vrms)
Power Requirements: 95 to 250 VAC 50-60Hz
MIDI In/Thru: Program change, CC events
Size: 5.25”D x 19”W x 1.75”H
Weight: 4.5 lbs
INTRODUCTION
INTRODUCTION
12340 World Trade Drive, San Diego, CA 92128
(800) 854-2235
www.carvin.com
XP2 - Two Engine DSP
XP4 - Four Engine DSP
This manual covers the XP2 and XP4 units with the software release of r009 or higher. Check the software
release for compatibility if you purchased your XP unit prior to Oct 2000.
see pg 17 for instructions
Page 3
FRONT & REAR PANEL
FRONT & REAR PANEL
2
6
5
1
3
4
4
13
7
10
9
12
11
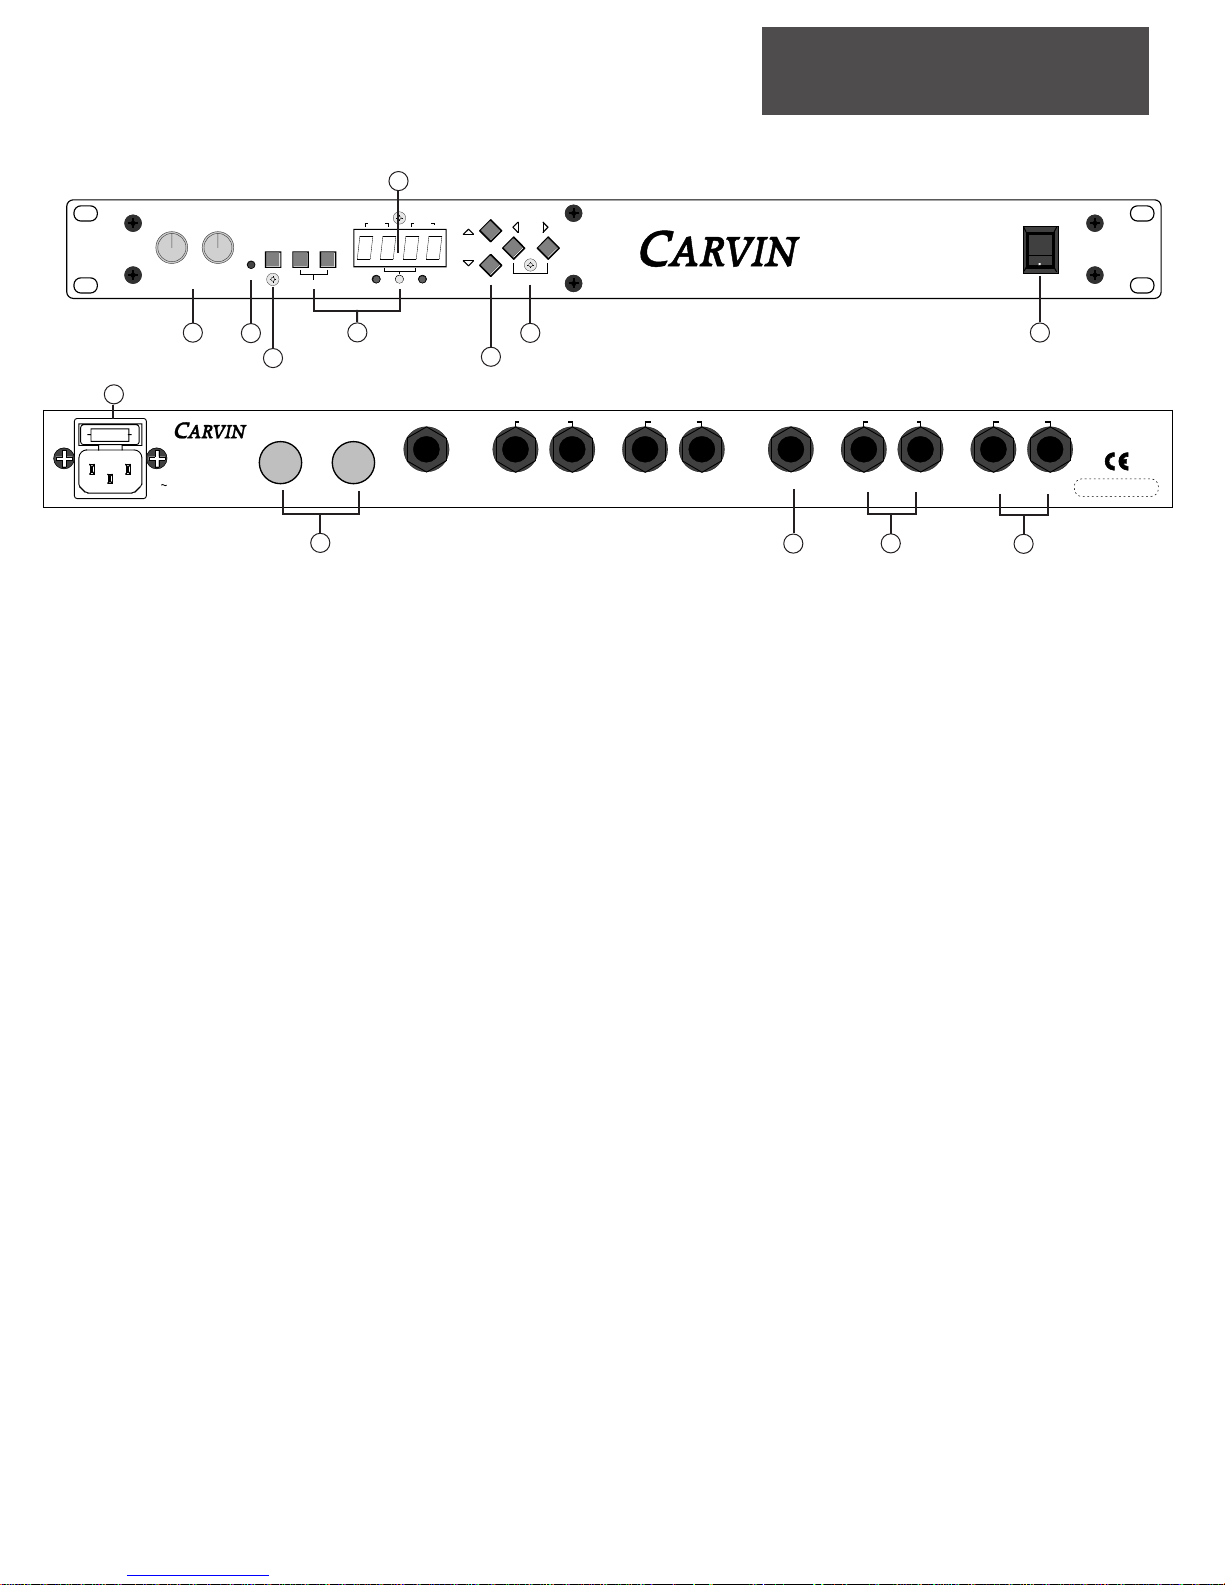
FRONT PANEL
1. INPUT AND OUTPUT LEVELS
The input and output level controls are stereo level controls adjusting both
the EFF1 and EFF2 engines at the same time. When adjusting the input level
control be sure to watch the clip LED to prevent overloading the input.
2. CLIP INDICATOR
The red CLIP LED indicator will start to flash when the input signal is near
maximum (6db below distortion levels). To avoid clipping, decrease the
INPUT level.
3. BYPASS/SHIFT
Disengages the effect when pressed. Acts as a shift button for the com-
pare and global parameters.
4. EFF1, EFF2 SWITCHES AND LED INDICATORS
These switches select the individual effect engines for editing and changing effects. When both of these buttons are pressed together, the two effect
engines function as one STEREO engine. The EFF1, EFF2 and STEREO
LEDs indicate which engine is selected and if they are in STEREO mode.
5. PARAMETER DISLPAY
Displays the effect assigned to EFF1 & EFF2. Also displays the edit parameters.
6. VALUE , GLOBAL & COMPARE
These buttons are used for
scrolling through the effects and editing effect parameters.
7. EDIT
Selects the parameters to edit.
8. POWER SWITCH
The XP series of processors do a brief initialization when powered on.
This is indicated by “----“ on the displays while this is being done.
REAR PANEL
9. AC FUSE & AC POWER
The XP series processors have a switching power supply circuit capable
of accommodating all voltages from 95-250 VAC.
10. MIDI IN & MIDI THRU
Standard MIDI Patches. See MIDI section for more information.
11. FOOTSWITCH JACK
The footswitch jack is designed to accept a footswitch (like Carvin’s FS22)
with a stereo or mono 1/4” plug. See the Global Parameters section for more
information.
12. OUTPUTS 1/2
When the XP2/XP4 is in stereo mode, these 1/4” jacks are stereo L/R outputs from the effect processor. When the unit is in dual mono mode these
are outputs from two separate mono effects.
13. INPUTS 1/2
While in dual mono mode, EFF1 & EFF2 are mono 1/4” inputs. When in
STEREO mode, EFF1 & EFF2 become the STEREO LEFT and EFF2 becomes
the STEREO RIGHT input.
XP2 FRONT
XP4 REAR
3
FUSE
4
3
2
1
010
INPUT
5
654
7
8
9
3
2
1
010
OUTPUT
VALUE
(GLOBAL)
(COMPARE)
EDIT
XP2
SAVE
TWO ENGINE DSP EFFECTS PROCESSOR
6
7
BYPASS EFF2EFF1
(SHIFT)
8
9
CLIP
STEREO
EFF 1 EFF 2
EFF1 EFF2
STEREO
ON
1-800-854-2235
www.carvin.com
100 to 250VAC
50 to 60Hz
20VA FUSE: 2ASB
MIDI
THRU
MIDI
BYPASS 3/4
IN
FOOTSWITCH
OUTPUTS 3/4
INPUTS 3/4
BYPASS 1/2
OUTPUTS 1/2
INPUTS 1/2
MADE
IN THE
AUS
RIGHTLEFT
RIGHTLEFT
(EFF 3) (EFF 4)(EFF 3) (EFF 4)
FOOTSWITCH
RIGHTLEFT
RIGHTLEFT
(EFF 1) (EFF 2)(EFF 1) (EFF 2)
S/N REMOVED
Page 4

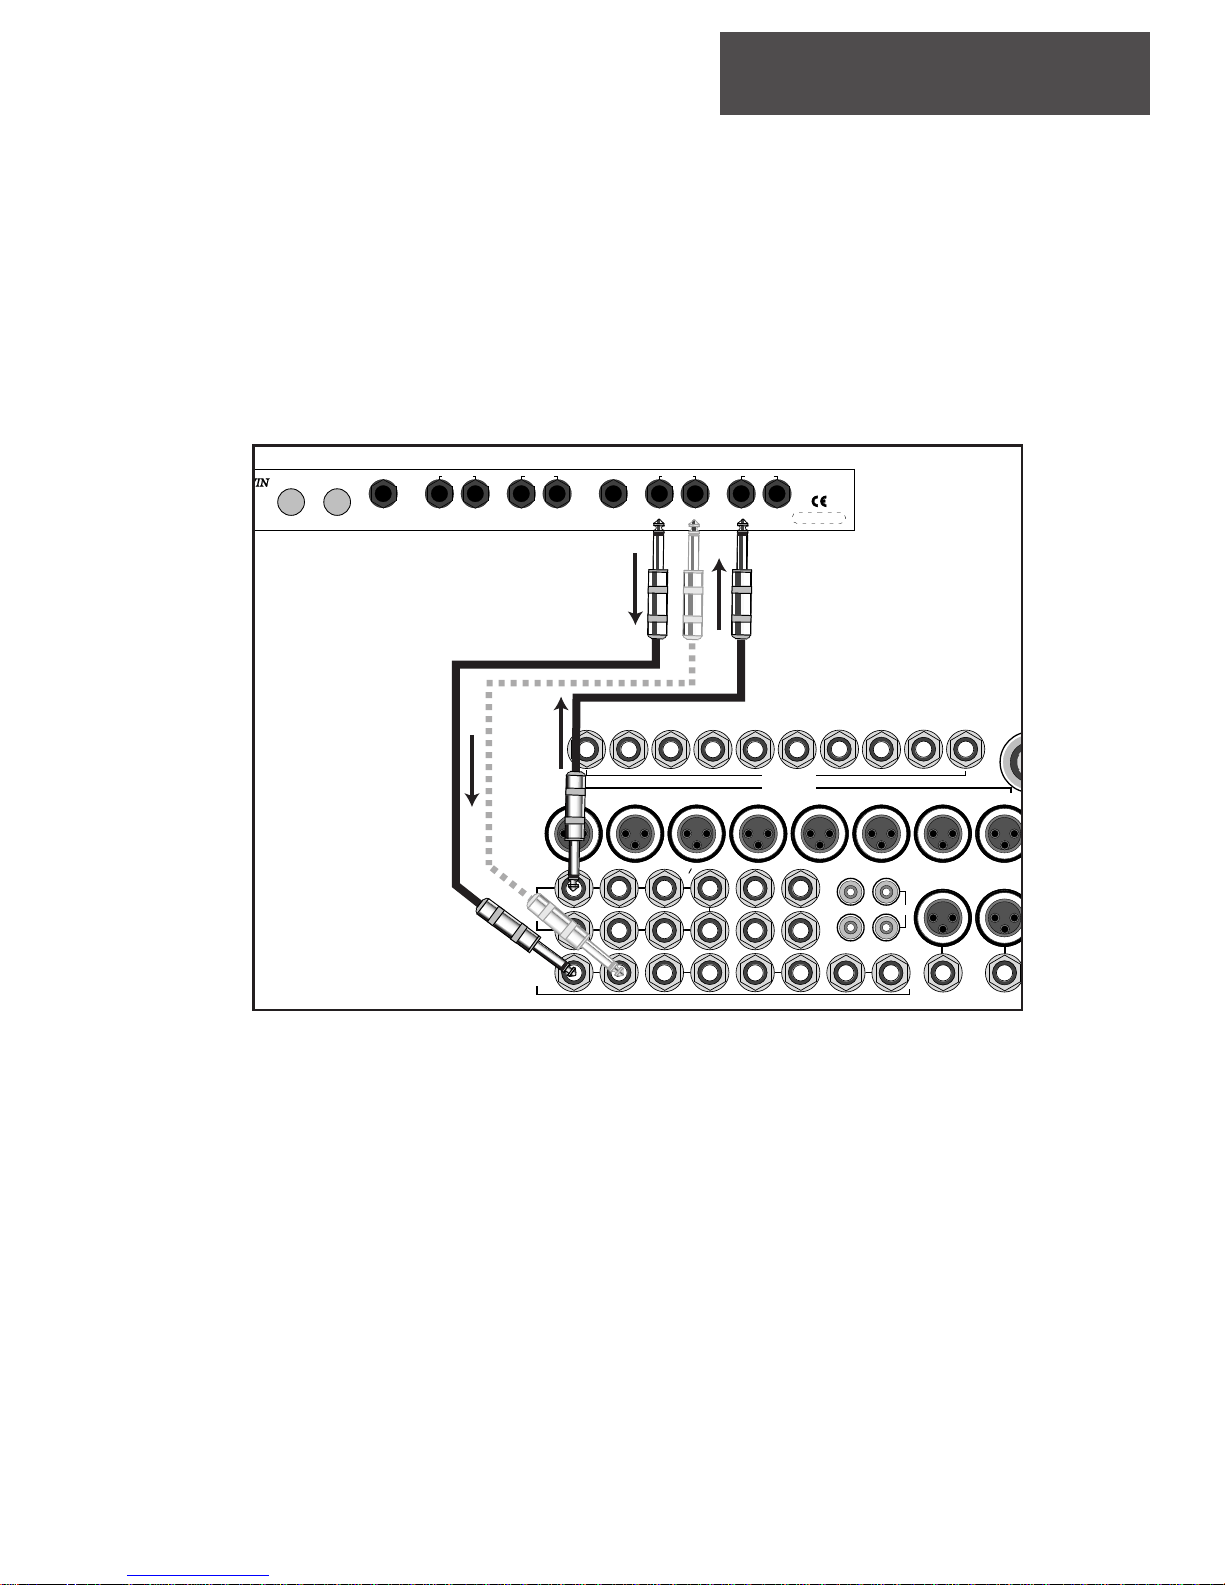
CONNECTING UP
CONNECTING UP
Connect the effects
send on the mixer to
the input on the XP
Use the Left input
when connecting a
mono signal.
Connect to the Left &
Right effect returns.
Connect the Left &
Right outputs to the
returns on the mixer.
When a stereo
source is available, the XP
processor will
accommodate
both Left and
Right sources.
CONNECTING TO AN EFFECTS LOOP
You will need audio-instrument cables with 1/4” mono plugs. These are not included with your XP processor and are required for
connecting to an effects loop on a mixer or preamp. Carvin suggests high quality shielded cables for the best possible signal.
Carvin’s SH instrument cables are well suited for this type of installation.
1. Turn off all audio components that are to be connected.
2. Turn all your mixer’s send levels down as well as the input and output levels on the XP.
3. Connect the XP’s inputs to the Send (output) on the mixer or preamp effects loop.
4. Connect the XP’s output(s) to the Return(s) (input) on the mixer or preamp effects loop. Both Left and Right stereo outputs will
need to be used when in Stereo mode.
Connect the Left & Right
outputs to the returns on
the guitar amp.
Connect the effects send
on the guitar amp to the
input on the XP.
Connect to the Left &
Right effect returns. If
the amp has a mono
return, use only the Left
Output from the XP
MIXER CONNECTION (STEREO MODE)
GUITAR AMP CONNECTION (STEREO OR MONO MODE)
4
To use multiple effects please see the “Digital Linking” section on page 10
OUTPUTS 3/4
INPUTS 3/4
RIGHTLEFT
(EFF 3) (EFF 4)(EFF 3) (EFF 4)
BYPASS 1/2
RIGHTLEFT
FOOTSWITCH
OUTPUTS 1/2
INPUTS 1/2
RIGHTLEFT
(EFF 1) (EFF 2)(EFF 1) (EFF 2)
MADE
IN THE
AUS
RIGHTLEFT
S/N REMOVED
LINE
LINE
LINE
MIC
MIC
MIC
DIR - INSERT
DIR - INSERT
DIR - INSERT
DIR - INSERT
LEFT RIGHT MONO
222120191817
LINE
LINE
MIC
MIC
DIR - INSERT
DIR - INSERT
2423
PHANTOM
LINE
MIC
DIR - INSERT
LINE
POWER
17-24
MIC
MIC
DIR - INSERT
RTN 2 LEFF 2 RTN 2 R RIGHT
LEFT
RTN 3 LEFF 3 RTN 3 R MON 2
MON 1
TAPE
R
MONO
OUT
TAPE IN
PHONES
OUTPUTS 3/4
BYPASS 3/4
MIDI
MIDI
IN
THRU
FOOTSWITCH
INPUTS 3/4
RIGHTLEFT
RIGHTLEFT
(EFF 3) (EFF 4)(EFF 3) (EFF 4)
BYPASS 1/2
FOOTSWITCH
OUTPUTS 1/2
INPUTS 1/2
MADE
IN THE
RIGHTLEFT
(EFF 1) (EFF 2)(EFF 1) (EFF 2)
AUS
RIGHTLEFT
S/N REMOVED
Guitar Amp
Effects Loop
EFFECTS
EFFECTS RETURN
LEFT
SEND
RIGHT
Page 5
CONNECTING UP
CONNECTING UP
O
Connect the consoles Aux Return(s) to
the XP’s outputs via 1/4” audio cables.
(If the console features stereo Aux returns,
you can use both L & R outputs on the XP
when in Stereo mode.)
Connect the consoles
Aux Send to the XP’s
inputs via 1/4” audio
cables.
DIAGRAM FOR AUX SEND/RETURN (DUAL MONO MODE)
CONNECTING TO AUXILIARY SENDS
In this case, the Aux sends and returns will be used as a mono effects loop. If the console features stereo Aux returns, use both L &
R outputs on the XP.
1. Turn off all audio components that are to be connected.
2. Turn all mixer’s aux send levels down as well as the input and output levels on the XP.
3. Connect the consoles’ Aux Send to the XP’s inputs via 1/4” audio cables.
4. Connect the consoles’ Aux Return(s) to the XP’s outputs via 1/4” audio cables.
5
BYPASS 3/4
MIDI
MIDI
IN
THRU
2235
.com
AC
z
2ASB
FOOTSWITCH
OUTPUTS 3/4
INPUTS 3/4
RIGHTLEFT
(EFF 3) (EFF 4)(EFF 3) (EFF 4)
BYPASS 1/2
RIGHTLEFT
FOOTSWITCH
OUTPUTS 1/2
INPUTS 1/2
RIGHTLEFT
(EFF 1) (EFF 2)(EFF 1) (EFF 2)
MADE
IN THE
AUS
RIGHTLEFT
S/N REMOVED
12345678L R
1
1234
AUX
5
SEND
AUX
RETURN
2345678
678
LR
12LR3
INSERTS
GROUPS
CONTROL
L-R
STUDIO
L-R
LR
PHONES
PHONES
L
OUT
IN
LR
4
R
LEFT
TAPE
P
RIGHT
Page 6

1. Choose either effect 1 or 2
2. Use your value buttons to scroll up or down until you reach the desired factory set effect program.
TIP: To scroll up or down very quickly hold down the value button. To limit the scroll speed, simultaneously
push the other value button while scrolling.
SELECTING EFFECT PROGRAMS
SELECTING EFFECT PROGRAMS
reverb
chorus
delay
rotary
speaker
FACTORY PRESETS
00-19 Plates
20-29 Rooms
40-49 Halls
FACTORY PRESETS
60-64 + Feedback
65-69 - Feedback
FACTORY PRESETS
70-74 + Feedback
75-79 - Feedback
FACTORY PRESETS
50-54 Triangle
55-59 Sine
FACTORY PRESETS
80-89 Misc Delays
FACTORY PRESETS
90-99 Various
EFFECTS PARAMETERS
flanger
phaser
1 2
1
1
2
for a more detailed list of effects, please see the Effects Algorithms listed on pg.11
1. Push the right EDIT button & BYPASS/SHIFT button (you will now be able to edit)
2. Now use the VALUE buttons to select the desired parameter to be changed.
3. Push the right EDIT button again and use the VALUE buttons to change the value of the parameters.
Please see pg 11 for more on effect parameters. To exit this operation, simply press either of the EFF buttons.
HOW TO CHANGE EFFECT PROGRAMS
HOW TO CHANGE EFFECTS PARAMETERS
press both simultaneously
1
HOW TO SAVE CHANGES AND/OR SAVE CREATED EFFECT PROGRAMS
press both simultaneously
1. After making adjustments to your effect program, press both EDIT LT and EDIT RT at the same time . The
screen will read Prxx. The "xx" indicates that effect program's number.
To exit this operation without saving, simply press either of the EFF buttons.
2. To complete the save push both EDIT buttons again simultaneously.
6
FOR ADVANCED USERS
See page 10 to enable Expert Mode and how to
re-number the order of the effects parameters !
4
3
2
1
010
INPUT
5
654
7
8
9
3
2
1
010
OUTPUT
6
7
BYPASS EFF2EFF1
(SHIFT)
8
9
CLIP
STEREO
EFF 1 EFF 2
EFF1 EFF2
STEREO
VALUE
(GLOBAL)
(COMPARE)
EDIT
XP2
SAVE
TWO ENGINE DSP EFFECTS PROCESSOR
ON
4
3
2
1
010
INPUT
5
654
7
8
9
3
2
1
010
OUTPUT
6
7
BYPASS EFF2EFF1
(SHIFT)
8
9
CLIP
STEREO
EFF 1 EFF 2
EFF1 EFF2
STEREO
VALUE
(GLOBAL)
(COMPARE)
EDIT
XP2
SAVE
TWO ENGINE DSP EFFECTS PROCESSOR
ON
4
3
2
1
010
INPUT
5
654
7
8
9
3
2
1
010
OUTPUT
6
7
BYPASS EFF2EFF1
(SHIFT)
8
9
CLIP
STEREO
EFF 1 EFF 2
EFF1 EFF2
STEREO
VALUE
(GLOBAL)
(COMPARE)
EDIT
XP2
SAVE
TWO ENGINE DSP EFFECTS PROCESSOR
ON
Page 7

1
1
2
HOW TO USE THE "MIX" FEATURE
The MIX control allows you to vary the level of the (effect) wet /dry (original) signal.
1. To access this function push the EDIT LT button.
2. Use the VALUE buttons to change the MIX.
The parameter lists 0-100. O being the dry signal almost exclusively and 100 being a completely effected signal
coming from your output. In a live sound situation when you are running the effected signal in one of your consoles aux, this parameter should be set at 100. This way you can vary the desired level of effect by using your
aux. send on each channel. The MIX control is great when using the XP2/XP4 in an effect loop of a guitar or bass
amp that has an effects loop. Simply vary the level of the mix parameter to your taste (see Guitar Tips on pg. 15).
COMPARE MODE is a feature that allows you to toggle between a stored or modified effect program and a factory preset program. This gives you the ability to compare your edits to the original factory effect.
1. This screen is entered by pushing BYPASS/SHIFT and VALUE (COMPARE) at the same time.
Tip: Compare Mode can be entered at any time while editing Effects or Global Parameters.
2. Once you have engaged the compare mode, you will use the VALUE buttons to select what you want to com-
pare your effect program to.
3. You may compare it to the stored effect program as indicated by SP on the display, or you can compare it to
the factory effect program labeled FP.
CHANGING THE EFFECT PROGRAM IN COMPARE MODE
If you want to replace your effect program, with either the stored or factory preset version, use the effect program save procedure while listening to the desired effect program.
EXITING WHILE KEEPING YOUR EFFECT PROGRAM
If you want to exit and keep your effect program either press BYPASS/SHIFT or exit using one of the EFFECTS
buttons.
COMPARE MODE
press both simultaneously
7
EDITING EFFECT PROGRAMS
EDITING EFFECT PROGRAMS
4
3
2
1
010
INPUT
5
654
7
8
9
3
2
1
010
OUTPUT
VALUE
(GLOBAL)
(COMPARE)
EDIT
XP2
SAVE
TWO ENGINE DSP EFFECTS PROCESSOR
6
7
BYPASS EFF2EFF1
(SHIFT)
8
9
CLIP
STEREO
EFF 1 EFF 2
EFF1 EFF2
STEREO
ON
VALUE
(GLOBAL)
(COMPARE)
EDIT
XP2
SAVE
TWO ENGINE DSP EFFECTS PROCESSOR
ON
5
4
654
7
8
9
3
2
1
010
OUTPUT
6
7
8
9
CLIP
3
2
1
010
INPUT
BYPASS EFF2EFF1
(SHIFT)
STEREO
EFF 1 EFF 2
EFF1 EFF2
STEREO
Page 8

When in the STEREO mode, you have the ability to have 2 independent inputs (L & R Inputs) processed by using
a single parameter control.
1. To engage this mode press EFF1 and EFF2 at the same time.
2. The parameter screen will change to a double-digit with the yellow Stereo LED on to indicate Stereo Mode. All
parameter changes will affect inputs and outputs 1 and 2. Using this function with the XP, gives you the option
of having a dual stereo setup by applying these instructions to EFF3 and EFF4.
STEREO MODE
STEREO MODE
GLOBAL PARAMETERS
GLOBAL PARAMETERS
1
press both simultaneously
2
1
press both simultaneously
2
1. Press BYPASS/SHIFT button and GLOBAL button to enter Global Parameters.
2. If done correctly "ParA" should appear (abbreviation for "parameters").
3. Scrolling to the right with the right EDIT button will display all the Global Parameters explained below.
To exit this operation simply press either of the EFF buttons.
ENTERING GLOBAL PARAMETERS
1
bO
- BYPASS OPERATION (0 OR 1)
After entering the GLOBAL PARAMETERS function, scroll right with the EDIT buttons. The first parameter you
encounter will be the "bO" operation.
DESCRIPTIONS OF GLOBAL PARAMETERS
8
5
4
654
7
8
9
3
2
1
010
OUTPUT
6
7
8
9
3
2
1
010
INPUT
BYPASS EFF2EFF1
CLIP
(SHIFT)
STEREO
VALUE
(GLOBAL)
(COMPARE)
EDIT
XP2
SAVE
TWO ENGINE DSP EFFECTS PROCESSOR
EFF 1 EFF 2
EFF1 EFF2
STEREO
ON
EFF 1 EFF 2
EFF1 EFF2
STEREO
VALUE
(GLOBAL)
(COMPARE)
EDIT
XP2
SAVE
TWO ENGINE DSP EFFECTS PROCESSOR
ON
4
3
2
1
010
INPUT
5
654
7
8
9
6
3
7
2
8
1
9
010
CLIP
OUTPUT
BYPASS EFF2EFF1
(SHIFT)
STEREO
4
3
2
1
010
INPUT
5
654
7
8
9
3
2
1
010
OUTPUT
6
7
BYPASS EFF2EFF1
(SHIFT)
8
9
CLIP
STEREO
EFF 1 EFF 2
EFF1 EFF2
STEREO
VALUE
(GLOBAL)
(COMPARE)
EDIT
XP2
SAVE
TWO ENGINE DSP EFFECTS PROCESSOR
ON
Page 9

GLOBAL PARAMETERS
GLOBAL PARAMETERS
bO
- BYPASS OPERATION
(0 OR 1)
cont.
When set to 0, the bypass operation blocks all audio and leaves the direct signal as specified by the MIX (for more
on the MIX control see pg 7). When set to 1 (use the VALUE buttons), the bypass operation blocks all effect audio
and routes the uneffected signal straight through. Mode 0 is good for a console setup and mode 1 is good for a
guitar effect chain set up.
bF-
BYPASS FOOTSWITCH MODE
(0 OR 1)
Scroll again using the right EDIT button and you will come to the "bF" function.
When this particular function is set to 0, the footswitch tip bypasses EFF1 and the footswitch ring bypasses EFF2.
When set to 1, the tip and ring act as an EFF1 and EFF2 switching (such as on a 2 channel amp). When in stereo
mode the tip and ring act identically. It is not necessary to have a stereo plug. If a mono plug is inserted, the XP
processor will listen to the tip and ignore the ring.
Cx (C1 & C2)
-MIDI CHANNEL CONFIGURATION
Scroll to the right again to come to C1 & C2.
C1 and C2 allow you to set up what MIDI channel each engine is routed to (See MIDI section).
CE-
MIDI DATA ENABLE
(0 OR 1)
Scroll to the right to come to the "CE" function.
When set to 0, all MIDI data handling for this unit is disabled (both engines). The MIDI implementation includes
the ability to respond to effect program change commands and continuos controller events on controllers 96-104
(see MIDI section on pg 15).
TRS-Tip/Ring/Sleeve
Stereo 1/4” connector
TS-Tip/Sleeve Mono
1/4” connector
Sleeve
Sleeve
Ring
Tip
Tip
9
OUTPUTS 1/2
RIGHTLEFT
(EFF 1) (EFF 2)(EFF 1) (EFF 2)
INPUTS 1/2
RIGHTLEFT
MIDI
THRU
1-800-854-2235
ww.carvin.com
100 to 250VAC
50 to 60Hz
VA FUSE: 2ASB
BYPASS 3/4
MIDI
IN
FOOTSWITCH
OUTPUTS 3/4
RIGHTLEFT
(EFF 3) (EFF 4)(EFF 3) (EFF 4)
INPUTS 3/4
RIGHTLEFT
BYPASS 1/2
FOOTSWITCH
MADE
IN THE
AUS
S/N REMOVED
Page 10

dl-
DIGITAL LINK FUNCTION
(0 OR 1)
Scroll again to the right to come to the "dl" function.
The DIGITAL LINK FUNCTION is active when set to 1 and inactive when set to 0. Use this function when you want
to run 2 different effects at once. We designed this function to minimize the analog-to-digital and digital-to-analog conversion step. When using this mode, the first effect in the chain is always EFF1. The EFF1 effect is digitally routed to the input of EFF2. At this point, you can use the EFF2 output as your final output or with the XP4 you
can route the signal to EFF3 with a patch cable. When the DIGITAL LINK FUNCTION is active on both sides of an
XP4 you can have a total of 4 different effects linked.
Fr-
FORCE RATIO FUNCTION
(0, 1 or 2)
Scroll once more to the right to come to the "Fr" function.
The MIX setting varies from 0 to 100% in each effect program. When you are using the effect loop of a console
(send and return loop), you want the MIX control to always be 100%. This parameter gives you an easy way of
overriding the MIX setting that is specified in the effect program. The function is active when set to 0. When set
to one the function is in-active. When set to 2 the original signal is passed thru and the MIX function determines
volume level of the effect signal. This setting is ideal for guitar effect loops.
E-
EXPERT MODE
Scroll once more to the right to come to the "E" function.
The Expert mode is intended for users that have mastered the interface of the XP. By engaging the Expert mode
the following features are available:
1. The EFF display is no longer fixed, you have the ability to view both effects at once on the screen (stereo mode
will remain the same). You are able to see what effect is being used on each engine simultaneously.
2. You are also able to change any of the factory effect program locations. Meaning, you could have effect programs 1-10 designated for Delay instead of Reverb. This allows you to put your most commonly used effect
programs next to each other for easy access. See “How to Change Effects Parameters” on Pg 6. When you
reach step 1 of the next section called ‘How to Save Changes...” you will see the characters Prxx displayed where
xx is the number of the Effect Program. Use the Value up or down buttons to select a new destination number
for this effect program. It is recommended to use a number other than a factory stored number.
3. In Expert mode, the save feature will now allow you to designate a destination number for the effect program
you are saving.
GLOBAL PARAMETERS
GLOBAL PARAMETERS
10
Page 11

EFFECTS ALGORITHMS
EFFECTS ALGORITHMS
00-19 PLATE REVERB
Simulates the old reverb device of the same name. It generated reverb by playing sound through a small speaker on one
end of a 6-foot by 4-foot plate of steel with a transducer on the other end to pick up the reverberated sound. This reverb is
excellent for vocals and Drums.
20-29 ROOM REVERB
Simulates various room sizes. Excellent for guitar and vocals.
40-49 HALL REVERB
Similar to the Room, but is a simulation of a larger room. The high ceilings, irregular shapes and the uniform density of
the reflections characterize Halls.
REVERB PARAMETERS
RA- Reverb algorithm selection (choose Plate, Room, or Hall).
PL1-Plate algorithm #1
PL2-Plate algorithm #2 - thinner, tighter sound
HA-Hall algorithm
ro1-Room algorithm #1
ro2-Room algorithm #2 - brighter, more open sound
ADDITIONAL PARAMETERS
RF- Input band width limit allows you to select the frequencies you would like to accentuate with the reverb.
(Example: Accentuating the high frequencies will give you a very airy open sound. Accentuateing low frequency on a
bass drum gives an ideal reverb effect.)
RP-Pre-delay is a slight delaying of the reverb so that the original signal stands out easily from the reverb.
RD-Decay time determines how long the reverb will sound before it dies away. Adjust this to create “long-tail” reverb
RH-Reverb damping alters intensity of the reverb for a darker or brighter sound.
REVERB & CHORUS
11
50-54 Triangle Choruses.
The Triangle Chorus is an sharp edged chorus used for clear sounding acoustic guitars and background vocals.
55-59 Sine Wave Choruses.
The Sine Wave Chorus is a smooth sounding chorus excellent for thickening lead and
background vocals and great for lead and rhythm guitar.
CHORUS PARAMETERS
Triangle
Sine Wave
LF-LFO(low freq. oscillation)
select - triangle or sine
r1-Oscillator 1 Speed
r2-Oscillator 2 Speed
d1-Depth Oscillator 1
d2-Depth Oscillator 2
Fd-Feedback
r1-Oscillator 1&2 Speed
How fast the frequency cycles are.
d1- Oscillator 1&2 Depth.
Fd-Feedback
Determines the amount of signal fed back through the
processor. Adds harmonic richness.
Page 12

EFFECTS ALGORITHMS
EFFECTS ALGORITHMS
PHASER & FLANGER
(60-64) PHASER POSITIVE FEEDBACK
(65-69) PHASER NEGATIVE FEEDBACK
The Phaser or "phase shifter" is a classic effect. It uses phase cancellation to create a sweeping effect. This is great for
solos and rhythm guitars when you need them it to stand out.
PHASER PARAMETERS
FF-Feedback polarity
Allows you to select either positive feedback (thicker sound) or negative feedback (thinner sound).
SP-Modulation speed
Controls (LFO) speed of phase.
PF-Phaser frequency
This allows you to choose what frequency you want effected.
Fd-Feedback
Allows you to control how dramatic the effect is.
(70-79) FLANGER
A Flanger is very similar to a chorus. It is a modulation effect, but where it differs from chorus is its ability to loop back
into itself. Before digital delay effects were available, the flanging effect could be accomplished by playing two tape
machines in synchronization, then causing one tape to become slightly out of sync by dragging a finger on the tape reel
the result is an airplane-like sound or sound reflections in a metal pipe.
(70-74) positive feedback
(75-79) negative feedback
FLANGER PARAMETERS
FF-feedback polarity
Allows you to choose either positive feedback (thicker sound) or negative feedback (thinner sound).
SP-modulation Speed
Controls speed of the Flanger.
DP-Depth
Controls the intensity of the Flanger.
Fd-Feedback
Controls how much feedback is put back into the input of the module.
Ib-input bandwidth
Selects which part of the frequency is effected (between high and low).
12
Page 13

13
EFFECTS ALGORITHMS
EFFECTS ALGORITHMS
DELAY • ROTARY SPEAKER • EQ
DELAY/ECHO
Use the DELAY/ECHO effects to simulate “canyon-like” reflections for guitar, vocals. drums etc... Also use it for correcting time delays in speaker systems. Please see page 15 for “Delayed Loudspeakers”.
80-90 Misc. Delays
DELAY PARAMETERS
d-Select LO for subtle delay effects (0-495), or select HI (500-595) for a more dramatic effect.
dL-Left delay time.
dR-Right delay time.
rL-Left regeneration time. The higher the number, the longer the echo decay.
rR- Right regeneration time. The higher the number, the longer the echo decay.
fL&fR-Loop low pass filter for the right or left signal (when in stereo mode).
ROTARY SPEAKER
This effect reproduces the classic sound of a rotating speaker such as the old “Leslie” speaker. This is a great effect
for guitar and keyboards.
90-94 Rotary Speaker
ROTARY SPEAKER PARAMETERS
Sr-Rotary speed slew selection. The difference in the rate of speeds between the woofer and the tweeter.
rS-Rotor speed.
dS-Drum speed-Speed of rotation.
dP-Rotary pan depth/Cabinet height.
rP-Rotary pan depth/Dispersion level.
EQ
The digital EQ provides +6dB to -12dB for Low Mid and High frequencies as well as phase adjustment.
95-99 EQ
EQ PARAMETERS
Pl-Phase.
L-Low.
C-Mid.
H-High.
Page 14

Usage tips as a guitar multi-effect processor.
CLEAN TONE GUITAR REVERB:
Select 00- (BLUE PLATE).
Ra-PL1
RH 2
Rd 7
Rp 3
Rf 3
MULTI PURPOSE CHORUS:
Select 50-(CHORDAL CHORUS).
MIX-30
LF-5
FD-1
D2-10
D1-7
R2-3
R1-8
MODERN ROCK & ROLL LEAD WITH REVERB+DELAY:
Digitally link EFF1 and EFF2 (See DIGITAL LINKING on page 10).
For EFF1 Select 41 (VATICAN-VERB).
MIX-15
D-LO
FL-5
RL-30
DL-200
For EFF2 Select 89-(DELAYED TRIP).
MIX-15
"ROCKABILLY" SLAP BACK DELAY:
Select -80.
D-LOW
FL-5
RL-30
DL-200
MIX-35
GUITAR TIPS
GUITAR TIPS
14
Page 15

DELAYED LOUDSPEAKERS
DELAYED LOUDSPEAKERS
15
USING THE XP TO CORRECT DISTANCES IN LOUDSPKEAR PLACEMENTS
In a large sound system as seen at many stadiums or ampitheaters, there is usually a second set of loudspeakers that are
used to cover the back or distant seats. Since the sound from these speakers will reach the listener’s ear faster than the
sound coming from the stage, a time delay must be used to correct for the physical distance between the two speaker
systems. Without this time delay, the sound may sound cluttered and undefined. With the proper time delay, all audio
will arrive simultaneously and sound more intelligable and clearer.
Delay time is determined by the distance between your main stage loudspeakers and the rear speakers in direct relation
to the amount of time it takes sound to travel. Sound travels at a rate of 1.086 ft per millisecond therefore you will need a
1ms delay for every 1.086 feet. Use this simple formula to calculate delay time:
∆ = The delta is the distance in feet between the main speakers and secondary speakers.
1.086 = constant velocity of sound in ft per millisecond (ft/ms)
ms delay = the delay value in milliseconds that will be applied to the delay speakers.
example: ∆=250ft (distance between speakers) Divide 250 by 1.086. The result is a 230 ms delay
Next, set your XP to delay the signal with your calculated ms delay.
SET DELAY PARAMETERS
FRONT OF HOUSE SPEAKERS
REAR DELAY
SPEAKERS
Professional Amplifier Series
POWER
PROTECT
SIGNAL
CLIP
SIGNAL
CLIP
CHANNEL ONE CHANNEL TWO
1
2
3
4
5
6
7
8
911
12
13
15
17
19
22
30
50
0 dB
10
1
2
3
4
5
6
7
8
911
12
13
15
17
19
22
30
50
0 dB
10
CHANNEL ONE CHANNEL TWO
1
2
3
4
5
6
7
8
911
12
13
15
17
19
22
30
50
0 dB
10
1
2
3
4
5
6
7
8
911
12
13
15
17
19
22
30
50
0 dB
10
CHANNEL ONE CHANNEL TWO
1
2
3
4
5
6
7
8
911
12
13
15
17
19
22
30
50
0 dB
10
1
2
3
4
5
6
7
8
911
12
13
15
17
19
22
30
50
0 dB
10
2000 Watt Power Amp
DCM2000
ON
INPUT
CLIP
OUTPUT
EFF 1 EFF 2
EFF1 EFF2
BYPASS EFF2EFF1
STEREO
EDIT
VALUE
STEREO
5
4
3
2
1
010
9
8
7
654
3
2
1
010
9
8
7
6
SAVE
(SHIFT)
(COMPARE)
(GLOBAL)
XP2
TWO ENGINE DSP EFFECTS PROCESSOR
STAGE
∆ = distance between speakers measured in feet
Sound source is
delayed using
the XP to correct
for distance.
Rear speakers with time
delayed audio arrives at
the same time the front
of house audio arrives.
Power amps for
delay speakers
∆
–––– = ms delay
1.086
1. In Dual Mono mode select a delay effect program (80-89).
2. Edit the Effect Program with the following settings:
dL= ms delay value, Fr=1, Bo=1, rL=0, MIX=0. The signal will not regenerate into an echo with these settings.
Instead you will only get the delayed signal.
Page 16

16
MIDI, the acronym for Musical Instrument Digital Interface, allows for the connection of music synthesizers,
musical instruments and computers. The MIDI standard is based partly on hardware, and partly on a description
of the way in which music and sound are encoded and communicated between MIDI devices. The hardware portion of the MIDI standard defines these types of input/output channels, called MIDI ports and specifies a particular type of cable (a MIDI cable) that plugs into the ports. The three types of ports defined by the MIDI specification are MIDI IN, MIDI OUT, and MIDI THRU. A synthesizer or other MIDI device receives MIDI messages via its
MIDI In port. It also echoes the messages back out through the MIDI THRU port so that other devices can receive
them. MIDI devices send their own messages to other devices via the MIDI Out port.
The information transmitted between MIDI devices is in a form called a MIDI message, which encodes aspects
of sound such as pitch and volume as 8-bit bytes of digital information.
What does all this mean?
MIDI is supposed to be here to make our lives easier. For use with the XP simply use an existing MIDI controller
as a way to make a "Virtual Pedal Board" for your guitar, or use it "live" for vocals, drums and guitars. In the studio it will communicate with your existing MIDI gear.
In order to use MIDI, the XP’s MIDI data enable switch needs to be turned on. This switch is located in the
global parameters and is titled “CE”. When this is set to “1”, MIDI functionality is enabled. MIDI is off when
“CE” is set to “0” (See Global Parameters section for details)
When you want to change the active effect program of an effect engine, send a program change command on
the channel that the engine is listening in on. The MIDI channel configuration is also located in the global parameters and is labeled “Cx” where x is the actual effect engine #. (See Global Parameters section for more info)
When you want to change an active parameter in an effect engine, send data on the appropriate controller
number tuned to that engine’s channel. (see effect parameter chart for details on what the controller numbers
are). If the display mode that is currently selected indicates anything with regard to that controller, the display
will update to reflect the value.
Examples:
1) If changing the effect wet/dry mix and the display mode is on the mix screen, sending controller #96 on the
appropriate MIDI channel will change the mix. You will see the new value display in real time on the display.
2) If changing an effect parameter value (for instance, reverb decay length rd) and the display mode is set to
parameter select, every time the controller messages are sent, the display is updated to display “rd”. This
gives you a visual indication of what parameter the XP processor thinks that you want to change.
3) If changing an effect parameter value and the display modes is set to the value change mode, the numerical
value changes that the continuous controller messages produce is shown on the screen in real-time.
MIDI
MIDI
Page 17

17
RESETTING DEFAULTS
RESETTING DEFAULTS
Unit will not power up
I want to run one signal through two or
more effect programs, how do I do it ?
I can’t get my effect program number to
stop blinking
My MIDI footswitch is not working with
my XP
My XP is noisy
My XP doesn’t work and displays EErr
when I turn it on.
My XP doesn’t work exactly the way this
manual describes.
Check to make sure your AC cable is securely plugged in to the
XP. If you continue to have the same symptom check the fuse
holder and make sure the fuse is good.
Check the Digital Link section of the of the manual to make
sure you have it set properly. Also check your cables to make
sure they are properly connected.
Simply hit the bypass button and it will stop. Also check to
see if the LED is corresponding with the effect that is blinking.
Review the global parameters section and make sure your CX
and CE parameters are properly set, also refer to your external
MIDI controller’s manual.
Double-check your cables and connections. Make sure your
input and output levels are properly set. A low input setting
with a high output setting may yield noise. Increase the input
level and decrease the output.
The unit is experiencing EEPROM failure and will need servicing.
This type of failure is highly unlikely, but is correctable with factory service.
This manual is for the XP2 and XP4 software release r009. To
check the software on your unit see the item 3 above.
Question Possible Solution
TROUBLESHOOTING
FREQUENTLY ASKED QUESTIONS
SPECIAL POWER-ON BUTTON COMBINATIONS
Hold down the following buttons while powering up your XP2/XP4 to activate these special features.
1) BYPASS-EFF1-EFF2 – Reset all effect programs on one side.
When this combination is held down while powering on, all effect programs of the unit are restored to factory
settings. Only one unit (side) of the XP4 model may be done at once.
2) BYPASS-PG RT – Reset the XP2/XP4
Total factory restore of both units. All effect programs and config. data is reset to factory condition.
Instructions for use: Power on with the buttons down, when you see “FFFF” on the display(s), release the
buttons and depress BYPASS-EFF1-EFF2. This begins the factory restore operation. When you are returned
back to the effect program screen, the restore is complete.
3) BYPASS – Software Release.
Allows you to check the software release # while powering on.
Page 18

18
00-BLUE PLATE
Simulates a Vintage Spring reverb. Ideal for guitar and vocals.
01-PLATEOON
A multi-purpose Plate reverb with a short pre-delay.
02-"SPEKTOR VERB"
A very encompassing reverb with no pre-delay. Great for
vocals and drums.
03-VERBAGE
A reverb to use when you need to keep things punchy in the
mix. Has a moderate pre-delay and is great for drums and
clean toned guitars.
04-VINTAGE-VOCO-VERB
Vintage Vocal Plate Reverb with no pre-delay and a moderately high decay.
05-VINTAGE-VOCO-VERB II
Same as Vintage-Voco-Verb I but with a higher decay.
06-PICKED CLEAN
Reverb for clean sounding vintage guitar tones.
07-LONG VIEW
A long-tailed reverb with no pre-delay.
08-VERB-TO-GO
Multi-purpose reverb.
09-PLATE STATION
A number of uses. Great for experimenting with parameters.
10-HIDDEN VALLEY VERB
A very subtle reverb effect that is best used for applications
that need a light overall reverb.
11-DRUMMERS PLATE
A great reverb for drums of all types.
12-PERCUSSION VERB
Great for drums of all types.
13-SPACE DRUM
Reverb that is suited for bass drums.
14-AIRY SNARY
Reverb that works well with snare drums.
15-VERB ALIVE
If you want the Plate reverb sound in a live situation, this
effect program is excellent. Moderately high pre-delay to
prevent any muddiness.
16-LONG TAILED SHORT HAIR
Reverb similar to 07 LONG VIEW, but with a pre-delay.
17-LONG TAILED SHORT HAIR II
Similar to Long Tailed Short Hair, but with an even longer
decay.
18-SPECIALTY VERB I
Great for dramatic reverb effects.
19-SPECIALTY VERB II
Good for light reverb effects.
20-COZY ROOM
Simulates a reverb in a reflective small room.
21-INTO THE BLUE ROOM
Reverb similar to 20. Cozy Room but a bit larger sounding.
Great for adding a warm ambience.
22 -DEEP BROOM CLOSET VERB
A big reverb sound with a quick decay.
23-DAMP ROOM
A less intense room reverb with a short decay.
24-AMBIENT BOX
A big reverb sound with very little decay and no pre-delay.
25-VERB IN-THE-LEU
Mimics a big sound in a highly reflective small room.
26-BIG ROOM
Sounds good for guitars and vocals. It really shines "live" in
a small club for adding ambience to vocals and guitars.
27-BIGGER ROOM
When you need an ambient reverb in a small room, live or in
the studio.
28-BIGGEST ROOM
This effect program is great for guitar and vocals. Use live
for guitar solo sounds or in the studio for vocal and guitar
tones.
29-INSIDE THE WHALE VERB
This is a very large room verb that sounds great for vocals in
small rooms.
30- ACOUSTICALLY YOURS
Reverb ideal for acoustic guitars, live and in the studio, with
very little decay and no pre-delay.
31-LITTLE ACOUSTICALLY YOURS
The decay in this reverb really helps smaller body acoustic
guitars. It helps make up for their lack of sustain.
32-VOICE OVER
This reverb is well suited for voice-over in the studio.
33-THE BALLADIZER
Works well for adding reverb to guitars and vocals, especially
for ballads.
34-SPACE DRUM II
Excellent reverb for toms and bass drums.
35-SHOWER STALL
Great reverb for that mic in the shower stall sound.
36-BRIGHT BACK ROUND
Great live or in the studio reverb for background vocals.
37-CAVENOURS VERB
Gives a cave reverb effect to your mix.
38-CARLSBAD CAVERNS
A reverb that works well for special effects whenever you
want to add some creativity.
39-GRAND CANYON
Makes vocals and instruments sound very distant, use your
mix control liberally with this effect program.
40-CARVIN-GIE HALL
Large hall reverb with a moderately high pre-delay. Best
used for live vocals and guitars.
41-VATICAN VERB
Large hall sounding reverb that has many reflective surfaces.
42-HALLACIOUS
Drums, guitars and vocals will sound amazingly huge and
ambient with this reverb.
43-HALL-O-WEEN
A little less dramatic when compared to 42. HALLACIOUS.
44-INSTANEOUS AMBIENCE
Similar to 42. HALLACIOUS reverb but with no pre-delay.
45-DEEP HALL
A dramatic hall reverb with a much broader frequency
response.
46-THE LONG HALL
Similar to Deep Hall reverb, but with a larger frequency
response.
47-OPEN ENDED
Similar to Long Hall reverb, but with more pre-delay.
48-OPEN ENDED II
Similar to Long Hall reverb, but with more pre-delay.
EFFECTS LIST
00-19 Plate Reverb
20-39 Room Reverbs
40-49 Halls
50-54 Triangle Chorus
55-69 Sine Chorus
70-74 +Feedback Flanger
75-79 -Feedback Flanger
80-89 Delays/Echos
90-94 Rotary Speaker
95-99 EQ
Page 19

19
49-PLATE II
Bright thin sounding reverb.
50-ACOUSTA CHORUS
Light chorus that excellent for adding some depth and ambience to a dull sounding acoustic instrument.
51-PICKERS CHORUS
Great when a lot of ambience is not necessary and you just
want a clean chorus for electric guitar, acoustic guitar, or
even vocals.
52-CRISPY FALLS
Utility chorus use it to fatten up and add life to your mix.
53-NEEDS SOMETHING? HMMM
When you are doing your mix down and it sounds kind of flat,
give this chorus a try!
54-ON THE EDGE OF DRAMA
Rich brilliant chorus effect for any application.
55-MILD CHORUS
When you need to tame a bright sounding instrument and
add a touch of ambience and color.
56-FRETLESSLY
This chorus helps you get a fretless tone out of your electric
bass or enhance and help with intonation on a fretless bass.
57-BACK ROUND VOCAL
A great chorus for acoustic instruments.
58-UFO LFO
The extra terrestrial chorus experience that increases by
upping the value of the feedback control.
59-UFO LFO II
An even more terrestrial chorus experience.
60-PHAZE THE MUSIC
A great phase effect for any instrument or vocal.
61-CLEAN PHASED OUT RHYTHM
Great for a clean rhythm with a twist of phase.
62-PURPLE PHASE
A great phase for solo guitar.
63-FUNK PHASE
Gives your electric bass or keyboard a funkified tone.
64-PHASE AWAY
Dramatic phase with a slow oscillation speed.
65-THIN ON PHASE
Negative feedback phase that will work well with bass and
rhythm guitar.
66-PHASE'IN
Quick phase modulation speed for special effects.
67-PHASING OUT QUICKLY
Quick phase for specialty effects.
68-SLOW AND INTENSE
A great phase for volume control swell with added ambience
and color.
69-KEEP YOU LOWS CLEAN
Phase effect that will only effect the high end.
70-SOLO FLANGE
Flanger that adds some depth and character.
71-FLANGELIC
Special effect for vocals and guitars.
72-BASS FLANGER
Special flanging effect for bass guitar and guitar.
73-DEEP FLANGE
Quick flange for a lot of depth.
74-FLANGE LITE
When only a light flanger is needed.
75-NEGATRON
Negative feed back Flanger for special effects. Negative feed
back Flanger that is brighter and thinner sounding then their
positive feedback counterparts.
76-FUNKIFIED SOLO GUITAR FLANGER
Self explanatory.
77-PLANATERY FLANGULATION
Special effect for just about anything. Use sparingly!
78-PLANETARY FLANGULATION II
Little less feedback but all the funk!
79-SLOW SWEEP ROTATION MODULATION
Great for jangle guitar rhythms with a twist.
80-SLAP BACK
Great for low to medium slap back delay effects.
81-DELAYVIS
Great vintage vocal delay.
82-50'S STYLE
Vintage vocal delay.
83-LIGHT ACOUSTIC DELAY
Great delay for acoustic instruments.
84-SILLY BILLY
Light slap back style delay.
85-SLAP HAPPY
Another great guitar delay.
86-SLAP HAPPY II
A little more dramatic than Slap Happy.
87-SNARE SLAP
Cool effect for drums.
88-DELAY-CIOUS
Nice long delay for guitar and special vocal effects.
89-TRIP DELAY
A more dramatic version of delay-cious.
90-BRUCE LEZ-LEE
Great for vocals and guitar mimics those vintage roto-speaker
sounds.
91-WHIRL WIND
Watery effect.
92-SLOW-TO -ROTO
Deep slow rotary effect.
93-SLOW-TO-ROTO II
Deeper than Slow-To-Roto.
94-SPIN CYCLE
Quick speaker rotation simulation.
95-LEVEL "Q'
An effect program with flat EQ (no cuts or boosts).
96-MID BOOST
EQ that cuts the mids and highs, while accentuating the mids.
97-CUT THROUGH
Use this EQ when you need to cut through in the mix.
98-THE DIP
Boosts the highs, cuts the mids and boosts the lows. This is
a typical “HiFi” EQ setting for listening to music.
99-SOLO
EQ for boosting your instruments tone into a mellow solo
tone.
Page 20

12340 World Trade Drive, San Diego, CA 92128
(800) 854-2235
www.carvin.com
76-00042 0400
 Loading...