

Page 1
Changing Strings
• Loosen strings completely by turning the buttons
on the Sperzel machine heads.
• Loosen the string lock thumb screws counter
clockwise on the back of the Sperzel gears. You
only need to turn these screws about 2 or 3 turns.
• To remove strings, pull strings out of the string post
holes. Push strings down into the tremolo saddles
so that the ball ends can be grabbed from the back
of the guitar.
• Insert new strings into the sustain block in the back
of the guitar, through the holes in the tremolo cover
plate. Pull strings tight.
• Slide string through the small hole in the Sperzel
string post. Take up all the slack then tighten the
thumb screw on the back. Cut off the excess string
and then tune your guitar.
• Tune up from low E (6th) string to high E (1st)
string, 6 or 7 times in order to stretch the tremolo
springs.
• Stretch your strings using the tremolo arm and by
pulling sideways on each string at about the 12th
fret.
• When strings hold their pitch relative to each other,
then tuning is complete.
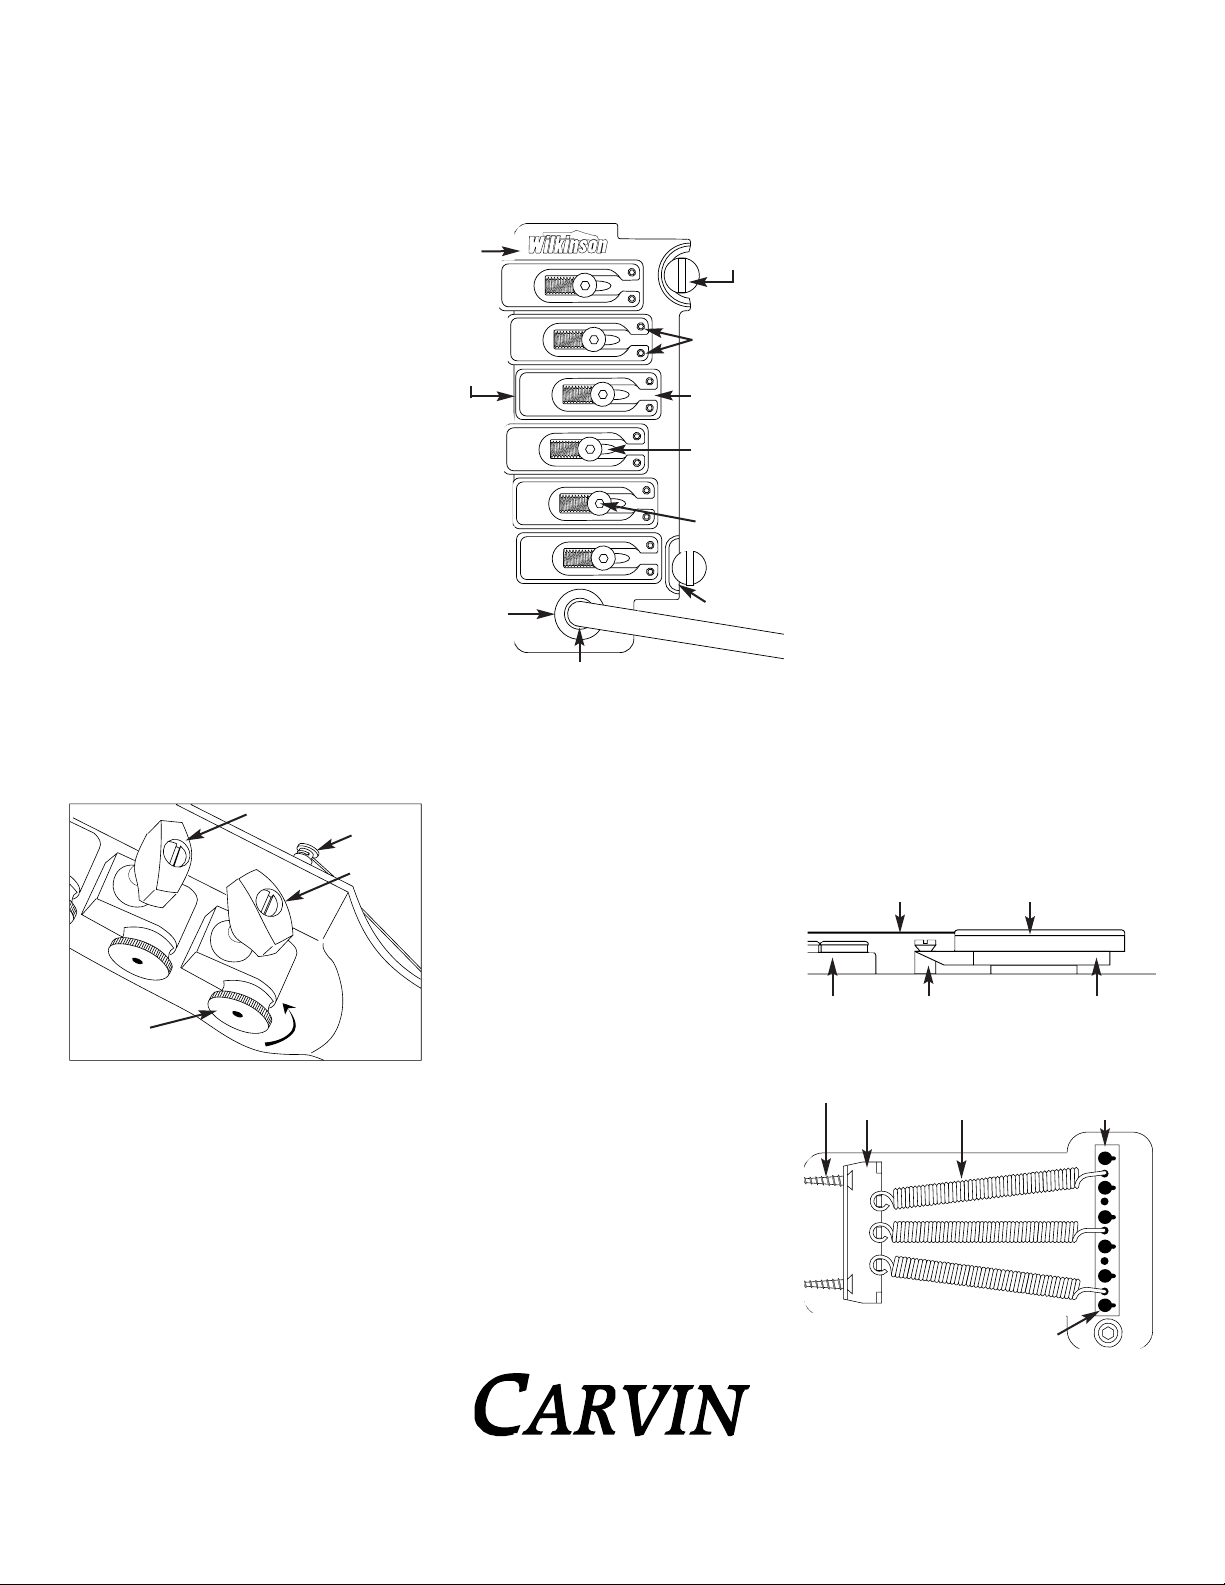
String Saddle
Arm Socket
Spring Tension Adjustment:
Your Carvin guitar comes set up with a set of high
quality 942 strings. If you continue to use the same
brand and gauge of strings, spring tension adjustment is
normally not necessary. However, if you switch brands
or gauges you may need to re-adjust spring tension.
The tremolo base plate should be set up parallel with the
face of the guitar body. Follow the steps below.
1. Tune up guitar to pitch.
2. Remove rear cover plate.
3. If tremolo rear end is too high in the air follow steps
#4,5,6 & 11.
4. Tighten the two screws on the rear of the guitar that
hold the spring claw,
1
/2 turn each with a phillips #2
driver.
5. Re-tune and see if the tremolo base plate is parallel
with the face of the guitar body. See drawing below.
6. If it’s just right, go to step #11. If it’s still too high
repeat steps #4 & 5.
7. If tremolo rear end is setting too low in the tremolo
cavity follow steps #8, 9, & 10.
8. Loosen the two screws that hold the spring claw,
1
/
2
turn each with a phillips #2 driver.
9. Re-tune and see if the tremolo base plate is parallel
with the face of the guitar body. See drawing below.
10. If it is just right, go to step #11. If it’s still too low
repeat steps #8 & 9.
11. Put rear cover plate back on.
Wilkinson Tremolo Instructions
12340 World Trade Drive, San Diego, CA 92128
800-854-2235
Saddle Lock
Down Screw
2mm
Overall Height
Adjustment
Stud
Tips:
• Don’t rest palm on tremolo while tuning up.
• When stringing up the Sperzel tuners, do not wrap
multiple string wraps around the post. Eliminate as
many wraps as possible to keep your guitar in better
tune.
1
/2 of a turn around the string post should be
considered maximum.
• You can adjust the tension of the Sperzel tuning keys
with a small slot head screwdriver. Just tighten or
loosen the screw on the end of the button until the
desired tension is obtained. To eliminate any
backlash, adjust the buttons fairly tight. This will give
your tuning buttons a firm feel, which will not hurt the
longevity of the internal gears.
• A teflon lubricant is recommended on the string
saddles, string feed through points and pivot points.
• Saddle lock down screws must be loosened before
adjusting intonation or individual string height.
Dial-in
Intonation
Screw
1.5mm
String Feed
Through Point
String height
Adjustment
Screws 1.5mm
Locking
Thumb Screw
Loosen
Sperzel Locking Tuners
Tension
Adjustment
String Post
Rear Tremolo Cavity
Adjustment Screws (use #2 phillips screwdriver)
Spring Claw
Springs
Tremolo Sustain Block
String Holes for Ball End Strings
Arm Tension
Adjustment
Screw
1.5mm
Knife Edge
Tuning Button
Attaching Arm:
• Slide tremolo arm into socket..
• If you want the tremolo arm to stay up, tighten the arm
tension screw at the rear of the arm socket. To swing
freely, back off slightly on the arm tension screw.
• Remove arm when transporting or storing guitar in its
case.
Overall String Height Adjustment:
• Turn string height studs C.W. to lower action.
• Turn string height studs C.C.W. to raise action.
• A dime can be used to turn the string height screws.
Note: For maximum sustain, the individual string height
saddle adjustment screws should not need to be
adjusted on your Carvin guitar because the #3 & #4 and
#2 & #5 saddles are designed taller than the #1 & #6
saddles. This makes the individual saddles match the
15” radius arc of the Carvin guitar fingerboard.
Individual String Height Adjustment:
• First loosen the saddle lock down screw.
• Turn height adjustment screws to adjust action.
• Re-Tighten the saddle lock down screw.
Base
Plate
Tip:
• When turning the two claw screws, have your guitar
face down on a padded table. Hold screw driver firmly
when turning, so as not to slip off screw head and
scratch the back of your guitar.
Bridge parallel to Guitar Face
Base PlatePickup
Guitar Body
Overall Height
Adjustment Stud
Saddle
String
76-00007
 Loading...