

Page 1
Cleaning, Operating, Maintenance Instructions, Parts List & Warranty
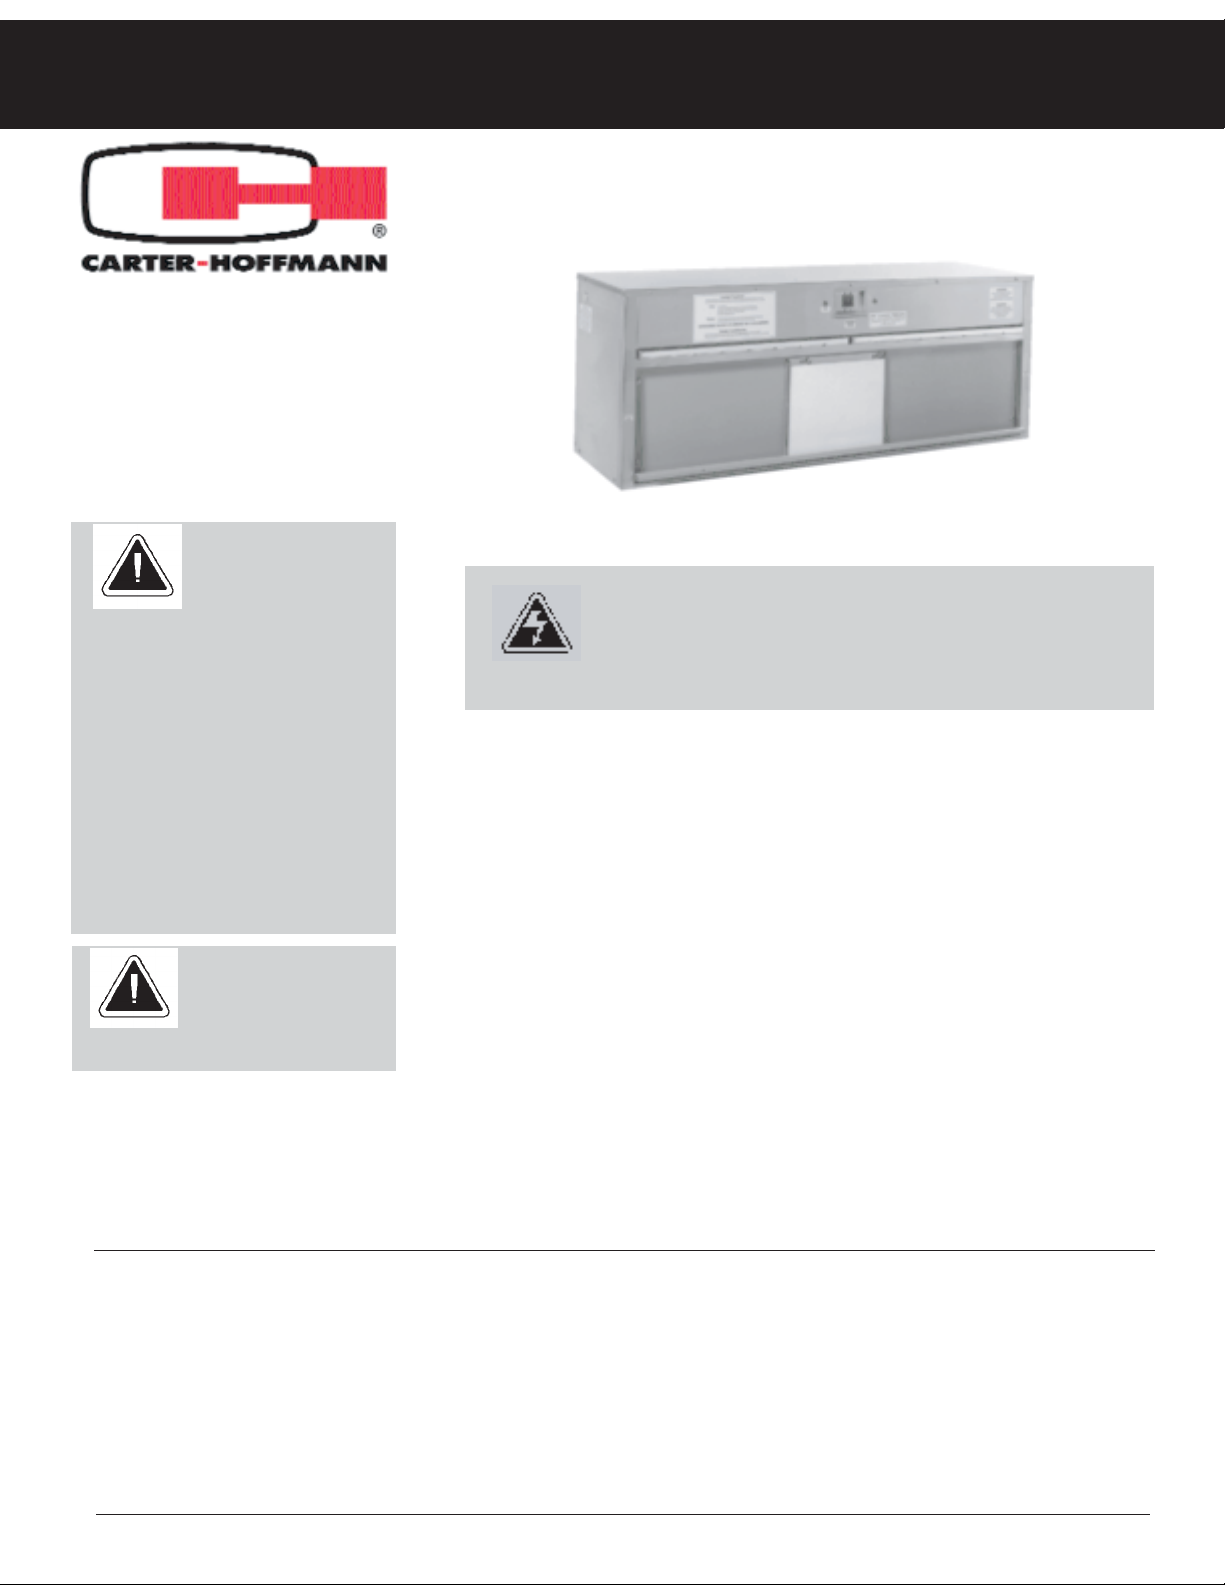
HP Series Shelf/Wall Mounted Warmers
for Bowls & Plates up to 11 3/4” Diameter
Cleaning Instructions
NOTE:
This equipment has been designed and
manufactured to meet all applicable
health and safety codes and will give
years of dependable service if used
properly. All cabinets should be thoroughly cleaned before using.
Cleansers, detergents,
degreasers, sanitizers
or bleaching agents
that contain chlorides
or phosphates will
cause permanent damage to stainless
steel products. The damage appears as
pits, eruptions, voids, small holes,
cracks, severe discoloration, or dulling
of the metal finish. Water with high
chloride content can also damage
stainless steel. If you are uncertain of
your water quality, we recommend you
have it tested. THIS DAMAGE IS
PERMANENT, COSTLY TO
REPAIR, AND IS NOT COVERED
BY THE WARRANTY.
Be sure the cabinet is unplugged and cool before cleaning. The
heater components should not be exposed to direct contact with
water or cleaning sprays. Permanent damage to the electrical
components will result. THIS DAMAGE IS PERMANENT,
COSTLY TO REPAIR, AND IS NOT COVERED BY THE
WARRANTY.
1. To clean stainless steel surfaces use only cleansers, detergents,
degreasers, or sanitizers that are certified to be chloride-free and phosphate-free, and cleansers, or sanitizers only in the recommended concentrations. DO NOT exceed recommended concentrations or mixing
ratios. After cleaning and sanitizing, rinse all exposed surfaces thoroughly with large amounts of clear water. DO NOT clean cabinet with high
pressure water sprays. Water from these sprays can enter the electrical
compartment and cause permanent damage to the components. THIS
DAMAGE IS NOT COVERED BY THE WARRANTY. With a clean cloth,
wipe off any standing liquid or residue from all horizontal surfaces, in corners, or near edges.
2. The powder-coated aluminum door can be cleaned in the same way as
the stainless steel surfaces. However, do not use strong detergents,
ammonia solutions or abrasive pads or cleaners.
3. The grease filters must be cleaned daily in a dishwasher. Pull master
switch to “OFF” position and pull filters out. Clean and then let dry. DO
NOT OPERATE CABINET WITHOUT FILTERS IN PLACE.
RECOMMENDED TIPS FOR CLEANING STAINLESS STEEL
Purpose Frequency Cleaning Agent Method of Application
Routine Daily Soap, ammonia detergent Sponge with cloth, rinse with clear water and wipe dry.
cleaning and water
Smears/ As Needed Stainless steel cleaner Rub with cloth as directed on package. Rub in direction of grain
finger prints or similar products of stainless steel. Do not use on vinyl trim or adhesive labels.
Stubborn Daily Any chloride-free Apply with damp sponge or cloth. Rub in direction of polish
spots and As Needed or phosphate-free lines. Rinse thoroughly after use, especially if cleaner contains
stains cleaner chlorine bleach. Do not use on vinyl trim or adhesive labels.
Hard water Daily Vinegar Swab with cloth. Rinse with water and wipe dry.
spots As Needed
DO NOT use steel
wool pads - ferrous
deposits will cause
rusting.
CAUTION
CAUTION
WARNING
Page 2

Electrical
Requirements
Operating
Instructions
Installation
Operates on 120 volt, 60 Hz, 1 PH, 1920 watts, 16 amps, 6 foot power cord
with NEMA 5-20P angled plug.
The HP Saute Station has been designed for warming and holding bowls or
plates up to 11 3/4” diameter. It is intended to be placed on a shelf and
securely fastened to the wall.
1. Remove the cabinet from its shipping carton and remove all packing
materials are from the cabinet.
2. Check to ensure that the equipment manual is present and removed
from the packaging.
3. Read the equipment manual completely before installing and operating
the cabinet.
4. Place cabinet on shelf. Do not operate cabinet until it has been securely
fastened to appropriate shelf or location. NOTE: Shelf or mounting
location should have a weight capacity of at least 600 lbs. With the
full weight of the cabinet on the shelf, secure unit to the shelf with stationary clips provided, one on each end of the unit. These clips are
intended to keep the unit stationary only, and are not intended to support
the unit in any way. Mounting must meet all local building code requirements. Use only hardware that is intended for the wall material present
(hardware not included). Make sure unit is level, square and flush with
the wall before tightening bolts.
6. Clean cabinet thoroughly before use (see instructions on page 1).
5. Connect the cabinet power cord to a correctly wired and protected power
source.
1. Plug in the power cord. On/Off switch is located on front of cabinet. Red
power light on the left side of the switch will illuminate when power is
turned on.
2. For best results, allow cabinet to heat for 30 minutes.
3. Load clean dishes directly from the dishwasher into cabinet. Dishes
should reach required temperature within 15 minutes.
NOTES:
Loading cooled dishes into a warm cabinet will extend the heating time.
Loading cooled dished into a cold cabinet will extend the heating time to
as much as two hours.
Do not plug into ungrounded receptacle. Check to
ensure that heater plug is in safe operating condition.
WARNING
Page 3
Maintenance
Instructions
Trouble/Caution
Light
Replacement
Parts
1. Clean the grease filter daily (see instructions on page one).
2. Clean the cabinet daily (see instructions on page one).
The HP Saute Station is equipped with a trouble/caution light. This light is
located to the right of the On/Off switch. The light will illuminate when the
cabinet is not heating properly. This indicates one or more of the following
conditions:
Air Blockage. The grease filter needs to be cleaned. A clogged grease
filter will block air flow into the cabinet and the cabinet will overheat. The
cabinet is equipped with an automatic shut off when this situation occurs.
Clean the grease filter according to the directions on page 1. If the filter
is too dirty and cannot be cleaned properly, it must be replaced.
If problem is not fixed by cleaning or replacing the grease filter, the
electrical components are damaged (see Electrical Component Failure
below).
Element Failure. If one side of the cabinet is heating and the other isn’t,
an element is not heating properly. DO NOT ATTEMPT TO OPEN THE
HEATING COMPARTMENT AND MAKE REPAIRS. THIS REPAIR
REQUIRES A QUALIFIED SERVICE TECHNICIAN. CALL FOR
SERVICE.
Electrical Component Failure. Moisture may have accumulated in the
heating compartment and may have damaged electrical components.
Component failure may also be caused by failure to clean the grease
filter. DO NOT ATTEMPT TO OPEN THE HEATING COMPARTMENT
AND MAKE REPAIRS. THIS REPAIR REQUIRES A QUALIFIED
SERVICE TECHNICIAN. CALL FOR SERVICE.
120V, 1920 watts, 16 amps, 60HZ, 1PH
Part Number Description
18600-0061 300oF Auto Reset Hi Limit
18601-1150 Red Pilot Light
18602-0073 On/Off Switch with Circuit Breaker
18602-0099 Quench Arc
18602-0220 Single Thermocouple
18602-0224 Relay
18605-0025 14/3 HJSO Power Cord
18606-0221 NEMA Plug 5-20P
18610-0197 Locknut for Power Cord
18612-0113 Heat Element 900 Watt
18614-0324 Fan Motor
18614-0325 Fan Blade
18616-0249 Controller
18616-9996 Aluminum Cord Grip
Contact factory with your model and
serial number for replacement cart
components.
DO NOT operate
cabinet without
grease filter in
place.
CAUTION
Use only
(OEM) original equipment
manufacturer
replacement
parts. Using unauthorized
parts may cause serious injury.
Replacement parts should be
installed by a qualified service
technician.
WARNING
Page 4

Carter-Hoffmann
Corporation
Warranty:
Warranty
Exclusions and
Limitations:
Specifications subject to change through product improvement and innovation.
Printed in U.S.A.
1551 McCormick Avenue, Mundelein, Illinois 60060 10/13
Tel. 1-800-323-9793 Fax No. (847)367-8981 18400-3056
Carter-Hoffmann Corporation (“CARTER-HOFFMANN”) warrants to the initial purchaser of its Carter
Line Products that CARTER-HOFFMANN will, at its option, repair or replace, during the warranty period set forth below, any part of such products made necessary due to a defect in material or workmanship
which is present when the product leaves its factory and which manifests itself during the warranty period
under normal use and service.
This warranty applies only to original equipment owned and possessed by the initial purchaser and the
warranty period begins on the date of original shipment from the CARTER-HOFFMANN factory and
extends as follows: to electrical components for one year; to electrical labor for one year; to refrigera-
tion compressor unit for one year and to all other components parts and labor for 12 months.
Repair or replacements under this warranty will be performed, unless otherwise authorized by CARTERHOFFMANN, at its factory. All parts or components to be repaired or replaced under this warranty are
to be shipped prepaid to CARTER-HOFFMANN, with reimbursement credit for such part or component
to be given if found by CARTER-HOFFMANN to be defective.
CARTER-HOFFMANN neither makes nor assumes and does not authorize any other person to make or
assume any obligation or liability in connection with its products other than that covered in this warranty. This warranty applies only within the continental United States and Canada. In Alaska and Hawaii,
this warranty applies only to and is limited to the supply of replacement parts.
Any implied warranty of merchantability or fitness for a particular purpose is hereby specifically disclaimed by Carter-Hoffmann Corporation. There are no warranties, expressed or implied, which extend
beyond the description on the face hereof.
This warranty does not cover and CARTER-HOFFMANN shall not under any circumstances be liable for
any incidental, consequential or other damages (such as injury to persons or property, loss of time,
inconvenience, loss of business or profits, or other matters not specifically covered) arising in connection
with the use of, inability to use, or failure of these
products.
Wiring
Diagram
Page 5

Nettoyage, utilisation, entretien, liste des pièces & garantie
Réchaud mural de la série HP pour assiettes
et bols de moins de 11 3/4” de diamètre
Entretien
NOTE:
Cet équipement a été conçu et fabriqué
pour répondre à tous les codes de sécurité et de santé applicables et donnera
des années de service fiable s'il est utilisé correctement. Les réchauds doivent
être soigneusement nettoyés avant de
l'utiliser.
Les nettoyants, détergents, dégraissants,
désinfectants ou
agents de blanchiment
qui contiennent des
chlorures ou des phosphates vont
causer des dommages permanents aux
produits en acier inoxydable. Les dommages apparaissent comme des éruptions, des vides, des petits trous, fissures, décoloration sévère, ou le
ternissement du métal. L'eau à forte
teneur en chlore peut également
endommager l'acier inoxydable.
Si vous n'êtes pas sûr de la qualité de
votre eau, nous vous recommandons de
la faire tester . CES DOMMAGES
SONT PERMANENTS, COÛTEUX À
RÉPARER, ET NE SONT PAS COUVERTS PAR LA GARANTIE.
Assurez-vous que le boîtier est débranché et laissez refroidir avant
de le nettoyer. Les éléments ne doivent pas être exposés à un contact direct avec l'eau ou le produit nettoyant. DES DOMMAGES
PERMANENTS AUX COMPOSANTES ÉLECTRIQUES
ENTRAÎNERONT DES DOMMAGES COÛTEUX À RÉPARER, ET
NE SONT PAS COUVERTS PAR LA GARANTIE.
1. Pour nettoyer les surfaces en acier inoxydable, utilisez uniquement des
nettoyants, détergents, dégraissants ou désinfectants qui sont certifiés
pour être exempt de chlorure et phosphate, et nettoyants ou désinfectants seulement dans les concentrations recommandées. NE PAS
dépasser les concentrations recommandées. Après le nettoyage et la
désinfection, rincez toutes les surfaces complètement avec de grandes
quantités d'eau claire. NE PAS nettoyer le boîtier avec un jet d'eau à
haute pression. Le jet peut entrer dans le compartiment électrique et
causer des dommages permanents aux composantes. CES DOM-
MAGES NE SONT PAS COUVERTS PAR LA GARANTIE. Avec un chiffon propre, essuyez tout liquide ou résidus de toutes les surfaces.
2. La porte en aluminium peut être nettoyée de la même façon que les sur
faces en acier inoxydable. Cependant, ne pas utiliser de détergents puissants, de solutions d'ammoniac ou de tampons ou de nettoyants abrasifs.
3. Les filtres à graisse doivent être nettoyés quotidiennement dans un lavevaisselle. Mettre l’interrupteur à «OFF» et retirez les filtres . Nettoyez et
puis laissez sécher. NE PAS UTILISER L’APPAREIL SANS FILTRES.
CONSEILS POUR LE NETTOYAGE DE L’ACIER INOXYDABLE
But Fréquence Produit nettoyant Méthode
Nettoyage Quotidiennement Savon, détergent Épongez avec un chiffon, rincez à l'eau claire et essuyez-le.
de routine et eau
Taches/ Au besoin Nettoyant pour Frottez avec un chiffon comme indiqué sur l'emballage. Frottez
Traces de doigts l’acier inoxydable dans le sens du grain de l’acier. Utilisez sur l’acier seulement.
Taches Quotidiennement Nettoyant sans Appliquer avec une éponge ou un chiffon humide. Frottez dans
tenaces Au besoin phosphate le sens du grain de l’acier. Rincez-bien.
Taches Quotidiennement Vinaigre Appliquez avec un chiffon. Rincez à l'eau et essuyez-le.
de calcaire Au besoin
N'utilisez pas de laine
d'acier. Ceci causera
de la rouille.
ATTENTION
ATTENTION
Page 6

EXIGENCES
ÉLECTRIQUES
Directives
d'exploitation
Installation
Fonctionne sur du 120 volts, 60 Hz, 1 PH, 1920 watts, 16 ampères, cordon
d'alimentation de 6’, NEMA 5-20P fiche coudée.
La station Saute HP a été conçu pour réchauffer et maintenir des bols ou
des assiettes ayant un diamètre maximal de 11 3/4 ". Elle est destinée à
être placée sur une étagère et solidement fixée au mur.
1. Retirez le carton d’emballage, assurez-vous que tous les matériaux
d’emballage et de protection en plastique ont été retirés de l’appareil.
2. Vérifiez afin de vous assurer que toutes les composantes sont incluses:
cabinet, manuel d’instruction et autres accessoires.
3. Lisez les instructions de fonctionnement.
4. Placez l’appareil sur une tablette. Ne pas utiliser l’armoire jusqu'à ce
qu'elle soit solidement attachée à une étagère ou installée sur une
surface appropriée. NOTE: l’étagère ou l’emplacement doivent avoir
une capacité de soutien d'au moins 600 livres. Sécurisez l’armoire à
la plate-forme avec les pinces prévues, une sur chaque extrémité de
l'unité. Ces pinces sont destinées à maintenir l'unité fixe seulement, et ne
sont pas destinées à soutenir l'unité en aucune façon. Le montage doit
satisfaire tout les codes du bâtiment. Utilisez uniquement du matériel qui
est destiné à la fixation selon la composition du mur actuel (matériel non
inclus). Assurez-vous que l'appareil est de niveau, équerre et au ras du
mur avant de serrer les boulons.
5. L’appareil doit être nettoyé à fond avant de l’utiliser. Voir PROCÉDURES
DE NETTOYAGE à la page 1 de ce manuel.
6. Branchez le cordon d'alimentation de l'armoire à une source
d'alimentation correctement câblés et protégés.
1. Branchez le cordon d'alimentation. L’interrupteur marche / arrêt se trouve
sur le devant du boîtier. Un voyant d'alimentation rouge sur le côté
gauche de l'interrupteur s'allume lorsque l'appareil est allumé.
2. Pour de meilleurs résultats, laissez l’armoire préchauffer pendant
30 minutes.
3. Chargez les assiettes directement du lave-vaisselle au cabinet. Les plats
devraient atteindre la température requise dans les 15 minutes.
NOTES:
Le chargement de plats froids dans une armoire chaude prolongera la
durée de chauffage.
Le chargement de plats refroidis dans une armoire froide va prolonger le
temps de chauffage de près de deux heures.
Ne branchez pas dans une prise sans mise à la terre.
Assurez-vous que l’élément est en bon état de fonctionnement.
ATTENTION
Page 7

Directives
d’entretien
Voyant
d’avertissement
Pièces
1. Nettoyez le filtre à graisse quotidiennement (voir les instructions à la
page 1).
2. Nettoyez l’armoire quotidiennement (voir les instructions à la page 1).
La station Saute HP est équipé d'un voyant d'avertissement. Cette lumière
est située à la droite de l'interrupteur Marche / Arrêt. La lumière s'allume
lorsque le boîtier ne chauffe pas correctement. Ceci indique une ou
plusieurs des conditions suivantes:
Blocage de la ventilation. Le filtre à graisse doit être nettoyé. Un filtre à
graisse bouché peut bloquer le flux d'air dans l'armoire et celle-ci
risquent de surchauffer. Le cabinet est équipé d'un arrêt automatique
lorsque cette situation se produit. Nettoyez le filtre à graisse selon les
instructions sur la page 1. Si le filtre est trop sale et ne peut pas être
nettoyé correctement, il doit être remplacé. Si le problème n'est pas
résolu par le nettoyage ou le remplacement du filtre à graisse, les
composantes électriques sont endommagées (voir défaillance des com
posantes électriques ci-dessous).
Élément endommagé. Si un côté de l'armoire se réchauffe et l'autre
non, un élément fait défaut. NE PAS TENTER D'OUVRIR LE
COMPARTIMENT DE CHAUFFAGE ET EFFECTUER DES
RÉPARATIONS. CETTE RÉPARATION NÉCESSITE UN TECHNICIEN
DE SERVICE QUALIFIÉ. CONTACTEZ NOTRE CENTRE DE SERVICE.
Défaillance des composantes électriques. L'humidité peut s'être
accumulée dans le compartiment de chauffage et peut avoir endommagé
les composantes électriques. La défaillance d'une composante peut
aussi être causée par une absence de nettoyage du filtre à graisse. NE
PAS TENTER D'OUVRIR LE COMPARTIMENT DE CHAUFFAGE ET
EFFECTUER DES RÉPARATIONS. CETTE RÉPARATION NÉCESSITE
UN TECHNICIEN DE SERVICE QUALIFIÉ. CONTACTEZ NOTRE
CENTRE DE SERVICE.
120V, 1920 watts, 16 amps, 60HZ, 1PH
Numéro de pièce Description
18600-0061 Thermostat limite 300
o
F
18601-1150 Témoin lumineux rouge
18602-0073 Interrupteur On/Off avec disjoncteur
18602-0099 Supresseur de surtention
18602-0220 Thermocouple simple
18602-0224 Relais
18605-0025 Cordon d’alimentation 14/3 HJSO
18606-0221 Fiche NEMA 5-20P
18610-0197 Contre-écrous pour cordon d’alimentation
18612-0113 Élément 900 Watt
18614-0324 Moteur du ventilateur
18614-0325 Pales de ventilateur
18616-0249 Panneau de contrôle
18616-9996 Serre-câble
Contactez l'usine avec votre modèle et le numéro de série pour
obtenir des pièces de rechange.
NE PAS utiliser
l’armoire sans filtre
à graisse en place.
ATTENTION
Utilisez
uniquement
des pièces de
rechange du
fabricant
d'équipement d'origine.
L'utilisation de pièces non
autorisées peut causer des
blessures graves. Les pièces de
rechange doivent être installées par un technicien qualifié.
ATTENTION
Page 8

Garantie CarterHoffmann:
Exclusions et limitations de la
garantie :
Spécifications sujettes à modifications par l'amélioration des produits et l'innovation.
Imprimé aux États-Unis
1551 McCormick Avenue, Mundelein, Illinois 60060 10/13
Tel. 1-800-323-9793 Fax. (847)367-8981 18400-3056
Carter-Hoffmann ("CARTER-HOFFMANN") garantit à l'acheteur initial de ses produits que CARTERHOFFMANN pourra, à son choix, réparer ou remplacer, pendant la période de garantie indiquée cidessous, une partie de ces produits rendues nécessaires en raison d'un défaut de matériau ou de fabrication qui est présent lorsque le produit quitte son usine et qui se manifeste au cours de la période de
garantie sous des conditions d'utilisation et de service normales.
Cette garantie s'applique uniquement aux équipements d'origine appartenant et en la possession de l'acheteur initial et la période de garantie commence à la date de livraison d'origine de l'usine CARTERHOFFMANN et se détail comme suit: 12 mois sur les pièces et la main d'oeuvre.
La réparation ou le remplacement sous cette garantie sera effectué, sauf autorisation contraire par écrit
de CARTER-HOFFMANN, dans son usine. Toutes les pièces ou composantes devant être réparées ou
remplacées sous cette garantie doivent être expédiées port payé à CARTER-HOFFMANN, un crédit de
remboursement sera émis si la pièce est reconnue défectueuse par CARTER-HOFFMANN.
CARTER-HOFFMANN fait ni ne suppose et n’autorise aucune autre personne à faire et d'assumer
aucune obligation ou responsabilité en rapport avec ses produits autres que ceux couverts par cette
garantie. Cette garantie s'applique uniquement dans le territoire continental des États-Unis et au
Canada. En Alaska et Hawaï, cette garantie se limite à la fourniture de pièces de rechange.
Toute garantie implicite de qualité marchande ou d'adéquation à un usage particulier est par la présente
expressément déclinée par CARTER-HOFFMANN. Il n'existe aucune garantie, expresse ou implicite, qui
s'étende audelà de la description ci-dessus.
Cette garantie ne couvre pas et CARTER-HOFFMANN ne peut en aucun cas être tenue responsable des
dommages accessoires, indirects ou autres (tels que les blessures aux personnes ou aux biens, perte de
temps, inconvénients, perte commerciale ou de bénéfices, ou d'autres questions ne sont pas spécifiquement couverts) découlant en relation avec l'utilisation ou l'impossibilité d'utiliser, ou de l'échec de ces
produits.
Schéma
électrique
 Loading...