

Page 1
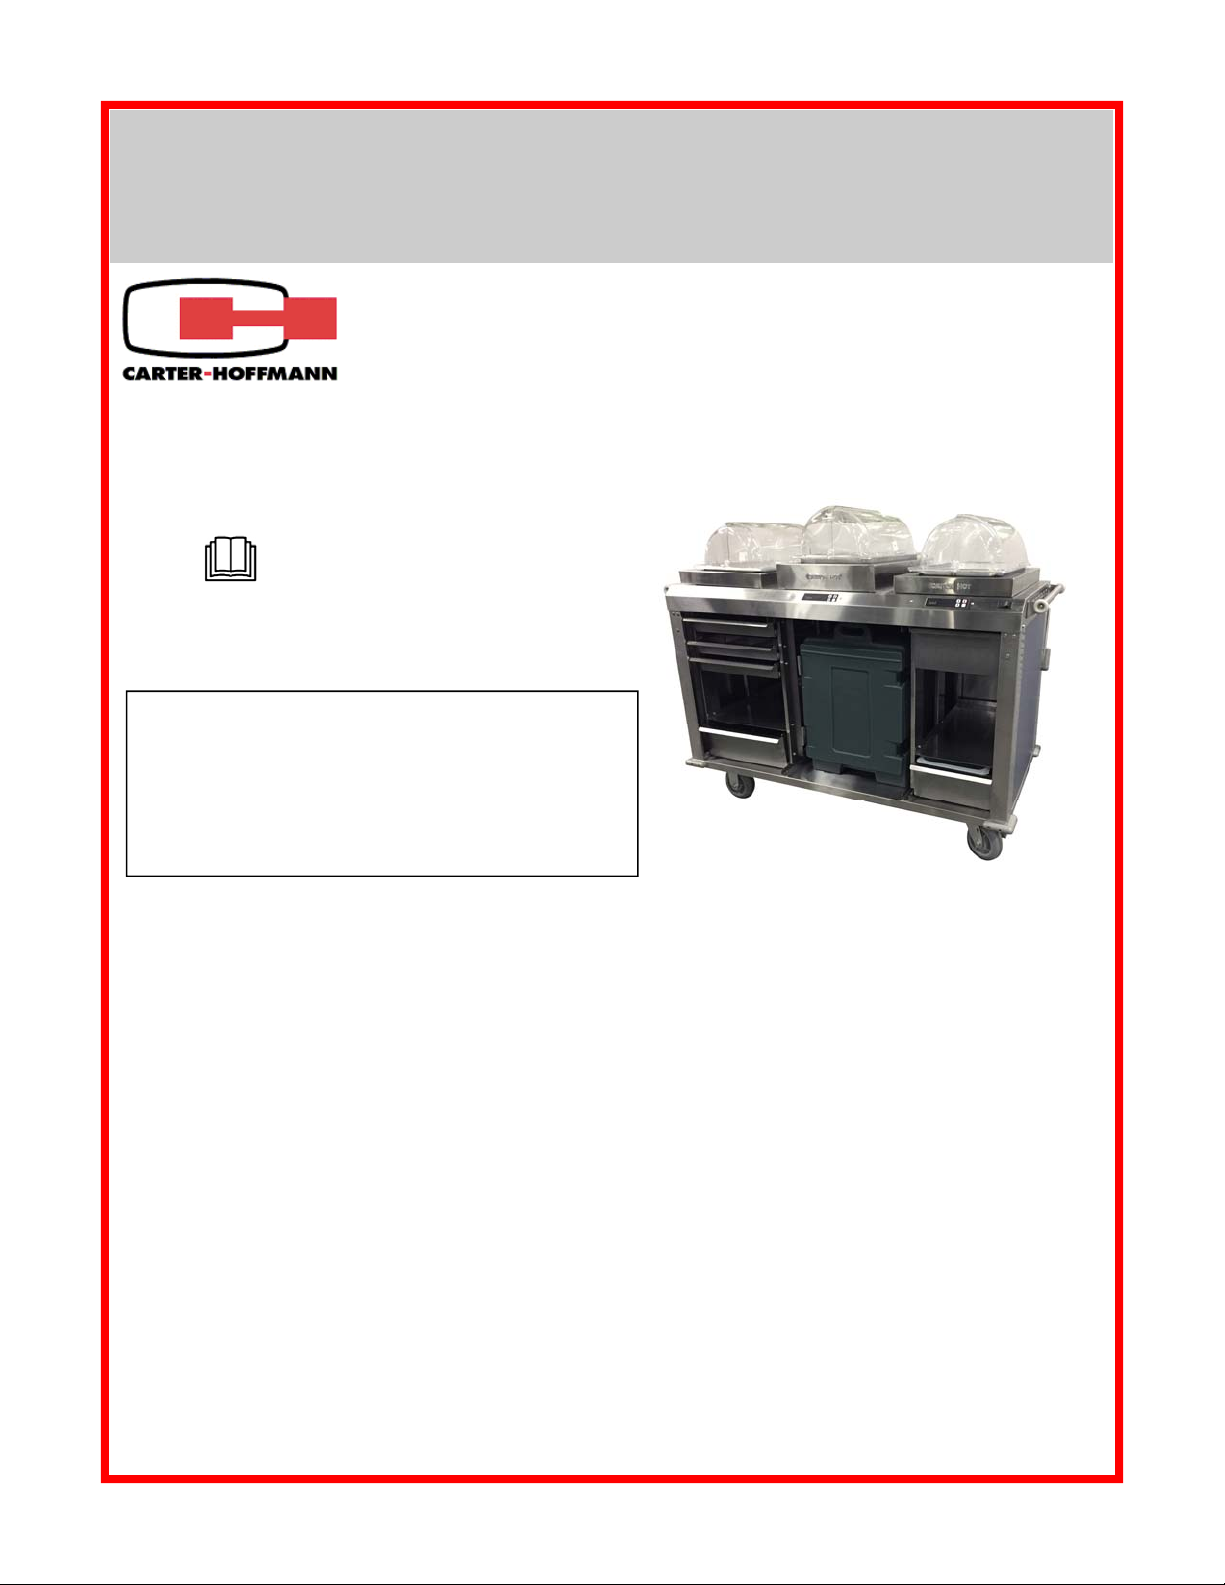
MOBILE BISTRO DINING CART
OWNERS OPERATORS MANUAL
Model MHC
MANUFACTURED BY:
CARTER-HOFFMANN
1551 McCORMICK AVENUE
MUNDELEIN, IL 60060 U.S.A.
PHONE: 847-362-5500
FAX: 847-367-8981
TOLL FREE: 800-323-9793
EMAIL: [email protected]
READ THIS MANUAL
COMPLETELY BEFORE
OPERATING THIS
APPLIANCE
IMPORTANT: DO NOT DISCARD THIS MANUAL
This manual is considered to be part of the appliance and is to be
given to the OWNER of MANAGER, or to the person responsible for
training operators of this appliance.
THIS MANUAL IS TO BE UNDERSTOOD BY ALL PERSONS
USING OR INSTALLING THIS APPLIANCE.
Contact Carter-Hoffmann if you have questions regarding installation,
operation or maintenance of this equipment.
SAFETY PRECAUTIONS……………………………………... 2
UNPACKING & INSPECTION, FREIGHT DAMAGE.………. 3
GROUNDING INSTRUCTIONS……………………………….. 3
SPECIFICATIONS…………..…………….…..……...………… 4
INSTALLATION & START-UP…………………………………. 5
NORMAL OPERATION…...……..………...…………………... 6
FEATURES & OPERATING CONTROLS……………………. 6
CONTROLLER PROGRAMMING….…..……………………… 7-8
FOOD HOLDING GUIDE……….……………….….………….. 9
CLEANING……………………………...………….……………. 10
SERVICE EXPECTATIONS……………………………………. 11
WARRANTY STATEMENT…………………………………….. 12
TABLE OF CONTENTS
SAFETY
Knowledge of proper installation, operation and maintenance procedures is essential to ensure the safe operation of this oven.
1. Always have dry hands prior to using the ON/OFF switch.
2. Turn OFF the ON/OFF switch anytime the cabinet is not in use, for extended periods of time.
3. If an electrical shock is felt when touching the cabinet, disconnect the power immediately and call Carter-Hoffmann Technical Service
for assistance or service.
4. If the power cord is frayed or the plug damaged, DO NOT PLUG INTO THE ELECTRICAL POWER RECEPTACLE. IF IT IS
ALREADY PLUGGED IN, SHUT OFF THE MAIN CIRCUIT BREAKER, LOCATED IN THE BREAKER BOX, THEN DISCONNECT
THE PLUG.
5. DISCONNECT THE POWER CORD BEFORE ATTEMPTING ANY REPAIRS TO THE CABINET AND/OR CLEANING THE UNIT.
REPAIRS TO THIS UNIT MUST BE PERFORMED BY QUALIFIED PERSONNEL.
6. DO NOT SPRAY WITH WATER HOSE OR SUBMERGE THE CABINET. ELECTRICAL COMPONENTS AND WIRING PRESENT A
HIGH SHOCK HAZARD WHEN WET.
Rev: KBA082516 Printed in The United States of America Part Number 18400-3241
Page 2
SAFETY PRECAUTIONS
WARNING: ELECTRIC SHOCK HAZARD
WARNING
When using electrical appliances basic safety precautions should be adhered to, including the following:
1) Operators of this appliance must be familiar with the appliance use, limitations and associated
restrictions. Operating instructions must be read and understood by all persons using or installing
this appliance.
2) This appliance must be grounded. Connect only to properly grounded outlet.
See “Grounding Instructions” found on page 3.
3) Use this appliance only for its intended use as described in the manual.
a. This equipment is specifically designed to hol d pre-cooked food at temperature.
b.
c. This equipment is not designed for industrial or laboratory use.
4) Cleanliness of this appliance and accessories is essential to good sanitation.
5) DO NOT submerge this appliance in water. This appliance is not jet stream approved. DO NOT direct
water jet or steam jet at this appliance, or at any control panel or wiring. DO NOT splash or pour water
on, in or over an y controls, control panel or wiring. DO NOT use corrosive chemicals or vapors in this
appliance.
6) DO NOT operate this appliance if it has a damaged cord or plug, if it is not working properly, or if it has
been damaged or dropped. Do not immerse cord or plug in water, keep cord away from heated
surfaces, and do not let cord hang over edge of table or counter.
7) Only qualified service personnel should service this appliance. Contact nearest author ized service
facility for examination, repair, or adjustment.
8) DO NOT cover or block any openings on the appliance.
9) DO NOT store this appliance outdoors. DO NOT use this product near water – for example,
near a kitchen sink, in a wet basement, or near a swimming pool, and the like.
10) DO NOT use the appliance for storage. DO NOT store flammable or combustible materials in or near
the appliance. Never leave anything in a warming cavity when the appliance is not in use.
All servicing requiring access to non-insulated components must be performed by
qualified service personnel. DO NOT open any access panel that requires the use
of tools. Failure to heed this warning may result in severe electric shock.
CAUTION: ELECTRIC SHOCK HAZARD
Disconnect this appliance from electrical power before performing any
maintenance or servicing.
CAUTION: BURN HAZARD
Exposed metal surfaces can be hot to the touch and may cause burns.
IMPORTANT SAFETY INSTRUCTIONS
This equipment is intended for use in commercial establishments only.
SAVE THESE INSTRUCTIONS
2
Page 3
This appliance
should be
thoroughly
cleaned prior to use.
See the CLEANING
INSTRUCTIONS on
page 6 in this manual.
NOTE: DO NOT discard
the carton or other
packing materials until
you have inspected the
appliance for hidden
damage and checked it
for proper operation.
Refer to FREIGHT
DAMAGE CLAIM
PROCEDURE on
bottom of this page.
UNPACKING AND INSPECTION
1. Remove the cabinet from shipping carton, ensuring that all packing materials and protective plastic have been removed from the unit.
2. Inspect all components for completeness and condition.
- (3) 12” X 20” roll top covers for food pans
- (1) Cambro Camchiller® for cold pan
- (3) stainless steel pan shrouds
- (2) Cambro® 9.4 qt, translucent pans with (2) drain shelves
1. If any freight damage is present, a freight claim must be filed immediately
with the shipping company.
2. Freight damage is not covered under warranty.
3. Check to insure all components are included: cabinet, instruction packet
and additional accessories: amber water reservoir, stainless steel water
trough.
4. Read operation instructions completely.
5. Appliance should be thoroughly cleaned before use. See CLEANING
INSTRUCTIONS on page 10 in this manual.
NOTE: For your protection, please note that equipment in this shipment was carefully inspected and packaged by
skilled personnel before leaving the factory. Upon accept ance of this shipment, the transportation company assumes
full responsibility for its safe delivery.
IF SHIPMENT ARRIVES DAMAGED:
1. VISIBLE LOSS OR DAMAGE: Be certain that any visible loss or damage is noted on the freight bill or express receipt, and that the note of loss or damage is signed by the delivery person.
2. FILE CLAIM FOR DAMAGE IMMEDIATELY: Regardless of the extent of damage. Contact your dealer immedi-
ately.
3. CONCEALED DAMAGE: If damage is unnoticed until the merchandise is unpack ed, notify the transportation company or carrier immediately, and then file a “CONCEALED DAMAGE” claim with them. This should be done within
fifteen (15) days from the date the delivery was made to you. Be sure to retain the container for inspection.
Carter-Hoffmann cannot assume liability for damage or loss incurred in transit, freight damage is not covered under
warranty. We will, however, at your request, supply you with the necessary documents to support your claim.
FREIGHT DAMAGE PROCEDURE
GROUNDING INSTRUCTIONS
This appliance is equipped with a cord having a grounding wire with a grounding plug which must be plugged into an
outlet that is properly installed and grounded. In the event of an electrical short circuit, grounding reduces the risk of
electric shock by providing an escape wire for the electric current.
WARNING—Improper use of the grounding can result in a risk of electric shock. Consult a qualified electrician or
service agent if the grounding instructions are not completely understood, or if doubt exists as to whether the applianc e
is properly grounded.
3
Page 4
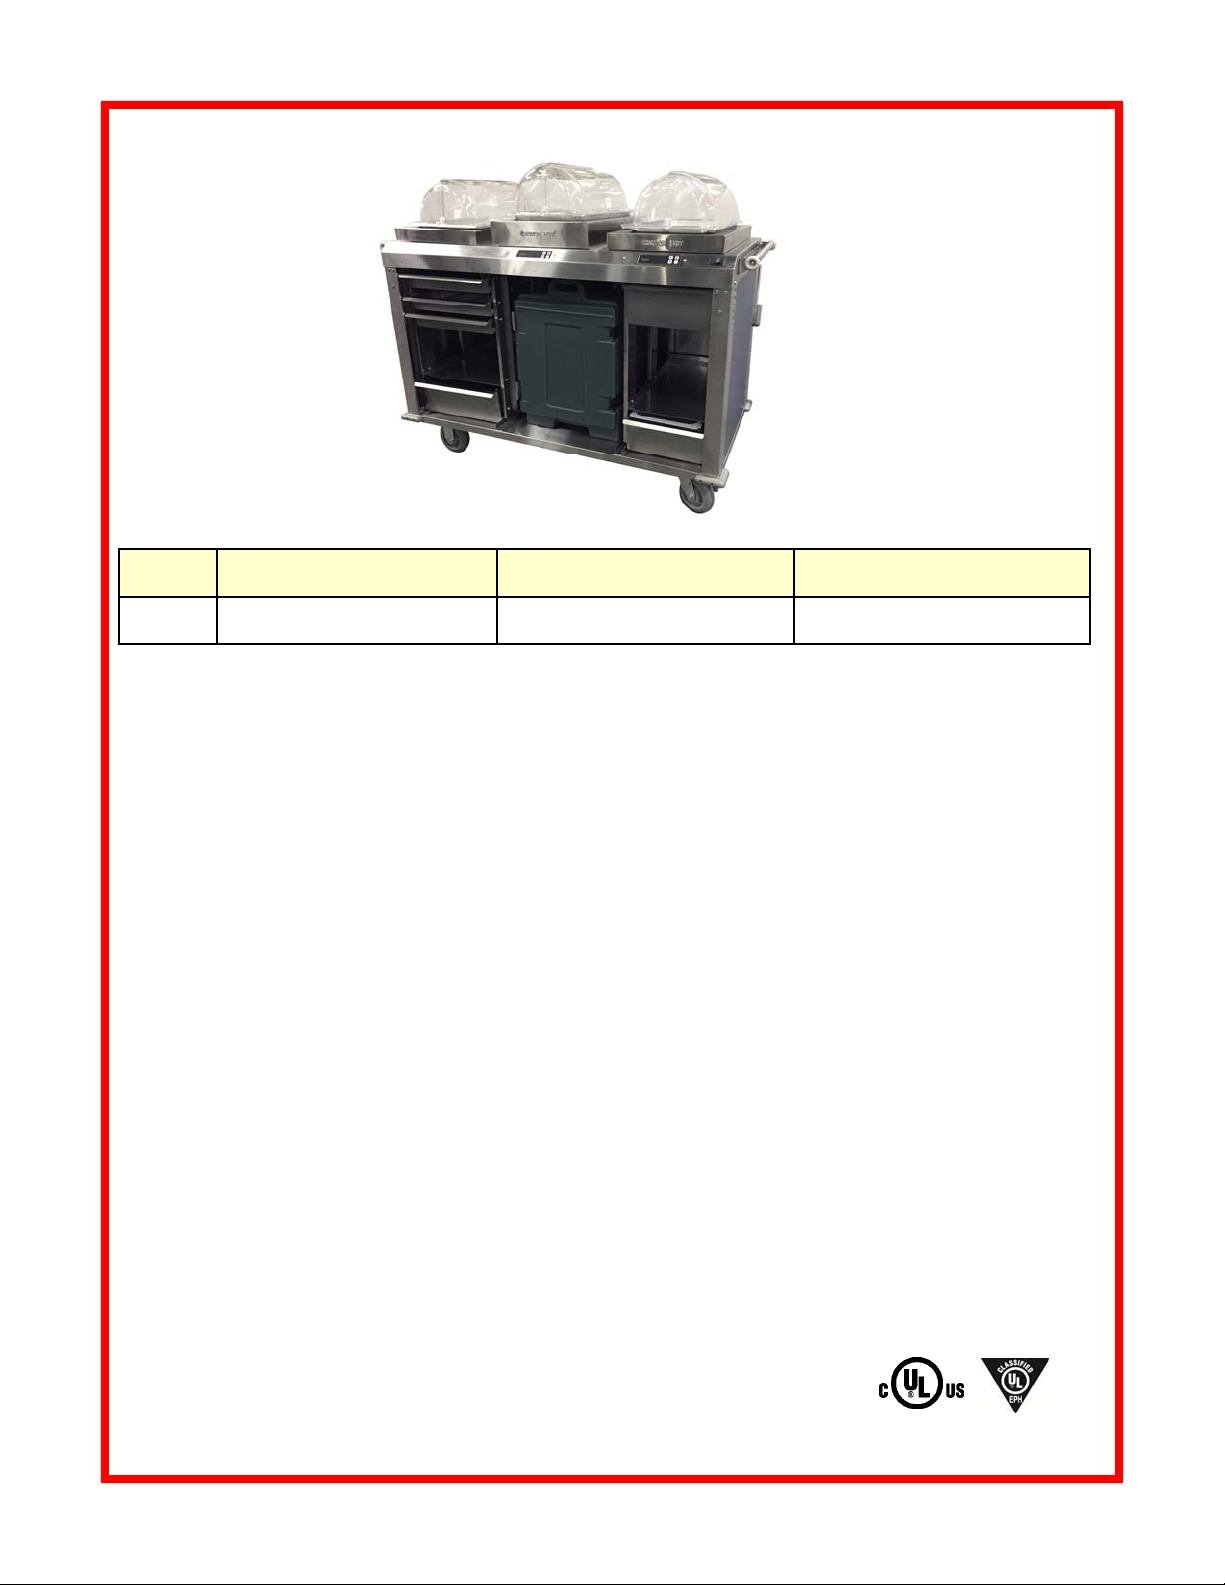
MOBILE BISTRO SPECIFICATIONS
MODEL DIMENSIONS (HxDxW) HEATED PAN CAPACITY
MHC 40.125H x 28.25D x 59.875W* (2) 12”X20”X2.5” steam tale pans or fractional
pans
*height to top of unit; does not include pan shrouds
CONSTRUCTION...All stainless steel construction, front and end panels stainless
steel or laminated. 3 buffet servers that
accommodate full size, half size and 1/2 size
steam table pans. Stainless steel pan
shrouds.
CABINET MATERIAL...430 series stainless
steel; single panel. Stainless steel exterior
finish.
DRAWERS... Stainless steel with magnetic
closure. Roller slides for easy gliding action.
Includes:
Plating Shelf: tray rest for plating
Silverware Storage Drawer: 3 sections
Condiment Storage Drawer: divided storage
for up to 9 different items
Plate Storage Drawer
Tray Storage Shelf: for 14”x18” or 15”x20”
trays
Extra Storage (Utensil) Drawer
Extra Storage Shelf
Cold Drawer: contains two Cambro 9.4 qt.
#26PP translucent pans, each with a
#20PPD drain shelf (included)
OPEN SHELF... Space for storage or additional hot or cold food holding. Accommodates optional Cambro CamCarrier
(300MPC) or Carlisle Cateraid (PC300).
BUMPERS... Four vinyl corner bumpers.
PUSH HANDLES... Full width stainless steel
1” tubular push handles mounted to each
end of cart. Rubber donut bumpers on each
end.
CASTERS...6” diameter heavy-duty performa balloon casters; two rigid, two swivel with
brakes. Plate mounted and bolted to base
on offset, wheel-ahead pattern.
HOT FOOD PLATES...Silicone pad heaters
vulcanized to bottom on black hard coated
anodized aluminum plate. Individually controlled. Food pans sit directly on the heaters
for even heating. Each surface accommodates 12”x20” full size, two 1/2 size pans or
three 1/3 size pans. Each plate can be set
for up to 6 temperature settings and has a
countdown timer to track length of time held.
Alarm sounds when time runs out. 2.5” stainless steel pan shrouds. Two plastic roll top
covers.
COLD FOOD PLATE... Cambro CP1220
Camchiller set into cart surface under 2.5”
pan shroud. One roll top cover. Chill overnight or for a minimum of 8 hours for maximum performance.
COLD PAN CAPACITY
(1) 12”X20”X2.5” steam tale pan or fractional
pans
HEATING SYSTEM...Silicone pan heaters
vulcanized and set into cabinet top. 300
watts each with individual programming
ability for temperature and time. Lighted on/
off master rocker switch.
ELECTRICAL CHARACTERISTICS...
Operates on 120 volts, 600 watts, 5 Amps,
60 cycle, single phase. Seven foot coiled
rubber cord with 3 prong grounding plug.
NEMA 5-15P plug.
4
Page 5
INSTALLATION AND START-UP
IMPORTANT:
Front and back of cart must
remain clear for access.
ELECTRICAL
SPECIFICATIONS
Operates on 120 volts,
600 watts, 5 Amps, 60 Hz,
single phase. Seven foot
coiled rubber cord with
3-prong grounding plug.
NOTE: The technical content of this manual, including any wiring diagrams,
schematics, parts breakdown illustrations and/or
adjustment procedures, is
intended for use ONLY by
qualified technical personnel.
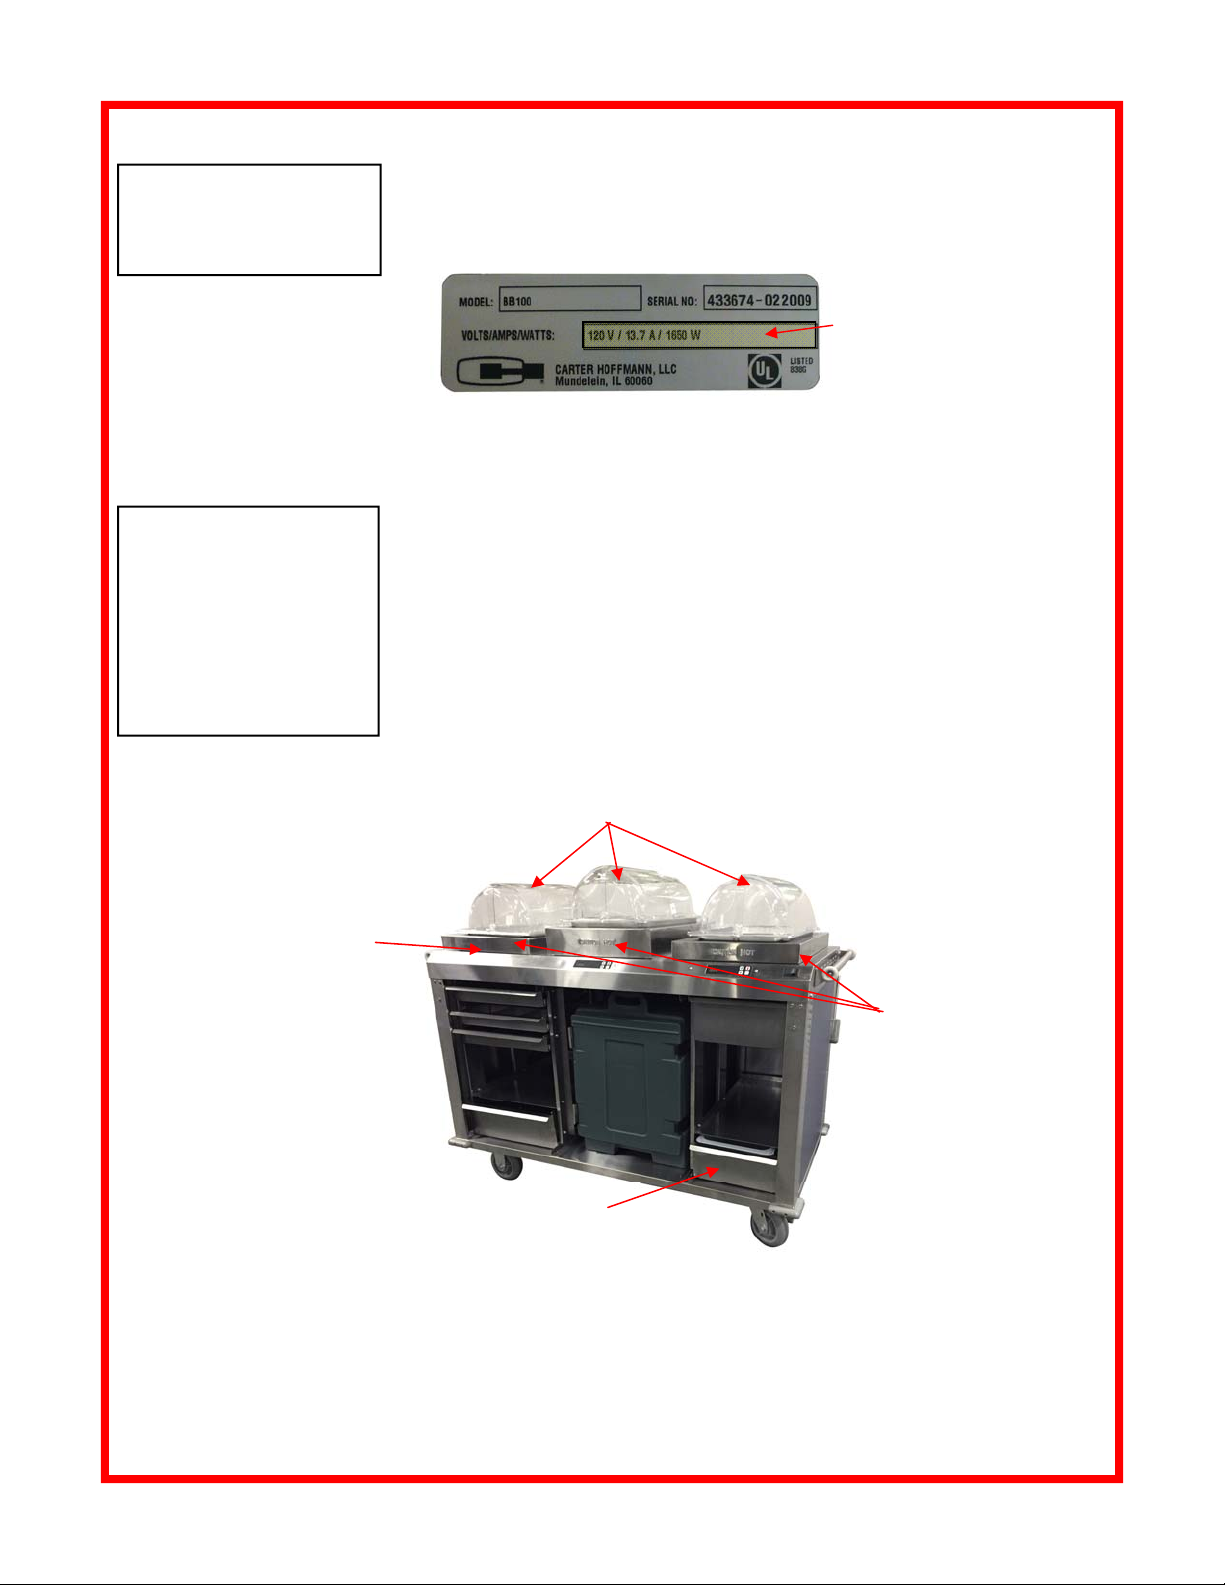
1. Check for proper voltage and circuit breaker size. Unit requires 120 volt,
single phase, 15 Amp circuit. Refer to serial tag on the cabinet for the electrical requirements for your particular cabinet.
Sample serial tag
location of electrical specs
2. Ensure receptacle is correctly installed and operating safely. Requires
grounded NEMA 5-15R receptacle.
Location
For proper operation and maximum performance, locate the unit in an ambient
air temperature of less than 80°F (21°C).
Avoid areas near exhaust fans where there are active air movements.
For safe operation, locate the unit at least 2” from any wall or combustible
materials.
To prevent injury and damage, locate the unit at a proper and safe working
height. The location should be level and clean of debris.
Place accessories in these locations:
Camchiller® (freeze before using
and place beneath shroud)
Cold Drawer: Cambro® translucent
pans with drain shelves
Roll-top covers
Pan shrouds: Shown with
two shrouds for 2.5” pans
and one shroud for 4” deep
pans. Standard cart includes
3 shrouds for 2.5” deep
pans. Shrouds for 4” deep
pans are optional.
5
Page 6
OPERATION
IMPORTANT:
Front and back of cart must
remain clear for access.
ELECTRICAL
SPECIFICATIONS
Operates on 120 volts,
600 watts, 5 Amps, 60 Hz,
single phase. Seven foot
coiled rubber cord with
3-prong grounding plug.
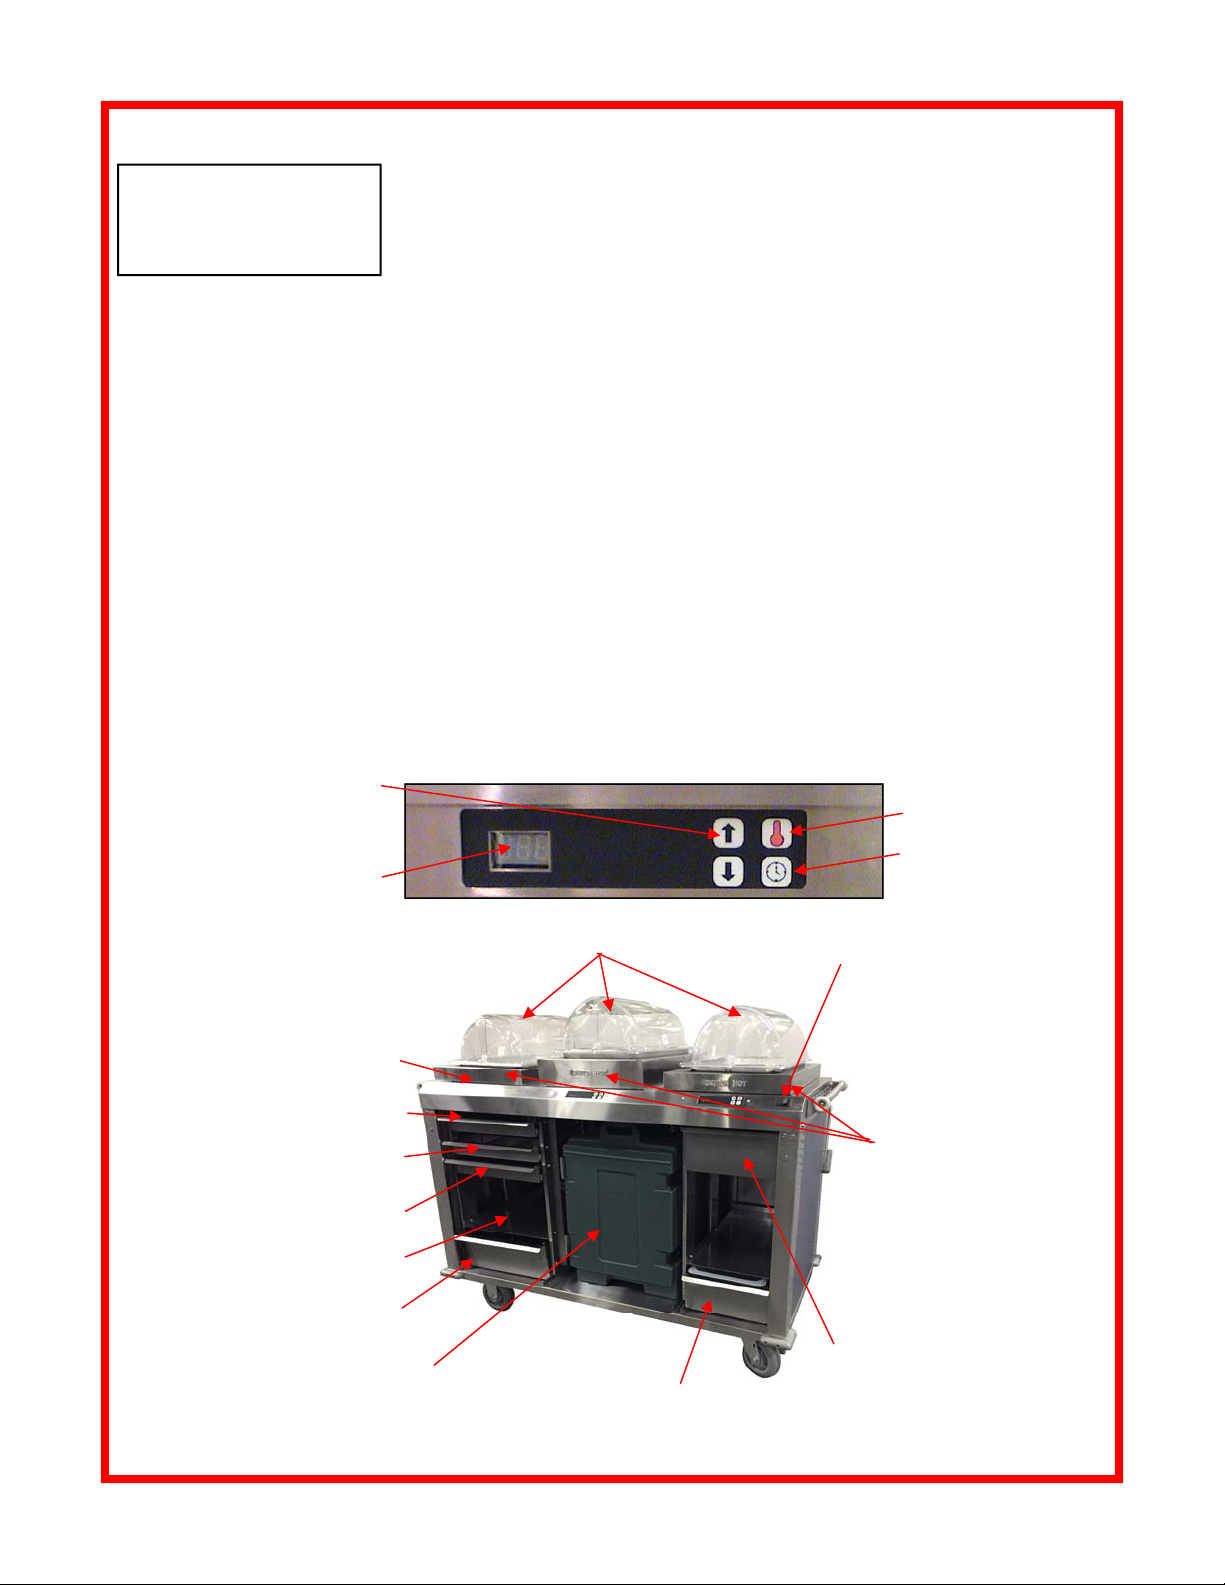
1. Familiarize yourself with the controls and the location of the drawers and
shelves for complete operation. Details regarding control settings for the
heated surfaces are detailed on pages 7-8. Freeze Camchiller® before
using. This will take several hours. Overnight is best.
2. Place condiments, silverware, trays and plates in their proper locations.
3. Prior to loading food, set Camchiller® in the base of the cold location.
4. Place pan shrouds over each food surface; 2 hot and 1 cold
5. Set controls for heated surfaces and allow to pre-heat for 20 minutes prior
to placing hot food pans on the hot surfaces.
6. Place hot food pans on heated surfaces and cover with roll top covers.
Metal or high heat plastic pans may be used.
7. Place cold food pan on Camchiller® and cover with roll top cover
8. Place items to be chilled (milk, juice, fruit cups, yogurt, etc.) into Cold
Drawer and cover with ice. Place back-up heated food pans in insulated
food carrier (if applicable). May also be used for cold foods.
9. Unplug and transport to serving location.
10. Upon arrival, plug unit into an available outlet at serving location, making
sure that it is an outlet with the appropriate electrical specifications (see
left).
11. You are ready to serve!
UP and DOWN arrows for
programming temperature
and time
Digital Display
Camchiller® (freeze before using
and place beneath shroud)
Plating shelf
Silverware drawer (3 sections)
Condiment drawer (9 sections)
Tray storage shelf
Plate storage drawer
Temp Button
Timer Button
Roll-top covers
Power Switch
Pan shrouds: Shown with
two shrouds for 2.5” pans
and one shroud for 4” deep
pans. Standard cart includes
3 shrouds for 2.5” deep
pans. Shrouds for 4” deep
pans are optional.
Insulated food carrier (optional accessory)
Bonus storage drawer (utensils)
Cold Drawer: Cambro® translucent pans with drain shelves
6
Page 7
CONTROLLER PROGRAMMING FOR HEATED SURFACES
Temperature
Typical
Temperature
Module is
READY
NOTE: Timer can not be
started until the cabinet is
pre-heated.
NOTE: Press and release
the TEMP key to
view of verify a cavity
setpoint. Cavity setpoint
will be displayed briefly. If
the cavity setpoint needs
to be changed, refer to
Programming Instructions
on page 9.
NOTE: Program timer
defaults to “P1” each time
the unit is turned OFF then
back ON.
Typical Time
Remaining
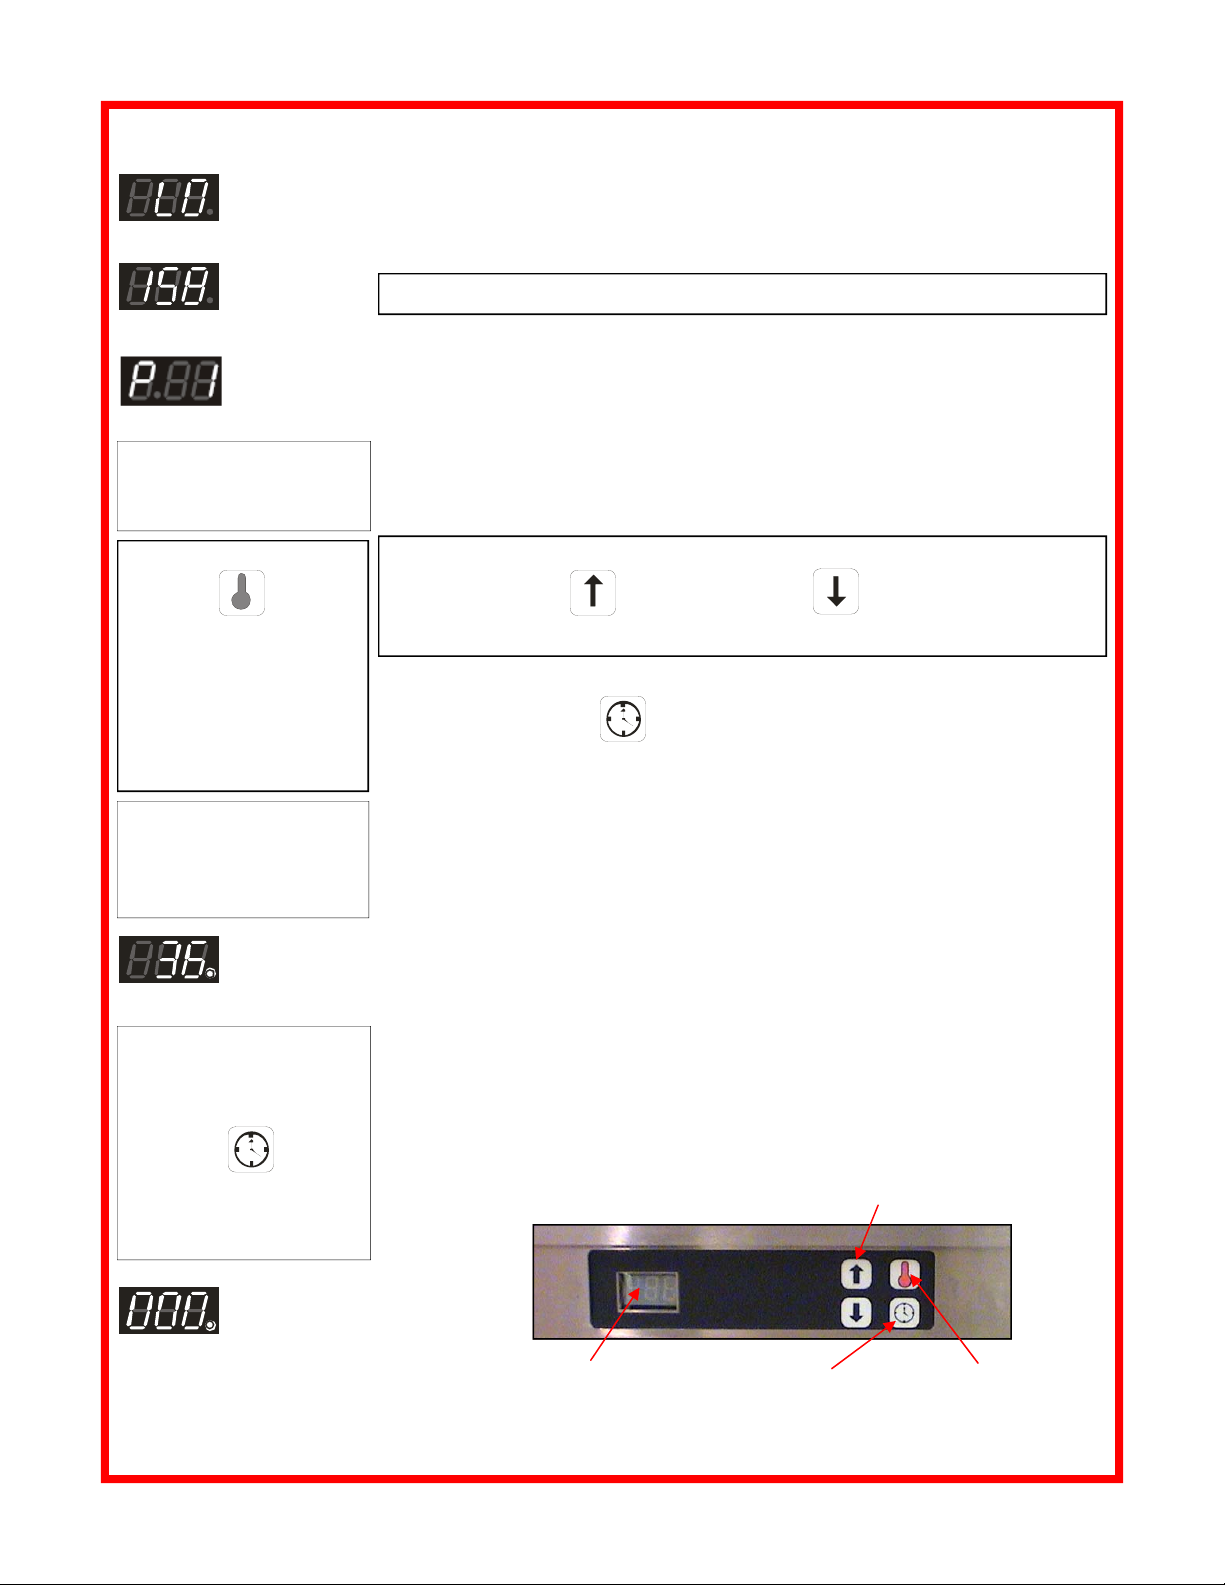
1. Press the POWER swit ch, located on the front panel, to ON. Illuminated
portion of the switch will glow, indicating power is ON. Pre-heat the cabinet
for 20 minutes. When first turned on, digital readout will display “LO” until the
cabinet reaches 122°F (50°C).
Cavity temperature setpoint range is between 122°F (50°C) and 195°F (91°C).
After the cabinet reaches 122°F (50°C), the digital readout will display the
current temperature, until the temperature reaches the setpoint. Once the
cabinet reaches the setpoint, the digital readout will display “P 1”. This
indicates the cabinet is ready to hold product.
2. Select the desired timer program by pressing the INCREASE / DECREASE
arrow keys. The cabinet has six programmable timers (“P 1”, “P 2”, “P 3”,
“P 4”, “P 5”, and “P 6”) for each cavity. Different program timers can be used
for different parts of the day (Breakfast, Lunch, Dinner) or alternate products.
NOTE: To select other time or temperature programs (“P 2” thru “P 6”), press
INCREASE KEY or DECREASE KEY until the digital readout
displays the desired program.
3. After pre-heat, load cooked product into pan(s) and place pan(s) in cavity.
Press the TIME KEY to start the timer. Refer to Programming
Instructions to change the programmed time
4. The digital readout will count down, displaying the remaining time. The digital
readout is displayed in hours and minutes until the time remaining is less than
one minute. Once the time remaining is less than one minute, the digital
readout counts down in seconds.
5. At the end of the timed cycle, the digital readout will flash “000” and an alarm
will sound until the TIME KEY is pressed.
6. The digital readout will display the currently selected timer (e.g. “P 1”),
indicating that the cabinet is ready to hold product.
NOTE: Timer can be
cancelled at any time
during the cycle by
pressing and holding the
TIME KEY for 2
seconds. Digital readout
will display currently
selected timer (e.g “P 1”).
Timed Cycle
Completed
7. Remove product pan from cavity.
8. At the end of the day, press the POWER switch to OFF.
UP and DOWN keys for
programming temperature and time
Digital Readout
7
Timer Key
Temp Key
Page 8
CONTROLLER PROGRAMMING FOR HEATED SURFACES
To enter into program
mode, display must
be in operating mode
and not in a timing
cycle .
NOTE: Each module
can be programmed
individually.
Rear display cannot be
programmed.
NOTE:
“P1” must be displayed
before temperature
scale can be changed.
If “P1” is not displayed,
press ARROW KEY to
display “P1.”
TEMPERATURE
SETPOINT RANGE:
122ºF - 195ºF
(50°C - 91°C)
TEMPERATURE
DEFAULT SETPOINT:
195ºF(91°C)
TIMER RANGE:
1 minute to 9 hours, 59
minutes
NOTE: While in the
program mode, if no
key is pressed for 10
seconds, any changes
will be saved and the
control returns to normal operation mode.
NOTE:
The technical content of
this manual, including any
wiring diagrams, schematics, parts breakdown
illustrations and/or adjustment procedures, is
intended for use ONLY
by qualified technical
personnel.
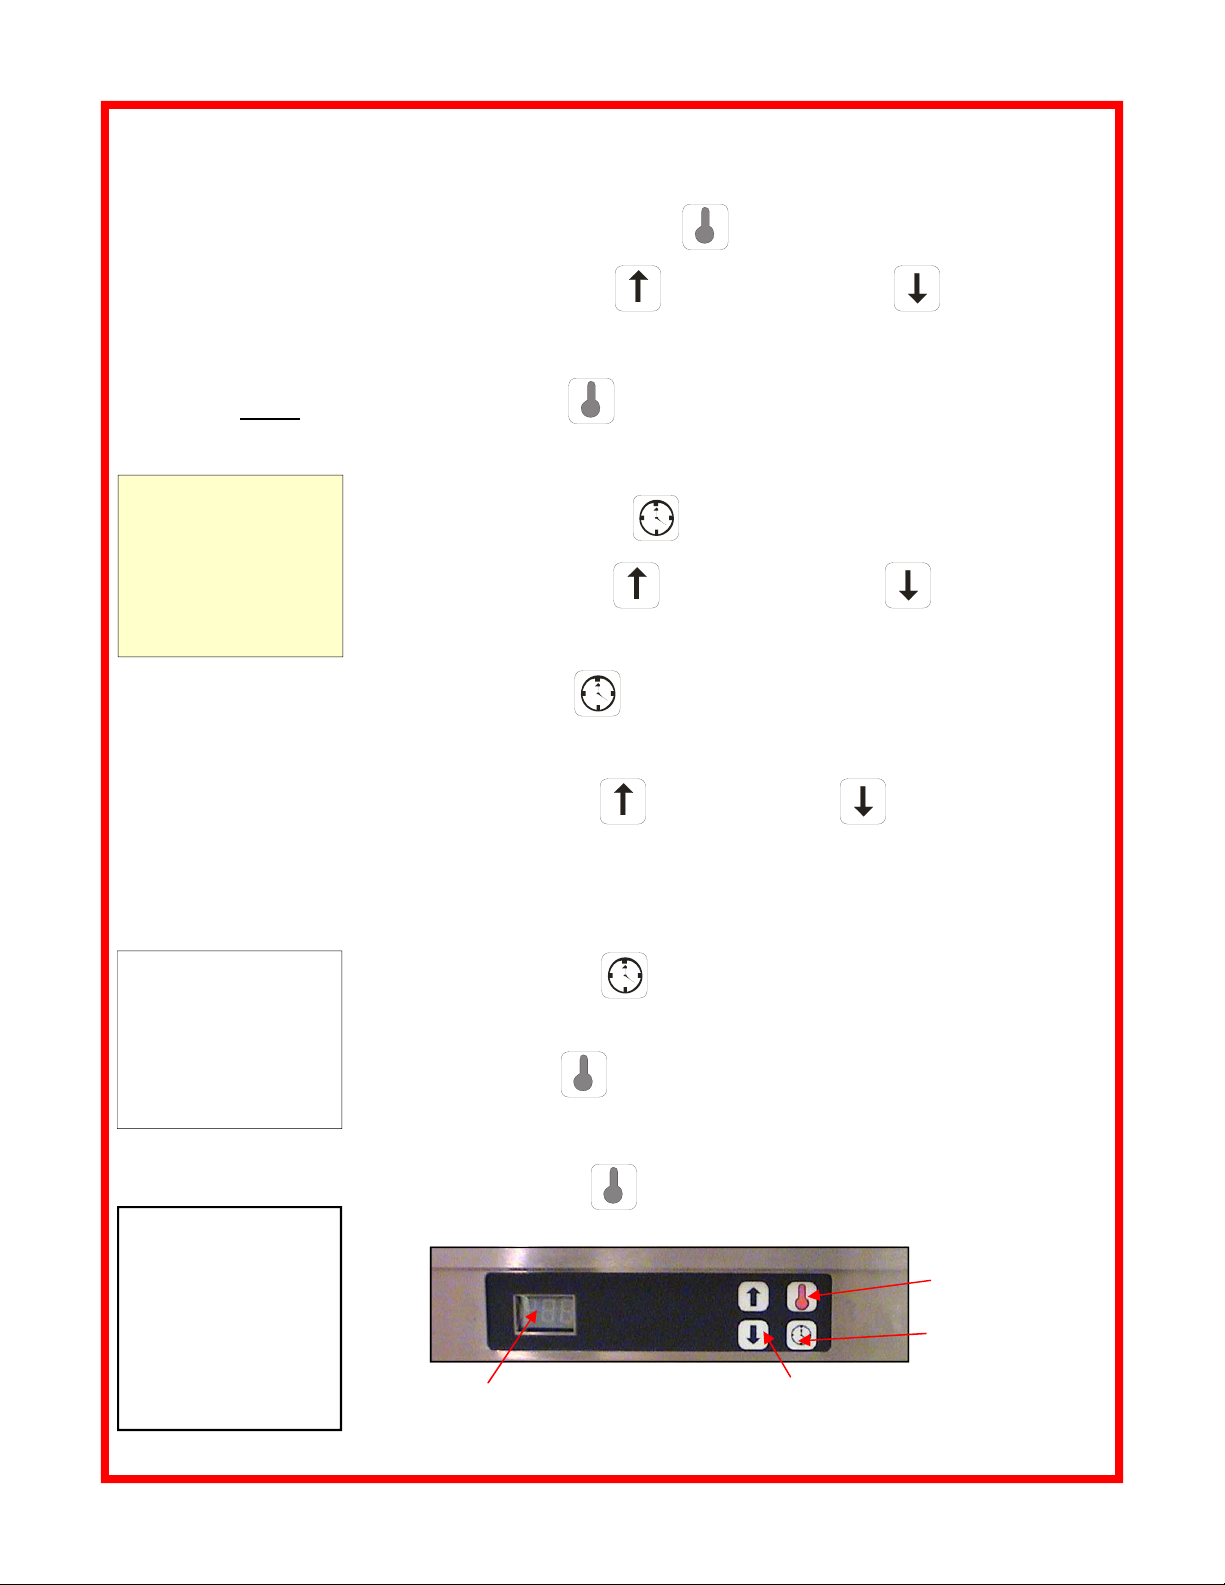
PROGRAM TEMPERATURE SETPOINT (P1 through P6)
1. Press and hold the TEMP KEY until display flashes.
2. Press INCREASE KEY or the DECREASE KEY to raise or lower
temperature or time setpoint. Each time the key is pressed, setpoint is changed
by 1º.
3. Press TEMP KEY to save changes
PROGRAM TIMERS (P1 through P6)
1. Press and hold TIME KEY until display flashes.
2. Press INCREASE KEY or the DECREASE KEY to raise or lower
time setpoint. Each time the key is pressed, setpoint is changed by one minute.
Hold the key to scroll faster.
3. Press the TIME KEY to save changes and return to “P 1”.
4. To program timers “P 2” through “P 6”:
5. Press INCREASE KEY or DECREASE KEY to select desired
timer program number (“P 2” thru “P 6”).
6. Repeat steps 1 through 3 above for each program.
TO CANCEL TIMER
Press and hold TIME KEY for 2 seconds.
TO CHANGE THE TEMPERATURE SCALE
Press the TEMP KEY until the temperature starts flashing. Then, press both
the up and down arrow buttons (together) until ‘F’ (Fahrenheit) is displayed.
Press the up or down arrow keys to toggle between ºC and ºF.
Once selected, press the TEMP KEY to save and exit.
Digital Readout
Temp Key
Timer Key
UP and DOWN keys for
programming temperature and time
8
Page 9
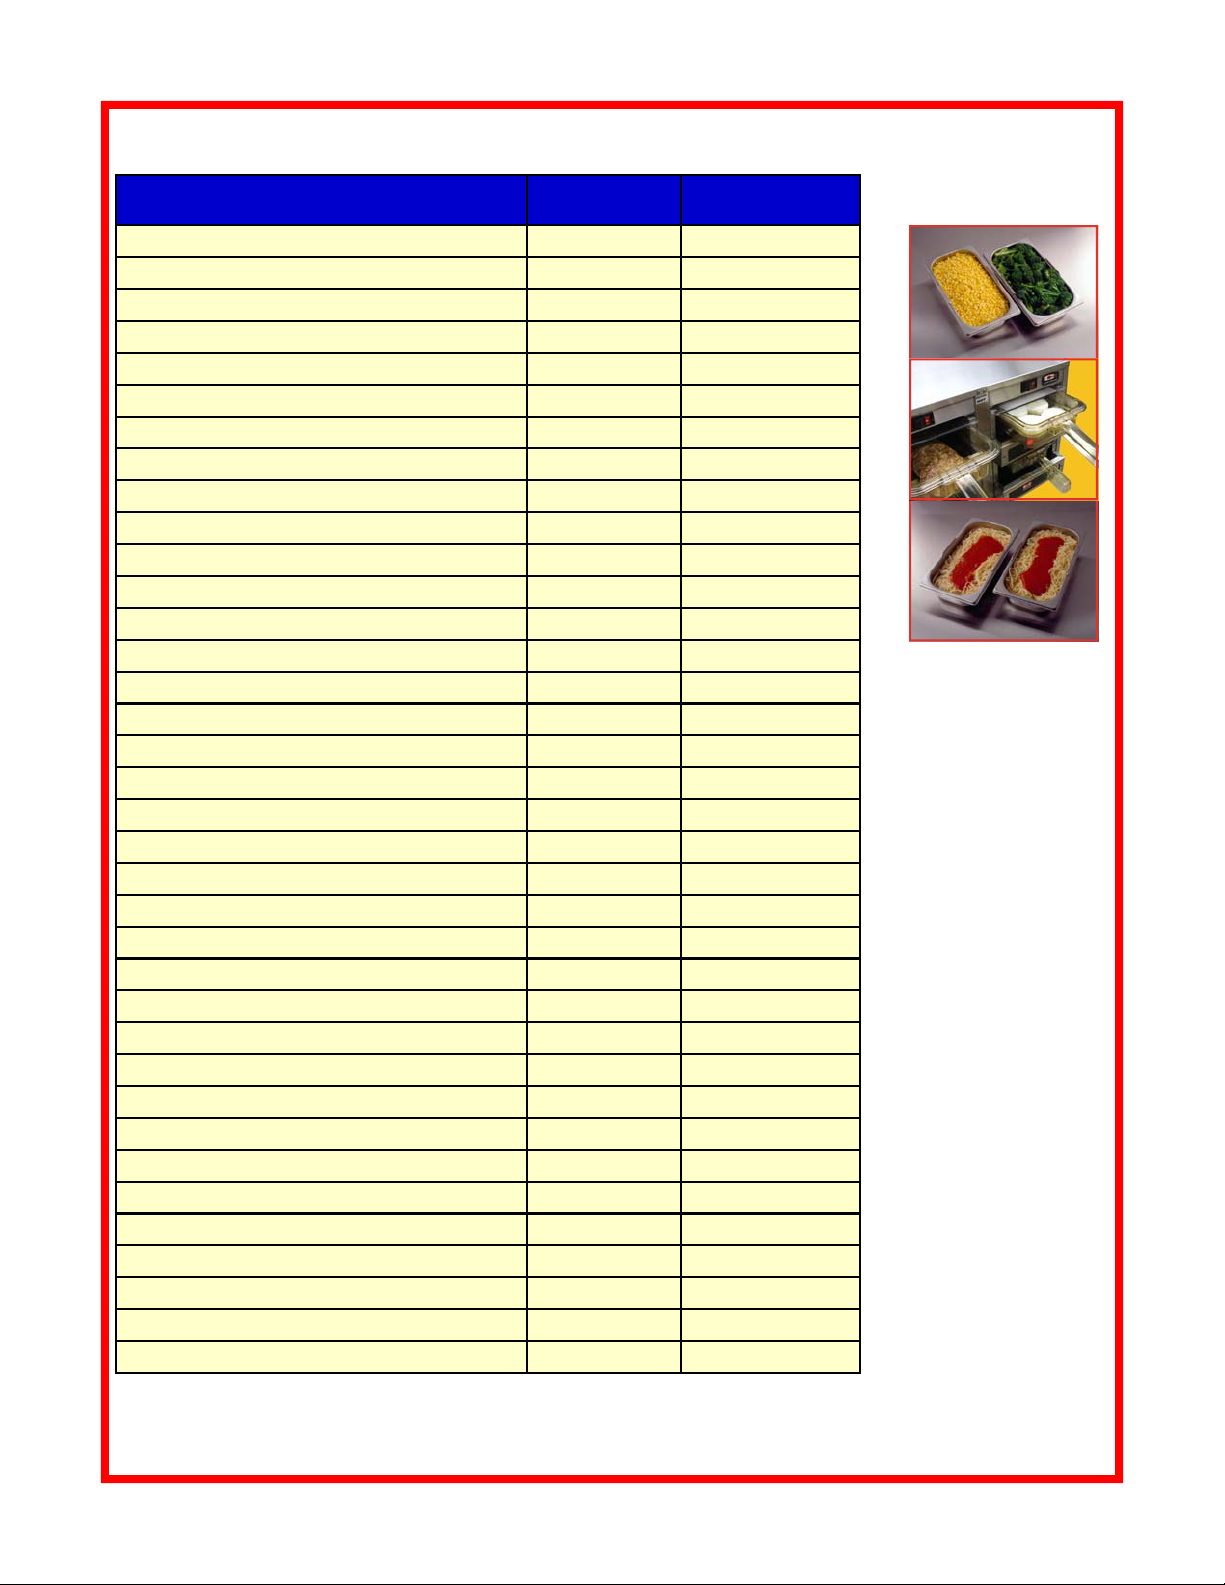
Food Holding Guide for Heated Food*
Product
Hamburger Patties 175 / 79 30
Crab Legs / Shrimp 160 / 71 45
Macaroni & Cheese 175 / 79 120
Baked Beans / Chili 180 / 82 120
Omelets 175 / 79 45
Egg Bake / Quiche 165 / 74 120
Hash Brown Potatoes 180 / 82 60
Sausage Patties 180 / 82 60
Biscuits (bottom heat only; no lid) 165 / 74 30
Tortillas, Soft 180 / 82 60
Croissants 170 / 77 60
French Toast 165 / 74 60
Pancakes 180 / 82 30
Scrambled Eggs 180 / 82 60
Hot Dogs 180 / 82 180
Lasagna 170 / 77 60
Pasta 175 / 79 60
Rice 175 / 79 30
Vegetables 175 / 79 45
Bacon, Crisp (top & bottom heat; no lid) 180 / 82 30
Bacon, Canadian 180 / 82 30
Nacho Cheese 165 / 74 240
Cut Green Beans / Mixed Vegetables 160 / 71 240
Chops. Sliced Meats 160 / 71 60
Chicken, Fried (top & bottom heat; no lids) 170 / 77 30
Chicken, Boneless Breasts 175 / 79 60
Chicken Breasts, Grilled 170 / 77 150
Chicken Nuggets, Breaded (top & bottom heat; no lid) 190 / 88 25
Chicken, Pre-Cooked Boneless Patties 150 / 66 90
Fish, Fried (top and bottom heat; no lid) 170 / 77 30
Fish, Baked or Broiled 155 / 68 45
Pork Loin Roast, Whole 180 / 82 60
Ribs, In Sauce 175 / 79 90
Paella 180 / 82 60
Gravies, Sauces 170 / 77 45
Soups 185 / 85 90
Temperature (°F/ °C)
Maximum Recommended
Hold Time (minutes)
*NOTE: Times and temperatures
observed in a test kitchen environment. Times & temperatures
may vary, depending on initial
food quality, initial cooked temperature and user expectations of
acceptable quality. Holding times/
temps for products with bottom
heat and lids, unless otherwise
noted.
9
Page 10
CAUTION:
ELECTRIC SHOCK
HAZARD
Disconnect appliance from
electric power before cleaning.
CAUTION:
HOT SURFACE
Exposed surfaces can be hot
to the touch and may cause
burns. Allow appliance to cool
before cleaning.
IMPORTANT:
DO NOT spill or pour
water into controls,
control panel or wiring. Water
damage is not covered by
warranty.
CLEANING
CAUTION: Unplug cabinet and allow to cool before cleaning.
Daily Cleaning:
1) Turn off cabinet and remove power cord plug from outlet. Allow cabinet
to cool.
2) Remove pans, shrouds, and roll-top covers and clean them in the sink
with mild detergent and allow to dry.
3) Wipe cart and warming surfaces of warming cavities with a clean towel
moistened wit h cleaning solution.
4) Rinse by wiping with a clean towel moistened with clean water. Allow
to air dry.
5) Connect power cord.
Weekly Cleaning:
1) Turn cart off and remove power cord plug from outlet. Allow cabinet
to cool.
2) Remove pans, shrouds, and roll-top covers and clean them in the sink
with mild detergent. Rinse and allow to dry.
3) Lightly spray warming surfaces with cleaning solutio n.
4) Wipe cart and warming surfaces with a clean towel until clean. For
heavy soils, use a non-scratch or nylon scouring pad.
5) Rinse by wiping with a clean towel moistened with cle an water. Allow
cabinet to air dry.
8) Connect power cord.
CAUTION: Cleansers, detergents, degreasers, sanitizers, or bleaching agents that contain chlorides or phosphates will cause permanent damage to stainless steel products. The damage appears as pits, eruptions,
voids, small holes, severe discoloration or dulling of the metal finish.
Water with high chloride content can also damage stainless steel. If unsure of your water quality, we recommend yo u
have it tested. THIS DAMAGE IS PERMANENT, COSTLY TO REPAIR, AND IS NOT COVERED BY THE WARRANTY.
RECOMMENDED TIPS FOR CLEANING STAINLESS STEEL
Purpose Frequency Cleaning Agent Method of Application
Routine Daily Soap, ammonia Sponge with cloth, rinse with clear water
cleaning detergent and wipe dry.
and water
Smears/ As Stainless steel cleaner Rub with soft cloth as directed on package.
Fingerprints needed or similar products Rub in direction of grain of stainless steel.
Do not use on vinyl trim.
Stubborn Daily Any chloride-free Apply with damp sponge or cloth. Rub in
spots and as or direction of grain of stainless steel. Rinse
stains needed phosphate-free thoroughly, especially if cleaner contains
cleaner chlorine bleach; do not use on vinyl trim.
Hard water Daily Vinegar Swab with cloth.
spots as needed Rinse with water and wipe dry.
10
Page 11

SERVICE EXPECTATIONS
Service Philosophy
For over sixty years, Carter-Hoffmann has earned a reputation for manufacturing rugged and
dependable foodservice equipment that permits foodservice professionals serve better food
products to more people, and thus, grow their business.
Our goal is not only to provide the best food service equipment for the price, but also to back it up
with after-sale service that is responsive, fast, efficient and professional. Carter-Hoffmann products
are innovative and efficient. They are easy to use, easy to clean and easy to maintain. Although the
products are quite reliable, they are also designed to be easy to repair when necessary.
We believe that a malfunction to a Carter-Hoffmann product should cause as little inconvenience to
the customer as possible. Our goal is to provide the same day service or within 24 hours and strive
to fix it the first time. We are dedicated to making every aspect of our customer service the standard
by which others are judged.
End-User Responsibilities
While we all strive to serve our mutual customers as well as possible, we remind the end-user
(and their employees) that they also have some responsibilities.
1. All shipping damage must be noted on the freight bill when the shipment is received. Any freight
damages must be collected from the Freight Company, NOT Carter-Hoffmann.
2. The end-user should be advised beforehand to carefully unpack and inspect all products when
they are received BEFORE SIGNING THE SHIPPER'S RECEIPT OF DELIVERY.
3. The end-user must provide a safe, dry, level surface for the equipment to be placed upon.
4. The end-user must provide the proper electrical supply. All in-wall electrical modifications are to
be completed by a licensed electrician. All building modifications are the responsibility of the end
-user. Specification literature changes frequently, please verify proper installation is possible.
5. The end-user must operate, clean and maintain the equipment in accordance with the
procedures described in this Operation Manual.
6. Carter-Hoffmann is NOT responsible for any loss of the customer’s income, loss of food product,
extra labor charges, or any other incidental or consequential costs as a result of the malfunction
of our product.
7. The end-user shall allow for on-premises repair of the equipment to be completed at a mutually
convenient place and time.
Warranty Service
1. Warranty service is to be initiated by authorized Carter-Hoffmann personnel only, please call
Carter-Hoffmann directly and we will take care of everything.
2. The service provider is NOT authorized to change or extend any of the terms or conditions of our
warranty.
3. Initial freight damage is NOT covered by the product warranty.
Confidentially
1. The end user and all his employees and sub-agents shall protect and keep confidential CarterHoffmann’s proprietary designs, information, and knowledge.
2. All literature and informational materials provided by Carter-Hoffmann are to be considered
confidential; they remains Carter-Hoffmann’s property; and are not to be reproduced without our
prior approval
NOTE:
The technical content of this manual, including any wiring diagrams, sche matics, parts breakdown illustrations
and/or adjustment procedures, is intended for use ONLY by qualified technical personnel.
11
Page 12
Carter-Hoffmann Warranty:
Carter-Hoffmann (“CARTER-HOFFMANN”) warrants to the initial purchaser of its standard Carter Line Products that CARTER-HOFFMANN will, at its option, repair or replace, during the warranty period set forth below,
any part of such products made necessary due to a defect in material or workmanship which is present when the
product leaves its factory and which manifests itself during the warranty period under normal use and service.
This warranty applies only to original equipment owned and possessed by th e initial purchaser and the warranty
period begins on the date of original shipment from the CARTER-HOFFMANN factory and extends as follows: to
component parts and labor for 12 months.
Repair or replacements under this warranty will be performed, unless otherwise authorized in writing by CARTER
-HOFFMANN, at its factory. All parts or components to be repaired or replaced under this warranty are to be
shipped prepaid to CARTER-HOFFMANN, with reimbursement credit for such part or component to be given if
found by CARTER-HOFFMANN to be defective.
CARTER-HOFFMANN neither makes nor assumes and does not authorize any other person to make or assume
any obligation or liability in connection with its produ cts other than that covered in this warranty. This warranty
applies only within the continental United States and Canada. In Alaska and Hawaii, this warranty applies only to
and is limited to the supply of replacement parts.
Warranty Exclusions and Limitations:
Any implied warranty of merchantability or fitness for a particular purpose is hereby specifically disclaimed by
CARTER-HOFFMANN. There are no warranties, expressed or implied, which extend beyond the description on
the face hereof. This warranty does not cover and CARTER-HOFFMANN shall not under any circumstances be
liable for any incidental, consequential or other damages (such as injury to persons or property, loss of time, inconvenience, loss of business or profits, or other matters not specifically covered) arising in connection with the
use of, inability to use, or failure of these products.
Specifications are subject to change through product improvement and innovation.
Carter-Hoffmann
1551 McCormick Ave.
Mundelein, Illinois, 60060 USA
Phone: 847-362-5500 Toll free: 800-323-9793 Fax: 847-367-8981
Sales and Marketing E-mail: [email protected]
Service E-mail: [email protected]
Company Website: www.carter-hoffmann.com
12
 Loading...